

Page 1
Wrap
®
1200VR
Video Eyewear
Quick Start Guide
Download the Wrap 1200VR software and documentation package from www.vuxiz.com/dd.
Read the important Safety and Warranty information provided before proceeding.
1. Install the “VR Manager” software onto your computer.
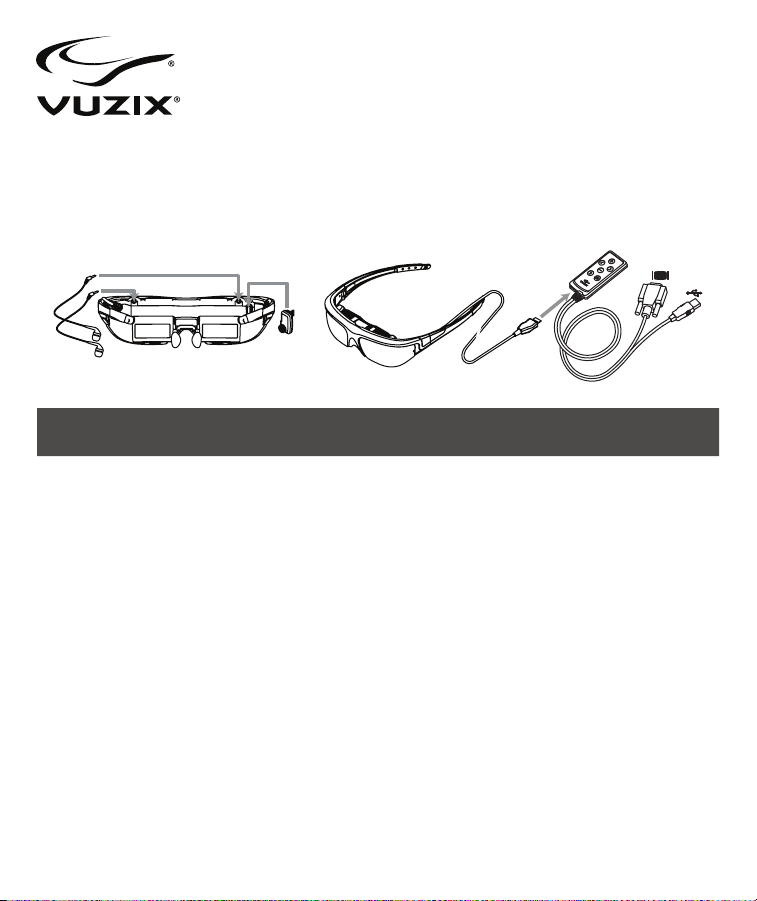
2. Plug the earphones into your eyewear display module.
3. Plug the Wrap Tracker 6TC into the display module near the right temple.
4. Connect the eyewear to the VGA Control Box.
5. Connect the VGA cable from the Control Box to a VGA port on your computer.
6. Connect the USB cable from the Control Box to a USB 2.0 port on your computer.
7. Congure your computer’s display settings for duplicate monitor support at 1280x720 resolution at 60 Hz.
8. Adjust the t and focus of your eyewear.
• Adjust the nose bridge length and nose pad t.
• Adjust the left & right eye focus, using the focus sliders above the displays if required.
• Adjust the IPD (eye separation), using the IPD sliders below the displays if required.
• Adjust the display angle, by rotating the display module if required.
• Adjust the display options through the OSD (On-Screen Display).
• Set the volume using the Control Box Adjustment Buttons or your computer’s volume adjustment.
9. Run the VR Manager application and calibrate the tracker.
10. Enable Vuzix Extensions for compatible software titles installed on your computer.
Page 2

Guide de démarrage rapide
Téléchargez l’intégralité du logiciel et de la documen-
tation du Wrap 1200VR à partir de www.vuxiz.com/dd.
Avant de continuer, lisez les informations importantes
fournies sur la sécurité et la garantie.
1. Installez le logiciel « VR Manager » sur votre ordinateur.
2. Branchez les écouteurs dans le module d’afchage de
vos lunettes.
3. Branchez le Wrap Tracker 6TC dans le module
d’afchage à côté de la tempe droite.
4. Connectez les lunettes au boîtier de commande VGA.
5. Connectez le câble VGA du boîtier de commande à un
port VGA sur votre ordinateur.
6. Connectez le câble USB du boîtier de commande à un
port USB 2.0 sur votre ordinateur.
7. Congurez les paramètres d’afchage de votre ordina-
teur pour la prise en charge du deuxième moniteur avec
une résolution de 1280 x 720 à 60 Hz.
8. Réglez la position et la mise au point de vos lunettes.
• Réglez la longueur du pont de nez et la position du
tampon de nez.
• Si nécessaire, réglez la mise au point de l’œil droit
et de l’œil gauche, en utilisant les curseurs de mise
au point, situés au-dessus des afchages.
• Si besoin, réglez l’IPD (écart entre les yeux) à l’aide
des curseurs IPD situés sous les afchages.
• Si besoin, réglez l’angle d’afchage en faisant
pivoter le module d’afchage.
• Réglez les options d’afchage au moyen de l’OSD
(afchage à l’écran).
• Réglez le volume à l’aide des boutons de réglage
du boîtier de commande ou du réglage du volume
de votre ordinateur.
9. Lancez l’application VR Manager et calibrez le dispositif
de poursuite.
10. Activez les extensions Vuzix pour les logiciels com-
patibles installés sur votre ordinateur.
Kurzanleitung
Laden Sie das vollständige Wrap 1200VR Software- und
Dokumentationspaket von www.vuxiz.com/dd herunter.
Lesen Sie die im Lieferumfang enthaltenen wichtigen
Sicherheits- und Garantieinformationen durch, bevor
Sie fortfahren.
1. Software „VR Manager“ auf dem Computer installieren.
2. Kopfhörer in das Anzeigemodul der Video-Brille stecken.
3. Wrap Tracker 6TC in das Anzeigemodul bei der rechten
Schläfe stecken.
4. Video-Brille mit dem VGA-Steuerungsgehäuse
verbinden.
5. Mit dem VGA-Kabel eine Verbindung zwischen dem
Steuerungsgehäuse und einem VGA-Anschluss am
Computer herstellen.
6. Mit dem USB-Kabel eine Verbindung zwischen dem
Steuerungsgehäuse und einem USB 2.0-Anschluss am
Computer herstellen.
7. Anzeigeeinstellungen des Computers für Dual-Monitor-
Support mit einer Auösung von 1280x720 bei 60 Hz
kongurieren.
8. Sitz und Schärfe der Video-Brille anpassen.
• Passen Sie die Länge des Nasenstegs und den Sitz
der Nasenauageäche an.
• Passen Sie die Bildschärfe für das linke und rechte
Auge an, indem Sie die Bildschärfe-Schieber ober-
halb der Anzeigen verwenden, falls erforderlich.
• Passen Sie die IPD (Augenabstand) an, indem Sie
die IPD-Schieber unterhalb der Anzeigen verwen-
den, falls erforderlich.
• Passen Sie den Anzeigewinkel an, indem Sie das
Anzeigemodul rotieren, falls erforderlich.
• Passen Sie die Anzeigeoptionen durch die Bild-
schirmanzeige (On-Screen Display, OSD) an.
• Stellen Sie die Lautstärke ein. Verwenden Sie hi-
erzu entweder die Einstelltasten am Steuerungsge-
häuse oder die Lautstärkeregelung des Computers.
9. VR Manager-Anwendung ausführen und Tracker
kalibrieren.
10. Vuzix-Erweiterungen für kompatible Softwaretitel aktivieren, die auf dem Computer installiert sind.
Guía rápida
Descargue el paquete completo de software y docu-
mentación de Wrap 1200VR en www.vuxiz.com/dd.
Lea la información importante sobre seguridad y ga-
rantía incluida antes de proceder.
1. Instale el software “VR Manager” en su ordenador.
2. Conecte los auriculares en el módulo de visualización
de las gafas.
3. Conecte el sensor de seguimiento 6TC Wrap en el
Page 3

módulo de visualización cerca del lateral derecho.
4. Conecte las gafas a la caja de controles VGA.
5. Conecte el cable VGA de la caja de controles al puerto
VGA de su ordenador.
6. Conecte el cable USB de la caja de controles a un
puerto USB 2.0 de su ordenador.
7. Congure la pantalla de su ordenador para duplicar el
monitor a una resolución de 1280 x 720 y a 60 Hz.
8. Ajuste la medida y el enfoque de sus gafas.
• Ajuste la medida del puente y de las almohadillas
de la nariz.
• Si es necesario, ajuste el enfoque de los dos ojos
con las barras deslizantes situadas en la parte
superior de las pantallas.
• Si es necesario, ajuste la distancia interpupilar
(separación de los ojos) con los ajustes de distancia
interpupilar situados en la parte inferior de las
pantallas.
• Si es necesario, ajuste el ángulo de visualización
rotando el módulo de visualización.
• Ajuste las opciones de visualización con el modo de
visualización en pantalla (On-Screen Display, OSD).
• Ajuste el volumen con los botones de ajuste de la
caja de controles o con el ajuste de volumen de su
ordenador.
9. Ejecute la aplicación VR Manager y calibre el sensor de
seguimiento.
10. Habilite las extensiones de Vuzix para detectar los títulos de software compatibles instalados en su ordenador.
Guida rapida
Scaricare la versione completa del software Wrap
1200VR e il pacchetto di documentazione dall’indirizzo
www.vuxiz.com/dd.
Prima di procedere, si prega di leggere le importanti in-
formazioni di sicurezza e di garanzia allegate.
1. Installare il software “VR Manager” sul proprio computer.
2. Inserire gli auricolari nel modulo schermo visore.
3. Inserire il rilevatore 6TC Wrap nel modulo schermo
vicino alla tempia destra.
4. Collegare il visore alla scatola comandi VGA.
5. Collegare il cavo VGA dalla scatola comandi a una porta
VGA sul proprio computer.
6. Collegare il cavo USB dalla scatola comandi a una porta
USB 2.0 sul proprio computer.
7. Congurare le impostazioni di visualizzazione del
computer per supportare la duplicazione del monitor a
risoluzione 1280x720 a 60 Hz.
8. Regolare la posizione e la messa a fuoco del visore.
• Regolare la lunghezza del ponte nasale e del
poggia-naso.
• Regolare la messa a fuoco dell’occhio sinistro e
destro utilizzando i cursori sopra gli schermi, se
necessario.
• Regolare la distanza interpupillare utilizzando i
cursori sotto gli schermi, se necessario.
• Regolare l’angolo di visualizzazione ruotando il
modulo dello schermo, se necessario.
• Regolare le opzioni di visualizzazione mediante
l’OSD (On-Screen Display).
• Impostare il volume utilizzando i pulsanti di regolazione della scatola comandi o la regolazione del
volume del computer.
9. Eseguire l’applicazione VR Manager e calibrare il
rilevatore.
10. Abilitare le estensioni Vuzix per i titoli software compatibili installati sul computer.
Guia de início rápido
Descarregue o software Wrap 1200VR completo e a
documentação em www.vuxiz.com/dd.
Leia a importante informação sobre Segurança e Garan-
tia fornecida antes de continuar.
1. Instale o software “VR Manager” no seu computador.
2. Ligue os auscultadores ao módulo de visualização dos
seus óculos.
3. Ligue o Wrap Tracker 6TC ao módulo de visualização
perto da têmpora direita.
4. Ligue os óculos à VGA Caixa de Controlo VGA.
5. Ligue o cabo VGA da Caixa de Controlo a uma porta
VGA no seu computador.
6. Ligue o cabo USB da Caixa de Controlo a uma porta
USB 2.0 no seu computador.
7. Congure as denições de visualização do seu com-
putador para suporte de monitor duplo a uma resolução
de 1280x720 a 60 Hz.
8. Ajuste e foque os seus óculos.
• Ajuste o comprimento da ponte e dos apoios nasais.
• Ajuste a focagem do olho direito e esquerdo,
usando os cursores de foco acima dos visores, se
necessário.
Page 4

• Se necessário, ajuste a IPD (separação ocular),
usando os cursores IPD em baixo dos visores.
• Se necessário, ajuste o ângulo de visualização,
rodando o módulo de visualização.
• Ajuste as opções de visualização através do OSD
(Indicador no Ecrã).
• Dena o volume usando os Botões de Ajuste da
Caixa de Controlo ou o ajuste de volume do seu
computador.
9. Execute a aplicação VR Manager e calibre o detector.
10. Active as Vuzix Extensions (Extensões Vuzix) para
títulos de software compatível instalado no seu
computador.
ク イ ッ ク・ス タ ー ト・ガ イド
完全なWrap 1200VRソフトウェアおよびドキュメントのパッ
ケージをwww.vuxiz.com/ddからダウンロードします。
事前に安全および保証に関する情報をお読みください。
1. 「VRマネージャー」ソフトウェアをコンピューターに
インストールします。
2. イヤホンをビデオアイウェア・ディスプレイ・モジュー
ルに 差し 込み ます。
3. WrapTracker6TCを右イヤホンジャック横のディ
ス プ レ イ・モ ジ ュ ー ル に 差 し 込 み ま す 。
4. ビデ オアイウェアをV G Aコントロー ルボックスに 接
続しま す。
5. VGAケーブルをコントロールボックスからコンピュー
ターのVGAポートに接続します。
6. USBケーブルをコントロールボックスからコンピュー
ターのUSB2.0ポートに接続します。
7. コンピューターの表示設定を解像度1280x720
、60Hzの複製モニター・サポートに設定します。
8. アイウェアの位置および焦点を調節します。
• 鼻当ての長さおよび鼻パッドの位置を調節し
ます。
• 必要 に応じて、ディスプレイの上 の焦 点スライダ
を使用して、左目と右目の焦点を調節します。
• 必要 に応じて、ディスプレイの下 のI PDスライダを
使用して、IPD(目の間隔)を調節します。
• 必要 に応じて、ディスプレイ・モジュールを回転さ
せて、表示角度を調節します。
• OS D(オンスクリーン・ディスプレイ)を使用して、
表示オプションを調節します。
• コントロールボックスの調節ボタンまたはコンピ
ューターのボリューム調 節を使用してボリューム
を設 定します。
9. VRマネージャー・アプリケーションを実行し、トラッ
カーを キャリブ レーション設 定 しま す。
10. コンピューターにインストールされ た互 換性 のあるソ
フトウェアのタイトルに対して、Vuzixエクステンショ
ンを 有効にします。
Subject to change without notice. Items may not be exactly as
illustrated.
Vuzix, the Vuzix logo, View the Future and Wrap are trademarks
of Vuzix Corporation registered in the U.S. and other countries.
© 2011 Vuzix Corporation. All rights reserved.
Designed by Vuzix in New York.
Made in USA
PB0000057-B
 Loading...