

Page 1
STAR™ 1200XLD
AR Eyewear System
User Guide
Page 2

2
STAR™ 1200XLD INTRODUCTION 6!
Overview 6!
Augmented Reality 7!
System Requirements 7!
Downloads & Updates 8!
Host Device 9!
Primary Components 9!
INSTALLATION & SETUP 11!
Step 1: Charging the Controller 11!
Charging 11!
Step 2: Connecting Accessories 12!
Earphones 12!
Tracker (Windows only) 13!
Camera 13!
Step 3: Connecting the Eyewear & Controller 14!
Mini-B USB 14!
HDMI 14!
Camera USB 15!
Step 4: Fit & Adjustment 15!
Video Display 15!
Audio 16!
Eye Separation Adjustment 16!
Accutilt® Display Angle Adjustment 16!
Nose Bridge 17!
Tether Strap 17!
Step 5: Head Tracker Calibration 17!
Installing VR Manager (Windows only) 18!
Tracker Calibration 18!
CONTROLLER & OSD 21!
Controller Buttons 21!
OSD Display Controls 22!
Display Mode 22!
STAR 1200XLD REFERENCE 25!
STAR Video Eyewear Display 25!
3D Video 25!
Controller 26!
Nose Bridge 26!
Page 3

3
Eye-separation Adjustment 27!
Accutilt Adjustment 27!
Camera Removal 28!
Lens Cover Replacement 28!
Lens Removal 28!
Lens Installation 29!
Wrap Noise-Isolating Earphones 29!
Windows - Lost Audio 30!
Tether Strap 30!
Wrap Tracker 31!
USB Charger 31!
MHL Adapter – Micro USB to HDMI® 32!
Connecting a MHL Adapter 33!
DEVELOPER TOOLS AND SUPPORT 36!
Vuzix AR/VR SDK 36!
Acquiring Vuzix VR/AR SDK 37!
CLEANING 38!
SUPPORT SERVICES 39!
WASTE ELECTRICAL & ELECTRONIC EQUIPMENT 42!
Page 4

4
Read the Safety and Warranty information before proceeding.
Page 5

5
Section 1
STAR 1200XLD Introduction
This Introduction section provides exposure to important terms and key aspects of the video
eyewear, helping you to better understand its functions and capabilities.
It provides an overview of what AR is, how AR content is created and the roll of the STAR
1200XLD in delivering compelling AR experiences. The Introduction also explains how this
Users Guide is setup and formatted for fast and easy access to information.
Page 6
6
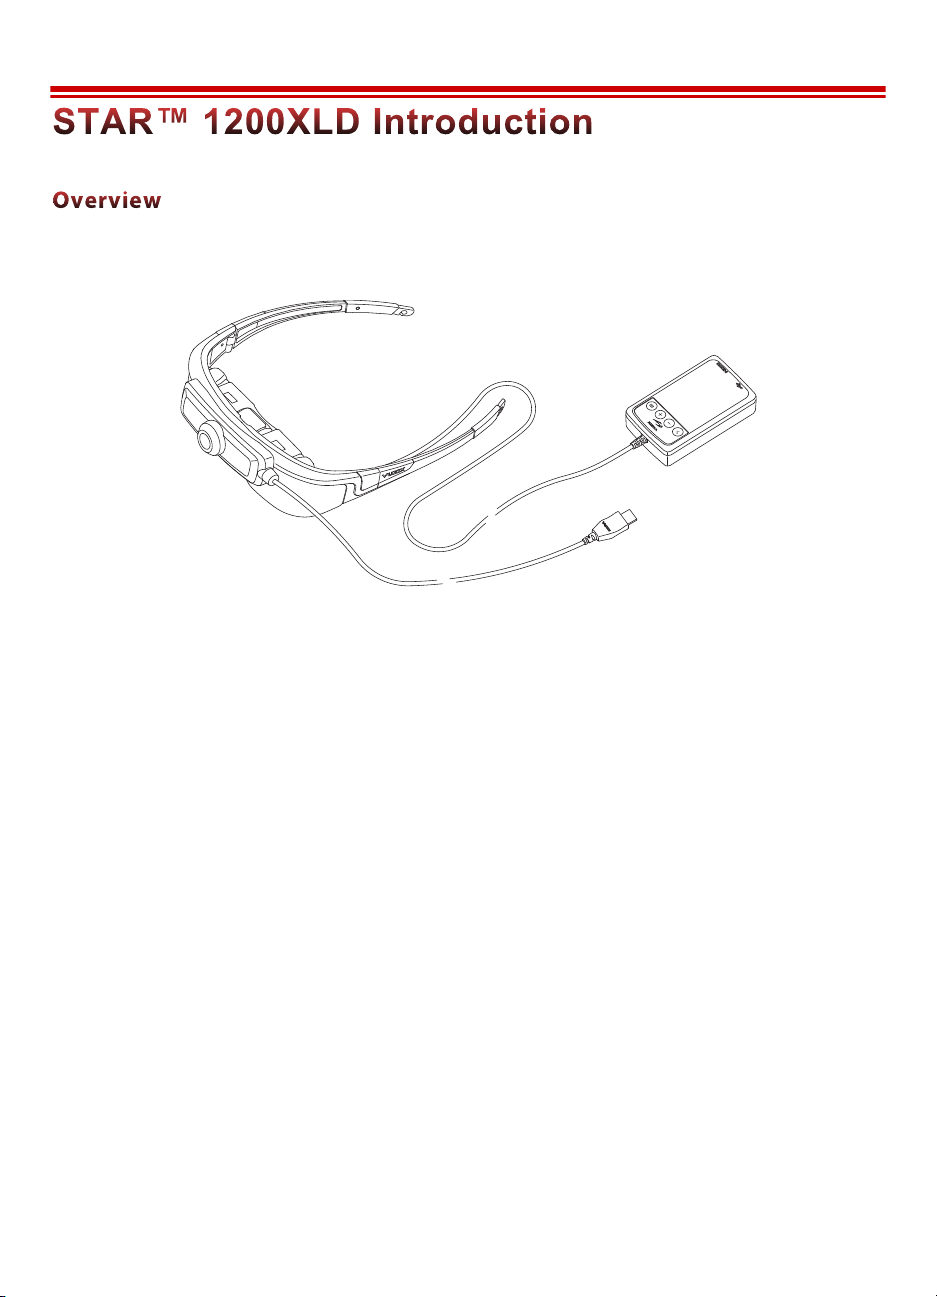
The STAR 1200XLD is the first optical see-through augmented reality eyewear
system with a digital computer interface.
The STAR 1200XLD extends the Vuzix STAR AR eyewear series with a wide field of view,
adjustable eye-separation, a high-performance 1080p HD camera and HDMI® connectivity.
HDMI (High-Definition Multimedia Interface) enables the STAR 1200XLD to connect to
virtually any audio/video device with HDMI output for improved video quality.
Vuzix’ patented quantum optic see-through technology enables you to see the world directly
through its transparent widescreen video displays. Computer content, such as text, images and
video, is displayed overlaying your real-world view. The STAR 1200XLD provides what appears
to be a 75-inch flat panel screen, as seen from 10 feet (~3m) and is able to display 2D or 3D
video from a Windows computer through virtually any graphics card with HDMI output.
A 1080p high definition UVC (Universal Video Class) compliant video camera is integrated onto
the face of the eyewear. It connects independently through its own USB connection for
maximum flexibility and is recognized by the computer’s operating system as a standard USB
webcam.
Rounding out the STAR 1200XLD’s capabilities is the Wrap Tracker, a 3-DOF (Degrees Of
Freedom) head tracker. When used with supporting software, the Wrap Tracker enhances spacial
awareness by providing head movement and positioning data to applications, thereby enabling
‘see where you look’ graphics.
Page 7
7
The STAR 1200XLD is a see-through AR eyewear system that enables the wearer to see the world
directly with computer-generated content overlaid in the transparent displays.
The above image shows a view of a real world desktop with the two animated characters (circled)
overlaid in the users view.
In this AR scene the user is able to see the desktop through the eyewear’s transparent displays.
The HD camera, mounted on the STAR 1200XLD captures the scene, including the AR Markers
laying on the desktop and provides its video feed to the AR application on the user’s host
computer. The AR application recognizes the AR Marker (paddle with a black & white pattern)
and displays the animation content in the STAR 1200XLD displays.
For the user, the AR characters come to life and seemingly perform on the desktop.
Note: The above AR example can be viewed in a video “VuzAR Introduction”, available on the Vuzix
website.
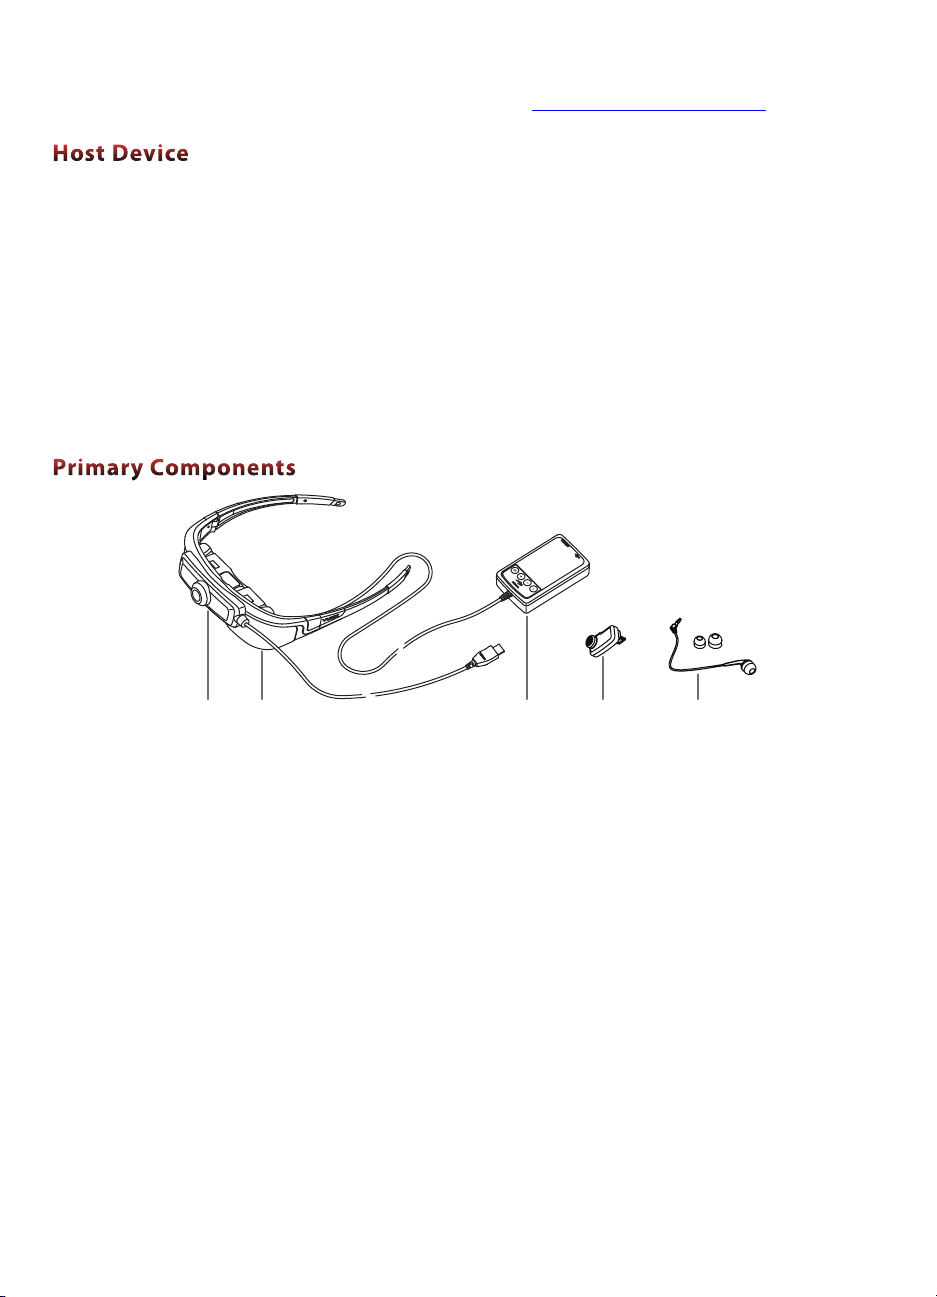
The STAR 1200XLD’s modular design enables maximum flexibility with a variety of host
devices*, used to process and/or serve AR, VR or audio/video content.
* A “host device” is the device used to process and/or serve audio/video content to the eyewear.
Typical examples include a personal computer or mobile device such as a smartphone or
tablet.
Page 8

8
STAR 1200XLD Video Display with HDMI Controller:
• Requires an audio/video host device with HDMI output
(i.e.: PC, mobile or other audio/video device with an HDMI port)
• HDMI 1.2 and 1.4a compatible
Note: Some DRM (Digital Rights Management) protected content requires a HDMI 1.4a compatible
host in order to display 3D content.
HD Camera:
• Personal computer supporting UVC (Universal Video Class) compliant camera
• USB 2.0 port (powered)
Head Tracker
• Personal computer running Windows 8, 7, Vista (32 or 64-bit) operating system
• USB 2.0 port (powered)
Other Components & Host Devices:
• All of the STAR 1200XLD’s key components are Windows compatible. Some of the
STAR components may work with other operating systems and host devices. Some
features and capabilities are not supported on non-Windows devices and compatibility is
not guaranteed.
• The video eyewear display has been demonstrated to work with all HDMI compliant
devices tested, but compatibility with all devices and content cannot be guaranteed.
• Some components, such as the camera and tracker, require a powered USB 2.0 port and
compatible host device and operating system. In some cases, these components may
require additional drivers, not provided by Vuzix, or support within the target
application.
• The STAR 1200XLD is supports audio and video display with MHL devices equipped
with an MHL adapter (not included). MHL connections do not support the use of the
STAR’s camera or tracker and require a continuous power connection to the MHL
adapter.
Vuzix provides online access to STAR 1200XLD software, documentation and updates.
• To download the complete set of software and documentation for this product, go to:
www.vuzix.com/DD
Page 9
9
• To download individual files and/or updates, go to: www.vuzix.com/downloads
The term “Host Device” is used throughout this User Guide. It refers to the device providing an
audio/video feed to the eyewear. Many AR applications use a Windows PC as their host device
but content can also be served from a variety of other HDMI equipped host devices including
mobile phones, tablet, Blu-ray players or set-top entertainment and gaming systems.
AR processing requires a host device able to accept the AR camera feed, process the data and send
the content out to the STAR eyewear through the host device’s HDMI port.
Note: The STAR’s camera and tracker components are not compatible with HDMI equipped host
devices that do not provide compatible data input ports and/or drivers.
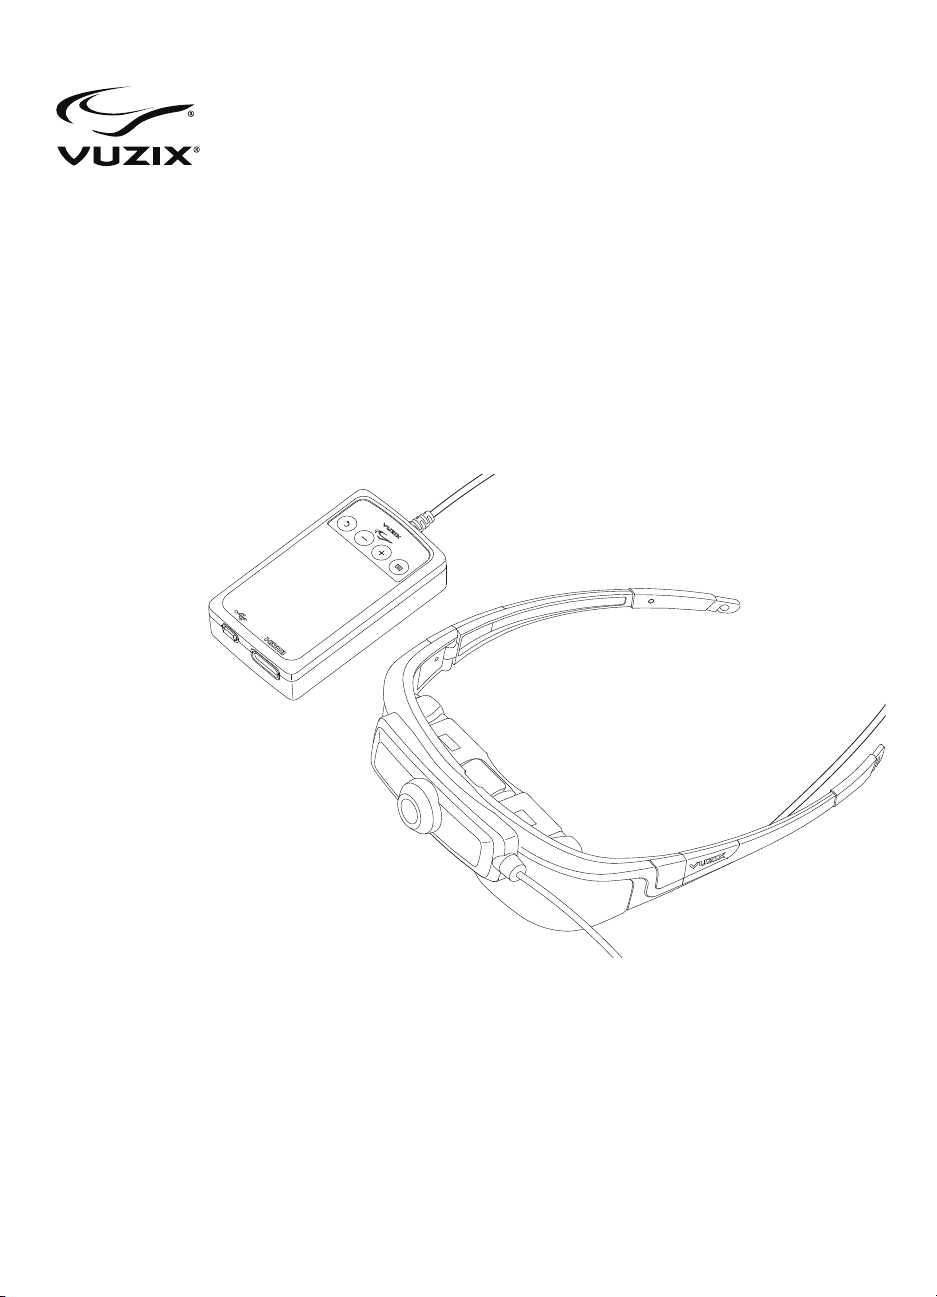
1. 1080p HD camera
2. STAR 1200XLD video eyewear with Controller
3. Controller
4. Wrap Tracker
5. Earphone and noise isolation rings
1 2 3 4 5
Page 10

10
Section 2
STAR 1200XLD Installation
Though the STAR 1200XLD installation and setup is fast and easy, there are specific
requirements. A Quick Start Guide is provided for those very familiar with hardware and
accessory installations but for most people, these more complete instructions are more
appropriate.
Page 11
11
These instructions lead you through the installation and connection of a STAR 1200XLD AR
eyewear system.
The most common installation configuration for the STAR AR eyewear line of products is with a
Windows based personal computer. These installation instructions are designed to reflect that
with additional notes and comments highlighting known variances when used with alternate host
devices.
Tip: Components and processes specific to Windows only are noted and may be skipped over.
The STAR 1200XLD connects to a host device, such as a HDMI equipped computer,
through the Controller. The Controller provides an interface to the host device, provides
video and data processing and power for the eyewear.
Power is provided through a rechargeable lithium-ion battery in the Controller. The
battery can be charged using a mini-B USB cable connected a powered USB port or a
wall adapter, such as the one provide.
Prior to initial use the Controller’s battery must be charged for a minimum of four (4)
hours using the provided USB charger. During this charge cycle, no other USB devices
should be connected to the charger.
Page 12
12
A variety of electrical plug adapters are provided, changeable by pressing the tab in the
bottom corner of the charger.
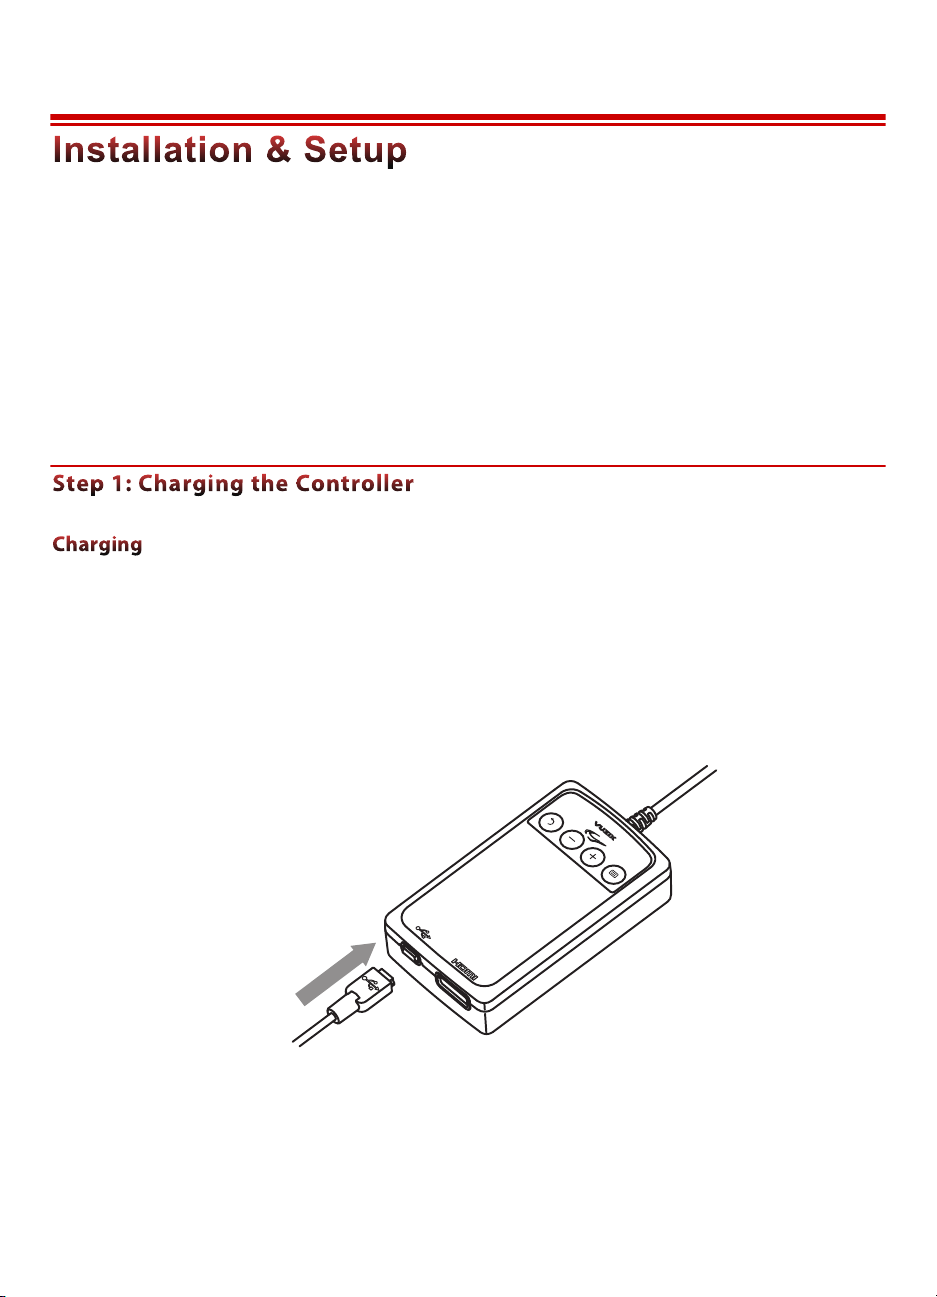
! Connect the Controller to the USB charger using the “mini-B” USB cable provided.
! Allow the Controller to charge for a minimum of 4 hours for its first charge.
Tip: Once charged, the Controller can power the STAR AR eyewear for a period of time without a
USB connection. For continuous use connect the Controller to the USB charger.
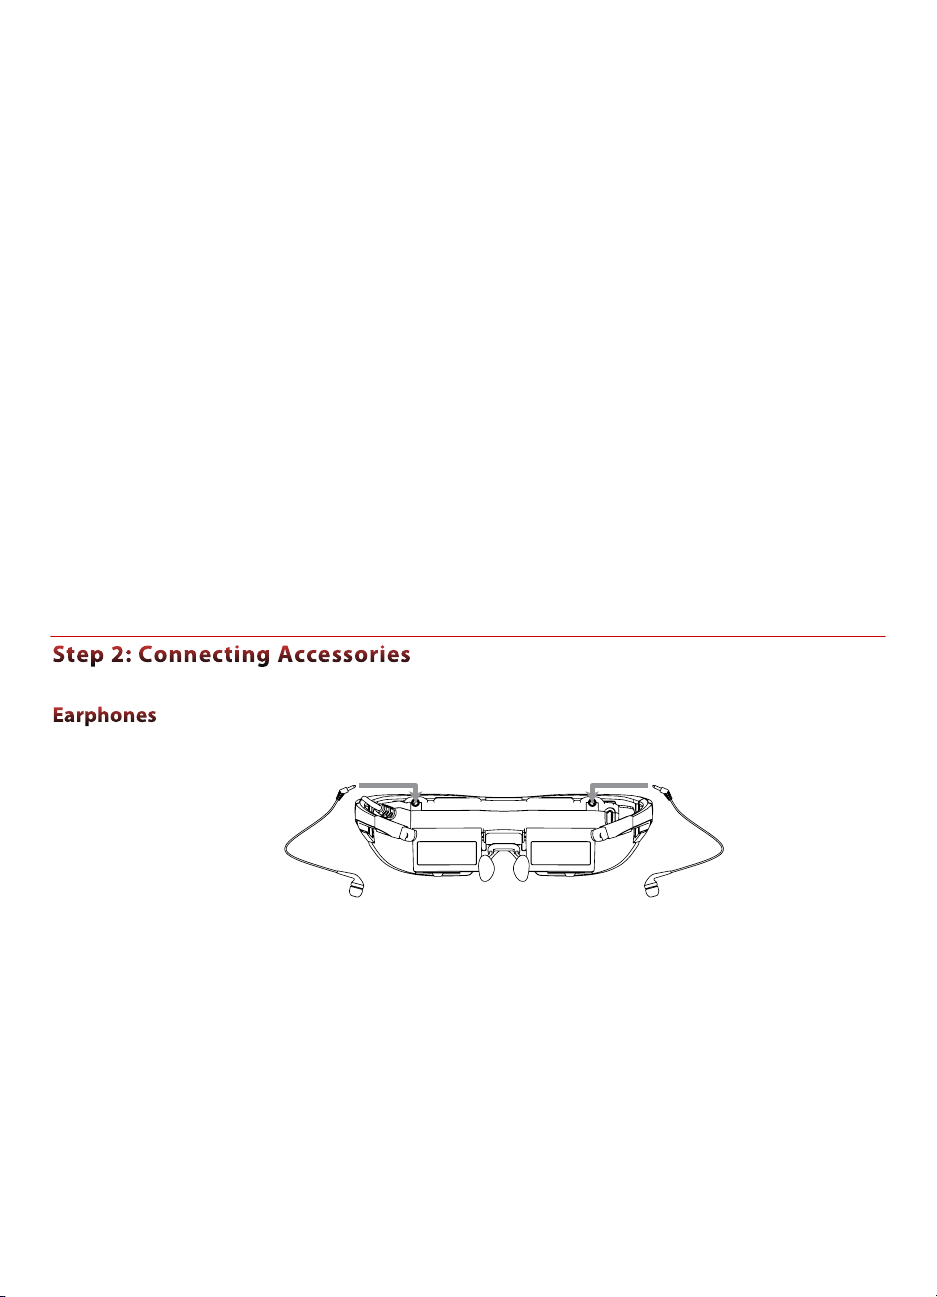
! Plug the stereo earphones into the jacks above each of the eyewear displays.
The noise-isolating earphones are not required for the proper operation of the eyewear.
Unplug the earphones if you prefer to use an alternate speaker system.
Note: Be sure to adjust the volume to a safe and comfortable level before inserting the earphones
into your ears. The volume is controlled through the “+” (plus) and “–” (minus) buttons on the
Controller.
Note: When you connect your STAR system to a Windows based computer Windows, it will detect a
new USB speaker system and automatically configure your computer to output sound to the
Wrap earphones.
Page 13
13
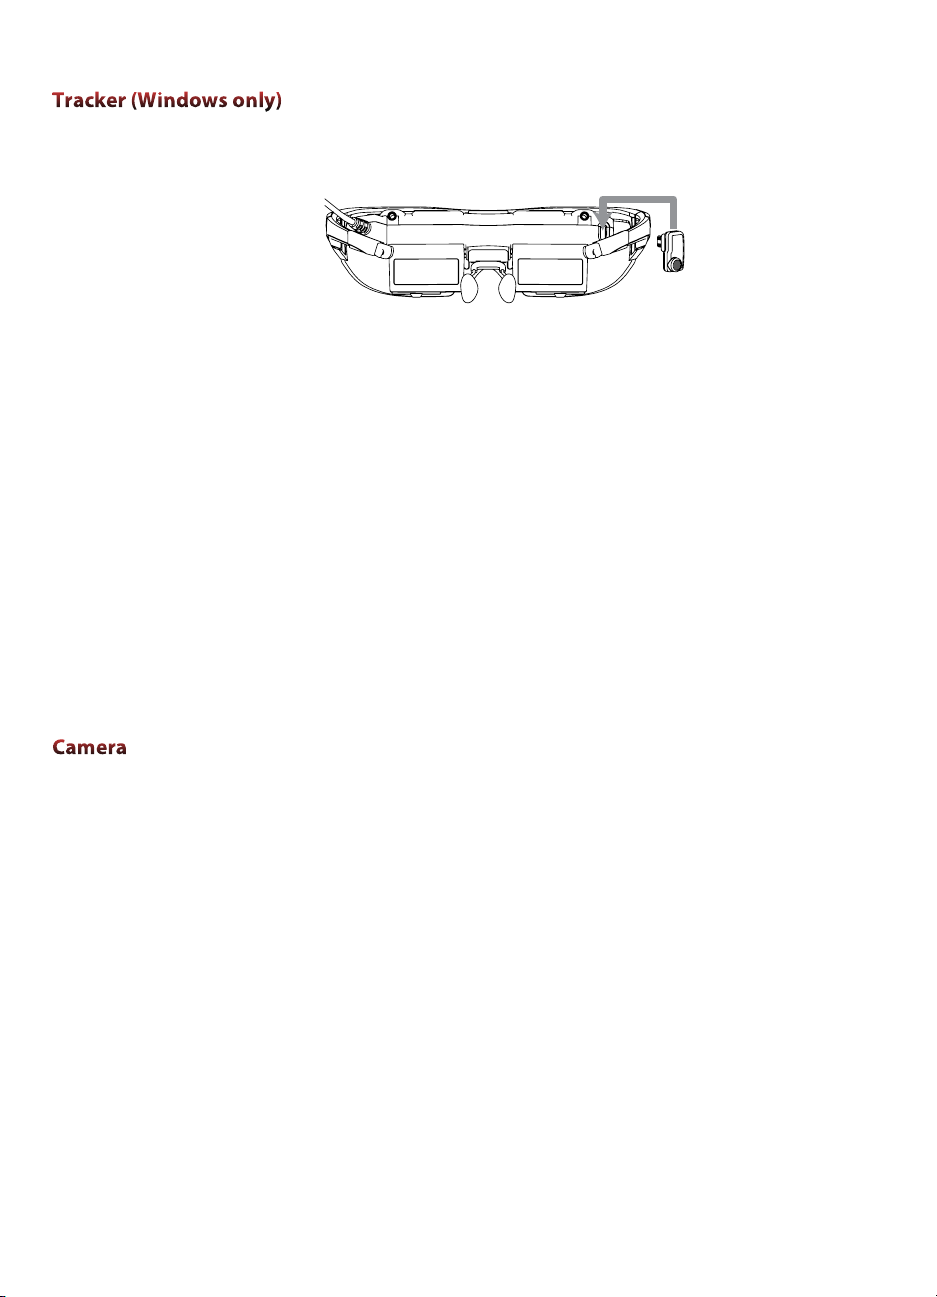
The Wrap Tracker is an optional use accessory that is not required for the proper
operation of the display module and other components.
! Plug the Tracker into its port, above and to the right of the right-eye display.
The Tracker works on a Windows based computer running supporting applications.
Data from the tracker is transmitted to your computer through the USB connection on
the Controller.
Note: Although the Tracker connector may look similar to a USB Mini-B connector, it is not.
Attempting to connect as a USB device may damage the eyewear and connecting the tracker
directly to a USB port may damage the tracker.
To function correctly, the tracker must be calibrated using the VR Manager software
package, included with your STAR 1200XLD. See the VR Manager section of this User
Guide for calibration details.
Tip: Additional drivers and resources for alternate host devices may become available over time.
Periodically check the Vuzix website for additional information.
Your STAR 1200XLD includes a UVC (plug ‘n play USB) compliant 1080p HD
camera.
Tip: UVC compliant video cameras are meant to provide basic functionality on Windows, Mac and
Linux computer systems, without the need for additional drivers.
The STAR camera system operates independent of the rest of the eyewear components
and connects to the host computer system through it own USB 2.0 connection.
! Connect the Camera’s USB connector to a USB 2.0 port on your computer.
Note: If you are connecting to a computer already equipped with a USB camera, you may need to
configure your host device to use the STAR’s camera.
Note: The STAR’s camera will be recognized by Windows as a “Logitech® C920” webcam.
Page 14

14
The Controller provides power for the STAR eyewear and an interface to your host
device.
One end of the Controller is hardwired to your eyewear and the other end has two
connectors; a mini-B USB and a HDMI connector. The face of the Controller contains
four control buttons and an indicator light.
Connect the mini-B USB connector to a power source (computer or USB wall adapter)
to power and charge the Controller.
A separate USB connection is provided for the camera, covered later in these instructions.
! Connect the Controller’s USB connector to a USB 2.0 port on your computer or other host
device.
Note: If a USB 2.0 hub is being used it must be a powered. Unpowered USB hubs do not provide the
amount of power required to operate the STAR components and/or charge its battery.
Tip: A USB extension cable can be used as long as it is meets USB 2.0 specifications. Some lower
quality USB extension cables are know to adversely affect performance.
The STAR 1200XLD supports HDMI 1.4a and connects to your host device using the
provided HDMI cable or an alternate HDMI high-speed cable.
! Connect the Controller to your host device using the provided HDMI cable.
Tip: Additional adapters or cables may be required for your installation. Be aware that some HDMI
cables may not provide an adequate level of performance. Use only high-speed HDMI cables.
High-speed cables with Ethernet can be used but the Ethernet capabilities are not used by the
eyewear.
HDMI
USB
USB
Page 15

15
The USB cable, connected directly to the camera, goes to any available USB 2.0 port on
your host device. A powered hub can also be used if sufficient free USB ports are not
available.
Note: Unpowered hubs and extension cables that are not USB 2.0 compatible, will not work and may
adversely affect performance.
Note: The STAR’s audio and video display are compatible with MHL equipped devices when used
with an MHL to HDMI adapter. The camera and tracker are not supported with MHL devices.
See the Reference section of this User Guide for additional information.
At this point your eyewear, camera and other components will be operational but require
adjustment or calibration for optimal performance.
The STAR 1200XLD generally does not require additional configuration for displaying
standard 2D video. When the eyewear is turned on, it will self configure to mirror your
desktop display.
! Press the “Power & Menu” button to turn the eyewear on.
! Press and hold the “Power & Menu” button to turn the eyewear off.
! Double press the “Power & Menu” button to display the OSD (On Screen Display)
In most cases, Windows will automatically configure your video display settings. It will
choose a display resolution that is mutually compatible, both for the eyewear as well as
your computer monitor. It will also select “Duplicate these displays” from the “Multiple
displays” drop list.
Power
& Menu
Page 16

16
The STAR 1200XLD is equipped with removable stereo earphones. The earphones come
equipped with medium sized noise-isolation rings. Small and large rings are also provided
for slip-off, slip-on size adjustment.
! Press the plus and minus buttons on the Controller to adjust the earphone volume.
Note: Do not put the earphones into your ears until the audio volume has been set to a moderate and
safe level.
Tip: If an alternate audio system is used, volume control is provided through that system’s controls.
IPD (InterPupillary Distance) is the distance separating your pupils. This distance varies
from one person to the next and, if your eyes are not correctly aligned with the displays,
the image in a misaligned display may appear dark or disappear entirely.
Each display adjusts independently by sliding its display screen left or right.
! Close one eye and slide the display box for the other eye to the left or right to provide the
clearest and brightest image.
! Repeat the process to adjust the other eye’s display.
The angle of your displays can also impact their clarity. Vuzix eyewear is equipped with a
patented Accutilt system that enables the display to be to be tilted up or down by up to
15 degrees.
! Adjust the display angle, by rotating the up/down tilt of display module, to achieve the
best quality image.
Page 17

17
The nose bridge assembly is adjustable. It can be slid in or out to adjust its length and the
nose pad wires can be bent for adjustment, like the pads on many prescription eyeglasses.
! Slide the nose pad assembly in or out to adjust the display height of your eyewear. The
eyewear displays should be aligned to the same level as your eyes.
! Bend the nose pad wires to adjust the pad separation and angle for a comfortable fit.
Tip: If the stem pulls completely out, simply slip it back into its slot taking care that the serrated strip
faces toward you – away from the eyewear display assembly.
Note: Just as is the case with prescription eyeglasses, the wire arms of the nose pads are designed
for adjustment for a single user. Excessive and/or frequent adjustment or sharp bends in the
wire arms may weaken and break them. Replacement nose pads are available from Vuzix.
For active applications, a tether strap can be used to provide a more secure fit.
! Attached each end of the tether strap to the eyelets on the eyewear temples.
! Adjust the strap synch for a comfortable and secure fit.
The final adjustment is the calibration of the head tracker for use on a Windows based
host device.
Tip: If you are not using a Windows based host device or are not using the head tracker, you can
bypass this step.
Tracker calibration requires the installation of the Windows application, VR Manager.
This software application is included in the STAR 1200XLD software and
documentation package downloaded from www.vuxiz.com/dd.
Page 18

18
VR Manager is a calibration and VR enablement software, compatible with Windows 8,
7, Vista and XP. Its installation is required to calibrate and enable the Wrap Tracker.
Tip: VR Manager is a 32-bit application that will run on 64-bit versions of Windows.
! Open the “VR Manager Installer” folder from the STAR 1200XLD Software &
Documentation Package.
! Run the “setup.exe” program and follow the on-screen instructions to install VR Manager.
The VR Manager install program will lead you step-by-step through the installation
process. The process will vary from one version of the Windows to the next and you may
be requested to provide permissions during the install. Accept the default choices
provided.
The Wrap Tracker utilizes a series of nine sensors (3-accelerometers, 3-gyros and 3magnetic field sensors) to determine your direction and angle of view and head
movement (yaw, pitch and roll). This information can be provided to a host Windows
computer system and utilized by tracker-enabled software.
Tip: Vuzix provides a free SDK to assist in enabling tracker support in software applications. Go to
“www.vuzix.com/developer” for additional information.
The gyros and magnetic field sensors require calibration. The gyros generally do not
require re-calibration (zeroing) unless the tracker is connected to a different computer.
The magnetic field sensors require calibration whenever your magnetic environment
changes. Nearby metal and electrical objects as well as the earth’s natural magnetic fields
affect magnetic sensors and the calibration process helps to minimize their influence.
Tip: Take note that any nearby magnetic interference will have an adverse effect on your head
tracker’s performance. Hidden objects, like a base speaker under your desk, can sometimes be
relocated for increased accuracy and reliability.
To calibrate the tracker on your STAR eyewear:
! Connect your tracker equipped STAR 1200XLD to your computer, with the VR Manager
software installed.
! Launch the VR Manager application.
If this is the first time starting VR Manager with a tracker attached, a Zero Gyros screen
will appear.
Page 19

19
! Place the Wrap eyewear flat on your desk facing your computer.
Note: Do not move the eyewear while the gyro zeroing process is being performed.
! Follow the on-screen instructions to zero the tracker’s gyros.
Once the gyros are zeroed, VR Manager will present you with its Calibration screen.
! Press the “Begin Calibration” button.
Tip: For the most accurate calibration, minimize earphone movement (or remove them) and position
your eyewear as close as possible to the position it will be in when used, upright and facing
your desktop computer monitor.
! Rotate your eyewear fully through each of the three axes.
This process captures tracker data through its full range of movement. The indicator bars
will move while new data is being received and stop progressing when no additional new
data is received. The indicator bars will not fill completely – this is normal.
! When the indicator bars stop moving, press the “Lock Calibration” button.
Pitch RollYaw
Page 20

20
! Put on your eyewear positioning them as they will normally be used – upright, at eye level
and facing your computer – and then press the “Set Zero” button.
The Set Zero button establishes the Tracker’s home or centered position. As you move
your head you will see the indicators and values in the Yaw, Pitch and Roll indicators
reflect movement relative to that centered position.
Page 21

21
The STAR 1200XLD provides an On Screen Display (OSD) for adjusting its display and audio
configuration. The volume and OSD options are managed through the four buttons on the
eyewear’s Controller.
The Controller contains a rechargeable lithium ion battery, charged by connecting a USB
charger, plugged into a wall outlet or computer port with an output of not less than 2.5W.
Tip: Charging a fully depleted Controller can take up to 11 hours at 2.5W. A 5W charger will reduce
this time significantly.
Use the provided USB charger for the shortest charge time. Its available power is divided
among it four ports. Use only one port to minimize the charge time.
The Vuzix icon will flash while the Controller is charging. Allow it to fully charge before using
your STAR eyewear for the first time.
Power & Menu
Powers up the video eyewear and enables its on-screen display menu (OSD).
Double-press to display the OSD.
Plus Selector
Changes your OSD selection to the next option and increases adjustment
settings.
Page 22

22
Minus Selector
Changes the OSD selection to the option and decreases adjustment settings.
Return – Go Back
A double-press toggles between 2D and the last 3D setting, if the OSD is not
displayed.
Press it once to turn off the OSD, if it is displayed.
With the display on, double-press the Power & Menu button to display the OSD.
The specific items displayed will vary depending on your host device and prior menu selections.
The display resolution is displayed in the top left corner, along with the current display mode.
The battery level is displayed in the top right corner.
The display mode menu options, titled “3D” are shown in white, above the brightness and
contrast setting controls.
3D 2D SxS T/B
2D
720P
Page 23

23
You have three display modes to choose from:
• “2D” for standard 2 dimensional content,
• “SxS” for side-by-side formatted 3D content, and
• “T/B” for top/bottom formatted 3D content.
Tip: You can toggle between the current and prior display mode by double-pressing the Go Back
button.
Page 24

24
Section 3
STAR 1200XLD Reference
The Reference section of this User Guide provides a collection of information on various aspects
of the STAR 1200XLD and its software and accessories. This detailed information is provided to
assist you in getting the most out of your eyewear and overcoming obstacles that you may
encounter.
Page 25

25
The STAR 1200XLD utilizes Vuzix’ patented Quantum Optics display system to provide a seethrough view of the real world with computer-generated content displayed as a 2D or 3D video
overlay.
Other than a minimally intrusive display frame, the STAR 1200XLD provides an unhindered
view of the real-world, similar to a pair of glasses. Semi-transparent video content is overlaid in
the twin high-resolution WVGA (852 x 480) LCD displays to appear in your view of the world.
Its widescreen, 16:9 displays and 35-degree field of view produce the equivalent of a 75-inch
virtual screen as viewed from ten feet (~3m).
Newer HDMI equipped computers, running Windows, will recognize the STAR as an HDMI
display and auto-configure to the highest available resolution. Some older systems may require
additional display configuration.
For the STAR 1200XLD display to function correctly on a Windows based PC the computer’s
display settings must be configured as follows:
• The computer must be configured for two monitors displaying the same image.
Depending upon the version of Windows being used this might be referred to as using
the duplicate, mirrored, or clone display mode.
• The following display resolutions are supported:
640 x 480, 60 Hertz (VGA)
800 x 600, 60 Hertz (SVGA)
1024 x 768, 60 Hertz (XGA)
1280 x 720, 60 Hertz (720p)
Note: Some resolutions may not be available on Windows XP systems.
Tip: The sharpest image can achieved using the lowest display resolution settings.
2D and 3D video is supported on all known makes and models of Windows compatible graphics
cards and no additional 3D drivers are required.
By default the STAR display supports standard 2D video. Stereoscopic 3D video support is
provided for side-by-side and top/bottom formatted content. To view 3D content, the computer
display must be set to “full screen”.
Page 26

26
Tip: Quickly switch between 2D and 3D video by double-pressing the “Go Back” button
the Controller.
Note: The STAR 1200XLD is HDMI 1.4a compliant and should correctly display DRM protected 3D
content when available in side-by-side or top/bottom format.
The STAR 1200XLD’s Controller is designed for use with all HDMI audio video output sources,
including but not limited to Windows based personal computers, mobile phones and tablets.
Note A STAR 1200XLD may work with other operating systems, such as the Mac OS or Linux, but
some components may not work with these operating systems. Though it is known that the
STAR 1200XLD display works with many of these alternate operating systems, these operating
systems are not officially supported for this product and Vuzix does not provide software or
technical support for them.
The STAR 1200XLD’s nose bridge and pads are adjustable. For the best viewing experience your
displays should be centered in front of your eyes. By sliding the nose bridge assembly’s stem in or
out of the display module you can adjust the resting height of the displays. By bending the wire
nose pad arms you can address the angle and spread of the pad to achieve optimum comfort.
To adjust the nose bridge:
! Slide the nose bridge assembly in and out to adjust its reach to position the eyewear
displays directly in your line of sight.
Note: If you withdraw the nose bridge assembly too far enough, it will come completely out of the
display module. Don't worry if this happens as it can be easily slid back in and enables you to
replace the nose bridge assembly should it be broken.
! Gently bend the wire arms of the nose pad to achieve a comfortable fit with the pad’s face
resting on the bridge of your nose – in the same manner that you would adjust the nose
pads on standard eyeglasses.
Tip: Gentle persuasion with a pair of needle nose pliers works best to bend the wire nose pad arms.
This places the least amount of strain on the assembly and adjacent parts.
Page 27

27
Note: The wire nose pad arms are not designed for frequent bending or sharp angles as this may
weaken and break them. Replacement nose pad assemblies are available for purchase from
Vuzix (www.vuzix.com).
IPD (InterPupillary Distance) is the distance separating your eyes - sometimes referred to simplify
as “eye-separation”. IPD varies from one person to the next and when yours does not match close
enough to the eyewear displays, the image in one eye or the other may darken or disappear
entirely.
Each display adjusts independently by sliding it left or right.
To adjust the IPD:
! Close one eye and slide the display box for the other eye left or right to provide the
clearest and brightest image.
! Repeat the process to adjust the other display.
Your STAR 1200XLD is equipped with a patented view angle adjustment called “Accutilt”. The
mechanism allows you to rotate and tilt the display module up and down approximately 15° to
achieve the best quality display.
To adjust the viewing angle:
! Pivot the display assembly to achieve the best quality display.
Page 28

28
The camera on the STAR 1200XLD can be removed to use it without a camera or to change the
lens covers. All that’s required to remove the camera is a #2 Phillips screwdriver, a .035 Allen
wrench (hex key) and a couple of minutes time.
The camera slips over two removable collars mounted onto the display assembly. The camera
body slides over the collars and is secured by two Allen keys.
Note: Take care not to over tighten the camera securing screws.
Your STAR 1200XLD is provided with clear and tinted lens covers.
Each lens cover is held in place by four tabs that allow it to snap in and out of the frame.
! The first step in replacing a lens is to remove the camera, as shown above.
1
2
3
4
A
B
B
C
Page 29

29
! With the eyewear upside down, grasp the frame in both hands with your thumbs pointing
toward each other along the bottom of the frame, at position “A” and your forefingers at
position “B”.
! Using your thumbs as a pressure point, apply pressure with your forefingers at position
“B” to gently bend the frame at position “A”, causing the cover and frame to separate
along the seam behind position “C”.
! Slowly apply increasing pressure until tab “3” pops free of the frame. Now the lens can be
easily lifted out of the frame.
! Insert tabs “1” and “2” into their slots in the frame.
! Insert tab “3” into its slot.
! Press the front of the cover inwards to pop tab “4” into its slot.
! Examine the fit of the cover in comparison to the other lens. Press more firmly to seat tab
“4” if the lens is not completely locked into the frame.
! Remount the camera, as shown above.
Remount the camera and wipe away any fingerprints with a clean microfiber cloth and you’re
ready to go.
The noise isolating earphones provided with the STAR 1200XLD are removable and the eyewear
can be used with or without them attached. The earphones are interchangeable and can be used
on either the left or right side.
1
2
3
4
Page 30

30
Three sizes of noise-isolators are provided, allowing you to adjust for a secure and comfortable fit.
Simply slide one noise isolator off the speaker stem and slide another on.
Volume adjustment for the STAR’s earphones is controlled using the Adjustment Buttons on the
Controller. Take care that the volume is set to a low level before inserting the earphones into your
ears.
Adjustment Buttons
Note: Volume adjustment is only available when the OSD is not displayed.
If you are using an alternate audio system, use that audio system’s controls to adjust volume.
When a Windows equipped computer detects a new speaker system it assumes that is the speaker
system you want to use and automatically configures it as the selected audio out device. If you are
listening for audio, other than through the eyewear earphones, it may appear that you’ve lost
audio. You have not – Windows has just reset the audio to play through the eyewear’s earphones.
You can change this to your preferred audio configuration by opening the Windows Sound
Control Panel and selecting a different speaker system.
A tether strap or lanyard is provided for those unaccustomed to wearing glasses or who are
moving around while wearing the STAR 1200XLD. The tether will help secure (but not prevent)
it from falling off and possibly being damaged.
The ends of the tether strap loop over the hooks at the end of each eyewear temples.
Page 31

31
The Wrap Tracker is a 3-DOF capable tracker with compass. It plugs into the back of the display
module and communicates with your computer through a USB cable connecting your Windows
computer to the Controller.
To install the Wrap Tracker:
! Plug the tracker into the port on the back of the display module, above and to the right of
the right-hand display.
! Calibrate the Tracker using VR Manager.
Note: Although the tracker connector looks similar to a mini-USB connector, it is not. Do not attempt
to connect a USB device or cable into this port or plug the Tracker into a USB port.
Note: Tracker support is required in an application for this device to work. Programming examples
are demonstrated in the Vuzix SDK to assist in embedding support code. (For additional
information, see “Developer Tools and Support” in the following chapter.)
The Tracker requires calibration before being used and periodically thereafter. If you connect
your Tracker to a different computer, you should reset or zero the Tracker’s gyro. If you move the
tracker to a different location or rearrange nearby electronic devices, we suggest re-calibrating the
tracker as the resulting magnetic field changes may adversely affect its calibration.
Tip: Periodically open VR Manager, face the eyewear forward, and press “Set Zero” to re-center the
home position.
Refer to the “VR Manager” section for detailed information and instructions on calibrating the
Tracker.
A 2000mA USB charger is provided with the STAR 1200XLD. This charger is compatible with
most types of electrical outlets from around the world.
See the separate USB Travel Charger Adapter User Manual for important safety information and
instructions on changing its plugs.
Page 32

32
MHL (Mobile High-Definition Link) is a standard used primarily by tablets and smartphones to
provide HDMI connectivity through a smaller micro USB port. It sends the audio and video
signals through the micro USB connector and converts it to a HDMI signal for use on supported
devices, such Vuzix eyewear equipped with a HDMI compatible Controller. The signal remains
in digital format throughout the conversion process, avoiding quality is lost.
A Micro USB to HDMI MHL Adapter enables MHL device, such as an HTC EVO 3D or
Samsung Galaxy S3, to connect to HDMI enabled eyewear models for audio and all of the
HDMI supported video resolutions. It also supports 3D video and HDCP media protection
when used with HDMI enabled Vuzix eyewear models.
Many MHL devices require an external power source to drive the adapter and to power the
eyewear. In many cases this power requirement exceeded the output of typical USB ports on a
computer. Though connecting to a computers USB will charge the eyewear Controller’s battery if
the eyewear is not in use, it may not provide sufficient power for indefinite use. For the shortest
charge time and to enable indefinite use of an MHL connected eyewear session, supply power to
the MHL Adapter from the power adapter provided with your eyewear, with no other USB
devices connected.
The following is a partial listing of MHL mobile devices from three popular manufacturers:
Galaxy S III (GT-i9300)*
One XL
Optimus 4X HD
Verizon Galaxy Nexus LTE
One X
Optimus LTE II
Sprint Galaxy Nexus
One S
Optimus LTE Tag
Galaxy Nexus (i9250)
EVO 4G LTE
Optimus 3D Max
AT&T Galaxy Note LTE 5.3"
Raider
Optimus 4X HD
Galaxy Note 5.3"
Velocity
Optimus Vu
Page 33

33
Sprint Epic 4G Touch
Vivid
Verizon Spectrum
AT&T Galaxy S II Skyrocket (i727)
Rezound
Prada
T-Mobile Galaxy S II (T989)
Amaze 4G
Nitro HD
AT&T Galaxy S II (i777)
Sensation XE
Galaxy S II (i9100)
JetStream
Infuse
Sensation 4G
EVO View 4G
EVO 3D
Sensation
Flyer
Note: Some MHL devices, such as the Samsung Galaxy SIII, may require an additional 5-pin to 11-
pin Micro USB Adapter for MHL Adapter.
• Connect the MHL Adapter’s “MHL / Micro-B USB” connector into the MHL port on
your video device.
• Connect a “Mini-B USB” cable between the HML Adapter and a USB power source.
HDMI Output
Mini-B USB
MHL
(Micro-B USB)
Page 34

34
Tip: For continuous playtime when using a MHL adapter connect both the MHL adapter and the
eyewear’s HDMI Controller to a power source, such as the USB Power Adapter provided. For
maximum output, do not connect other devices to the USB Power Adapter.
• Connect a HDMI cable between the HDMI port on the MHL Adapter and the HDMI
port on the eyewear Controller.
Page 35

35
Section 4
Service and Support
From time to time you may have a question or you might encounter a challenge that requires
assistance.
This Service and Support section is able to answer many of the commonly asked questions or
direct you to someone able to assist with the less common questions.
Page 36

36
Vuzix works with a large number of software developers and academic institutions developing a
variety of AR applications. One of the services we provide to assist in these efforts is an SDK that
can be freely downloaded from our website and used without royalty for non-competing
products, for private or commercial use.
The Vuzix AR/VR SDK (Software Development Kit) is a set of development resources and
examples that demonstrate the application of native support for special features and capabilities
provided by certain models of Vuzix video eyewear. It is available for download from the Vuzix
website and can be used royalty-free in any non-competing application, including commercial
software.
SDK – Windows Version
Vuzix AR/VR SDK examples are provided in: C++, C# and XNA
The Vuzix AR/VR SDK demonstrates support for:
OpenGL: Full screen and windowed mode
DirectX: Full screen and windowed mode
XNA: Full screen and windowed mode
MFC windowed mode application, demonstrating head tracking only support.
Product ID
The SDK demonstrates using "Product ID" to identify what products features and capabilities are
operational. Different Vuzix eyewear models may feature different stereoscopy, head tracking and
other technologies.
Head Tracking
The Wrap Tracker supports 3 degree (yaw, pitch and roll) of freedom for head tracking. RAW
and Cooked output is available from the Wrap Tracker and is demonstrated in the SDK.
Page 37

37
AR Extension
Support for the AR camera and ALVAR fiduciary markers provided by the Vuzix AR/VR SDK in
its AR Extension, packed in a separate installer. It demonstrates the use of OpenCV for camera
support.
The Vuzix AR/VR SDK is available for download and royalty free use in not competing
applications, including commercial products. It can be downloaded from the Vuzix website’s
Support/Developer Program web page: www.vuzix.com/developer
Page 38

38
Your eyewear is virtually maintenance free, requiring only occasional cleaning with a soft
microfiber cloth. Do not spray cleaners onto the eyewear or any of its components or immerse
them in water. If required, spray a small amount of optical lens cleaner on a microfiber cloth and
use that to clean stubborn marks or oily film.
Never use solvents, abrasive cleaners or paper towel on your eyewear. These items will damage the
lens coatings, permanently degrading the eyewear’s image quality.
Page 39

39
Customer Service and Technical and Warranty Support are provided only through the region
office and distribution center from which the product originated. Due to importation, duty and
other considerations these services cannot be provided for product purchased in another region.
Note: Technical support and product warranty cannot be provided for product not purchased or
originating from that region. As an example, product purchased from a US online retailer
cannot receive support or warranty service through our United Kingdom Customer Support
services. Support service for U.S. product is provided exclusively by our U.S. Customer
Service facilities.
If you are unsure of the correct region to contact for these services, please refer to the following
list of distribution regions or ask the vendor providing the product:
Japan: Japan only
United Kingdom: United Kingdom, Europe, Russia, Middle East, and Africa
United States: United States, Canada, Central & South America, Asia (other than Japan),
Australia, and New Zealand
Product originating from the United Kingdom, please contact:
Corporate Website: www.vuzix.com/uksite
Email Customer Support: vuzix@tmti.com
Customer Helpline: 0044 844 477 2977
Customer Service Hours: 9 AM to 6 PM GMT Monday to Saturday
Product originating from the United States, please contact:
Corporate Website: www.vuzix.com
Email Customer Support: technical_support@vuzix.com
Customer Helpline: (800) 436-7838
Customer Service Hours: 9 AM to 6 PM EST, weekdays
Page 40

40
When requesting technical support, please provide the following information:
• Serial number, complete model name, and model number of your video eyewear.
• Make and model number of the audio video device being used.
• The name of any video content related to your support needs.
• Detailed explanation of the symptoms you are experiencing.
Note: Vuzix manufactures several models of eyewear, often with similar number sequences and
model series name. As an example a “1200” could refer to no less than 6 different models and
“STAR” could refer to 4 very different models. Please provide the complete model name, such
as the “STAR 1200XLD” when seeking technical assistance or referencing your product..
Page 41

41
保 証 書
本書は、無料修理を行うことをお約束するものとなります。
修理の際には、本書を同封して送付下さい。
本書は再発行致しませんので、大切に保管して下さい。
Eメールサポート : japan@vuzix.com
の項目は必ずご記入下さい。
FAX
保証期間(ご購入年月日から)1年
Page 42

42
1. The equipment that you bought has required the extraction and use of natural resources for its
production. It may contain hazardous substances that could impact health and the environment.
2. In order to avoid the dissemination of those substances in our environment and to diminish
the pressure on the natural resources, we encourage you to use the appropriate take-back systems.
Those systems will reuse or recycle most of the materials of your end life equipment in a sound
way.
3. The crossed-out wheeled bin symbol invites you to use those systems.
4. If you need more information on the collection, reuse and recycling systems, please contact
your local or regional waste administration.
5. You can also contact us for more information on the environmental performances of our
products.
Page 43

43
Vuzix, the Vuzix logo, View the Future, Wrap and STAR are trademarks of Vuzix Corporation registered in the U.S. and other
countries. All other trademarks are the property of their respective owners. Vuzix Corporation accepts no responsibility for errors that
may appear in this manual. Information contained within is subject to change without notice. Items represented by illustration or
photograph may not be exactly as shown.
© 2013 Vuzix Corporation. All rights reserved.
Designed by Vuzix in New York.
Made in USA rev1,20130402
 Loading...