

Page 1

M100 Smart Glasses
Product Guide
Enterprise Edition
English
Page 2

2
Table of Contents
TABLE OF CONTENTS 2
1. INTRODUCTION 5
Product Evolution 5
About this Product Guide 6
2. M100 AT A GLANCE 7
M100 Smart Glasses – back 7
M100 Smart Glasses – front 8
Accessories 9
3. HARDWARE SETUP 11
Before Using the M100 11
Charging 11
Mounting Options 12
Left or Right Eye? 12
Headband Mounting 13
Safety Glasses Mounting 14
Display Adjustment 17
PowerPak 3800 18
425PB0002-02
4. SMART GLASSES TOUR 20
User Interface Controls 20
Buttons 20
Voice Navigation 22
Gesture Control 23
Operating Methods 25
Independent Use 25
Partner Device Use 25
M100 Software 26
Smart Glasses Manager 26
Vuzix App Store (COMING SOON) 26
Page 3

3
M100 System File Manager 26
Over the Air Updates 27
5. USING THE M100 28
First Use 28
Turning the Smart Glasses On/Off 28
Charging M100 Smart Glasses 28
Connecting to WiFi 28
Bluetooth Partner Device Interface 29
Connecting to a Partner Device 29
6. SMART GLASS MANAGER 31
Description 31
The Manager and the Carousel 31
Running M100 Native Applications 32
Running Legacy Android Applications 32
The Application World (Coming Soon) 33
7. SPECIFICATIONS 34
8. SOFTWARE QUICK REFERENCE 35
Native Applications 35
Audio Recorder 36
Calendar 37
Camera 38
Clock 39
Contacts 40
Gallery 41
Scanner 42
Settings 46
Legacy Applications 47
Camera Extra 48
Download 49
Email 49
Movie Studio 49
425PB0002-02
Page 4

4
Music 50
Search 50
9. SUPPORT SERVICES 51
Contacting Customer Service 51
REGULATORY COMPLIANCE 53
Waste Electrical & Electronic Equipment 53
FCC Compliance 53
Read the Safety and Warranty information before
proceeding.
425PB0002-02
Page 5

5
1. Introduction
Vuzix M100 Smart Glasses
serves up the digital world
before your eye, offering
unprecedented “hands free”
access to information, data
collection and more.
The Vuzix M100 Smart Glasses is an Android-based wearable computer, enhanced
with a monocular display, speaker, and a high definition camera able to capture video
and still image pictures. It can be used as a stand-alone device, paired to work cooperatively with an Android device, or to connect wirelessly to other devices and the
Internet.
Product Evolution
Smart Glasses are an emerging technology with the Vuzix M100 being the first on the
market, breaking new ground for others to follow. Unlike an established technology,
the M100 Smart Glasses are evolving and improving based upon user feedback and
continuing engineering development. They have been designed with a high degree of
upgradeability built-in. Not only can you install new end-user software, you can also
update the M100’s firmware to enable new capabilities.
This product Guide has been written based upon the M100 Smart Glasses features
and capabilities at a given point in time. As the product evolves, new features,
capabilities, and software may no longer be accurately reflected in this document.
Check the Vuzix website for periodic updates and releases of new documentation,
available at www.vuzix.com/downloads.
Note: You can always get the latest manuals and
documentation at the Vuzix website
www.vuzix.com/downloads.
425PB0002-02
Page 6

6
About this Product Guide
This Product Guide provides detailed information on your M100 Smart Glasses and
instructions on its components and usage. Additional information may be provided
in related documents available for download from www.vuzix.com/downloads.
425PB0002-02
Page 7
7
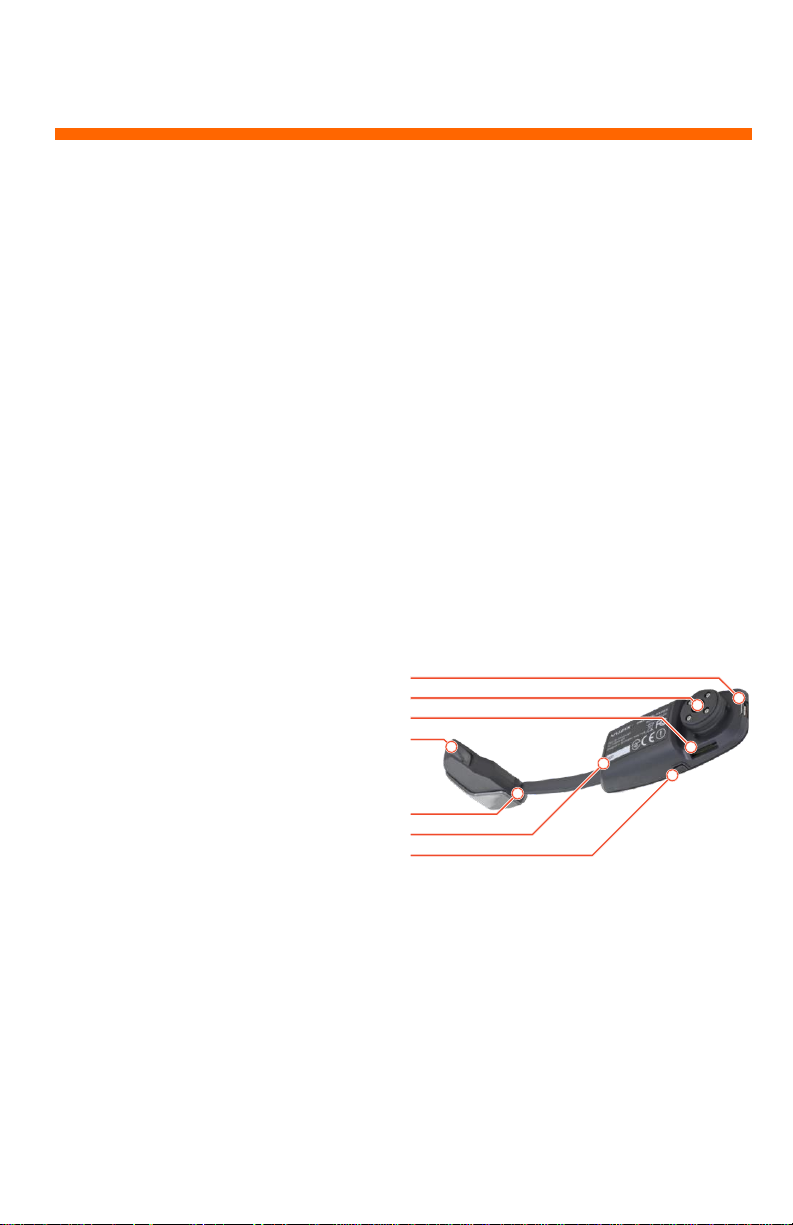
2. M100 at a Glance
1. Power/Data Port: Micro USB
port for charging battery and
loading firmware updates and
other software.
2. Speaker: Speaker and
mounting assembly base.
3. Memory Card Slot: Micro SD
Card slot for removable
memory.
4. Display Screen: Full color
display screen.
5. Display/Camera Head: Adjusts
the tilt of the assembly
6. Display Arm: Bends and
extends to enable display
positioning.
7. Power Button: Display angle
adjustment.
1
2
3
4
5
6
7
Below is a brief description of the items included in a typical M100 Smart Glasses
package and significant components referenced throughout this Guide.
The M100 Smart Glasses are a global product undergoing continual improvement.
The following items are those included in the standard M100 package at the time of
this Guide’s creation. Local demands and preferences as well as product changes
themselves may influence the specific items included in your package. The contents
of the M100 Smart Glasses package may change at any time without notice.
M100 Smart Glasses – back
425PB0002-02
Page 8
8
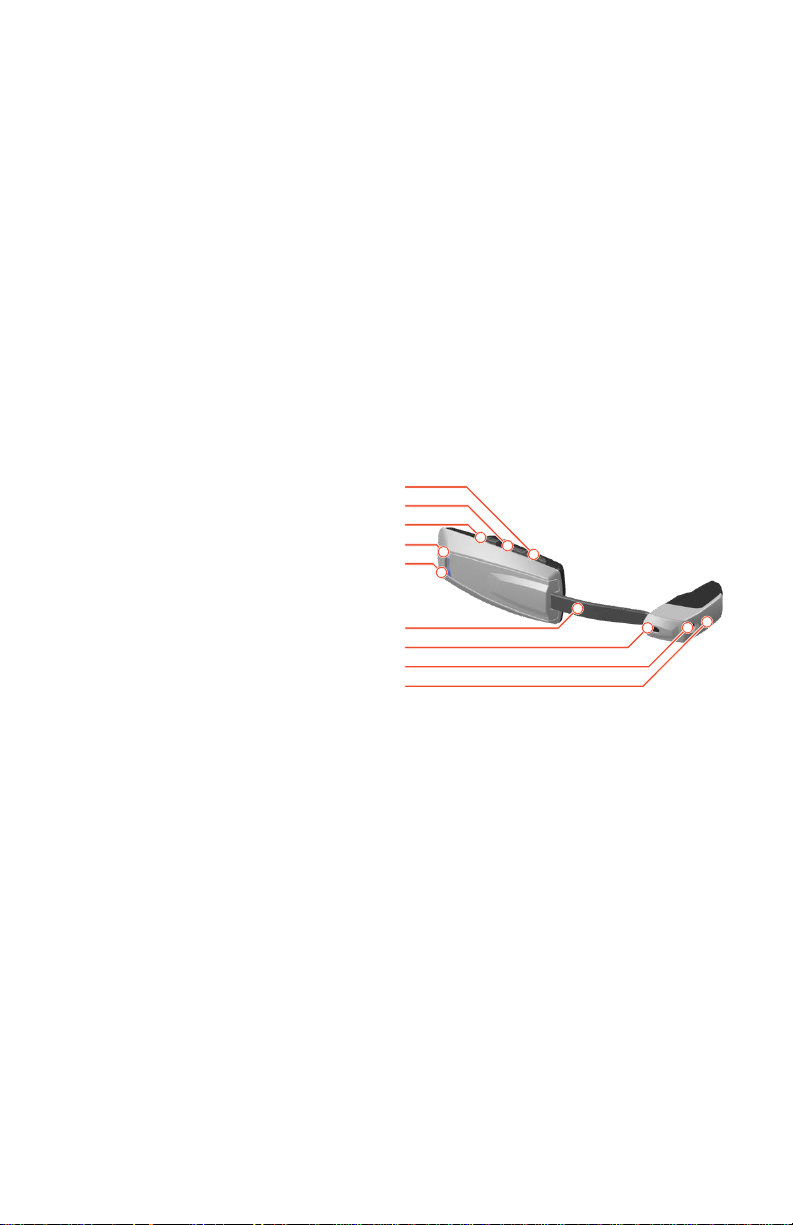
M100 Smart Glasses – front
1. Front Button: Moves the on-
screen selection forward (Short
Press)/Opens menu (Long Press).
2. Center Button: Moves the on-
screen selection backward (Short
Press)/Go home (Long Press).
3. Rear Button: Selects objects
displayed on-screen in the Smart
Glasses (Short Press)/Go back
(Long Press).
4. White Power Indicator: Indicates
power and charge status (Solid
white – full charge/ 1 intermittent
blink – charging/ 3 fast blinks –
nearly 0 charge and will not boot
due to lack of charge).
5. Blue Notification Indicator:
Provides status notification.
6. Display Arm: Bends and extends
in and out to enable display
positioning.
7. Gesture Sensor: Input sensor for
gesture control (Located between
(4) and (5) on generation 1
M100).
8. Camera: High definition camera
for video and still images.
9. Red LED Camera Indicator:
Indicates that the camera is in
operation.
1
2
3
4
5
6
7
8
9
425PB0002-02
Page 9
9
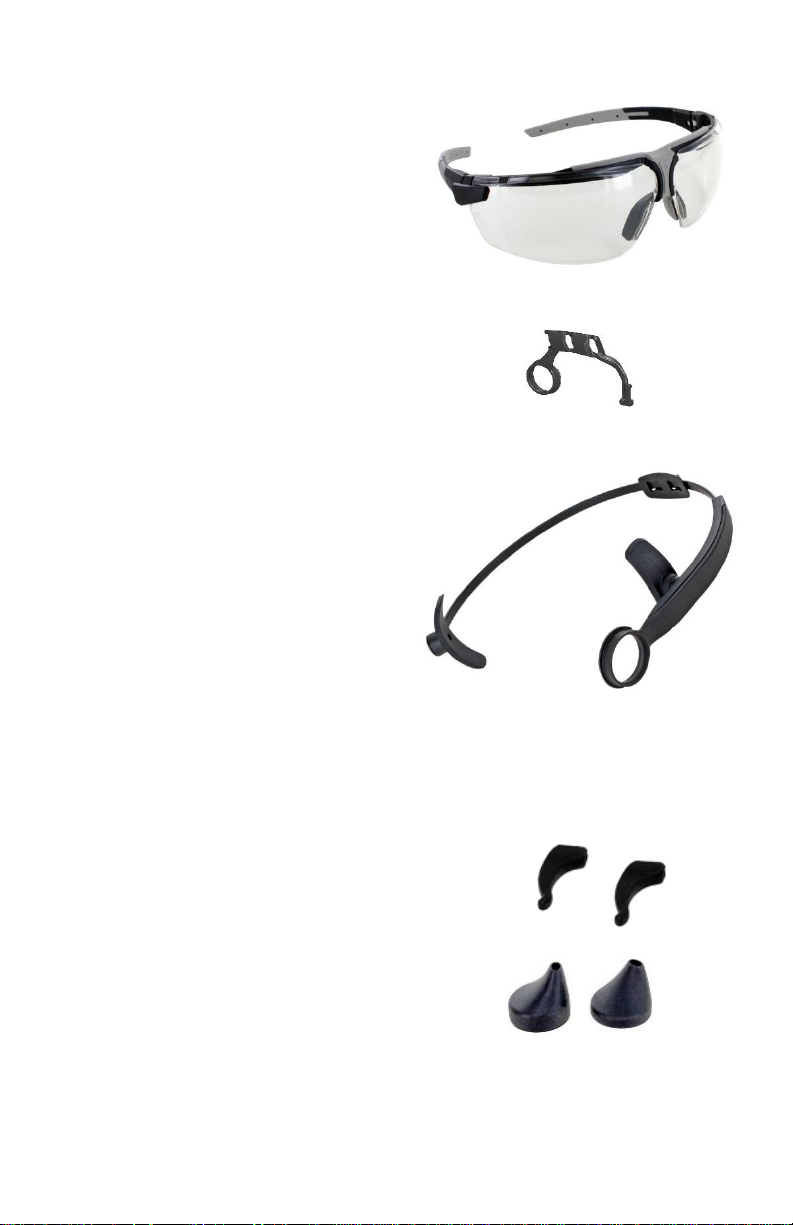
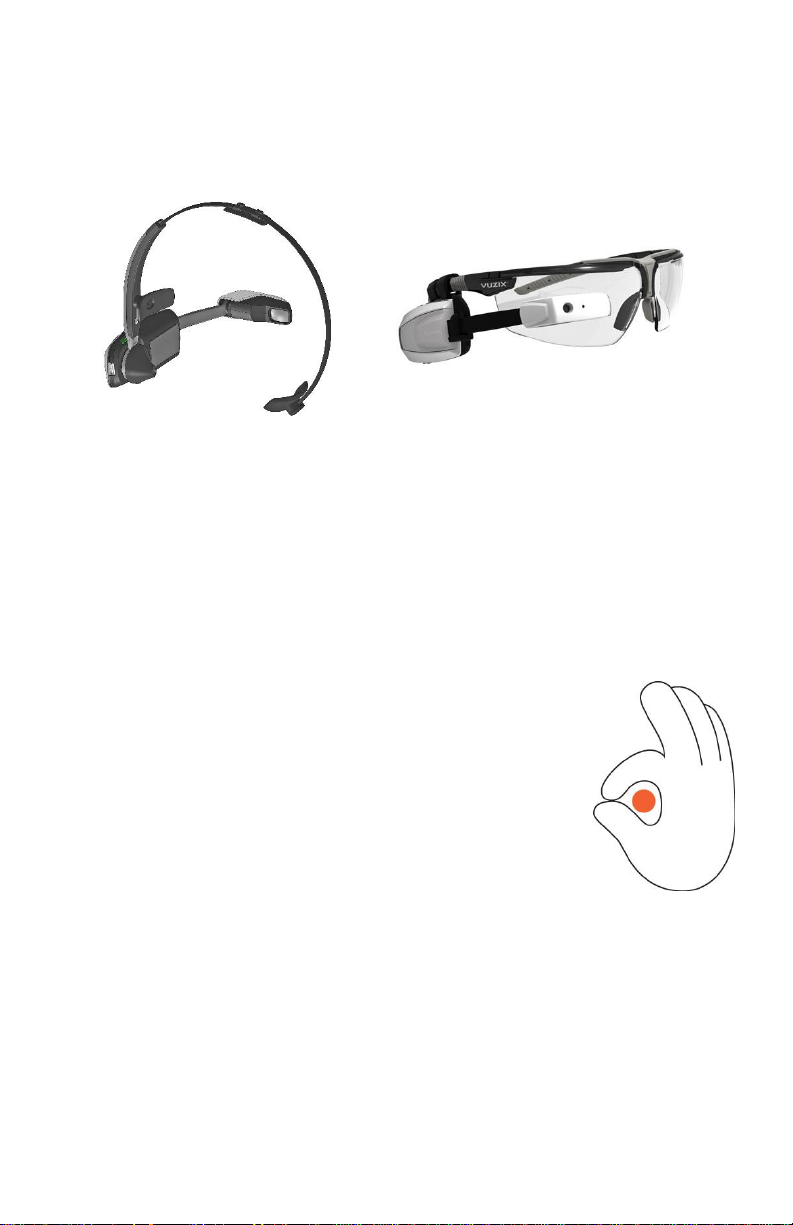
Accessories
Safety Glasses: M100 mounts on left or
right side using one the Safety Glasses
Mounting Brackets provided.
Safety Glasses Mounting Bracket: Two
brackets, identified with “R” and “L”
indicators, are provided; one for
mouting the M100 for right-eye viewing
and the other for left-eye viewing.
Headband: An adjustable headband
enables left or right eye viewing for
applications where safety glasses are not
used.
Ear Locks: The included ear locks are
designed for added comfort and stability
when using the safety glasses mounting
option.
Speaker Cones: Two optional speaker
cones are provided in a small and large
size. They slip over the ridge on the
M100’s speaker to channel sound,
increasing audio quality.
425PB0002-02
Page 10
10
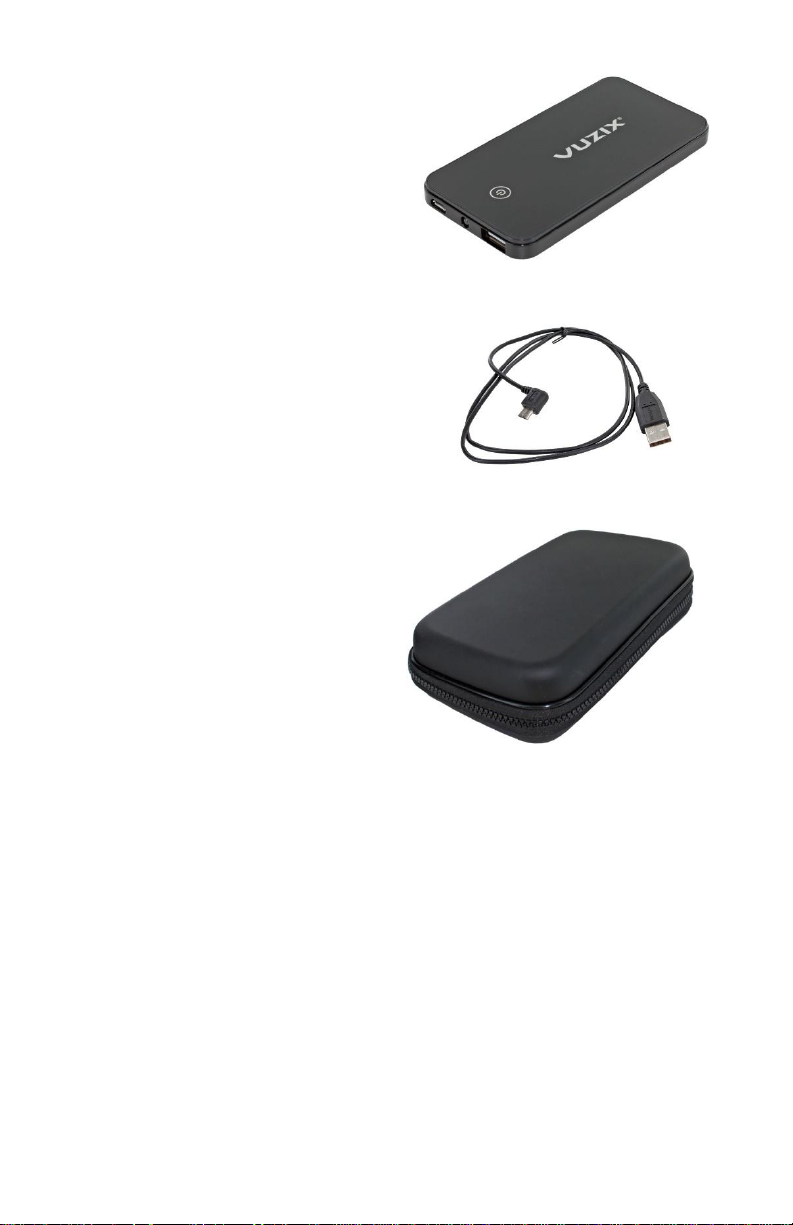
PowerPak 3800: This rechargeable
battery enables four to five times the
run time of the internal M100 battery. It
connects to the M100’s Power/Data port
using the provided USB cable (note the
protective film, which can be removed).
USB Cable: This USB cable connects the
M100 to an available USB power source
to charge its internal battery and to the
PowerPak 3800 to recharge it. This
cable is also used for updating the M100
firmware when connected to a Windows
PC.
Travel Case: This semi-rigid case and its
foam insert provide a convenient
storage location for your M100 Smart
Glasses and its accessories as well as
offer protection for the M100 when
travelling.
425PB0002-02
Page 11

11
3. Hardware Setup
Before Using the M100
The M100 Smart Glasses and the PowerPak 3800 should be fully charged before being
used for the first time.
Charging
The M100 Smart Glasses are equipped with an internal rechargeable battery. In
respect of weight considerations, a battery suitable for the most common tasks and
needs has been provided. Certain activities may place additional power demands on
the M100, reducing its internal battery charge. An external battery, the PowerPak
3800 or a similar battery, can be used to extend the M100’s running time.
The M100 Smart Glasses and the PowerPak 3800 can be charged from any USB power
source providing a minimum of 500mA. Recharge time can be dramatically reduced
by utilizing a 1000mA or greater power source.
Connect the USB cable to a USB power adapter or USB port on a
computer and then plug the smaller USB connector into the microUSB port on the M100 or PowerPak 3800.
The white Power Indicator light on the M100 will flash while the device is charging
and remain lit when fully charged. The light will blink intermittently while charging
and blink rapidly 3 times when the device is at a power level that is too low for the
M100 to turn on.
If the M100 Smart Glasses are connected to a power source, but very low on charge,
the Power Indicator will flash three times every five seconds until a charge sufficient
for booting up has been achieved. It will continue to flash every two seconds while
charging.
Note: While the Power Indicator is flashing three times, the
M100 has insufficient charge to turn on.
425PB0002-02
Page 12
12
Mounting Options
Two mounting options are provided – an over-the-head strap (headband) and safety
glasses. Both mounting systems accommodate either right or left eye viewing.
Left or Right Eye?
Prior to mounting your M100 on one of the provided systems, you’ll need to choose
to use your left or right eye. The majority of people, about 66%, are right eye
dominant, meaning they prefer visual input from their right eye. But which eye is
right for you? The following exercise will help you determine your eye dominance.
Hold your hand out at arm’s length and form a
circle with your thumb and forefinger.
With both eyes open, align the circle with a small
distant object, such as a doorknob.
Without moving your hand, look through one eye
and then the other.
While alternating eyes, the object will remain centered in your thumb/forefinger circle
when viewed through your dominant eye and disappear or move when viewed
through the other eye.
425PB0002-02
Page 13
13
Note: The M100 senses its orientation and automatically
“flips” the displayed image whether being worn in the
left or right eye.
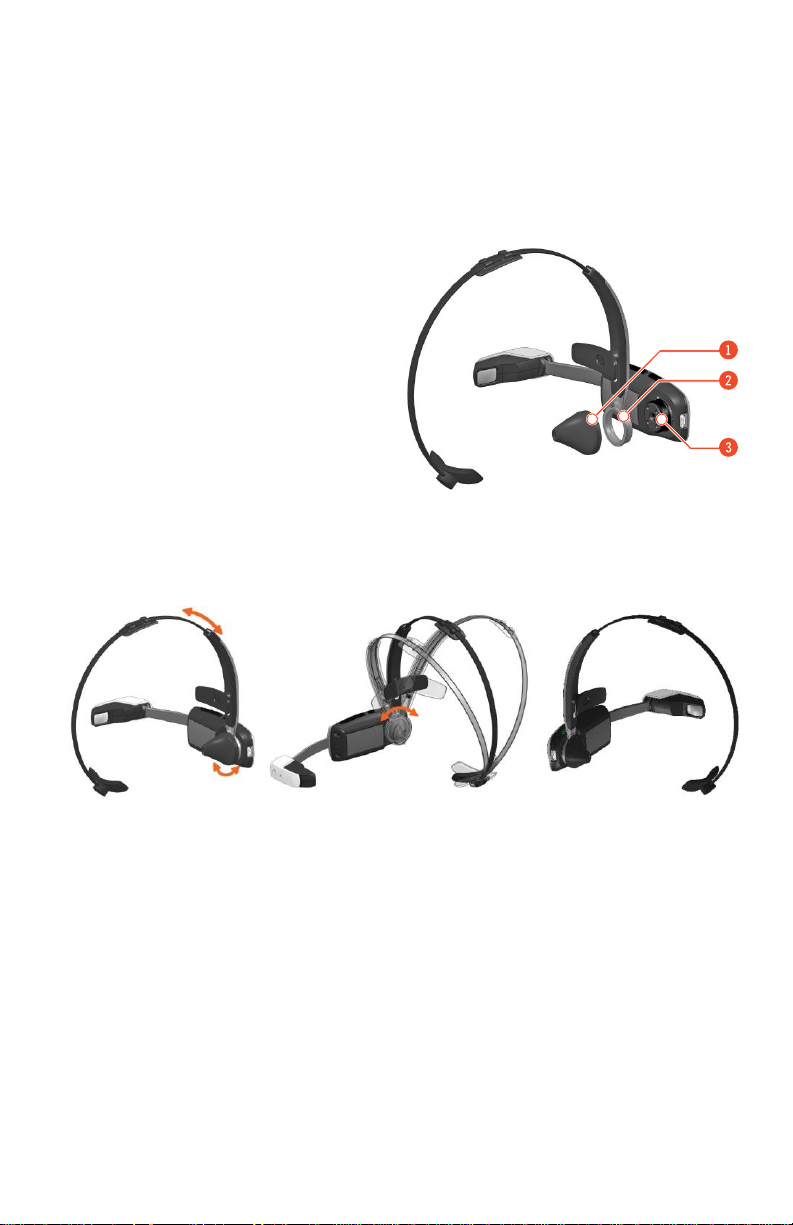
Headband Mounting
The headband attaches directly to the
M100 Smart Glasses with its mounting
ring snapping over the M100’s speaker.
The optional speaker cone stretches over
the raised edge of the mounting ring to
complete the assembly.
1. Speaker Cone
2. Mounting Bracket
3. Speaker
To mount the M100 Smart Glasses on the headband:
Press the M100 universal ring mount (3) into the mount ring (2) of
the headband.
Slide the speaker cone (1) onto the backside of the headband ring
mount (optional).
425PB0002-02
Page 14
14
Caution: To prevent damage to your device, when removing the
①
②
③
headband rotate it around the speaker while pulling.
Note: The headband strap slides in and out of the mounting
assembly to accommodate a secure fit over your head
and the M100 assembly swivels around the speaker to
adjust the display angle.
Note: Swiveling the headband around the speaker a full 180
degrees orients the M100 Smart Glasses from right to
left eye viewing or vise-versa.
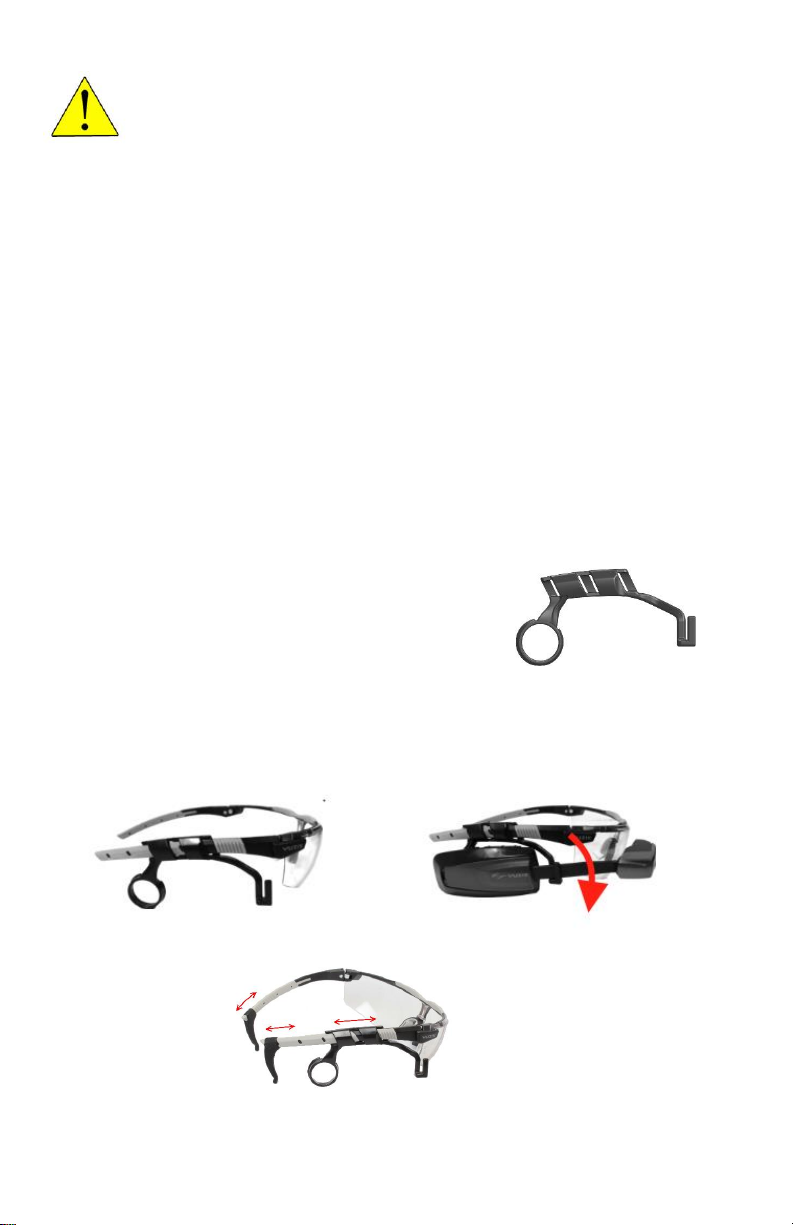
Safety Glasses Mounting
Safety glasses and two mounting brackets are provided
with the M100 Smart Glasses. Each is marked with an
“L” or “R” to indicate which side of the safety glasses it
fits on.
To mount the M100 Smart Glasses and ear hooks on the safety glasses:
425PB0002-02
Page 15
15
Slide the adapter onto the safety glass stem, with the mounting
ring to the rear. ①
Snap the M100’s speaker into the mounting ring. ②
Rotate the display arm down and clip it into the adapter’s retainer
clip. ②
Slide both the left and right ear hooks onto the stem far enough to
secure the glasses when worn. ③
Finally, attach the rubber speaker cone over the lip of the
mounting ring (optional).
The arm tilt of the safety glasses is adjustable (as indicated in the below picture).
Most users find that the M100 is in the best position when both arms have been
adjusted down to the lowest setting, and the M100 is positioned higher in your line
of sight.
Please make sure that both arms are in approximately the same position, to ensure
that the M100 is level and comfortable.
425PB0002-02
Page 16
16
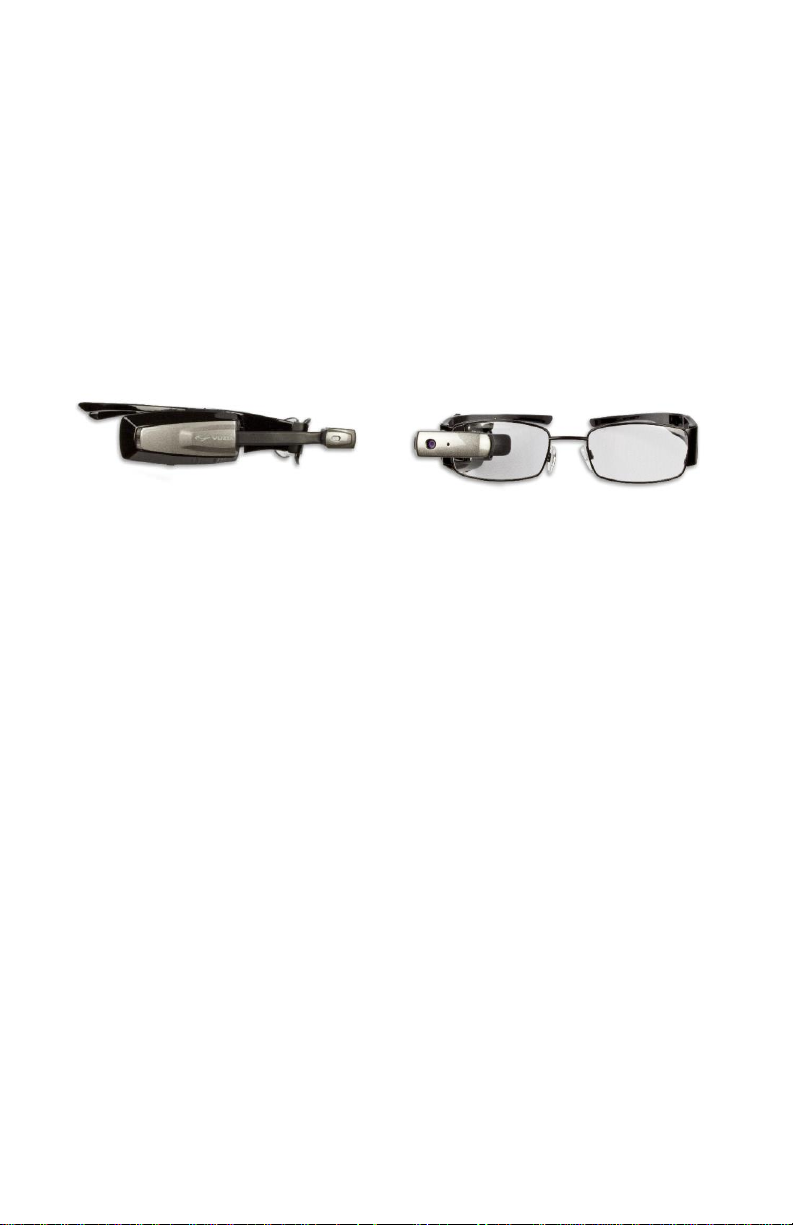
Note: The M100 has optional eyeglass frames available
(shown below) complete with prescription inserts for
those users that want eyeglass form factors or need
prescription lenses for distance viewing as an
alternative to the headband mounting option. See
www.vuzix .com for more details.
425PB0002-02
Page 17
17
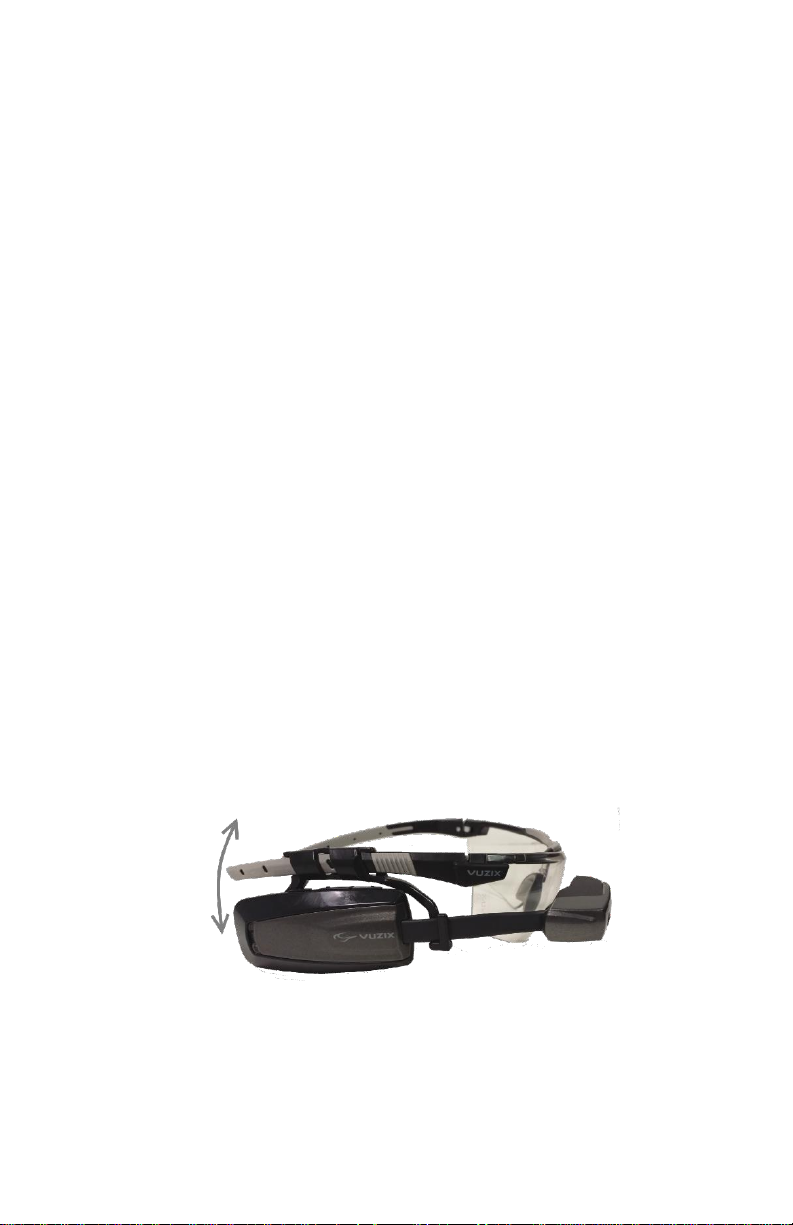
Display Adjustment
Positioning of the M100’s display is crucial to its effective use. It can be worn above,
below or directly in your line of sight, all of which are enabled through adjusting the
display arm and its tilting mechanism.
Note: The M100 Smart Glasses can be worn with or without
prescription eyeglasses.
Note: The following adjustments relate generally to the
headband mounting option. However, some of the
same principles and philosophies apply to other M100
mounting options.
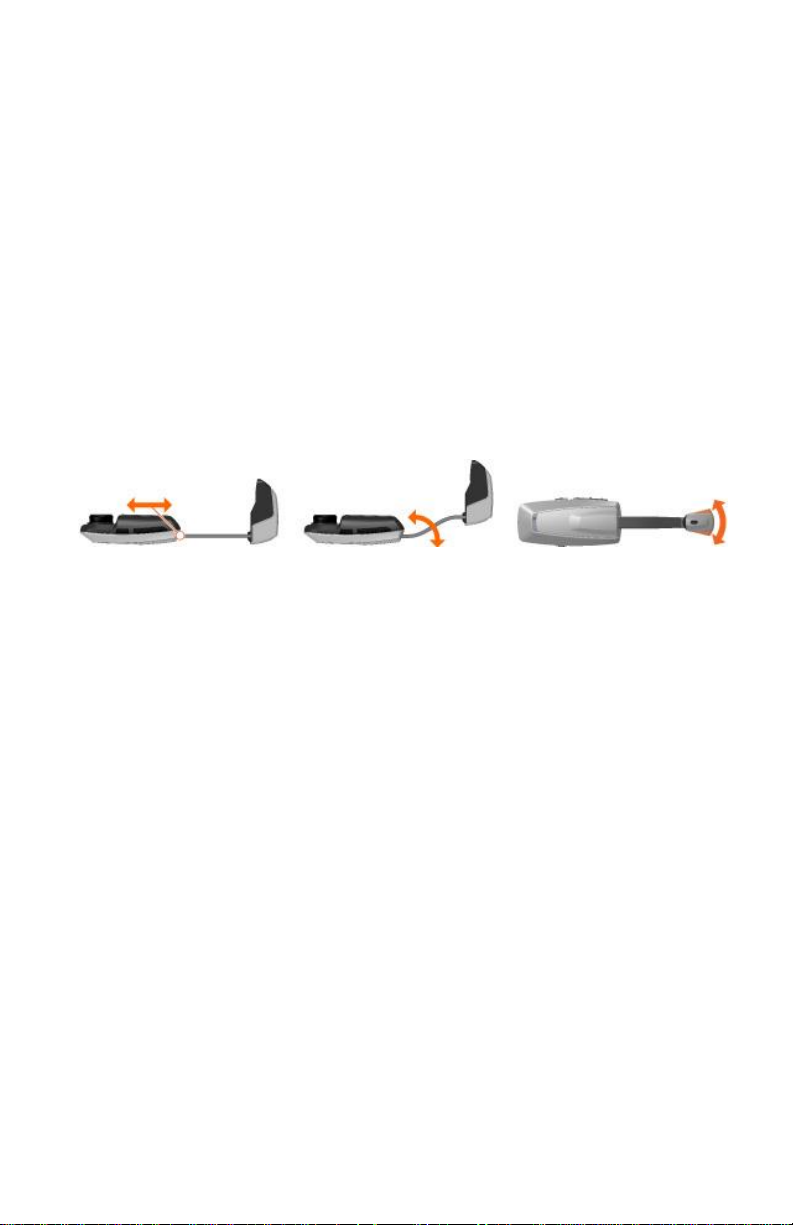
The display can be adjusted in three ways; the length of the arm, the shape of the
arm and the angle of the display assembly. The arm slides in and out of the main
body, allowing for approximately one inch of adjustment. The display arm is also
flexible; enabling it to be bent with gentle curves for exact positioning. And lastly, the
display assembly or head can be tilted up 15° or down 15° for approximately 30 degrees
total to provide accurate alignment in multiple viewing positions.
Note: Many M100 users find an “S” bend, as shown in the
above middle illustration, to be a good starting point
in finding the position that works best for them.
The following instructions illustrate positioning the M100 using the headband for
right-eye viewing. The same general process can be employed when using the safety
glasses and for either right or left-eye viewing.
425PB0002-02
Page 18

18
Make an “S” bend in the display arm, as illustrated above. This will
help position the display in front of your eye and at the correct
angle.
Clip the M100’s speaker into the mounting ring of the headband.
Turn on your M100 by pressing the power button, the single button
along the bottom edge of the M100’s main body.
Center the display in front of your eye, tilting it as required to
achieve a full view of the display.
Once centered in front of your eye, slide the display arm back to
position the display approximately 1 inch (~25 mm) away from your
eye.
You can position the display further from your eye but doing so will reduce the image
size.
Finding the correct position may require
some trial and error adjustments,
possibly repeating some of the above
steps multiple times.
When correctly positioned you should
have a clear view of the entire display
area, surrounded by a black border.
The image is focused at approximately 10 feet (3 meters) so if you wear bifocal
prescription glasses, position the display over the distant viewing area.
PowerPak 3800
The M100 Smart Glasses contains an internal battery able to deliver 1 to 2 hours of
operation under normal use. Some functions such as camera operation and wireless
425PB0002-02
Page 19

19
connections consume additional power resulting in decreased battery life. The Vuzix
PowerPak 3800, an external 3800mAh rechargeable battery is included to extend the
M100 operating time by up to 5 times.
1. USB Port – power to Smart Glasses
2. LED Flashlight
3. Micro USB – power to battery pack
4. Power level indicator
5. Power On/Off
To use the PowerPak 3800 plug the provided USB cable into the micro USB port of
the M100 Smart Glasses. Plug the full sized USB dongle into the PowerPak and
then press the power button on the PowerPak. The blue LEDs indicate the power
level of the Battery.
Long pressing the power button on the PowerPak 3800 will turn on the LED
flashlight. This is especially useful if you are utilizing the M100 in dark areas and
need additional light to engage in your task.
425PB0002-02
Page 20

20
4. Smart Glasses Tour
User Interface Controls
The M100 Smart Glasses support multiple user interface methods including hardware
buttons, voice navigation, gesturing, and remote user interface software running on
a paired Partner Device.
1. Rear Button
2. Center Button
3. Front Button
4. Gesture Sensor
5. Microphone
6. On/Off Power Button
Buttons
The hardware buttons function similarly to those on other Android devices. In many
instances, a quick “
longer period, may be interpreted differently by different apps.
Short Press
” and a “
Long Press,
” holding the button down for a
425PB0002-02
Page 21

21
Button
Action
Result
Rear Button (1)
Short Press
Android’s standard SELECT
function
Long Press
Android’s standard BACK
function
Center Button (2)
Short Press
Move selection BACK
Long Press
Android’s standard HOME
function
Front Button (3)
Short Press
Move selection FORWARD
Long Press
Android’s standard MENU
function
On/Off Power Button
(6)
Short Press
Puts M100 in sleep mode
Long Press
Open power menu to turn
off the M100 or toggle
Airplane mode
Long Press (10 Seconds)
Force complete shutdown of
the M100
425PB0002-02
Page 22

22
Voice Navigation
Voice navigation is supported by the Smart Glasses when used in conjunction with
compatible voice command enabled software. A microphone located behind the
display arm picks up voice commands.
If voice control is turned on the Mic
icon is present on the status bar of
the M100, and the M100 is always
listening for the ‘Voice On’
command. If you say ‘Voice On’, the
Mic will go from grey to green
showing the M100 is now listening
for a voice command. By default,
after 15 seconds of not hearing any
voice commands, the Mic icon will
return to grey, and the M100 will
stop listening for any command
other than ‘Voice On’ and wait to be re-enabled. The 15 second default timeout can
be adjusted through the Settings application under Voice. The range is in seconds
with zero (0) being always listening. The list of recognized voice commands is growing
constantly and may vary from one program to another. Examples of some basic
commands recognized by the pre-installed M100 software are provided below. See the
Vuzix website for additional commands and other software documentation for 3rd
party apps.
425PB0002-02
Voice on – enable voice control (The M100 is always listening for this
unless voice control is selected to be turned off)
Voice off – disable voice control (automatically disables after 20seconds
with no voice action)
Voice help – displays a list of possible words the current application
understands for about 5 seconds
Scroll left – scroll to the left
Page 23

23
Scroll right – scroll to the right
Stop/Halt – stop scroll
Move left – move left one icon
Move right – move right one icon
Select [1-5] – selects the corresponding item
Take Picture – opens the Camera app
Show menu – shows menu options
Go back – back one level in app
Go home – return to launcher
Current Time – opens the Clock app
Note: Most applications that have voice enabled also
support the ‘Voice Help’ command. Say ‘Voice Help’
to get a list of available voice commands.
Gesture Control
The M100 Smart Glasses support gesture control, recognizing forward/back, up/down
and in/out hand gestures performed in close proximity to its gesture sensor.
The gesture sensor in your M100 may
be located in either of two locations,
depending upon its date of
manufacture. Both function exactly the
same and are simply placed in different
locations on the M100. Model 1 (no
opening in side of display module), has
its gesture sensor located in the main body of the M100, between the indicator lights.
Model 2 has an opening in the side of the display module where its gesture sensor is
located.
The gesture sensor is activated in the Settings menu of the M100. Under settings,
scroll down to “Gesture Settings” and select it. Then, select “Calibrate Gesture
425PB0002-02
Page 24

24
Sensor.” After that, toggle “Use gesture sensor” to ON. The gesture sensor is now
Gesture
Command
Back to Front
Right/Next
Front to Back
Left/Previous
Far to Near (perpendicular
to your line of vision)
Android Standard Select
Near to Far
Back
Below to Above
Up
Above to Below
Down
active.
Note: A “long press” of the
front M100 button
from the M100 desktop
brings up a menu that
allows the user to
quickly Disable or
Enable Voice or
Gesture Control,
Ensure (Bluetooth)
Visibility, or Close
Recent Apps.
The pictured gestures performed
to the side of the M100
correspond to the following
commands:
425PB0002-02
Page 25

25
For example sliding your hand first close (in) and then away (out) from the sensor is
a standard Android BACK command. Sliding your hand from a far positon to close is
a standard Android SELECT command.
Operating Methods
M100 Smart Glasses can be used independently or in conjunction with a partner
Android device such as a smartphone or tablet. They can also be used with or without
a Bluetooth connection to other devices or a Wi-Fi connection to the Internet.
Independent Use
When used independently, Android apps are loaded directly onto the M100 Smart
Glasses and run from there. This mode of operation provides mobility advantages and
allows the user to operate the device using the provided buttons on the M100, voice
navigation and/or gesture control. Some operations, such as those requiring keyboard
input, may be unavailable in this operating environment.
Partner Device Use
The M100 Smart Glasses can be paired with an Android device, commandeering its
interface to supplement the M100’s native control options. A Smart Glasses Manager
app is available for download for Android devices providing a more traditional tap
and drag style of interface as well as support for a virtual keyboard. An iOS partner
app will be available soon to allow pairing with iPhones and iPads.
425PB0002-02
Page 26

26
M100 Software
The M100 includes a number of Smart Glasses specific apps, some of which are preinstalled on the M100 and others that are downloaded to Android Partner Devices.
Smart Glasses Manager
Smart Glasses Manager installs on a Partner Device. It is available for
Android devices and can be obtained from www.vuzix.com/downloads.
Smart Glasses Manager provides a traditional tap and drag style of
interface where a facsimile of the Smart Glasses screen is displayed on the Partner
Device. Using the Partner Device’s screen you can scroll through the menus of apps
installed on your M100 as well as launch and manage them. A virtual keyboard, on
the Partner Device screen, enables you to provide keyboard input.
Vuzix App Store (COMING SOON)
A Vuzix App Store app is available for loading on Android based Partner Devices.
This enables access to an App Store featuring apps designed for and tuned to take
advantages of the M100 Smart Glasses unique features and capabilities.
M100 System File Manager
The M100 System File Manager is available at www.vuzix.com/downloads. Among
other things, this program enables users to easily install and uninstall apps onto the
M100 from their Windows based PC. Documentation describing use and functionality
of the System File Manager is packaged with the download.
425PB0002-02
Page 27

27
Over the Air Updates
Operating system updates are available Over the Air. Accessing OTA Updates
requires your M100 to be connected to the internet via Wi-Fi. To check for updates,
go to Settings and select the “About Smart Glasses” option. Then select “M100 System
Updates.”
425PB0002-02
Page 28

28
5. Using the M100
First Use
Turning the Smart Glasses On/Off
To turn on the M100 Smart Glasses:
Press the On/Off Power Button to turn on the M100 Smart Glasses.
When the Smart Glasses power on, the White and Blue Indicator Lights will illuminate
for two seconds.
Two options are provided for turning the M100 Smart Glasses off.
Press and hold the On/Off Power Button to turn the M100 Smart
Glasses off.
Press On/Off Power Button to bring up the Power Off display and
then press the Select Button to initiate the powering down
sequence.
Note: Please ensure your Smart Glasses are fully charged
before first use for best results.
Charging M100 Smart Glasses
M100 is charged using a USB connection. For best results the power source should
be 1 amp, though 500mA USB sources will also charge the M100 at a slower rate. The
LED power indicator light allows the user to monitor charge status (Solid white – full
charge/ 1 intermittent blink – charging/ 3 fast blinks – nearly 0 charge).
Connecting to WiFi
To connect the M100 to the internet via Wi-Fi select the settings menu on the device.
Under settings, select “Wi-Fi.” Turn Wi-Fi on. You can also scan for a network or
add a network manually. Pairing the M100 with a partner device as described below
425PB0002-02
Page 29

29
allows for easy input methods for typing in passwords. The M100 System File
Manager also provides a method for this (available at www.vuzix.com/downloads).
Finally, it is possible to connect using the scanner application and a QR code. For
more information on this please visit the Vuzix forums online.
Bluetooth Partner Device Interface
Connecting to a Partner Device
To pair the M100 first install the Smart Glasses Manager app on your phone from
www.vuzix.com/downloads.
On your M100, long press the front
button and select “Ensure
Visibility.” The M100 will now be
discoverable.
Select the option to “Find Smart Glasses” in the Smart Glasses Manager app on the
Partner Device. A list of all Bluetooth pair-able devices
(not just M100s) within range will open.
Select an M100 to pair from the list to start connecting.
The last four digits of your M100’s serial number will
correspond to the displayed M100 in the list.
A passkey verification will show up on the M100 and
the Partner Device. Ensure they match and select
“Pair.” Your devices should now be paired, and the
M100 can be managed by the Partner Device over
Bluetooth.
425PB0002-02
Page 30

30
To disconnect from this M100, open the menu and select “Disconnect from device”.
This option will only be available if an M100 is currently paired to the device.
Once paired, the M100 can be used to listen to music from the Partner Device and
be used as a hands free headset for phone calls. To enable these with the Partner
Device, in Bluetooth settings on the Partner Device enable Media Audio and Call
Audio as shown below.
425PB0002-02
Page 31

31
6. Smart Glass Manager
Description
The Smart Glass Manager is designed to manage applications on the M100, to be the
conduit for connecting your phone to the M100, and to install new applications on
the M100.
The Manager and the Carousel
Every app installed on the M100 appears on the Carousel. The Manager stays in sync
with the Carousel on the M100. Selecting an icon on the Manager runs that app on
the M100. M100 Native applications can be fully controlled through the Manager
application on the phone or directly on the M100 with Voice, Button, or Gesture
inputs.
425PB0002-02
Page 32

32
Running M100 Native Applications
In the case of running a native M100 App, like the Camera App, when the camera
icon is selected on the Partner Device it opens up all the controls for the camera on
the Manager and the camera on the M100 starts running as shown. Now either the
M100 controls described above or the Manager App can be used to control the
application running on the M100
Running Legacy Android Applications
Legacy applications often need a keyboard and a mouse to run them. When a Legacy
application like the Search or Browser application on the M100 is selected from the
manager, the Smart Glass Manager application supplies the keyboard and mouse
function as shown here. The space above the keyboard becomes a mouse pad for the
M100 and when a field is selected that needs a keyboard the keyboard automatically
comes up as shown.
425PB0002-02
Page 33

33
The Application World (Coming Soon)
Application World allows you to manage your M100 Apps as well as access the store.
To access the App store, select the settings button. A
menu will drop with a selection choice for the
Application World
This function is expected to be enabled soon so please
check back.
425PB0002-02
Page 34

34
7. Specifications
General
Display r e so l u t i o n:
WQVGA C o lo r d i s p l a y
Aspect ratio: 16:9
Field o f vi ew ( Di ag on al ) :
15 de g r e e s
o E qu i v a l en t t o 4 i n .
mobi l e d evic e
scre en se en a t 14
in
Brightness: >200 0 n i t s
24 bit color
Left or right ey e u s a b l e
OMAP4460 at 1.2 GHz
1 GB RAM
Android ICS 4.04, AP I 1 5
4GB flash
External Flash S lo t
M i c r o S D s u p p o r t up t o 32
GB
Controls
4 c o n t r o l b u t t o ns
R e m o t e co nt ro l ap p, ru ns
o n pai r e d A n d r o i d de v i c e
S u p p o r t s c u st o m i z a bl e
voice n a v i g a t i o n
S u p p o r t s g e s t ur i ng
Sensor Sys t ems
3 D O F ge s tu r e e ng in e
(L /R , U/ D , N / F )
A m b i e n t l i g h t
G P S
P r o x i m i t y
Integrated H ea d Tr ack er
3 - d e g r e e of f r ee d o m head
trac ki n g
3 a x i s g y r o
3 a x i s a c c e l e r o m et e r
3 a xi s mag/integra te d
co m pa s s
Battery
5 5 0 m h a r e c h a r g e a b l e
inter n al b a t t e r y
U p to 6 h ou rs h a n d s f r e e
(dis pl a y o f f )
2 ho ur s h a n d s free +
dis pl a y
1 ho ur ha n d s fr ee +
dis pl a y + c am er a + h ig h
CPU lo a d i n g
External Ba t t er y P ac k
3 8 0 0 m h a rechargea bl e
batt ery
U l t r a - t h i n U SB mi ni-B
cab le
P o w e r s & recharges M100
1 1 5 x 5 8 . 6 x 1 0 M M
I n c r e a s e s r un time u p t o
6.5 ti m e s o v e r b a s e M 1 0 0
Hands Free
E a r s p e a k e r
N o i s e c a n c e l l i n g
micro p h o n e
Camera
5 m e g a p i x e l s t i l l s
1 0 8 0 p v i d e o
1 6 : 9 a s p e c t r a t io
Mounting Op tion s
O v e r h e a d
S a f e t y g l a s s e s ( i nc l u de d )
U s e w i t h l e f t o r r i gh t e y e
Connectivi ty
M i c r o U SB:
co nt ro l/ p o w e r / u p g r a d e
Wi- F i 8 0 2 . 1 1 b / g / n ,
B l u e t o o t h
425PB0002-02
Page 35

35
8. Software Quick Reference
The M100 is based on the Android 4.0.4 operating system. As such it is compatible
with hundreds of thousands of applications already available. There is also a growing
developer community that is working on applications specifically designed to take
advantage of the unique features the M100 Smart Glasses provide. This creates a new
category of Smart Glasses applications that are “Native applications” designed
specifically for the M100. Native Applications that have been specifically designed to
run on the M100, and Android Legacy Applications which consist of the hundreds of
thousands of applications available for Android devices.
As mentioned above the M100 can be used in a standalone operation mode or in
conjunction with a Partner Device like a smartphone. When used with a Partner
Device the Manager application is installed on the Partner Device to “manage” all the
communications and controls between the M100 and the Partner Device. For Native
Applications, the Manager application can have complete control over the M100,
simplifying ordinarily complex user interface controls. For Legacy and Native
applications running on the M100 the Manager application can also be used as a
keyboard and mouse controller.
The M100 ships with both Legacy and Native style applications. This next section
provides a quick overview of how these applications function both standalone and
with the Manager application.
Native Applications
Most Native applications running on the M100 Smart Glasses support multiple user
interface methods including hardware buttons, voice navigation, gesturing, and
Manager Application support that can supply a user interface running on a paired
Partner Device.
425PB0002-02
Page 36

36
Most native applications support the following voice commands:
Voice o n – If voice control is
turned on the Mic icon is present
on the status bar of the M100, and
the M100 is always listening for the
‘Voice On’ command. If you say
‘Voice On’, the Mic will go from
grey to green showing the M100 is
now listening for a voice command.
By default, after 15 seconds of not
hearing any voice commands, the
Mic icon will return to grey, and
the M100 will stop listening for any
command other than ‘Voice On’ and wait to be re-enabled. The 15 second default
timeout can be adjusted through the Settings application under Voice. The range is
in seconds with zero (0) being always listening. The list of recognized voice commands
is growing constantly and may vary from one program to another.
Voice of f – disable voice control (Note: Voice is automatically disabled after 20
seconds with no voice action)
Voice help – displays a list of possible command words the current
application understands for about 5 seconds
Go back – back one level in app
Go home – return to launcher/M100 desktop
Audio Recorder
The Audio Recorder application is a Native M100 application. It can
be controlled standalone by Voice, Buttons, and Gestures; or by
using the Smart Glasses Manager application installed on the
Partner Device.
425PB0002-02
Page 37

37
Sample voice commands supported:
delete recording, go library, go audio recording
Press the Audio Recorder icon on the Partner Device, then press the START button
to begin recording. As shown, the M100’s VU meter will track the audio levels as it is
recording. Recordings will then be saved in the M100 Smart Glasses audio library.
record audio, pause recording, resume recording,
Calendar
The Calendar application is a Native M100 application designed to
sync with the calendar on the Partner Device. It can be controlled
standalone by Voice, Buttons, and Gestures; or by using the Smart
Glasses Manager application installed on the Partner Device.
Sample voice commands supported:
Day/Week/Month/Year, Previous Day, Stop/Halt, View calendar for <date>
425PB0002-02
Scroll Down, Scroll Up, Next
Page 38

38
Press the Calendar icon on the Partner Device, adjust the date to the day required,
and as shown the M100 will show the event calendar for that day.
Native Camera
The Camera application is a Native M100 application. It can be
controlled standalone by Voice, Buttons, and Gestures; or by using
the Smart Glasses Manager application installed on the Partner
Device.
Sample voice commands supported:
focus, zoom, take picture, take video, start
recording, stop recording
There is also a Legacy Camera application (described in the Legacy
Application section below).
425PB0002-02
Page 39

39
If using the Parnter Device for control, press the Camera icon on the Partner Device
carousel to start the Camera application on the M100. Select Camera or Video mode
and press “camera image” to take pics or “RECORD” for video.
Clock
The Clock application is a Native M100 application. It can be
controlled standalone by Voice, Buttons, and Gestures; or by using
the Smart Glasses Manager application installed on the Partner
Device.
Sample voice commands supported:
timer, start, resume, stop, halt, reset timer.
425PB0002-02
go clock, go stopwatch, go
Page 40

40
If using the Parnter Device for control, press the Clock icon on the Partner Device
and then select the “Clock”, “Stopwatch” or “Timer” mode. Set up the M100 through
this interface and press “Start”.
Contacts
The Contacts application is a Native M100 application designed to
sync to the contacts database on the Partner Device. It can be
controlled standalone by Voice, Buttons, and Gestures; or by using
the Smart Glasses Manager application installed on the Partner
Device.
Sample voice commands supported: s
select, stop
425PB0002-02
croll right, scroll left, move right, move left,
Page 41

41
If using the Parnter Device for control, press the Contacts icon on the Partner Device
carousel to start Contacts on the M100. Press “Sync” to sync the Partner Device’s
contacts to the M100. Selecting a contact name will open it and allow calling, email,
SMS, etc. through the Partner Device using the M100 as a hands free headset. The
M100 will also show the contacts on screen.
Gallery
The Gallery application is a Native M100 application that manages
the videos and pictures taken on the M100 Smart Glasses and allows
them to be moved/copied to the Partner Device. Using the launcher
on the M100, images and videos can also be connected directly to
social media sites. The Gallery app can be controlled standalone by
Voice, Buttons, and Gestures; or by using the Smart Glasses Manager application
installed on the Partner Device.
Sample voice commands supported:
pause, select
425PB0002-02
scroll right, scroll left, move right, move left, play,
Page 42

42
If using the Parnter Device for control, press the Gallery icon on the Partner Device
carousel to start the Gallery on the M100. The Partner Device will show all pictures
and videos that have been recorded in the M100. As they are scrolled through they
are also shown on the M100. To copy them from the M100 to the partner device
press the “Save a copy” button.
Scanner
The Scanner application allows you to read QR Codes and Bar Code
using your Smart Glasses camera. It has been integrated into
certain features of the M100 to make it easy, for example, to open
websites, log onto Wi-Fi networks, shop and research products on
the web, and the like. Simply run the Scanner application and point
the M100 to a QR Code. You can scan in both landscape and portrait modes, and can
even scan mirrored images!
425PB0002-02
Page 43

43
To create your own QR or Bar codes we recommend using the QR Droid site located
at www.qrdroid.com. The M100’s scanner is based on the QR Droid software.
Here is an example of creating a QR Code to access the Vuzix website www.vuzix.com.
425PB0002-02
Page 44

44
To proceed to the website represented by the generated QR Code run the Scanner
app and point the M100 camera at the QR Code as shown here.
Once scanned, the Scanner will give you the option to share the link or to proceed to
the website via the Browser as shown here:
The Scanner will also scan conventional bar codes and allow searching the web for
shopping and product information. Simply scan the bar code and proceed as follows:
425PB0002-02
Page 45

45
The M100 also supports using the Scanner as input for Wi-Fi connectivity. In the
Settings application under Wi-Fi there is an option to use QR Codes as input. If
selected, the Scanner will automatically open and when a QR Code is scanned that
has encoded Wi-Fi connection information the M100 will then connect to the coded
Wi-Fi network. You will need to create a QR Code encoded with the appropriate
network information to use this option. See the Vuzix web forums for more
information.
425PB0002-02
Page 46

46
Settings
The Settings application is a Hybrid Native M100 application. It can
be controlled standalone using Buttons and Gestures or by using the
Smart Glasses Manager application installed on the Partner Device
when keyboard entry is required (like entering Wi-Fi keys). You can
also use the scanner for Wi-Fi connectivity. See the Vuzix web forums
for more information
Press the Settings icon on the M100 or the Partner Device and use the Buttons or
Gesture sensors on the M100 to navigate within the Settings application. Most input
can be managed with just the M100 controls. If keyboard entry or mouse is required
the Smart Glass Manager provides them, as shown above,
425PB0002-02
Page 47

47
Legacy Applications
Legacy applications on the M100 Smart Glasses support multiple user interface
methods including hardware buttons, gesturing, and the Manager Application that
supplies a user interface running on a paired Partner Device.
Browser
The Browser application is used to browse the internet with the
M100 and is a Legacy M100 application. It can be partially controlled
standalone with the Buttons and Gesture but will need the Smart
Glasses Manager application installed on the Partner Device when
keyboard entry or mouse control is needed.
Press the Browser icon on the M100 or the Partner Device and use the Buttons or
Gesture sensors on the M100 to navigate within the Browser application. Most input
can be managed with just the M100 controls. If keyboard entry or mouse is required
the Smart Glass Manager provides them, as shown above,
425PB0002-02
Page 48

48
Legacy Camera
The Legacy Camera application allows some advanced features of
the built-in M100 camera to be used. It is a Legacy based application
for the M100. It can be partially controlled standalone with the
Buttons and Gestures but will need the Smart Glasses Manager
application installed on the Partner Device when mouse control is
needed.
Press the Camera icon on the M100 or the Partner Device and use the Buttons or
Gesture sensors on the M100 to navigate within the Camera application. Most input
can be managed with just the M100 controls. If keyboard entry or mouse is required
the Smart Glass Manager provides them, as shown above,
The Native Camera application was previously described in the Native
Applications section.
425PB0002-02
Page 49

49
Download
The Download application allows access to the M100 downloaded
files and is a Legacy based application for the M100. It can be
partially controlled standalone with Buttons and Gestures but will
need the Smart Glasses Manager application installed on the Partner
Device when mouse control is needed. The downloaded files can also
be accessed by connecting the M100 to a PC via USB and browsing the M100s
directories.
Email
The Email application allows the M100 to receive and send email
directly. Although the M100 does support direct email access typically
users utilize the email services on their Partner Device and use the
notification on the M100 as an indicator to know when email or text
messages have been received on the Partner Device. The Email
application is a Legacy based application for the M100. It can be partially controlled
standalone with the Buttons and Gestures but will need the Smart Glasses Manager
application installed on the Partner Device when mouse control or keyboard input is
needed.
Movie Studio
425PB0002-02
The Movie Studio application allows movies to be played on the
M100 and is a Legacy based application for the M100. It can be
partially controlled standalone with the Buttons and Gestures but
will need the Smart Glasses Manager application installed on the
Partner Device when mouse control or keyboard input is needed.
Page 50

50
Music
Search
The Music application allows audio files to be played on the M100
and is a Legacy based application. The Music application be partially
controlled standalone with the Buttons and Gestures but will need
the Smart Glasses Manager application installed on the Partner
Device when mouse control or keyboard input is needed.
The Search application allows the M100 file system to be searched
and is a Legacy based application for the M100. It can be partially
controlled standalone with the Buttons and Gestures but will need
the Smart Glasses Manager application installed on the Partner
Device when mouse control or keyboard input is needed.
425PB0002-02
Page 51

51
9. Support Services
Vuzix M100 Smart Glasses are manufactured to the highest standards but from time
to time technical challenges may be experienced. These challenges may be addressed
through product knowledge or user applied remedies, or possibly through direct
support from Vuzix Customer Service.
Prior to contacting Vuzix Customer Service, please review the FAQs (Frequently Asked
Questions) available on the Vuzix website at www.vuzix.com/support.
Contacting Customer Service
Due to importation requirement, duty and other considerations Vuzix Customer
Service and warranty support can only be provided through the region from which
your Vuzix product was purchased. As an example, product purchased from a US
retailer cannot receive support and/or warranty service through our Customer Service
located in the United Kingdom. In this case, you must contact our US based Customer
Service.
The following is a listing of Vuzix Customer Service facilities and the product purchase
regions each covers. If you purchased you Vuzix product online and you are unsure
of its origin, contact the seller and request the point of origin from them.
Japan: Japan only
United Kingdom: United Kingdom, Europe, Russia, Middle East, and Africa
United States: United States, Canada, Central & South America, Asia
(other than Japan), Australia, and New Zealand
For products originating from the United States, please contact:
Corporate Website: www.vuzix.com
Email Customer Support: technical_support@vuzix.com
Customer Helpline: (800) 436-7838
Customer Service Hours: 9 AM to 6 PM EST, weekdays
425PB0002-02
Page 52

52
For products originating from the United Kingdom, please contact:
Corporate Website: www.vuzix.com/UKSITE (case sensitive)
Email Customer Support: vuzix@tmti.com
Customer Helpline: 0044 844 477 2977
Customer Service Hours: 9 AM to 6 PM GMT Monday to Saturday
For products originating from Japan, please contact:
Corporate Website: www.vuzix.jp
Email Customer Support: Japan@vuzix.com
When requesting technical support please provide the following information:
Serial number, complete model name, and model number of your video eyewear.
Make and model number of the audio video device being used.
The name of any video content related to your support needs.
Detailed explanation of the symptoms you are experiencing your questions.
425PB0002-02
Page 53

53
Regulatory Compliance
Waste Electrical & Electronic Equipment
1. The equipment that you bought has required the extraction and use of natural
resources for its production. It may contain hazardous substances that could impact
health and the environment.
2. In order to avoid the dissemination of those substances in our environment and to
diminish the pressure on the natural resources, we encourage you to use the
appropriate take-back systems. Those systems will reuse or recycle most of the
materials of your end life equipment in a sound way.
3. The crossed-out wheeled bin symbol invites you to use those systems.
4. If you need more information on the collection, reuse and recycling systems, please
contact your local or regional waste administration.
5. You can also contact us for more information on the environmental performances
of our products.
FCC Compliance
NOTE: This equipment has been tested and found to comply with the limits for a
Class B digital device, pursuant to Part 15 of the FCC Rules. These limits are designed
to provide reasonable protection against harmful interference in a residential
installation. This equipment generates, uses and can radiate radio frequency energy
and, if not installed and used in accordance with the instructions, may cause harmful
interference to radio communications. However, there is no guarantee that
interference will not occur in a particular installation. If this equipment does cause
harmful interference to radio or television reception, which can be determined by
turning the equipment off and on, the user is encouraged to try to correct the
interference by one or more of the following measures: 1) Increase the separation
between the equipment and receiver or 2) Connect the equipment into an outlet on
a circuit different from that to which the receiver is connected.
425PB0002-02
Page 54

54
This page intentionally left blank.
425PB0002-02
Page 55

55
Vuzix, the Vuzix logo and View the Future are trademarks of Vuzix Corporation registered in
the U.S. and other countries. All other trademarks are the property of their respective owners.
Vuzix Corporation accepts no responsibility for errors that may appear in this document.
Information and specifications contained within this document are subject to change without
notice. Items represented by illustration or photographs may not be exactly as shown.
© 2014 Vuzix Corporation. All rights reserved.
Designed and assembled by Vuzix in New York
425PB0002-02
Page 56

56
425PB0002-02
 Loading...