

Page 1
iWear®AV920
User’sGuide
Read the enclosed Safety Instructions before using eyewear!
Welcome to the world of big screen viewing! Your Vuzix™ iWear®
AV920 Video Eyewear delivers extraordinary high quality 2D and 3D
images in your own personal, portable movie theater!
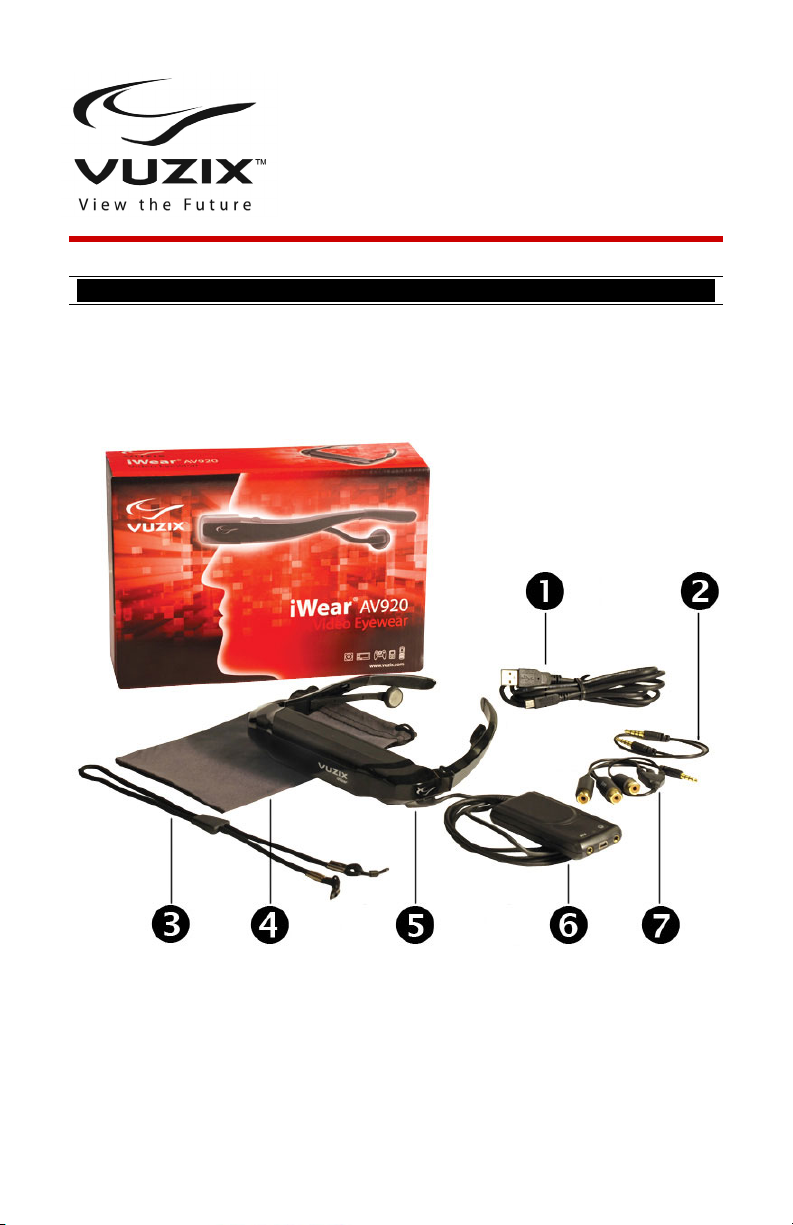
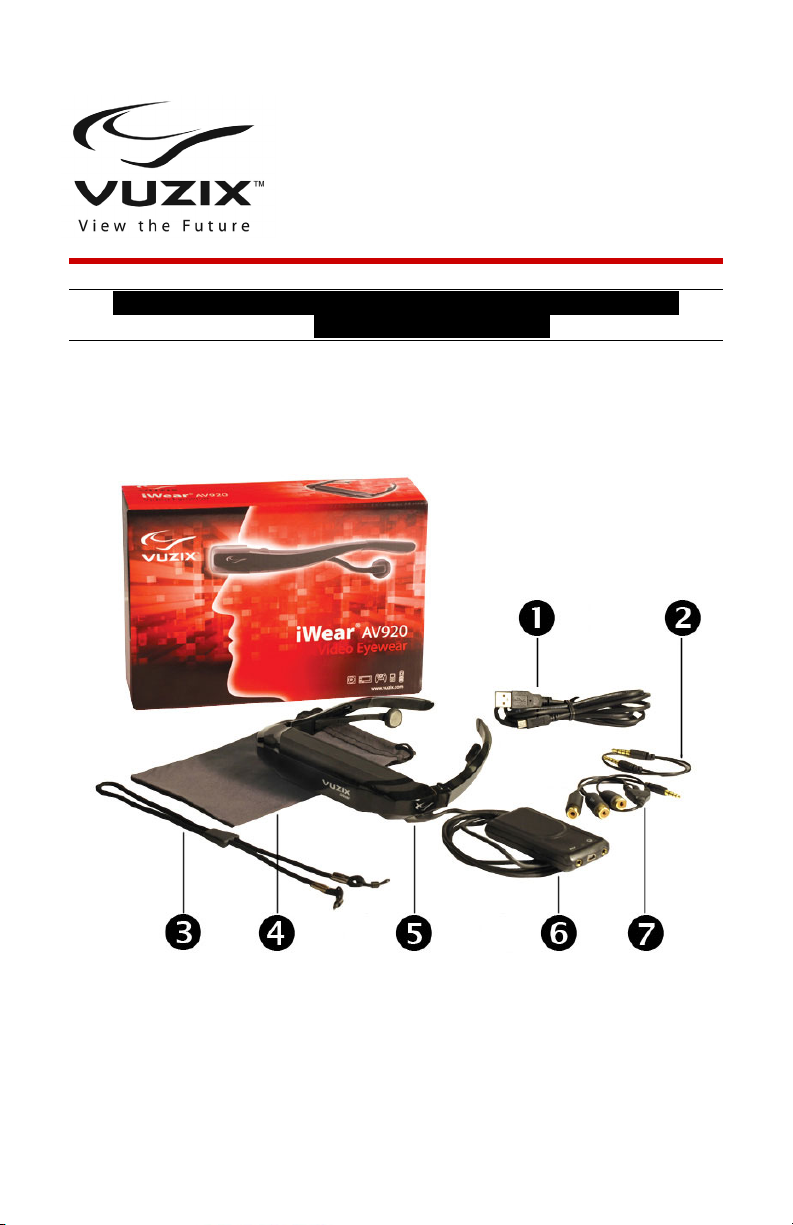
Package Contents:
1. USB & Charger Cable
2. iPod Cable*
3. Tether Strap
4. Carry Case / Lens Cleaner
© Copyright 2008, Vuzix Corporation
• User’s Guide booklet not shown
5. Video Eyewear Viewer
6. Battery Box
7. Composite Audio/Video Cable
Model of iPod Cable may vary by region
*
and current iPod models and availability.
Page 2

Important Safety Instructions
Follow these safety instructions when using or handling your VUZIX Video Eyewear to
reduce the risk of fire, electric shock, and injury to persons and property.
1. READ ALL OF THE INSTRUCTIONS AND SAFETY INFORMATION PROVIDED
BEFORE USING THIS PRODUCT.
2. Use the product only for its intended use, as described in this manual.
3. Close supervision is needed when this product is by or near children.
4. Children under the age of seven (7) are still learning to focus and track with their eyes.
Their vision is still immature. For these reasons, THIS PRODUCT SHOULD NOT BE USED
BY CHILDREN UNDER THE AGE OF SEVEN (7).
5. A very small portion of the population may experience epileptic seizures when viewing
certain kinds of flashing lights or patterns that are commonly present in our daily
environment. These persons may also experience seizures while watching some kinds of
television pictures or playing certain video games on regular monitors, including the use of
a display system such as this. These effects can be increased due to the large size of the
video screens in this device. As a result consult a physician if you have any epileptic
condition before using this device or if you experience any of the following symptoms while
using this device: altered vision, muscle twitching, other involuntary movements, loss of
awareness of your surroundings, mental confusion, and/or convulsions.
6. Immersive video, whether viewed on a regular TV, a movie theater screen or a VUZIX
video display, can potentially have adverse effects on the user including motion sickness,
perceptual after effects and disorientation, and decreased postural stability and eye strain.
Take frequent breaks to lessen the potential of these effects, as is commonly suggested for
other items, such as keyboards and computer monitors, that you may tend to fixate or
concentrate on. If your eyes show signs of fatigue or dryness or if any of the above
symptoms is noted, immediately discontinue use of this device and do not resume using it
for at least 30 minutes after the symptoms have fully subsided.
7. Permanent or temporary hearing loss or impairment can result from excessive volume
levels emitted from the headphones. Always adjust the volume to a safe level BEFORE
wearing the product or headphones.
8. Always be aware of the world around you. This product will immerse you in realistic
sights and sounds, possibly causing you to forget about the real world around you and the
threats to your well being and the well being of others. DO NOT use this product near
stairs, balconies, or other things that can be tripped over, run into, knocked down or fallen
over. This product should only be used while you are seated and never while using sharp
or potentially dangerous objects, operating any form of mechanical device, driving motor
vehicles, or performing any act that normally requires you to see what you are doing.
9. This product may be tethered to a power outlet and cables may extend between
components. Be careful that these cords do not tangle around you or pose a potential
threat to the safety of others.
10. Do not disassemble this product. If service work is required, contact VUZIX using the
Support contact information shown in this manual.
11. Do not pull or yank on the cable, kink any of the cables or tie them in sharp or tight
knots. Do not hang the product or allow it to be suspended by any of its cables. To
disconnect cables, pull on the cable connector. Cables damaged by such actions are not
covered by the product’s limited warranty.
12. Do not drop, strike, or cause any portion of the product to be struck or shaken
aggressively. Such actions may damage the product and void your warranty.
13. Save these instructions.
Page 3

Immediately unplug the product from external power sources if:
• The power adaptor, power cord or USB cord is damaged or frayed.
• Liquid has been sprayed, splashed or poured on the product.
• Any component of the product has been dropped or damaged.
• The product exhibits any distinct change in performance.
Battery Safety Instructions
• Batteries contain toxic materials. Do not burn, disassemble, mutilate, or puncture the
batteries.
• Do not dispose of batteries in a fire.
• Dispose of batteries in a method that is consistent with your local laws and regulations.
Vuzix Hardware Product Limited Warranty
Vuzix warrants that your Vuzix hardware product shall be free from defects in material and
workmanship for the length of time specified in the Warranty Period (one year), beginning
from the date of purchase. If your Vuzix hardware product is used for commercial purposes
(including rental or lease) the Warranty Period shall be reduced to only ninety (90) days
from date of purchase. Except where prohibited by applicable law, this warranty is
nontransferable and is limited to the original purchaser and does not apply to anyone else,
including anyone to whom You later make any transfer or sale. This warranty gives you
specific legal rights, and you may also have other rights that vary under local laws, some of
which are not affected by the warranties in this Limited Warranty.
This Limited Warranty does not cover, and no warranty of any kind is provided with respect
to any subjective or aesthetic aspects of the hardware product. Vuzix does not warrant that
the operation of the product will be uninterrupted or error-free. The limited warranty stated
above is the only warranty made to You and is provided in lieu of all other express or
implied warranties and conditions (except for any non-disclaimable implied warranties that
exist), including any created by any other documentation or packaging. No information or
suggestions (oral or in a record) given by Vuzix, its agents, affiliates, dealers or suppliers or
its or their employees or agents, shall create a warranty or condition or expand the scope of
this Limited Warranty.
Any software distributed with the hardware product by Vuzix with or without the Vuzix brand
name is not covered under this Limited Warranty. Refer to the licensing agreement
accompanying the software (viewable upon its installation), for details of your rights with
respect to its use.
Remedies
Vuzix’s entire liability and Your exclusive remedy for any breach of warranty shall be, at
Vuzix’s option, (1) to repair or replace all or part of the hardware, 2) exchange the hardware
with a product that is new or which has been manufactured from new or serviceable used
parts and is at least functionally equivalent to the original product, or (3) to refund the price
paid by You less reasonable depreciation based on your actual use, provided that the
hardware is returned to the point of purchase or such other place as Vuzix may direct with
a copy of the sales receipt or dated itemized receipt. Except where prohibited by
applicable law, all shipping and handling costs associated with transport (including
packaging) for warranty service shall be at Your expense. Vuzix may, at its option, use new
or refurbished or used parts in good working condition to repair or replace any hardware
product. Any replacement hardware product will be warranted for the remainder of the
original warranty period or thirty (30) days, whichever is longer or for any additional period
of time that may be applicable in Your jurisdiction. This warranty does not cover problems
or damage resulting from (1) Acts of God, power surge, misuse, abuse, negligence,
accident, wear and tear, mishandling, misapplication, or other causes unrelated to defects
in the hardware device (2) any unauthorized repair, modification, tampering or disassembly;
(3) improper operation or maintenance, usage not in accordance with product instructions
or connection to improper voltage supply; or (3) use of consumables, such as replacement
Page 4

batteries, not supplied by Vuzix except where such restriction is prohibited by applicable
law.
How to Obtain Technical Support
Technical support is defined as assistance with questions on issues about the Vuzix
hardware product. Technical support for hardware and its software is available for the first
ninety (90) days from date of product purchase. Your dated sales or delivery receipt,
showing the date of purchase or lease of the product, is Your proof of the purchase or
lease date. You may be required to provide proof of purchase or lease as a condition of
receiving software technical support. The addresses and technical service contact
information for Vuzix can be found in the documentation accompanying your product and
on the web at our global site: www.vuzix.com
How to Obtain Warranty Support
Vuzix is the warrantor under this Limited Warranty. Before submitting a warranty claim, we
recommend You visit the support section at www.Vuzix.com for technical assistance.
Warranty claims cannot be processed through the point of purchase and any other product
related questions should be addressed directly to Vuzix. The addresses and customer
service contact information for Vuzix can be found in the documentation accompanying
Your product and on the web at our global site at www.vuzix.com
any Vuzix subsidiary or branch serving Your country and its local address. You may also
write to: Vuzix Sales Support, 75 Town Centre Drive, Rochester, NY 14623, USA.
Limitation of Liability
VUZIX SHALL NOT BE LIABLE FOR ANY SPECIAL, INDIRECT, INCIDENTAL OR
CONSEQUENTIAL DAMAGES WHATSOEVER, INCLUDING BUT NOT LIMITED TO
LOSS OF PROFITS, REVENUE OR DATA (WHETHER DIRECT OR INDIRECT) OR
COMMERCIAL LOSS FOR BREACH OF ANY EXPRESS OR IMPLIED WARRANTY ON
YOUR PRODUCT EVEN IF VUZIX HAS BEEN ADVISED OF THE POSSIBILITY OF
SUCH DAMAGES. Some jurisdictions do not allow the exclusion or limitation of special,
indirect, incidental or consequential damages, so the above limitation or exclusion may not
apply to You, but the remainder of this Limited Warranty shall remain in full force and effect.
Duration of Implied Warranties
EXCEPT TO THE EXTENT PROHIBITED BY APPLICABLE LAW, ANY IMPLIED
WARRANTY OR CONDITION OF MERCHANTABILITY OR FITNESS FOR A
PARTICULAR PURPOSE ON THIS HARDWARE PRODUCT IS LIMITED IN DURATION
TO THE LIMITED WARRANTY PERIOD STATE ABOVE FOR YOUR PRODUCT. Some
jurisdictions do not allow limitations on how long an implied warranty lasts, so the above
limitation may not apply to You. Please note that in the European Union, any warranty
period less than two years shall be increased to two years except in the case of use for
commercial purposes.
NOTE: This equipment has been tested and found to comply with the limits for a Class B
digital device, pursuant to Part 15 of the FCC Rules. These limits are designed to provide
reasonable protection against harmful interference in a residential installation. This
equipment generates, uses and can radiate radio frequency energy and, if not installed and
used in accordance with the instructions, may cause harmful interference to radio
communications. However, there is no guarantee that interference will not occur in a
particular installation. If this equipment does cause harmful interference to radio or
television reception, which can be determined by turning the equipment off and on, the user
is encouraged to try to correct the interference by one or more of the following measures:
1) Increase the separation between the equipment and receiver or 2) Connect the
equipment into an outlet on a circuit different from that to which the receiver is connected.
.
, which will also identify
Page 5
Using Your Video Eyewear
Before using your video eyewear for the first time, remove the clear peelback lens protection film from the inside surface of the viewer lens and
charge the battery (see Charging).
The iWear AV920 video eyewear can be connected to any 2D or 3D
video devise with compatible connectors. The AV920 will sense if the
video signal is PAL or NTSC and automatically adjust.
Multi-function Control Wheel/Button
A multi-function Control Wheel is
located under the right-front corner of
the video eyewear display unit.
Rotating the multi-function wheel
enables the selection of menu options
and adjusts settings. When pressed, it
functions as a dual action button. A
quick press and release selects menu
options while a press and hold (3 or
more seconds) provides a second
level of button commands.
Power On/Off: Press and release to turn on the eyewear.
Press and hold for 3 or more seconds to turn off the
eyewear. It will also turn off automatically if no video
signal is available for several minutes.
Adjust Volume: Rotate to turn speaker volume up or down. Available
only when the OSD is not displayed.
Access OSD: Press and release to access and dismiss the OSD
(on screen display) menu.
OSD Menu: Rotate to change menu selection. Press and release
to select an OSD menu item.
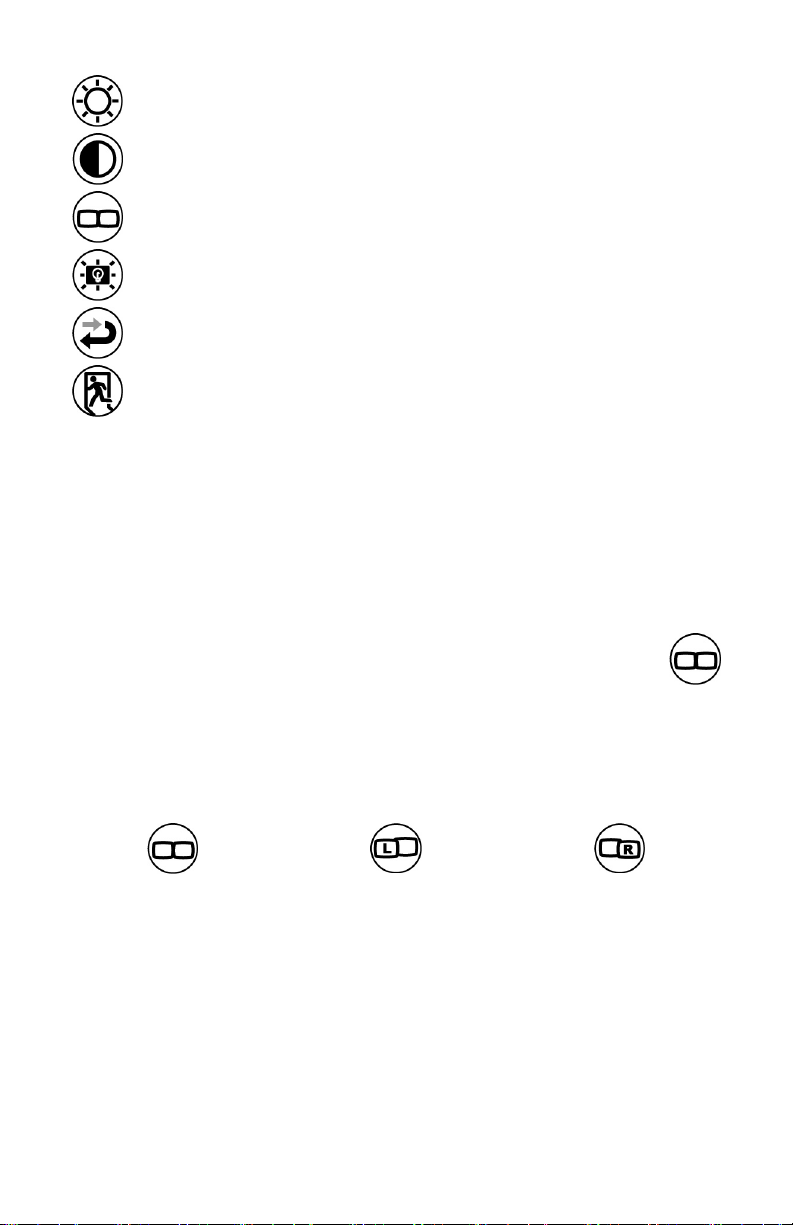
On Screen Display Menu (OSD)
When you press and hold the Control Wheel for more than 3 seconds,
the following menu commands will appear horizontally across the lower
section of your iWear display. These commands will allow you to adjust
the display settings of your video eyewear.
Page 6
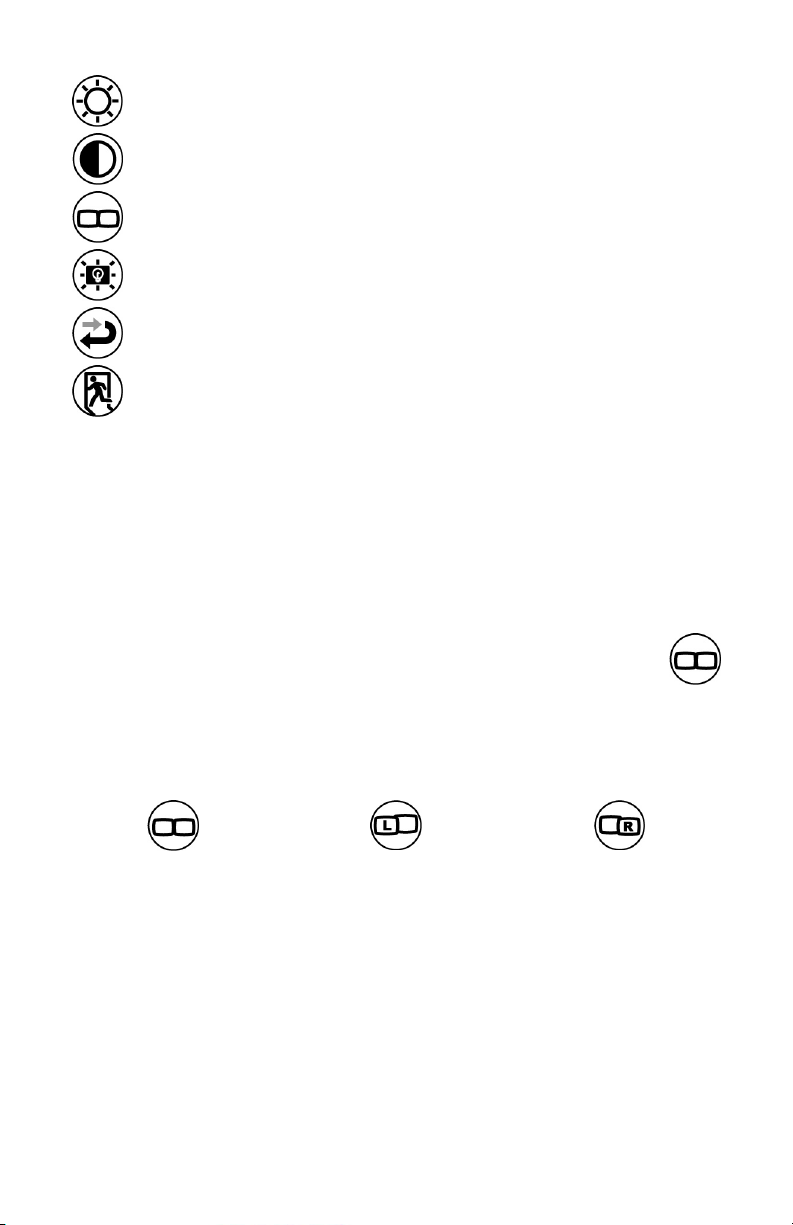
Adjust display brightness
Adjust display contrast
Select display mode
Adjust display backlight brightness
Reset display settings to factory defaults
Exit OSD
Display Modes
Your video eyewear is capable of displaying stereoscopic 3D images in
two ways. If the video content is enabled with iWear 3D control
information, it will automatically be displayed in the proper 3D mode. If
your 3D content does not contain iWear 3D control information, use the
OSD controls to select the correct display mode.
Select & Adjust Display Mode:
Access the OSD by pressing and holding down the Control
Wheel for more than 3 seconds. With the OSD visible, rotate the
Control Wheel to select the Display Mode option
s icon.
With the Display Mode command selected, rotate the Control Wheel to
select one of the display modes. Press and release the Control Wheel to
make your selection.
2D display mode L/R display mode R/L display mode
Use the 2D display mode for all monoscopic (2D) video content.
There is no standard for videos using L/R or R/L mode for 3D video. The
easiest method of determining which is used for any given video is too
simply to try one and if the 3D quality is not as expected, switch to the
other.
Page 7

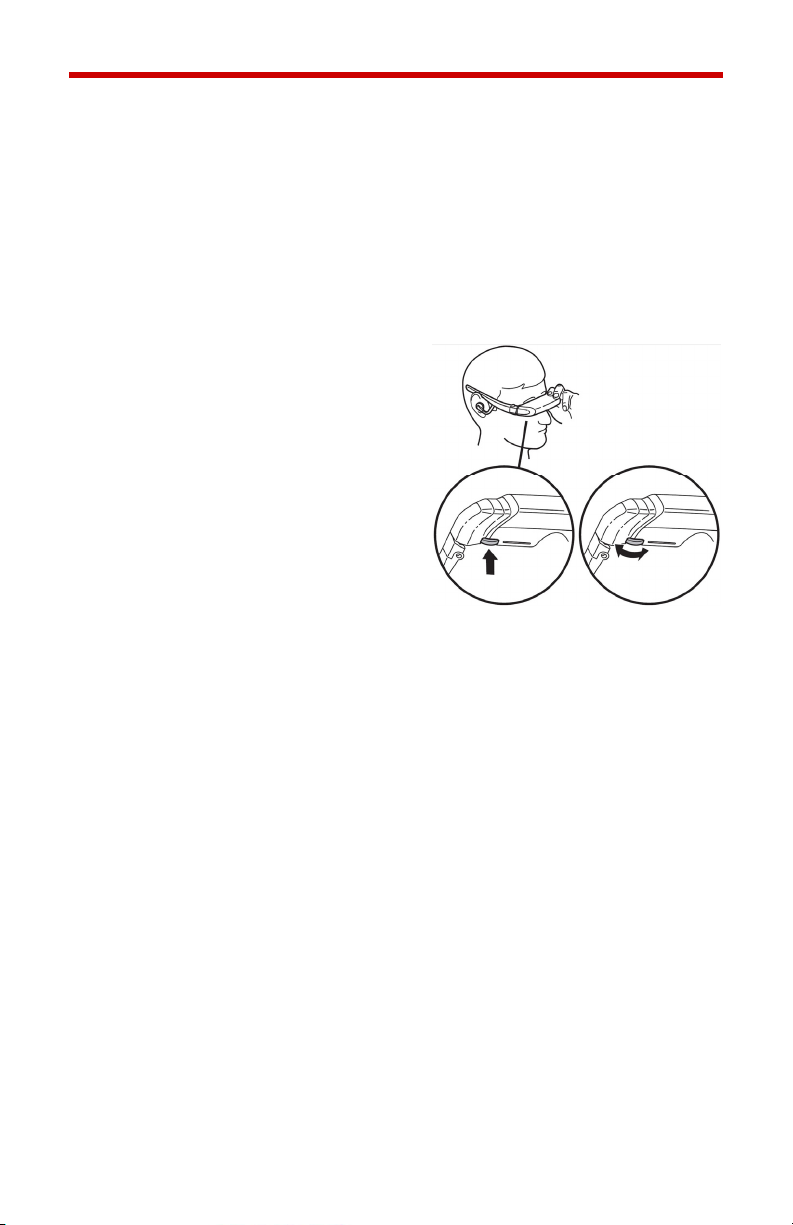
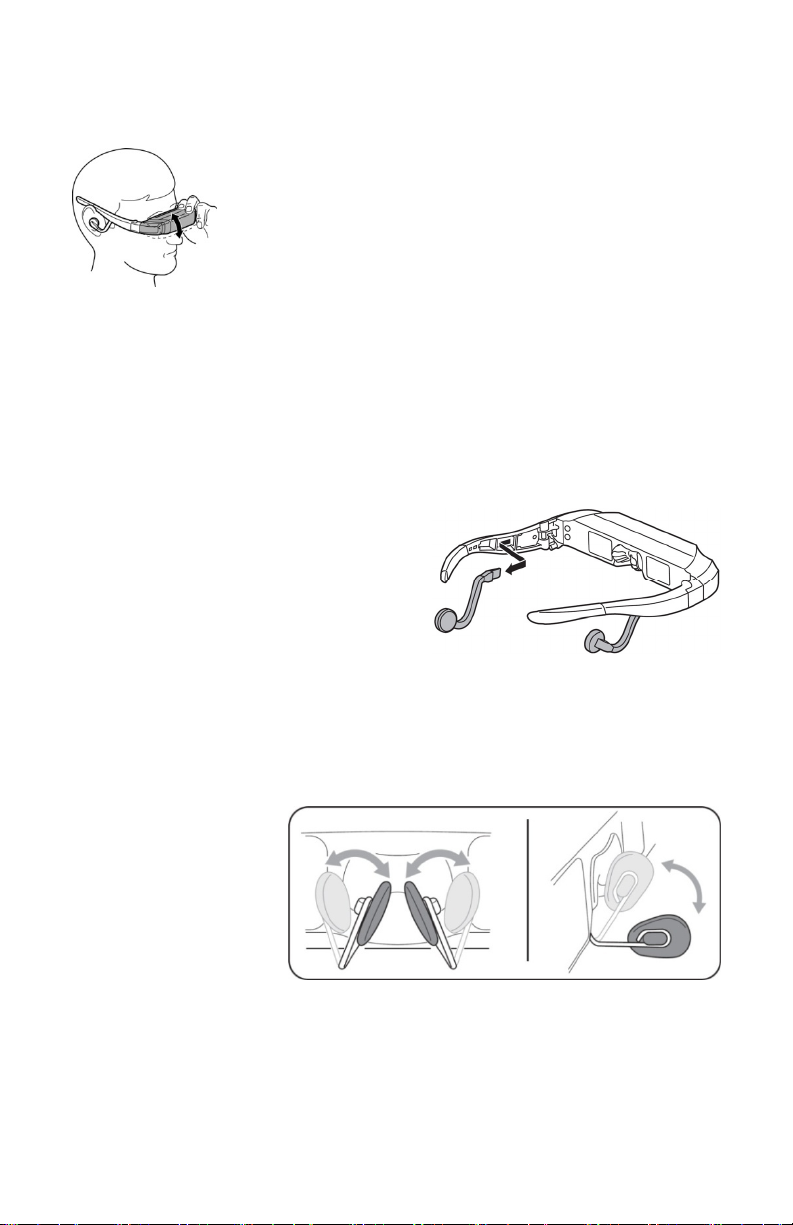
AccuTilt® Viewer Adjustment
AccuTilt viewer adjustment is a Vuzix technology that
allows you to adjust the angle of the display housing
15 degrees to ensure optimum alignment.
Grasp the iWear viewer’s front display on both either
side and
tilt it up or down to aligned the displays.
Speaker Adjustment & Removal
Your video eyewear’s stereo speakers are both adjustable for fit or
removed should you wish to use an alternate speaker system.
Unlike ear buds that fit into your ears, these speakers are designed to sit
outside of your ears for longer listening comfort. Flex the speaker stem to
bend it to a comfortable position.
To remove the speakers, grasp a
speaker stem firmly by its base, near
the temple, and pull straight back.
Reverse the process to re-insert the
speakers.
The video eyewear has a single input
mini-jack for line level stereo audio and video, marked as “AV” on the
battery case. A second mini-jack is also provided on the battery box
(headphone icon) for connecting external head phones.
Nose Bridge Adjust
Your video eyewear is equipped with an adjustable nose bridge that
offers hours of comfort and provides an extensive range of adjustment.
Prescription eyeglass wearers can adjust their nose bridge to wear their
video eyewear over and in front of their glasses.
To adjust the nose
bridge, grasp a nose
bridge pad between
your thumb and
forefinger and bend
the arm to an
appropriate position.
Repeat with the other
nose pad and then make minor adjustments until a comfortable position
has been achieved.
Page 8
The nose bridge is designed to be adjusted to your personal needs – not
to be readjusted repeatedly for multiple users. Sharp angles and
excessive bending can result in metal fatigue and premature failure of
the nose bridge stems.
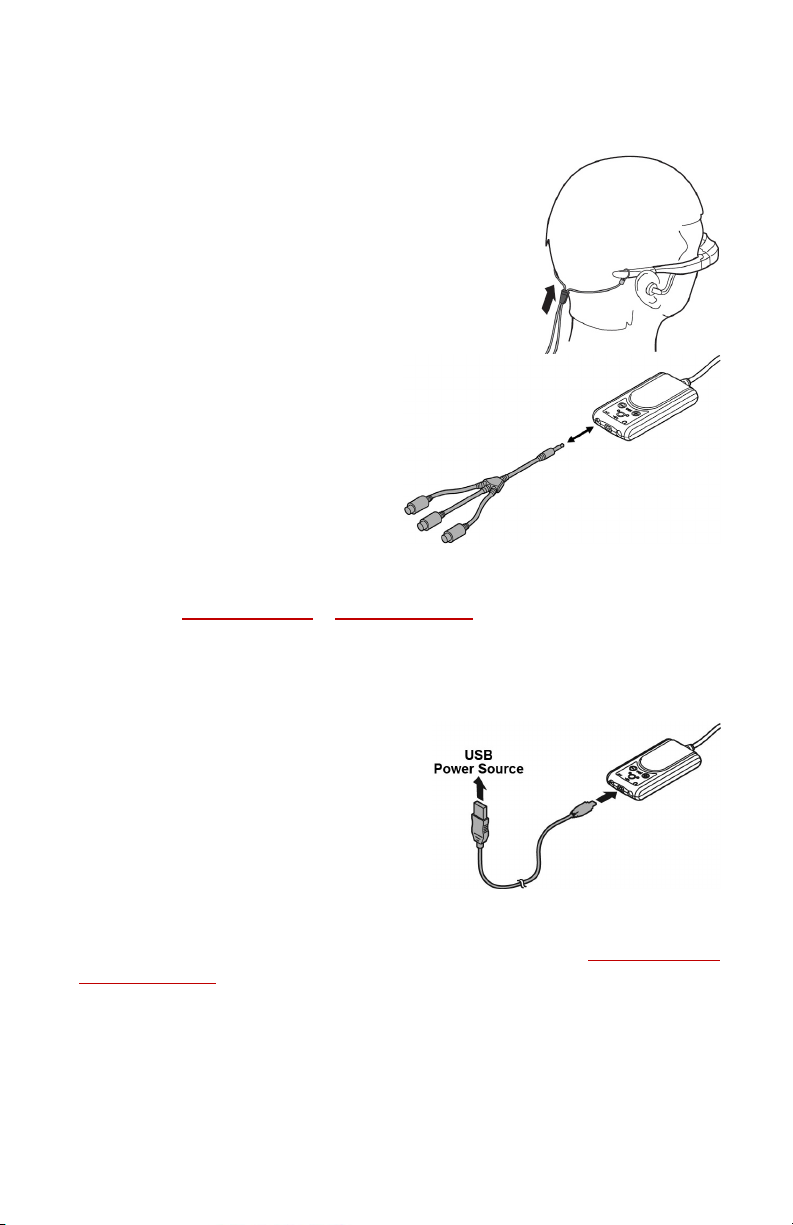
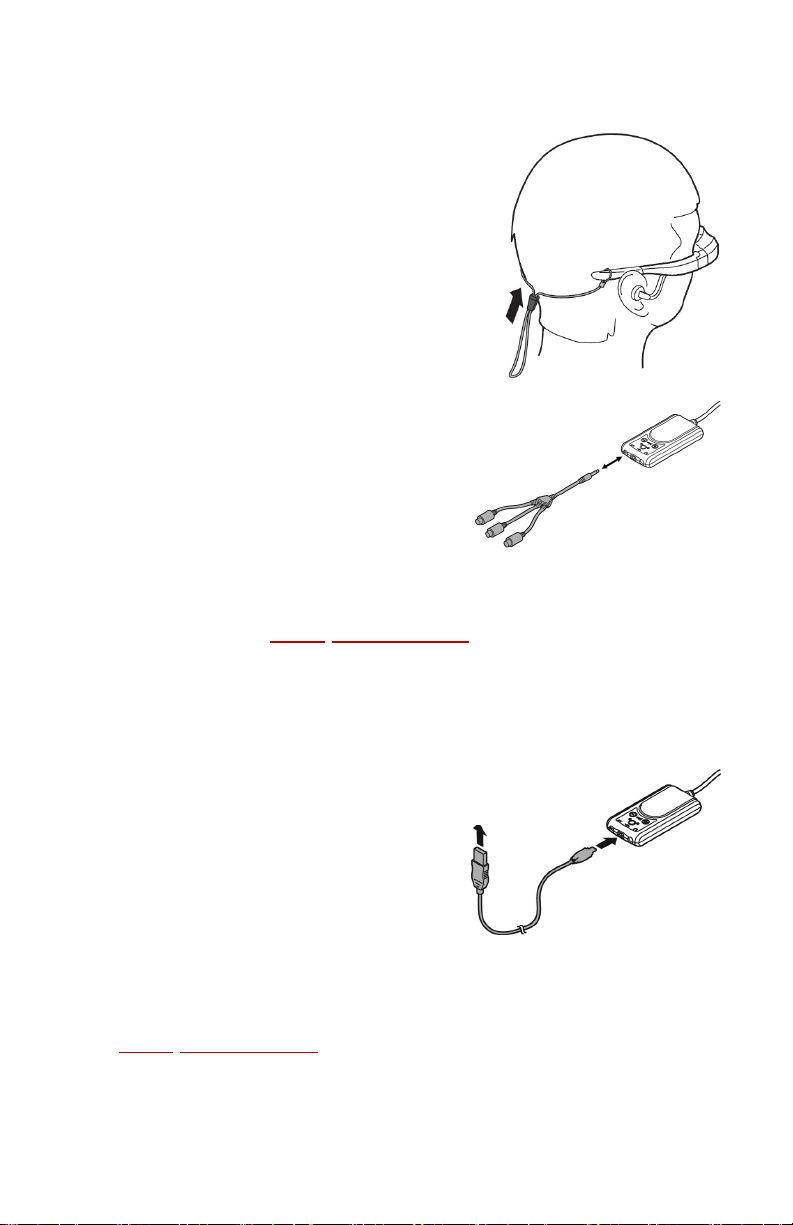
Tether Strap
A tether strap is provided to assist in securing your
eyewear when being over eyeglasses or when
resting your head on a pillow or other object that
might cause the eyewear to shift positions.
Connecting To A Video Source
The cable used to connect your
eyewear to a video source will
depend upon the source device’s
available connections. The
accompanying illustration shows a
omposite audio/video cable
c
connecting to the AV port on the
battery box – the same port used
for all video cable connections.
If none of the provided cables are compatible with your video device,
check the Vuzix website
optional S-Video cable is available for use with many laptops as well as a
braod assortment of cables for other devices..
(www.vuzix.com) for optional cables. An
Charging
Your video eyewear comes with a
USB cable for charging your batteries.
This cable can be connected to a
variety of USB power sources
including a desktop or laptop
computer, a USB port such as those
provided on many aircraft or to a plugin A/C or D/C power adaptor, such as
those used with many mobi
Optional power adaptors are available through the Vuzix website
(www.vuzix.com
).
le phones.
Page 9

Cleaning
Use a soft dry cloth to clean your iWear AV920 video eyewear enclosure
and its optics. The cloth carry pouch that came with your eyewear is
good for this. Do not use liquid or spray-on cleaners.
Updating
Your video eyewear is field upgradable to ensure that you have the best
experience possible. To upgrade your iWear AV920 firmware or to
download updated software, please visit www.vuzix.com/support
.
Troubleshooting
The video eyewear will not turn on.
• Press the Control Wheel on the right side, below the display.
• Charge the battery.
The product turns off immediately after I turn it on.
• Charge the battery.
When the battery charge is extremely low, allow it to charge for several
minutes before turning the product on.
There is no audio in one or more speakers.
• Ensure all connections are fully plugged in.
• Try to unplug the speakers and plug them back into the viewer’s
temples.
The normal (2D) video is not very clear.
• Make sure your video eyewear is not in 3D mode.
I’m viewing 3D content but it is fuzzy and not in 3D.
• Set the View Mode to L/R display and if that does not work, set it to R/L
display made.
Page 10

Contacting VUZIX
In the United States or Canada, refer to the Vuzix website
(www.vuzix.com
) or call (800) 436-7838, 9 AM to 6 PM EST weekdays,
excluding holidays.
Be sure to have the following information available before you call:
• Serial number, model name, and model number
• Operating system and version of operating system, when associated
with a computer
• Applicable error messages
• Third-party hardware or software installed
• Add-on options if applicable
• Detailed questions you need answers to
Waste Electrical & Electronic Equipment (WEEE)
1. The equipment that you bought has required the extraction and use
of natural resources for its production. It may contain hazardous
substances that could impact health and the environment.
2. In order to avoid the dissemination of those substances in our
environment and to diminish the pressure on the natural resources,
we encourage you to use the appropriate take-back systems. Those
systems will reuse or recycle most of the materials of your end life
equipment in a sound way.
3. The crossed-out wheeled bin symbol invites you to use those
systems.
4. If you need more information on the collection, reuse and recycling
systems, please contact your local or regional waste administration.
5. You can also contact us for more information on the environmental
performances of our products.
© 2008 Vuzix Corporation
All rights reserved. All trade names
owners.
Designed by Vuzix in New York.
Made in USA.
are registered trademarks of their respective
Page 11
iWear®AV920
Guidedel’utilisateur
Veuillez lire les consignes de sécurité ci-jointes avant
d’utiliser les lunettes !
Bienvenue au monde de l’affichage grand écran ! Vos Lunettes
®
vidéo Vuzix™ iWear
exceptionnelle, comme si vous aviez votre propre cinéma nomade !
Contenu de la boîte :
AV920 offrent des images 2D et 3D de qualité
1. Câble USB & Chargeur 5. Lunettes vidéo
2. Câble iPod* 6. Boîtier de pile
3. Sangle d’attache 7. Câble audio/vidéo composite
4. Étui/Chiffon de nettoyage des lentilles
• Le Guide de l’utilisateur n’est pas indiqué
Le modèle de câble iPod peut varier selon la
*
région et les modèles iPod actuels et selon la
disponibilité.
Page 12

Consignes de sécurité importantes
Observez les consignes de sécurité lors de l’utilisation ou de la manipulation de vos
Lunettes vidéo VUZIX afin de réduire le risque d’incendie, de choc électrique, et de
dommages corporels ou matériels.
1. LISEZ TOUTES LES INSTRUCTIONS ET LES DÉTAILS SUR LA SÉCURITÉ AVANT
D’UTILISER CE DISPOSITIF.
2. Utilisez ce dispositif conformément à son usage prévu, tel que décrit dans ce manuel.
3. Surveillez de près les enfants quand ils se trouvent à proximité du dispositif.
4. Les enfants âgés de moins de sept (7) ans n’ont pas fini d’apprendre à focaliser et à
suivre avec leurs yeux. Leur vision est encore immature. Par conséquent, CE PRODUIT
NE DOIT PAS ÊTRE UTILISÉ PAR DES ENFANTS DE MOINS DE SEPT (7) ANS.
5. Un pourcentage minime de la population risque de présenter des crises épileptiques en
visionnant certains types de lumières clignotantes et de motifs communs présents dans
notre environnement quotidien. Ces personnes peuvent également présenter des crises en
regardant certaines images à la télévision ou en jouant à certains jeux vidéo sur des écrans
normaux, y compris un système d’affichage tel que celui-ci. La grande dimension des
écrans vidéo de ce dispositif risque d’aggraver ces réactions. Si vous avez des
antécédents d’épilepsie, consultez un médecin avant d’utiliser ce dispositif ou lorsque vous
ressentez l’un des symptômes suivants durant son fonctionnement : troubles de la vision,
contractions musculaires, autres mouvements involontaires, perte de reconnaissance de
votre environnement, confusion mentale, et/ou convulsions.
6. La vidéo immersive, qu’elle soit visionnée sur un téléviseur ordinaire, un écran de
cinéma, ou un affichage vidéo VUZIX, peut avoir des effets adverses sur l’utilisateur parmi
lesquels : mal des transports, effets résiduels perceptifs, désorientation, stabilité posturale
réduite et fatigue oculaire. Accordez-vous des pauses fréquentes pour réduire le risque de
tels effets, comme cela est souvent recommandé pour d’autres dispositifs, claviers et
écrans d’ordinateur, sur lesquels vous avez tendance à fixer et concentrer votre attention.
Si vos yeux montrent des signes de fatigue ou sont secs, ou en présence de l’un ou l’autre
des symptômes ci-dessus, cessez immédiatement d’utiliser cet appareil et attendez au
moins 30 minutes que les symptômes disparaissent avant de recommencer.
7. Une perte auditive permanente ou temporaire peut résulter de niveaux de volume
excessifs émis par les écouteurs. Ajustez toujours le volume à un niveau sûr AVANT de
porter le dispositif ou les écouteurs.
8. Soyez toujours conscient du monde autour de vous. Ce produit vous plongera dans des
sons et lumières réalistes, vous faisant peut-être oublier le monde réel autour de vous et
les menaces à votre bien-être et celui des autres. N’utilisez PAS ce produit près
d’escaliers, de balcons, ou d’autres objets sur lesquels vous pourriez trébucher, culbuter ou
tomber. Ce produit ne doit être utilisé qu’en position assise et jamais pendant que vous
utilisez des objets coupants ou potentiellement dangereux, lorsque vous faites fonctionner
un engin mécanique quelconque, lorsque vous conduisez un véhicule automobile, ou
durant toute autre activité exigeant une attention visuelle.
9. Ce produit peut être branché à une prise de courant et ses composants peuvent être
reliés à des câbles. Veillez à ce que ces câbles ne s’enroulent pas autour de vous et ne
présentent aucun danger pour les autres.
10. Ne démontez pas ce produit. Si une réparation du produit est nécessaire, contactez le
service client de VUZIX (les coordonnées sont indiquées dans ce manuel).
11. Ne tirez pas sur le câble, n’effectuez ni torsion, ni entrelacement. Ne suspendez pas le
produit, ni ne le laissez suspendu à l’un de ses câbles. Pour débrancher les câbles, tirez
sur leur connecteur. Les câbles endommagés par de telles actions ne sont pas couverts
par la garantie limitée du produit.
Page 13

12. Ne faites tomber, ne heurtez, ne frappez ni ne secouez vigoureusement aucune partie
de ce produit. De telles actions pourraient endommager le produit et annuler votre garantie.
13. Conservez ces instructions.
Débranchez immédiatement le produit des sources externes de courant si :
• L’adaptateur de courant, le câble d’alimentation ou le cordon USB est endommagé ou
effiloché.
• Du liquide a été vaporisé, éclaboussé ou versé sur le produit.
• Un composant du produit est tombé ou a été endommagé.
• La performance du produit s’est dégradée considérablement.
Consignes de sécurité des piles
• Les piles contiennent des produits toxiques. Ne brûlez pas ni ne désassemblez, ni ne
mutilez, ni ne percez les piles.
• Ne jetez pas les piles au feu.
• Mettez les piles au rebut conformément aux lois et aux règlements locaux.
Garantie limitée du matériel Vuzix
Vuzix garantit que le matériel Vuzix est exempt de tout défaut de fabrication ou de main
d’œuvre pendant la période spécifiée dans la Période de garantie (un an), à compter de la
date d’achat. Si votre matériel Vuzix est utilisé à des fins commerciales (y compris une
location) la Période de garantie sera réduite à seulement quatre-vingt dix (90) jours à
compter de la date d’achat. Sauf si la loi applicable l’interdit, cette garantie n’est pas
transférable, est limitée à l’acheteur initial et ne s’applique à personne d’autre, y compris
toute personne à laquelle vous pourrez transférer ou vendre le dispositif par la suite. Cette
garantie vous accorde des droits spécifiques selon la loi, et vous pouvez également
disposer d’autres droits variant selon les lois locales, dont certains ne sont pas affectés par
les garanties contenues dans cette Garantie limitée.
Cette Garantie limitée ne couvre pas, et aucune garantie n’est donnée en ce qui concerne,
les aspects subjectifs ou esthétiques du matériel. Vuzix ne garantit pas un fonctionnement
ininterrompu ou sans erreur de ce produit. La garantie limitée indiquée ci-dessus est la
seule garantie qui vous soit offerte, elle remplace toute autre garantie ou condition
expresse ou tacite (à l’exception de toute garantie tacite non déclinable existante), y
compris toute garantie issue de toute autre documentation ou emballage. Nulle information
ni suggestion (orale ou enregistrée) donnée par Vuzix, ses agents, sociétés affiliées,
concessionnaires ou fournisseurs ou ses employés ou agents, ne constituera une garantie
ou une condition, ou n’étendra la portée de cette Garantie limitée.
Le logiciel fourni avec le matériel par Vuzix, avec ou sans le nom commercial Vuzix, n‘est
pas couvert par cette Garantie limitée. Consultez l’accord de licence qui accompagne le
logiciel (consultable lors de son installation), pour en savoir plus sur vos droits concernant
son utilisation.
Recours
La responsabilité entière de Vuzix et votre recours exclusif en cas de non-respect de
garantie seront, à la discrétion de Vuzix, (1) de réparer ou de remplacer l’ensemble ou une
partie du matériel, 2) d’échanger le matériel contre un produit neuf ou un produit qui a été
fabriqué avec des pièces neuves ou usagées réparables et qui est au moins
fonctionnellement équivalent au produit original , ou (3) de rembourser le prix que vous
avez payé, réduit d’une dépréciation raisonnable basée sur votre usage réel, à condition
que le matériel soit retourné au point d’achat ou à tout autre endroit que Vuzix pourra
suggérer avec une copie du coupon de caisse ou un reçu détaillé et daté. Sauf interdiction
de la loi, tous les frais d’expédition et de manutention associés au transport (y compris
l’emballage) pour le service de garantie seront à votre charge. Vuzix pourra, à sa
discrétion, utiliser des pièces neuves, usagées ou réusinées en bon état pour réparer ou
remplacer le matériel. Tout matériel de rechange sera garanti pour le reste de la période de
garantie originale ou trente (30) jours, la durée la plus longue l’emportant, ou pour toute
Page 14

période de temps supplémentaire éventuellement applicable dans votre juridiction. Cette
garantie ne couvre pas les problèmes ou dommages résultant des (1) cas de force
majeure, surtension, usage abusif, abus, négligence, accident, usure, manutention
inadéquate, mauvaise application, ou autres causes non associées aux défauts du matériel
(2) de toute réparation, modification, altération ou démontage non autorisé ; (3) d’utilisation
ou maintenance incorrecte, usage non conforme aux instructions concernant le produit ou
branchement à une alimentation inappropriée ; ou (3) de l’utilisation de consommables, tels
que des piles de rechange, non fournies par Vuzix, sauf si cette restriction est interdite par
la loi applicable.
Pour obtenir une assistance technique
L’assistance technique répondra aux questions relatives au matériel Vuzix. L’assistance
technique pour le matériel et son logiciel est offerte pendant les quatre-vingt dix (90)
premiers jours suivant la date d’achat du produit. Votre coupon de caisse ou de livraison
daté, indiquant la date de l’achat ou de la location du produit, constitue la preuve de la date
de votre achat ou de votre location. Pour obtenir une assistance technique logicielle, on
pourra vous demander de fournir la preuve de la date de votre achat ou de votre location.
Les adresses et les coordonnées du service technique de Vuzix sont indiquées dans la
documentation qui accompagne le produit et sur notre site web : www.vuzix.com
Pour obtenir une assistance concernant les questions de garantie
Dans le cadre de cette Garantie limitée, Vuzix est le garant. Avant de soumettre une
réclamation au titre de la garantie, nous vous recommandons de consulter la section
assistance sur www.Vuzix.com pour obtenir une assistance technique. Les réclamations de
garantie ne peuvent pas être traitées au point d’achat et toute autre question relative au
produit devra être adressée directement à Vuzix. Les adresses et coordonnées de service
après-vente de Vuzix sont indiquées dans la documentation qui accompagne le produit et
sur notre site web www.vuzix.com
Vuzix dans votre pays avec leur adresse. Vous pouvez également écrire à : Vuzix Sales
Support, 75 Town Centre Drive, Rochester, NY 14623, États-Unis.
Limitation de responsabilité
VUZIX NE SERA TENUE RESPONSABLE D’AUCUN DOMMAGE SPÉCIAL, INDIRECT,
ACCIDENTEL OU CONSÉCUTIF QUEL QU’IL SOIT, Y COMPRIS MAIS SANS S’Y
LIMITER, DE TOUT MANQUE À GAGNER, PERTES DE REVENUS OU DE DONNÉES
(DIRECTES OU INDIRECTES) OU PERTE COMMERCIALE POUR NON-RESPECT DE
TOUTE GARANTIE EXPRESSE OU TACITE SUR VOTRE PRODUIT MÊME SI LA
SOCIÉTÉ VUZIX A ÉTÉ AVISÉE DE L’ÉVENTUALITÉ DE TELS DOMMAGES. Certaines
juridictions interdisent l’exclusion et la limitation de dommages spéciaux, indirects,
accidentels ou consécutifs, par conséquent, il est possible que la limitation ou l’exclusion
ci-dessous ne vous concerne pas, mais pour le reste, cette Garantie limitée restera
pleinement en vigueur.
Durée des Garanties tacites
SAUF DANS LA MESURE OÙ LA LOI APPLICABLE L’INTERDIT, TOUTE GARANTIE
TACITE OU CONDITION DE QUALITÉ MARCHANDE OU D’ADAPTATION À UN USAGE
PARTICULIER SUR CE MATÉRIEL EST LIMITÉE EN DURÉE À LA PÉRIODE DE
GARANTIE LIMITÉE INDIQUÉE CI-DESSUS POUR VOTRE PRODUIT. Certaines
juridictions interdisent toute limitation de la durée d’une garantie tacite, par conséquent, il
est possible que la limitation ci-dessus ne vous concerne pas. Veuillez noter que dans
l’Union européenne, une période de garantie de moins de deux ans sera prolongée de
deux ans, sauf si le produit est utilisé à des fins commerciales.
, qui répertorie également les filiales ou succursales
.
Page 15

Utilisation des lunettes vidéo
Avant d’utiliser les lunettes vidéo pour la première fois, décollez le film
de protection de la surface intérieure des lentilles et chargez la pile (Cf.
Recharge).
Les lunettes vidéo iWear AV920 peuvent être connectées à n’importe
quel dispositif 2D ou 3D doté de connecteurs compatibles. Le AV920
détecte le signal vidéo, PAL ou NTSC, et s’ajuste automatiquement.
Roulette/bouton de commande polyvalent
Une roulette de commande polyvalente
est située sous le coin avant droit de
l’affichage des lunettes vidéo.
La rotation de la roulette polyvalente
permet de sélectionner les options de
menu et de modifier les paramètres. Une
fois enfoncée, elle fonctionne comme un
bouton à double action. Une pression et
une libération rapides sélectionnent les
options de menu tandis qu’une pression
continue (de 3 secondes ou plus) fournit un deuxième niveau de
commande de bouton.
Marche/Arrêt : Appuyez et relâchez pour activer les lunettes.
Appuyez sur le bouton pendant au moins
3 secondes pour désactiver les lunettes. Elles
s’éteindront automatiquement si aucun signal vidéo
n’est disponible pendant plusieurs minutes.
Réglage du volume : Tournez le bouton pour augmenter ou réduire
le volume de l’écouteur. Disponible uniquement
quand l’OSD n’est pas affiché.
Accès à l’affichage : Appuyez et relâchez pour accéder au menu
OSD (affichage à l’écran) et le quitter.
Menu OSD : Tournez le bouton pour changer la sélection de
menu. Appuyez et relâchez pour sélectionner une
commande de menu OSD.
Menu OSD (affichage à l’écran)
Quand vous appuyez sur la roulette de commande pendant plus de
3 secondes, les commandes de menu suivantes apparaissent
horizontalement au bas de l’affichage iWear. Ces commandes vous
permettent de modifier les paramètres d’affichage de vos lunettes vidéo.
Page 16
Réglage de la luminosité de l’affichage
Réglage du contraste de l’affichage
Sélection du mode d’affichage
Paramétrage de la luminosité du rétroéclairage
Réinitialisation des paramètres d’affichage par défaut d’usine
Fermeture de l’OSD
Modes d’affichage
Vos lunettes vidéo affichent des images 3D stéréoscopiques de deux
façons. Si le contenu vidéo contient des informations de commande 3D
iWear, il s’affiche automatiquement en mode 3D correct. Si le contenu
3D ne contient pas d’informations de commande 3D iWear, utilisez les
commandes OSD pour sélectionner le mode d’affichage correct.
Sélectionnez et ajustez le mode d’affichage :
Appuyez sur la roulette de commande pendant au moins
3 secondes pour accéder à l’affichage OSD. Quand l’affichage
OSD est visible, tournez la roulette de commande pour
sélectionner l’icône des options du mode d’affichage.
La commande du mode d’affichage étant sélectionnée, tournez la
roulette pour sélectionner l’un des modes d’affichage. Appuyez et
relâchez la roulette pour valider votre sélection.
Mode d’affichage 2D Mode d’affichage G/D Mode d’affichage D/G
Utilisez le mode d’affichage 2D pour tous les contenus vidéo
monoscopiques (2D).
Il n’existe aucun standard pour les vidéos utilisant le mode G/D ou D/G
pour la vidéo 3D. La meilleure façon de déterminer celui qui est utilisé
pour une vidéo donnée est d’en essayer un et, si la qualité 3D n’est pas
correcte, d’essayer l’autre.
Page 17
Ajustement du visionneur AccuTilt®
AccuTilt est une technologie Vuzix qui vous permet
d’ajuster de 15 degrés l’angle du boîtier d’affichage
pour obtenir un alignement optimal.
Saisissez l’affichage avant du visionneur iWear des
deux côtés et
pour aligner les affichages
inclinez-le vers le haut et vers le bas
.
Ajustement et dépose des écouteurs
Les écouteurs stéréo de vos lunettes vidéo sont ajustables ou peuvent
être enlevés si vous souhaitez utiliser un système d’écoute différent.
Contrairement aux écouteurs boutons qui se placent dans l’oreille, ces
écouteurs sont conçus pour se poser sur l’extérieur de l’oreille pour un
meilleur confort d’écoute. Pliez la tige de l’écouteur pour améliorer votre
confort.
Pour enlever les écouteurs, saisissez
la tige de l’écouteur à sa base, près
de la tempe, et tirez vers l’arrière.
Procédez à l’inverse pour remettre les
écouteurs en place.
Les lunettes vidéo comportent un mini-jack à une entrée pour une stéréo
audio et vidéo niveau ligne, identifié par « AV » sur le boîtier de pile. Un
deuxième mini-jack est également prévu sur la boîte à pile (icône
d’écouteur) pour la connexion d’écouteurs externes.
Ajustement du pont de nez.
Vos lunettes vidéo
comportent un pont
de nez réglable qui
offre des heures de
confort et permet
divers ajustements.
Les porteurs de
lunettes de vue
peuvent ajuster leur pont de nez et porter leurs lunettes vidéo pardessus et devant leurs lunettes habituelles.
Pour ajuster le pont de nez, saisissez un de ses tampons entre le pouce
et l’index et courbez le bras sur la position voulue. Répétez avec l’autre
tampon puis effectuez de petits ajustements jusqu’à ce qu’il soit
confortable.
Page 18
Le pont de nez est conçu pour être ajusté pour votre confort personnel et
non pour être adapté fréquemment à plusieurs utilisateurs. La formation
d’angles aigus et un pliage excessif pourront
fatiguer le métal et entraîner la défaillance
prématurée des tiges du pont de nez.
Sangle d’attache
Une sangle d’attache est prévue pour retenir
vos lunettes quand elles sont placées pardessus vos lunettes habituelles ou lorsque
vous posez la tête sur un oreiller ou sur un
autre objet susceptible de les déplacer.
Connexion à une source vidéo
Le câble utilisé pour connecter vos lunettes
à une source vidéo dépendra des
connexions disponibles du dispositif
source. L’illustration ci-contre montre la
connexion d’un câble
composite au port AV de la boîte à pile – le
port utilisé pour toutes les connexions de
câble vidéo.
Si aucun des câbles fournis n’est compatible avec votre dispositif vidéo,
consultez le site Web Vuzix
câbles en option. Un câble S-Vidéo en option est disponible pour de
nombreux ordinateurs portables ainsi qu’une large gamme de câbles
pour d’autres appareils.
audio/vidéo
(www.vuzix.com) pour en savoir plus sur les
Recharge
Vos lunettes vidéo sont
accompagnées d’un câble USB pour
le chargement des piles. Ce câble
peut être connecté à diverses sources
d’alimentation USB y compris un
ordinateur de bureau ou un ordinateur
portable, un port USB tel ceux
proposés dans certains avions ou un
adaptateur d’alimentation CC ou CA enfichable, tel ceux utilisés dans
certains téléphones portables.
Des adaptateurs d’alimentation en option sont disponibles sur le site
Web Vuzix
(www.vuzix.com).
Source
d’alimentation
USB
Page 19

Nettoyage
Utilisez un chiffon sec et doux pour nettoyer le coffret de vos lunettes
vidéo iWear AV920 et les composants optiques. La pochette en tissu
fournie avec vos lunettes peut être utilisée à cet effet. N’utilisez aucun
liquide ni vaporisateur de nettoyage.
Mise à niveau
Vos lunettes vidéo peuvent être mises à niveau sur place pour garantir
une expérience optimale. Pour mettre votre micrologiciel iWear AV920 à
niveau ou télécharger une mise à jour logicielle, visitez
www.vuzix.com/support
.
Dépannage
Les lunettes vidéo ne s’allument pas.
• Appuyez sur la roulette de commande, à droite, sous l’affichage.
• Chargez la pile.
Le dispositif s’éteint immédiatement après sa mise en marche.
• Chargez la pile.
Quand la pile est épuisée, attendez qu’elle se charge pendant plusieurs
minutes avant de mettre le dispositif en marche.
Il n’y a pas de son dans un ou les deux écouteur(s).
• Vérifiez que toutes les connexions sont bien branchées.
• Essayez de débrancher les écouteurs et de les rebrancher dans les
tempes du visionneur.
La vidéo normale (2D) n’est pas très claire.
• Vérifiez que vos lunettes vidéo ne sont pas en mode 3D.
Je visualise un contenu 3D mais il est flou et n’est pas en 3D.
• Réglez le mode View (visualisation) sur l’affichage G/D et, si cela ne
résout pas le problème, réglez-le sur l’affichage D/G.
Page 20

Pour contacter VUZIX
Aux États-Unis ou au Canada, consultez le site Web Vuzix
(www.vuzix.com) ou appelez le +1-(800) 436-7838, de 9 h 00 à 18 h 00,
heure standard de l’Est, en semaine, sauf pendant les vacances.
Avant d’appeler, réunissez les informations suivantes :
• Numéro de série, nom de modèle et numéro de modèle
• Système d’exploitation ou version du système d’exploitation, s’il est
associé à un ordinateur.
• Messages d’erreur applicables
• Matériel ou logiciel tiers installé
• Options d’addiciel, le cas échéant
• Questions détaillées que vous souhaitez poser
Déchet d’équipement électrique et électronique (DEEE)
6. La production de votre équipement a nécessité l’extraction et l’utilisation de
ressources naturelles. Il peut contenir des substances nocives nuisibles à la
santé et à l’environnement.
7. Afin d’éviter la dissémination de ces substances dans l’environnement et
réduire l’exploitation de ressources naturelles, nous vous encourageons à
utiliser les systèmes de reprise appropriés. Ces systèmes vont permettre de
réutiliser ou de recycler correctement la plupart des composants de votre
équipement.
8. Le symbole de la poubelle roulante marquée d’une croix vous invite à utiliser
ces systèmes.
9. Pour obtenir un complément d’information sur la collecte, la réutilisation et le
recyclage des systèmes, veuillez contacter l’autorité locale ou régionale
chargée de la gestion des déchets.
10. Vous pouvez aussi nous contacter pour obtenir un complément d’information
sur la performance environnementale de nos produits.
© 2008 Vuzix Corporation
Tous droits réservés. Tous les noms commerciaux sont des marques déposées de leurs
propriétaires respectifs.
Conçu par Vuzix à New York. Fabriqué aux États-Unis.
DESTINÉ À ÊTRE UTILISÉ À DOMICILE OU AU BUREAU.
Brevet numéro 811906-0001 Brevets en instance.
Page 21

iWear®AV920
Bedienungsanleitung
Lesen Sie vor dem Verwenden der Video-Brille die
beiliegenden Sicherheitshinweise!
Willkommen in der Welt des Heimkinos! Die Vuzix™ iWear® AV920Video-Brille bietet außerordentlich hohe 2D- und 3D-Bildqualität –
direkt in Ihrem eigenen, tragbaren Kino!
Paketinhalt:
1. Kabel für USB und Ladegerät 5. Video-Brillen-Viewer
2. iPod-Kabel* 6. Batteriegehäuse
3. Halteband 7. Gemischtadriges Audio-/ Videokabel
4. Tragebeutel/Linsenreiniger
• Bedienungsanleitungsbroschüre nicht gezeigt
iPod-Kabelmodell kann je nach Region sowie
*
nach Modell und Verfügbarkeit aktueller
iPods unterschiedlich sein.
Page 22

Wichtige Sicherheitsanweisungen
Befolgen Sie bei der Verwendung oder Handhabung der VUZIX-Video-Brille die
vorliegenden Sicherheitsanweisungen, um das Risiko von Brand, Stromschlag,
Personenverletzungen und Sachschäden zu reduzieren.
1. LESEN SIE VOR DER INBETRIEBNAHME DIESES GERÄTS SÄMTLICHE
ANLEITUNGEN UND SICHERHEITSINFORMATIONEN.
2. Das Gerät darf nur entsprechend der Beschreibung in diesem Handbuch für seinen
vorgesehenen Zweck verwendet werden.
3. Kinder, die sich beim Gerät oder in der Nähe des Geräts aufhalten, müssen gut
beaufsichtigt werden.
4. Kinder unter sieben (7) Jahren lernen noch, ihre Augen auf Objekte zu fokussieren und
diese mit den Augen zu verfolgen. Ihr Sehvermögen ist noch nicht vollständig ausgebildet.
Aus diesen Gründen DARF DIESES GERÄT NICHT VON KINDERN UNTER SIEBEN (7)
JAHREN VERWENDET WERDEN.
5. Bei einer sehr geringen Anzahl von Benutzern können epileptische Anfälle auftreten,
wenn sie bestimmte Arten blitzender Lichter oder Muster ansehen, die im täglichen Leben
auf uns einwirken. Bei diesen Personen können auch Anfälle auftreten, während sie
bestimmte Arten von Fernsehbildern betrachten, gewisse Arten von Videospielen auf
Standardmonitoren spielen oder auch ein Anzeigesystem wie das Vorliegende verwenden.
Dieser Effekt kann aufgrund des großen Videobildschirmformats dieses Geräts noch
verstärkt werden. Sollten Sie bereits einmal einen epileptischen Zustand erlitten haben,
oder sollten sich bei der Verwendung dieses Gerätes Symptome von verändertem
Sehvermögen, Muskelzucken oder anderen unfreiwilligen Bewegungen, Verlust des
Umgebungsbewusstseins, geistiger Verwirrung und/oder Konvulsionen einstellen, sollten
Sie vor der Verwendung des Geräts unbedingt einen Arzt zurate ziehen.
6. Immersives Video – ob auf einem regulären Fernsehgerät, einer Kinoleinwand oder einer
VUZIX-Videoanzeige betrachtet – kann sich unter Umständen schädlich auf den Benutzer
auswirken, beispielsweise in Form von Bewegungskrankheit, Wahrnehmungs- oder
Orientierungsstörungen, Störungen der Haltungsstabilität sowie Augenüberanstrengung.
Legen Sie häufig Pausen ein, um einem Auftreten solcher Zustände entgegenzuwirken,
was allgemein auch für andere Geräte empfohlen wird, wie z. B. für Tastaturen oder
Computerbildschirme, die man oft fixiert oder konzentriert betrachtet. Wenn bei Ihren
Augen Anzeichen von Ermüdung oder Trockenheit auftreten, oder wenn eines der oben
aufgeführten Symptome eintritt, ist der Gebrauch dieses Geräts umgehend einzustellen.
Warten Sie nach vollständigem Abklingen der Symptome noch mindestens 30 Minuten, bis
Sie den Gebrauch des Geräts wieder aufnehmen.
7. Aus den Kopfhörern abgegebene extreme Lautstärken können zu dauerhaften oder
vorübergehenden Hörverlusten oder -schäden führen. Stellen Sie den Ton stets auf eine
ungefährliche Lautstärke ein, BEVOR Sie dieses Gerät oder den Kopfhörer tragen.
8. Bleiben Sie sich stets über Ihre Umgebung bewusst. Dieses Gerät vermittelt realistische
Bilder und Geräusche, die dazu führen könnten, dass Sie die Realität um sich herum
vergessen und eventuelle Gefahren, die sich Ihnen oder anderen stellen könnten, nicht
wahrnehmen. Dieses Gerät DARF NICHT in der Nähe von Treppen, Balkons oder anderen
Objekten verwendet werden, über die Sie stolpern, mit denen Sie zusammenstoßen, die
Sie herunter stoßen oder über die Sie fallen könnten. Dieses Gerät darf nur benutzt
werden, während Sie sitzen und niemals in Situationen, in denen Sie spitze oder potenziell
gefährliche Gegenstände verwenden, mechanische Geräte bedienen, Motorfahrzeuge
steuern oder andere Handlungen ausführen, bei denen Sie normalerweise in der Lage sein
müssen, zu sehen, was sie machen.
Page 23

9. Dieses Gerät kann über ein Kabel mit einer Steckdose verbunden sein, und Kabel
können sich auch zwischen Komponenten befinden. Passen Sie gut auf, dass Sie sich
nicht in diesen Kabeln verwickeln, und dass die Kabel auch für andere keine Gefahr
darstellen.
10. Das Gerät darf nicht auseinandergenommen werden. Sollten Wartungs- oder
Reparaturarbeiten am Gerät erforderlich werden, sollten Sie sich über die in diesem
Handbuch angegebenen Kontaktinformationen mit der Support-Abteilung von VUZIX in
Verbindung setzen.
11. Ziehen oder reißen Sie niemals an den Kabeln. Die Kabel dürfen auch niemals geknickt
oder in festen Knoten gewickelt oder eng zusammengebunden werden. Das Gerät darf
nicht aufgehängt werden oder von einem seiner Kabel herabhängen. Ziehen Sie zum
Abtrennen von Kabeln stets am Anschlussstück des Kabels. Ein durch die Nichtbeachtung
dieser Vorschrift beschädigtes Kabel wird nicht durch die eingeschränkte Garantie für das
Gerät gedeckt.
12. Lassen Sie das Gerät nicht fallen, und stoßen Sie es nicht. Achten Sie darauf, dass auf
keinen Teil des Geräts gewaltsame Stöße einwirken, und dass es nicht stark geschüttelt
wird. Vorgehensweisen solcher Art können das Gerät beschädigen und Ihre Garantie
ungültig machen.
13. Bewahren Sie diese Anweisungen gut auf.
Das Gerät muss sofort von äußeren Stromquellen getrennt werden, wenn Folgendes zutrifft:
• Der Stromadapter, das Stromkabel oder das USB-Kabel ist beschädigt oder ausgefranst.
• Flüssigkeit wurde auf das Gerät gesprüht, gespritzt oder gegossen.
• Eine Komponente des Geräts ist heruntergefallen oder wurde beschädigt.
• Das Gerät weist eine Leistungsveränderung auf.
Sicherheitsanweisungen für den Umgang mit Batterien
• Batterien enthalten giftige Stoffe. Batterien dürfen nicht verbrannt,
auseinandergenommen oder zerstört werden, und es darf nicht in sie hineingestochen
werden.
• Batterien dürfen nicht durch Verbrennen entsorgt werden.
• Entsorgen Sie Batterien stets auf eine Weise, die den örtlichen Vorschriften und
Bestimmungen entspricht.
Page 24

•
Vuzix-Hardwareprodukt, eingeschränkte
Garantie.
Vuzix garantiert, dass das Vuzix-Hardwaregerät ab dem Datum des Kaufs während der
Dauer des Garantiezeitraumes (ein Jahr) frei von Material- und Verarbeitungsfehlern ist.
Wird das Vuzix-Hardwaregerät zu gewerblichen Zwecken genutzt (einschließlich
Vermietung oder Leasing) reduziert sich der Garantiezeitraum auf neunzig (90) Tage ab
dem Datum des Kaufs. Außer wenn nach anwendbarem Recht unzulässig, ist diese
Garantie nicht übertragbar und gilt ausschließlich für den ursprünglichen Käufer und für
keine anderen Personen einschließlich Personen, an die das Gerät zu einem späteren
Zeitpunkt übertragen oder verkauft werden könnte. Mit dieser Garantie werden Ihnen
bestimmte Rechtsansprüche erteilt, die durch andere Rechte ergänzt werden können, die
je nach örtlich anwendbarem Recht unterschiedlich sein können, und auf die die in dieser
eingeschränkten Garantie aufgeführten Garantien eventuell nicht zutreffen.
Diese eingeschränkte Garantie deckt keine subjektiven oder ästhetischen Aspekte in
Bezug auf das Hardwaregerät und übernimmt in dieser Hinsicht keinerlei Garantie. Vuzix
übernimmt keine Garantie für den unterbrechungsfreien oder fehlerfreien Betrieb des
Geräts. Die oben aufgeführte eingeschränkte Garantie gilt als einzige für Sie wirksame
Garantie und tritt anstelle aller anderen ausdrücklichen oder stillschweigenden Garantien
und Bedingungen (außer nicht ablehnbaren bestehenden stillschweigenden Garantien)
einschließlich derer, die in anderen Dokumentationen oder Verpackungen aufgeführt
werden. Keine von Vuzix, seinen Stellvertretern, Partnern, Händlern oder Zulieferern oder
deren Mitarbeitern oder Stellvertretern mündlich oder schriftlich erteilten Informationen oder
Vorschläge erzeugen eine Garantie oder Bedingung oder Erweiterung des
Gültigkeitsumfangs der vorliegenden eingeschränkten Garantie.
Keine Arten von Software, die von Vuzix, mit oder ohne den Markennamen Vuzix,
zusammen mit dem Hardwaregerät vertrieben werden, sind unter dieser eingeschränkten
Garantie gedeckt. Beziehen Sie sich auf die der Software zugehörige Lizenzvereinbarung
(die nach Abschluss der Installation eingesehen werden kann), um über Einzelheiten zu
Ihren Rechten bezüglich der Verwendung der Software nachzulesen.
Rechtsmittel
Der gesamte Haftungsumfang für Vuzix und Ihr ausschließliches Rechtsmittel bei einer
Verletzung der Garantie besteht, nach dem Ermessen von Vuzix, aus Folgendem: (1) die
Hardware in vollem Umfang oder in Teilen zu reparieren oder zu ersetzen, 2) die Hardware
gegen ein Gerät auszutauschen, das entweder neu ist oder aus neuen oder
funktionsfähigen gebrauchten Teilen gefertigt wurde und dem Originalgerät zumindest in
Hinsicht auf dessen Funktionstüchtigkeit entspricht oder (3) den von Ihnen bezahlten
Kaufpreis minus angemessener Wertminderung auf Grundlage tatsächlicher Verwendung
zurückzuerstatten, unter der Voraussetzung, dass die Hardware mit einer Rechnungskopie
oder einer mit einem Datum versehenen Rechnung mit Angabe der Einzelposten an die
Verkaufsstelle oder an eine andere von Vuzix angewiesene Stelle zurückgesendet wird.
Außer wenn nach anwendbarem Recht unzulässig, gehen sämtliche mit der
Inanspruchnahme von Garantieleistungen in Verbindung stehenden Kosten für Versand
und Transport (einschließlich Verpackung) an Sie. Vuzix ist nach eigenem Ermessen
berechtigt, neue oder wiederaufgearbeitete oder gebrauchte betriebsfähige Teile zur
Reparatur oder zum Umtausch von Hardwaregeräten zu verwenden. Jedes umgetauschte
Hardwaregerät ist während des restlichen Zeitraums der ursprünglichen Garantie oder
während dreißig (30) Tagen gedeckt, je nachdem, welcher Zeitraum der längere ist, oder
während eines in Ihrem Gerichtsbezirk vorgegebenen zusätzlichen Zeitraums. Diese
Garantie erstreckt sich nicht auf Probleme oder Beschädigungen, die auf Folgendes
zurückzuführen sind: (1) höhere Gewalt, Spannungsspitzen, Zweckentfremdung,
Missbrauch, Nachlässigkeit, Unfall, Abnutzung, falsche Handhabung, falsche Anwendung
oder andere, nicht mit Schäden des Hardwaregeräts in Zusammenhang stehende
Page 25

Ursachen, (2) unbefugte Reparaturen, Änderungen, Manipulationen oder Demontagen; (3)
unsachgemäßer Betrieb oder unsachgemäße Wartung, Verwendung des Geräts unter
Missachtung der Geräteanleitungen oder Verbindung mit einer ungeeigneten
Spannungsversorgung oder (4) Verwendung von Verbrauchsartikeln wie Ersatzbatterien,
die nicht von Vuzix zur Verfügung gestellt wurden, außer wo solcherlei Einschränkungen
nach anwendbarem Recht unzulässig sind.
So erhalten Sie technischen Support
Technischer Support wird als Unterstützung bei Fragen zu Problemen mit dem VuzixHardwaregerät definiert. Technischer Support für die Hardware und ihre Software steht
während der ersten neunzig (90) Tage ab dem Datum des Gerätekaufs zur Verfügung. Ihre
mit einem Datum versehene Rechnung oder Lieferungsbestätigung, die das Datum des
Kaufs oder des Mietens des Geräts aufweist, gilt als Ihr Nachweis des Kauf- oder
Mietdatums. Sie werden eventuell gebeten, als Bedingung der Inanspruchnahme von
technischem Support einen Kauf- oder Mietnachweis zu erbringen. Die Adressen und
Kontaktinformationen des technischen Service von Vuzix stehen in der mit dem Gerät
gelieferten Dokumentation sowie über das Internet auf unserer globalen Website unter
www.vuzix.com
So erhalten Sie Support zur Inanspruchnahme von Garantieleistungen
Vuzix ist der Garantiegeber unter der vorliegenden eingeschränkten Garantie. Wir
empfehlen, dass bevor Sie einen Garantieanspruch geltend machen, den Supportabschnitt
unter www.Vuzix.com einsehen, der technische Unterstützung bietet. Garantieansprüche
können nicht durch Verkaufsstellen bearbeitet werden, und alle anderen produktbezogenen
Fragen sollten direkt an Vuzix gerichtet werden. Die Adressen und Kontaktinformationen
des Vuzix-Kundendiensts stehen in der mit dem Gerät gelieferten Dokumentation sowie
über das Internet auf unserer globalen Website unter www.vuzix.com
auch die Vuzix-Filialen oder -Zweigstellen Ihres Landes sowie deren örtliche Adressen
angegeben sind. Sie haben auch die Möglichkeit, sich schriftlich an uns zu wenden: Vuzix
Sales Support, 75 Town Centre Drive, Rochester, NY 14623, USA.
Haftungsbeschränkung
VUZIX HAFTET UNTER KEINEN UMSTÄNDEN FÜR KONKRETE SCHÄDEN,
INDIREKTE SCHÄDEN, BEILÄUFIG ENTSTANDENE SCHÄDEN ODER
FOLGESCHÄDEN, EINSCHLIESSLICH, JEDOCH NICHT BESCHRÄNKT AUF,
ENTGANGENE GEWINNE ODER UMSÄTZE ODER VERLORENE DATEN (DIREKT
ODER INDIREKT) ODER GEWERBLICHE VERLUSTE, DIE AUF EINE VERLETZUNG
DER AUSDRÜCKLICHEN ODER STILLSCHWEIGENDEN GARANTIE DES PRODUKTES
ZURÜCKZUFÜHREN SIND, SELBST WENN VUZIX ÜBER DIE MÖGLICHKEIT
SOLCHER SCHÄDEN INFORMIERT WURDE. In einigen Gerichtsbezirken ist der
Ausschluss oder die Einschränkung von konkreten Schäden, indirekten Schäden, beiläufig
entstandenen Schäden oder Folgeschäden nicht zulässig, weshalb die oben aufgeführte
Einschränkung bzw. der oben aufgeführte Ausschluss eventuell nicht auf Sie zutrifft, wobei
der übrige Teil dieser eingeschränkten Garantie jedoch weiterhin volle Gültigkeit hat.
Dauer der stillschweigenden Garantien
AUSSER WENN NACH ANWENDBAREM RECHT UNZULÄSSIG, BESCHRÄNKT SICH
IN BEZUG AUF DIESES HARDWAREGERÄT JEGLICHE STILLSCHWEIGENDE
GARANTIE ODER BEDINGUNG DER MARKTGÄNGIGKEIT ODER EIGNUNG FÜR
EINEN BESTIMMTEN ZWECK AUF DIE DAUER DES OBEN AUFGEFÜHRTEN
ZEITRAUMS DER EINGESCHRÄNKTEN GARANTIE. In einigen Gerichtsbezirken ist die
Einschränkung der Dauer einer stillschweigenden Garantie nicht zulässig, weshalb die
oben aufgeführte Einschränkung eventuell nicht auf Sie zutrifft. Bitte beachten Sie, dass
innerhalb der Europäischen Union jeder Garantiezeitraum unter zwei Jahren auf zwei Jahre
angehoben wird, außer im Falle der Verwendung für gewerbliche Zwecke.
zur Verfügung.
zur Verfügung, wo
Page 26

Verwendung der Video-Brille
Entfernen Sie vor der ersten Verwendung der Video-Brille den
durchsichtigen abziehbaren Linsenschutzfilm von der Innenseite der
Viewer-Linse ab, und laden Sie die Batterie auf (siehe Aufladen).
Die iWear AV920-Video-Brille kann mit einem beliebigen 2D- oder 3DVideogerät mit kompatiblen Anschlüssen verbunden werden. Der AV920
kann feststellen, ob es sich beim Videosignal um PAL oder NTSC
handelt und nimmt eine entsprechende automatische Einstellung vor.
Multifunktions-Schaltradtaste
Unterhalb der rechten vorderen Kante
der Video-Brillen-Anzeige befindet
sich ein Multifunktions-Schaltrad.
Durch das Drehen des MultifunktionsRads wird die Auswahl der
Menüoptionen aktiviert und die
Einstellungen werden angepasst.
Wenn Sie darauf drücken, funktioniert
es als Doppelfunktionstaste. Durch ein
kurzes Drücken und Loslassen
können Menüoptionen ausgewählt
werden, während Sie durch ein mindestens drei Sekunden langes
Drücken Zugriff auf eine zweite Ebene von Tastenbefehlen e
rhalten.
Strom ein/aus: Drücken und loslassen, um Video-Brille
einzuschalten.
Mindestens drei Sekunden lang gedrückt halten,
um die Video-Brille auszuschalten. Wenn mehrere
Minuten lang kein Videosignal zur Verfügung
steht, wird sie automatisch ausgeschaltet.
Lautstärkeregelung: Rad drehen, um Lautsprecher lauter oder leiser zu
stellen. Nur verfügbar, wenn das OSD nicht
angezeigt wird.
Zugriffs-OSD: Drücken und loslassen, um auf das
Bildschirmanzeige-Menü (On Screen Display,
OSD) zuzugreifen und es auszublenden.
OSD-Menü: Rad drehen, um Menüauswahl zu ändern.
Drücken und loslassen, um ein OSDMenüelement auszuwählen.
Page 27

Bildschirmanzeige-Menü (OSD)
Wenn Sie das Schaltrad mindestens drei Sekunden lang gedrückt
halten, werden die folgenden Menübefehle im unteren Bereich der
iWear-Anzeige horizontal eingeblendet. Über diese Befehle können Sie
die Anzeigeeinstellungen der Video-Brille anpassen.
Helligkeit der Anzeige einstellen
Kontrast der Anzeige einstellen
Anzeigemodus auswählen
Helligkeit des Hintergrundlichts einstellen
Anzeigeeinstellungen auf Werkseinstellungen zurücksetzen
OSD beenden
Anzeigemodi
Die Video-Brille kann stereoskopische 3D-Bilder auf zwei Arten
anzeigen. Wenn der Videoinhalt über iWear-3DSteuerungsinformationen aktiviert ist, wird er automatisch im
ordnungsgemäßen 3D-Modus angezeigt. Wenn der 3D-Inhalt keine
iWear-3D-Steuerungsinformationen enthält, wählen Sie den
ordnungsgemäßen Anzeigemodus über die OSD-Steuerungen aus.
Anzeigemodus auswählen und einstellen
Sie können auf das OSD zugreifen, indem Sie das Schaltrad
länger als drei Sekunden gedrückt halten. Wenn das OSD
sichtbar ist, drehen Sie das Schaltrad, um das Symbol für die
Optionen des Anzeigemodus auszuwählen.
Nach Auswahl des Anzeigemodus-Befehls drehen Sie das Schaltrad, um
einen der Anzeigemodi auszuwählen. Drücken Sie auf das Schaltrad und
lassen sie es wieder los, um Ihre Auswahl zu treffen.
2D-Anzeigemodus L/R-Anzeigemodus R/L-Anzeigemodus
Verwenden Sie für sämtlichen monoskopischen (2D-)Videoinhalt den
2D-Anzeigemodus.
Page 28

Bei Videos liegt für 3D-Video kein Standard für die Verwendung des L/Roder R/L-Modus vor. Die einfachste Methode, den für ein Video
verwendeten Modus zu bestimmen, besteht darin, einen auszuprobieren.
Wenn die 3D-Qualität niedriger als erwartet ist, schalten Sie in den
anderen Modus über.
Einstellen des AccuTilt®-Viewers
Das Einstellen des AccuTilt-Viewers wird über eine
Vuzix-Technologie ausgeführt, die eine 15-GradVerstellung des Winkels des Anzeigegehäuses
ermöglicht und somit eine optimale Ausrichtung
gewährleistet.
Halten Sie die vordere Anzeige des iWear-Viewers an
beiden Seiten fest, und
die Anzeige optimal auszurichten
neigen Sie sie nach oben oder nach unten, um
.
Anpassen und Abnehmen der Lautsprecher
Sie können den Sitz der Stereolautsprecher der Video-Brille anpassen
oder die Lautsprecher abnehmen, falls Sie ein anderes
Lautsprechersystem verwenden möchten.
Anders als bei Ohrstöpseln, die Sie in die Ohren einpassen können, sind
diese Lautsprecher so entworfen, dass sie zur Gewährleistung eines
länger anhaltenden Hörkomforts auf dem äußeren Bereich der Ohren
anliegen. Biegen Sie den Schaft des Lautsprechers in eine Position, die
sich komfortabel anfühlt.
Ein Lautsprecher kann abgenommen
werden, indem Sie ihn fest an seiner
Basis nahe dem Bügel halten und
gerade abziehen. Führen Sie das
Verfahren in umgekehrter Reihenfolge
aus, um die Lautsprecher wieder
einzusetzen.
Die Video-Brille verfügt über eine Single-Input-Minibuchse für Line-LevelAudio und -Video in Stereo, die am Batteriegehäuse mit „AV“
gekennzeichnet ist. Das Batteriegehäuse enthält eine zweite Minibuchse
(Kopfhörer-Symbol), an die Sie einen externen Kopfhörer anschließen
können.
Page 29

Anpassen der Nasenbügel
Die Video-Brille ist mit
verstellbaren
Nasenbügeln
ausgestattet, die
stundenlangen
Komfort bieten und
über einen breiten
Einstellungsbereich
verfügen. Brillenträger können die Nasenbügel so einstellen, dass die
Video-Brille über und vor der Brille getragen werden kann.
Sie können die Nasenbügel verstellen, indem Sie die Auflagefläche
eines Nasenbügels zwischen Daumen und Zeigefinger halten und den
Bügel in eine passende Stellung biegen. Wiederholen Sie dieses
Verfahren mit der Auflagefläche des anderen Nasenbügels. Nehmen Sie
dann geringfügige Anpassungsänderungen vor, bis ein komfortabler Sitz
erzielt wird.
Die Nasenbügel sind so entworfen, dass sie Ihren persönlichen
Bedürfnissen entsprechend angepasst werden können. Sie sind nicht
dafür vorgesehen, für verschiedene Benutzer wiederholt verstellt zu
werden. Spitze Winkel und übermäßiges Verbiegen kann zu
Metallermüdung oder vorzeitigem Bruch der Bügel führen.
Halteband
Im Lieferumfang ist ein Halteband enthalten, mit
der Sie die Video-Brille in Situationen befestigen
können, wenn Sie sie über Ihrer Brille tragen oder
wenn Sie mit dem Kopf auf einem Kissen oder
einem anderen Objekt aufliegen, durch das die
Video-Brille verrutschen könnte.
Anschließen an eine Videoquelle
Die Art des Kabels, über das die
Video-Brille mit einer Videoquelle
verbunden wird, hängt von den
verfügbaren Anschlüssen des
Ursprungsgeräts ab. Die folgende
Illustration zeigt ein
gemischtadriges Audio/Videokabel, das mit dem AVAnschluss am Batteriegehäuse
verbunden wird – demselben Anschluss, der für sämtliche
Videokabelverbindungen verwendet wird.
Page 30

Wenn keines der bereitgestellten Kabel mit dem Videogerät kompatibel
ist, können Sie auf der Vuzix-Website
optionalen Kabeln suchen. Ein optionales S-Video-Kabel für viele Arten
von Laptops sowie eine umfangreiche Auswahl an Kabeln für andere
Geräte sind erhältlich.
(unter www.vuzix.com) nach
Batterieaufladung
Die Video-Brille wird mit einem USBKabel für das Aufladen der Batterien
geliefert. Das Kabel kann an
verschiedene Arten von USBEnergiequellen angeschlossen werden,
wie z. B. an Desktop- oder LaptopComputer, an einen USB-Anschluss,
wie er in Flugzeugen verwendet wird, oder an einen einsteckbaren
Wechsel- oder Gleichstromadapter, w
Optionale Stromadapter sind über die Vuzix-Website
www.vuzix.com) erhältlich.
ie er z. B. an Handys zu finden ist.
USB-
Energiequelle
(unter
Reinigung
Verwenden Sie ein weiches, trockenes Tuch zum Reinigen des
Gehäuses der iWear AV920-Video-Brille und ihrer Optik. Der
Stofftragebeutel, der mit der Video-Brille geliefert wurde, eignet sich
hierfür. Verwenden Sie keine Flüssig- oder Sprühreinigungsmittel.
Aktualisierung
Die Video-Brille kann von Ihnen selbst aktualisiert werden, damit sich
Ihre Verwendung des Geräts so positiv wie möglich gestaltet. Besuchen
Sie die Website www.vuzix.com/support
zu aktualisieren oder um aktualisierte Software herunterzuladen.
, um die iWear AV920-Firmware
Page 31

Fehlerbehebung
Die Video-Brille schaltet sich nicht ein.
• Drücken Sie rechts unterhalb der Anzeige auf das Schaltrad.
• Laden Sie die Batterie auf.
Das Gerät schaltet sich sofort, nachdem ich es eingeschaltet habe, wieder aus.
• Laden Sie die Batterie auf.
Lassen Sie die Batterie, wenn die Batterieladung sehr niedrig ist, einige
Minuten lang aufladen, bevor Sie das Gerät einschalten.
Ein Lautsprecher oder beide Lautsprecher geben keinen Ton aus.
• Stellen Sie sicher, dass sämtliche Anschlüsse ordnungsgemäß
eingesteckt sind.
• Nehmen Sie die Lautsprecher ab, und setzen Sie sie dann wieder in die
Bügel des Viewers ein.
Die normale (2D-)Videoanzeige ist nicht besonders klar.
• Stellen Sie sicher, dass sich die Video-Brille nicht im 3D-Modus
befindet.
Das Gerät zeigt 3D-Inhalt an, aber er ist verschwommen und nicht in 3D.
• Stellen Sie den Anzeigemodus auf L/R-Anzeige ein. Wird das Problem
hierdurch nicht behoben, stellen Sie den Modus auf R/L-Anzeige ein.
Kontaktaufnahme mit VUZIX
Wenn Sie sich in den USA oder in Kanada befinden, können Sie sich
über die Vuzix-Website
setzen oder uns telefonisch unter (800) 436-7838 erreichen (wochentags
von 9.00 bis 18.00 Uhr EST, außer an Feiertagen).
Vergewissern Sie sich, dass Sie die folgenden Informationen zur Hand
haben, bevor Sie Kontakt mit uns aufnehmen:
• Seriennummer, Modellname und Modellnummer
• Betriebssystem und Betriebssystemversion (wenn Anfrage mit einem
Computer in Verbindung steht)
• Relevante Fehlermeldungen
• Installierte Hardware oder Software Dritter
• Add-On-Optionen, falls zutreffend
• Detaillierte Fragen, zu denen Sie Antworten benötigen
(unter www.vuzix.com) mit uns in Verbindung
Page 32

Elektro- und Elektronikalt-/schrottgeräte (WEEE)
1. Für die Herstellung des von Ihnen erworbenen Geräts war die Gewinnung
und Verwendung von Rohstoffquellen erforderlich. Das Gerät kann
Schadstoffe enthalten, die sich negativ auf Gesundheit und Umwelt
auswirken können.
2. Wir bitten Sie freundlich, sich an eine Recycling-Annahmestelle zu wenden,
damit diese Schadstoffe nicht in die Umwelt gelangen, und um einen Beitrag
zur Verminderung der Erschöpfung von Rohstoffquellen zu leisten.
Recycling-Annahmestellen können das meiste Material, das in Altgeräten
enthalten ist, auf sinnvolle Art wieder verwenden oder wieder verwerten.
3. Das Symbol des durchgestrichenen Mülleimers lädt Sie ein, von diesen
Annahmestellen Gebrauch zu machen.
4. Weitere Auskünfte zum Sammeln, Wiederverwenden oder Recyceln von
Systemen erteilt Ihnen Ihre örtliche oder regionale
Abfallbeseitigungsbehörde.
5. Sie können sich auch gerne mit uns in Verbindung setzen, um weitere
Informationen über die ökologische Leistung unserer Produkte zu erhalten.
© 2008 Vuzix Corporation
Alle Rechte vorbehalten. Alle aufgeführten Handelsbezeichnungen sind eingetragene
Marken der entsprechenden Besitzer.
Design Vuzix, New York. Made in USA.
FÜR DEN PRIVAT- ODER BÜROGEBRAUCH.
Patent-Nr. 811906-0001 Patente ausstehend.
Page 33

iWear®AV920
Guíadelusuario
¡Lea las instrucciones de seguridad incluidas antes de proceder a
la utilización de las gafas!
Bienvenido al mundo de la visualización en gran pantalla. Las gafas
®
de vídeo Vuzix™ iWear
extraordinaria en imágenes 2D y 3D en su propia pantalla de cine
personal y portátil.
Contenido del paquete:
AV920 le ofrecen una alta calidad
1. Cable USB y cargador 5. Gafas de visualización de vídeo
2. Cable para iPod* 6. Compartimento de la batería
3. Correa de ajuste 7. Cable audio/vídeo
4. Funda/limpiador de lentes
• Folleto de la Guía del usuario no mostrado
El modelo de cable para iPod puede variar en
*
distintas regiones según la disponibilidad y los
modelos iPod actuales.
Page 34

Instrucciones importantes de seguridad
Siga estas instrucciones de seguridad cuando utilice o manipule las gafas de vídeo VUZIX
para reducir el riesgo de fuego, descarga eléctrica y daños personales o materiales.
1. LEA TODAS LAS INSTRUCCIONES E INFORMACIÓN DE SEGURIDAD
PROPORCIONADAS ANTES DE UTILIZAR ESTE PRODUCTO.
2. Utilice el producto sólo para el propósito especificado, tal y como se describe en este
manual.
3. Se requiere una estrecha supervisión cuando esté producto sea utilizado o esté al
alcance de los niños.
4. Los niños menores de siete (7) años todavía están aprendiendo a enfocar y hacer
seguimiento con los ojos. Su visión es todavía inmadura. Por estos motivos, ESTE
PRODUCTO NO DEBERÍA SER UTILIZADO POR NIÑOS MENORES DE SIETE (7)
AÑOS.
5. Un porcentaje muy reducido de la población puede experimentar ataques epilépticos al
visualizar cierto tipo de luces o diseños intermitentes que son comunes en nuestro entorno
diario. Estas personas también pueden experimentar ataques al ver cierto tipo de
imágenes de televisión o al jugar a determinados videojuegos en monitores normales, lo
que incluye un sistema de visualización como éste. Estos efectos pueden verse
incrementados por el gran tamaño de las pantallas de vídeo de este dispositivo. Por ello,
consulte a un médico antes de utilizar este dispositivo si es usted epiléptico, o durante su
uso si experimenta cualquiera de estos síntomas: visión alterada, tics musculares, otros
movimientos involuntarios, pérdida de consciencia sobre lo que le rodea, confusión mental
y/o convulsiones.
6. El vídeo inmersivo, ya sea en un televisor normal, en una pantalla de cine o en un visor
de vídeo VUZIX, puede tener potencialmente efectos adversos en el usuario, lo que
incluye mareos, efectos perceptivos posteriores y desorientación, así como una
disminución de la estabilidad postural y la tensión ocular. Descanse con frecuencia para
reducir la posibilidad de estos efectos, tal y como se suele sugerir para otros artículos,
como teclados y monitores de ordenador, en los que se tiende a fijar la vista o a
concentrarse. Si sus ojos muestran signos de fatiga o sequedad, o cualquiera de los
síntomas especificados previamente, suspenda de inmediato el uso de este dispositivo y
no vuelva a utilizarlo hasta al menos 30 minutos después de la completa desaparición de
los síntomas.
7. Puede darse una pérdida temporal de audición o una alteración auditiva como resultado
de niveles excesivos de volumen emitidos por los auriculares. Ajuste siempre el volumen a
un nivel seguro ANTES de utilizar el producto o los auriculares.
8. Sea consciente en todo momento de lo que le rodea. Este producto le sumergirá en
imágenes y sonidos muy realistas, algo que posiblemente le hará olvidar el mundo real que
le rodea y los posibles peligros para su bienestar y el de otras personas. NO utilice este
producto cerca de escaleras, balcones u otros elementos que le puedan hacer tropezar,
chocar, golpearse o caer. Este producto debería utilizarse sólo estando sentado y nunca
mientras se hace uso de objetos afilados o potencialmente peligrosos, ni mientras se está
utilizando cualquier tipo de dispositivo mecánico, conduciendo vehículos de motor o
realizando cualquier acción que normalmente requiera prestar atención y ver lo que se
está haciendo.
9. Este producto puede conectarse a una toma eléctrica y se pueden utilizar cables para
aumentar la distancia entre los distintos componentes. Tenga cuidado de no enredarse con
estos cables, ya que esto puede ser un peligro potencial tanto para su seguridad como
para la de otras personas.
10. No desmonte este producto. Si necesita llevar a cabo algún tipo de comprobación o
reparación, póngase en contacto con VUZIX utilizando la información de contacto de
asistencia que encontrará en este manual.
Page 35

11. No tire de los cables ni los enrosque o ate utilizando nudos fuertes o tirantes. No
cuelgue el producto ni lo deje suspendido por cualquiera de sus cables. Para desconectar
los cables, tire del conector del cable. Los cables dañados por las acciones previamente
descritas no están cubiertos por la garantía limitada del producto.
12. No deje caer, no golpee ni permita que ninguna parte del producto sea golpeada o
agitada de forma agresiva. Estas acciones pueden dañar el producto y anular la garantía.
13. Guarde estas instrucciones.
Desenchufe inmediatamente este producto de fuentes de alimentación externas
(incluyendo USB) si:
• El adaptador, el cable eléctrico o el cable USB están dañados o pelados.
• Se ha rociado, salpicado o vertido un líquido sobre el producto.
• Cualquier componente del producto se ha caído o está dañado.
• El producto muestra un cambio perceptible en su funcionamiento.
Instrucciones de seguridad de la batería
• Las baterías contienen materiales tóxicos. No queme, desmonte o perfore la batería.
• No se deshaga de las baterías echándolas al fuego.
Deseche las baterías utilizando un método que cumpla las leyes y normativas locales.
Garantía limitada de productos de hardware de
Vuzix
Vuzix garantiza que el producto de hardware Vuzix no tiene defecto alguno, tanto de
materiales como de fabricación, durante el tiempo especificado en el período de garantía
(un año), que empieza a partir de la fecha de compra. Si el producto de hardware Vuzix
está destinado a un uso comercial (incluyendo el alquiler o leasing), el período de garantía
se reducirá a noventa (90) días desde la fecha de compra. Excepto donde esté
expresamente prohibido por la legislación vigente, esta garantía no es transferible y está
limitada al comprador original, no aplicándose a ninguna otra persona, lo que incluye
cualquier persona a la que se pueda transferir o vender el producto posteriormente. Esta
garantía le proporciona derechos legales específicos; puede tener otros derechos que
varían según las distintas legislaciones locales, algunos de los cuales no están afectados
por las disposiciones de esta garantía limitada.
Esta garantía limitada no cubre ningún aspecto subjetivo o estético del producto de
hardware, y no se proporciona garantía alguna de este tipo a este respecto. Vuzix no
garantiza que el funcionamiento del producto sea continuo o sin errores. La garantía
limitada que aquí se define es la única garantía que se ofrece, y se proporciona en lugar
de cualquier otra garantía o condición expresa o implícita (a excepción de cualquier
garantía implícita irrenunciable que exista), incluyendo las creadas por cualquier otra
documentación o embalaje. Ninguna información ni sugerencia (verbal o escrita)
proporcionada por Vuzix, sus agentes, filiales, distribuidores o proveedores, o los
empleados o agentes de estos, creará una garantía o condición o ampliará el alcance de
esta garantía limitada.
Cualquier software distribuido con el producto de hardware, pertenezca o no a la marca
Vuzix, no está cubierto por esta garantía limitada. Consulte el acuerdo de licencia que
acompaña al software (que podrá ver cuando lo instale) para obtener detalles sobre sus
derechos en relación con el uso de dicho software.
Compensaciones
Toda la responsabilidad de Vuzix y la compensación a la que usted tiene derecho de forma
exclusiva por cualquier incumplimiento de la garantía será, a elección de Vuzix, (1) reparar
o sustituir todo el hardware o parte de él, (2) cambiar el hardware por un producto que sea
nuevo o que haya sido fabricado a partir de piezas nuevas o reparadas y que sea al menos
funcionalmente equivalente al producto original o (3) reembolsar el precio pagado menos
una depreciación razonable basada en la utilización que se haya hecho del producto,
siempre que el hardware se devuelva al punto de compra o a otra ubicación indicada por
Page 36

Vuzix con una copia del recibo de compra o de un recibo detallado con fecha. Excepto en
los casos en los que la legislación vigente especifique lo contrario, usted tendrá que pagar
todos los gastos de envío y manipulación asociados con el transporte (incluyendo el
embalaje) para el servicio de garantía. Vuzix puede, si así lo decide, utilizar piezas nuevas,
reparadas o usadas que estén en buenas condiciones de funcionamiento para reparar o
sustituir cualquier producto de hardware. Cualquier producto de hardware sustituido estará
garantizado durante el tiempo restante del período de garantía original o treinta (30) días,
lo que sea más largo, o por cualquier período de tiempo adicional que pueda ser aplicable
según su jurisdicción. Esta garantía no cubre problemas o daños provocados por (1)
causas de fuerza mayor, subidas de tensión, mal uso, abuso, negligencia, accidente,
desgaste, maltrato, mala aplicación u otras causas no relacionadas con defectos en el
dispositivo de hardware; (2) cualquier reparación, modificación, manipulación o desmontaje
no autorizados; (3) funcionamiento o mantenimiento inadecuados, uso no acorde a las
instrucciones del producto o conexión a un voltaje incorrecto; o (4) utilización de
consumibles, tales como baterías de repuesto, no proporcionadas por Vuzix excepto en los
casos en los que esta restricción esté prohibida por la legislación vigente.
Cómo obtener asistencia técnica
La asistencia técnica es la asistencia que se ofrece para preguntas sobre asuntos
relacionados con el producto de hardware de Vuzix. La asistencia técnica para el hardware
y su software está disponible durante los primeros noventa (90) días a partir de la fecha de
compra del producto. El recibo de venta o de entrega fechado, en el que se muestra la
fecha de compra o de alquiler del producto, es la prueba de compra o alquiler. Se le puede
pedir que proporcione una prueba de compra o alquiler como condición para recibir
asistencia técnica del software. Puede encontrar las direcciones y la información de
contacto del servicio técnico de Vuzix en la documentación que acompaña al producto y en
el sitio web de nuestro sitio global www.vuzix.com
Cómo obtener asistencia en garantía
Vuzix es el garante de esta garantía limitada. Antes de presentar una reclamación en
garantía, le recomendamos que visite la sección de asistencia de www.Vuzix.com para
obtener asistencia técnica. Las reclamaciones en garantía no pueden procesarse a través
del punto de venta y cualquier otra pregunta relacionada con el producto debe remitirse
directamente a Vuzix. Las direcciones y la información de contacto del servicio al
consumidor de Vuzix pueden encontrarse en la documentación que acompaña al producto
y en el sitio web de nuestro sitio global www.vuzix.com
filiales o sucursales de Vuzix para su país y su dirección local. Asimismo, puede escribir a
Vuzix Sales Support, 75 Town Centre Drive, Rochester, NY 14623, EE. UU.
Limitación de responsabilidad
VUZIX NO PODRÁ CONSIDERARSE RESPONSABLE EN ABSOLUTO DE NINGÚN
DAÑO ESPECIAL, INDIRECTO, FORTUITO O RESULTANTE, INCLUYENDO, PERO SIN
LIMITARSE A ELLO, LA PÉRDIDA DE BENEFICIOS, INGRESOS O DATOS (YA SEA DE
FORMA DIRECTA O INDIRECTA) O LA PÉRDIDA COMERCIAL POR INCUMPLIMIENTO
DE CUALQUIER GARANTÍA EXPRESA O IMPLÍCITA DEL PRODUCTO, INCLUSO EN
EL CASO DE QUE SE HAYA NOTIFICADO A VUZIX DE LA POSIBILIDAD DE DICHOS
DAÑOS. Algunas jurisdicciones no permiten la exclusión o limitación de daños especiales,
indirectos, fortuitos o resultantes, por lo que la limitación o exclusión previamente
mencionada puede no ser aplicable en su caso, aunque el resto de esta garantía limitada
seguirá siendo completamente vigente y aplicable.
Duración de las garantías implícitas
A EXCEPCIÓN DE LAS PROHIBICIONES VIGENTES POR LA LEGISLACIÓN
APLICABLE, CUALQUIER GARANTÍA IMPLÍCITA O CONDICIÓN DE
COMERCIABILIDAD O IDONEIDAD PARA UN DETERMINADO PROPÓSITO DE ESTE
PRODUCTO DE HARDWARE ESTÁ LIMITADA A LA DURACIÓN DEL PERÍODO DE
GARANTÍA LIMITADA ESTABLECIDO PREVIAMENTE PARA EL PRODUCTO. Algunas
jurisdicciones no permiten limitaciones en lo que respecta a la duración de la garantía
implícita, por lo que la limitación anterior puede no ser aplicable en su caso. Tenga en
cuenta que, en la Unión Europea, cualquier período de garantía inferior a dos años debe
aumentarse hasta dos años, excepto en el caso de utilización para fines comerciales.
.
, donde también se identifican las
Page 37

Utilización de las gafas de vídeo
Antes de utilizar su gafas de vídeo por primera vez, quite la protección
de la superficie interior de las lentes de visualización y cargue la batería
(véase la sección Carga).
Las gafas de vídeo iWear AV920 pueden conectarse a cualquier
dispositivo de vídeo 2D o 3D con conectores compatibles. Las AV920
reconocerán si la señal de vídeo es PAL o NTSC y se ajustarán de
forma automática.
Botón/rueda de control multifunción
Encontrará una rueda de control
multifunción debajo de la esquina
delantera derecha de la unidad de
visualización de las gafas de vídeo.
Mediante el giro de esta rueda
multifunción podrá seleccionar
opciones de menú y modificar los
distintos ajustes. Cuando se pulsa,
funciona como un botón de doble
acción. Si pulsa y suelta rápidamente,
seleccionará las distintas opciones del
menú, mientras que si pulsa y mantiene pulsado el botón (durante 3
segundos o más) accederá a un segundo nivel de comandos de botón.
Encender/apagar: Pulse y suelte para encender las gafas.
Pulse y mantenga pulsado el botón durante 3
segundos o más para apagar las gafas.
También se apagarán automáticamente si no
hay señal de video disponible durante varios
minutos.
Ajustar el volumen: Gire para subir o bajar el volumen del auricular.
Disponible sólo cuando no se muestra la
visualización en pantalla.
Acceder a visualización en pantalla: Pulse y suelte para acceder al
menú de visualización en pantalla y para
descartarlo.
Menú de visualización en pantalla: Gire para cambiar la selección del
menú. Pulse y suelte para seleccionar un
elemento del menú de visualización en pantalla.
Page 38

Menú de visualización en pantalla
Cuando pulse y mantenga pulsada la rueda de control durante más de 3
segundos, aparecerán los siguientes comandos de menú
horizontalmente en la parte inferior de la pantalla de iWear. Estos
comandos le permitirán modificar los ajustes de visualización de las
gafas de vídeo.
Ajustar el brillo
Ajustar el contraste
Seleccionar el modo de visualización
Ajustar el brillo de la iluminación de fondo
Restaurar los ajustes de visualización a los predeterminados
de fábrica
Salir de la visualización en pantalla
Modos de visualización
Las gafas de vídeo pueden mostrar imágenes 3D estereoscópicas en
dos formas. Si el vídeo contiene información de control iWear 3D, se
mostrará automáticamente en el modo 3D adecuado. Si el contenido 3D
no contiene información de control iWear 3D, utilice los controles de
visualización en pantalla para seleccionar el modo de visualización
correcto.
Seleccionar y ajustar el modo de visualización
Acceda a la visualización en pantalla pulsando y manteniendo
pulsada la rueda de control durante más de 3 segundos. Con la
visualización en pantalla visible, gire la rueda de control para
seleccionar el icono de opciones del modo de visualización.
Con el comando de modo de visualización seleccionado, gire la rueda
de control para seleccionar uno de los modos de visualización. Pulse y
suelte la rueda de control para realizar su selección.
Modo de visualización 2D Modo de visualización L/R Modo de visualización R/L
Page 39

Utilice el modo de visualización 2D para todo el contenido de vídeo
monoscópico (2D).
No hay estándar para los vídeos que utilizan el modo L/R o R/L para el
vídeo 3D. La forma más fácil de determinar cuál de ellos se utiliza para
un vídeo dado es simplemente probar uno y si la calidad 3D no es la
esperada, cambiar a otro.
Ajuste del visor AccuTilt®
El ajuste del visor AccuTilt es una tecnología de Vuzix
que le permite ajustar el ángulo de visualización en 15
grados para garantizar una alineación óptima.
Agarre la parte delantera del visor iWear por los dos
lados e
alinear las pantallas
inclínelo hacia arriba o hacia abajo para
.
Ajuste y remoción de auriculares
Los auriculares estéreo de las gafas de vídeo son ajustables; además
son desmontables, lo que le permitirle utilizar un sistema de auriculares
alternativo si lo desea.
A diferencia de los auriculares convencionales que se ajustan dentro de
sus oídos, estos auriculares están diseñados para colocarse por fuera
de sus oídos, proporcionándole así comodidad durante más tiempo.
Doble el auricular hasta localizar una
posición que le resulte cómoda.
Para quitar los auriculares, cójalos
con firmeza por la base cerca del
lateral y tire en dirección horizontal
hacia atrás. Invierta el proceso para
volver a insertar los auriculares.
Las gafas de vídeo tienen un solo mini-jack de entrada para audio
estéreo y vídeo, marcado como “AV” en el compartimento de la batería.
Además, hay un segundo mini-jack en el compartimento de la batería
(con el icono de un auricular) para conectar auriculares externos.
Ajuste del puente de la nariz
Las gafas de vídeo están
equipadas con un puente de
nariz que le ofrece horas de
comodidad y proporciona una
amplia gama de posiciones de
ajuste. Las personas que
lleven gafas pueden ajustar
Page 40

este puente para ponerse las gafas de vídeo encima de sus propias
gafas.
Para ajustar el puente de la nariz, agarre una de las almohadillas con el
dedo pulgar y el índice y gire el brazo hasta dar con la posición
adecuada. Repita la operación con la otra almohadilla y, a continuación,
lleve a cabo pequeños ajustes hasta que encuentre la posición más
cómoda.
El puente de la nariz está diseñado para adaptarse a sus necesidades
personales, no para ajustarlo continuamente para varios usuarios. Si
utiliza ángulos marcados o dobla este puente de forma excesiva, puede
tener como resultado tanto que se estropee el metal como un desgaste
prematuro de los enganches del puente de la
nariz.
Correa de ajuste
Se proporciona una correa de ajuste para
asegurar las gafas de vídeo cuando las utilice
sobre sus propias gafas o cuando ponga la
cabeza sobre una almohada u otro objeto que
pueda hacer que estas gafas cambien de
posición.
Conexión a una fuente de vídeo
El cable utilizado para conectar las gafas a
una fuente de vídeo dependerá de las
conexiones disponibles en el dispositivo
fuente. La ilustración que aparece a
continuación muestra un cable c
audio/v
ídeo que se conecta al puerto AV
del compartimento de la batería, el mismo
puerto que se utiliza para todas las conexiones de cable de vídeo.
Si ninguno de los cables proporcionados es compatible con su
dispositivo de vídeo, visite el sitio web de Vuzix
encontrará cables opcionales. También tiene a su disposición un cable
S-vídeo opcional para utilizarlo con muchos portátiles, así como una
amplia variedad de cables para otros dispositivos.
Carga
Las gafas de vídeo vienen con un
cable USB para cargar la batería.
Este cable puede conectarse a
diversas fuentes USB entre las que se
incluyen los ordenadores de
sobremesa y portátiles, un puerto
ompuesto
(www.vuzix.com) donde
Fuente de
alimentación
USB
Page 41

USB como los proporcionados en muchos aviones o un adaptador de
corriente A/C o D/C como los que se usan en muchos teléfonos móviles.
Encontrará adaptadores de corriente opcionales en el sitio web de Vuzix
(www.vuzix.com
).
Limpieza
Utilice un trapo suave y seco para limpiar el soporte y las lentes de las
gafas de vídeo iWear AV920. La gamuza que viene con la funda de las
gafas es adecuada para realizar esta operación. No utilice limpiadores
líquidos ni de aerosol.
Actualización
Puede actualizar sus gafas para garantizar la mejor experiencia posible.
Para actualizar el firmware de las iWear AV920 o descargar software
actualizado, visite www.vuzix.com/support
.
Resolución de problemas
Las gafas de vídeo no se encienden.
• Pulse la rueda de control que encontrará en la parte derecha, debajo de
la pantalla.
• Cargue la batería.
El producto se apaga inmediatamente después de encenderlo.
• Cargue la batería.
Cuando la batería está muy baja, deje que se cargue durante varios
minutos antes de encender el producto.
No hay audio en uno o más auriculares.
• Asegúrese de que todas las conexiones están bien enchufadas.
• Pruebe a desenchufar los auriculares y a volver a enchufarlos en los
laterales del visor.
El vídeo normal (2D) no se ve muy claro.
• Asegúrese de que las gafas de vídeo no se encuentran en el modo 3D.
Estoy visualizando contenido 3D pero se ve borroso y no en 3D.
• Configure el modo de visualización en L/R y, si no funciona, configúrelo
en el modo R/L.
Page 42

Contacto con VUZIX
En Estados Unidos y Canadá, diríjase al sitio web de Vuzix
(www.vuzix.com
a 6 de la tarde (hora del Este) de lunes a viernes, excepto días festivos.
Antes de llamar, asegúrese de tener a mano la siguiente información:
• Número de serie, nombre y número de modelo.
• Sistema operativo y versión, cuando se asocie a un ordenador.
• Mensajes de error aplicables.
• Hardware o software de terceros que tenga instalados.
• Programas añadidos si corresponde.
• Cuestiones detalladas para las que necesita respuesta.
Directiva sobre residuos de aparatos eléctricos y
electrónicos (RAEE)
1. El equipo que ha comprado ha necesitado la extracción y utilización de
recursos naturales para su producción. Puede contener sustancias
peligrosas que podrían afectar a la salud y al medio ambiente.
2. Con el fin de evitar la propagación de estas sustancias en nuestro medio
ambiente y disminuir la presión sobre los recursos naturales, le instamos a
que utilice los sistemas de eliminación adecuados. Estos sistemas
reutilizarán o reciclarán la mayor parte de los materiales cuando llegue el
final de la vida útil del equipo de forma segura.
) o llame al teléfono (800) 436-7838, de 9 de la mañana
3. El icono de la papelera tachada le invita a utilizar estos sistemas.
4. Si necesita más información sobre los sistemas de recogida, reutilización y
reciclaje, póngase en contacto con su administración de residuos local o
regional.
5. También puede ponerse en contacto con nosotros para obtener más
información sobre el comportamiento medioambiental de nuestros
productos.
© 2008 Vuzix Corporation
Reservados todos los derechos. Todos los nombres comerciales son marcas registradas
de sus respectivos propietarios.
Diseñado por Vuzix en Nueva York. Fabricado en EE. UU.
PARA UTILIZACIÓN DOMÉSTICA O EN OFICINAS.
Patente número 811906-0001 Patentes en trámite.
Page 43

iWear®AV920
Guidadell'utente
Leggere le istruzioni di sicurezza allegate prima di usare il visore!
Benvenuti nel mondo dello spettacolo su maxi-schermo! Il visore
®
Vuzix™ iWear
qualità per il vostro cinema portatile personale!
Contenuto della confezione:
AV920 offre straordinarie immagini 2D e 3D di alta
1. Cavo USB e del caricabatteria 5. Visore per video
2. Cavo iPod* 6. Scatola della batteria
3. Cinghia di fissaggio 7. Cavo composito audio/video
4. Custodia di trasporto / Pulitore per lenti
Il modello del cavo iPod può variare in base alla
*
regione, le versioni e la disponibilità dei modelli
iPod correnti.
• La guida dell'utente non è illustrata
Page 44

Istruzioni importanti per la sicurezza
Rispettare queste istruzioni per la sicurezza durante l'uso o la manipolazione del visore
VUZIX, in modo da ridurre il rischio di incendio, scossa elettrica e danni a persone e cose.
1. PRIMA DI USARE QUESTO PRODOTTO LEGGERE TUTTE LE ISTRUZIONI E LE
INFORMAZIONI DI SICUREZZA FORNITE.
2. Usare il prodotto esclusivamente per lo scopo previsto, come descritto in questo
manuale.
3. È necessario controllare strettamente il prodotto, quando questo si trova in prossimità di
bambini.
4. I bambini di età inferiore a sette (7) anni sono ancora in fase di apprendimento per la
messa a fuoco e la visione. La loro vista è ancora immatura. Per questi motivi, QUESTO
PRODOTTO NON DEVE ESSERE USATO DAI BAMBINI DI ETÀ INFERIORE A SETTE
(7) ANNI.
5. Una minima percentuale della popolazione può essere soggetta a crisi epilettiche
durante la visione di alcuni tipi di luci lampeggianti o schemi che sono comunemente
presenti nel nostro ambiente quotidiano. Queste persone possono anche essere soggette a
crisi mentre guardano alcuni tipi di immagini televisive o giocano con determinati
videogame su schermi regolari, incluso l'impiego di un sistema di visualizzazione come
questo. Questi effetti possono subire un incremento a causa delle dimensioni degli schermi
video in questo dispositivo. Di conseguenza è opportuno consultare un medico prima di
utilizzare questo dispositivo, qualora si verifichi uno dei seguenti sintomi durante la visione
con questo dispositivo: visione alterata, spasmi muscolari, altri movimenti involontari,
perdita della consapevolezza del proprio ambiente circostante, confusione mentale e/o
convulsioni.
6. I video ad immersione, siano essi visualizzati su una normale TV, uno schermo
cinematografico o un visore VUZIX, possono avere potenziali effetti avversi sull'utente, tra
cui vertigini, effetti successivi alla percezione e disorientamento, oltre ad una ridotta
stabilità posturale e affaticamento oculare. Fare delle pause frequenti per mitigare la
potenzialità di questi effetti, così come è consigliato per altri prodotti analoghi, come
tastiere e monitor di computer, sui quali si tende a fissare lo sguardo e la concentrazione.
Qualora gli occhi mostrino segni di affaticamento o secchezza, o qualora si notino i sintomi
succitati, interrompere immediatamente l'uso di questo dispositivo ed evitare di riprenderlo
per almeno 30 minuti dopo la scomparsa completa dei sintomi.
7. I livelli eccessivi del volume emesso dagli altoparlanti possono provocare la perdita o la
compromissione temporanea dell'udito. Regolare sempre il volume su un livello innocuo
PRIMA di indossare il prodotto o gli altoparlanti.
8. Mantenere sempre il contatto con il mondo circostante. Questo prodotto vi farà
immergere in suoni e visioni realistici, causando probabilmente l'estraniazione dal mondo
reale intorno a voi, con grave pericolo per la vostra incolumità e per quella degli altri. NON
usare questo prodotto vicino a scale, balconi, o altri luoghi da cui è possibile cadere, contro
i quali è possibile urtare, essere colpiti o schiacciati. Questo prodotto deve essere usato
esclusivamente in posizione seduta, mai mentre si utilizzano oggetti taglienti o
potenzialmente pericolosi, mentre si azionano dispositivi meccanici di qualsiasi tipo o si
eseguono azioni che normalmente richiedono la visione di ciò che si sta facendo.
9. Questo prodotto può essere collegato ad una presa di alimentazione e i cavi possono
raggiungere altri componenti. Prestare attenzione affinché i cavi non si aggroviglino intorno
al corpo o rappresentino una potenziale minaccia alla sicurezza degli altri.
10. Non smontare questo prodotto. Qualora sia richiesto un intervento di riparazione,
rivolgersi a VUZIX usando le informazioni di contatto per l'assistenza riportate in questo
manuale.
Page 45

11. Non tirare o torcere il cavo, né piegare alcuno dei cavi o legarlo con nodi stretti. Non
appendere il prodotto, né lasciarlo appeso per uno dei suoi cavi. Tirare il connettore per
scollegare i cavi. I cavi danneggiati da tali azioni non sono coperti dalla garanzia limitata
del prodotto.
12. Non lasciare cadere o urtare il prodotto, né consentire che alcuna delle sue parti sia
urtata o agitata violentemente. Tali azioni possono danneggiare il prodotto, rendendo nulla
la garanzia.
13. Conservare queste istruzioni.
Scollegare immediatamente il prodotto dalle sorgenti di alimentazioni esterne nei seguenti
casi:
• Adattatore di alimentazione, cavo di alimentazione o cavo USB danneggiati o rotti.
• Spruzzi o versamenti di liquido sul prodotto.
• Caduta o danneggiamento di uno qualsiasi dei componenti del prodotto.
• Chiara alterazione delle prestazioni del prodotto.
Istruzioni di sicurezza per la batteria
• Le batterie contengono materiali tossici. Non bruciare, smontare, tagliare o forare le
batterie.
• Non smaltire le batterie nel fuoco.
• Smaltire le batterie in modo conforme alle leggi e alle normative locali.
Garanzia limitata del prodotto per l'hardware
Vuzix
Vuzix garantisce che il prodotto hardware Vuzix sarà privo di difetti materiali e di
fabbricazione per tutto il periodo di tempo specificato nella garanzia (un anno), a partire
dalla data d'acquisto. Se il prodotto hardware Vuzix è usato a scopo commerciale (incluso il
noleggio o l'affitto), il periodo di garanzia sarà ridotto a soli novanta (90) giorni a partire
dalla data d'acquisto. Ad eccezione dei casi vietati dalla legge vigente, questa garanzia non
è trasferibile, essendo esclusivamente limitata all'acquirente originario e a nessun altro,
inclusi i beneficiari di un trasferimento o una vendita successivi. Questa garanzia offre
specifici diritti legali. Alcune normative locali possono attribuire anche altri diritti, alcuni dei
quali non sono interessati dalle garanzie presenti in questa garanzia limitata.
Questa garanzia limitata, analogamente a qualunque altra garanzia, non copre gli aspetti
soggettivi o estetici del prodotto hardware. Vuzix non garantisce il funzionamento
ininterrotto o privo di errori del prodotto. La garanzia limitata succitata è l'unica garanzia
offerta, ed è fornita al posto di qualsiasi altra garanzia o condizione espressa o implicita (ad
eccezione delle garanzie implicite non ricusabili esistenti), incluse quelle eventualmente
risultanti da altre documentazioni o confezioni. Nessuna delle informazioni o delle
indicazioni (orali o documentate) fornite da Vuzix, dai suoi agenti, affiliati, concessionari o
fornitori, potrà essere assunta come garanzia o condizione, né potrà estendere l'ambito di
questa garanzia limitata.
Gli eventuali software distribuiti con il prodotto hardware di Vuzix, con o senza il marchio
Vuzix, non sono coperti da questa garanzia limitata. Consultare l'accordo per la licenza
allegato al software (visibile al momento dell'installazione) per informazioni relative ai diritti
sul suo utilizzo.
Ricorsi
L'intera responsabilità legale di Vuzix e il ricorso esclusivo del Cliente per qualsiasi
violazione della garanzia consisteranno, a discrezione di Vuzix: (1) nella riparazione o
sostituzione dell'hardware completo o di parte di esso, (2) nella sostituzione dell'hardware
con un prodotto nuovo o prodotto con parti nuove o usate funzionanti, tale da avere una
funzionalità almeno equivalente a quella del prodotto originale, o (3) nel rimborso del
prezzo pagato dal Cliente, meno il ragionevole deprezzamento dovuto all'uso, a condizione
che l'hardware sia reso al punto d'acquisto o in altro luogo scelto da Vuzix, unitamente allo
Page 46

scontrino fiscale o alla fattura recante la data. Ad eccezione dei casi proibiti dalla legge
vigente, le spese di spedizione e di trasporto (incluso l'imballaggio) per gli interventi di
riparazione in garanzia saranno a carico del Cliente. Vuzix può, a sua discrezione,
utilizzare parti nuove o usate, ma funzionanti in modo ottimale, per riparare o sostituire
qualsiasi prodotto hardware. Tutti i prodotti hardware sostitutivi saranno garantiti per il
periodo rimanente della garanzia originale o per trenta (30) giorni, in base al caso che
presenta durata superiore, o per l'eventuale periodo di tempo addizionale previsto dalla
legislazione locale. Questa garanzia non copre i problemi o i danni dovuti a: (1) cause di
forza maggiore, picchi di tensione, uso incorretto, abuso, negligenza, incidente, usura e
rottura, errata manipolazione, errata applicazione o altre cause non correlate a difetti del
dispositivo hardware, (2) riparazioni, modifiche, manomissione o smontaggio non
autorizzati, (3) uso o manutenzione incorretti, uso non conforme alle istruzioni del prodotto
o collegamento a sorgenti di alimentazione inadeguate, (4) uso di consumabili, come le
batterie di ricambio, non forniti da Vuzix, ad eccezione dei casi in cui tali restrizioni siano
proibite dalla legge vigente.
Come ottenere assistenza tecnica?
L'assistenza tecnica viene definita come assistenza relativa a domande su questioni legate
al prodotto hardware Vuzix. L'assistenza tecnica per l'hardware e il suo software è
disponibile per i primi novanta (90) giorni dalla data di acquisto del prodotto. La ricevuta di
vendita o di consegna, che riporta la data di acquisto o di leasing di questo prodotto,
costituisce la prova di acquisto o leasing da parte del Cliente. Potrebbe essere necessario
presentare una prova d'acquisto come condizione per l'ottenimento dell'assistenza tecnica
per il software. Gli indirizzi e i dati per contattare il servizio di assistenza tecnica sono
disponibili nella documentazione allegata al prodotto e sul nostro sito web globale:
www.vuzix.com
Come ottenere assistenza in garanzia?
Vuzix è il garante ai sensi di questa garanzia limitata. Prima di presentare una richiesta di
assistenza in garanzia, consigliamo di visitare la nostra sezione relativa all'assistenza
tecnica su www.Vuzix.com. Le richieste di assistenza in garanzia non possono essere
elaborate tramite il punto d'acquisto, e tutte le domande relative ad altri prodotti devono
essere inviate direttamente a Vuzix. Gli indirizzi e le informazioni per contattare il servizio di
assistenza clienti di Vuzix sono reperibili nella documentazione allegata al prodotto e sul
nostro sito web globale www.vuzix.com
filiali di Vuzix nel paese del Cliente, con i relativi indirizzi. Inoltre è possibile scrivere a:
Vuzix Sales Support, 75 Town Centre Drive, Rochester, NY 14623, USA.
Limitazione di responsabilità
VUZIX NON È RESPONSABILE PER EVENTUALI DANNI SPECIALI, INDIRETTI,
INCIDENTALI O CONSEQUENZIALI DI QUALUNQUE TIPO, TRA I QUALI (PUR NON
LIMITANDOSI A QUESTI) PERDITA DI PROFITTI, REDDITO O DATI (DIRETTI O
INDIRETTI) O PERDITA COMMERCIALE DOVUTA ALLA VIOLAZIONE DI QUALUNQUE
GARANZIA ESPRESSA O IMPLICITA RELATIVA AL PRODOTTO, ANCHE QUALORA
VUZIX SIA STATA INFORMATA DELLA POSSIBILITÀ DI TALI DANNI. Alcune legislazioni
non consentono l'esclusione o la limitazione dei danni speciali, indiretti, incidentali o
consequenziali, perciò la limitazione o esclusione succitate potrebbero non essere valide
per il Cliente, anche se la parte restante di questa garanzia limitata conserverà la propria
forza ed efficacia.
Durata delle garanzie implicite
AD ECCEZIONE DEI CASI PREVISTI DALLA LEGGE VIGENTE, TUTTE LE GARANZIE
IMPLICITE O CONDIZIONI DI COMMERCIABILITÀ O IDONEITÀ PER UNO SCOPO
PARTICOLARE, RIFERITE A QUESTO PRODOTTO HARDWARE, SONO LIMITATE AL
PERIODO DI VALIDITÀ DELLA GARANZIA LIMITATA, DICHIARATA
PRECEDENTEMENTE PER QUESTO PRODOTTO. Alcune legislazioni non consentono
limitazioni alla durata della garanzia implicita, quindi la limitazione succitata potrebbe non
essere valida per il Cliente. Occorre notare che nell'Unione Europea i periodi di garanzia
inferiori a due anni possono essere estesi a due anni, tranne che nei casi di utilizzo a
scopo commerciale.
.
, che potrà anche identificare eventuali sussidiarie o
Page 47

Uso del visore
Prima di utilizzare il visore per la prima volta, rimuovere la pellicola
adesiva di protezione delle lenti dalla superficie interna e caricare la
batteria (vedere Ricarica).
Il visore iWear AV920 può essere collegato a qualsiasi dispositivo video
2D o 3D mediante connettori compatibili. Lo AV920 rileverà
automaticamente la modalità PAL o NTSC, regolandosi
automaticamente.
Manopola/ pulsante di comando multifunzione
Sotto l'angolo anteriore destro del
visore si trova una Manopola di
comando multifunzione.
Ruotando la manopola multifunzione è
possibile selezionare le opzioni dei
menu e le impostazioni di regolazione.
Una volta premuta funzionerà come
un pulsante a doppia azione.
Premendo e rilasciando rapidamente
si selezionano le opzioni del menu,
mentre premendo e tenendo premuto
(per 3 secondi o più) viene visualizzato un secondo livello di co
pulsante.
mandi a
Accensione/spegnimento:
Regolazione del volume:
OSD di accesso:
Menu OSD:
premere e rilasciare per accendere il
visore. Premere e tenere premuto per 3
secondi o più per spegnere il visore, che si
spegnerà anche automaticamente
assenza di segnale per parecchi minuti.
ruotare per aumentare o diminuire il
volume dell'altoparlante. Disponi
quando l'OSD non è visualizzato.
premere e rilasciare per attivare e
disattivare
Display).
ruotare per cambiare la selezione del
menu. Premere e rilasciare
una voce del menu OSD.
il menu OSD (On Screen
per selezionare
bile solo
in
Page 48

Menu di visualizzazione su schermo (OSD)
Premendo e tenendo premuta la manopola di comando per più di 3
secondi compariranno i seguenti comandi di menu, in posizione
orizzontale e trasversale nella sezione inferiore del display iWear. Questi
comandi consentono di regolare le impostazioni di visualizzazione del
visore.
Regolazione luminosità display
Regolazione contrasto display
Selezione modalità display
Regolazione retroilluminazione display
Reimpostazione display sui parametri predefiniti di fabbrica
Uscita dall'OSD
Modalità display
Il visore può visualizzare immagini stereoscopiche 3D in due modi. Se il
contenuto video è abilitato per le informazioni di controllo 3D iWear, tali
informazioni saranno visualizzate nella corretta modalità 3D. Se il
contenuto 3D non contiene informazioni di controllo iWear 3D, usare i
comandi OSD per selezionare la corretta modalità di visualizzazione.
Selezione e regolazione della modalità di visualizzazione:
accedere all'OSD premendo e tenendo premuta la manopola di
comando per più di 3 secondi. Con l'OSD visibile, ruotare la
manopola di comando per selezionare l'icona delle opzioni di
modalità di visualizzazione.
Una volta selezionata la modalità di visualizzazione, ruotare la manopola
di controllo delle modalità di visualizzazione. Premere e rilasciare la
manopola di comando per effettuare la selezione.
Modalità di
visualizzazione 2D
Modalità di
visualizzazione S/D
Modalità di
visualizzazione D/S
Usare la modalità di visualizzazione 2D per tutti i contenuti video
monoscopici (2D).
Page 49

Non esiste alcuno standard per i video che usano le modalità S/D o D/S
per i video 3D; il metodo più semplice per determinare quello utilizzato
consiste semplicemente nel provarne uno, passando ad un altro nel caso
in cui la qualità video non sia quella prevista.
Regolazione AccuTilt® del visualizzatore
La regolazione AccuTilt de
Vuzix che consente di rego
display di 15 gradi per g
ottimale.
Afferrare il display frontale iWear ad entrambi i lati e
inclinarlo
r
Regolazione e
Entrambi gli alto e rimovibili,
qualora si desiderasse utilizzare un sistema di altopa
A differenza degli auricolari che si infilano negli orecchi, questi
altoparlanti sono progettati per restare all'esterno degli orecchi, per
prolungato comfort di ascolto. Flettere lo stelo dell'altoparlante in una
posizione confortevole.
Per rimuovere gli altoparlanti, afferrare
uno stelo saldamente all
alla tempia, e tirarlo indietro.
Procedere nell'ordine inverso per
reinserire gli altoparlanti.
imozione degli altoparlanti
parlanti stereo del visore sono regolabili
su o giù per allineare i display.
a base, vicino
l visore è una tecnologia
lare l'angolo del corpo dei
arantire un allineamento
rlanti alternativi.
un
Il visore ha un singolo miniconnettore d
stereo e video, contrasseg
della batteria è presente anche un secon
cuffia) per il collegamento ad una cuffia esterna.
nato con "
i ingresso per le linee audio
AV" sul vano della batteria. Sul vano
do miniconnettore (icona della
Regolazione del ponte nasale
Il visore è dotato di un ponte
nasale regolabile che offre
ore di comfort e un'ampia
serie di possibilità di
regolazione. I portatori di
occhiali possono regolare il
ponte nasale per indossare
il visore sopra e davanti ai
propri occhiali.
Per regolare il ponte nasale af
l'indice, quindi
piegare il braccio nella posizione appropriata. Ripetere
ferrare uno dei due cuscinetti tra il pollice e
Page 50

con l'altro cuscinetto nasale, quindi apportare gli aggiustamenti
secondari per ottenere una posizione confortevole.
Il ponte nasale è progettato per essere regolato in base alle esigenze
personali, ma non per essere regolato frequentemente per utenti multipli.
Gli angoli acuti e la piegatura eccessiva
possono causare fatica nel metallo e la rottura
precoce degli steli del ponte nasale.
Cinghia di fissaggio
Per fissare il visore, in caso di utilizzo sopra gli
occhiali o con la testa r
eclinata su un cuscino
o un oggetto simile, è presente una cinghia di
fissaggio che ne impedisce lo spostamento.
Collegamento ad una sorgente video
Il cavo usato per collegare il visore
ad una sorgente video dipende dal
tipo di connettori presenti sul
dispositivo sorgente. L'illustrazione
mostra un c
udio/video per il collegamento
a
alla porta AV sul vano della
batteria - la stessa porta usata per
tutti i collegamenti video via cavo.
avo composito
Se nessuno dei cavi forniti è compatibile con il dispositivo video,
controllare il sito web Vuzix
(www.vuzix.com) per i cavi opzionali. Per
l'uso con la maggior parte di laptop è disponibile un cavo opzionale SVideo, oltre ad un vasto assortimento di cavi per altri dispositivi.
Ricarica
Il visore è provvisto di un cavo USB
per la rica
rica delle batterie. Questo
cavo può essere collegato a varie
sorgenti di alimentazione USB, tra un
PC o un laptop, una porta USB
analoga a quelle presenti su molti
aerei o adattatori di alimentazione CA
o CC, come quelli usati per molti
telefoni cellulari.
Sul Error! Hyp
erlink reference not valid. (www.vuzix.com
disponibili altri tipi di adattatori opzionali.
USB per
alimentazione
) sono
Page 51

Pulizia
Usare un panno morbido asciutto per pulire il visore iWear AV920 ed i
suoi elementi ottici. La busta di trasporto fornita con il visore è adatta a
tale scopo. Non usare detergenti liquidi o spray.
Aggiornamento
Il visore è aggiornabile sul campo per garantire la migliore esperienza
visiva possibile. Visitare www.vuzix.com/support
firmware della iWear AV920 o per scaricare il software aggiornato.
per aggiornare il
Risoluzione dei problemi
Il visore non si accende.
• Premere la manopola di comando sul lato destro, sotto al display.
• Ricaricare la batteria.
Il prodotto si spegne immediatamente dopo l'accensione.
• Ricaricare la batteria.
Quando la carica della batteria è molto bassa, è necessario eseguire
una ricarica per parecchi minuti prima di riaccendere il prodotto.
Assenza di audio in uno o più altoparlanti.
• Verificare che tutti i connettori siano correttamente inseriti.
• Provare a disconnettere gli altoparlanti e a riconnetterli sulle tempie del
visore.
Il video normale (2D) non è molto chiaro.
• Verificare che il visore non sia in modalità 3D.
Riesco a visualizzare il contenuto 3D, ma è piuttosto confuso e non in 3D.
• Impostare la modalità di visualizzazione su display S/D. Qualora non
funzioni, impostare su modalità video D/S.
Page 52

Rivolgersi a VUZIX
Negli Stati Uniti o in Canada, consultare il Error! Hyperlink reference
not valid. (www.vuzix.com
436-7838, dalle 9:00 alle 18:00 (ora della costa orientale degli Stati Uniti)
nei giorni feriali, ad esclusione delle festività.
Assicurarsi di avere a portata di mano le seguenti informazioni prima di
chiamare:
• Numero di serie, nome del modello e numero del modello
• Sistema operativo e versione del sistema operativo, se associato ad
un computer
• Messaggi d'errore pertinenti
• Hardware o software di terze parti installato
• Opzioni aggiuntive, se pertinente
• Domande dettagliate per le quali si richiedono risposte
Rifiuti di apparecchiature elettriche ed elettroniche (WEEE)
1. Il dispositivo acquistato ha richiesto l'estrazione e l'impiego di risorse naturali
per la sua produzione. Può contenere sostanze pericolose che potrebbero
influire sulla salute e sull'ambiente.
) o chiamare il numero verde USA +1 (800)
2. Per evitare la dispersione di tali sostanze nel nostro ambiente, e per ridurre
la pressione sulle risorse naturali, vi suggeriamo di ricorrere ai sistemi di
recupero appropriati. In tal modo sarà possibile riutilizzare o riciclare in
modo adeguato la maggior parte dei materiali risultanti alla fine del ciclo di
vita del dispositivo.
3. Il simbolo del cestino dei rifiuti barrato è un invito a ricorrere a tali sistemi.
4. Qualora siano richieste ulteriori informazioni sulla raccolta, il riutilizzo e i
sistemi di riciclaggio, rivolgersi alle autorità locali o regionali per la gestione
dei rifiuti.
5. Inoltre, potete contattarci per ulteriori informazioni sulle prestazioni
ambientali dei nostri prodotti.
© 2008 Vuzix Corporation
Tutti i diritti riservati. Tutti i nomi commerciali sono marchi registrati dei rispettivi proprietari.
Progettato da Vuzix a New York. Prodotto in USA.
DA UTILIZZARE IN CASA O IN UFFICIO.
Numero di brevetto 811906-0001 Brevetti in corso di registrazione.
Page 53

iWear®AV920
Guiadoutilizador
Leia as instruções de segurança inclusas antes de utilizar os óculos!
Bem-vindo ao mundo da visão em ecrã gigante! Os seus óculos
®
para vídeo Vuzix™ iWear
qualidade de imagens em 2D e 3D no seu sistema de cinema
pessoal e portátil!
Conteúdo da embalagem:
AV920 oferecem uma extraordinária alta
1. Cabo USB e cabo carregador 5. Visor dos óculos para vídeo
2. Cabo do iPod* 6. Caixa das baterias
3. Correia de aperto 7. Cabo de áudio/vídeo
4. Bolsa/limpador de lentes
• Folheto do guia do utilizador não mostrado
O modelo de cabo do iPod pode variar de
*
acordo com a região e os modelos actuais de
iPod e a sua disponibilidade.
Page 54

Instruções de segurança importantes
Siga estas instruções de segurança ao utilizar ou manusear os seus óculos para vídeo
VUZIX para reduzir o risco de incêndio, choque eléctrico e ferimentos pessoais ou danos
materiais.
1. LEIA TODAS AS INSTRUÇÕES E INFORMAÇÕES DE SEGURANÇA FORNECIDAS
ANTES DE UTILIZAR ESTE PRODUTO.
2. Utilize o produto apenas para os fins previstos, conforme descrito neste manual.
3. É necessária uma supervisão cuidadosa quando este produto estiver próximo de
crianças.
4. As crianças com menos de sete (7) anos ainda estão a aprender a focalizar e a localizar
com os olhos. A sua visão ainda é imatura. Por esses motivos, ESTE PRODUTO NÃO
DEVE SER UTILIZADO POR CRIANÇAS COM MENOS DE SETE (7) ANOS.
5. Uma parte muito pequena da população pode sofrer ataques epilépticos quando
visualizar certos tipos de luzes ou padrões luminosos a piscar que estão comummente
presentes no nosso meio ambiente diário. Essas pessoas também podem sofrer
convulsões enquanto assistem a alguns tipos de filmes na televisão ou jogar certos jogos
de vídeo em monitores normais, inclusive ao utilizarem um sistema de visor como este.
Esses efeitos podem ser intensificados devido aos ecrãs de vídeo terem dimensões
grandes neste dispositivo. Sendo assim, consulte um médico se apresentar um quadro
clínico de epilepsia antes de utilizar este dispositivo, ou se sentir qualquer um dos
seguintes sintomas enquanto utiliza este dispositivo: visão alterada, contracção muscular,
outros movimentos involuntários, perda de consciência sobre onde se encontra, confusão
mental e/ou convulsões.
6. O vídeo imersivo, seja visualizado num televisor normal, num ecrã de cinema ou num
visor de vídeo VUZIX, pode causar efeitos adversos no utilizador, inclusive enjoo de
movimento, percepção de pós-efeitos e desorientação, hipotensão postural e cansaço
ocular. Faça pausas frequentes para diminuir o potencial desses efeitos, como é
comummente sugerido para outros artigos, como teclados e monitores de computador, nos
quais pode tender a fixar-se ou concentrar-se. Se os seus olhos mostram sinais de fadiga
ou secura ou se qualquer um dos sintomas acima for observado, pare imediatamente de
utilizar este dispositivo e não continue a utilizá-lo durante, pelo menos, 30 minutos após os
sintomas terem desaparecido completamente.
7. A perda ou dano permanente ou temporário na audição pode resultar de níveis
excessivos do volume emitido a partir dos auscultadores. Ajuste sempre o volume para um
nível seguro ANTES de utilizar o produto ou os auscultadores.
8. Tome sempre consciência do mundo à sua volta. Este produto mergulhá-lo-á em
imagens e sons reais, possivelmente levando-o a esquecer-se do mundo real à sua volta e
das ameaças contra o seu bem-estar e o bem-estar dos outros. NÃO utilize este produto
junto de escadas, varandas ou outras coisas em que possa tropeçar, esbarrar, ser
derrubado ou cair. Este produto só deve ser utilizado quando estiver sentado e nunca
quando estiver a utilizar objectos pontiagudos ou potencialmente perigosos, a manobrar
qualquer forma de dispositivo mecânico, a conduzir veículos automotores ou a realizar
qualquer acção que normalmente requeira que veja o que está a fazer.
9. Este produto pode ser ligado a uma tomada eléctrica e os cabos podem estender-se
entre os componentes. Tome cuidado para que esses fios não se enrolem em si ou
provoquem uma potencial ameaça contra a segurança dos outros.
10. Não desmonte este produto. Se forem necessárias reparações, contacte a VUZIX
utilizando as informações de contacto de suporte que se encontram neste manual.
11. Não puxe ou arranque o cabo, não torça nenhum dos cabos nem os amarre em nós
pronunciados ou apertados. Não pendure o produto nem permita que seja suspenso por
Page 55

qualquer um dos seus cabos. Para desligar os cabos, puxe o conector do cabo. Os cabos
danificados por tais acções não estão cobertos pela garantia limitada do produto.
12. Não derrube, golpeie ou deixe que qualquer parte do produto seja tocada ou sacudida
agressivamente. Tais acções podem danificar o produto e anular a sua garantia.
13. Guarde estas instruções.
Desligue imediatamente o produto de fontes eléctricas externas se:
• o adaptador de energia, o cabo de alimentação ou o cabo USB estiver danificado ou
desgastado;
• algum líquido tiver sido aplicado com vaporizador, borrifado ou derramado sobre o
produto;
• qualquer componente do produto tiver caído ou tiver sido danificado;
• o produto apresentar qualquer mudança aparente no seu desempenho.
Instruções de segurança das baterias
• As baterias contêm materiais tóxicos. Não queime, desmonte, disforme ou perfure as
baterias.
• Não deite as baterias numa fogueira.
• Deite fora as baterias por meio de um método que seja consistente com as suas leis e
regulamentações locais.
Garantia limitada do produto de hardware Vuzix
A Vuzix garante que seu produto de hardware Vuzix estará livre de defeitos no material ou
no fabrico pela duração do tempo especificado no período de garantia (um ano), a
começar a partir da data de compra. Se o seu produto de hardware Vuzix for utilizado
para fins comerciais (incluindo aluguer ou leasing), o período de garantia será reduzido
para apenas noventa (90) dias a partir da data de compra. Excepto quando proibido pela
legislação aplicável, essa garantia não é transmissível, sendo limitada ao comprador
original e não se aplicando a ninguém mais, inclusive a qualquer pessoa a quem
posteriormente fizer qualquer transferência ou venda. Esta garantia concede-lhe direitos
legais específicos e também pode ter outros direitos que variam conforme as leis locais,
algumas das quais não são afectadas pelas garantias nesta garantia limitada.
Esta garantia limitada não cobre, e nenhuma garantia de qualquer tipo é fornecida em
relação a, quaisquer aspectos subjectivos ou estéticos do produto de hardware. A Vuzix
não garante que o funcionamento do produto seja interrompido ou esteja livre de erros. A
garantia limitada supramencionada é a única garantia que lhe é feita e substitui todas as
outras garantias e condições expressas ou implícitas (excepto por qualquer garantia não
renunciável implícita que exista), incluindo qualquer uma criada por outra documentação
ou embalagem. Nenhuma informação ou sugestão (oral ou gravada) dada pela Vuzix,
pelos seus agentes, filiais, revendedores ou fornecedores, ou pelos seus funcionários ou
agentes, poderá criar uma garantia ou condição para estender o campo de aplicação desta
garantia limitada.
Nenhum software distribuído com o produto de hardware da Vuzix com ou sem o nome
comercial Vuzix está coberto por esta garantia limitada. Consulte o acordo de licença que
acompanha o software (visível aquando da sua instalação) para obter informações sobre
os seus direitos em relação à sua utilização.
Recursos
A total responsabilidade da Vuzix e seu recurso exclusivo por qualquer incumprimento de
garantia será, conforme a opção da Vuzix (1) reparar ou substituir toda e qualquer peça do
hardware; 2) trocar o hardware por um produto que seja novo ou que tenha sido
manufacturado a partir de peças novas ou utilizadas e reparadas e estiver, pelo menos,
funcionalmente equivalente ao produto original; ou (3) devolver a quantia paga por si
menos a depreciação razoável baseada na sua utilização real, desde que o hardware seja
devolvido ao posto de compra ou a outro determinado local conforme a Vuzix solicitar com
Page 56

uma cópia da factura ou recibo datado e detalhado. Salvo quando proibido pela legislação
aplicável, todos os custos de expedição e manuseio associados ao transporte (incluindo a
embalagem) por serviço de garantia ficarão a seu cargo. A Vuzix poderá, conforme optar,
utilizar peças novas, renovadas ou usadas em boas condições de funcionamento para
reparar ou substituir qualquer produto de hardware. Qualquer produto de hardware para
substituição será garantido pelo período restante da garantia original ou trinta (30) dias, o
que for mais longo, ou por qualquer período de tempo adicional que possa ser aplicável na
sua jurisdição. Essa garantia não cobre problemas ou danos resultantes de (1) motivos de
força maior, oscilação de corrente, má utilização, abuso, negligência, acidente, desgaste,
manuseio incorrecto, aplicação incorrecta ou outras causas não relacionadas com defeitos
no dispositivo de hardware; (2) qualquer reparação, modificação, deformação ou
desmontagem; (3) operação e manutenção impróprias, utilização que não estiver de
acordo com as instruções do produto ou ligação a fonte de alimentação imprópria; ou (4)
utilização de artigos de consumo, como baterias de substituição, não fornecidas pela
Vuzix, excepto onde tal restrição for proibida pela legislação aplicável.
Como obter suporte técnico
O suporte técnico é definido como a assistência com questões sobre o produto de
hardware Vuzix. O suporte técnico para hardware e o seu software estão disponíveis nos
primeiros noventa (90) dias a partir da data de compra do produto. A sua factura ou
entrega datada, mostrando a data de compra ou de leasing do produto, é a sua prova da
data de compra ou leasing. Pode ser solicitado a fornecer um comprovativo de compra ou
leasing como condição para receber suporte técnico do software. Os endereços e as
informações de contacto do serviço técnico para a Vuzix podem ser encontrados na
documentação que acompanha o seu produto e na rede no seu sítio Web global:
www.vuzix.com
Como obter suporte da garantia
A Vuzix é o fiador sob essa garantia limitada. Antes de submeter uma reclamação de
garantia, recomendamos a que visite a secção de suporte em www.Vuzix.com para obter
assistência técnica. As reclamações de garantia não podem ser processadas por meio do
posto de compra e quaisquer outras perguntas relacionadas com o produto devem ser
dirigidas directamente à Vuzix. Os endereços e as informações para contacto com o
serviço ao cliente para a Vizux podem ser encontrados na documentação que acompanha
o seu produto e na rede no nosso sítio Web global www.vuzix.com
identificará qualquer subsidiária ou filial da Vuzix em funcionamento no seu país e o seu
endereço. Também poderá escrever para: Vuzix Sales Support, 75 Town Centre Drive,
Rochester, NY 14623, EUA.
Exclusão de responsabilidade
A VUZIX NÃO SERÁ RESPONSÁVEL POR QUALQUER DANO ESPECIAL, INDIRECTO,
INCIDENTAL OU CONSEQUENCIAL, INCLUINDO MAS NÃO SE LIMITANDO À PERDA
DE LUCROS, RENDA OU DADOS (SEJAM ELES DIRECTOS OU INDIRECTOS) OU
POR PERDA COMERCIAL POR INCUMPRIMENTO DE QUALQUER GARANTIA
EXPRESSA OU IMPLÍCITA SOBRE O SEU PRODUTO, MESMO SE A VUZIX TIVER
SIDO AVISADA DA POSSIBILIDADE DE TAIS DANOS. Algumas jurisdições não
permitem a exclusão ou a limitação de danos especiais, indirectos, incidentais ou
consequenciais, assim, a limitação ou exclusão acima podem não se aplicar a si, mas o
restante dessa garantia limitada permanecerá em pleno vigor.
Duração de garantias implícitas
SALVO ATÉ ONDE PROIBIDO PELA LEGISLAÇÃO APLICÁVEL, QUALQUER
GARANTIA OU CONDIÇÃO IMPLÍCITA DE COMERCIALIZAÇÃO OU ADEQUAÇÃO A
UM DETERMINADO PROPÓSITO DESSE PRODUTO DE HARDWARE É LIMITADA NA
DURAÇÃO PARA O PERÍODO DE GARANTIA LIMITADA DECLARADA ACIMA PARA O
SEU PRODUTO. Algumas jurisdições não permitem limitações durante o período de
duração de uma garantia implícita, assim a exclusão acima pode não se aplicar a si. Note
que, na União Europeia, qualquer período de garantia inferior a dois anos será aumentado
para dois anos, excepto no caso de utilização para fins comerciais.
.
, o qual também
Page 57

Utilizar os seus óculos para vídeo
Antes de utilizar os seus óculos para vídeo pela primeira vez, retire o
filme claro de protecção das lentes da superfície de dentro das lentes do
visor e carregue a bateria (ver Carregamento).
Os óculos para vídeo iWear AV920 podem ser ligados a qualquer
dispositivo de vídeo em 2D ou 3D com conectores compatíveis. O
AV920 aperceber-se-á se o sinal de vídeo é PAL ou NTSC e ajustar-seá automaticamente.
Botão de controlo multifunções
Está localizado um botão de controlo
multifunções em baixo do canto direito
na frente da unidade do visor dos
óculos para vídeo.
Rodar o botão multifunções permitelhe a selecção de opções de menu e
de configurações dos ajustes. Quando
premido, funciona como um botão de
acção dupla. Premir rapidamente e
soltar permite-lhe seleccionar as
opções de menu, enquanto que, ao
premir e segurar (durante três segundos ou mais), é-lhe apresentado um
segundo nível de comandos de botões.
Ligado/desligado: Prima e solte para ligar os óculos.
Prima e mantenha premido durante três segundos
ou mais para desligar os óculos. Também desligará
automaticamente se não houver sinal de vídeo
disponível durante alguns minutos.
Ajustar o volume: Rodar para aumentar ou diminuir o volume do
altifalante. Disponível apenas quando o OSD não for
mostrado.
Aceder ao OSD: Premir e soltar e sair do menu OSD – On Screen
Display (Vizualização no ecrã).
Menu OSD: Rodar para mudar a selecção do menu. Premir e
soltar para seleccionar um item do menu OSD.
Page 58

Menu Visualização no ecrã (OSD)
Quando premir e manter premido o botão de controlo durante mais de
três segundos, os seguintes comandos de menu aparecerão
horizontalmente na secção inferior do seu visor iWear. Esses comandos
permitir-lhe-ão ajustar as configurações do visor dos seus óculos para
vídeo.
Ajustar o brilho do visor
Ajustar o contraste do visor
Seleccionar o modo do visor
Ajustar o brilho da luz de fundo do visor
Reinicializar as configurações do visor para os padrões de
fábrica
Sair do OSD
Modos do visor
Os seus óculos para vídeo podem mostrar imagens estereoscópicas em
3D de duas maneiras. Se o conteúdo do vídeo for habilitado com
informações de controlo em 3D do iWear, será automaticamente
apresentado no modo em 3D apropriado. Se o seu conteúdo em 3D não
contiver informações sobre controlo em 3D do iWear, utilize os controlos
OSD para seleccionar o modo de exibição correcto.
Seleccionar e ajustar o modo do visor:
Aceda ao OSD premindo e mantendo premido o botão de
controlo por mais de três segundos. Com o OSD visível, rode o
botão de controlo para seleccionar o ícone de opções de modo
do visor.
Com o comando de modo do visor seleccionado, rode o botão de
controlo para seleccionar um dos modos do visor. Prima e solte o botão
de controlo para fazer a sua selecção.
Modo do visor em 2D Modo do visor da E/D Modo do visor da D/E
Page 59

Utilize o modo do visor em 2D para todo o conteúdo de vídeo
monoscópico (2D).
Não há padrão para vídeos que utilizam o modo E/D ou D/E para vídeos
em 3D. O método mais fácil para determinar qual é o utilizado para um
dado vídeo é simplesmente testar um e, se a qualidade de 3D não for a
esperada, mudar para o outro.
Ajuste do visor AccuTilt®
O ajuste do visor do AccuTilt é uma tecnologia da
Vuzix que lhe permite ajustar o ângulo do visor em 15
graus para assegurar um óptimo alinhamento.
Segure o mostrador frontal do visor iWear em
qualquer um dos lados e
baixo para alinhar os visores
incline-o para cima ou para
.
Ajuste e remoção do altifalante
Os altifalantes estéreos dos seus óculos para vídeo são ambos
ajustáveis para que se adaptem ou para serem removidos se desejar
utilizar um sistema de altifalantes alternativo.
Ao contrário dos auriculares que se adaptam aos seus ouvidos, esses
altifalantes são projectados para ficarem do lado de fora dos seus
ouvidos para uma audição cómoda e mais duradoura. Estique a haste
do altifalante para uma posição cómoda.
Para remover os altifalantes, segure bem
a haste de um deles pela sua base, perto
da têmpora e puxe para trás. Faça o
processo inverso para reinserir os
altifalantes.
Os óculos para vídeo possuem uma mini-ficha de entrada única para
áudio e vídeo estéreo de nível de linha marcada como "AV" no
compartimento da bateria. Uma segunda mini-ficha também é fornecida
com o compartimento da bateria (ícone dos auscultadores) para ligar os
auscultadores externos.
Ajuste do arco nasal
Os seus óculos para vídeo
estão equipados com um arco
nasal ajustável que oferece
horas de comodidade e
fornece um amplo espectro
para ajustes. Os utilizadores
de lentes oculares por
Page 60

prescrição médica podem ajustar o seu arco nasal para utilizarem os
seus óculos para vídeo sobrepostos ou por cima das suas lentes.
Para ajustar o arco nasal, pegue numa protecção do arco nasal entre o
polegar e o dedo indicador e dobre o braço até uma posição adequada.
Repita com a outra protecção nasal e, depois, faça pequenos ajustes até
conseguir uma posição confortável.
O arco nasal foi concebido para ser ajustado às suas necessidades
pessoais – não para ser reajustado repetidamente para vários
utilizadores. Os ângulos agudos e uma curvatura excessiva podem
resultar no desgaste do metal e na falha prematura das hastes do arco
nasal.
Correia de aperto
É fornecida uma correia de aperto para ajudar a
segurar os seus óculos quando usar óculos por
prescrição médica ou quando apoiar a sua
cabeça numa almofada ou noutro objecto que
possa fazer com que os óculos para vídeo
mudem de posição.
Ligar a uma fonte de vídeo
O cabo utilizado para ligar os seus óculos a
uma fonte de vídeo dependerá das conexões
disponíveis do dispositivo fonte. A ilustração
inclusa mostra um cabo
é
ligado a uma porta AV no compartimento
da bateria – a mesma porta utilizada para
todas as conexões de cabo de vídeo.
de áudio/vídeo que
Se nenhum dos cabos fornecidos for compatível com o seu dispositivo
de vídeo, consulte o sítio Web da Vuzix
(www.vuzix.com) para cabos
opcionais. Um cabo de S-vídeo opcional está disponível para ser
utilizado com muitos computadores portáteis, assim como uma ampla
variedade de cabos para outros dispositivos.
Carregamento
Os seus óculos para vídeo vêm com um
cabo USB para carregar as suas baterias.
Esse cabo pode ser ligado a várias fontes
de alimentação USB, inclusive a um
computador de secretária ou portátil, a uma
porta USB como a fornecida em muitos
aviões ou a um adaptador de alimentação
A/C ou D/C, como os que são utilizados em muitos telemóveis.
Fonte de
alimentação
USB
Page 61

Estão disponíveis adaptadores de alimentação opcionais no
(www.vuzix.com
).
Limpeza
Utilize um pano seco macio para limpar a caixa dos seus óculos para
vídeo iWear e seus recursos ópticos. O pano que vem na bolsa com os
seus óculos é adequado para tal. Não utilize substâncias líquidas ou de
vaporização para limpar.
Actualização
Os seus óculos para vídeo são actualizáveis por campo por forma a
garantir a sua melhor experiência possível. Para actualizar o firmware do
seu iWear AV920 ou para descarregar o software actualizado, consulte
www.vuzix.com/support
.
Resolução de problemas
Os óculos para vídeo não ligam.
• Prima o botão de controlo no lado direito, abaixo do visor.
• Carregue a bateria.
O produto desliga-se imediatamente depois que o ligo.
• Carregue a bateria.
Quando a carga da bateria estiver extremamente fraca, deixe-a a
carregar durante alguns minutos antes de ligar o produto.
Não há áudio num ou em mais altifalantes.
• Assegure-se de que todas as conexões estão totalmente ligadas às
tomadas.
• Tente desligar os altifalantes e ligá-los de novo nas hastes do
visualizador.
O vídeo normal (2D) não está muito nítido.
• Certifique-se de que os seus óculos não estão no modo 3D.
Estou a visualizar conteúdo em 3D, mas está indistinto e não em 3D.
• Configure o modo de visualização para o visor E/D e, se isso não
funcionar, configure-o para o modo de visor D/E.
Page 62

Contactar a VUZIX
Nos Estados Unidos ou no Canadá, consulte (www.vuzix.com) ou ligue
para (800) 436-7838, das 9h às 18h nos dias úteis, excluindo feriados.
Certifique-se de que tem disponíveis as seguintes informações antes de
telefonar:
• número de série, nome do modelo e número do modelo;
• sistema operativo e versão do sistema operativo, quando associado a
um computador;
• mensagens de erro aplicáveis;
• hardware ou software de terceiros instalados;
• opções complementares, se aplicável; e
• perguntas detalhadas para as quais precisa de respostas.
Resíduos de equipamentos eléctricos e electrónicos (WEEE)
1. O equipamento que comprou necessitou da extracção e da utilização de
recursos naturais para a sua produção. Pode conter substâncias perigosas
que podem causar impacto na saúde e meio ambiente.
2. Para evitar a disseminação dessas substâncias no nosso meio ambiente e
diminuir o impacto nos recursos naturais, incentivámo-lo a utilizar os
sistemas de eliminação apropriados. Esses sistemas reutilizarão ou
reciclarão a maior parte dos materiais do seu equipamento no fim da vida
útil de uma maneira saudável.
3. O símbolo do caixote de lixo que contém um X convida-o a utilizar esses
sistemas.
4. Se necessitar de mais informações sobre os sistemas de recolha,
reutilização e reciclagem, contacte a administração de resíduos local ou
regional.
5. Também pode contactar-nos para obter mais informações sobre o
desempenho ambiental dos nossos produtos.
© 2008 Vuzix Corporation
Todos os direitos reservados. Todos os nomes comerciais são marcas registadas dos seus
respectivos proprietários.
Concebido pela Vuzix em Nova Iorque. Fabricado nos EUA.
PARA UTILIZAÇÃO DOMÉSTICA OU NO TRABALHO.
Número de patente 811906-0001 patentes provisórias.
242PB0004-A
 Loading...