

Page 1
PortableDVDPlayer
User’sManual
Read the Safety Instructions before using the DVD Player!
Welcome! Your Vuzix™ Portable DVD Player delivers extraordinary
performance and allows you to watch your favorite DVD using Vuzix iWear®
video eyewear or another display system, such as a TV.
Compatible with MP3, MP4, DIVX, DVD, SVCD, DVCD, VCD, HDCD, CD, CD-R,
CD-RW, JPEG, and WMA discs.
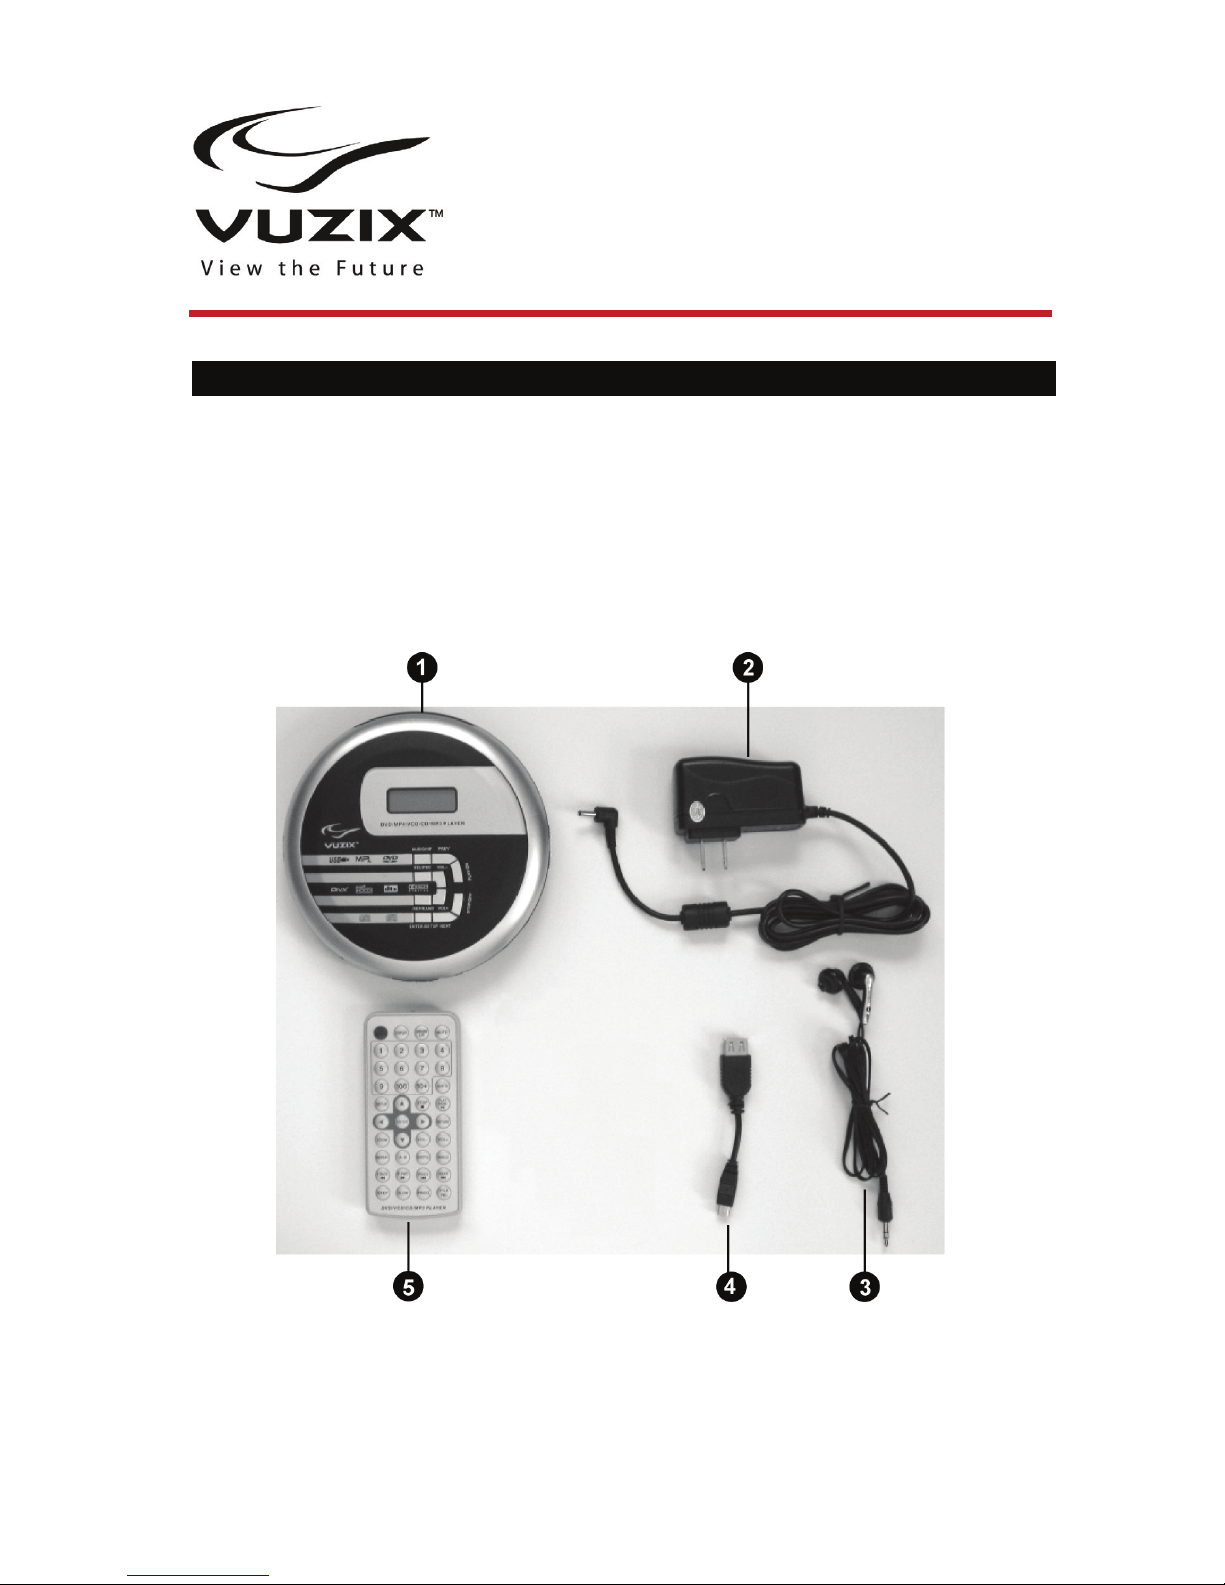
Package Contents*
May not be exactly as illustrated
1. Portable DVD Player
2. AC Power Adaptor
3. Earphones
4. USB Cable
5. Remote Control
6. Audio/Video Cable (
not shown)
User’s Manual not shown
Page 2

2
Important Safety Instructions
Follow these safety instructions when using or handling your VUZIX Video Eyewear to reduce
the risk of fire, electric shock, and injury to persons and property.
1. READ ALL OF THE INSTRUCTIONS AND SAFETY INFORMATION PROVIDED BEFORE
USING THIS PRODUCT.
2. Use the product only for its intended use, as described in this manual.
3. Close supervision is needed when this product is used by or near children.
4. Children under the age of seven (7) are still learning to focus and track with their eyes.
Their vision is still immature. For these reasons, THIS PRODUCT SHOULD NOT BE USED
BY CHILDREN UNDER THE AGE OF SEVEN (7).
5. A very small portion of the population may experience epileptic seizures when viewing
certain kinds of flashing lights or patterns that are commonly present in our daily environment.
These persons may also experience seizures while watching some kinds of television
pictures or playing certain video games on regular monitors, including the use of a display
system such as this. These effects can be increased due to the large size of the video
screens in this device. As a result consult a physician if you have any epileptic condition
before using this device or if you experience any of the following symptoms while using this
device: altered vision, muscle twitching, other involuntary movements, loss of awareness of
your surroundings, mental confusion, and/or convulsions.
6. Immersive video, whether viewed on a regular TV, a movie theater screen or a VUZIX
video display, can potentially have adverse effects on the user, including: motion sickness,
perceptual after effects, disorientation, decreased postural stability, and eye strain. Take
frequent breaks to lessen the potential of these effects, as is commonly suggested for other
items, such as keyboards and computer monitors, that you may tend to fixate or concentrate
on. If your eyes show signs of fatigue or dryness or if any of the above symptoms are noted,
immediately discontinue use of this device and do not resume using it for at least 30 minutes
after the symptoms have fully subsided.
7. Permanent or temporary hearing loss or impairment can result from excessive volume
levels emitted from the headphones. Always adjust the volume to a safe level BEFORE
wearing the product or headphones.
8. Always be aware of the world around you. This product will immerse you in realistic sights
and sounds, possibly causing you to forget about the real world around you and the threats to
your well being and the well being of others. DO NOT use this product near stairs, balconies,
or other things that can be tripped over, run into, knocked down or fallen over. This product
should only be used while you are seated and never while using sharp or potentially
dangerous objects, operating any form of mechanical device, driving motor vehicles, or
performing any act that normally requires you to see and/or be aware of your surroundings.
9. This product may be tethered to a power outlet and cables may extend between
components. Be careful that these cords do not tangle around you or pose a potential threat
to the safety of others.
10. Do not disassemble this product. If service work is required, contact VUZIX using the
Support contact information shown in this manual.
11. Do not pull or yank on the cable, kink any of the cables or tie them in sharp or tight knots.
Do not hang the product or allow it to be suspended by any of its cables. To disconnect
cables, pull on the cable connector. Cables damaged by such actions are not covered by the
product’s limited warranty.
12. Do not drop, strike, or cause any portion of the product to be struck or shaken
aggressively. Such actions may damage the product and void your warranty.
13. Save these instructions for future reference.
Page 3

3
Immediately unplug the product from external power sources if:
• Liquid has been sprayed, splashed or poured on the product.
• Any component of the product has been dropped or damaged.
• The product exhibits any distinct change in performance.
Battery Safety Instructions
• Batteries contain toxic materials. Do not burn, disassemble, mutilate, or puncture the
batteries.
• Do not dispose of batteries in a fire.
• Dispose of batteries in a method that is consistent with your local laws and regulations.
Vuzix Hardware Product Limited Warranty
Vuzix warrants that your Vuzix hardware product shall be free from defects in material and
workmanship for the length of time specified in the Warranty Period (one year), beginning
from the date of purchase. If your Vuzix hardware product is used for commercial purposes
(including rental or lease) the Warranty Period shall be reduced to only ninety (90) days from
date of purchase. Except where prohibited by applicable law, this warranty is nontransferable
and is limited to the original purchaser and does not apply to anyone else, including anyone
to whom You later make any transfer or sale. This warranty gives you specific legal rights,
and you may also have other rights that vary under local laws, some of which are not affected
by the warranties in this Limited Warranty.
This Limited Warranty does not cover, and no warranty of any kind is provided with respect to
any subjective or aesthetic aspects of the hardware product. Vuzix does not warrant that the
operation of the product will be uninterrupted or error-free. The limited warranty stated above
is the only warranty made to You and is provided in lieu of all other express or implied
warranties and conditions (except for any non-disclaimable implied warranties that exist),
including any created by any other documentation or packaging. No information or
suggestions (oral or in a record) given by Vuzix, its agents, affiliates, dealers or suppliers or
its or their employees or agents, shall create a warranty or condition or expand the scope of
this Limited Warranty.
Any software distributed with the hardware product by Vuzix with or without the Vuzix brand
name is not covered under this Limited Warranty. Refer to the licensing agreement
accompanying the software (viewable upon its installation), for details of your rights with
respect to its use.
Remedies
Vuzix’s entire liability and Your exclusive remedy for any breach of warranty shall be, at
Vuzix’s option, (1) to repair or replace all or part of the hardware, 2) exchange the hardware
with a product that is new or which has been manufactured from new or serviceable used
parts and is at least functionally equivalent to the original product, or (3) to refund the price
paid by You less reasonable depreciation based on your actual use, provided that the
hardware is returned to the point of purchase or such other place as Vuzix may direct with a
copy of the sales receipt or dated itemized receipt. Except where prohibited by applicable
law, all shipping and handling costs associated with transport (including packaging) for
warranty service shall be at Your expense. Vuzix may, at its option, use new or refurbished or
used parts in good working condition to repair or replace any hardware product. Any
replacement hardware product will be warranted for the remainder of the original warranty
period or thirty (30) days, whichever is longer or for any additional period of time that may be
applicable in Your jurisdiction. This warranty does not cover problems or damage resulting
from (1) Acts of God, power surge, misuse, abuse, negligence, accident, wear and tear,
mishandling, misapplication, or other causes unrelated to defects in the hardware device (2)
any unauthorized repair, modification, tampering or disassembly; (3) improper operation or
maintenance, usage not in accordance with product instructions or connection to improper
Page 4

4
voltage supply; or (3) use of consumables, such as replacement batteries, not supplied by
Vuzix except where such restriction is prohibited by applicable law.
How to Obtain Technical Support
Technical support is defined as assistance with questions on issues about the Vuzix
hardware product. Technical support for hardware and its software is available for the first
ninety (90) days from date of product purchase. Your dated sales or delivery receipt, showing
the date of purchase or lease of the product, is Your proof of the purchase or lease date. You
may be required to provide proof of purchase or lease as a condition of receiving software
technical support. The addresses and technical service contact information for Vuzix can be
found in the documentation accompanying your product and on the web at our global site:
www.vuzix.com
.
How to Obtain Warranty Support
Vuzix is the warrantor under this Limited Warranty. Before submitting a warranty claim, we
recommend You visit the support section at www.Vuzix.com for technical assistance.
Warranty claims cannot be processed through the point of purchase and any other product
related questions should be addressed directly to Vuzix. The addresses and customer service
contact information for Vuzix can be found in the documentation accompanying Your product
and on the web at our global site at www.vuzix.com
, which will also identify any Vuzix
subsidiary or branch serving Your country and its local address. You may also write to: Vuzix
Sales Support, 75 Town Centre Drive, Rochester, NY 14623, USA.
Limitation of Liability
VUZIX SHALL NOT BE LIABLE FOR ANY SPECIAL, INDIRECT, INCIDENTAL OR
CONSEQUENTIAL DAMAGES WHATSOEVER, INCLUDING BUT NOT LIMITED TO LOSS
OF PROFITS, REVENUE OR DATA (WHETHER DIRECT OR INDIRECT) OR
COMMERCIAL LOSS FOR BREACH OF ANY EXPRESS OR IMPLIED WARRANTY ON
YOUR PRODUCT EVEN IF VUZIX HAS BEEN ADVISED OF THE POSSIBILITY OF SUCH
DAMAGES. Some jurisdictions do not allow the exclusion or limitation of special, indirect,
incidental or consequential damages, so the above limitation or exclusion may not apply to
You, but the remainder of this Limited Warranty shall remain in full force and effect.
Duration of Implied Warranties
EXCEPT TO THE EXTENT PROHIBITED BY APPLICABLE LAW, ANY IMPLIED
WARRANTY OR CONDITION OF MERCHANTABILITY OR FITNESS FOR A PARTICULAR
PURPOSE ON THIS HARDWARE PRODUCT IS LIMITED IN DURATION TO THE LIMITED
WARRANTY PERIOD STATE ABOVE FOR YOUR PRODUCT. Some jurisdictions do not
allow limitations on how long an implied warranty lasts, so the above limitation may not apply
to You. Please note that in the European Union, any warranty period less than two years shall
be increased to two years except in the case of use for commercial purposes.
FCC Compliance
NOTE: This equipment has been tested and found to comply with the limits for a Class B
digital device, pursuant to Part 15 of the FCC Rules. These limits are designed to provide
reasonable protection against harmful interference in a residential installation. This equipment
generates, uses and can radiate radio frequency energy and, if not installed and used in
accordance with the instructions, may cause harmful interference to radio communications.
However, there is no guarantee that interference will not occur in a particular installation. If
this equipment does cause harmful interference to radio or television reception, which can be
determined by turning the equipment off and on, the user is encouraged to try to correct the
interference by one or more of the following measures: 1) Increase the separation between
the equipment and receiver or 2) Connect the equipment into an outlet on a circuit different
from that to which the receiver is connected.
Page 5
Getting Started
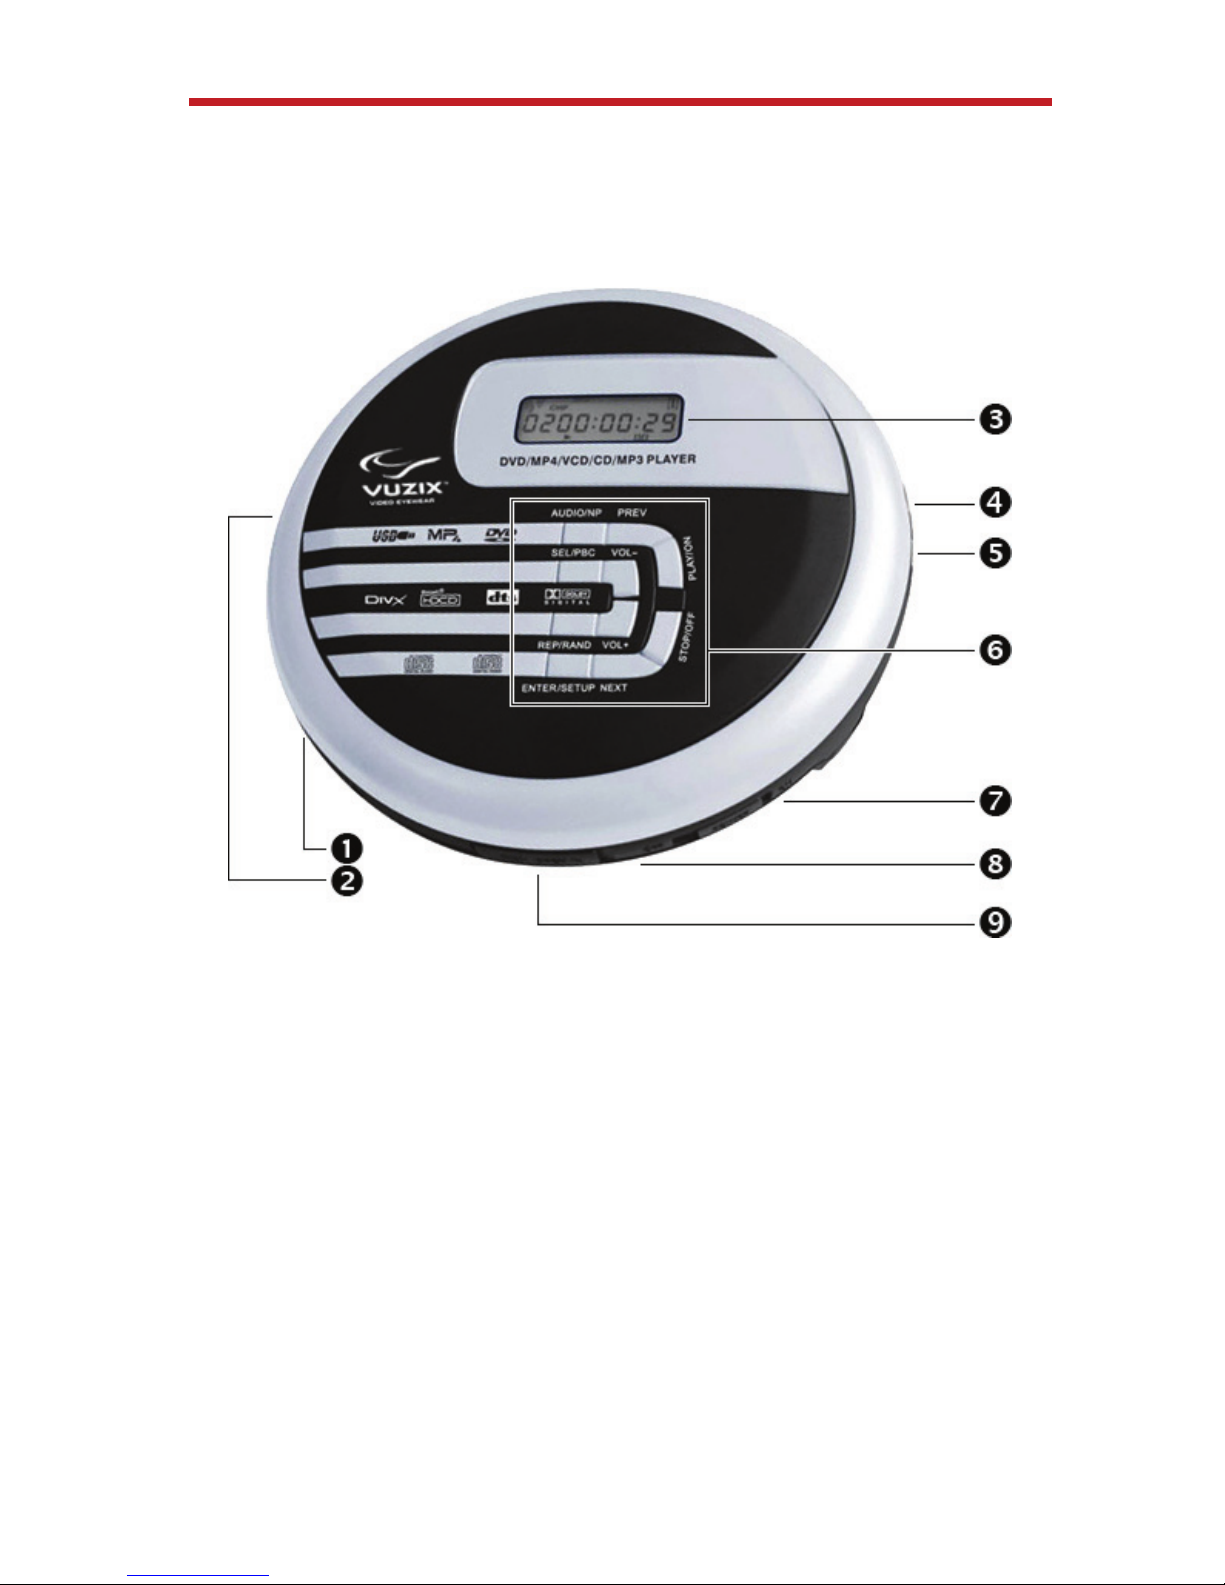
DVD Player Overview
This section includes a brief description of buttons and connections that are used
to operate the Portable DVD Player.
n
IR/CHG LED: Remote control infrared sensor charge indicator.
o
DC IN 5V: Connector for charging and power adaptor.
p
LCD Display: Displays operational and status information.
q
VIDEO: Video out connector.
r
AUDIO OPTICAL: Audio out connector.
s
Control Panel: Operational controls. (see below)
t
USB: USB port for connecting to external media.
u
POWER ON/OFF: Power switch.
v
OPEN: Opens door to load or unload CD/DVD disc.
5
Page 6

Control Panel
AUDIO/NP: Change audio soundtrack and
alternate TV video output format between NTSC
and PAL.
SEL/PBC: Directory selection on external media.
REP/RAND: Repeat or play random content.
ENTER/SETUP: Confirm selections and access
the Setup menu.
PREV: Select previous option or setting.
NEXT: Select next option or setting.
VOL-: Decrease volume.
VOL+: Increase volume.
PLAY/ON: Play or pause.
STOP/OFF: Start or stop playback.
Charging Battery
IMPORTANT
DVD Player must be charged for a minimum of 4 hours prior to first use.
Use only the 5V power adaptor provided with this DVD Player.
1. Connect the AC Power Adaptor to the DVD Player and plug the adaptor into a
100-240V AC power outlet.
2. Turn the POWER ON/OFF switch to ON.
3. Press and hold the PLAY button until the LCD shows “READ”. After a moment
the LCD will show “NO DISC”.
4. When “NO DISC” is displayed, press the PLAY button again and the LCD will
show “HOUR 08”.
5. Press the PREV or NEXT buttons to select the desired charge time (1-15
hours). Normally, a full charge requires 4 hours.
6. After selecting a charge time, press the PLAY button to start charging the unit.
The display will show “CHG 00:00” and show the charge time elasped.
7. When the charge cycle is complete, switch the POWER to OFF, unplug the
power adaptor from the AC power outlet and DVD player.
6
Page 7

Connecting the Portable DVD Player
Your portable DVD player can be connected to an iWear video display or TV
monitor using the provided composite video cable. It can also be connected to an
iWear video display using a special adaptor cable, available from www.vuzix.com.
DVD Player to iWear with Adaptor Cable: Connect the dual-end cable to the
DVD Player’s AUDIO and VIDEO ports and the single end connector to the iWear
AV port.
DVD Player to iWear with Composite Video Cable: From dual connector end of
Composite Adaptor Cable (provided with DVD Player) plug the red connector into
the DVD Player’s AUDIO port and the yellow connector into its VIDEO port.
Connect the 3-end connector to the color matched connectors on your device’s
composite A/V cable.
DVD Player to TV with Composite Video Cable: From dual connector end of
Composite Adaptor Cable (provided with DVD Player) plug the red connector into
the DVD Player’s AUDIO port and the yellow connector into its VIDEO port.
Connect the 3-end connector to the color matched composite audio/video
connectors on your television monitor.
Your television may have to be reconfigured to use its composite input.
7
Page 8

8
Using the DVD Player
Basic Operation – Watch a DVD
1. Connect your DVD Player to an audio/video system, such as a Vuzix iWear
video device.
2. Slide the OPEN switch, along the lower rim, to the right to open the DVD
Player’s lid.
If this is the first time this DVD Player has been used, remove the cardboard
protector.
Always inspect the interior of the DVD Player when inserting a DVD and clean
away any dust or other foreign matter.
3. Place a DVD or CD into the DVD Player, gently snapping it over the center
spindle retainer clips.
4. Close the DVD Player lip by gently pressing along its bottom edge. It should
close easily – do not use force.
5. Slide the POWER ON/OFF to ON.
6. Press PLAY/ON button to start playing your disc.
• To stop playing your disc, press the STOP/OFF button, or press the PLAY/ON
button to pause, without turning off your play session.
• When you are finished using the DVD Player, slide the POWER switch to the
OFF position.
Additional controls are available through the DVD Player’s Remote Control.
Read the remainder of the manual for information on using the Remote Control and
accessing the additional features of the Vuzix DVD Player.
Page 9

Using the Remote Control
1. POWER: Turns DVD Player
on or Off.
2. DISPLAY: Displays the
current disc content.
3. LANGUAGE: Enables the
selection of a language from
movie language preferences.
• Also changes the audio
soundtrack on a multi-audio
soundtrack disc.
4. MUTE: Turns off the sound.
Press again to resume.
5. Numeric Keypad
6. Navigation Arrows: Used to
change menu and option
selections.
7. ENTER: Confirms selection
or starts playback.
8. ZOOM: Increases or
decreases picture size.
• Use the navigation arrows to
move to different positions
within the picture.
9. REPEAT: Plays the current selection over again.
10. A–B: Defines a specific segment on the disc to repeat.
11. F.BACK: Moves track backward at a rate of 2X, 4X, 8X, or 20X.
12. F.FWD: Moves track forward at a rate of 2X, 4X, 8X, or 20X.
13. STEP: Shows pictures step by step or frame by frame.
14. SLOW: Enables selection of six slow-motion modes.
15. GO TO: Press, and then use the numeric keys to select the title, chapter, or
playing time.
16. PLAY PAUSE: Plays disc or pauses play.
9
Page 10

10
17. STOP: Press STOP once to stop playback.
• Press STOP again to stop disc from spinning.
• Press STOP a third time to power off DVD Player.
18. RETURN: Return to the Root Menu on a DVD or the PBC Menu on a VCD or
other media.
19. VOL+: Increase volume.
20. VOL-: Decrease volume.
21. ANGLE: Change angle of view on a multi-angle DVD. This function is only
available for multi-angle, recorded media.
22. SUBTITLE: Select or turn off a subtitle.
23. NEXT: Skip to the next chapter, track, or title.
24. PREV: Skip to the previous chapter, track, or title.
25. TITLE PBC: Go to the title menu in DVD mode.
• Press the direction buttons or numeric buttons to select the title of the disc
option you wish to play, then press the PLAY button to start playback.
• Press to switch the PBC on or off. (only for VCD)
• While playing, press STOP twice, and then press TITLE PBC to change to the
USB function.
26. PROG: Program the tracks.
SETUP, not numbered in the above illustration, is used to access the DVD Player’s
set menu. It function is described separately, later in this manual.
DVD Player Setup menu
Accessing and Selecting Menu Items
1. Press and hold the desired feature.
2. When the desired feature displays, release the button.
Using the Setup Menus
1. Press Setup. The Setup screen is displayed on the connected video display.
2. Use the navigation arrows to highlight the desired function. The setup choices
are described below.
You can use either the directional buttons on the Remote Control or the
PREV/NEXT and VOL-/VOL+ buttons on the DVD Player to navigate the Setup
Menus
Page 11

11
3. Press Enter to save the selections.
Setup choices
System setup:
• TV system: Change the TV system
• TV type
- 4:3 PS - 4:3 Pan & Scan video output for a normal TV set. The screen
displays the wide picture on the whole screen with a left and right
portion automatically cut off.
- 4:3 LB - 4:3 Letter Box video output for a normal TV set. The screen
displays the wide picture with bands displayed on the upper and lower
portions of the screen
- 16:9 - 16:9 Wide screen video output for a wide screen TV set
• Password - Change the default password “0000” to the desired password
• Rating - Set up rating limits and lock your player to control the type of
content viewed on your DVD player. (This only works when the password
lock is open)
• Default - Restore factory settings
• Exit setup
Language setup:
• OSD language - Set preferred language options for the DVD player’s menu
system
• Audio Lang - Set preference for the language in which movie dialogue is
played
• Subtitle Lang - Set language preference for the subtitles
• Menu Lang - Set language preference for disc menu
• Exit setup
Audio setup:
• Audio out – Used to set the format of digital audio. “SPDIF OFF” turns off
the digital audio; “SPDIF/RAW” outputs the original. For example, if the
disc being played is Dolby Digital, then the digital audio output is also
Dolby Digital. Select “SPDIF/PCM” when you connect with a 2-channel
digital stereo amplifier
• Key – Move the navigation key to adjust the tone
• Exit setup
Video setup:
• Brightness - Increase or decrease the screen brightness
• Contrast - Adjust the contrast level of the screen display
• Hue - Adjust the hue of the screen display
• Saturation - Adjust the saturation of the screen display
Page 12

12
• Sharpness - Adjust the sharpness of the screen display
• Exit setup
Digital setup:
• OP mode options include LINE OUT and RF REMOD
• Dynamic range - To adjust compression ratio. When adjusted to FULL, the
compression ratio will be set lowest. When adjusted to OFF, the
compression ratio will be set highest
• Dual Mono - You can set audio output way of L and R channel. There are
four modes: Stereo, Mono L, Mono R, Mix Mono
• Exit setup
Changing the Language
1. Press and hold Language.
2. When the player displays the language you want, release the Language button.
Continuous Repeat
1. Press and hold Repeat.
2. When playing a DVD disc, when the item you want repeated displays (Chapter,
Title, or Release off), release the button.
3. When playing a VCD/CD/MP3 disc, when the item you want repeated displays
(Repeat one, Repeat all, or Repeat off), release the button.
Manually Repeat
1. Press A-B at the start of the desired passage.
2. Press A-B again at the end of the passage. The segment repeats over and
over.
3. To revert to normal playing, press A-B again.
Programming the Tracks
1. Select PROG.
2. Use the numbers to enter the title, chapter, or track number. The number
entered appears in the box.
3. Use the arrows to move to the next spot.
4. Verify that the box is highlighted, and then enter your next title, chapter, or
track number.
5. Continue adding until your program is complete.
6. To play your program, highlight PLAY.
7. To clear the program, highlight CLEAR.
8. To remove the program playback, press STOP twice during the program play.
Page 13

13
Cleaning & Care
Use a soft damp cloth to clean your Portable DVD Player enclosure. Do not use
alcohol or any other chemical solution.
Do not use discs that are soiled, warped or discs with stickers applied as these can
damage your DVD Player.
Troubleshooting
If it appears that your DVD player is defective, first consult the following checklist. It
may be that something simple has been overlooked. Under no circumstances
should you try to repair the unit by yourself. Only qualified service personnel can
remove the cover or service this player.
No power.
• Check that the power plug is properly connected.
• Charge the battery.
• Check that there is power at the AC outlet by plugging in another
appliance.
No picture.
• Check if the iWear Video Display or TV is connected correctly and turned
on.
• Check that the DVD Player is connected to the iWear Video Display
System or TV and turned on.
• Check the video connection.
• Select the correct AV input on the TV.
• Check that the channel selector is set to AV on the TV.
No sound.
• Check the audio connections.
• Make sure the sound setup of the DVD disc is correct.
• Check the volume adjustment on the iWear Video Display or TV.
No sound or picture.
• Check that the unit is turned on.
• Check the cable connections.
• Check that the unit has power.
• For sound, check the volume adjustment on the iWear Video Display (if in
use).
Page 14

14
Distorted picture.
• Check the disc for fingerprints, and clean with soft cloth, wiping from
center to edge.
• Sometimes a small amount of picture distortion may appear. This is not a
malfunction.
Completely distorted picture (when connected to the TV).
• The disc is not formatted to the TV in use (PAL/NTSC).
No color in picture (when connected to the TV).
• The disc is not formatted to the TV in use (PAL/NTSC).
• Ensure DVD player is not connected through VCR.
Disc does not play.
• Ensure the disc is label side up.
• Clean the disc.
• Check if the disc is defective by trying another disc.
The player does not respond to the remote control.
• Aim the remote control directly at the sensor on the side of the player.
• Avoid all obstacles that may interfere with the signal path.
• Inspect or replace the batteries.
No audio at digital output.
• Check the digital connections.
• Check the Digital Output menu to make sure that the digital output is set
correctly.
• Check if the audio format of the selected audio language matches your
receiver capabilities.
Buttons do not work.
• Disconnect the player from power outlet and reconnect after a few
seconds.
You have forgotten the password.
• The default password is “0000”.
Page 15

15
Technical Specifications
Power supply AC adaptor: AC 100–240 V, 50/60 Hz
DC source: DC 5 V/1500 mA
Disc played DIVX, DVD, VCD, DVCD, SVCD, CD, MP3, HDCD, CD-
RW, WMA, and JPG
Video formats PAL/NTSC
Audio output (stereo) 2.0 +0.2 Vrms (at 10 k ohm).
Frequency response 20 Hz – 20 kHz
Video output 1.0 ±0.2 VPP (at 75 ohm)
Battery Rechargeable lithium battery: 3.7 V/1500 mA
Recharge time: approximately 240 min.
Playback time: approximately 120 min.
Contacting Vuzix Corporation
In the United States or Canada, refer to the Vuzix website (www.vuzix.com) or
call 1-800-436-7838, 9 AM to 6 PM EST weekdays, excluding holidays.
Be sure to have the following information available before you call:
• Serial number, model name, and model number
• Applicable error messages
• Detailed questions for which you need answers
The information and specifications provided in this document are subject to change without notice.
Page 16

Vuzix, The Vuzix Logo, View the Future and iWear are trademarks of Vuzix Corporation at
least some of which are protected by the following registration(s): 3,245,574.
© 2008 Vuzix Corporation
PB0000038-A
16
 Loading...