

Page 1
M400
User Manual v1.0
Model 472
Page 2

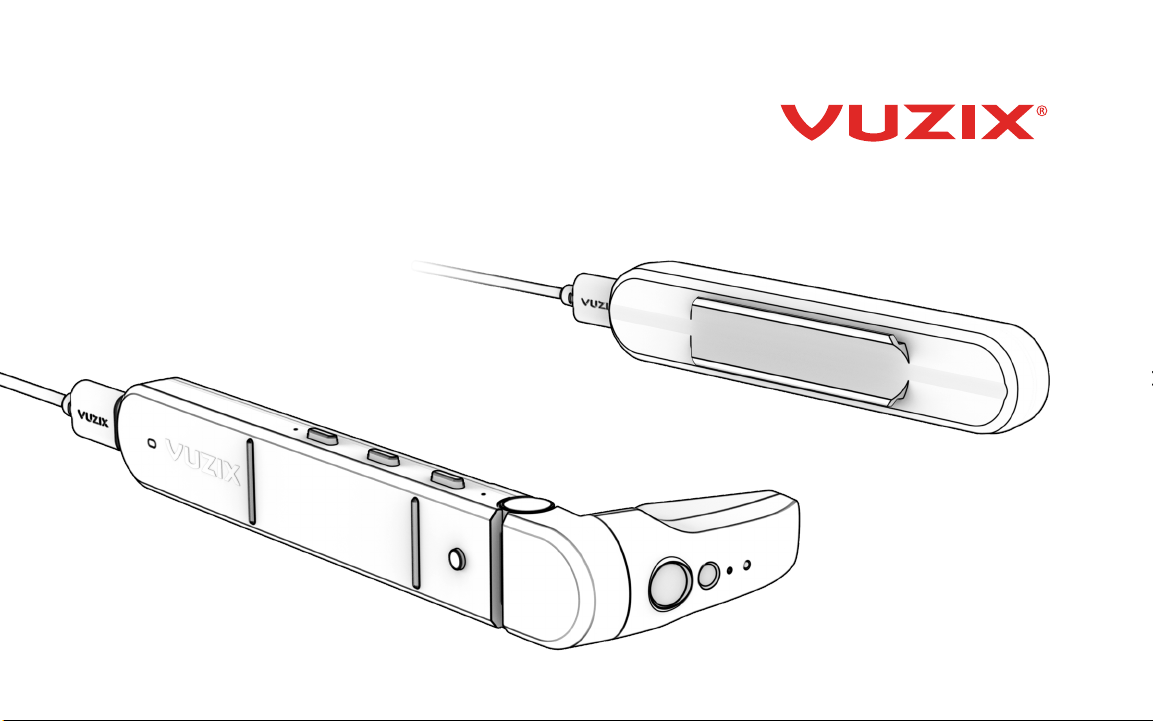
CONGRATULATIONS ON YOUR NEW VUZIX M400 SMART GLASSES SYSTEM
Your M400 Smart Glasses System is an ergonomically designed,
wearable Android-based computer with Wi-Fi connectivity,
voice-command functionality and HD camera — right out of the
box, including:
• M400 viewer with adjustable display screen
• USB-A Battery
• USB-A to USB-C power cable
• USB-A to Micro USB cable (for charging the USB-A Battery)
• M-Series Lens-less frames
• Soft case for storage
02
Page 3

CHARGING FOR FIRST-TIME USE
Charge battery before use with wall charger, wait until all
three LEDs are solid.
Can take up to two hours if the battery is fully empty.
03
Page 4

04
USB-A Battery
Viewer
USB-A to
USB-C Cable
Charging the battery
Assembling the M400 mounting system
Power to M400 from Battery
Page 5

ASSEMBLING YOUR M400 SMART GLASSES SYSTEM
1. The viewer will be worn on the dominant eye. Before attaching the viewer to either side of the
Smart Glasses frames, determine your dominant eye for optimum use of M400 capabilities.
2. Attach viewer to the side of the frame by sliding the mounting rail onto the temple mount on
the frames. Once properly fitted, the unit will be adjustable by sliding forward and backward.
3. Using the same mounting process, attach the USB-A battery onto the other side of the frames.
4. Plug the USB-C end of the connector cable into the viewer and the USB-A connector to the
USB-A battery. Press the power button on the battery for 2 seconds to turn on the system.
The LED on the battery will illuminate when the system is powered-on.
5. When ready to wear your M400 Smart Glasses, lift the power cable over
your head to rest on your shoulders as you place the Smart Glasses as
you would a pair of glasses.
6. Ear hooks and alternate nose pads are available for proper fit.
DETERMINE YOUR DOMINANT EYE
Extend your hands, placing them together to make a small triangle between your thumbs
and knuckle. Keeping both eyes open, center a nearby object inside the triangle. Close each
eye one at a time. Notice how the object moves out of view when one eye is closed? When
the object remains in view, the open eye is your dominant eye.
05
Page 6

06
Page 7

WEARING THE M400
1. Make sure the Smart Glasses frames are resting comfortably on your head. Frames can
be worn over the top of a majority of regular prescription eyewear. The nosepiece of
the frames can be adjusted to fit comfortably and securely.
2. After mounting the viewer, adjust the viewer as shown until it is a comfortable distance
and preferred position from your dominant eye.
3. Adjust the eyepiece as shown until you can see the full image.
4. Additional mounting options, including frames with prescription lenses, safety frames,
hard hat, headband mounts, and more, can be found online at Vuzix.com under
Products > M400 Smart Glasses > Accessories.
FOCUSING NEAR-FIELD
First time users may find some challenges focusing their near-field
vision on the M400 display. Making sure to keep both eyes open,
some users may need up to 20 minutes to adjust.
07
Page 8

NAVIGATING THE M400
08
USB-C Port
Power LED
Mounting Rail
Touchpad
Navigation Buttons
Back
Power Button
Center
Front
Display
Camera
Flash/Flashlight
Recording LED
Page 9
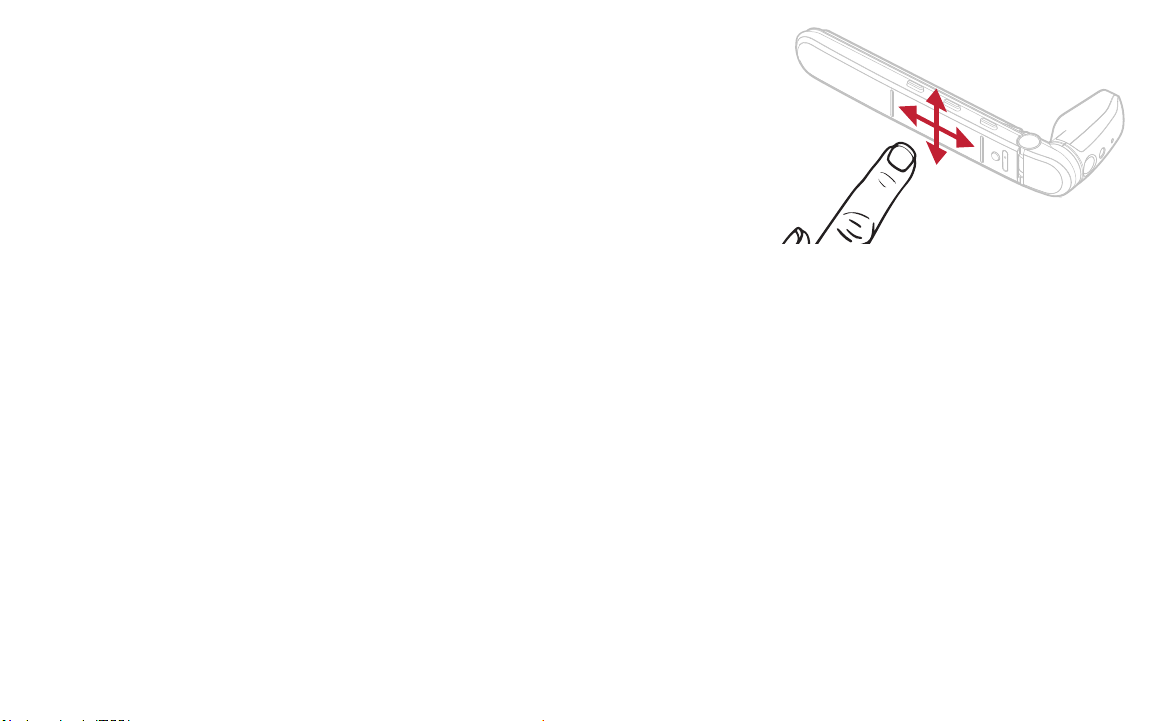
TOUCHPAD
One finger:
• Tap to activate selection or
turn on the screen
• Hold to activate menu
• Swipe up/down/left/right to
move selection
Two fingers:
• Tap to go back or return
• Hold to go to home screen
• Swipe back for backspace
• Swipe forward for delete
• Swipe up to raise volume
• Swipe down to lower volume
Three fingers:
• Tap to turn off screen
BUTTONS
Short Press for primary functions:
Front: Forward navigation
Center: Back navigation
Back: Select
Long Press (approx. one sec) touch for secondary functions:
Front: Open menu
Center: Exit to home menu
Back: Back one step
VOICE
The M400 can be activated by “Hello Vuzix” when
properly configured. The M400 will listen for voice
commands for 15 seconds by default.
To activate Voice control, open the Settings menu and
navigate to System -> Speech Recognition. Enable the
speech recognition.
A full list of voice control commands can be viewed from
that same settings menu.
09
Page 10

M400 POWER LED
10
Color
Green
Blinking red
Meaning
On
Too low to power on, keep plugged in to USB to charge
IF THE BATTERY RUNS OUT DURING USE
If the battery runs out of power the viewer will display a message on the screen
1. Unplug the USB cable from the battery
2. Remove the battery from the mount and replace with a charged one
3. Plug the USB cable back in
4. Turn on the battery by pressing the power button on the battery for 2 seconds
5. The message on the screen will go away
Page 11

POWERING DOWN AND RESTARTING
Press and hold the power button on the viewer to access the power menu.
• To reboot, highlight the reboot entry and activate it.
The viewer will power off and automatically turn back on.
• To fully power off, highlight the power off entry and activate it. The viewer will
ask you to unplug the USB cable. After you unplug the cable the viewer will fully
power off. Leave the cable disconnected while the viewer is off. The battery will
power off as soon as it’s unplugged.
If the USB cable is unplugged the device will power off after about five minutes. If the
internal battery is already discharged this may occur sooner.
11
Page 12

PREINSTALLED APPLICATIONS
APPLICATION MENUS
12
The M400 comes preinstalled with
several standard applications such as
Camera, Gallery and QR and barcode
Scanner.
The M400 Application Carousel has multiple
sections for helping organize and easily access
your most commonly used M400 applications. A
long press on the center button while on the home
screen will toggle between All Apps section, an
automatically populated Recently Used section
and a Favorites section.
For more information on managing applications, visit:
www.vuzix.com/support
Page 13

CONNECTING TO WI-FI
QR code setup:
1. The easiest way to connect to Wi-Fi is by
scanning a QR code — QR codes can be
securely created using vuzix.com/wifiQR from
your phone or computer.
2. Open Scanner from the main carousel.
3. Point the M400 at the phone or computer
screen that is displaying the QR code to scan.
Manual setup:
1. At the home page, select the Settings app.
2. Select Network & Internet then Wi-Fi menu
option and then press the select button to
activate Wi-Fi.
3. Once the list of available networks populates,
highlight the preferred network and select.
4. Enter password using displayed keyboard,
Select Connect.
13
Page 14

REGISTERING YOUR DEVICE
INSTALLING APPLICATIONS
14
1. Register your device by logging on
to your Vuzix App Store account
from a computer or phone at
vuzix.com/appstore.
2. Follow the instructions on the website
3. Once registered, you will see the serial
number of your M400 under your
account.
serial number
location
Application can be installed on the M400
via the Vuzix App Store. The Vuzix App
Store will install and manage applications
via the OTA (Over the Air) mechanism and
will require Wi-Fi connectivity.
For instructions and additional
information about installing applications
and using the Vuzix App Store, visit:
www.vuzix.com/support.
The M400 supports ADB (Android Debug
Bridge) as an alternative mechanism for
advanced users to install applications.
Page 15

GETTING THE LATEST UPDATES
The M400 will automatically check for updates once it is connected
to Wi-Fi. Click Update on the following pop-up.
NOTE: If your corporate firewall prevents access to the external
website, your system administrator may provide additional settings
for your M400 or may provide a software update offline.
15
Page 16

DEVELOPING FOR M400
Developer documentation is available at vuzix.com/developers.
In order to power the unit during development, please note:
• The included battery does not support data pass-through.
• The viewer should be plugged into the developer’s machine with
a USB C-to-C cable for the best experience.
• If a USB A-to-C cable must be used, then using a CDP-capable
port will provide enough power. If the USB-A port is not providing
sufficient power, functions of the device may become impaired
without notice, and the viewer may shut down completely.
16
Page 17

TROUBLESHOOTING COMMON ISSUES
SYMPTOM DIAGNOSIS REMEDY
M400 will not turn on and
status LED is not lit
M400 will not turn on and
status LED is blinking red
M400 display is blank but
status LED is lit
M400 powers off after
20-30 minutes while
plugged in to USB
Battery is discharged Connect battery to wall charger for
up to two hours for a full charge, then
connect battery to viewer.
Internal battery is
discharged
Leave viewer connected to USB power.
System will begin booting within a few
minutes.
Screen has turned off to
conserve power
USB source does not
provide enough current
Tap the power button or the touchpad
to wake the screen.
M400 can draw up to 1.5A while in
operation.
17
Page 18

CLEANING AND CARE
• Clean the viewer and battery with a damp cloth and mild
detergent if necessary. Do not use all-purpose cleaners as
these may damage the seals and impair the water resistance.
• Make sure that there is no standing water in the USB
connector before inserting the cable.
• Do not insert sharp objects into any holes in the viewer as this
may damage the mesh and impair the water resistance.
• Do not use metal objects to clean the USB port as this may
cause electrical damage.
18
Page 19

ULATORY INFORMATION
REG
Regulatory information can be viewed from the Settings application:
1. Open “System”
2. Open “About Glasses”
3. Open “Regulatory labels”
Radiation Exposure Statement – Europe
The maximum combined SAR head measurements (limit 2.0 W/kg)
WLAN 2.4G 0.011 W/kg 10 g Head SAR
WLAN 5.2G 0.014 W/kg 10 g Head SAR
Frequency band and power as below
Frequency Range:
Bluetooth: 2402~2480MHz (TX/RX)
2.4G Wi-Fi: 2412~2472MHz (TX/RX)
5G WiFi: 5150-5250 MHz, 5745-5825MHz (TX/RX)
GPS L1/ GLONASS G1: 1559-1610MHz (RX)
Transmit Power:
Bluetooth: 2.16dBm
BLE: 2.39dBm
2.4G Wi-Fi:13.71dBm(802.11b), 13.67 dBm(802.11g), 13.26dBm(802.11n20), 13.81dBm(802.11n40)
5G Wi-Fi:
5150-5250 MHz: 17.19dBm (802.11a), 17.29dBm (802.11n20), 17.89dBm (802.11n40),
17.21dBm (802.11ac20), 17.83dBm(802.11 ac40), 18.44dBm (802.11 ac80)
5745-5825MHz:13.30dBm(802.11a),13.31dBm(802.11n20),13.03dBm(802.11n40),
13.30dBm(802.11ac20), 13.10dBm(802.11ac40),
FCC/IC/MIC Statement
Operation of this device in the band 5150-5250 MHz is restricted to indoor use only.
( )
( )( )( )
For CE
(
13.20dBm(802.11ac80)
19
Page 20

EARNING MORE
L
Visit www.vuzix.com/support/M400-smart-glasses for more information on the
M400 or contact technical_support@vuzix.com for additional information.
FOR MORE INFORMATION ON THE M400
AND ACCESSORIES, VISIT:
vuzix.com | vuzix.eu | vuzix.jp
Vuzix Corporation
25 Hendrix Road
West Henrietta, NY 14586
©Vuzix 2019. This User Manual is subject to change.
Please read the included safety information, also at www.vuzix.co
trademarks belong to respect owners.
m/support/safety-warranty-m-series before using this product. All
72PB0002(0003) – M400 USER MANUAL
4
Page 21

Safety & Warranty
Important Safety & Warranty Information
for the VUZIX M-Series Smart Glasses
Sûreté et garantie
Sicherheit und Garantie
Seguridad y garantía
Sicurezza e garanzia
Segurança e garantia
Page 22

Important Safety Instructions
Follow these safety instructions when using or handling your VUZIX M-Series Smart Glasses to
reduce the risk of fire, electric shock, and injury to persons and property.
1. READ ALL OF THE INSTRUCTIONS AND SAFETY INFORMATION PROVIDED BEFORE USING THIS
PRODUCT.
2. Use the product only for its intended use, as described in this manual.
3. Close supervision is needed when this product is used by or near children.
4. Children under the age of seven (7) are still learning to focus and track with their eyes. Their vision
is still immature. For these reasons, near eye-displays SHOULD NOT BE USED BY CHILDREN UNDER
THE AGE OF SEVEN (7).
5. A very small portion of the population may experience epileptic seizures when viewing certain
kinds of flashing lights or patterns that are commonly present in our daily environment. These
persons may also experience seizures while watching some kinds of television pictures or
playing certain video games on regular monitors, including the use of a display system such as
this. These effects can be increased due to the size and nature of the displays in this device.
As a result, consult a physician if you have any epileptic condition before using this device or
if you experience any of the following symptoms while using this device: altered vision, muscle
twitching, other involuntary movements, loss of awareness of your surroundings, mental
confusion, and/or convulsions.
6. Smart glasses can potentially have adverse effects on the user, including: motion sickness,
perceptual after effects, disorientation, decreased postural stability, and eye strain. Take
frequent breaks to lessen the potential of these effects, as is commonly suggested for other
items, such as keyboards and computer monitors, that you may tend to fixate or concentrate
on. If your eyes show signs of fatigue or dryness or if any of the above symptoms are noted,
immediately discontinue use of this device and do not resume using it for at least 30 minutes
after the symptoms have fully subsided.
7. Permanent or temporary hearing loss or impairment can result from excessive volume levels
emitted from the included headphones or earbuds. Always adjust the volume to a safe level
BEFORE wearing the product earbuds or headphones.
8. This product may be tethered to a power source or battery and cables may extend between
components. Be careful that these cords do not tangle around you or pose a potential threat
to the safety of others.
9. Do not disassemble this product. If service work is required, contact VUZIX using the Support
contact information shown in this manual.
10. Do not pull or yank on the cable, kink any of the cables or tie them in sharp or tight knots.
Cables damaged by such actions are not covered by the product’s limited warranty.
11. Do not drop, strike, or cause any portion of the product to be struck or shaken aggressively.
Such actions may damage the product and void your warranty.
12. Save these instructions for future reference.
Immediately unplug the product from external power sources if:
Liquid has been sprayed, splashed or poured on the product. Any component of the product has
been dropped or damaged. The product exhibits any distinct change in performance.
Battery Safety Instructions
Batteries contain toxic materials. Do not burn, disassemble, mutilate, or puncture the batteries.
Do not dispose of batteries in a fire. Dispose of batteries in a method that is consistent with your
local laws and regulations.
Vuzix Hardware Product Limited Warranty
Vuzix warrants that your Vuzix hardware product shall be free from defects in material and
workmanship for the length of time specified in the Warranty Period (typically one year), beginning
Page 23

from the date of purchase from Vuzix or an authorized Vuzix dealer. If your Vuzix hardware product
is used for commercial purposes (including rental or lease) the Warranty Period shall be reduced to
only ninety (90) days from date of purchase. Except where prohibited by applicable law, this warranty
is nontransferable and is limited to the original purchaser and does not apply to anyone else,
including anyone to whom You later make any transfer or sale. This warranty gives you specific legal
rights, and you may also have other rights that vary under local laws, some of which are not affected
by the warranties in this Limited Warranty.
This Limited Warranty does not cover, and no warranty of any kind is provided with respect to any
subjective or aesthetic aspects of the hardware product. Vuzix does not warrant that the operation
of the product will be uninterrupted or error-free. The limited warranty stated above is the only
warranty made to You and is provided in lieu of all other express or implied warranties and conditions
(except for any non-disclaimable implied warranties that exist), including any created by any other
documentation or packaging. No information or suggestions (oral or in a record) given by Vuzix, its
agents, affiliates, dealers or suppliers or its or their employees or agents, shall create a warranty or
condition or expand the scope of this Limited Warranty.
Any software distributed with the hardware product by Vuzix with or without the Vuzix brand name
is not covered under this Limited Warranty. Refer to the licensing agreement accompanying the
software (viewable upon its installation), for details of your rights with respect to its use.
Remedies
Vuzix’s entire liability and Your exclusive remedy for any breach of warranty shall be, at Vuzix’s
option, (1) to repair or replace all or part of the hardware, (2) exchange the hardware with a product
that is new or which has been manufactured from new or serviceable used parts and is at least
functionally equivalent to the original product, or (3) to refund the price paid by You less reasonable
depreciation based on your actual use, provided that the hardware is returned to the point of
purchase or such other place as Vuzix may direct with a copy of the sales receipt or dated itemized
receipt. Except where prohibited by applicable law, all shipping and handling costs associated with
transport (including packaging) for warranty service shall be at Your expense. Vuzix may, at its option,
use new or refurbished or used parts in good working condition to repair or replace any hardware
product. Any replacement hardware product will be warranted for the remainder of the original
warranty period or thirty (30) days, whichever is longer or for any additional period of time that may
be applicable in Your jurisdiction. This warranty does not cover problems or damage resulting from
(1) Acts of God, power surge, misuse, abuse, negligence, accident, wear and tear, mishandling,
misapplication, or other causes unrelated to defects in the hardware device (2) any unauthorized
repair, modification, tampering or disassembly; (3) improper operation or maintenance, usage not
in accordance with product instructions or connection to improper voltage supply; or (3) use of
consumables, such as replacement batteries, not supplied by Vuzix except where such restriction is
prohibited by applicable law.
How to Obtain Technical Support
Technical support is defined as assistance with questions on issues about the Vuzix hardware
product. Technical support for hardware and its software is available for the first ninety (90) days
from date of product purchase. Your dated sales or delivery receipt, showing the date of purchase
or lease of the product, is Your proof of the purchase or lease date. You may be required to provide
proof of purchase as a condition of receiving software technical support. The addresses and technical
service contact information for Vuzix can be found in the documentation accompanying your product
and on the web at our global site: www.vuzix.com.
How to Obtain Warranty Support
Vuzix is the warrantor under this Limited Warranty. Before submitting a warranty claim, we
recommend You visit the support section at www.vuzix.com for technical assistance. Warranty claims
cannot be processed through the point of purchase and any other product related questions should
be addressed directly to Vuzix. The addresses and customer service contact information for Vuzix
Page 24

can be found in the documentation accompanying Your product and on the web at our global site at
www.vuzix.com, which will also identify any Vuzix subsidiary or branch serving Your country and its
local address. You may also write to: Vuzix Sales Support, 25 Hendrix Drive, West Henrietta, NY
14586, USA.
Limitation of Liability
VUZIX SHALL NOT BE LIABLE FOR ANY SPECIAL, INDIRECT, INCIDENTAL OR CONSEQUENTIAL
DAMAGES WHATSOEVER, INCLUDING BUT NOT LIMITED TO LOSS OF PROFITS, REVENUE OR DATA
(WHETHER DIRECT OR INDIRECT) OR COMMERCIAL LOSS FOR BREACH OF ANY EXPRESS OR IMPLIED
WARRANTY ON YOUR PRODUCT EVEN IF VUZIX HAS BEEN ADVISED OF THE POSSIBILITY OF SUCH
DAMAGES.
Some jurisdictions do not allow the exclusion or limitation of special, indirect, incidental or
consequential damages, so the above limitation or exclusion may not apply to You, but the remainder
of this Limited Warranty shall remain in full force and effect.
Duration of Implied Warranties
EXCEPT TO THE EXTENT PROHIBITED BY APPLICABLE LAW, ANY IMPLIED WARRANTY OR CONDITION
OF MERCHANTABILITY OR FITNESS FOR A PARTICULAR PURPOSE ON THIS HARDWARE PRODUCT IS
LIMITED IN DURATION TO THE LIMITED WARRANTY PERIOD STATE ABOVE FOR YOUR PRODUCT.
Some jurisdictions do not allow limitations on how long an implied warranty lasts, so the above
limitation may not apply to You. Please note that in the European Union, any warranty period less
than two years shall be increased to two years except in the case of use for commercial purposes or
commercial products.
Page 25

FCC and ISED Compliance
FCC Caution: Any Changes or modifications not expressly approved by the party responsible for
compliance could void the user's authority to operate the equipment.
This device complies with part 15 of the FCC Rules. Operation is subject to the following two
conditions: (1) This device may not cause harmful interference, and (2) this device must accept any
interference received, including interference that may cause undesired operation.
Note: This equipment has been tested and found to comply with the limits for a Class B digital
device, pursuant to part 15 of the FCC Rules. These limits are designed to provide reasonable
protection against harmful interference in a residential installation. This equipment generates, uses
and can radiate radio frequency energy and, if not installed and used in accordance with the
instructions, may cause harmful interference to radio communications. However, there is no
guarantee that interference will not occur in a particular installation. If this equipment does cause
harmful interference to radio or television reception, which can be determined by turning the
equipment off and on, the user is encouraged to try to correct the interference by one or more of
the following measures:
—Reorient or relocate the receiving antenna.
—Increase the separation between the equipment and receiver.
—Connect the equipment into an outlet on a circuit different from that to which the receiver is
connected.
—Consult the dealer or an experienced radio/TV technician for help.
The device has been tested and compliance with SAR limits. This equipment should be installed and
operated with minimum distance 0mm between the radiator& your body.
ISEDC Warning:
This device complies with Industry Canada licence-exempt RSS standard(s). Operation is subject to
the following two conditions:
(1) this device may not cause interference, and
(2) this device must accept any interference, including interference that may cause undesired
operation of the device.
The device has been tested and compliance with SAR limits, users can obtain Canadian information
on RF exposure and compliance. This equipment should be installed and operated with minimum
distance 0mm between the radiator& your body.
Page 26

USED ELECTRICAL AND ELECTRONIC EQUIPMENT (WEEE) Information
For private households: Information on Disposal for Users of WEEE
This symbol (figure 1) on the product(s) and / or accompanying documents means that used electrical
and electronic equipment (WEEE) should not be mixed with general household waste. For proper
treatment, recovery and recycling, please take this product(s) to designated collection points where
it will be accepted free of charge. Alternatively, in some countries, you may be able to return your
products to your local retailer upon purchase of an equivalent new product.
Disposing of this product correctly will help save valuable resources and prevent any potential
negative effects on human health and the environment, which could otherwise arise from
inappropriate waste handling.
Please contact your local authority for further details of your nearest designated collection point.
Penalties may be applicable for incorrect disposal of this waste, in accordance with your national
legislation.
For professional users in the European Union
If you wish to discard electrical and electronic equipment (EEE), please contact your dealer or
supplier for further information.
For disposal in countries outside of the European Union
This symbol is only valid in the European Union (EU). If you wish to discard this product, please
contact your local authorities or dealer.
Page 27

Consignes de sécurité importantes
Observez les consignes de sécurité lors de l’utilisation ou de la manipulation de vos lunettes
intelligentes VUZIX M-Series afin de réduire le risque d’incendie, de choc électrique, et de dommages
corporels ou matériels.
1. LISEZ TOUTES LES INSTRUCTIONS ET LES DÉTAILS SUR LA SÉCURITÉ AVANT D’UTILISER CE
DISPOSITIF.
2. Utilisez ce dispositif conformément à son usage prévu, tel que décrit dans ce manuel.
3. Surveillez de près les enfants quand ils se trouvent à proximité du dispositif.
4. Les enfants âgés de moins de sept (7) ans n’ont pas fini d’apprendre à focaliser et à suivre avec
leurs yeux. Leur vision est encore immature. Par conséquent, près des écrans NE DOIT PAS ÊTRE
UTILISÉ PAR DES ENFANTS DE MOINS DE SEPT (7) ANS.
5. Un pourcentage minime de la population risque de présenter des crises épileptiques en
visionnant certains types de lumières clignotantes et de motifs communs présents dans notre
environnement quotidien. Ces personnes peuvent également présenter des crises en
regardant certaines images à la télévision ou en jouant à certains jeux vidéo sur des écrans
normaux, y compris un système d’affichage tel que celui-ci. La dimension et nature des écrans
vidéo de ce dispositif risque d’aggraver ces réactions. Si vous avez des antécédents d’épilepsie,
consultez un médecin avant d’utiliser ce dispositif ou lorsque vous ressentez l’un des
symptômes suivants durant son fonctionnement: troubles de la vision, contractions
musculaires, autres mouvements involontaires, perte de reconnaissance de votre
environnement, confusion mentale, et/ou convulsions.
6. Lunettes intelligentes peut avoir des effets adverses sur l’utilisateur parmi lesquels: mal des
transports, effets résiduels perceptifs, désorientation, stabilité posturale réduite et fatigue
oculaire. Accordez-vous des pauses fréquentes pour réduire le risque de tels effets, comme
cela est souvent recommandé pour d’autres dispositifs, claviers et écrans d’ordinateur, sur
lesquels vous avez tendance à fixer et concentrer votre attention. Si vos yeux montrent des
signes de fatigue ou sont secs, ou en présence de l’un ou l’autre des symptômes ci-dessus,
cessez immédiatement d’utiliser cet appareil et attendez au moins 30 minutes que les
symptômes disparaissent avant de recommencer.
7. Une perte ou une perte auditive permanente ou temporaire peut résulter d'un volume
excessif émis par les écouteurs ou les oreillettes fournis. Réglez toujours le volume à un niveau
sécuritaire AVANT de porter les écouteurs ou le casque du produit.
8. Ce produit peut être branché sur une source d'alimentation ou une batterie et ses composants
peuvent être connectés à des câbles. Veillez à ce que ces câbles ne s’enroulent pas autour de
vous et ne présentent aucun danger pour les autres.
9. Ne démontez pas ce produit. Si une réparation du produit est nécessaire, contactez le service
client de VUZIX (les coordonnées sont indiquées dans ce manuel).
10. Ne tirez pas sur le câble, n’effectuez ni torsion, ni entrelacement. Ne suspendez pas le produit,
ni ne le laissez suspendu à l’un de ses câbles. Pour débrancher les câbles, tirez sur leur
connecteur. Les câbles endommagés par de telles actions ne sont pas couverts par la garantie
limitée du produit.
11. Ne faites tomber, ne heurtez, ne frappez ni ne secouez vigoureusement aucune partie de ce
produit. De telles actions pourraient endommager le produit et annuler votre garantie.
12. Conservez ces instructions, vous pourriez en avoir besoin plus tard.
Débranchez immédiatement le produit des sources externes de courant si:
L’adaptateur de courant, le câble d’alimentation ou le cordon USB est endommagé ou effiloché. Du
liquide a été vaporisé, éclaboussé ou versé sur le produit. Un composant du produit est tombé ou a
été endommagé. La performance du produit s’est dégradée considérablement.
Consignes de sécurité des piles
Les piles contiennent des produits toxiques. Ne brûlez pas ni ne désassemblez, ni ne mutilez, ni ne
percez les piles. Ne jetez pas les piles au feu. Mettez les piles au rebut conformément aux lois et
aux règlements locaux.
Page 28

Garantie limitée du matériel Vuzix
Vuzix garantit que le matériel Vuzix est exempt de tout défaut de fabrication ou de main d’œuvre
pendant la période spécifiée dans la Période de garantie (typiquement un an), à compter de la date
d’achat. Si votre matériel Vuzix est utilisé à des fins commerciales (y compris une location) la Période
de garantie sera réduite à seulement quatre-vingt dix (90) jours à compter de la date d’achat. Sauf si
la loi applicable l’interdit, cette garantie n’est pas transférable, est limitée à l’acheteur initial et ne
s’applique à personne d’autre, y compris toute personne à laquelle vous pourrez transférer ou
vendre le dispositif par la suite. Cette garantie vous accorde des droits spécifiques selon la loi, et vous
pouvez également disposer d’autres droits variant selon les lois locales, dont certains ne sont pas
affectés par les garanties contenues dans cette Garantie limitée.
Cette Garantie limitée ne couvre pas, et aucune garantie n’est donnée en ce qui concerne, les aspects
subjectifs ou esthétiques du matériel. Vuzix ne garantit pas un fonctionnement ininterrompu ou sans
erreur de ce produit. La garantie limitée indiquée ci-dessus est la seule garantie qui vous soit offerte,
elle remplace toute autre garantie ou condition expresse ou tacite (à l’exception de toute garantie
tacite non déclinable existante), y compris toute garantie issue de toute autre documentation ou
emballage. Nulle information ni suggestion (orale ou enregistrée) donnée par Vuzix, ses agents,
sociétés affiliées, concessionnaires ou fournisseurs ou ses employés ou agents, ne constituera une
garantie ou une condition, ou n’étendra la portée de cette Garantie limitée.
Le logiciel fourni avec le matériel par Vuzix, avec ou sans le nom commercial Vuzix, n‘est pas couvert
par cette Garantie limitée. Consultez l’accord de licence qui accompagne le logiciel (consultable lors
de son installation), pour en savoir plus sur vos droits concernant son utilisation.
Recours
La responsabilité entière de Vuzix et votre recours exclusif en cas de non-respect de garantie seront,
à la discrétion de Vuzix, (1) de réparer ou de remplacer l’ensemble ou une partie du matériel, (2)
d’échanger le matériel contre un produit neuf ou un produit qui a été fabriqué avec des pièces
neuves ou usagées réparables et qui est au moins fonctionnellement équivalent au produit original ,
ou (3) de rembourser le prix que vous avez payé, réduit d’une dépréciation raisonnable basée sur
votre usage réel, à condition que le matériel soit retourné au point d’achat ou à tout autre endroit
que Vuzix pourra suggérer avec une copie du coupon de caisse ou un reçu détaillé et daté. Sauf
interdiction de la loi, tous les frais d’expédition et de manutention associés au transport (y compris
l’emballage) pour le service de garantie seront à votre charge. Vuzix pourra, à sa discrétion, utiliser
des pièces neuves, usagées ou réusinées en bon état pour réparer ou remplacer le matériel. Tout
matériel de rechange sera garanti pour le reste de la période de garantie originale ou trente (30)
jours, la durée la plus longue l’emportant, ou pour toute période de temps supplémentaire
éventuellement applicable dans votre juridiction. Cette garantie ne couvre pas les problèmes ou
dommages résultant des (1) cas de force majeure, surtension, usage abusif, abus, négligence,
accident, usure, manutention inadéquate, mauvaise application, ou autres causes non associées aux
défauts du matériel (2) de toute réparation, modification, altération ou démontage non autorisé ; (3)
d’utilisation ou maintenance incorrecte, usage non conforme aux instructions concernant le produit
ou branchement à une alimentation inappropriée ; ou (3) de l’utilisation de consommables, tels que
des piles de rechange, non fournies par Vuzix, sauf si cette restriction est interdite par la loi
applicable.
Pour obtenir une assistance technique
L’assistance technique répondra aux questions relatives au matériel Vuzix. L’assistance technique
pour le matériel et son logiciel est offerte pendant les quatre-vingt dix (90) premiers jours suivant la
date d’achat du produit. Votre coupon de caisse ou de livraison daté, indiquant la date de l’achat ou
de la location du produit, constitue la preuve de la date de votre achat ou de votre location. Pour
obtenir une assistance technique logicielle, on pourra vous demander de fournir la preuve de la date
Page 29

de votre achat. Les adresses et les coordonnées du service technique de Vuzix sont indiquées dans
la documentation qui accompagne le produit et sur notre site web: www.vuzix.com.
Pour obtenir une assistance concernant les questions de garantie
Dans le cadre de cette Garantie limitée, Vuzix est le garant. Avant de soumettre une réclamation au
titre de la garantie, nous vous recommandons de consulter la section assistance sur www.Vuzix.com
pour obtenir une assistance technique. Les réclamations de garantie ne peuvent pas être traitées au
point d’achat et toute autre question relative au produit devra être adressée directement à Vuzix.
Les adresses et coordonnées de service après-vente de Vuzix sont indiquées dans la documentation
qui accompagne le produit et sur notre site web www.vuzix.com, qui répertorie également les filiales
ou succursales Vuzix dans votre pays avec leur adresse. Vous pouvez également écrire à: Vuzix Sales
Support, 25 Hendrix Drive, West Henrietta, NY 14586, États-Unis.
Limitation de responsabilité
VUZIX NE SERA TENUE RESPONSABLE D’AUCUN DOMMAGE SPÉCIAL, INDIRECT, ACCIDENTEL OU
CONSÉCUTIF QUEL QU’IL SOIT, Y COMPRIS MAIS SANS S’Y LIMITER, DE TOUT MANQUE À GAGNER,
PERTES DE REVENUS OU DE DONNÉES (DIRECTES OU INDIRECTES) OU PERTE COMMERCIALE POUR
NON- RESPECT DE TOUTE GARANTIE EXPRESSE OU TACITE SUR VOTRE PRODUIT MÊME SI LA SOCIÉTÉ
VUZIX A ÉTÉ AVISÉE DE L’ÉVENTUALITÉ DE TELS DOMMAGES.
Certaines juridictions interdisent l’exclusion et la limitation de dommages spéciaux, indirects,
accidentels ou consécutifs, par conséquent, il est possible que la limitation ou l’exclusion ci-dessous
ne vous concerne pas, mais pour le reste, cette Garantie limitée restera pleinement en vigueur.
Durée des Garanties tacites
SAUF DANS LA MESURE OÙ LA LOI APPLICABLE L’INTERDIT, TOUTE GARANTIE TACITE OU CONDITION
DE QUALITÉ MARCHANDE OU D’ADAPTATION À UN USAGE PARTICULIER SUR CE MATÉRIEL EST
LIMITÉE EN DURÉE À LA PÉRIODE DE GARANTIE LIMITÉE INDIQUÉE CI-DESSUS POUR VOTRE PRODUIT.
Certaines juridictions interdisent toute limitation de la durée d’une garantie tacite, par conséquent,
il est possible que la limitation ci-dessus ne vous concerne pas. Veuillez noter que dans l’Union
européenne, une période de garantie de moins de deux ans sera prolongée de deux ans, sauf si le
produit est utilisé à des fins commerciales ou de produits commerciaux.
Page 30

Conformité FCC et ISED
FCC Caution: Toute modification ou modification non expressément approuvée par la partie
responsable de la conformité pourrait annuler l'autorisation de l'utilisateur d'exploiter l'équipement.
Cet appareil est conforme à la partie 15 des Règles de la FCC. L'exploitation est soumise aux deux
conditions suivantes : (1) Cet appareil ne peut pas causer d'interférences nocives, et (2) cet appareil
doit accepter toute interférence reçue, y compris les interférences qui peuvent causer un
fonctionnement indésirable.
Remarque : Cet équipement a été testé et s'est avéré conforme aux limites d'un appareil numérique
de classe B, conformément à la partie 15 des Règles de la FCC. Ces limites sont conçues pour offrir
une protection raisonnable contre les interférences nocives dans une installation résidentielle. Cet
équipement génère, utilise et peut émettre de l'énergie radiofréquence et, s'il n'est pas installé et
utilisé conformément aux instructions, peut causer des interférences nocives aux communications
radio. Cependant, il n'y a aucune garantie que l'interférence ne se produira pas dans une installation
particulière. Si cet équipement cause des interférences nocives à la réception radio ou à la télévision,
qui peut être déterminée en désactiveant et en arrêtant l'équipement, l'utilisateur est encouragé à
essayer de corriger l'interférence par une ou plusieurs des mesures suivantes :
—Réorienter ou déplacer l'antenne réceptrice.
—Augmenter la séparation entre l'équipement et le récepteur.
—Connectez l'équipement dans une prise sur un circuit différent de celui auquel le récepteur est
connecté.
—Consultez le concessionnaire ou un technicien expérimenté en radio/télévision pour obtenir de
l'aide.
L'appareil a été testé et le respect des limites SAR. Cet équipement doit être installé et actionné avec
une distance minimale de 0 mm entre le radiateur et votre corps.
ISEDC Warning:
Le présent appareil est conforme aux CNR d'Industrie Canada applicables aux appareils radio
exempts de licence. L'exploitation est autorisée aux deux conditions suivantes :
(1) l'appareil nedoit pas produire de brouillage, et
(2) l'utilisateur de l'appareil doit accepter tout brouillage radioélectrique subi, même si le brouillage
est susceptible d'en compromettre le fonctionnement.
Après examen de ce matériel aux conformité aux limites DAS et/ou aux limites d’intensité de champ
RF, les utilisateurs peuvent sur l’exposition aux radiofréquences et la conformité and compliance
d’acquérir les informations correspondantes. Ce matériel devrait être installé et adapté à une
distance minimale de 0mm entre le radiateur et votre corps.
Page 31

ÉQUIPEMENT ÉLECTRIQUE ET ÉLECTRONIQUE UTILISÉ (DEEE)
Pour les ménages privés: Information sur l'élimination des utilisateurs de DEEE
Ce symbole (figure 1) sur le (s) produit (s) et / ou les documents d’accompagnement signifie que les
équipements électriques et électroniques usagés (DEEE) ne doivent pas être mélangés avec les
déchets ménagers. Pour un traitement, une récupération et un recyclage appropriés, veuillez
apporter ce (s) produit (s) à des points de collecte désignés où il sera accepté gratuitement. Dans
certains pays, vous pouvez également retourner vos produits chez votre revendeur local à l’achat
d’un nouveau produit équivalent.
L'élimination correcte de ce produit contribuera à économiser des ressources précieuses et à
prévenir tout effet négatif potentiel sur la santé humaine et l'environnement, qui pourrait autrement
découler d'une gestion inappropriée des déchets.
Veuillez contacter votre autorité locale pour plus d'informations sur le point de collecte désigné le
plus proche.
Des pénalités peuvent être appliquées en cas d'élimination incorrecte de ces déchets, conformément
à votre législation nationale.
Pour les utilisateurs professionnels dans l'Union européenne
Si vous souhaitez mettre au rebut un équipement électrique et électronique (EEE), veuillez contacter
votre revendeur ou votre fournisseur pour plus d'informations.
Pour élimination dans des pays hors de l'Union européenne
Ce symbole n'est valable que dans l'Union européenne (UE). Si vous souhaitez jeter ce produit,
veuillez contacter les autorités locales ou votre revendeur.
Page 32

Wichtige Sicherheitsanweisungen
Befolgen Sie bei der Verwendung oder Handhabung der Smart Glasses der VUZIX M-Serie die
vorliegenden Sicherheitsanweisungen, um das Risiko von Brand, Stromschlag, Personenverletzungen
und Sachschäden zu reduzieren.
1. LESEN SIE VOR DER INBETRIEBNAHME DIESES GERÄTS SÄMTLICHE ANLEITUNGEN UND
SICHERHEITSINFORMATIONEN.
2. Das Gerät darf nur entsprechend der Beschreibung in diesem Handbuch für seinen
vorgesehenen Zweck verwendet werden.
3. Kinder, die sich beim Gerät oder in der Nähe des Geräts aufhalten, müssen gut beaufsichtigt
werden.
4. Kinder unter sieben Jahren (7) lernen immer noch, sich zu konzentrieren und mit ihren Augen
zu verfolgen. Ihre Vision ist noch nicht ausgereift. Aus diesen Gründen DÜRFEN KINDER UNTER
DEM ALTER VON SIEBEN (7) KEINE Nahsicht-Displays verwenden.
5. Bei einer sehr geringen Anzahl von Benutzern können epileptische Anfälle auftreten, wenn sie
bestimmte Arten blitzender Lichter oder Muster ansehen, die im täglichen Leben auf uns
einwirken. Bei diesen Personen können auch Anfälle auftreten, während sie bestimmte Arten
von Fernsehbildern betrachten, gewisse Arten von Videospielen auf Standardmonitoren
spielen oder auch ein Anzeigesystem wie das Vorliegende verwenden. Diese Effekte können
aufgrund der Größe und Art der Bildschirmanzeigen in diesem Gerät verstärkt werden. Sollten
Sie bereits einmal einen epileptischen Zustand erlitten haben, oder sollten sich bei der
Verwendung dieses Gerätes Symptome von verändertem Sehvermögen, Muskelzucken oder
anderen unfreiwilligen Bewegungen, Verlust des Umgebungsbewusstseins, geistiger
Verwirrung und/oder Konvulsionen einstellen, sollten Sie vor der Verwendung des Geräts
unbedingt einen Arzt zurate ziehen.
6. Intelligente Brillen können potenziell nachteilige Auswirkungen auf den Benutzer haben,
einschließlich: Reisekrankheit, Wahrnehmungsnachwirkungen, Orientierungslosigkeit,
verminderte Haltungsstabilität und Augenbelastung. Machen Sie häufige Pausen, um das
Potenzial dieser Effekte zu verringern. Dies wird häufig für andere Elemente empfohlen, z. B.
Tastaturen und Computermonitore, auf die Sie sich möglicherweise konzentrieren. Wenn Ihre
Augen Anzeichen von Müdigkeit oder Trockenheit aufweisen oder eines der oben genannten
Symptome festgestellt wird, stellen Sie die Verwendung dieses Geräts sofort ein und setzen
Sie die Verwendung für mindestens 30 Minuten fort, nachdem die Symptome vollständig
abgeklungen sind.
7. Ein dauerhafter oder vorübergehender Hörverlust oder eine Beeinträchtigung des
Hörvermögens können durch übermäßige Lautstärke der mitgelieferten Kopfhörer oder
Ohrhörer verursacht werden. Stellen Sie die Lautstärke immer auf einen sicheren Wert ein,
BEVOR Sie die Ohrhörer oder Kopfhörer des Produkts tragen.
8. Dieses Produkt ist möglicherweise an eine Stromquelle oder einen Akku angeschlossen, und
die Kabel können zwischen den Komponenten verlaufen. Achten Sie darauf, dass sich diese
Kabel nicht um Sie verwickeln oder die Sicherheit anderer gefährden.
9. Das Gerät darf nicht auseinandergenommen werden. Sollten Wartungs- oder
Reparaturarbeiten am Gerät erforderlich werden, sollten Sie sich über die in diesem Handbuch
angegebenen Kontaktinformationen mit der Support-Abteilung von VUZIX in Verbindung
setzen.
10. Ziehen oder reißen Sie nicht am Kabel, knicken Sie keines der Kabel und binden Sie sie nicht
mit scharfen oder engen Knoten. Kabel, die durch solche Maßnahmen beschädigt wurden,
fallen nicht unter die beschränkte Garantie des Produkts.
11. Lassen Sie das Gerät nicht fallen, und stoßen Sie es nicht. Achten Sie darauf, dass auf keinen
Teil des Geräts gewaltsame Stöße einwirken, und dass es nicht stark geschüttelt wird.
Vorgehensweisen solcher Art können das Gerät beschädigen und Ihre Garantie ungültig
machen.
12. Bewahren Sie diese Anweisungen gut auf.
Page 33

Das Gerät muss sofort von äußeren Stromquellen getrennt werden, wenn Folgendes zutrifft:
Der Stromadapter, das Stromkabel oder das USB-Kabel ist beschädigt oder ausgefranst. Flüssigkeit
wurde auf das Gerät gesprüht, gespritzt oder gegossen. Eine Komponente des Geräts ist
heruntergefallen oder wurde beschädigt. Das Gerät weist eine Leistungsveränderung auf.
Sicherheitsanweisungen für den Umgang mit Batterien
Batterien enthalten giftige Stoffe. Batterien dürfen nicht verbrannt, auseinandergenommen oder
zerstört werden, und es darf nicht in sie hineingestochen werden. Batterien dürfen nicht durch
Verbrennen entsorgt werden. Entsorgen Sie Batterien stets auf eine Weise, die den örtlichen
Vorschriften und Bestimmungen entspricht.
Vuzix-Hardwareprodukt, eingeschränkte Garantie
Vuzix garantiert, dass das Vuzix-Hardwaregerät ab dem Datum des Kaufs während der Dauer des
Garantiezeitraumes (in der Regel ein Jahr) frei von Material- und Verarbeitungsfehlern ist. Wird das
Vuzix- Hardwaregerät zu gewerblichen Zwecken genutzt (einschließlich Vermietung oder Leasing)
reduziert sich der Garantiezeitraum auf neunzig (90) Tage ab dem Datum des Kaufs. Außer wenn
nach anwendbarem Recht unzulässig, ist diese Garantie nicht übertragbar und gilt ausschließlich für
den ursprünglichen Käufer und für keine anderen Personen einschließlich Personen, an die das Gerät
zu einem späteren Zeitpunkt übertragen oder verkauft werden könnte. Mit dieser Garantie werden
Ihnen bestimmte Rechtsansprüche erteilt, die durch andere Rechte ergänzt werden können, die je
nach örtlich anwendbarem Recht unterschiedlich sein können, und auf die die in dieser
eingeschränkten Garantie aufgeführten Garantien eventuell nicht zutreffen.
Diese eingeschränkte Garantie deckt keine subjektiven oder ästhetischen Aspekte in Bezug auf das
Hardwaregerät und übernimmt in dieser Hinsicht keinerlei Garantie. Vuzix übernimmt keine Garantie
für den unterbrechungsfreien oder fehlerfreien Betrieb des Geräts. Die oben aufgeführte
eingeschränkte Garantie gilt als einzige für Sie wirksame Garantie und tritt anstelle aller anderen
ausdrücklichen oder stillschweigenden Garantien und Bedingungen (außer nicht ablehnbaren
bestehenden stillschweigenden Garantien) einschließlich derer, die in anderen Dokumentationen
oder Verpackungen aufgeführt werden. Keine von Vuzix, seinen Stellvertretern, Partnern, Händlern
oder Zulieferern oder deren Mitarbeitern oder Stellvertretern mündlich oder schriftlich erteilten
Informationen oder Vorschläge erzeugen eine Garantie oder Bedingung oder Erweiterung des
Gültigkeitsumfangs der vorliegenden eingeschränkten Garantie.
Keine Arten von Software, die von Vuzix, mit oder ohne den Markennamen Vuzix, zusammen mit
dem Hardwaregerät vertrieben werden, sind unter dieser eingeschränkten Garantie gedeckt.
Beziehen Sie sich auf die der Software zugehörige Lizenzvereinbarung (die nach Abschluss der
Installation eingesehen werden kann), um über Einzelheiten zu Ihren Rechten bezüglich der
Verwendung der Software nachzulesen.
Rechtsmittel
Der gesamte Haftungsumfang für Vuzix und Ihr ausschließliches Rechtsmittel bei einer Verletzung der
Garantie besteht, nach dem Ermessen von Vuzix, aus Folgendem: (1) die Hardware in vollem Umfang
oder in Teilen zu reparieren oder zu ersetzen, (2) die Hardware gegen ein Gerät auszutauschen, das
entweder neu ist oder aus neuen oder funktionsfähigen gebrauchten Teilen gefertigt wurde und dem
Originalgerät zumindest in Hinsicht auf dessen Funktionstüchtigkeit entspricht oder (3) den von Ihnen
bezahlten Kaufpreis minus angemessener Wertminderung auf Grundlage tatsächlicher Verwendung
zurückzuerstatten, unter der Voraussetzung, dass die Hardware mit einer Rechnungskopie oder einer
mit einem Datum versehenen Rechnung mit Angabe der Einzelposten an die Verkaufsstelle oder an
eine andere von Vuzix angewiesene Stelle zurückgesendet wird. Außer wenn nach anwendbarem
Recht unzulässig, gehen sämtliche mit der Inanspruchnahme von Garantieleistungen in Verbindung
stehenden Kosten für Versand und Transport (einschließlich Verpackung) an Sie. Vuzix ist nach
eigenem Ermessen berechtigt, neue oder wiederaufgearbeitete oder gebrauchte betriebsfähige Teile
Page 34

zur Reparatur oder zum Umtausch von Hardwaregeräten zu verwenden. Jedes umgetauschte
Hardwaregerät ist während des restlichen Zeitraums der ursprünglichen Garantie oder während
dreißig (30) Tagen gedeckt, je nachdem, welcher Zeitraum der längere ist, oder während eines in
Ihrem Gerichtsbezirk vorgegebenen zusätzlichen Zeitraums. Diese Garantie erstreckt sich nicht auf
Probleme oder Beschädigungen, die auf Folgendes zurückzuführen sind: (1) höhere Gewalt,
Spannungsspitzen, Zweckentfremdung, Missbrauch, Nachlässigkeit, Unfall, Abnutzung, falsche
Handhabung, falsche Anwendung oder andere, nicht mit Schäden des Hardwaregeräts in
Zusammenhang stehende Ursachen, (2) unbefugte Reparaturen, Änderungen, Manipulationen oder
Demontagen; (3) unsachgemäßer Betrieb oder unsachgemäße Wartung, Verwendung des Geräts
unter Missachtung der Geräteanleitungen oder Verbindung mit einer ungeeigneten
Spannungsversorgung oder (4) Verwendung von Verbrauchsartikeln wie Ersatzbatterien, die nicht
von Vuzix zur Verfügung gestellt wurden, außer wo solcherlei Einschränkungen nach anwendbarem
Recht unzulässig sind.
So erhalten Sie technischen Support
Technischer Support ist die Unterstützung bei Fragen zu Problemen mit dem VuzixHardwareprodukt. Der technische Support für Hardware und Software ist ab Kaufdatum des
Produkts in den ersten neunzig (90) Tagen verfügbar. Ihr datierter Kauf- oder Lieferschein mit dem
Kauf- oder Leihdatum des Produkts ist Ihr Beweis für das Kauf- oder Leihdatum. Möglicherweise
müssen Sie einen Kaufnachweis vorlegen, um technischen Support für Software zu erhalten. Die
Adressen und Kontaktinformationen für den technischen Service von Vuzix finden Sie in der
Dokumentation zu Ihrem Produkt und im Internet auf unserer globalen Website: www.vuzix.com.
So erhalten Sie Support zur Inanspruchnahme von Garantieleistungen
Vuzix ist der Garantiegeber unter der vorliegenden eingeschränkten Garantie. Wir empfehlen, dass
bevor Sie einen Garantieanspruch geltend machen, den Supportabschnitt unter www.Vuzix.com
einsehen, der technische Unterstützung bietet. Garantieansprüche können nicht durch
Verkaufsstellen bearbeitet werden, und alle anderen produktbezogenen Fragen sollten direkt an
Vuzix gerichtet werden. Die Adressen und Kontaktinformationen des Vuzix-Kundendiensts stehen in
der mit dem Gerät gelieferten Dokumentation sowie über das Internet auf unserer globalen Website
unter www.vuzix.com zur Verfügung, wo auch die Vuzix-Filialen oder -Zweigstellen Ihres Landes
sowie deren örtliche Adressen angegeben sind. Sie haben auch die Möglichkeit, sich schriftlich an
uns zu wenden: Vuzix Sales Support, 25 Hendrix Drive, West Henrietta, NY 14586, USA.
Haftungsbeschränkung
VUZIX HAFTET UNTER KEINEN UMSTÄNDEN FÜR KONKRETE SCHÄDEN, INDIREKTE SCHÄDEN,
BEILÄUFIG ENTSTANDENE SCHÄDEN ODER FOLGESCHÄDEN, EINSCHLIESSLICH, JEDOCH NICHT
BESCHRÄNKT AUF, ENTGANGENE GEWINNE ODER UMSÄTZE ODER VERLORENE DATEN (DIREKT
ODER INDIREKT) ODER GEWERBLICHE VERLUSTE, DIE AUF EINE VERLETZUNG DER AUSDRÜCKLICHEN
ODER STILLSCHWEIGENDEN GARANTIE DES PRODUKTES ZURÜCKZUFÜHREN SIND, SELBST WENN
VUZIX ÜBER DIE MÖGLICHKEIT SOLCHER SCHÄDEN INFORMIERT WURDE.
In einigen Gerichtsbezirken ist der Ausschluss oder die Einschränkung von konkreten Schäden,
indirekten Schäden, beiläufig entstandenen Schäden oder Folgeschäden nicht zulässig, weshalb die
oben aufgeführte Einschränkung bzw. der oben aufgeführte Ausschluss eventuell nicht auf Sie
zutrifft, wobei der übrige Teil dieser eingeschränkten Garantie jedoch
Dauer der stillschweigenden Garantien
JEGLICHE STILLSCHWEIGENDE GEWÄHRLEISTUNG ODER BEDINGUNG DER MARKTGÄNGIGKEIT ODER
EIGNUNG FÜR EINEN BESTIMMTEN ZWECK DIESES HARDWAREPRODUKTS IST MIT AUSNAHME DES
FÜR IHR PRODUKT GESETZLICH BESCHRÄNKTEN GARANTIEZEITRAUMS BESCHRÄNKT.
In einigen Ländern ist keine Beschränkung der Dauer einer stillschweigenden Garantie zulässig.
Daher gilt die oben genannte Beschränkung möglicherweise nicht für Sie. Bitte beachten Sie, dass in
der Europäischen Union die Gewährleistungsfrist von weniger als zwei Jahren auf zwei Jahre
verlängert wird, außer bei Verwendung für gewerbliche Zwecke oder gewerbliche Produkte.
weiterhin volle Gültigkeit hat.
Page 35

FCC- und ISED-Konformität
FCC Caution: Änderungen oder Änderungen, die nicht ausdrücklich von der für die Einhaltung der
Vorschriften verantwortlichen Partei genehmigt wurden, können die Befugnis des Benutzers, das
Gerät zu betreiben, für ungültig erklären.
Dieses Gerät entspricht Teil 15 der FCC-Regeln. Der Betrieb unterliegt den folgenden beiden
Bedingungen: (1) Dieses Gerät darf keine schädlichen Störungen verursachen, und (2) dieses Gerät
muss empfangene Interferenzen akzeptieren, einschließlich Interferenzen, die einen unerwünschten
Betrieb verursachen können.
Hinweis: Dieses Gerät wurde gemäß Teil 15 der FCC-Regeln getestet und erfüllt die Grenzwerte für
ein digitales Gerät der Klasse B. Diese Grenzwerte sollen einen angemessenen Schutz vor schädlichen
Störungen in einer Wohnanlage bieten. Dieses Gerät erzeugt, nutzt und kann hochfrequente Energie
ausstrahlen und kann, wenn es nicht gemäß den Anweisungen installiert und verwendet wird,
schädliche Störungen der Funkkommunikation verursachen. Es gibt jedoch keine Garantie dafür, dass
in einer bestimmten Installation keine Störungen auftreten. Wenn dieses Gerät schädliche Störungen
des Radio- oder Fernsehempfangs verursacht, die durch Aus- und Einschalten des Geräts bestimmt
werden können, wird der Benutzer aufgefordert, zu versuchen, die Störung durch eine oder mehrere
der folgenden Maßnahmen zu korrigieren:
— Neuausrichtung oder Verlagerung der Empfangsantenne.
— Erhöhen Sie die Trennung zwischen Gerät und Empfänger.
– Schließen Sie das Gerät an eine Steckdose an, die sich von der Verbindung des Empfängers
unterscheidet.
– Wenden Sie sich an den Händler oder einen erfahrenen Radio-/TV-Techniker.
Das Gerät wurde getestet und erfüllt die SAR-Grenzwerte. Dieses Gerät sollte mit einem
Mindestabstand von 0 mm zwischen dem Kühler und Ihrem Körper installiert und betrieben werden.
ISEDC Warning:
Dieses Gerät entspricht den von Industry Canada lizenzfreien RSS-Standards. Der Betrieb unterliegt
den folgenden beiden Bedingungen:
(1) Dieses Gerät darf keine Störungen verursachen und
(2) Dieses Gerät muss jegliche Interferenzen akzeptieren, einschließlich Interferenzen, die einen
unerwünschten Betrieb des Geräts verursachen können.
Das Gerät wurde getestet und die Einhaltung der SAR-Grenzwerte, Benutzer können kanadische
Informationen über HF-Exposition und Compliance erhalten. Dieses Gerät sollte mit einem
Mindestabstand von 0 mm zwischen dem Kühler und Ihrem Körper installiert und betrieben werden.
Page 36

GEBRAUCHTE ELEKTRISCHE UND ELEKTRONISCHE GERÄTE (WEEE) Informationen
Für Privathaushalte: Informationen zur Entsorgung von Elektro- und Elektronikaltgeräten
Dieses Symbol (Abbildung 1) auf den Produkten und / oder Begleitdokumenten bedeutet, dass
gebrauchte Elektro- und Elektronikgeräte nicht mit dem normalen Hausmüll gemischt werden
dürfen. Bringen Sie dieses Produkt zur ordnungsgemäßen Behandlung, Rückgewinnung und
Wiederverwertung zu bestimmten Sammelstellen, wo es kostenlos angenommen wird. In einigen
Ländern können Sie Ihre Produkte nach dem Kauf eines gleichwertigen neuen Produkts
möglicherweise auch an Ihren Händler vor Ort zurückgeben.
Eine korrekte Entsorgung dieses Produkts hilft, wertvolle Ressourcen zu schonen und mögliche
negative Auswirkungen auf die menschliche Gesundheit und die Umwelt zu vermeiden, die
ansonsten durch eine unsachgemäße Abfallbehandlung entstehen könnten.
Bitte wenden Sie sich an Ihre örtliche Behörde, um weitere Informationen zur nächstgelegenen
Sammelstelle zu erhalten.
Für die falsche Entsorgung dieses Abfalls können gemäß Ihrer nationalen Gesetzgebung Strafen
verhängt werden.
Für professionelle Anwender in der Europäischen Union
Wenn Sie Elektro- und Elektronikgeräte entsorgen möchten, wenden Sie sich an Ihren Händler oder
Lieferanten, um weitere Informationen zu erhalten.
Zur Entsorgung in Ländern außerhalb der Europäischen Union
Dieses Symbol ist nur in der Europäischen Union (EU) gültig. Wenn Sie dieses Produkt entsorgen
möchten, wenden Sie sich bitte an Ihre örtlichen Behörden oder Ihren Händler
Page 37

Instrucciones importantes de seguridad
Siga estas instrucciones de seguridad cuando utilice o manipule las gafas inteligentes Vuzix M- serie
para reducir el riesgo de fuego, descarga eléctrica y daños personales o materiales.
1. LEA TODAS LAS INSTRUCCIONES E INFORMACIÓN DE SEGURIDAD PROPORCIONADAS ANTES DE
UTILIZAR ESTE PRODUCTO.
2. Utilice el producto sólo para el propósito especificado, tal y como se describe en este manual.
3. Se requiere una estrecha supervisión cuando esté producto sea utilizado o esté al alcance de
los niños.
4. Los niños menores de siete (7) años todavía están aprendiendo a enfocar y hacer seguimiento
con los ojos. Su visión es todavía inmadura. Por estos motivos, cerca de pantallas oculares NO
DEBERÍA SER UTILIZADO POR NIÑOS MENORES DE SIETE (7) AÑOS.
5. Un porcentaje muy reducido de la población puede experimentar ataques epilépticos al
visualizar cierto tipo de luces o diseños intermitentes que son comunes en nuestro entorno
diario. Estas personas también pueden experimentar ataques al ver cierto tipo de imágenes
de televisión o al jugar a determinados video juegos en monitores normales, lo que incluye un
sistema de visualización como éste. Estos efectos pueden verse incrementados por el tamaño
y naturaleza de las pantallas en este dispositivo. Por ello, consulte a un médico antes de utilizar
este dispositivo si es usted epiléptico, o durante su uso si experimenta cualquiera de estos
síntomas: visión alterada, tics musculares, otros movimientos involuntarios, pérdida de
consciencia sobre lo que le rodea, confusión mental y/o convulsiones.
6. Oculares inteligentes puede tener efectos potencialmente adversos en el usuario, lo que
incluye mareos, efectos secundarios perceptivos y desorientación, así como una disminución
de la estabilidad postural y la tensión ocular. Descanse con frecuencia para reducir la
posibilidad de estos efectos, tal como se suele sugerir para otros artículos, como teclados y
monitores de ordenador, en los que se tiende a fijar la vista o a concentrarse. Si sus ojos
muestran signos de fatiga o sequedad, o cualquiera de los síntomas especificados
previamente, suspenda de inmediato el uso de este dispositivo y no vuelva a utilizarlo hasta al
menos 30 minutos después de la completa desaparición de los síntomas.
7. Puede darse una pérdida temporal de audición o una alteración auditiva como resultado de
niveles excesivos de volumen emitidos por los auriculares incluidos. Ajuste siempre el
volumen a un nivel seguro ANTES de utilizar el producto o los auriculares.
8. Este producto puede conectarse a una fuente de energia o batería y se pueden utilizar cables
para aumentar la distancia entre los distintos componentes. Tenga cuidado de no enredarse
con estos cables, ya que esto puede ser un peligro potencial tanto para su seguridad como
para la de otras personas.
9. No desmonte este producto. Si necesita llevar a cabo algún tipo de comprobación o reparación,
póngase en contacto con VUZIX utilizando la información de contacto de asistencia que
encontrará en este manual.
10. No tire de los cables ni los enrosque o ate utilizando nudos fuertes o tirantes. Los cables
dañados por las acciones previamente descritas no están cubiertos por la garantía limitada del
producto.
11. No deje caer, no golpee ni permita que ninguna parte del producto sea golpeada o agitada de
forma agresiva. Estas acciones pueden dañar el producto y anular la garantía.
12. Guarde estas instrucciones.
Desenchufe inmediatamente este producto de fuentes de alimentación externas si:
El adaptador, el cable eléctrico o el cable USB están dañados o pelados. Se ha rociado, salpicado o
vertido un líquido sobre el producto. Cualquier componente del producto se ha caído o está dañado.
El producto muestra un cambio perceptible en su funcionamiento.
Instrucciones de seguridad de la batería
Las baterías contienen materiales tóxicos. No queme, desmonte o perfore la batería. No se deshaga
de las baterías echándolas al fuego. Deseche las baterías utilizando un método que cumpla las leyes
y normativas locales.
Page 38

Garantía limitada de productos de hardware de Vuzix
Vuzix garantiza que el producto de hardware Vuzix no tiene defecto alguno, tanto de materiales
como de fabricación, durante el tiempo especificado en el período de garantía (tipicamente un año),
que empieza a partir de la fecha de compra. Si el producto de hardware Vuzix está destinado a un
uso comercial (incluyendo el alquiler o leasing), el período de garantía se reducirá a noventa (90) días
desde la fecha de compra. Excepto donde esté expresamente prohibido por la legislación vigente,
esta garantía no es transferible y está limitada al comprador original, no aplicándose a ninguna otra
persona, lo que incluye cualquier persona a la que se pueda transferir o vender el producto
posteriormente. Esta garantía le proporciona derechos legales específicos; puede tener otros
derechos que varían según las distintas legislaciones locales, algunos de los cuales no están afectados
por las disposiciones de esta garantía limitada.
Esta garantía limitada no cubre ningún aspecto subjetivo o estético del producto de hardware, y no
se proporciona garantía alguna de este tipo a este respecto. Vuzix no garantiza que el
funcionamiento del producto sea continuo o sin errores. La garantía limitada que aquí se define es
la única garantía que se ofrece, y se proporciona en lugar de cualquier otra garantía o condición
expresa o implícita (a excepción de cualquier garantía implícita irrenunciable que exista), incluyendo
las creadas por cualquier otra documentación o embalaje. Ninguna información ni sugerencia (verbal
o escrita) proporcionada por Vuzix, sus agentes, filiales, distribuidores o proveedores, o los
empleados o agentes de estos, creará una garantía o condición o ampliará el alcance de esta garantía
limitada.
Cualquier software distribuido con el producto de hardware, pertenezca o no a la marca Vuzix, no
está cubierto por esta garantía limitada. Consulte el acuerdo de licencia que acompaña al software
(que podrá ver cuando lo instale) para obtener detalles sobre sus derechos en relación con el uso de
dicho software.
Compensaciones
Toda la responsabilidad de Vuzix y la compensación a la que usted tiene derecho de forma exclusiva
por cualquier incumplimiento de la garantía será, a elección de Vuzix, (1) reparar o sustituir todo el
hardware o parte de él, (2) cambiar el hardware por un producto que sea nuevo o que haya sido
fabricado a partir de piezas nuevas o reparadas y que sea al menos funcionalmente equivalente al
producto original o (3) reembolsar el precio pagado menos una depreciación razonable basada en la
utilización que se haya hecho del producto, siempre que el hardware se devuelva al punto de compra
o a otra ubicación indicada por Vuzix con una copia del recibo de compra o de un recibo detallado
con fecha. Excepto en los casos en los que la legislación vigente especifique lo contrario, usted tendrá
que pagar todos los gastos de envío y manipulación asociados con el transporte (incluyendo el
embalaje) para el servicio de garantía. Vuzix puede, si así lo decide, utilizar piezas nuevas, reparadas
o usadas que estén en buenas condiciones de funcionamiento para reparar o sustituir cualquier
producto de hardware. Cualquier producto de hardware sustituido estará garantizado durante el
tiempo restante del período de garantía original o treinta (30) días, lo que sea más largo, o por
cualquier período de tiempo adicional que pueda ser aplicable según su jurisdicción. Esta garantía
no cubre problemas o daños provocados por (1) causas de fuerza mayor, subidas de tensión, mal uso,
abuso, negligencia, accidente, desgaste, maltrato, mala aplicación u otras causas no relacionadas con
defectos en el dispositivo de hardware; (2) cualquier reparación, modificación, manipulación o
desmontaje no autorizados; (3) funcionamiento o mantenimiento inadecuados, uso no acorde
a las instrucciones del producto o conexión a un voltaje incorrecto; o (4) utilización de consumibles,
tales como baterías de repuesto, no proporcionadas por Vuzix excepto en los casos en los que esta
restricción esté prohibida por la legislación vigente.
Page 39

Cómo obtener asistencia técnica
La asistencia técnica es la asistencia que se ofrece para preguntas sobre asuntos relacionados con el
producto de hardware de Vuzix. La asistencia técnica para el hardware y su software está disponible
durante los primeros noventa (90) días a partir de la fecha de compra del producto. El recibo de venta
o de entrega fechado, en el que se muestra la fecha de compra o de alquiler del producto, es la
prueba de compra o alquiler. Se le puede pedir que proporcione una prueba de compra como
condición para recibir asistencia técnica del software. Puede encontrar las direcciones y la
información de contacto del servicio técnico de Vuzix en la documentación que acompaña al
producto y en el sitio web de nuestro sitio global www.vuzix.com.
Cómo obtener asistencia en garantí
Vuzix es el garante de esta garantía limitada. Antes de presentar una reclamación en garantía, le
recomendamos que visite la sección de asistencia de www.Vuzix.com para obtener asistencia técnica.
Las reclamaciones en garantía no pueden procesarse a través del punto de venta y cualquier otra
pregunta relacionada con el producto debe remitirse directamente a Vuzix. Las direcciones y la
información de contacto del servicio al consumidor de Vuzix pueden encontrarse en la
documentación que acompaña al producto y en el sitio web de nuestro sitio global www.vuzix.com,
donde también se identifican las filiales o sucursales de Vuzix para su país y su dirección local.
Asimismo, puede escribir a Vuzix Sales Support, 25 Hendrix Drive, West Henrietta, NY 14586, EE. UU.
Limitación de responsabilidad
VUZIX NO PODRÁ CONSIDERARSE RESPONSABLE EN ABSOLUTO DE NINGÚN DAÑO ESPECIAL,
INDIRECTO, FORTUITO O RESULTANTE, INCLUYENDO, PERO SIN LIMITARSE A ELLO, LA PÉRDIDA DE
BENEFICIOS, INGRESOS O DATOS (YA SEA DE FORMA DIRECTA O INDIRECTA) O LA PÉRDIDA
COMERCIAL POR INCUMPLIMIENTO DE CUALQUIER GARANTÍA EXPRESA O IMPLÍCITA DEL
PRODUCTO, INCLUSO EN EL CASO DE QUE SE HAYA NOTIFICADO A VUZIX DE LA POSIBILIDAD DE
DICHOS DAÑOS.
Algunas jurisdicciones no permiten la exclusión o limitación de daños especiales, indirectos, fortuitos
o resultantes, por lo que la limitación o exclusión previamente mencionada puede no ser aplicable
en su caso, aunque el resto de esta garantía limitada seguirá siendo completamente vigente y
aplicable.
Duración de las garantías implícitas
A EXCEPCIÓN DE LAS PROHIBICIONES VIGENTES POR LA LEGISLACIÓN APLICABLE, CUALQUIER
GARANTÍA IMPLÍCITA O CONDICIÓN DE COMERCIABILIDAD O IDONEIDAD PARA UN DETERMINADO
PROPÓSITO DE ESTE PRODUCTO DE HARDWARE ESTÁ LIMITADA A LA DURACIÓN DEL PERÍODO DE
GARANTÍA LIMITADA ESTABLECIDO PREVIAMENTE PARA EL PRODUCTO.
Algunas jurisdicciones no permiten limitaciones en lo que respecta a la duración de la garantía
implícita, por lo que la limitación anterior puede no ser aplicable en su caso. Tenga en cuenta que,
en la Unión Europea, cualquier período de garantía inferior a dos años debe aumentarse hasta dos
años, excepto en el caso de utilización para fines comerciales o productos comerciales.
Page 40

Cumplimiento de FCC e ISED
FCC Caution: Cualquier cambio o modificación no aprobado expresamente por la parte responsable
del cumplimiento podría anular la autoridad del usuario para operar el equipo.
Este dispositivo cumple con la parte 15 de las reglas de la FCC. El funcionamiento está sujeto a las
dos condiciones siguientes: (1) Este dispositivo no puede causar interferencias dañinas, y (2) este
dispositivo debe aceptar cualquier interferencia recibida, incluida la interferencia que pueda causar
un funcionamiento no deseado.
Nota: Este equipo ha sido probado y se ha comprobado que cumple con los límites para un dispositivo
digital de Clase B, de conformidad con la parte 15 de las Reglas de la FCC. Estos límites están
diseñados para proporcionar una protección razonable contra interferencias dañinas en una
instalación residencial. Este equipo genera, utiliza y puede irradiar energía de radiofrecuencia y, si
no se instala y utiliza de acuerdo con las instrucciones, puede causar interferencias dañinas a las
comunicaciones radioeléctricas. Sin embargo, no hay garantía de que no se produzcan interferencias
en una instalación en particular. Si este equipo causa interferencias perjudiciales en la recepción de
radio o televisión, que se pueden determinar apagando y encendiendo el equipo, se recomienda al
usuario que intente corregir la interferencia mediante una o más de las siguientes medidas:
— Reorientar o reubicar la antena receptora.
—Permite aumentar la separación entre el equipo y el receptor.
—Conecte el equipo a una toma de corriente en un circuito diferente al que está conectado el
receptor.
—Consulte al distribuidor o a un técnico de radio/TV con experiencia para obtener ayuda.
El dispositivo ha sido probado y el cumplimiento de los límites SAR. Este equipo debe ser instalado y
operado con una distancia mínima de 0 mm entre el radiador y su cuerpo.
ISEDC Warning:
Este dispositivo cumple con los estándares RSS exentos de licencia de Industry Canada. El
funcionamiento está sujeto a las dos condiciones siguientes:
(1) este dispositivo no puede causar interferencias, y
(2) este dispositivo debe aceptar cualquier interferencia, incluida la interferencia que pueda causar un
funcionamiento no deseado del dispositivo.
El dispositivo ha sido probado y el cumplimiento de los límites de SAR, los usuarios pueden obtener
información canadiense sobre la exposición de RF y el cumplimiento. Este equipo debe ser instalado y
operado con una distancia mínima de 0 mm entre el radiador y su cuerpo.
Page 41

Información sobre equipos eléctricos y electrónicos usados (WEEE)
Para hogares privados: Información sobre eliminación para usuarios de WEEE
Este símbolo (figura 1) en el (los) producto (s) y / o los documentos que lo acompañan significa que
el equipo eléctrico y electrónico usado (WEEE) no debe mezclarse con la basura doméstica general.
Para el tratamiento, la recuperación y el reciclaje adecuados, lleve este producto a los puntos de
recolección designados donde se aceptará de forma gratuita. Alternativamente, en algunos países,
puede devolver sus productos a su distribuidor local al comprar un producto nuevo equivalente.
Desechar este producto correctamente ayudará a ahorrar recursos valiosos y evitará posibles efectos
negativos en la salud humana y el medio ambiente, que de otra manera podrían surgir de un manejo
inadecuado de los desechos.
Póngase en contacto con su autoridad local para obtener más detalles del punto de recogida
designado más cercano.
Se pueden aplicar sanciones por la eliminación incorrecta de estos residuos, de acuerdo con su
legislación nacional.
Para usuarios profesionales en la Unión Europea
Si desea desechar equipos eléctricos y electrónicos (EEE), comuníquese con su distribuidor o
proveedor para obtener más información.
Para su eliminación en países fuera de la Unión Europea
Este símbolo solo es válido en la Unión Europea (UE). Si desea desechar este producto, póngase en
contacto con las autoridades locales o el distribuidor.
Page 42

Istruzioni importanti per la sicurezza
Seguire queste istruzioni di sicurezza quando si utilizzano o si maneggiano gli occhiali VUZIX M-Series
per ridurre il rischio di incendi, scosse elettriche e lesioni a persone e cose.
1. PRIMA DI USARE QUESTO PRODOTTO LEGGERE TUTTE LE ISTRUZIONI E LE INFORMAZIONI DI
SICUREZZA FORNITE.
2. Usare il prodotto esclusivamente per lo scopo previsto, come descritto in questo manuale.
3. È necessario controllare strettamente il prodotto, quando questo si trova in prossimità di
bambini.
4. I bambini di età inferiore a sette (7) anni sono ancora in fase di apprendimento per la messa a
fuoco e la visione. La loro vista è ancora immatura. Per questi motivi, i display per gli occhi
vicini non devono essere utilizzati da bambini di età inferiore a sette (7) ANNI.
5. Una piccolissima porzione della popolazione può manifestare crisi epilettiche durante la
visualizzazione di determinati tipi di luci lampeggianti o di schemi comunemente presenti nel
nostro ambiente quotidiano. Queste persone possono anche provare convulsioni mentre
guardano alcuni tipi di immagini televisive o riproducono determinati videogiochi su monitor
regolari, incluso l'uso di un sistema di visualizzazione come questo. Questi effetti possono
essere aumentati a causa delle dimensioni e della natura dei display in questo dispositivo.
Come risultato, consultare un medico se si dispone di una condizione epilettica prima di
utilizzare questo dispositivo o se si verifica uno dei seguenti sintomi durante l'utilizzo di questo
dispositivo: visione alterata, contrazioni muscolari, altri movimenti involontari, perdita di
consapevolezza dell'ambiente circostante, confusione mentale e / o convulsioni.
6. Gli occhiali intelligenti possono potenzialmente avere effetti negativi sull'utente, tra cui:
cinetosi, effetti post-percettivi, disorientamento, ridotta stabilità posturale e affaticamento
degli occhi. Fai frequenti pause per ridurre il potenziale di questi effetti, come comunemente
consigliato per altri elementi, come tastiere e monitor di computer, che potresti tendere a
fissare o concentrare. Se i tuoi occhi mostrano segni di affaticamento o secchezza o se si nota
uno qualsiasi dei suddetti sintomi, interrompere immediatamente l'uso di questo dispositivo
e non riprenderlo per almeno 30 minuti dopo che i sintomi si sono completamente attenuati.
7. La perdita o la perdita dell'udito permanente o temporanea può derivare da livelli di volume
eccessivi emessi dalle cuffie o dagli auricolari inclusi. Regolare sempre il volume a un livello
sicuro PRIMA di indossare auricolari o cuffie del prodotto.
8. Questo prodotto può essere collegato a una fonte di alimentazione o a una batteria e i cavi
possono estendersi tra i componenti. Fai attenzione che questi cavi non si attorciglino intorno
a te o pongano una potenziale minaccia per la sicurezza degli altri.
9. Non smontare questo prodotto. Qualora sia richiesto un intervento di riparazione, rivolgersi a
VUZIX usando le informazioni di contatto per l’assistenza riportate in questo manuale.
10. Non tirare o strattonare il cavo, piegare i cavi o legarli in nodi taglienti o stretti. I cavi
danneggiati da tali azioni non sono coperti dalla garanzia limitata del prodotto.
11. Non lasciare cadere o urtare il prodotto, né consentire che alcuna delle sue parti sia urtata o
agitata violentemente. Tali azioni possono danneggiare il prodotto, rendendo nulla la garanzia.
12. Conservare queste istruzioni.
Scollegare immediatamente il prodotto dalle sorgenti di alimentazioni esterne nei seguenti casi:
Adattatore di alimentazione, cavo di alimentazione o cavo USB danneggiati o rotti. Spruzzi o
versamenti di liquido sul prodotto. Caduta o danneggiamento di uno qualsiasi dei componenti del
prodotto. Chiara alterazione delle prestazioni del prodotto.
Istruzioni di sicurezza per la batteria
Le batterie contengono materiali tossici. Non bruciare, smontare, tagliare o forare le batterie. Non
smaltire le batterie nel fuoco. Smaltire le batterie in modo conforme alle leggi e alle normative locali.
Page 43

Garanzia limitata del prodotto per l’hardware Vuzix
Vuzix garantisce che il prodotto hardware Vuzix sarà privo di difetti materiali e di fabbricazione per
tutto il periodo di tempo specificato nella garanzia (tipicamente un anno), a partire dalla data
d’acquisto. Se il prodotto hardware Vuzix è usato a scopo commerciale (incluso il noleggio o l’affitto),
il periodo di garanzia sarà ridotto a soli novanta (90) giorni a partire dalla data d’acquisto. Ad
eccezione dei casi vietati dalla legge vigente, questa garanzia non è trasferibile, essendo
esclusivamente limitata all’acquirente originario e a nessun altro, inclusi i beneficiari di un
trasferimento o una vendita successivi. Questa garanzia offre specifici diritti legali. Alcune normative
locali possono attribuire anche altri diritti, alcuni dei quali non sono interessati dalle garanzie presenti
in questa garanzia limitata.
Questa garanzia limitata, analogamente a qualunque altra garanzia, non copre gli aspetti soggettivi
o estetici del prodotto hardware. Vuzix non garantisce il funzionamento ininterrotto o privo di errori
del prodotto. La garanzia limitata succitata è l’unica garanzia offerta, ed è fornita al posto di qualsiasi
altra garanzia o condizione espressa o implicita (ad eccezione delle garanzie implicite non ricusabili
esistenti), incluse quelle eventualmente risultanti da altre documentazioni o confezioni. Nessuna
delle informazioni o delle indicazioni (orali o documentate) fornite da Vuzix, dai suoi agenti, affiliati,
concessionari o fornitori, potrà essere assunta come garanzia o condizione, né potrà estendere
l’ambito di questa garanzia limitata.
Gli eventuali software distribuiti con il prodotto hardware di Vuzix, con o senza il marchio Vuzix, non
sono coperti da questa garanzia limitata. Consultare l’accordo per la licenza allegato al software
(visibile al momento dell’installazione) per informazioni relative ai diritti sul suo utilizzo.
Ricorsi
L’intera responsabilità legale di Vuzix e il ricorso esclusivo del Cliente per qualsiasi violazione della
garanzia consisteranno, a discrezione di Vuzix: (1) nella riparazione o sostituzione dell’hardware
completo o di parte di esso, (2) nella sostituzione dell’hardware con un prodotto nuovo o prodotto
con parti nuove o usate funzionanti, tale da avere una funzionalità almeno equivalente a quella del
prodotto originale, o (3) nel rimborso del prezzo pagato dal Cliente, meno il ragionevole
deprezzamento dovuto all’uso, a condizione che l’hardware sia reso al punto d’acquisto o in altro
luogo scelto da Vuzix, unitamente allo scontrino fiscale o alla fattura recante la data. Ad eccezione
dei casi proibiti dalla legge vigente, le spese di spedizione e di trasporto (incluso l’imballaggio) per gli
interventi di riparazione in garanzia saranno a carico del Cliente. Vuzix può, a sua discrezione,
utilizzare parti nuove o usate, ma funzionanti in modo ottimale, per riparare o sostituire qualsiasi
prodotto hardware. Tutti i prodotti hardware sostitutivi saranno garantiti per il periodo rimanente
della garanzia originale o per trenta (30) giorni, in base al caso che presenta durata superiore, o per
l’eventuale periodo di tempo addizionale previsto dalla legislazione locale. Questa garanzia non
copre i problemi o i danni dovuti a: (1) cause di forza maggiore, picchi di tensione, uso incorretto,
abuso, negligenza, incidente, usura e rottura, errata manipolazione, errata applicazione o altre cause
non correlate a difetti del dispositivo hardware, (2) riparazioni, modifiche, manomissione o
smontaggio non autorizzati, (3) uso o manutenzione incorretti, uso non conforme alle istruzioni del
prodotto o collegamento a sorgenti di alimentazione inadeguate, (4) uso di consumabili, come le
batterie di ricambio, non forniti da Vuzix, ad eccezione dei casi in cui tali restrizioni siano proibite
dalla legge vigente.
Come ottenere assistenza tecnica?
L’assistenza tecnica viene definita come assistenza relativa a domande su questioni legate al prodotto
hardware Vuzix. L’assistenza tecnica per l’hardware e il suo software è disponibile per i primi novanta
(90) giorni dalla data di acquisto del prodotto. La ricevuta di vendita o di consegna, che riporta la
data di acquisto o di leasing di questo prodotto, costituisce la prova di acquisto o leasing da parte del
Cliente. Potrebbe essere necessario presentare una prova d’acquisto come condizione per
l’ottenimento dell’assistenza tecnica per il software. Gli indirizzi e i dati per contattare il servizio di
Page 44

assistenza tecnica sono disponibili nella documentazione allegata al prodotto e sul nostro sito web
globale: www.vuzix.com.
Come ottenere assistenza in garanzia?
Vuzix è il garante ai sensi di questa garanzia limitata. Prima di presentare una richiesta di assistenza
in garanzia, consigliamo di visitare la nostra sezione relativa all’assistenza tecnica su www.Vuzix.com.
Le richieste di assistenza in garanzia non possono essere elaborate tramite il punto d’acquisto, e tutte
le domande relative ad altri prodotti devono essere inviate direttamente a Vuzix. Gli indirizzi e le
informazioni per contattare il servizio di assistenza clienti di Vuzix sono reperibili nella
documentazione allegata al prodotto e sul nostro sito web globale www.vuzix.com, che potrà anche
identificare eventuali
possibile scrivere a: Vuzix Sales Support, 25 Hendrix Drive, West Henrietta, NY 14586, USA.
Limitazione di responsabilità
VUZIX NON È RESPONSABILE PER EVENTUALI DANNI SPECIALI, INDIRETTI, INCIDENTALI O
CONSEQUENZIALI DI QUALUNQUE TIPO, TRA I QUALI (PUR NON LIMITANDOSI A QUESTI) PERDITA DI
PROFITTI, REDDITO O DATI (DIRETTI O INDIRETTI) O PERDITA COMMERCIALE DOVUTA ALLA
VIOLAZIONE DI QUALUNQUE GARANZIA ESPRESSA O IMPLICITA RELATIVA AL PRODOTTO, ANCHE
QUALORA VUZIX SIA STATA INFORMATA DELLA POSSIBILITÀ DI TALI DANNI.
Alcune legislazioni non consentono l’esclusione o la limitazione dei danni speciali, indiretti,
incidentali o consequenziali, perciò la limitazione o esclusione succitate potrebbero non essere valide
per il Cliente, anche se la parte restante di questa garanzia limitata conserverà la propria forza ed
efficacia.
Durata delle garanzie implicite
AD ECCEZIONE DEI CASI PREVISTI DALLA LEGGE VIGENTE, TUTTE LE GARANZIE IMPLICITE O
CONDIZIONI DI COMMERCIABILITÀ O IDONEITÀ PER UNO SCOPO PARTICOLARE, RIFERITE A QUESTO
PRODOTTO HARDWARE, SONO LIMITATE AL PERIODO DI VALIDITÀ DELLA GARANZIA LIMITATA,
DICHIARATA PRECEDENTEMENTE PER QUESTO PRODOTTO.
Alcune legislazioni non consentono limitazioni alla durata della garanzia implicita, quindi la
limitazione succitata potrebbe non essere valida per il Cliente. Si prega di notare che nell'Unione
Europea, ogni periodo di garanzia inferiore a due anni deve essere aumentato a due anni salvo nel
caso di utilizzo per scopi commerciali o prodotti commerciali.
sussidiarie o filiali di Vuzix nel paese del Cliente, con i relativi indirizzi. Inoltre è
Page 45

Conformità FCC e ISED
FCC Caution: Eventuali modifiche o modifiche non espressamente approvate dalla parte
responsabile della conformità potrebbero annullare l'autorità dell'utente di utilizzare
l'apparecchiatura.
Questo dispositivo è conforme alla parte 15 delle Regole FCC. Il funzionamento è soggetto alle
seguenti due condizioni: (1) Questo dispositivo potrebbe non causare interferenze dannose e (2)
questo dispositivo deve accettare qualsiasi interferenza ricevuta, inclusa l'interferenza che
potrebbe causare un funzionamento indesiderato.
Nota: questa apparecchiatura è stata testata e trovata come conforme ai limiti per un dispositivo
digitale di classe B, ai sensi della parte 15 delle Regole FCC. Questi limiti sono progettati per fornire
una protezione ragionevole contro le interferenze dannose in un impianto residenziale. Questa
apparecchiatura genera, utilizza e può irradiare energia a radiofrequenza e, se non installata e
utilizzata in conformità con le istruzioni, può causare interferenze dannose alle comunicazioni
radio. Tuttavia, non vi è alcuna garanzia che l'interferenza non si verificherà in una particolare
installazione. Se questa apparecchiatura causa interferenze dannose alla ricezione radio o
Page 46

televisione, che può essere determinata spegnendo e accendendo l'apparecchiatura, l'utente è
incoraggiato a cercare di correggere l'interferenza con una o più delle seguenti misure:
- Riorientare o riposizionare l'antenna ricevente.
- Aumentare la separazione tra l'apparecchiatura e il ricevitore.
- Collegare l'apparecchiatura in una presa su un circuito diverso da quello a cui è collegato il
ricevitore.
- Consultare il rivenditore o un tecnico radio/TV esperto per aiuto.
Il dispositivo è stato testato e la conformità ai limiti SAR. Questa apparecchiatura deve essere
installata e azionata con una distanza minima di 0 mm tra il radiatore e il corpo.
ISEDC Warning:
Questo dispositivo è conforme agli standard RSS esenti da licenza Industry Canada. L'operazione è
soggetta alle seguenti due condizioni:
(1) questo dispositivo potrebbe non causare interferenze e
(2) questo dispositivo deve accettare qualsiasi interferenza, inclusa l'interferenza che può causare il
funzionamento indesiderato del dispositivo.
Il dispositivo è stato testato e la conformità ai limiti SAR, gli utenti possono ottenere informazioni
canadesi sull'esposizione e la conformità RF. Questa apparecchiatura deve essere installata e
azionata con una distanza minima di 0 mm tra il radiatore e il corpo.
Page 47

Informazioni sull'uso di apparecchiature elettriche ed elettroniche (WEEE)
Per le famiglie: Informazioni sullo smaltimento per gli utenti dei WEEE
Questo simbolo (figura 1) sui prodotti e / o sui documenti di accompagnamento significa che le
apparecchiature elettriche ed elettroniche (WEEE) usate non devono essere mescolate con i rifiuti
domestici generici. Per un corretto trattamento, recupero e riciclaggio, si prega di prendere questo
/ i prodotto / i nei punti di raccolta designati dove sarà accettato gratuitamente. In alternativa, in
alcuni paesi, potresti essere in grado di restituire i tuoi prodotti al tuo rivenditore locale al momento
dell'acquisto di un nuovo prodotto equivalente.
Lo smaltimento corretto di questo prodotto consentirà di risparmiare risorse preziose e di prevenire
eventuali effetti negativi sulla salute umana e sull'ambiente, che potrebbero altrimenti derivare da
una gestione inadeguata dei rifiuti.
Per ulteriori dettagli sul punto di raccolta designato più vicino, contattare l'autorità locale.
Le penalità possono essere applicabili per lo smaltimento non corretto di questi rifiuti, in conformità
con la legislazione nazionale.
Per utenti professionali nell'Unione europea
Se si desidera eliminare apparecchiature elettriche ed elettroniche (EEE), contattare il rivenditore o
il fornitore per ulteriori informazioni.
Per lo smaltimento in paesi al di fuori dell'Unione Europea
This symbol is only valid in the European Union (EU). If you wish to discard this product, please
contact your local authorities or dealer
Page 48

Instruções de segurança importantes
Siga estas instruções de segurança ao utilizar ou manusear os óculos inteligentes VUZIX M-Series para
reduzir o risco de incêndio, choque eléctrico e ferimentos pessoais ou danos materiais.
1. LEIA TODAS AS INSTRUÇÕES E INFORMAÇÕES DE SEGURANÇA FORNECIDAS ANTES DE
UTILIZAR ESTE PRODUTO.
2. Utilize o produto apenas para os fins previstos, conforme descrito neste manual.
3. É necessária uma supervisão cuidadosa quando este produto estiver próximo de crianças.
4. As crianças com menos de sete (7) anos ainda estão a aprender a focalizar e a localizar com os
olhos. Sua visão ainda é imatura. Por estas razões, perto de monitores NÃO DEVE SER
UTILIZADO POR CRIANÇAS MENORES DE SETE (7) ANOS.
5. Uma parte muito pequena da população pode sofrer ataques epilépticos quando visualizar
certos tipos de luzes ou padrões luminosos a piscar que estão comummente presentes no
nosso meio ambiente diário. Essas pessoas também podem sofrer convulsões enquanto
assistem a alguns tipos de filmes na televisão ou jogar certos jogos de vídeo em monitores
normais, inclusive ao utilizarem um sistema de visor como este. Esses efeitos podem ser
aumentados devido ao tamanho e natureza dos monitores neste dispositivo. Sendo assim,
consulte um médico se apresentar um quadro clínico de epilepsia antes de utilizar este
dispositivo, ou se sentir qualquer um dos seguintes sintomas enquanto utiliza este dispositivo:
visão alterada, contracção muscular, outros movimentos involuntários, perda de consciência
sobre onde se encontra, confusão mental e/ou convulsões.
6. Óculos inteligentes pode causar efeitos adversos no utilizador, entre os quais: enjoo, pós-
efeitos na percepção, desorientação, hipotensão postural e cansaço ocular. Faça pausas
frequentes para diminuir o potencial desses efeitos, como é comummente sugerido para
outros artigos, como teclados e monitores de computador, nos quais pode ocorrer a tendência
para se fixar ou concentrar. Se os seus olhos mostrarem sinais de fadiga ou secura, ou se
qualquer um dos sintomas acima for observado, pare imediatamente de utilizar este
dispositivo e não volte a utilizá-lo por pelo menos trinta minutos após os sintomas terem
desaparecido completamente.
7. Perda ou impedimento auditivo permanente ou temporário pode resultar de níveis excessivos
de volume emitidos pelos fones de ouvido ou fones de ouvido incluídos. Sempre ajuste o
volume para um nível seguro ANTES de usar os fones de ouvido ou fones de ouvido do
produto.
8. Este produto pode ser conectado a uma fonte de energia ou bateria e os cabos podem se
estender entre os componentes. Tome cuidado para que esses fios não se enrolem em si ou
provoquem uma potencial ameaça contra a segurança dos outros.
9. Não desmonte este produto. Se forem necessárias reparações, contacte a VUZIX utilizando as
informações de contacto de suporte que se encontram neste manual.
10. Não puxe ou puxe o cabo, torça os cabos ou amarre-os em nós afiados ou apertados. Os cabos
danificados por tais ações não são cobertos pela garantia limitada do produto.
11. Não derrube, golpeie ou deixe que qualquer parte do produto seja tocada ou sacudida
agressivamente. Tais acções podem danificar o produto e anular a sua garantia.
12. Guarde estas instruções.
Desligue imediatamente o produto de fonts eléctricas externas se:
o adaptador de energia, o cabo de alimentação ou o cabo USB estiver danificado ou desgastado;
algum líquido tiver sido aplicado com vaporizador, borrifado ou derramado sobre o produto;
qualquer componente do produto tiver caído ou tiver sido danificado; o
produto apresentar qualquer mudança aparente no seu desempenho.
Instruções de segurança das baterias
As baterias contêm materiais tóxicos. Não queime, desmonte, disforme ou perfure as baterias. Não
deite as baterias numa fogueira. Deite fora as baterias por meio de um método que seja consistente
com as suas leis e regulamentações locais.
Page 49

Garantia limitada do produto de hardware Vuzix
A Vuzix garante que seu produto de hardware Vuzix estará livre de defeitos no material ou no fabrico
pela duração do tempo especificado no período de garantia (typically one year), a começar a partir
da data de compra. Se o seu produto de hardware Vuzix for utilizado para fins comerciais (incluindo
aluguer ou leasing), o período de garantia será reduzido para apenas noventa (90) dias a partir da
data de compra. Excepto quando proibido pela legislação aplicável, essa garantia não é transmissível,
sendo limitada ao comprador original e não se aplicando a ninguém mais, inclusive a qualquer pessoa
a quem posteriormente fizer qualquer transferência ou venda. Esta garantia concede-lhe direitos
legais específicos e também pode ter outros direitos que variam conforme as leis locais, algumas das
quais não são afectadas pelas garantias nesta garantia limitada.
Esta garantia limitada não cobre, e nenhuma garantia de qualquer tipo é fornecida em relação a,
quaisquer aspectos subjectivos ou estéticos do produto de hardware. A Vuzix não garante que o
funcionamento do produto seja interrompido ou esteja livre de erros. A garantia limitada
supramencionada é a única garantia que lhe é feita e substitui todas as outras garantias e condições
expressas ou implícitas (excepto por qualquer garantia não renunciável implícita que exista),
incluindo qualquer uma criada por outra documentação ou embalagem. Nenhuma informação ou
sugestão (oral ou gravada) dada pela Vuzix, pelos seus agentes, filiais, revendedores ou fornecedores,
ou pelos seus funcionários ou agentes, poderá criar uma garantia ou condição para estender o campo
de aplicação desta garantia limitada.
Nenhum software distribuído com o produto de hardware da Vuzix com ou sem o nome comercial
Vuzix está coberto por esta garantia limitada. Consulte o acordo de licença que acompanha o
software (visível aquando da sua instalação) para obter informações sobre os seus direitos em
relação à sua utilização.
Recursos
A total responsabilidade da Vuzix e seu recurso exclusivo por qualquer incumprimento de garantia
será, conforme a opção da Vuzix (1) reparar ou substituir toda e qualquer peça do hardware; (2)
trocar o hardware por um produto que seja novo ou que tenha sido manufacturado a partir de peças
novas ou utilizadas e reparadas e estiver, pelo menos, funcionalmente equivalente ao produto
original; ou (3) devolver a quantia paga por si menos a depreciação razoável baseada na sua utilização
real, desde que o hardware seja devolvido ao posto de compra ou a outro determinado local
conforme a Vuzix solicitar com uma cópia da factura ou recibo datado e detalhado. Salvo quando
proibido pela legislação aplicável, todos os custos de expedição e manuseio associados ao transporte
(incluindo a embalagem) por serviço de garantia ficarão a seu cargo. A Vuzix poderá, conforme optar,
utilizar peças novas, renovadas ou usadas em boas condições de funcionamento para reparar ou
substituir qualquer produto de hardware. Qualquer produto de hardware para substituição será
garantido pelo período restante da garantia original ou trinta (30) dias, o que for mais longo, ou por
qualquer período de tempo adicional que possa ser aplicável na sua jurisdição. Essa garantia não
cobre problemas ou danos resultantes de (1) motivos de força maior, oscilação de corrente, má
utilização, abuso, negligência, acidente, desgaste, manuseio incorrecto, aplicação incorrecta ou
outras causas não relacionadas com defeitos no dispositivo de hardware; (2) qualquer reparação,
modificação, deformação ou desmontagem; (3) operação e manutenção impróprias, utilização que
não estiver de acordo com as instruções do produto ou ligação a fonte de alimentação imprópria; ou
(4) utilização de artigos de consumo, como baterias de substituição, não fornecidas pela Vuzix,
excepto onde tal restrição for proibida pela legislação aplicável.
Como obter suporte técnico
O suporte técnico é definido como a assistência com questões sobre o produto de hardware Vuzix.
O suporte técnico para hardware e o seu software estão disponíveis nos primeiros noventa (90) dias
a partir da data de compra do produto. A sua factura ou entrega datada, mostrando a data de compra
ou de leasing do produto, é a sua prova da data de compra ou leasing. Pode ser solicitado a fornecer
Page 50

um comprovativo de compra como condição para receber suporte técnico do software. Os endereços
e as informações de contacto do serviço técnico para a Vuzix podem ser encontrados na
documentação que acompanha o seu produto e na rede no seu sítio Web global: www.vuzix.com.
Como obter suporte da garantia
A Vuzix é o fiador sob essa garantia limitada. Antes de submeter uma reclamação de garantia,
recomendamos a que visite a secção de suporte em www.Vuzix.com para obter assistência técnica.
As reclamações de garantia não podem ser processadas por meio do posto de compra e quaisquer
outras perguntas relacionadas com o produto devem ser dirigidas directamente à Vuzix. Os
endereços e as informações para contacto com o serviço ao cliente para a Vizux podem ser
encontrados na documentação que acompanha o seu produto e na rede no nosso sítio Web global
www.vuzix.com, o qual também identificará qualquer subsidiária ou filial da Vuzix em funcionamento
no seu país e o seu endereço. Também poderá escrever para: Vuzix Sales Support, 25 Hendrix Drive,
West Henrietta, NY 14586, EUA.
Exclusão de responsabilidade
A VUZIX NÃO SERÁ RESPONSÁVEL POR QUALQUER DANO ESPECIAL, INDIRECTO, INCIDENTAL OU
CONSEQUENCIAL, INCLUINDO MAS NÃO SE LIMITANDO À PERDA DE LUCROS, RENDA OU DADOS
(SEJAM ELES DIRECTOS OU INDIRECTOS) OU POR PERDA COMERCIAL POR INCUMPRIMENTO DE
QUALQUER GARANTIA EXPRESSA OU IMPLÍCITA SOBRE O SEU PRODUTO, MESMO SE A VUZIX TIVER
SIDO AVISADA DA POSSIBILIDADE DE TAIS DANOS.
Algumas jurisdições não permitem a exclusão ou a limitação de danos especiais, indirectos,
incidentais ou consequenciais, assim, a limitação ou exclusão acima podem não se aplicar a si, mas
o restante dessa garantia limitada permanecerá em pleno vigor.
Duração de garantias implícitas
SALVO ATÉ ONDE PROIBIDO PELA LEGISLAÇÃO APLICÁVEL, QUALQUER GARANTIA OU CONDIÇÃO
IMPLÍCITA DE COMERCIALIZAÇÃO OU ADEQUAÇÃO A UM DETERMINADO PROPÓSITO DESSE
PRODUTO DE HARDWARE É LIMITADA NA DURAÇÃO PARA O PERÍODO DE GARANTIA LIMITADA
DECLARADA ACIMA PARA O SEU PRODUTO.
Algumas jurisdições não permitem limitações durante o período de duração de uma garantia
implícita, assim a exclusão acima pode não se aplicar a si. Por favor, note que na União Europeia,
qualquer período de garantia inferior a dois anos será aumentado para dois anos, exceto no caso de
uso para fins comerciais ou produtos comerciais.
Page 51

Conformidade com a FCC e ISED
FCC Caution: Quaisquer alterações ou modificações não expressamente aprovadas pela parte
responsável pela conformidade podem anular a autoridade do usuário para operar o equipamento.
Este dispositivo está em conformidade com a parte 15 das regras da FCC. A operação está sujeita às
duas condições seguintes: (1) este dispositivo não pode provocar interferências nocivas e (2) este
dispositivo deve aceitar qualquer interferência recebida, incluindo interferências que possam
provocar uma operação indesejável.
Nota: este equipamento foi testado e encontra-se em conformidade com os limites de um dispositivo
digital classe B, de acordo com a parte 15 das regras da FCC. Estes limites são projetados fornecer a
proteção razoável de encontro à interferência prejudicial em uma instalação residencial. Este
equipamento gera, usa e pode irradiar energia de radiofrequência e, se não for instalado e usado de
acordo com as instruções, pode causar interferência prejudicial às comunicações de rádio. No
entanto, não há nenhuma garantia de que a interferência não ocorrerá em uma instalação específica.
Se este equipamento causar interferências prejudiciais à recepção de rádio ou televisão, o que pode
ser determinado ao desligar e ligar o equipamento, o utilizador é encorajado a tentar corrigir a
interferência através de uma ou mais das seguintes medidas:
— Reorientar ou realocar a antena receptora.
— Aumente a separação entre o equipamento e o receptor.
— Ligue o equipamento a uma tomada num circuito diferente daquele ao qual o receptor está ligado.
— Consulte o revendedor ou um técnico experiente de rádio/TV para obter ajuda.
O dispositivo foi testado e conformidade com os limites de SAR. Este equipamento deve ser instalado
e operado com distância mínima de 0mm entre o radiador & o seu corpo.
ISEDC Warning:
Este dispositivo cumpre com os padrões RSS isentos de licença da Industry Canada (s). A operação está
sujeita às seguintes duas condições:
(1) este dispositivo não pode causar interferências, e
(2) este dispositivo deve aceitar qualquer interferência, incluindo a interferência que pode causar o
funcionamento indesejado do dispositivo.
O dispositivo foi testado e a conformidade com limites de SAR, usuários pode obter a informação
canadense na exposição e na conformidade do RF. Este equipamento deve ser instalado e operado com
distância mínima de 0mm entre o radiador & o seu corpo.
Page 52

INFORMAÇÕES DE EQUIPAMENTOS ELÉTRICOS E ELETRÔNICOS USADOS (WEEE)
Para residências particulares: Informações sobre descarte para usuários de WEEE
Este símbolo (figura 1) no (s) produto (s) e / ou documentos anexos significa que o equipamento
elétrico e eletrónico usado (WEEE) não deve ser misturado com o lixo doméstico geral. Para
tratamento, recuperação e reciclagem adequados, leve este (s) produto (s) a pontos de coleta
designados, nos quais será aceito gratuitamente. Como alternativa, em alguns países, você poderá
devolver seus produtos ao revendedor local ao comprar um novo produto equivalente.
A eliminação correta deste produto ajudará a economizar recursos valiosos e a evitar quaisquer
efeitos negativos potenciais sobre a saúde humana e o meio ambiente, que poderiam surgir do
manuseio inadequado de resíduos.
Entre em contato com a autoridade local para obter mais detalhes sobre o ponto de coleta designado
mais próximo.
Penalidades podem ser aplicadas ao descarte incorreto deste resíduo, de acordo com a legislação
nacional.
Para utilizadores profissionais na União Europeia
Se você deseja descartar equipamentos elétricos e eletrônicos (EEE), entre em contato com seu
revendedor ou fornecedor para obter mais informações.
Para eliminação em países fora da União Europeia
Este símbolo é válido apenas na União Europeia (UE). Se desejar descartar este produto, entre em
contato com as autoridades locais ou revendedor.
Page 53

All contents of this document are subject to change without notice.
For a copy of the latest Safety & Warranty Information, go to the Legal Documentation page of the
Vuzix website: http://www.vuzix.com/support/legal
Vuzix, the Vuzix logo and Vuzix Blade® are trademarks of Vuzix Corporation, at least some of which
are protected by the following registration(s): 3603362, 5644709. Patents Pending.
Copyright 2019
Designed by Vuzix in New York
Printed in USA
446PB0003 (0006)
 Loading...