

Page 1
25 Hendrix Road, Suite A, West Henrietta NY, 14620 I P 585 359 5900 I F 585 359 4172 I E contact@vuzix.com I www.vuzix.com
INTRODUCTION
The new M300 represents the next evolution of Vuzix Smart Glasses design specifically for enterprise use,
providing easy access to information, data collection and more. Improve existing workflows and open new
opportunities in industrial, medical, retail, supply chain, remote help desk, and other aspects of your business.
The new M300 design is born from real world user feedback and industry requirements culminating from over 2
years of productive use of the workhorse Vuzix M100 Smart Glasses predecessor.
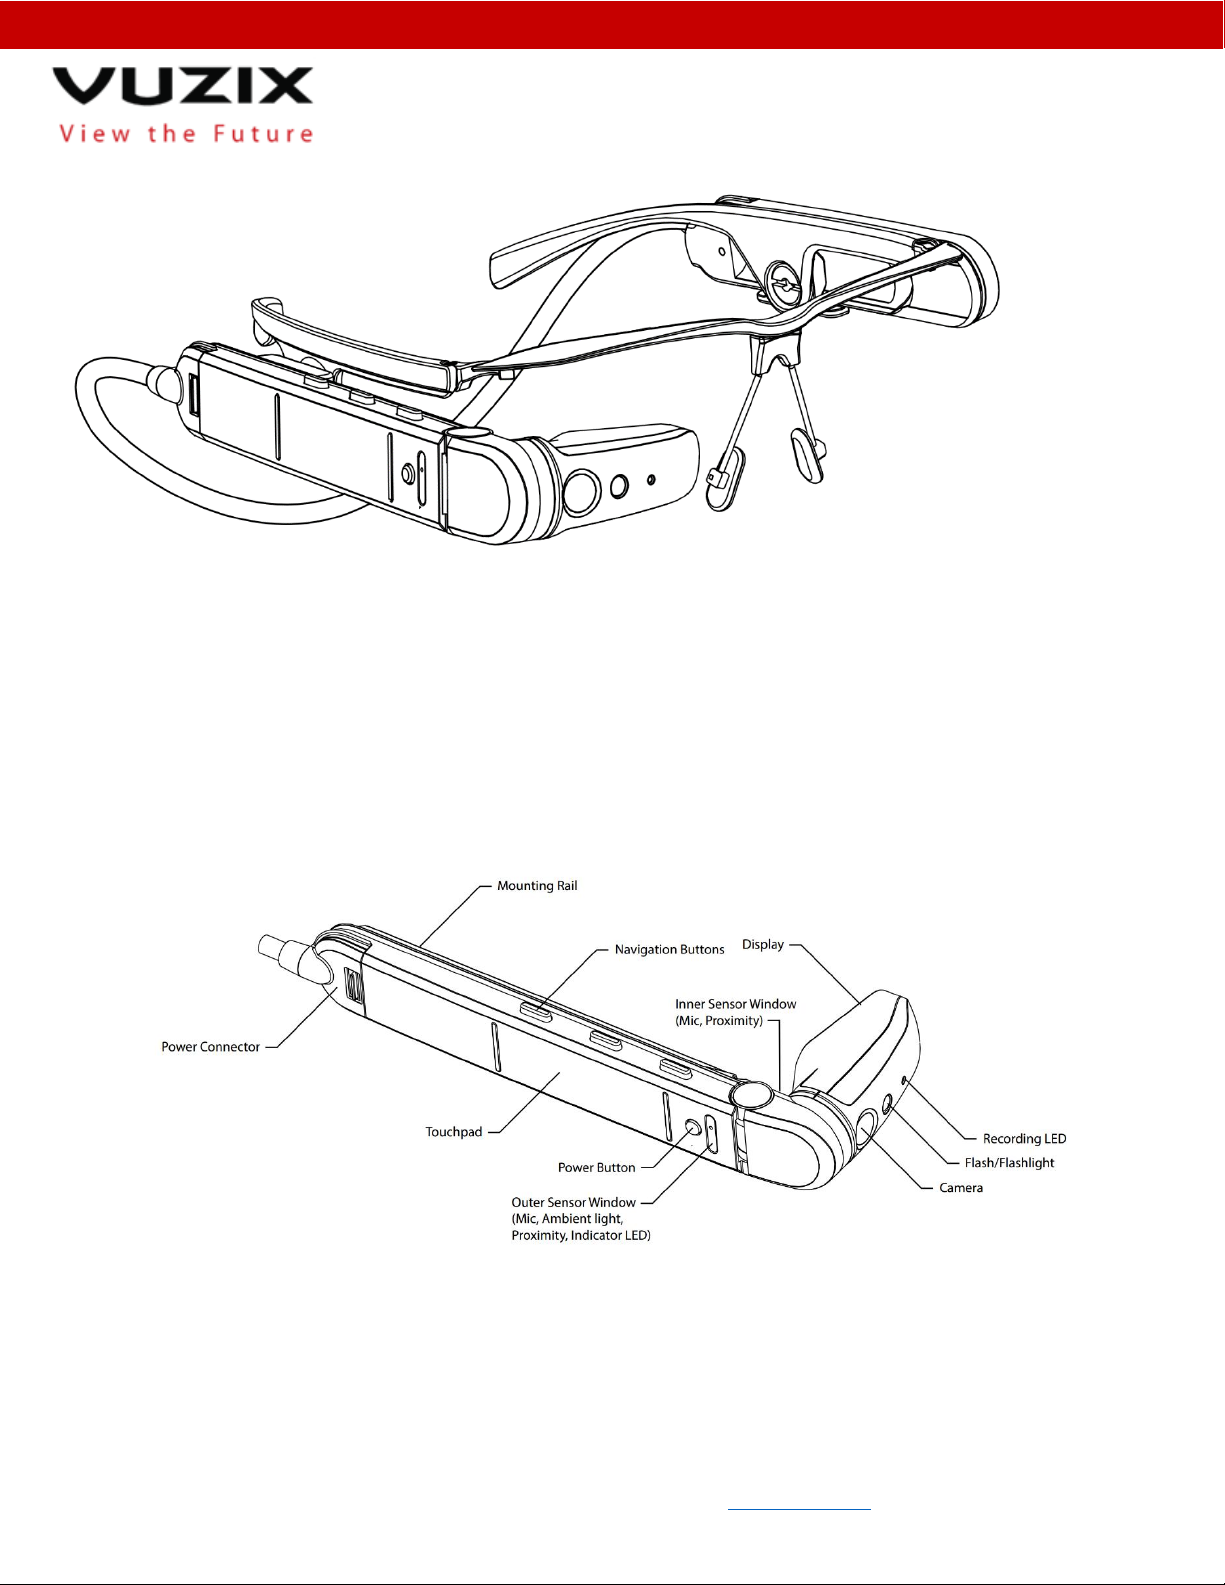
M300 AT A GLANCE
Device Diagram
HARDWARE SETUP
Before Using the M300
The M300 battery pack should be fully charged and the unit assembled prior to first time use, see the
Assembly and Charging sections below for further detail.
Page 2

25 Hendrix Road, Suite A, West Henrietta NY, 14620 I P 585 359 5900 I F 585 359 4172 I E contact@vuzix.com I www.vuzix.com
Assembly
To assemble the M300, first mount the main unit and battery pod to the frame by sliding into the cchannel mounting clips. Then, simply connect the power cable to the main unit and battery, as
illustrated below.
Charging
To charge the M300, connect the included Micro-USB cable to the battery pod via the port on the rear
of the battery. The battery can be connected to the main unit while charging, but that is not required.
Page 3

25 Hendrix Road, Suite A, West Henrietta NY, 14620 I P 585 359 5900 I F 585 359 4172 I E contact@vuzix.com I www.vuzix.com
Mounting Options
Lensless frames for use with existing eye glasses
Eyeglass frames with prescription option
Safety glasses
Hard hat mount
Left or Right Eye?
The M300 mounting system is ambidextrous; the battery and main unit can be swapped on the frame,
for those who may be left eye dominant or simply prefer to have the unit mounted on the left side. The
display with rotate to the proper orientation automatically when mounted to the left side of the frame.
Display Adjustment
The display of the M300 can be rotated on two separate axes, as indicated in the diagram below. In
addition, the entire main unit can be rotated on the temple mount of degrees.
SMART GLASSES TOUR
Power Button Behavior
To power on the M300, press the power button on the side of the device for 3 seconds.
To power off the M300, either press the power button for 3 seconds and confirm the power off
dialogues, or press and hold the power button for a full 10 seconds to force a shutdown.
A short press on the power button will turn on/off the display.
Additional power behavior:
Plugging in a Micro-USB cable connected to a power source to the battery pod will power on the device
if the device is off.
Pressing power button for 3 seconds without the battery pod connected will turn on the M300, though
the internal battery in the main unit is not designed to power the unit for an extended period of time
and is only intended for hot swapping of the battery.
Hot Swapping of Battery
The battery pod of the M300 can be hot swapped by disconnecting M300 power cable the battery and
connecting another charged battery. The internal battery in the main unit will maintain power and
connectivity on the M300 for approximately 60 seconds, at which point the device will put itself to sleep
to prevent data loss. The display will power off during the swap, but the device will stay running.
For instructions on how to connect/disconnect the battery, refer to Assembly section of this manual.
User Interface Controls
The M300 supports a variety of methods to control the device, including the standard buttons, a
touchpad, as well as a sophisticated voice control engine.
Buttons
The buttons are intended as a basic interface navigation method, allowing the user to navigate through
menus and make selections. The two front-most buttons will perform a forward/back function, and the
rear most button will perform a select action. A long press on the front button will bring up a context
menu for the current selection, and a long press on the center button will exit back to the home screen.
Page 4

25 Hendrix Road, Suite A, West Henrietta NY, 14620 I P 585 359 5900 I F 585 359 4172 I E contact@vuzix.com I www.vuzix.com
Touchpad
The M300 features a two-axis swipe pad with tap gestures. The touchpad can be used to navigate
through menus with side-to-side as well as up-and-down swipe gestures, and selections can be made
with a tap gesture on the touchpad.
Voice Navigation
The M300 features a sophisticated voice control engine, supporting a variety of languages.
M300 Software
The M300 is running a Vuzix custom build of Android 6.0 Marshmallow. Our Android OS can be updated
Over the Air, via our System File Manager, and for more experienced users, via ADB (Android Debug
Bridge).
For more detailed information on your M300 please see the online manual at www.vuzix.com
SPECIFICATIONS
Optics
Display resolution: nHD color display
Aspect ratio: 16:9
Field of View (diagonal): 20 degrees, equivalent to 5 in. mobile device screen at 14 in
Brightness: >2000 nits
24-bit color
Supports left or right eye use
Processing Core
Dual Core Intel Atom CPU
2GB system RAM
Android 6 OS
64GB internal flash memory
Controls
4 Android control buttons
Remote control M300 manager app – Runs on iOS and Android
Voice Control – customizable and supports multiple languages
2 Axis touch pad
Sensor Systems
Proximity inward facing
Proximity/ambient light sensor outward facing
Integrated Head Tracking
3-axis gyro
3-axis accelerometer
3-axis mag/integrated compass
GPS
Integrated
Page 5

25 Hendrix Road, Suite A, West Henrietta NY, 14620 I P 585 359 5900 I F 585 359 4172 I E contact@vuzix.com I www.vuzix.com
Battery
160mAh internal battery supports hot swapping of external batteries
860mAh smart external battery
Supports USB batteries providing at least 1 Amp
2 – 12 hours of operation based on external battery choice
Audio
Ear speaker
Dual noise cancelling microphones
Camera
Up to 13 megapixel stills
Up to 1080p video
Auto-Focus
Optical Image Stabilization
Flash/scene illumination
Connectivity
MicroUSB 2.0 HS with OTG Support
Wi-Fi b/g/n/ac – Dual-B 2.4/5 GHz
MIMO 2x2
BT 4.1/2.1+EDR
TROUBLESHOOTING
The M300 will not power on
If the M300 will not power on despite the battery pod being fully charged, first disconnect both ends of
the M300 power cable, press and hold the power button for a full 10 seconds to ensure that the device
is in fact fully shut down, then reconnect the cable to the battery pod and main unit and attempt to
power on the device again.
If the M300 will still not power on after attempting the above, please contact Vuzix Customer Support
for additional troubleshooting.
SUPPORT SERVICES
Contacting Customer Service please visit www.vuzix.com
Page 6

25 Hendrix Road, Suite A, West Henrietta NY, 14620 I P 585 359 5900 I F 585 359 4172 I E contact@vuzix.com I www.vuzix.com
REGULATORY COMPLIANCE
Electrical Waste & Electronic Equipment
1. The equipment that you bought has required the extraction and use of natural resources for its
production. It may contain hazardous substances that could impact health and the environment.
2. In order to avoid the dissemination of those substances in our environment and to diminish the
pressure on the natural resources, we encourage you to use the appropriate take-back systems. Those
systems will reuse or recycle most of the materials of your end life equipment in a sound way.
3. The crossed-out wheeled bin symbol invites you to use those systems.
4. If you need more information on the collection, reuse and recycling systems, please contact your local
or regional waste administration.
5. You can also contact us for more information on the environmental performances of our products.
FCC Compliance
NOTE: This equipment has been tested and found to comply with the limits for a Class B digital device,
pursuant to part 15 of the FCC Rules. These limits are designed to provide reasonable protection against
harmful interference in a residential installation. This equipment generates, uses and can radiate radio
frequency energy and, if not in-stalled and used in accordance with the instructions, may cause harmful
interference to radio communications. However, there is no guarantee that interference will not occur
in a particular installation. If this equipment does cause harmful interference to radio or television
reception, which can be determined by turning the equipment off and on, the user is encouraged to try
to correct the interference by one or more of the following measures:
- Reorient or relocate the receiving antenna.
- Increase the separation between the equipment and receiver.
- Connect the equipment into an outlet on a circuit different from that to which the receiver is
connected.
- Consult the dealer or an experienced radio/ TV technician for help.
This device complies with part 15 of the FCC Rules. Operation is subject to the following two conditions:
(1) This device may not cause harmful interference, and (2) this device must accept any interference
received, including interference that may cause undesired operation.
This equipment complies with the FCC radio frequency (RF) exposure limits set forth for an uncontrolled
environment. Specific Absorption Rate (SAR) refers to the rate at which the body absorbs RF
energy. The M300 is tested at its highest transmission levels and placed in a position that simulates use
against the head with no separation. To minimize exposure to RF energy, use a hands-free option to
maintain separation between the device and your head.
The maximum combined SAR head measurements for all radio modes are below:
SAR 1g (W/kg): 1.0687
SAR 10g (W/kg): 0.4047
 Loading...