

Page 1

M100 Smart Glasses
Quick Start Guide
Vuzix 425PB0001-01
Page 2

M100 smart glasses - front view
M100 smart glasses - back view
M100 Smart Glasses
About your Vuzix M100 Smart Glasses
Congratulations on your purchase of the latest wearable display technology from Vuzix, the
M100 smart glasses. Vuzix M100 is the world's first enhanced "Hands Free" smartphone
display and communications system for on-the-go data access from your smartphone and
the Internet. Vuzix smart glasses offer a wearable visual connection directly to the Cloud,
through your smartphone or other compatible connected device, wherever you go.
Support
This guide provides you with the information you need to get started with your M100 smart
glasses. For more information and additional support please visit Vuzix website
www.vuzix.com
M100 Smart Glasses Hardware Features
1. Blue and white LED indicators
2. Gesture, proximity and light
sensor
3. Back / Select button
4. Volume down button
5. Volume up button
6. Eye piece arm
7. Eye piece / display window
8. HD camera
9. Camera recording indicator
Quick Start Guide
1. FCC and product label
2. Speaker
3. Universal mount
4. Micro USB connector
5. Micro SD card slot
6. Power button
7. Eye piece arm
8. Eye piece
9. Eye piece display window
Vuzix 425PB0001-01
1
Page 3

Setting up your M100
Charging the M100 smart glasses
Before turning on your smart glasses for the first time charge it fully.
Connect the charge cable to the micro USB connector at the end of the M100. Use a
standard USB charger and plug the USB cable into its USB connector. Plug the
charger into a standard AC wall outlet or if you are using USB from your computer,
turn your computer on. The M100 turns on and indicates its charge state with the
white LED flashing if charging. When charging is complete the white LED will be
remain solid, disconnect the micro USB cable from the M100 and remove the USB
charger from the AC wall outlet or remove the cable from your computer.
Indicators if the M100 is not connected to a power source:
- If the M100 is powered off and not connected to an external charger, there are no
LEDs lit.
- If the M100 is powered on, but is not connected to an external power source, and
has a low battery, the blue led flashes 3 times every 5 seconds and a low battery
indicator appears on the display in the eye piece.
Indicators if the M100 is connected to a power source:
- The white led on the device will pulse every 2 seconds until fully charged.
- The white led will remain solid when the M100 is fully charged and plugged into a
power source.
- If the M100 is powered on, the user can fully operate the device even when it is
connected to an external power source.
Head band Assembly
The M100 has a universal mount built into the main body and is designed around the
audio speaker. This mount will connect to many different head worn options. The
M100 ships with an “over the head” mounting option and a “safety glasses” mounting
option. To assemble the over the head mounting option to the M100, push the head
band mounting ring 4 onto the universal mount 3 on the main body of the M100. This
will require a fair amount of force as this is a tight fitting connection. Once secured,
the ear bud 5 is then slid onto the ring edge on the outside rim of the mounting arm 4.
Vuzix 425PB0001-01
2
Page 4
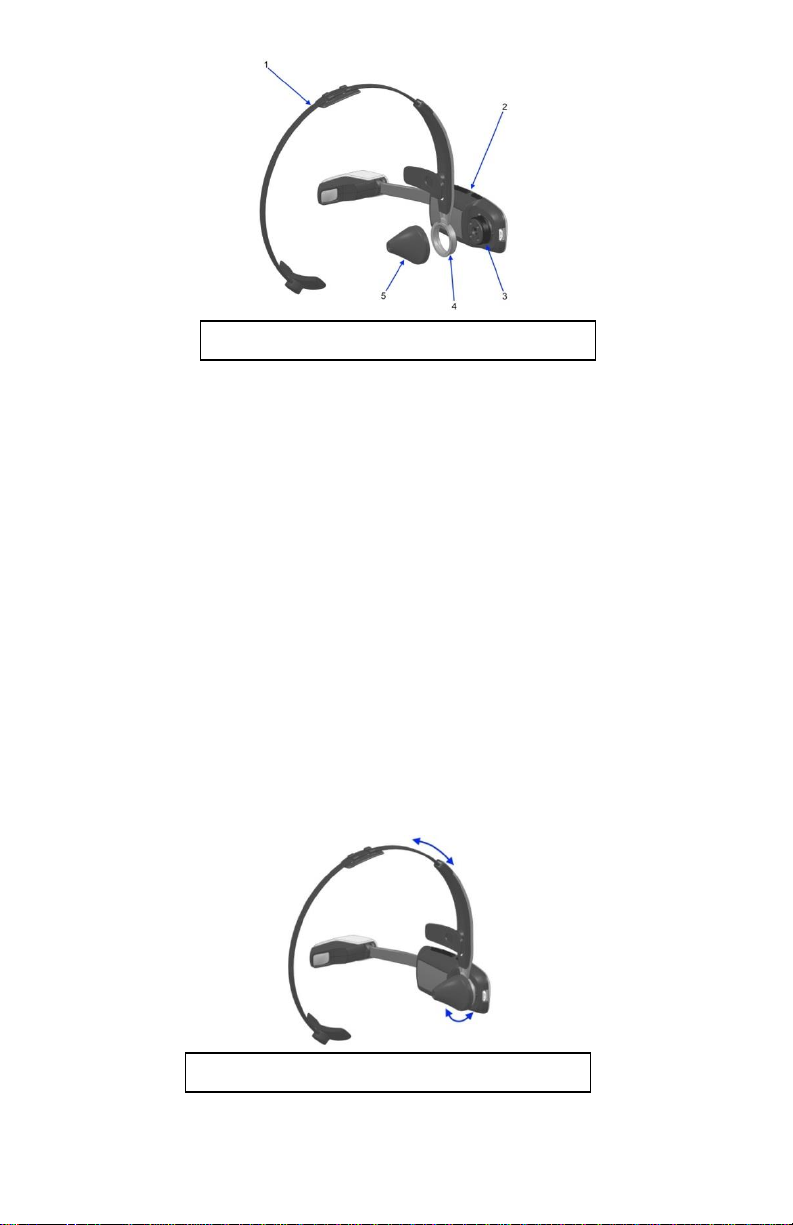
M100 smart glasses - headband mount
Ear bud rotation and headband retraction
1. Head band
2. Main body of M100 smart glasses
3. Universal mount
4. Mounting ring with integrated ear bud option
5. Ear bud
Congratulations, your smart glasses are now ready to be adjusted to fit your
specifications.
Fitting your M100
Now that your smart glasses are assembled you can begin fitting them to your
particular needs. There are many adjustments that can be made to get the best
performance and fitting for each user. Your M100 has been designed to work with or
without glasses and can accommodate either left or right eye users. This section
describes all of the adjustments available to accommodate this and the varied
ergonomics of different users from around the world.
As can be seen in the figure below, the ear bud can be rotated anywhere in a 360
degree circle about the mount ring of the headband adjusting the offset of the M100
body around the users ear canal. The head band also itself retracts and expands into
the mounting arm, adjusting for different head sizes.
Vuzix 425PB0001-01
3
Page 5

As shown below, the entire headband also rotates around the universal mount which
Eye piece tilt
will allow for different positions of the head band over the users head. This movement
also allows the eye piece to be positioned up and down in the user’s field of vision.
Once the head band has been optimally adjusted, we turn our attention to the
eyepiece. As shown above, the eye piece can be tilted towards the eye by as much as
plus or minus 15 degrees from center. This allows for the optimum placement of the
display eye piece in your vision field from low near the cheek to high near the eyebrow
while allowing the eyepiece to be tilted towards the user’s eye.
Vuzix 425PB0001-01
4
Page 6

Eyepiece arm adjustment
Left / Right eye configuration*
The adjustability of the eye piece arm has been designed to accommodate users with
or without prescription eye glasses. To accommodate this and to place the eyepiece
left to right in front of the user, the eye piece arm bends as shown and slides in and
out of the M100 body. These adjustments allow the eye piece to be positioned
comfortably in front of the user’s eye even while using prescription glasses.
It is important to note that there is no focus required for the M100. The M100’s optics
has been designed so that the image appears, from a focus perspective, to be about
10 feet away. For this reason only users that need glasses for distance vision will
need their glasses while using the M100. Users with presbyopia, or that need reading
glasses, will not need them to operate the M100.
Finally, it is well known that users have an eye preference that is tied to their eye
dominance. For this reason, the M100 has been designed to be used in either left or
right eye configurations. To use the M100 on either eye, simply rotate the body of the
M100 around the headband arm mount 180 degrees. The display, camera, and other
functions will automatically flip to accommodate this change.
*The left eye configuration has not been enabled in this build of the M100 OS. Please
visit the Vuzix website for updates.
Vuzix 425PB0001-01
5
Page 7

Turning your smart glasses on and off
To turn the smart glasses on, press and hold the power/home button until the LED
(white or blue) illuminates.
To turn the smart glasses off,
a) Hold the power button until the Power Menu appears
b) Hold the Back/Select button to select the Power Off option
c) Hold Volume Up to move the selector to the right
d) Hold Back/Select to select the OK option and power off the device
The first time the smart glasses are switched on, the user is taken to the pairing mode
set-utility to allow pairing with a partner device. If the smart glasses are already paired,
your Home desktop is displayed.
M100 Smart Glasses Manager (For your Smartphone)
Installing the M100 Smart Glasses manager app
To install the manager download the APK from the following website:
www.vuzix.com/downloads
Push the manager to your phone using the Android developer tools or one of the
many APK side loading tools.
Note: The smart glasses manager app will soon be available for download from the
Vuzix app store.
Launching the M100 manager
From within your smartphone’s application page tap the Smart
Glasses Manager icon
If the M100 has been paired with your smart phone it will
automatically sync with your phone and the desktop will appear
on your phones display screen. See more information below
Navigating the M100 Smart Glasses Manager
The M100 application manager not only helps to manage your applications on the
M100 and is the tool for updating and loading new applications onto your M100, it is
also a user interface to the M100 with a keyboard and mouse implementation.
Vuzix 425PB0001-01
6
Page 8

1. M100 desktop – Does not
mirror applications while
running
2. Partner device current time
3. To send text to the M100
that is entered (11)
4. Mouse pad
5. Sync button to M100
6. Vuzix App store (coming
soon)
7. M100 Menu button
8. M100 Home button
9. M100 Back button
10. Mouse select button
11. M100 Text entry box
(brings up the keyboard
when selected)
Pairing the M100 to the smartphone
The first time the smart glasses are switched on, they default to pairing mode with a partner
device. If the M100 are already paired, your Home desktop page is displayed. To pair your
M100 to your smart phone follow the below procedure:
1) Activate Bluetooth on your Smart phone
a) From the desktop, press the Applications button to open the App List.
b) Navigate to the Settings app and tap it to open it.
c) Tap the “Bluetooth” list item in the Wireless & Networks section to open the
Bluetooth Settings page.
d) Tap “Search For Devices” to begin scanning for discoverable Bluetooth
2) Tap Scan to start Searching.
3) Tap M100 to pair it with your phone
4) Once you see the Pairing Complete message, touch home to exit.
Vuzix 425PB0001-01
devices.
7
Page 9

WiFi Connection with your M100
Using your smart phone manager app to control the M100 proceed as follows.
1. Using the scroll buttons on the M100 scroll down to the Setting icon and
select it. Or, use the manager app to slide to the settings app and select it
through the phone.
2. Use the mouse from the smartphone manager to select Wi-Fi and turn the
toggle or button to “On.”
3. The device will display all of the networks in range.
4. When you see your network’s name, select it, enter your password using
the phones manager app and hit “Connect.”
5. You are now connected to a Wi-Fi network.
How to navigate and run applications
The M100 smart glasses have several user interface modes you can employ to navigate
and run applications. The M100 can be used standalone with the hardware buttons and
through the gesture engine. The M100 can also be controlled through the application
manager, or by other third party connected device like keyboards, mice and other human
interface devices. Finally, the M100 can also be controlled remotely under software control
from the cloud.
Hardware and Gesture Engine*
The M100 smart glasses have a
built in gesture sensor that looks
out from the body of the smart
glasses into the real world. This
sensor is always on so if the
M100 is sleeping when it detects
a motion past the front of the
sensor the M100 wakes up in
preparation for action. The
sensor recognizes hand/finger
motions forward and back, up and
down, and in and out. These
functions have been mapped to
the Android OS to allow the basic
D pad functions enabling motion
around the desktop and selecting
applications to execute.
*The gesture engine has not been enabled in this build of the M100 OS. Please visit
the Vuzix website periodically for updates as this functionality is enabled.
Vuzix 425PB0001-01
8
Page 10

Physical buttons on the M100
The four physical buttons on the M100 can also be used to interface with the M100.
At the desktop the volume up and down button navigates around your various
application icons. The back/select button runs and/or exits from an application.
Natively these buttons are used like the standard android buttons on a phone; volume
up and down, home and the power button. Any given application can remap these
buttons as desired.
M100 Smart Glasses Manager
The M100 application manager not only helps to manage your applications on the
M100 and is the tool for updating and loading new applications onto your M100, it is
also a user interface to the M100 with a keyboard and mouse implementation. See
above for more information.
PowerPak 3800
Because Vuzix anticipates that Enterprise users will
want to perform heavy duty tasks with longer running
time applications, the M100 comes equipped with a
3800 mAh battery that can extends its run time 6.5 times
that of the base battery in the M100. Please ensure to
fully charge the PowerPak 3800 before using it.
The battery is connected to the M100 through a light weight USB cable. The cable that
ships with the M100 is designed for right eye dominant users (although it can be used for
either). Custom left eye cables will be available on the Vuzix web site.
1. Power out to the M100 Smart Glasses
2. Multifunction LED light
a. Press Power for 2 seconds to turn on and off
b. Press twice for flashing
3. Micro USB input for charging
4. Power on/off
5. Charge level
a. Press Power once to activate
Vuzix 425PB0001-01
9
Page 11

Intentionally Blank
Vuzix 425PB0001-01
10
Page 12

Important Notice
For a copy of the latest Safety & Warranty Information, go to the Downloads and Drivers page of the Vuzix web site:
http://www.vuzix.com/support/downloads_drivers.html
Vuzix and the Vuzix Logo are registered trademarks of Vuzix Corporation. All other trademarks are the property of their
respective owners.
© 2013 Vuzix Corporation. All rights reserved.
All content of this document are subject to change without notice.
Designed and Assembled by Vuzix in New York, USA.
11
Vuzix 425PB0001-01
 Loading...