

Page 1

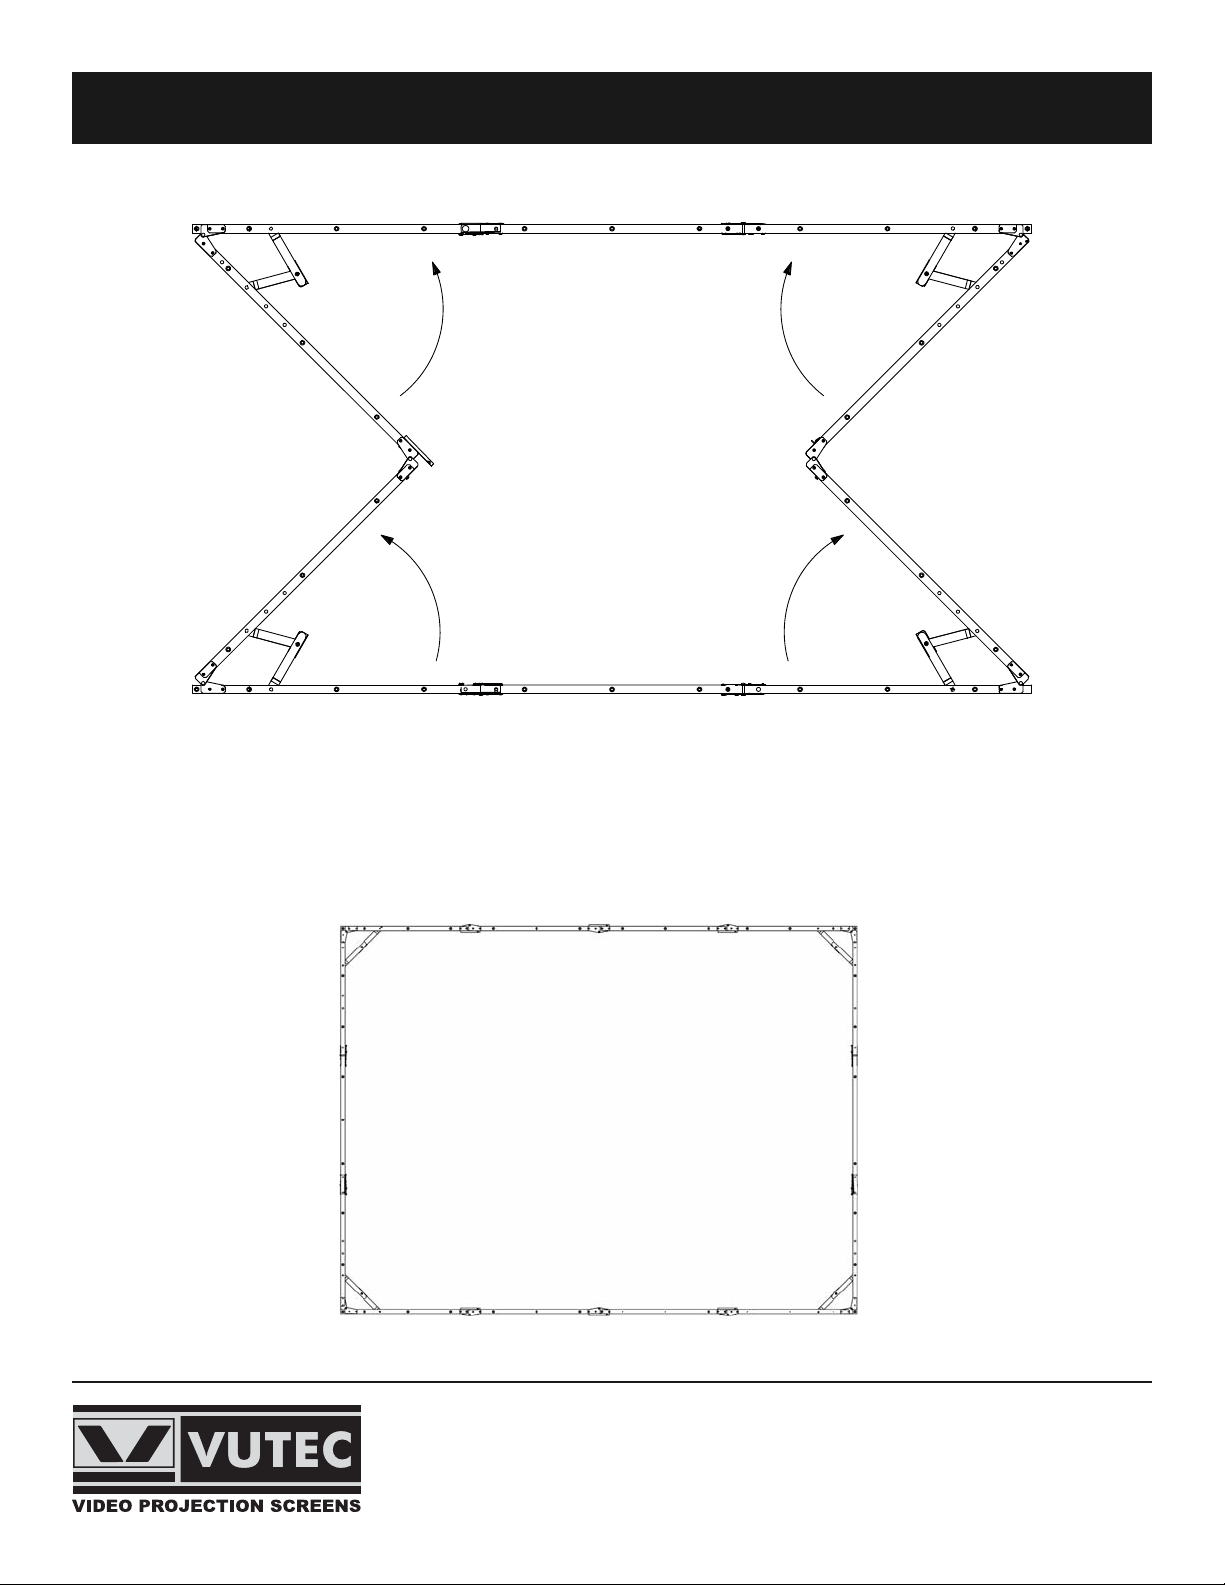
3. Lay the frame flat on the floor and engage the hinge lock handles to secure the frame hinges.
4. Flip the frame over and follow the same manner to lock the hinges on the reverse side.
Vutec Porta-Fold frames are made of 1 inch square hard aluminum tubing with an anodized finish.
With proper care they will provide many years of use. Please follow the set up instructions below (steps 1-11).
1. Remove the frame from its case and wrapping.
2. Unfold the sections marked top and bottom as illustrated below.
Porta-Fold Instructions
Vutec Corporation
Phone: (800) 770-4700 | (954) 545-9000
Fax: (800) 548-5885 | (954) 545-9011
info@vutec.com | www.vutec.com
TOP
BOTTOM
HINGE LOCK
Page 2
6. Lock all four corners and ensure all hinges are fully engaged and locked.
7. Lay the frame on the floor.
8. Match the top of the screen surface (labeled TOP) with top of frame.
Porta-Fold Instructions
Vutec Corporation
Phone: (800) 770-4700 | (954) 545-9000
Fax: (800) 548-5885 | (954) 545-9011
info@vutec.com | www.vutec.com
5. Expand the vertical side sections.
Lock Lock Lock
Lock
Lock
LockLockLock
Lock
Lock
Page 3

9. Once the frame is fully extracted and all hinge locks have been firmly secured you may attach the leg braces.
Use a minimum of two Speedy Cranks per leg, the bottom crank should be placed on the same side of the leg
stand and away from the screen surface. Do not tighten the cranks until all are in place.
10. The Porta-Fold screen has a height adjustment of 6 inch increments in either (UP OR DOWN) direction. The
Normal and Standard (for presentation drapery accessories) height is 44 inches from the bottom of the floor
to the bottom of the screen.
11. To fold the frame, Unlock the top and bottom hinge locks and disengage all corner hinges, begin folding the
vertical sections, unlock the side hinge locks and fold the to and bottom sections as illustrated on page one.
Vutec Corporation
Phone: (800) 770-4700 | (954) 545-9000
Fax: (800) 548-5885 | (954) 545-9011
info@vutec.com | www.vutec.com
Porta-Fold Instructions
Page 4

For a finished, professional appearance, Porta-Fold
screens can be dramatically enhanced with the Drapery
Presentation Accessory Kit. Handsome velour drapes in a
choice of two eye-catching colors surround the screen on
four sides, providing an attractive stage front to the
audience.
The Presentation Drapery Accessory Kit serves a second
function when used with a rear projection surface. It
shields extraneous light from the projector as well as
hiding projection and other equipment from the audience.
An optional Adjustable Skirt Bar provides a versatile
method of changing the picture ratio.
The hardware in the kit is made of lightweight aluminum
and, along with the folded velour drapes, is packed into a
convenient easy to carry poly case. The entire kit can be
set up in minutes. Case optional at additional cost.
Presentation Drapery Accessory Kit
(ILLUSTRATED)
Consists of a set of velour drapes in choice of Blue or
Black, Valance, two Wings, Skirt, Valance Bar, and two
Wing Bars.
• All bars attach to screen frame with slip on clamps.
No tools needed.
• Valance Bar attaches to frame first. Wing Bars then attach to
Valance Bar.
• Valance Bar extends 12" above frame. Wing Bars extend 32" on
each side.
• Wing Bars attach to frame when ceiling height prevents use of
Valance.
• 45" High Skirt snaps to bottom of screen or to optional
Adjustable Skirt Bar.
When folding the screen material for packing, observe the following
precautions before proceeding:
1. The surface should not be allowed to contact painted,
varnished or plastic finished objects for a prolonged period of
time.
2. Make certain the picture surface is on a clean, flat surface.
Then proceed in the following manner:
Place clean white tissue paper – with no printing – on top of the
picture surface. If tissue is not available, a soft white cloth or
something similar will serve the same purpose. Under no conditions
should newspaper or anything similar be used since these may
damage the screen material.
1. With the viewing side facing up, fold the fabric in half from top
to bottom. Make certain when folding that the surface does not
come in contact with either the black binding, grommets or
snap buttons.
2. If the material on the first fold is more than 3 feet high, then
fold once again, but always place clean tissue paper between
the folds.
3. For large size screens, fold in half again if necessary. Make
certain when folding that the surface does not come in contact
with either the black binding, grommets or snap buttons.
4. After the top to bottom folding procedure is completed, then
fold from left to right and continue folding until the fabric is of
sufficient size to fit into the leatherette case.
NOTE: Keep the screen surface in the envelope provided when it is
not in use. Failure to observe these normal precautions may
cause discoloration of the material.
CLEANING
Using a white clean cloth (100% cotton preferred) that is
dampened with clear water. Gently wipe the area in one
direction. Do not use a circular motion. Using a dry 100% cotton cloth.
Wipe dry after each cleaning session. To clean a stubborn stain or a
sticky surface, use denatured alcohol (methanol or methyl alcohol)
following the same procedure as for water. For extremely stubborn
stains, use V M & P, Naphtha or Super Naphtha and follow the same
procedure as for water.
Porta-Fold Packing
Porta-Fold Accessories
Vutec Corporation
Phone: (800) 770-4700 | (954) 545-9000
Fax: (800) 548-5885 | (954) 545-9011
 Loading...