

Page 1
Page 2

TABLE OF CONTENTS
A.
Features ………………………………………………………………………..............
3
B.
Installation Guide …………………………………………………………………..….
4
C.
Specifications ………… ……………………………………………………………….
5
D.
Physical Description of the Product and Remote Control ………………………….
6
E.
Main Menu Description …………………………………………………....................
8
1. On Screen Display (OSD) Menu…………………………………………..….
8
2. Setup Menu …………………………………………………………………….
9
3. Camcorder Menu ……………………………………………………….……..
15
4. Camera Menu ………………………………………………………………….
16
5. LDWS Menu ……………………………………………………...…………….
17
6. Motion Menu …………………………………………….……………………..
19
F.
Playback ……………………………………………………………...........................
20
1. Direct Playback on the Device …………………………………………….....
20
2. Video Modes …………………………………………..……………………….
20
3. Snapshot Playback…………………………………………….………………
22
G.
VuPro Player …………………………………………………………………………...
24
H.
Formatting the memory card …………………………………………………..……..
30
I.
Recording Time Estimation (based on continuous recording with an 8GB
memory card) ……………………………………………………………………..……
31
J.
LCD Screen Inspection : Bright and Dark Spots ……………………………….…..
32
Page 3

A. FEATURES
• Built-in Full HD 5M CMOS Sensor. Viewing angle of approximately 105˚.
• Suitable for all types of vehicles. Compact design. Easy installation.
• Equipped with a 3 inch LCD screen. Viewing angle is easily adjustable. Manual photo capture is also
possible.
• During playback of video footage and photos, the built-in screen direction sensor will detect if it is for
horizontal or vertical viewing.
• The device simultaneously records a video of the outside driving conditions and the audio inside the
vehicle.
• A memory SD card of a maximum of 32 GB Class 10 or above is recommended.
• The G-sensor sensitivity can be adjusted according to vehicles and road conditions. When detecting
strong impact, the device will start emergency recording and protect these files from being deleted/
overwritten.
• When the vehicle is parked and the ignition is powered off, the device can detect motion/impact onto
the vehicle and will start recording. N.B.: An external power source is needed for this function to work.
• The GPS and Image data are recorded and playable on the VuPro Player.
• The Lane Departure Warning System (LDWS) feature alerts the driver by sounding of f a beep when the
vehicle drives outside of the lanes.
• This device also has a Speeding Warning Function.
Page 4
B. INSTALLATION GUIDE
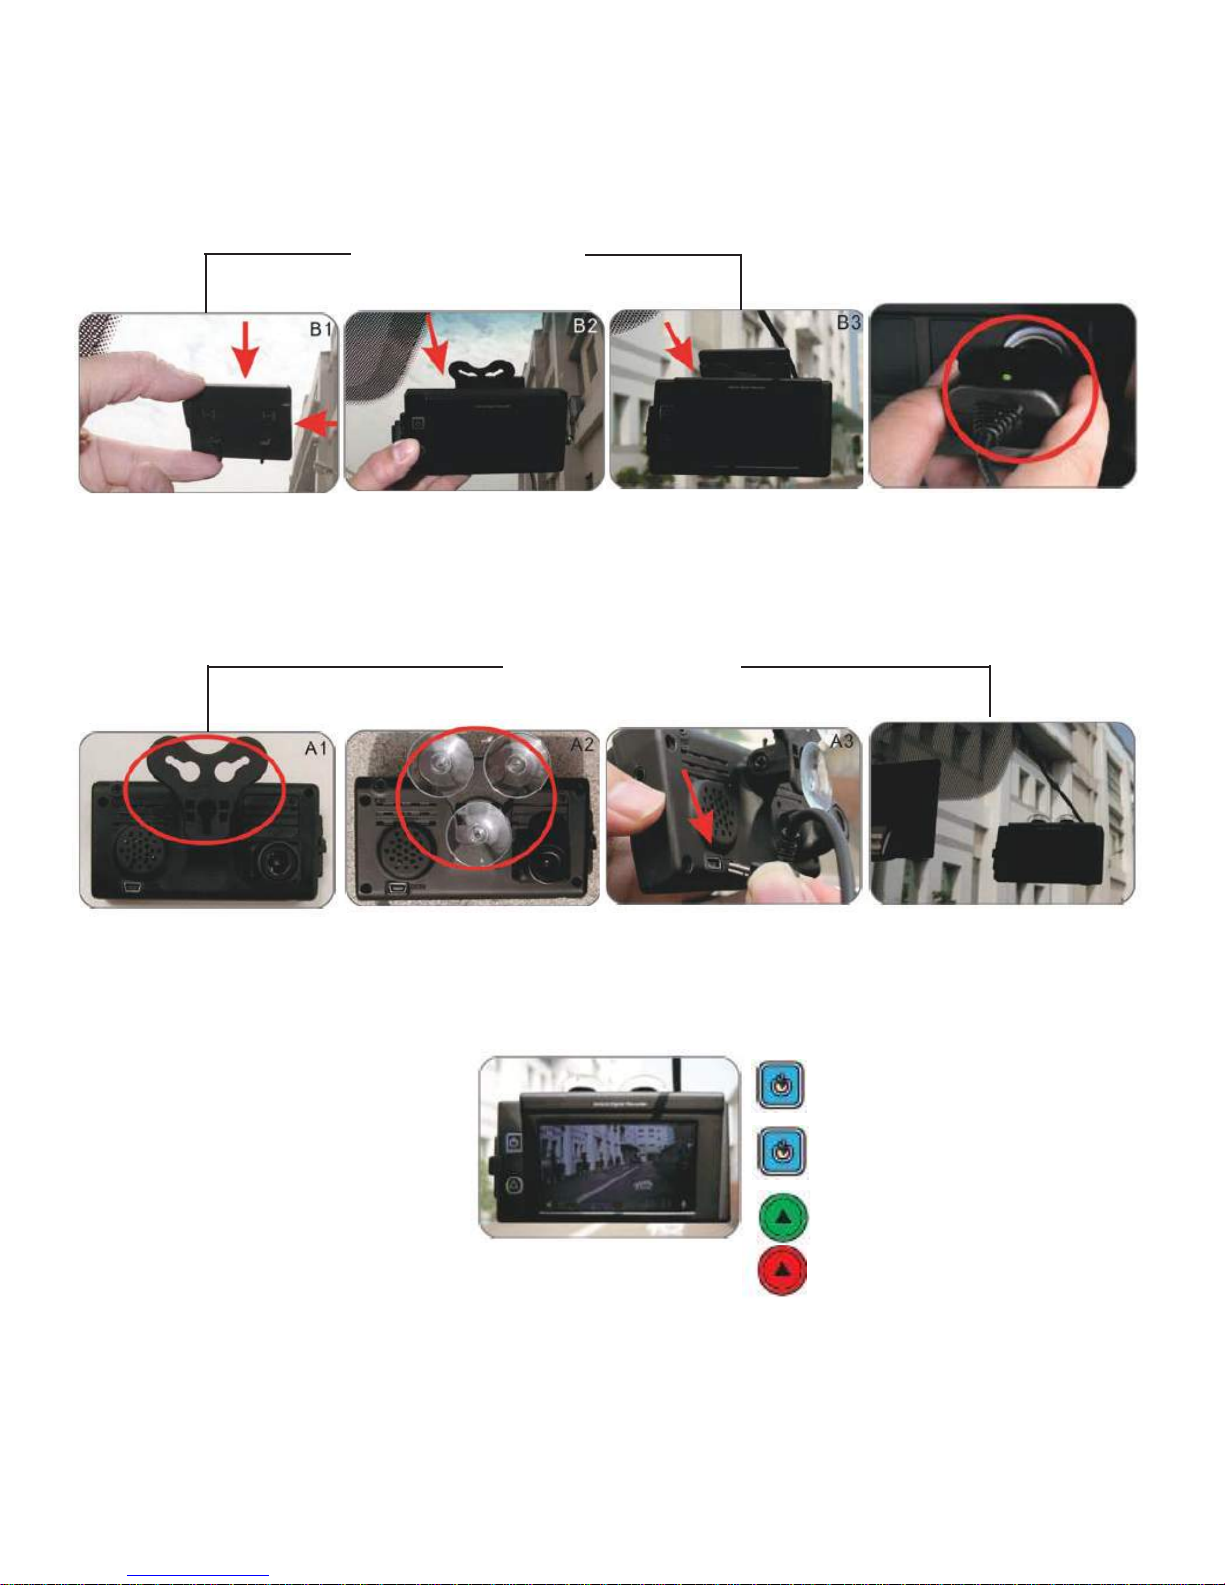
There are two types of brackets that can be used for the installation: sticker-holder or suction-cup
(optional).
Stick-holder method
Remove 3M sticker
and place it onto
the windshield in the
best location.
Face the bracket
upward.
Place the bracket; latch into the device
and fix the cable.
Suction-cup method
(*Optional)
Insert the suction
cups. *Optional
Insert the cable into
the USB port.
Plug in the cigarette
lighter adaptor into
the outlet.
Place the device on
the windshield using
the suction cups and
fix the cable.
Blue light flashing: GPS
positioning
Screen display
Blue light on: GPS
positioning ready
Green light: Power on
Red light: Recording
Page 5
C. SPECIFICATIONS
Page 6
D. PHYSICAL DESCRIPTION OF THE PRODUCT AND REMOTE CONTROL
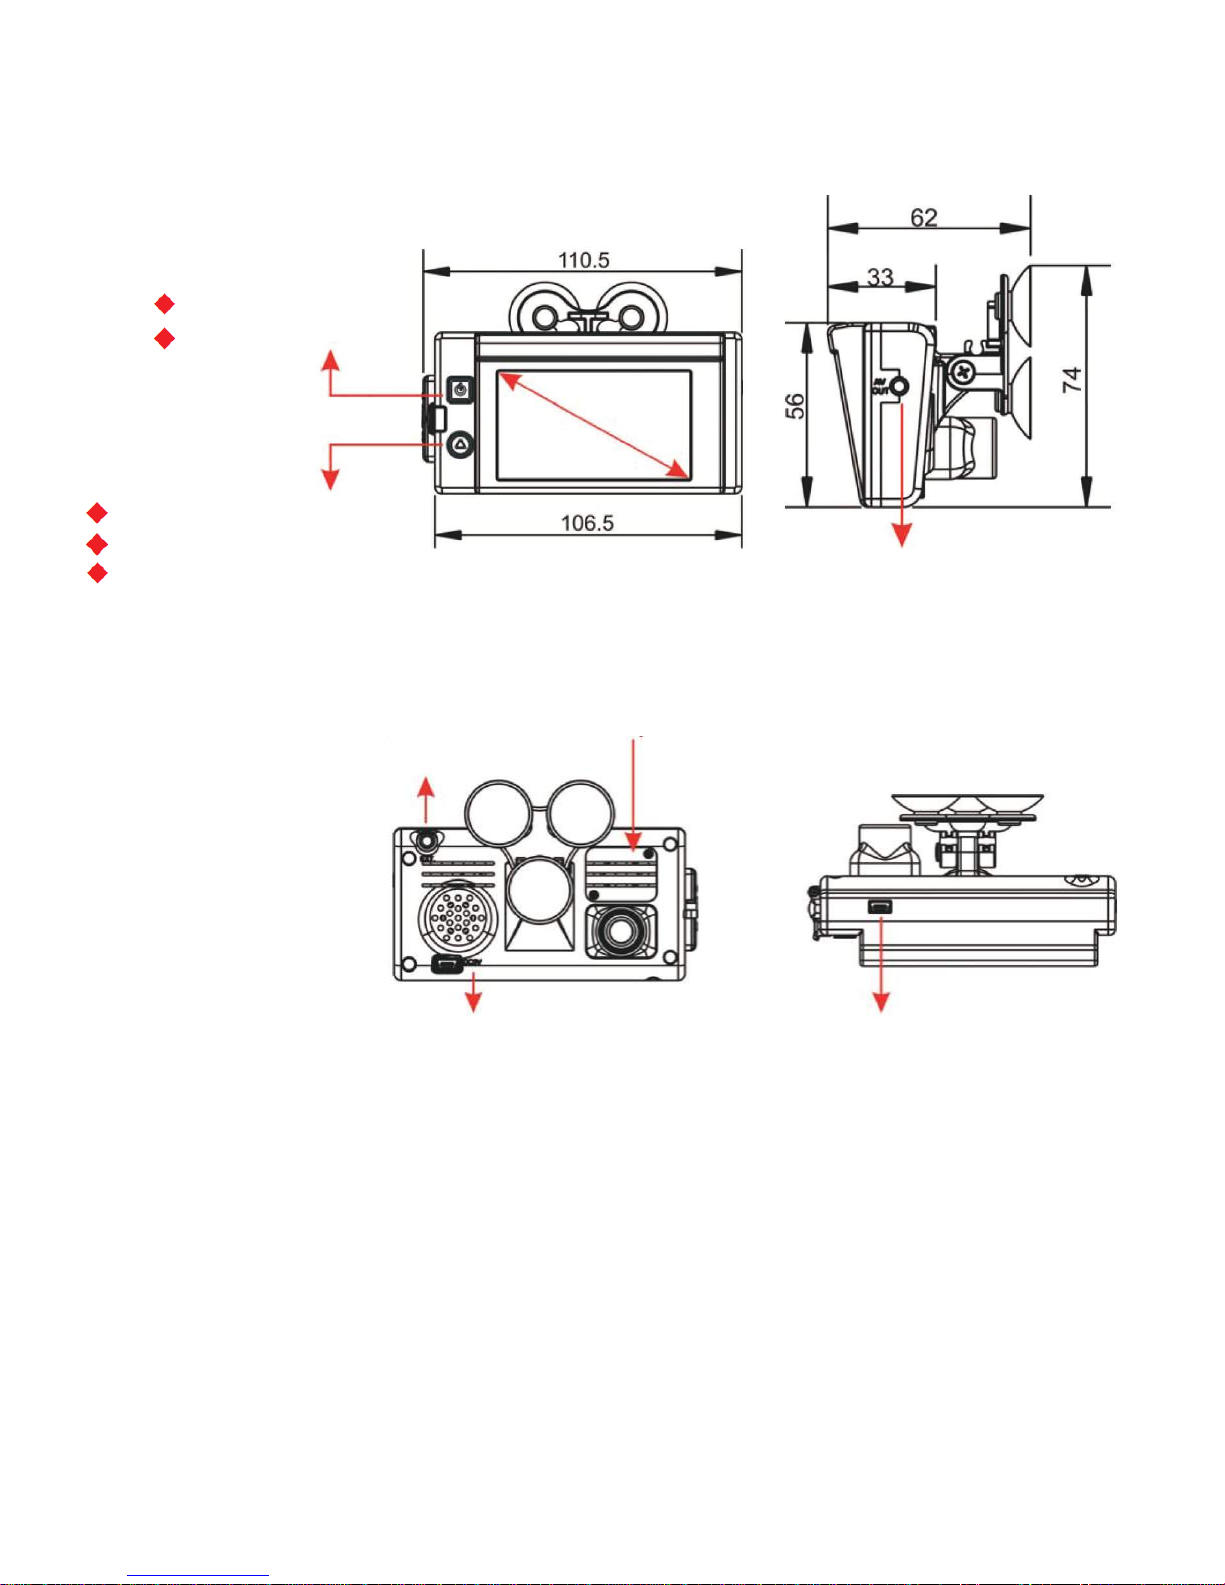
Unit: mm
Monitor ON/OFF
GPS Positioning
LCD in 16:9
Green light: power on
Red light: recording
Red light (flashing rapidly):
force recording
Video/Audio Output
GPS Mouse
Extension Hole
DC5V Power input
RTC Battery Cover
Mini USB for PC
Page 7
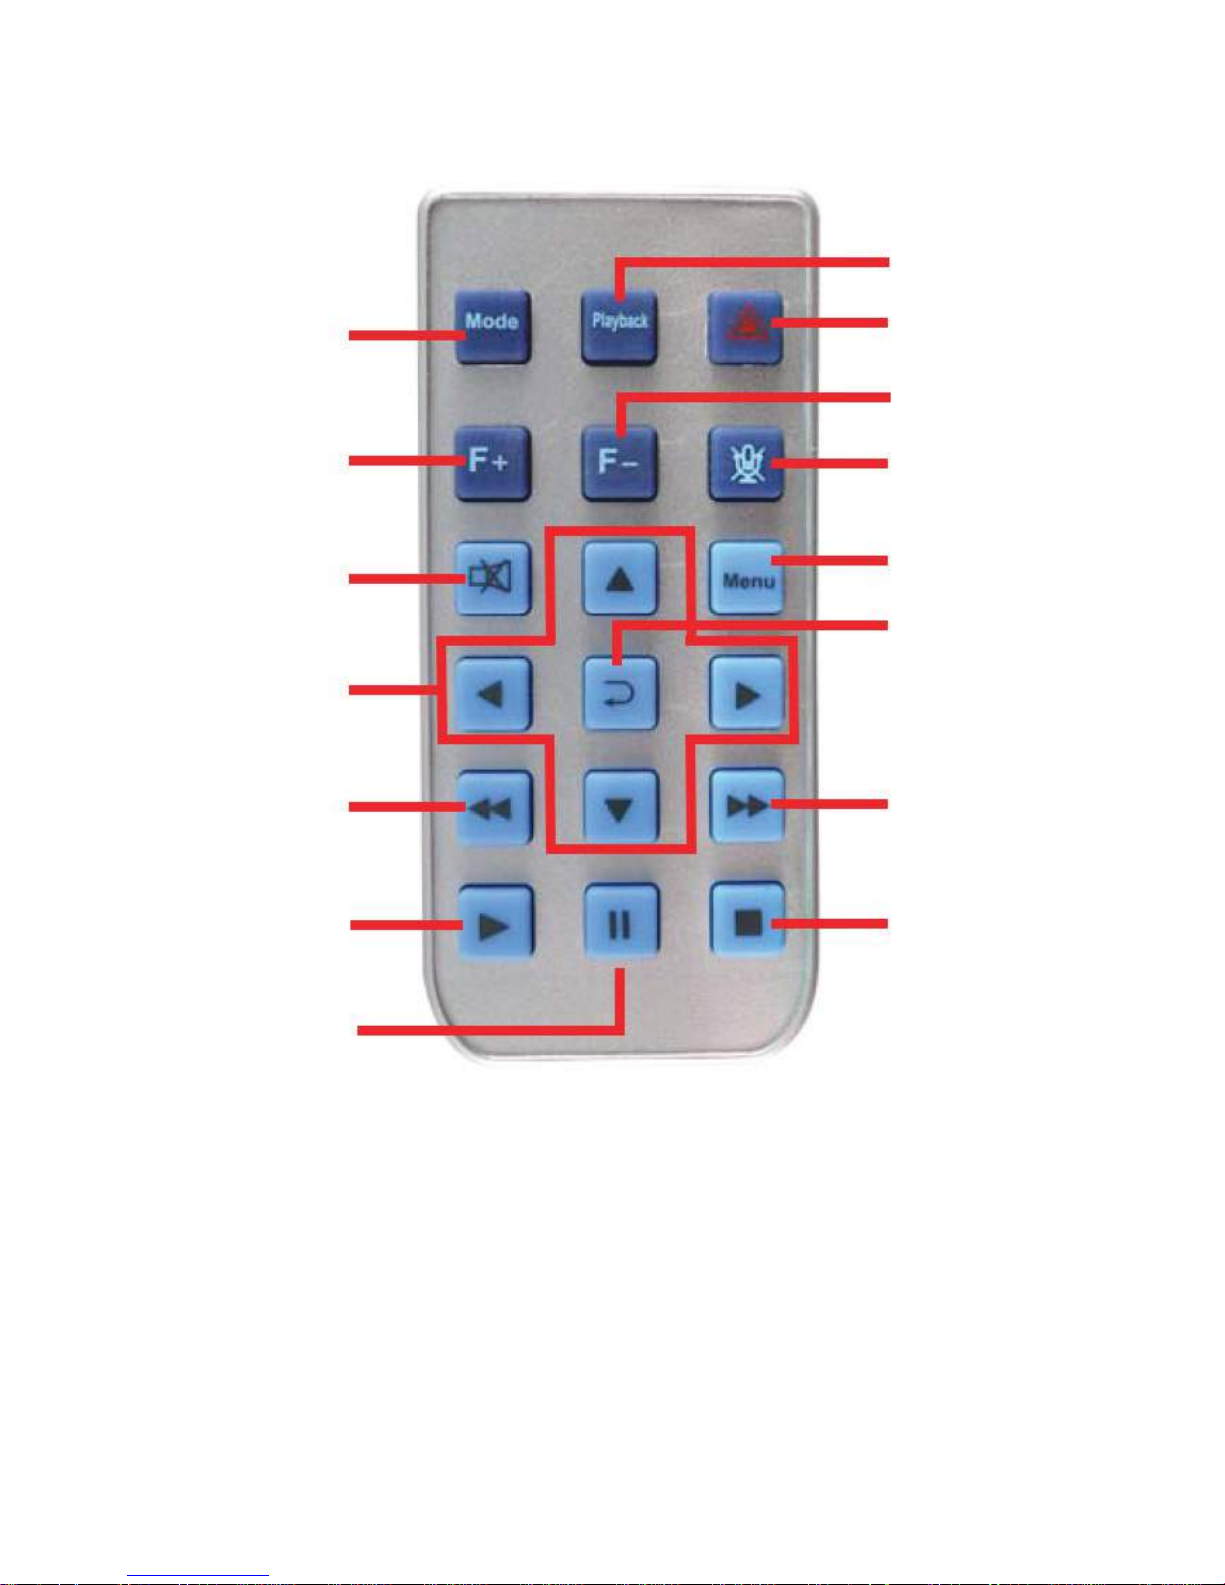
REMOTE CONTROL FUNCTIONS
Playback
Mode
Volume up
Mute
Up / Down / Left / Right
Rewind
Force Recording
Volume down
Voice Recording On/Off
Menu
Enter/Confirm
Fast Forward
Play
Pause
Stop
Page 8
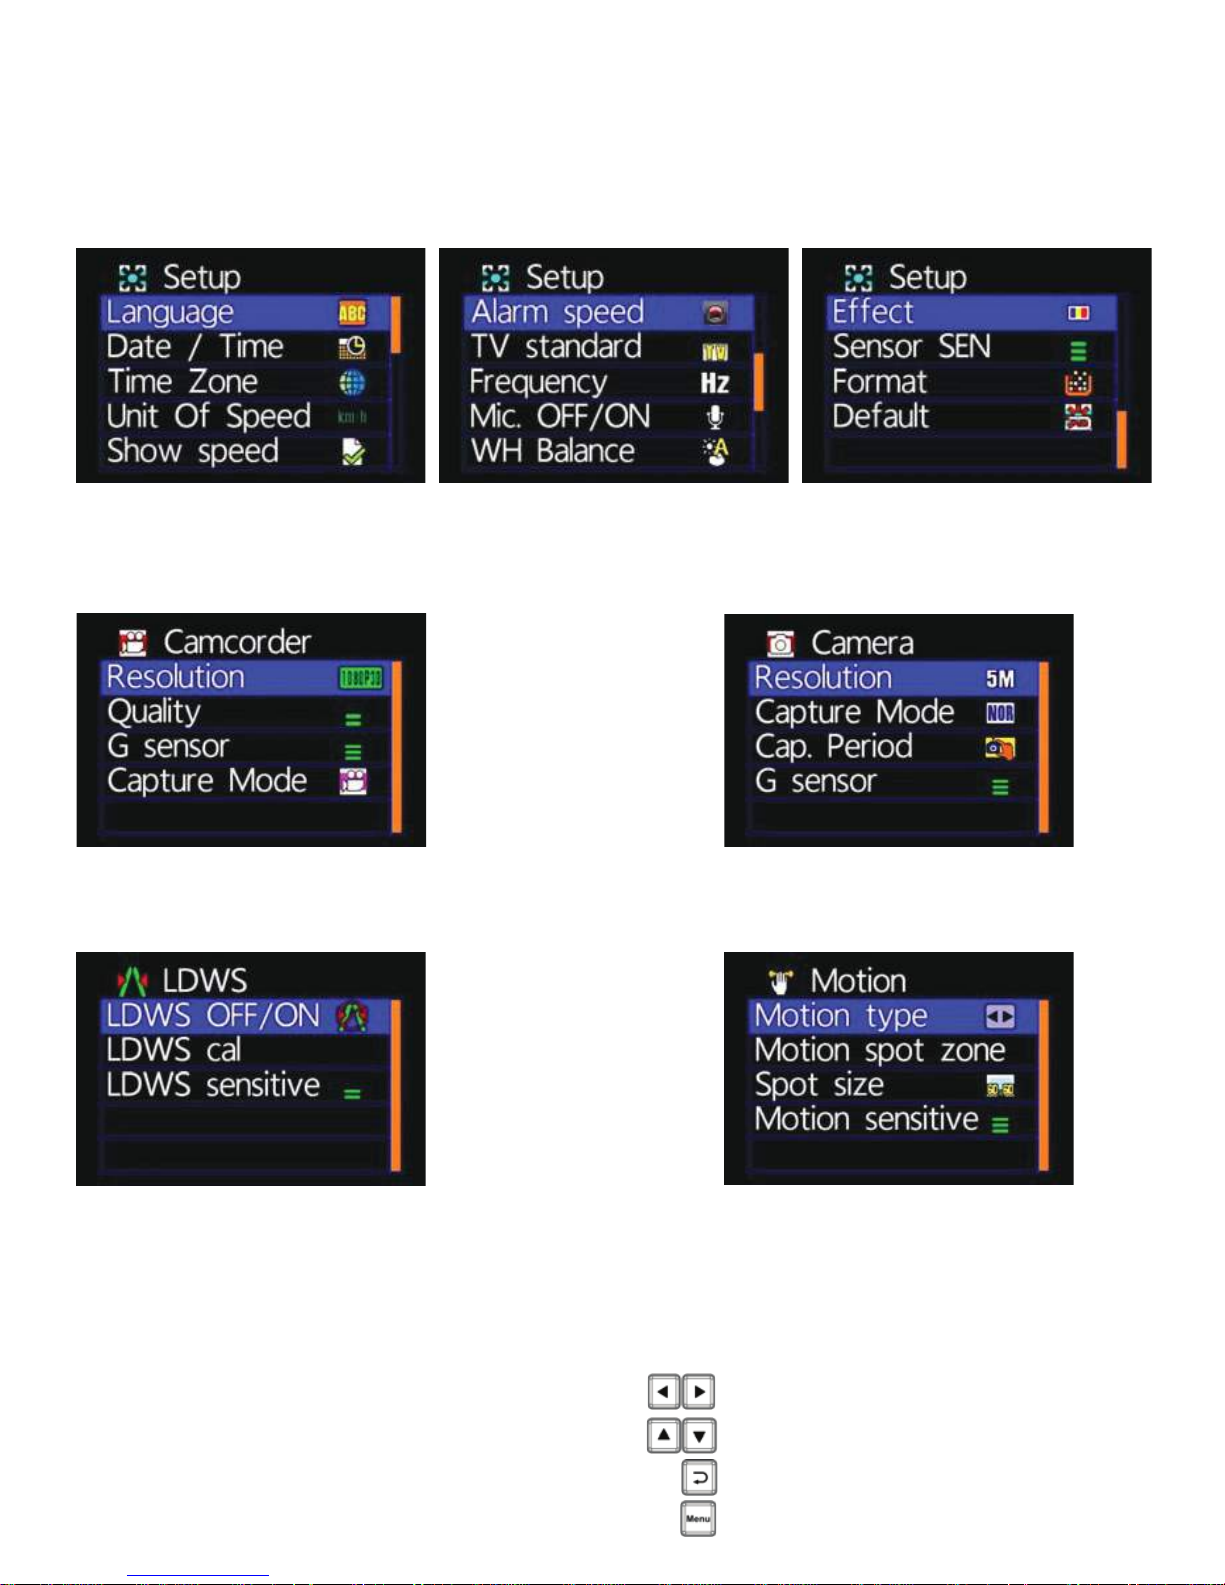
E. MAIN MENU DESCRIPTION
1. OSD (On Screen Display) Menu
■ Setup Menu
1/3
■ Camcorder Menu ■ Camera Menu
■ LDWS Menu ■ Motion Menu
2/3 3/3
■ Please use the remote control to execute the following actions:
ACTION KEY ON REMOTE CONTROL
Move through the lists [LEFT OR RIGHT]
Move the blue bar [UP OR DOWN]
Confirm [ENTER]
Go to Previous Menu or Main Menu [MENU]
Page 9
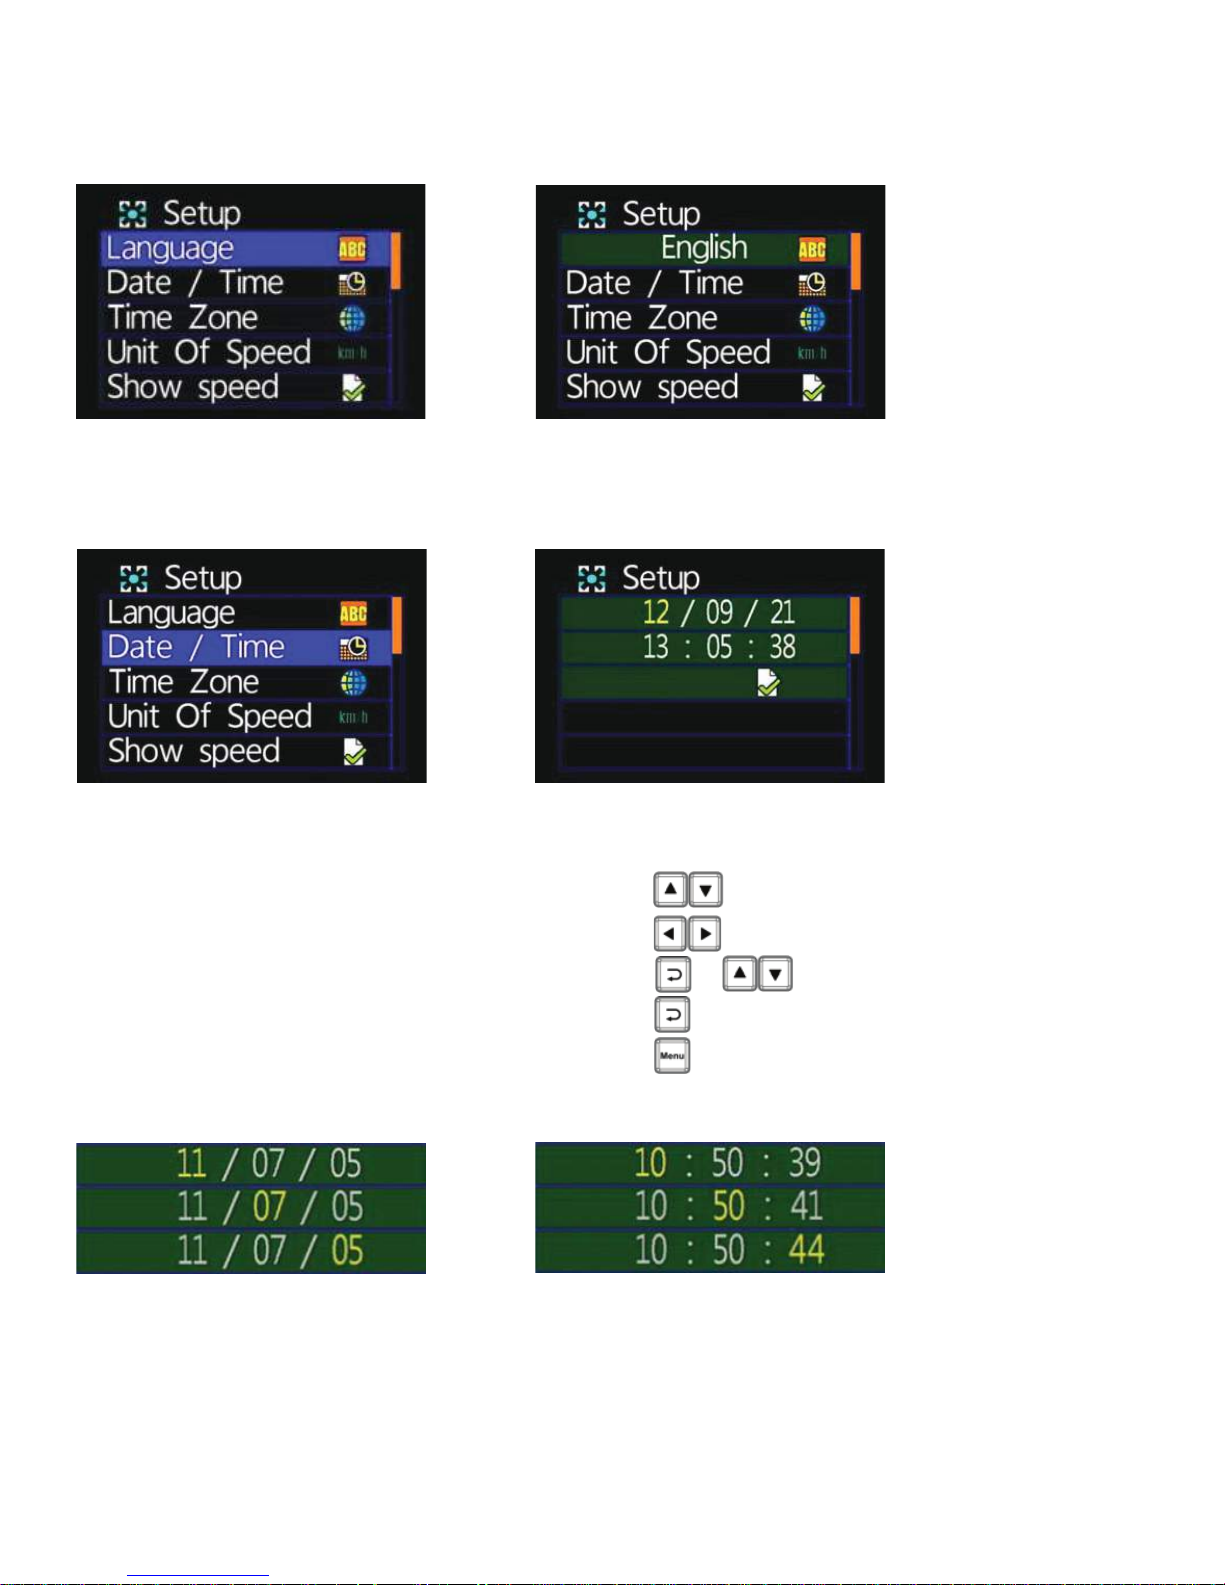
2. Setup Menu
■ Language Setting
* Select English / French / German / Italian / Japanese / Korean / Portuguese / Russian /
Traditional Chinese / Spanish / Simplified Chinese / Turkish / Dutch/ etc.
■ Date/Time Setting
ACTION KEY ON REMOTE CONTROL
Move through the list of settings [UP/DOWN]
Change the settings [RIGHT/LEFT] +
+ [CONFIRMATION] + [UP/DOWN]
Confirm [CONFIRM]
Go to Previous Menu [MENU]
A M J
A M J
* Year: Last digits of year (11 means 2011).
Hour: 24 hour cycle
Page 10
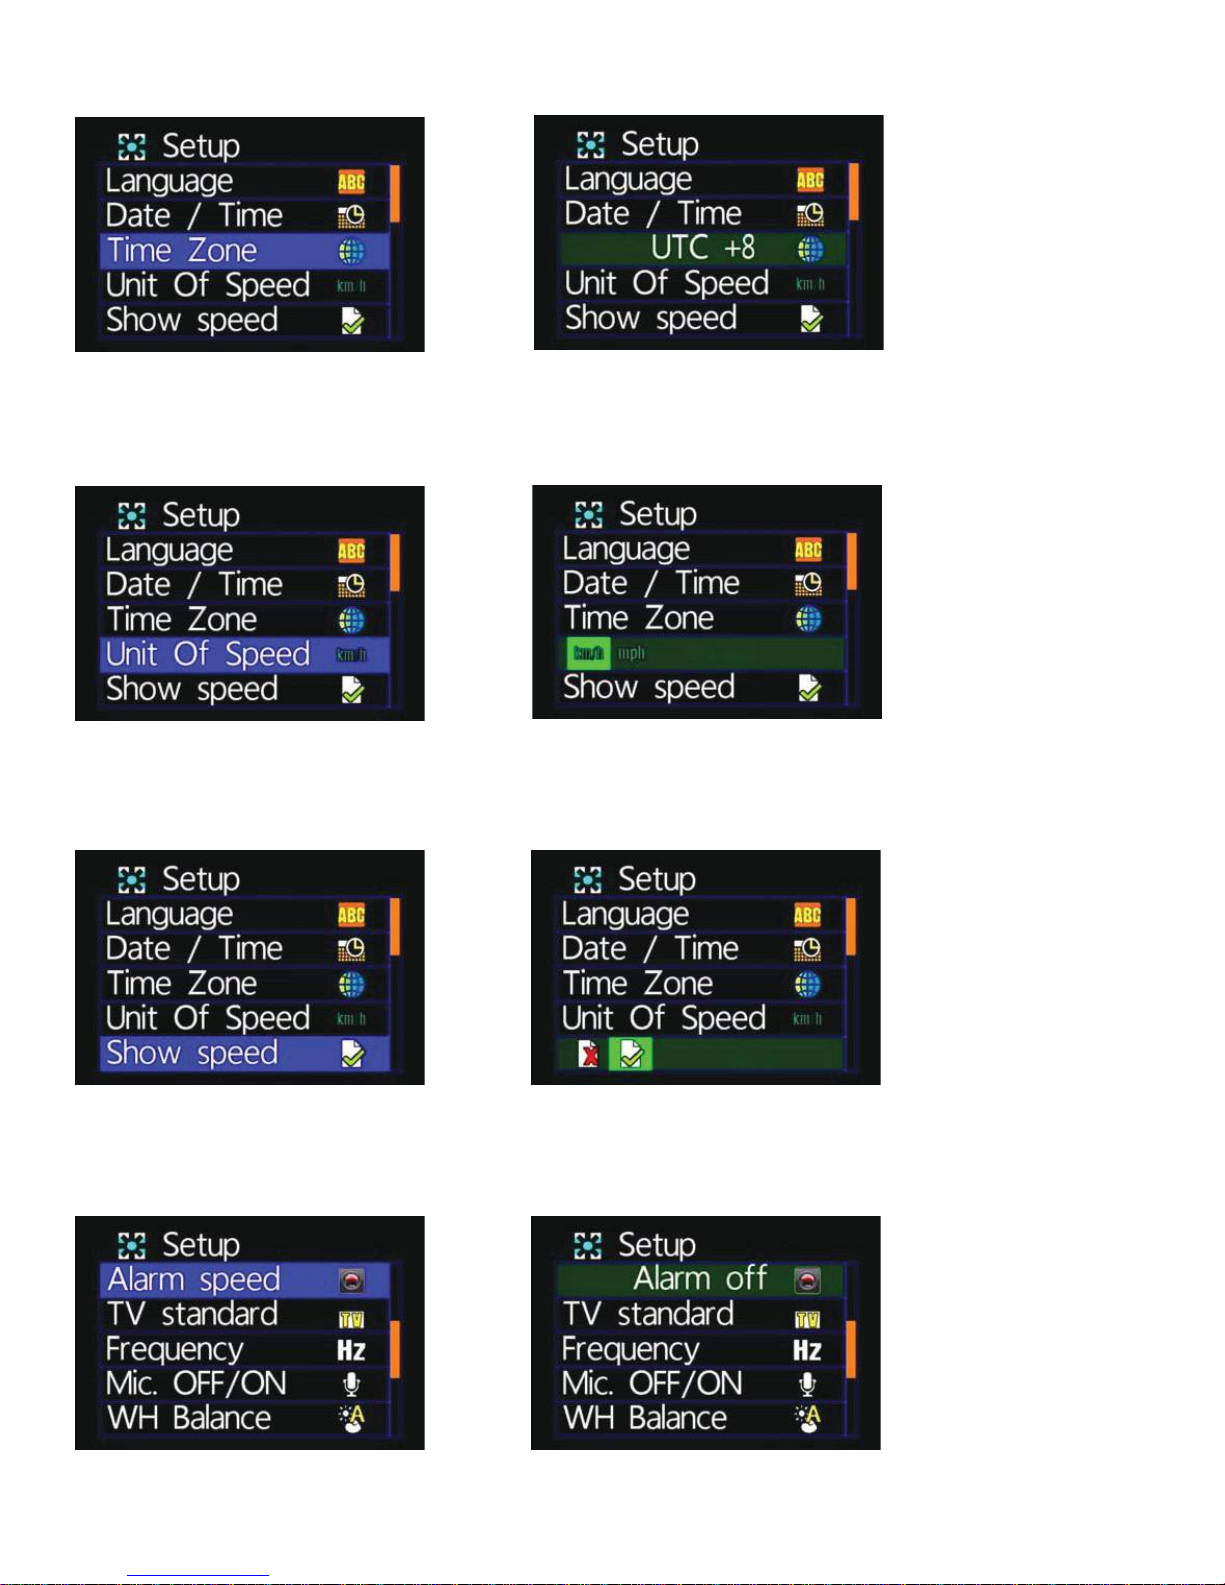
■ Time Zone Setting
* Select the time zone for the specific area
■ Unit Of Speed Setting
* km/h (kilometers) or mph (miles)
■ Show Speed Setting
* Delete / Select
■ Speeding Alarm Setting
* Select Cancel, 40 km/h, 45 km/h…195 km/h, 200 km/h etc.
Page 11
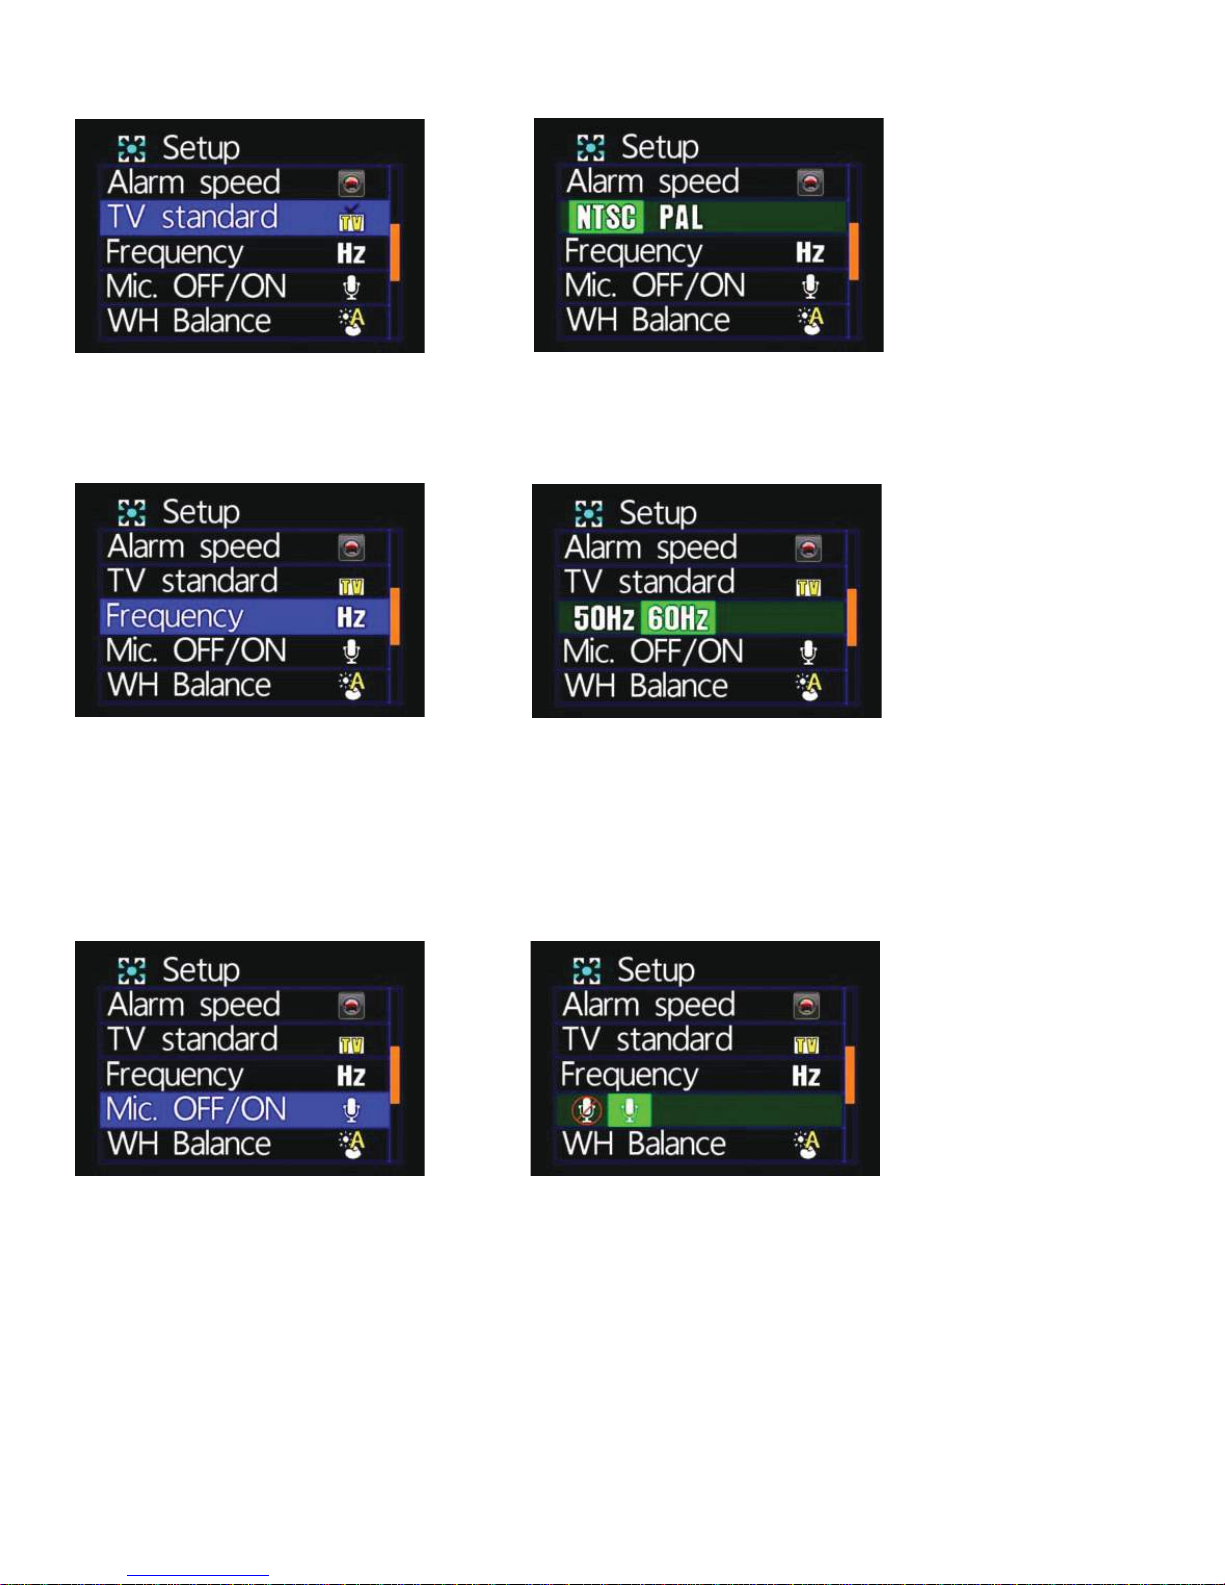
■ TV Standard Setting
■ Light Frequency Setting
* Select NTSC / PAL
* Select 50Hz / 60Hz
* Light frequency enables specific light wavelengths to be detected by the lens.
The higher the light frequency, the brighter it is around the lens.
■ Microphone Off / On Setting
* Select Off / On
Page 12
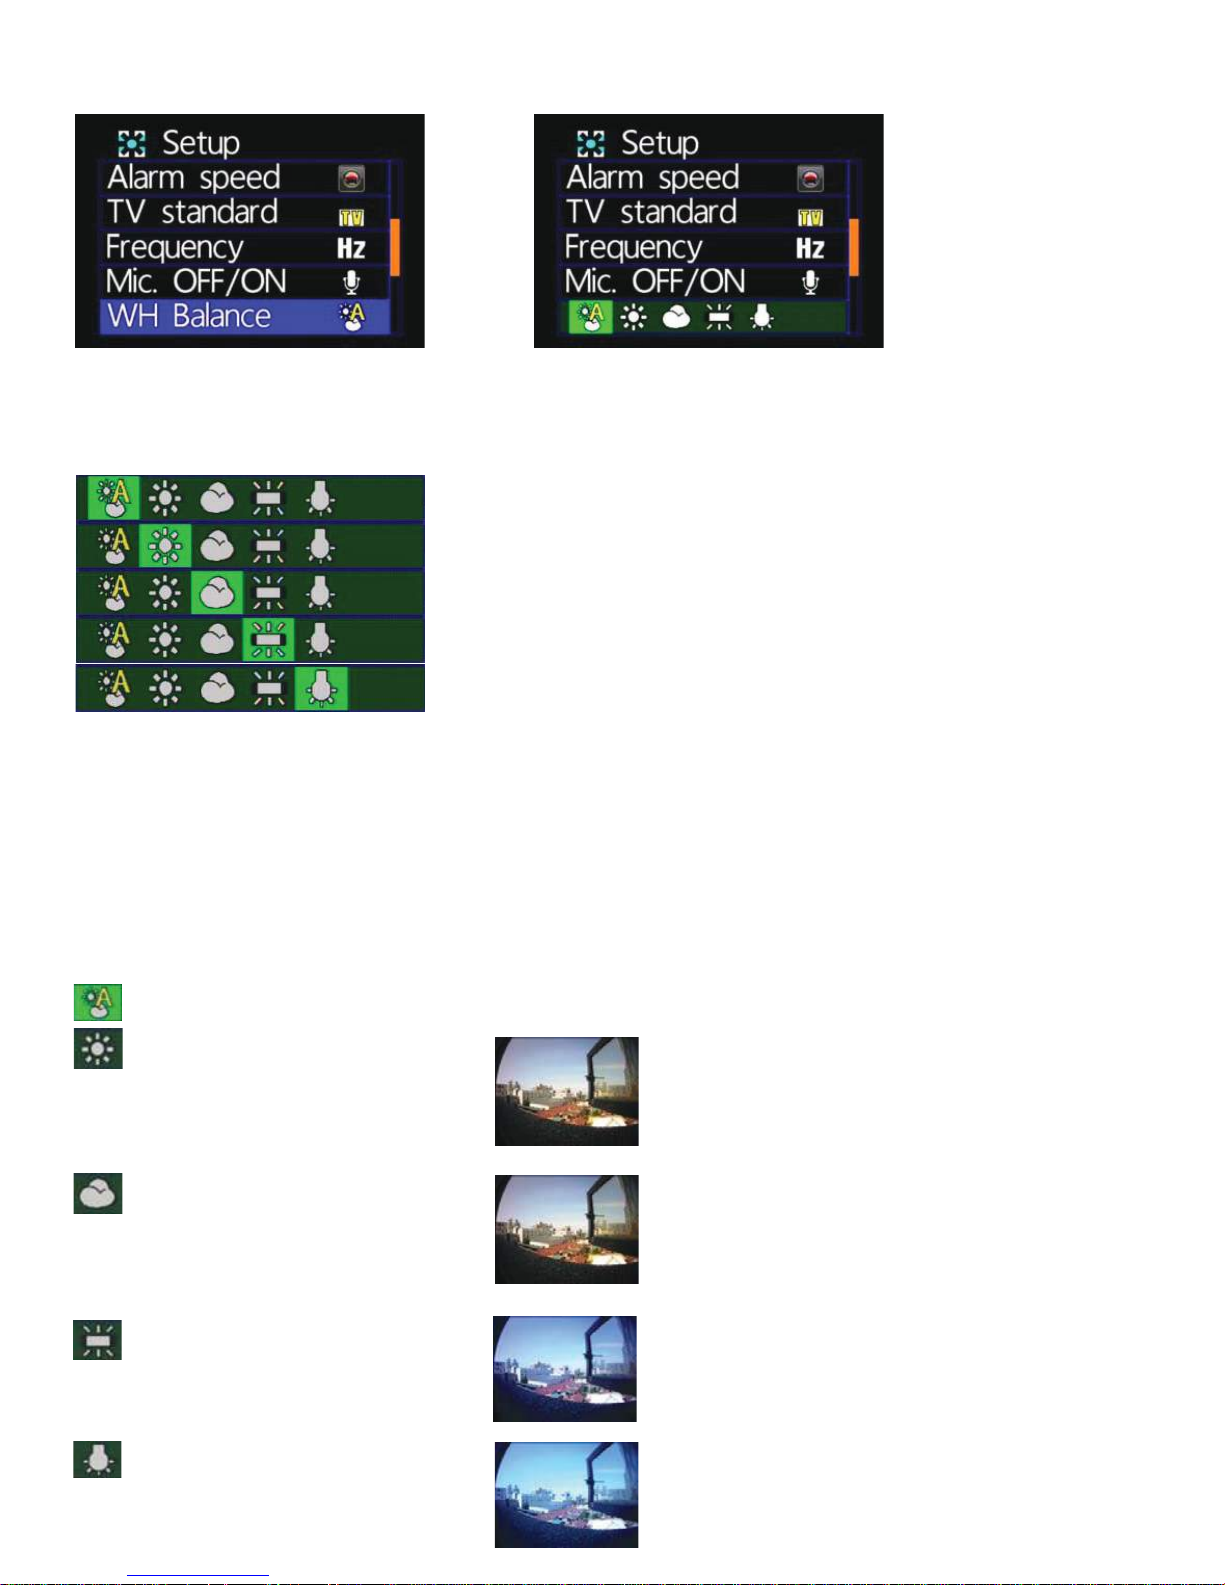
■ White Balance Setting
* Select Automatic / Sunny Day / Cloudy Day / Fluorescent / Incandescent
Automatic
Sunny Day
Cloudy Day
Fluorescent (Yellow Background)
Incandescent (Bright White Background)
* “Automatic” is the recommended setting when recording while on the road in order to prevent getting a
blurred image. “Automatic” is the default setting.
The following pictures show the same capture modified by the different White Balance settings.
Icon White Setting Balance Picture
Automatique Default setting
Journée ensoleillée Sunny
Journée nuageuse Cloudy/Dark/Sunset
Fluorescent Fluorescent (Yellow Light Background)
Incandescent Incandescent (White Light Background)
Page 13
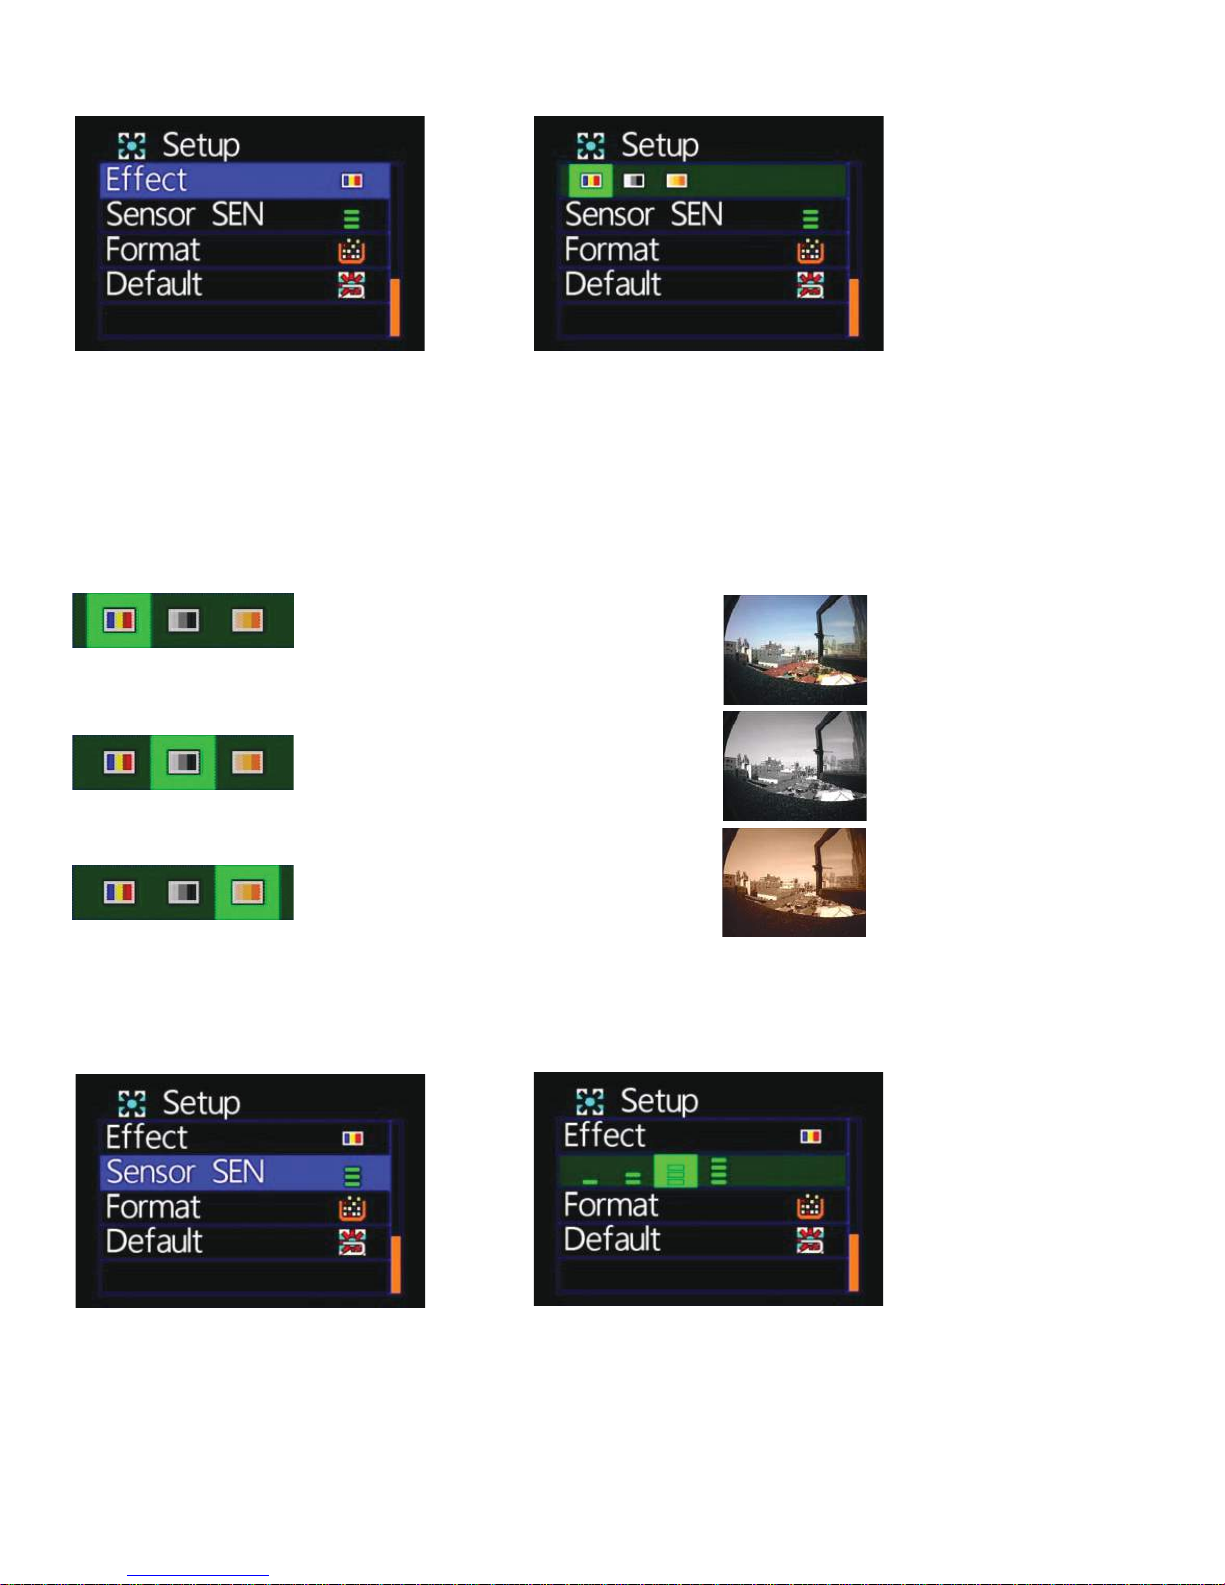
■ Effect Setting
* Select Color / B&W / Classic
* Once the “Effect” is set, it will automatically be used for the snapshots or when operating the camera.
The following pictures show the same capture modified by the different Effect settings.
Icon Effect Setting Picture
Color
B&W
Classic
■ Sensor Sensitivity Setting
* The more stripes you select, the more sensitive the sensor.
Page 14
* When a vehicle drives through darker areas, the “sensitivity sensor” will decide whether “white balance”
setting will be activated or not. If the “sensitivity sensor” is set to more sensitive, as the vehicle drives
into darker areas the “white balance” will automatically be activated. In this situation, the video image
may be too bright.
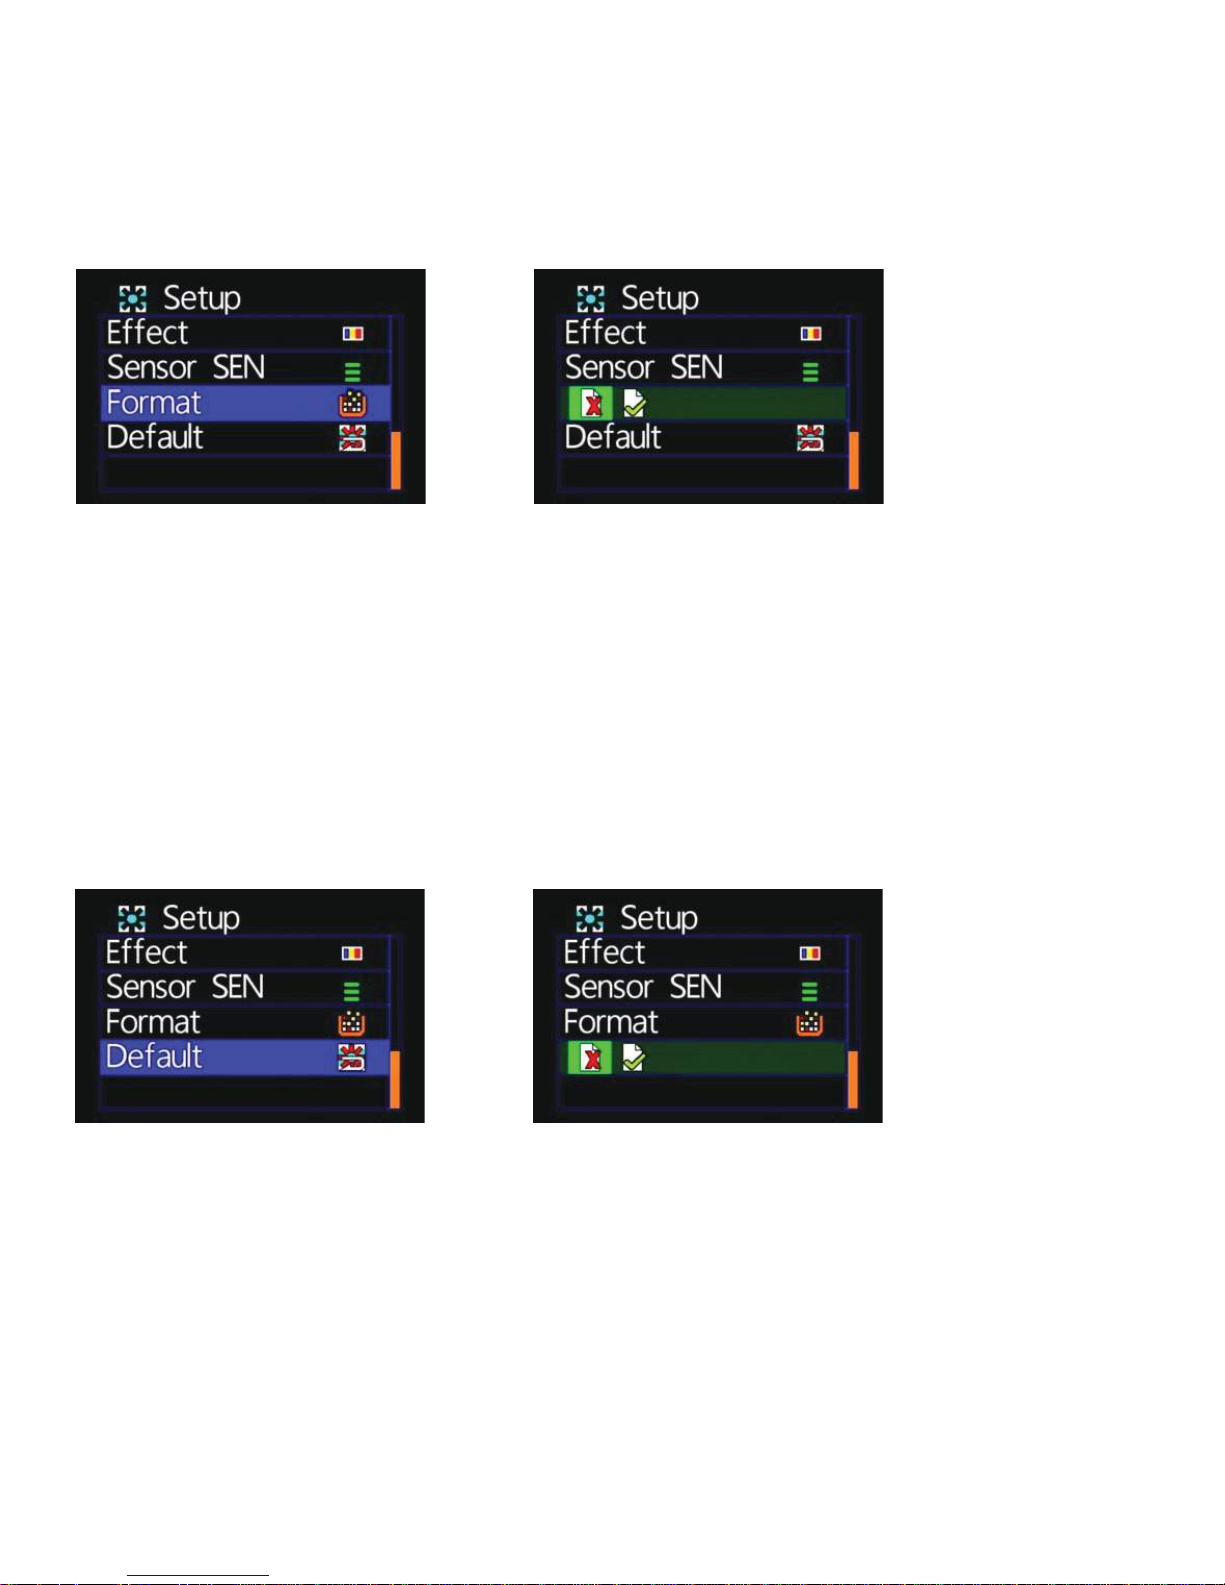
■ Format Setting
* Select Cancel / Confirm Formatting.
* When “Cancel Formatting” is selected; you will be redirected to the “Main Menu”.
* During formatting, existing data will be erased. Please backup all important data prior to formatting the
memory card.
* All brand new SD memory cards must be formatted before using.
■ Default Setting
* Select Cancel Factory Default Setting / Confirm Factory Default Setting
* When “Default” is selected you will be redirected to the “Main Menu” and the factory default setting will
be automatically chosen.
* To change the settings go back to the main menu.
Page 15
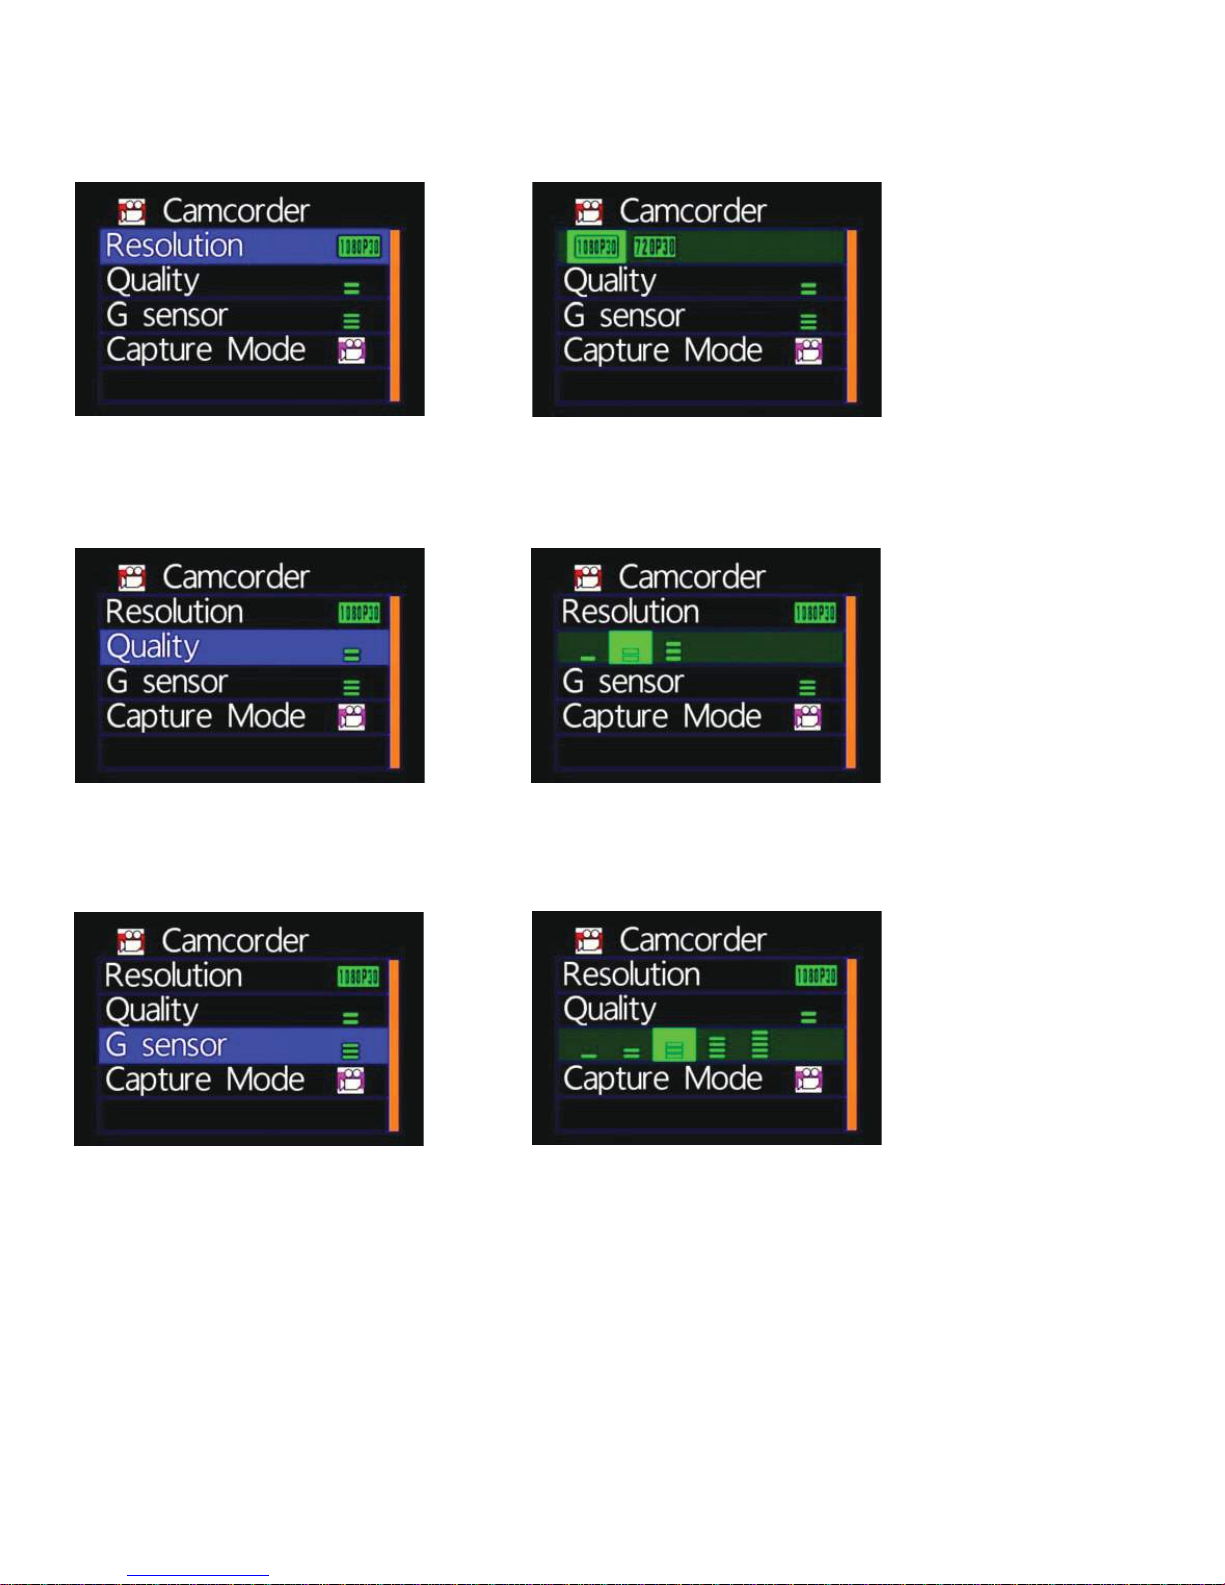
3. Camcorder Menu
■ Resolution Setting
* Select one of 2 resolutions: 1080P (30fps) / 720P (30fps)
■ Quality Setting
* Notice: the more stripes you select, the more effective the video resolution.
■ G-Sensor Setting
* NOTICE: the more stripes you select, the more sensitive to impacts your G-sensor
will be and the more easily Force Recording will be activated
* Each time Force Recording is triggered, 3 minutes of footage before and after the accident will be
automatically recorded, saved and protected.
Page 16
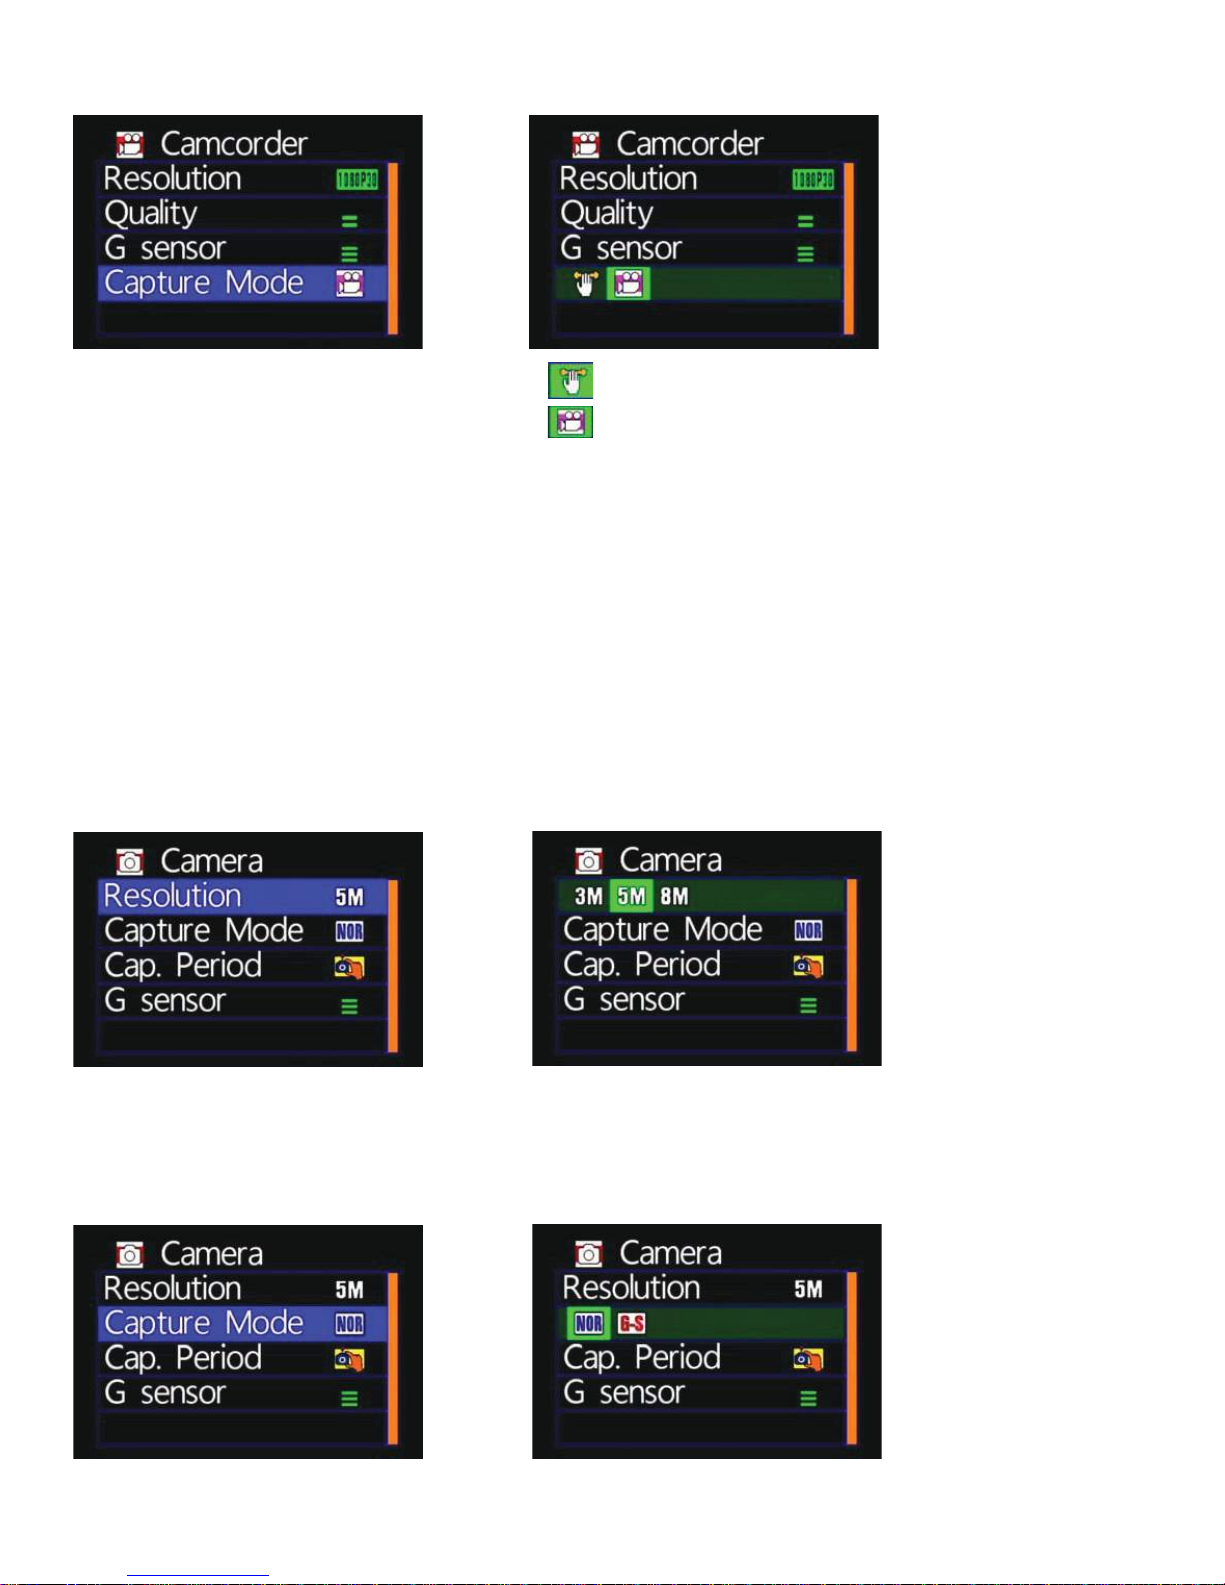
■ Capture Mode Setting
* : Motion mode
: Normal mode
* When Motion mode is selected: once the device is rebooted it will be switch back to normal recording
mode.
* To activate the Motion and LDWS functions, you must reselect the Motion mode.
4. Camera Menu
■ Resolution Setting
* Select one of 3 Resolution modes: 3M/ 5M/ 8M.
■ Capture Mode Setting
* Select NOR (Normal) or G-S (G Sensor mode, three continuous snapshots).
Page 17
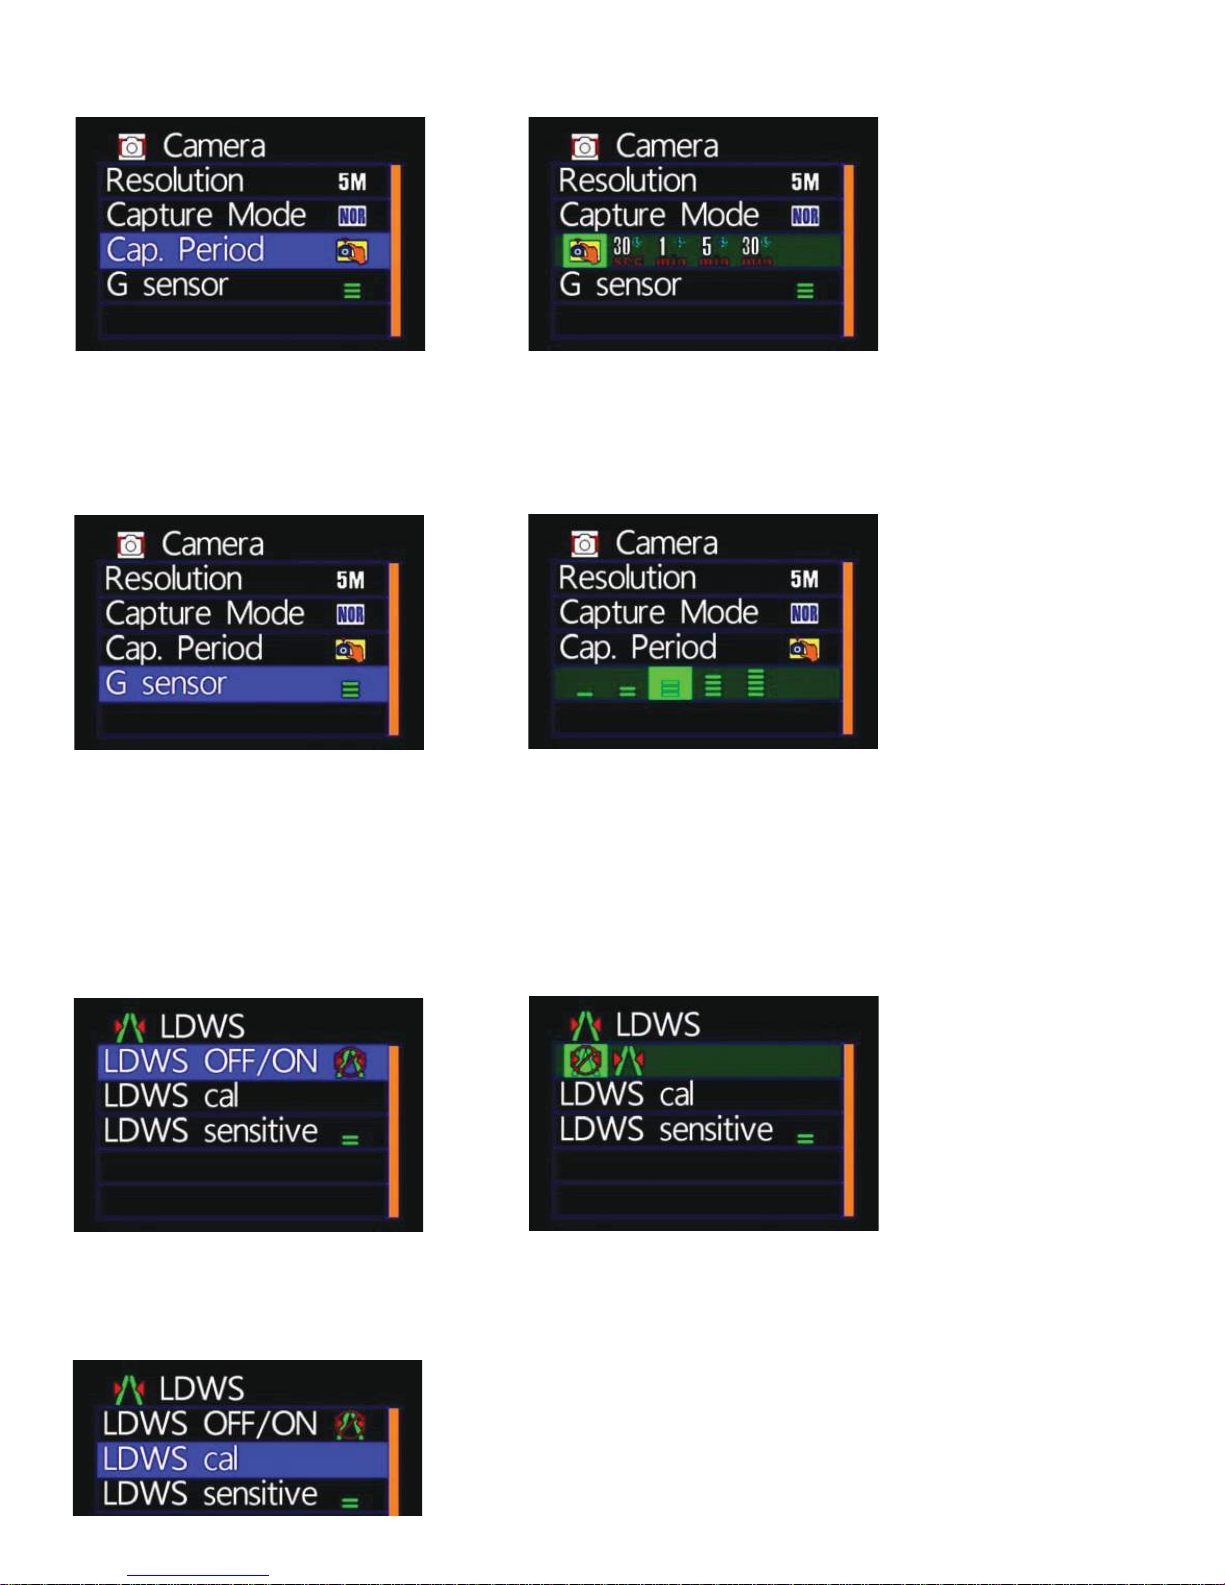
■ Capture Frequency Setting
* Select Normal / 30 sec / 1 minute / 5 minutes / 30 minutes
■ G-sensor Setting
* Notice: The higher the sensitivity of the G-sensor, the easier it will be to trigger a
Force Recording. Once Force Recording is activated, 3 consecutive pictures will
automatically be taken and saved.
5. LDWS Menu
■ LDWS setting
* Select LDWS on / LDWS off
■ LDWS Calibration
Page 18
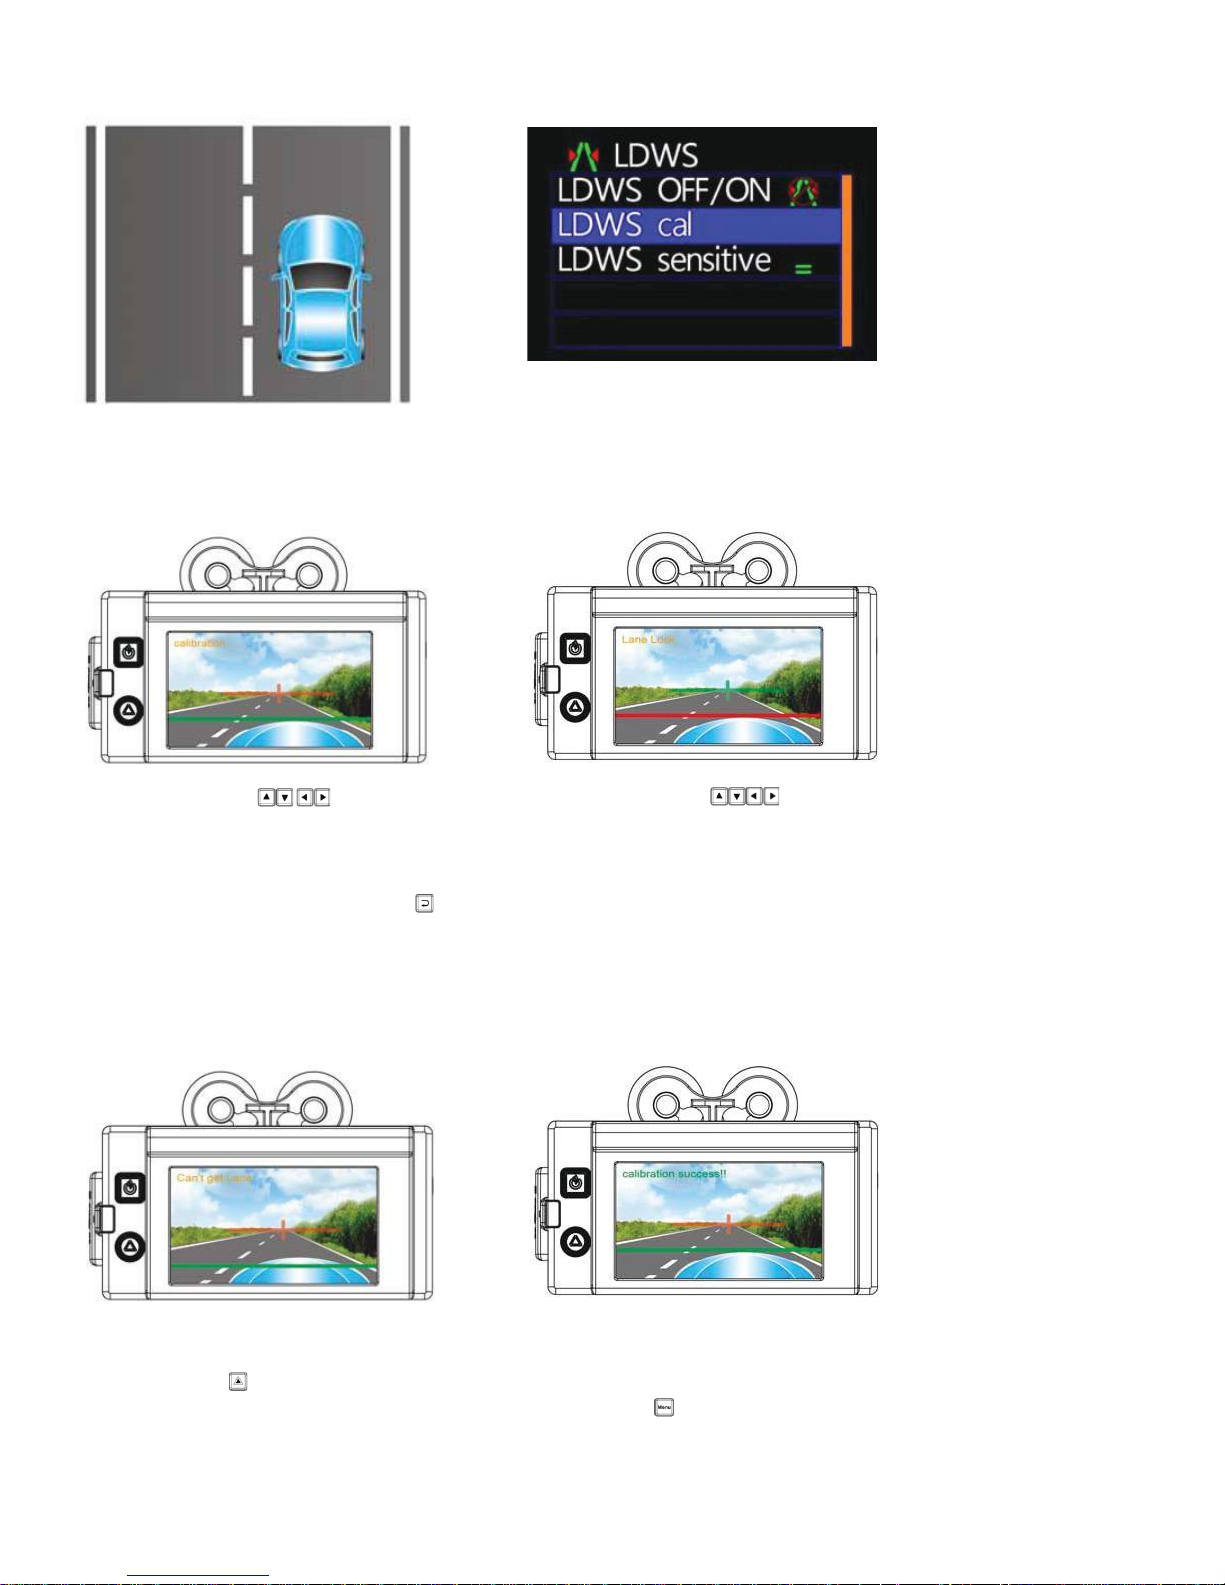
■ Setting LDWS:
of the road.
2. Open “LDWS” and select “LDWS cal”.1. Drive the vehicle in the middle
3. Use these keys on the
remote control to place the “CROSS”
in the exact middle of the road. If
setting fails, a “Can’t get Lane”
message will be appeared. Use
to change horizontal line.
5. Please wait for a few seconds in
order for the device to be calibrated
after the key “Force Recording”
is pressed.
4. Use these keys on the remote
control to adjust the horizontal line
above the vehicle’s hood. When the
line can be recognized by the DVCR,
a “Lane Lock” message will appear.
6. After calibration is completed, the
message “calibration success!!”
will appear in GREEN on the screen.
Press the “menu” key on the remote
control.
Page 19
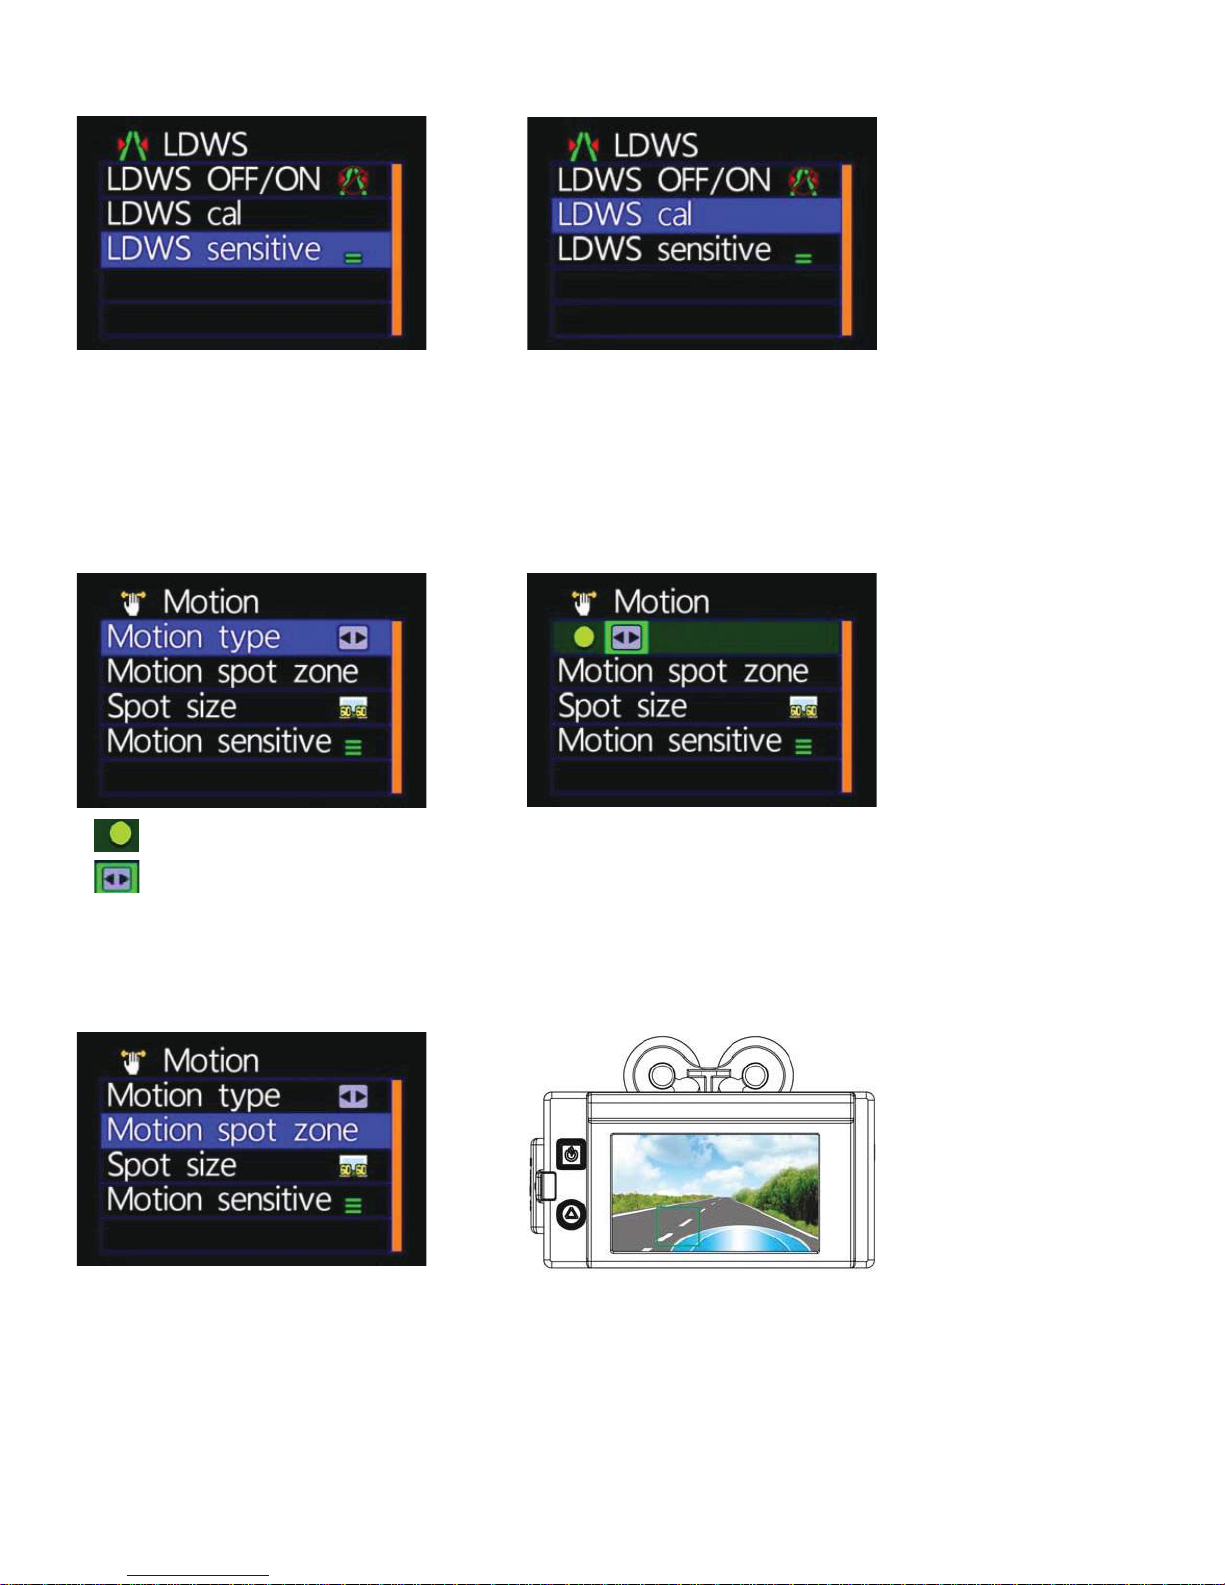
■ LDWS Sensitive Setting
* The more stripes are selected the more sensitive the LDWS is.
6. Motion Menu
■ Motion Type Setting
* : Constant Motion Recording.
* : Full Screen Motion Recording. (For this setting, it is not necessary to setup
the motion detection areas).
■ Motion Spot Zone Setting
* Use the remote control to detect the location where there is motion.
* When constant motion recording mode is selected, you must determine and set the
area for motion detection.
Page 20
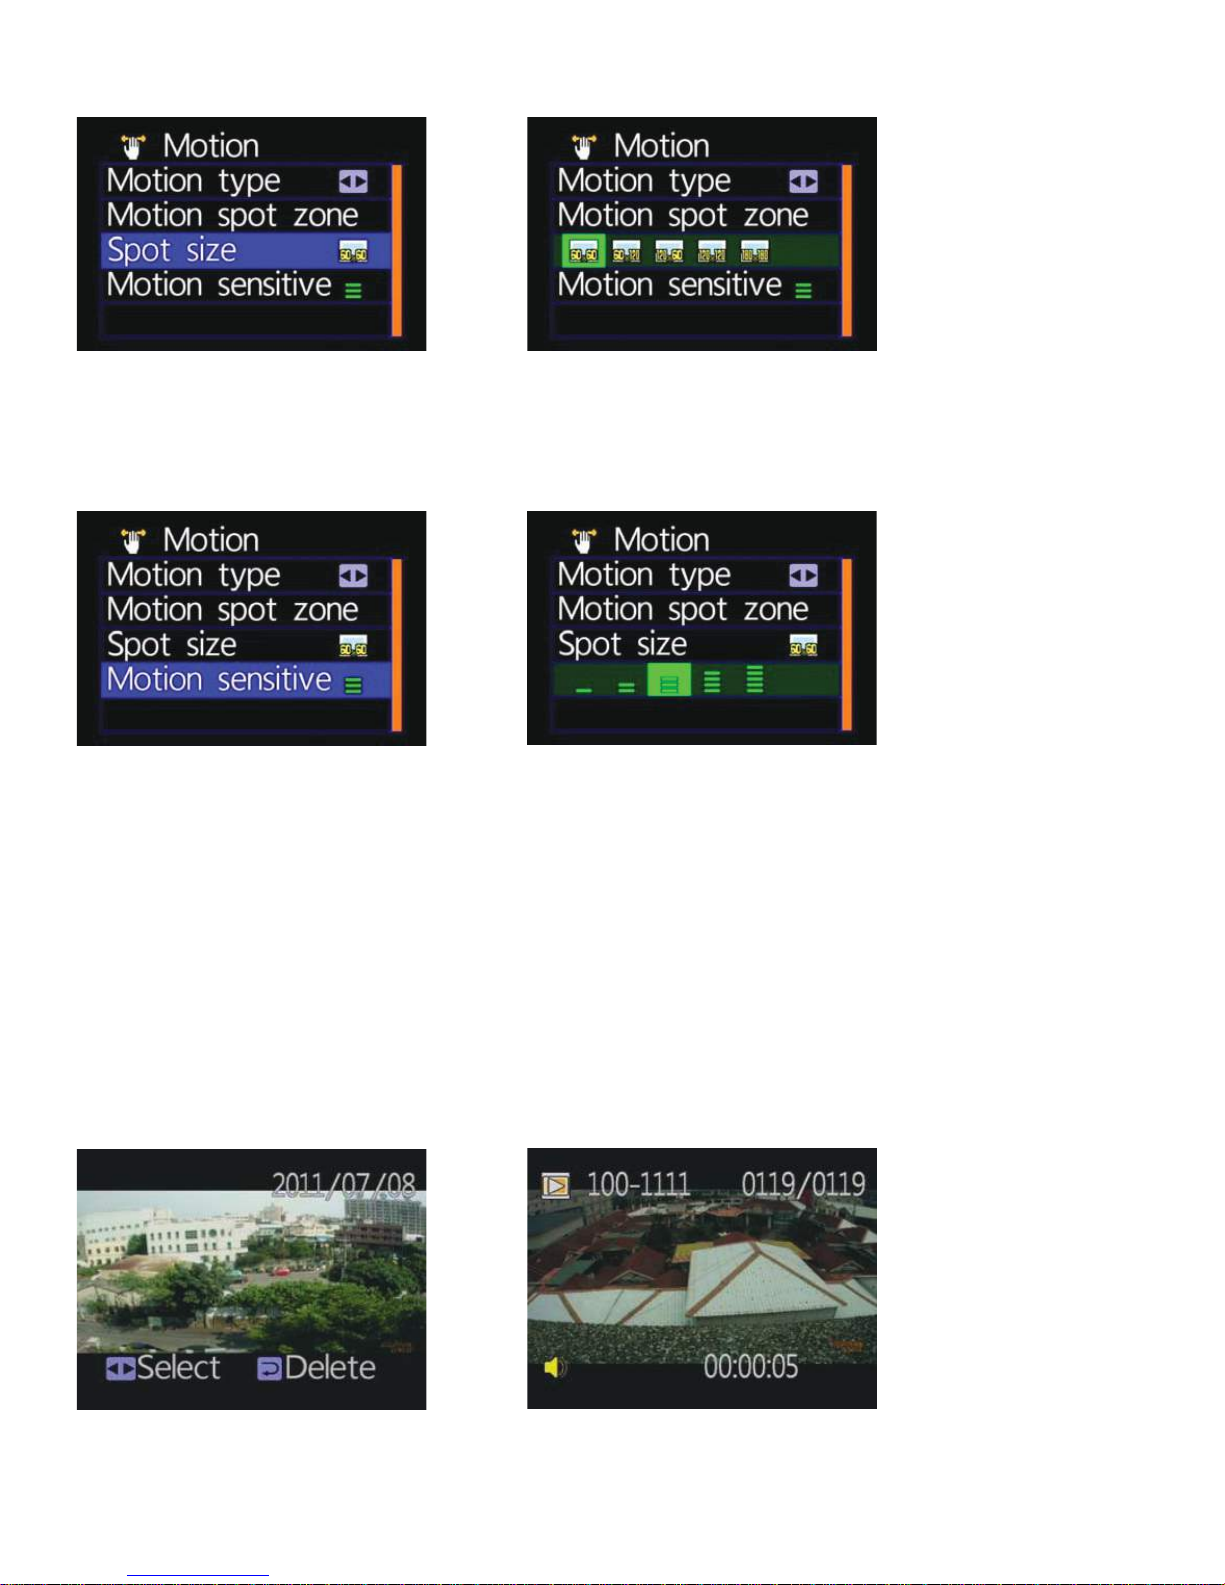
■ Spot Size Setting
* Select 60x60 / 60x120 / 120x60 / 120x120 / 180x180.
■ Motion Sensitivity Setting
* The more stripes are selected the more sensitive it is.
F. PLAYBACK
1. Direct playback on the device
The built-in accelerometer senses screen orientation, inclination, tilt and automatically detects if it
needs to be rotated back to its normal position.
2. Video modes
Press “Playback” on the remote control in the Video Modes. Select the timing of the appropriate
video and press “Play”.
Page 21
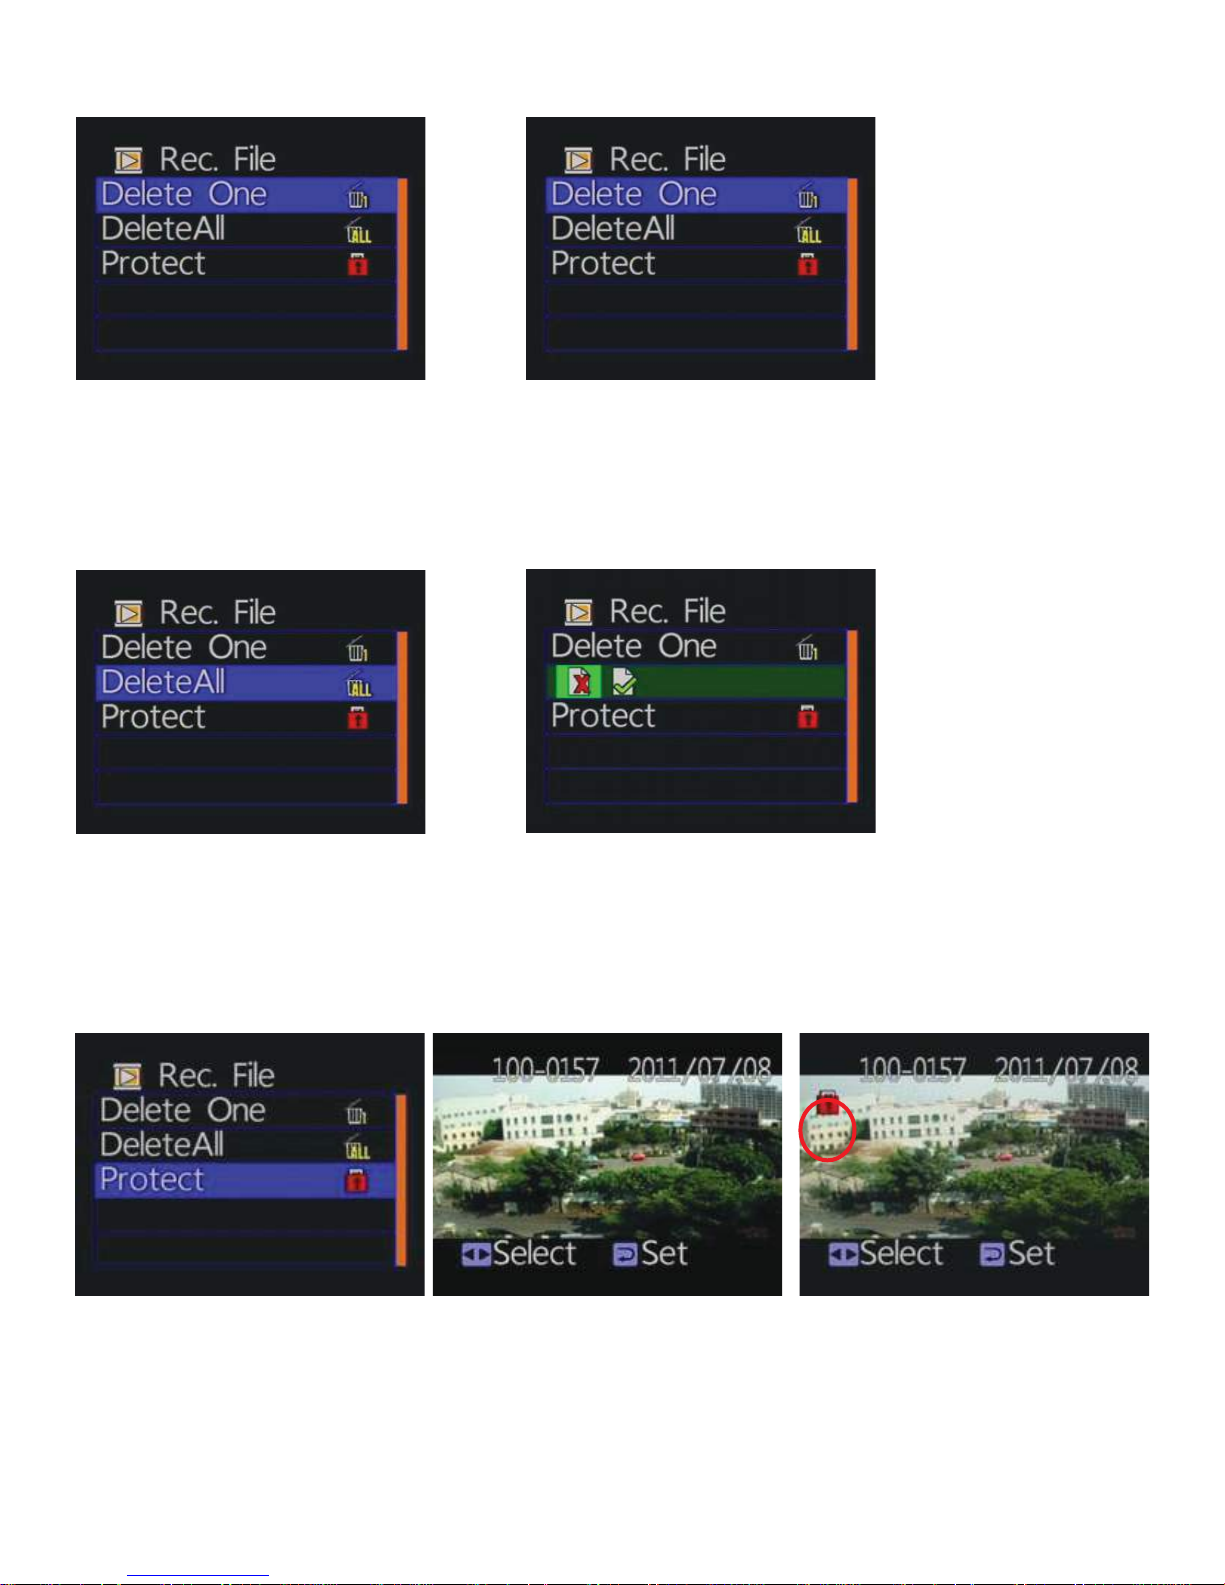
■ Playback settings - Deleting a single file
* You must first disable the protection function in order to delete a file.
■ Playback settings - Delete All
* You must first disable the protection function in order to delete a file.
■ Playback file setting - Protect
Note: When the lock icon appears, this specific video data is protected.
Page 22
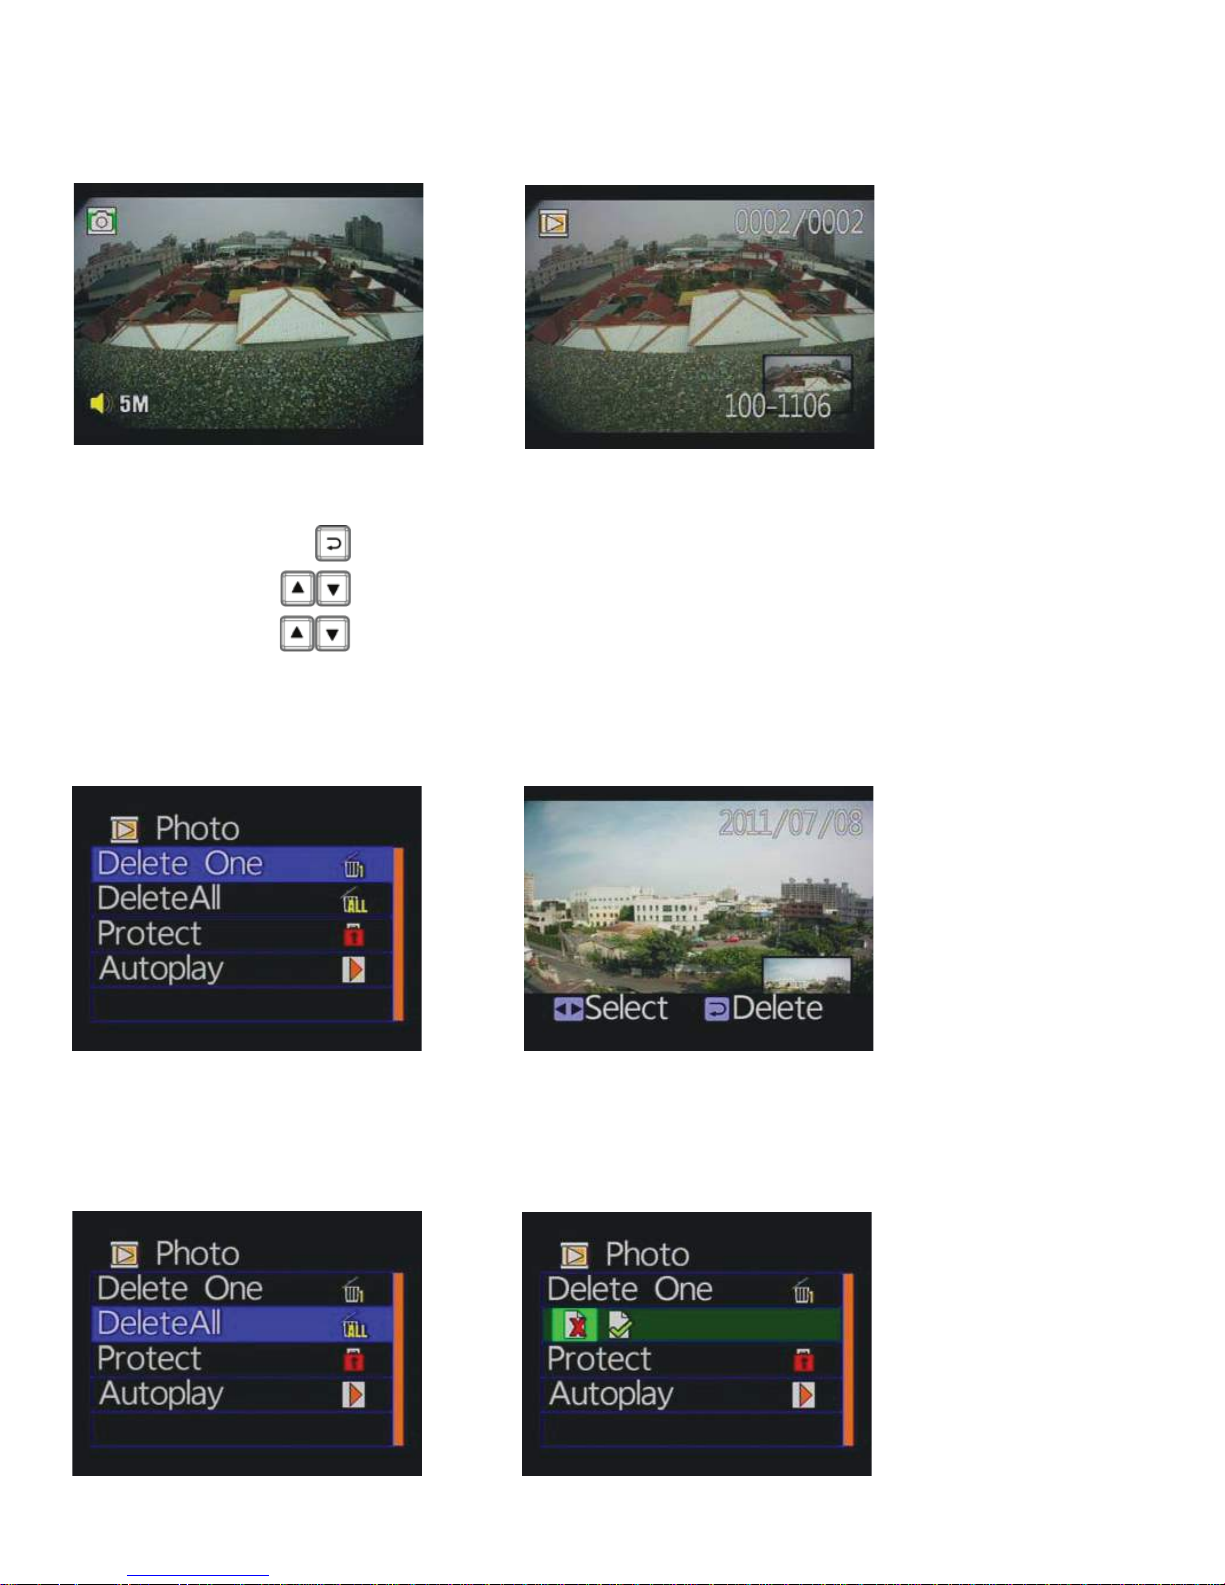
3. Snapshot playback
Press “ Playback” on the remote control in the Snapshot mode. Select the timing of the snapshot pictures.
ACTION TOUCHE SUR LA TÉLÉCOMMANDE
Rotate [Enter] key
Next [R/L] key
Zoom [U/D] key
■ Photo playback settings - Delete one
* You must first disable the protection function in order to delete a file.
■ Photo playback settings - Delete All
* You must first disable the protection function in order to delete a file.
Page 23
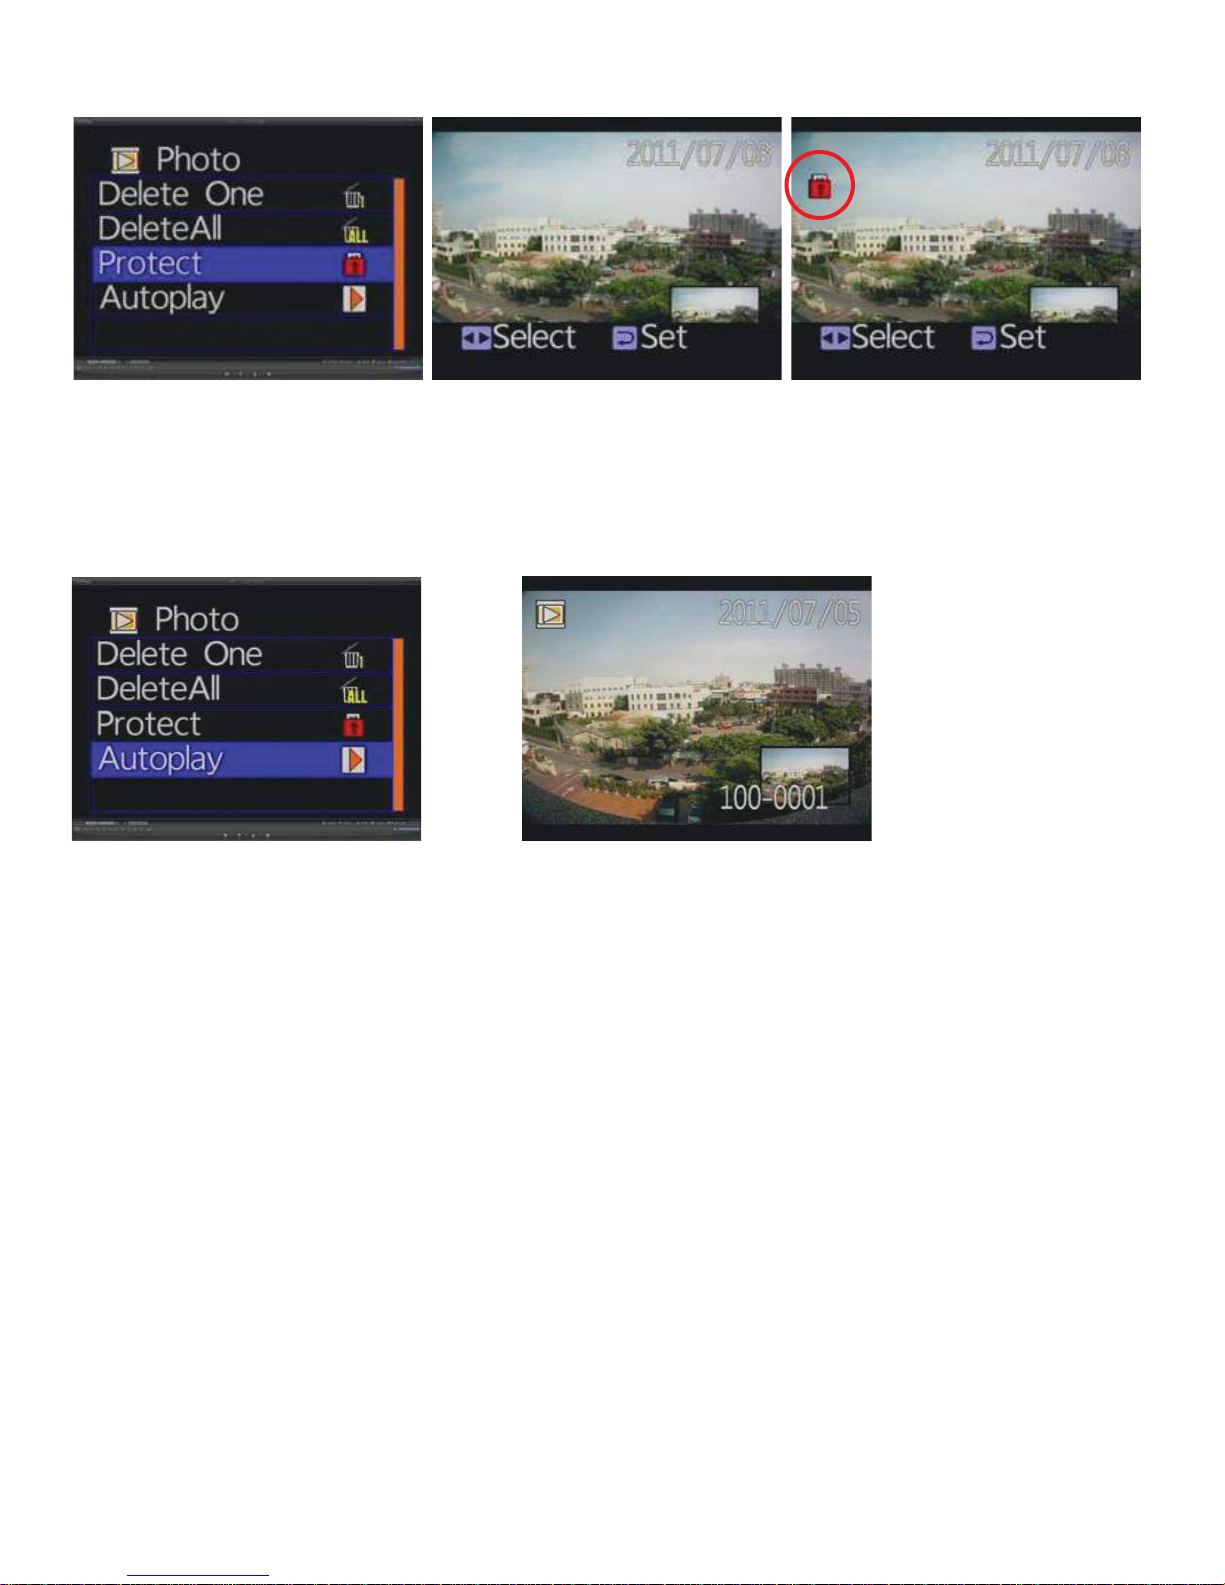
■ Photo playback settings-protect
Note: When the lock icon appears, this specific picture data is protected.
■ Photo playback settings - Autoplay
A Photo/Snapshot will be displayed every 5 seconds. Press “Menu” to stop this function.
Page 24
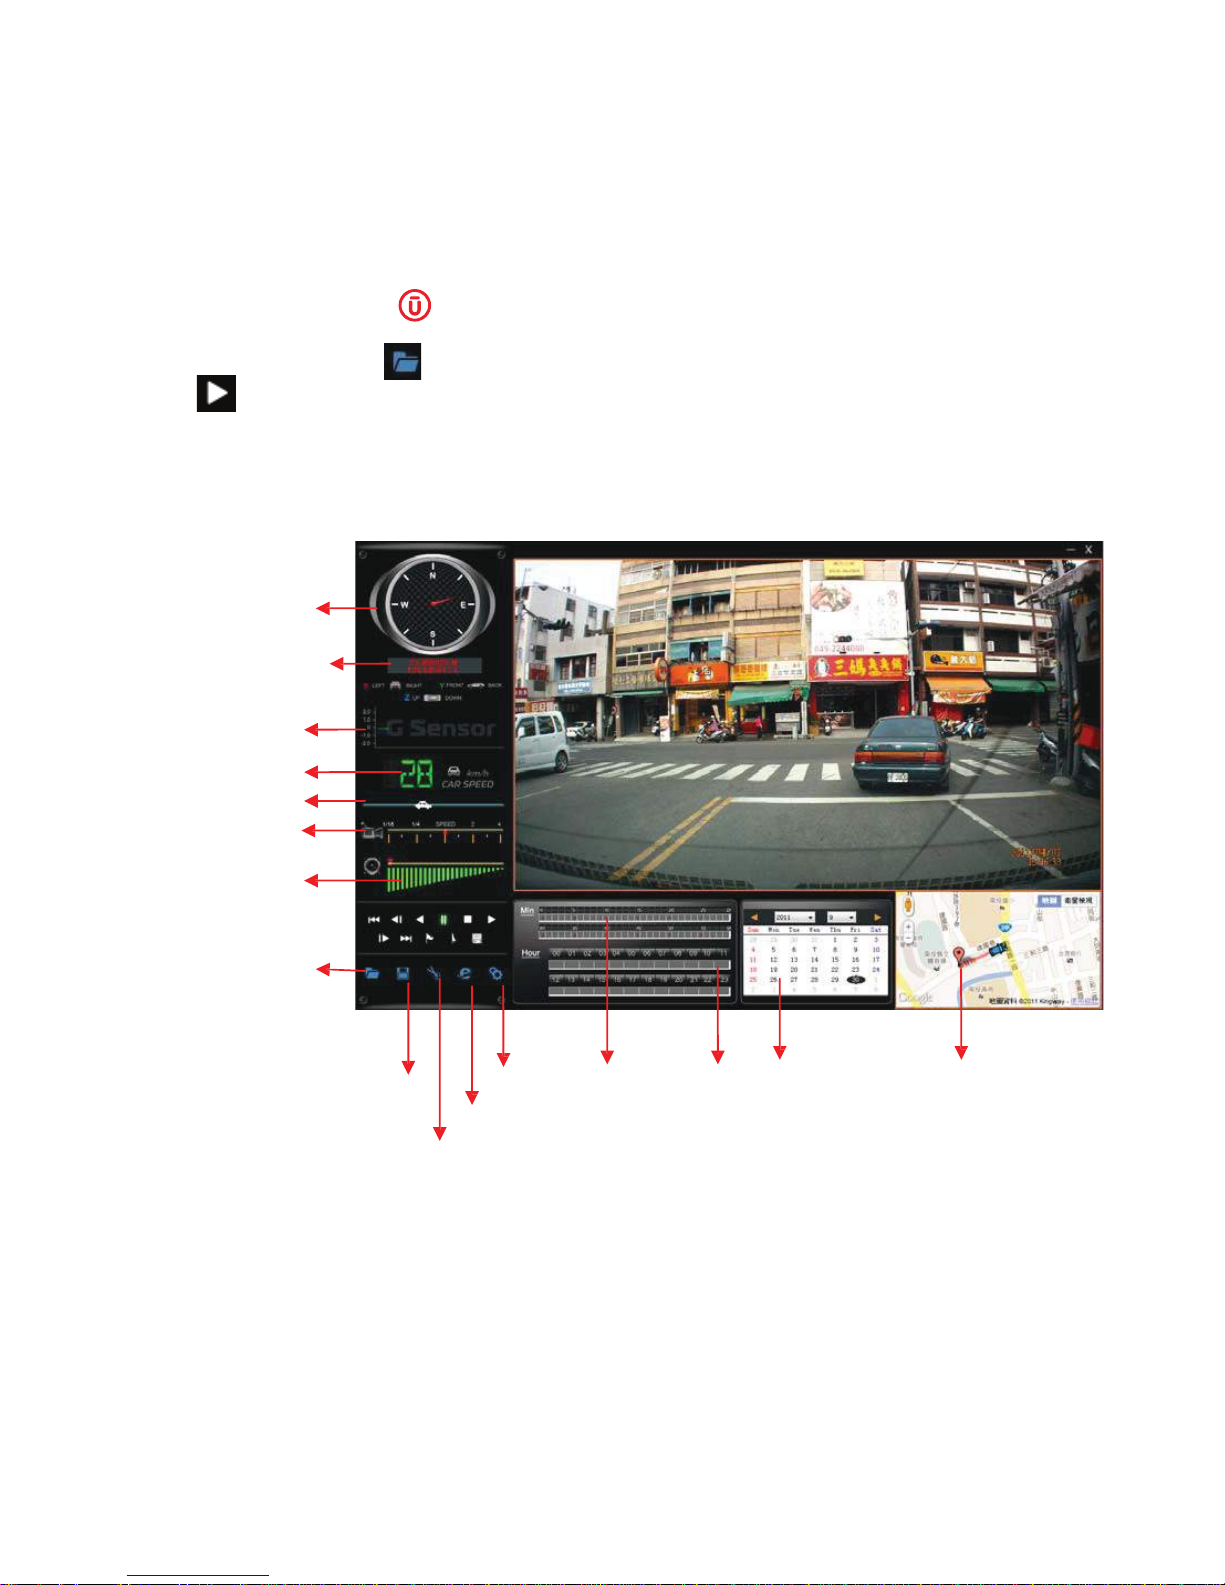
G. VUuPRO PLAYER
1. Remove the SD memory card from the memory card slot located on the device.
2. Put the SD memory card in the USB memory card reader.
3. Connect the memory card reader to the USB port on your PC. How to choose the file to play: Run the
“VuPro Player” software located on the USB key. The below screen will appear. Select the
“Open the folder” icon and choose the correct file on the memory card and click on the “Play”
icon to play it back.
Note: To use this program you need to install Direct X 9.0 or higher.
VuPro Player Interface Description
GPS Direction
GPS Longitude & Latitude
G-sensor
Speed
Speed Meter
Playback
Volume
Open the Folder
Save the File
Snapshot
Configuration
Google Maps
Minutes Date
Hours
Google Maps
Page 25
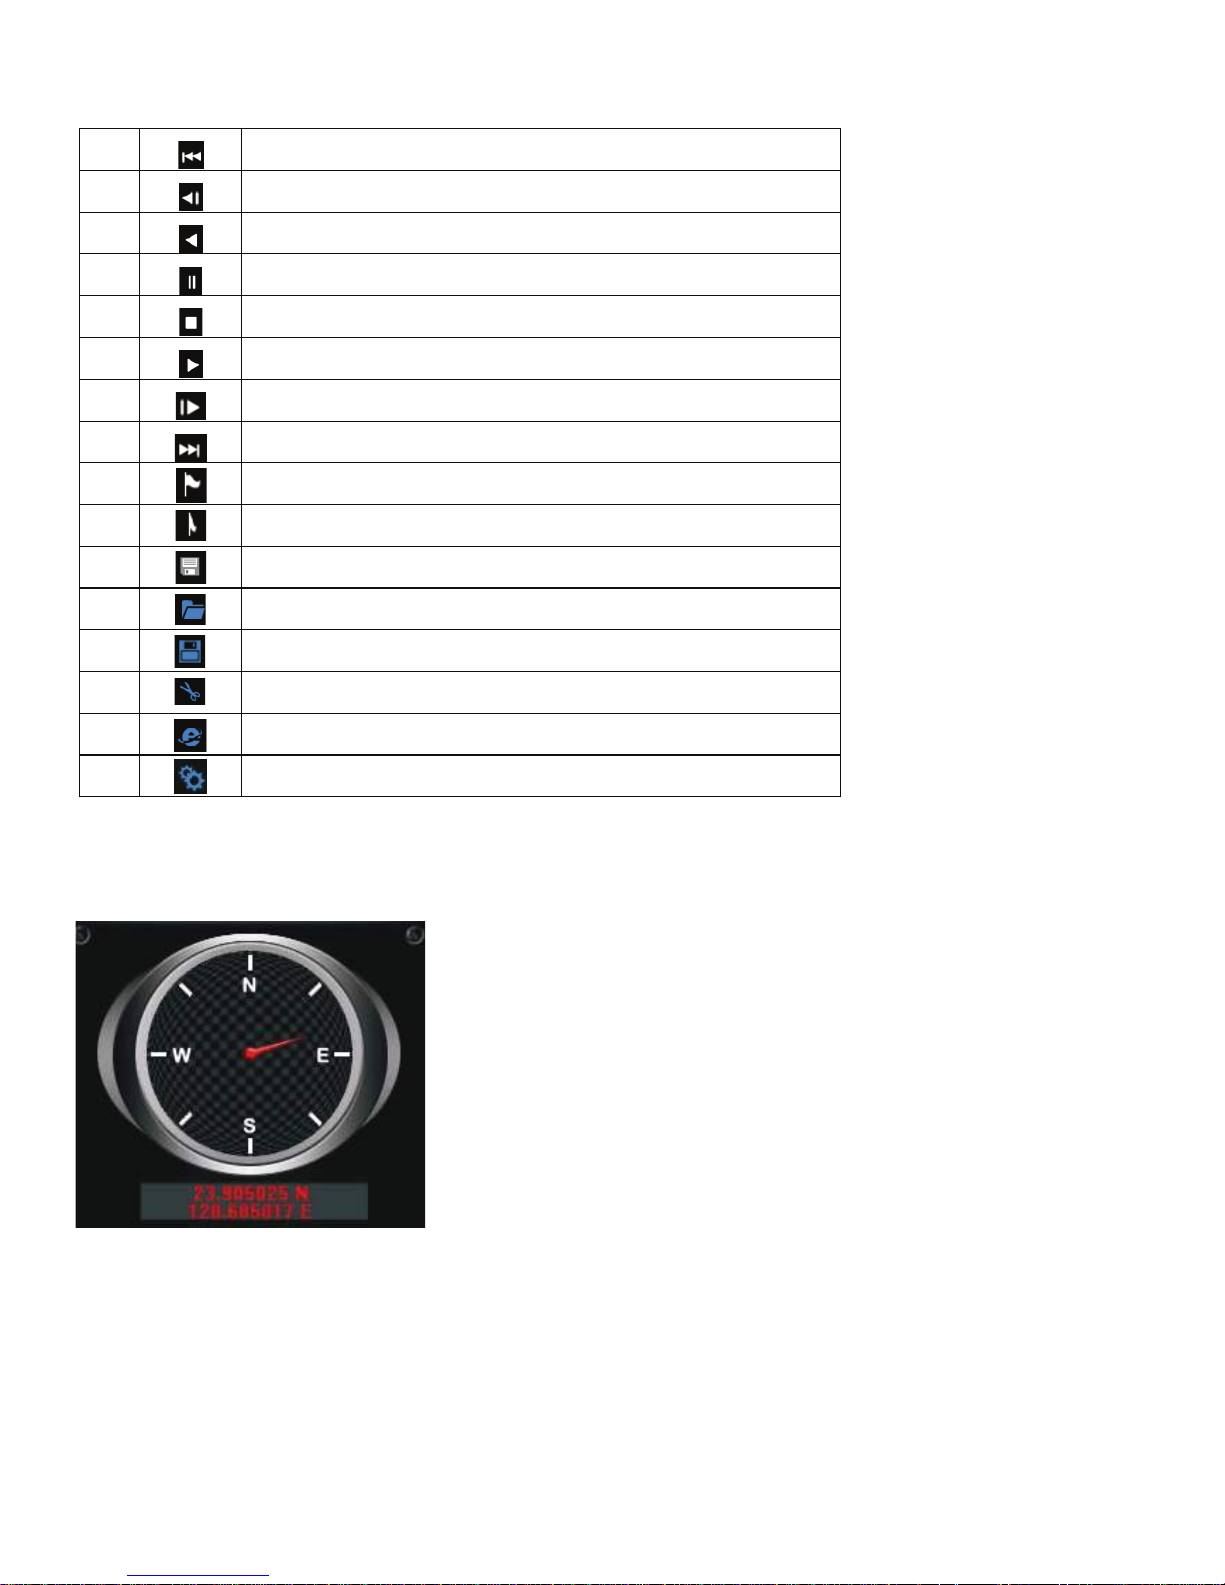
1. Description of the On Screen Display (OSD) Keys:
1
2
3
4
5
6
7
8
9
10
11
12
13
14
Play previous file
Play previous frame
Rewind
Pause
Stop
Play
Play next frame
Play next file
Mark starting point of back up file
Mark end point of back up file
Backup the marked file
Open the folder
Backup the current file
Snapshot
15
16
■ Shows the GPS latitude and longitude positions
Google Maps
Configuration/Settings
■ G-sensor: Detects strong impact and activates Force Recording to save and protect about 3 min-
utes of footage before and after the accident. This video will not be deleted or overwritten by other
files; the integrity of the accident video is protected.
Page 26
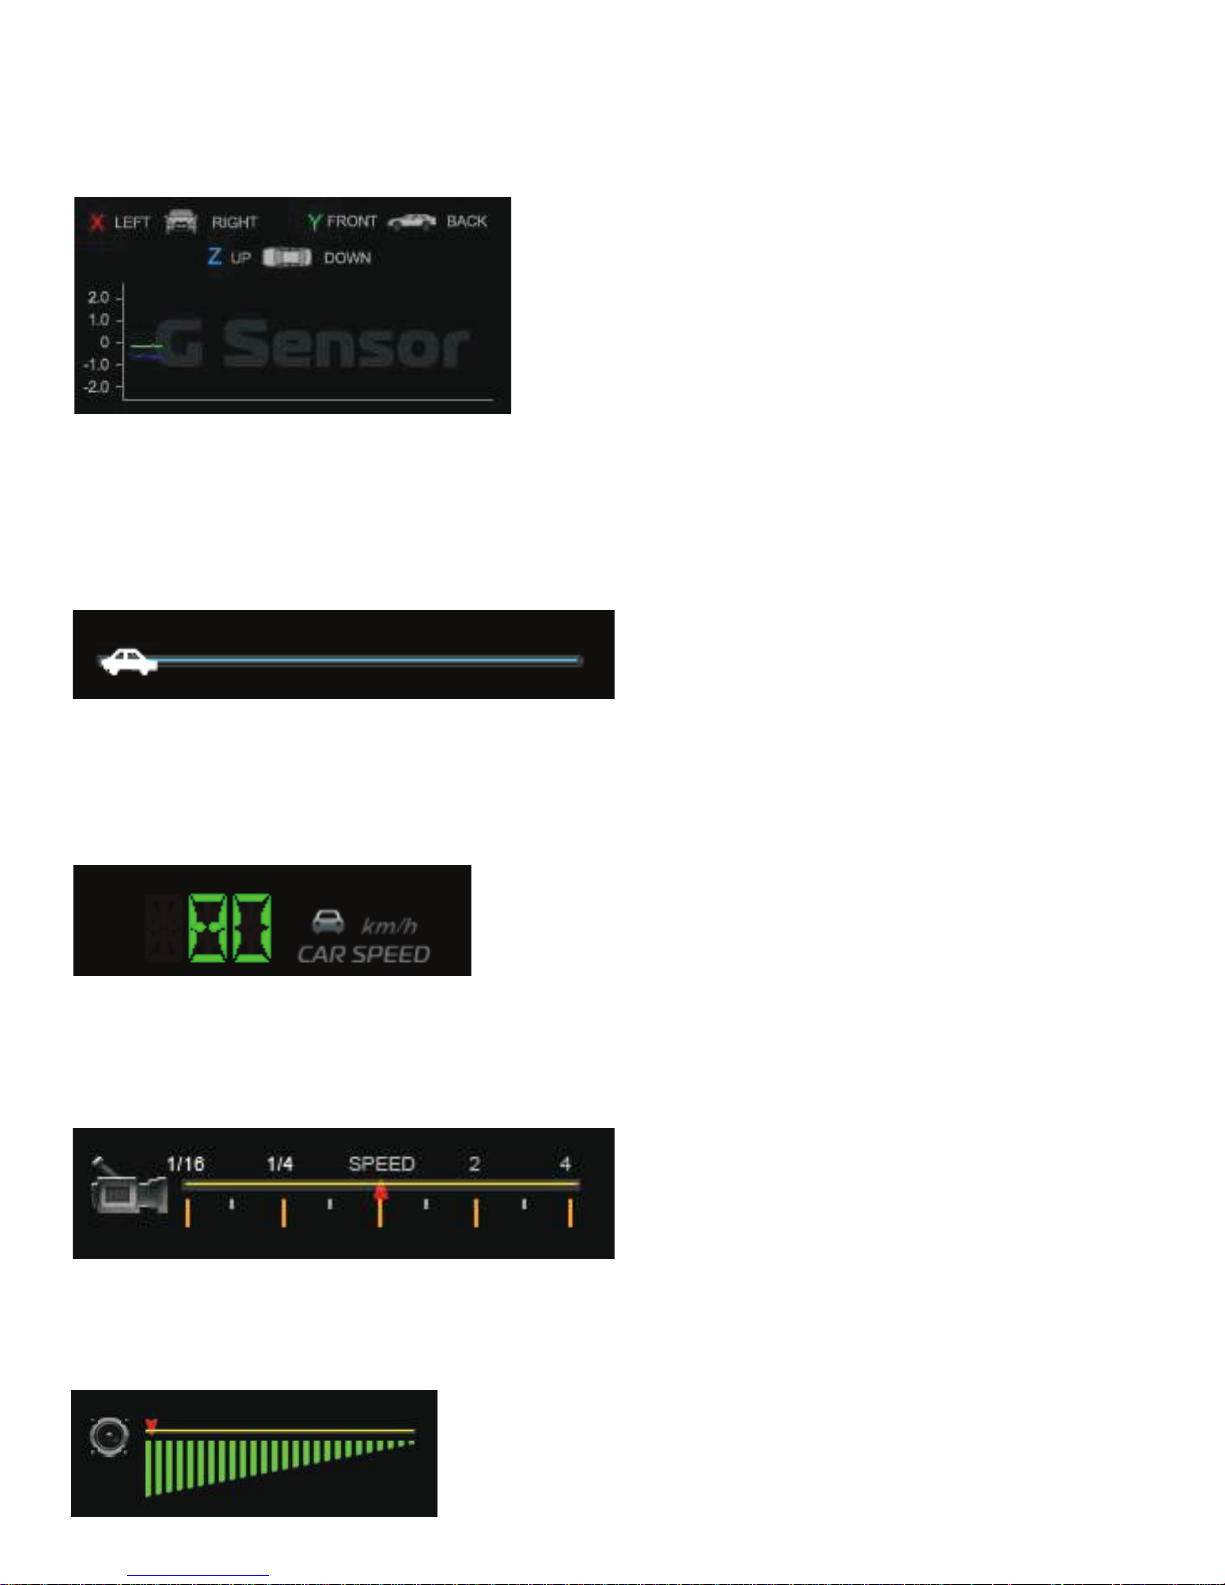
X: The G-force detected from left/right of the vehicle
Y: The G-force detected from front/back of the vehicle
Z: The G-force detected from upside/downside of the vehicle
■ Play BAR
Press on the left side of the mouse and drag the car across the BAR to search more quickly through
the video.
■ Driving Speed
■ Playback speed
Supports the following speeds: 2x and 4x fast forwarding and 0.25x and 0.0625x slow playback.
■ Volume control
Page 27
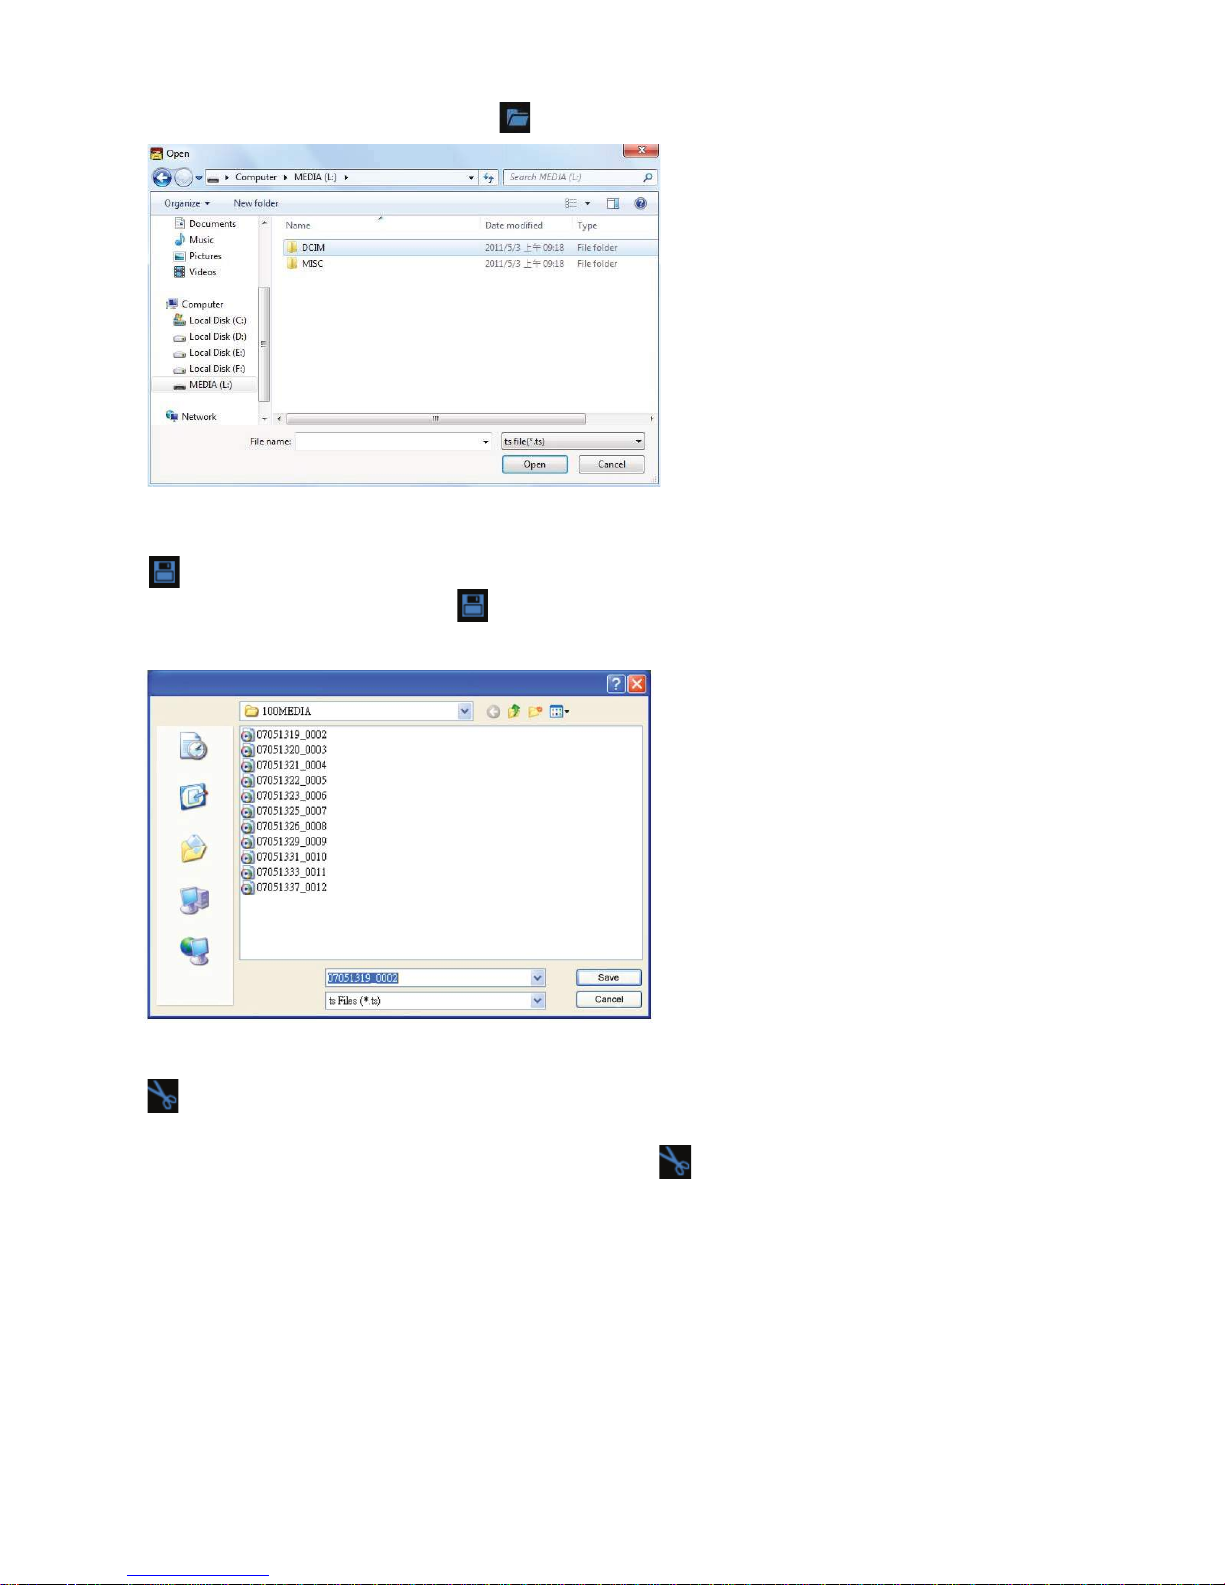
■ File Playback
Select the icon “Open the folder” and choose the appropriate file to open. (The file format is *.ts)
■ File Backup
Select the “File Backup” icon and choose the file on the memory that you would like to save.
(The file format is *.ts)
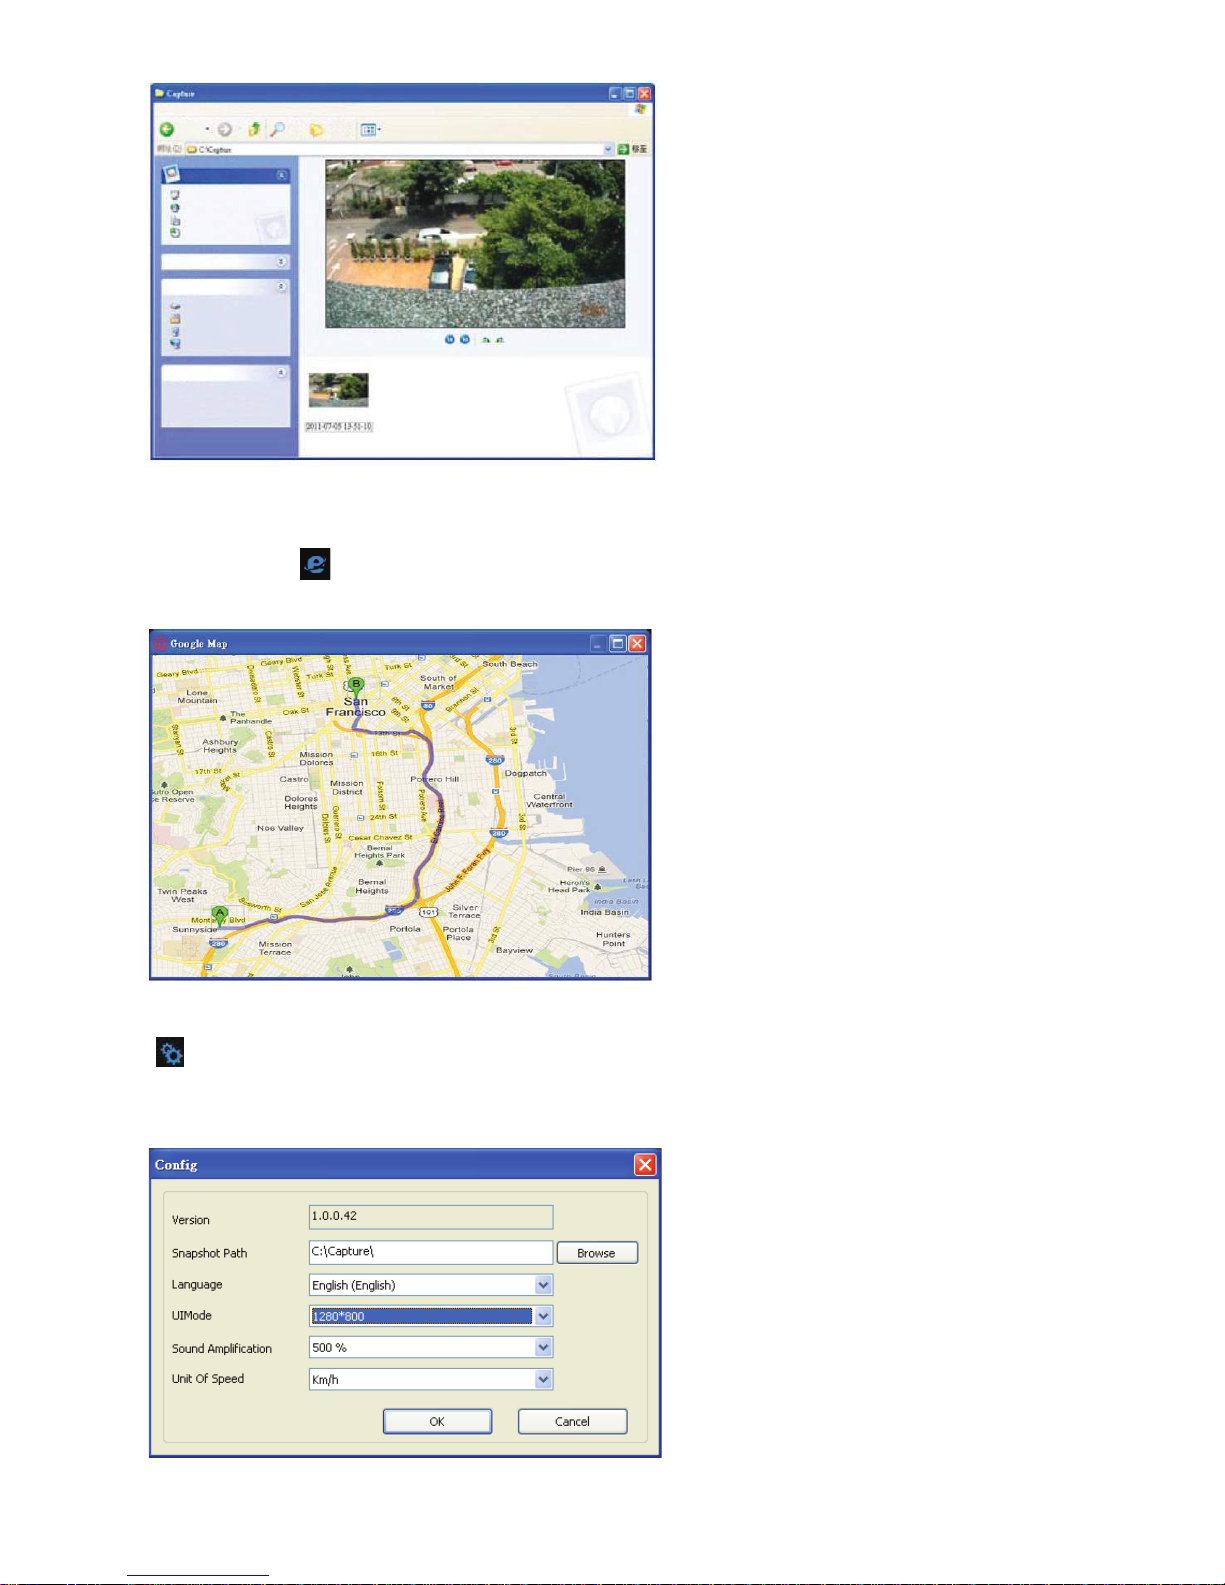
■ Snapshot Tool
Play the recordings from the SD memory card and then use the Snapshot tool to capture the
screen. When you select the snapshot tool icon the below window will appear. (The image on
the display screen will be saved in the Capture storage folder).
Page 28
■ Google Maps
Click this icon and a Google Maps window will appear tracking the route of the vehicle. (Con-
nection to the Internet is required for this feature to work).
■ Configuration/Settings
This page contains the software version information and the SD memory card data storage
settings.
Page 29
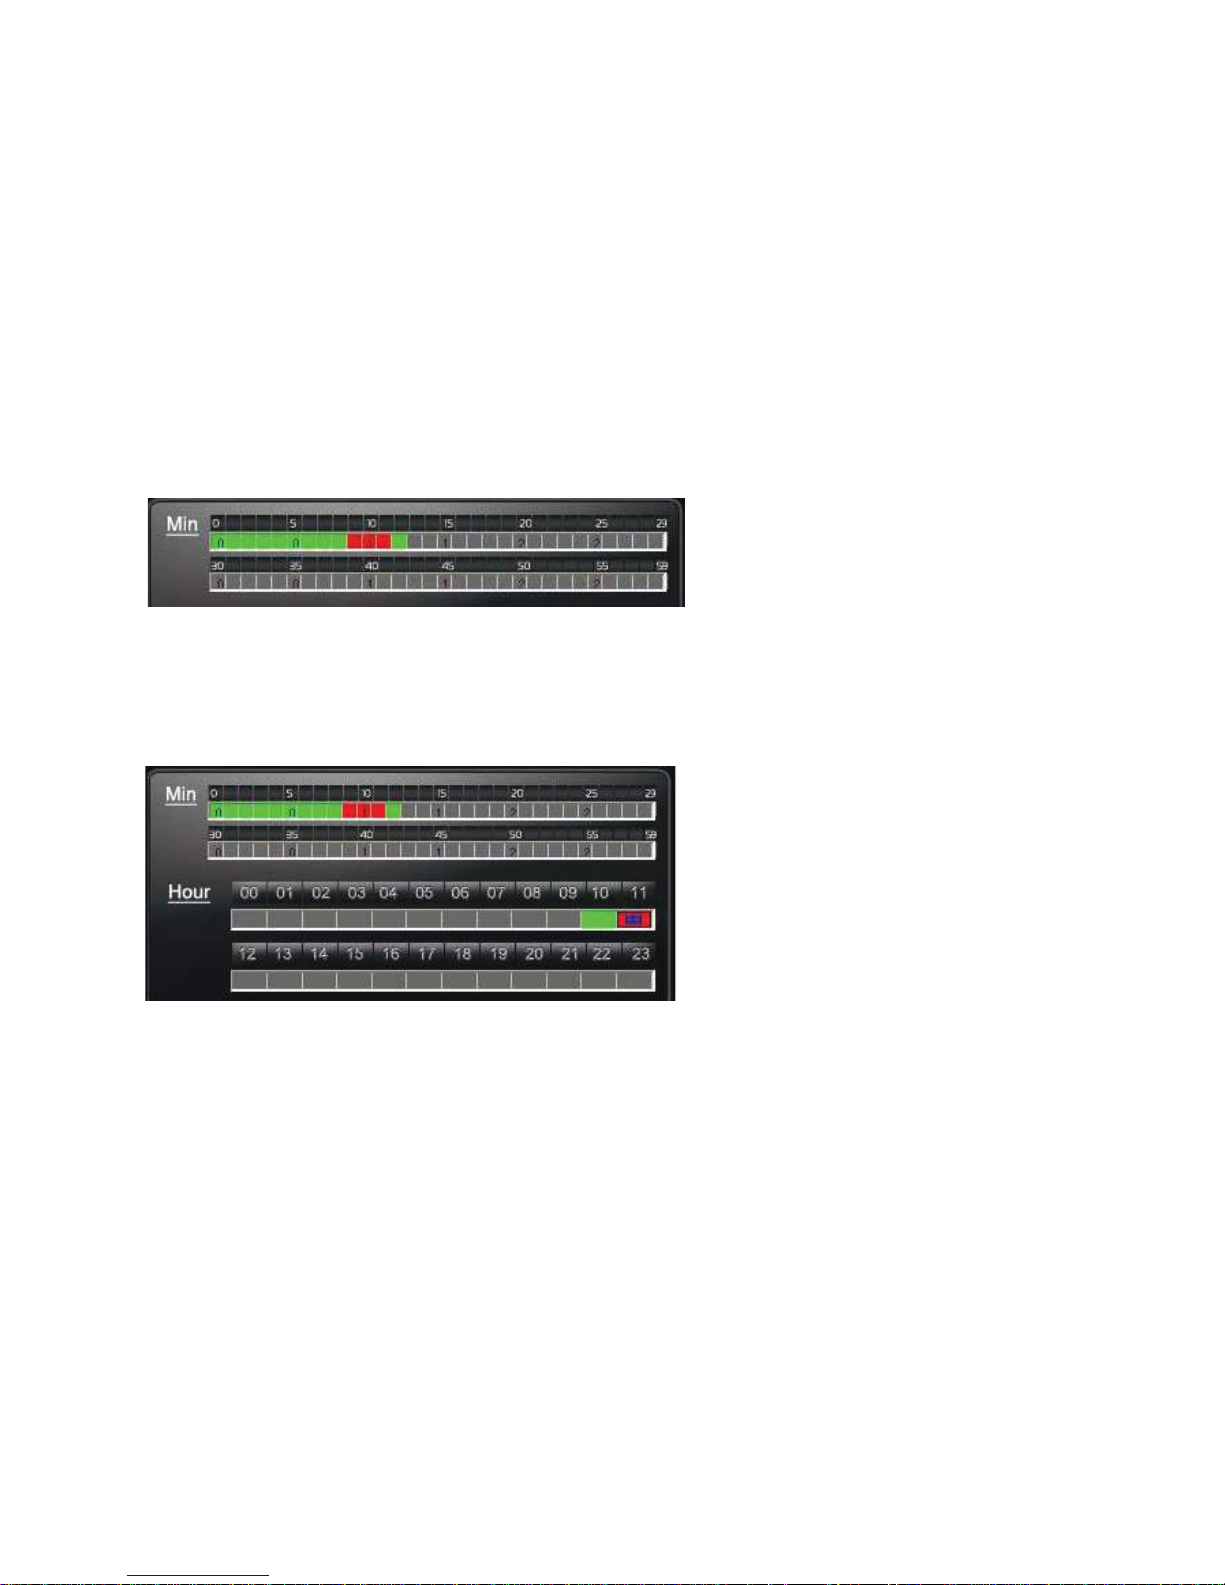
(a) Snapshot Path: where to save images.
(b) Language: select the language for the VuPro Player. The settings will be activated once the device
is rebooted.
(c) User Interface (UI) Mode: Set the display mode. To change the configuration option, the SD
memory card must be inserted into the device. It provides 3 different resolutions: 960x600,
1280x800 and 1920x1080.
(d) Sound Amplification: maximum 10 times
(e) Unit of Speed: km/h, miles/h, knots
■ Playback time selection
Quick switching by minutes
Click the minute’s table to change the recording footage immediately.
■ Selecting by Hour/Minutes (24hr cycle)
After selecting the "Date", the Hour/Minutes table will display Red and Green colored sections.
Green: normal recording
Red: force recording
Page 30
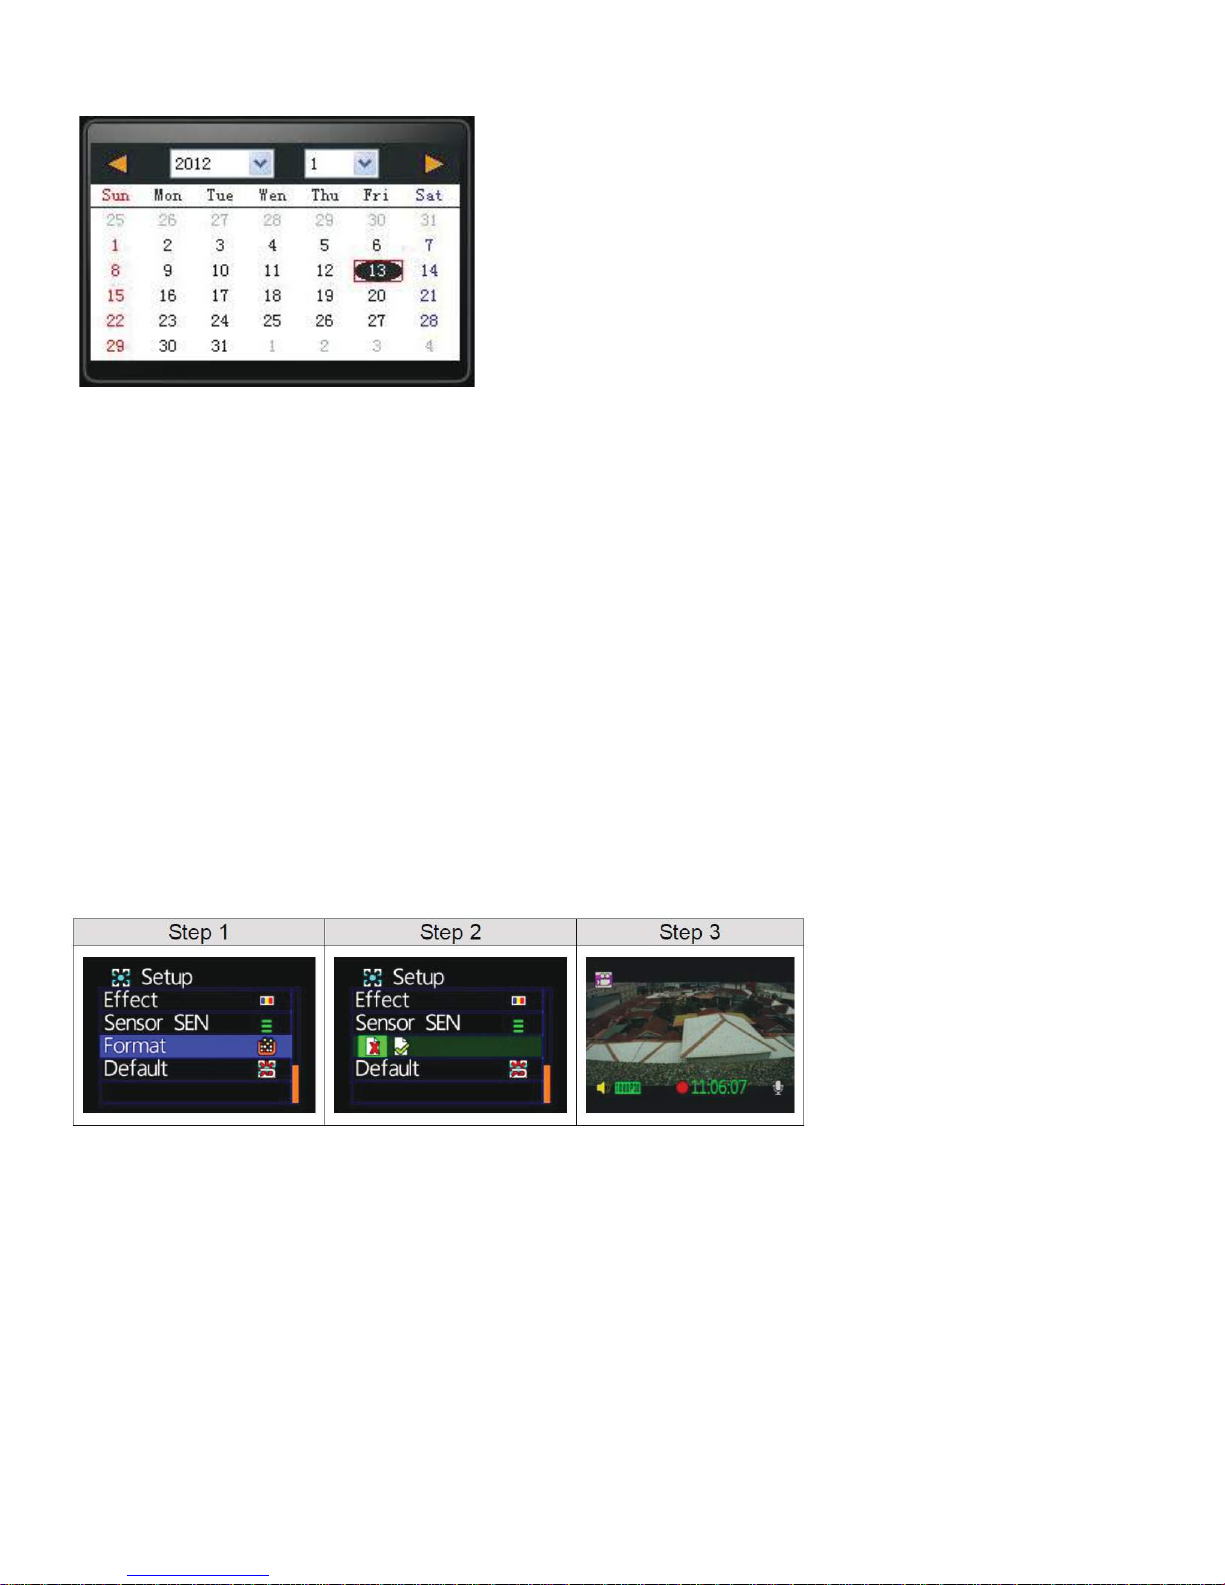
■ Selecting by date
Launch the VuPro Player, click "open" to select the storage file or path. Then select the date in the
calendar table. The gray-brown color indicates the recording footage.
H. FORMATTING THE MEMORY CARD
When should you format the SD memory card?
When you purchase a new SD memory card you must first format it in order for the vehicle video recorder
to record properly.
Formatting a new SD memory card:
1. Insert the SD memory card into the SD card slot on the device and then open the menu. Find the
1. Format option and select it to begin formatting the SD card.
2. Your power cable should be connected to your device and you can use the remote control to do this.
Steps are shown below.
3. Once the formatting is complete, leave the menu and go back to the live screen. The SD card is now
ready to use.
Page 31
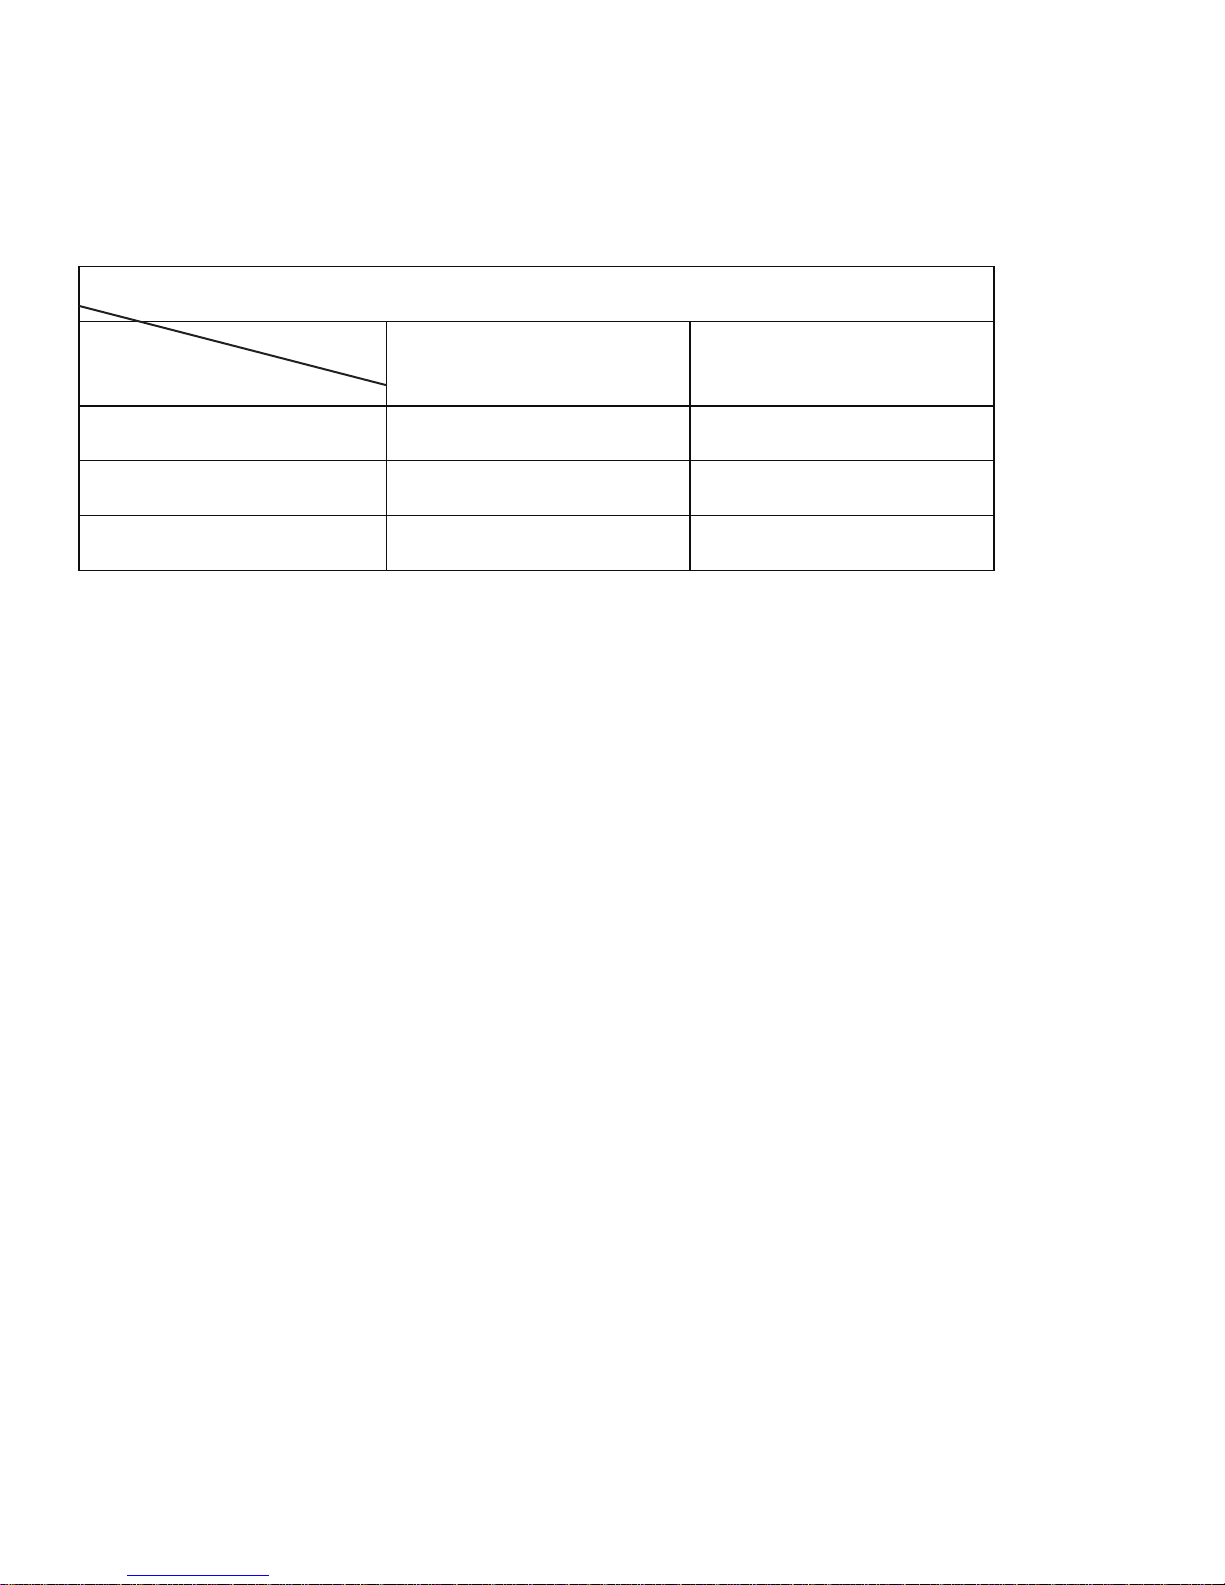
I. RECORDING TIME ESTIMATION (based on continuous recording
Resolution
Video Quality
H
N
L
with an 8GB memory card)
*The chart below is for reference only. The length of time recorded can vary according to image size that
may be different.
igh
ormal
ow
Video Format (NTSC / PAL)
1080P 30fps
110 Min
115 Min
135 Min
720P 30fps
115 Min
135 Min
155 Min
Page 32
J. LCD SCREEN INSPECTION: Bright and Dark Spots
o
Q: What is a Bright/Dark Spot?
A : • Bright Spot: In a dark background, we found abnormal bright spots and called those spots a “Bright
Spot”.
• Dark Spot: In a multicolored background (excluding a dark background), we found abnormal dark
spots and called those spots a “Dark Spot”.
Q: The indication for a bright and dark spot:
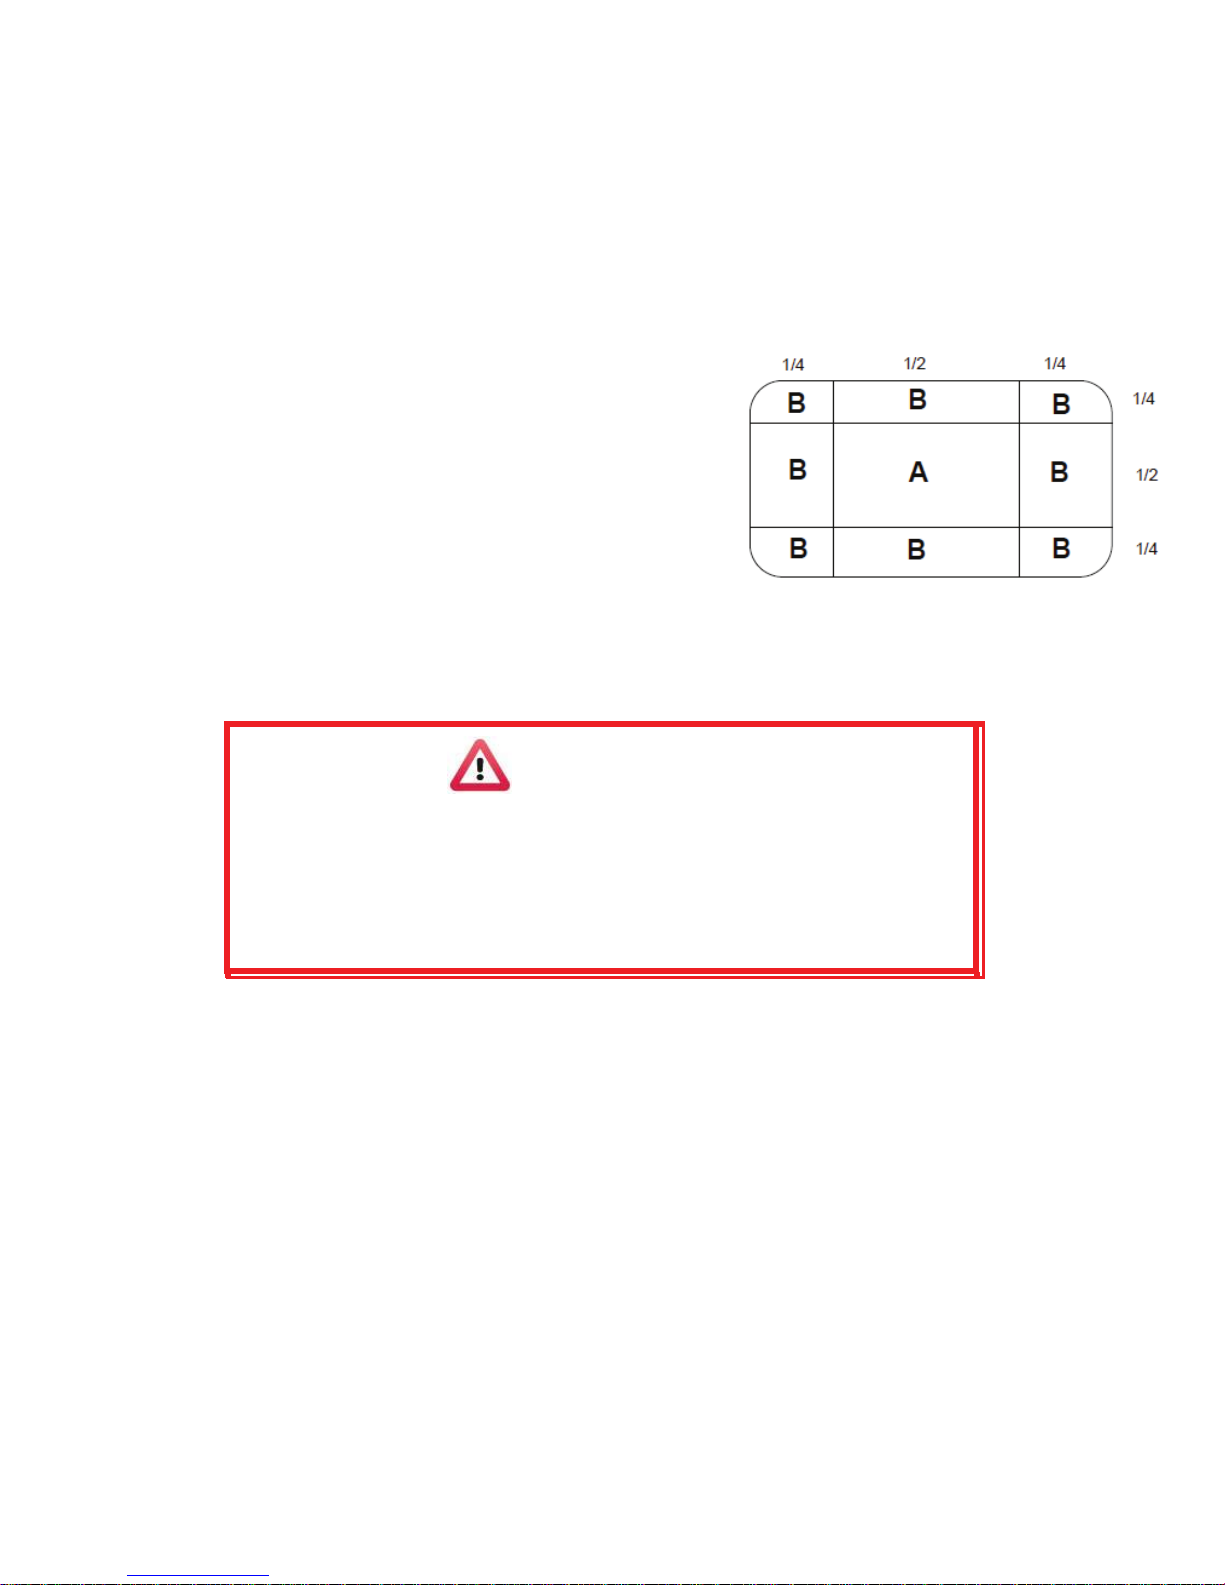
• There is no bright spot allowed in Area A. At most,
only a single dark spot is allowed.
• The maximum number of bright spots and dark spots
allowed in Area B are two of each.
• The total maximum number of bright and dark spots
in Area A and B are three.
The Diagram of Areas A and B
Caution
(1).
There is a 30 day exchange policy for a defective LCD screen (in regards t
bright and dark spots).
(2).
Please keep the receipt and contact your local dealer to exchange
the merchandise.
(3).
The maximum valid exchange date is 30 days from purchase.
Page 33

 Loading...