

Page 1
Page 2
For customers in North and South America
For customers in USA
This device complies with Part 15 of the FCC rules. Operation is subject to the following
two conditions:
(1) This device may not cause harmful
interference.
(2) This device must accept any interference received,
including interference that may cause undesired operation.
For customers in Canada
This Class B digital apparatus meets all requirements of
the Canadian Interference-Causing Equipment
Regulations.
For customers in Europe
“CE” mark indicates that this product complies with the European requirements for safety,
health,environment and customer protection. “CE” mark cameras are intended for sales in
Europe.
Page 3

1. System Requirements
• Personal computer, laptop, desktop or IBM compatible with Pentium 166 MHz minimum, and with
an active USB (Universal Serial Bus) port.
• Windows 98SE (Driver needed), Windows ME / 2000 / XP, Vista 32/64-bit, Mac10.4 or a bove, CD
ROM drive, color monitor, mouse and keyboard.
• When using ArcSoft PhotoImpression program, the computer needs the foll owing requirements:
- Pentium III 450 processor or equivalent (Pentium III 800 recommended)
- 128 MB of RAM (Minimum), 50 MB available hard disk space (minimum), 800x600 pixels 16-bit color monitor
- Microsoft Windows Media Player 9.0 or higher
- Microsoft DirectX 9.0 or higher (included on installer)
2. Package Contents
Make sure these items are included in your package:
- Film Converter
- USB cable
- CD-ROM for Arcsoft Software
- User’s Manual
- Video cable
- Adapter
- Positive Slide Holder
- Negative Film Holder
- Cleaning Brush
Page 4
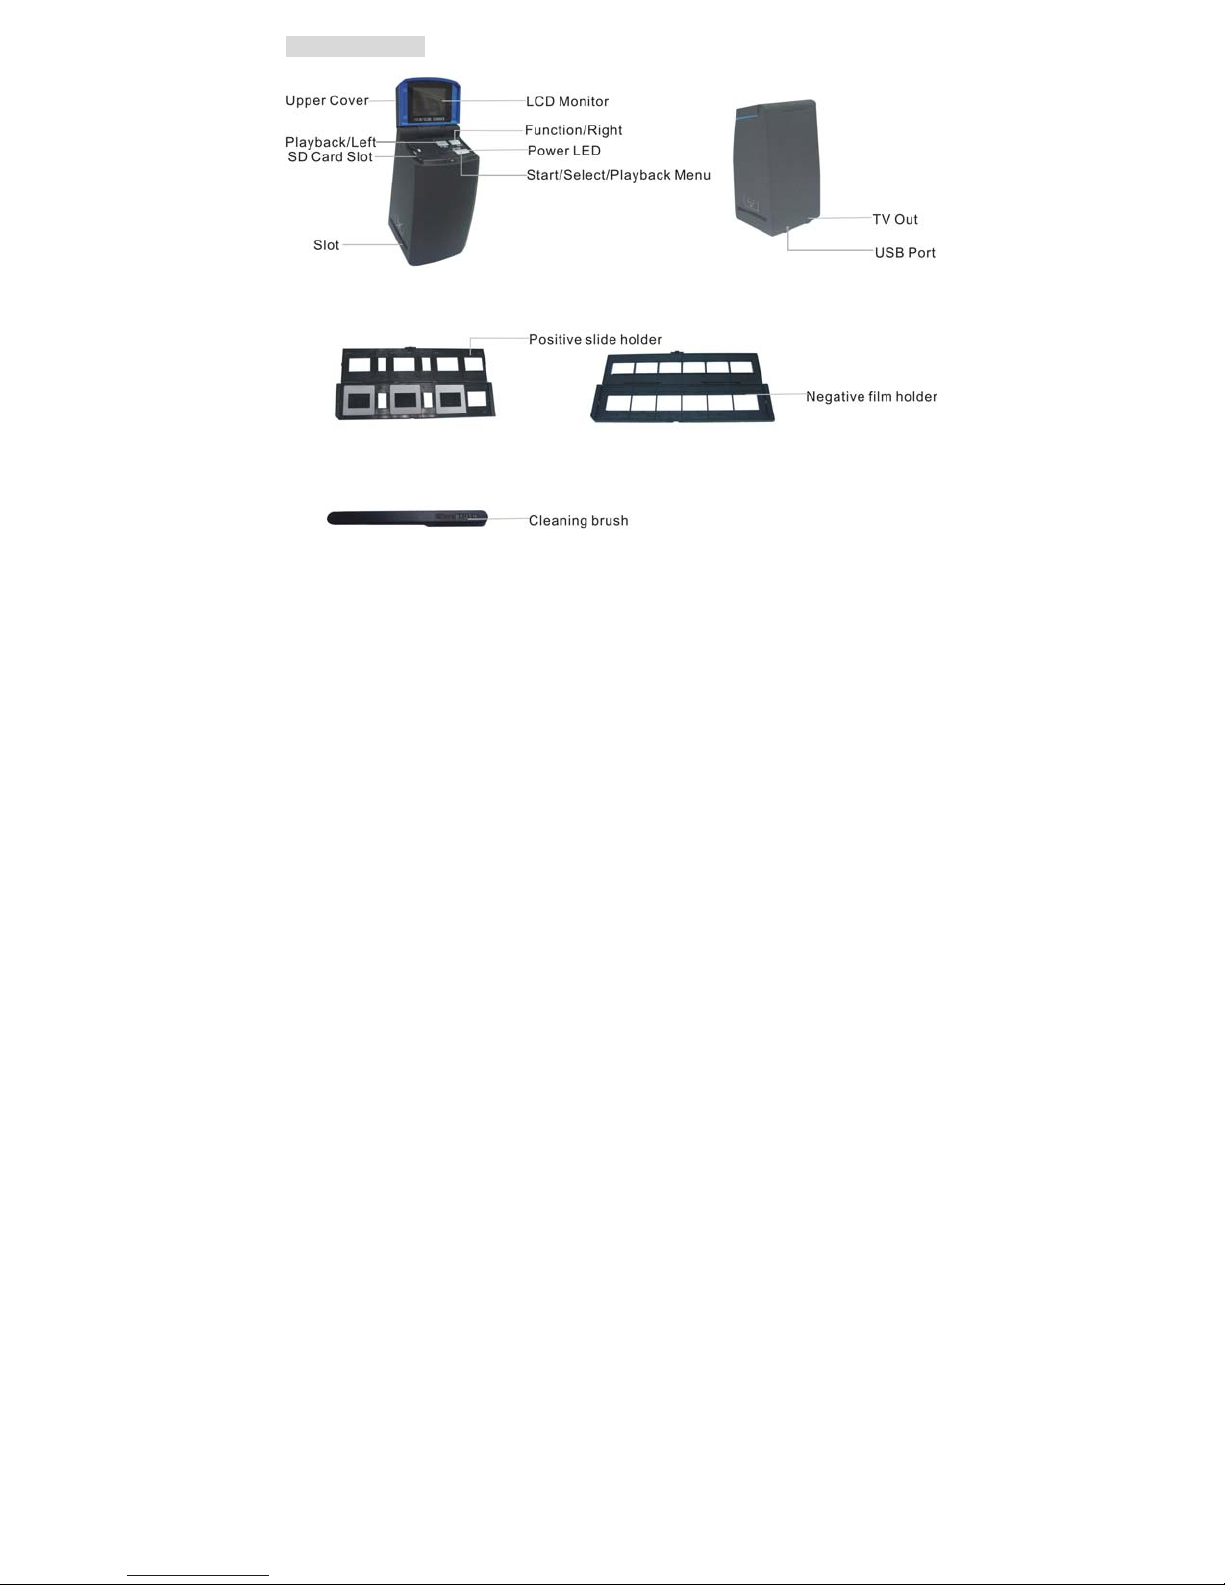
3. Name of parts
Page 5
We suggest using a clean, dry , c ott on sw ab to cl ea n th e glas s lens in th e film converter periodically.
This is to ensure clear converted images.
Please make sure your negativ e/slid e and ho lder ar e clean before inserti ng int o the co nv erter. D ust
or dirt on the negative/slide or holder will affect the quality of your converted images.
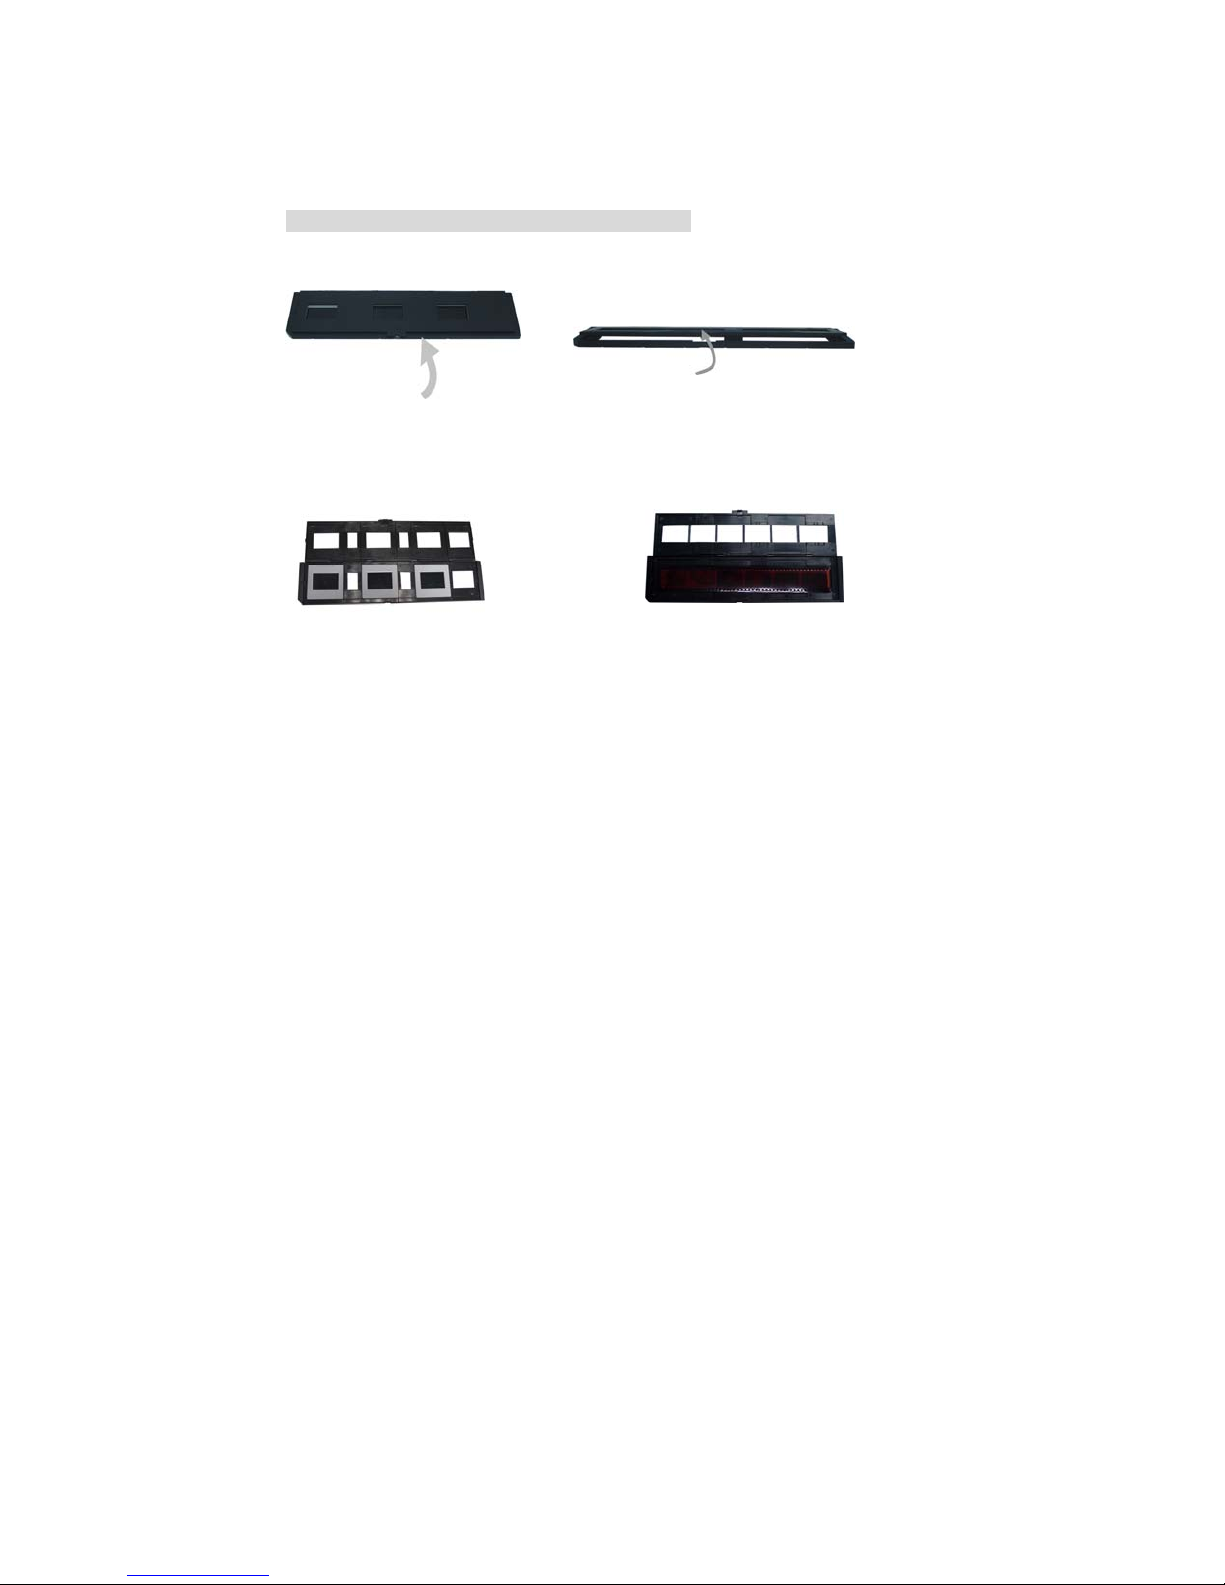
4 Installing slides and negatives into the holder
a. Open the negative/slide holder as illustrated.
b. Put a negative/slide in the negative/slide slots as shown.
Note: The negative/slides should be put in motion side down.
Page 6
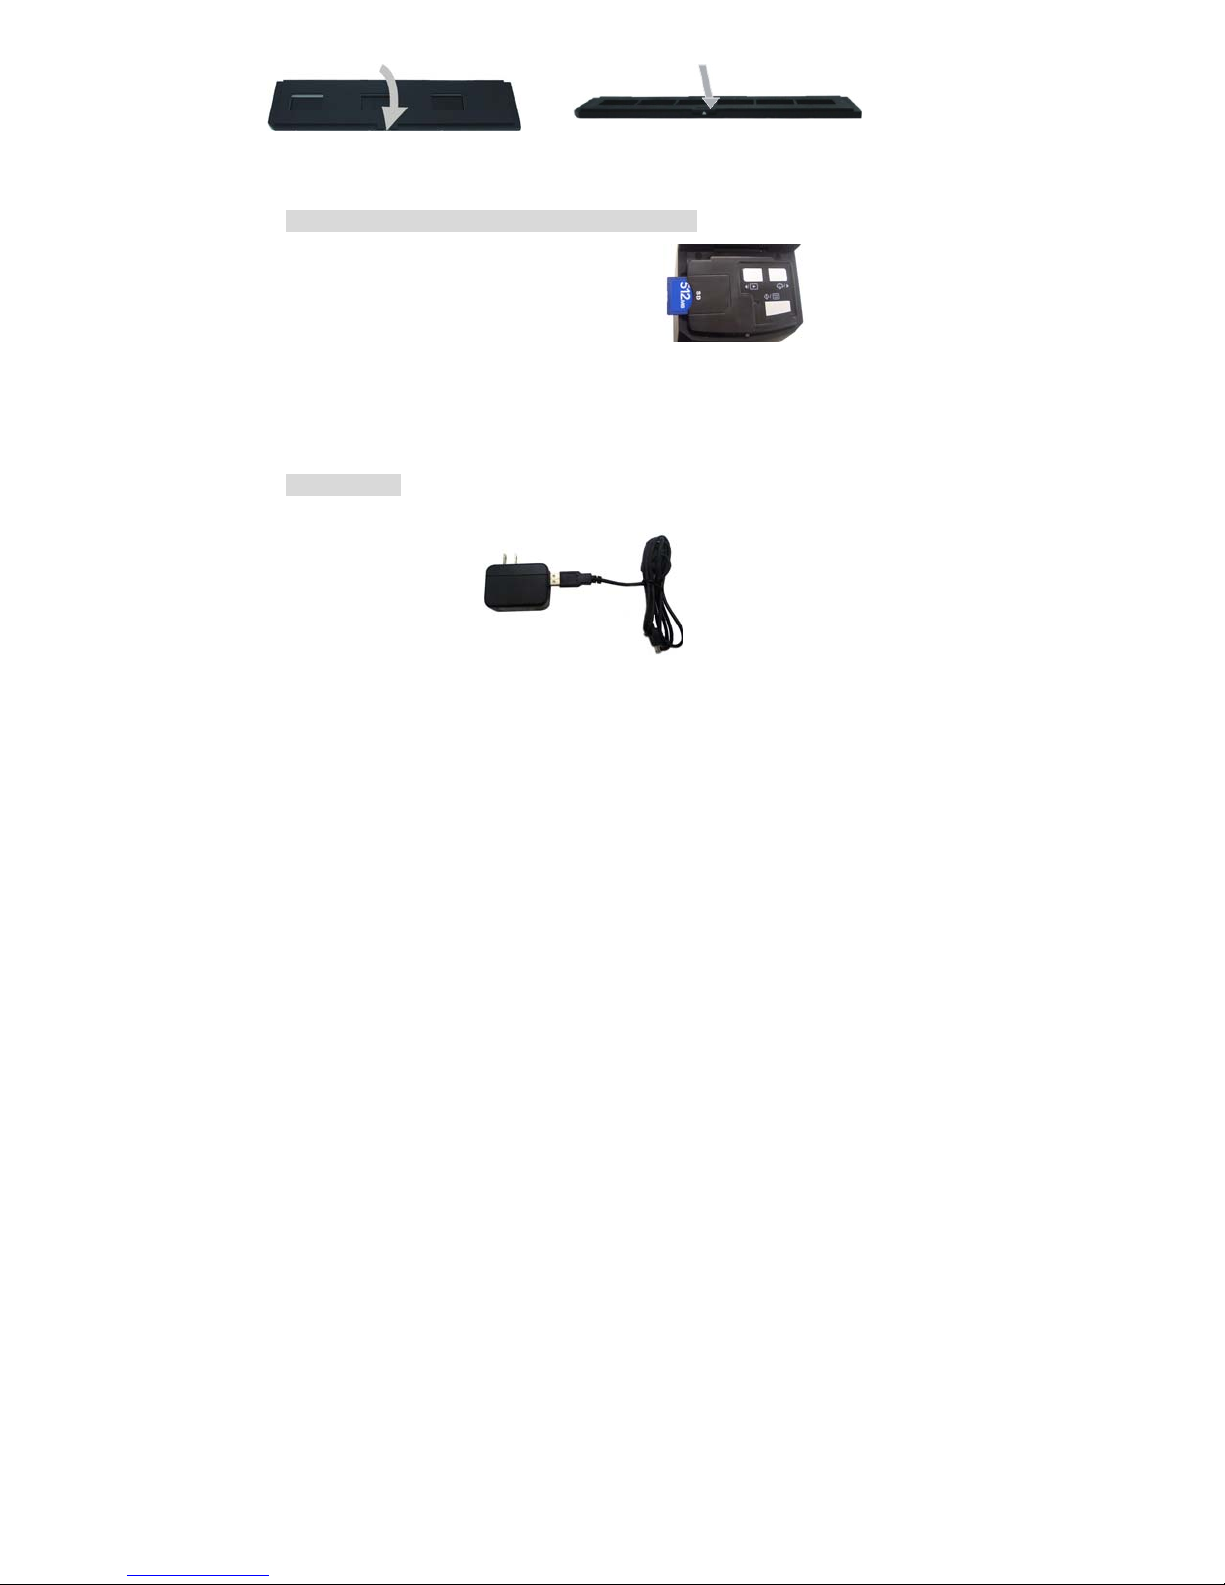
c. Close the negative /slide holder tightly by snapping the middle and sides shut.
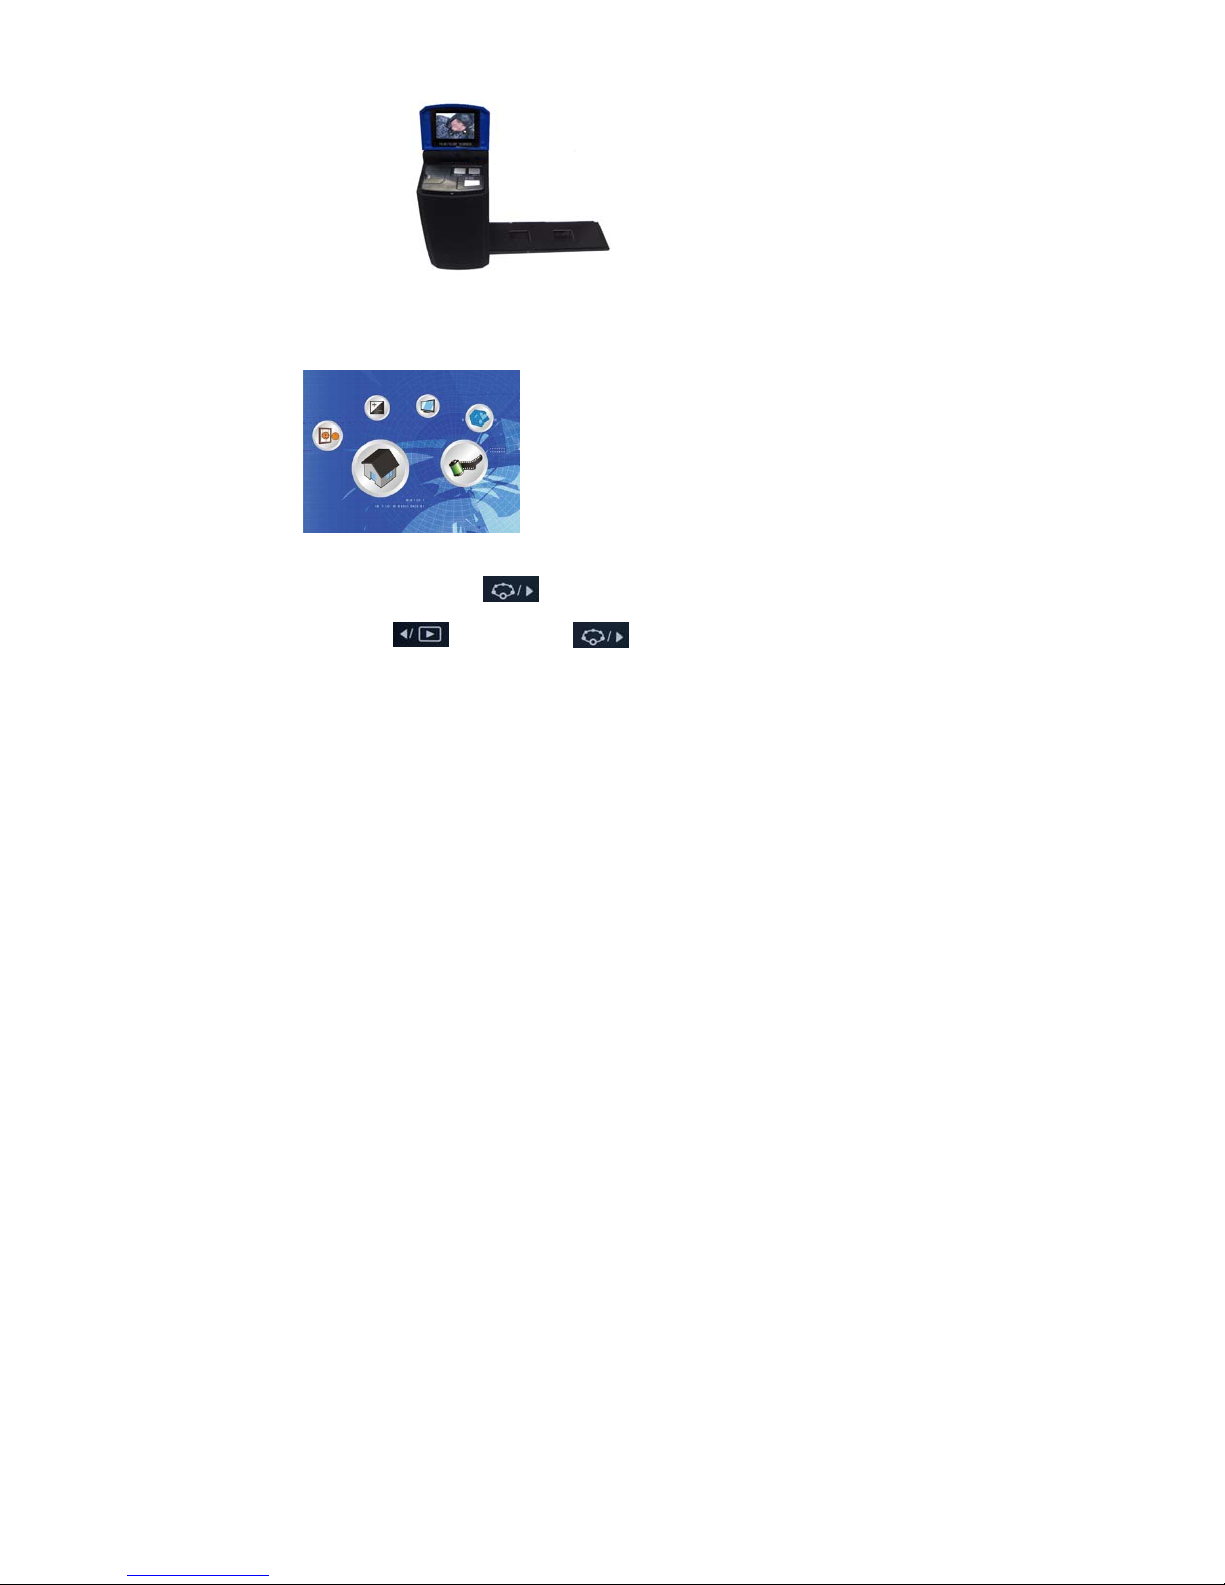
5. Inserting and removing the SD card (optional)
• Insert the SD card before plugging in the converter.
• The 32MB built-in memory will not be used if the SD card is inserted.
• Close the cover and connect the converter with the USB cord to the adapter. Then plug the
adapter to an outlet and open the cover to turn the converter on.
Note: Inserting a SD card during operation will cause the converter to turn off.
6. Quick Start
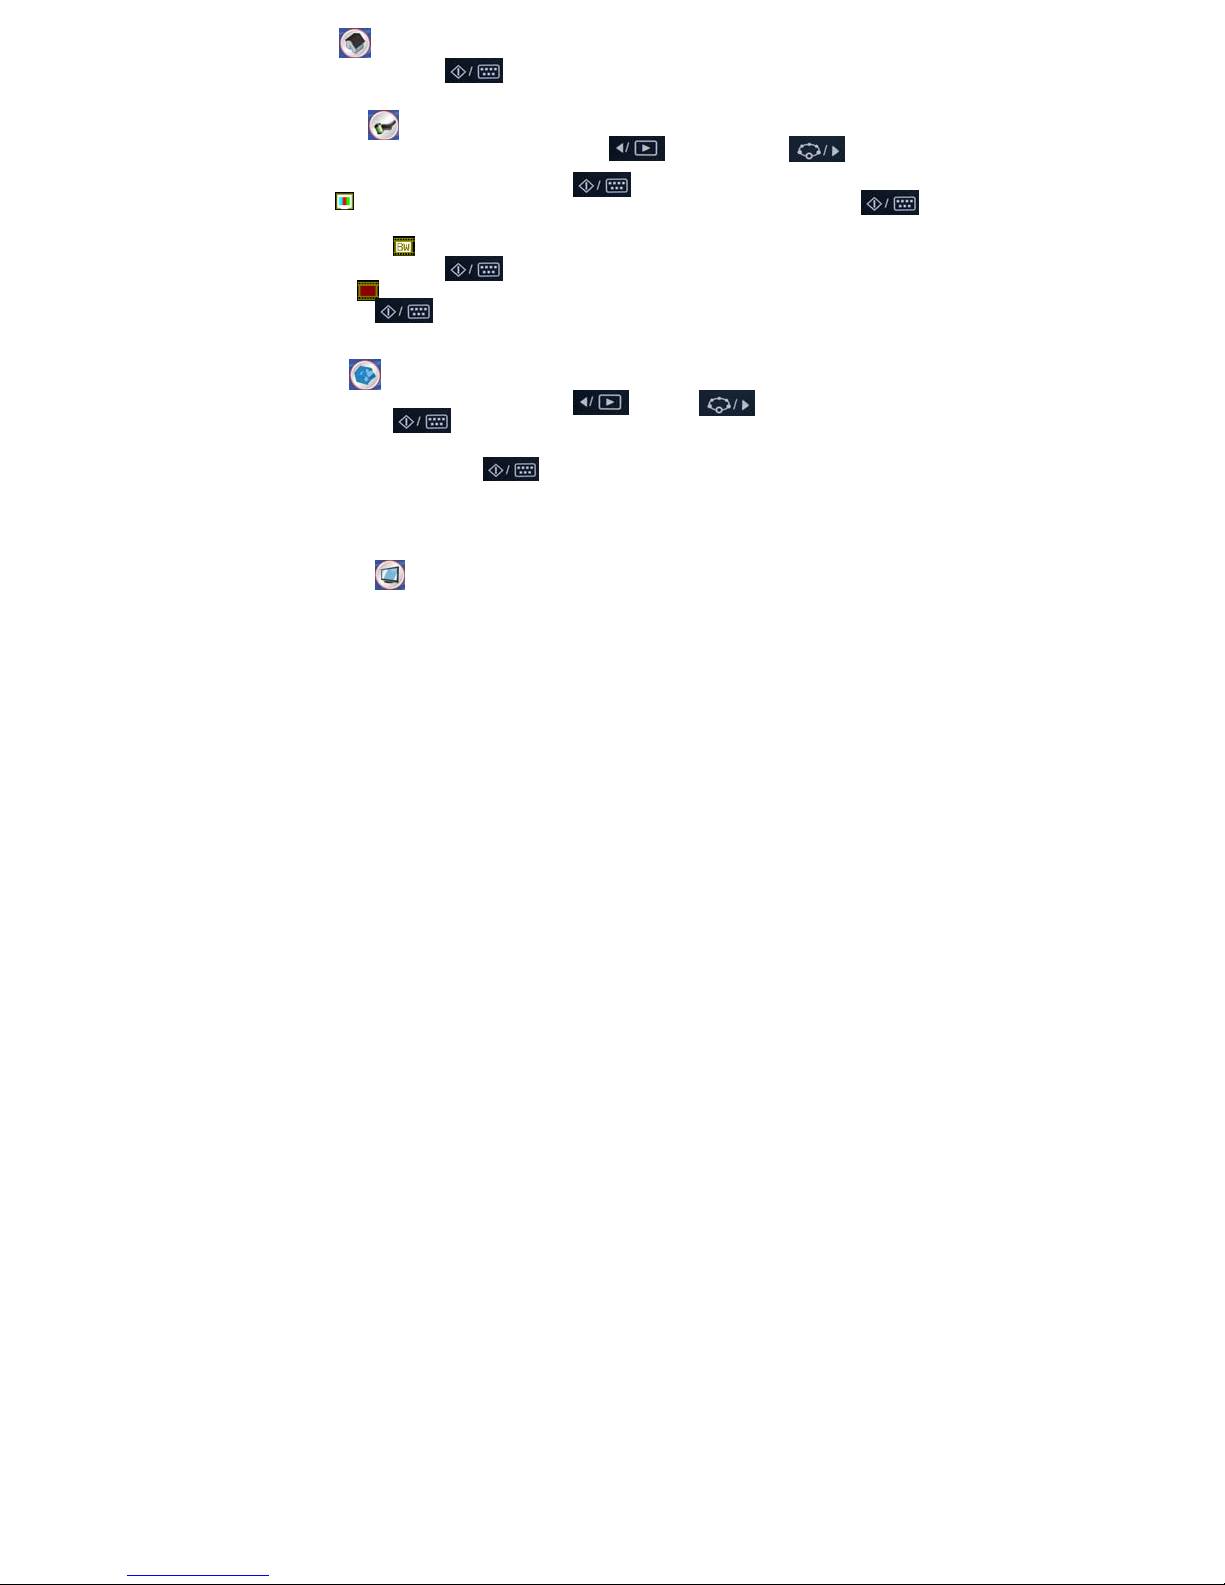
Connect the USB cord to the converter and the adapter. See picture below for further reference:
Page 7
Plug the adapter in to a power source. Open the cover. The converter will turn on and the power
LED light will glow red. Insert the slide or negativ e tray into t he sc anner and mov e the t ray careful ly
to adjust the film. You will be able to see the picture on the LCD monitor. Press the Start button to
capture a picture.
Powering On/Off:
• Power On: Open the cover. The converter will turn on and the power LED light will glow red.
• Power Off: Close the upper cover until cover clicks.
Select Function
• Press the Function button to enter the function menu.
Press the Left or Right buttons to select the function you wish to use.
Page 8
• Home
Press the Start button to return to capture mode.
• Film Type
To change the Film Type, you can use the Left or Right buttons to navigate
the function menu, press the Start button to enter.
Slide: Select the Slide mode when scanning colored slides. Press the Start button
to confirm selection.
Monochrome: Select the Monochrome mode when scanning black and white negatives.
Press the Start button to confirm selection.
Negative: Select the Negative mode when scanning colored negatives. Press the
Start button to confirm selection.
• Format
To enter the Format mode, press the Left or Right buttons to select, and press
the Start button to enter.
Select ‘”do not format” (X) or “format” (√).
Then press the Start button to confirm your selection.
Caution: Formatting will delete all files on internal memory as well the on the SD card. Formatted
files cannot be recovered!
• TV Output
Connect the converter to a TV with the video cable provided for optional viewing purposes. If you
connect the converter to a TV, the images on the LCD monitor will not appear.
NTSC: Sets the TV Output to NTSC. (Video format in America and Asia)
PAL: Sets the TV Output to PAL. (Video format in Europe)
Page 9
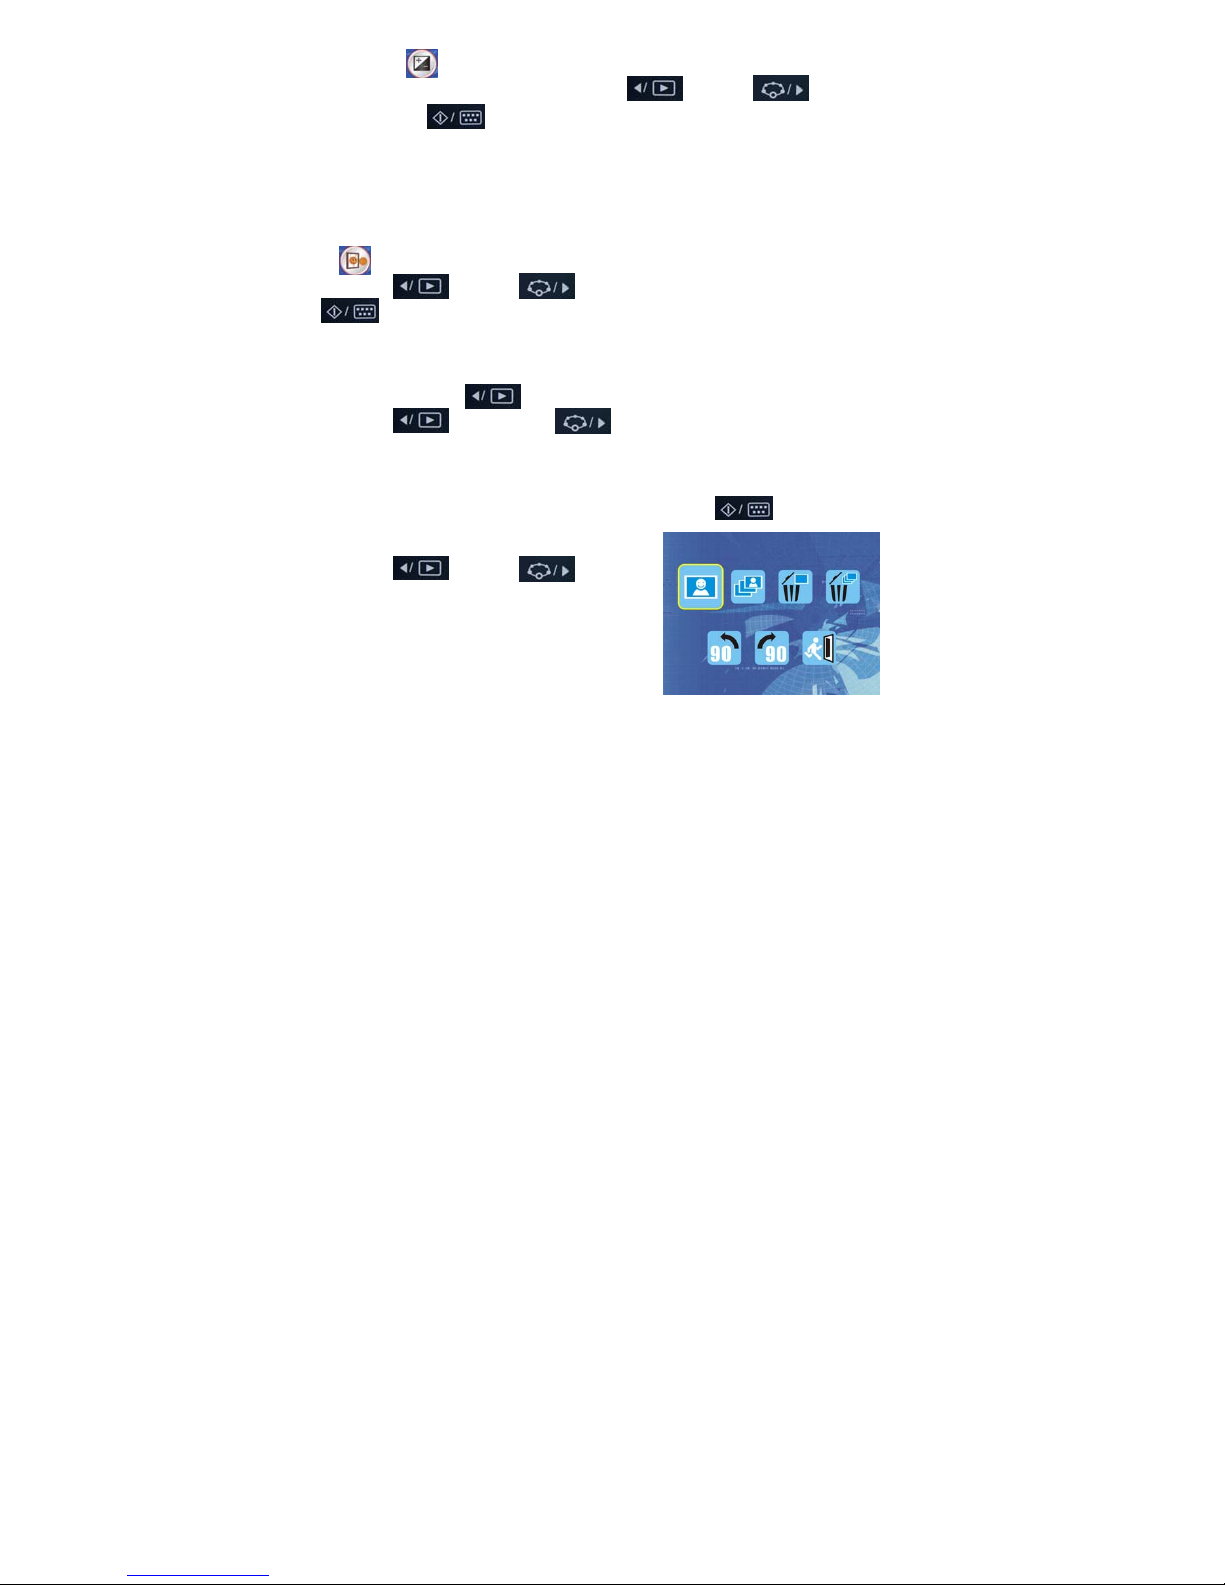
• Exposure Value
To enter the Exposure Value mode, press the Left or Right buttons to select,
and press the Start button to enter.
Exposure compensation allows you to change the exposure setting manually to adjust the lighting.
This feature helps to achieve better results when scanning a photo with high color contrast.
• The exposure value can be adjusted in 1/2 steps within the range –2EV ~ +2EV.
• You can check the result of the compensation by viewing the image on the LCD monitor.
• Mirror
Press the Left or Right buttons to select the icon on the screen, and press the
Start button to confirm the type of mirror image you want. Press the Start button to
capture the picture again. The end result will be a mirror image of the original negative or slide.
Review Images (Playback)
Press the Playback button to enter the playback mode to revie w your conv erte d i mage s.
Press the Left button or Right buttons to select the next or previous converted
image.
Playback Menu
Once in Review Playback mode, press the Start/Playback menu button to enter the
Playback Menu mode.
You will see these icons on the screen.
Press the Left or Right buttons
to select from these features:
Single display, Slideshow, Delete single,
Delete all, Rotate 90° left, Rotate 90° right, and Exit.
Page 10

• Display Single Image
When you select the icon, press the Start button to confirm your selection. Press
the Left or Right buttons to review the next or previous converted image.
• Slide Show
Use the Slide Show feature to di spl ay y our conv erted im ages o n the LCD scree n of y our conv erter .
Once the Slide Show mode is sele cted, the converter will automatically play all th e im age s that y ou
saved in the internal memory or the SD card you have inserted. The slide show will not play the
images in the internal memory and the S D card a t the same tim e. Pre ss any button to st op the slide
show and return to the menu.
• Delete Single Image
Select the icon to delete the current image shown on the LCD monitor. Press the Start
button to confirm your selection.
• Delete All Images
Select the icon to delete all of the stored images from the internal memory or SD card.
Press the Start button to confirm your selection.
Files that are erased cannot be recovered. Make sure you select the image(s) you wish to delete
only.
• Rotate 90 ∘Left
Select the icon to rotate the image by 90∘in a counter clockwise direction. Press the Start
button to confirm your selection.
Page 11

• Rotate 90 ∘Right
Select the icon to rotate the image by 90∘in a clockwise direction. Press the Start
button to confirm your selection.
• Exit
Select the icon, and press the Start button to exit the playback menu.
Page 12
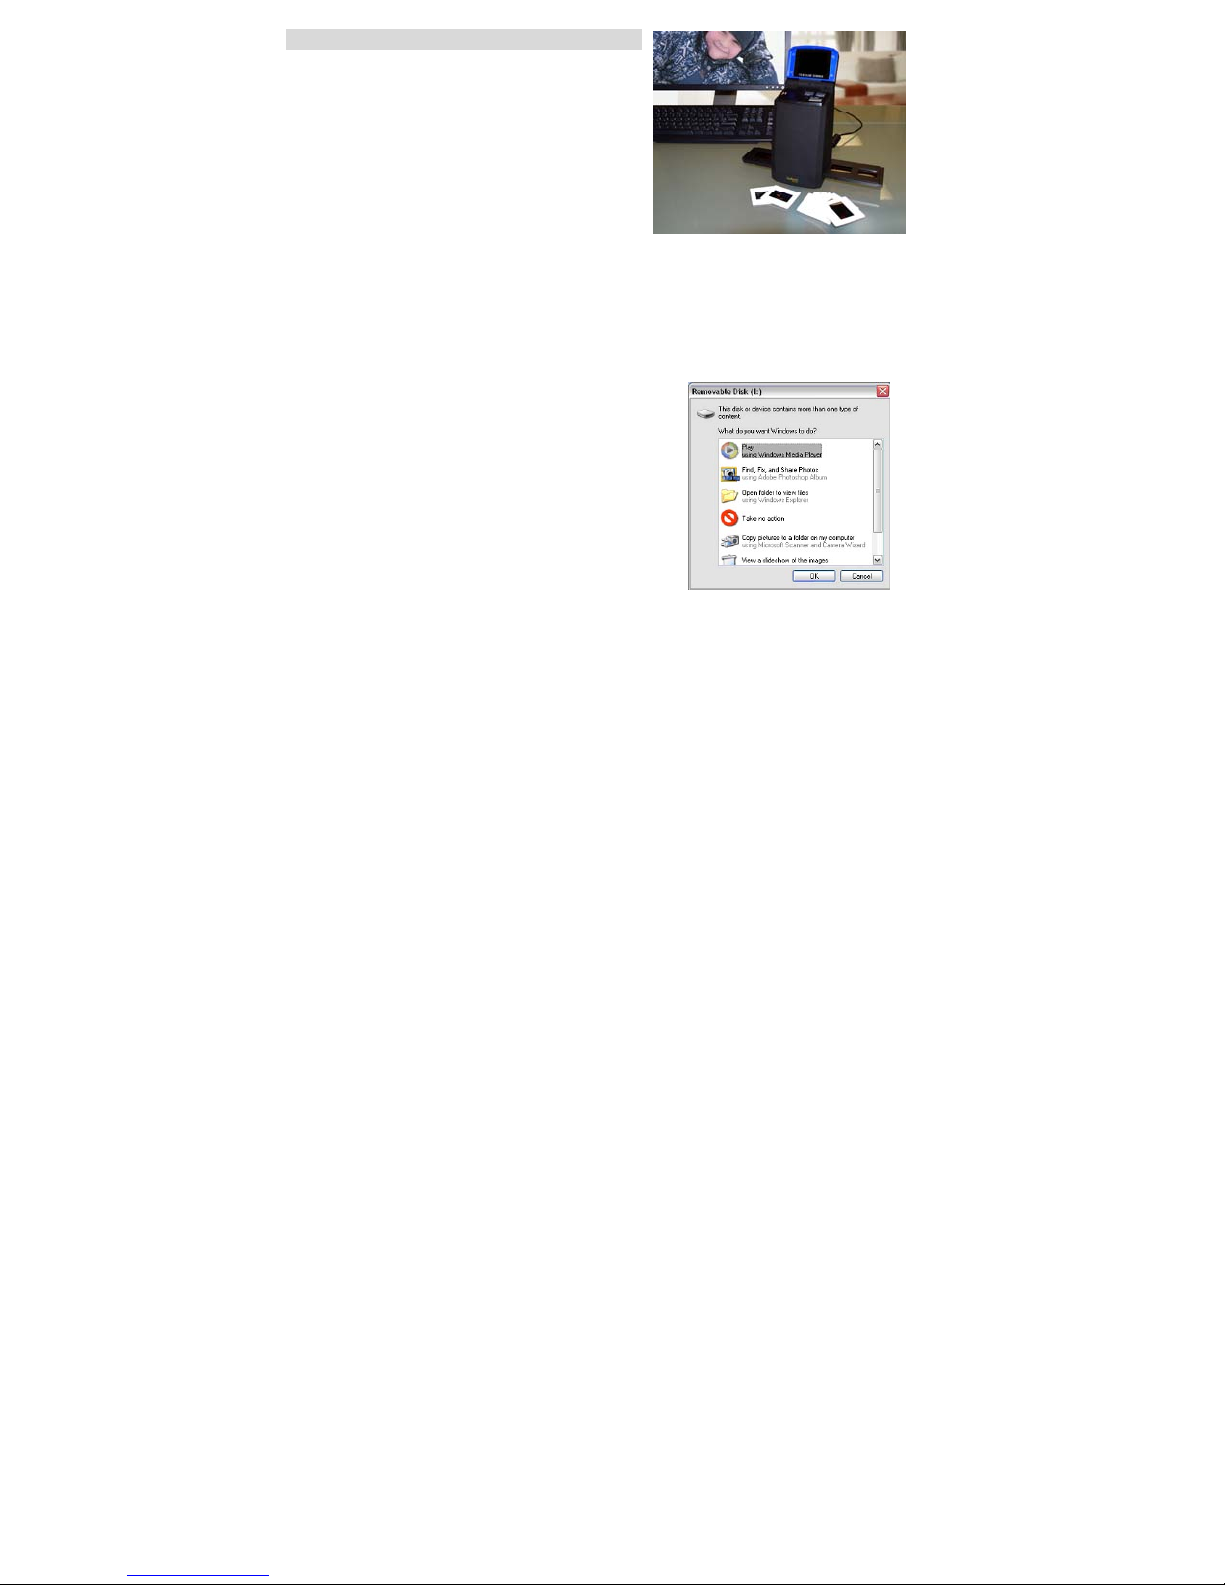
7. Downloading Images to Your Computer
When the converter is connected to the
computer with the USB cable, the
“USB Mass Storage driver” will appear
on the computer screen.
Note: For Windows 98SE users, please
install the driver before connecting the
unit to the computer.
Please remember to save the images to your
computer. Viewing images on your computer does automatically save them to your computer.
For Windows 98 SE users:
1. Install the “scanner driver” from the software CD provided for Windows 98SE.
2. Then connect the converter to the computer with the USB cable.
3. “USB Mass Storage drive” will appear on the computer screen.
For Windows XP users:
A dialogue box with options should appear as
shown on the right.
The options are Play, Find/Fix/Share Images,
Open folders to View files, Take no action,
Copy images to a folder on My computer,
For Windows 2000/ME users:
Double click on “My computer”, and t hen doub le cli ck o n Remov able D isk (i:) . Th e Remov able Di sk
that shows up in “My computer” depends on your computer so it may differ. All of the photos are
stored in the DCIM folder.
Page 13
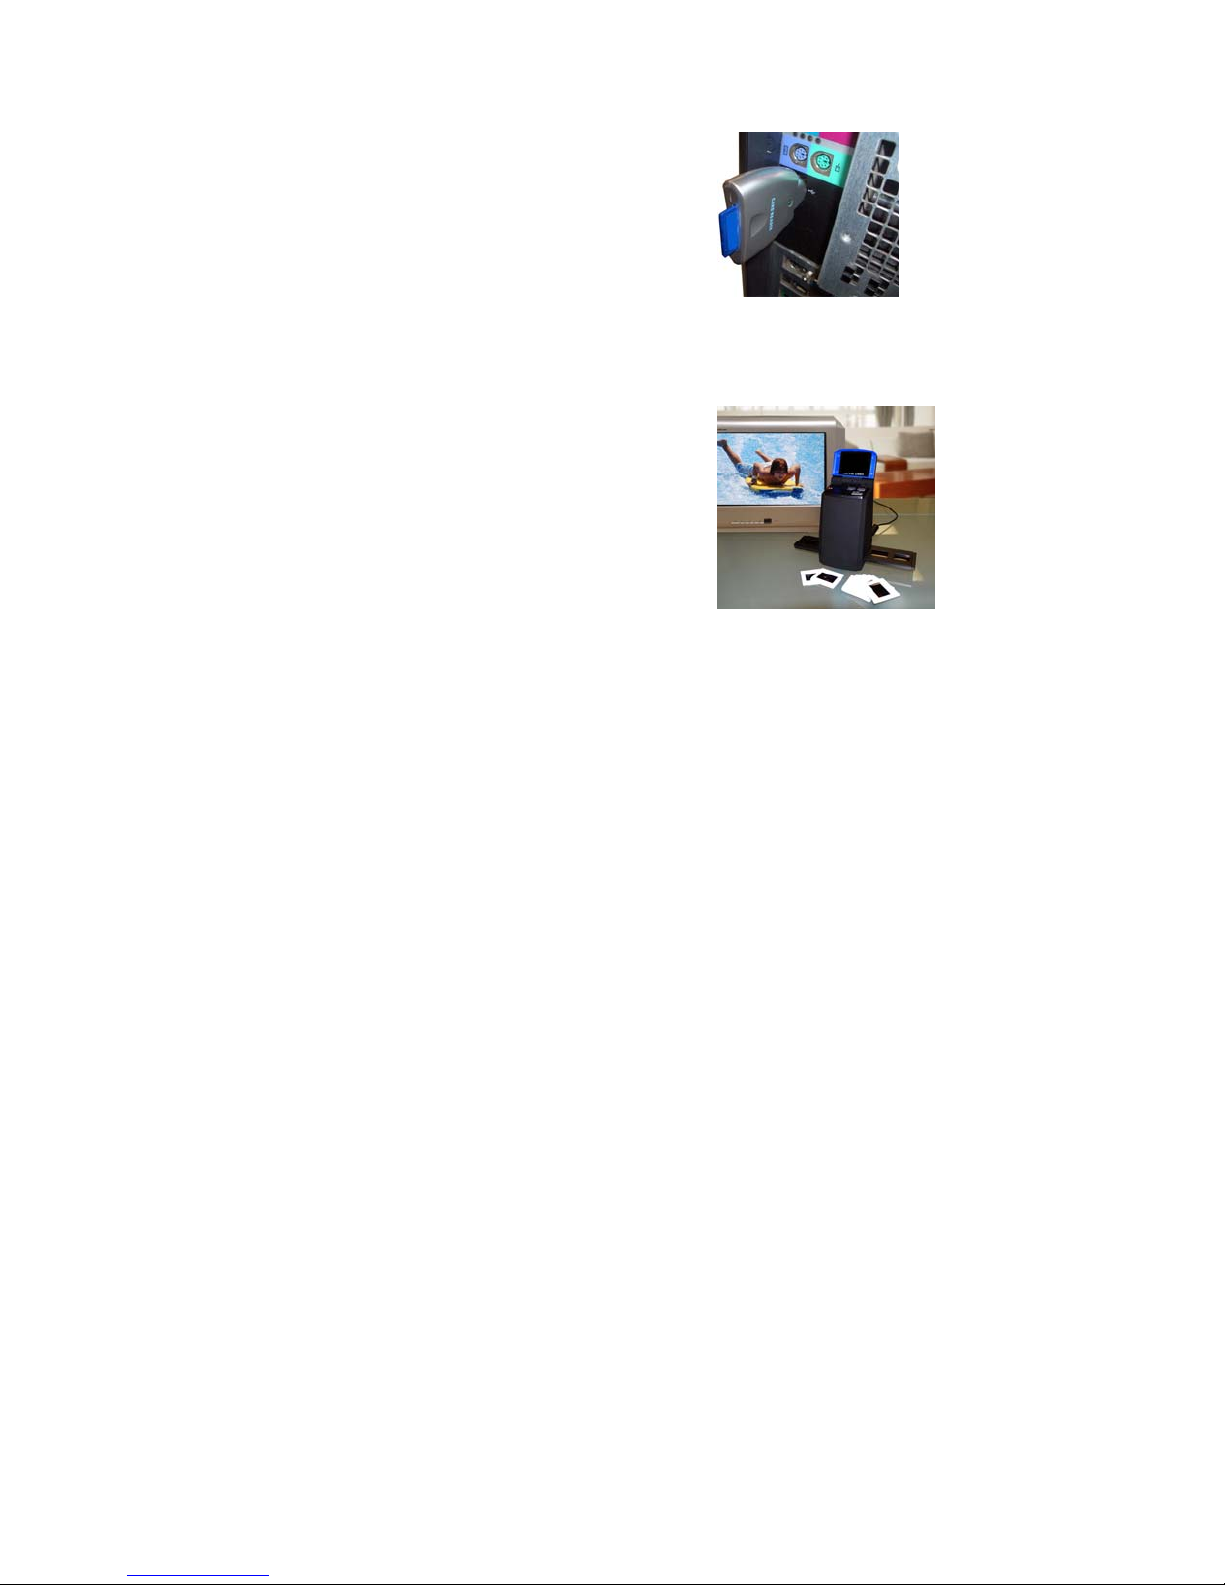
For SD Memory Card Readers (optional):
If you have a SD memory card reader for your computer, you can put images on to your computer
without the driver. Just plug the SD memory card reader to your computers USB port and then
insert the SD card in to the SD card slot on the card reader.
Then you should be able to get the data
off of the SD card like you normally do
when using your SD memory card reader.
Viewing Pictures on the Television (optional):
If you would like to view converted images on your television you must use the video cable
included. Plug the black end of the cable in to your converter
and the yellow end of the cable to the television video input.
Make sure that the converter is plugged in to the power source.
Turn on the television, change the input on the television and
turn on the converter. You should see what would normally be
displayed on your converter screen displayed on your television
screen instead.
Page 14
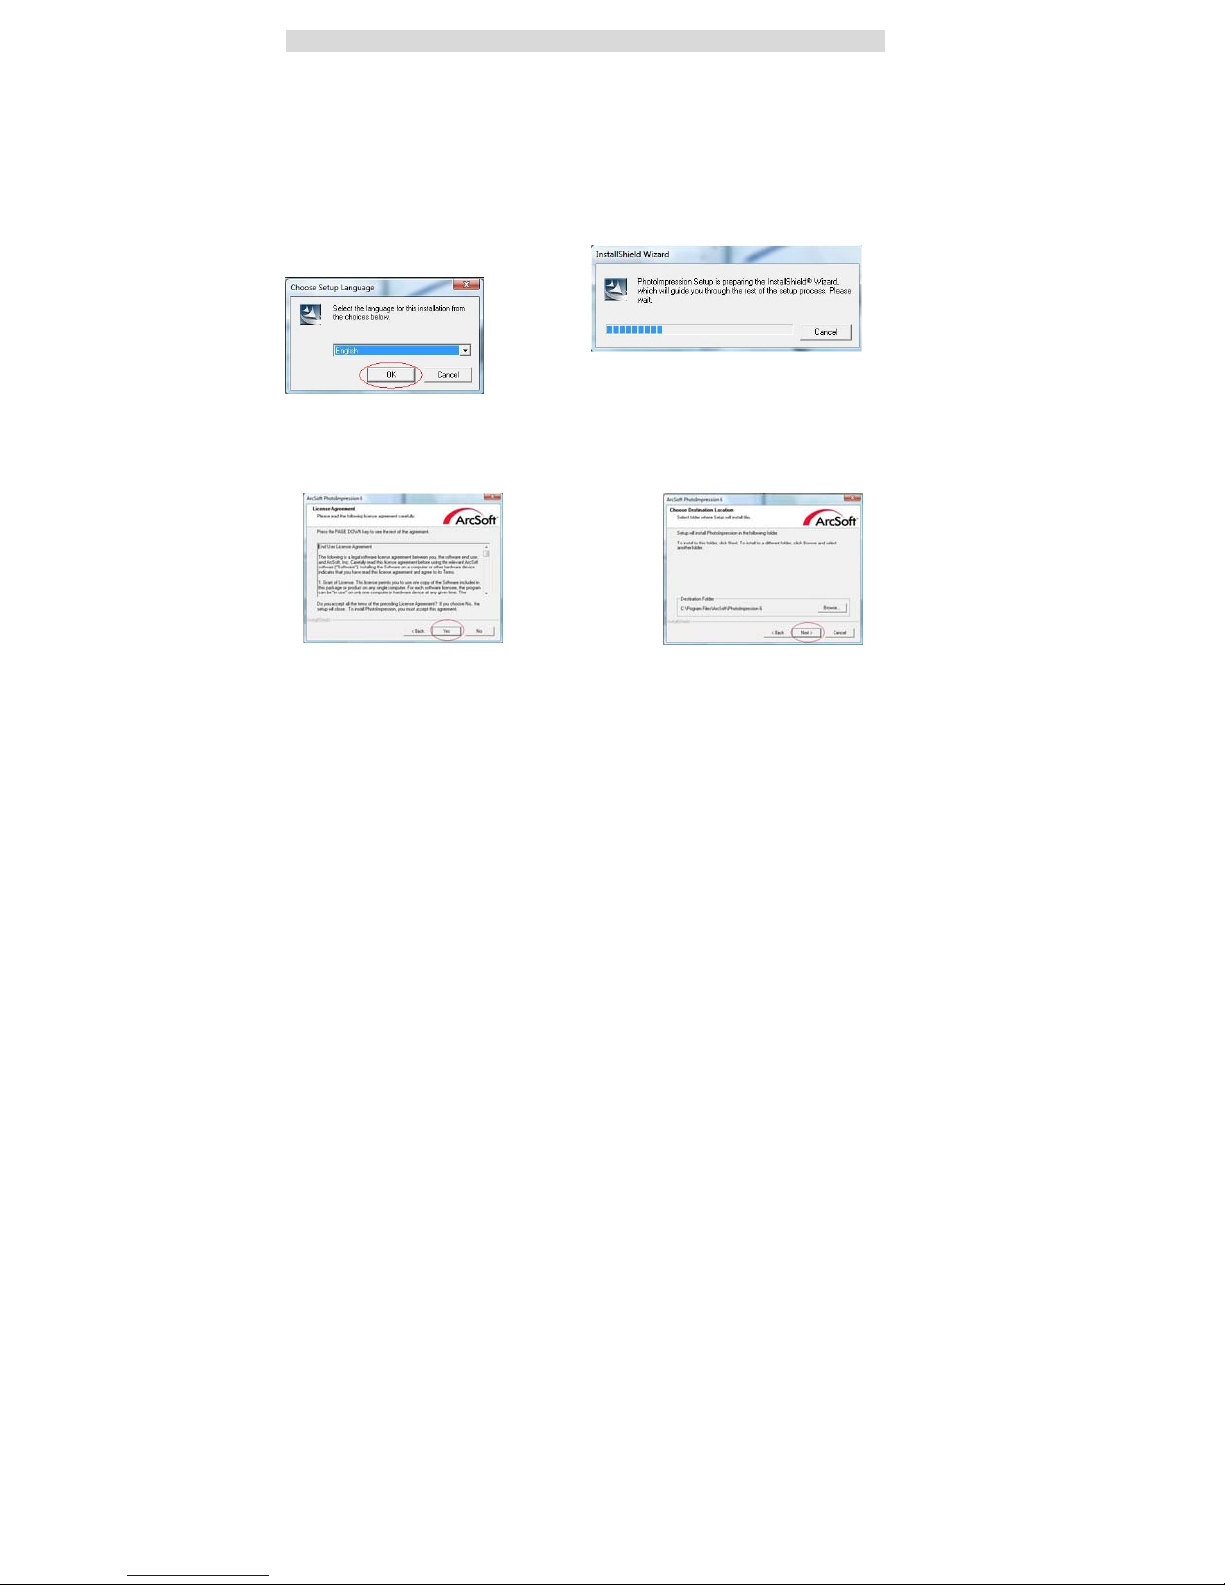
8. Installing the ArcSoft software (Windows XP and Vista users only)
• Installing the software
1. Insert the installation CD into the CD-ROM drive and the installation CD menu should appear.
2. When you see the following screen,
Choose “Arcsoft Software Suite” to install the software.
Windows XP and Windows Vista directions :
1. Select the language you wish to be 2. PhotoImpression will start the installation.
displayed. Then click OK.
3. Click on Yes to agree to the terms and 4. Click Next to have PhotoImpressions
conditions. download into your Programs folder.
Page 15
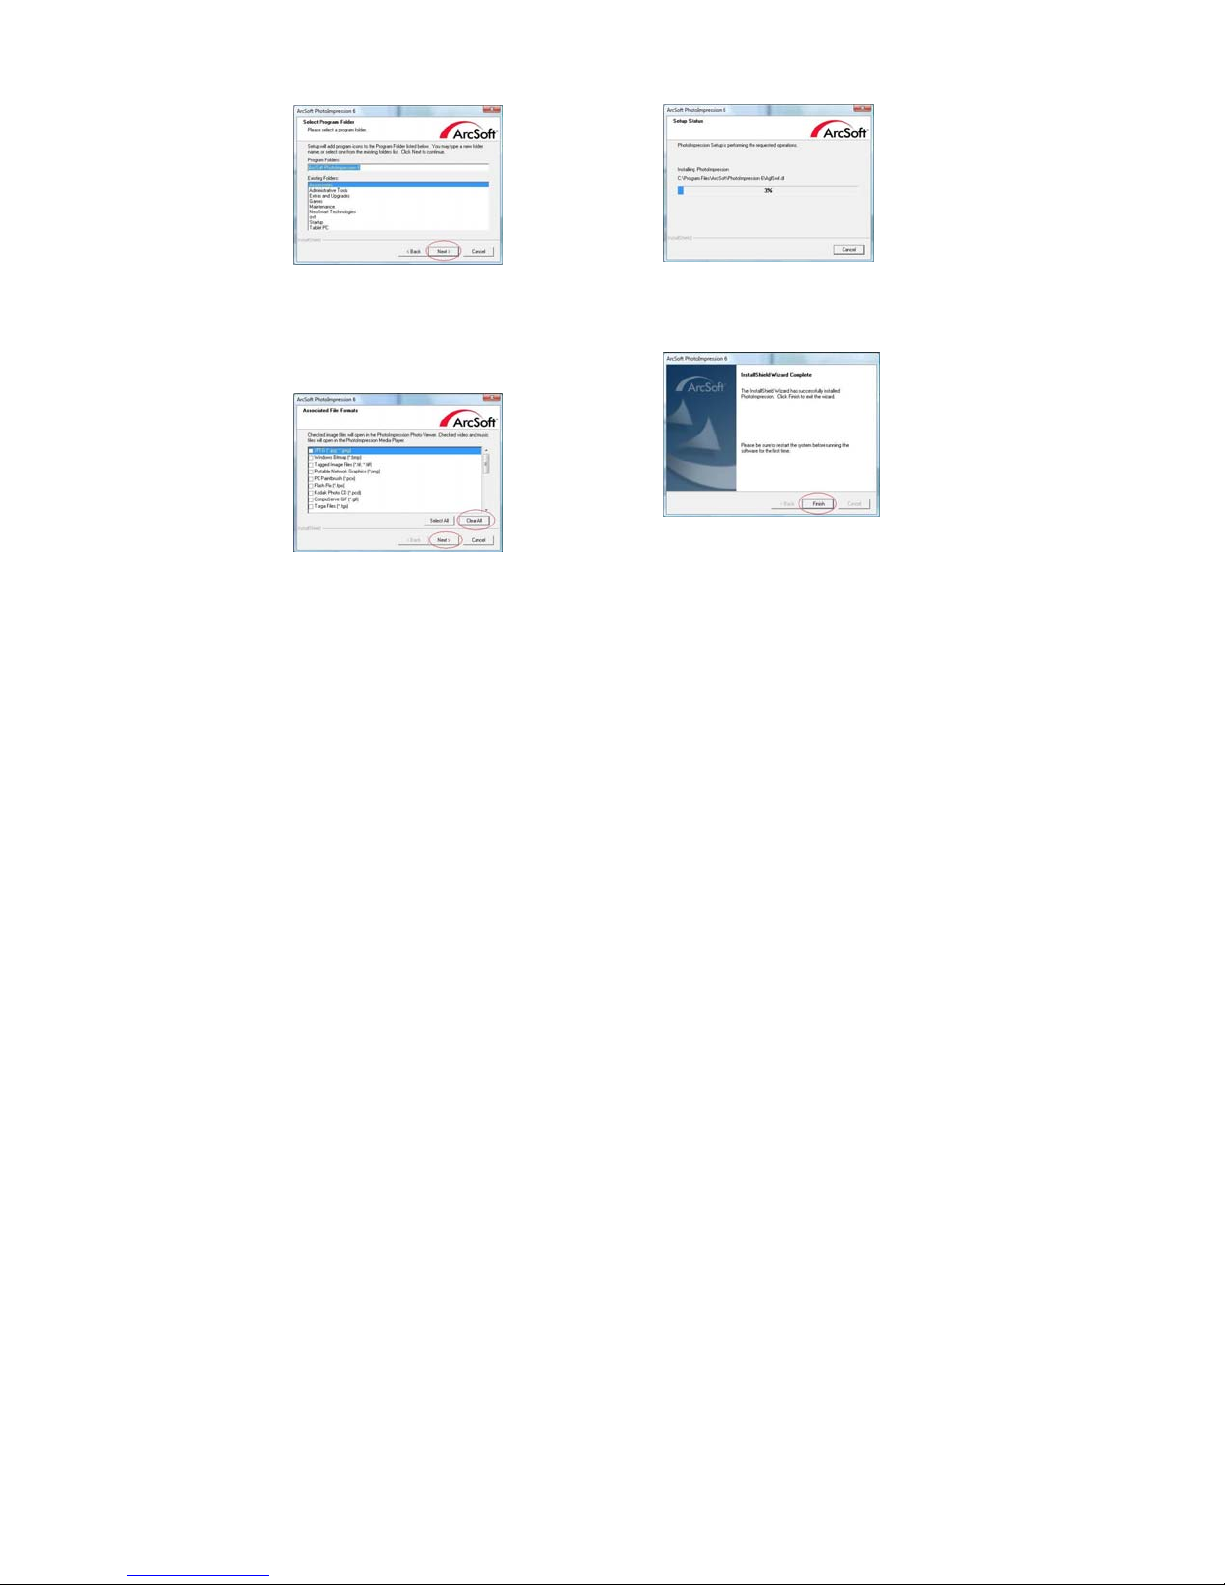
5. Click Next to continue. 6. PhotoImpressions will start the setup process.
7. Once you get this to this screen select 8. Click on Finish to complete installation.
"Clear All" so that Photo Impr es sion does
not take over the files on your computer.
9. Remove the installation disk and rest art th e comp uter.
The installed software will automatically create a “PhotoImpression 6” logo on your desktop.
Page 16

9. Editing pictures:
Click on the “PhotoImpression 6” icon on the desktop. Click on the picture you would like to edit,
then click on Edit next to Get Photos and select Photo Editing tools.
Use the left toolbar to navigate and find your pictures to edit.
- Main Menu
The Main Menu appears in the upper left corner of the workspace many of the program's key
options and controls are available in the Main Menu. To learn more about a particular menu item
and the options and controls it contains, choose fr om the list bel ow:
* File
Scan for Media Files
Launches the Scan for Media Files dialog box that enables you to scan your computer for all
photos, music and video files. This process creates a media library that helps the program perform
as fast as possible. You can scan your computer in one of the following three ways:
• Scan Primary Folders Only - Scans folders most commonly used for storing media,
such as My Documents, My Pictures and Desktop.
• Scan All Folders - Scans your entire computer for media (except Windows and
Program Files folders).
• Select the folders you want to scan -Let's you choose the folders for scanning.
z View
Page 17

Full Screen/Play (F4)
Plays or displays the first selected file in full screen view.
- Main Buttons
* Get Photos
Acquire from Scanner
Here you can:
• Acquire images from connected TWAIN compliant devices such as scanners and some
digital cameras.
• Assign names to image files as they are acq uired (using today's date or a descr iptive
word).
How to acquire images from a TWAIN compliant device:
1. Select a scanner or other TWAIN device from th e drop down list.
2. Choose the file format you want to use for the acquired images (JPG, BMP, TIF, PCX,
TGA).
3. If you've selected JPG as the file format, select the image quality for the acquired
images (Highest, High, Normal, Low). The lower the quality selected, the higher the
level of compression applied.
4. Choose a destination folder for the photos by clicking "Browse" (folder icon) and
Page 18

navigating to the folder.
5. Choose a naming method (today's date or descripti on) . Enter a des cript ion if ap pli cable.
6. Click "Acquire".
* Edit
Photo Editing Tools
The Photo Editing Tools module includes a complete set photo enhancement, editing and
retouching controls.
The window can be stretched to provide a large size view of the active photo. Double click the
module's tool bar to maximize the window to fill the computer screen.
In addition to the large photo workspace, the Photo Editing Tools module includes five distinct sets
of controls:
Enhance
The Enhance function includes two types of controls:
Auto Enhance
Click "Auto Enhance" button to improve the overall quality of your pictures with a single
click.
Manual Fix
For precise image enhancement control, adjust the Brightness, Contrast and Sharpen
sliders.
How to enhance a photo manually:
1. Move the sliders to adjust the lev el of Brig htness and Co ntrast a nd to make the
image more Sharp.
Page 19

2. Use the zoom slider to get a closer look at how the adjustment affects the
photo.
3. Click "Apply" if you like the result. Click "Cancel" if you do not.
Color
This feature is designed to fix digital photos that have unnatural color or appear to dark. It's also
great for fixing scanned versions of old prints that have faded or whose colors have changed after
many years of neglect.
How to fix the color of a photo:
1. Drag the color balance sliders to make the photo color appear more natural. Add red or
yellow to make the photo warmer. Add blue or green to make the photo cooler.
2. Drag the Lighter/Darker slider to t he left to reveal details hidden i n a dar k photo or t o the
right to make a faded photo look new again.
3. Click "Apply" if you like the result. Click "Cancel" if you do not.
Red-Eye
This feature makes it easy for you to fix all red eye - a common problem in flash photography.
There are two ways to fix redeye:
Auto Fix
1. Simply click the "Fix Red-Eye" button to automatically find and fix all red-eye.
2. If not all of the redeye is fixed, used the "Click to Fix" method.
Page 20

Manual Fix
1. Use the zoom slider on the toolbar to zoom in on the photo.
2. Drag the small white box inside the zoom navigator to move over a red eye.
3. Place your cursor directly over the red eye and click.
4. Repeat the process until all red eyes are fixed.
5. Click "Undo" if you make a mistake or don't like the result.
Crop
This feature enables you to trim photos for dramatic effect or cut off the ugly/distracting parts of a
picture.
How to use crop:
1. Choose the crop orientation (portr ait or l an ds ca pe ).
2. Select a fixed proportion for t he cr op rect an gle ( 4:6, 5 :7, 8:10 ) or choos e "Custom" if y ou
want to use another proportion.
3. Resize the crop rectangle by clicking and dragging the red lines.
4. Move the crop rectangle into positio n by clicking and dragging inside the red box.
5. Click "Crop". The area inside the rectangle will be kept, the area outside will be trimmed
away.
6. Click "Undo" if you make a mistake or don't like the result.
Straighten
This feature enables you to fix photos that appear to be tilted.
Page 21

How to use Straighten:
1. Move the slider (or click the rotate buttons) until the photo appears straight.
2. Use the superimposed grid lines for vertical and horizontal reference.
3. Click "Apply" if you like the result. Click "Cancel" if you do not.
Blur Background
This feature can be used in a subtle way -- to tone down un-important background details, or for
dramatic effect -- by making the main subject of a photo pop out of the picture.
How to use Blur Background:
1. With your cursor, trace a line around the person or object you want to stand out. When
you release the mouse button, the area outside the traced line will become slightly
blurred.
2. Drag the first slider to make the transition between the blurred and non-blurred area
sharp or smooth.
3. Drag the second slider to increase or decrease the amount of blur.
4. Click "Apply" if you like the result. Click "Cancel" if you do not.
Saving Your Results
When you're done editing a phot o, click Save As to save your results. You can c hoose to overwrite
the original file or save a new one.
Click "Close" to exit the Photo Editing module.
Retouch
Healing Brush
The Healing Brush is good for fixing dust, scratches and removing skin blemishes.
How to use the Healing Brush to fix a skin blemish:
1. Establish a source point for the Healing Brush by holding the Shift key and clicking on
Page 22

an area of the skin that is close in color and texture to the area you want to heal.
2. Use the zoom control to zoom in on the blemish.
3. Adjust the size of the healing brush so the cursor (circle) is only slightly larger than the
blemish.
4. Paint over the blemish. The area will be healed.
Click "Undo" if you make a mistake or don't like the result.
Clone
The Clone tool is good for removing unwanted elements from a photo. It can also be used for fun
effect, like moving a nose from one person to another.
How to use the Clone tool to remove a telephone pole from the background of a photo:
1. Establish a source point for the Clone tool by holding the Shift key and clicking on an
area of the sky that you want to use to paint over the telephone pole.
2. Adjust the brush size so the cursor (circle) is only slightly larger than the widest part of
the telephone pole.
3. Click and hold your mouse button and carefully paint over the telephone pole. Do not
release the mouse button until the job is done. The sky will be cloned into place.
Click "Undo" if you make a mistake or don't like the result.
Lighten/Darken
The Lighten/Darken tool is good for adjusting specific areas of a photo.
Smudge
Simulate the smearing of wet paint. Please click and drag the sliders below to change the brush
size and hardness.
Sharpen
Sharpen blurry areas. Please click and drag the sliders below to change the brush size and
transparency.
Page 23

Blur
Smooth out rough areas. Please click and drag the sliders below to change the brush size and
intensity.
Paint Brush
Let you "paint" on your image w hen y ou click and dra g the mo use. Pl ease c lick and drag t he slid ers
below to change the brush size and transparency.
Line
Draw a straight line in the photo. Please click and drag the slide rs below to change the line width
and transparency.
Eraser
Simulate an eraser, removing the image painting by paintbrush and line tools from your photo.
Please click and drag the sliders below to change the eraser size and effect.
Saving You Results
When you're done, click "S av e As" butt on to save your results. You can ov erwrite t he or igi nal f ile o r
save it as a new one. Or click "Cancel" to exit without saving.
Click "Close" to exit the Photo Editing Module.
Note: For more detailed information, please refer to the [Help] of the program.
Page 24
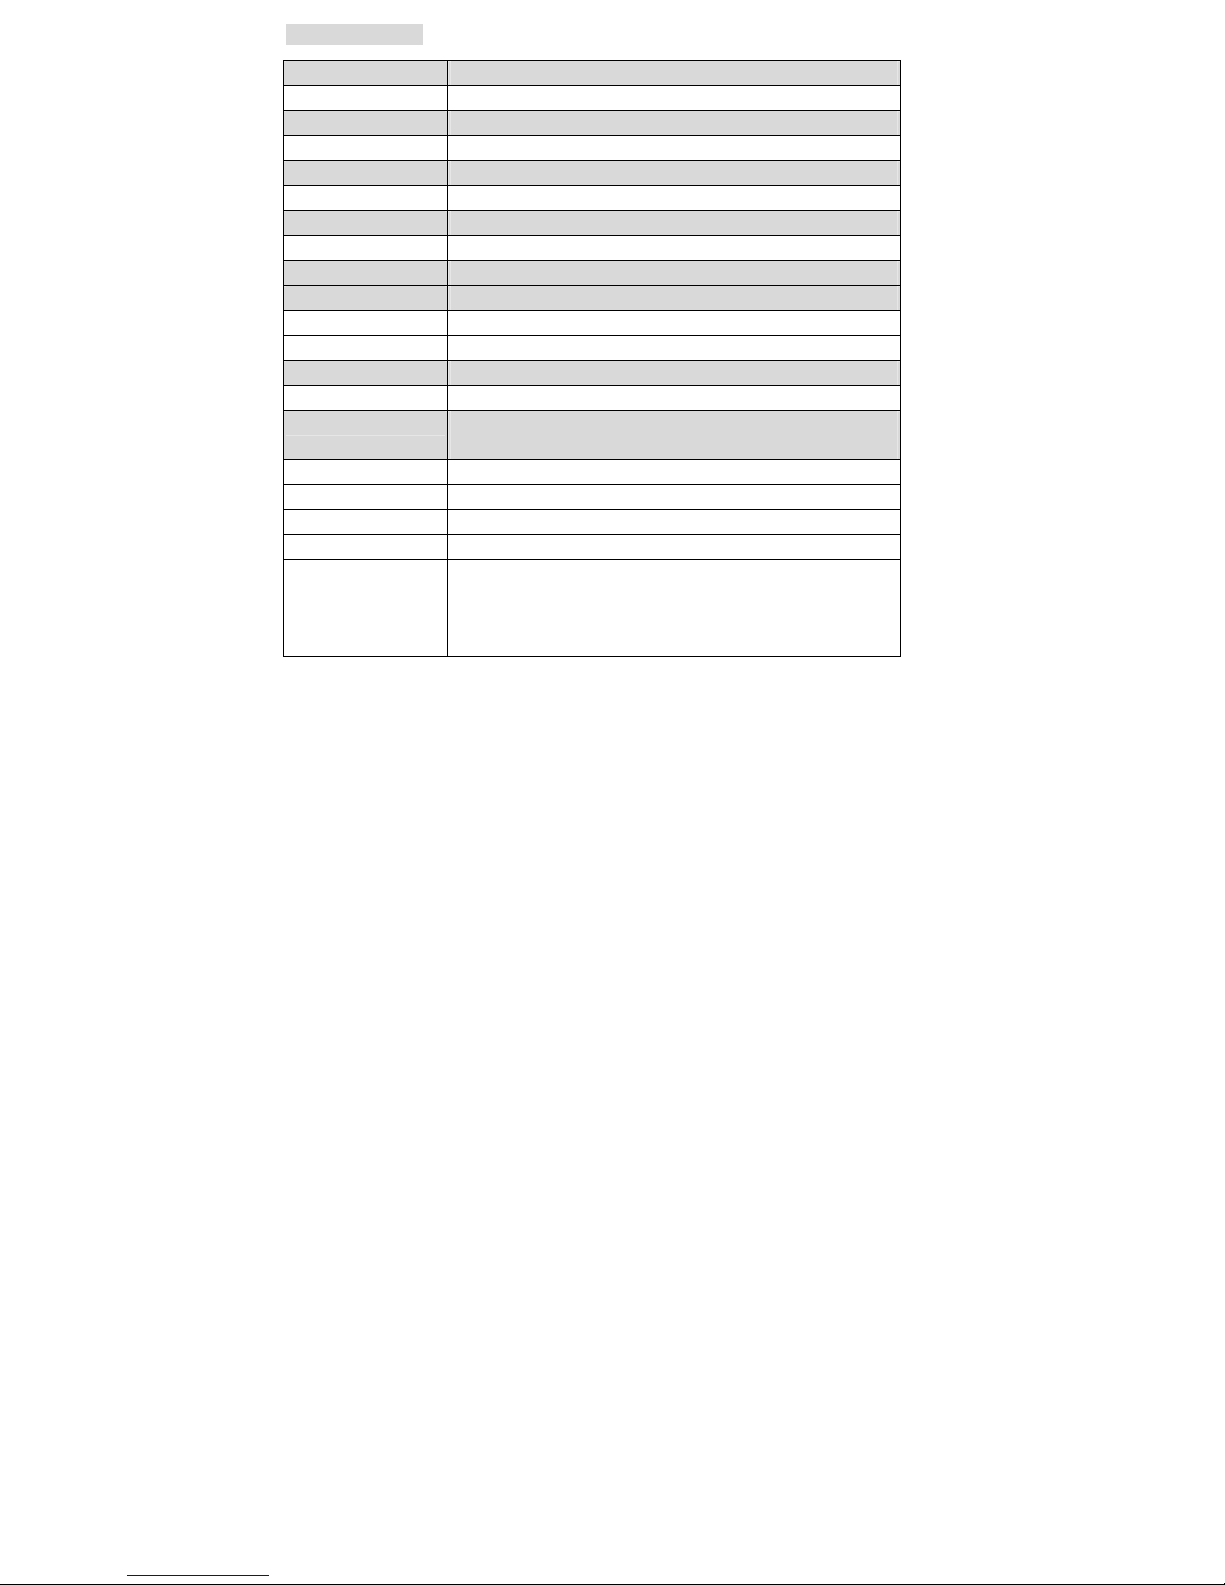
10.Specification
Interface: USB 1.1 & USB 2.0
Image Sensor: 5 mega pixels CMOS sensor
Lens: F no.= 6.0, 3 glass elements , Half-field Angle=15°
Panel 2.4" TFT LCD
Focus Range: Fixed focus
Exposure Control: Automatic / Manual (-2.0 EV~ +2.0EV)
Color Balance: Automatic
Scan high resolution 2592X1680
Data Conversion 10 bits per color channel
Film type Standard 35mm Film , Monochrome , Slide
Scan Method Single pass
Light Source Back light (3 white LED)
Button Left, Right ,Start
TV OUT YES (NTSC / PAL)
Storage Built-in 32 MB Nand Flash + SD card Slot
(supports up to 16GB SDHC)
Power: DC 5V (Adapter included)
USB MODE Mass storage
Dimensions 3.8” (H) X 3.7”(W) X 6.7”(L)
Weight 1.1 lbs
Software Arcsoft PhotoImpression 6 (included) for Windows XP , Vista
(32/64-bit)
- Pentium III 450 processor or equivalent (Pentium III 800 recommended)
- 128 MB of RAM (Minimum), 50 MB available hard disk space (minimum), 800x600
Page 25

pixels 16-bit color monitor
- Microsoft Windows Media Player 9.0 or higher
- Microsoft DirectX 9.0 or higher (included on installer)
Operating Systems Windows 98SE (Driver needed),Windows ME,Windows 2000,
Windows XP,Windows Vista (32/64-bit),
Mac OS 10.4 or above
VPS09-0202 FC-C520-VP_ENG
 Loading...