

Page 1
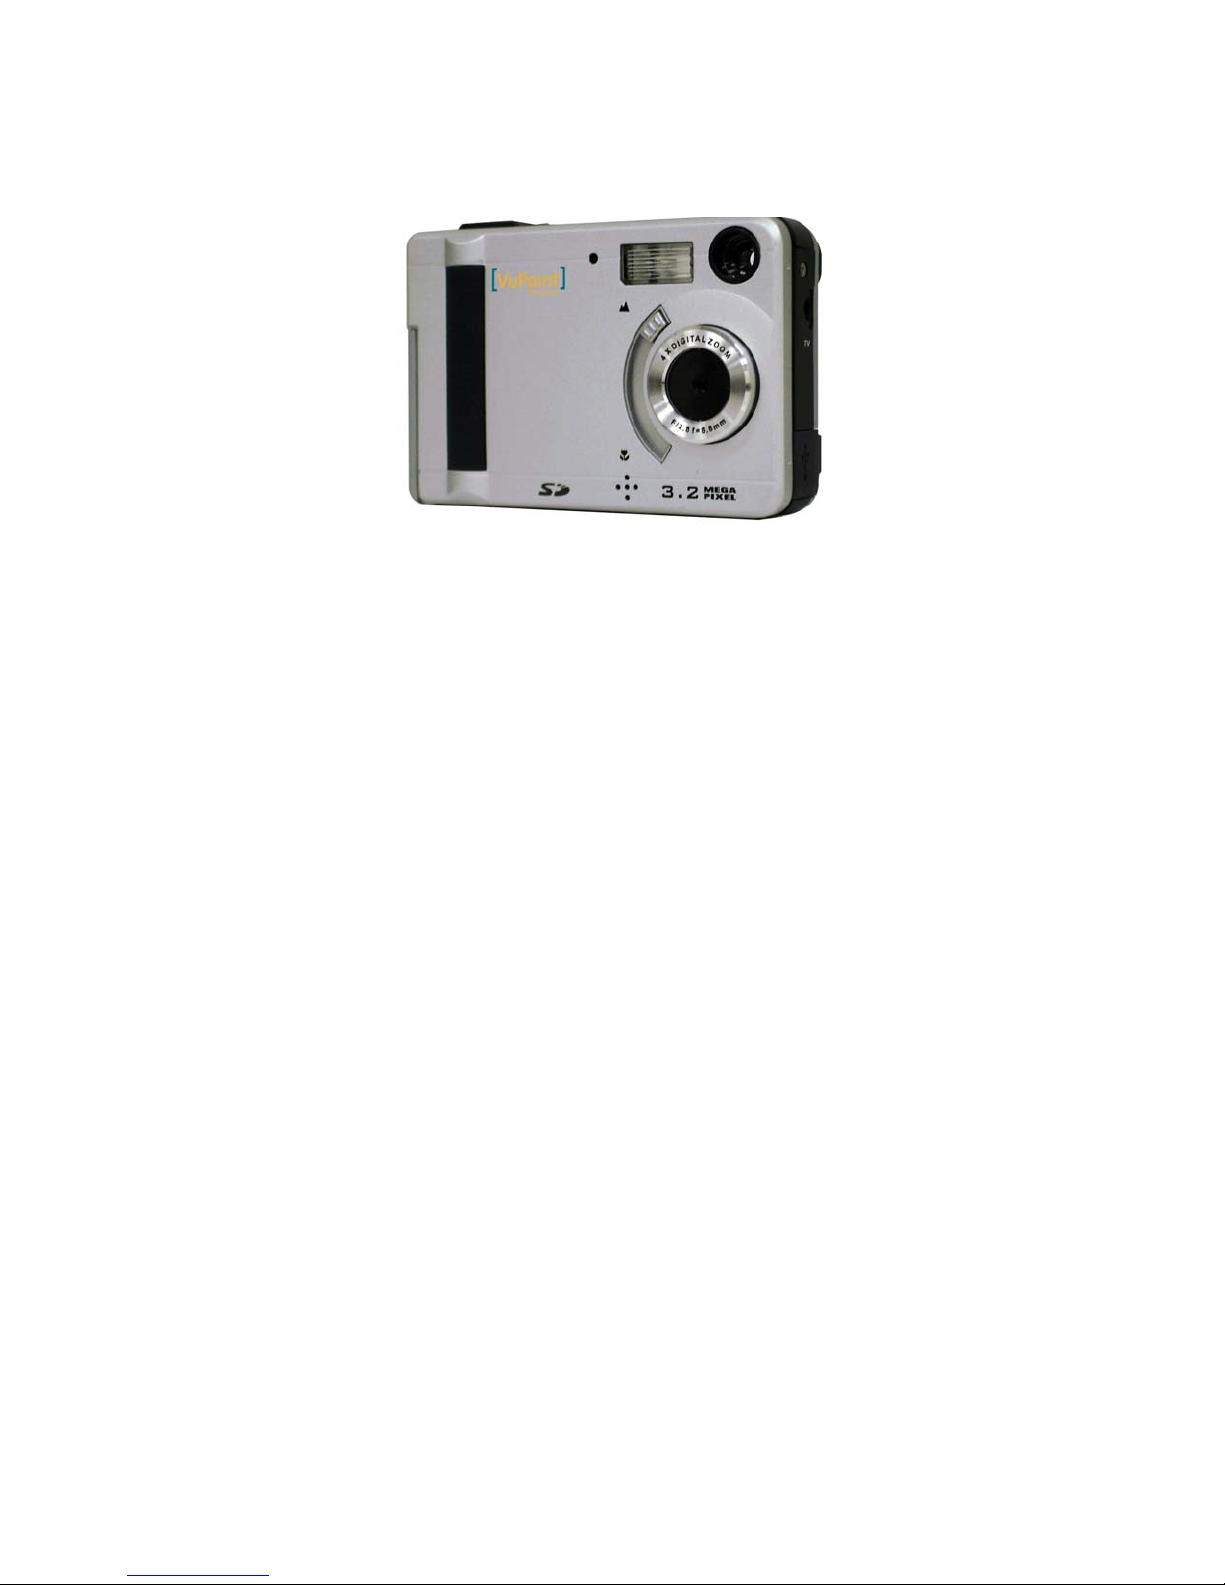
Digital Camera
DC-C310ML-VP
User's Manual
Page 2

For customers in North and South America
For customers in USA
This device complies with Part 15 of the FCC rules. Operation is subject to
the following two conditions:
For customers in Canada
This Class B digital apparatus meets all requirements of the Canadian
Interference-Causing Equipment Regulations.
(1) This device may not cause harmful
interference.
(2) This device must accept any
interference received, including
interference that may cause undesired
operation.
For customers in Europe
“CE” mark indicates that this product complies with the
European requirements for safety, health, environment and
customer protection. “CE” mark cameras are intended for
sales in Europe.
Page 3

NOTE:
1. In playback mode, you can “delete or save” pictures.
2. The camera’s Marco icon does not show on the LCD display.
3. When the camera is connected to a PC’s USB port, the PC will
not support power to the camera. The camera’s power is
mainly supported by the batteries.
4. You must slide the slide switch to change between capture
and playback mode.
5. The initial picture will show on the LCD display as the camera
is turned on but if the camera is connected to a TV, it will not
show on the TV screen after the camera is turned on.
Page 4

Table of Contents Page
1. System Requirements ----------------------------------------------------------- 1
2. Package Contents ---------------------------------------------------------------- 1
3. Quick Start -------------------------------------------------------------------------- 2
4. Name of Parts ---------------------------------------------------------------------- 4
5. Display Information -------------------------------------------------------------- 6
6. Getting Started -------------------------------------------------------------------- 7
• Installing Camera Batteries --------------------------------------------------- 7
• Inserting SD Card (Optional) ------------------------------------------------ 7
• Turning On the Camera ------------------------------------------------------- 8
• Setting the Date, Time and Date Stamp ---------------------------------- 8
• Power Saving ------------------------------------------------------------------- 9
7. Taking Pictures ------------------------------------------------------------------- 10
• Taking a Picture ---------------------------------------------------------------- 10
• Taking Continuous Pictures ------------------------------------------------- 10
• Using Digital Zoom ------------------------------------------------------------ 11
• Using Flash Light -------------------------------------------------------------- 12
• Setting Picture Quality -------------------------------------------------------- 12
• Putting Yourself in the Picture ---------------------------------------------- 13
8. Taking Videos -------------------------------------------------------------------- 14
• Taking a Video ------------------------------------------------------------------ 14
9. Reviewing Pictures and Videos -------------------------------------------- 15
• Reviewing Pictures and Videos -------------------------------------------- 15
• Viewing Six Pictures -------------------------------------------------------- 15
• Using Slide Show -------------------------------------------------------------- 16
• Magnifying Pictures ----------------------------------------------------------- 16
• Selecting Pictures for Printing (DPOF Print Settings) ---------------- 17
Page 5

Table of Contents Page
10. Deleting Pictures and Videos ----------------------------------------------- 18
• Deleting Single Picture or Video -------------------------------------------- 18
• Deleting All Pictures and Videos -------------------------------------------- 18
• Formatting Internal Memory or SD Card ---------------------------------- 19
11. Customizing Your Camera Settings -------------------------------------- 20
* Capture Function Menu ------------------------------------------------------ 20
* Playback Function Menu ---------------------------------------------------- 25
12. Installing Your Camera Driver ---------------------------------------------- 27
13. Installing Software -------------------------------------------------------------- 28
14. Uninstalling Software --------------------------------------------------------- 29
• Uninstalling Software ----------------------------------------------------------- 29
• Uninstall Camera's Driver ----------------------------------------------------- 29
15. Downloading Pictures and Use PC Camera --------------------------- 30
16. Downloading Pictures in Macintosh and Linux ------------------------ 31
1
7. Arcsoft PhotoImpression 5 ------------------------------------------------ 33
18.
Arcsoft videoImpression2--------------------------------------------------- 34
19. Internet Video Conferencing --------------------------------------------------- 37
Appendix ------------------------------------------------------------------------------- 38
Specifications ---------------------------------------------------------------------- 38
FAQ ----------------------------------------------------------------------------------- 39
Troubleshooting -------------------------------------------------------------------- 41
Page 6
1. System Requirements
• Personal computer, laptop, desktop, or IBM compatible with Pentium 166
MHz minimum, and with an active USB (Universal Serial Bus) port.
• Windows 98 SE / ME / 2000 / XP, CD ROM drive, color monitor, mouse and
keyboard.
• Color printer for printing color pictures.
• For transferring still images via the Internet, or for video conferencing, your
computer must have modem and communication software for Internet
connection.
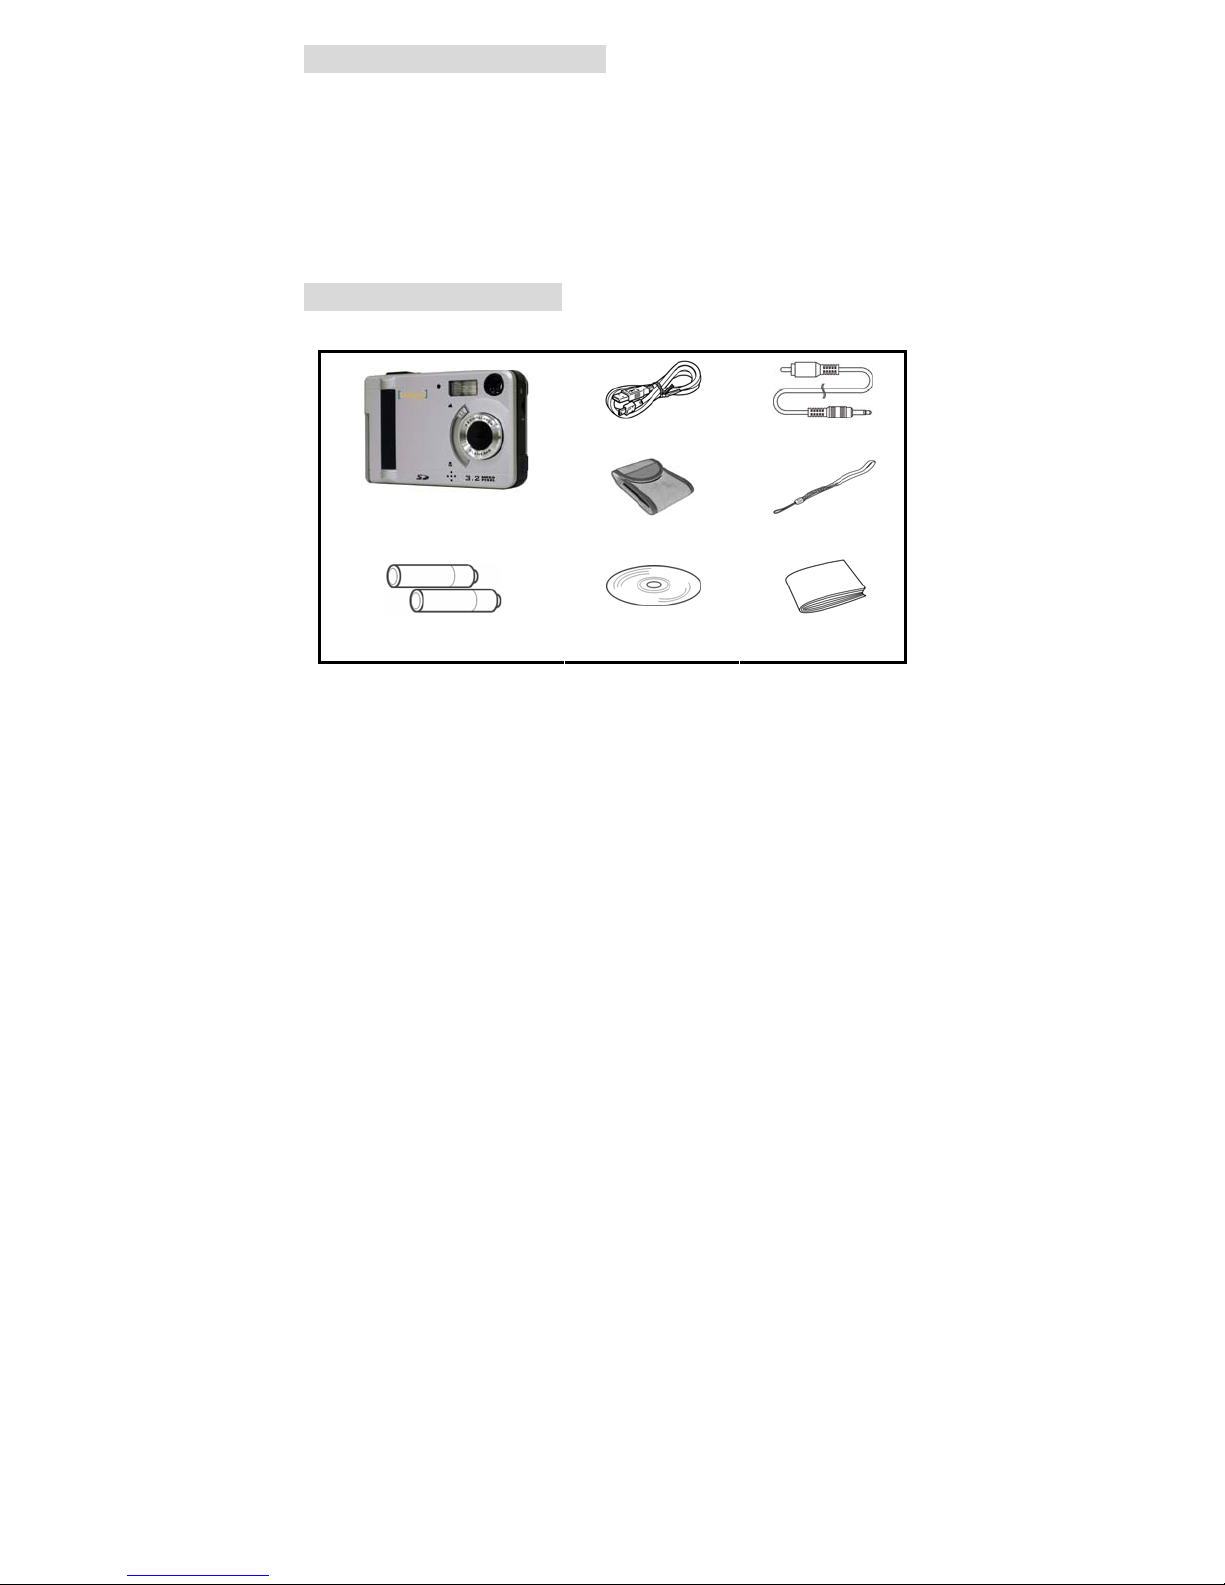
2. Package Contents
Make sure that all of the items shown below are included with your camera.
•
USB cable
Video cable
•
•
•
Digital camera
2x AAA Batteries
• Pouch
•
Installation CD
• Wrist strap
•
User’s manual
- 1 -
Page 7
3. Quick Start
CAUTION
• Please install the camera driver before using your camera with a PC.
• Best way to transfer picture to PC is using the PC-DISK (Mass Storage)
mode to copy all your pictures.
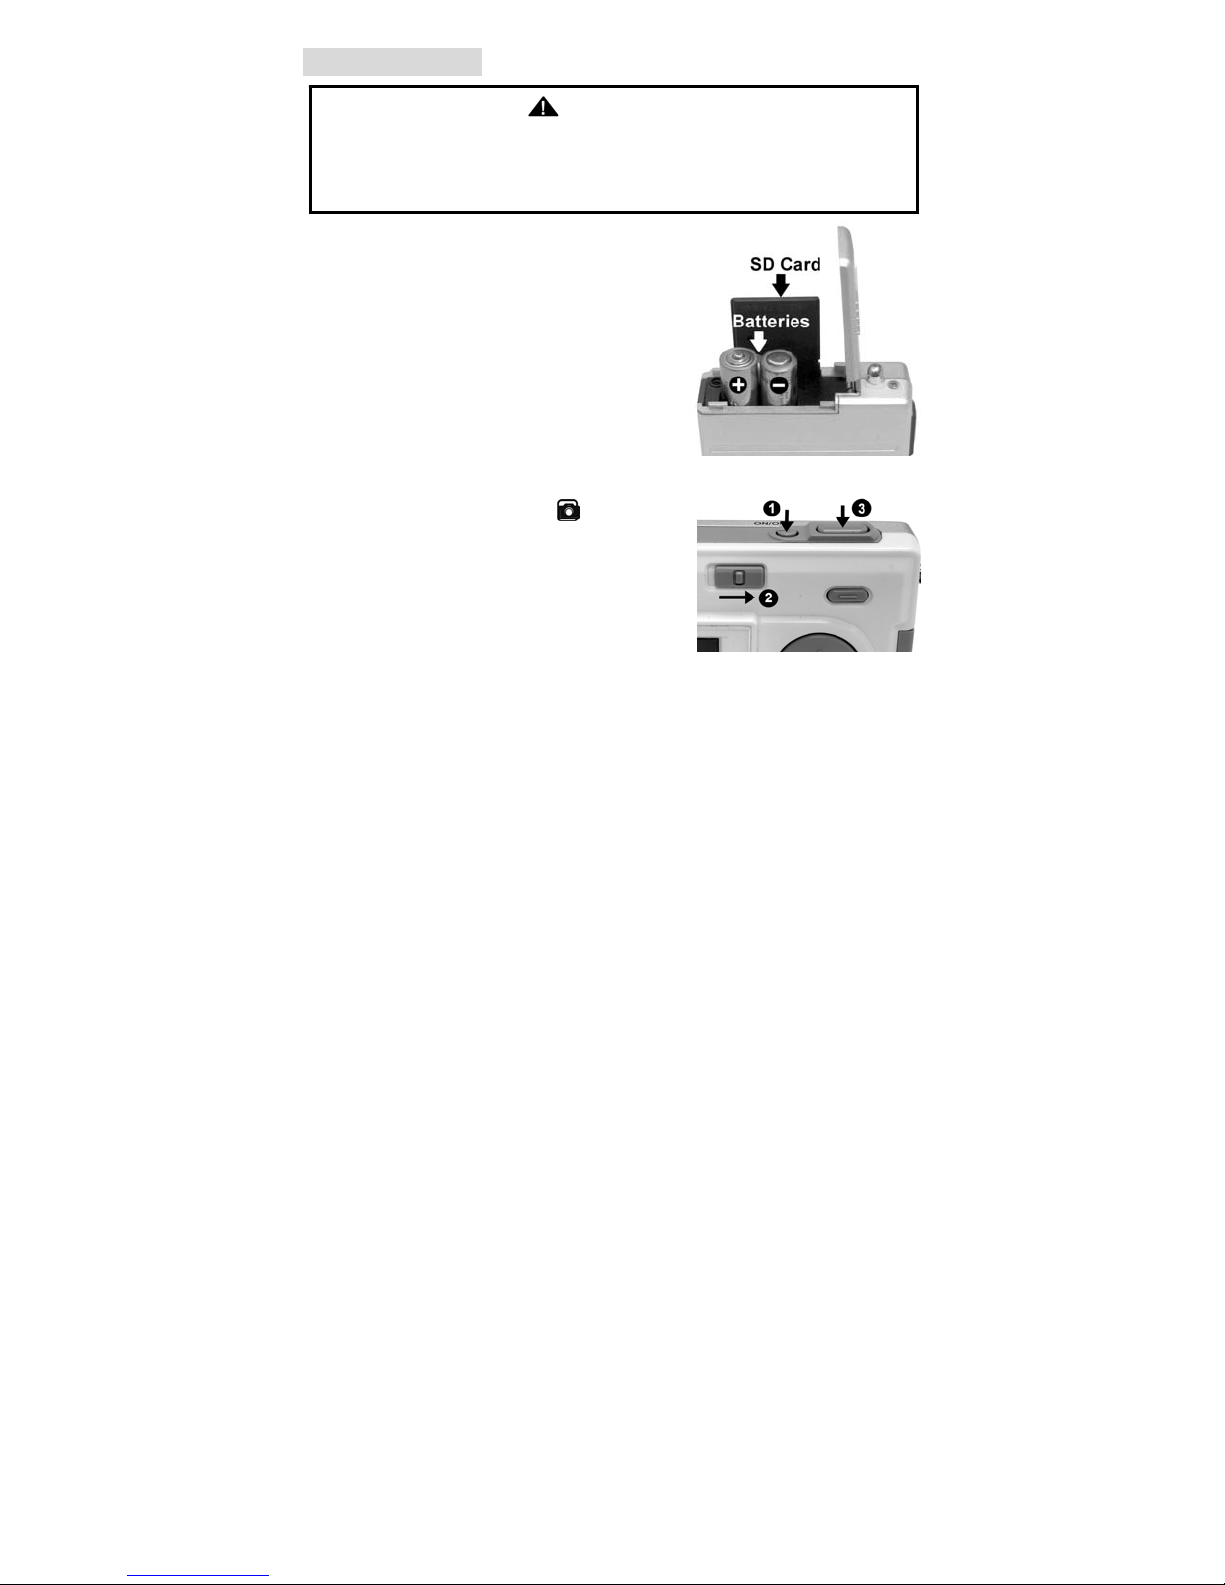
• Getting Ready
1. Open the battery compartment cover.
2. Load the batteries and the SD card (Optional)
into the camera.
3. Close the battery compartment cover.
• Taking a Picture
1. Turn on the camera.
2. Slide the Function switch to
Function).
3. Point the camera at the subject and look
through the viewfinder or at the LCD screen to
take a picture.
4. Hold the camera still and gently press the
shutter button to take a picture.
(Capture
- 2 -
Page 8
• Reviewing a Picture
1. Turn on the camera.
2. Slide the Function switch to ► (Playback
Function).
3. Use ▲ or ▼ to scroll through the pictures or
videos on the LCD screen.
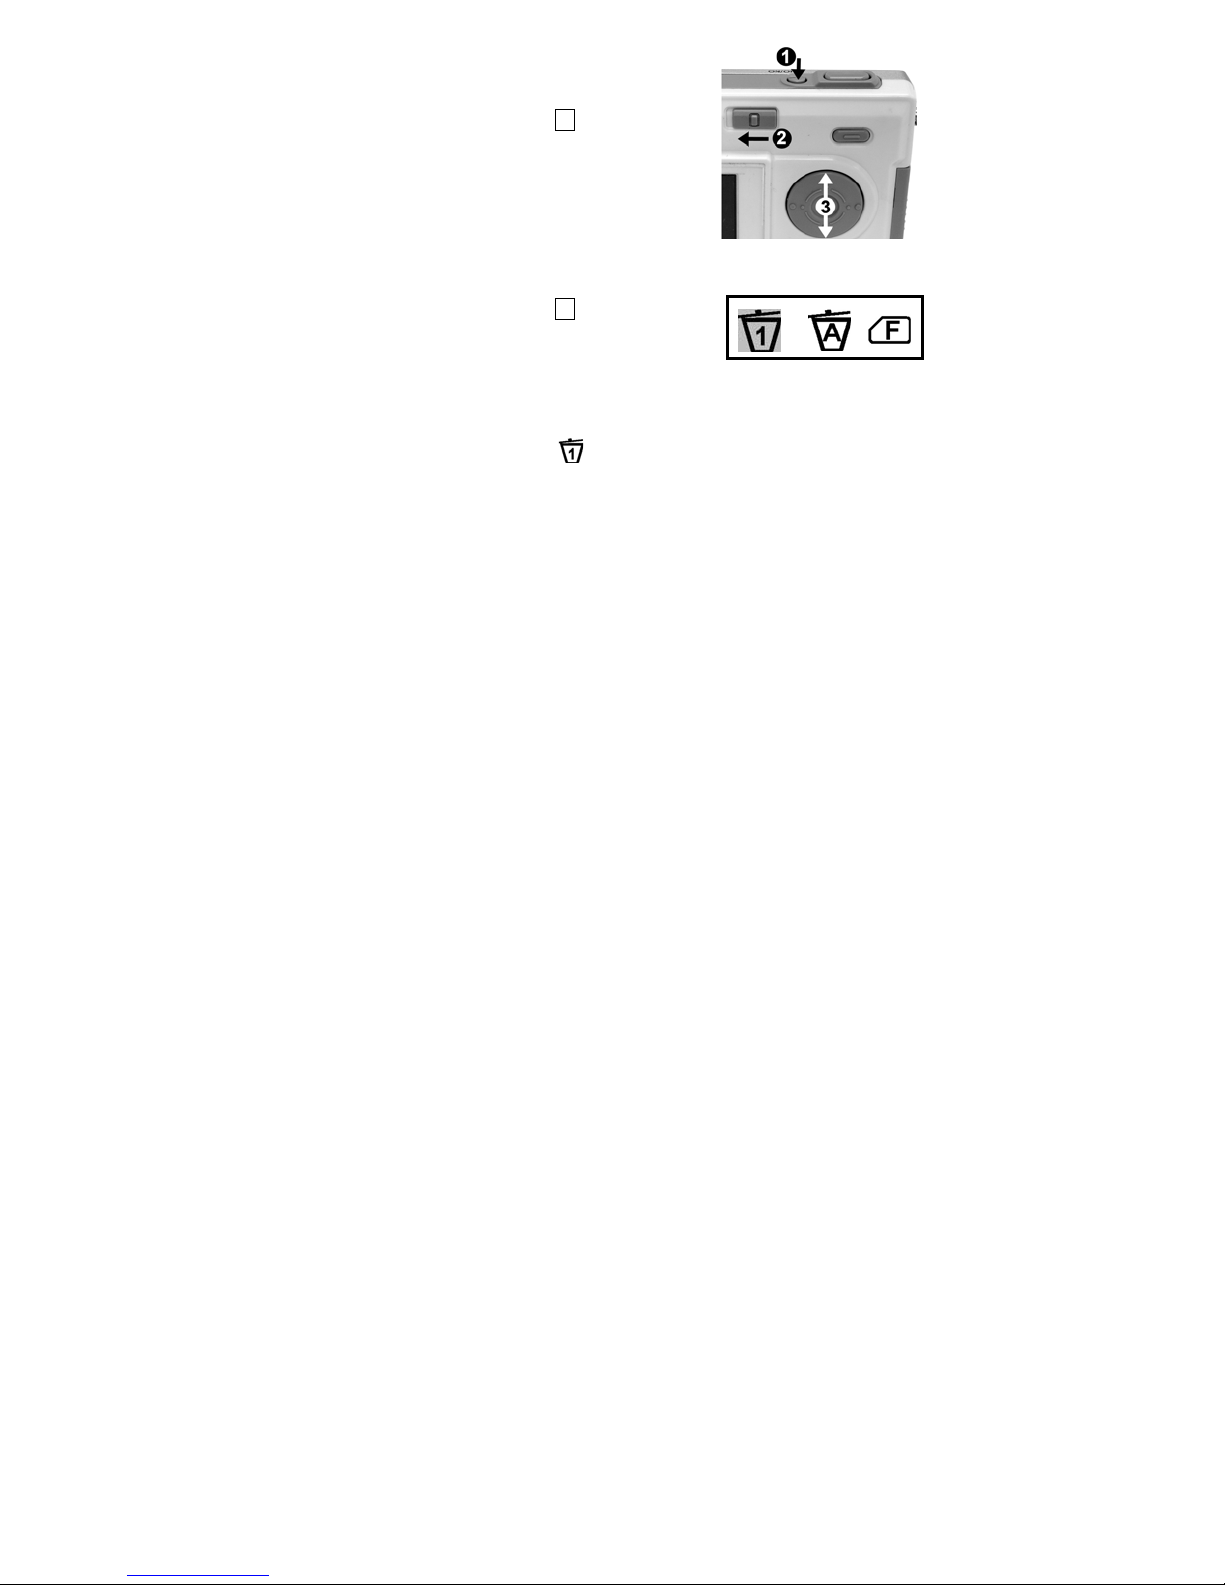
• Deleting a Picture
1. Turn on the camera.
2. Slide the Function switch to ► (Playback
Function).
3. Use ▲ or ▼ to display the picture you want to
delete.
4. Press the MENU button and then use ◄ and ► to select [Delete] on the
screen. Press the Enter button.
5. Use ◄ or ► button to select
button to confirm.
([Delete One]), and then press the Enter
Delete One
- 3 -
Page 9
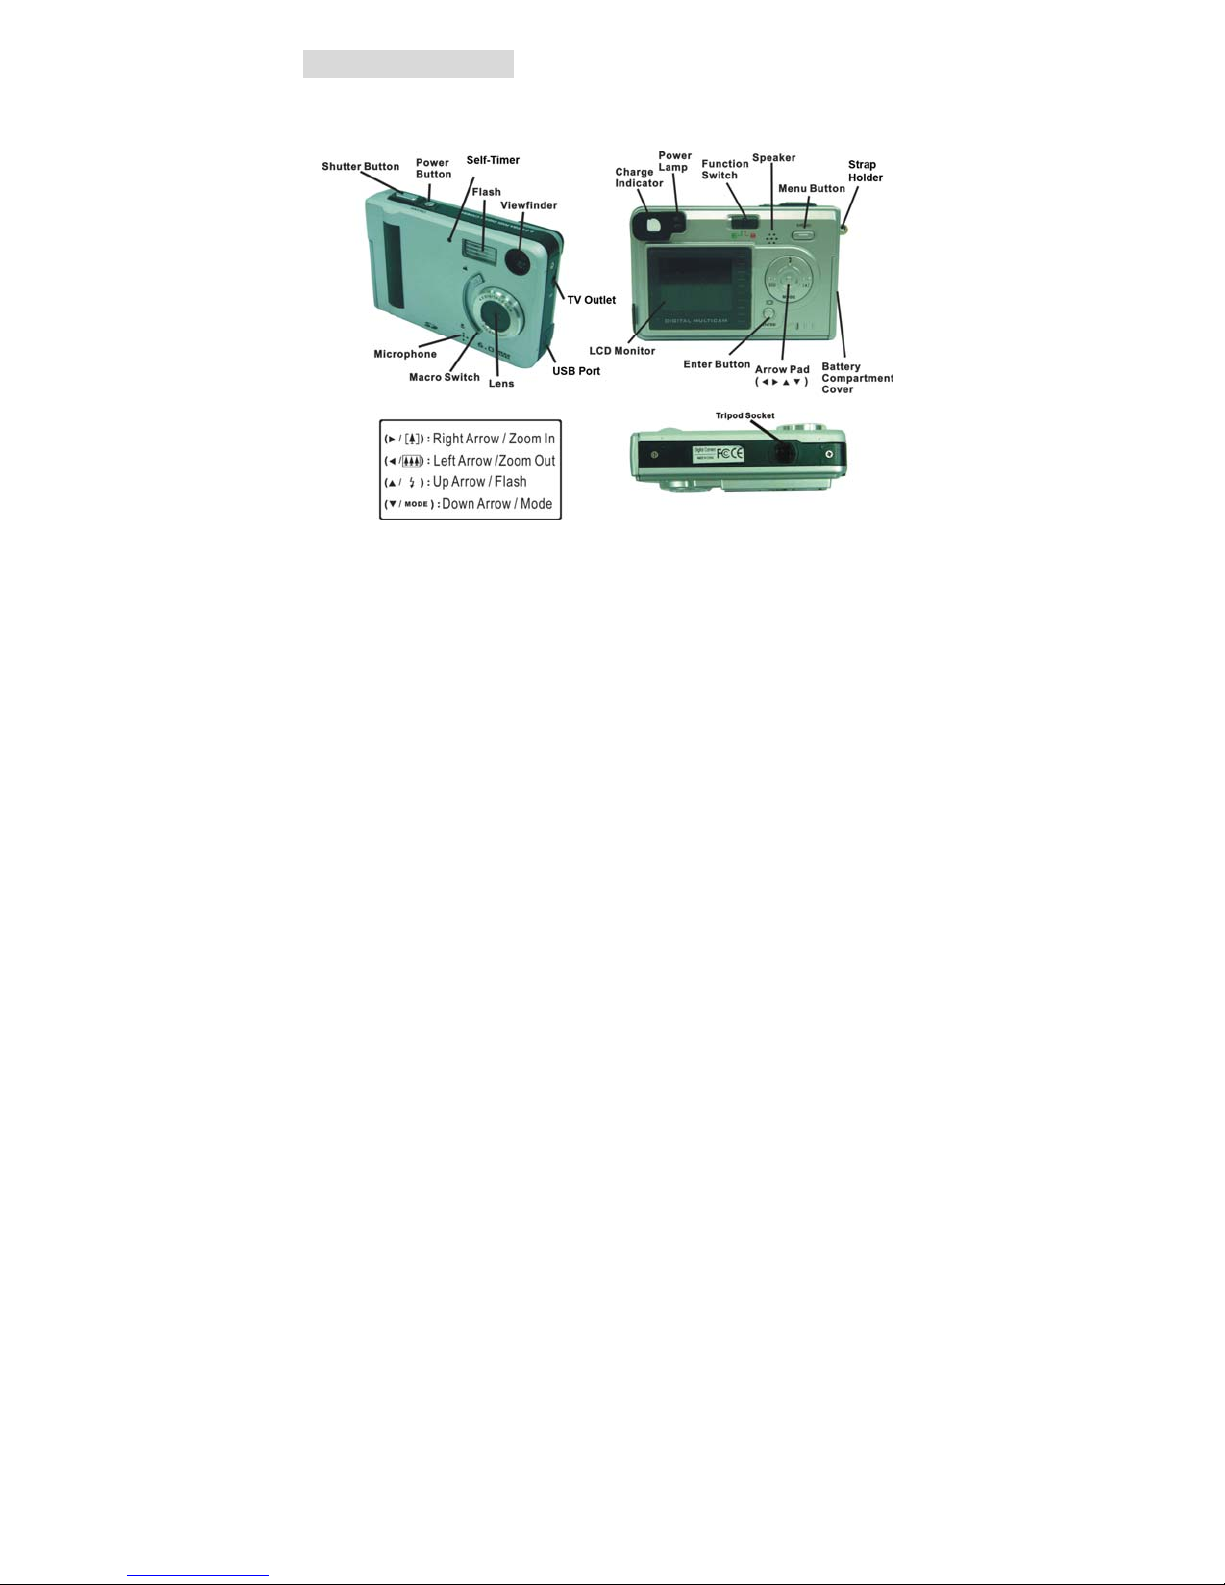
4. Name of Parts
The following illustrations show the names of each component, button, and
switch on the camera.
- 4 -
Page 10
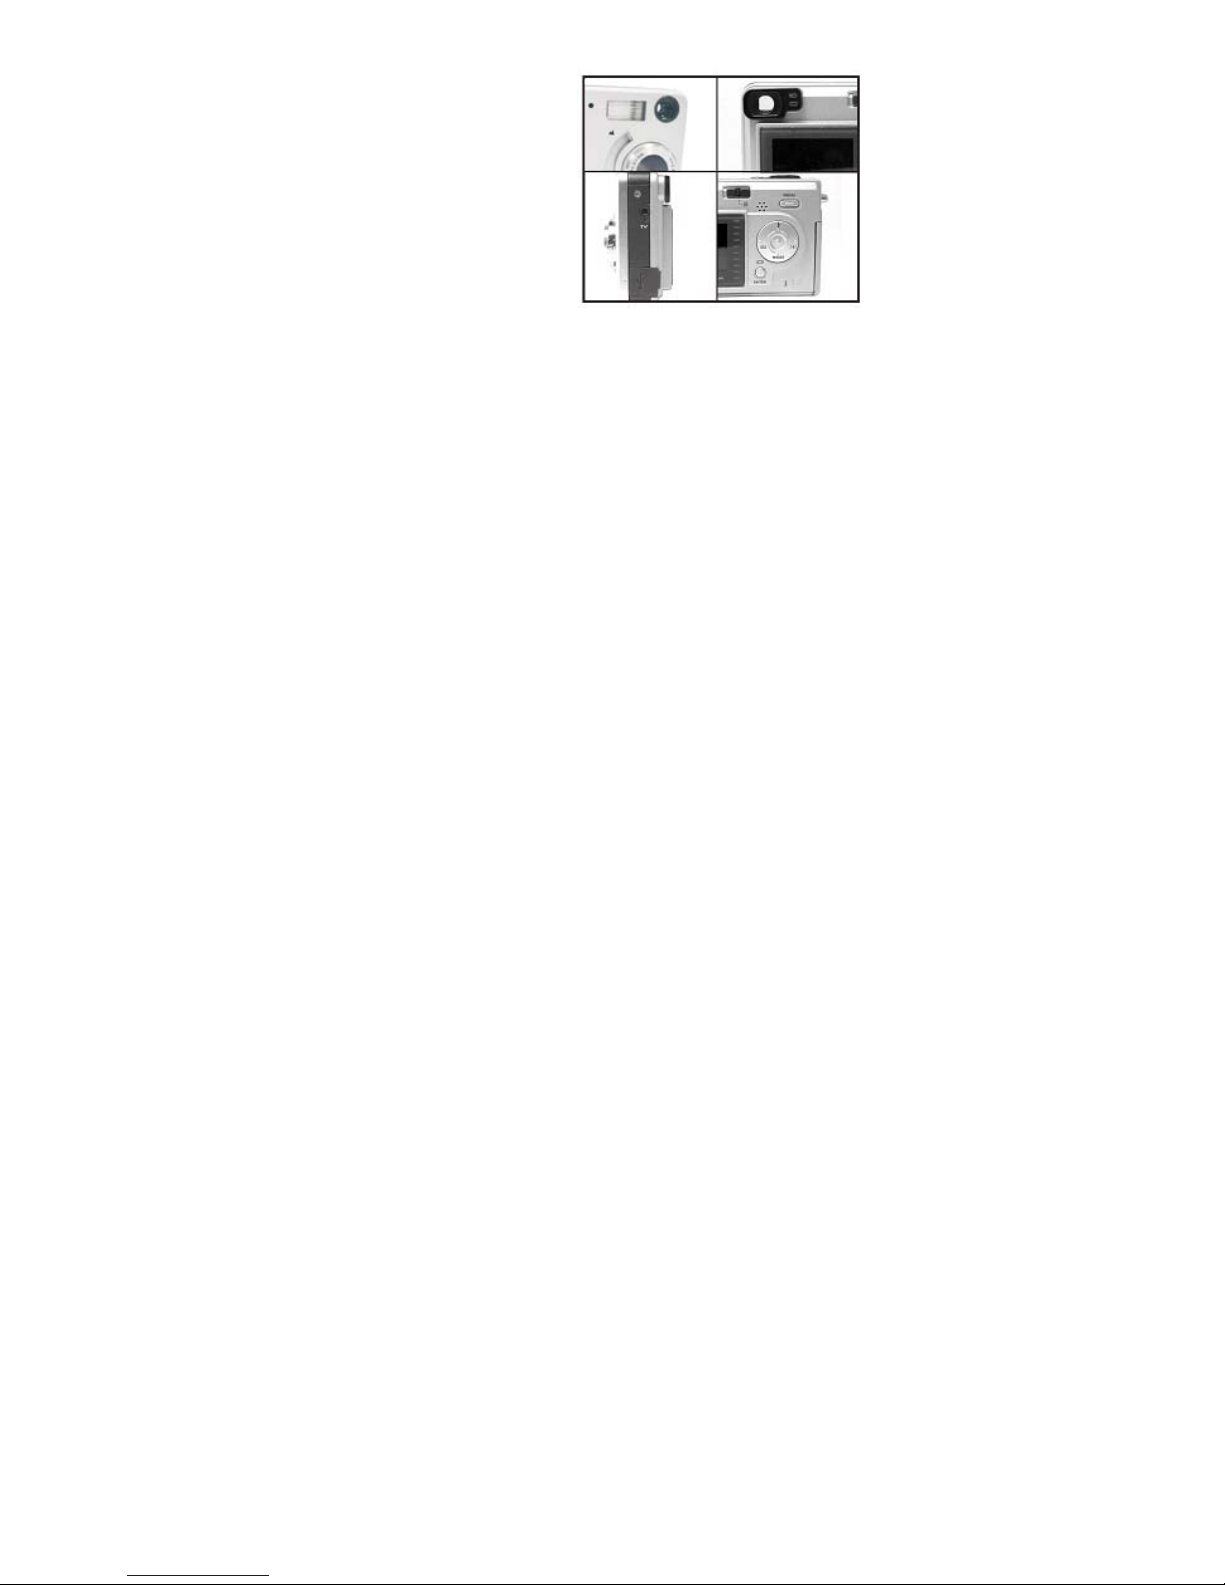
Indicators
1. Indicator Lamp (Green)
2. Self-Timer Lamp (Red)
3. Power Lamp
Digital Interface:
USB 1.1
Video Output:
TV out in NTSC / PAL
DIGITAL ZOOM
During shooting, the user can push ◄ and ► to zoom in and zoom out.
Display Button
Press the Enter button and the current information on the LCD screen will be
displayed.
Menu Button
You can turn the menu ON or OFF by pressing the Menu button. When menu
is on, it will appear on top of your LCD screen. Use ◄ and ► button to select
and press the Enter button or ▲ ▼ button to enter each menu item.
- 5 -
Page 11
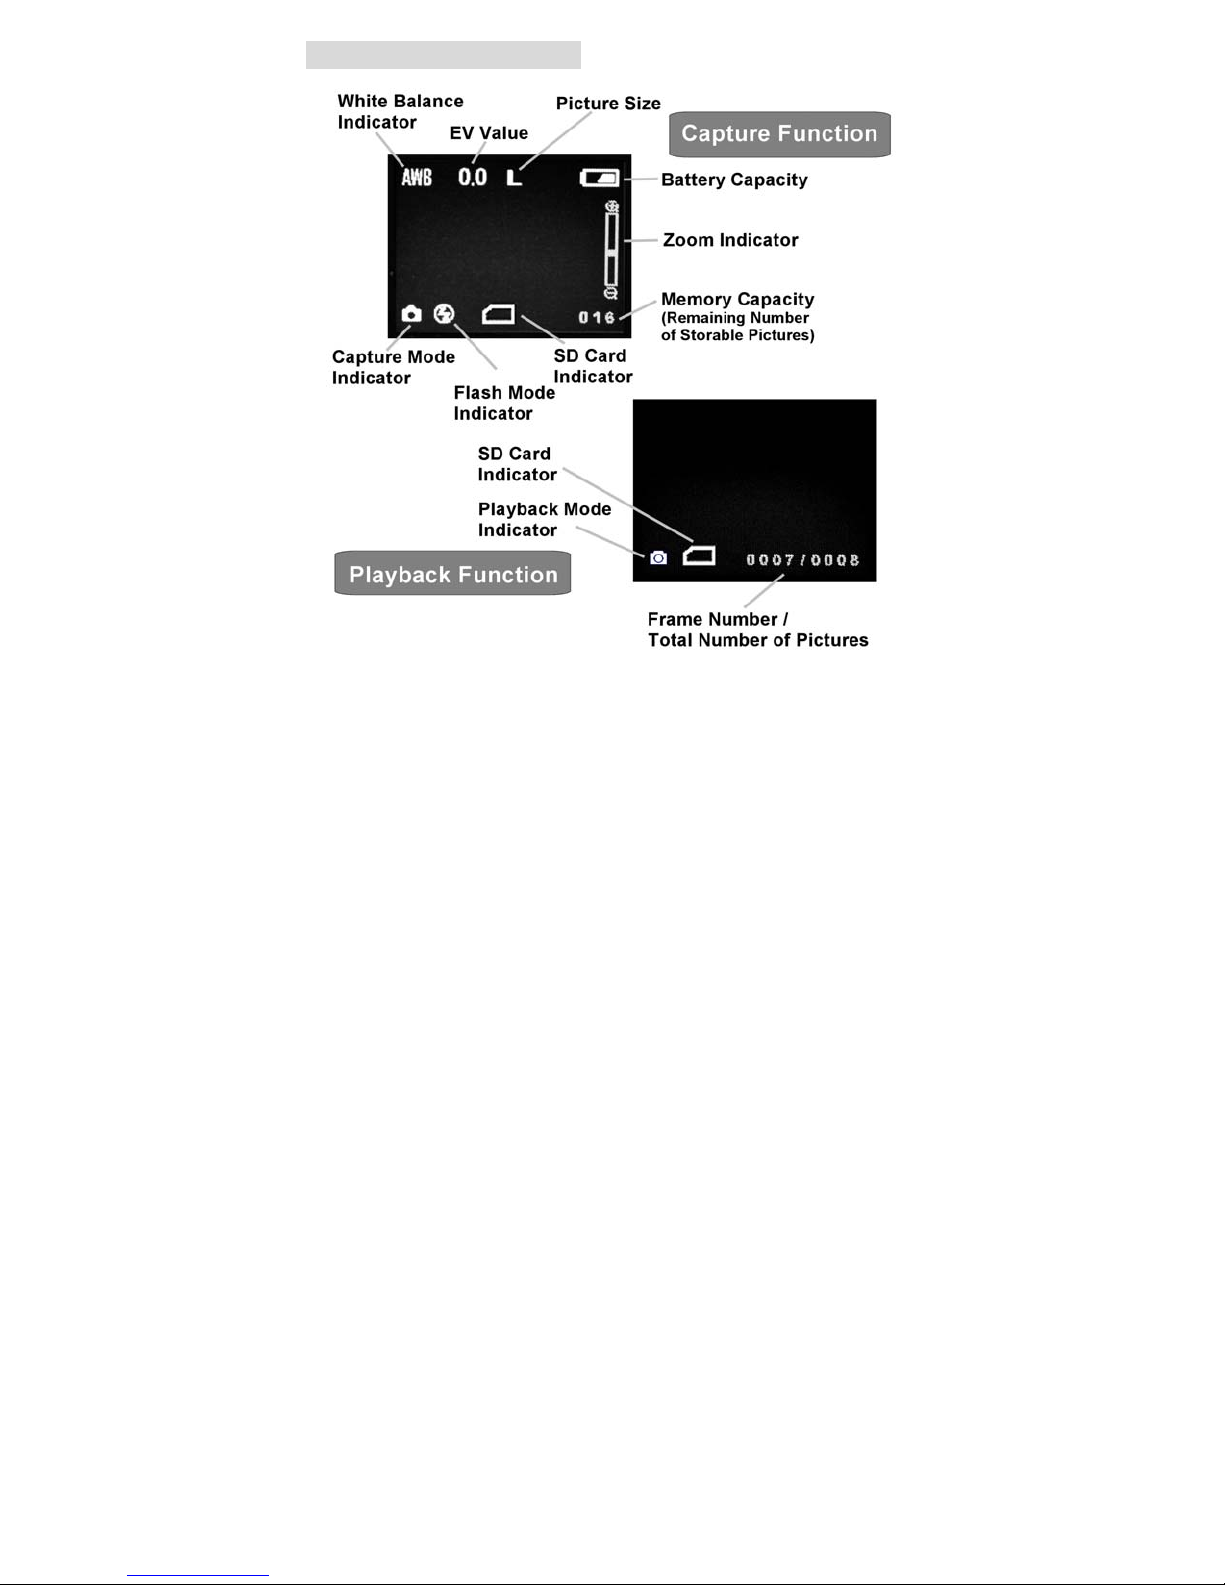
5. Display Information
- 6 -
Page 12
6. Getting Started
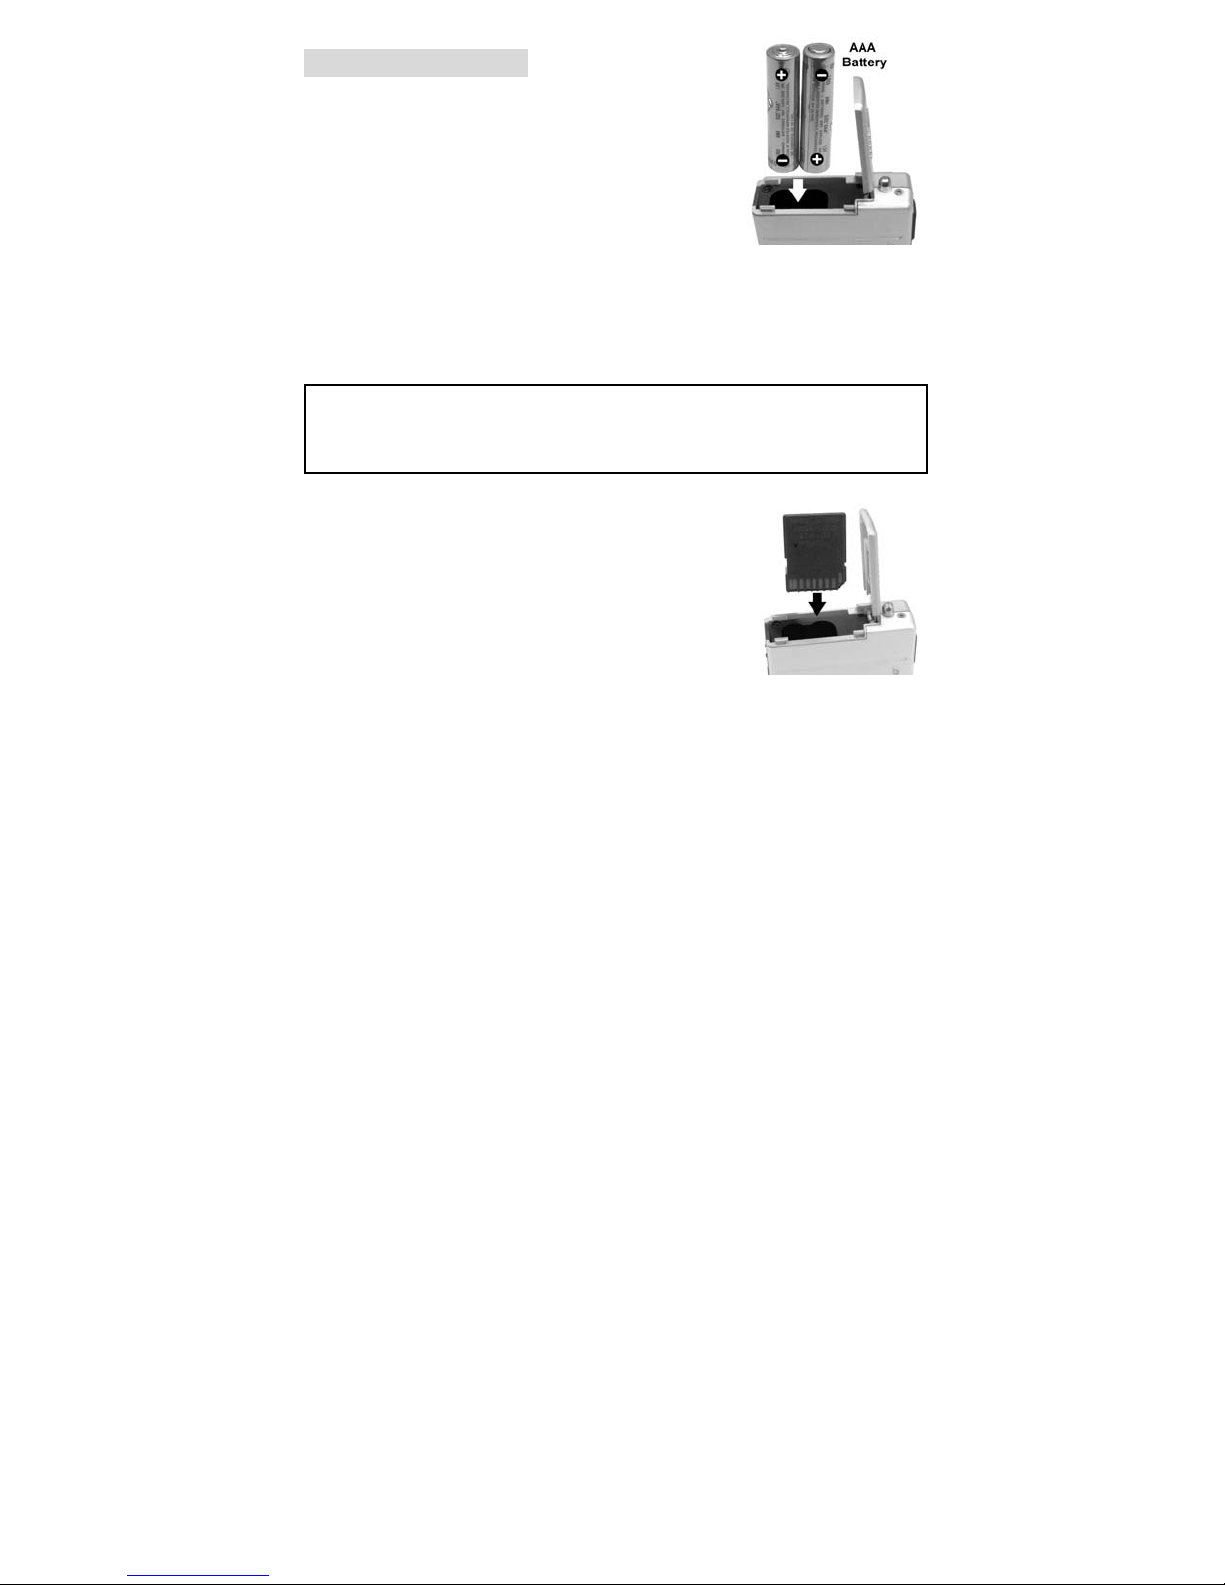
• Installing Camera Batteries:
1. Open the battery compartment cover.
2. Insert batteries. Be sure to load batteries with +
and – terminals as shown on the battery cover.
3. Close the battery compartment cover.
• Inserting SD Card (Optional):
The camera offers two options for storing pictures and videos:
Internal Memory - Store pictures and videos in the 16 MB internal memory.
SD Card - Optional SD cards provide removable, reusable storage for
CAUTION:
• The card can only be inserted one way. Forcing it may damage the
camera or the card. Do not insert or remove the card when power is
on.
To insert a SD card:
1. Turn off the camera and open the battery
compartment cover.
2. Adjust the card as shown. Push the card into the slot
and push again to have it fully inserted into the slot.
3. To remove the card, push it in, then release it. When
the card is partially ejected, pull it out.
4. Close the battery compartment cover.
pictures and videos. Store as many pictures as you like, depending
on the size of the card. (supports up to 1GB SD Card)
- 7 -
Page 13
Note: 1. If the SD card is present in the camera, then the pictures/
videos will be saved in the SD card. If no card is inserted, the
camera will use its built-in 16MB internal memory.
2. If the “MEMORY FULL” warning message appears on the LCD
screen, it means the SD card or internal memory is full. Please
remove the memory and insert a new one or move/store all
pictures/videos in the memory to your computer.
• Turning On the Camera:
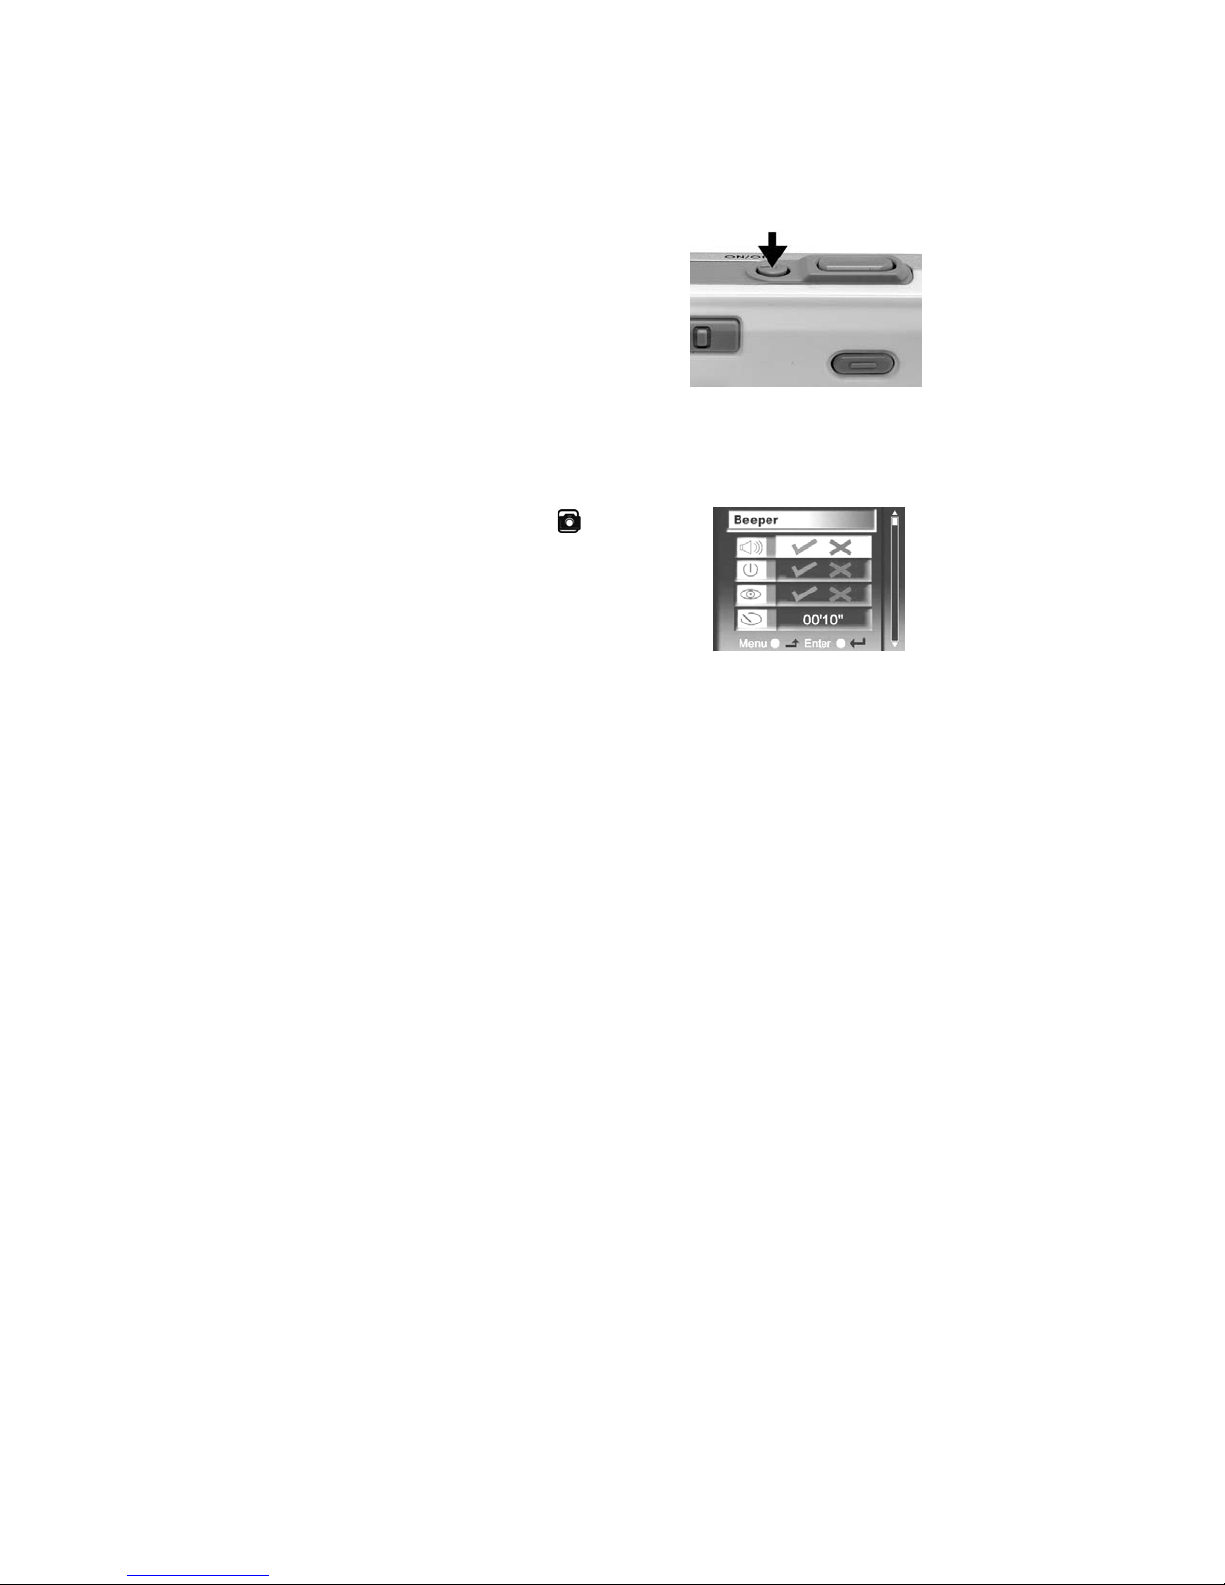
1. Press the Power button to turn on the
camera. (shown in the illustration)
2. Buzzer will beep and indicator lamp will light
up. The LCD monitor will be turned on.
3. Press the Power button again to turn off the
camera.
• Setting the Date, Time and Date Stamp:
You should set the Date and Time when you first use your camera or if the
battery is removed for an extended period of time (approximately 120 min).
Use the following procedure to change the date and time setting.
1. Slide the Function switch to
Function).
2. Press the MENU button. Use◄ or ► button to
select [Advance] option and press the Enter
button to bring up the advanced menu.
(Capture
- 8 -
Page 14
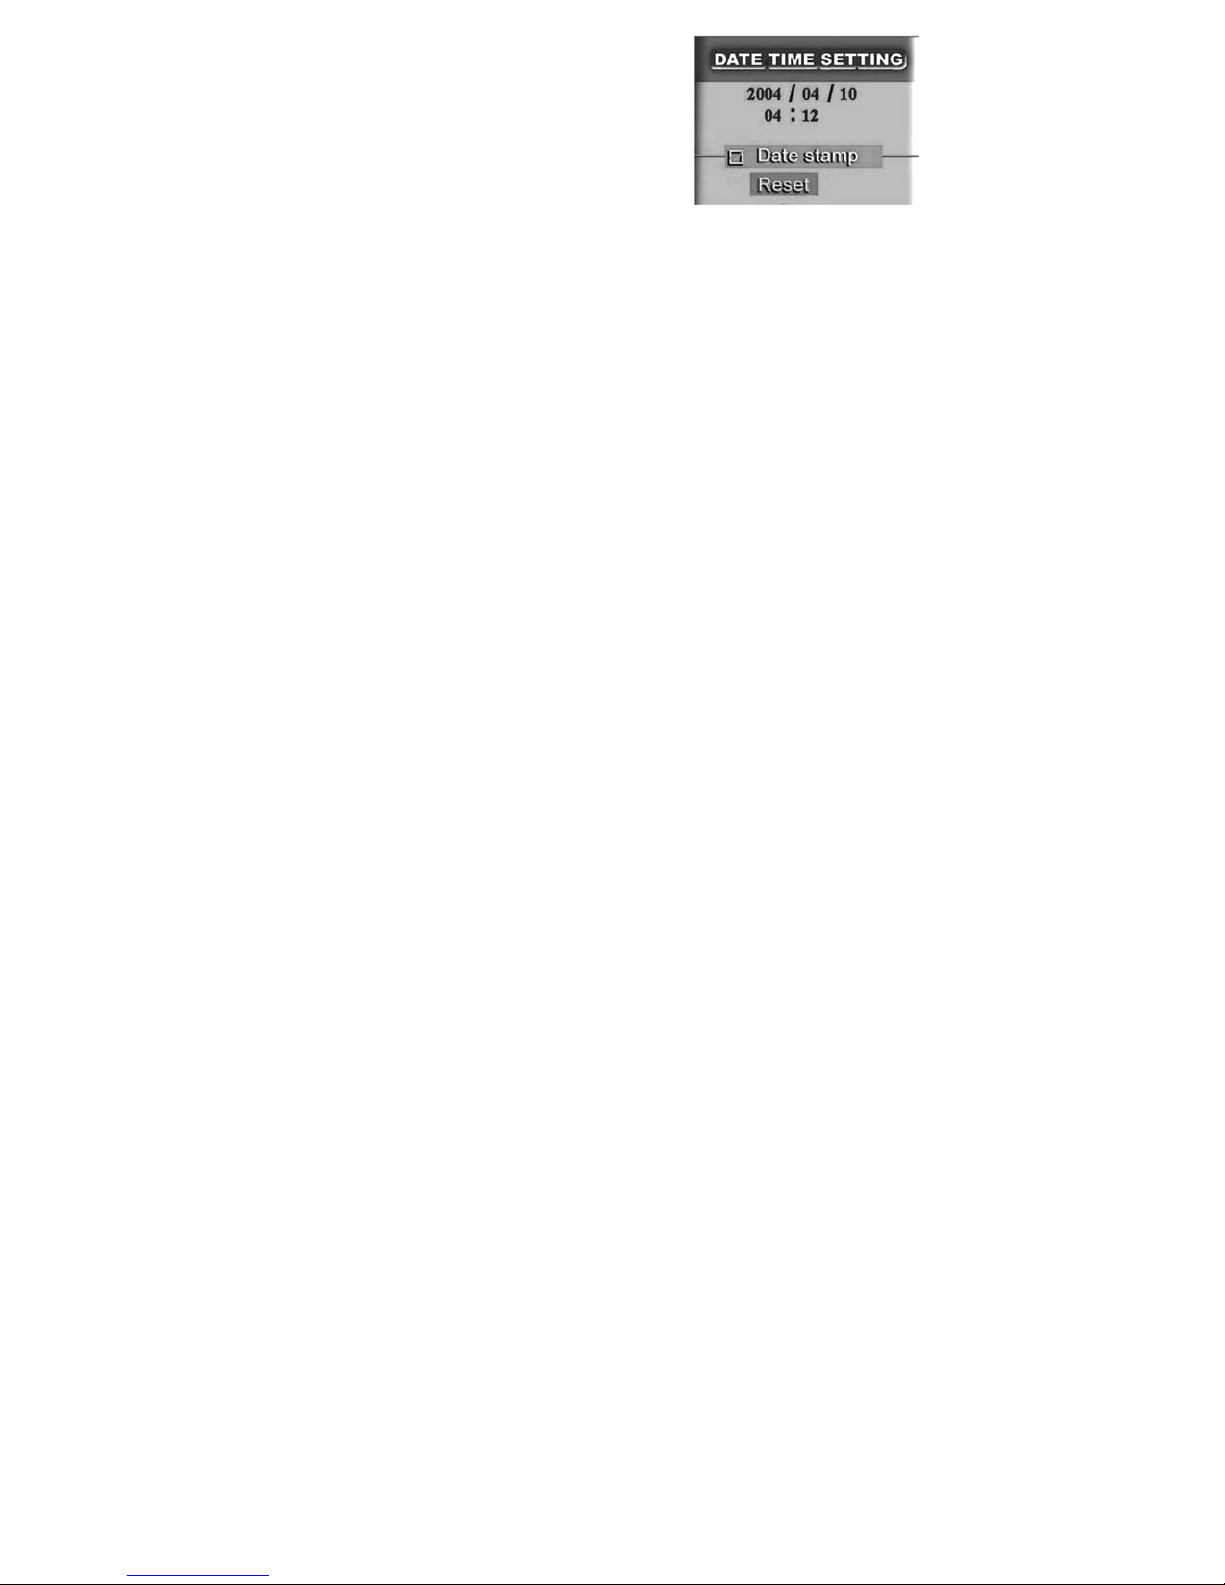
3. Use ▲ or ▼ to select [Date Time], and then
press the Enter button.
4. Press ▲ or ▼ to adjust the date and time.
Press ◄ or ► to advance to the next setting.
5. When finished, press the MENU button to
exit the menu.
Use the Date Stamp setting to imprint the date on your pictures.
1. In the Date Time Setting menu, make sure the camera clock is set to the
correct date.
2. Press ◄ or ► to select [Date stamp] option.
3. Press the Enter button to switch the Date stamp function to on or off.
4. Press the MENU button to exit the menu.
• Power Saving:
The camera will automatically power off approximately in 3 minutes if the
camera is not in use.
When this function is enabled, the power is not turned off automatically.
- 9 -
Page 15
7. Taking Pictures
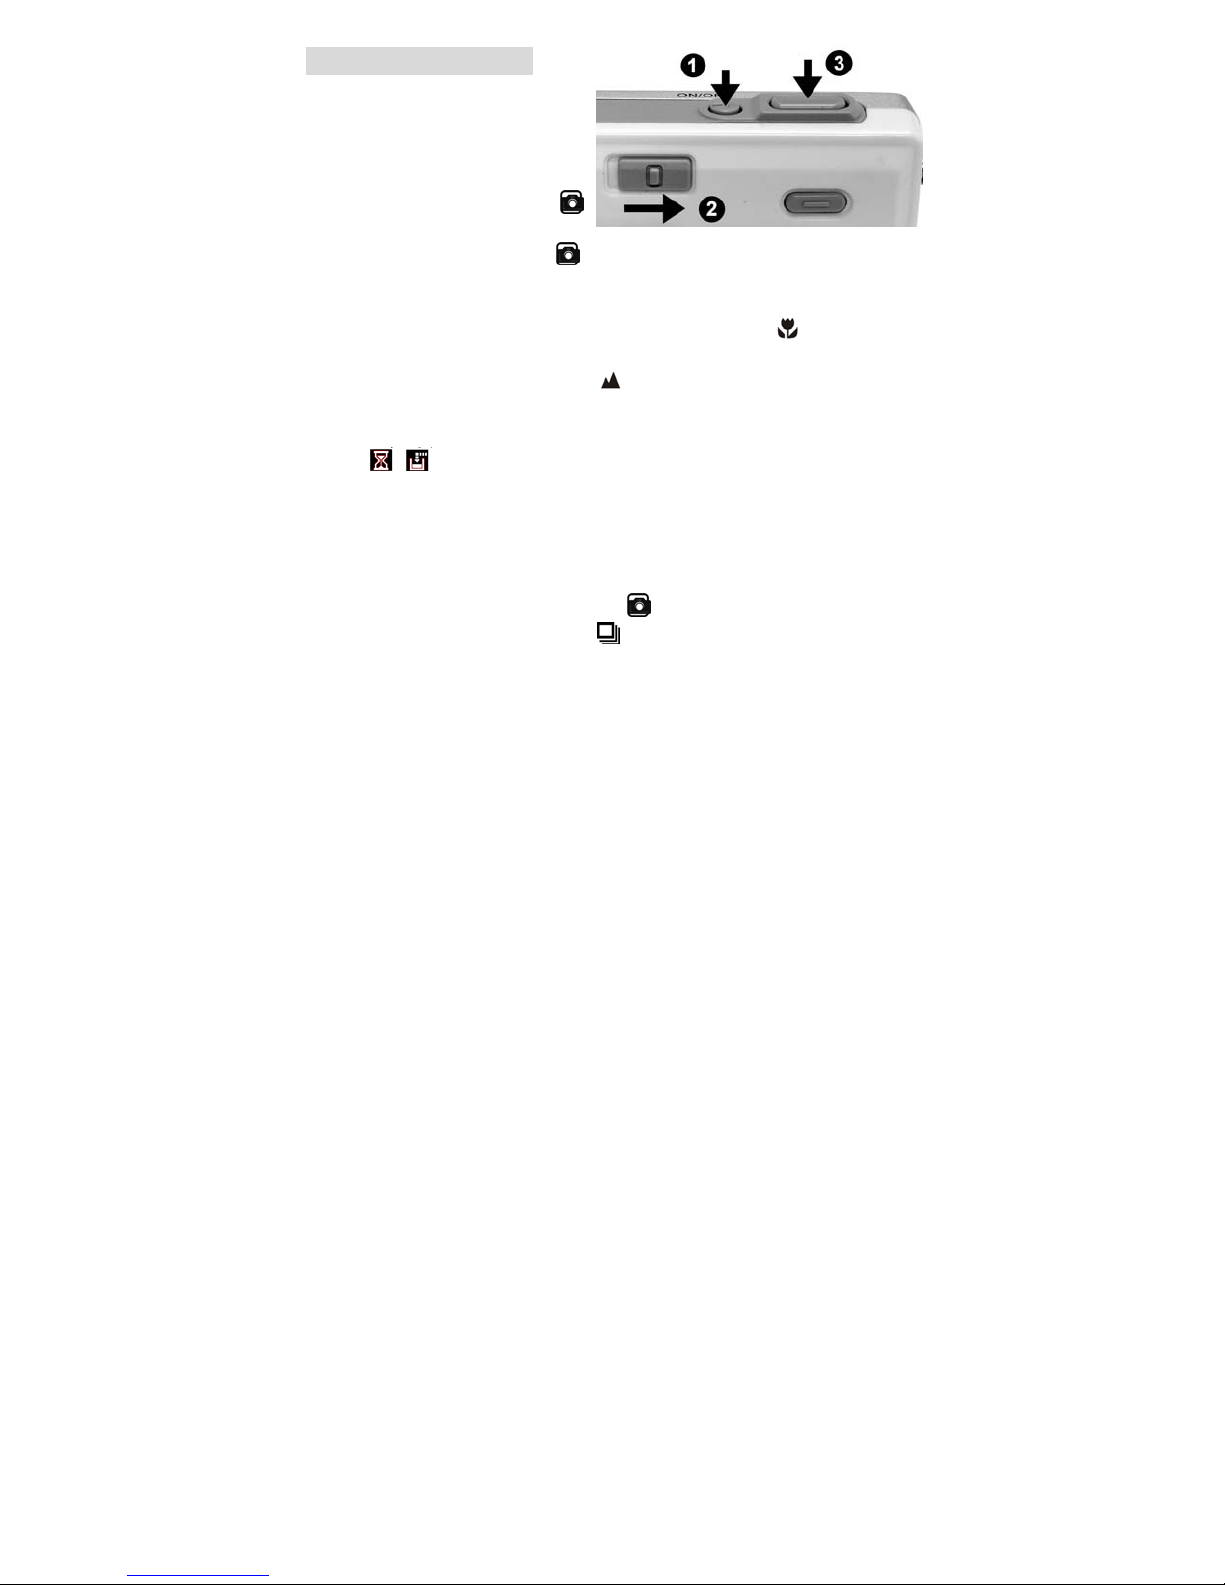
• Taking a Picture
1. Turn on the camera.
2. The LCD monitor will display
images and symbols.
3. Slide the Function switch to
(Capture Function).
4. The LCD screen will display
press the MODE button (▼) until the icon appears on the LCD screen.
5. Point the camera at the subject and use the monitor screen or the
viewfinder to frame your subject. (Switch to Macro Mode
you are taking is 1.6 ft or closer. If the object you are taking is further than
1.6 ft, please switch to the Normal
6. Hold the camera still and gently press the Shutter button to take the
picture.
7. The will appear on the screen while the camera is
storing/processing the picture.
Note : How to take a good shot? After pressing the shutter button, keep
your hand steady for 2 seconds to get best result.
(Snapshot Mode). If the icon is different,
if the object
)
• Taking Continuous Pictures
1. Make sure the Function switch is on . (Capture Function)
2. Press the MODE button (▼) until
(Continuous Mode)
appears on the LCD screen.
- 10 -
Page 16
3. Point the camera at the subject and use the LCD screen to frame the
image you wish to capture.
4. Hold the camera still and gently press the shutter button to take the picture.
5. You will hear a beep sound indication your picture is being
processed/stored.
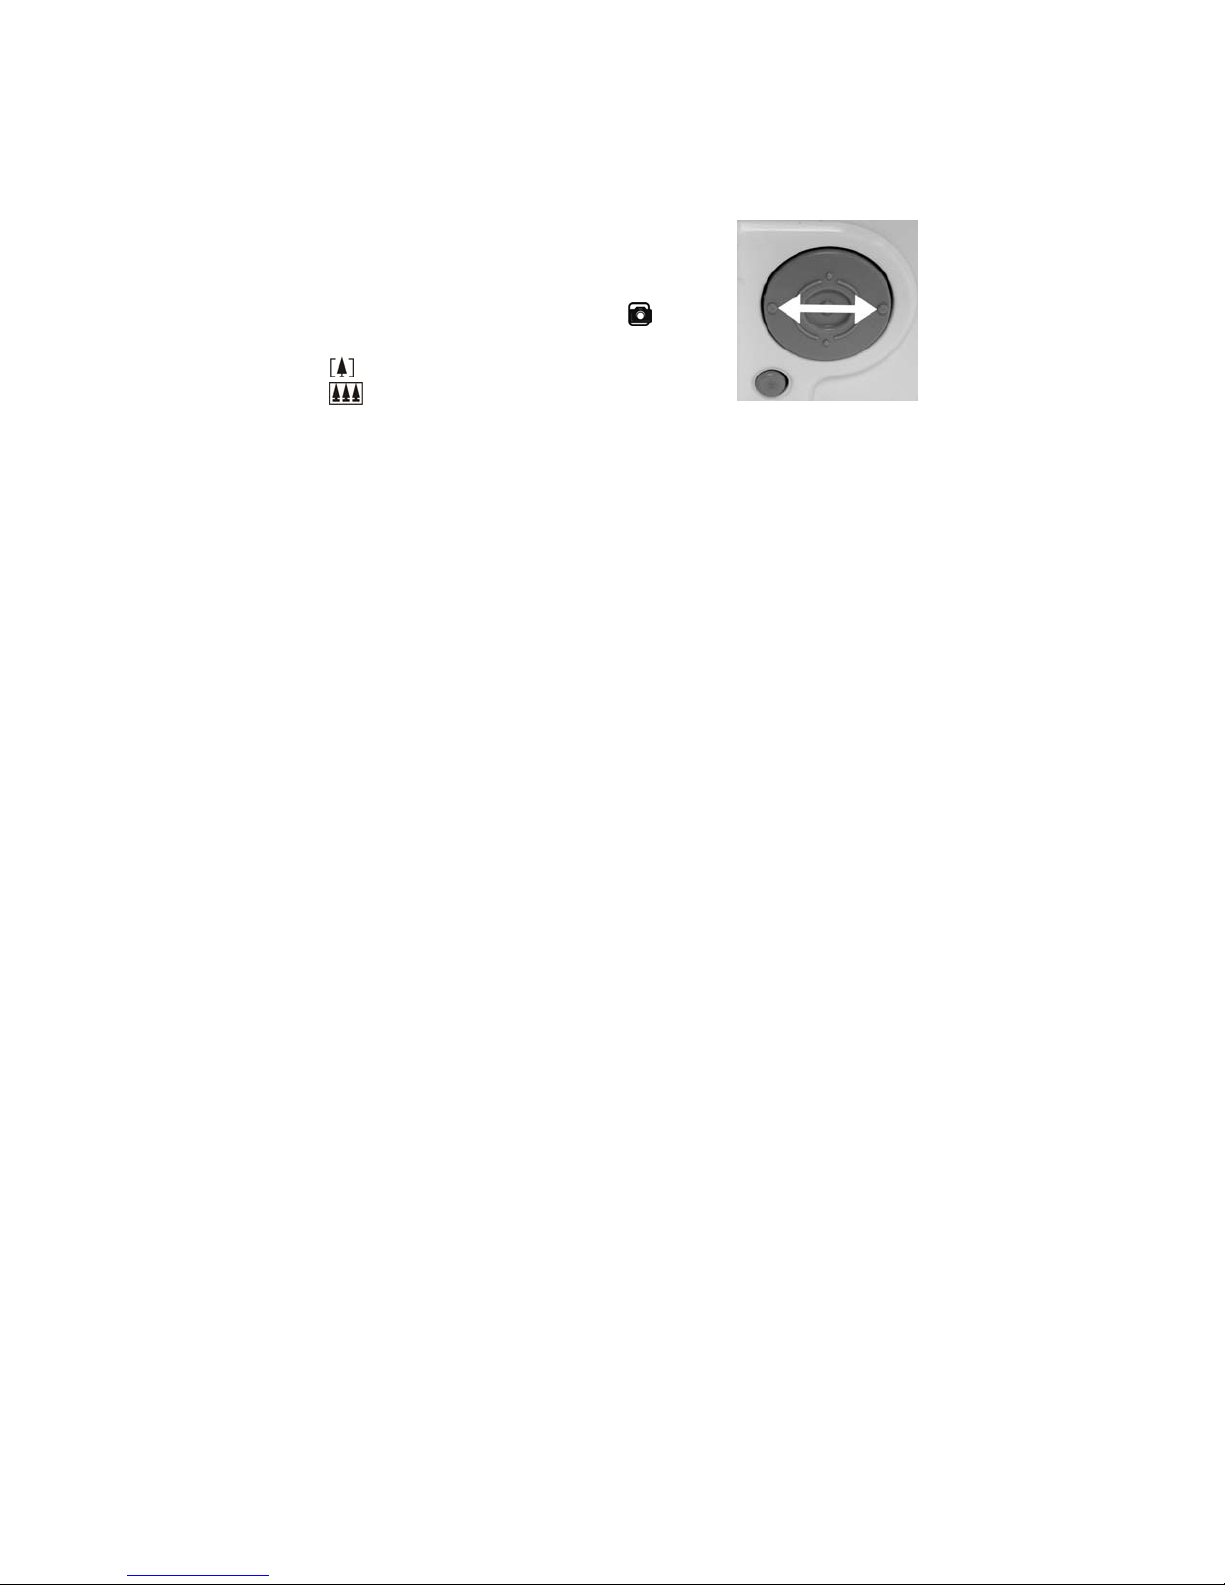
• Using Digital Zoom
The Digital Zoom provides up to 4X magnification of
your pictures. You may notice a decrease in printed
image quality when using Digital Zoom.
1. Make sure the Function switch is on
LCD to frame your subject.
2.
( ► ) Button: The subject will be enlarged.
( ◄ ) Button: The subject will be reduced.
Press the ► to zoom in. Keep the button pressed for continuous
magnification. The LCD displays the zoomed image and the magnification
level.
3. Press the ◄ to zoom out.
4. Press the Shutter button to take the picture.
Note:
1. The image will appear grainier as the image is digitally zoomed.
. Use the
2. Digital Zoom is automatically turned off when the camera is
turned off.
- 11 -
Page 17
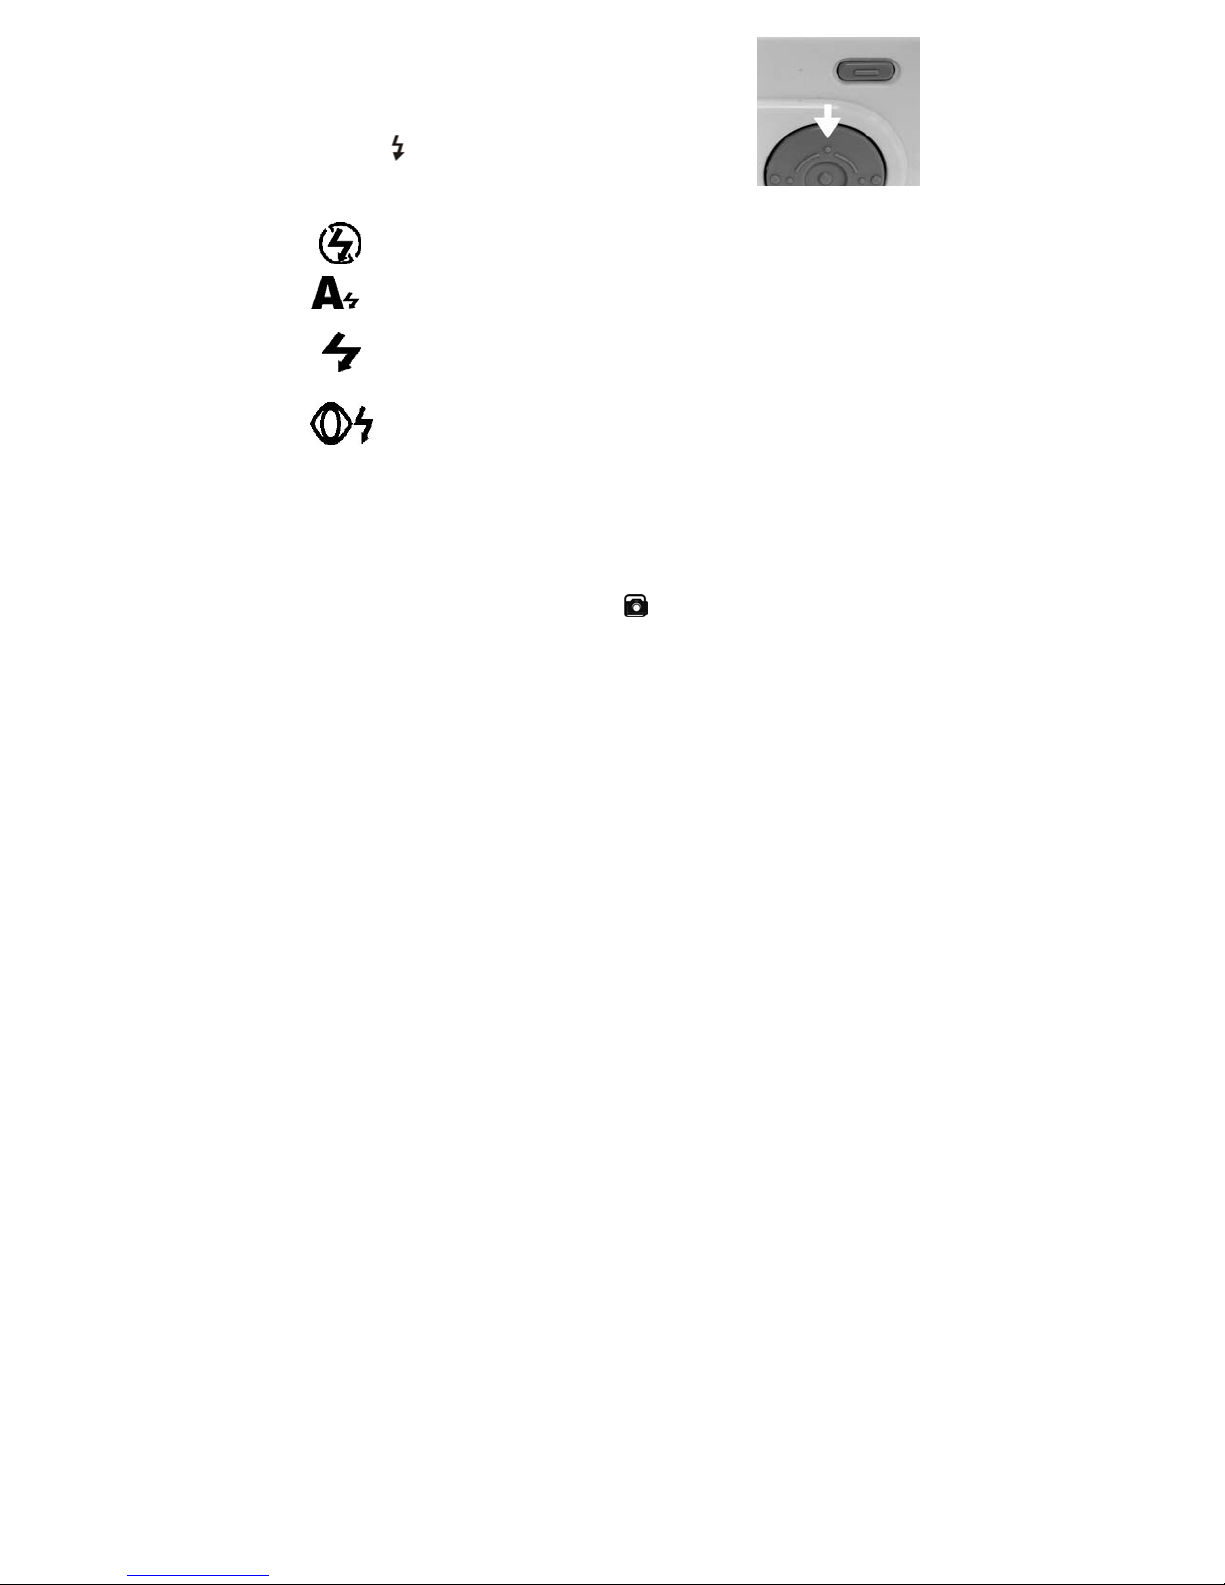
• Using the Flash
When you take pictures at night, indoors, or outdoors in
heavy shadows, your use the flash.
Press the
the flash options.
The flash icon that is displayed on the LCD monitor is the active option.
button (▲) repeatedly to scroll through
Off—flash never fires. (Default)
Auto Flash—flash fires when the lighting conditions require it.
Force Flash—flash fires every time you take a picture, regardless
of the lighting conditions.
Red-eye—flash fires once so the subject’s eyes become
accustomed to the flash, then fires again when the picture is taken.
The Red-eye option remains in effect until you change it.
Note: All flash options revert to Off when the camera is turned off.
• Setting Picture Quality
Use the Quality setting to select a picture resolution:
1. Make sure the Function switch is on
2. Press the ◄ or ► to select [
Pict Size] and press the Enter button.
, then press the MENU button.
- 12 -
Page 18

3. Select an option with ◄ or ► :
L (2400 x 1800) — for enlarged picture size; produces higher picture
resolution and larger file size.
M (2048 x 1536) — for standard picture size; produces normal picture
resolution and middle file size.
S (1600 x 1200) — for small picture size; pictures are of lower resolution
and file size is smaller.
4. Press the Enter button to confirm.
Note: 1. This setting remains until you change it.
2. Movies can be shot with the QVGA (320 x 240) or VGA (640 x 480)
resolution.
• Putting Yourself in the Picture (Self-Timer)
The Self-Timer creates a default delay between the time you press the
Shutter button and the time the picture is taken. This setting is ideal when you
want to include yourself in the picture.
1. Make sure the Function switch is on
2. Press the MODE button (▼) until appears on the LCD monitor.
(Self-Timer Mode)
3. Place the camera on a flat surface or use a tripod.
4. Use the LCD Screen or viewfinder to find the frame you wish to capture
then press the Shutter button all the way down.
5. The red Self-Timer light, located on the front of the camera, blinks for 10
seconds before the picture is taken.
.
- 13 -
Page 19

8. Taking Videos
• Taking a Video
1. Turn on the camera.
2. The LCD monitor will display images
and symbols.
3. Slide the Function switch to
(Capture Function).
4. Press the MODE button (▼) until
appears on the LCD screen. (Video
Mode)
5. Frame your subject on the LCD or
viewfinder, then press the Shutter
button to take the video.
6. Press the Shutter button again to stop recording.
Note: 1. During recording, user can press the ◄ / ► button for zoom
in/out.
2. The video resolution is QVGA (320 x240) and VGA (640 X 480).
“CIF” or “VGA” will appear on the LCD in Video mode.
3. You can select the video resolution by going into [Pict Size] in
Advance setting.
- 14 -
Page 20

9. Reviewing Pictures and Videos
• Reviewing Pictures and Videos
1. Turn on the camera.
2. Slide the Function switch to ► (Playback Function). The last picture or
video will be displayed.
3. Use ▲ and ▼ to select the picture or video (If appears on the LCD
screen) you want to review.
4. Press the Enter button to start the playback of the video.
5. During the playback, press the Enter button to pause / resume the video
playing.
Note: You can use the ◄ or ► button to enlarge or reduce the picture.
• Viewing six Pictures
View six pictures at once on the LCD monitor (Index View) so that you can
search through the pictures quickly.
1. Make sure the Function switch is on ► , then press the MENU button.
2. Press the ◄ or ► to select View on the screen and press the Enter button.
3. Press the ◄ or ► to select
button.
4. Six picture thumbnail will appear on the LCD monitor.
5. Use ◄ ►or▲ ▼ to select the picture. Press the Enter button for the picture
you want to zoom.
([Thumbnails]) and press the Enter
- 15 -
Page 21

• Using Slide Show
Use the Slide Show feature to sequentially display your pictures and videos
on the camera LCD, on a television screen, or on any external display device
equipped with a video input.
1. Make sure the Function switch is on ►, then press the MENU button.
2. Press the ◄ or ► to select [View] on the screen and press the Enter
button.
3. Press the ◄ or ► to select and press the Enter button.
4. Each picture and video thumbnail is displayed once in the order in which
you took them.
5. After the slide show finished, it will stop and show last picture in playback
mode.
Note: If you want to run the slide show on a television, connect the
video cable from the video-out port on the camera to the video-in
port on the television. Ensure that the Video Out setting is
correctly set to NTSC or PAL.
• Magnifying Pictures
Use the Magnify feature to zoom in to different areas of the picture.
1. Make sure the Function switch is on ►.
2. Use ▲ and ▼ to select the picture you want to enlarge, then press the
MENU button.
- 16 -
Page 22

3. Press the ◄ or ► to select [Zoom] on the screen and press the Enter
button.
4. The frame (approximate location of the magnified area) appears on the
LCD monitor. Use ▲ ▼ ◄ ► to select location of the magnified area and
press the Enter button.
5. The picture is displayed at 2X magnification. Use ▲ ▼ ◄ ► to navigate to
different parts of the picture.
6. Press the Enter button to redisplay the picture at the original size.
Note: Videos cannot be enlarged.
• Selecting Pictures for Printing (DPOF Print Settings)
1. Make sure the Function switch is on ►.
2. Use ▲ and ▼ to select the picture you want to print, then press the MENU
button.
3. Press the ◄ or ► to select [Print] on the screen and press the Enter
button.
4. For setting images one by one:
Use ◄ or ► button to select
button to set current picture for printing with DPOF.
For setting all images on the SD card:
Select
5. The checkmark
6. You can use the DPOF print settings to print with an optional direct print
function compliant printer. (Refer to your printer User’s Guide for details.)
Note: The DPOF printing feature support SD cards only.
([Print All]) to set all pictures for printing with DPOF.
appears the LCD monitor.
([Print One]), and then press the Enter
- 17 -
Page 23
10. Deleting Pictures and Videos
Delete allows the user to delete current or all the stored images from the
internal memory or the SD card.
• Deleting Single Picture or Video
1. Turn on the camera.
2. The LCD monitor will display images and symbols.
3. Slide the Function switch to ► (Playback Function).
4. Use ▲ and ▼ to select the picture or video you want to delete, then press
the MENU button.
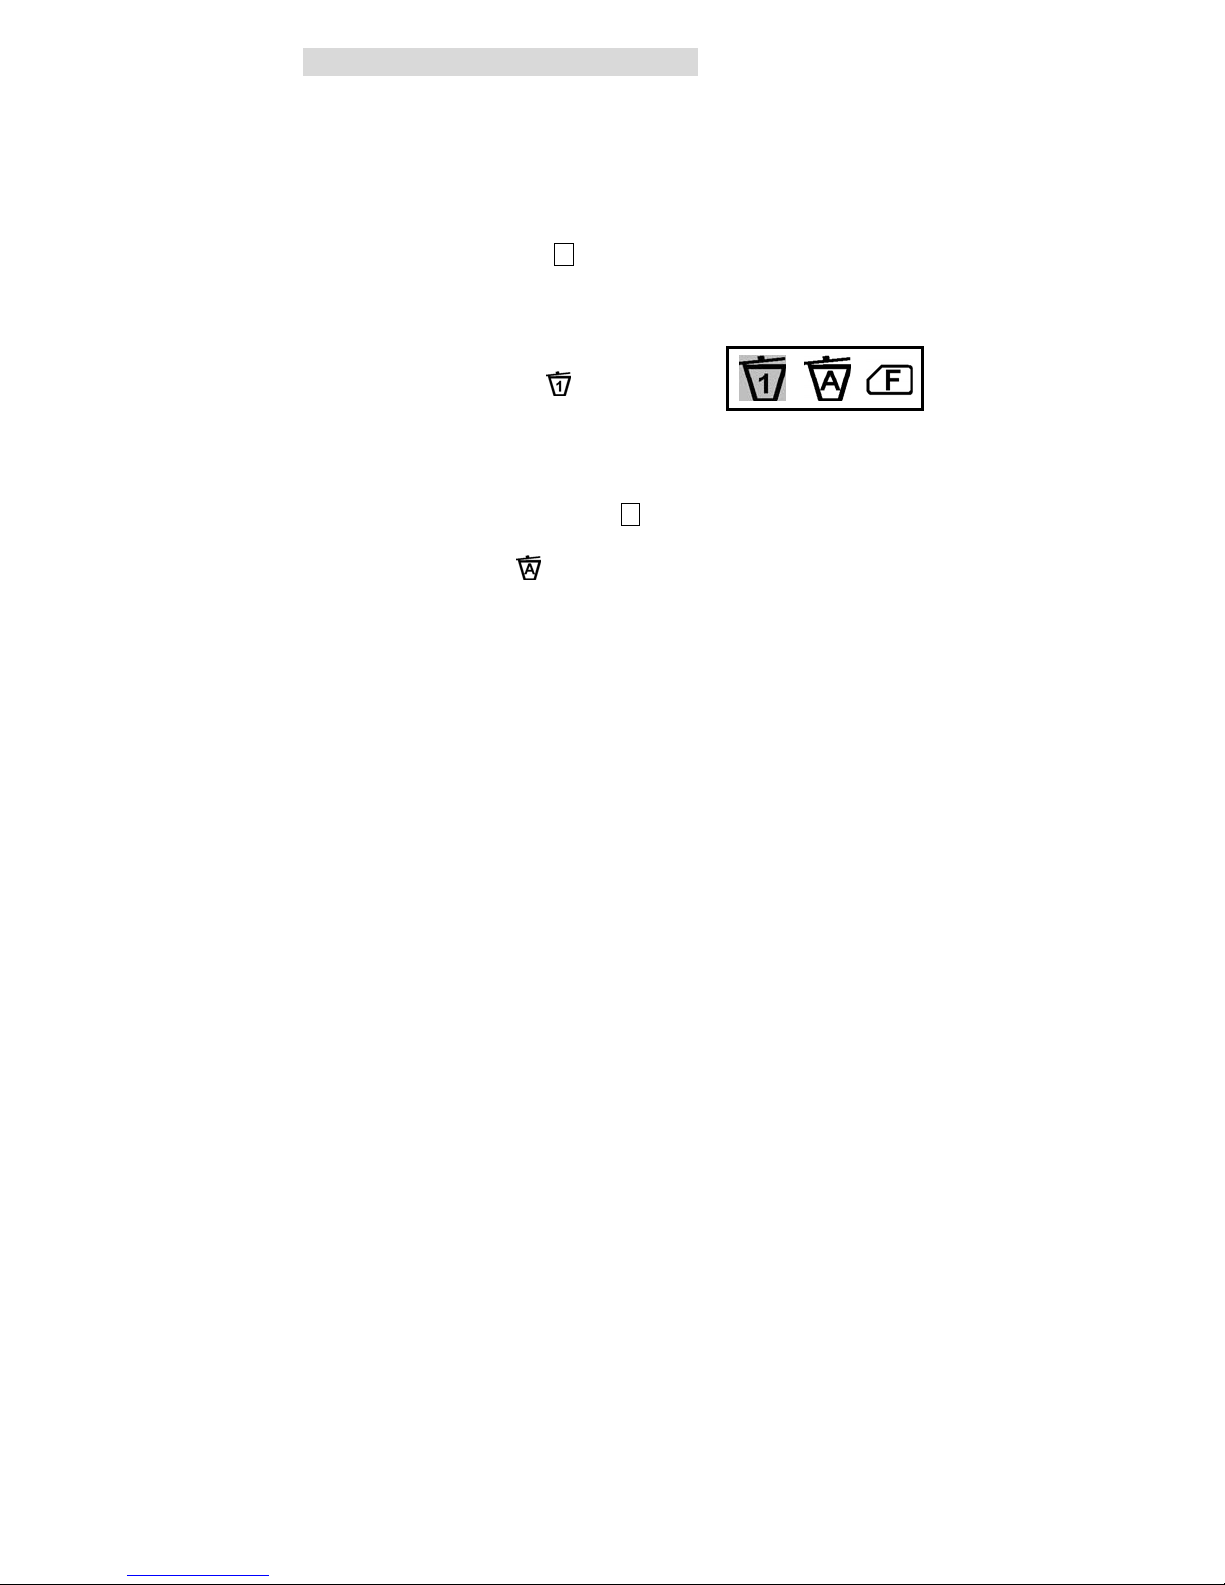
5. Press the ◄ or ► to select [Delete] on the
screen and press the Enter button.
6. Press the ◄ or ► to select
([Delete One]),
Delete One
then press the Enter button to delete the picture
or video.
• Deleting All Pictures and Videos
1. Make sure the Function switch is on ►, then press the MENU button.
2. Press ◄ or ► to select [Delete] on the screen and press the Enter button.
3. Press ◄ or ► to select
delete all pictures or videos.
4. The “NO PICTURE !” warning message will appear on the LCD monitor.
([Delete All]), then press the Enter button to
- 18 -
Page 24

• Formatting Internal Memory or SD Card
1. Make sure the Function switch is on ►, then press the MENU button.
2. Press ◄ or ► to select [Delete] on the screen and press the Enter button.
3. Press ◄ or ► to select
format the Internal Memory or the SD card.
4. The “NO PICTURE !” warning message will appear on the LCD monitor.
Note: Make sure to transfer all the pictures in your Internal memory or
SD card to your computer before formatting or else all your pictures
will be lost.
([Format]), then press the Enter button to
- 19 -
Page 25
11. Customizing Your Camera Settings
* Capture Function Menu
Slide the Function switch to
(Capture Function). Press the MENU
button to turn ON/OFF the function menu. Use ◄ or ► button to select items
and press the Enter button to confirm.
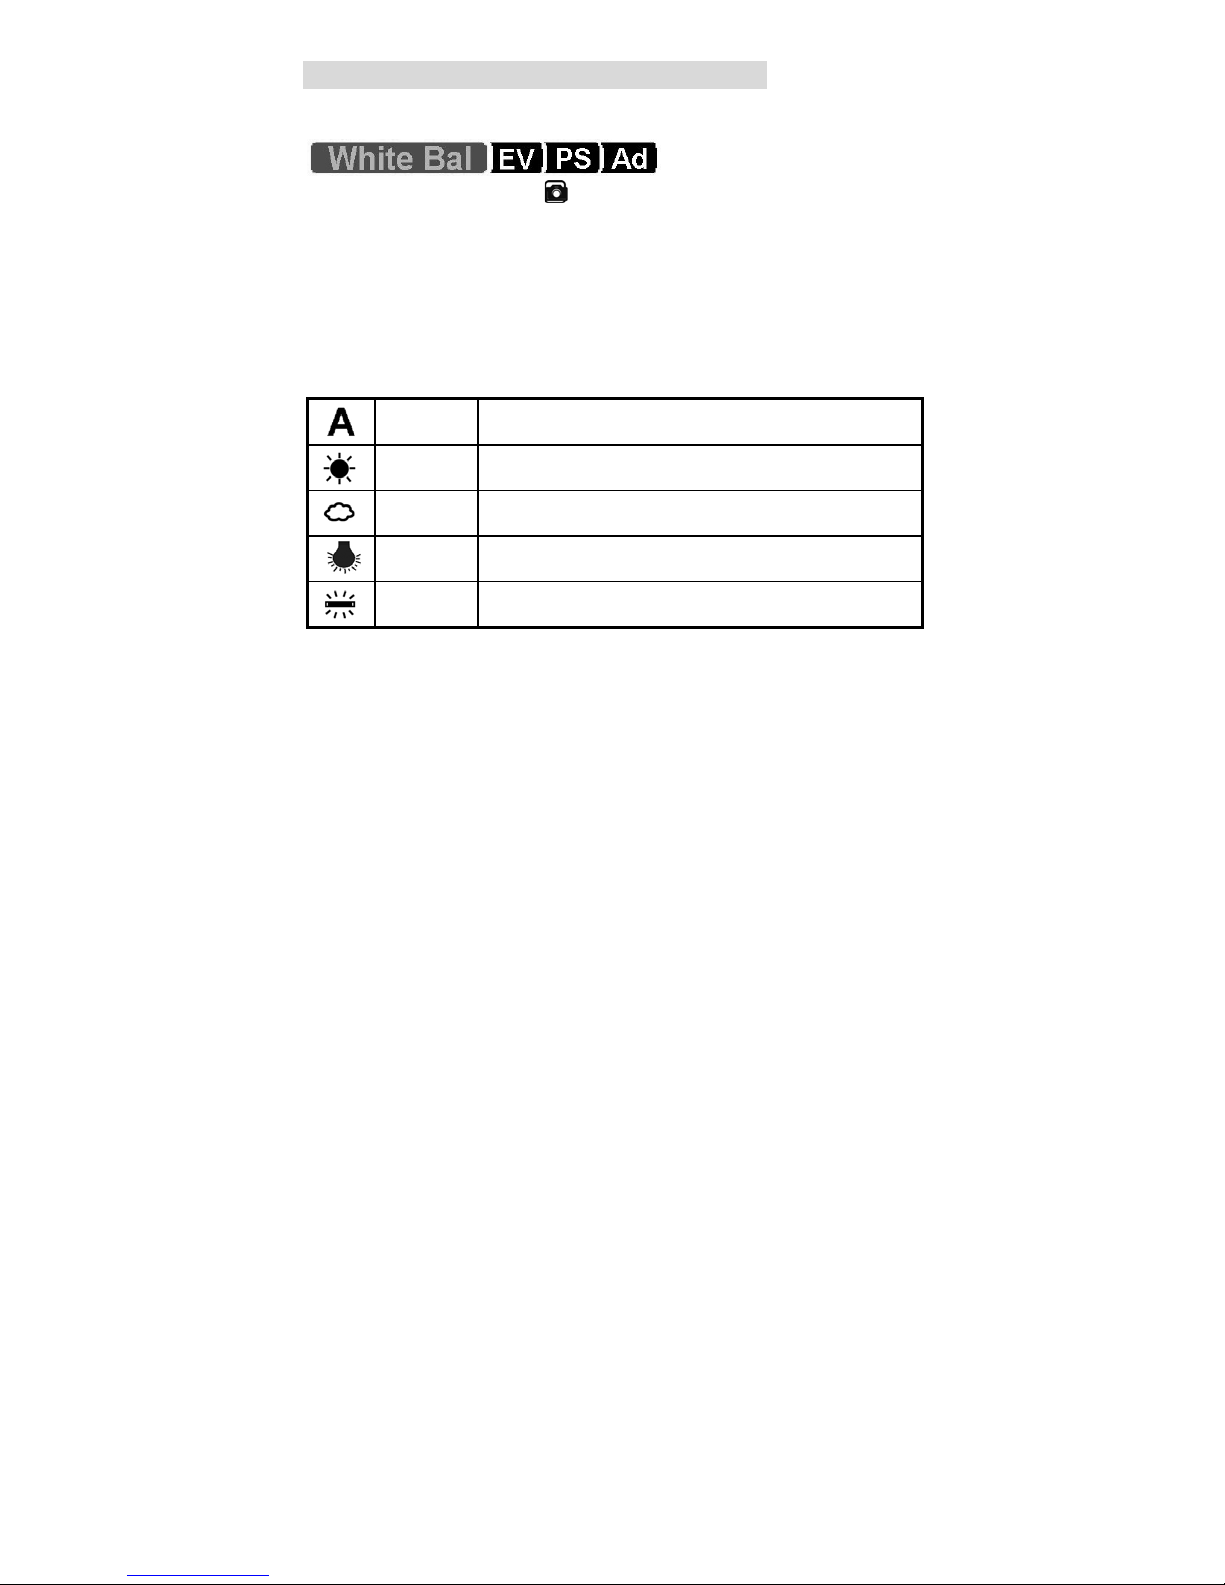
[ White Bal ]: (White Balance)
When the white balance is set to match the light source, the camera can take
the picture more accurately.
(*) : Default
Auto (*)
Daylight Use when shooting outdoors in sunlight on a clear day.
Cloudy
Tungsten For recording under tungsten fluorescent lighting.
Fluorescent For recording under fluorescent lighting.
The camera sets the white balance automatically according to
shooting conditions.
Use when shooting outdoors and the sunlight is not bright
enough such as under cloudy skies, shade or at dusk.
- 20 -
Page 26
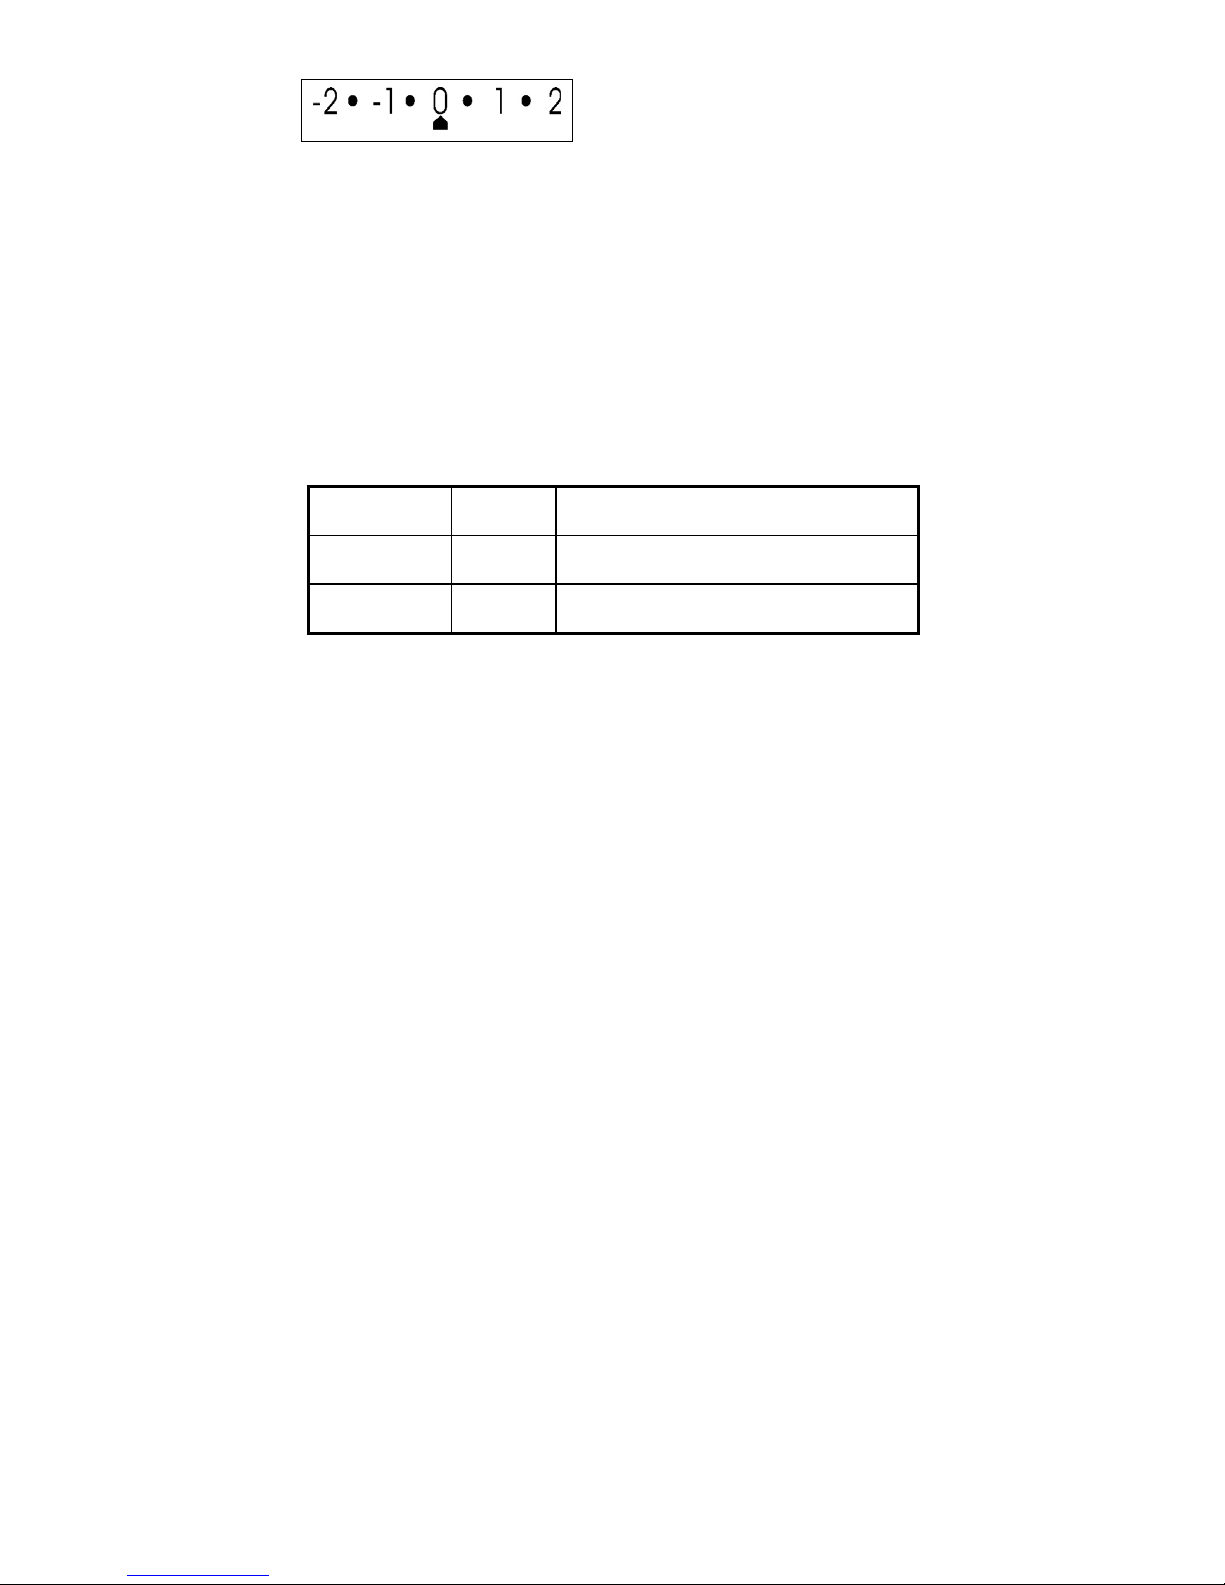
[ Exp Val ]: (Exposure Value)
Exposure compensation lets you change the exposure setting (EV value)
manually to adjust the lighting of your subject. This feature helps achieve
better results when recording a backlit subject, strong lit subject indoors, or a
subject that is against a dark background.
1. Press the ◄ or ► to adjust the compensation.
2. Press the Enter button to confirm.
• The settings can be adjusted in 1/2 steps within the range -2 and +2.
• You can check the result of the compensation by viewing the image on the
LCD monitor.
[ Pict Size ]: (Picture Size)
You can change the picture size (excluding videos) settings to suit your
needs.
L (Large)
M (Medium)
S (Small)
2400 x 1800
pixels
2048 x 1536
pixels
1600 x 1200
pixels
for enlarged picture size; produces higher picture
resolution and larger file size.
for standard picture size; produces normal picture
resolution and middle file size.
for small picture size; produces lower picture
resolution and smaller file size.
- 21 -
Page 27
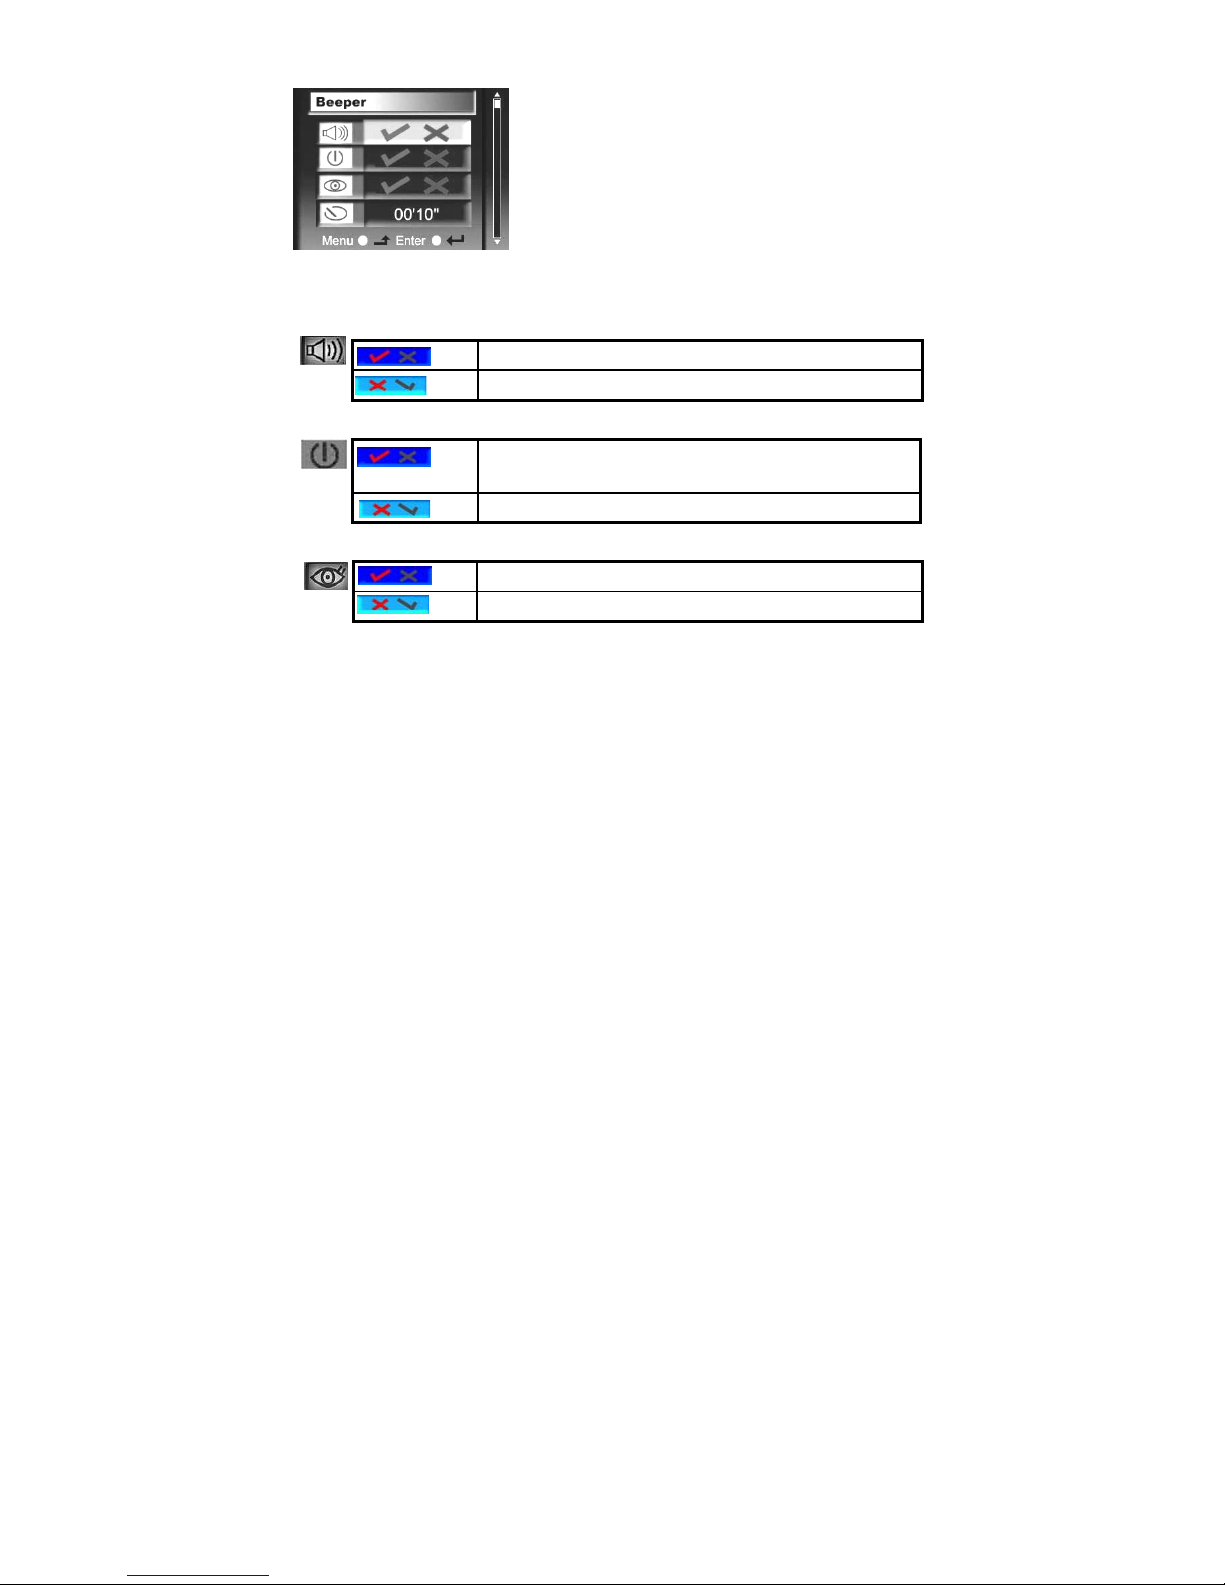
[ Advance ]:
Beeper:
Auto Power Off:
Quick Review:
Select Advance Option to bring up the following
advanced menu. Use ▲ and ▼ to select the
function you want to set, and then press the ◄
and ► to change the current selected setting.
Press the Enter button to confirm the setting.
Press the Menu button to cancel the advance
menu and return to shooting status.
(*) : Default
ON Setting the beep sound to on.
OFF Setting the beep sound to off. (*)
ON Setting the camera to power off automatically in 3 minutes if
the camera is not in use.
OFF Stopping the camera to power off automatically. (*)
ON Setting the quick review feature to on.
OFF Setting the quick review feature to off. (*)
- 22 -
Page 28
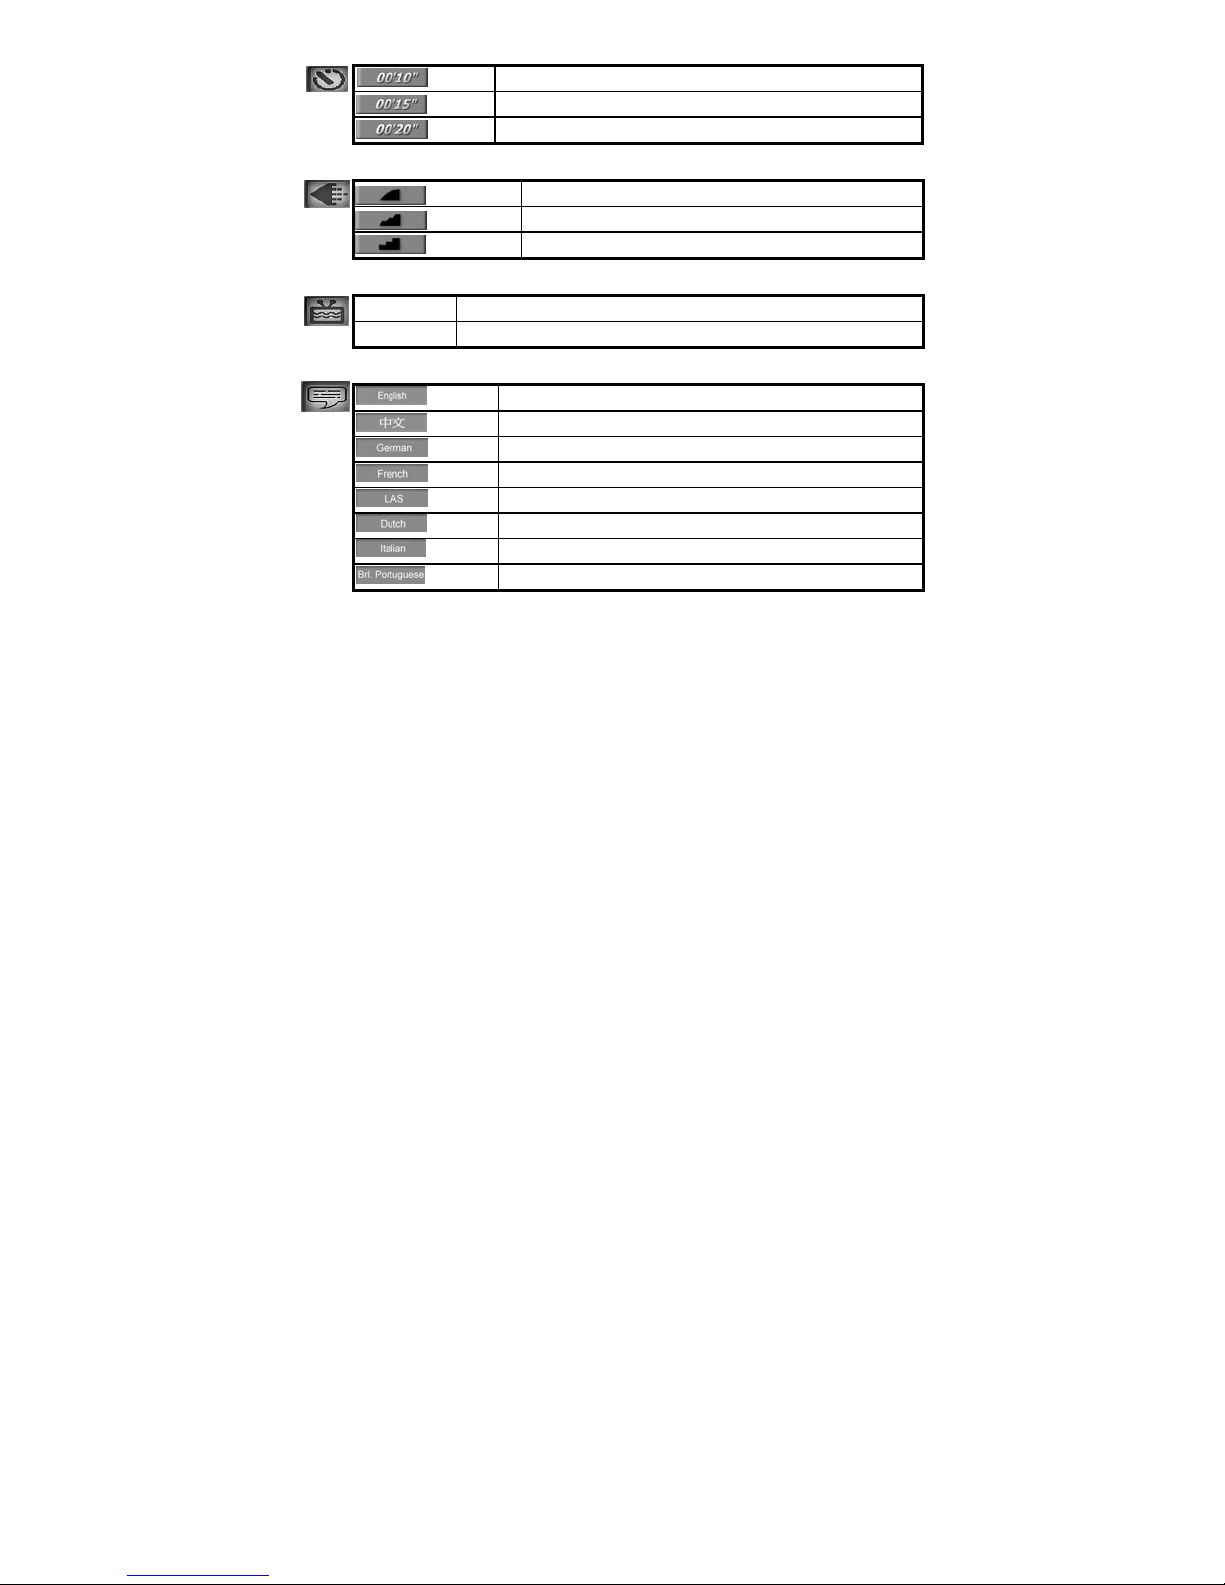
Timer:
10 sec Setting the timer in self-timer mode to 10 second. (*)
15 sec Setting the timer in self-timer mode to 15 second.
20 sec Setting the timer in self-timer mode to 20 second.
Quality:
SuperFine Setting the picture quality to super fine. (Bigger file size)
Fine Setting the picture quality to fine. (*)
Normal Setting the picture quality to normal. (Small file size)
TV:
PAL Setting the TV mode to PAL. (*)
NTSC Setting the TV mode to NTSC.
Language:
English Setting the language to English. (*)
Chinese Setting the language to Chinese.
German Setting the language to German.
French Setting the language to French.
LAS Setting the language to LAS.
Dutch Setting the language to Dutch.
Italian Setting the language to Italian.
Brt Portuguese Setting the language to Brt Portuguese.
- 23 -
Page 29

Flicker:
PAL / 50Hz
NTSC / 60Hz Setting the flicker frequency to 60 Hz.
Setting the flicker frequency to 50 Hz. (*)
Date Time:
YES Setting the Date / Time
Reset:
YES Setting to default.
- 24 -
Page 30
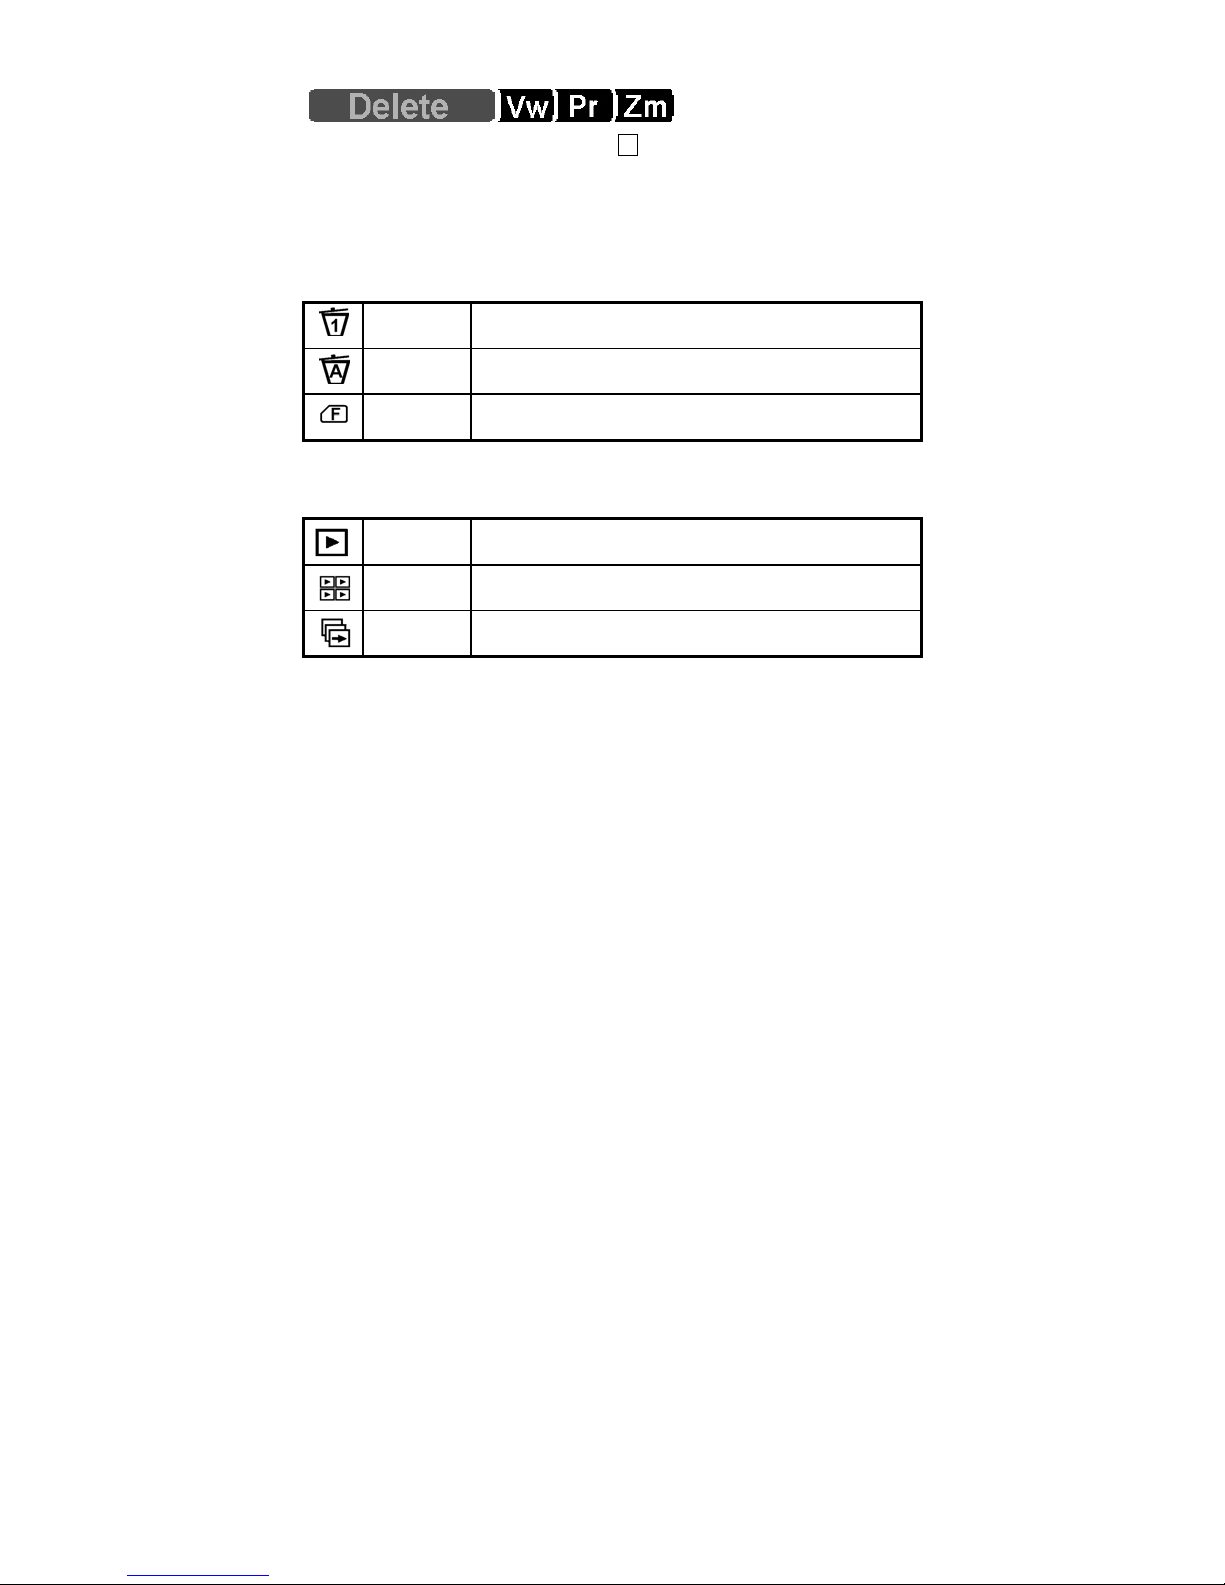
* Playback Function Menu
When you slide the Function switch to ► (Playback Function), press the
Menu button. Use ◄ or ► button to select items listed above, press the Enter
button to confirm.
[ Delete ]:
Delete item allows the user to delete current or all the stored images from the
memory.
[ View ]:
Default setting of the playback mode displays one picture on the LCD screen.
Delete One Select “Delete One” to delete (erase) current picture or video.
Delete All Select “Delete All” to delete (erase) all pictures or videos.
Format Select “Format” to format the flash memory or CF card.
Single Select “Single” to Display one picture.
Thumbnails Select “Thumbnails” to Display nine pictures.
Slide Show Select “Slide Show” for Slide Show.
- 25 -
Page 31
The user can select to show six pictures on the screen and a white-frame
indicates the current picture selected. Press the Enter button to fill (enlarge)
the picture on screen. Use ◄ or ► button to jump to previous/next picture.
Once the user selects the Slide Show Mode, camera will automatically play all
the pictures. The function will stop automatically and the screen will stay at the
last picture when the Slide Show is done.
Note﹕Videos are viewed just like playing a video.
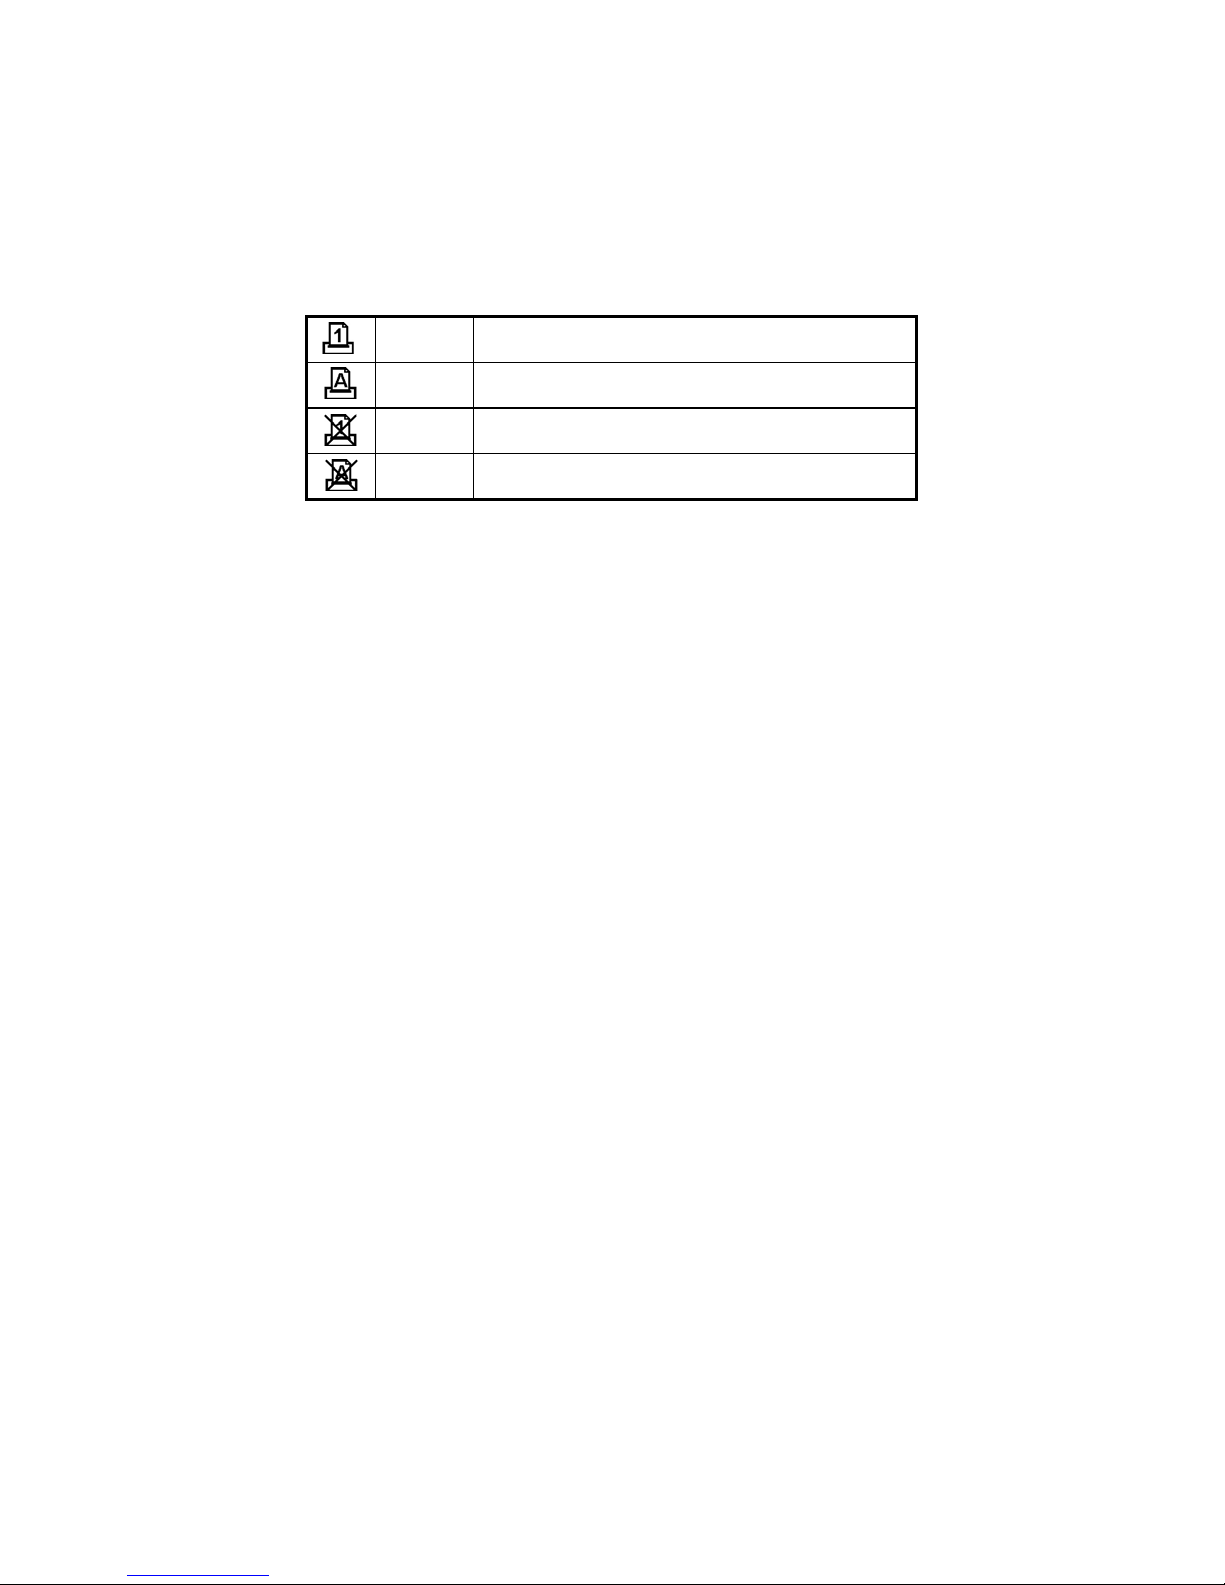
[ Print ] (DPOF):
Select this item to bring up the printing option.
Print One Select “Print One” to print current picture.
Print All Select “Print All” to print all pictures.
Cancel One Select “Cancel One” to cancel print setting of current picture.
Cancel All Select “Cancel All” to cancel print setting of all pictures.
[ Zoom ]:
To Zoom, use ▲ ▼ ◄ ► to select the area of interest. Press the Enter button
to enlarge the zoom area to the whole screen. User can adjust the zoom area
to each part of the picture by ▲ ▼ ◄ ► Select Enter button to cancel the
Zoom.
- 26 -
Page 32
12. Installing Your Camera Driver
• Turn on your computer.
• Insert the installation CD into your CD-ROM drive and the installation CD
menu should appear. If the menu does not appear, double-click the CD drive
icon in My Computer or run D:\Autorun.exe to open the setup screen
(assuming that your CD-ROM drive is drive D:).
Do not connect the camera to the computer at this time.
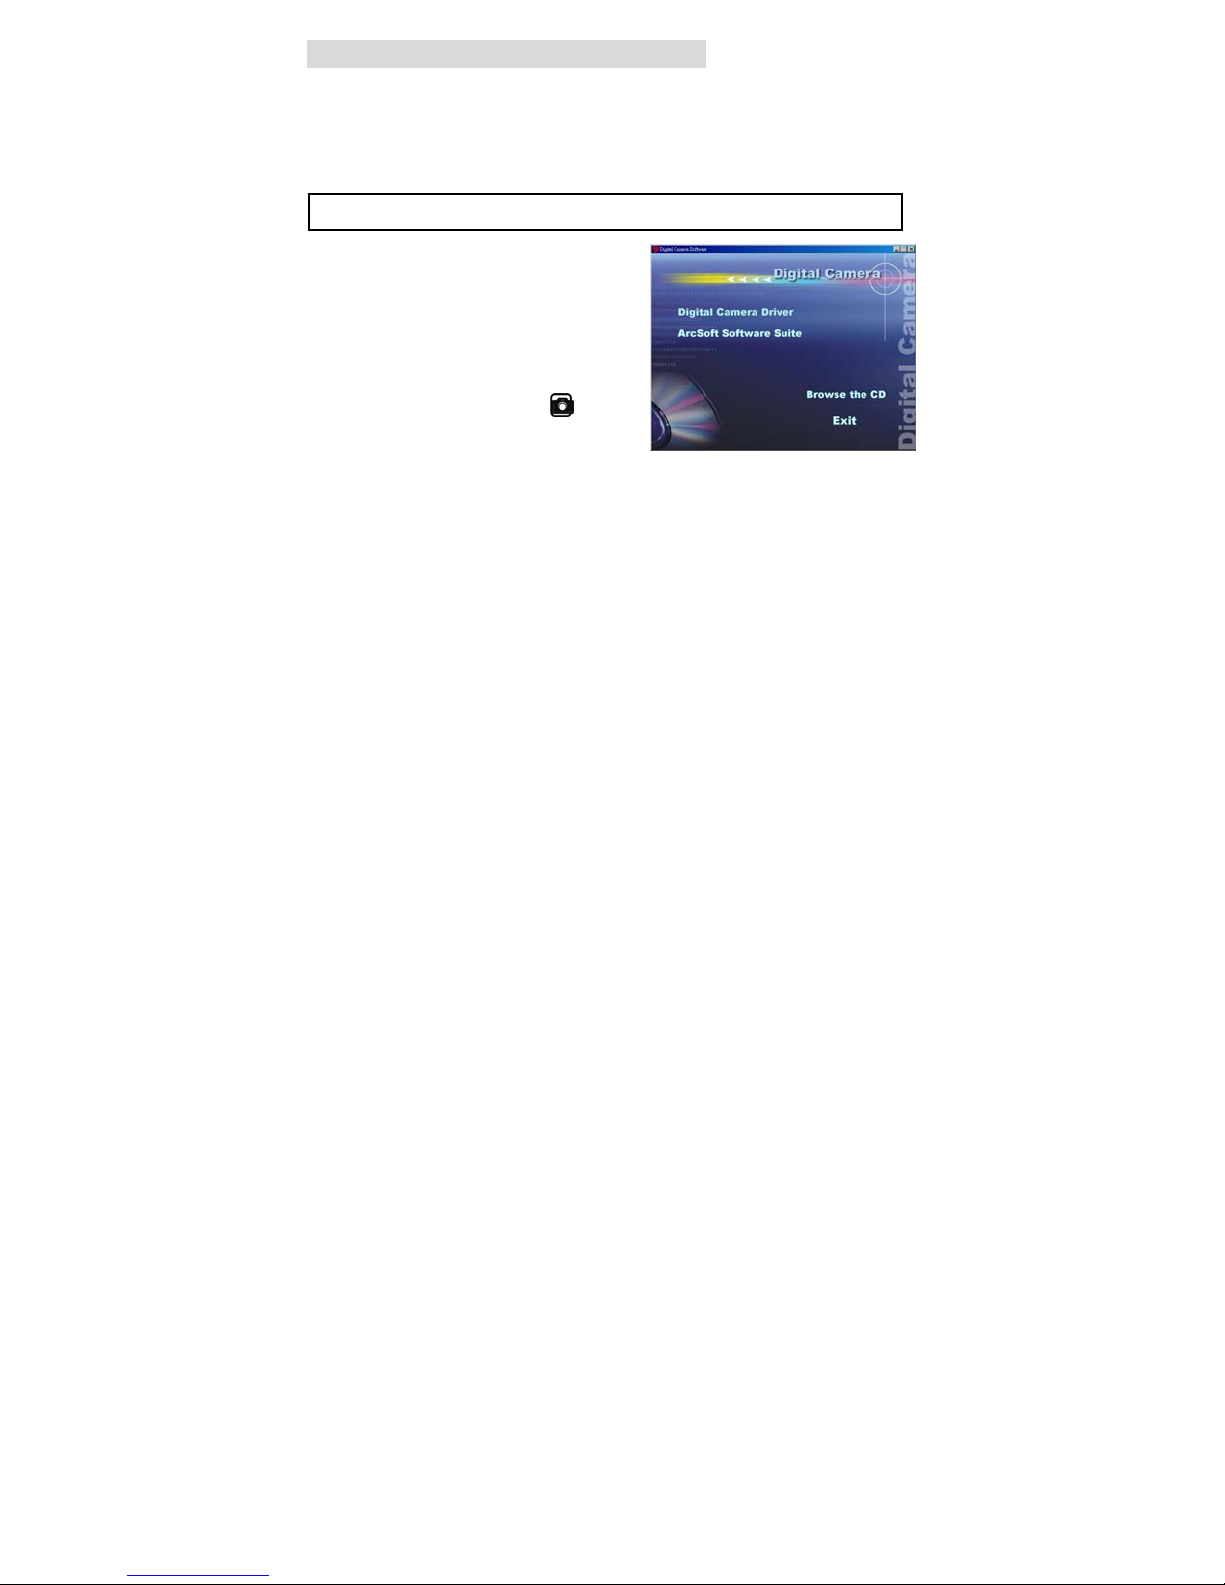
• When you see the following screen,
choose "Digital Camera Driver".
• Follow the instructions on screen.
• Restart your computer.
• Slide the Function switch to
(PC-CAM mode).
• Connect USB Cable with PC and digital camera. Turn on your camera.
• PC will find " DC310L Driver " device by itself.
- 27 -
Page 33

For Windows 2000/XP only:
During installation of the driver, your
computer may display "Digital Signature
Not Found" (Windows 2000) or
"Hardware Installation" (Windows XP)
windows.
Please select "Yes" and continue
installation.
- 28 -
Page 34
13. Installing Software
In order to download your photos to your computer, you must Install:
Arcsoft PhotoImpression 5
1.
PhotoImpression 5 makes photography easy and fun on the PC. Acquire,
organize, edit and share photos fast.
2.
Arcsoft VideoImpression 2
VideoImpression 2 creates home movies and slide shows by combining
existing videos, still images, exciting scene transitions, and multiple audio
tracks.
• Insert the installation CD into your CD-ROM drive and the installation CD
menu should appear. If the menu does not appear, double-click the CD drive
icon in My Computer or run D:\Autorun.exe to bring up the setup screen
(assuming that your CD-ROM drive is drive D:).
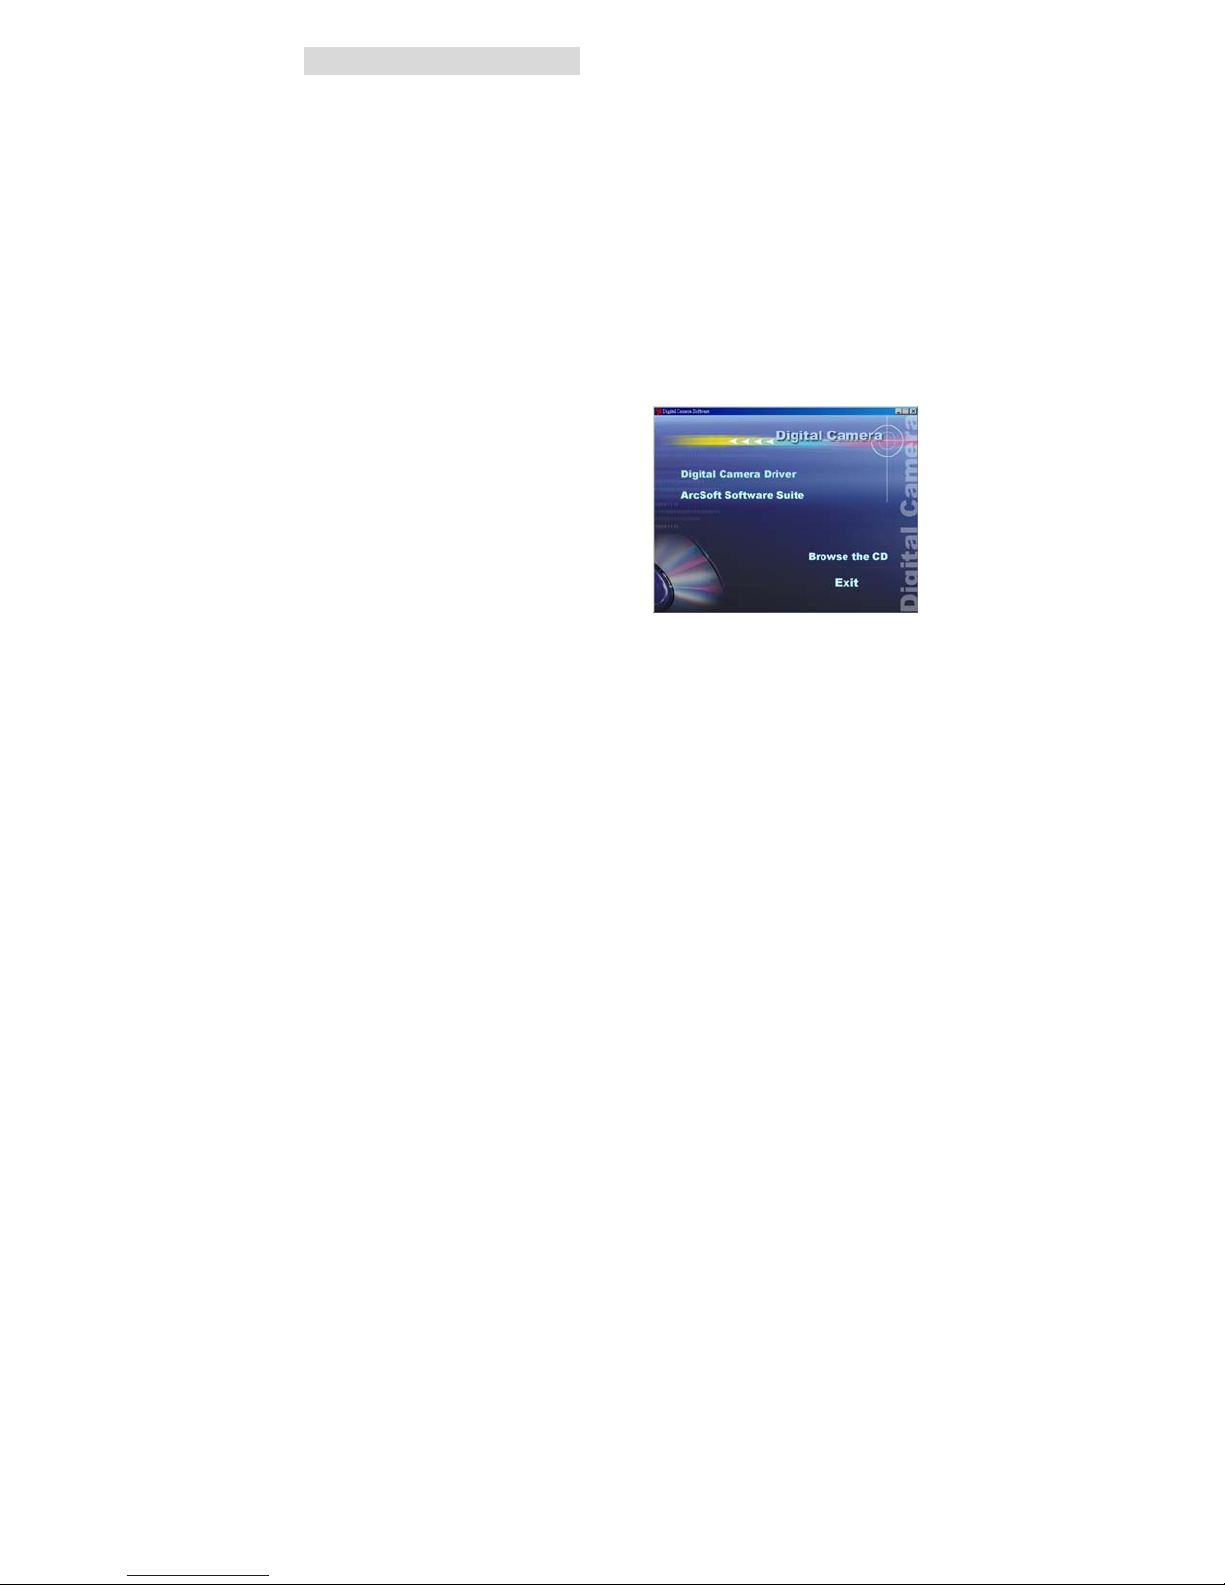
• When you see the following screen,
choose "Arcsoft Software Suite" to
install the software.
• Follow the instructions on screen.
• Installed software will automatically
create
Arcsoft PhotoImpression 5 or
Arcsoft VideoImpression 2 icons on your
desktop.
- 29 -
Page 35

14. Uninstalling Software
Following instruction will guide you to uninstall (remove) software from
computer.
• Uninstalling Software
1. Click "Start" from the task bar and choose "Settings" -> "Control Panel".
(For Windows XP : "Start" -> "Control Panels")
2. Double click "Add/Remove Programs".
3. Select the program to be uninstalled: "Arcsoft Software Suite".
4. Click on "
and then "OK".
• Uninstall Camera's Driver
1. Click "Start" from the task bar and choose "Settings" -> "Control Panel".
(For Windows XP: "Start" -> "Control Panels").
2. Double click "Add/Remove Programs".
3. Select the program to be uninstalled "DC310L Driver".
4. Click on "
and then "OK".
Remove Program" (For Windows 2000/XP : "Change/Remove")
Remove Program" (For Windows 2000/XP: "Change/Remove")
- 30 -
Page 36
15. Downloading Pictures and Use PC Camera
• Slide the Function switch to ► (Playback Function).
• Connect USB Data Cable with PC and digital camera.
Turn on your camera.
• The pop up menu will appears and choose the “Disk”.
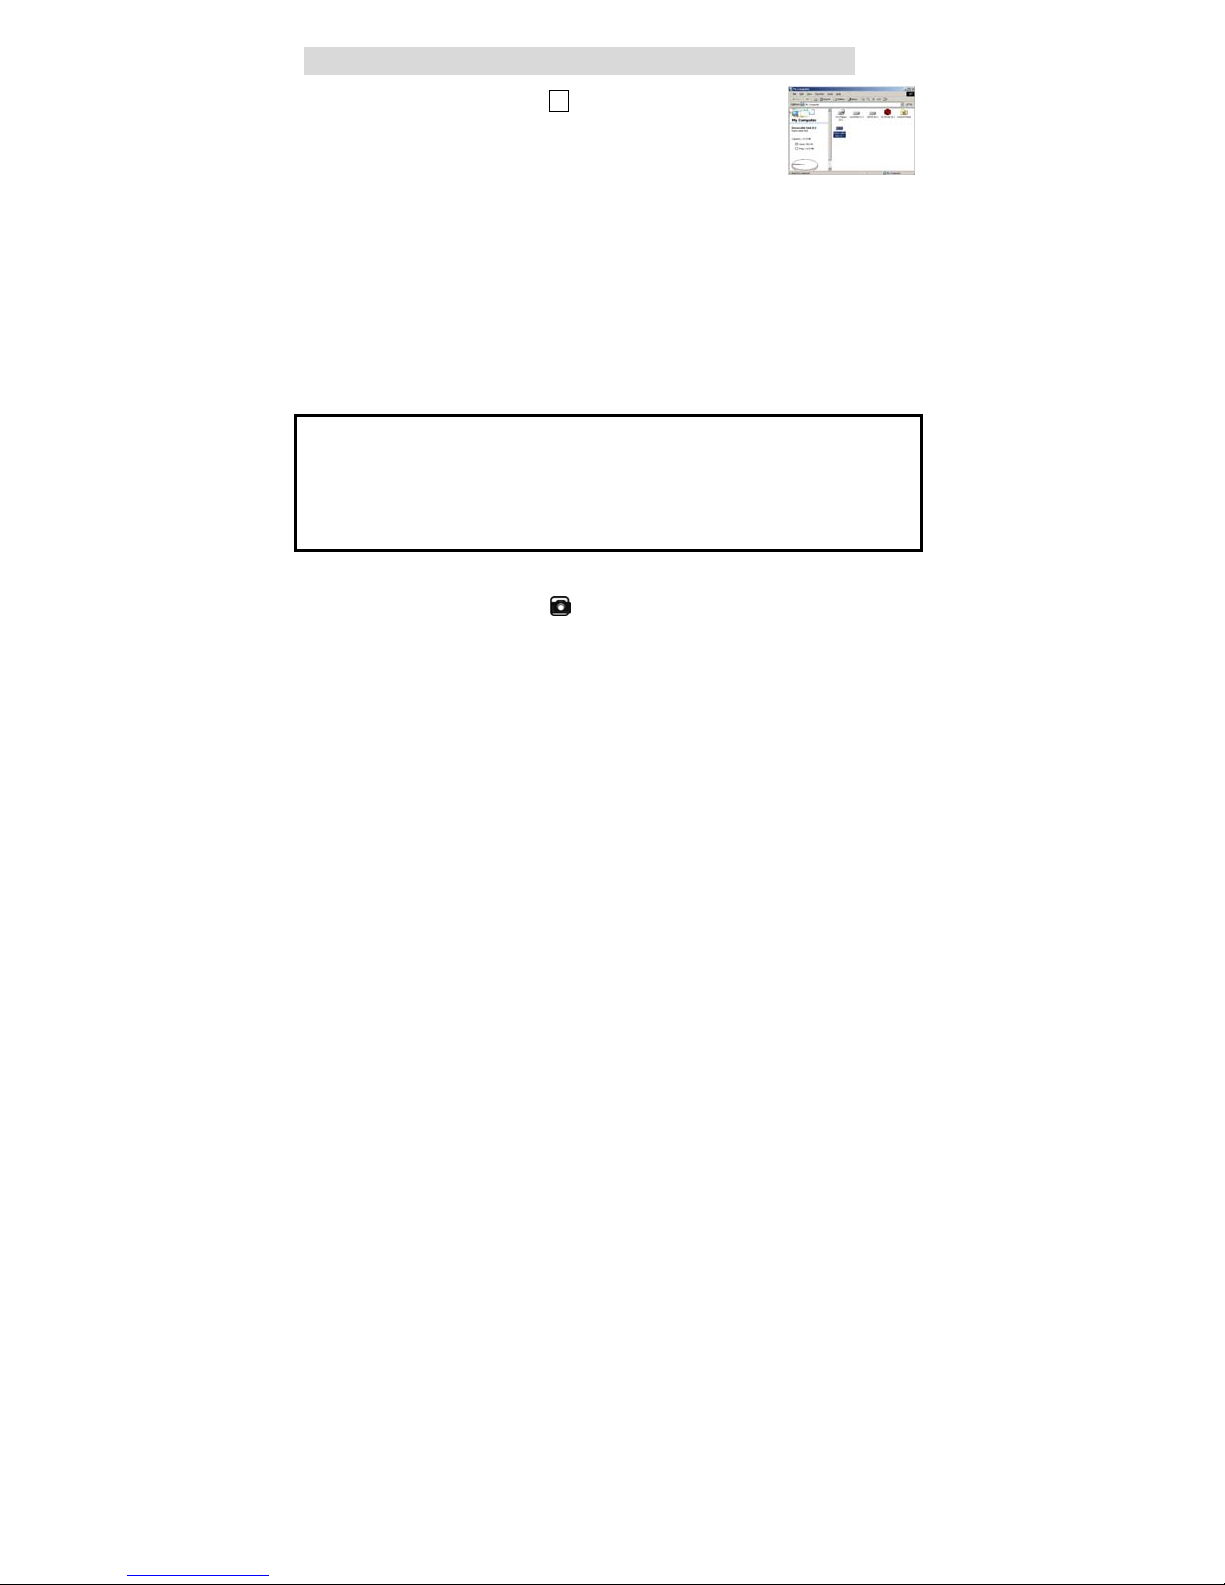
• Double click “My Computer” icon on desktop and the “My Computer”
windows should appear. (If your operating system is Windows XP, press
“start” and select “My Computer” and the “My Computer” windows should
appear)
• If you see "Removable Disk (F:)", then your camera removable disk device
is ready.
• You can copy or move files (.jpg and .avi ) to your computer from the folder
“100Coach” by the path F:\DCIM\100Coach. (Supposing drive (F) is the
removable disk).
• If you want to create cool photos and share with others. You can use
Arsoft PhotoImpression and VideoImpression.
Note:
1. If your OS is Windows 98/98 SE, you must install the driver before using
PC-DISK mode.
2. In PC-DISK mode, if you display images in windows explorer as visual
thumbnails, please don’t remove the USB cable from PC.
3. You should play with images that have been copied to PC.
PC Camera
Slide the Function switch to
with PC and digital camera. Turn on your camera.
Note: You must install the driver before using PC-CAM mode.
(PC-CAM mode). Link USB Data Cable
- 31 -
Page 37

16. Downloading Pictures in Macintosh and linux
Mac OS 10:
Before starting, make sure to put batteries in. If not, open the battery
compartment cover and insert batteries. Make sure to load batteries with +
and – terminals as indicated. Close the battery compartment.
• Slide the Function switch to ► (PC-DISK mode)
• Connect USB Cable with Mac and digital camera. Turn on your camera,
then an ”
• Double click the ”
folder
“100PCoach”, double click it and you can find all the photo files in the
camera.
• You can now copy or move photo files to your computer.
Untitled” removable disk icon should appear.
Untitled” removable disk icon and enter into DCIM
. Inside this folder, you can find another folder labeled
RedHat Linux 8.0:
RedHat Linux users can use the following example steps to access camera
images. For detail operation, please refer to RedHat Linux 8.0 User’s Manual.
• To download photos, first slide the Function switch to ► (PC-DISK mode),
then connect USB cable to the Linux machine. At this time, find the
“Hardware Browser” (1) program from Linux program menu, check into
“Hard Drives” (2) and find the new drive called “MultiCam Disk” (3). In this
- 32 -
Page 38
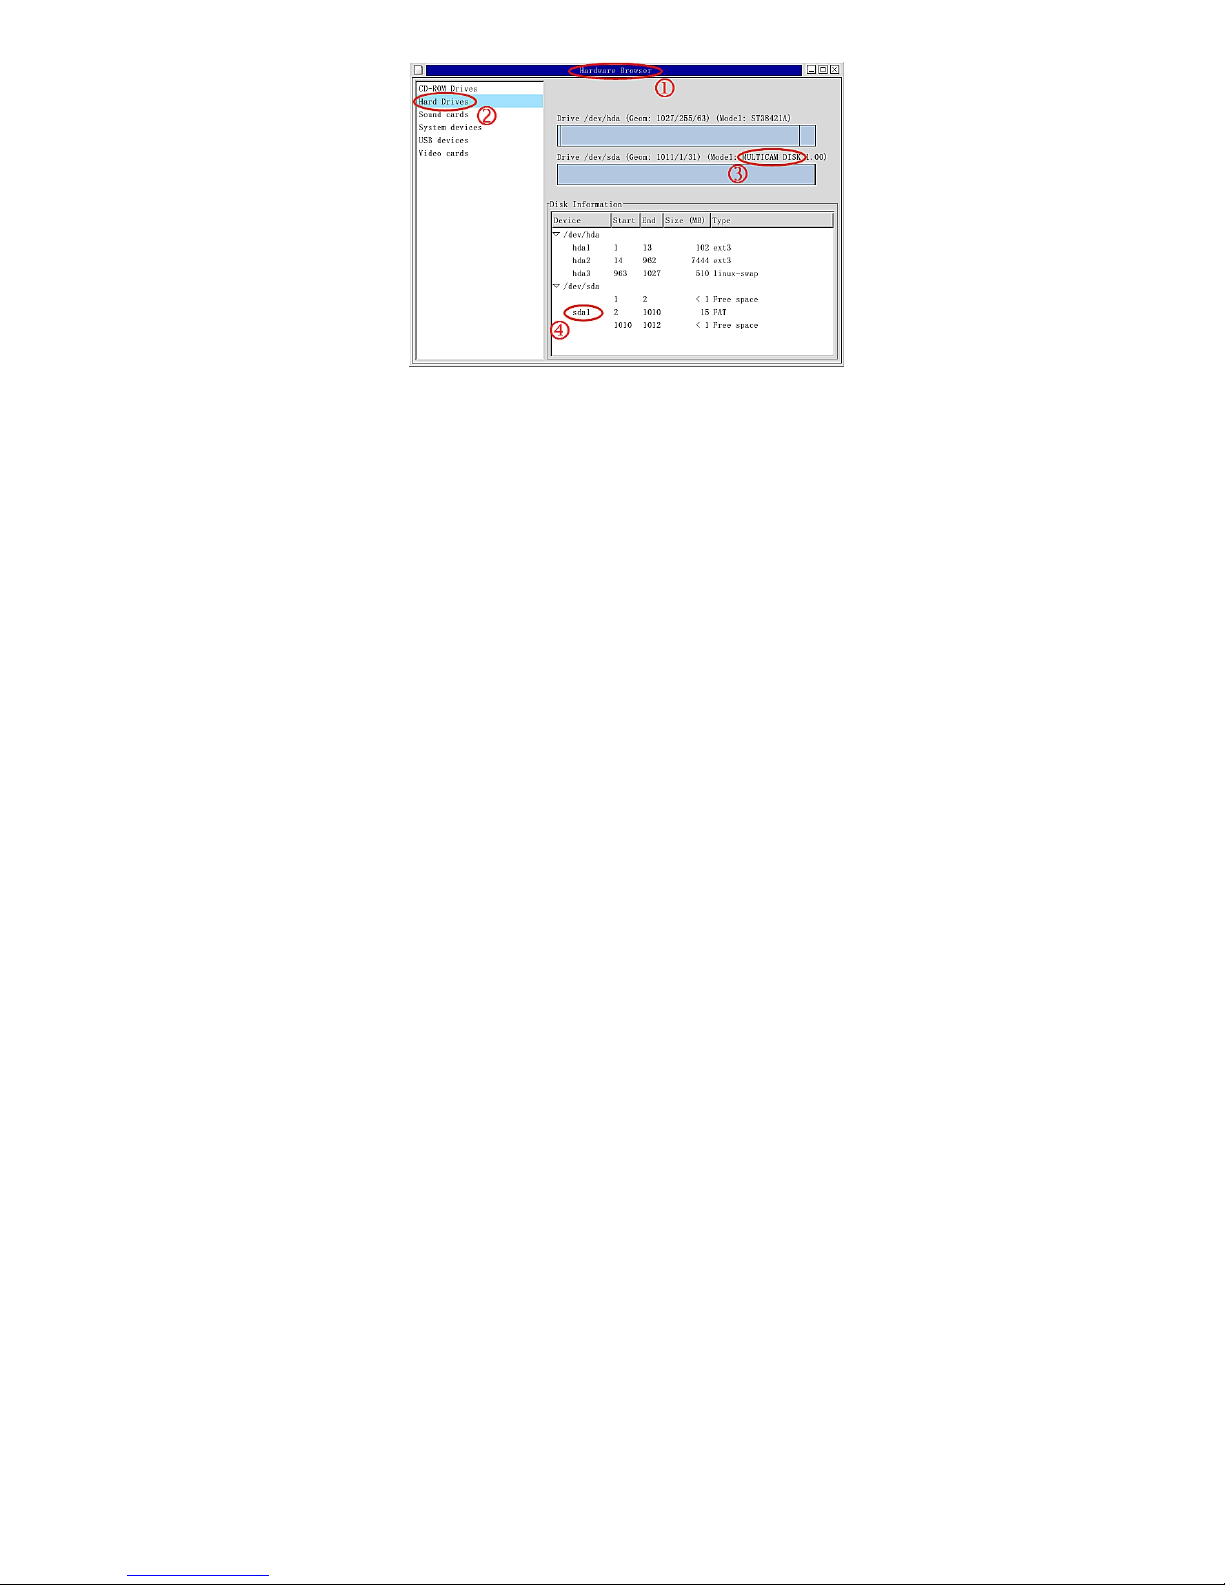
example, “sda1” (4) is the new device can be mounted as a new disk.
• Now the drive has been detected by the system, open a Linux Terminal, use
the following example as a reference to mount the device:
• In command prompt #, type “mkdir /mnt/multicam“, press enter.
• In command prompt #, type “mount /dev/sda1 /mnt/multicam”, press enter.
• Sometimes you need to specify the drive type as MSDOS, use “man mount”
for detail usage.
• Now, you can access camera photos in the “/mnt/multicam/DCIM/100media”
directory. Please copy all the photos into your own directory for storage.
- 33 -
Page 39
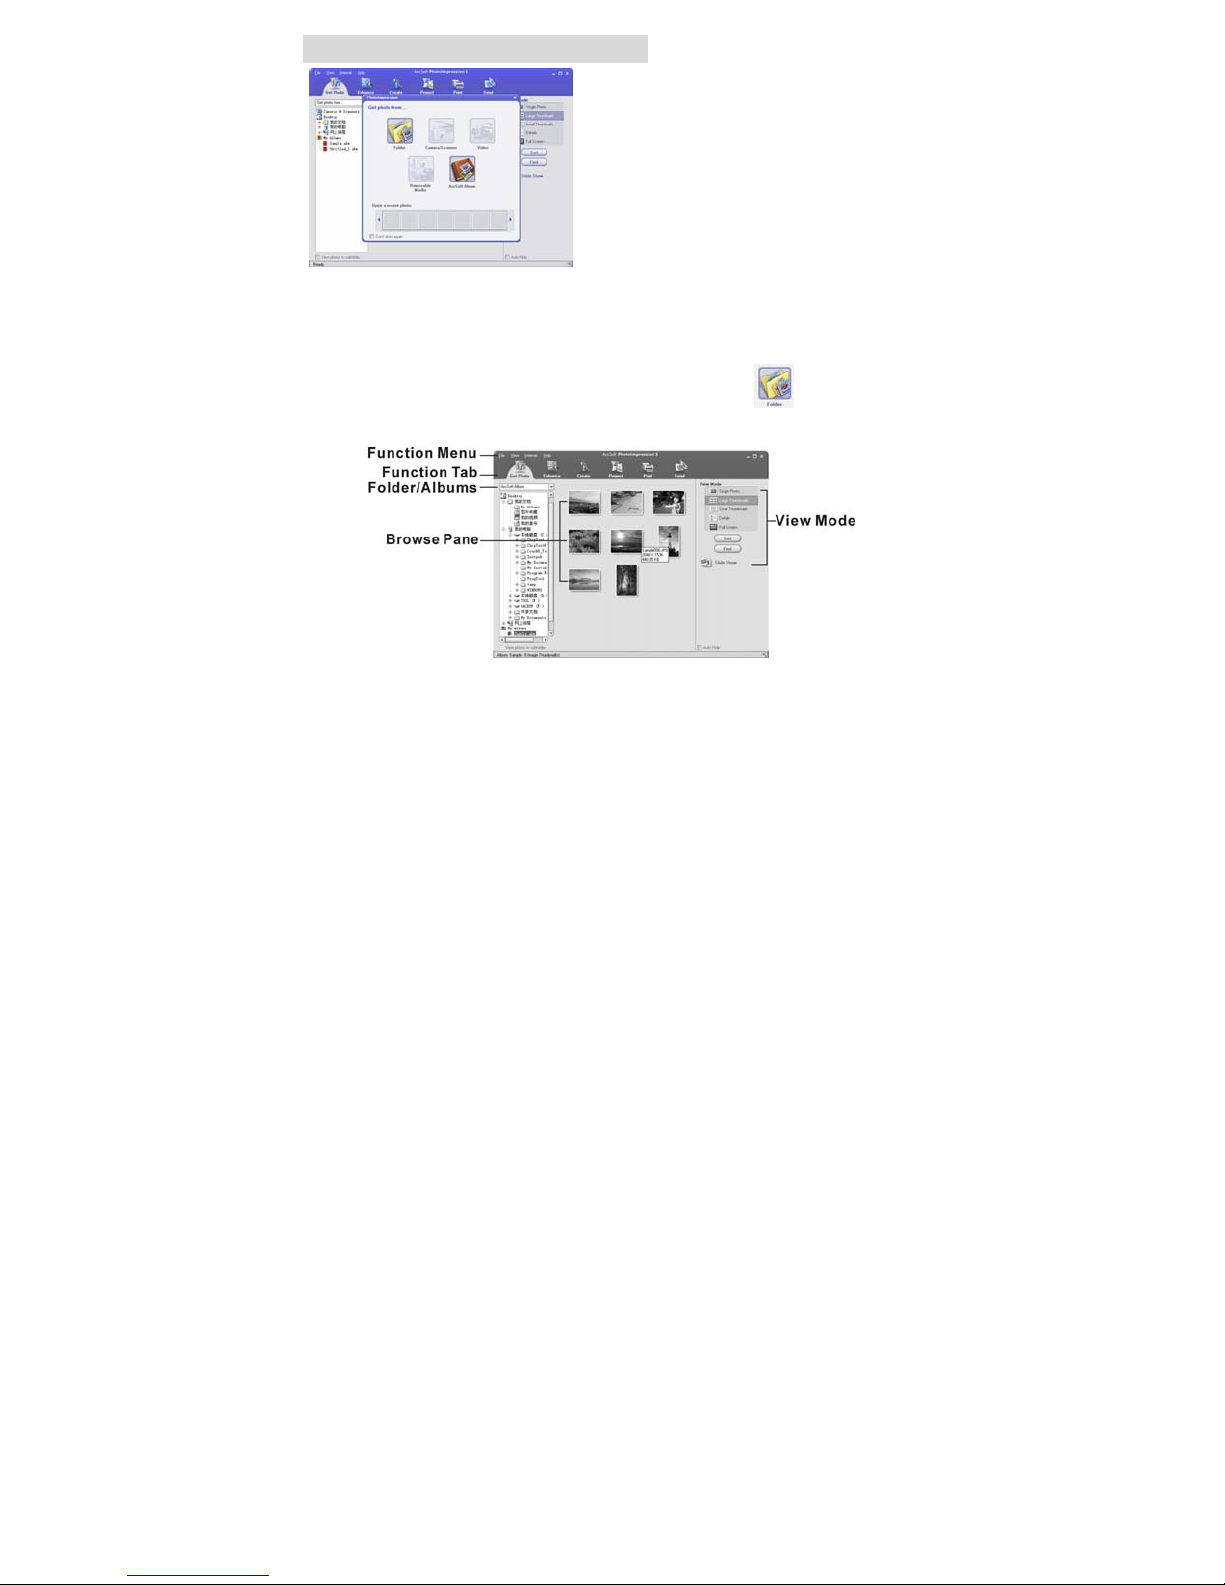
17. Arcsoft PhotoImpression 5
ArcSoft PhotoImpression 5 is a
complete digital image editing application
designed with real people in mind.
Easy-to-use “Getting Start” guides,
user-friendly UI, complete image editing
functionality, give users wonderful
experience to organizing, viewing,
enhancing, editing, printing and sharing
photos.
Click “Start”Æ “Program”Æ “ArcSoft Software Suite“Æ “PhotoImpression 5” to
launch PhotoImpression 5 or double click PhotoImpression 5 icon on the
desktop and you will see a window as the screenshot above.
Select the picture source. For example: 1. Click “Folder” for acquiring
photos from your computer 2. Select the file path. 3. You can start editing
them.
- 34 -
Page 40
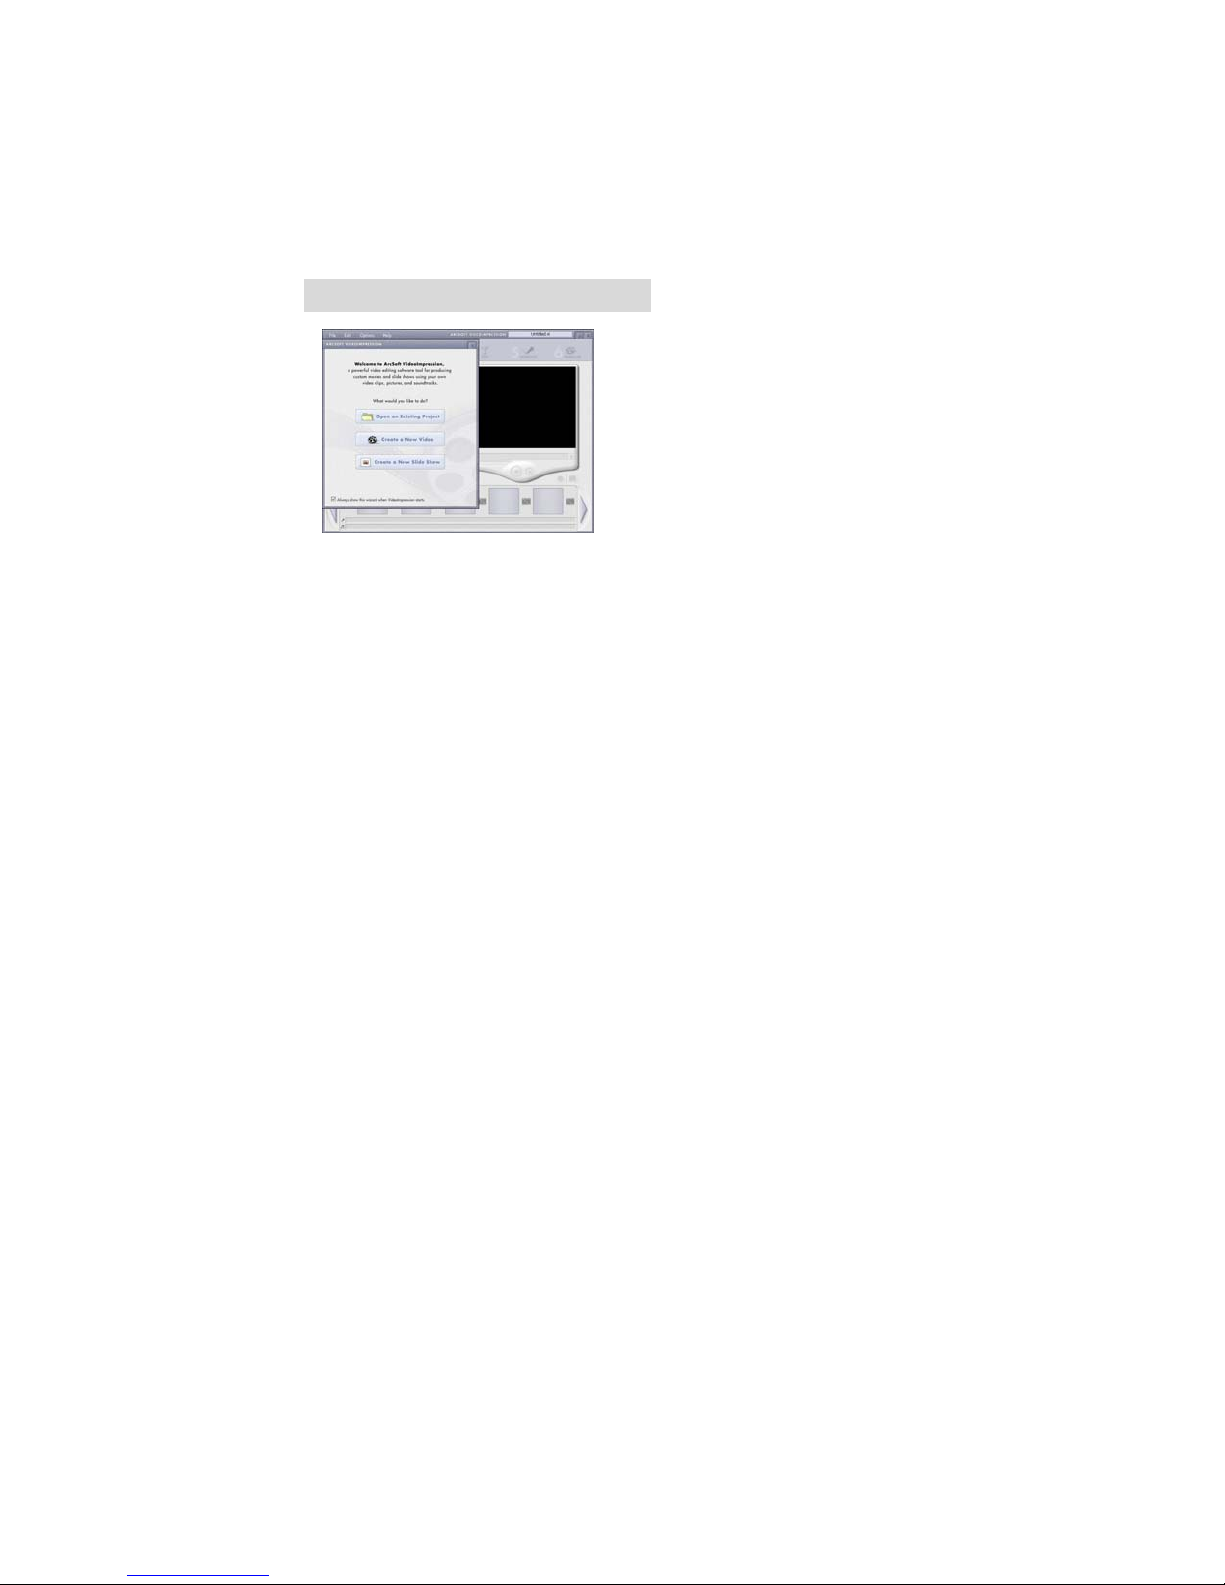
1. Get Photo – Choose how to view or acquire photos.
2. Enhance – Crop, brighten, rotate, resize and modify photos.
3. Create – Add clip art, special effects, frames and more.
4. Project – Make calendars, photo books and greeting cards.
5. Print – Print multiple images per page and multiple pages at
one time.
6. Send – Email photos or upload them to online photo sharing
accounts.
Note
﹕
For more detailed information, please refer to the Help of the program.
18. Arcsoft VideoImpression 2
ArcSoft VideoImpression 2 creates
home movies and slide shows by
combining existing videos, still images,
exciting scene transitions, and multiple
audio tracks. Though simple to use,
the program provides intense and broad
video editing and export options perfect
for owners of digital still cameras,
desktop and digital video cameras, and
camcorders.
Click “Start”Æ “Program”Æ “ArcSoft Software Suite“Æ “VideoImpression 2”
to launch VideoImpression 2 or double click VideoImpression 2 icon on the
desktop and you will see a window as the screenshot above.
Open a Project – Let you browse the project files in the VideoImpression
system folder. By “project,” we mean to say a file that contains all of the
settings and each individual component on the Storyboard. When you save
- 35 -
Page 41
your work as a project, you can go back and swap components, add and
remove them, alter audio, etc.
Create a Video – Create a new video project. You can retrieve media
materials from the device connected or choose media files from system
folder. You can choose video materials from your photo album as well.
Create a Slide Show – Create a slide show project. You can retrieve media
materials from the device connected or choose media files from system
folder. You can choose slide show materials from your photo album as well.
If the box “Always show this wizard when VideoImpression starts.” at the bottom
of the wizard is checked, the wizard will appear each time you run the program.
If you'd like to skip the wizard the next time, uncheck the box.
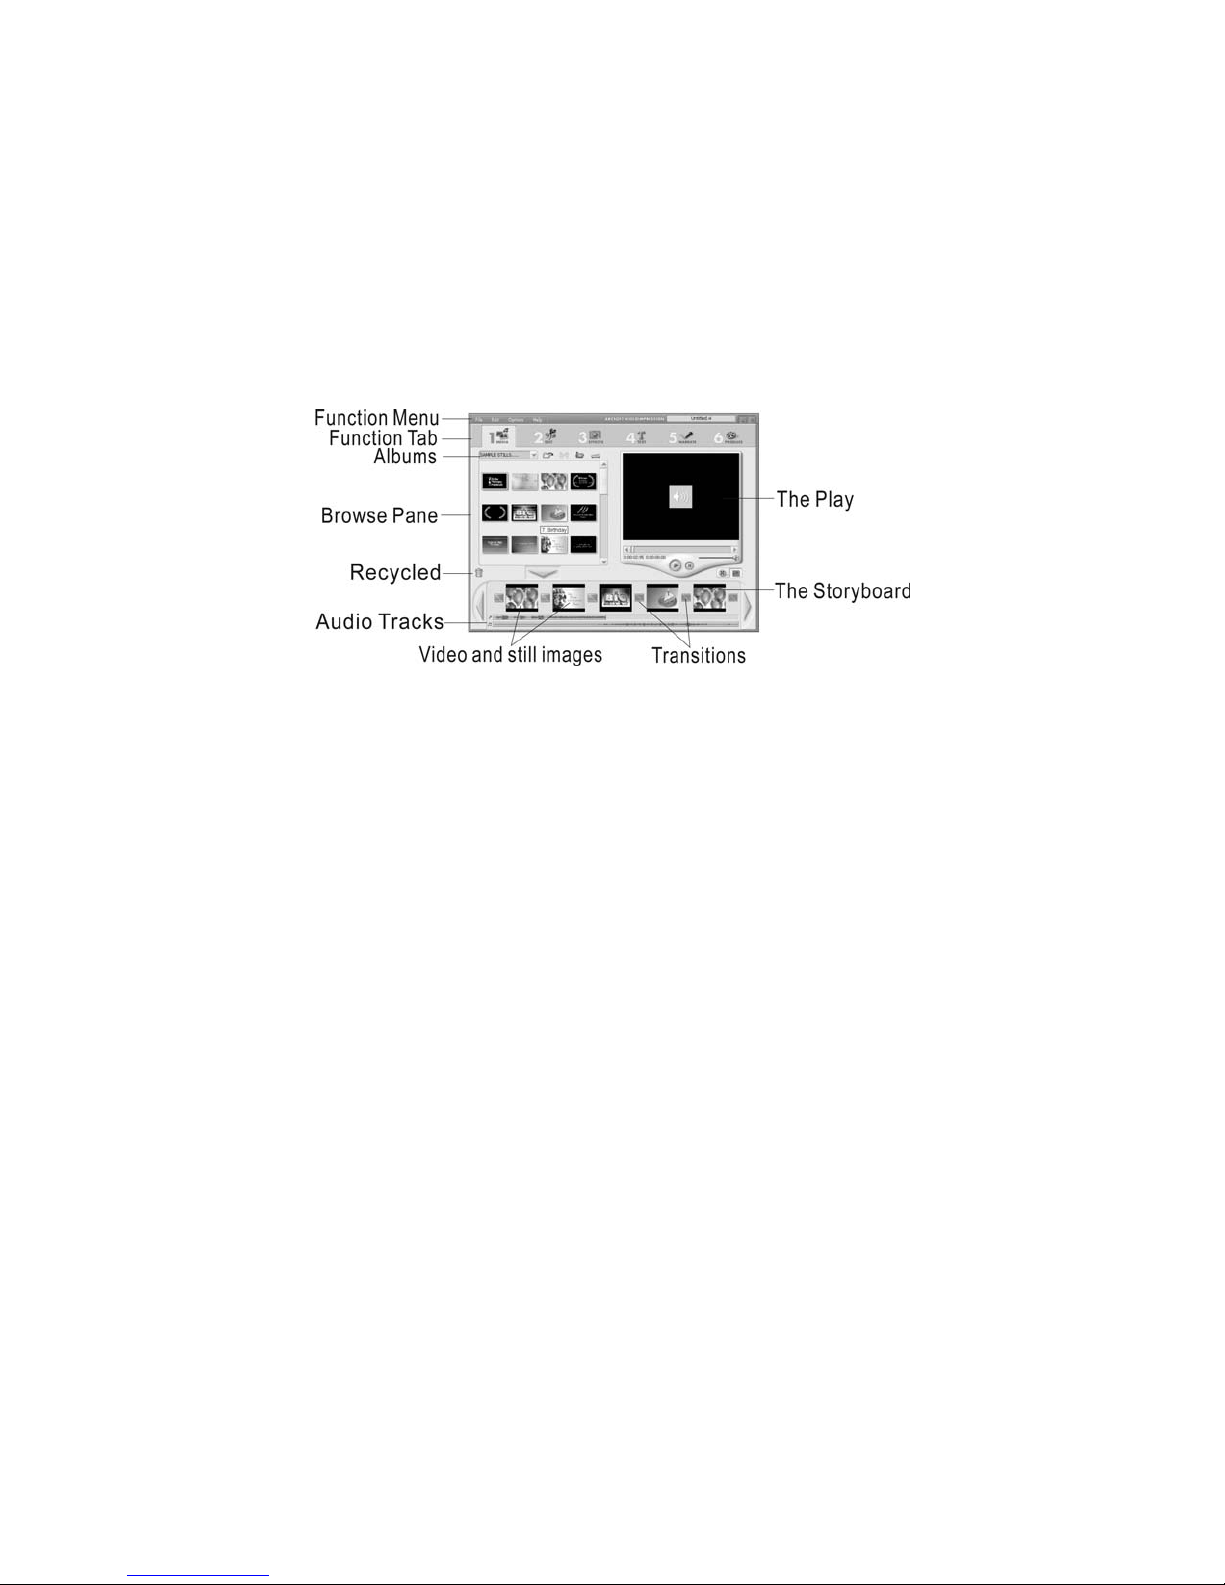
Select the item you desire and the picture and videos you need then you
will enter the editing interface as below.
You can use the six steps in the Function Menu to create video clips and
slide shows.
- 36 -
Page 42

1. Media - Select the videos and images that will comprise your final movie or
slide show.
2. Edit - Modify video and image color and adjust the duration of each movie
component. Only available for video projects.
3. Effects - Add neat special effect transitions between each component, or
apply a pre-made theme.
4. Text - Place animated text on any movie component. Only available for
video projects.
5. Narrate - Record audio directly from the program and add it to your movie.
6. Produce - Combine all components to create your final video; save it in a
variety of ways or email it to friends.
The Storyboard - The backbone of the creation process, it's where you
assemble your movie.
The Player - Preview and modify your movies in this area.
Working with Albums - Albums let you organize your media for easy access.
Note: For more detailed information, please refer to the Help of the program.
- 37 -
Page 43

19. Internet Video Conferencing
To run a video conference with another person, you and the other person
must have the computer station configured with a web camera, microphone,
speakers, and have access to the Internet.
You have to download video conference software, purchased or free, such as
basic software like I-phone or Microsoft NetMeeting.
As example: to download Windows NetMeeting, go to www.microsoft.com
search for NetMeeting and follow the download procedure.
Starting NetMeeting, you have to follow the simple set up procedure on the
computer screen, enter your personal information and adjust the microphone
volume. Here's how video conferencing works:
To receive video:
1. Call someone you want to see/hear.
2. On the Too ls menu, point to Video, and then click Receive.
If you have a video camera, you can send video to the person you are calling.
To send a video
1. Call someone you want to see/hear.
2. Click the Start Video button.
Note:
You can also send a video by clicking the Tools menu, pointing to Video, and
then clicking Send. After starting the video, the button changes to Stop Video.
To stop the video, click the Stop Video button again.
- 38 -
Page 44
Appendix :
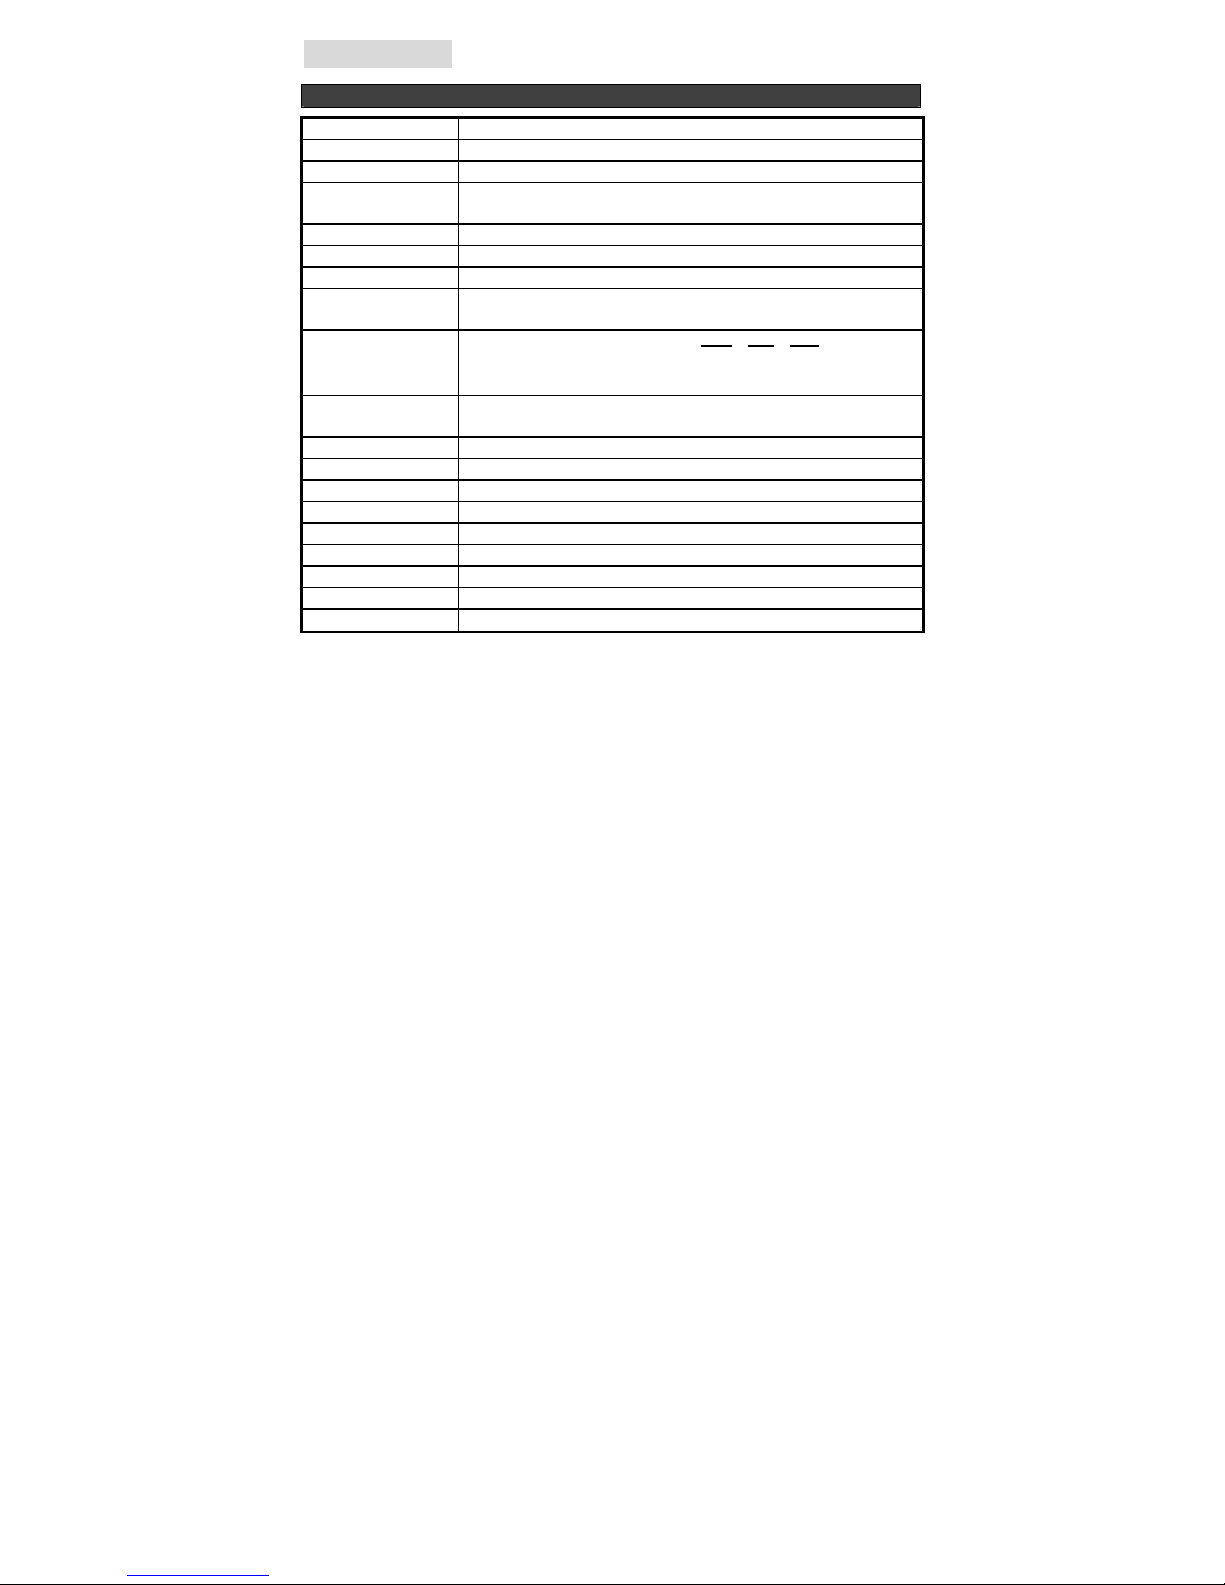
Image Sensor CMOS Sensor (2048 x 1536 Mega Pixels), Sensor area 1 / 2 "
Lens Specification F 2.8, f = 8.8 mm, View angle 52 °, 5 Glasses Element
Focus Range Normal: 4.9 ft. to Infinity, Macro: 1.6 ft.
Operating System
Flash Strobe Yes, (Auto, Flash On, Flash Off, Red Eye Reduction)
White Balance Automatic / Daylight / Cloudy / Fluorescent / Tungsten
Exposure Control Auto / Manual (-2EV ~ +2EV)
Frame Rate Video Mode
Capacity –
Still Mode
Movie Mode
Compression JPEG / MJPEG (AVI)
Zoom 4x Digital Zoom
Display 1.5” TFT LCD
PC Interface USB 1.1
Video Output NTSC and PAL
Storage Type Built-in 16MB Flash Memory + SD Card Slot (Card Not Included)
Power AAA 1.5V Alkaline / Re-chargeable Batteries x 2 (not included)
Dimension(LxHxW) 3.5” x 2.3” x 1.0”
Bundled Software Arcsoft PhotoImpression 5 and Arcsoft VideoImpression 2
Microsoft Windows 98SE / 2000 / ME / XP
Support Image Download for MAC OS X or Later
VGA 640 x 480 Pixels 30 fps with audio
Fine Mid Low
4.3M --- 2400x1800 Pixels 4 8 12 Pictures
L
M 3.2M --S XVGA --- 1600x1200 Pixels 8 17 26 Pictures
QVGA 320 x 240 Pixels Up to 38 sec. (30 fps)
VGA
Specifications
2048x1536 Pixels 5 10 16 Pictures
640 x 480 Pixels Up to 15 sec. (20 fps)
- 39 -
Page 45

Q1: If I do not use batteries, can I use an USB cord and Adaptor and still take
pictures with my digital camera?
A1: No, when taking pictures, it is important that you use batteries. Also, you have to
remember to charge the batteries before operating your camera.
Q2: I am not very familiar with digital cameras and usually my pictures turn out
blurry. Is there any way I can better focus my camera?
A2: Yes, please locate the Macro Switch on the camera lens. Switch it to the Normal (
setting unless taking close-up pictures in which case, you must switch to the Macro (
setting.
Note: If the pointer is found anywhere in between these two symbols, it will adversely
affect the focus. Also, ensuring there is enough lighting and that your hands are steady
for one second after you press the Shutter Button will help with the focus.
Q3: I have noticed that the pictures I have taken are all very dark. How can I
make these pictures lighter? Should I use the flash often?
A3: Avoid taking pictures in places with little lighting. When it is cloudy, please use other
means to create more light before taking pictures. We recommend using the flash
function during night time. During the day, the flash may be too strong and the picture
may come out too bright, thus use it only during the night.
Q4: After I am done taking a picture, it takes a while for the picture to come up on
the LCD monitor. Is there something wrong with my camera?
A4: No, with the camera, if you select a larger picture size, it will take longer for it to
come up on the LCD monitor. So if you want to speed things up, please select a smaller
picture size. (M picture size is recommend)
FAQ
)
)
- 40 -
Page 46
Troubleshooting
Problem Source Solution
The camera is not
running
The camera is not
taking pictures.
The power is not on • Press the ON/OFF button to turn the
camera on.
The batteries were not
inserted properly
Batteries are depleted • Replace with unused alkaline or fully
The SD card slot/battery
cover is not closed
properly
The camera is in the
Playback Function mode
The flash is charging • Wait until the flash charges. You can
The SD card or internal
memory is already full
The SD card is not
formatted correctly
• The correct direction to insert the
AAA batteries is indicated on the
camera.
recharged batteries (two AAA-size
batteries).
• Close the cover correctly and
securely.
• Slide the function switch to Capture
Function mode.
press the shutter button when the
indicator glows a steady green.
• Obtain a new SD card and insert it.
• Download images to your computer,
and then erase them from the card
or format
• Ask SD card manufacturer for
assistance.
to free up more space.
- 41 -
Page 47
Problem Source Solution
Picture is not
clear
The pictures are
blurred
The flash doesn't
fire
The computer
cannot
communicate with
the camera
The PC Camera
doesn't work
The lens is dirty • Clean the lens.
Hands were not steady
when taking the picture
The picture subject was
not in the focus range of
the camera
The flash mode is set to
Off
Camera power is off • Turn on the camera.
USB cable is not
securely connected
Driver is not installed (for
Windows 98 user)
Camera power is off • Turn on the camera.
USB cable is not
securely connected
Driver is not installed • Install the camera driver.
• Ensure hands are steady when
taking picture and remain steady
after clicking the shutter button until
the image is processed.
• Keep a minimum distance of 60
inches between the picture subject
and the camera lens to stay in the
focus range of the camera.
• Set the flash to any other mode
except Off.
• Connect cable to camera and
computer port.
• Install the camera driver.
• Connect cable to camera and
computer port.
VPS05-0831 DC-C310ML-VP_ENG
- 42 -
 Loading...