

Page 1
User manual
VULKKANO A4 ARC
Please read all instructions before use for the best performance of this product.
Save these instructions for future reference.
Page 2
Thank you for choosing products of VULKKANO
Learn more about VULKKANO products on our official website
or follow us on social networks, we are waiting for you!
Merci d'avoir choisi les produits de VULKKANO
Découvrez les produits VULKKANO sur notre site officiel ou suivez-nous
sur les médias sociaux, nous sommes impatients de vous voir!
Gracias por elegir los productos de VULKKANO
Conoce más productos VULKKANO en nuestra página oficial
o síguenos en redes sociales. ¡Te esperamos!
Danke, dass Sie sich für Produkte von VULKKANO entschieden haben
Erfahren Sie mehr über VULKKANO-Produkte auf unserer offiziellen Website
oder folgen Sie uns in den sozialen Medien, wir freuen uns auf Sie!
Grazie per aver scelto i prodotti di VULKKANO
Scopri di più sui prodotti VULKKANO sul nostro sito ufficiale
o seguici sui social media, ti aspettiamo!
Obrigado por escolher os produtos de VULKKANO
Descubra mais sobre os produtos VULKKANO no nosso site oficial
ou siga-nos nas redes sociais, estamos ansiosos por o ver!
@Vulkkano
@vulkkanosound
www.vulkkano.com
@vulkkanosound
Page 3
Content
page 3 ... ... ... ...
page 3 ... ... ... ...
page 5 ... ... ... ...
page 6 ... ... ... ...
page 6 ... ... ... ...
page 7 ... ... ... ...
page 8 ... ... ... ...
page 8 ... ... ... ...
page 9 ... ... ... ...
page 10 ... ... ... ...
page 17 ... ... ... ...
page 24 ... ... ... ...
page 31 ... ... ... ...
page 38 ... ... ... ...
Box Contents
LED Indicators and Button Introduction
Connection Diagram
Connecting with a TV
Setting “PCM” on your TV
Connecting a Bluetooth Device
Specifications
Troubleshooting
FCC Statement
Manuel d'utilisateur
Manual de usuario
Bedienungsanleitung
Manuale dell’utente
Manual do utilizador
2
English
Page 4
Box Content
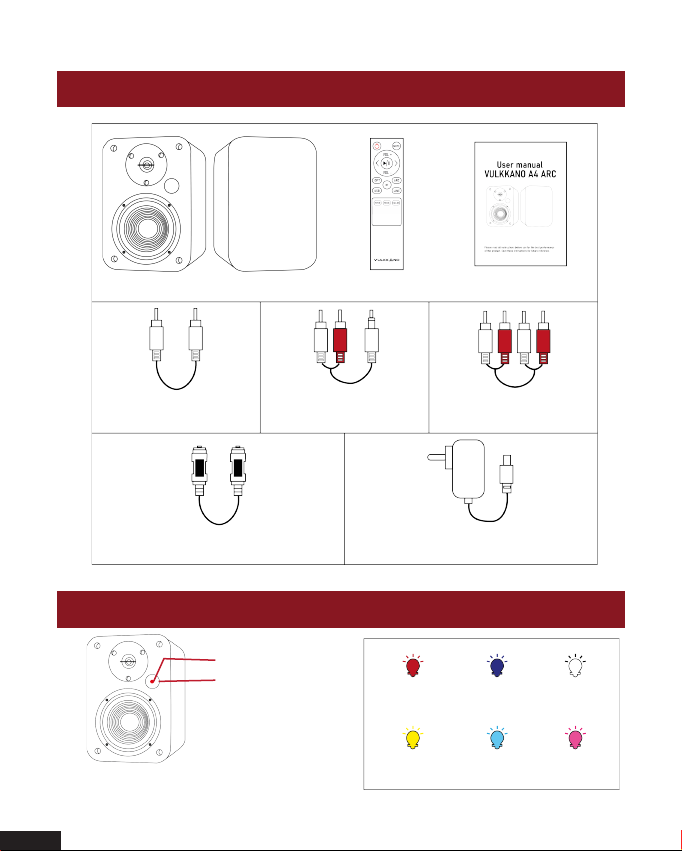
Bookshelf Speaker Remote control User manual
3
English
RCA to RCA
audio cable
Digital Optical cable Power adapter
Stereo RCA to 3.5mm
audio cable
*For reasons beyond the control of the brand, the accessories may vary.
RCA to RCA
audio cable
LED Indicators and Button Introduction
Infrared receiver
LED indicators
Active Speaker
Standby Bluetooth Optical
Line in
ARC
USB
Page 5
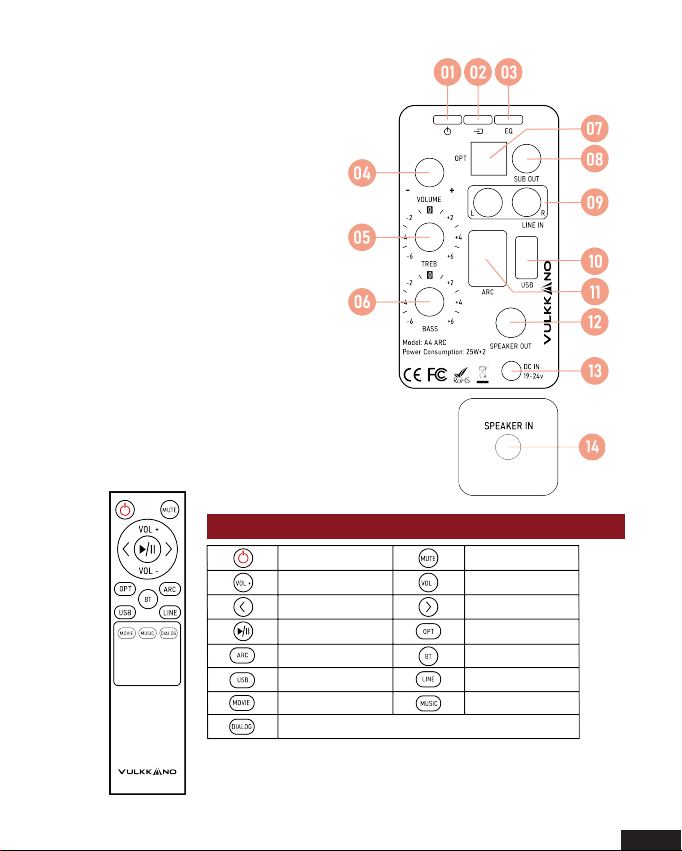
01. Power switch
02. Input selection
Press in to navigate between audio sources:
Bluetooth -> Optical -> Line in -> ARC -> USB
03. Sound effects
Press in to navigate between audio sources:
Music -> Dialogue -> Movie
04. Volume control
05. Treble control
06. Bass control
07. Optical input port
08. Connect a subwoofer
09. Line in input port
10. USB input port
11. ARC input port
12. Left speaker audio output
Active Speaker
13. Power port
14. Left speaker audio in
Know your remote
Power button Mute/Unmute
Volume up Volume down
Previous track
Play/Pause Optical mode
ARC mode
USB mode
Movie mode
Passive Speaker
Next track
Bluetooth mode
Line in mode
Music mode
Dialogue mode
4
English
Page 6
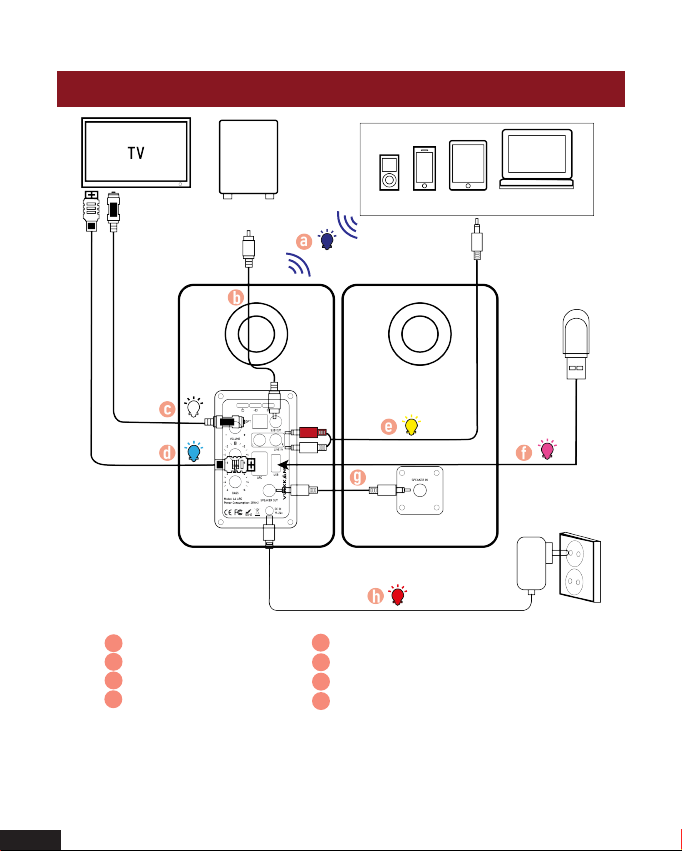
Connection Diagram
Subwoofer
Active Speaker Passive Speaker
a Bluetooth
a
a
b Audio cable
b
c
c Digital Optical cable
d
d High speed ARC cable
Bluetooth Device
Bluetooth signal
up to 30 feet
e
e Stereo RCA to 3.5mm audio cable
f USB
f
g
RCA to RCA Audio cable
h Power Adapter
h
USB
5
English
Page 7
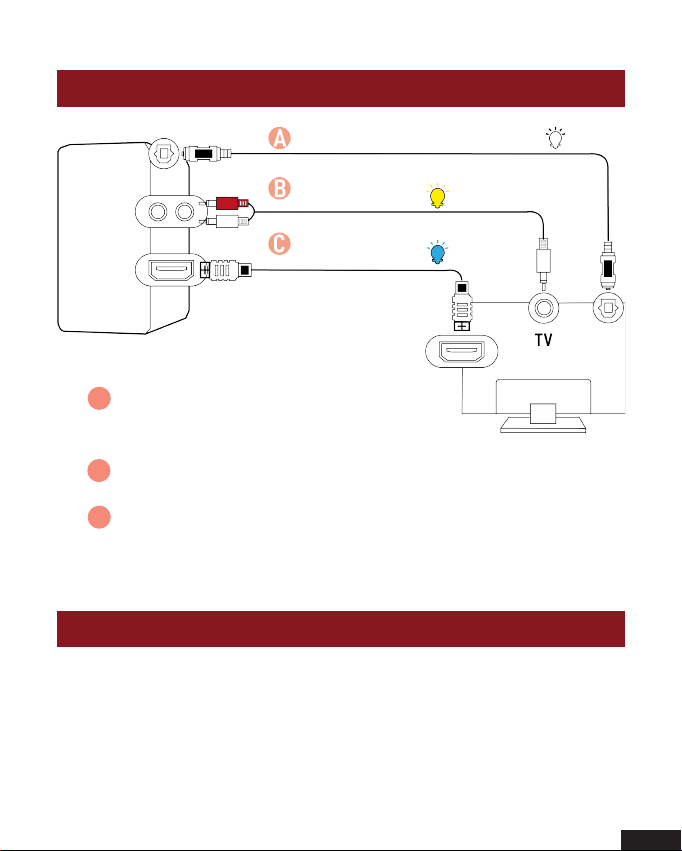
Connecting with a TV
Optical digital cable
RCA to 3.5mm
audio cable
High speed
ARC cable
Active Speaker
Method 1. Connecting using an Optical cable.
A
Select Optical mode and set the TV’s audio
output to “PCM”. (More information on PCM page)
Method 2. Connecting using a RCA to 3.5mm audio cable.
B
Select RCA mode.
Method 3. Connecting using an ARC cable. Select ARC mode
C
and set the TV’s audio output to “PCM”.
(More information on PCM page)
Setting “PCM” on your TV
When all cables are connected properly, and LED indicator
lights properly, if there is no sound from tv or Soundbar, please
setting your tv as below:
6
English
Page 8
1. Press “Menu” on the TV’s remote control.
2. Press the arrow keys on the remote to scroll to “Audio Settings”.
3. Press “OK” on the remote control.
4. Scroll to “Advanced Audio” and press “OK”. Some televisions may
not have an ”Advanced Audio” menu and may list various audio
settings instead.
5. Scroll to “Audio Output Mode” or “Digital Audio Output Mode” and
press “OK”.
6. Scroll until “PCM” is displayed as the current audio output.
7. Press “OK” to save the settings.
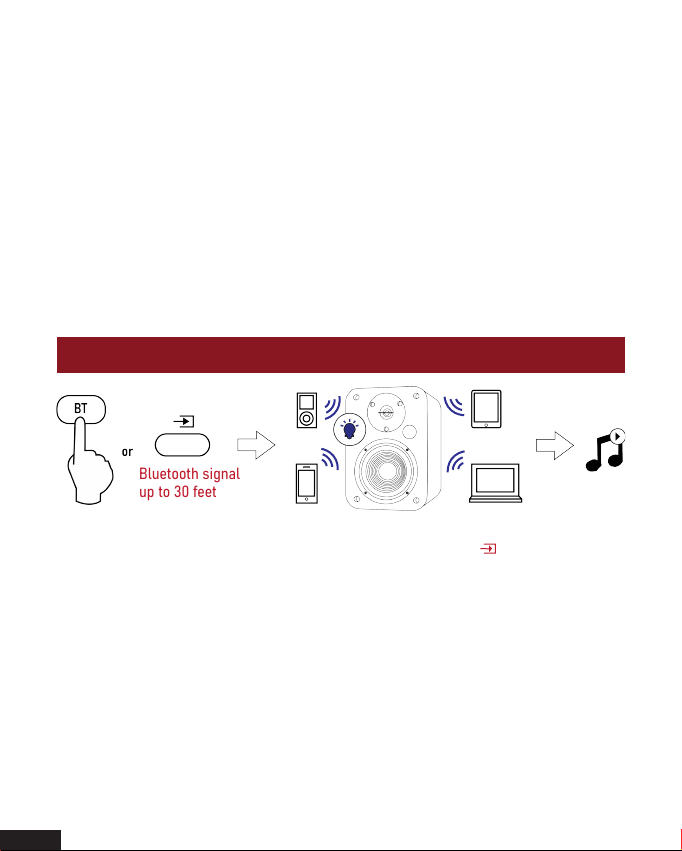
Connecting a Bluetooth Device
Bluetooth signal
up to 30 feet
a. Press the “BT” button on the remote or press the “ ” button on
back panel of the active speaker, the LED indicator blinks blue.
b. Turn on Bluetooth on the Bluetooth device.
c. Select “VULKKANO A4 ARC” and connect it. When your Bluetooth
device is connected, the LED indicator blinks blue slowly.
d. Play music files from the device, connected via Bluetooth, through
the bookshelf speaker.
7
English
Page 9

Specifications
Power output: L/R: 25W + 25W
Signal to noise ratio dB(A):
Input sensitivity:
Frequency response: 40HZ-18KHZ
Bass unit:
Tweeter unit:
L/R: ≥85dB (A)
LINE IN: R/L: 650±50mV
OPT: R/L: 500±50mFFS
Bluetooth: R/L: 700±50mFFS
4 inch (116mm)
Φ13 mm tweeter
Troubleshooting
No sound
- Check if the power indicator light is ON.
- Try to turn up the volume using either the master volume control or remote control.
- Ensure the audio cables are firmly connected and the input is set correctly on the
speakers.
- Check if there is signal output from the audio source.
Cannot connect via Bluetooth
- Make sure the speaker is switched to Bluetooth input, in other audio input mode
Bluetooth can not be paired or connected. Disconnect from any Bluetooth device by
press and hold the volume dial in Bluetooth mode, then try again.
- Effective Bluetooth transmission range is 10 meters, please make sure operation is
within the range.
- Try another Bluetooth device for connection.
The VULKKANO A4 ARC Bookshelf Speaker does not turn on
- Check if mains power is connected. or if the wall outlet is switched on.
8
English
Page 10

FCC Statement
This device complies with Part 15 of the FCC Rules. Operation is subject to the
following two conditions:
(1) This device may not cause harmful interference.
(2) This device must accept any interference received, including interference that
may cause undesired operation.
Warning: Changes or modifications not expressly approved by the party
responsible for compliance could void the user's authority to operate the
equipment.
NOTE: This equipment has been tested and found to comply with the limits for a
Class B digital device, pursuant to Part 15 of the FCC Rules. These limits are
designed to provide reasonable protection against harmful interference in a
residential installation. This equipment generates uses and can radiate radio
frequency energy and, if not installed and used in accordance with the
instructions, may cause harmful interference to radio communications. However,
there is no guarantee that interference will not occur in a particular installation.
If this equipment does cause harmful interference to radio or television reception,
which can be determined by turning the equipment off and on, the user is
encouraged to try to correct the interference by one or more of the following
measures:
- Reorient or relocate the receiving antenna.
- Increase the separation between the equipment and receiver.
- Connect the equipment into an outlet on a circuit different from that to which
the receiver is connected.
- Consult the dealer or an experienced radio/TV technician for help.
FCC Radiation Exposure Statement:
This equipment complies with FCC radiation exposure limits set forth for an
uncontrolled environment. This equipment should be installed and operated with
minimum distance 20cm between the radiator & your body.
9
English
Page 11
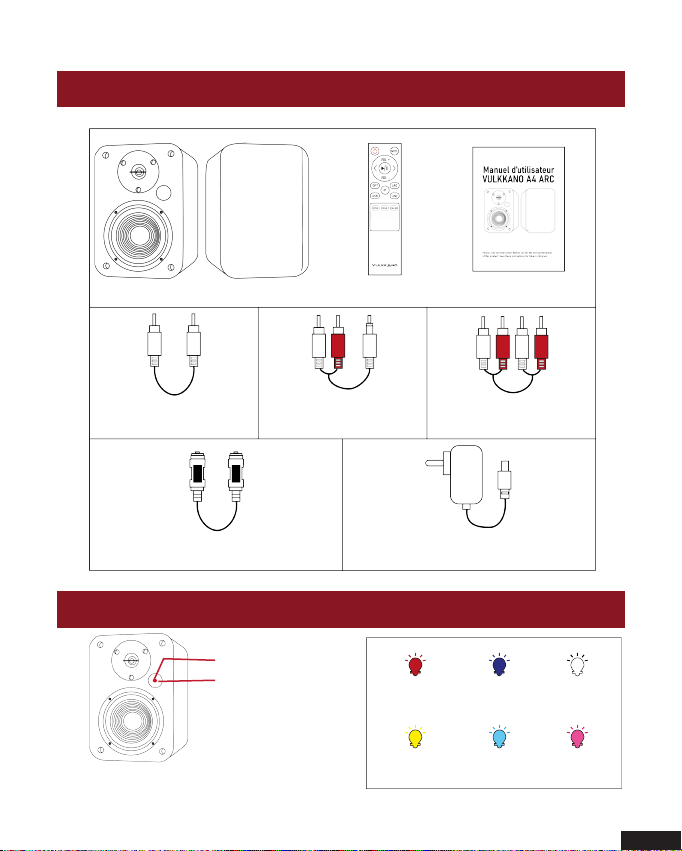
Contenu de la boîte
Haut-parleur d'étagère
RCA à RCA
câble audio
Câble optique numérique Adaptateur secteur
*Pour des raisons indépendantes de la volonté de la marque, les accessoires peuvent varier
Télécommande
RCA stéréo vers
câble audio 3,5 mm
Manuel d’utilisateur
Câble audio
RCA vers RCA
Indicateurs LED et introduction des boutons
Récepteur infrarouge
Indicateurs LED
Haut-parleur Actif
Veille Bluetooth Optique
Ligne d'entrée ARC
USB
10
Français
Page 12
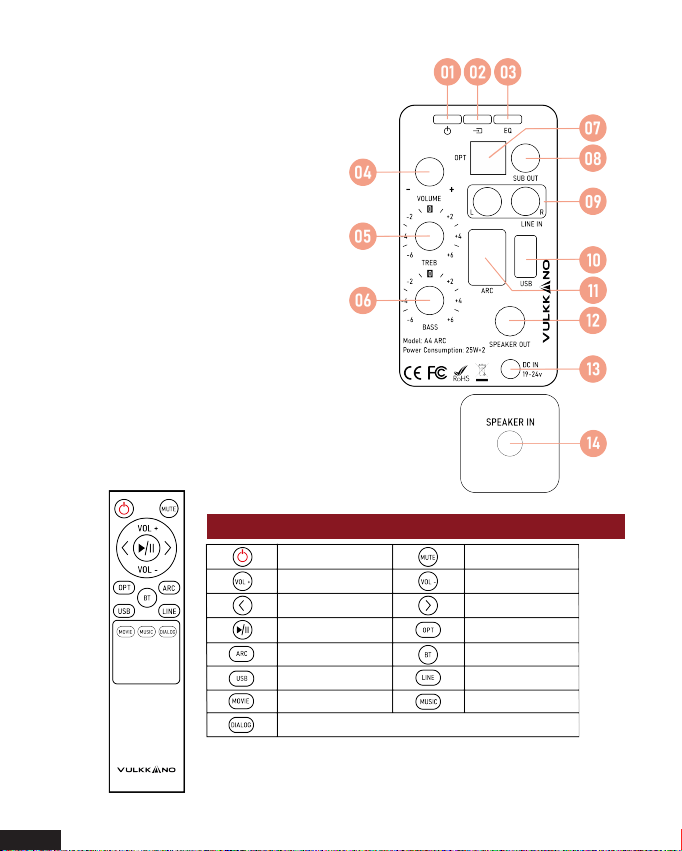
01. Interrupteur on/off
02. Sélection de l'entrée
Appuyez pour naviguer entre les sources audio :
Bluetooth -> Optique -> Ligne d'entrée -> ARC > USB
03. Effets sonores
Appuyez pour naviguer entre les sources audio :
Musique -> Dialogue -> Film
04. Contrôle du volume
05. Contrôle des aigus
06. Contrôle des basses
07. Port d'entrée optique
08. Connecter un caisson de basses
09. Port d'entrée LIGNE D'ENTRÉE
10. Port d'entrée USB
11. Port d'entrée ARC
Haut-parleur Actif
12. Sortie audio du haut-parleur gauche
13. Port d'alimentation
14. Entrée audio du haut-parleur gauche
Haut-parleur passif
Votre télécommande
Bouton d’alimentation Muet / Sonore
Augmenter le volume Diminuer le volume
Piste précédente
Lecture/pause Mode Optique
Mode ARC
Mode USB
Mode film Mode Musique
Piste suivante
Mode Bluetooth
Mode ligne d'entrée
Mode dialogue
11
Français
Page 13
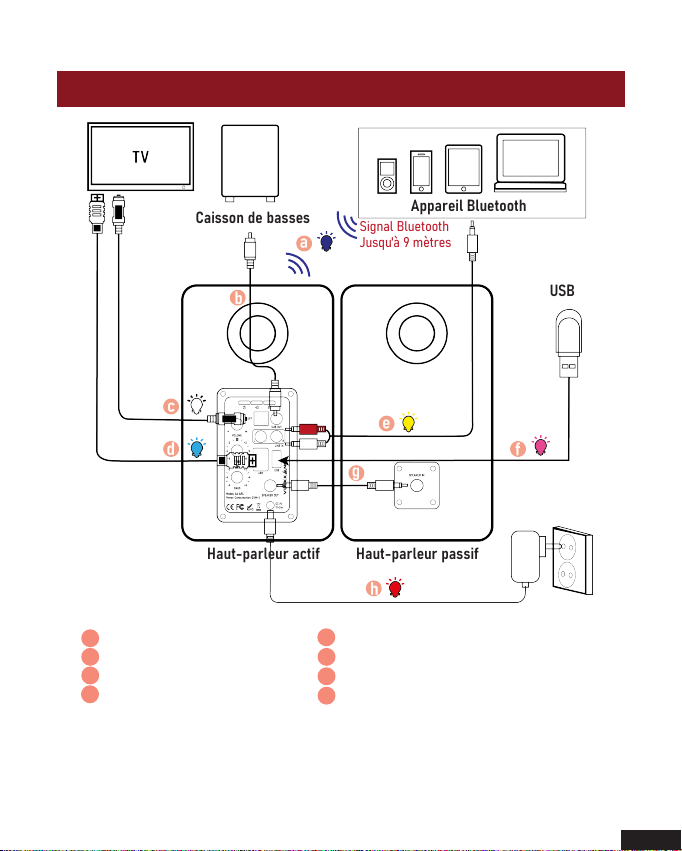
Schéma de raccordement
Caisson de basses
Haut-parleur actif Haut-parleur passif
a Bluetooth
a
a
b Câble audio
b
c
c Câble optique numérique
d
d Câble ARC haute vitesse
Appareil Bluetooth
Signal Bluetooth
Jusqu'à 9 mètres
USB
e
e Câble audio stéréo RCA vers 3,5 mm
f USB
f
g
RCA à RCA câble audio
h Adaptateur secteur
h
12
Français
Page 14
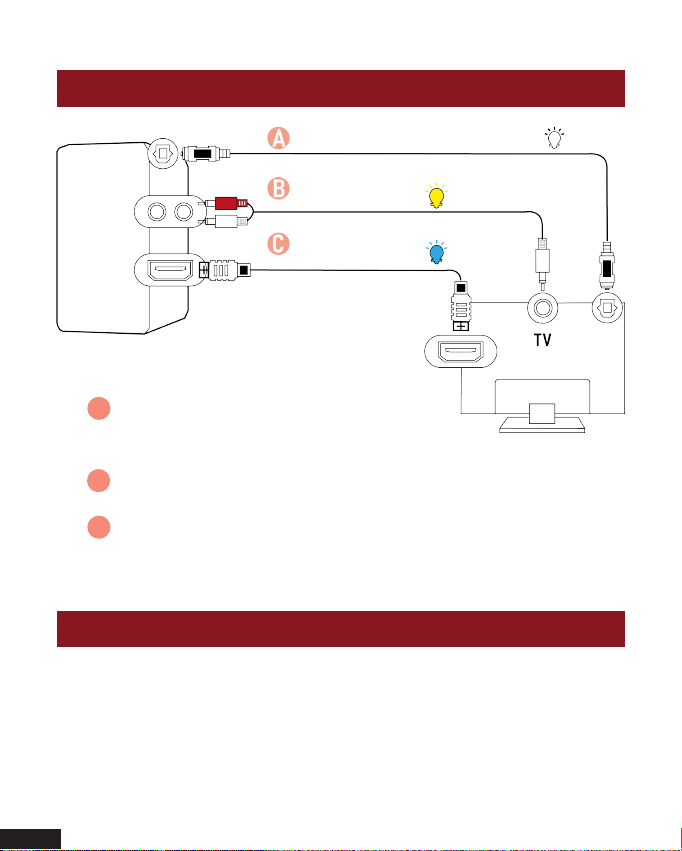
Connexion à un téléviseur
Câble optique numérique
RCA vers câble audio
3,5 mm
Câble ARC grande
vitesse
Haut-parleur actif
Méthode 1. Connexion à l'aide d'un câble optique.
A
Sélectionner Mode optique et régler la sortie
audio TV sur « PCM ». (Plus d'informations sur la page PCM)
Méthode 2. Connexion à l'aide d'un RCA vers câble audio 3,5
B
mm. Sélectionner le mode RCA.
Méthode 3. Connexion au moyen d'un câble ARC. Sélectionner
C
Mode ARC et régler la sortie audio TV sur « PCM ».
(Plus d'informations sur la page PCM)
Réglage du « PCM » sur votre TV
13
Français
Lorsque tous les câbles sont correctement connectés et que le
voyant LED s'allume correctement, s'il n'y a pas de son provenant
de la tv ou de la barre de son, veuillez régler votre tv comme suit :
Page 15
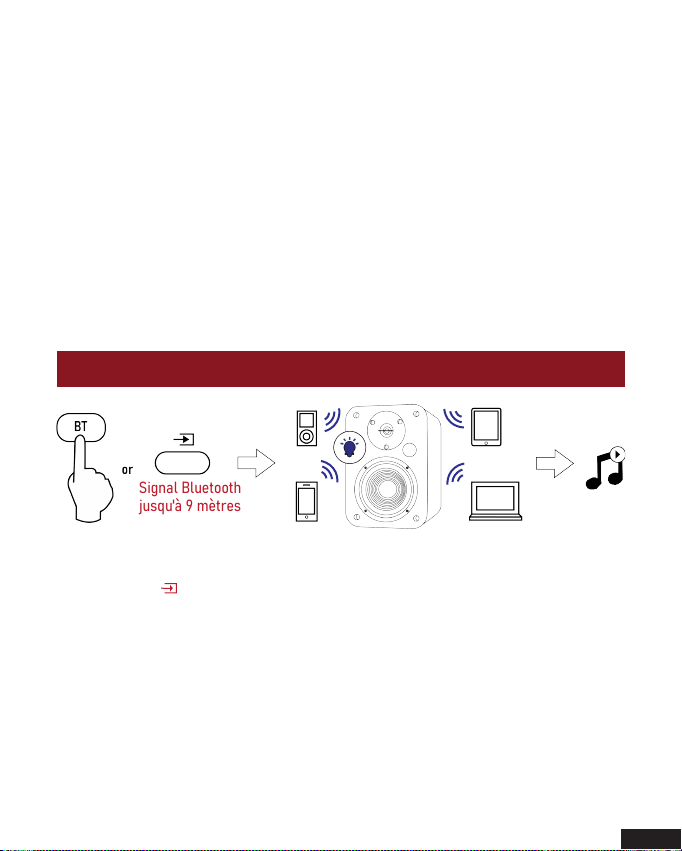
1. Appuyer « Menu » sur la télécommande de la TV.
2. Appuyer sur les touches fléchées de la télécommande pour faire
défiler jusqu'à « Paramètres audio ».
3. Appuyer sur « OK » sur la télécommande.
4. Faire défiler jusqu'à « Advanced Audio » et appuyer sur « OK ».
Certaines tv peuvent ne pas avoir de menu « Audio avancé » et peuvent
énumérer différents paramètres audio.
5. Faire défiler jusqu'à « Mode de sortie audio » ou « Mode de sortie
audio numérique » et appuyer sur « OK ».
6. Faire défiler jusqu'à ce que « PCM » s'affiche comme sortie audio
actuelle.
7. Appuyer sur « OK » pour enregistrer les paramètres.
Connexion d'un appareil Bluetooth
Signal Bluetooth
jusqu'à 9 mètres
a. Appuyer sur le bouton « BT » de la télécommande ou appuyer sur le
bouton « » sur le panneau arrière du haut-parleur actif, le voyant
LED clignote en bleu.
b. Activer le Bluetooth sur l'appareil Bluetooth.
c. Sélectionner « VULKKANO A4 ARC » et connecter. Lorsque
votre appareil Bluetooth est connecté, le voyant LED clignote
lentement en bleu.
d. Lire des fichiers musicaux à partir de l'appareil, connecté via
Bluetooth, via le haut-parleur de la bibliothèque.
14
Français
Page 16

Caractéristiques
Puissance de sortie: L/R: 25W + 25W
Rapport signal/bruit dB(A):
Sensibilité d’entrée:
Réponse en fréquence: 40HZ-18KHZ
Unité de commande des graves:
Unité haute-fréquence:
LIGNE D'ENTRÉE: R/L: 650±50mV
L/R: ≥85dB (A)
OPT: R/L: 500±50mFFS
Bluetooth: R/L: 700±50mFFS
140 mm (5,25 pouces)
Tweeter de Φ13 mm
Dépannage
Aucun son
- Vérifiez si le voyant d'alimentation est allumé.
- Essayez d'augmenter le volume à l'aide de la commande de volume principale ou
de la télécommande.
- Assurez-vous que les câbles audio sont bien connectés et que l'entrée est
correctement réglée sur les haut-parleurs.
- Vérifiez s'il y a un signal de sortie de la source audio.
Impossible de se connecter via Bluetooth
- Assurez-vous que le haut-parleur est commuté sur l'entrée Bluetooth, dans un autre
mode d'entrée audio, le Bluetooth ne peut pas être jumelé ou connecté.
- Déconnectez-vous de n'importe quel appareil Bluetooth en maintenant la molette
de réglage du volume en mode Bluetooth enfoncée, puis réessayez.
- La portée de transmission Bluetooth effective est de 10 mètres, veuillez vous
assurer que l'appareil est à sa portée.
- Essayez un autre périphérique Bluetooth pour vous connecter.
Le haut-parleur d'étagère VULKKANO A4 ARC ne s'allume pas
- Vérifiez si l'alimentation secteur est branchée ou si la prise murale est branchée.
15
Français
Page 17

Déclaration FCC
Cet appareil est conforme à la section 15 du Règlement de la FCC. Son
fonctionnement est soumis aux deux conditions suivantes :
(1) Cet appareil ne doit causer aucune interférence nuisible.
(2) Cet appareil doit accepter toute interférence reçue, y compris des interférences
qui peuvent provoquer un fonctionnement non désiré.
Attention: toutes modifications ou changements qui ne sont pas
expressément approuvés par le tiers responsable de la conformité peut
annuler le droit de l’utilisateur à utiliser cet appareil.
REMARQUE: Cet équipement a été testé et déclaré conforme aux limites d’un
appareil numérique de classe B, conformément à la partie 15 des règles de la FCC.
Ces limites sont destinées à assurer une protection raisonnable contre les
interférences nuisibles dans une installation résidentielle. Cet équipement émet,
utilise et peut émettre des radiofréquences et, si non installé et utilisé
conformément aux instructions, il peut causer des interférences nuisibles aux
communications radio. Toutefois, il n'y a aucune garantie que l'interférence ne se
produise dans une installation particulière.
Si cet équipement provoque effectivement un brouillage préjudiciable à la réception
radio ou télévisuelle, ce qui peut être établi en éteignant et en rallumant
l'équipement, l'utilisateur est invité à tenter de corriger le brouillage par une ou
plusieurs des mesures suivantes :
- Réorienter ou relocaliser l'antenne de réception.
- Augmenter la distance entre l'équipement et le récepteur.
- Connecter l'équipement dans une prise sur un circuit autre que celui du
récepteur.
- Contacter le revendeur ou un technicien radio/TV qualifié pour obtenir une
assistance.
Déclaration de la FCC sur l'exposition aux rayonnements :
Cet équipement est conforme aux limites d’exposition aux rayonnements radio
fréquence de la FCC établies pour un environnement non contrôlé. Cet équipement
doit être installé et utilisé en respectant une distance minimale de 20 cm entre
l’élément rayonnant et le corps.
16
Français
Page 18
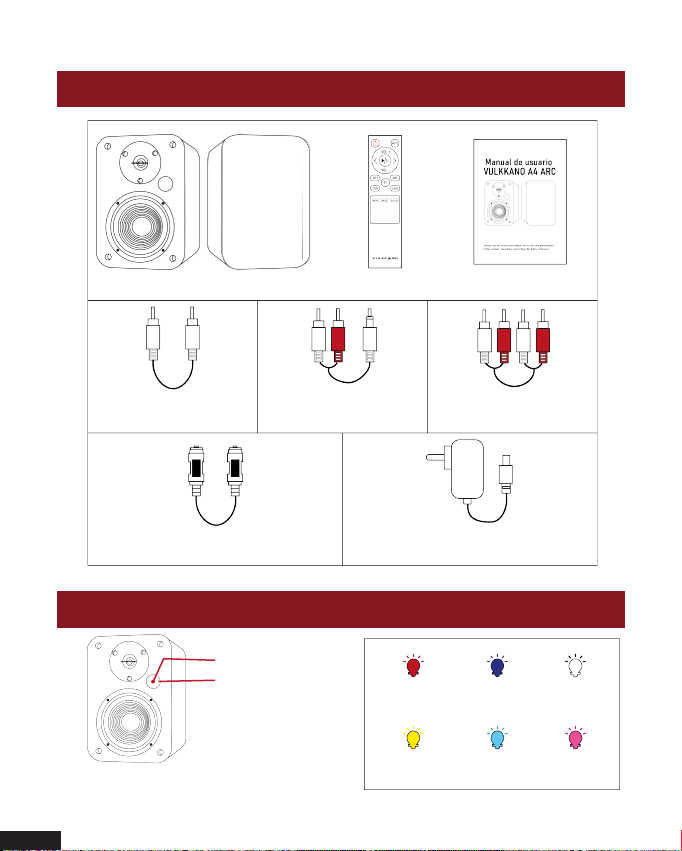
Contenido de la caja
Altavoces activos Control remoto Manual de usuario
17
Español
Cable de audio
RCA a RCA
Cable óptico digital Adaptador de corriente
Cable estéreo
3.5mm a RCA
*Por motivos ajenos a la marca, los accesorios pueden variar
Indicadores LED y controles
Receptor infrarrojos
Indicadores LED
Altavoces activos
Standby
Entrada línea
Cable estéreo RCA
Bluetooth Óptica
ARC USB
Page 19
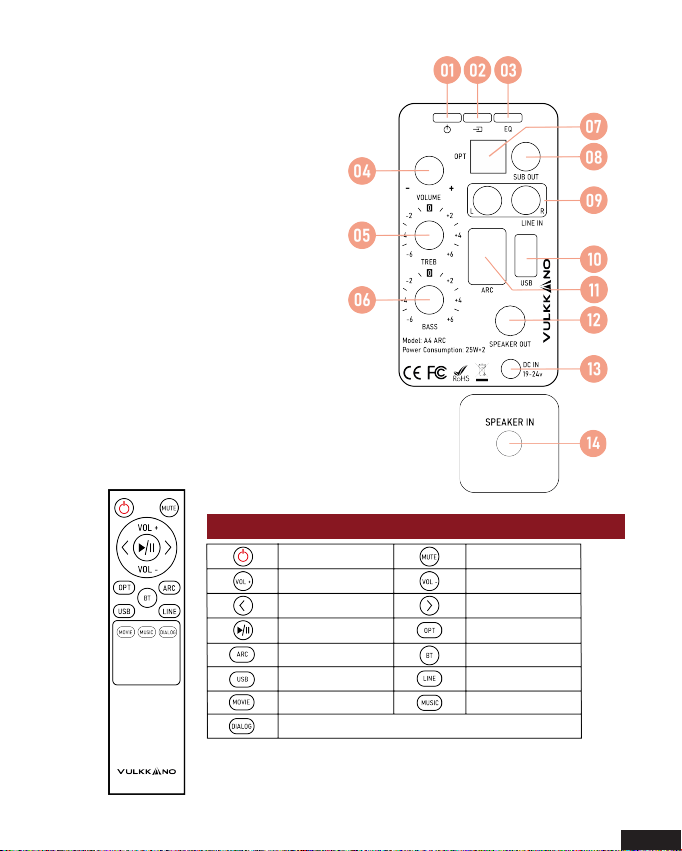
01. Interruptor de encendido
02. Selector de entrada
Presiona para navegar entre las fuentes de audio:
Bluetooth -> Óptica -> Entrada de línea -> ARC > USB
03. Efectos de sonido
Presiona para navegar entre las fuentes de audio:
Música -> Dialogo -> Película
04. Control de volumen
05. Control de agudos
06. Control de graves
07. Entrada óptica
08. Salida de subwoofer
09. Entrada de línea
10. Entrada USB
Altavoz activo
11. Entrada ARC
12. Salida de audio del altavoz izquierdo
13. Puerto de alimentación
14. Entrada de audio del altavoz izquierdo
Control remoto
Botón encendido
Subir volumen Bajar volumen
Pista anterior Pista siguiente
Reproducir/pausar Modo óptico
Modo ARC
Modo USB
Modo película Modo música
Altavoz pasivo
Modo diálogo
Mutear/Desmutear
Modo Bluetooth
Modo entrada
de línea
18
Español
Page 20
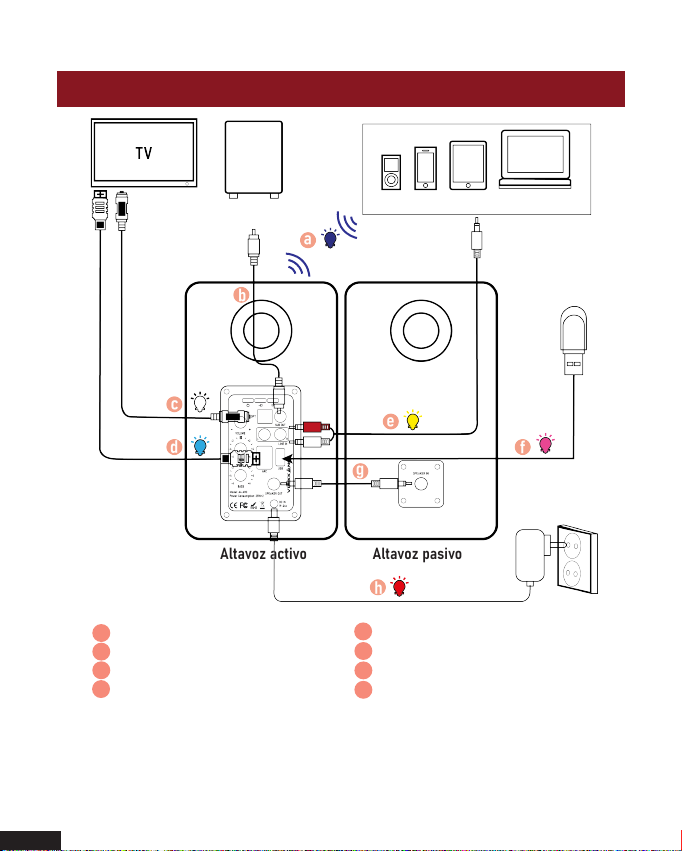
Diagrama de conexiones
Subwoofer
Altavoz activo Altavoz pasivo
a Bluetooth
a
a
b Cable de audio
b
c
c Cable óptico digital
d
d Cable ARC de alta velocidad
Dispositivo Bluetooth
Señal Bluetooth
hasta 10 metros
USB
e
e Cable de audio RCA a 3,5mm
f USB
f
g
Cable de audio RCA a RCA
h Adaptador de corriente
h
19
Español
Page 21
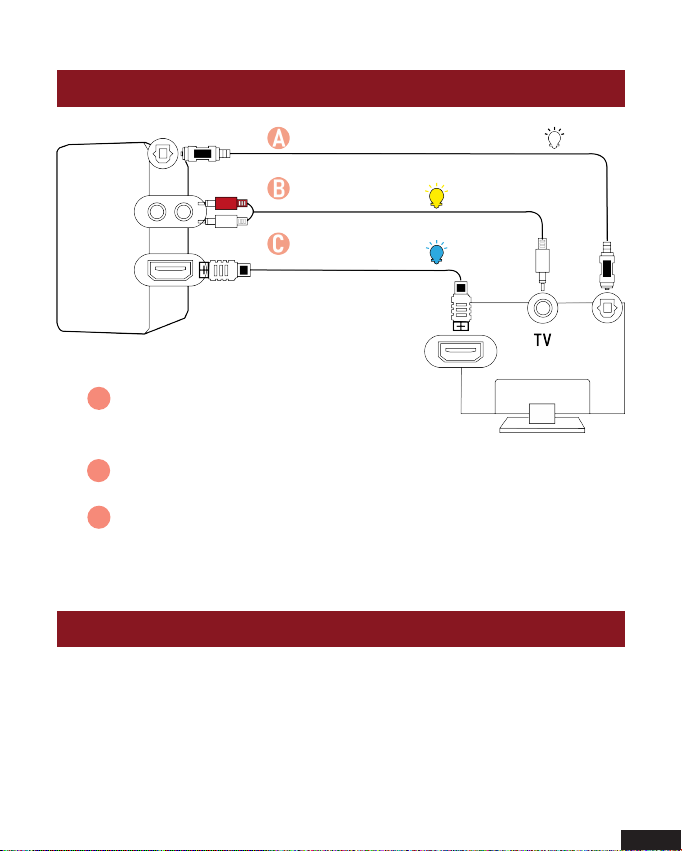
Conectar a la TV
Cable óptico digital
Cable de audio
RCA a 3,5mm
ARC alta
velocidad
Altavoz activo
Método 1. Conexión mediante un cable óptico.
A
Seleccione el modo óptico y configure la salida
de audio del televisor en “PCM”.
Método 2. Conexión mediante un cable de audio RCA a
B
3,5mm. Seleccione el modo RCA.
Método 3. Conexión mediante un cable ARC. Seleccione el modo
C
ARC y configure la salida de audio del televisor en “PCM” .
(Más información en la página del PCM)
(Más información en la página del PCM)
Configurar “PCM” en la TV
Cuando todos los cables estén conectados correctamente y el
indicador LED se encienda, si no hay sonido en el televisor o la
barra de sonido, configure su televisor de la siguiente manera:
20
Español
Page 22
1. Presione “Menú” en el control remoto del televisor.
2. Presione las teclas de flecha en el control remoto para
desplazarse hasta “Configuración de audio”.
3. Presione “OK” en el control remoto.
4. Desplácese hasta “Audio avanzado” y presione “Aceptar”. Algunos
televisores pueden no tener un menú de “Audio avanzado” y pueden
enumerar varias configuraciones de audio en su lugar.
5. Desplácese hasta “Modo de salida de audio” o “Modo de salida de
audio digital” y presione “OK”.
6. Desplácese hasta que se muestre “PCM” como la salida de audio
actual.
7. Presione “OK” para guardar la configuración.
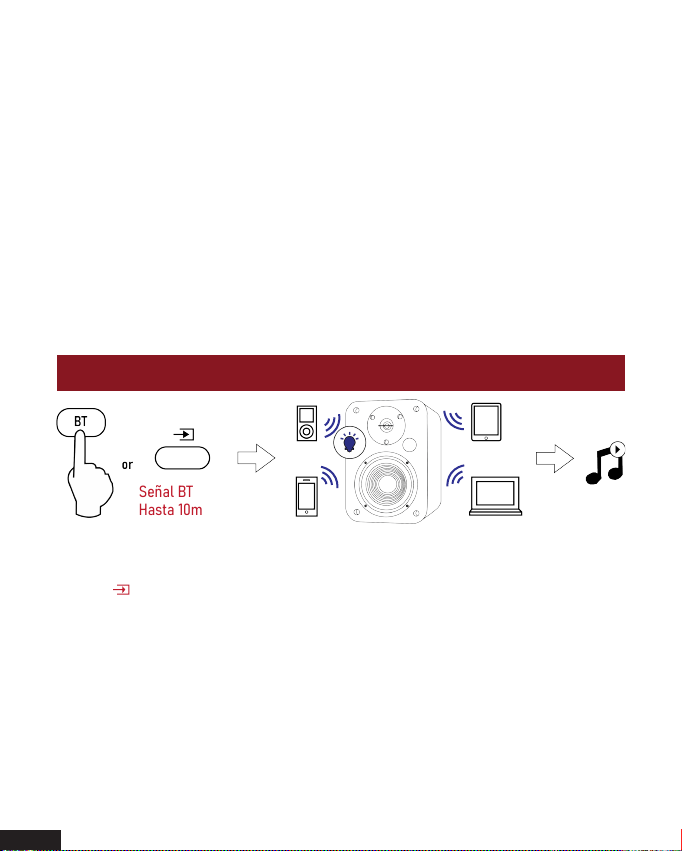
Conectar a un dispositivo Bluetooth
Señal BT
Hasta 10m
a. Presione el botón “BT” en el control remoto o presione el botón
“ ” en el panel posterior del altavoz activo, el indicador LED
parpadea en azul.
b. Activar Bluetooth en el dispositivo Bluetooth
c. Seleccione “VULKKANO A4 ARC” y conéctelo. Cuando el dispositivo
Bluetooth está conectado, el indicador LED parpadea lentamente en
azul.
d. Reproduzca archivos de música desde el dispositivo Bluetooth, a
través del altavoz de estantería.
21
Español
Page 23

Especificaciones
Potencia de salida: L/R: 25W + 25W
Relación señal/ruido dB(A):
Sensibilidad de entrada:
Respuesta de frecuencia: 40HZ-18KHZ
Unidad de graves:
Unidad de agudos:
L/R: ≥85dB (A)
LINE IN: R/L: 650±50mV
OPT: R/L: 500±50mFFS
Bluetooth: R/L: 700±50mFFS
4” (116mm)
Tweeter de Φ13 mm
Solución de problemas
Sin sonido
- Compruebe si la luz indicadora de encendido está encendida.
- Intente subir el volumen usando el control de volumen maestro o el control remoto.
- Asegúrese de que los cables de audio estén firmemente conectados y que la
entrada esté configurada correctamente en los altavoces.
- Compruebe si hay salida de señal desde la fuente de audio.
No se puede conectar a través de Bluetooth
- Asegúrese de que el altavoz esté en la entrada Bluetooth; en otro modo de entrada
de audio, Bluetooth no se puede emparejar ni conectar. Desconéctese de cualquier
dispositivo Bluetooth manteniendo presionado el dial de volumen en el modo
Bluetooth, luego intente nuevamente.
- El rango efectivo de transmisión de Bluetooth es de 10 metros, asegúrese de que
la operación esté dentro del rango.
- Pruebe con otro dispositivo Bluetooth para la conexión.
El VULKKANO A4 ARC no se enciende
- Compruebe si la alimentación de red está conectada o si la toma de
corriente de la pared está encendida.
22
Español
Page 24

Declaración FCC
Este dispositivo cumple con la Parte 15 de las Normas de la FCC. La operación
está sujeta a las siguientes dos condiciones:
(1) Es posible que este dispositivo no cause interferencias dañinas.
(2) Este dispositivo debe aceptar cualquier interferencia recibida, incluida la
interferencia que pueda provocar un funcionamiento no deseado.
Advertencia: Los cambios o modificaciones no aprobados expresamente por la
parte responsable del cumplimiento podrían anular la autoridad del usuario para
operar el equipo.
NOTA: Este equipo ha sido probado y cumple con los límites para un dispositivo
digital de Clase B, de conformidad con la Parte 15 de las Normas de la FCC. Estos
límites están diseñados para brindar una protección razonable contra interferencias
dañinas en una instalación residencial. Este equipo genera usos y puede irradiar
energía de radiofrecuencia y, si no se instala y utiliza de acuerdo con las
instrucciones, puede causar interferencias dañinas en las comunicaciones por
radio. Sin embargo, no hay garantía de que no se produzcan interferencias en una
instalación en particular.
Si este equipo causa interferencias dañinas en la recepción de radio o televisión, lo
que se puede determinar apagando y encendiendo el equipo, se recomienda al
usuario que intente corregir la interferencia mediante una o más de las siguientes
medidas:
- Reorientar o reubicar la antena receptora.
- Aumente la separación entre el equipo y el receptor.
- Conecte el equipo a una toma de un circuito diferente al que está conectado el
receptor.
- Consulte al distribuidor con un técnico experimentado en radio/TV para obtener
ayuda.
Declaración de exposición a la radiación de la FCC:
Este equipo cumple con los límites de exposición a la radiación de la FCC
establecidos para un entorno no controlado. Este equipo debe instalarse y
operarse con una distancia mínima de 20 cm entre el radiador y su cuerpo
.
23
Español
Page 25
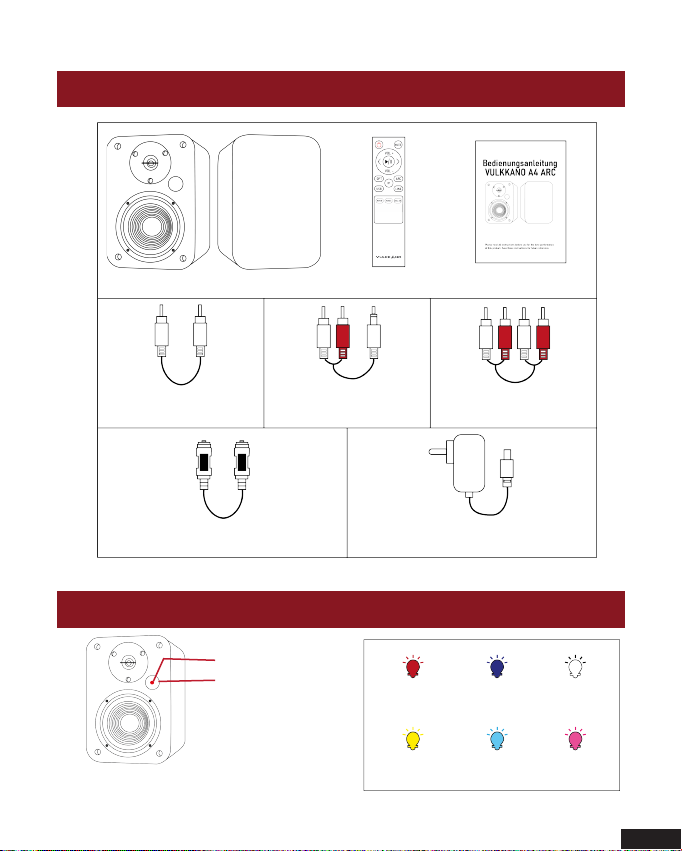
Inhalt des Kartons
Regal-Lautsprecher Fernbedienung Bedienungsanleitung
RCA AudioKabel
Optisches Digitalkabel Netzstecker
*Aus Gründen, die außerhalb der Kontrolle der Marke liegen, kann das Zubehör variieren.
Stereo RCA auf
3,5mm Audiokabel
LED Anzeigen und Tasten
Infrarot Receiver
LED Anzeigen
Aktiv-Lautsprecher
RCA auf
RCA Kabel
Standby Bluetooth Optisch
Line-in
ARC
USB
24
Deutsch
Page 26
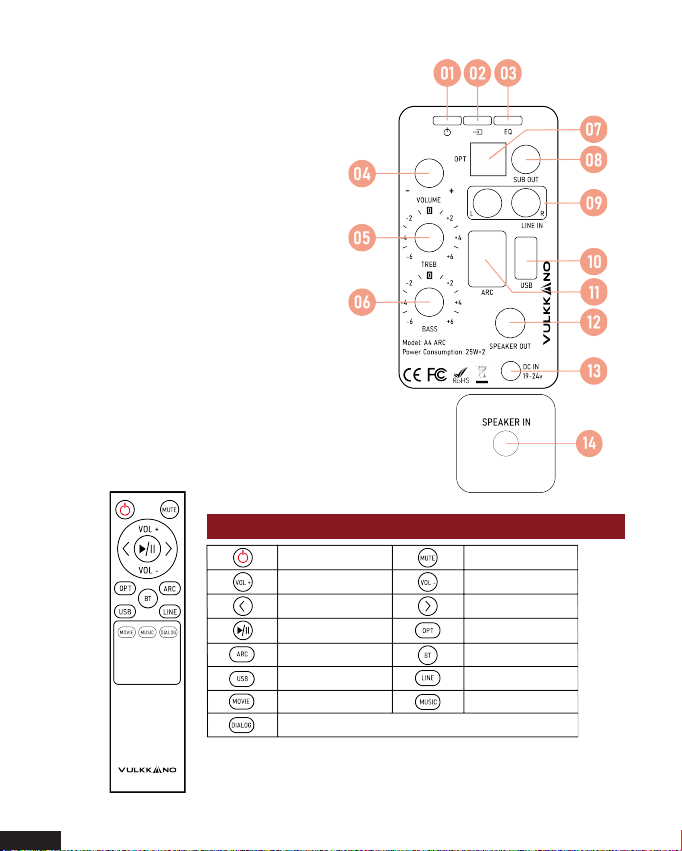
01.Ein-/Ausschalter
02.Eingangsauswahl
Um zwischen den Audioquellen zu wechseln,
drücken Sie: Bluetooth -> Optical -> Line-In -> ARC
-> USB
03. Sound-Effekte
Um zwischen den Audioquellen zu wechseln,
drücken Sie: Musik -> Dialog -> Film
04. Lautstärkeregler
05. Treble-Regler
06. Bass- Regler
07. Optischer Eingang
08. Subwoofer-Anschluss
09. Line-In
10. USB-Eingang
11. ARC-Eingang
Aktiv-Lautsprecher
12. Output Lautsprecher links
13. Stromanschluss
14. Input Lautsprecher links
Passiv-Lautsprecher
Ihre Fernbedienung
Einschalttaste
Lauter Leiser
Vorheriger Titel Nächster Titel
Play/Pause Optischer-Modus
ARC-Modus
USB-Modus
Film-Modus
Mute/Unmute
Bluetooth-Modus
Line-In-Modus
Musik-Modus
Dialog-Modus
25
Deutsch
Page 27
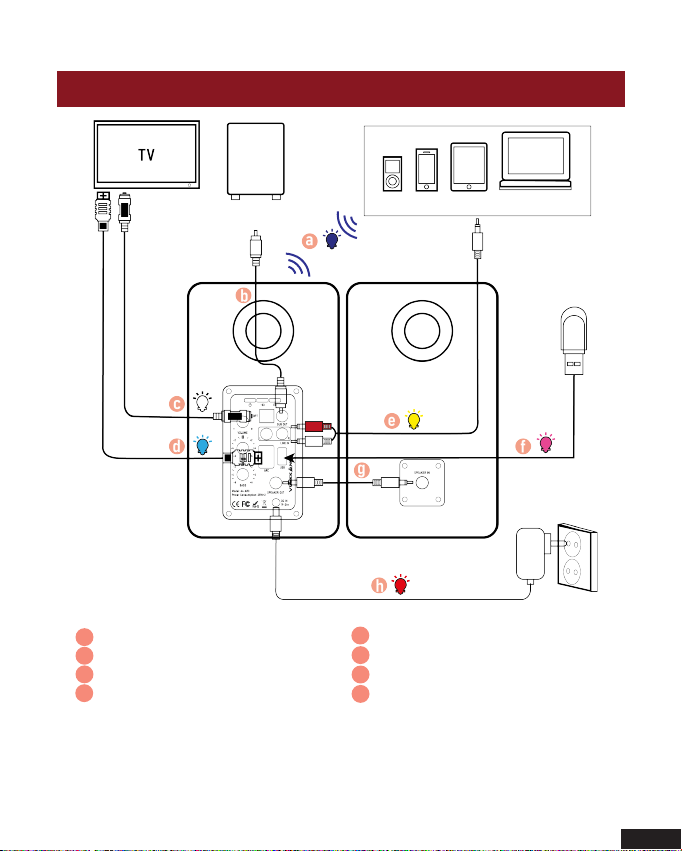
Anschlussdiagramm
Subwoofer
Aktiver Lautsprecher Passiver Lautsprecher
a Bluetooth
a
a
b Audiokabel
b
c
c Optisches Digitalkabel
d
d Hochgeschwindigkeits-ARC-Kabel
Bluetooth-Gerät
Bluetooth-Signal
bis zu 9 Meter
USB
e
e Stereo RCA auf 3,5mm Audiokabel
f USB
f
g
Audiokabel
h Netzstecker
h
26
Deutsch
Page 28
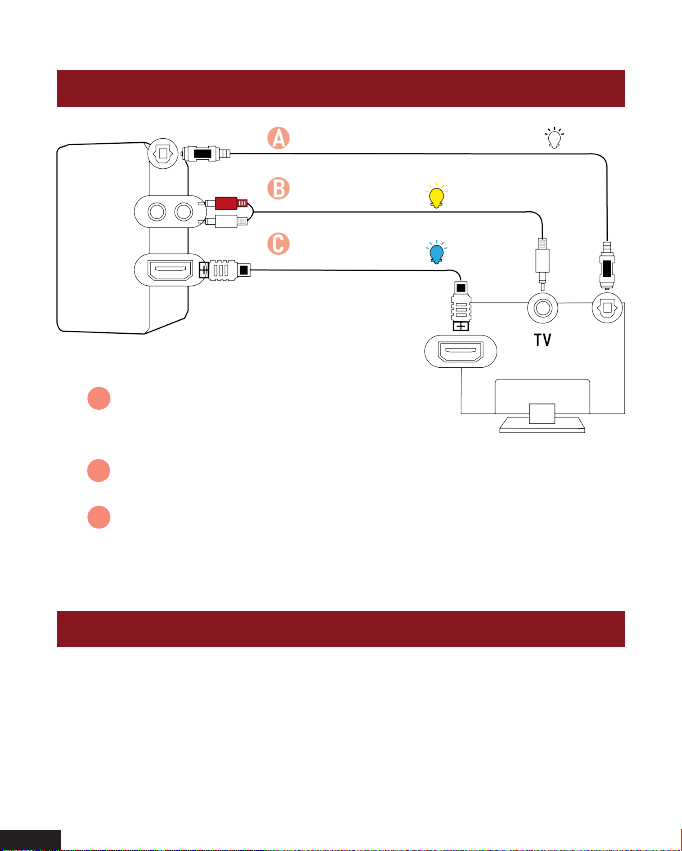
Verbinden mit einem TV-Gerät
Optisches Digitalkabel
RCA auf 3,5mm
Audiokabel
HochgeschwindigkeitsARC Kabel
Aktivlautsprecher
Methode 1. Über ein optisches Kabel. Optischen
A
Modus wählen und den Audio-Ausgang des
TV-Geräts auf “PCM” stellen.
Methode 2. Über ein RCA auf 3,5mm Audiokabel. RCA-
B
Modus auswählen.
Methode 3. Über ein AR-Kabel. ARC-Modus auswählen und
C
Audio-Ausgang des TV-Geräts auf “PCM” stellen.
(Weitere Informationen auf der PCM-Seite)
(Weitere Informationen auf der PCM-Seite)
“PCM” Einstellung an Ihrem Fernseher
27
Deutsch
Wenn alle Kabel richtig angeschlossen sind und die LED-Anzeige
richtig leuchtet, wenn kein Ton vom Fernseher oder der Soundbar
kommt, stellen Sie Ihren Fernseher bitte wie unten beschrieben
ein:
Page 29
1. Drücken Sie “Menü” auf der Fernbedienung des Fernsehers.
2. Drücken Sie die Pfeiltasten auf der Fernbedienung, um zu “Audio
Settings” zu gelangen.
3. Drücken Sie “OK” auf der Fernbedienung.
4. Gehen Sie zu “Erweiterte Audioeinstellungen” und drücken Sie “OK”.
Einige Fernsehgeräte verfügen möglicherweise nicht über das Menü
“Erweitertes Audioeinstellungen” und führen stattdessen verschiedene
Audioeinstellungen auf.
5. Gehen Sie zu “Audio Output Modus” oder “Digitaler Audio Output
Modus” und drücken Sie “OK”.
6. Scrollen Sie weiter, bis “PCM” als aktueller Audioausgang angezeigt
wird.
7. Drücken Sie “OK” , um die Einstellungen zu speichern.
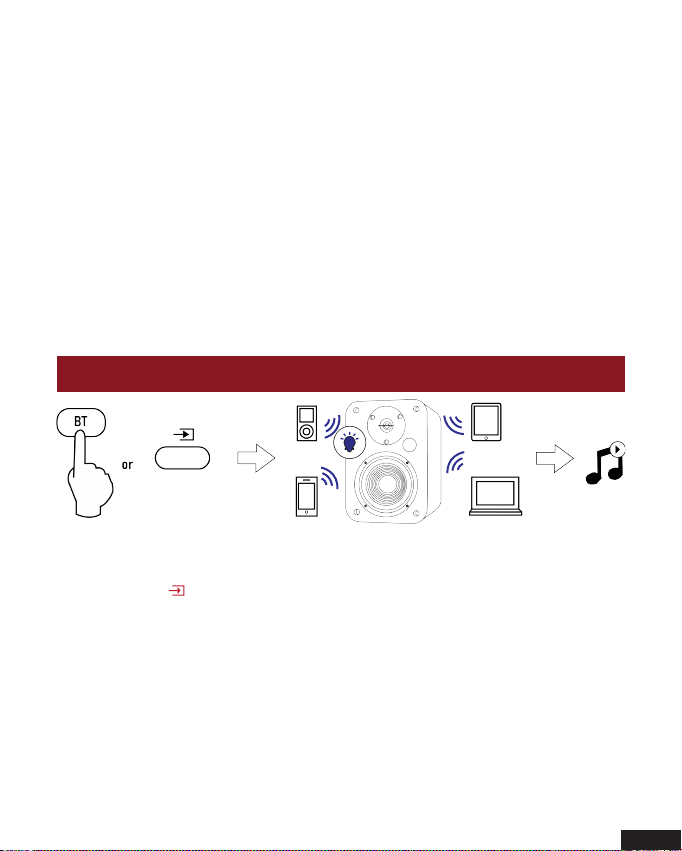
Ein Bluetooth-Gerät anschließen
Bluetooth-Signal
bis zu 9 Meter
a. Drücken Sie den “BT” Knopf auf der Fernbedienung oder drücken
Sie den “ ” Knopf auf der Rückseite des aktiven Lautsprechers. Die
LED-Anzeige blinkt blau.
b. Schalten Sie Bluetooth an dem Bluetooth-Gerät ein.
c. Wählen Sie “VULKKANO A4 ARC” und verbinden Sie das
Gerät. Wenn Ihr Bluetooth-Gerät verbunden ist, blinkt die LEDAnzeige langsam blau.
d. Geben Sie Musikdateien von dem über Bluetooth verbundenen
Gerät über den Regal-Lautsprecher wieder.
28
Deutsch
Page 30

Technische Daten
Ausgangsleistung: L/R: 25W + 25W
Signal-Rausch-Verhältnis dB(A):
Eingangsempfindlichkeit:
L/R: ≥85dB (A)
LINE IN: R/L: 650±50mV
OPT: R/L: 500±50mFFS
Bluetooth: R/L: 700±50mFFS
Frequenzgang: 40HZ-18KHZ
Tieftöner:
Hochtöner:
4 Zoll (116mm)
Φ13 mm Hochtöner
Fehlerbehebung
Kein Ton
- Prüfen Sie, ob die Betriebskontrollleuchte leuchtet.
- Versuchen Sie, die Lautstärke entweder mit dem Hauptlautstärkeregler oder der
Fernbedienung zu erhöhen.
- Vergewissern Sie sich, dass die Audiokabel fest angeschlossen sind und der Eingang an den
Lautsprechern richtig eingestellt ist.
- Prüfen Sie, ob ein Signal von der Audioquelle ausgegeben wird.
Keine Verbindung über Bluetooth möglich
- Vergewissern Sie sich, dass der Lautsprecher auf den Bluetooth-Eingang geschaltet ist; in
einem anderen Audioeingangsmodus kann Bluetooth nicht gekoppelt oder verbunden werden.
Trennen Sie die Verbindung zu einem Bluetooth-Gerät, indem Sie den Lautstärkeregler im
Bluetooth-Modus gedrückt halten, und versuchen Sie es dann erneut.
- Die effektive Bluetooth-Übertragungsreichweite beträgt 10 Meter. Bitte stellen Sie sicher,
dass sich das Gerät innerhalb dieser Reichweite befindet.
- Versuchen Sie, ein anderes Bluetooth-Gerät zu verbinden.
Der VULKKANO A4 ARC Regal-Lautsprecher lässt sich nicht anschalten
- Prüfen Sie, ob das Gerät an das Stromnetz angeschlossen ist oder ob die Steckdose
eingeschaltet ist.
29
Deutsch
Page 31

FCC-Erklärung
Dieses Gerät erfüllt die Anforderungen von Teil 15 der FCC-Vorschriften. Der
Betrieb unterliegt den folgenden zwei Bedingungen:
(1) Dieses Gerät darf keine schädlichen Störungen verursachen.
(2) Dieses Gerät muss alle empfangenen Störungen annehmen, einschließlich
Störungen, die einen unerwünschten Betrieb verursachen können.
Warnung: Änderungen oder Anpassungen, die nicht ausdrücklich von der
für die Einhaltung der Vorschriften verantwortlichen Stelle genehmigt
wurden, können dazu führen, dass der Benutzer die Berechtigung zum
Betrieb des Geräts verliert.
HINWEIS: Dieses Gerät wurde getestet und entspricht den Grenzwerten für ein
digitales Gerät der Klasse B gemäß Teil 15 der FCC-Vorschriften. Diese
Grenzwerte sind so ausgelegt, dass sie einen angemessenen Schutz gegen
schädliche Störungen in Wohngebäuden bieten. Dieses Gerät erzeugt und
verwendet Hochfrequenzenergie und kann diese ausstrahlen. Wenn es nicht
gemäß den Anweisungen installiert und verwendet wird, kann es schädliche
Störungen des Funkverkehrs verursachen. Es kann jedoch nicht garantiert werden,
dass bei einer bestimmten Installation keine Störungen auftreten.
Wenn dieses Gerät den Radio- oder Fernsehempfang stört, was durch Aus- und
Einschalten des Geräts festgestellt werden kann, sollte der Benutzer versuchen, die
Störung durch eine oder mehrere der folgenden Maßnahmen zu beheben:
- Richten Sie die Empfangsantenne neu aus oder platzieren Sie sie anders.
- Vergrößern Sie den Abstand zwischen dem Gerät und dem Receiver.
- Schließen Sie das Gerät an eine Steckdose an, die nicht mit dem Stromkreis
verbunden ist, an den der Receiver angeschlossen ist.
- Wenden Sie sich an den Händler oder einen erfahrenen Radio-/Fernsehtechniker.
FCC-Erklärung zur Strahlungsexposition:
Dieses Gerät entspricht den FCC-Grenzwerten für die Strahlenbelastung, die
für eine unkontrollierte Umgebung festgelegt wurden. Dieses Gerät sollte mit
einem Mindestabstand von 20 cm zwischen dem Strahlungsgerät und Ihrem
Körper installiert und betrieben werden
.
30
Deutsch
Page 32
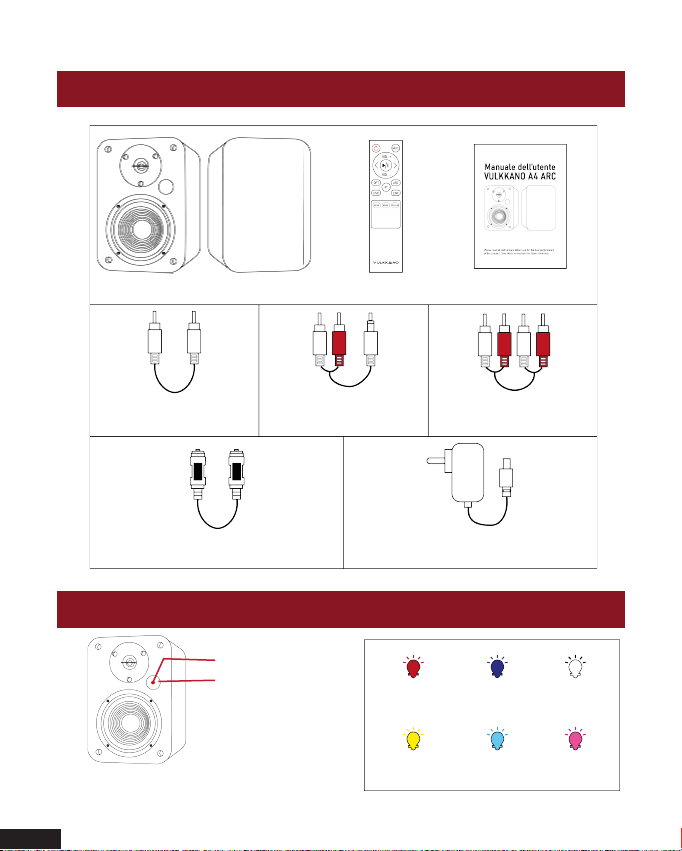
Contenuto della scatola
31
Italiano
Diffusore acustico da scaffale Telecomando
Cavo audio
RCA a RCA
Cavo ottico digitale
Cavo audio stereo
RCA e jack 3,5 mm
*Per motivi che esulano dal controllo del marchio, gli accessori possono variare.
Manuale dell’utente
Cavo audio stereo
2 RCA
Adattatore alimentazione
Indicatori LED e introduzione Pulsanti
Ricevitore a infrarossi
Indicatori LED
Altoparlante Attivo
Standby Bluetooth
Line in
ARC
Ottico
USB
Page 33
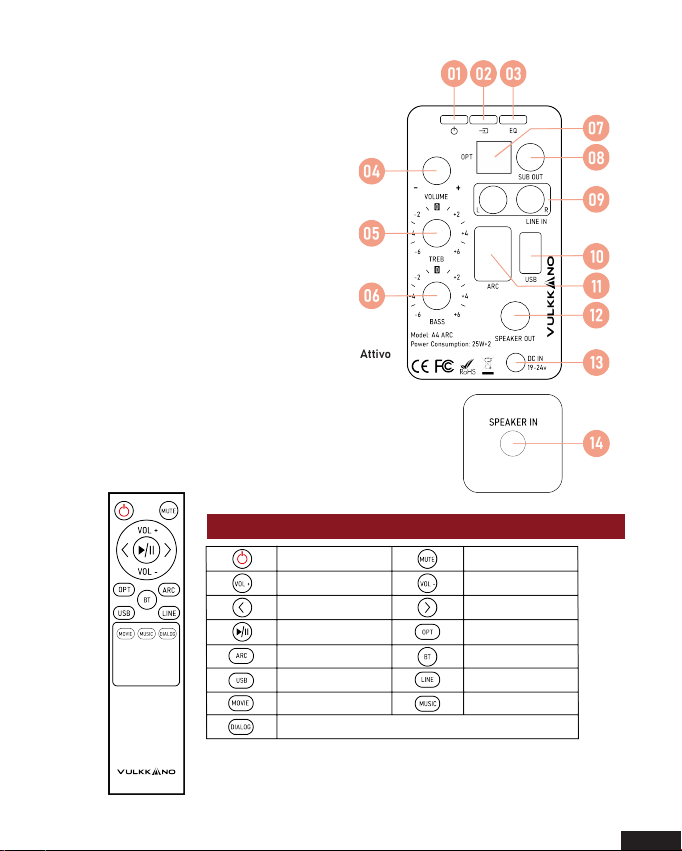
01.Pulsante accensione
02.Selezione ingresso
Premere per scorrere le fonti audio:
Bluetooth -> Ottico -> Line in -> ARC -> USB
03. Effetti sonori
Premere per scorrere le fonti audio:
Musica -> Dialogo -> Film
04. Controllo volume
05. Controllo Alti
06. Controllo Bassi
07. Porta ingresso ottico
08. Collegare un subwoofer
09. Porta ingresso Line in
10. Porta ingresso USB
11. Porta ingresso ARC
Altoparlante Attivo
12. Uscita audio altoparlante sinistro
13. Porta alimentazione
14. Ingresso audio altoparlante sinistro
Comandi telecomando
Tasto accensione
Alzare volume
Traccia precedente
Play/pausa Modalità ottica
Modalità ARC
Modalità USB
Modalità film
Altoparlante Passivo
Attiva/Disattiva audio
Abbassare volume
Traccia successiva
Modalità Bluetooth
Modalità Line in
Modalità musica
Modalità dialogo
32
Italiano
Page 34
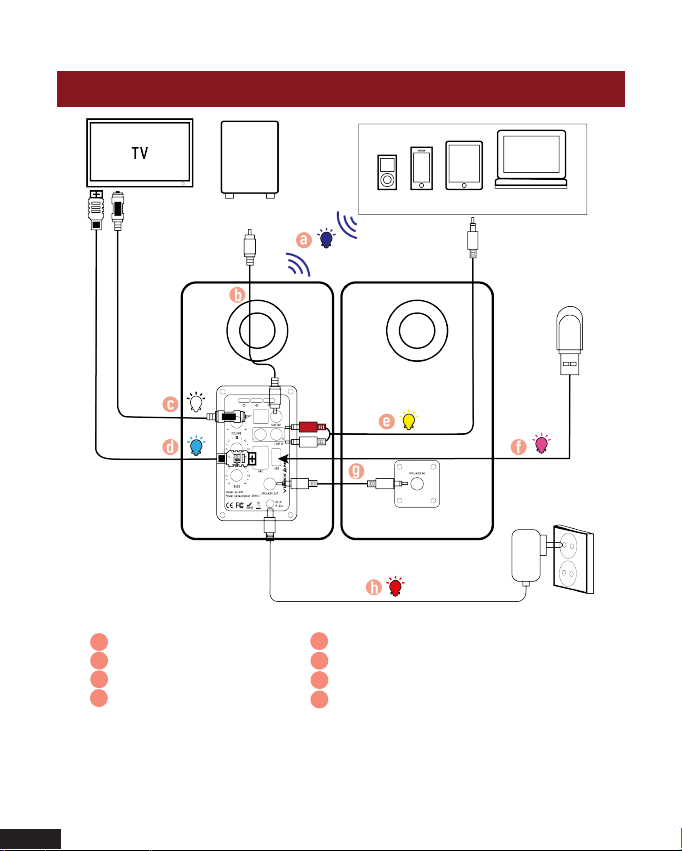
Diagramma Connessione
Subwoofer
Altoparlante Attivo Altoparlante Passivo
a Bluetooth
a
a
b Cavo audio
b
c
c Cavo ottico digitale
d
d Cavo alta velocità ARC
Dispositivo Bluetooth
Segnale Bluetooth
fino a 10 metri
USB
e
e Cavo audio stereo RCA e jack 3.5 mm
f USB
f
g
Cavo audio
h Adattatore alimentazione
h
33
Italiano
Page 35
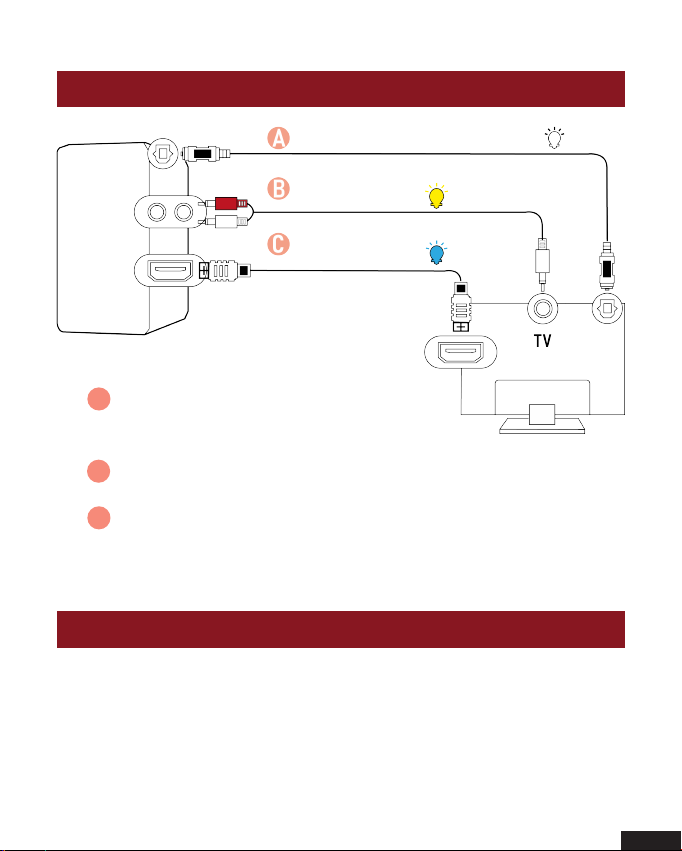
Connessione alla TV
Cavo ottico digitale
Cavo audio stereo RCA
e jack 3.5 mm
Cavo alta
velocità ARC
Altoparlante Attivo
Metodo 1. Connessione con cavo Ottico.
A
Selezionare modalità Ottica e impostare
l’uscita audio TV su “PCM”.
Metodo 2. Connessione con cavo audio RCA e jack 3.5mm.
B
Selezionare modalità RCA.
Metodo 3. Connessione con cavo ARC. Selezionare modalità
C
ARC e impostare l’uscita audio TV su “PCM”.
(Maggiori informazioni alla pagina PCM)
(Maggiori informazioni alla pagina PCM)
Impostare “PCM” sulla tua TV
Quando tutti I cavi sono connessi correttamente e gli indicatori
LED si illuminano, se la TV o la soundbar non producono nessun
suono, impostare la tv come a seguire:
34
Italiano
Page 36
1. Premere “Menù” sul telecomando della TV.
2. Premere i tasti con le frecce sul telecomando e scorrere fino a
“Impostazioni Audio”.
3. Premere “OK” sul telecomando.
4. Scorrere fino a “Impostazioni audio avanzate” e premere “OK”. Alcuni
televisori potrebbero non avere un menù “Impostazioni audio avanzate”
e potrebbe invece avere elencate diverse impostazioni audio.
5. Scorrere fino a “Modalità Uscita Audio” e premere “OK”.
6. Scorrere fino a che “PCM” non appare come modalità uscita audio
impostata.
7. Premere “OK” e salvare le impostazioni.
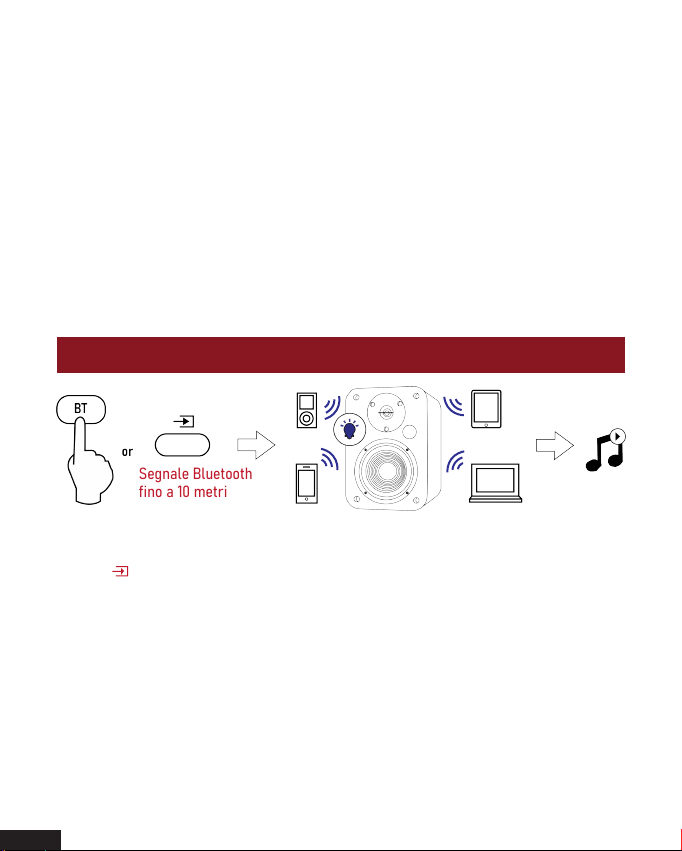
Connessione di un dispositivo Bluetooth
Segnale Bluetooth
fino a 10 metri
a. Premere il pulsante “BT” sul telecomando o premere il pulsante
“ ” sul retro dell’altoparlante attivo, l’indicatore LED si illuminerà
di blu.
b. Accendere il Bluetooth sul dispositivo Bluetooth.
c. Selezionare “VULKKANO A4 ARC” e collegarlo. Quando il tuo
dispositivo Bluetooth sarà connesso, il l’indicatore LED
lampeggerà lentamente di blu.
d. Riproduci file musicali dal dispositivo, connesso tramite Bluetooth,
attraverso l’altoparlante da scaffale.
35
Italiano
Page 37

Specifiche
Uscita alimentazione:
S/N dB(A):
Sensibilità d’ingresso:
L/R: 25W + 25W
L/R: ≥85dB (A)
LINE IN: R/L: 650±50mV
OPT: R/L: 500±50mFFS
Bluetooth: R/L: 700±50mFFS
Risposta in frequenza: 40HZ-18KHZ
Unità bassi:
Unità tweeter:
116mm
Tweeter da Φ13 mm
Risoluzione dei problemi
Nessun suono
- Controllare che la luce dell’indicatore di accensione si accesa.
- Provare ad alzare il volume usando sia il controllo volume principale che quello del
telecomando.
- Assicurarsi che I cavi audio siano connessi correttamente che l’ingresso sia impostato
correttamente negli altoparlanti.
- Controllare che ci sia segnale in uscita dalla sorgente audio.
Impossibile connettere tramite Bluetooth
- Assicurarsi che l’altoparlante sia impostato sull’ingresso Bluetooth, con le altre modalità
audio il Bluetooth non può essere connesso. Disconnettersi da qualunque dispositivo Bluetooth t
enendo premuto la manopola del volume nella modalità Bluetooth, quindi riprovare.
- Il raggio effettivo della trasmissione Bluetooth è di 10 metri, assicurarsi che l’operazione venga
svolta entra tale distanza
- Provare a connettere un altro dispositivo.
L’Altoparlante da scaffale VULKKANO A4 ARC non si accende
- Controllare che l’alimentatore sia connesso e che la presa a parete sia accesa.
36
Italiano
Page 38

Certificazione FCC
Questo dispositivo rispetta la parte 15 del Regolamento FCC. Il funzionamento è
soggetto alle due seguenti condizioni:
(1) Questo dispositivo non deve causare interferenze dannose
(2) Questo dispositivo deve accettare qualsiasi interferenza, incluse interferenze
che potrebbero causare problemi di operatività.
Avvertenza: Cambi o modifiche non espressamente approvate dalle parti
responsabili della conformità potrebbero far decadere la garanzia e
annullare i diritti dell'utente all'utilizzo di questo dispositivo.
NOTA: Questa unità è stata testata e trovata conforme ai limiti vigenti per le
apparecchiature digitali in Classe B, in conformità della parte 15 delle norme FCC.
Queste limitazioni sono disegnate per fornire ragionevole protezione contro
interferenze nocive in un’installazione residenziale. Il presente apparecchio genera,
usa e può emettere frequenze radio e, se non installato e usato secondo le
istruzioni, può causare interferenze alle comunicazioni via etere. Non si garantisce,
tuttavia, in alcun modo che tali interferenze non possano verificarsi in
un'installazione specifica.
Qualora questa apparecchiatura generasse interferenze dannose per la ricezione di
segnali radio o televisivi (condizione verificabile spegnendo e riaccendendo il
dispositivo), si consiglia di adottare le seguenti misure correttive:
- Orientare o posizionare diversamente l'antenna ricevente.
- Aumentare la distanza tra dispositivo e ricevitore
- Collegare l'apparecchiatura a una presa di corrente su un circuito diverso da
quello a cui è collegato il ricevitore.
- Rivolgersi al rivenditore o a un tecnico radio/TV per ricevere assistenza.
Dichiarazione sull'esposizione alle radiazioni FCC:
Questa apparecchiatura è conforme ai limiti di esposizione alle radiazioni FCC
definiti per un ambiente non controllato. Questa apparecchiatura deve essere
installata e azionata a una distanza minima di 20 tra il trasmettitore e l'utente.
37
Italiano
Page 39
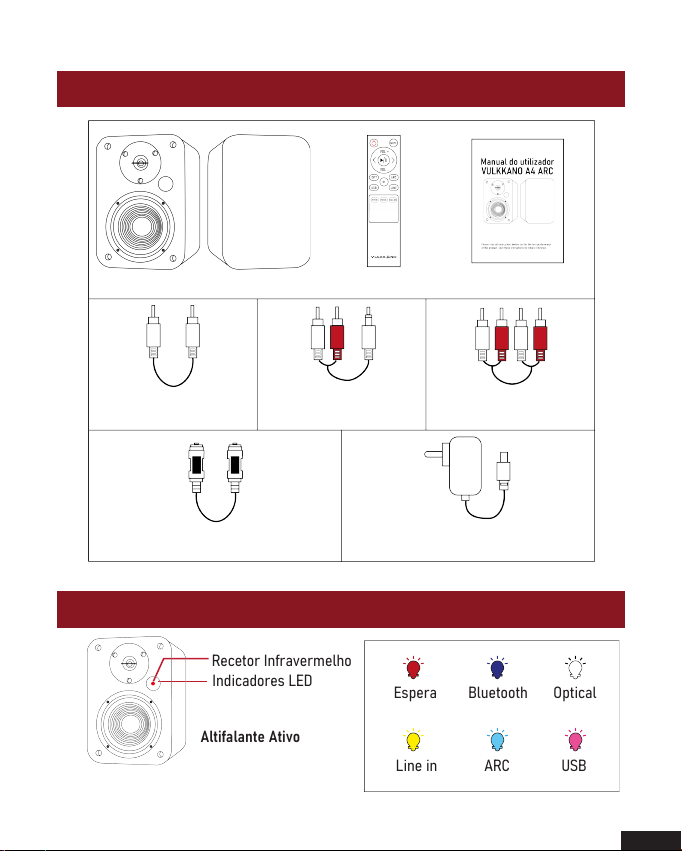
Conteúdo da Embalagem
Altifalante de Estante Controlo Remoto Manual do utilizador
RCA Cabo Áudio
Cabo Ótico Digital Adaptador de Energia
RCA Estéreo para
3,5mm cabo áudio
*Por razões para além do controlo da marca, os acessórios podem variar.
RCA para RCA
cabo áudio
Indicadores LED e Introdução aos Botões
Recetor Infravermelho
Indicadores LED
Altifalante Ativo
Espera Bluetooth Optical
Line in ARC USB
38
Português
Page 40
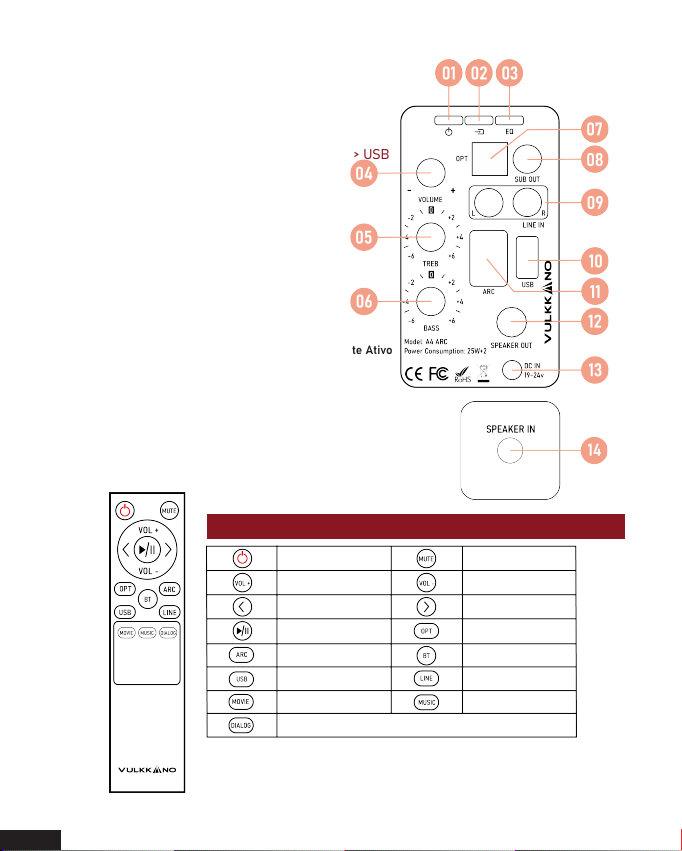
01. Interruptor energia
02. Seleção entrada
Pressione para navegar entre as fontes de
áudio: Bluetooth -> Optical -> Line in -> ARC -> USB
03. Efeitos sonoros
Pressione para navegar entre as fontes
áudio: Música -> Diálogo -> Filme
04. Controlo de volume
05. Controlo de agudos
06. Controlo de graves
07. Porta de entrada ótica
08. Ligar um subwoofer
09. Porta entrada Line in
10. Porta entrada USB
11. Porta entrada ARC
Altifalante Ativo
12. Saída áudio altifalante esquerdo
13. Porta energia
14. Entrada áudio altifalante esquerdo
Altifalante Passivo
O seu Controlo Remoto
Botão energia
Aumentar Volume
Faixa anterior
Play/Pausa Modo Optical
Modo ARC
Modo USB
Modo filme Modo Música
Mudo/Reativar som
Baixar Volume
Faixa seguinte
Modo Bluetooth
Modo Line in
Modo Diálogo
39
Português
Page 41
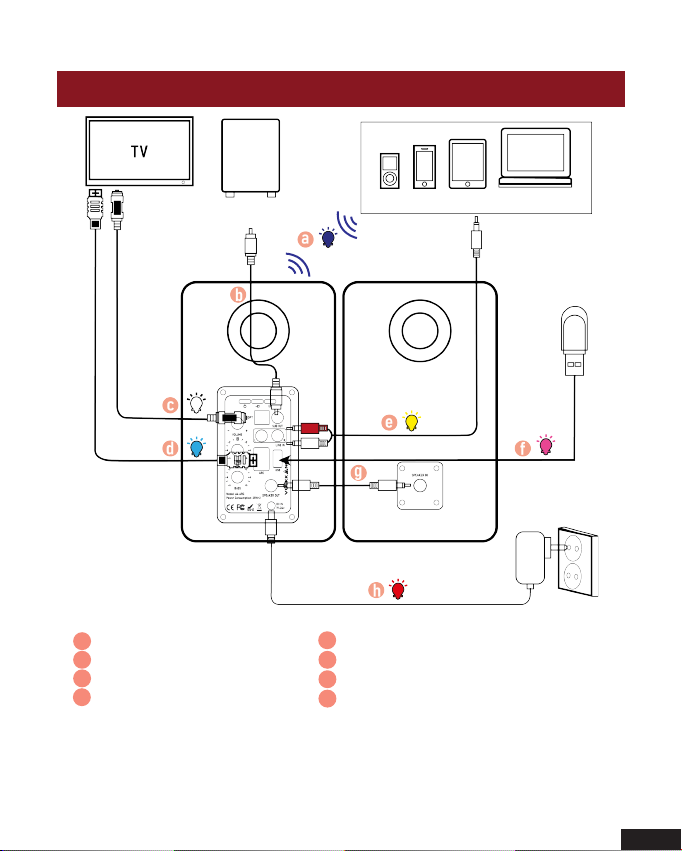
Diagrama de Conexão
Subwoofer
Altifalante Ativo Altifalante Passivo
a Bluetooth
a
a
b Cabo áudio
b
c
c Cabo ótico digital
d
d Cabo ARC alta velocidade
Dispositivo Bluetooth
Sinal Bluetooth
até 9 m
USB
e
e Cabo áudio estéreo RCA para 3,5 mm
f USB
f
g
Cabo áudio
h Adaptador energia
h
40
Português
Page 42
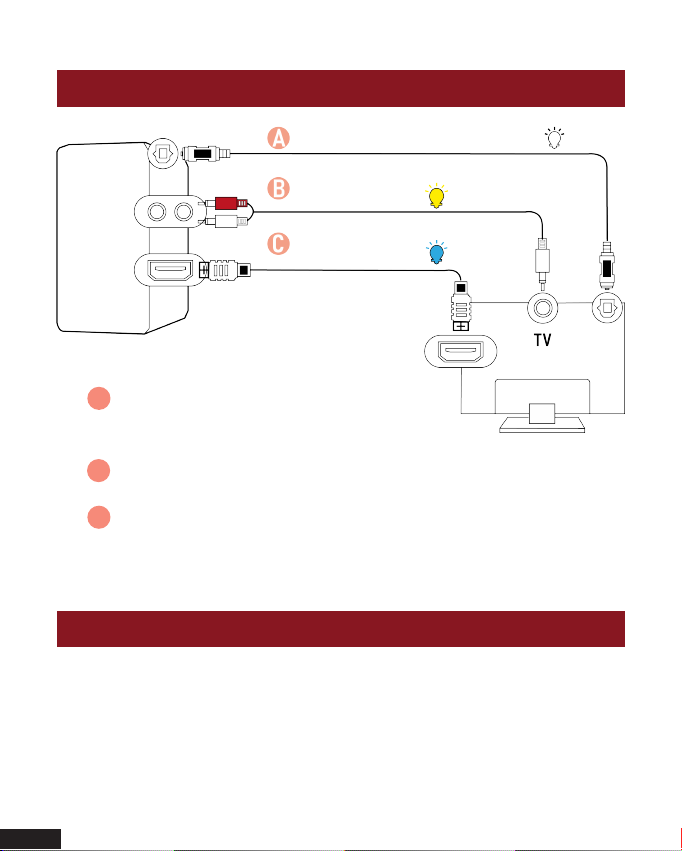
Conectar a uma TV
Cabo ótico digital
Cabo áudio RCA
para 3,5 mm
Cabo ARC alta
velocidade
Altifalante Ativo
Método 1. Ligar usando um cabo Ótico.
A
Selecione o modo Ótico e defina a saída de
áudio da TV para “PCM”.
Método 2. Ligar usando um cabo áudio RCA para 3,5 mm.
B
Selecione o modo RCA.
Método 3. Ligar usando um cabo ARC. Selecione o modo ARC e
C
defina a saída de áudio da TV para “PCM”.
(Mais informações na página PCM)
(Mais informações na página PCM)
Configurar “PCM” na sua TV
41
Português
Quando todos os cabos estiverem ligados corretamente e o
indicador LED acender como é devido, se não houver som da TV
ou da Soundbar, configure a sua TV conforme abaixo:
Page 43
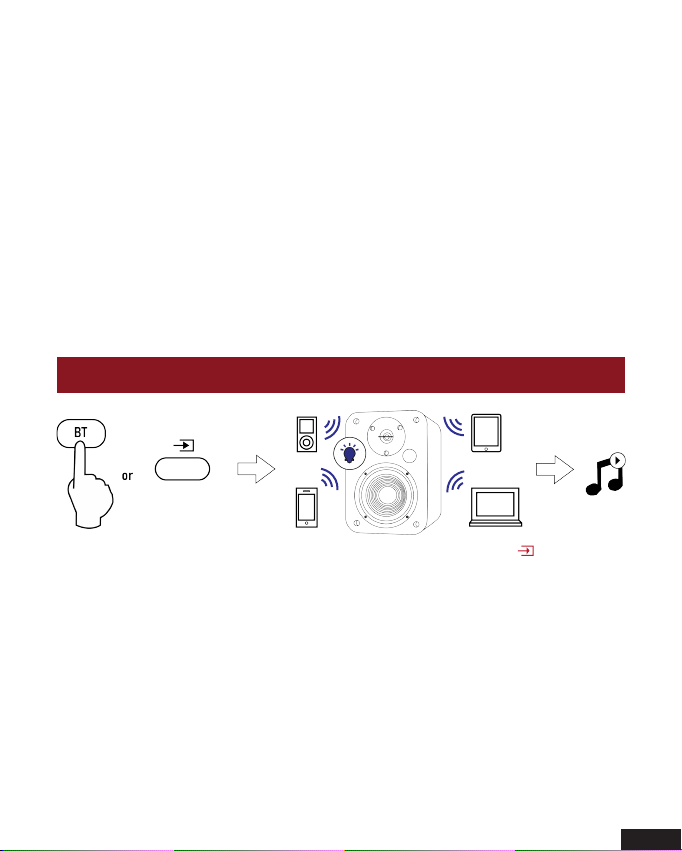
1. Pressione “Menu” no controlo remoto da TV.
2. Pressione as teclas de seta no controlo remoto para chegar às
“Configurações Áudio”.
3. Pressione “OK” no controlo remoto.
4. Vá até “Áudio Avançado” e pressione “OK”. Alguns televisores podem
não ter um menu “Áudio Avançado” e, em vez disso, podem listar várias
configurações de áudio.
5. Vá até “Modo de Saída Áudio” ou “Modo de Saída Áudio Digital” e
pressione “OK”.
6. Role até que “PCM” seja exibido como a saída de áudio atual.
7. Pressione “OK” para guardar as configurações.
Ligar um Dispositivo Bluetooth
Sinal Bluetooth
até 9 m
a. Pressione o botão “BT” no controlo remoto ou o botão “ ” no
painel traseiro do altifalante ativo, o indicador LED pisca a azul.
b. Ative o Bluetooth no dispositivo Bluetooth.
c. Selecione “VULKKANO A4 ARC” e ligue-o. Quando o seu
dispositivo Bluetooth estiver ligado, o indicador LED pisca a azul
lentamente.
d. Reproduza ficheiros de música no dispositivo ligado via Bluetooth,
através do altifalante de estante.
42
Português
Page 44

Especificações
Potência de saída: L/R: 25W + 25W
Rácio sinal-ruído dB(A):
Sensibilidade de entrada:
L/R: ≥85dB (A)
LINE IN: R/L: 650±50mV
OPT: R/L: 500±50mFFS
Bluetooth: R/L: 700±50mFFS
Resposta de frequência: 40HZ-18KHZ
Unidade de graves:
Unidade tweeter:
4 Polegadas (116 mm)
Tweeter de Φ13 mm
Resoluçao de Problemas
Sem som
- Verifique se a luz indicadora de energia está ligada.
- Tente aumentar o volume usando o controlo de volume principal ou o controlo remoto.
- Verifique se os cabos de áudio estão bem ligados e a entrada configurada corretamente
nos altifalantes.
- Verifique se há saída de sinal da fonte áudio.
Não é possível conectar via Bluetooth
- Certifique-se se o altifalante está ligado à entrada Bluetooth, noutro modo de entrada de
áudio o Bluetooth não pode ser emparelhado ou ligado. Desconecte de qualquer dispositivo
Bluetooth pressionando e segurando o botão de volume no modo Bluetooth e tente novamente.
- O alcance efetivo da transmissão Bluetooth é de 10 metros, verifique se a operação está
neste alcance.
- Experimente ligar outro dispositivo Bluetooth.
O Altifalante de Estante VULKKANO A4 ARC não liga
- Verifique se a rede elétrica está conectada ou se a tomada de parede está ligada
43
Português
Page 45

Declaração FCC
Este dispositivo está em conformidade com a Parte 15 das Regras FCC. O
funcionamento está sujeito às duas condições seguintes:
(1) Este dispositivo não pode causar interferência prejudicial.
(2) Este dispositivo deve aceitar qualquer interferência recebida, incluindo
interferência que possa causar funcionamento indesejado.
Aviso: Alterações ou modificações não expressamente aprovadas pela
parte responsável pela conformidade podem anular a autoridade do
utilizador para operar o equipamento.
NOTA: Este equipamento foi testado e está em conformidade com os limites para
um dispositivo digital Classe B, de acordo com a Parte 15 das Regras FCC. Estes
limites foram projetados para fornecer proteção razoável contra interferências
prejudiciais numa instalação residencial. Este equipamento gera utilizações e pode
irradiar energia de radiofrequência e, se não for instalado e utilizado de acordo
com as instruções, pode causar interferência prejudicial às comunicações de rádio.
Contudo, não há garantia de que não ocorrerá interferência numa instalação
específica.
Se este equipamento causar interferência prejudicial à receção de rádio ou
televisão, o que pode ser determinado desligando e ligando o equipamento, o
utilizador é encorajado a corrigir a interferência através de uma ou mais das
seguintes medidas:
- Reorientar ou reposicionar a antena recetora.
- Aumentar a separação entre o equipamento e o recetor.
- Conectar o equipamento a uma tomada de um circuito diferente daquele ao
qual o recetor está ligado.
- Consultar o vendedor ou um técnico rádio/TV experimentado para obter ajuda.
Declaração de Exposição à Radiação da FCC:
Este equipamento está em conformidade com os limites de exposição à
radiação da FCC estabelecidos para um ambiente não controlado. Este
equipamento deve ser instalado e operado a uma distância mínima de 20 cm
do seu corpo.
44
Português
Page 46

Thank you for choosing products of VULKKANO
Merci d'avoir choisi les produits de VULKKANO
Gracias por elegir los productos de VULKKANO
Danke, dass Sie sich für Produkte von VULKKANO entschieden haben
Grazie per aver scelto i prodotti di VULKKANO
Obrigado por escolher os produtos de VULKKANO
45
Page 47

 Loading...