

Vulcan-Hart VCD22* ML-138037, VCD44 ML-138069, VCD22, VCD44, VCD5 Installation & Operation Manual
INSTALLATION &
OPERATION MANUAL
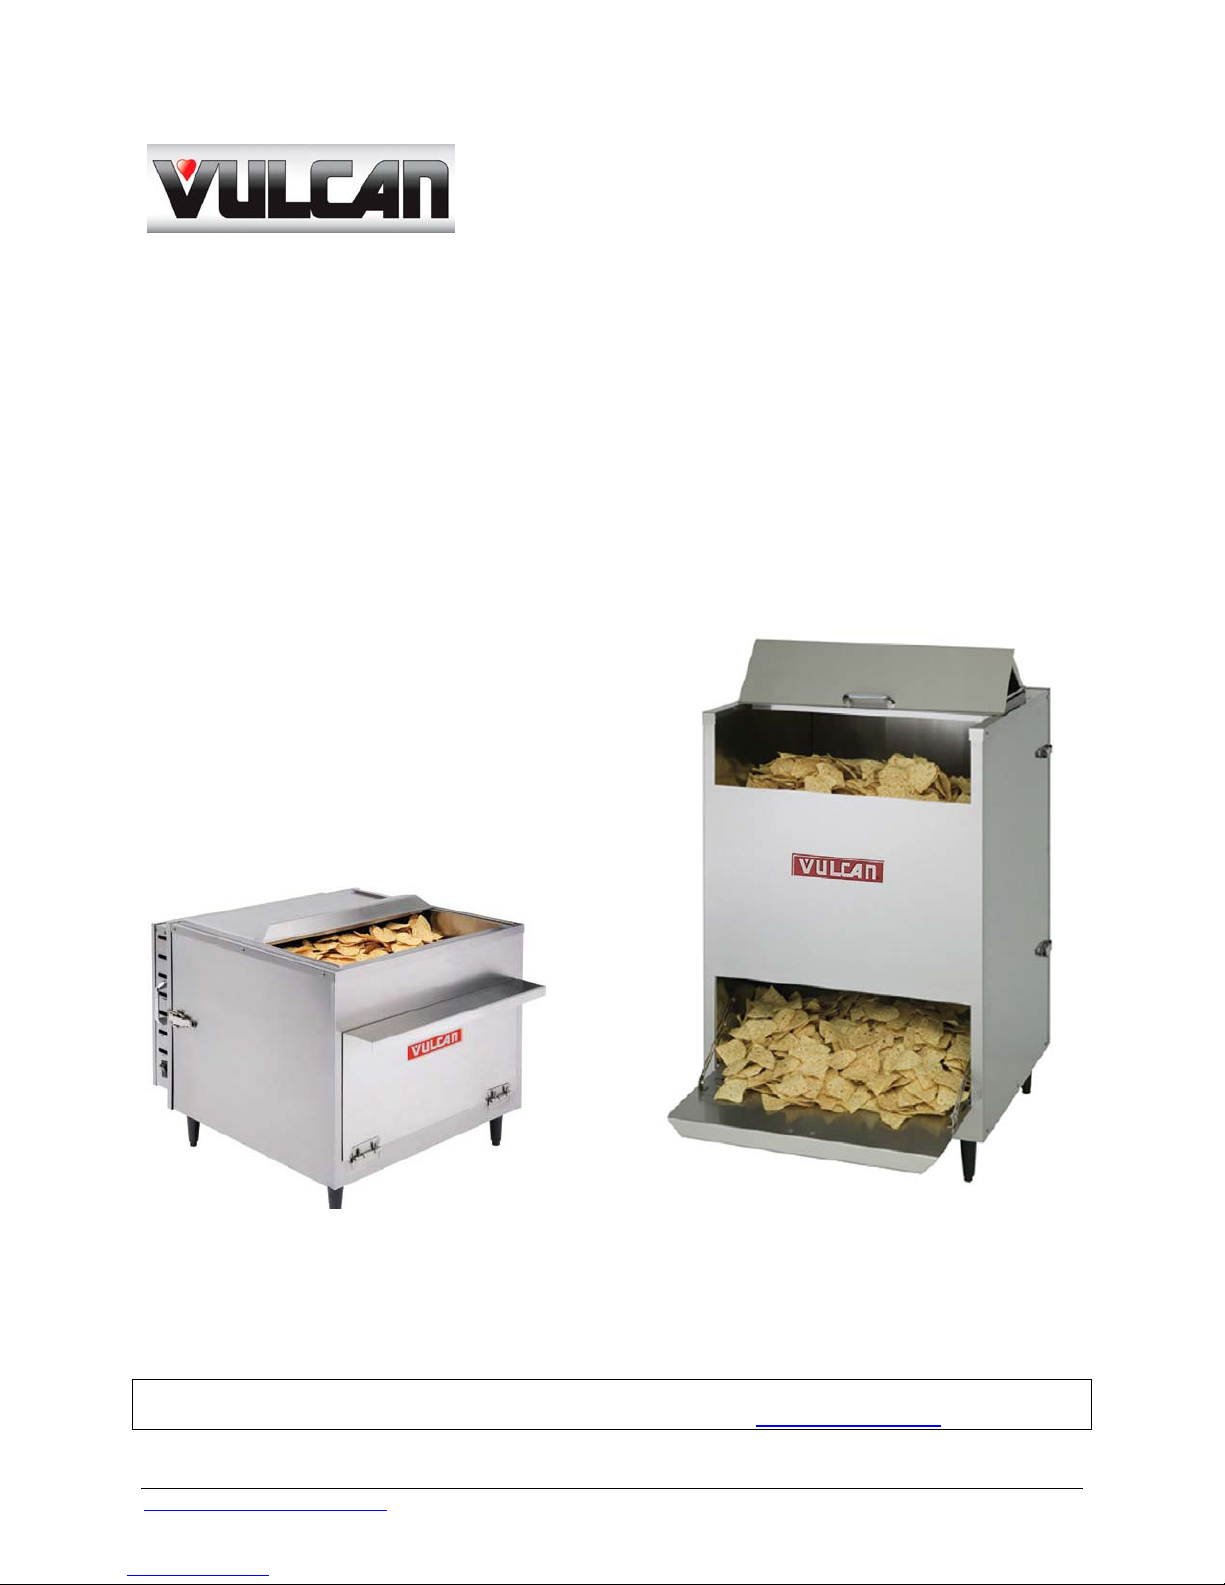
VCD SERIES CHIP WARMER S
MODELS:
VCD22* ML-138037
VCD44 ML-138069
*Formerly VCD5
For additional information on Vulcan-Hart or to locate an authorized parts
and service provider in your area, visit our website at www.vulcanhart.com
VULCAN-HART 3600 NORTH POINT BLVD.
DIVISION OF ITW FOOD EQUIPMENT GROUP, LLC BALTIMORE, MD 21222
www.vulcanequipment.com Vulcan ©2013 All Rights Reserved F-38053 (02-13)
VCD SERIES CHIP WARMER F-38053 (02-13)
IMPORTANT FOR YOUR SAFETY
THIS MANUAL HAS BEEN PREPARED FOR PERSONNEL QUALIFIED TO INSTALL
ELECTRICAL EQUIPMENT, WHO SHOULD PERFORM THE INITIAL FIELD ST ARTUP AND ADJUSTMENTS OF THE EQUIPMENT COVERED BY THIS MANUAL.
FOR YOUR SAFETY
DO NOT STORE OR USE GASOLINE OR OTHER
FLAMMABLE VAPORS OR LIQUIDS IN THE
VICINITYOF THIS OR ANY OTHER APPLIANCE.
Improper installation, adjustment,
alteration, service, or maintenance can
cause property damage, inj ury, or death.
Read the installation, operating and
maintenance instructions thoroughly
before installing or servicing equipment.
IN THE EVENT OF A POWER FAILURE,
DO NOT ATTEMPT TO OPERATE THIS DEVICE.
1

VCD SERIES CHIP WARMER F-38053 (02-13)
TABLE OF CONTENTS
IMPORTANT FOR YOUR SAFETY . . . . . . . . . . . . . . . . . . . . . . . . . . . . . . . . . . . . . . . . 1
GENERAL . . . . . . . . . . . . . . . . . . . . . . . . . . . . . . . . . . . . . . . . . . . . . . . . . . . . . . . . . . . 3
INTRODUCTION . . . . . . . . . . . . . . . . . . . . . . . . . . . . . . . . . . . . . . . . . . . . . . . . . 3
INSTALLATION . . . . . . . . . . . . . . . . . . . . . . . . . . . . . . . . . . . . . . . . . . . . . . . . . . 3
UNPACKING . . . . . . . . . . . . . . . . . . . . . . . . . . . . . . . . . . . . . . . . . . . . . . . 3
ACCESS PANEL POSITIONING . . . . . . . . . . . . . . . . . . . . . . . . . . . . . . . 4
LEGS INSTALLATION . . . . . . . . . . . . . . . . . . . . . . . . . . . . . . . . . . . . . . . 4
SCOOP HOLDER INSTALLAT ION . . . . . . . . . . . . . . . . . . . . . . . . . . . . . . 4
LOCATION . . . . . . . . . . . . . . . . . . . . . . . . . . . . . . . . . . . . . . . . . . . . . . . . 4
ELECTRICAL REQUIREMENTS . . . . . . . . . . . . . . . . . . . . . . . . . . . . . . . . . . . . . . . . . . 5
ELECTRICAL CODES & STANDARDS . . . . . . . . . . . . . . . . . . . . . . . . . . . . . . . 5
ELECTRICAL CONNECTIONS . . . . . . . . . . . . . . . . . . . . . . . . . . . . . . . . . . . . . . 5
OPERATION . . . . . . . . . . . . . . . . . . . . . . . . . . . . . . . . . . . . . . . . . . . . . . . . . . . . . . . . . 6
BEFORE FIRST USE . . . . . . . . . . . . . . . . . . . . . . . . . . . . . . . . . . . . . . . . . . . . . 6
TESTING THE CHIP WARMER . . . . . . . . . . . . . . . . . . . . . . . . . . . . . . . . . . . . . 6
OPERATION INSTRUCTIONS . . . . . . . . . . . . . . . . . . . . . . . . . . . . . . . . . . . . . . 7
SHUTDOWN . . . . . . . . . . . . . . . . . . . . . . . . . . . . . . . . . . . . . . . . . . . . . . . . . . . . 7
EXTENDED SHUTDOWN . . . . . . . . . . . . . . . . . . . . . . . . . . . . . . . . . . . . . . . . . . 7
SPECIFICATIONS . . . . . . . . . . . . . . . . . . . . . . . . . . . . . . . . . . . . . . . . . . . . . . . . . . . . . 7
MAINTENANCE . . . . . . . . . . . . . . . . . . . . . . . . . . . . . . . . . . . . . . . . . . . . . . . . . . . . . . . 8
CLEANING . . . . . . . . . . . . . . . . . . . . . . . . . . . . . . . . . . . . . . . . . . . . . . . . . . . . . . 8
STAINLESS STEEL CARE . . . . . . . . . . . . . . . . . . . . . . . . . . . . . . . . . . . . . . . . . 8
LOCKOUT / TAGOUT PROCEDURE . . . . . . . . . . . . . . . . . . . . . . . . . . . . . . . . . . . . . . 9
TROUBLESHOOTING . . . . . . . . . . . . . . . . . . . . . . . . . . . . . . . . . . . . . . . . . . . . . . . . . 10
SERVICE & PARTS INFORMATION. . . . . . . . . . . . . . . . . . . . . . . . . . . . . . . 10
WIRING DIAGRAMS . . . . . . . . . . . . . . . . . . . . . . . . . . . . . . . . . . . . . . . . . . . . . . . . . . 11
WARRANTY . . . . . . . . . . . . . . . . . . . . . . . . . . . . . . . . . . . . . . . . . . . . . . . . . . . . . . . . . 12
2

VCD SERIES CHIP WARMER F-38053 (02-13)
GENERAL
INTRODUCTION
Vulcan-Hart Chip Warmers are
produced with quality workmanship and
material. Proper installation, usage, and
maintenance of your warmer will result
in many years of satisfactory
performance.
It is suggested that you thoroughly read
this entire manual and carefully follow all
of the instructions provided.
As with any piece of food service
equipment, this Chip Warmer requires a
minimum of care and maintenance.
Recommended procedures are
contained in this manual and should
become a regular part of the operation
of the unit.
INSTALLATION
Before installing, verify that the electrical
service agrees with the specifications on
the rating plate located on the lower
back corner of the warmer. If the supply
and equipment requirements do not
agree, do not proceed with unpacking
and installation. Contact your VulcanHart Customer Service Department
immediately. (Fig. 4)
UNPACKING:
The Warmer was inspected before
leaving the factory. The transportation
company assumes full responsibility for
safe delivery upon acceptance of the
shipment. Immediately after unpacking,
check for possible shipping damage to
the warmer.
If the warmer is found to be
damaged, save the packaging
material and contact the carrier
within 15 days of delivery.
Carefully unpack warmer and place in a
work accessible area.
1. Remove banding holding the
carton to the pallet.
2. Carefully remove warmer from
carton and place on floor or table.
3. Remove any and all packaging
materials inside unit.
4. Peel off all vinyl protection film.
5. Thoroughly clean the warmer as
described in the cleaning instruct-
ions in this manual.
3
 Loading...