

Page 1
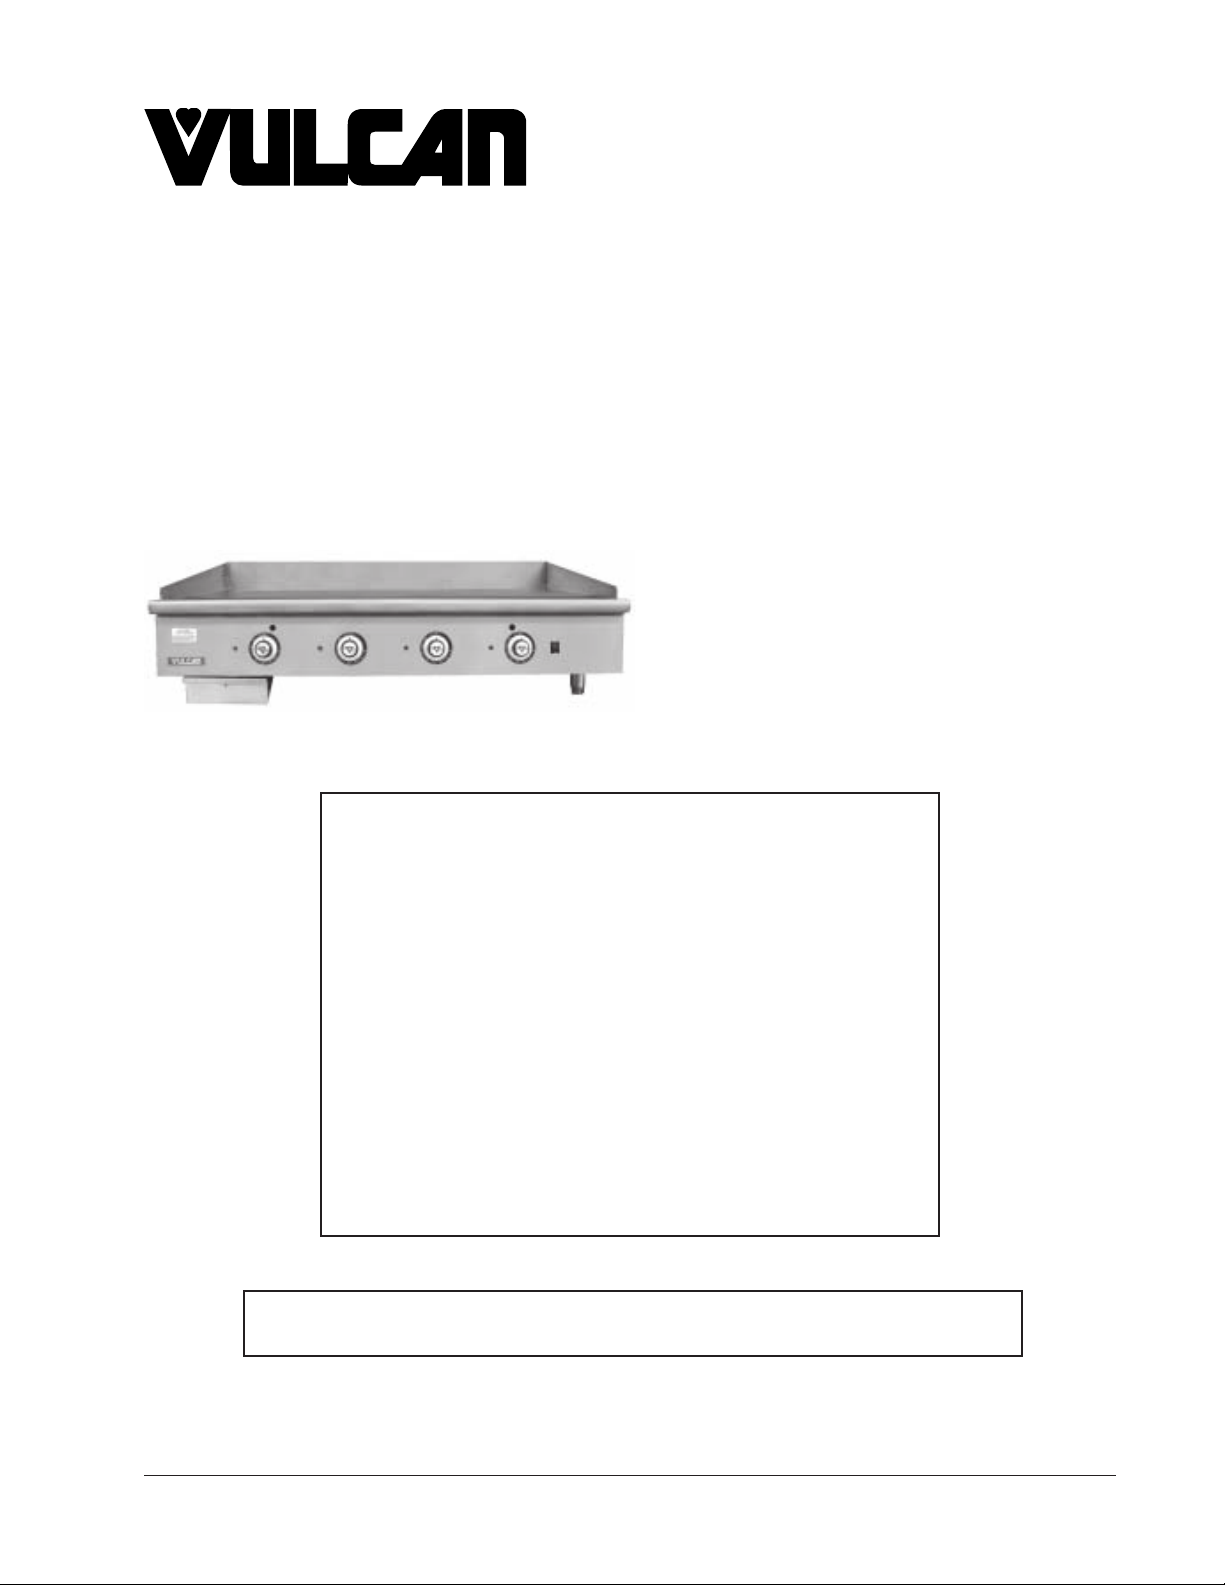
SERVICE MANUAL
900RE SERIES
HEAVY DUTY
GAS GRIDDLES
MODELS
924RE ML-135221-00G24
936RE ML-135222-00G36
948RE ML-135223-00G48
960RE ML-135224-00G60
972RE ML-135225-00G72
- NOTICE -
This manual is prepared for the use of trained Vulcan Service
Technicians and should not be used by those not properly qualified.
If you have attended a Vulcan Service School for this product, you
may be qualified to perform all the procedures described in this
manual.
This manual is not intended to be all encompassing. If you have not
attended a Vulcan Service School for this product, you should
read, in it's entirety, the repair procedure you wish to perform to
determine if you have the necessary tools, instruments and skills
required to perform the procedure. Procedures for which you do
not have the necessary tools, instruments and skills should be
performed by a trained Vulcan Service Technician.
Reproduction or other use of this Manual, without the express
written consent of Vulcan, is prohibited.
For additional information on Vulcan-Hart or to locate an authorized parts
and service provider in your area, visit our website at www.vulcanhart.com
VULCAN-HART
DIVISION OF ITW FOOD EQUIPMENT GROUP, LLC
WWW.VULCANHART.COM
P.O. BOX 696, LOUISVILLE, KY 40201-0696
TEL. (502) 778-2791
F35628 (10-04)
Page 2

TABLE OF CONTENTS
GENERAL ........................................................................................................................................3
Introduction ................................................................................................................................3
Installation ..................................................................................................................................3
Operation....................................................................................................................................3
Cleaning .....................................................................................................................................3
Lubrication..................................................................................................................................3
Specifications............................................................................................................................. 3
Tools ...........................................................................................................................................3
REMOVAL AND REPLACEMENT OF PARTS ..............................................................................4
Component Location ................................................................................................................. 4
Control Panel ............................................................................................................................. 5
Covers and Panels .................................................................................................................... 5
Bullnose Weld Assembly ..........................................................................................................5
Heat Shield.................................................................................................................................5
Back Panel .................................................................................................................................5
Power On/Off Switch .................................................................................................................6
Indicator Light ............................................................................................................................ 6
Thermostat .................................................................................................................................6
Flame Switch..............................................................................................................................7
Ignitor Module ............................................................................................................................ 7
Gas Burner .................................................................................................................................8
Pilot Solenoid .............................................................................................................................8
Pilot .............................................................................................................................................9
Dual Solenoid.............................................................................................................................9
SERVICE PROCEDURES AND ADJUSTMENTS...................................................................... 10
Thermostat Calibration ........................................................................................................... 10
Main Burner Adjustment ........................................................................................................ 10
Gas Pressure Measurement .................................................................................................. 11
Extended Shutdown ............................................................................................................... 11
ELECTRICAL OPERATION ......................................................................................................... 12
Component Description.......................................................................................................... 12
Sequence of Operation .......................................................................................................... 12
SCHEMATIC DIAGRAMS ............................................................................................................ 13
TROUBLESHOOTING GUIDE..................................................................................................... 18
F35628 (10-04)
© VULCAN-HART, 2004
— 2 —
Page 3
GENERAL
INTRODUCTION
Procedures in this manual will apply to all
models unless specified. Pictures and
illustrations can be of any model unless the
picture or illustration needs to be model
specific. All models are equipped with 30,000
BTU/HR burners as standard equipment. One
burner is used for every 12 inches of griddle
surface.
All models use an automatic spark igniter to
light the burners.
INSTALLATION
Generally, installations are made by the dealer
or contracted by the dealer or owner. Detailed
installation instructions are included in the
Installation & Operation Manual which is sent
with each unit.
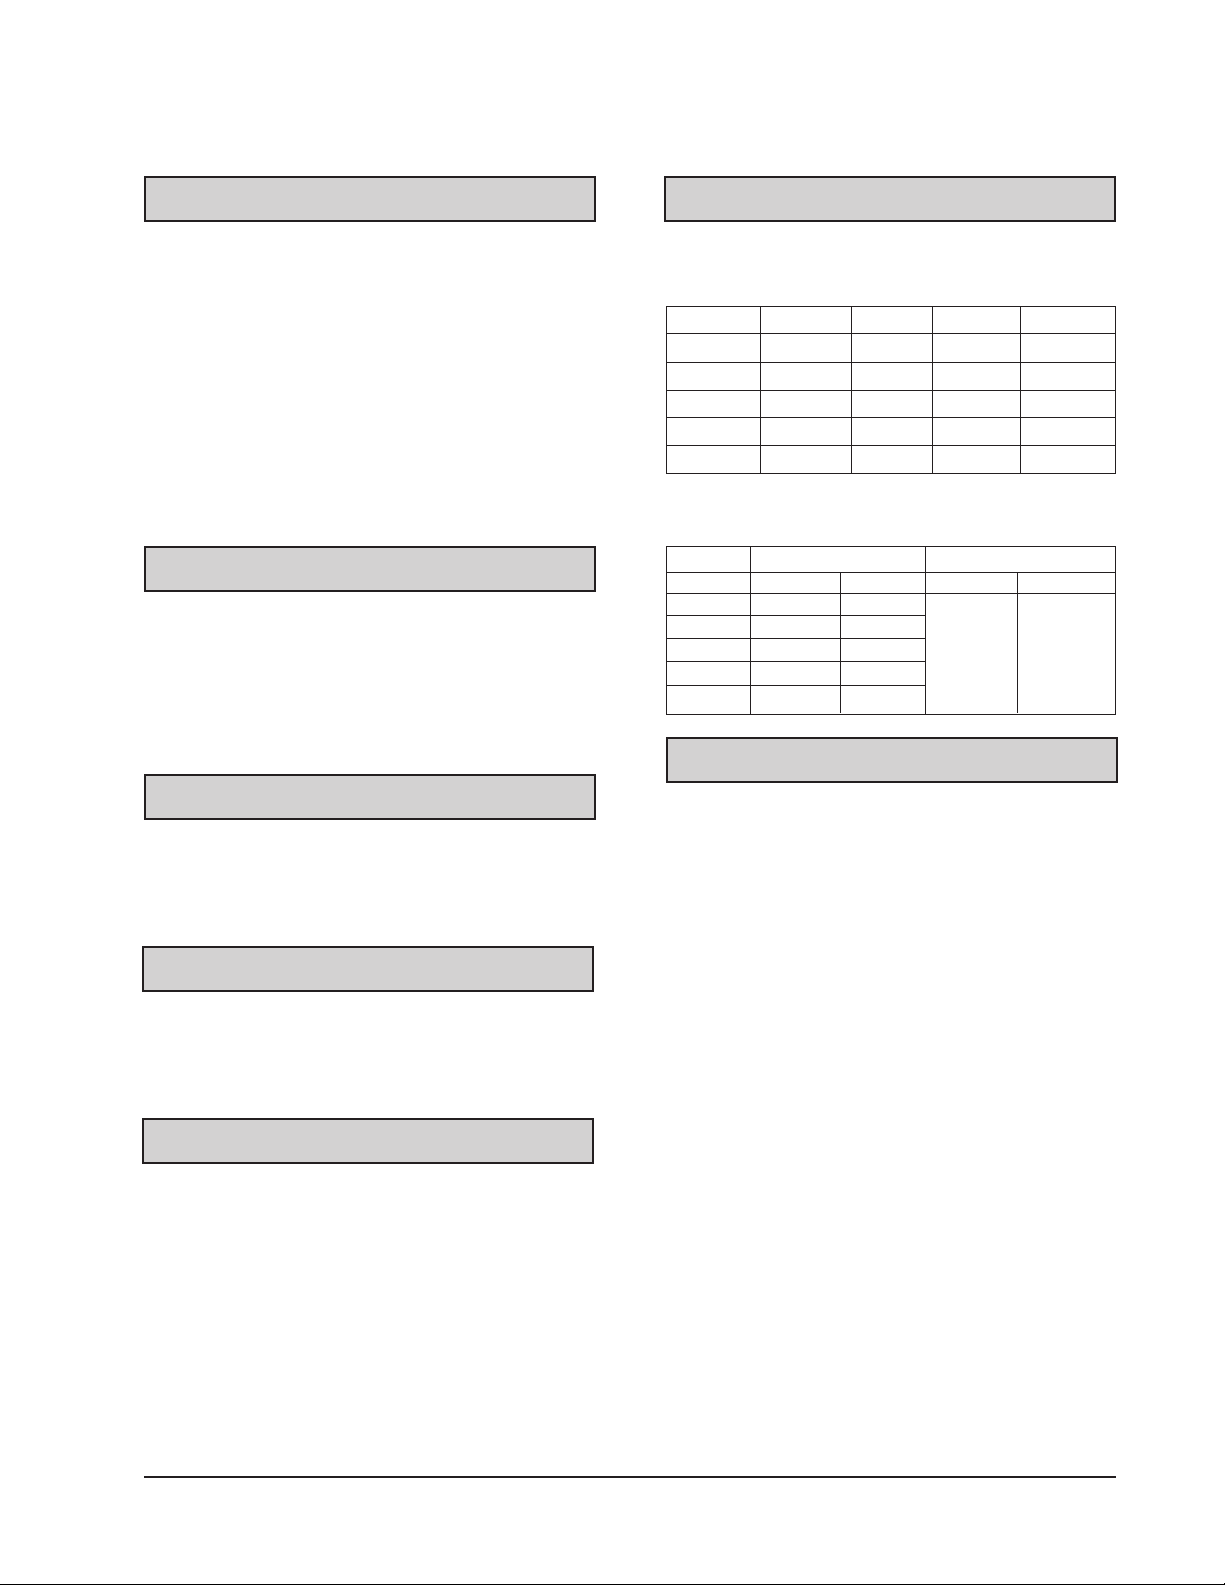
SPECIFICATIONS
Electrical Data
Model Volts Hertz Phase Amps
924RE 120 60 1 0.5
936RE 120 60 1 0.5
948RE 120 60 1 0.5
960RE 120 60 1 0.5
972RE 120 60 1 0.5
Gas Data
Model Input BTU/HR Manifold Pressure
Natural LP Gas Natural LP Gas
924RE 60,000 60,000 5.0” W.C. 10” W.C.
936RE 90,000 90,000 (1.1 kPa) (2.2 kPa)
948RE 120,000 120,000
960RE 150,000 150,000
972RE 180,000 180,000
TOOLS
OPERATION
Detailed operation instruction are included in
the Installation and Operation Manual which
is sent with each unit.
CLEANING
Detailed cleaning procedures are included in
the Installation and Operation Manual which
is sent with each unit.
LUBRICATION
No lubrication is required on this equipment.
Standard
· Hand tools (standard set)
· VOM with AC current tester (any
quality VOM with a sensitivity of at least
20,000 ohms per volt can be used)
· Temperature tester (thermocouple type)
· Manometer
— 3 —
F35628 (10-04)
Page 4
Back Panel
Griddle
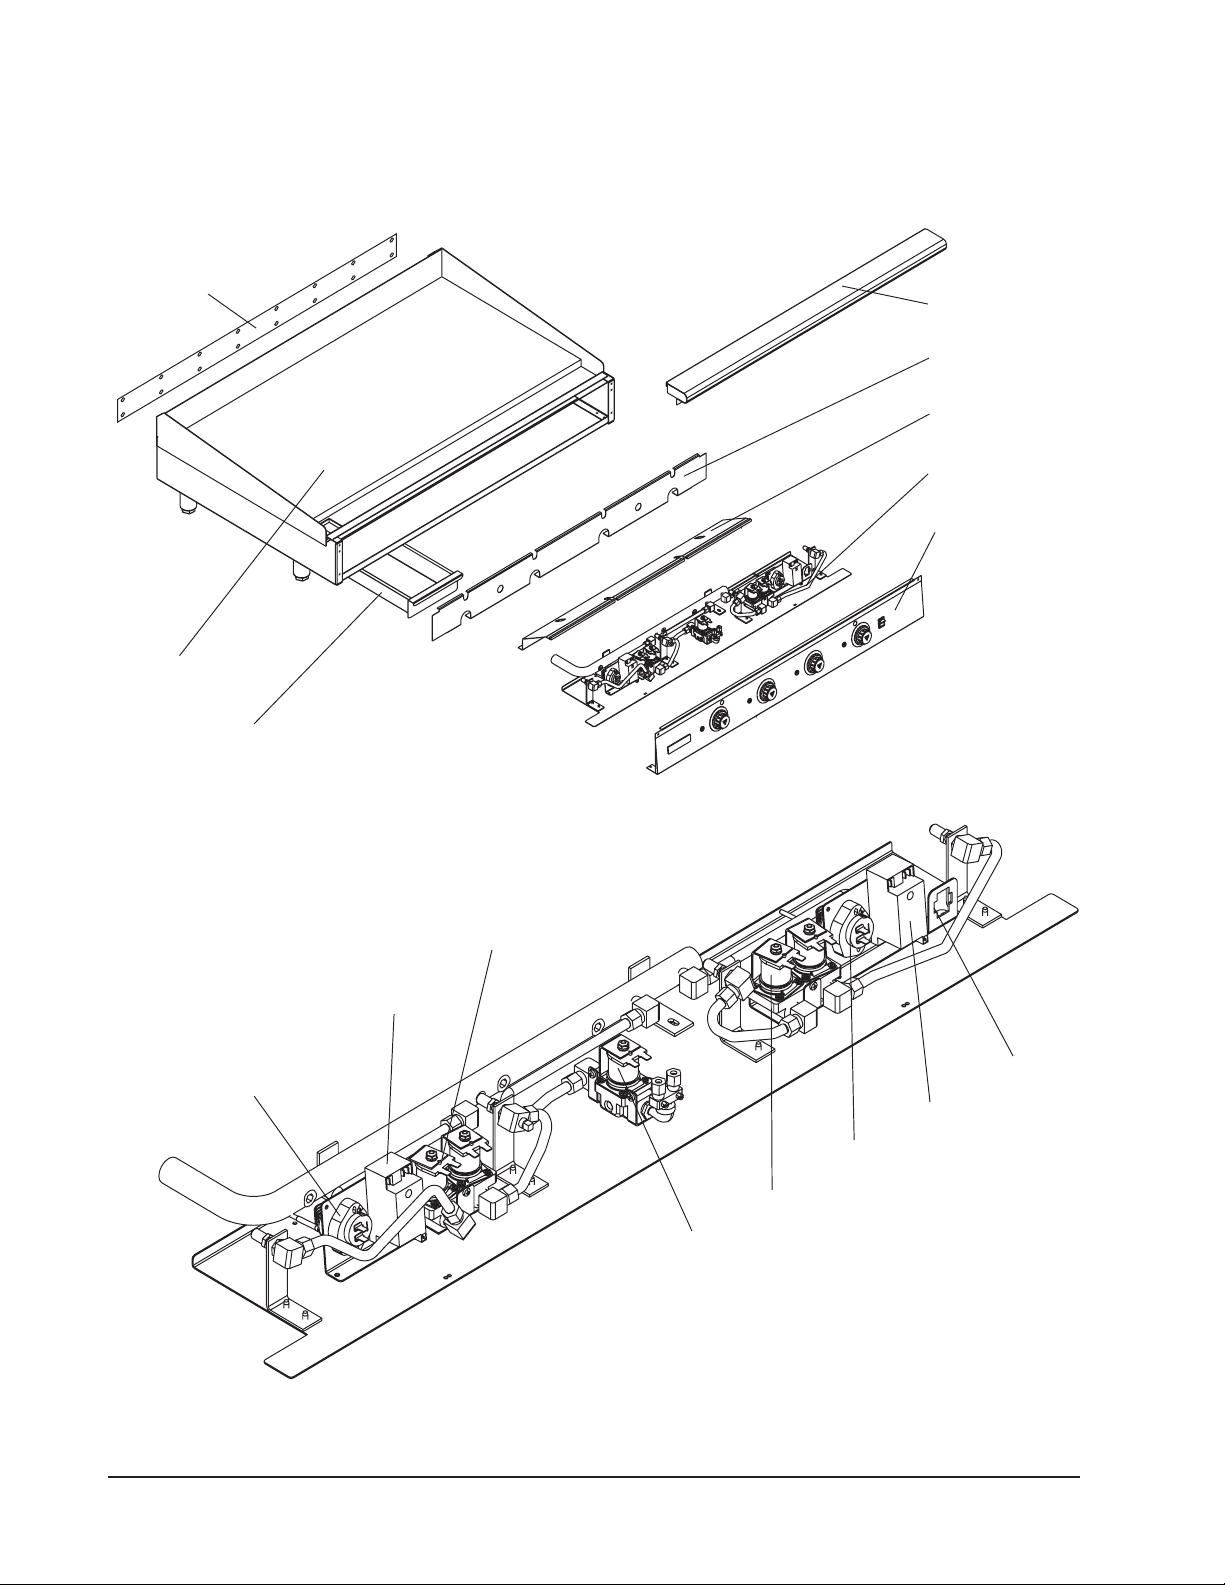
REMOVAL AND REPLACEMENT OF PARTS
COMPONENT LOCATION
Bullnose
Deflector Plate
Heat Shield
Control Plate
Control Panel
Grease Drawer
Flame
Switch
Dual
Solenoid
Ignitor
Module
Panel
Connector
Ignitor
Module
Flame
Switch
Dual
Solenoid
Pilot
Solenoid
F35628 (10-04)
Figure A
— 4 —
Page 5
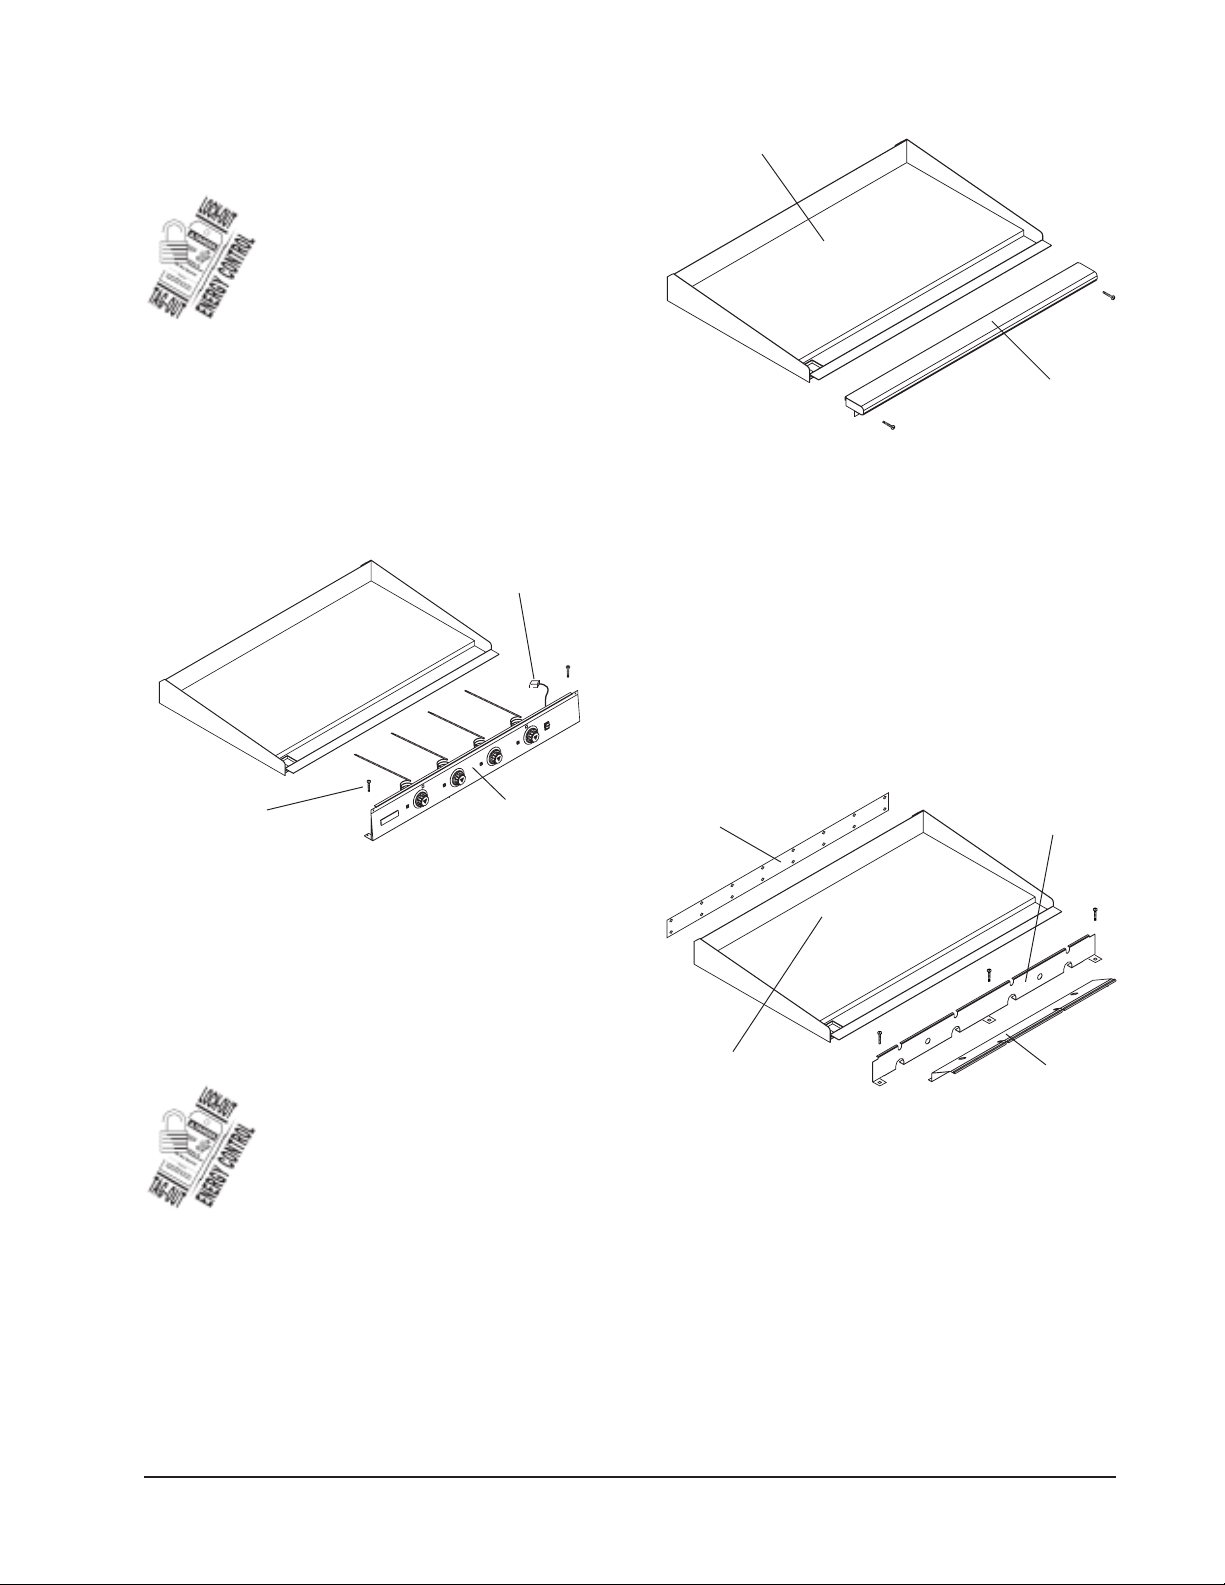
CONTROL PANEL
WARNING: DISCONNECT THE ELECTRICAL
POWER TO THE MACHINE AND
FOLLOW LOCKOUT / TAGOUT
PROCEDURES.
1. Remove the two screws securing the
control panel. One screw is located at
each end of the control panel.
2. Pull the control panel forward and
disconnect the electrical connector near
the right end.
Panel
Connector
Griddle
Bullnose
Figure C
3. Reverse the procedure to install.
Heat Shield
1. Remove control panel.
2. The heat shield clamps on the front of the
griddle and can be removed by grasping
the top of the shield and pulling forward.
Remove
Screw
Control
Panel
Figure B
3. Reverse the procedure to install.
COVERS AND PANELS
WARNING: DISCONNECT THE ELECTRICAL
POWER TO THE MACHINE AND
FOLLOW LOCKOUT / TAGOUT
PROCEDURES.
Bullnose Weld Assembly
1. Remove control panel.
2. The bullnose weld assembly is secured
with two screws, one on each side of the
bottom of the assembly. Remove these
screws, then remove the bullnose weld
assembly from the griddle.
Back
Panel
Griddle
Deflector
Plate
Heat
Shield
Figure D
3. Reverse the procedure to install.
Back Panel
1. Remove all screws from rear of griddle
securing the back panel.
2. Remove the back panel. (See Figure D)
3. Reverse procedures to install.
— 5 —
F35628 (10-04)
Page 6
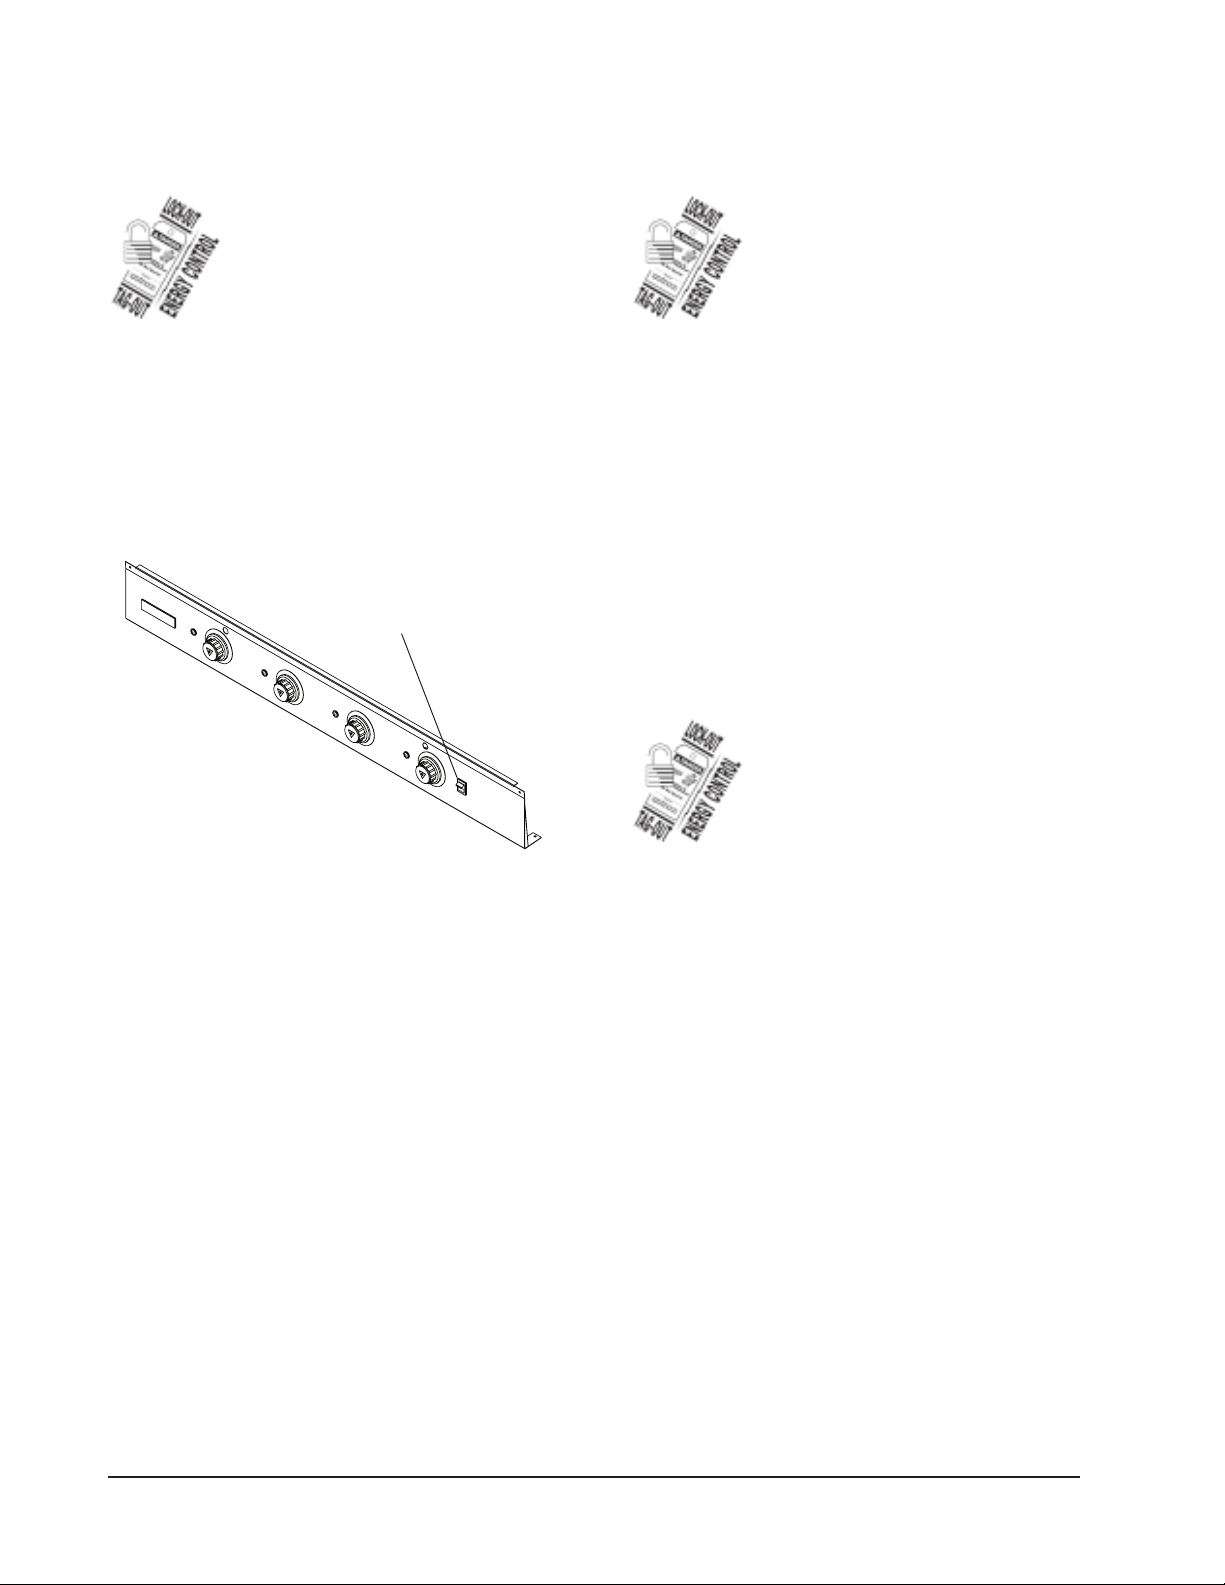
POWER ON/OFF SWITCH
INDICATOR LIGHT
WARNING: DISCONNECT THE ELECTRICAL
POWER TO THE MACHINE AND
FOLLOW LOCKOUT / TAGOUT
PROCEDURES.
1. Remove the control panel.
2. Label and disconnect the wires to the
power ON/OFF switch.
3. Squeeze the switch retainer and slide the
switch out through the front of the control
panel.
ON/OFF
Switch
WARNING: DISCONNECT THE ELECTRICAL
POWER TO THE MACHINE AND
FOLLOW LOCKOUT / TAGOUT
PROCEDURES.
1. Remove the control panel.
2. Label and disconnect the wires to the Red
indicator light.
3. Squeeze the light retainers and slide the
indicator light out through the front of the
control panel.
4. Reverse procedures to install and check
for proper operation.
THERMOSTAT
WARNING: DISCONNECT THE ELECTRICAL
POWER TO THE MACHINE AND
FOLLOW LOCKOUT / TAGOUT
PROCEDURES.
Figure E
4. Reverse procedures to install and check
for proper operation.
1. Remove the control panel.
2. Remove the knob.
3. Remove the two screws and two washers
securing the thermostat and thermostat
dial to the control panel, then remove the
thermostat and thermostat dial.
4. When installing a new thermostat reverse
the procedure and be sure to position the
thermostat dial with OFF at the top.
5. Check calibration. Refer to the Service
Procedures and Adjustments section of
this manual.
F35628 (10-04)
— 6 —
Page 7

FLAME SWITCH
IGNITOR MODULE
WARNING: DISCONNECT THE ELECTRICAL
POWER TO THE MACHINE AND
FOLLOW LOCKOUT / TAGOUT
PROCEDURES.
1. Remove the control panel.
2. Label and disconnect the wires to the
flame switch.
3. Remove the two screws securing flame
switch to control plate.
4. Remove sensor from the pilot assembly.
Sensor can be accessed from the front of
unit or from underneath the unit via the
pilot assembly access cut out opening.
The sensor is a snap in fit device.
5. When installing a new flame switch,
reverse the procedure. Be sure to carefully
route and attach the sensor to the pilot
assembly and check for proper operation.
Remove
Probe
From Pilot
Assembly
WARNING: DISCONNECT THE ELECTRICAL
POWER TO THE MACHINE AND
FOLLOW LOCKOUT / TAGOUT
PROCEDURES.
1. Remove the control panel.
2. Label and disconnect the black, green,
and white wires from the ignitor module.
3. Disconnect the ignitor cable from the
bottom of the ignitor module.
4. Remove the two screws securing ignitor
module to module bracket.
5. Remove ignitor module from module
bracket.
6. When installing a new ignitor module
reverse the procedure and check for
proper operation.
Disconnect
Wires
Ignitor
Module
Flame
Switch
Sensor
Remove
Screws
Module
Bracket
Figure F
Ignitor
Electrode
Flame
Switch
Disconnect
Wires
— 7 —
Module
Bracket
Remove
Screw
Figure G
Disconnect
Wire
F35628 (10-04)
Page 8

GAS BURNER
PILOT SOLENOID
WARNING: DISCONNECT THE ELECTRICAL
POWER TO THE MACHINE AND
FOLLOW LOCKOUT / TAGOUT
PROCEDURES.
1. Remove the back panel.
2. Cut shipping tie from burner.
3. To remove the burner, reach through the
back of the unit and lift the burner up over
the guide screw then pull the burner out
through the back of the unit.
4. Replace the burner by inserting the burner
through the rear of the unit, engaging the
burner venturi onto the burner valve orifice
at the front of unit. From the front of the
unit, remove the control panel to check
that the venturi is properly fitted over the
orifice.
5. Reassemble the control and back panels
then check for proper operation.
WARNING: DISCONNECT THE ELECTRICAL
POWER TO THE MACHINE AND
FOLLOW LOCKOUT / TAGOUT
PROCEDURES.
WARNING: SHUT OFF THE GAS BEFORE
SERVICING THE GRIDDLE.
1. Remove the control panel.
2. Label and disconnect the two wires
connected to the solenoid.
3. Disconnect the input compression fitting
and the two output compression fittings.
4. Remove the two screws attaching solenoid
to single solenoid bracket and remove
solenoid.
Input
Compression
Fitting
Guide
Screw
Burner
Figure H
Orifice
Output
Remove
Screws
Compression
Fittings
Figure I
5. Reverse procedure to install the
replacement gas solenoid.
WARNING: ALL GAS JOINTS DISTURBED
DURING SERVICING MUST BE
CHECKED FOR LEAKS. CHECK
WITH SOAP AND WATER
SOLUTION (BUBBLES).
DO NOT USE AN OPEN FLAME.
6. Verify gas pressure as outlined under the
GAS PRESSURE ADJUSTMENT in
Service Procedures and Adjustments.
Check for proper operation.
F35628 (10-04)
— 8 —
Page 9

PILOT
DUAL SOLENOID
WARNING: DISCONNECT THE ELECTRICAL
POWER TO THE MACHINE AND
FOLLOW LOCKOUT / TAGOUT
PROCEDURES.
WARNING: SHUT OFF THE GAS BEFORE
SERVICING THE GRIDDLE.
1. Remove control panel and heat shield for
visual access of the pilot.
2. Reaching underneath the front of the
griddle remove the pilot tube fitting and
disengage the pilot tube from the pilot.
3. Reaching up through the square pilot
access cut out, remove the screw retaining
the pilot bracket to the unit and slip the
entire pilot assembly out from under the
front section of the unit.
4. Remove the pilot from the bracket.
5. Reverse procedures to install new pilot.
WARNING: DISCONNECT THE ELECTRICAL
POWER TO THE MACHINE AND
FOLLOW LOCKOUT / TAGOUT
PROCEDURES.
WARNING: SHUT OFF THE GAS BEFORE
SERVICING THE GRIDDLE.
1. Remove the control panel.
2. Label and disconnect the two wires
connected to each solenoid.
3. Disconnect the input compression fitting
and the two output compression fittings.
4. Remove the screw securing solenoids to
solenoid bracket and remove solenoid.
Disconnect
Wires
WARNING: ALL GAS JOINTS DISTURBED
DURING SERVICING MUST BE
CHECKED FOR LEAKS. CHECK
WITH SOAP AND WATER
SOLUTION (BUBBLES). DO
NOT USE AN OPEN FLAME.
6. Verify gas pressure as outlined under the
GAS PRESSURE ADJUSTMENT in the
Service Procedures and Adjustments section
of this manual. Check for proper operation.
Pilot
Bracket
Pilot
Assembly
Remove
Screw
Figure J
Disconnect
Screw
Fittings
Figure K
5. Reverse procedure to install the
replacement dual solenoid.
WARNING: ALL GAS JOINTS DISTURBED
DURING SERVICING MUST BE
CHECKED FOR LEAKS. CHECK
WITH SOAP AND WATER
SOLUTION (BUBBLES).
DO NOT USE AN OPEN FLAME.
6. Verify gas pressure as outlined under the
GAS PRESSURE ADJUSTMENT in
Service Procedures and Adjustments.
Check for proper operation.
— 9 —
F35628 (10-04)
Page 10

SERVICE PROCEDURES AND ADJUSTMENTS
WARNING: CERTAIN PROCEDURES IN
THIS SECTION REQUIRE
ELECTRICAL TEST OR
MEASUREMENTS WHILE
POWER IS APPLIED TO THE
MACHINE. EXERCISE
EXTREME CAUTION AT ALL
TIMES. IF TEST POINTS ARE
NOT EASILY ACCESSIBLE,
DISCONNECT POWER AND
FOLLOW LOCKOUT / TAGOUT
PROCEDURES, ATTACH TEST
EQUIPMENT AND REAPPLY
POWER TO TEST.
THERMOSTAT CALIBRATION
1. Set the thermocouple in the center of the
burner section to be calibrated.
2. Set the ON/OFF switch to the ON position.
Adjust the thermostat knob of the burner
to be calibrated to 350 degrees.
3. Allow the burners to cycle on and off at
least twice. Observe the griddle heat light
and thermocouple readings. The
thermocouple reading should be 350
degrees plus or minus 15 degrees the
instant the heating light comes on.
If the unit is not within these calibration
specifications follow the steps below.
4. Gently, remove the thermostat knob from
the unit without rotating the thermostat
shaft.
5. Loosen (2) screws securing the
temperature dial plate to the unit. Gently,
replace the thermostat knob onto the unit
without moving the thermostat shaft.
6. Hold the thermostat knob in place and
rotate the dial plate so that the 350 degree
position aligns with the knob temperature
indicator mark.
7. While holding the dial plate in position,
gently remove the knob without moving
the shaft . Tighten down the (2) dial plate
securing screws.
8. Replace the thermostat knob and verify
that thermocouple reading, knob indicator
and dial setting all agree.
9. Turn the knob and ON/OFF switch to the
OFF position.
10. Remove the thermocouple.
Thermostat
Dial
Loosen
Screws
Knob
Figure L
MAIN BURNER ADJUSTMENT
For efficient burner operation, it is important
that a proper balance of gas volume and
primary air supply is maintained, to give
complete combustion. Insufficient air supply
results in a yellow streaming flame. Primary
air supply is controlled by the air shutter on
the front of the burner venturi. Loosen the
screws on the venturi and adjust the air
shutter to just eliminate yellow tips on burner
flames. Lock the air shutter in place by
tightening the screws. Repeat this procedure
with all burners.
1. All units are equipped with fixed orifices
for use with natural or propane gas and
no adjustment is necessary.
F35628 (10-04)
— 10 —
Page 11

2. Units for operation of natural or propane
gas are also equipped with a factory preset
pressure regulator with an outlet pressure
of 5” W.C. (Water Column) for natural gas
supply and 10” W.C. for propane gas
supply, and should not require further
adjustment.
3. The burners and pilot flames may be
observed through round holes in the front
panel.
GAS PRESSURE MEASUREMENT
1. Set the power ON/OFF switch to the OFF
position.
2. Turn the gas supply off at manual shutoff
valve.
3. Remove the screws securing the control
panel and move the panel forward
sufficiently to access the plug on the
manifold pressure port.
4. Remove the plug from the manifold
pressure port.
5. Install hose barb adapter and attach
manometer tube.
WARNING: THE FOLLOWING STEPS
REQUIRE POWER TO BE
APPLIED TO THE UNIT
DURING TEST. USE EXTREME
CAUTION AT ALL TIMES.
6. Turn the power switch to the ON position.
7. Turn only one burner on to the maximum
temperature.
8. Check gas pressure.
9. Turn all burners on to the maximum
temperature.
10. Check gas pressure.
11. Turn all other equipment on same supply
line on.
12. Check gas presssure.
NOTE: Pressure drop should not be greater
than ±½” W.C. If gas pressure requires
adjustment, the adjustment screw is
located under a cap on the regulator.
PRESSURE READINGS (IN W.C.)
Gas Type
Natural Propane
Manifold 5 10
Recommended 7-9 (Line) 11-12 (Line)
Minimum 6 (Line) 11 (Line)
Maximum 14 (Line) 14 (Line)
Manifold
Pressure
Port
Figure M
Plug
— 11 —
13. Turn off all burners.
14. Turn ON/OFF switch to OFF position.
15. Disconnect manometer and reinstall plug.
F35628 (10-04)
Page 12

ELECTRICAL OPERATION
COMPONENT DESCRIPTION
Power Switch ON/OFF – Switch turns power
ON or OFF.
Ignition Control Module – Provides ignition
spark. Turned on when ON/OFF switch is set
to the ON position and turned off when flame
switch closes.
Burner On Lights – Illuminates to indicate
burner is turned on.
Thermostats – Turns burner on and sets
operating temperature.
Flame Switch – When the flame switch is
heated by the pilot the switch contacts close
and turn on the single and/or dual burner
solenoids.
Gas Valve (Single Solenoid) – Contains one
valve. The valve controls a single burner. The
solenoid is turned on when the ON/OFF switch
is in the ON position and the corresponding
thermostat is rotated out of the OFF position.
When the solenoid is turned on (operated)
gas flows to the burners.
Gas Valve (Dual Solenoid) – Contains two
valves. Each valve controls a separate burner.
Solenoids are turned on when the ON/OFF
switch is in the ON position and the
corresponding thermostat is rotated out of
the OFF position.
Pilot Gas Valve (Single Solenoid) – Contains
one valve. The valve controls the gas to the
pilot. The solenoid is turned on when the
ON/OFF switch is in the ON position and
turned off when the flame switch closes.
SEQUENCE OF OPERATION
Operation of all size griddles is the same.
The following discussion is for the 48” griddle.
This griddle has four thermostats, two flame
switches, two dual solenoids and one pilot
solenoid.
The neutral wire from the power source is
directly connected to the following terminals:
• A terminal on each thermostat
• The N terminal on each ignition module
• One terminal on the pilot solenoid
When the power ON/OFF switch is set to the
ON position, voltage is applied to the following
terminals:
• Terminal L1 on each ignition module
turning the module on
• One side of each flame switch
• The remaining terminal on the pilot
solenoid energizing the solenoid
The ignition module which is now connected
across the power lines turns on and provides
the voltage for the ignition spark. The pilot
valve solenoid is energized allowing gas to
flow to the pilot where it is ignited by the
spark. The pilot flame heats up the flame
switch. When the flame switch is sufficiently
hot, the switch closes. The voltage through
the flame switch is applied to one side of
each burner solenoid and one side of the
burner ON light.
When the pilot flame is sensed, the ignition
module will shut off automatically.
F35628 (10-04)
When a thermostat is rotated out of the OFF
position the neutral return wire is connected
to the other side of the burner light causing
the light to be illuminated. At the same time
the neutral is connected to the other side of
the burner solenoid causing the solenoid to
operate and allowing gas to flow to the burner.
— 12 —
Page 13

SCHEMATIC DIAGRAMS
Schematic Drawing for 24” Griddle
— 13 —
EMPLOYER DES FILS D’ALIMENTATION ADEQUATS 200°C OR EQUIVALENT
1. USE SUPPLY WIRES SUITABLE FOR 200°C OR EQUIVALENT
2. HARNESS PART NO. 723526-1
B NOTE:
F35628 (10-04)
Page 14

SCHEMATIC DIAGRAMS
F35628 (10-04)
Schematic Drawing for 36” Griddle
— 14 —
EMPLOYER DES FILS D’ALIMENTATION ADEQUATS 200°C OR EQUIVALENT
1. USE SUPPLY WIRES SUITABLE FOR 200°C OR EQUIVALENT
2. HARNESS PART NO. 723527-1
B NOTE:
Page 15

SCHEMATIC DIAGRAMS
Schematic Drawing for 48” Griddle
— 15 —
EMPLOYER DES FILS D’ALIMENTATION ADEQUATS 200°C OR EQUIVALENT
1. USE SUPPLY WIRES SUITABLE FOR 200°C OR EQUIVALENT
2. HARNESS PART NO. 723528-1
B NOTE:
F35628 (10-04)
Page 16

SCHEMATIC DIAGRAMS
F35628 (10-04)
Schematic Drawing for 60” Griddle
— 16 —
EMPLOYER DES FILS D’ALIMENTATION ADEQUATS 200°C OR EQUIVALENT
1. USE SUPPLY WIRES SUITABLE FOR 200°C OR EQUIVALENT
2. HARNESS PART NO. 723529-1
B NOTE:
Page 17

SCHEMATIC DIAGRAMS
Schematic Drawing for 72” Griddle
— 17 —
EMPLOYER DES FILS D’ALIMENTATION ADEQUATS 200°C OR EQUIVALENT
1. USE SUPPLY WIRES SUITABLE FOR 200°C OR EQUIVALENT
2. HARNESS PART NO. 723530-1
B NOTE:
F35628 (10-04)
Page 18

TROUBLESHOOTING GUIDE
SYMPTOM
Indicator light fails to light
when power ON/OFF
switch is set to ON
position
Indicator light fails to go
out when power ON/OFF
switch is set to the OFF
position
Griddle does not heat
when thermostat is turned
on
CAUSE
Not plugged in
Faulty ON/OFF switch
Store circuit breaker tripped
Faulty lamp
Faulty power ON/OFF switch
Not plugged in
Faulty ON/OFF switch
Store circuit breaker tripped
Faulty thermostat
Problem with pilot valve
REMEDY
Plug griddle into correct voltage
outlet
Replace ON/OFF switch
Reset circuit breaker
Replace lamp
Replace switch
Plug griddle into correct voltage
outlet
Replace ON/OFF switch
Reset circuit breaker
Replace thermostat
Check operation of pilot valve
Igniter stays on too long
after pilot flame is
established
Igniter fails to light
Problem with igniter
Problem with flame switch
Loose wire connection
Flame switch has not had enough
time to heat up
Flame switch bulb not hot enough
Problem with igniter
Unit not plugged in
Store circuit breaker tripped
Check operation of igniter
Check operation of flame switch
Check for bad connection and
correct
Allow more time for flame switch to
heat up
Check alignment of pilot and flame
switch
Check for obstruction or wrong size
orifice
Check for proper gas pressure
Replace igniter
Plug griddle into correct voltage
outlet
Reset circuit breaker
F35628 (10-04)
Problem with power ON/OFF switch
Loose wire connection
— 18 —
Replace ON/OFF switch
Check and repair wire connection
Page 19

TROUBLESHOOTING GUIDE
SYMPTOM
Pilot does not light after
igniter has been on
several minutes
Pilot fails to remain lit
after igniter goes out
(Pilot may cycle on and
off normally several times
after cold start-up before
the pilot heats up.)
CAUSE
Problem with pilot valve
Gas supply not purged of air
No gas supply
Loose wire connection
Obstructed or wrong size pilot orifice
Problem with alignment of pilot and
igniter
Loose wire connection
Air blowing pilot out
Obstructed or wrong size pilot orifice
Problem with alignment of pilot and
flame switch
REMEDY
Check operation of pilot valve
Purge gas lines
Check that gas supply is on
Check and repair wire connection
Check for obstruction or wrong size
orifice
Realign pilot and igniter
Check and repair wire connection
Correct air flow
Check for obstruction or wrong size
orifice
Realign pilot and igniter
Burner does not come on
(burner light does not
come on)
Heat does not turn off,
burner light is off,
temperature is above
thermostat setting
Heat does not turn off,
burner light is on,
temperature is above
thermostat setting
Temperature varies
Problem with flame switch
Thermostat setting too low
Problem with thermostat sensor
Problem with temperature controller
Problem with thermostat gas valve
Loose wire connection
Problem with thermostat gas valve
Problem with temperature controller
Low gas pressure
Check operation of flame switch
Adjust thermostat to a high
temperature setting
Replace sensor
Check or replace controller
Check thermostat gas valve
Check and repair wire connection
Check or replace thermostat gas
valve
Check or replace temperature
controller
Check and adjust proper gas
pressure
Faulty thermostat sensor
— 19 —
Replace faulty thermostat and sensor
F35628 (10-04)
Page 20

FORM 35628 (10-04)
PRINTED IN U.S.A.
 Loading...