

INSTALLATION &
OPERATION MANUAL
CONVEYORIZED PIZZA OVEN
MODEL
CB1824E ML-52497
VULCAN-HART COMPANY, P.O. BOX 696, LOUISVILLE, KY 40201-0696, TEL. (502) 778-2791
FORM 30995 (9-96)

Installation, Operation and Care of
MODEL CB1824E
CONVEYORIZED PIZZA OVEN
PLEASE KEEP THIS MANUAL FOR FUTURE USE
GENERAL
The Vulcan Conveyorized Pizza Oven uses Calrod heaters in independently controlled groups. The
heaters and conveyor speed have a wide range of adjustment suitable for pizza baking or other uses.
Vulcan Pizza Ovens are produced with quality workmanship and material. Proper installation, usage
and maintenance of your oven will result in many years of satisfactory performance.
It is suggested that you thoroughly read this entire manual and carefully follow all of the instructions
provided.
INSTALLATION
Before installing, verify that the electrical service agrees with the specifications on the rating plate
located underneath the right front corner. If the supply and equipment requirements do not agree, do
not proceed with the installation. Contact your dealer or Vulcan-Hart Company immediately.
UNPACKING
Immediately after unpacking, check for possible shipping damage. If the oven is found to be damaged,
save the packaging material and contact the carrier within 15 days of delivery.
ASSEMBLY
Assemble four 4" legs to the threaded holes in the bottom corners of the oven. The foot on each leg
may be adjusted to provide stability; precise leveling is not required.
All deflector pans must be properly installed in the oven before operating.
© VULCAN-HART COMPANY, 1996
— 2 —

LOCATION
This oven can be placed on a suitable counter surface. Allow 4" minimum bottom clearance and 6"
minimum clearance on all sides of the oven. Additionally, appropriate operator access is required to
the front and back of the oven, and 27" minimum clearance on either side to allow removal of the bottom
deflector pan. Do not place anything on top of the oven.
This oven must not be connected directly to a ventilation system as this would cause uneven heating
and reduce operating efficiency. If ventilation is desired, install the oven under a suitable hood that
will not result in a direct pull of air through the oven.
1
Overall dimensions are 29" wide x 64
/4" deep x 193/4" high.
INSTALLATION CODES AND STANDARDS
The oven must be installed in accordance with:
In the United States of America:
1. State and local codes.
2. National Electrical Code, ANSI/NFPA-70 (latest edition). Copies may be obtained from The
National Fire Protection Association, Batterymarch Park, Quincy, MA 02269.
In Canada:
1. Local codes.
2. Canadian Electrical Code, Part 2, CSA Standard C22.1 (latest edition). Copies may be obtained
from The Canadian Standard Association, 178 Rexdale Blvd., Rexdale, Ontario, Canada M9W1R3.
ELECTRICAL CONNECTION
Permanently Connected Ovens
WARNING: ELECTRICAL AND GROUNDING CONNECTIONS MUST COMPLY WITH THE
APPLICABLE PORTIONS OF THE NATIONAL ELECTRICAL CODE AND/OR OTHER LOCAL
ELECTRICAL CODES.
WARNING: DISCONNECT ELECTRICAL POWER SUPPLY AND PLACE A TAG AT THE
DISCONNECT SWITCH TO INDICATE THAT YOU ARE WORKING ON THE CIRCUIT.
Remove the left side panel and connect incoming power to the terminal block in accordance with the
wiring diagram located on the inside wall of the left side panel and the ELECTRICAL DATA chart on
page 4.
— 3 —

Cord Connected Ovens
WARNING: THE ELECTRICAL CORD HAS A GROUNDING PLUG WHICH MUST BE CONNECTED
TO A PROPERLY GROUNDED RECEPTACLE. IF THE RECEPTACLE IS NOT THE PROPER
GROUNDING TYPE, CONTACT AN ELECTRICIAN. DO NOT REMOVE THE GROUNDING PRONG
FROM THE PLUG.
ELECTRICAL DATA
Fuse
Model
CB1824E 208/60/1 9.4 45.2 60 60 6
CB1824E 240/60/1 9.4 39.2 50 50 8
Volts / Hz
/ Ph
Kilowatts Rated Amps
Circuit
Size
(Amps)
Size or
Circuit
Breaker
Size*
(Amps)
90°
Copper
Wire Size
Per Phase Per Line Wire
L1 - L2 L2 - L3 L1 - L3 L1 L2 L3
CB1824E 208/60/3 5.2 1.6 2.6 32.5 28.3 17.5 40 40 8
CB1824E 240/60/3 5.2 1.6 2.6 28.2 24.5 15.2 40 40 8
* Dual Element Time-Delay Fuse or
Inverse Time Circuit Breaker
Circuit Size (Minimum) & Fuse / Circuit Breaker Size (Maximum) compiled in accordance with the National Electrical Code (ANSI/
NFPA 70), 1993 Edition.
— 4 —

OPERATION
WARNING: THE OVEN AND ITS PARTS ARE HOT. BE VERY CAREFUL WHEN OPERATING AND
CLEANING THE OVEN.
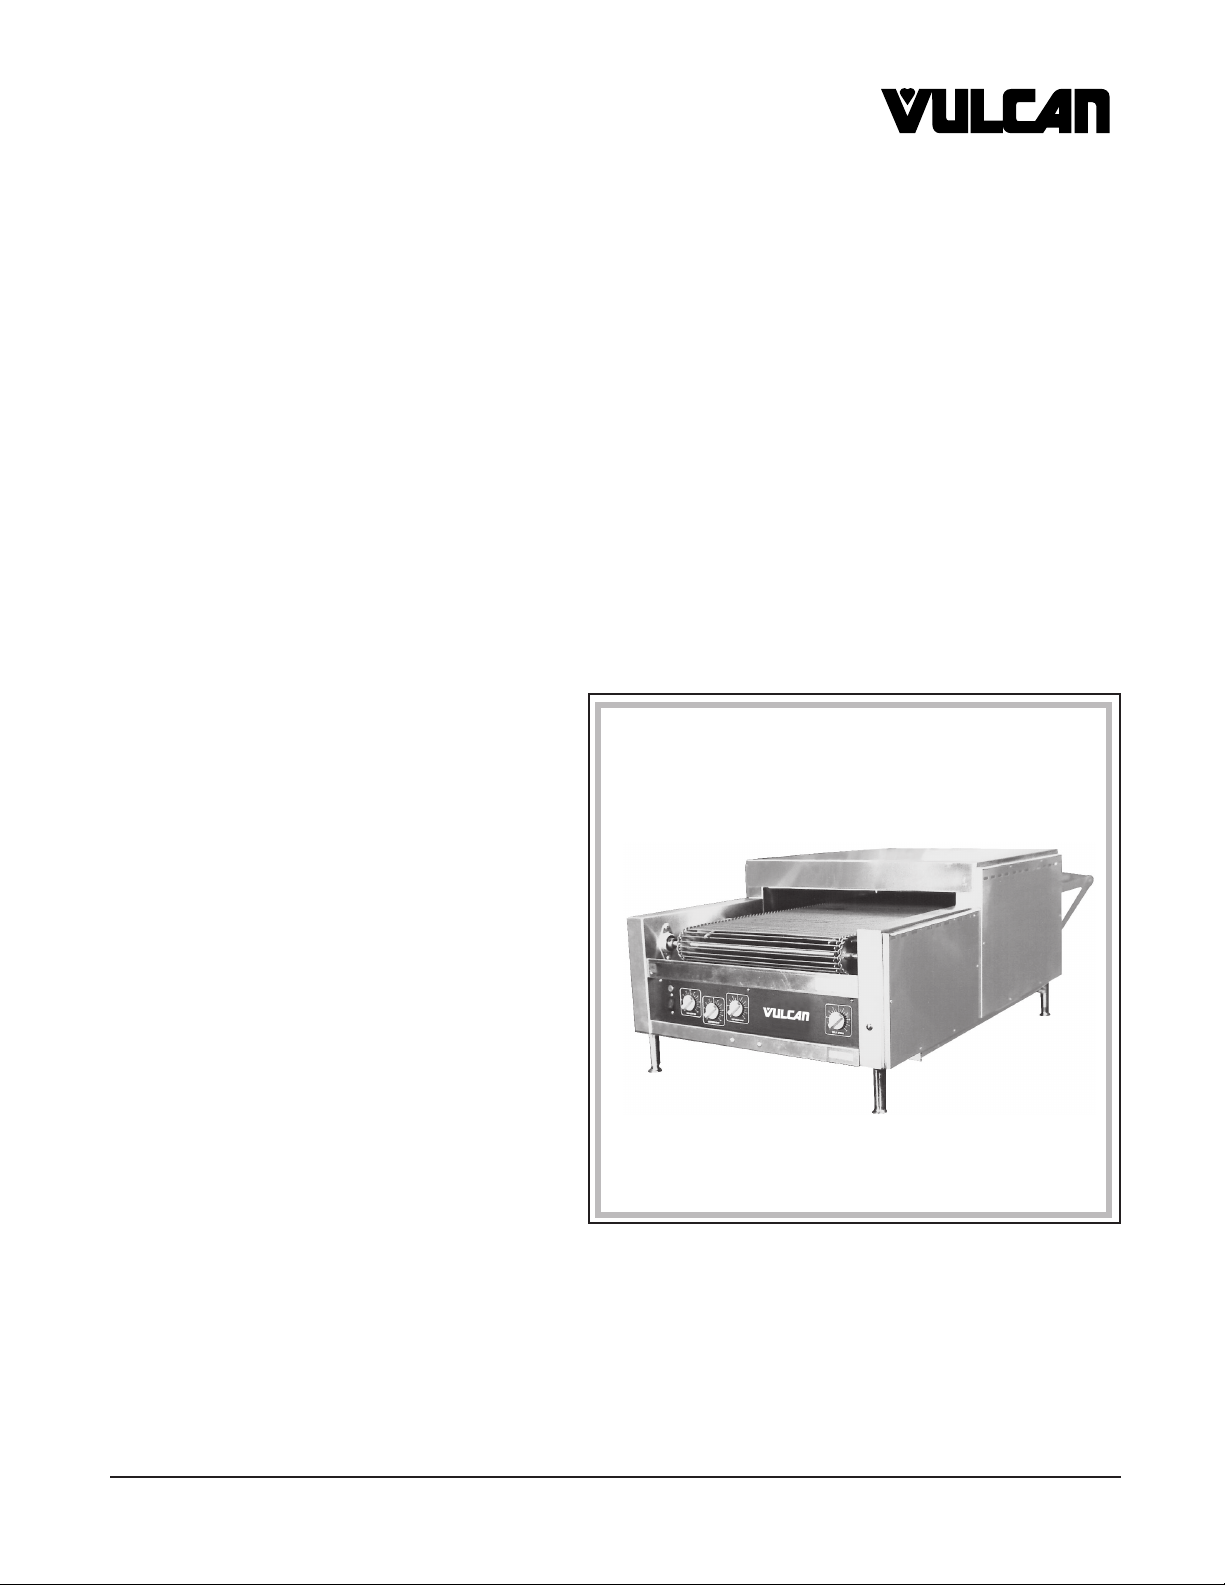
CONTROLS (Fig. 1)
Pilot Light
Main Power Switch
Top Heat-In
Top Heat-Out
Bottom Heat
Fig. 1
Belt Speed
PL-40949-1
MAIN POWER SWITCH — Turns power on or off.
PILOT LIGHT — Main power is on when light is on.
TOP HEAT - IN — Settings [ 0 - 10 ] adjust the first two heaters above the conveyor.
TOP HEAT - OUT — Settings [ 0 - 10 ] adjust the final heater above the conveyor.
BOTTOM HEAT — Settings [ 0 - 10 ] adjust the four heaters below the conveyor.
BELT SPEED — Settings [ 0 - 10 ] adjust the conveyor speed.
BEFORE FIRST USE
WARNING: DISCONNECT ELECTRICAL POWER SUPPLY BEFORE CLEANING.
Clean all stainless steel parts with a soft cloth moistened in mild detergent and warm water to remove
any shipping dust and the protective oil film. Refer to CLEANING in this manual.
WARM-UP
Turn main power ON. Adjust dial settings for: Top Heat - In, Bottom Heat, Top Heat - Out, and Belt
Speed to medium position 5. Allow about 7 minutes for warm-up.
OPERATOR TIPS
Depending on settings for Top Heat - In, Top Heat - Out, and Bottom Heat, product can be baked on
top and/or bottom. Product is placed on the chain conveyor at the front and moves through the heated
oven chamber to the exit tray at the rear.
— 5 —

Maximum product size is 18" wide. Moving product through the 24" long baking chamber requires
about 6 - 8 minutes, depending on the belt speed. Belt Speed 1 is slowest (for more doneness); Belt
Speed 10 is fastest and results in lighter toasting or less doneness.
CAUTION: DO NOT turn speed to 0 during warm-up or baking. This could damage the conveyor.
Products will require some experimentation to achieve the appropriate balance of heat control and
conveyor speed. Each time the controls are changed, allow about 5 minutes for the temperature to
stabilize.
COOKING GUIDELINES
The suggested settings, pages 6 and 7, are guidelines only. They are based on Vulcan-Hart lab testing
and may differ from your products. Prove your products and recipes by testing them in the oven to
determine repeatable settings before full operation.
For consistent results, allow the temperature to stabilize in the oven before sending products through.
Baking temperatures and belt speed settings depend primarily on whether the pizza dough is parbaked or raw.
Par-Baked Dough pizza products are generally prebaked from 50 - 90% done and come in different
thicknesses. These pizzas require less bottom heat, while the belt speed can vary depending on
variety and number of toppings. High-moisture toppings can require more top heat to evaporate excess
moisture before completing the browning/melting process in baking. Sauce should be spread evenly
to the outer edge of the pizza crusts.
Par-Baked Regular/Thin Crust Pepperoni Pizza.
Prep: Thawed Crust + thin layer sauce + half the cheese + layer pepperoni + other half cheese.
TOP HEAT - IN BOTTOM HEAT TOP HEAT - OUT BELT SPEED
5 8.5 8 6
Par-Baked Regular/Thin Crust Deluxe Pizza (extra cheese).
Prep: Thawed Crust + thin layer sauce + half the cheese + four toppings + other half cheese.
TOP HEAT - IN BOTTOM HEAT TOP HEAT - OUT BELT SPEED
5 8 9.5 5
Par-Baked Thick Crust Pan Pizza.
Prep: Thawed Crust + thin layer sauce + half the cheese + all toppings + other half cheese.
TOP HEAT - IN BOTTOM HEAT TOP HEAT - OUT BELT SPEED
6885.5
— 6 —

Raw Dough pizza products use fresh-prepared dough (or thawed from frozen). These doughs are
either run through a "sheeter" or "tossed" and then "proofed" in a proofing cabinet before baking. After
the dough has been mixed and "scaled" into uniform balls (portioned), a "sheeter" is used to stretch,
flatten, and shape the dough. Dough may be passed through the sheeter one or more times to achieve
proper thickness and shape. "Tossing" the dough means manually stretching, flattening and shaping
the dough. "Proofing" means the dough has been allowed to rise for a period of time in a proofing
cabinet under controlled temperature and humidity. Raw dough pizza requires high bottom heat and
lower top heat settings to properly bake the crust. Dough may or may not be "docked" before baking.
"Docked" means the dough was rolled with a spiked rolling pin which punches holes in the dough,
preventing the dough from rising during baking. The number of toppings has little to do with the heat
settings. Again, sauce should be spread evenly to the outer edge of the pizza crust.
Results are similar with seasoned pans or screens; however, bottom heat should be reduced when
baking in aluminum foil deep-dish pans because of their high level of heat transfer.
Raw Dough Regular/Thin Crust with any number of toppings, baked on pan or screen.
Prep: Raw Crust + thin layer sauce + any number of toppings and cheese.
TOP HEAT - IN BOTTOM HEAT TOP HEAT - OUT BELT SPEED
4 10 4.5 4.5
Raw Dough Regular Crust with any number of toppings baked in a deep-dish aluminum foil pan.
Prep: Raw Crust + thin layer sauce + any number of toppings and cheese.
TOP HEAT - IN BOTTOM HEAT TOP HEAT - OUT BELT SPEED
4 8 4.5 4.5
Hoagie Sandwiches can also be heated in the conveyor oven.
Hoagie Sandwiches.
Prep: Butter or dress the top bun and cover with aluminum foil. Assemble the bottom half of the sandwich and heat
face up.
TOP HEAT - IN BOTTOM HEAT TOP HEAT - OUT BELT SPEED
4 10 4.5 4.5 - 5
CLEANING (Fig. 2)
WARNING: DISCONNECT ELECTRICAL POWER SUPPLY BEFORE CLEANING. WAIT FOR OVEN
TO COOL.
CAUTION: Avoid using abrasive powders or pads on the outside of the oven; these cleaners
may damage the finish.
NEVER clean any electrical appliance by immersing it in water. Using a soft clean cloth and detergent
and warm water, clean the exterior of the oven daily after use. Reconnect the oven. With the heaters
— 7 —

OFF, turn the conveyor speed to 5. Using a plastic abrasive pad, carefully wipe the conveyor belt in
a horizontal motion (side-to-side) to remove baked-on product. Wipe the conveyor in the same manner
with a hot damp cloth. When the open link of the conveyor is accessible at the front, turn the main power
switch OFF. WARNING: DISCONNECT ELECTRIC POWER.
1. Lift up to remove the top cover and top reflector.
2. Slide the bottom deflector pan out the side.
3. Remove the rear deflector by lifting over the supports.
4. Relax the conveyor chain by pressing down on the top of the chain and disconnect at the open
master link. When reconnecting the chain's master link, the weight of the chain holds it in place.
5. With the chain removed, the middle deflector pan and conveyor support rods can be removed.
6. Lift up to remove the exit tray; its support legs must be removed from the side pins.
7. Clean parts in a sink with warm soapy water, rinse, and wipe dry.
8. Reassemble all parts before returning oven to operation.
TOP
COVER
CONVEYOR
CHAIN
TOP
REFLECTOR
MIDDLE DEFLECTOR
BOTTOM DEFLECTOR
PAN
Fig. 2
MAINTENANCE
ADJUSTABLE
EXIT
TRAY
REAR DEFLECTOR
PAN
PL-52403
The drive motor bearings are permanently lubricated and do not require any lubrication maintenance.
The conveyor chain does not require any lubrication maintenance.
With reasonable care and periodic cleaning, the oven requires no customer applied maintenance.
SERVICE AND PARTS INFORMATION
WARNING: DISCONNECT ELECTRICAL POWER SUPPLY BEFORE SERVICING THE OVEN.
To obtain service and parts information concerning this oven, contact the Vulcan-Hart Service Agency
in your area (refer to listing supplied with the oven), or Vulcan-Hart Company Service Department at
the address or phone number shown on the front cover of this manual.
FORM 30995 (9-96) PRINTED IN U.S.A.
— 8 —
 Loading...