

Page 1
SERVICE MANUAL
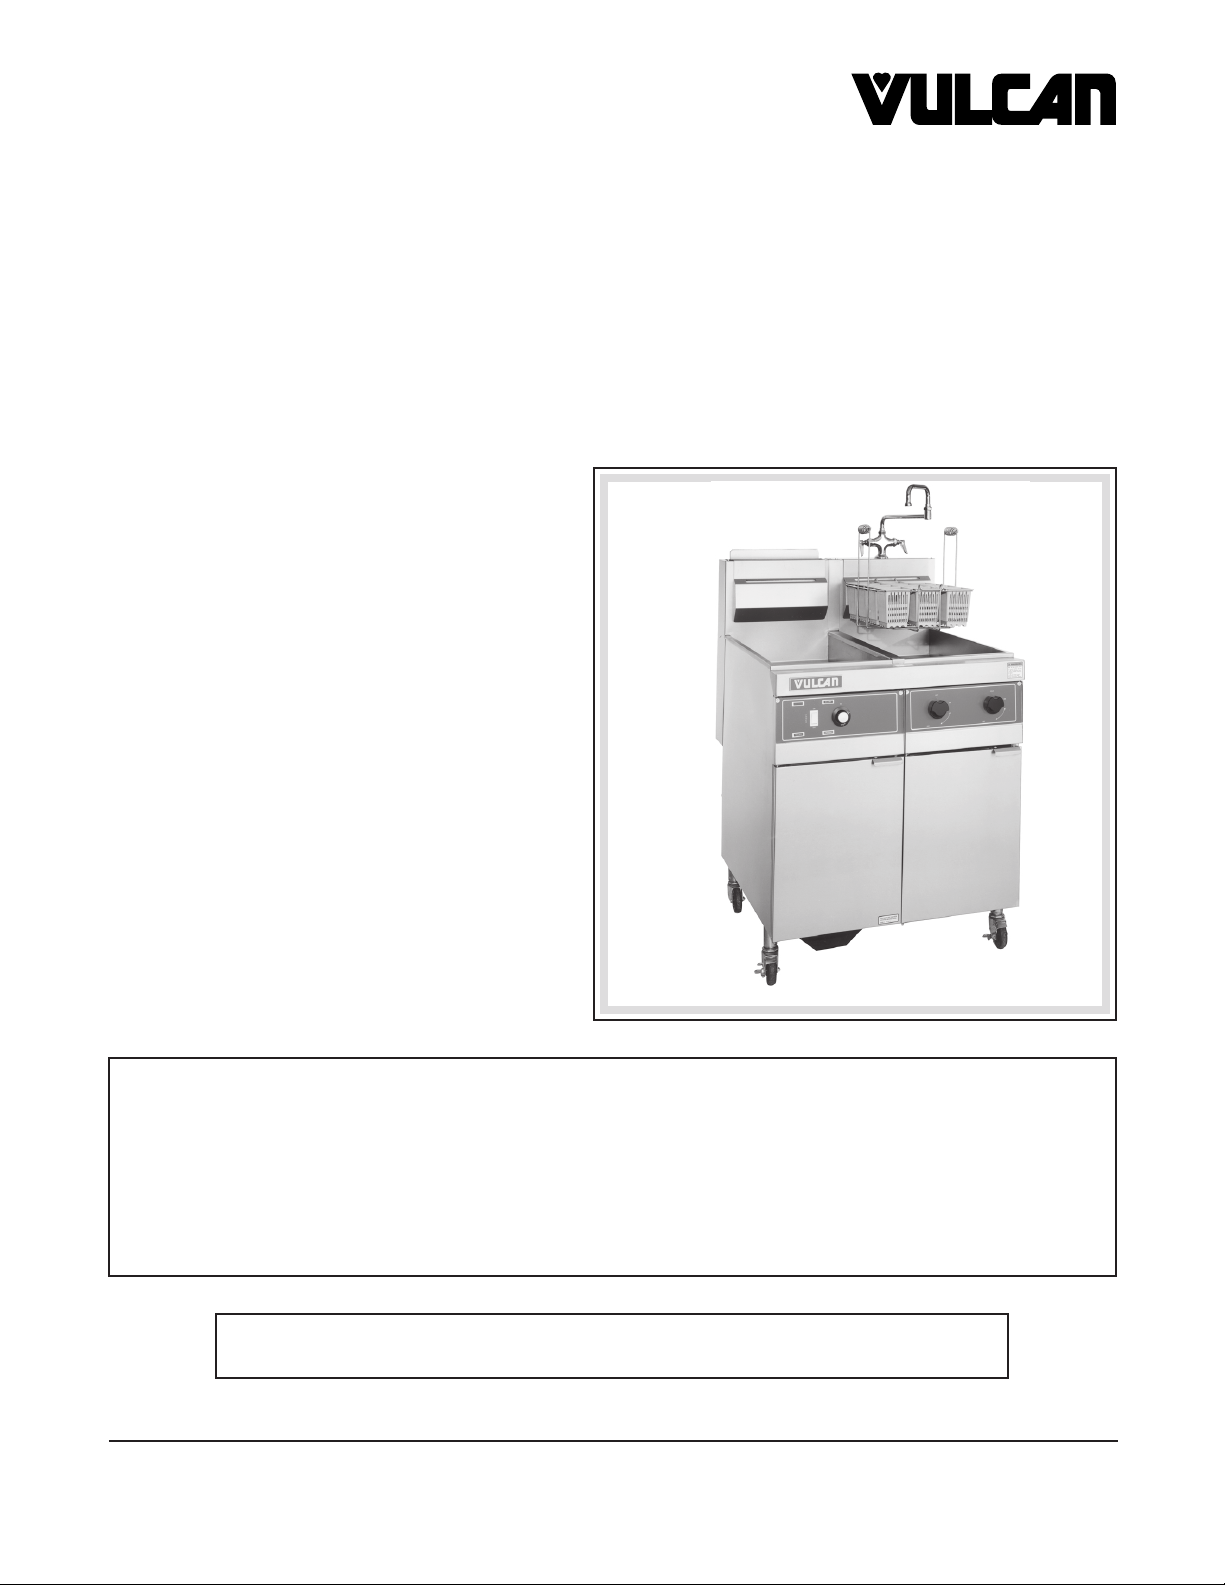
GPC SERIES GAS PASTA COOKERS
MODELS
GPC12 ML-126881
GPC12S ML-126883
GPC16 ML-126882
GPC16S ML-126884
– NOTICE –
This Manual is prepared for the use of trained Vulcan Service Technicians and should not be used by those not properly
qualified. If you have attended a Vulcan Service School for this product, you may be qualified to perform all the
procedures described in this manual.
This manual is not intended to be all encompassing. If you have not attended a Vulcan Service School for this product,
you should read, in its entirety, the repair procedure you wish to perform to determine if you have the necessary tools,
instruments and skills required to perform the procedure. Procedures for which you do not have the necessary tools,
instruments and skills should be performed by a trained Vulcan Service Technician.
Reproduction or other use of this Manual, without the express written consent of Vulcan, is prohibited.
For additional information on Vulcan-Hart Company or to locate an authorized
parts and service provider in your area, visit our website at www.vulcanhart.com
VULCAN-HART COMPANY, P.O. BOX 696, LOUISVILLE, KY 40201-0696, TEL. (502) 778-2791
FORM 31207 (April 2002)
Page 2

TABLE OF CONTENTS
GENERAL .............................................................................................................................................................. 4
Introduction ............................................................................................................................................... 4
Installation ................................................................................................................................................ 4
Operation................................................................................................................................................... 4
Cleaning .................................................................................................................................................... 4
Lubrication................................................................................................................................................. 4
Specifications ........................................................................................................................................... 4
Electrical Data .................................................................................................................................... 4
Gas Data............................................................................................................................................. 4
Tools ......................................................................................................................................................... 4
Standard ............................................................................................................................................. 4
REMOVAL AND REPLACEMENT OF PARTS ..................................................................................................... 5
Covers and Panels ................................................................................................................................... 5
Cooker Control Panel ......................................................................................................................... 5
Rinse Station Control Panel ............................................................................................................... 5
Upper and Lower Lift Mechanism Panels .......................................................................................... 6
Control Panel Components ....................................................................................................................... 7
Indicator Light ..................................................................................................................................... 7
Rocker Switches ................................................................................................................................7
Optional Basket Lift Timer ................................................................................................................. 7
Relay ................................................................................................................................................... 8
Thermostat ......................................................................................................................................... 8
Water Fittings ..................................................................................................................................... 9
Control Box Housing ................................................................................................................................10
Gas Burners .............................................................................................................................................10
High Limit .................................................................................................................................................11
Burner Nozzle and Orifice .......................................................................................................................12
Pilot Ignitor Assembly .............................................................................................................................13
Gas Combination Valve ...........................................................................................................................14
Overflow Hoses ........................................................................................................................................15
Cooker Tank Hose .............................................................................................................................15
Rinse Tank Hose ...............................................................................................................................15
Doors ........................................................................................................................................................16
Optional Basket Lift Assembly................................................................................................................16
Lifting Rod and Bracket..................................................................................................................... 16
Cam ................................................................................................................................................... 17
Cam Switch .......................................................................................................................................17
Cam Arm and Motor ..........................................................................................................................17
Power Supply Box ...................................................................................................................................18
Power Supply Box Internal Components.................................................................................................19
Ignitor Module ....................................................................................................................................19
Transformer .......................................................................................................................................19
Cooker Tank .............................................................................................................................................20
Rinse Tank ...............................................................................................................................................21
© VULCAN-HART COMPANY, 2002
– 2 –
Page 3

TABLE OF CONTENTS (Cont.)
SERVICE PROCEDURES AND ADJUSTMENTS ............................................................................................. 23
Gas Regulator Adjustment ..................................................................................................................... 23
Thermostat Calibration........................................................................................................................... 23
Optional Basket Lift Assembly ............................................................................................................... 24
Adjustment ....................................................................................................................................... 24
Timer Check ..................................................................................................................................... 24
Relay Check ..................................................................................................................................... 24
Micro Switch Check ......................................................................................................................... 24
Motor Check ..................................................................................................................................... 24
Transformer Check ................................................................................................................................25
High Limit Check .................................................................................................................................... 25
Verification of Spark at Ignitor ............................................................................................................... 25
ELECTRICAL OPERATION ................................................................................................................................26
Wiring Diagrams ..................................................................................................................................... 26
TROUBLESHOOTING ..........................................................................................................................................27
– 3 –
Page 4
GENERAL
INTRODUCTION
Procedures in this manual will apply to all models
unless specified. Pictures and illustrations can be of
any model unless the picture or illustration needs to
be model-specific.
Models GPC12S and GPC16S are equipped with an
additional tank, which is plumbed to both hot and cold
water. Some models are equipped with an optional
basket lift.
INSTALLATION
Generally, installations are made by the dealer or
contracted by the dealer or owner. Detailed installation
instructions are included in the Installation and
Operation Manual, which is sent with each unit.
OPERATION
Detailed operation instructions are included with each
pasta cooker in the Installation and Operation manual.
Gas Data
ledoM sebuT.oN tupnIUTB htdiW
21CPG3 000,09511/2"
S21CPG3 000,09"13
61CPG4 000,021"12
S61CPG4 000,021"24
TOOLS
Standard
• Hand tools (standard set)
• VOM with AC current tester (any quality VOM
with a sensitivity of at least 20,000 ohms per
volt can be used)
• Temperature tester (thermocouple-type)
CLEANING
Detailed cleaning procedures are included in the
Installation and Operation Manual.
LUBRICATION
Motor bearings are sealed and prelubricated.
SPECIFICATIONS
Electrical Data
ledoM stloV ztreH esahP spmA
,S21CPG,21CPG
S61SPG,61CPG
021061 2.31
• Manometer
– 4 –
Page 5
REMOVAL AND REPLACEMENT OF PARTS
COVERS AND PANELS
WARNING: DISCONNECT (UNPLUG) ELECTRICAL
POWER SUPPLY AND PLACE A TAG AT THE
DISCONNECT SWITCH INDICATING YOU ARE
WORKING ON THE CIRCUIT.
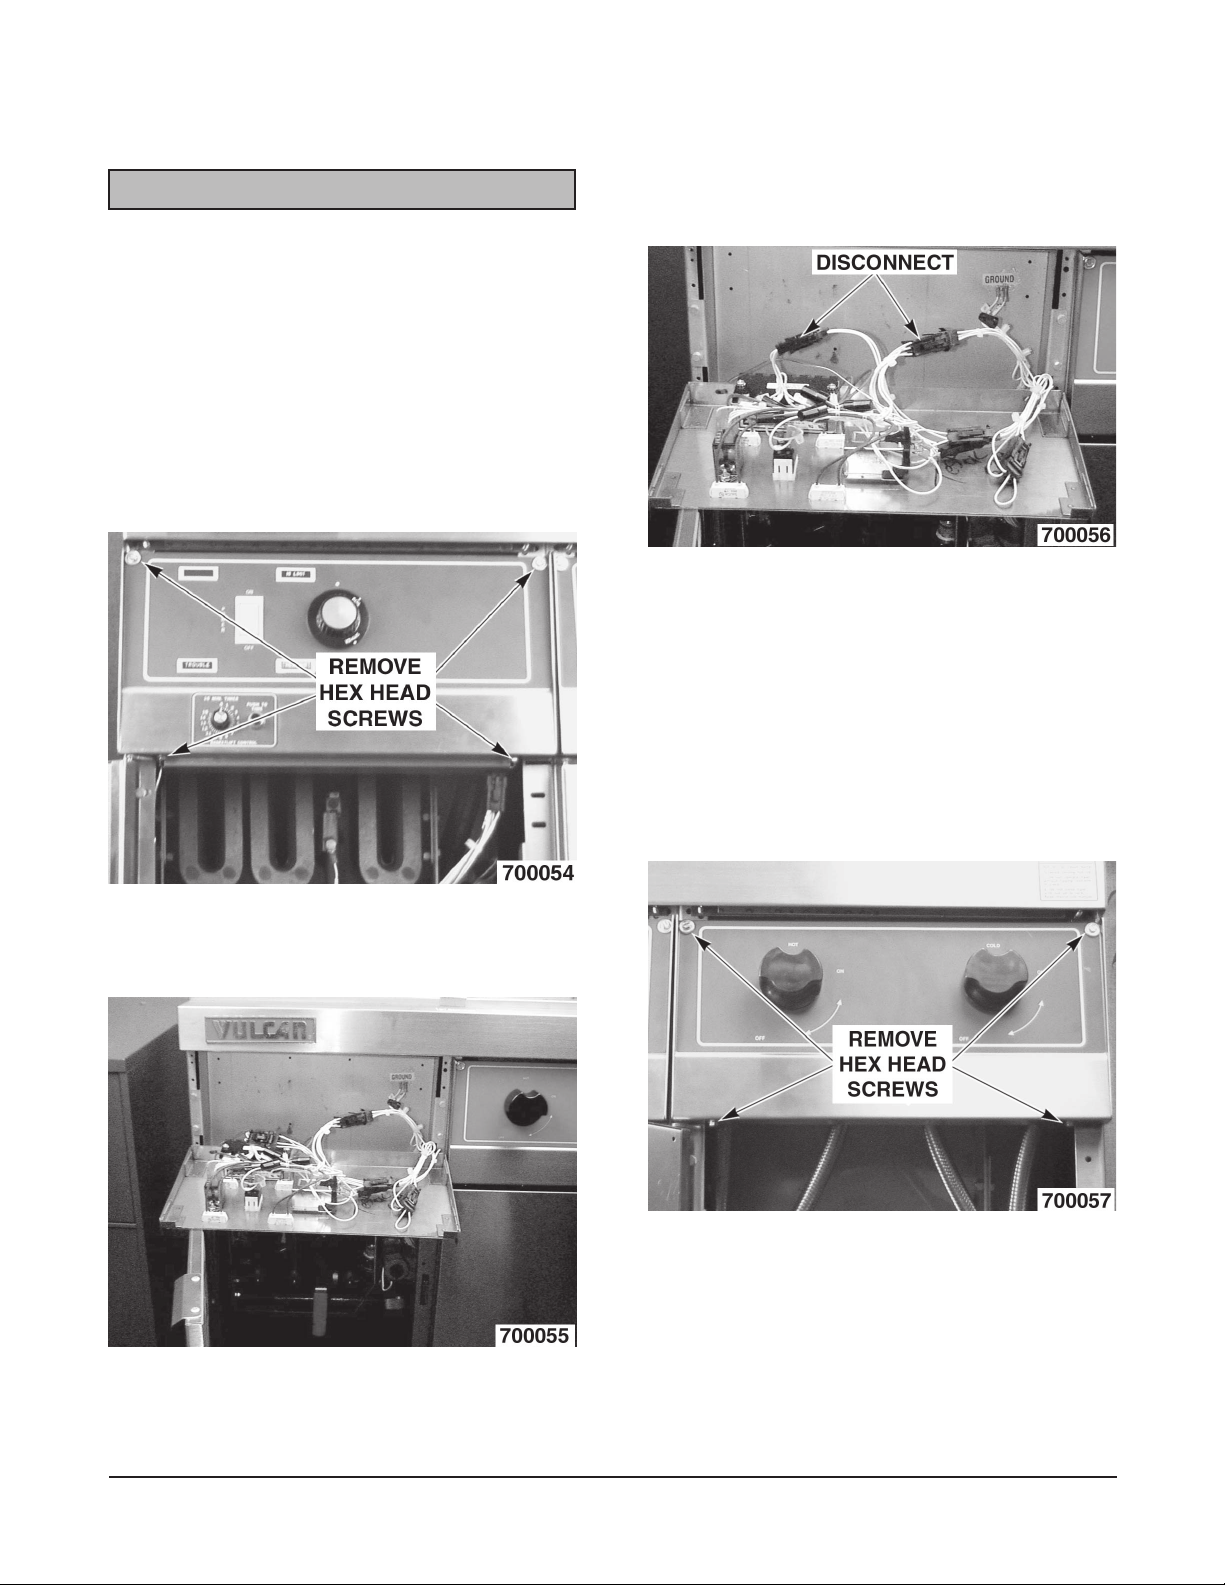
Cooker Control Panel
1. The control panel is secured with four hex
head screws, two on each side of the panel
and two under the flange. Remove these
screws.
3. Disconnect the main wire harness (two places)
and carefully remove the panel from the fryer.
4. Reverse the procedure to install.
Rinse Station Control Panel
WARNING: SHUT OFF WATER BEFORE
SERVICING.
2. Fold down the control panel.
1. The control panel is secured with four hex
head screws, two on each side of the panel
and two under the flange. Remove these
screws.
2. Lift the panel off.
– 5 –
Page 6
3. Disconnect the water hoses and remove the
panel from the rinse station.
4. Reverse the procedure to install.
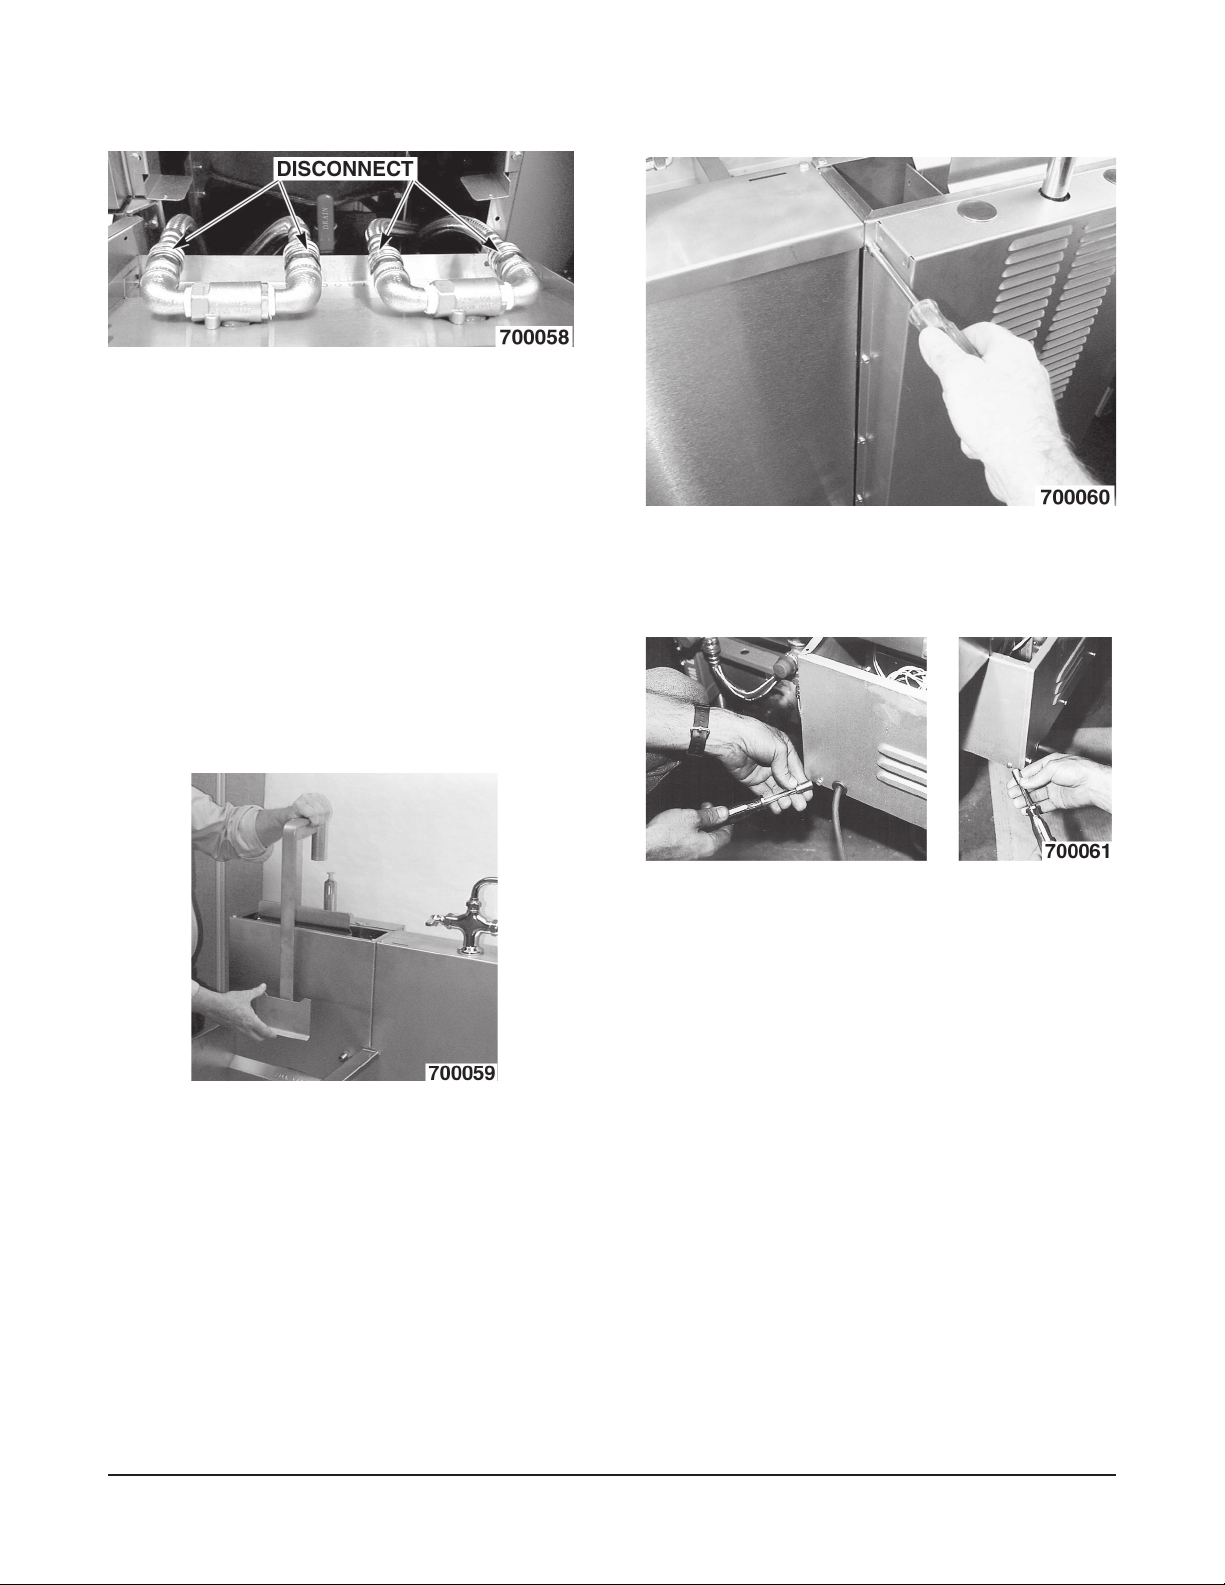
Upper and Lower Lift Mechanism Panels
WARNING: SHUT OFF THE GAS BEFORE
SERVICING.
WARNING: ALL GAS JOINTS DISTURBED DURING
SERVICING MUST BE CHECKED FOR LEAKS.
CHECK WITH SOAP AND WATER SOLUTION
(BUBBLES). DO NOT USE AN OPEN FLAME.
3. Remove hex head screws from the upper
panel.
4. Remove the head screws from the lower
panel.
1. Remove basket lift arm.
2. Disconnect tipping restraint. Disconnect gas
supply union at the rear of the pasta cooker.
5. Lift back up and over the lift mechanism.
6. Remove panel.
7. Reverse the procedure to reinstall panels.
– 6 –
Page 7
CONTROL PANEL COMPONENTS
WARNING: DISCONNECT (UNPLUG) ELECTRICAL
POWER SUPPLY AND PLACE A TAG AT THE
DISCONNECT SWITCH INDICATING YOU ARE
WORKING ON THE CIRCUIT.
Indicator Light
1. Remove the cooker control panel as outlined
under Covers and Panels.
2. From the rear of the control panel, unscrew
the wire cap of the light to be replaced.
3. Press the tabs on both sides of the indicator
light being replaced and pull the light out
through the front of the panel.
Optional Basket Lift Timer
1. Remove the cooker control panel as outlined
under Covers and Panels.
2. Remove all the wiring associated with the
timer.
3. With an 1/8" Allen wrench, loosen the setscrew
and remove the knob.
4. Reverse the procedure to install indicator
light.
Rocker Switches
1. Remove the cooker control panel as outlined
under Covers and Panels.
2. Remove the wire leads from the rocker switch
terminals.
3. Press the tabs on both sides of the switch
and push it through the front of the control
panel. Retain the switch backup plate for
reassembly.
4. Reverse the procedure to install new rocker
switch.
4. Remove the timer mounting hardware and
remove the timer.
5. Reverse the procedure to install new timer.
– 7 –
Page 8
Relay
1. Remove the cooker control panel as outlined
under Covers and Panels.
2. Remove all the wiring associated with the
relay.
3. Remove the two holding nuts and pull the
relay off of the panel.
4. Reverse the procedure to install new relay.
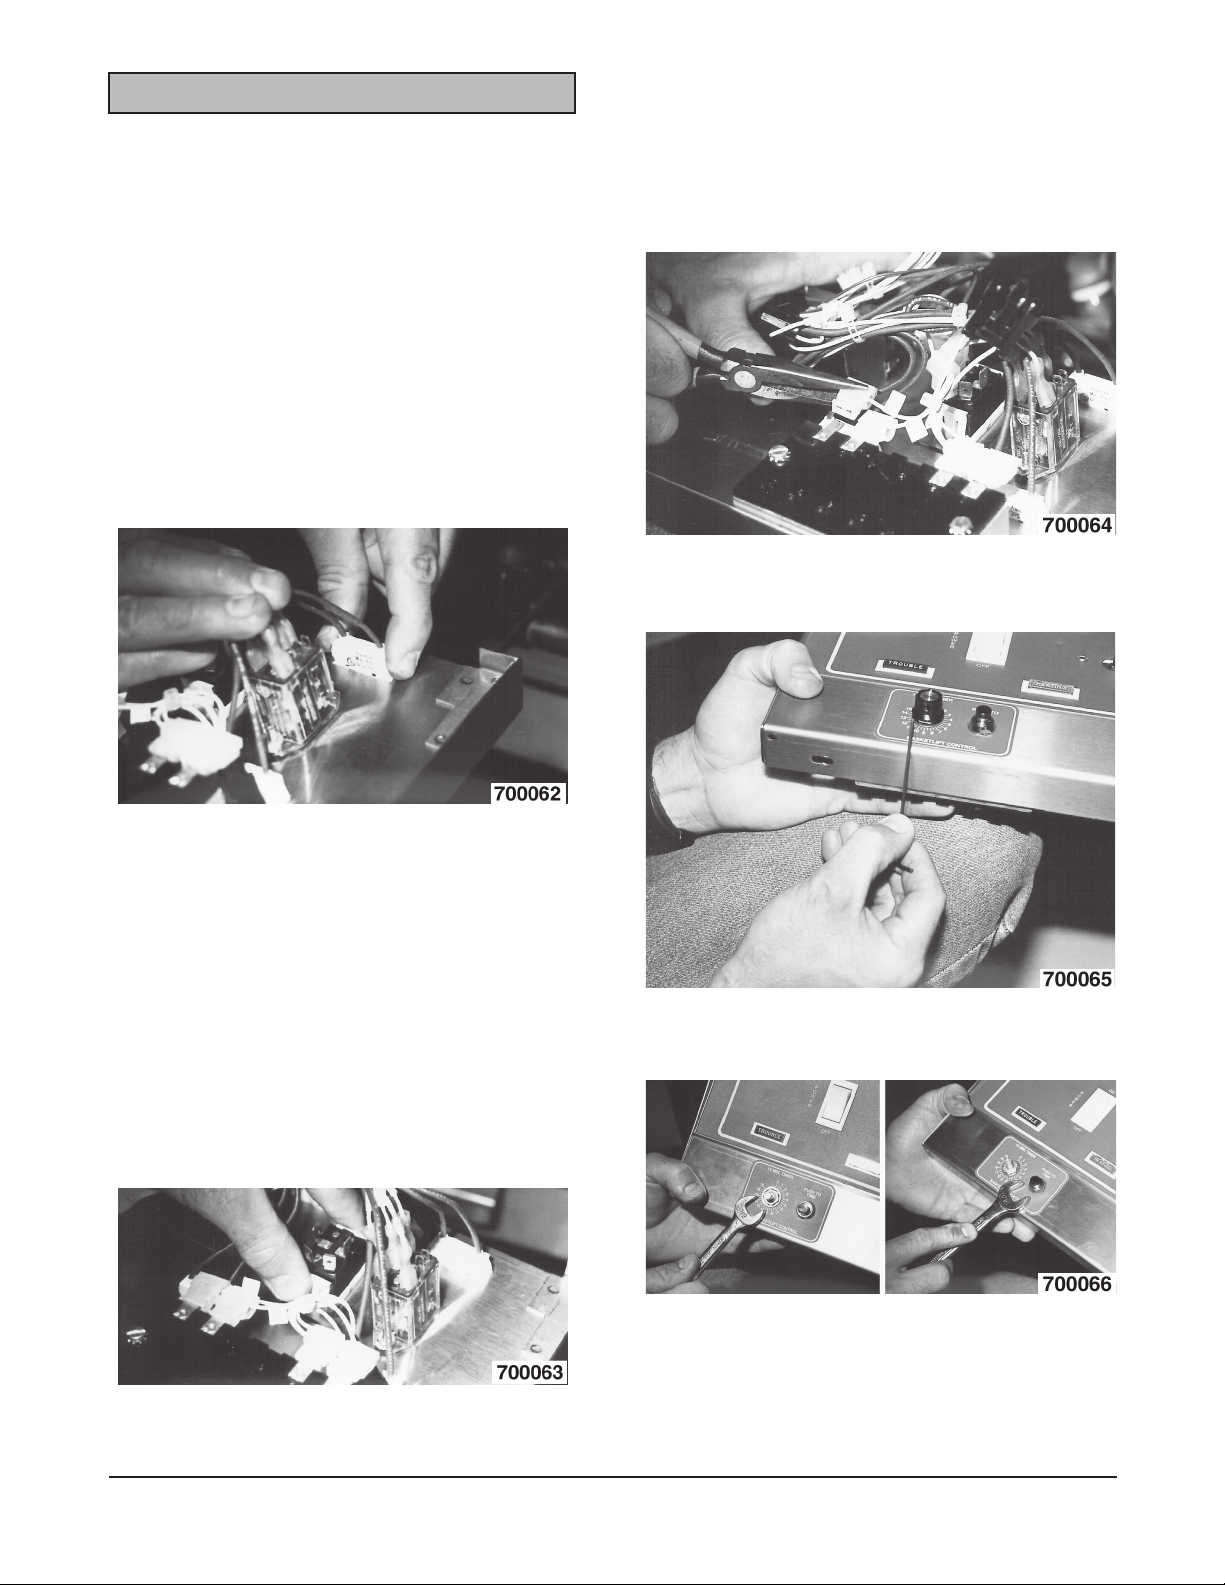
Thermostat
1. Drain all the water from the cooker tank.
5. Remove all the wiring associated with the
thermostat.
6. Follow the thermostat capillary to the packing
nut located on the bottom of the cooker tank.
7. Access to the packing nut can be gained
through the rinse station door on the right
side of the pasta cooker. Remove the packing
nut then remove the thermostat mounting
nut.
NOTE: If more room is required to reach the packing
nut, the right burner may be removed in front of the
cooker tank (see Gas Burners).
2. Remove the cooker control panel as outlined
under Covers and Panels.
3. Remove knob.
4. Remove the two screws securing the
thermostat to the panel.
– 8 –
Page 9

8. Remove the thermostat bulb from the tank
mounting brackets.
9. Reverse the procedure to install new
thermostat.
Water Fittings
3. Disconnect the water hoses and remove the
control panel from the rinse station.
NOTE: When hose fittings are removed, inspect the
hose washers for cracking and wear. Replace with
new washers if needed.
4. Remove the two screws securing the water
fittings to the control panel and remove the
fittings.
WARNING: SHUT OFF WATER BEFORE
SERVICING.
1. Remove the rinse station control panel as
outlined under Covers and Panels.
2. With an 1/8" Allen wrench, loosen the
setscrews and remove the knobs.
5. Reverse the procedure to install new water
fittings.
– 9 –
Page 10

CONTROL BOX HOUSING
GAS BURNERS
WARNING: DISCONNECT (UNPLUG) ELECTRICAL
POWER SUPPLY AND PLACE A TAG AT THE
DISCONNECT SWITCH INDICATING YOU ARE
WORKING ON THE CIRCUIT.
1. Remove the cooker control panel as outlined
under Covers and Panels.
2. Disconnect the wire harness located on the
bottom right side of the control housing.
WARNING: DISCONNECT (UNPLUG) ELECTRICAL
POWER SUPPLY AND PLACE A TAG AT THE
DISCONNECT SWITCH INDICATING YOU ARE
WORKING ON THE CIRCUIT.
WARNING: SHUT OFF THE GAS BEFORE
SERVICING.
1. Remove the cooker control panel as outlined
under Covers and Panels.
2. Remove the control box housing as outlined
under Control Box Housing.
3. There are three burners located in front of the
cooker tank. Loosen the bolts above each
burner.
3. Remove the four hex head screws holding the
control box housing to the frame.
4. Remove the control box housing.
5. Reverse the procedure to install.
4. Grasp the burner body and push it upward
over the burner nozzle. Tilt the burner head
back and pull out.
5. Reverse the procedure to install.
– 10 –
Page 11

HIGH LIMIT
WARNING: DISCONNECT (UNPLUG) ELECTRICAL
POWER SUPPLY AND PLACE A TAG AT THE
DISCONNECT SWITCH INDICATING YOU ARE
WORKING ON THE CIRCUIT.
1. Drain all the water from the cooker tank.
2. Remove the left burner for direct access to
the high limit. See Gas Burners for removal.
3. Remove the electrical wiring from the high
limit.
5. Remove the two holding hex head screws
securing the mounting bracket to the high
limit.
4. Remove the two nuts and bolts securing the
high limit mounting bracket to the frame.
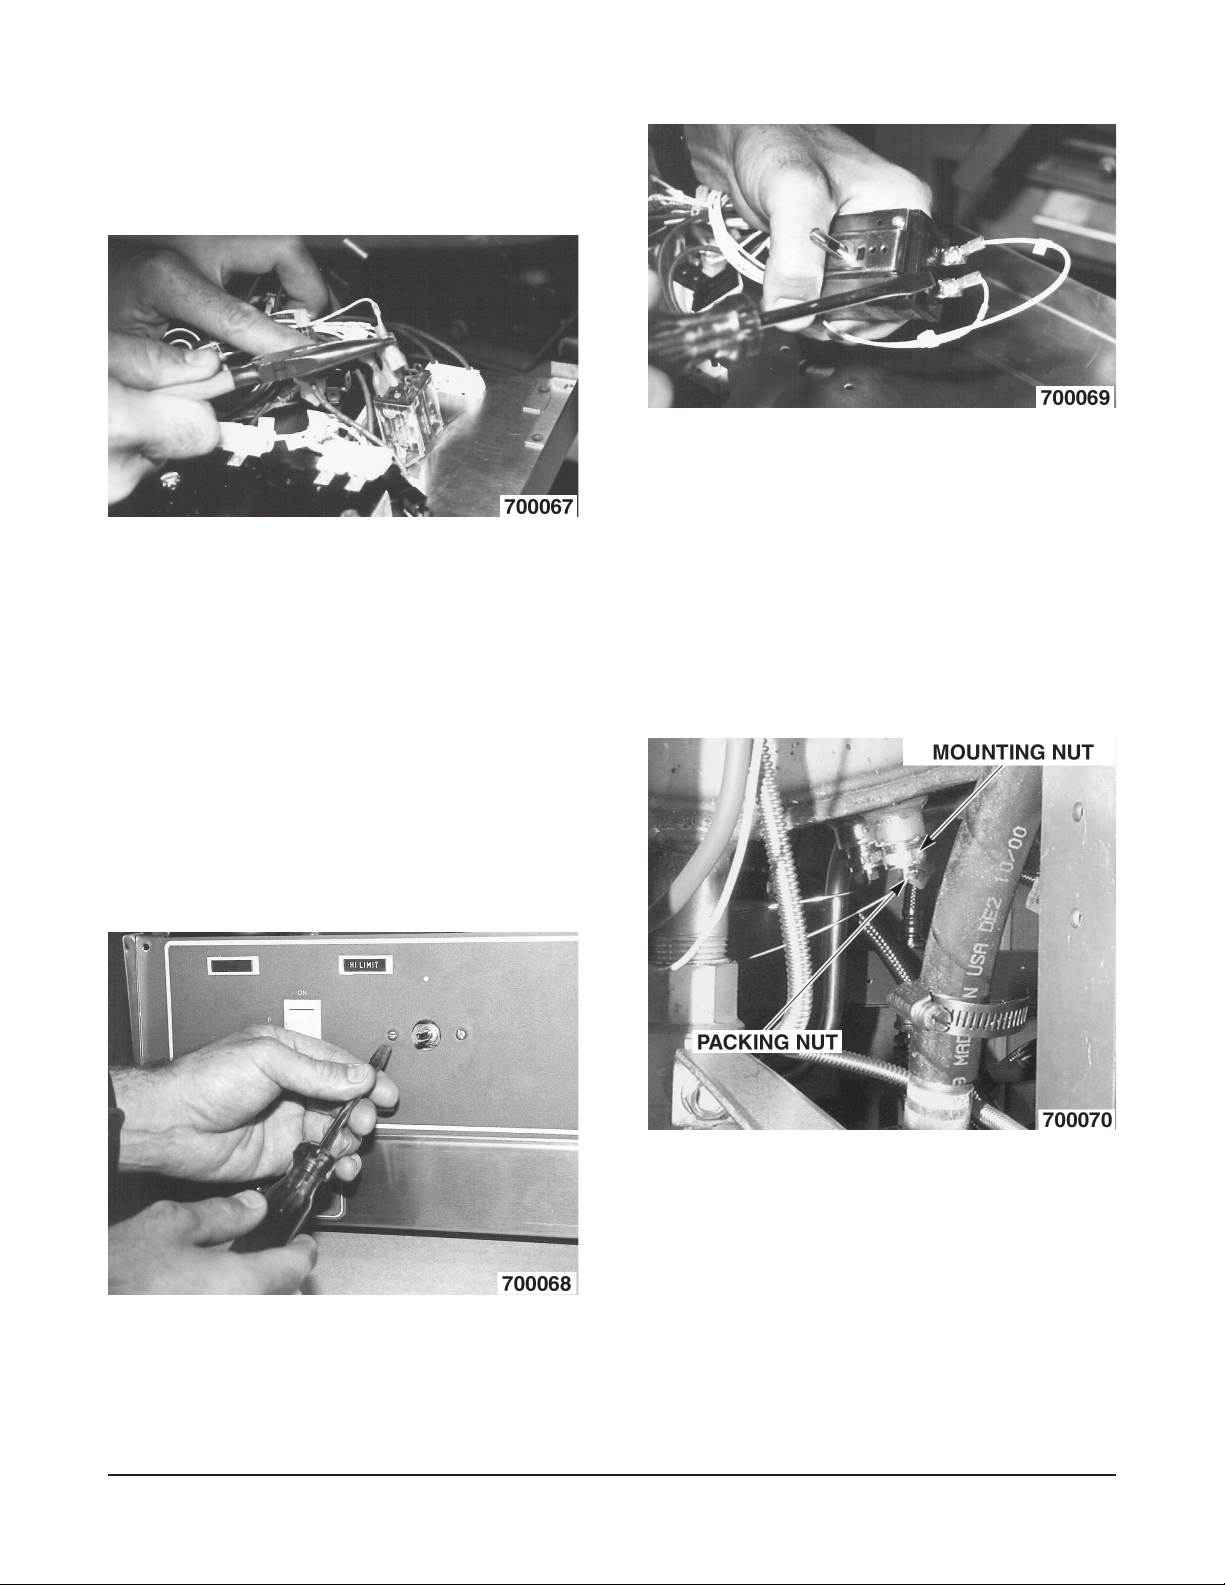
6. Follow the high limit capillary to the packing
nut located on the bottom of the cooker tank.
7. Access to the packing nut can be gained
through the rinse station door on the right
side of the pasta cooker. Remove the packing
nut then remove the high limit mounting nut.
NOTE: If more room is required to reach the packing
nut the right burner may be removed. See Gas
Burners for removal.
– 11 –
Page 12

8. Remove the high limit bulb from the tank
mounting brackets.
9. Reverse procedures to install new high limit.
NOTE: When installing a new high limit, take care not
to kink the capillary.
BURNER NOZZLE AND ORIFICE
WARNING: DISCONNECT (UNPLUG) ELECTRICAL
POWER SUPPLY AND PLACE A TAG AT THE
DISCONNECT SWITCH INDICATING YOU ARE
WORKING ON THE CIRCUIT.
WARNING: SHUT OFF THE GAS BEFORE
SERVICING.
WARNING: ALL GAS JOINTS DISTURBED DURING
SERVICING MUST BE CHECKED FOR LEAKS.
CHECK WITH SOAP AND WATER SOLUTION
(BUBBLES). DO NOT USE AN OPEN FLAME.
1. Remove the burners as outlined under Gas
Burners.
2. Hold the burner nozzle with channel locks
and remove the orifice.
– 12 –
3. With channel locks remove the burner nozzle.
4. Reverse procedure to install new burner nozzle
and orifice.
Page 13

PILOT IGNITOR ASSEMBLY
WARNING: DISCONNECT (UNPLUG) ELECTRICAL
POWER SUPPLY AND PLACE A TAG AT THE
DISCONNECT SWITCH INDICATING YOU ARE
WORKING ON THE CIRCUIT.
WARNING: SHUT OFF THE GAS BEFORE
SERVICING.
WARNING: ALL GAS JOINTS DISTURBED DURING
SERVICING MUST BE CHECKED FOR LEAKS.
CHECK WITH SOAP AND WATER SOLUTION
(BUBBLES). DO NOT USE AN OPEN FLAME.
1. Remove the cooker control panel as outlined
under Covers and Panels.
2. Remove the control box housing as outlined
under Control Box Housing.
3. Remove the burners as outlined under Gas
Burners.
4. Pull the ignition cable from the spark ignitor.
6. With an offset screwdriver, remove the two
screws from the ignitor/pilot holding bracket
and pull the assembly from the cooker tank.
5. Loosen the pilot tube compression nut.
7. Reverse the procedure to install new pilot
ignitor assembly.
– 13 –
Page 14

GAS COMBINATION VALVE
WARNING: DISCONNECT (UNPLUG) ELECTRICAL
POWER SUPPLY AND PLACE A TAG AT THE
DISCONNECT SWITCH INDICATING YOU ARE
WORKING ON THE CIRCUIT.
WARNING: SHUT OFF THE GAS BEFORE
SERVICING.
WARNING: ALL GAS JOINTS DISTURBED DURING
SERVICING MUST BE CHECKED FOR LEAKS.
CHECK WITH SOAP AND WATER SOLUTION
(BUBBLES). DO NOT USE AN OPEN FLAME.
1. Remove all wiring associated with the
combination valve.
3. Loosen the gas line compression fitting at
the elbow on top of the combination valve.
4. Loosen the gas line union fitting below the
combination valve.
2. Loosen the pilot tube compression nut at the
combination valve.
5. Remove the combination valve.
6. Reverse procedure to install new combination
valve.
– 14 –
Page 15

OVERFLOW HOSES
WARNING: DISCONNECT (UNPLUG) ELECTRICAL
POWER SUPPLY AND PLACE A TAG AT THE
DISCONNECT SWITCH INDICATING YOU ARE
WORKING ON THE CIRCUIT.
Cooker Tank Hose
1. Drain all the water from the cooker tank.
2. Remove the cooker control panel as outlined
under Covers and Panels.
3. Remove the control box housing as outlined
under Control Box Housing.
4. Remove the hose clamps on the top of the
hose.
Rinse Tank Hose
1. Drain all the water from the rinse tank.
2. Remove the rinse tank control panel as
outlined under Covers and Panels.
3. Remove the hose clamps on the top of the
hose.
4. Remove the hose clamps on the bottom of
the hose.
5. Remove the hose clamps on the bottom of
the hose.
6. Pull the hose from the top drain tube and the
and the bottom T-fitting.
7. Reverse the procedure to install new overflow
hose.
5. Pull the hose from the top drain tube and the
and the bottom elbow fitting.
6. Reverse the procedure to install new overflow
hose.
– 15 –
Page 16

DOORS
1. There are two doors on the pasta cooker.
Open the door to be removed.
2. Loosen the nuts and bolts securing the
mounting bracket to the frame.
OPTIONAL BASKET LIFT ASSEMBLY
WARNING: DISCONNECT (UNPLUG) ELECTRICAL
POWER SUPPLY AND PLACE A TAG AT THE
DISCONNECT SWITCH INDICATING YOU ARE
WORKING ON THE CIRCUIT.
Lifting Rod and Bracket
1. Remove basket lift arm.
3. Remove the door.
4. Reverse the procedure to install.
2. Remove upper and lower panels as outlined
under Lifting Mechanism Panels.
3. Remove the nut that attaches the lifting rod
to the lifting bar.
– 16 –
4. Remove the hex head screws from the lifting
rod holding bracket.
5. Reverse the procedure to install new lift rod
and bracket.
Page 17

Cam
Cam Switch
1. Remove upper and lower panels as outlined
under Lifting Mechanism Panels.
2. Remove the bottom nut from the lifting bar,
and move it to the side.
3. Remove the two screws from the crank arm
holding the cam.
1. Remove the two nuts and bolts holding the
cam switch to the motor mounting bracket.
2. Remove wiring from the cam switch.
3. Remove the cam switch.
Crank Arm and Motor
4. Remove the cam.
1. Remove all the wiring from the motor.
– 17 –
Page 18

2. Remove the two set screws on the crank arm
and the four screws holding the motor to the
mounting bracket.
3. Remove the nuts and bolts securing the
electrical cord holding straps (two places).
3. Remove the crank arm and motor.
4. Reverse procedures to install all components.
POWER SUPPLY BOX
WARNING: DISCONNECT (UNPLUG) ELECTRICAL
POWER SUPPLY AND PLACE A TAG AT THE
DISCONNECT SWITCH INDICATING YOU ARE
WORKING ON THE CIRCUIT.
1. Remove the upper and lower lift mechanism
panel as outlined under Upper and Lower Lift
Mechanism Panels in Covers and Panels.
2. Disconnect the wiring harness from the power
supply box (two places).
4. Pull the ignition cable from the spark ignitor,
and remove the wire attached to the pilot
ignitor assembly bracket.
5. Loosen the two bolts on the bottom of the
power supply box.
– 18 –
6. Slide the power supply box forward and down
to remove.
7. Reverse the procedure to reinstall power
supply box.
Page 19

POWER SUPPLY BOX INTERNAL
COMPONENTS
WARNING: DISCONNECT (UNPLUG) ELECTRICAL
POWER SUPPLY AND PLACE A TAG AT THE
DISCONNECT SWITCH INDICATING YOU ARE
WORKING ON THE CIRCUIT.
To access the power box internal components, remove
the two screws securing the power supply box cover.
Transformer
1. Disconnect all wiring associated with the
transformer.
Ignitor Module
1. Disconnect all wiring associated with the
ignitor module.
2. Remove the four screws holding the ignitor
module.
2. Remove the two screws holding the
transformer.
3. Reverse the procedure to install new
transformer.
3. Reverse the procedure to install new ignitor
module.
– 19 –
Page 20

COOKER TANK
WARNING: DISCONNECT (UNPLUG) ELECTRICAL
POWER SUPPLY AND PLACE A TAG AT THE
DISCONNECT SWITCH INDICATING YOU ARE
WORKING ON THE CIRCUIT.
WARNING: SHUT OFF THE GAS BEFORE
SERVICING.
WARNING: SHUT OFF WATER BEFORE
SERVICING.
1. Remove basket and basket hanger.
2. Drain cooker tank.
3. Remove the basket lift arm.
4. Remove the upper and lower back panels as
outlined under Covers and Panels.
5. Remove the cooker control panel as outlined
under Cooker Control Panel in Covers and
Panels.
13. Remove the two hex head screws at the top
of the flue box.
14. Remove the center strip between the cooker
and rinse tank.
6. Remove the control box housing as outlined
under Control Box Housing.
7. Remove the burners as outlined under
Burners.
8. Remove the pilot ignitor assembly as outlined
under Pilot Ignitor Assembly.
9. Remove the thermostat bulb as outlined under
Thermostat Removal in Control Panel
Components.
10. Remove the high limit bulb as outlined under
High Limit.
11. Remove the cooker tank overflow hose as
outlined under Cooker Tank Hose in Overflow
Hoses.
12. Remove the four nuts and bolts from the tank
support bracket.
15. Disconnect the center rubber drain hose.
16. Disconnect the fill port spray nozzle water
fitting from the rear of the pasta cooler.
– 20 –
Page 21

17. Remove the fill port spray nozzle.
NOTE: When reinstalling, the fill port spray nozzle
should be pointed down and angled slightly to
the right. When operating, the spray pattern
should spray the entire width of the tank.
18. With the assistance of another person, stand
in front of the pasta cooker and grasp the
back and the front of the tank. Carefully tilt
the tank back forward and lift the tank out the
pasta cooker body.
RINSE TANK
WARNING: DISCONNECT (UNPLUG) ELECTRICAL
POWER SUPPLY AND PLACE A TAG AT THE
DISCONNECT SWITCH INDICATING YOU ARE
WORKING ON THE CIRCUIT.
WARNING: SHUT OFF THE GAS BEFORE
SERVICING.
WARNING: SHUT OFF WATER BEFORE
SERVICING.
1. Remove basket hanger, basket support rack
and basket.
2. Drain rinse tank.
3. Remove the rinse station control panel as
outlined under Rinse Station Control Panel in
Covers and Panels.
4. Remove the rinse tank overflow hose as
outlined under Rinse Tank Hose in Overflow
Hoses.
5. Remove the four nuts and bolts from the tank
support bracket.
19. Reverse procedure to install. Retain the
controls and hardware for reassembly to the
new tank.
6. Remove the two hex head screws at the top
of the rinse station box.
– 21 –
Page 22

7. Remove the center strip between the cooker
and rinse tank.
8. Disconnect the center rubber drain hose.
10. With the assistance of another person, stand
in front of the pasta cooker and grasp the
back and the front of the tank. Carefully tilt
the tank back forward and lift the tank out of
the pasta cooker body (see step 18 under
Cooker Tank).
11. Remove the rinse station faucet assembly.
12. Reverse procedure to install. Retain the
controls and hardware for reassembly to the
new tank.
9. Disconnect the water fill hose fittings from
the rear of the of the pasta cooker.
– 22 –
Page 23

SERVICE PROCEDURES AND ADJUSTMENTS
WARNING: CERTAIN PROCEDURES IN THIS SECTION REQUIRE ELECTRICAL TEST OR MEASUREMENTS
WHILE POWER IS APPLIED TO THE MACHINE. EXERCISE EXTREME CAUTION AT ALL TIMES. IF TEST
POINTS ARE NOT EASILY ACCESSIBLE, DISCERN POWER, ATTACH TEST EQUIPMENT AND REAPPLY
POWER TO TEST.
GAS REGULATOR ADJUSTMENT
WARNING: DISCONNECT (UNPLUG) ELECTRICAL
POWER SUPPLY AND PLACE A TAG AT THE
DISCONNECT SWITCH INDICATING YOU ARE
WORKING ON THE CIRCUIT.
WARNING: SHUT OFF THE GAS BEFORE
SERVICING.
Accurate gas pressure adjustments can only be
made with the gas on and the burner lit. If the
incoming line pressure to the valve is less than the
minimum stated, then the pressure cannot be set
correctly.
1. Remove the plug from the bottom port of the
gas valve.
A. To adjust, remove the cap covering the
manifold pressure adjustment screw. Turn
the recessed manifold pressure
adjustment screw counterclockwise to
decrease pressure or clockwise to
increase pressure.
THERMOSTAT CALIBRATION
WARNING: DISCONNECT (UNPLUG) ELECTRICAL
POWER SUPPLY AND PLACE A TAG AT THE
DISCONNECT SWITCH INDICATING YOU ARE
WORKING ON THE CIRCUIT.
2. Install a hose barb adapter and attach the
manometer tube. Turn the gas supply to the
pasta cooker back on.
3. Connect power.
4. Set the thermostat to BOIL. The burner must
be lit during test and adjustment.
5. Read the manometer. The manifold pressure
reading should match the pressure rating on
the data plate.
WARNING: SHUT OFF THE GAS BEFORE
SERVICING.
1. Set the thermostat to BOIL and allow the
temperature to stabilize (at least three
minutes).
2. Place a temperature tester near the tank
probe tubes.
3. The water temperature reading of the
temperature tester should be 225°F ±10°F.
4. If the thermostat needs adjusted, remove the
knob and insert a small flat head screwdriver
into the slotted shaft.
5. Turn the small adjusting screw until the
temperature tester has a reading of 225°F
±10°F. Turn the screw clockwise to increase
temperature and counterclockwise to
decrease temperature . One-quarter turn will
change the temperature by 18°F.
– 23 –
Page 24

OPTIONAL BASKET LIFT ASSEMBLY
WARNING: DISCONNECT (UNPLUG) ELECTRICAL
POWER SUPPLY AND PLACE A TAG AT THE
DISCONNECT SWITCH INDICATING YOU ARE
WORKING ON THE CIRCUIT.
Adjustment
1. Allow pasta cooker to cool.
2. Remove the cooker basket.
3. Pull the lift arm from the cooker.
Relay Check
1. Remove the lower lift mechanism panel as
outlined under Covers and Panels in Removal
and Replacement of Parts.
2. Connect power and switch to ON.
3. Check for 0 ohms between connections 5 and
3, 6 and 4.
4. Turn the power OFF and disconnect.
5. Check for coil resistance of above 168 ohms.
Also check for continuity of 0 ohms across
connections 1 and 5, 0 and 6.
4. Turn the adjustment bolt to raise or lower the
basket as needed.
Timer Check
1. Remove the cooker control panel as outlined
under Covers and Panels in Removal and
Replacement of Parts.
2. Check for good wire connection at the
terminals.
3. Connect power and switch to ON.
Micro Switch Check
1. Remove the lower lift mechanism panel as
outlined under Covers and Panels in Removal
and Replacement of Parts.
2. Remove switch wiring.
3. Engage the switch and check for continuity
across the common and normally open
circuits.
Motor Check
1. Remove the lower lift mechanism panel as
outlined under Covers and Panels in Removal
and Replacement of Parts.
2. Connect power and check for voltage to the
motor.
3. Verify the motor voltage agrees with the
voltage on the data plate.
4. Disconnect power and disconnect the motor
wires at the motor terminals.
4. Check for 24 VAC across the input terminals
of L1 and L2.
5. Check for 24 VAC across the load terminals
after pushing the timer button and setting the
timer. The reading should remain constant at
24 VAC until the timer runs out.
5. Check for 28 ohms of resistance across the
terminals.
– 24 –
Page 25

TRANSFORMER CHECK
WARNING: DISCONNECT (UNPLUG) ELECTRICAL
POWER SUPPLY AND PLACE A TAG AT THE
DISCONNECT SWITCH INDICATING YOU ARE
WORKING ON THE CIRCUIT.
1. Remove the power supply box as outlined
under Power Supply Box in Removal and
Replacement of Parts.
2. Connect power and check the primary and
secondary voltages. They should match the
voltages marked on the transformer.
HIGH LIMIT CHECK
WARNING: DISCONNECT (UNPLUG) ELECTRICAL
POWER SUPPLY AND PLACE A TAG AT THE
DISCONNECT SWITCH INDICATING YOU ARE
WORKING ON THE CIRCUIT.
1. Turn the pasta cooker ON.
2. Set the temperature to BOIL.
VERIFICATION OF SPARK AT
IGNITOR
WARNING: DISCONNECT (UNPLUG) ELECTRICAL
POWER SUPPLY AND PLACE A TAG AT THE
DISCONNECT SWITCH INDICATING YOU ARE
WORKING ON THE CIRCUIT.
WARNING: SHUT OFF THE GAS BEFORE
SERVICING.
1. Remove the cooker control panel as outlined
under Covers and Panels.
2. Remove the control box housing as outlined
under Control Box Housing.
3. Disconnect the ignition cable from the spark
ignitor.
4. Clamp the ignition cable in a manner that will
position the end of the cable 3/16" from the
oven frame (bare metal surface). It is critical
that the cable be held 3/16" away from the
surface of the oven frame, or sparking may
not occur even though the sparking circuit is
functioning properly.
3. Place pyrometer in tank near the probe tubes.
4. The high limit should trip between 235°F to
265°F.
WARNING: THE FOLLOWING STEPS REQUIRE
POWER TO BE APPLIED TO THE UNIT DURING
THE TEST. USE EXTREME CAUTION AT ALL
TIMES. GAS SUPPLY SHOULD BE OFF.
5. Plug the pasta cooker in and set the
temperature controller to BOIL.
6. Turn the power switch ON.
7. Arcing from the ignition cable to the frame
should be observed.
– 25 –
Page 26

ELECTRICAL OPERATION
WIRING DIAGRAMS
– 26 –
Page 27

TROUBLESHOOTING
SMOTPMYS
.etingitonseodsaG
.krapsoN
.etingitonseodsagtubskrapS
.emalfniatniamtonlliwtubsetingisaG
.taehwolroevissecxE
.evitareponiremrofsnarT
.nepotatsomrehttimilhgiH
.noitcnuflameludomnoitingI
.desolcevlavsaglaunaM
.noitcnuflameludomnoitingI
.evitareponidnuorgrotingI
.erusserpsagtneiciffusnI
.noitcnuflameborperutarepmeT
.noitcnuflamlortnocerutarepmeT
.tneiciffusnierusserpsaG
SESUACELBISSOP
.esnesemalf/retinginoedortceledetrohS
.NEPO)egatlovhgih(elbacrotingI
.noitcnuflamyalerlortnocerutarepmeT
.noitcnuflamgniriwgnitcennocretnI
.evitareponiroffoevlavdionelossaG
.erusserpsagtneiciffusniroffoylppussaG
.noitcnuflamgniriwgnitcennocretnI
.noitcnuflamsnoitcennocdaelrotingI
.detsujdalamronoitcnuflamesnesemalf/rotingI
.eludomnoitingiotremrofsnartmorfytiraloptcerrocnI
.detcurtsborodeggulpecifirosaG
tonroevitareponiremitlacinahceM
.ylreporpgninoitcnuf
– 27 –
.tcerrocniegatloveniL
.noitcnuflamremiT
.noitcnuflamgniriwgnitcennocretnI
Page 28

NOTES
FORM 31207 (April 2002) PRINTED IN U.S.A.
– 28 –
 Loading...