

Falls Sie dies vorziehen, können Sie sich stattdessen auch auf unserer Website unter www.hagen.com registrieren.
Para el registro en línea, visite nuestro sitio web en www.hagen.com
To register online, visit our website at www.hagen.com • Pour l’enregistrement en ligne, visiter notre site Web à www.hagen.com
WF10 5QH
Rolf C. Hagen (U.K.) Ltd.
Castleford, W. Yorkshire
UK
Baie d’Urfé, Québec H9X 0A2
20500 Trans Canada Hwy,
Rolf C. Hagen Inc.
CANADA
Registrierungskarte aus und schicken Sie sie an uns zurück.
besser betreuen können, füllen Sie bitte diese
Bitte zurücksenden zur Erhaltung der Garantie. Damit wir Sie
GARANTIE-REGISTRIERUNGSKARTE
When complete, place Warranty Registration Card in an
envelope, affix correct postage and mail to:
WARRANTY REGISTRATION CARD
www.hagen.com
F-77388 Combs la Ville.
Av. De Beniparrell n. 11 y 13
46460 Silla, Valencia
Hagen France SA.,
FRANCE
Rolf C. Hagen España S.A.,
ESPAÑA
Mansfield, MA. 02048
25488 Holm
Rolf C. Hagen (U.S.A.) Corp.,
305 Forbes Blvd,
HAGEN Deutschland
GmbH & Co. KG,
U.S.A.
GERMANY
en u
n sobre debidamente franqueado y envíela a:
Una vez llenada, coloque la tarjeta de registro de la garantía
TARJETA DE REGISTRO DE LA GARANTÍA
enveloppe suffisamment affranchie et poster à :
Déposer la carte de garantie dûment remplie dans une
CARTE D’ENREGISTREMENT DE LA GARANTIE
Advanced Electronic
Aquarium Heater
INSTRUCTIONS FOR USE
E50
E100
up to
15 U.S. gal/60 L*
up to
30 U.S. gal/120 L*
E200
E 300
E Series
up to
65 U.S. gal/250 L*
up to
100 U.S. gal/375 L*
Dear Customer,
Thank you for purchasing the new FLUVAL “E” series aquarium heater. The
superior performance and capability of this heater with “ ” technology
is backed by Fluval’s well earned best in quality and design aquarium products.
For a complete understanding of the heaters operation and capabilities, please
read and follow these instructions for proper installation, maintenance and use.
Failure to do so may result in loss of fish and/or damage to the unit. SA VETH
INSTRUCTIONS FOR FUTURE REFERENCE.
ESE
IMPORTANT SAFETY INSTRUCTIONS
WARNING – To guard against injury, basic safety precautions should be observed,
including the following:
1.
READ AND FOLLOW ALL SAFETY
INSTRUCTIONS
and all the important notices on the appliance before using the heater. Failure to do so
may result in loss of fish life and/or damage to this appliance.
DANGER
2.
is employed in the use ofaquariumequipment.Foreachof the following situations, do
not attempt repairs yourself; return the appliance to an authorized service facility for
service or discard the appliance.
A. If the appliance shows any sign of abnormal water leakage, immediately unplug it from
the power source.
B. Carefully examine the appliance after installation.It should not be plugged in if there is
water on parts not intended to be wet. Prior to installation, carefully check and ma
sure the glass tube is not fractured.
WARNING!
C. Do not operate any appliance if it has a damaged cord or plug, if it is malfunctioning or
it is dropped or damaged in any manner. The power cord of this appliance cannot be
replaced; if the cord is damaged, the appliance should be discarded. Never cut the cord.
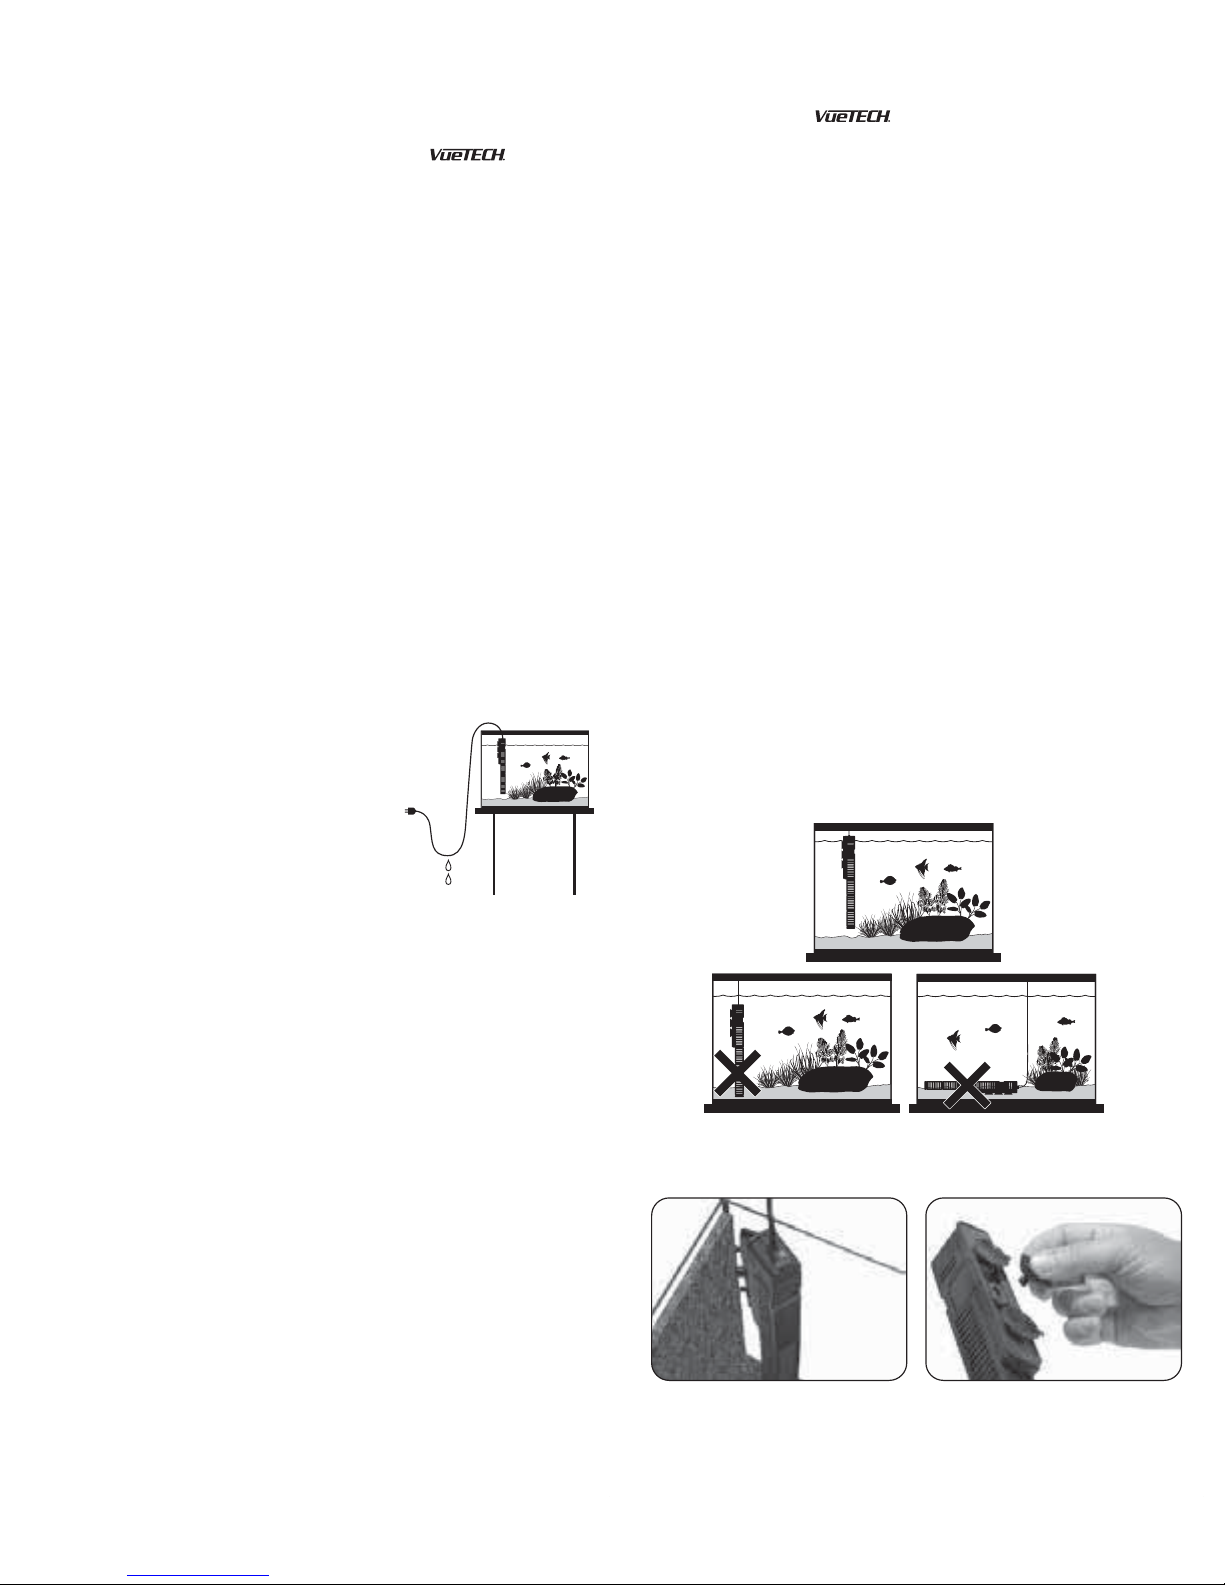
D. To avoid the possibility of the appliance plug or
receptacle getting wet, position the appliance t
side of a wall mounted receptacle to prevent water
from dripping onto the receptacle or plug. A “drip loop”
(see illustration) should be arranged by the user for
the cord connecting appliance to a receptacle. The
“drip loop” is that part of the cord below the level of the
receptacle or the connector if an extension cord is
used, to prevent water traveling along the cord and
coming in contact with the receptacle. If the plug or
receptacle does get wet,
Disconnect the fuse or circuit breaker that supplies
power to the appliance. Then unplug and examine for presence of water inreceptacle.
3. This appliance is not intended for use by persons (including children) with reduced
physical, sensory or mental capabilities, or lack of experience and knowledge, unless
they have been given supervision or instruction concerning use of the appliance by a
person responsible for their safety. Children should be supervised to ensure th
do not play with the appliance.
4. To avoid injury , do not touch hot parts.
CAUTION:
5.
supply before carrying out maintenance. When inserting or removing the heater from
the water, always pull out the mains electricity plug and do not pull the equipment out
of the water until it has been allowed to cool for at least 30 minutes. Never yank cord
to pull plug from outlet. Grasp the plug and pull to dis
appliance from an outlet when not in use.
6. This is an aquarium heater. Do not use an appliance for other than intended use (i.e.:
don’t use this heater on swimming pools, garden ponds, bathrooms, etc.). The useof
attachments not recommended or sold by the appliance manufacturer may cause a
dangerous situation.
7. This heater is suitable for
it will be exposed to the weather or to temperatures below freezing.
8. Make sure that the heater is securely installed before operating it. The heater must be
immersed in water at least up to the
exceeding the depth of 100 cm - 39 inches). This aquarium heater must never operate
outside of water. The heater must never operate without the heater guard.
9. If an extension cord is necessary, a cord with proper rating should be used.
A cord rated for less amperes or watts than the appliance rat
should be taken to arrange the cord so that it will not be tripped over or pulled. The
connection should be carried out by a qualified electrical installer.
SAVE THESE INSTRUCTIONS
10.
– To avoid possible electric shock, special care should be taken since water
The heater core is made of glass. Handle the unit with care at all times.
o one
DON’T
unplug the cord.
at they
Always unplug or disconnect all appliances in the aquarium from electricity
connect. Always unplug an
INDOOR
use only. Do not install or store the appliance where
MIN. WATER LEVEL
indicated (but without
ing may overheat. Care
ke
FLUVAL “E” SERIES with “ ” Technology
Immediate and clear feedback for the well-being of your aquarium inhabitants!
The “E” series employs an advanced digital microprocessor monitoring system with dual
temperature sensors which continuously monitor and display the aquarium water
temperature. As well, it references the set temperature in relation to the actual water
temperature. During normal operation, when water temperature is within -1/+1 °C or
-2/+2 °F of the set t emperature, the backlight of the LCD screen is green. If water
temperature exceeds the set temperature by 1 °C or 2 °F, the LCD’s backlight will turn red.
If water temperature is lower than the set temperature by more than 1 °Cor 2 °F, the LCD’s
backlight will turn blue. If ever the temperature goes outside -/+3 °C or -/+5,5 °F ofthe set
temperature, the display will provide an alert by flashing.
*The heater is factory calibrated. Variables such as lower room temperature, wide
fluctuations, lack of an aquarium cover, presence of submersible pumps and filters,
aquarium placement in proximity to cooling sources, may require a higher wattage for
proper control. The volumes indicated are approximate values corresponding to water
temperatures up to 26°C/78°F with a room temperature of 20°C/68°F. If the ambient
temperature is higher than the set temperature of at least 1°C/2°F, or external sources of
heat elevate the aquarium temperature more th
untill conditions change.
THERMAL SENSOR
The temperature sensing technology as precise as an external probe!
The internal Thermal Sensor samples the actual water temperature directly through the
glass of the heater tube ratherthan the air temperature within the tube, as is the case with
standard bi-metallic strip thermostats. Since the Thermal Sensor actually reads the true
water temperature, it is more accurate and reliable than conventional bi-metallic heaters.
RELIABLE AND PRECISE ELECTRONIC COMPONENTS
Advanced Electronic Circuitry , no moving parts to wear out!
Since the FLUVAL E heater has no bi-metallic points, there are no moving parts to arc,
corrode or wear. The thermostatic control of the heater is separated from the water
thermal sensor, different from conventional bi-metallic heaters, where the sensor is directly
built into the thermostat. It is therefore less affected by extraneous factors.
INSTALLATION
It’s recommended to fill the aquarium with water that is close to the desired
temperature you are trying to achieve.
To ensure even and thorough distribution of warmed water and to provide an accurate
temperature readings, the heater must be placed in close proximity to a sour ce of water
movement. Specifically, it should be placed at the rear of the aquarium, close to a filter or
must
pumps water output. Water
level indicated. Always maintain the water level in the aquarium to compensate for water
loss due to evaporation.
1. Position the heater in the aquarium and press suction cups firmly against glass, to
adhere to the aquarium wall. If rear glass mounting is not possible, use the side glass
mounting adapter (ill.
from heater bracket, and place them in the slots of the side mounting bracket. (ill. B and
at all times cover the heater at least up to the MINwater
A
). To fit the side mounting bracket, first remove the suction cups
an 1°C/2°F ,the LCD display will remain red
(A)
(B)
(C)
(D)
push of the lever to the right orto the left will increase or decrease the set temperature by
0.5 degree intervals (°C or °F). Once the adjustment has been made, release the lever.After
a few seconds, the display will stop flashing and will return to the normal working condition
displaying the aquarium water temperature.
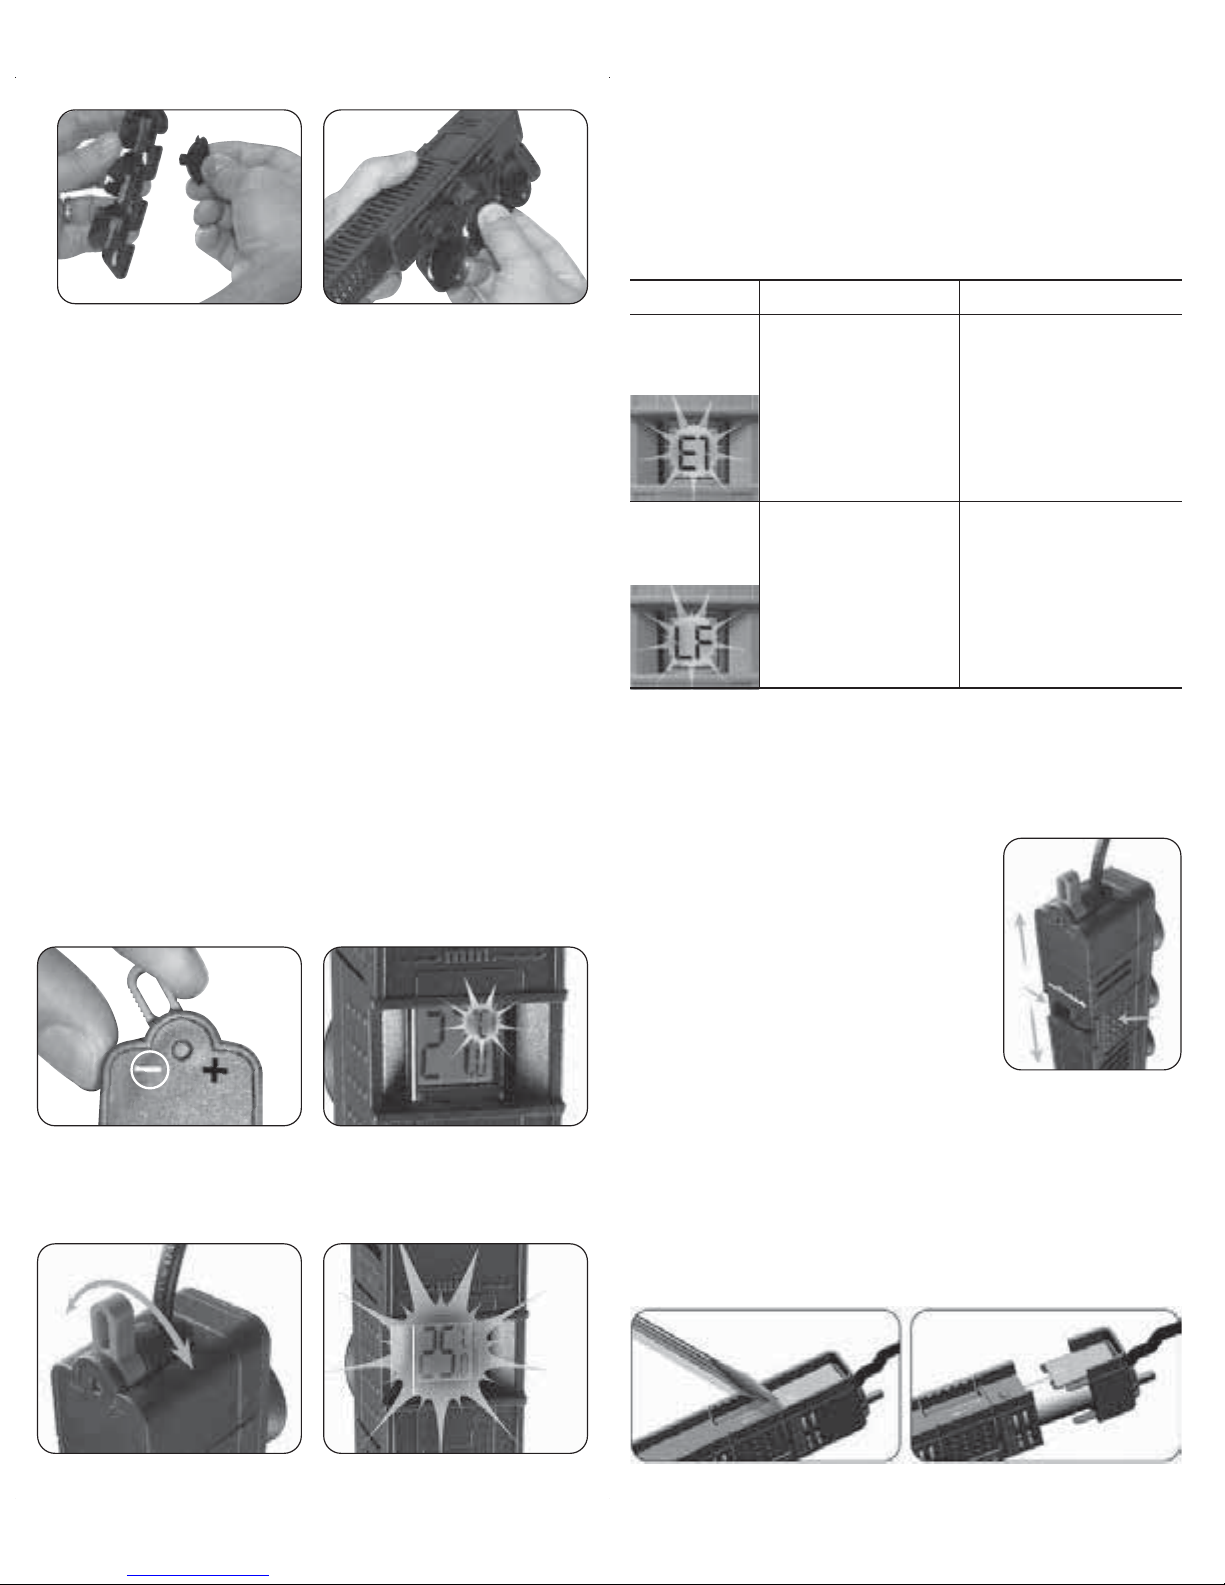
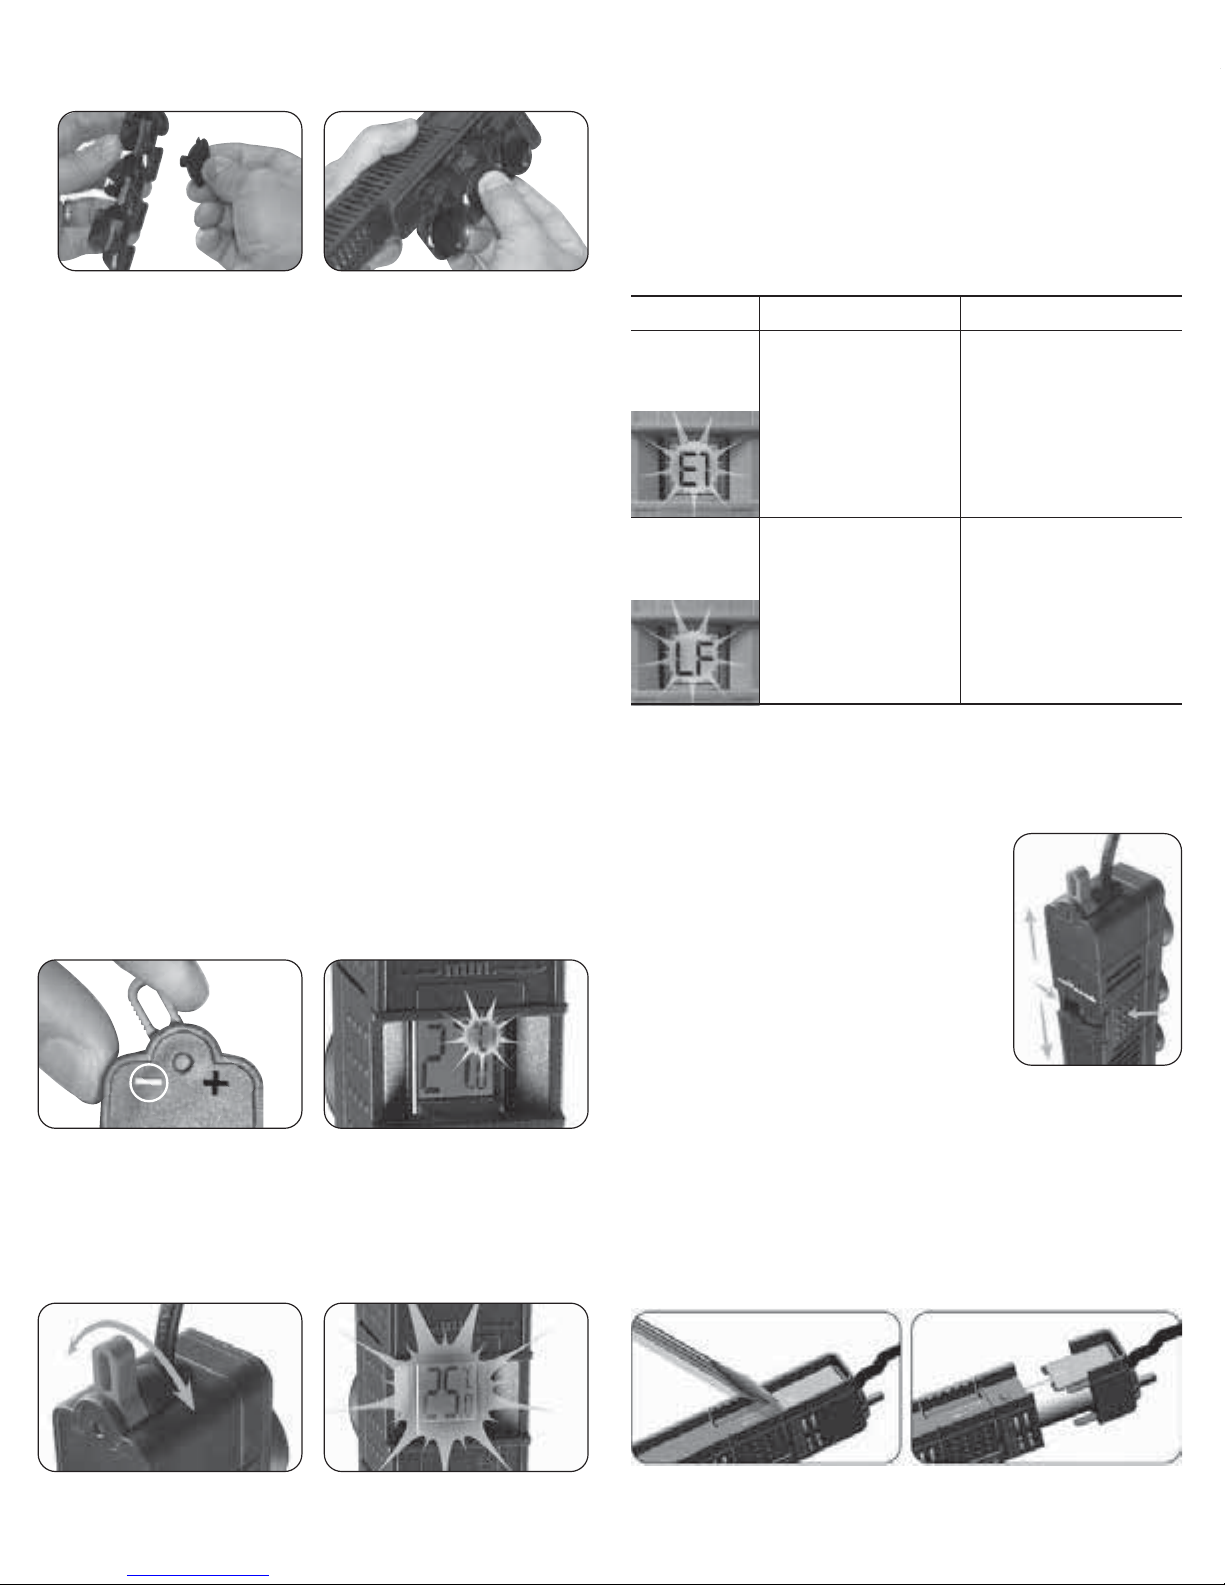
INTELLIGENT ERROR MESSAGES
The advanced E Heater microprocessor detects and displays some abnormal or nonoptimal usage conditions, which require verification and proper action by the owner. The
possible error codes are the following:
ill. C) The three protruding arms of the side mountingbracket are then clipped into the
D
revealed slots of flat heater bracket (ill.
). Important: Place the heater where the unit
is unobstructed, and where there is a free flow of water to ensure even heat dispersion.
Ensure that the heater is positioned so that the aquarium waterlevel is never below the
MIN indicator found on the guard of the heater. If necessary ,you can simply adjust the
heater height by sliding it along the bracket, by squeezing the two release arms on the
side of the heater guard. Be sure there are no rocks, decorations or gravel obstructions
touching the heater to create uneven heat.
2. Allow heater to acclimatize in the aquarium water temperature for 20 minutes before
plugging it into the electrical outlet. Be sure to arrange a drip loop for the heater cord
and any other electrical item that is placed in or on the aquarium.
3. After 20 minutes, plug in the heater and set the degree sc
paragraph
temperature (refer to the paragraph
TEMPERATURE”
“HOW TO SET °C OR °F DEGREE SCALE”
“HOW TO SET THE AQUARIUM
below). Once set, there is no need for readjustment.
ale if necessary (refer to the
below) and the aquarium
4. At each Power-on, the E Heater goes through an initial self test procedure during which
it carries out a self-diagnosis to check internal circuitry and sensors operation, followed
by a period to verify the surrounding conditions. The self-diagnost
ic check requires
several minutes to complete, during which time the E heating element is switched on
for a few seconds only to verify the heater operation and application conditions. After
the self-diagnosis is completed, the E Heater starts its standard operation. During the
self-diagnostic test, the LCD screen will display the water temperature.
WARNING:
falls below the minimum water level M
The heater must never be operated outside of the aquarium. Ifthe water level
IN, the thermostat can no longer "read” the water
temperature and therefore can nolonger control the heating correctly. If it has to betaken
out of the water or when transferring or changing the water, disconnect the heater from the
power source and wait for at least 30 minutes to allow it to cool down.
HOW TO SET °C OR °F DEGREE SCALE
The heater is factory set on the °C degree scale for 50 Hz markets and °F degree scale for
60 Hz markets. In case you need to change the degree scale, hold the set lever in the full
left (-) position for at least 5 seconds (ill. E). When the new degree scale is displayed,you
may release the lever. After a few seconds, the display will automatically return to display
the water temperature (ill. F).
(E)
(F)
HOW TO SET THE AQUARIUM TEMPERATURE
The heater is factory set at 25 °C / 77 °F .If a different water temperature is desired, use the
easy set lever on the top of the heater. Push the lever to the right or left and release; the
LCD screen will start to flash showing theset temperature (ill. G and H). Each subsequent
(G) (H)
Displayed Error Code
E1,DISPLAY IS FLASHING,
ALL COLORS ARE
ALTERNATELY DISPLAYED
LF (LOW FLOW)
DISPLAYED EVERY FEW
SECONDS
Heater Status
The “E” Heater has gone into error
status and has removed power from the
heating element. This error status can
only be reset by unplugging the unit.
The “E” Heater will keep on operating,
IS
although its proper operation is
inhibited due to poor water circulation
around the heater.
The error status will be automatically
reset once adequate water circulation
around the heater has been provided
and the heater has had time to recalibrate itself..
Possible cause and solution
The “E” Heater has detected an abnormal
usage condition.
Unplug the heater.
Check that all application conditions are
correct according to the instructions,
including the respect of the MIN water level.
Start up the heater again following the
“Installation” instructions above.
The “E” Heater has detected poor water
circulation around the heater. The even and
thorough distri
the tank could be limited by the inadequate
circulation. Ensure adequate water circulation
around the heater and inside the aquarium.
Verify installation conditions outlined in the
“INSTALLATION” instructions
bution of warmed water inside
WARNING: This aquarium heater must never operate outside of water .If the heater is accidentally
removed from water while operating, DO NOT re-submerse it in water. Unplug it and let it cool
down for at least 1 hour before reusing.
MAINTENANCE
CAUTION: Unplug all appliances in the aquarium
before carrying out maintenance. Unplug the
heater and allow it to cool for at the least 30
minutes before taking it out of the water.
Clean the heater guard and the glass tube regularly to
move encrustation and deposits that couldimpair the
re
heating performance and the sensitivity of the
thermostat.
1. Remove the heater from the suction cups bracket by
squeezing the two release arms on the side of the
heater guard and separating it fromthe bracket (ill. I).
2. In order to reach the internal glass tube, remove the
heater guard as explained in the paragraph “REMOVE
THE HEATER GUARD FROM THE UNIT” below.
3. Clean the heater glasstube regularly to remove deposits t
performance. Deposits on heater can be removed by soaking the heater tube in
vinegar, then rinsing with fresh water before repositioning in aquarium.
4. Clean the heater guardunder a stream of water, assuring that all openings are free
from dirt and debris. If required use a soft cleaning brush.
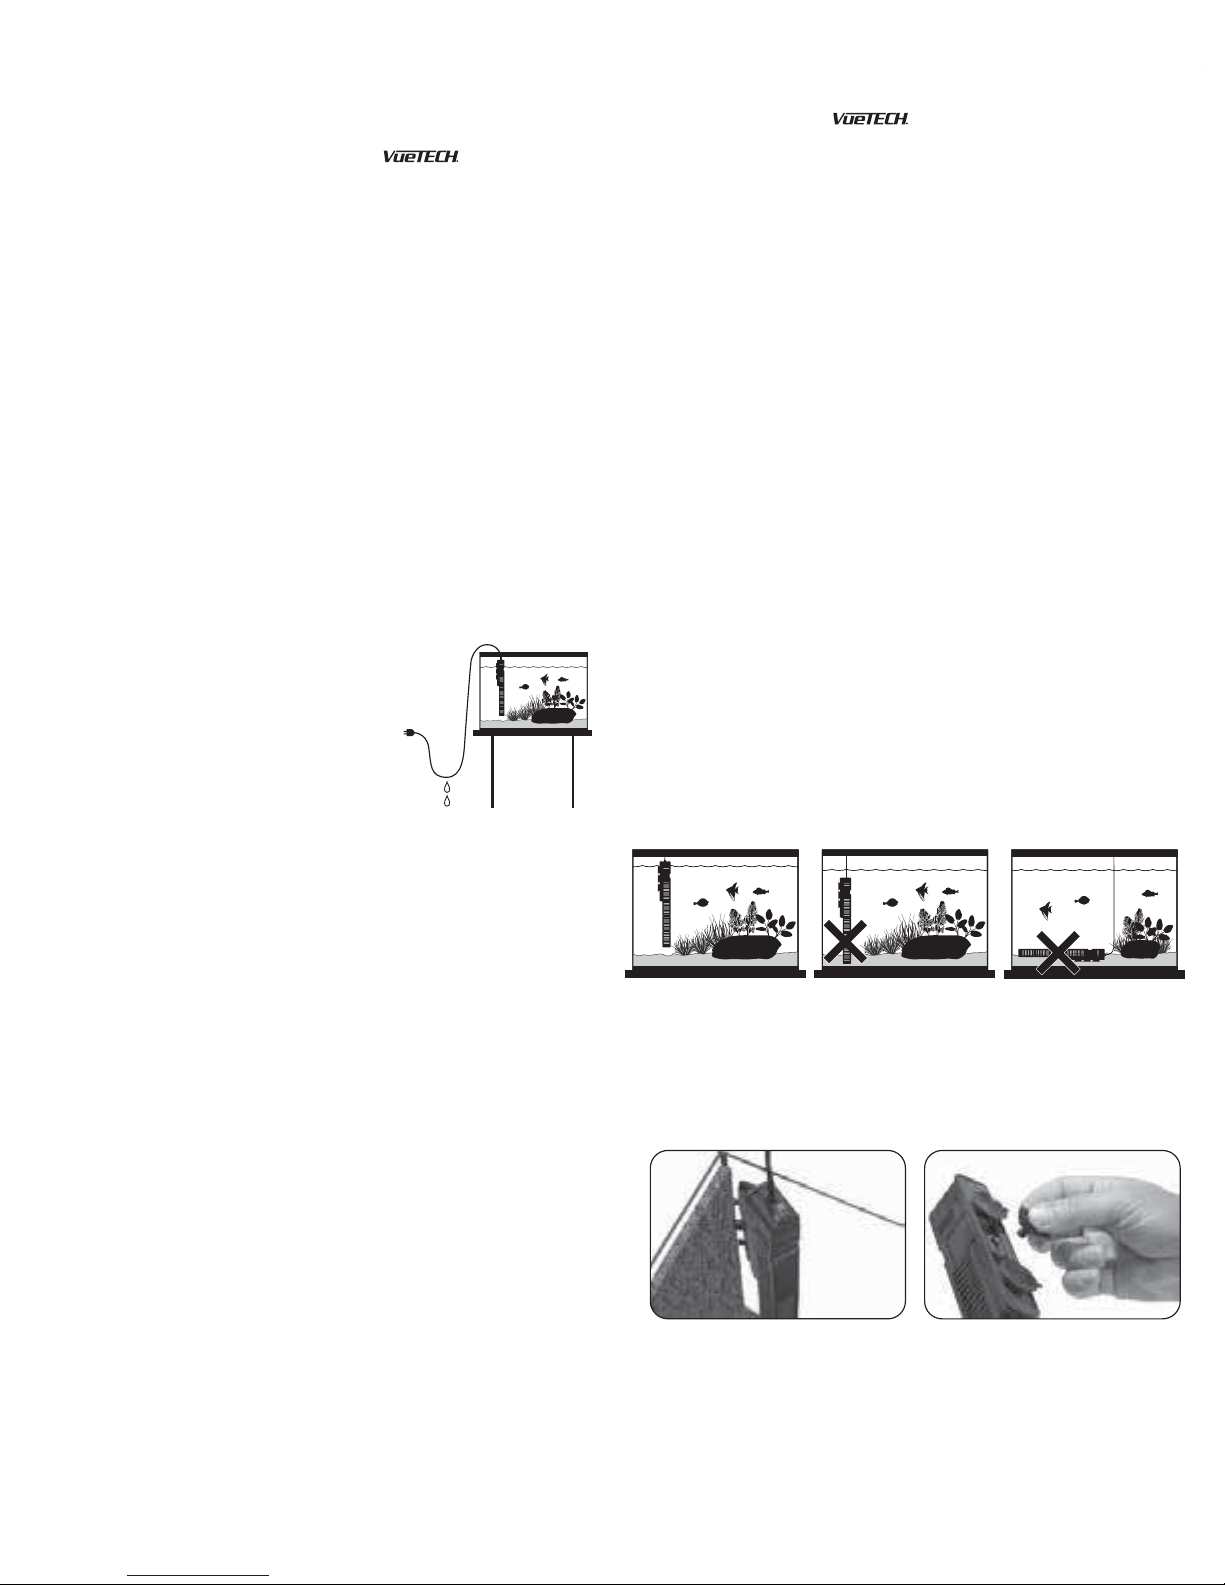
HOW TO REMOVE THE HEATER GUARD FROM THE UNIT
Once the heater has been removed from the aquarium and suction cup bracket, you
can remove the heater guard and have access to the internal glass tube. Using a
flathead screwdriver, slightly lift the secure lock tab at the back of the heater cap to
free and remove the heater guard, as shown in the pictures below.
(I)
hat could impair the heater
(J) (K)
12
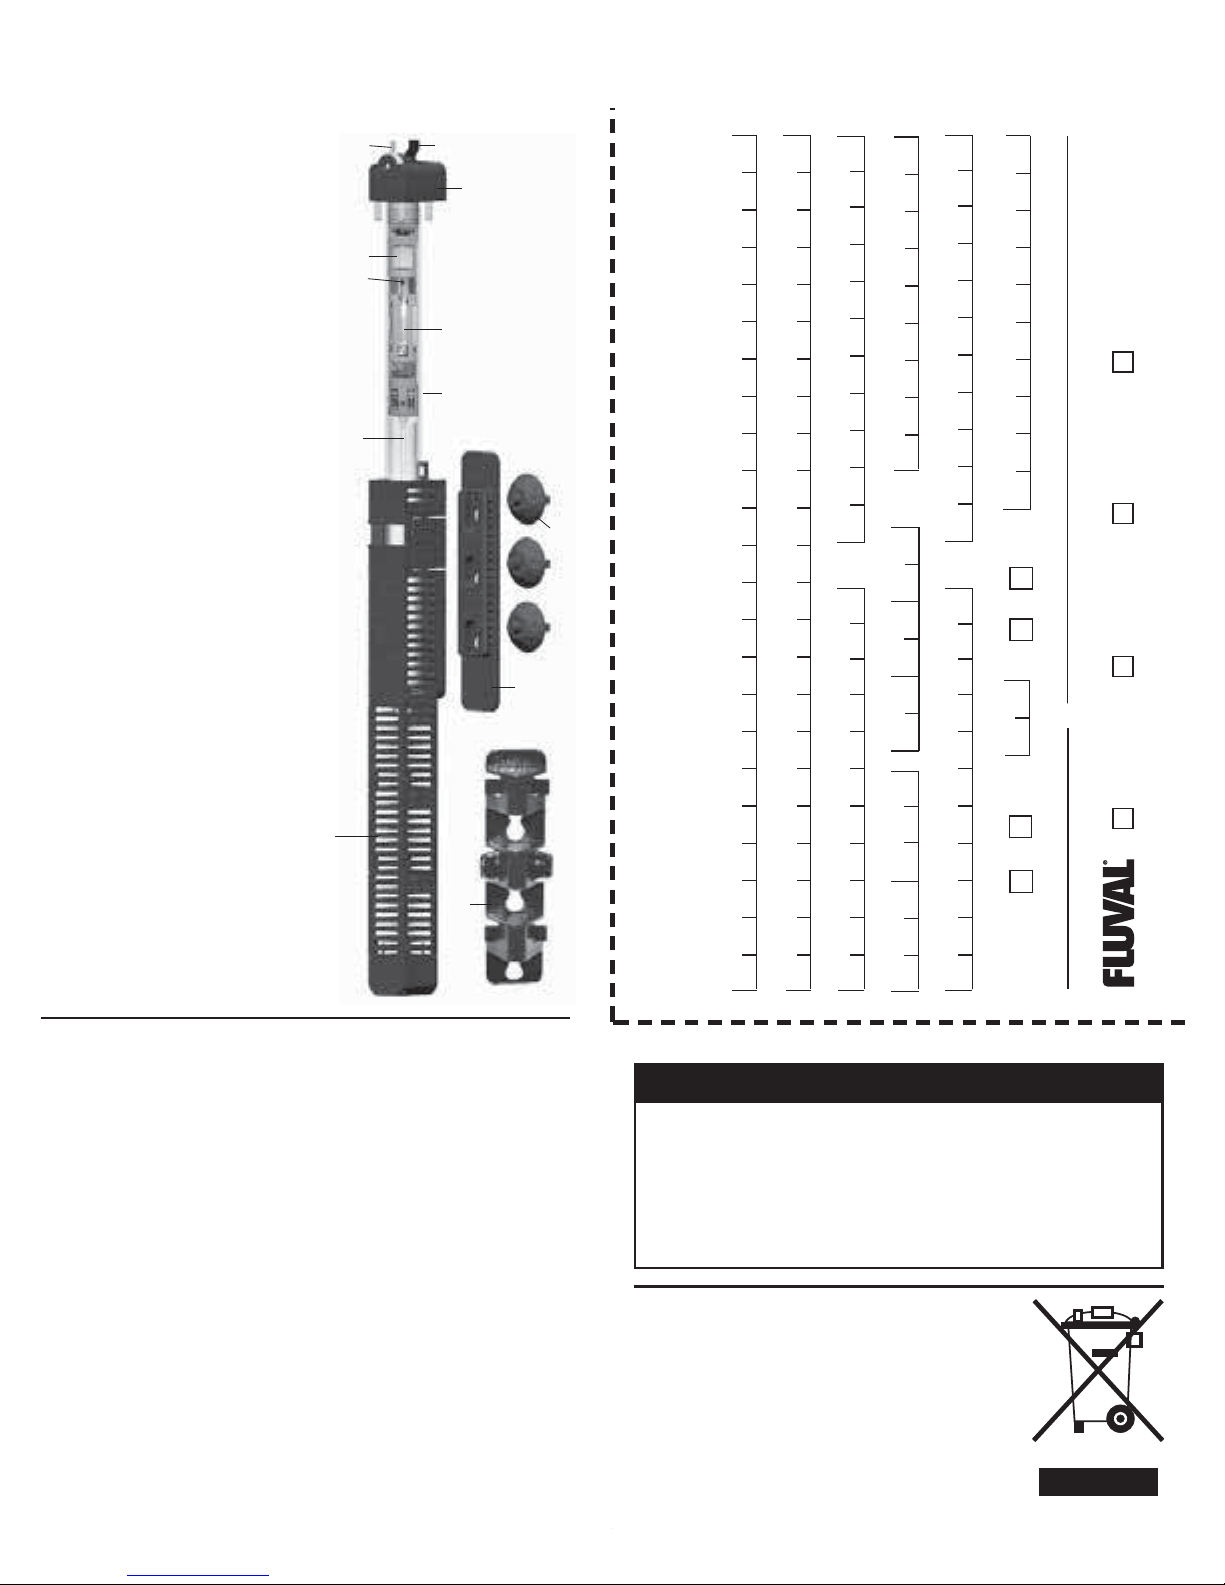
1 POWER CORD
2 EASY SET TEMPERATURE LEVER
3 WATERTIGHT SAFETY SEAL
4 LCD TEMPERATURE DISPLAY
5 ELECTRONIC MONITORING
SYSTEM
6 THERMAL SENSOR
7 GLASS TUBE
8 CERAMIC HEATER CORE
9 ADJUSTABLE SUCTION CUP
BRACKET
10 HEATER GUARD
11 SUCTION CUPS (3)
12 SIDE MOUNTING ADAPTER
FOR FRESH AND
SALTWATER AQUARIUMS
3
4
6
5
7
8
Store
11
9
MM DD YY
Date Purchased
WARRANTY REGISTRATION CARD
Tel .:
Type(s) of fish
Age Sex M F
E50 E100 E200 E300
10
12
FOR AUTHORIZED GUARANTEE REPAIR SERVICE:
For Authorized Warranty Service please return (well packaged and by registered
post) to the address below enclosing dated receipt and reason for return.
If you have any queries or comments about the operation of this product, please let
us try to help you before you return the product to your retailer. Most queries can
be handled promptly with a phone call. When you call (or write), please have all
relevant information such as model n
umber, age of product, details of aquarium
set-up, as well as the nature of the problem.
CANADA: Hagen Industries, Consumer Repair, 3235 Guénette,
Montréal QC H4S 1N2
U.S.A.: Rolf C. Hagen (U.S.A.) Corp., 305 Forbes Blvd, Mansfield, MA. 02048
UK: Rolf C. Hagen (UK) Ltd, Customer Service Department
California Drive, Whitwood Ind Est., Castleford, West Yorkshire WF10 5QH
CALL US ON OUR TOLL-FREE NUMBER:
Canada only: 1-800-554-2436 between 9:00 a.m. and 4:30 p.m.
Eastern S
tandard Time. Ask for Customer Service.
U.S. only: 1-800-724-2436 between 9:00 a.m. and 4:00 p.m.
Eastern Standard Time. Ask for Customer Service.
U.K. only: Helpline Number 01977 556622.
Between 9:00 AM and 5:00 PM, Monday to Friday (excluding Bank Holidays).
To register your warranty on line or for more information on this and other
products go to www.hagen.com.
Return to validate your guarantee. Or, if you prefer, you may register on our web site at www.hagen.com
Name
Address
City/Town Prov./State/County
Postal/Zip Code
Wasthisagift? Yes No
City/Town Prov./State/County
Size of aquarium
5 YEAR WARRANTY
Fluval E Series Heaters are guaranteed against defects in material or workmanship under
normal aquarium usage and service for 5 years. We offer a 5 year guarantee on all nonreplaceable parts which means that the heater will be repaired or replaced at the
manufacturer's discretion, free of charge, when the complete heater is returned with proof
of purchase and postage paid. This warranty does not apply to any heater that has been
subjected to misuse, negligence, or tampering. No liability is assumed with respect to loss
or damage to livestock or personal property irrespective of the cause thereof.
RECYCLING
This symbol bears the selective sorting symbol for waste
electrical and electronic equipment (WEEE). This means that this
product must be handled pursuant to European Directive
2002/96/EC in order to be recycled or dismantled to minimize its
impact on the environment. For further information, please
contact your loca
l or regional Authorities.
Electronic products not Included in the selective sorting
process are potentially dangerous for the environment and
human health due to the presence of hazardous substances.

Falls Sie dies vorziehen, können Sie sich stattdessen auch auf unserer Website unter www.hagen.com registrieren.
Para el registro en línea, visite nuestro sitio web en www.hagen.com
To register online, visit our website at www.hagen.com • Pour l’enregistrement en ligne, visiter notre site Web à www.hagen.com
WF10 5QH
Rolf C. Hagen (U.K.) Ltd.
Castleford, W. Yorkshire
UK
Baie d’Urfé, Québec H9X 0A2
20500 Trans Canada Hwy,
Rolf C. Hagen Inc.
CANADA
Registrierungskarte aus und schicken Sie sie an uns zurück.
besser betreuen können, füllen Sie bitte diese
Bitte zurücksenden zur Erhaltung der Garantie. Damit wir Sie
GARANTIE-REGISTRIERUNGSKARTE
When complete, place Warranty Registration Card in an
envelope, affix correct postage and mail to:
WARRANTY REGISTRATION CARD
www.hagen.com
F-77388 Combs la Ville.
Av. De Beniparrell n. 11 y 13
46460 Silla, Valencia
Hagen France SA.,
Rolf C. Hagen España S.A.,
Mansfield, MA. 02048
FRANCE
25488 Holm
ESPAÑA
Rolf C. Hagen (U.S.A.) Corp.,
305 Forbes Blvd,
HAGEN Deutschland
GmbH & Co. KG,
U.S.A.
GERMANY
en u
n sobre debidamente franqueado y envíela a:
Una vez llenada, coloque la tarjeta de registro de la garantía
TARJETA DE REGISTRO DE LA GARANTÍA
enveloppe suffisamment affranchie et poster à :
Déposer la carte de garantie dûment remplie dans une
CARTE D’ENREGISTREMENT DE LA GARANTIE
Séries E
Chauffe-eau
électronique perfectionné pour aquariums
MODE D’EMPLOI
E50
E100
jusqu’à
15 U.S. gal/60 L*
jusqu’à
30 U.S. gal/120 L*
E200
E 300
jusqu’à
65 U.S. gal/250 L*
jusqu’à
100 U.S. gal/375 L*

Cher client,
Nous vous remercions d’avoir acheté le nouveau chauffe-eau Fluval de série E pour
aquarium. La performance et la capacité supérieures de ce chauffe-eau caractérisé par
la technologie « » sont appuyées par la réputation bien méritée de Fluval
dont les produits sont les meilleurs quant à la qualité et à la conception. Pour une
compréhension complète du fonctionnement et des capacités du chauffe-eau, prière
de lire et suivre ce mode d’emploi pour bien l’install
er, l’entretenir et l’utiliser. Manquer
à ces précautions pourrait entraîner la perte de poissons ou des dommages à l’appareil.
CONSERVER CES INSTRUCTIONS POUR RÉFÉRENCE FUTURE.
MESURES DE SÉCURITÉ IMPORTANTES
MISE EN GARDE – Pour éviter toute blessure, il faudrait observer des précautions
élémentaires de sécurité, y compris les suivantes :
1. LIRE ET RESPECTER TOUTES LES CONSIGNES DE SÉCURITÉ avant usage et tous les
avis importants apparaissant sur l’appareil. Man
quer à ces précautions pourrait
entraîner la perte de poissons ou des dommages à l’appareil.
2. DANGER – Pour éviter tout risque d’électrocution, une attention spéciale devrait être
portée puisque de l’eau est utilisée avec l’équipement d’aquarium. Dans chacune des
situations suivantes, ne pas essayer de réparer l’appareil soi-même; le retourner plutôt
à un service autorisé de réparations ou le jeter.
A. Si l’appareil montre un signe de fuite d’eau anormale, le débran
cher immédiatement de
l’alimentation principale.
B. Examiner attentivement l’appareil après l’installation. Il ne devrait pas être branché en
présence d’eau sur des pièces ne devant pas être mouillées. Avant l'installation, vérifier
soigneusement et s'assurer que le tube de verre n'est pas brisé.
MISE EN GARDE! Le noyau du chauffe-eau est fait de verre. Manipuler l’appareil avec
soin en tout temps.
C. Ne pas faire fonctionner un appareil dont la fiche ou le cordon est e
ndommagé, qui ne
fonctionne pas correctement ou qui est tombé ou a été endommagé d’une quelconque
manière. Le cordon d’alimentation de cet appareil ne peut pas être remplacé; si le
cordon est endommagé, il faut jeter l’appareil. Ne jamais couper le cordon.
D. Afin d’éviter que la fiche ou la prise de courant électriques
soient mouillées, installer l’appareil à côté d’une prise
de courant murale pour empêcher l’eau de dégoutter sur
la prise ou la fiche. On devrait former une «
boucle
d’égouttement » (voir illustration). Celle-ci est la partie
du cordon se trouvant sous la prise de courant ou le
raccord, si une rallonge est utilisée, afin d’empêcher
l’eau de glisser le long du cordon et d’entrer en contact
avec la prise de courant. Si la fiche ou la prise de courant
sont mouillées, NE PAS débrancher l’appareil. Mettre
d’abord hors circuit le fusible ou le disjoncteur qui
fournit l’électricité à l’appareil et le débrancher ensuite. Vérifier qu’il n
’y a pas d’eau dans
la prise.
3. Cet appareil ne doit pas être utilisé par des personnes (y compris des enfants) aux
capacités physiques, sensorielles ou mentales réduites, ou manquant d’expérience ou
de connaissances, à moins qu'elles soient placées sous la supervision d'une personne
chargée de leur sécurité ou qu'elles en aient reçu les directives nécessaires à l'utilisation
de cet appareil. Bien surveiller les enfants pour les empêcher de jouer avec cet appareil.
4. P
our éviter toute blessure, ne toucher aucune pièce chaude.
5. ATTENTION : Toujours débrancher tous les appareils dans l’aquarium, de l’alimentation
électrique, avant d'effectuer un entretien. Au moment de déposer le chauffe-eau dans
l’eau ou de l’en retirer, toujours le débrancher de l’alimentation principale et ne pas sortir
l’appareil de l’eau sans l’avoir fait refroidir pendant au moins 30 minutes. Ne jamais tirer
sur le cordon d’alimentation pour débrancher l’a
ppareil, mais plutôt prendre la fiche
entre les doigts et tirer. Toujours débrancher tout appareil quand il n’est pas utilisé.
6. Cet appareil est un chauffe-eau pour aquarium. Ne pas employer un appareil pour un
usage autre que celui prévu (c.-à-d. : ne pas utiliser ce chauffe-eau dans des piscines,
des jardins aquatiques, des salles de bains, etc.). L’emploide fixations ni recommandées
ni vendues par le fabricant de l’appareil peut être source de situations dangereuse
s.
7. Ce chauffe-eau convient pour usage À L’INTÉRIEUR seulement. Ne pas installer ni
ranger l’appareil où il sera exposé à des températures sous le point de congélation.
8. S’assurer que le chauffe-eau est solidement installé avant de le faire fonctionner. Il doit
être immergé dans l’eau au moins jusqu’à la LIGNE DU MINIMUM indiquée(mais sans
dépasser la profondeur de 100 cm (39 po.)). Ce chauffe-eau pour aquarium ne doit
jamais fonctionner en dehors de l’eau. Canada seul
ement : le niveau d’eau ne doit pas
monter au-dessus de la LIGNE DU MAXIMUM indiquée. Le chauffe-eau ne doit jamais
fonctionner sans le protège-chauffe-eau.
9. Si une rallonge électrique est nécessaire, vérifier qu’elle est d’un calibre suffisant. Un
cordon électrique de moins d’ampères ou de watts que l’appareil peut surchauffer. Des
précautions devraient être prises afin d’éviter qu’on tire la rallonge ou qu’on trébuche
dessus. Le raccordement devrait être effectu
é par un électricien qualifié.
10. CONSERVER CES INSTRUCTIONS
La technologie « » du chauffe-eau FLUVAL de série E
Information immédiate et claire pour le bien-être de vos organismes aquatiques!
La série E est caractérisée par un système de surveillance numérique de pointe à
microprocesseur et comprenant deux détecteurs thermiques qui contrôlent continuellement la
température de l’eau dans l’aquarium toujours affichée sur l’écran ACL. Ce système fait
également référence à la température réglée en rapport avec la température ré
elle de l’eau. Au
cours du fonctionnement normal, lorsque la température de l’eau est autour de -1/+1 °C ou
-2/+2 °F de la température réglée, la lumière en arrière-plan de l’écran ACL est verte. Si la
température de l’eau dépasse la température réglée de 1 °C ou 2 °F, la lumière en arrière-plan
de l’écran ACL deviendra rouge. Si la température de l’eau est plus basse que la température
réglée de plus de 1 °C ou 2 °F, la lumière en arrière-plan de l’écran ACL tournera au bleu. Si la
te
mpérature est en dehors de -/+3 °C ou -/+5,5 °F de la température réglée, la lumière en
arrière-plan produira une alerte en clignotant.
*Le chauffe-eau a été calibré en usine. Des variables telles qu’une basse température dans la pièce,
d’importantes variations de température, l’absence d’un couvercle sur l’aquarium, la présence de
pompes et de filtres submersibles ou l’installation de l’aquarium près de sources de refroidissement
peuvent nécessiter un wattage supé
rieur pour un contrôle adéquat. Les volumes indiqués sont des
valeurs approximatives correspondant aux températures de l'eau jusqu'à 26 °C/78 °F avec une
température de la pièce de 20 °C/68 °F. Si la température de l’eau dépasse la température réglée d'au
moins 1 °C ou 2 °F, ou si des sources extérieures de chaleur élèvent la température de l'aquarium
de plus de 1 °C ou 2 °F, l'affichage à cristaux liquides restera rouge jusqu'à ce que les conditions
changent.
DÉTECTEUR THERMIQUE
Un détecteur de température aussi précis qu’une sonde extérieure!
Le détecteur thermique interne échantillonne la température réelle de l’eau directement à travers
le tube en verre du chauffe-eau plutôt qu’à l’aide de la température de l’air dans le tube comme
c’est le cas pour les thermostats standards à bilame. Étant donné que le détecteur thermique lit
exactement la température réelle de l’eau, il est plus précis et plus fiable que les chauffe-eau
conventionnel
s à bilame.
COMPOSANTES ÉLECTRONIQUES FIABLES ET PRÉCISES
Circuit électronique de pointe et aucune pièce mobile qui s’use!
Étant donné que le chauffe-eau FLUVAL de série E n’est pas bimétallique, aucune pièce mobile ne
forme un arc, ni ne se corrode ni s’use. Le contrôle thermostatique du chauffe-eau est séparé du
détecteur thermique de l’eau, ce qui le différencie des chauffe-eau conventionnels à bilame dans
lesquels le détecteur est construit directement dans le ther
mostat. Il est donc moins touché par des
facteurs extérieurs.
INSTALLATION
Il est conseillé de remplir l’aquarium d’eau près de la température désirée.
Pour assurer une distribution égale et complète de l’eau chauffée et pour fournir des lectures
précises de la température, le chauffe-eau doit être placé près d’une source d’eau en mouvement.
Il doit être placé précisément à l’arrière de l’aquarium, près d'un filtre ou d'une sortie d'eau. De
l’eau doit en tout temps couvr
ir le chauffe-eau au moins jusqu’à la LIGNE DU MINIMUM
indiquée. Il faut toujours maintenir le niveau d’eau dans l’aquarium afin de compenser la perte d’eau
(A)
(B)
due à l’évaporation. En général, le chauffe-eau devrait être placé à l’arrière de l’aquarium, près d’une
source d’eau en mouvement pour assurer une distribution égale et complète de l’eau chauffée.
1. Déposer le chauffe-eau dans l’aquarium et presser les ventouses fermement contre le
(C)
(D)
verre afin qu’elles collent à la paroi de l’aquarium. S’il est impossible de le monter sur
la paroi arrière, utiliser l’adapteur pour le montage sur la paroi latérale
(illustration A)
Pour l’installation du support de montage à la paroi latérale, retirer d'abord les ventousesdu
support du chauffe-eau et les placer dans les ouvertures de l'adapteur. (illustrations B et C)
Les trois bras en saillie de l’adapteur sont ensuite fixés dans les ouvertures du support plat
du cha
uffe-eau
(illustration D)
. Important : Placer le chauffe-eau où il sera dégagé et où
il y aura un débit d’eau continuel pour assurer une dispersion égale de chaleur. Vérifier
que le chauffe-eau est placé pour que le niveau d’eau dans l’aquarium ne soit jamais sous la
LIGNE DU MINIMUM indiquée sur le protège-chauffe-eau. Au besoin, il est possible de régler
simplement lahauteur du chauffe-eau en le glissant le long du support ou en pressant les deux
languettes de dégagement s
ur les côtés du protège-chauffe-eau. S’assurer d’aucune
obstruction par des roches, des décorations ou du gravier qui en touchant le chauffe-eau
pourraient créer une chaleur inégale sur le tube de verre et l’affaiblir.
2. Faire en sorte d’ajuster le chauffe-eau à la température dans l’aquarium pendant 20 minutes
avant de le brancher dans une source d’alimentation. Faire une boucle d’égouttement pour le
cordon électrique du chauffe-eau ou tout autre appareil électriq
ue placé dans ou sur l’aquarium.
3. Après 20 minutes, brancher le chauffe-eau et régler la graduation des degrés, au besoin
(consulter le paragraphe COMMENT RÉGLER LA GRADUATION EN ºC OU ºF ci-dessous)
et la température de l’aquarium (consulter le paragraphe COMMENT RÉGLER LA
TEMPÉRATURE DANS L’AQUARIUM). Une fois ces ajustements effectués, il n’est pas
nécessaire d’en refaire.
4. Chaque fois qu’il est mis en marche, le chauffe-eau Fluval de série E est soumis à une
autos
urveillance initiale au cours de laquelle un autodiagnostic vérifie le circuit interne et
le fonctionnement des capteurs et est suivi d’une période pour examiner les conditions
environnantes. L’autodiagnostic prend quelques minutes, période durant laquelle l’élément
chauffant du chauffe-eau Fluval de série E est allumé pendant quelques secondes seulement
pour vérifier le fonctionnement du chauffe-eau et les conditions d’application. Une fois
l’autodiagnost
ic complété, le chauffe-eau Fluval de série E commence à fonctionner
normalement. Durant l’autodiagnostic, l’écran ACL affichera la température de l’eau.
MISE EN GARDE : Le chauffe-eau ne doit jamais fonctionner en dehors de l’aquarium. Si le
niveau d’eau descend sous la LIGNE DU MINIMUM, le thermostat ne peut plus « lire » la
température de l’eau, et par conséquent, ne peut plus contrôler le chauffage correctement. Si le
chauffe-eau doit être retiré de l’eau, ou au moment
d’un transfert ou d’un changement d’eau, il
faut le débrancher et attendre au moins 30 minutes pour le laisser refroidir.
COMMENT RÉGLER LA GRADUATION EN ºC OU ºF
Le chauffe-eau est réglé en usine à la graduation en ºC pour les marchés de 50 Hz et en ºF pour
(E)
(F)
les marchés de 60 Hz. Pour tout changement de graduation des degrés, garder le levier de
réglage en position complète à gauche (-) pendant au moins 5 secondes
La nouvelle graduation des degrés apparaîtra alor
s et il sera possible de relâcher le levier.
(illustration E)
Après quelques secondes, l’affichage retournera automatiquement à son fonctionnement
normal
(illustration F)
.
COMMENT RÉGLER LA TEMPÉRATURE DANS L’AQUARIUM
Le chauffe-eau est réglé en usine à 25 ºC/77 ºF. Pour une température de l’eau différente, utiliser
le levier facile à régler sur le dessus du chauffe-eau. Pousser le levier vers la droite ou la gauche
et le relâcher; l’écran ACL commencera alors à clignoter
(illustration G et H)
. Chaque nouvelle
poussée du levier vers la droite ou la gauche augmentera ou diminuera la température réglée par
intervalles de 0,5 degré (ºC ou ºF). Une fois le réglage effectué, dégager le levier. Après quelques
secondes, l’écran cessera de clignoter et retournera à son fonctionnement normal c’est-à-dire
l’affichage de la température de l’eau dans l’aquarium.
MESSAGES D’ERREURS INTELLIGENTS
Le microprocesseur de pointe du chauffe-eau Fluval de série E détecte et indique un usage
anormal ou inadéquat qui nécessite une vérification et l'action appropriée du propriétaire. Les
codes possibles d'erreurs sont les suivants :
.
Code d’erreur affiché État du chauffe-eau Cause possible et solution
E1
L'ÉCRAN CLIGNOTE,
TOUTES LES COULEURS
SONT AFFICHÉES EN
ALTERNANCE
(FAIBLE DÉBIT) EST
LF
AFFICHÉ À INTERVALLES
DE QUELQUES
SECONDES
Le chauffe-eau Fluval de série E
affiche un code d’erreur et éteint
l’élément chauffant. Ce code d’erreur
ne peut être annulé qu’en
débranchant le chauffe-eau.
Le chauffe-eau Fluval de série E
continuera à fonctionner même s’il
est perturbé à cause d'une circulation
insuffisante de l’eau autour.
Le code d’erreur sera annulé
automatiquement une fois que la
circulation adéquate de l’eau autour
du chauffe-eau aura été assurée et
que le chauffe-eau aura eu le temps
de refaire son calibrage.
Le chauffe-eau Fluval de série E a décelé
un état anormal.
Débrancher le chauffe-eau.
Vérifier que toutes les conditions
d’application sont correctes selon les
directives y compris l’observation de la
ligne du MINIMUM indiquée.
Faire redémarrer le chauffe-eau en suivant
les directives ci-dessus sous Installation.
Le chauffe-eau Fluval de série E a décelé
une circulation d’eau insuffisante autour.
La distribution égale et complète de l’eau
chauffée dans l’aquarium pourrait être
limitée par la circulation inadéquate.
S’assurer d’une circulation adéquate de
l’eau autour du chauffe-eau et dans
l’aquarium. Examiner les conditions
d’installation en suivant les directives sous
INSTALLATION.
MISE EN GARDE : Ce chauffe-eau pour aquarium ne doit jamais fonctionner en dehors
de l’eau. Si le chauffe-eau est accidentellement retiré de l'eau pendant qu'il fonctionne,
NE PAS le submerger de nouveau dans l'eau. Le débrancher et le laisser refroidir
pendant au moins 1 heure avant de le réutiliser.
ENTRETIEN
ATTENTION : Débrancher tous les appareils dans
l’aquarium avant d'effectuer un entretien. Débrancher
le chauffe-eau et le laisser refroidir pendant au moins
30 m
inutes avant de le retirer de l’eau.
Nettoyer régulièrement le protège-chauffe-eau et le tube en verre
pour retirer la croûte et les dépôts qui pourraient nuire au
chauffage et à la sensibilité du thermostat.
1. Retirer le chauffe-eau du support à ventouses en pressant
les deux languettes de dégagement sur les côtés du
protège-chauffe-eau et en glissant l’appareil en dehors du
support
(illustration I)
.
2. Afin d’avoir accès au tube intérieur en verre, enlever le
protège-
chauffe-eau tel qu’il est expliqué dans le paragraphe
COMMENT ENLEVER LE PROTÈGE-CHAUFFE-EAU ci-dessous.
3. Nettoyer régulièrement le tube en verre du chauffe-eau pour déloger les dépôts qui
pourraient nuire à sa performance, en le faisant tremper dans du vinaigre et en le rinçant
ensuite avec de l’eau douce avant de le replacer dans l’aquarium.
4. Nettoyer le protège-chauffe-eau sous unjet d’eau en s’assurant que toutes les ouvertures ne
.
sont pas obstruées par de la sa
leté et des débris. Au besoin, utiliser une brosse douce.
COMMENT ENLEVER LE PROTÈGE-CHAUFFE-EAU
Une fois le chauffe-eau retiré de l’aquarium et du support à ventouses, ôter le protège-chauffeeau pour avoir accès au tube intérieur en verre. À l’aide d’un tournevis à tête plate, soulever
légèrement le verrou solide à l’arrière de la partie supérieure du chauffe-eau pour libérer et
retirer le protège-chauffe-eau tel qu’il est montré dans les illustrations ci-dessous.
(I)
(G) (H)
(J) (K)

12
1 CORDON D’ALIMENTATION
2 LEVIER DE TEMPÉRATURE FACILE
À RÉGLER
3 SCELLEMENT DE SÉCURITÉ ÉTANCHE
4 AFFICHAGE À CRISTAUX LIQUIDES DE
LA TEMPÉRATURE
5 SYSTÈME DE SURVEILLANCE
ÉLECTRONIQUE
6 DÉTECTEUR THERMIQUE
7 TUBE EN VERRE
8 NOYAU CHAUFFANT EN CÉRAMIQUE
9 SUPPORT RÉGLABLE À VENTOUSES
10 PROTÈGE-CHAUFFE-EAU
11 VENTOUSES (3)
12 ADAPTEUR DE MONTAGE
POUR AQUARIUM D’EAU DOUCE
OU D’EAU DE MER
3
4
6
5
7
8
Magasin
11
Tél. :
F
M
www.hagen.com
9
MM JJ AA
Date de l’achat
Espèce(s) de poissons
Âge Sexe
E50 E100 E200 E300
10
12
POUR LE SERVICE AUTORISÉ DE RÉPARATION SOUS GARANTIE :
Pour la réparation de cet article sous garantie, veuillez le retourner (bien emballé et par
courrier recommandé) à l’adresse indiquée ci-dessous, accompagné d’un reçu daté et
d’une note expliquant la raison du retour.
Si vous avez un problème ou des questions au sujet du fonctionnement de cet appareil,
veuillez nous permettre de vous aider avant de le retourner à votre détaillant. La plupart des
problèmes peuvent êtr
e résolus rapidement par un appel téléphonique au numéro sans frais.
Lorsque vous nous téléphonez (ou nous écrivez), s’il vous plaît ayez en main tous les
renseignements pertinents tels que le numéro de modèle, l’âge du produit, les détails sur
l’aménagement de l’aquarium ainsi que des précisions sur le problème.
CANADA SEULEMENT :
Industries Hagen Ltée
3235, rue Guénette, Montréal (Québec) H4S 1N2
Numéro sans frais 1 800 55HAGEN (1 800 554-2436). Entre9het16h30(HNE).
FRANCE :
Rolf C. Hagen (France) SA.
Parisud 4, boulevard Jean Monnet, F-77388 Combs la Ville
Pour enregistrer votre garantie en ligne ou pour plus d’information sur ce produit ou sur nos
autres produits, visitez notre site Web www.hagen.com.
CARTE D’ENREGISTREMENT DE LA GARANTIE
Oui Non
Retourner pour valider votre garantie. Si vous préférez, vous pouvez enregistrer l’article sur notre site Web
S’agit-il d’un
Adresse
Nom
Ville Province
Code postal
GARANTIE DE 5 ANS
Les chauffe-eau Fluval de série E sont garantis contre tout défaut de matériaux et de
main-d’œuvre pour une période de 5 ans, dans des conditions normales d’utilisation. La
garantie s’applique à toutes les pièces non remplaçables, ce qui signifie que le chauffe-eau
sera réparé ou remplacé sans frais, à la discrétion du fabricant, lorsque le chauffe-eau
complet sera retourné, port payé et accompagné d’une preuve d’achat. Cette garantie ne
s’applique pas
modifiés. Le fabricant ne peut être tenu responsable des pertes ou des dommages causés aux
animaux et aux biens, quelle qu’en soit la raison.
RECYCLAGE
Ce symbole porte le marquage de la collecte sélective des déchets
d’équipements électriques et électroniques (DEEE), ce qui signifie
qu’on doit éliminer ce produit conformément à la directive
européenne 2002/96/ EC afin d’être recyclé ou désasse
minimiser ses répercussions sur l’environnement. Pour plus
d’information, contactez les autorités locales ou régionales.
Les produits électroniques non compris dans le processus de
collecte sélective sont potentiellement dangereux pour
l’environnement et la santé humaine en raison de la présence
de substances dangereuses.
aux articles utilisés de façon inappropriée, avec négligence ou ayant été
mblé pour
Ville Province
cadeau?
Volume de l’aquarium

Falls Sie dies vorziehen, können Sie sich stattdessen auch auf unserer Website unter www.hagen.com registrieren.
Para el registro en línea, visite nuestro sitio web en www.hagen.com
To register online, visit our website at www.hagen.com • Pour l’enregistrement en ligne, visiter notre site Web à www.hagen.com
WF10 5QH
Rolf C. Hagen (U.K.) Ltd.
Castleford, W. Yorkshire
UK
Baie d’Urfé, Québec H9X 0A2
20500 Trans Canada Hwy,
Rolf C. Hagen Inc.
CANADA
Registrierungskarte aus und schicken Sie sie an uns zurück.
besser betreuen können, füllen Sie bitte diese
Bitte zurücksenden zur Erhaltung der Garantie. Damit wir Sie
GARANTIE-REGISTRIERUNGSKARTE
When complete, place Warranty Registration Card in an
envelope, affix correct postage and mail to:
WARRANTY REGISTRATION CARD
www.hagen.com
F-77388 Combs la Ville.
Av.DeBeniparrelln.11y13
46460 Silla, Valencia
Hagen France SA.,
FRANCE
Rolf C. Hagen España S.A.,
ESPAÑA
Mansfield, MA. 02048
305 Forbes Blvd,
GmbH & Co. KG,
25488 Holm
Rolf C. Hagen (U.S.A.) Corp.,
U.S.A.
HAGEN Deutschland
GERMANY
en u
n sobre debidamente franqueado y envíela a:
Una vez llenada, coloque la tarjeta de registro de la garantía
TARJETA DE REGISTRO DE LA GARANTÍA
enveloppe suffisamment affranchie et poster à :
Déposer la carte de garantie dûment remplie dans une
CARTE D’ENREGISTREMENT DE LA GARANTIE
E50
E 100
E Series
Innovativer elektronischer
Aquarienheizer
GEBRAUCHSINFORMATION
bis zu
15 U.S. gal/60 L*
bis zu
30 U.S. gal/120 L*
E 200
E300
bis zu
65 U.S. gal/250 L*
bis zu
100 U.S. gal/375 L*

Sehr geehrter Kunde,
Vielen Dank für den Kauf des neuen
FLUVAL E-Serie
Aquarienheizers. Die ausgezeichnete Leistung
dieses mit „ “ Technologie ausgestatteten Heizers wird noch durch den wohlverdienten
Ruf gestützt, dass Fluval die hochwertigsten Aquarienprodukte mit den besten Konstruktionen hat.
Damit Sie den Betrieb, die Leistungen sowie die ordnungsgemäße Installation und Wartung des Heizers
ganz verstehen, lesen und befolgen Sie bitte die nachfolgenden An
dies zu Fischverlusten und/oder Schäden an diesem Gerät führen.
weisungen. Bei Nichtbeachtung kann
BEWAHREN SIE DIESE
ANLEITUNGEN AUF .
WICHTIGE SICHERHEITSHINWEISE.
WARNUNG – Um sich vor Verletzungen zu schützen, sollten die grundlegenden
Sicherheitsvorkehrungen, inklusive der folgenden, beachtet werden:
1. LESEN UND BEFOLGEN SIE ALLE SICHERHEITSHINWEISE und alle wichtigen Hinweise auf dem Gerät
vor der Inbetriebnahme dieses Heizers. Bei Nichtbeachtung k
ann dies zu Fischverlusten und/oder
Schäden an diesem Gerät führen.
2. GEFAHR – Um einen möglichen elektrischen Schlag zu vermeiden, sollten Sie besonders
vorsichtig sein, weil zur Benutzung dieses Gerätes Wasser verwendet wird. Wenn eine der nachfolgenden
Situationen eintritt, sollten Sie nicht versuchen, das Gerät selber zu reparieren, sondern dieses an eine
autorisierte Kundendienststelle zur Reparatur geben oder das Gerät wegwerfen.
A. Wenn das Gerät anorma
le Wasserleckagen aufweist, trennen Sie es umgehend vom Stromnetz.
B. Überprüfen Sie das Gerät sorgfältig vor der Installation. Es darf nicht an das Stromnetz angeschlossen
werden, wenn sich Wasser auf Teilen befindet, die nicht nass werden dürfen. Bitte prüfen sie den Heizer
sorgfältig vor Inbetriebnahme und vergewissern Sie sich, dass das Glas keine Brüche oder Risse
aufweist.
WARNUNG!
Der Heizerkern besteht aus Glas. Gehen Sie zu jeder Zeit vorsichtig mit dem Heizer um.
C. Kein Gerät mit beschädigtem Netzkabel oder beschädigtem Stecker benutzen oder wenn dieses nicht
richtig funktioniert oder heruntergefallen oder anderweitig beschädigt wurde. Die Netzschnur dieses
Gerätes kann nicht ausgewechselt werden; wenn die Schnur beschädigt ist, muss das Gerät
weggeworfen werden. Niemals die Schnur abschneiden.
D. Um die Möglichkeit auszuschließen, dass der Gerätestecker oder
die Steckdose nass werden, soll das Gerät neben ein
er
Wandsteckdose so angeordnet werden, dass kein Wasser auf
Steckdose oder Stecker tropfen kann. Eine „Tropfschleife“ (siehe
Abb.) sollte zur Steckdose hin gebildet werden. Die „Tropfschleife“
ist der Teil des Netzkabels, der unter dem Niveau der Steckdose
oder der Anschlussdose bei Verwendung einer
Verlängerungsschnur liegt. Damit wird verhindert, dass W asser
die Schnur entlang wandert und mit der Steckdose in Berührung
kommt. Wenn der Stecker oder Steckdose na
ss werden,
Netzkabel NICHT aus der Steckdose ziehen. Sicherung oder Sicherungsschalter des Stromkreises für
das Gerät ausschalten. Erst danach das Netzkabel herausziehen und die Steckdose auf Vorhandensein
von Wasser überprüfen.
3. Dieses Gerät ist nicht für den Gebrauch von Personen (einschließlich Kindern) mit eingeschränkten
physischen, sensorischen oder geistigen Fähigkeiten vorgesehen, es sei denn, ihnen wurde der Gebrauch
des Gerätes unter Beaufsicht
igung oder Anleitung durch eine verantwortliche Person, die für deren
Sicherheit verantwortlich ist, erlaubt. Kinder sollten unter Aufsicht stehen, um sicherzustellen, dass sie
mit dem Gerät nicht spielen.
4. Zur Vermeidung von Verletzungen berühren Sie niemals heiße Teile.
5. VORSICHT: Vor jeder Wartungsarbeit im Aquarium müssen sämtliche elektrischen Geräte vom
Stromnetz getrennt werden. Beim Eintauchen oder Herausnehmen des Heizers aus dem Wasser muss
imme
r der Netzstecker herausgezogen sein. Anschließend muss der Heizer zwecks Abkühlung noch
mindestens 30 Minuten im Wasser bleiben. Niemals am Stromkabel reißen um den Stecker aus der
Steckdose zu ziehen. Greifen Sie den Stecker mit der Hand und ziehen sie ihn aus der Steckdose heraus.
Ein elektrisches Gerät, das nicht in Betrieb ist muss immer vom Stromnetz getrennt sein.
6. Dies ist ein Aquarienheizer. Benutzen Sie das Gerät nur für seinen vorgesehenen Verwendungszwec
k.
Benutzen Sie den Heizer nicht in Schwimmbecken, Gartenteichen oder Badezimmern etc. Die
Verwendung von Anbauteilen, die nicht vom Gerätehersteller empfohlen oder verkauft werden, kann zu
einem unsicheren Betriebszustand führen.
7. Dieser Heizer ist nur für den Gebrauch in
geschlossenen Räumen
geeignet. Installieren oder lagern
Sie das Gerät nicht an Stellen, an denen es der Witterung oder Temperaturen unter dem Gefrierpunkt
ausgesetzt ist.
8. Achten Sie darau
f, dass der Heizer sicher installiert ist, bevor er in Betrieb genommen wird. Der Heizer
muss mindestens bis zur angezeigten MIN. WASSERHÖHE (MIN. WATER LEVEL) unter Wasser getaucht
werden (aber nicht tiefer als 100 cm). Der Aquarienheizer darf niemals außerhalb des Wassers in Betrieb
genommen werden. Der Heizer darf niemals ohne Heizerschutz betrieben werden.
9. Wenn ein V erlängerungskabel benötigt wird, muss ein Kabel geeigneter Leistung benutzt werden. Ein
Verl
ängerungskabel mit einer kleineren Ampere- oder Wattzahl als das Gerät kann sich
überhitzen. Achten Sie darauf, das Verlängerungskabel so zu verlegen, dass man nicht darüber stolpert
oder es herauszieht.
10. BEWAHREN SIE DIESE ANLEITUNG AUF.
FLUVAL E-SERIE mit “ ” Technologie
Sofortige und klare Antworten für das Wohlergehen Ihrer Aquarienbewohner!
Die E-Serie arbeitet mit einem innovativen, digitalen Mikroprozessor-Messsystem mit zwei
Temperatursensoren, das die Wassertemperatur im Aquarium kontinuierlich misst und anzeigt.
Außerdem bezieht es sich auf die eingestellte Temperatur in Bezug auf die gegenwärtige
Wassertemperatur .Während des normalen Betriebes, wenn die Wassertemperatur sich
im Bereich +/- 1° C oder
+/- 2° F um die eingestellte Temperatur befindet, ist das Hintergrundlicht auf der LCD-Anzeigegrün. Wenn die
Wassertemperatur die eingestellte Temperatur um mehr als 1° C oder 2° F überschreitet, wird das
Hintergrundlicht rot. Wenn die W assertemperatur die eingestellte T emperatur um mehr als 1° C oder 2° F
unterschreitet, wird das Hintergrundlicht blau. Wenn die Temperatur um mehr als +/- 3°C oder +/- 5,5° F von
der eingestellten Temperatur abwe
icht, blinkt das Display.
*Der Heizer ist bereits vorkalibriert. Unvorhergesehene Bedingungen wie eine niedrige Raumtemperatur ,
große Temperaturschwankungen, das Fehlen einer Aquarienabdeckung, die Verwendung von Tauchpumpen
und Filtern, sowie die Aufstellung des Aquariums in der Nähe von Kältequellen können dazu führen, dass eine
höhere Wattzahl für den ordnungsgemäßen Betrieb erforderlich ist. Bei den Volumenangaben handelt es
sich um ungefähre W erte, d
ie sich auf eine entsprechende Wassertemperatur von 26°C/78°F und eine
Zimmertemperatur von 20°C/68°F beziehen. Sollte die Umgebungstemperatur um wenigstens 1°C/2°F höher
sein, oder externe Hitzequellen die Aquariumtemperatur um mehr als 1°C/2°F anheben, wird die LCD-Anzeige
solange rot bleiben, bis sich die Bedingungen normalisiert haben.
THERMOSENSOR
Eine Temperatur -Sensor-Technologie so präzise wie ein externer Fühler!
Der eingebaute Thermosensor fr
agt die gegenwärtige Wassertemperatur direkt durch das Glas des
Heizerröhrchens ab und nicht durch die Lufttemperatur in der Röhre, wie es bei StandardThermostaten mit Bimetall der Fall ist. Da der Thermosensor die echte Wassertemperatur abfragt, ist die
Temperaturmessung präziser und verlässlicher als bei konventionellen Bimetallheizern.
VERLÄSSLICHE UND PRÄZISE ELEKTRONISCHE KOMPONENTEN
Innovative Elektronik – keine beweglichen Teile, die sich abnutze
n könnten!
Da der FLUVAL E-Heizer keine Bimetallpunkte hat, gibt es keine beweglichen Teile, die sich verbiegen,
korrodieren oder sich abnutzen könnten. Die Thermostatkontrolle des Heizers ist von dem
Thermosensor getrennt; anders als bei herkömmlichen Bimetallheizern, bei denen der Sensor direkt in das
Thermostat eingebaut ist. Daher wird er weniger von Fremdeinwirkungen beeinträchtigt.
INSTALLATION
Es ist empfehlenswert, das Aquarium mit Wasser zu befüllen
, das annähernd die gewünschte
Temperatur hat, die sie erreichen möchten.
Um eine gleichmäßige und gründliche Verteilung des aufgewärmten Wassers sowie eine genaue
Temperaturanzeige sicher zu stellen, muss der Heizer in unmittelbarer Nähe der Wasserbewegungsquelle
installiert werden. Es wird empfohlen den Heizer im hinteren Bereich des Aquariums in der Nähe des
Wasserrücklaufs eines Filters oder einer Pumpe anzubringen. Der Heizer
muss
zu jeder Zeit mindestens bis
zu dem angezeigten „Mindestwasserstand“ in Wasser eingetaucht sein. Sorgen Sie für eine gleich bleibende
Wasserhöhe im Aquarium und gleichen Sie durch Verdunstung verloren gegangenes W asser aus.
1. Positionieren Sie den Heizer im Aquarium und drücken Siedie Saugnäpfe fest gegen das Glas, damit er
fest an der Aquarienwand sitzt. Wenn eine Installation an der Rückwand nicht möglich sein sollte,
benutzen Sie den Installationsadapter für die Seitenwände (Abb A).U
m die seitliche Befestigung
anzubringen, müssen zunächst die Saugnäpfe von der Heizerbefestigung entfernt und in die dafür
vorgesehenen Öffnungen der seitlichen Befestigung eingesetzt werden (Abb. B und C). Die drei
hervorstehenden Arme der seitlichen Befestigung werden dann in die jetzt offenen Löcher der flachen
Heizerbefestigung eingeführt. (Abb D).
Wichtig:
Positionieren Sie den Heizer an einem Ort, an dem er nicht blockiert wird und an dem ein
freier Wasserf
luss möglich ist, um eine gleichmäßige Wärmeverteilung sicherzustellen. Stellen Sie bei der
Positionierung des Heizers sicher, dass der Wasserstand im Aquarium niemals unter die
Mindestwasserstandslinie fällt, die auf dem Heizerschutz angezeigt ist. Gegebenenfalls können Sie die
Höhe des Heizers anpassen, indem Sie ihn einfach auf der Halterung nach oben oder nach unten schieben.
Dabei müssen Sie auf die beiden Freigabearme an der Seite des Heizerschutzes drück
en. Achten Sie
(B)(A)

(C)
(D)
darauf, dass der Heizer nicht von Steinen, Dekorationsgegenständen oder Kies berührt wird, da sonst die
Wärme im Heizerröhrchen ungleichmäßig erzeugt wird.
2. Geben Sie dem Heizer mindestens 20 Minuten Zeit, um sich der Aquarienwassertemperatur anzupassen,
bevor Sie ihn mit dem Stromnetz verbinden. Achten Sie darauf, dass Sie eine „Tropfschleife“ mit dem
Netzkabel des Heizers und aller anderen Geräte in oder am Aquarium gebildet haben.
3. Verbinden Sie den Heizer n
(siehe Abschnitt
Aquarientemperatur (siehe Abschnitt
ach 20 Minuten mit dem Stromnetz und stellen Sie die Gradskala
„EINSTELLUNG DER °C- ODER DER °F-GRADSKALA“
„EINSTELLUNG DER AQUARIENTEMPERATUR“
) und die
gegebenenfalls ein. Wenn der Heizer einmal eingestellt ist, müssen Sie die Einstellung nicht mehr
anpassen.
4. Jedes Mal wenn der E-Heizer mit dem Stromnetz verbunden wird, durchläuft der Fluval E-Heizer einen
Selbsttest, mit dem er die eingebaute Schaltung
stechnik und den Sensorenbetrieb prüft. Danach prüft
er die äußeren Bedingungen. Der Selbsttest dauert einige Minuten. In dieser Zeit ist der E-Heizer für ein
paar Sekunden an, um den Heizerbetrieb und die Anwendungsbedingungen zu überprüfen. Nachdem der
Selbsttest abgeschlossen ist, nimmt der E-Heizer wieder seinen regulären Betrieb auf. Während des
Selbsttestes zeigt die LCD-Anzeige die Wassertemperatur an.
WARNUNG: Der Heizer darf niemals außerhalb des Wass
ers in Betrieb genommen werden. Wenn der
Wasserstand unter den Mindestwasserstand fällt, kann das Thermostat die Wassertemperatur nicht mehr
„lesen“ und daher die Beheizung nicht mehr ordnungsgemäß kontrollieren. Wenn der Heizer aus dem
Wasser genommen werden muss oder wenn Sie das Wasser wechseln, trennen Sie den Heizer vom
Stromnetz und warten Sie mindestens 30 Minuten, damit der Heizer abkühlen kann.
EINSTELLUNG DER °C- ODER DER °F-GRADSKALA
Der Heizer wurde in d
er Fabrik für Märkte mit 50 Hz auf °C und für Märkte mit 60 Hz auf °F eingestellt. Wenn
Sie die Gradskala verändern möchten, halten Sie den Hebel für mindestens 5 Sekunden ganz nach links
gedrückt (-) (Abb E). Wenn die neue Gradskala angezeigt wird, können Sie den Hebel loslassen. Nach ein
paar Sekunden zeigt das Display automatisch wieder die Wassertemperatur im Aquarium an. ( Abb F).
EINSTELLUNG DER AQUARIENTEMPERATUR
(E)
Der Heizer wurde in der Fabrik auf 25° C / 77° F eingestel
(F)
lt. Wenn Sie eine andere Wassertemperatur
einstellen möchten, benutzen Sie den Hebel oben am Heizer. Drücken Sie den Hebel nach rechts oder links
und lassen ihn wieder los. Das Display fängt an zu blinken und zeigt dieeingestellte Temperatur an. (Abb G
und H) Jede jetzt folgende Bewegung des Hebels nach rechts oder links erhöht oder vermindert die
eingestellte Temperatur in 0,5-Grad-Schritten (°C oder °F). Wenn Sie die gewünschte Einstellung
vorgenommen haben, lassen
Sie den Hebel wieder los. Nach einigen Sekunden hört das Display auf zu
blinken und geht wieder in den normalen Betrieb über und zeigt die Wassertemperatur im Aquarium an.
(G) (H)
INTELLIGENTE FEHLERMELDUNGEN
Der hochentwickelte Mikroprozessor des E-Heizers registriert einige anormale oder nicht optimale
Betriebszustände, die eine Überprüfung und einen ordnungsgemäßen Eingriff des Betreibers erfordern und
zeigt diese an. Die möglichen Fehlermeldungen sind in der nachstehenden Tabelle aufgeführt:
Angezeigte
Fehlermeldung
E1,
ALLE FARBEN WERDEN
ABWECHSELND
ANGEZEIGT
LF
)
WASSERZIRKULATION)
WIRD ALLE PAAR
SEKUNDEN ANGEZEIGT
ANZEIGE BLINKT
(SCHLECHTE
Heizerstatus Mögliche Ursache und Behebung
Der “E” Heizer hat eine Störung registriert
und die Stromzufuhr vom Heizelement
getrennt. Dieser Zustand kann nur durch
das Ziehen des Netzsteckers aufgehoben
werden.
Der “E” Heizer arbeitet weiter, obwohl ein
ordnungsgemäßer Betrieb durch schl
Wasserzirkulation in der Nähe des Heizers
eingeschränkt ist.
Die Fehlermeldung wird automatisch
aufgehoben, sobald eine entsprechende
Wasserzirkulation um den Heizer herum
wieder gegeben ist und der Heizer
ausreichend Zeit hatte sich selbst wieder
zu kalibrieren.
Der “E” Heizer hat einen anormalen
Betriebszustand festgestellt. Ziehen Sie den
Netzstecker heraus und überprüfen Sie, dass alle
Voraussetzungen für den korrekten Betrieb des
Heizers gem. Betriebsanweisung gegeben sind,
einschließlich Berücksichtigung des MIN
Wasserstandes.
Installieren Sie jetzt den Heizer erneut unter
Berücksichtigung der oben erwähnten
“BETRIEBSANWEISUNG”.
Der “E” Heizer hat eine schlechte
echte
Wasserzirkulation in Heizernähe festgestellt. Die
gleichmäßige und gründliche Verteilung von
warmem Wasser innerhalb des Aquariums
könnte durch die unzureichende Zirkulation
eingeschränkt sein. Stellen Sie eine ausreichende
Wasserzirkulation in der Nähe des Heizers sowie
im Aquarium sicher. Überprüfen Sie die
Einbauvorschriften gemäß
„BETRIEBSANWEISUNG“
WARNUNG: Dieser Aquarienheizer darf niemals außerhalb des Aquariums betrieben werden. Sollte der
Heizer aber trotzdem während des Betriebs zufällig aus dem Wasser genommen werden, DARF ER AUF
GAR KEINEN FALL wieder in das Wasser getaucht werden. Ziehen Sieden Netzstecker und lassen Sie
den Heizer vor Wiederverwendung für wenigstens 1 Stunde abkühlen.
WARTUNG
VORSICHT:Vor jeder Wartungsarbeit im Aquarium müssen sämtliche
elektrischen Geräte vom Stromnetz getre
nnt werden. Ziehen Sie den
(I)
Netzstecker des Heizers aus der Steckdose und lassen Sie ihn vor
dem Herausnehmen für mindestens 30 Minuten abkühlen.
Reinigen Sie den Heizerschutz und die Glasröhre regelmäßig, um
etwaige Verkrustungen und Ablagerungen zu entfernen, die die
Heizerleistung und die Empfindlichkeit des Thermostats beinträchtigen
könnten.
1. Nehmen Sie den Heizer aus der Saugnapfhalterung, indem Sie die
beiden Freigabearme an der Seite des Heizerschutzes
drücken und den
Heizer aus der Klammer ziehen (Abb I).
2. Um an die innere Glasröhre zu gelangen, entfernen Sie den Heizerschutz, wie im Abschnitt
“ENTFERNUNG DES HEIZERSCHUTZES VON DER EINHEIT” erklärt.
3. Reinigen Sie die Glasröhre des Heizers regelmäßig, um Ablagerungen zu entfernen, die die Leistung
des Heizers beeinträchtigen könnten. Ablagerungen können vom Heizer entfernt werden, indem Sie
die Heizerröhre in Essig eintauchen und dann mit frischem Wasser absp
ülen, bevor Sie ihn zurück
in das Aquarium setzen.
4. Reinigen Sie den Heizerschutz unter fließendem Wasser und stellen Sie sicher, dass alle Öffnungen
frei von Verunreinigungen und Ablagerungen sind. Gegebenenfalls benutzen Sie eine weiche
Reinigungsbürste.
ENTFERNUNG DES HEIZERSCHUTZES VON DER EINHEIT
Wenn Sie den Heizer aus dem Aquarium genommen und die Saugnapfhalterungabgenommen haben,
können Sie den Heizerschutz abnehmen und haben so Zugang zu der inneren
Glasröhre. Mithilfe eines
Schlitzschraubendrehers können Sie den Verschluss hinten an der Heizerkappe etwas anheben, um
den Heizerschutz freizulegen und ihn zu entfernen, wie in den Abbildungen unten gezeigt.
(J) (K)

12
1 NETZKABEL
2 TEMPERATUR-EINSTELLHEBEL
3 WASSERDICHTE SICHERHEITSDICHTUNG
4 LCD-TEMPERATURDISPLAY
5 ELEKTRONISCHES MESSSYSTEM
6 THERMOSENSOR
7 GLASROHR
8 HEIZERKERN AUS KERAMIK
9 ANPASSBARE SAUGNAPFHALTERUNG
10 HEIZERSCHUTZ
11 SAUGNÄPFE (3)
12 MONTAGEADAPTER
FÜR SÜSS- UND
MEERWASSERAQUARIEN GEEIGNET
3
4
6
5
7
8
Geschäft
11
9
MM DD YY
Kaufdatum
Tel .:
Fisharten
10
12
REPARATUR-SERVICE IM RAHMEN DER GARANTIE:
Wenn Sie sich zu Garantiezwecken online registrieren oder Sie weitere Information
über unser gesamtes Produktprogramm erhalten möchten, besuchen Sie uns auf
www.hagen.com.
KUNDENDIENST
Falls dieses Produkt fehlerhaft sein sollte, geben Sie es zusammen mit dem
Kaufnachweis entweder an Ihren örtlichen Zoofachhändler oder senden
Sie es mit im Voraus bezahlten Versandkosten an:
HAGEN Deutschland GmbH & Co. KG
Lehmweg 99 – 1
05
25488 Holm
GARANTIE-REGISTRIERUNGSKARTE
Bitte zur Erhaltung der Garantie zurücksenden. Falls Sie dies vorziehen, können
Sie sich stattdessen auch auf unserer Website unter www.hagen.com registrieren.
Name
Adresse
Stadt Telefonnummer
Postleitzahl
Alter Geschlecht M F
Ja Nein
War es ein
Geschenk?
Geschäft Telefonnummer
Größe des Aquariums
5 JAHRE GARANTIE
Auf die Fluval Aquarienheizer der E-Serie wird eine uneingeschränkte Garantie für Mängel in
Material und Verarbeitung für die Dauer von 5 Jahren eingeräumt. Diese Garantie gilt bei
Einhaltung der normalen Betriebsbedingungen, für die die Filter entwickelt wurden. Diese
Garantie gilt nicht für Geräte, diemissbräuchlich oder fahrlässig verwendet oder manipuliert
wurden. Diese Garantie umfasst keine Haftung für Lebewesen im Aquarium und ist
ausschließlich auf die Fluval Aquarienheizer beschränkt. Der Motor wurde werksseitig
versiegelt. Bei Manipulationen verliert diese Garantie ihre Gültigkeit.
RECYCLING. Dieses Produkt unterliegt der europäischen Richtlinie WEEE
2002/96/EC als auch späteren Änderungen. Die sachgemäße Entsorgung
und getrennte Sammlung von Altgeräten dienen der Vorbeugung von
potenziellen Umwelt- und Gesundheitsschäden. Sie sind eine Voraussetzung
für die Wiederverwendung und
das Recycling gebrauchter Elektro- und
Elektronikgeräte. Das auf dem Produkt oder in den dazugehörigen
Dokumenten platzierte Symbol weist darauf hin, dass das Produkt nicht in
den Hausmüll geworfen werden darf. Das Gerät sollte an die entsprechende
Entsorgungsstelle für Abfälle mit dem Ziel des Recyclings weggebracht
werden. Ausführlichere Informationen zur Entsorgung Ihrer Altgeräte
erhalten Sie bei Ihrer Kommune, Ihrem Müllentsorgungsdienst oder dem Fachh
ändler, bei dem
Sie das Produkt erworben haben.
E50 E100 E200 E300

Falls Sie dies vorziehen, können Sie sich stattdessen auch auf unserer Website unter www.hagen.com registrieren.
Para el registro en línea, visite nuestro sitio web en www.hagen.com
To register online, visit our website at www.hagen.com • Pour l’enregistrement en ligne, visiter notre site Web à www.hagen.com
WF10 5QH
Rolf C. Hagen (U.K.) Ltd.
Castleford, W. Yorkshire
UK
Baie d’Urfé, Québec H9X 0A2
20500 Trans Canada Hwy,
Rolf C. Hagen Inc.
CANADA
Registrierungskarte aus und schicken Sie sie an uns zurück.
besser betreuen können, füllen Sie bitte diese
Bitte zurücksenden zur Erhaltung der Garantie. Damit wir Sie
GARANTIE-REGISTRIERUNGSKARTE
When complete, place Warranty Registration Card in an
envelope, affix correct postage and mail to:
WARRANTY REGISTRATION CARD
www.hagen.com
F-77388 Combs la Ville.
Av. De Beniparrell n. 11 y 13
46460 Silla, Valencia
Hagen France SA.,
Rolf C. Hagen España S.A.,
Mansfield, MA. 02048
FRANCE
25488 Holm
ESPAÑA
Rolf C. Hagen (U.S.A.) Corp.,
305 Forbes Blvd,
HAGEN Deutschland
GmbH & Co. KG,
U.S.A.
GERMANY
en u
n sobre debidamente franqueado y envíela a:
Una vez llenada, coloque la tarjeta de registro de la garantía
TARJETA DE REGISTRO DE LA GARANTÍA
enveloppe suffisamment affranchie et poster à :
Déposer la carte de garantie dûment remplie dans une
CARTE D’ENREGISTREMENT DE LA GARANTIE
Calentador
electrónico avanzado para acuarios
INFORMACIÓN PARA EL USUARIO
E50
E 100
hasta
15 U.S. gal/60 L*
hasta
30 U.S. gal/120 L*
E 200
E300
E Series
hasta
65 U.S. gal/250 L*
hasta
100 U.S. gal/375 L*
Estimado cliente:
Gracias por adquirir el nuevo calentador de acuario de la
serieEdeFLUVAL
. El rendimiento
y la eficacia superiores de este calentador con tecnología están respaldados por
la mejor calidad y el mejor diseño en productos para acuarios que sólo Fluval puede ofrecer.
Para entender totalmente el funcionamiento y la eficacia de este calentador, lea y siga las
instrucciones para instalar, mantener y utilizar correctamente el aparato. De lo contrario, podrí
ocasionar la muerte de los peces o dañar el equipo.
GUARDE ESTAS INSTRUCCIONES
a
PARA CONSULTARLAS EN EL FUTURO.
ADVERTENCIA: Para evitar lesiones, se deben tener en cuenta las precauciones básicas de
seguridad, incluidas las que se detallan a continuación.
1. LEA Y CUMPLA CON TODAS LAS MEDIDAS DE SEGURIDAD y las advertencias importantes que
figuran en el aparato, antes de usarlo. De lo contrario, podría ocasionar la muerte de los peces o
dañar el equipo.
2. PELIGRO: Para ev
itar una posible descarga eléctrica, se debe tener especial cuidado, ya que se
manipula agua al usar el equipo del acuario. En las situaciones que se describen a continuación,
no intente hacer una reparación usted mismo; lleve el aparato a un centro autorizado que provea
los servicios necesarios o deséchelo.
A. Si el aparato presenta indicios de una pérdida irregular de agua, desenchúfelo inmediatamente de
la fuente de alimentación.
B. Inspeccione cuidadosamente el apa
rato una vez instalado. No se debe enchufar si hay agua en
alguna pieza que no esté diseñada para estar mojada. Antes de la instalación, verifique
cuidadosamente y asegúrese de que el tubo de vidrio no esté quebrado.
ADVERTENCIA:
El núcleo del calentador es de vidrio. Manipule la unidad con cuidado en todo
momento.
C. No utilice ningún aparato que tenga un cable o un enchufe dañados, que no funcione
correctamente o que se haya caído o dañado de alguna manera. El cable de alimenta
ción de este
aparato no se puede cambiar; si se daña, deberá desechar el aparato. Nunca corte el cable.
D. Para evitar que el enchufe o el tomacorriente se mojen,
coloque el aparato al costado de u n tomacorriente de pared,
con el fin de evitar que el agua gotee en el tomacorriente o el
enchufe. El usuario debe utilizar un “lazo de goteo” (ver
ilustración) en el cable que conecta el aparato al
tomacorriente. El “lazo de goteo” es la parte del cable que
está por debajo del nivel del toma
corriente, o el conector si
se usa un cable de extensión, para evitar que el agua resbale
por el cable y entre en contacto con el tomacorriente. Si el
enchufe o el tomacorriente se mojan, NO desenchufe el cable.
Desconecte el fusible o el interruptor que proporciona la
alimentación al aparato. A continuación, desenchufe y verifique si hay agua en el tomacorriente.
3. Este aparato no debe ser usado por personas (incluidos los niños) con capacidades físicas,
sensoriales o ment
ales reducidas, o personas sin experiencia ni conocimiento, a menos que sean
supervisadas o hayan recibido instrucciones sobre el uso del aparato de parte de una persona
responsable de su seguridad. Se debe supervisar a los niños para impedir que jueguen con el
aparato.
4. Para evitar lesiones, no toque las piezas calientes.
5. PRECAUCIÓN: Siempre desenchufe o desconecte todos los aparatos que están dentro delacuario
de la fuente de alimentación eléctrica antes de reali
zar el mantenimiento del equipo. Siempre
desenchufe el calentador antes de introducirlo en el agua o extraerlo. No extraiga el equipo del
agua hasta que se haya enfriado; para ello debe esperar al menos 30 minutos. Nunca tire con
fuerza del cable para quitar el enchufe del tomacorriente. Tome el enchufe y tire para
desconectarlo. Siempre desenchufe el aparato cuando no lo utilice.
6. Éste es un calentador de acuario.No use un aparato para una función que no sea para la queestá
diseñado (p. ej.: no utilice este calentador en piscinas, estanques de jardín, baños, etc.). El uso
de accesorios no recomendados o no vendidos por el fabricante del aparato puede provocar
condiciones de uso inseguras.
7. Este calentador es apto para uso en
INTERIORES
únicamente. No instale ni guarde el aparato
en lugares expuestos a las condiciones climáticas o a temperaturas bajo cero.
8. Asegúrese de que el calentador esté bien instalado antes de utilizarlo. El calent
ador debe
sumergirse al menos hasta el NIVEL DE AGUA MÍNIMO indicado (sin exceder una profundidad de
100 cm-39 pulgadas). Nunca debe utilizarse fuera del agua. Sólo para Canadá: El agua no debe
sobrepasar la LÍNEA DE AGUA MÁXIMA indicada. El calentador nunca debe utilizarse sin su
protector.
9. Si es necesario usar un cable de extensión, procure que tenga el calibre adecuado.
Un cable con un amperaje o vataje inferior al del aparato puede recalentarse. Se debe tener cuidado
a
l colocar el cable para que nadie se tropiece con él ni lo desenchufe. Un electricista calificado debe
realizar la conexión.
10.
GUARDE ESTAS INSTRUCCIONES
SERIE E de FLUVAL con tecnología
¡Una solución segura e inmediata para el bienestar de los habitantes de su acuario!
La serie E emplea un avanzado sistema de control con un microprocesador digital y sensores
de temperatura dobles que controlan y muestran constantemente la temperatura del agua del acuario.
Además, relaciona la temperatura programada con la temperatura real del agua. Durante
su funcionamiento normal, cuando la temperatura del agua se encuentra entre -1/
+1 °C o -2/+2 °F
en comparación con la temperatura programada, la luz posterior de la pantalla LCD se muestra en
color verde. Si la temperatura del agua excede a la temperatura programada en 1 °C o 2 °F, la luz
posterior de la pantalla LCD se mostrará en color rojo. Si, en cambio, la temperatura del agua es
1 °C o 2 °F más baja que la temperatura programada, la luz posterior de la pantalla LCD se mostrará
en azul. Si se aleja -/+3 °C o -/+5,5 °F de la temperatura programada, la pantalla des
tellará para alertar
al usuario.
*El calentador está calibrado de fábrica. La baja temperatura ambiente, las grandes fluctuaciones, la
falta de una cubierta para el acuario, la presencia de bombas y filtros sumergibles yla proximidad del
acuario a fuentes de refrigeración constituyen variables por las cuales posiblemente se necesite un
vataje más alto para que el control sea el adecuado. Los volúmenes indicados son valores
aproximados correspondientes a aguas con te
mperaturas de hasta 26.°C/78.°F con una temperatura
ambiente de 20.°C/68.°F. Si la temperatura ambiente es superior a la temperatura p rogramada en al
menos 1.°C/2.°F o las fuentes de calefacción externas elevan la temperatura del acuario en más de
1.°C/2.°F, la pantalla de LCD permanecerá roja hasta que las condiciones cambien.
SENSOR TÉRMICO
¡La tecnología de detección de temperatura tan precisa como una sonda externa!
El sensor térmico interno mide la temperatura r
eal del agua directamente a través del vidrio del tubo
del calentador, en lugar de medir la temperatura del aire dentro del tubo, tal como lo hacen los
termostatos de lámina bimetálica estándar. Puesto que el sensor térmico lee la temperatura real del
agua, es más preciso y confiable que los calentadores bimetálicos convencionales.
COMPONENTES ELECTRÓNICOS CONFIABLES Y PRECISOS
Sistema avanzado de circuitos electrónicos: ¡no incluye piezas móviles que se desgasten!
D
ado que el calentador de la serie E de FLUVAL no presenta extremos bimetálicos, no incluye piezas
móviles que hagan arco, se corroan o se gasten. El control termostático del calentador está separado
del sensor térmico del agua, a diferencia de los calentadores bimetálicos convencionales, donde el
sensor se encuentra incorporado directamente en el termostato. Por este motivo, resulta menos
perjudicado a causa de factores externos. El calentador funciona ininterrumpi
damente hasta alcanzar
la temperatura adecuada para que el calentamiento resulte más rápido.
INSTALACIÓN
Se recomienda llenar el acuario con agua que tenga una temperatura similar a la que se
intenta alcanzar.
Para garantizar una distribución total y uniforme del agua entibiada, y para proporcionar un lectura
más precisa de la temperatura, debe colocar el calentador cerca de una fuente de movimiento del
agua. Especialmente, debe colocarse en la parte posterior del acu
la bomba de agua. En todo momento, el agua
debe
cubrir el calentador al menos hasta el nivel de
ario, cerca del filtro ode la salida de
agua MÍNIMO indicado. Para compensar la pérdida de agua que provoca la evaporación, siempre
mantenga el mismo nivel de agua en el acuario.
1. Introduzca el calentador en el acuario y presione las ventosas de succión firmemente contra el
vidrio, para que se adhieran a la pared del acuario. Si no es posible realizar el montaje en el vidrio
trasero, us
e el adaptador de montaje para el vidrio lateral (Fig. A). Para adaptar el soporte lateral
(A)
(B)
de montaje, primero quite las ventosas del soporte del calentador y colóquelas en las ranuras del
soporte lateral de montaje. (Figura B y figura C) Los tres brazos prominentes del soporte lateral
de montaje se aseguran a las ranuras externas del soporte plano del calentador (Fig. D).
Importante:
circulación
Acomode el calentador donde la unidad esté despejada y donde exista una libre
del agua, para asegurar la dispersión uniforme del calor. Procure que el calentador se
instale de modo que el nivel de agua del acuario nunca se encuentre debajo del nivel MÍNIMO

(C)
(D)
indicado en el protector del calentador. Si es necesario, puede ajustar la altura del calentador. Para
esto, deslícelo por el soporte oprimiendo los dos sujetadores que están al costado del protector
del calentador. Procure que no haya rocas, adornos ni obstrucciones de grava que toquen el
calentador, para que no se produzca un calor desigual.
2. Permita que el calentador se aclimate a la temperatura del agua del acuario durante 20 minutos
antes de enchufarlo a un tomacorr
iente. Procure utilizar un lazo de goteo en el cable del calentador
y de cualquier otro artículo eléctrico que se coloque sobre el acuario o dentro de éste.
3. Después de 20 minutos, enchufe el calentador y configure la escala de grados, en caso de ser
necesario, (vea a continuación el párrafo
°CO°F
) y la temperatura del acuario (vea a continuación el párrafo
TEMPERATURA DEL ACUARIO
CÓMO CONFIGURAR LA ESCALA DE GRADOS
CÓMO AJUSTAR LA
). Una vez realizada la configuración, no es necesario volver
a regularla.
4. En cada encendido, el calentador de la serie E pasa por un procedimiento de autocomprobación
inicial durante el cual realiza un autodiagnóstico para verificar el circuito interno y el funcionamiento
de los sensores, seguido de un período para verificar las condiciones circundantes. La verificación
autodiagnóstica tarda algunos minutos. Durante este lapso, la resistencia se enciende durante
unos segundos para verificar el funciona
miento del calentador y las condiciones de uso. Luego del
autodiagnóstico, el calentador de la serie E comienza su funcionamiento estándar.
Durante la prueba autodiagnóstica, la pantalla LCD mostrará la temperatura del agua.
ADVERTENCIA: El calentador nunca debe estar en funcionamiento fuera del acuario. Si el nivel del
agua desciende por debajo del nivel de agua MÍNIMO, el termostato no puede seguir “leyendo” la
temperatura del agua, por lo que no puede controlar corr
ectamente el calentamiento. Si debe sacar
el calentador del agua o si debe traspasar o cambiar el agua, desenchufe el calentador y espere al
menos 30 minutos para que éste se enfríe.
CÓMO CONFIGURAR LA ESCALA DE GRADOS °C O °F
El calentador está configurado de fábrica con la escala de grados ºC para los mercados de 50 Hz y con
la de ºF para los mercados de 60 Hz. En caso de que necesite cambiar la escala de grados, mantenga
la palanca de ajuste en la posición izquierda (-) durante al men
os 5 segundos (Fig. E). Cuando se
muestre la nueva escala de grados, podrá soltar la palanca. Después de unos segundos, la pantalla
mostrará otra vez la temperatura del agua automáticamente (Fig. F).
CÓMO AJUSTAR LA TEMPERATURA DEL ACUARIO
El calentador está ajustado de fábrica en 25 °C/77 °F. Si desea cambiar la temperatura del agua,
(E)
(F)
utilice la palanca de ajuste fácil que está en la parte superior del calentador. Oriente la palanca hacia
la derecha o la izquierda y suéltela;
la pantalla LCD comenzará a destellar y aparecerá la temperatura
programada (Fig. GiyH). Los movimientos posteriores de la palanca hacia la izquierda o la derecha
aumentarán o disminuirán la temperatura establecida en intervalos de 0,5 grados (°C o °F). Una vez
realizado el ajuste, suelte la palanca. Después de unos segundos, la pantalla dejará de destellar, volverá
a las condiciones de funcionamiento normales y mostrará la temperatura del agua del acuario.
MENSAJES DE ERROR INTELIGENTES
El microprocesador avanzado del calentador E detecta y muestra las condiciones de uso irregulares
o no óptimas, que requieren que el propietario verifique y tome las medidas adecuadas. Los posibles
códigos de error son los siguientes:
Código de error
mostrado
E1,
LA PANTALLA
DESTELLA, TODOS LOS
COLORES SE MUESTRAN
ALTERNADAMENTE
LF
(FLUJO BAJO) SE
MUESTRA CADA
ALGUNOS SEGUNDOS
Estado del calentador
El calentador “E” se encuentra en
estado de error y apaga la
resistencia. Este error sólo se puede
restablecer si se desenchufa la
unidad.
El calentador “E” continúa funcionando,
aunque el funcionamiento adecuado se
inhibe debido a la circulación deficiente
de agua alrededor del calentador.
El estado de error se restablecerá
automáticamente una vez que la
circulación de agua alrededor del
calentador sea adecuada y que el
calentador tenga tiempo de calibrarse
nuevamente.
Posible causa y solución
El calentador “E” detectó una condición de
uso irregular.
Desenchufe el calentador.
Verifique que todas las condiciones de uso
sean adecuadas y conforme a las
instrucciones, incluso aquellas
relacionadas con el nivel de agua MÍNIMO.
Vuelva a encender el calentador y siga las
instrucciones de “Instalación” antes
mencionadas.
El calen
tador “E” detectó circulación
deficiente de agua a su alrededor. La
distribución completa y uniforme del agua
entibiada dentro del tanque podría verse
limitada por una circulación deficiente.
Procure una circulación de agua adecuada
alrededor del calentador y dentro del
acuario. Verifique las condiciones de
instalación descritas en las instrucciones
de “INSTALACIÓN”.
ADVERTENCIA: Este calentador para acuarios nunca debe utilizarse fuera del agua. Si
accidentalmente retira el calentador del agua mientras está funcionando, NO lo vuelva
a sumergir. Desenchúfelo y déjelo enfriar durante al menos 1 hora antes de volver a
usarlo.
MANTENIMIENTO
PRECAUCIÓN: Desenchufe todos los aparatos que están
dentro del acuario antes de realizar el mantenimiento.
Desenchufe el calentador y deje que se enfríe durante al
menos 30 minutos antes de sacar
lo del agua.
Limpie asiduamente el protector del calentador y el tubo de vidrio
para eliminar incrustaciones y los depósitos que pueden afectar
el rendimiento del calentador y la sensibilidad del termostato.
1. Para separar el calentador del soporte para ventosas de
succión, oprima los dos sujetadores que están al costado del
protector del calentador y sepárelo del soporte
(Fig. I)
.
2. Para alcanzar el tubo de vidrio interno, quite el protector del
calentador como se expl
ica en el párrafo “QUITAR EL
PROTECTOR DEL CALENTADOR DE LA UNIDAD”, a
continuación.
3. Limpie asiduamente el tubo de vidrio del calentador para eliminar los depósitos que pueden
afectar su rendimiento. Puede eliminar los depósitos del calentador si remoja el tubo en
vinagre y luego lo enjuaga con agua dulce antes de colocarlo nuevamente en el acuario.
4. Limpie el protector del calentador con un chorro de agua, procurando eliminar la suciedad
y los desechos de todos sus ori
ficios. Si lo considera necesario, utilice un cepillo de limpieza
suave.
CÓMO QUITAR EL PROTECTOR DEL CALENTADOR DE LA UNIDAD
Cuando haya retirado el calentador del acuario y del soporte para ventosas de succión, podrá
quitarle el protector y acceder al tubo de vidrio interno. Con un destornillador de cabeza plana,
levante levemente la traba de seguridad en la parte posterior de la tapa del calentador y quite el
protector del calentador, como se muestra en las imágenes a con
(I)
tinuación.
(G) (H)
(J) (K)

12
1 CABLE DE ALIMENTACIÓN
2 PALANCA DE AJUSTE FÁCIL
DE LA TEMPERATURA
3 CIERRE HERMÉTICO DE SEGURIDAD
4 PANTALLA LCD DE VISUALIZACIÓN
DE TEMPERATURA
5 SISTEMA DE CONTROL ELECTRÓNICO
6 SENSOR TÉRMICO
7 TUBO DE VIDRIO
8 NÚCLEO DEL CALENTADOR
DE CERÁMICA
9 SOPORTE DE VENTOSAS REGULABLE
10 PROTECTOR DEL CALENTADOR
11 VENTOSAS (3)
12 ADAPTADOR DE MONTAJE
PARA ACUARIOS DE AGUA DULCE Y SALADA
3
4
6
5
7
8
Tienda
11
9
DD MM AA
Fecha de compra
TARJETA DE REGISTRO DE LA GARANTÍA
10
Tel .:
Tipo(s) de peces
Edad Sexo M F
E50 E100 E200 E300
12
SI TIENE UN PROBLEMA Y NECESITA AYUDA
Permítanos ayudarlo antes de devolver el producto a su distribuidor. La mayoría de los
problemas puede resolverse inmediatamente mediante una llamada sin cargo. Si lo prefiere,
puede comunicarse mediante nuestro sitio web en www.hagen.com. Cuando llame
(o escriba), tenga disponible toda la información importante, como el número del modelo o
los números de las piezas, y sepa decirnos cuál es la naturaleza del problema.
LLÁMENOS A NUESTRO NÚMERO SIN CARGO AL:
1-800-724-2436, entre las 8:30 a. m. y las 4:00 p. m., hora del Este estándar.
Solicite hablar con Servicio a la clientela.
PARA OBTENER EL SERVICIO DE REPARACIÓN AUTORIZADO CON GARANTÍA:
Devuelva el producto con la factura fechada y $4,00 en concepto de gastos de envío a:
Rolf C. Hagen (U.S.A.) Corp.,
Consumer Repair, 305 Forbes Blvd.,
Mansfield, MA 02048
REGÍSTRESE EN LÍNEA EN:
• Para obtener más información sobre los productos Hag
www.hagen.com
en
• Para recibir una copia GRATUITA a todo color de nuestra
Guía básica para acuarios
Devuelva esta tarjeta para convalidar su garantía. O, si prefiere, registre la información en nuestro sitio web, www.hagen.com
Nombre
Dirección
Ciudad Provincia
Código postal
Ciudad Provincia
¿Fue un regalo? Sí No
Tamaño del acuario
5 A OS DE GARANTŒA
Los calentadores electrónicos Fluval de la serie E tienen garantía por defectos en el material
o en su fabricación en caso de servicio y uso normal del acuario durante 5 años. La garantía
cubre todas las piezas no reemplazables, lo que significa que el calentador electrónico será
reparado o reemplazado según el criterio del fabricante, sin costo alguno, cuando se devuelva
el calentador completo con el comprobante de compra y los gastos de envío pagos. Esta
arantía no se aplica a los calentadores que han sido sometidos a uso indebido, negligencia
g
o maltrato. No se asume ninguna responsabilidad en relación con la pérdida o daños a los
animales de cría o de la propiedad personal independientemente de dicha causa.
RECICLAJE
Este símbolo lleva el símbolo de clasificación selectiva para
residuos de aparatos eléctricos y electrónicos (WEEE). Esto
significa que este producto debe manipularse según la Directiva
Europea 2002/96/
disminuir el impacto medio ambiental. Para obtener más
información, póngase en contacto con las autoridades locales o
regionales.
Los productos electrónicos que no están incluidos en este
proceso de clasificación selectivo son potencialmente
peligrosos para el medio ambiente y la salud de los seres
humanos debido a la presencia de sustancias peligrosas.
EC para ser reciclado o desmantelado para
 Loading...