

Vuescape 62904200 Installation & User Manual

5.0 MP Digital Camera
Item Number: 62904200
Installation & User’s Guide
All brand names and trademarks are the property of their respective owners.

1
Contents
OOvveerrvviieeww…………………………………………………………………………………………………………………………………………………………………………....………….... 22
SSyysstteemm rreeqquuiirreemmeennttss…
……………………………………………………………………………………………………………………………………………
..………….... 22
PPrreeccaauuttiioonnss…………………………………………………………………………………………………………………………………………………………………….... ………….
.
..33
BBuuttttoonn OOuuttlliinnee aanndd DDeessccrriippttiioonn……………………………………………………………………………………………
……………………………
.. …………....66
GGeettttiinngg SSttaarrtteedd…………………………………………………………………………………………………………………
…
………………………………………….. …………....88
Load Batteries………………………………………………………………………………………
8
8
Insert SD/MMC Memory Card (optional)………………………………………………………
8
8
Power On………………………………………………………………………………….. … 9
Power Off………………………………………………………………………………….. … 9
Function Selection Dial……………………………………………………………. …………9
Taking Pictures………………………………………………………………………………10
Description of Flash Function…………………………………………………………….…12
Self Timer……………………………………………………………………………….... …13
Shoot Mode Menu…………………………………………………………………………….14
Video Record…………………………………………………………………………………16
Video Record Mode Menu……………………………………………………………….. …18
Play Back Photo or Video……………………………………………………………………19
Playback Mode Menu…………………………………………………………………………21
Delete Photo/Video File ………………………………………………………………………23
Setup Mode……………………………………………………………………………………23
Connecting to Computer…………………………………………………………………… 26
IInnssttaalllliinngg tthhee DDrriivveerr…
…
……………………………………………………………………………………………………………………………………………
…………2277
PPhhoottoo aanndd VViiddeeoo SSooffeewwaarree OOppeerraattiioonn IInnssttrruuccttiioonnss…
………………………………………………………………………………………
.... 3311
OOp
p
eerraattiioonn ooff PPhhoottoo IImmpprreessssiioonn…
………………………………………………………………………………………………………………………
…
…
...
. ……3355
OOppeerraattiioonn ooff VViiddeeoo IImmpprreessssiioonn…………………………………………………………………………………
…
…………………………………………...
. ……3399
TTeecchhnniiccaall SSppeecciiffiiccaattiioonnss………………………………………………………………………
…………………………………………………………………
...
. ………4433
TTrroouubbllee sshhoooottiinngg aanndd FFAAQQ’’ss…………………………………
…
……………………………………………………………………………………...
. …………4455
FFCCCC aanndd CCEE RRaannddiiaattiioonn NNoorrmm…………………
…………………………………………………………………………………………………
…
……………4466
SSeerrvviiccee PPrroocceedduurree………………………………………………………
…
………………………………………………………………………………………….
. ………4477
WWaarrrraannttyy…………………………………………………………………………………………………………………
………………………………………………………
...
. ………4499

2
Overview
This camera is capable of taking a digital photo at a maximum of 5 mega pixels, and is able to
shoot brief AVI videos. The camera is able to automatically adjust exposure and color balance,
and it has a 4X digital zoom function. The camera can be used as a PC web camera when
connecting with a computer.
The screen display and illustrations contained in the manual are for demonstration purposes
on the digital camera. They may differ slightly from your actual digital camera because of the
different versions of technical development and production.
SSyysstteemm RReeqquuiirreemmeenntts
s
To operate and use the digital camera, please refer to the minimum system requirements for
the camera application. It is strongly recommended that you use above the minimum computer
requirements in order to operate the camera at it’s best capability. The minimum system
requirements are as follows:

3
System requirements
Operating system Microsoft Windows 98/SE, ME, 2000, XP
CPU Intel Pentium above or equivalent performance
Memory 128MB and above
Sound card, display
card
Sound card and display card support Direct X 8 or higher
version
Optical driver 4 X and above
Hard disc 500 MB and above residual space
Other A standard USB 1.1 interface port
PPrreeccaauuttiioonns
s
Please avoid subjecting the camera to dust and chemicals. Please store it in a cool, dry
and well ventilated location. Never place it in a location with high temperature, humidity
or dust to prevent failure.
It is suggested that you test the camera regularly during long periods of storage. Please
check to make certain the camera operates normally before use.
If dirt or stains accumulate on the camera or lens, it is required to use a piece of soft,
clean and dry cloth to wipe it out lightly. Never use rough cloth to wipe. Otherwise, it may
scrape the camera or lens surface.
If it is required to clean the lens surface, blow away the dust accumulated on the surface,
and then use cloth or towel suitable for optical equipment to wipe the lens lightly. If need

4
be please use a lens cleaning solution. Never use organic solvent to clean the camera.
Never touch the lens surface with finger.
The external SD and MMC card slots are made with precise electronic components. The
following conditions may cause the information stored on these cards to be lost or
damaged:
1. Use of the memory card incorrectly.
2. Memory card is subjected to being bent, dropped or stepped on.
3. Heat, humidity and direct sunlight.
4. Static or electromagnetic field around the memory card.
5. Removing the memory card or unplugging the digital camera power supply when
the digital camera or computer is accessing the memory card (i.e. read, write and
format, etc.)
6. Touching the metal contact surface of the card with a finger or metal object.
7. The memory card has reached the end of its service life (please purchase a new
memory card.)
The SD card contains a write protection switch used to prevent the information being
deleted by mistake. If the switch is placed in the lock position, the information inside the
card will be protected. However, when the card is placed in the Write protection status, it
cannot be used for operations such as saving pictures or deleting them.

◄◄ WWrriittee pprrootteeccttiioonn
sswwiittcchh
LLoocckk llooccaattiioonn
It should be noted that when saving a file in the memory or the memory card, the file size
should not be larger than the size of the memory.
The digital camera will function in temperatures of 0-40° C (32-104° F). Never place the
digital camera into an extreme heat environment, such as inside a car parked under
heated sun, or in a very damp environment. To avoid the condensation in the digital
camera, when it is taken out from a cold place to a warm location, please put the digital
camera into a tightly sealed plastic bag, and take it out after the digital camera
temperature reaches the indoor temperature.
Any television program, movie, music, picture and other resources all may be protected
by copyrights, and it may breach the laws concerning copyrights when shooting/using
these resources without permission. Please note that the resource subjected to the
copyright protection can only be used provided the user complies with the laws
concerning copyrights.
5
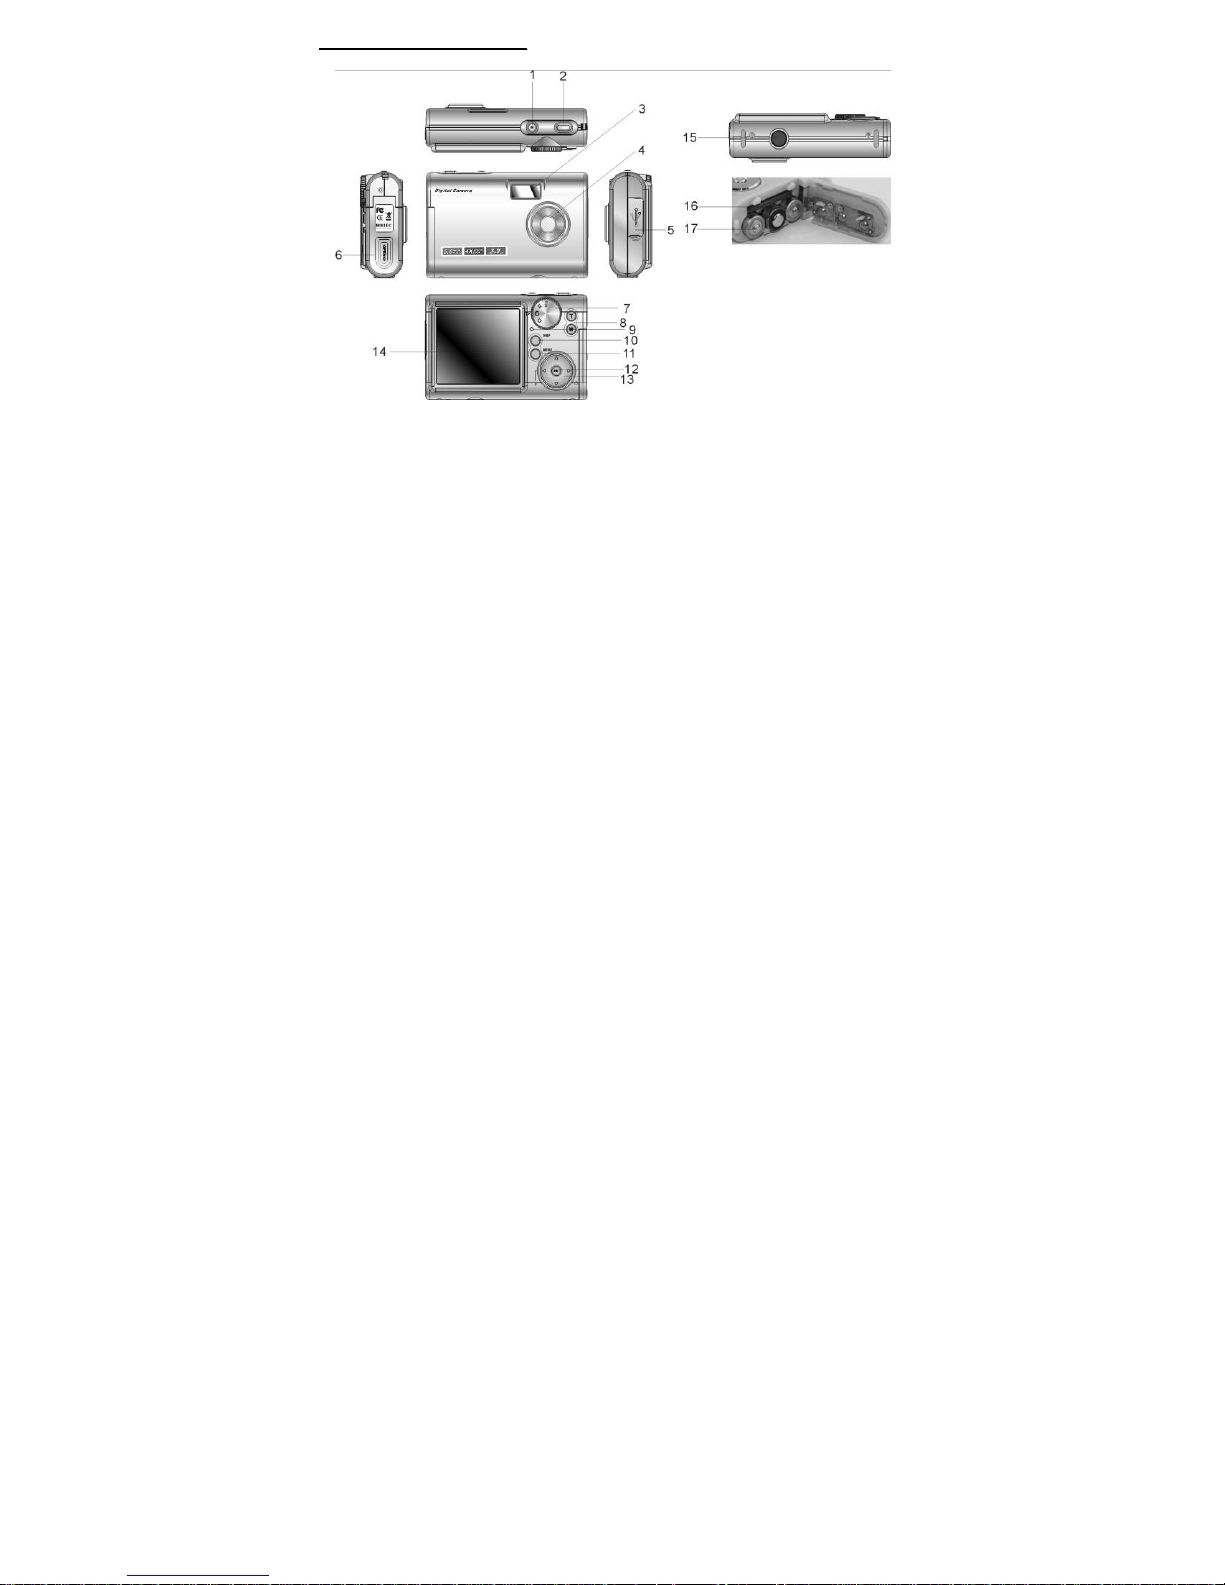
BBuuttttoonn OOuuttlliinnee aanndd DDeessccrriippttiioonn
6

7
FFuunnccttiioonn DDeessccrriippttiioonn ffoorr KKeeyyss:
:
No. Key Function description
1 Power Power On/ Off
2 Shutter Shoot
3 Flash strobe Flash pictures
4 Lens Shoot images
5 USB port Connection to computer
6 Battery lid Hold Batteries
7 Mode turntable dial Photos/Video record/playback/setup
8 Digital zoom key Tele-zoom in / Wide angle-zoom out
9 Status indicator (LED) System busy status indicator
10 DISP Display mode control button
11 MENU Enter/exit menu button
12 OK Play/Confirm button
13 Direction key Select cursor guide/value adjustment
14 Display screen TFT Display all operating information and pictures
15 Tripod support lug Connect camera to tripod
16 SD/MMC card slot For insertion of memory card
17 Battery compartment Load 3 x AAA batteries

8
GGeettttiinngg SSttaarrtteedd
Load Batteries:
The digital camera uses 3 AAA batteries. It is required to turn off the power first when
replacing the batteries.
Open the battery compartment lid, and load all batteries, noting the battery
positive/negative polarity mark. Then, close the battery compartment lid.
Insert SD/MMC Memory Card (optional)
The camera supports SD and MMC cards. If the camera is loaded with a memory card,
the camera’s built-in memory is disabled.
Open the battery compartment lid, insert SD/MMC memory card in the correct direction.
To take out a memory card, please open the battery compartment lid first, then press
downward on the SD/MMC memory card lightly and the card will pop out automatically.
Note:
z To insert the card, please follow the proper direction as shown by the symbol
beside the card slot. Please don't push too hard when inserting the card to prevent
damaging the card or camera parts.
z If it is required to remove the memory, the camera’s power should be turned off
prior to taking out the memory card.

Power On
Press the POWER key down and hold for 1 second. The camera will be turned on and
the LCD Display will light up.
Power Off
Manual power off: Press POWER key and hold for 1 second.
Auto power off: When the camera is not in use for a period of time, the camera will turn
off automatically at the time that you can set while in the setup mode in order to save on
battery power.
Low power off: When the battery power is low, a low power icon will appear on the LCD
display screen as
. Several seconds later, the camera will turn off automatically,
meaning that it is time to replace the cells with new batteries.
Function Selection Dial
Rotate the mode select dial ( ) after turning on the camera to select shoot / video
record/playback or setup modes.
9

Taking Pictures
1 Move the mode turntable dial after booting to enter shoot mode (
).
2 Hold the camera steady and press the shutter key to shoot one photo after aiming at a
scene.
3 Under the preview mode, press the Tele or Wide key to use the digital zoom function
(4×), and the right side of LCD is displayed with the zoom level indicator.
4 Press the navigation key left button to turn on the flash for shooting.
5 When the memory is full and the shutter button is pressed, it will display “Memory
full”, and no more memory space is available.
6 Press the DISP key under the shoot mode preview status to switch between the
following modes: normal mode-information, concealed mode or screen saver
(energy saving) mode.
Shoot mode preview (normal mode) Information concealed mode Screen saver
(energy saving) mode
10

Display
Graphics
Description
0007
Number of frames camera is able to take (7 photos) in current mode
(estimated value.)
Camera is set for frequency of 50 Hz at present, selectable frequencies:
50Hz/60Hz
The photo print date function is on, and the icon will be concealed if you
turn off the function.
The self-timer function is off, selectable for off
/ on
Flash is cancelled, you may select: forced flash
/auto flash / flash off
11

12
The present exposure compensation EV is set at 0.0, and in preview mode
you can press the direction key Up/Down to adjust the EV from:
-1.5EV~+1.5EV, in 0.3EV/steps
Image resolution setting, you may select from: 3264×2448; 2592×1944;
2304×1728, 2048×1536; 1600×1200 and 640×480
Battery icon represents the battery power status,
for low battery
power, and will activate automatic turning off
SD/MMC card icon displays after you insert a card into the camera.
Self-Timer 10 second count down allows you to get in picture
10
Description of Flash Function
Press Down the direction left key while in the shoot mode preview status to select the
flash functions from the following 3 modes:
Flash off--Forced flash--Auto flash

Graphic Display Description
Flash Off : Will not allow flash to function
Forced Flash: Flash will go off for each shot taken
Auto Flash: A sensor in the camera automatically controls whether to allo w
flash by measuring the available light present.
When turning on the flash function, the camera will charge the flash automatically and
during the charging interval, the status indicator will blink. When the charging is complete
(generally 10 sec.), the status indicator will stop blinking and this will indicate you are
ready to take the picture.
Self-Timer
Press Down the direction right key while in the shoot mode preview status to turn on the
self-timer function, and the self-timer icon
will appear at the top of LCD. Press again
the shutter key to start the 10 second count down which will allow you to get into the
picture. When the counter reaches 0 the camera will shoot one photo automatically.
Press the direction key’s Right key under the self-timer mode to turn off the self-timer
function, and to return back to the normal shoot mode.
Precautions:
1 When using built-in memory to save the photo, it is required to download the photo
or information backup from the camera before turning the power off and removing
the battery. Otherwise, the photo o r informat ion will b e lost due to camer a power off;
It is suggested to use external memory card (SD/MMC) to save the ph oto and
information.
2 When using the built-in memory to save a photo, only 2 photos can be taken , A
“Memory full” warning will appear after shooting 2 photos.
13

Shoot Mode Menu
1 Enter menu: Under the shooting mode preview status, press the MENU key to enter
menu mode;
2 Press the direction key Up/Down key to select menu, press the direction key
Left/Right to enter/exit a submenu or to adjust a parameter;
3 Press OK key to confirm the operation;
14

Shooting Mode Menu
Graphic
display
Description
Presently camera is set in shoot menu mode
/①②
Page 1 of menu, Page 2 of menu①②
Image
Size
Present resolution will be indicated in the menu title
Allows you to press the direction key Left or Right to adjust or select menu
parameter entry
Image resolution is selectable: 3264×2448; 2592×1944 (default);
2304×1728, 2048×1536; 1600×1200 and 640×480
Image quality can be selected as: Fine/ Normal/ Super
White balance setup : Auto/ manual (Daylight), (Cloudy), (Inca) and
(Fluoresce)
Photo effect available to setup for: Normal/black and white/Sepia/negative
Photo sharpness, available to setup for: +2/+1/0/-1/-2
Photo print date, available to setup for: Off/Date/ Date & time
15
 Loading...