

Page 1
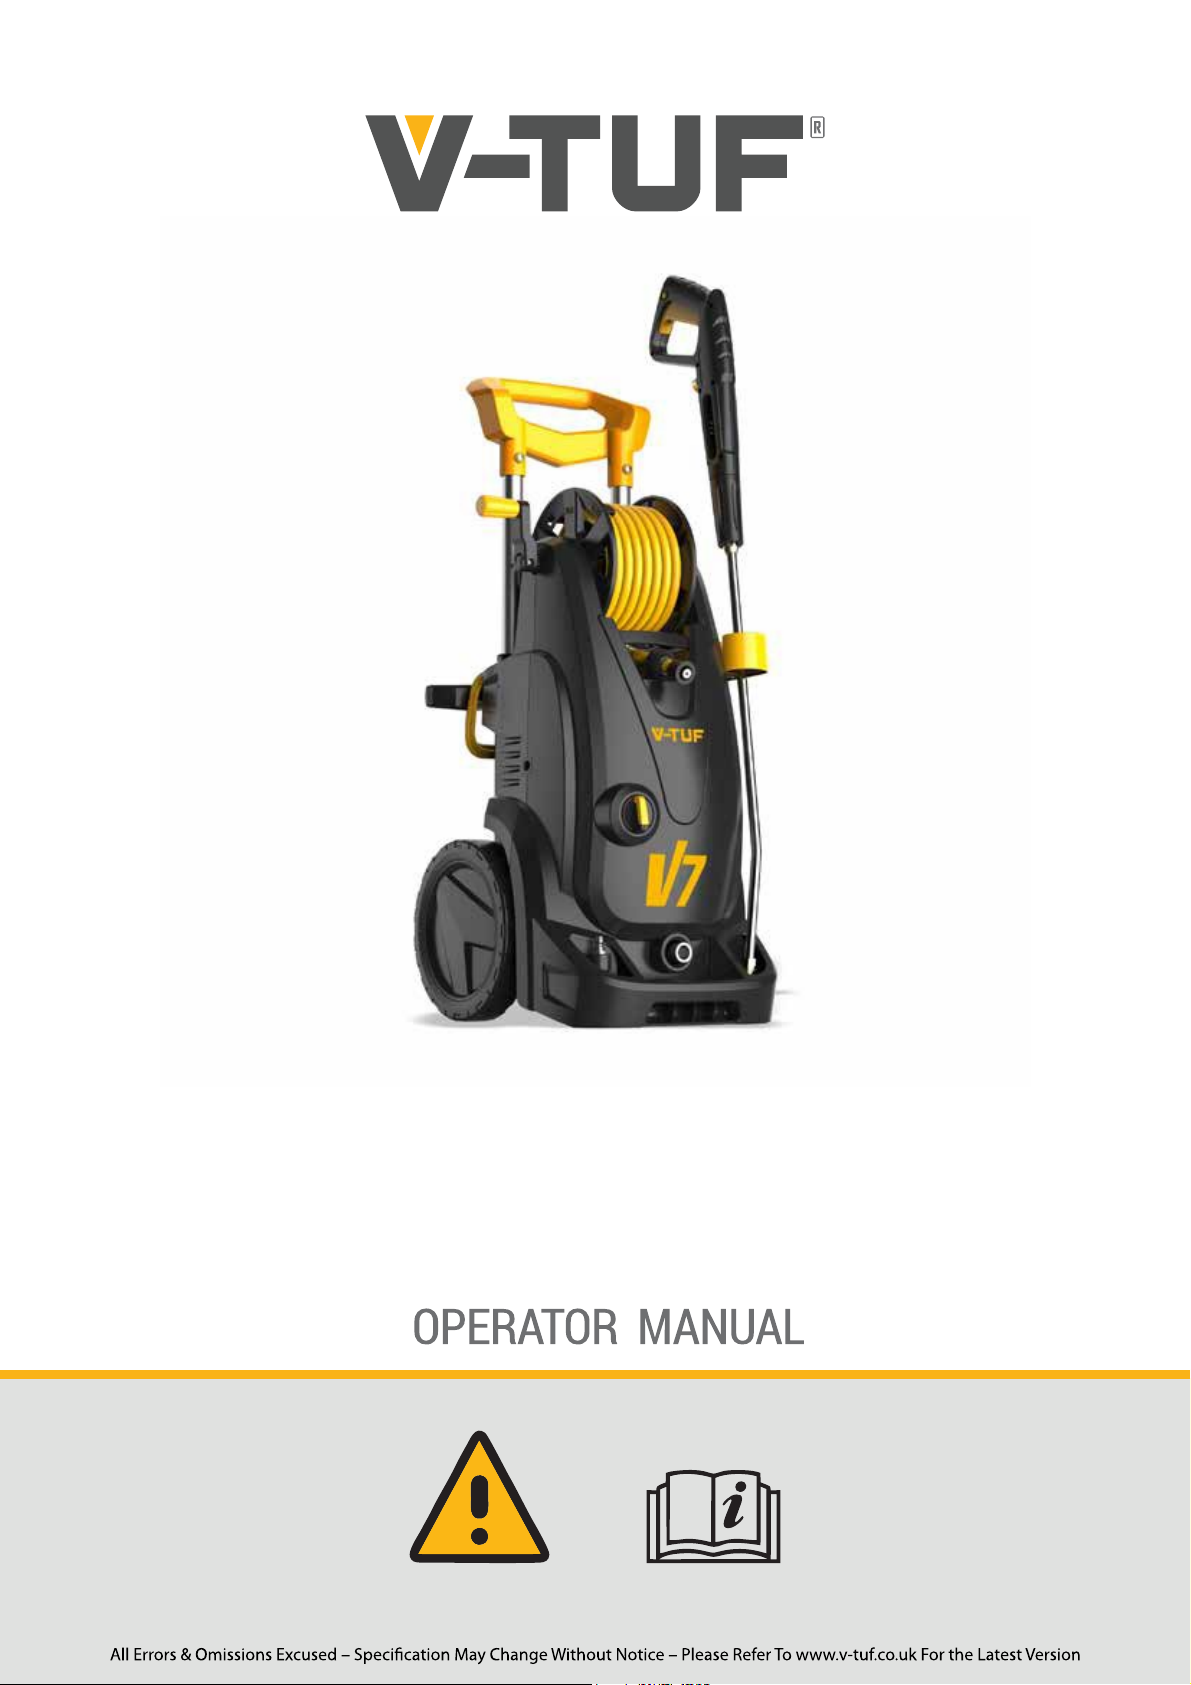
V7
DIY ELECTRIC PRESSURE WASHER
Please read this manual before using the V7
Page 2

V-TUF (EQUIPMENT BRAND OF FENCO GROUP LTD.)
WARRANTS TO THE CONSUMER THAT THIS PRODUCT WILL BE FREE OF MATERIAL OR
ASSEMBLY DEFECTS FOR 1 YEAR.
• Please Note: This excludes wearing parts such as hoses, turbo nozzle, pump seals and
valves etc that wear out and need replacing within the normal working life of the machine.
• Warranty claims must be processed through the dealer from whom the machine was
purchased. If you have any problems, please contact V-TUF with your proof of purchase
to hand.
• Warranty claim will need to be validated by manufacturer's inspection.
Please note that the machine is for light duty use and is only built to last 96 hours minimum in
conformance to CE standards. If the machine has been used in a heavy use application the
warranty will not apply.
The V-TUF warranty is a manufacturing cover for vour domestic product. This warranty shall not
apply to defects caused by:
• Misuse
• Neglect
• Accidental Damage
• Improper storage
• Installation or careless handling
• Frost damage/heat damage
• Alteration not carried out or authorised by V-TUF approved supplier
• The use of incorrect supply voltage
• Contaminated water supply
• Unsuitable chemicals
FENCO GROUP Limited shall not be liable in any event at any time for any indirect or consequential
loss or damage.
The rights and benefits under warranty are additional to your statutory rights which are not affected
by this Warranty.
2
Page 3
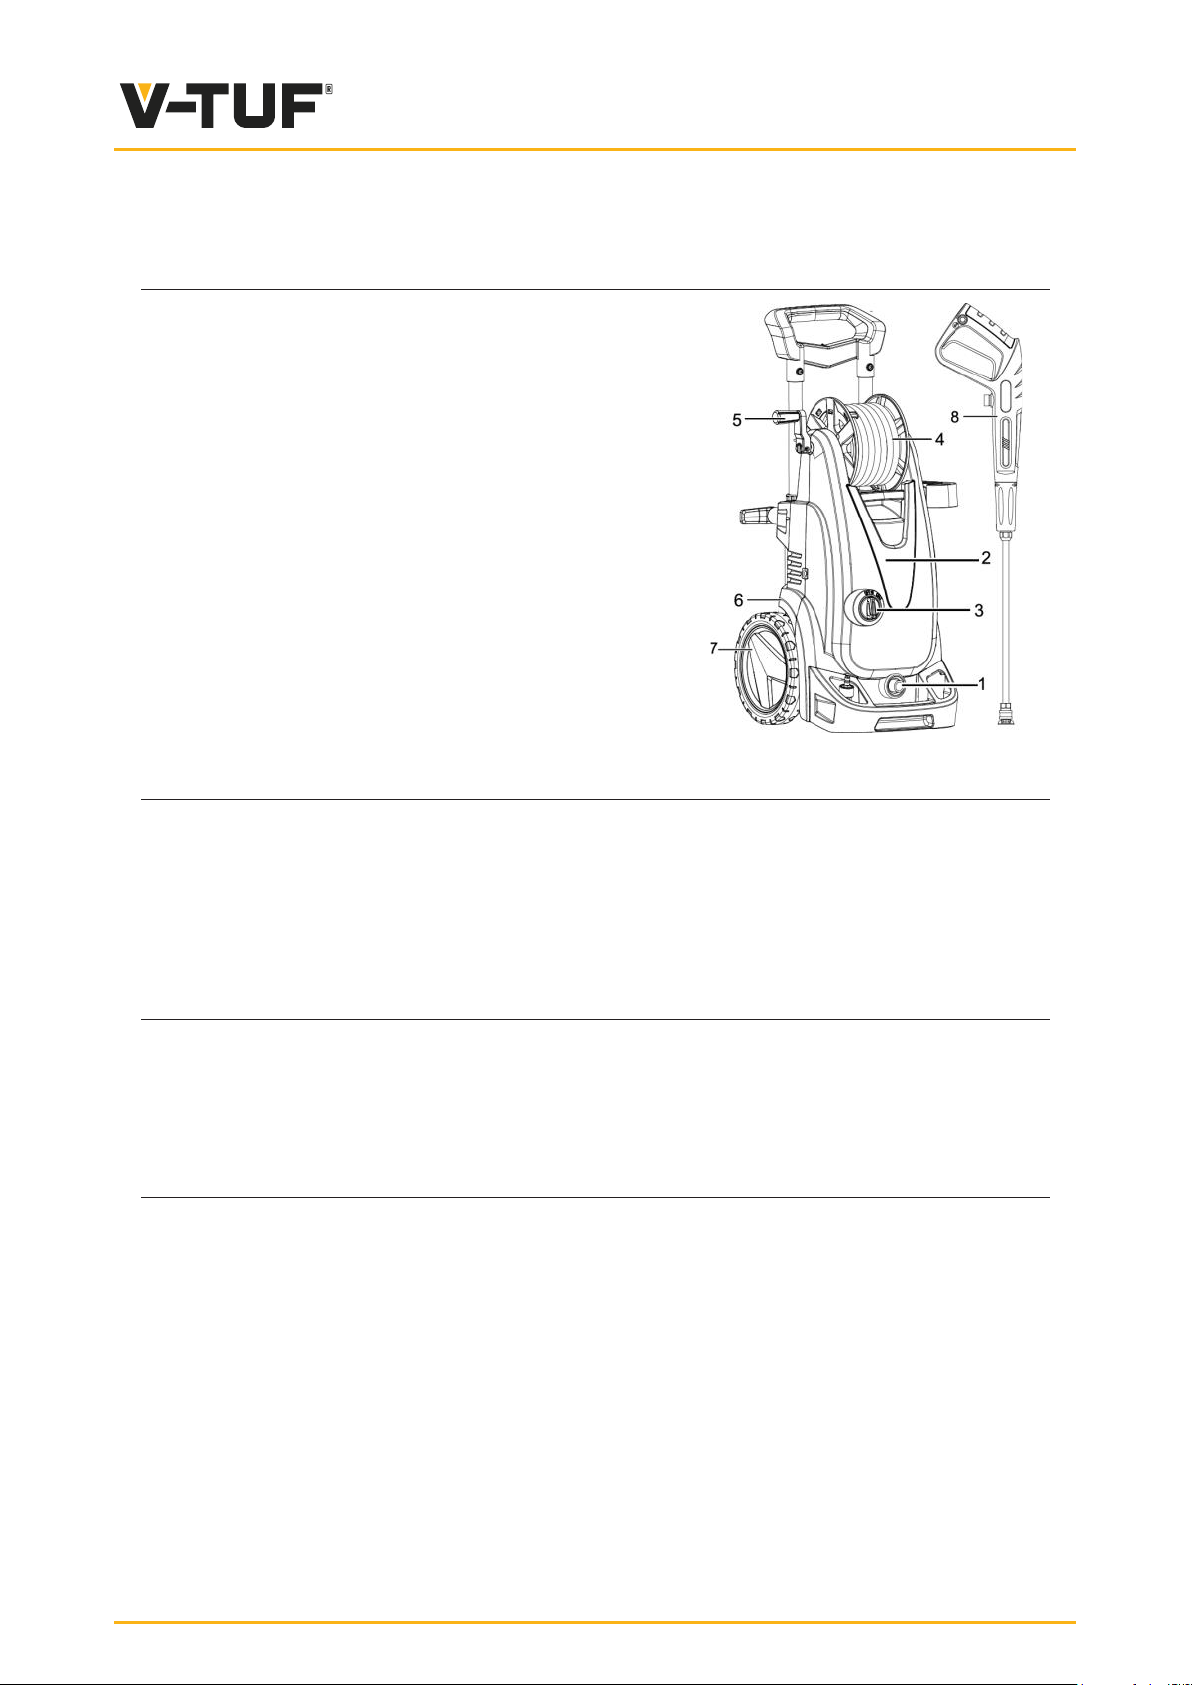
ITEM DESCRIPTION
1. Water inlet
2. On/off switch
3. High pressure washer
4. Hose Reel with Trigger Gun Hose
5. Hose Reel Handle
6. Water outlet
7. Mobile adapter bracket with wheel
8. Gun
OVERVIEW
APPLICATION
THE PORTABLE PRESSURE WASHING MACHINE is a highly specialized multifunctional machine with
exceptionally reliable safety assurance, which may be used to wash and clean cars, bikes and other
outdoor equipment or garden patios, green houses etc.
Helpful Hints for Getting Started
AUTOMATIC ON/OFF:
The motor on this pressure washer does not run continuously. It only runs when the trigger of the
spray gun is squeezed. After following the start up procedures in this manual, turn the pressure
washer ON and squeeze the trigger for activation. See the section of this manual entitled “Operating
Instructions” for further details on this feature.
BLEEDING THE GUN:
It is very important to bleed the gun before using the pressure washer. Squeeze the trigger to allow
any air that is trapped inside of the unit and hose to escape. Continue to squeeze trigger until a
steady stream of water comes from the nozzle. (This process may take up to 2 minutes). See the
section of this manual entitled “Operating Instructions” for further details on this process.
3
Page 4
SAFETY REGULATIONS
This book has important information for the use and safe operation of this machine.
Read and understand all warnings before you start working.
The electric supply connection shall be made by a qualified electrician and comply with
IEC 60364-1
Electric supply should include a residual current device for max. 30 mA
WARNING: The appliance is intend to be used at a temperature above 0 degree.
WARNING: Read all the instructions before using the product.
WARNING: Before each use pressure must be released! Trigger on wand then start
the washer
WARNING: To reduce the risk of injury, close supervision is necessary when a
product is used near children. High-pressure cleaner shall not be used by children or
untrained person.
WARNING: Know how to stop the product and bleed pressures quickly. Be thoroughly
familiar with the controls.
WARNING: Stay alert and watch what you are doing.
WARNING: Do not operate the product when fatigued or under the influence of alcohol
or drugs.
WARNING: Keep operating area clear of all persons.
WARNING: Do not overreach or stand on unstable support. Keep good footing and
balance at all times.
WARNING: Follow the maintenance instructions specified in the manual.
WARNING: This product must be grounded. If it should have malfunction or break-
down, grounding provides a path of least resistance for electric current to reduce the
risk of electric shock. The plug must be plugged into an appropriate outlet that is
properly installed and grounded in accordance with all local codes and ordinances. The
rating voltage (V/Hz) of the appliance has to be in compliance with the local power
supplying voltage.
4
Page 5

WARNING: Check with a qualified electrician or service personnel if you are in doubt
as to whether the outlet is properly grounded. Do not modify the plug provided with
the product. If it will not fit the outlet, have a proper outlet installed by a qualified
electrician.
Do not use any type of adapter with this product.
WARNING: Use only 3-wire extension cords that have 3-prong grounding-type plugs
and 3-pole cord connectors that accept the plug from the product. Use only extension
cords that are intended for outdoor use and the socket must be of watertight construction. These extension cords are identified by a marking “Acceptable for use with
outdoor appliances; store indoors while not in use.” Use only extension cords having an
electrical rating not less than the rating of the product. Do not use damaged extension
cords. Examine extension cord before using and replace if damaged. Inadequate
extension cords can be dangerous. Do not abuse extension cord and do not yank on
any cord to disconnect. Keep cord away from heat and sharp edges. Always disconnect
the extension cord from the receptacle before disconnecting the product from the
extension cord.
WARNING: If the supply cord is damaged, it must be replaced by a special cord or
assembly available from the manufacturer or its service agent; and should not change
the length of the cable.
WARNING: To reduce the risk of electrocution, don’t start and run the machine in the
rain or storm. Keep all connections dry and off the ground. Do not touch plug with wet
hands. It is strictly prohibited to let water leak into the machine.
WARNING: When the machine is turned on, the interior pumps start and continue to
run even if the pressure wand trigger has not been depressed. Running the machine for
more than 3 minutes without depressing the pressure wand trigger could cause heat
damage to the motor and pumps, Please do not leave the machine running unattended
or unused for more than 3 minutes.
WARNING: When the machine is running, please maintain a constant water supply.
Without water circulation will damage the sealing rings of the machine.
WARNING: It is necessary to turn on the spray lance within one or two minutes after
the machine has been started. Otherwise, the temperature of the circulating water
within the machine will soon rise to a critical point, which will cause damage to the
sealing rings inside the machine.
WARNING: Don’t start and run the machine in a place excessively cold so as to
prevent the machine from the freezing current.
WARNING: This appliance has been designed for only using cleaning water, do not use
corrosive chemicals.
WARNING: Use cleaning agent supplied or recommend by the manufacturer.
WARNING: Do not use the appliance within the range of persons unless they wear
protective clothing.
5
Page 6
WARNING: High-pressure jets can be dangerous if subject to misuse. The jet must
not be directed at persons, live electrical equipment or the appliance itself. Pressure
washers should not be pointed at tire walls, as it may be possible to damage them.
WARNING: Do not direct the jet against yourself or others in order to clean clothes or
footwear.
WARNING: Disconnect from the electrical power supply before carrying out user
maintenance.
WARNING: To ensure the appliance safety, please only use original spare parts from
the manufacturer or approved by the manufacturer. Do not use the machine before you
changed them if they are damaged.
WARNING: High pressure hoses, fittings and couplings are important for the safety of
the appliance. Use only hoses, fittings and couplings recommended by the manufacturer
WARNING: Do not use the appliance if a supply cord or important parts are damaged,
e.g. safety devices, high pressure hoses, trigger gun.
WARNING: Incorrect fuels shall not be used, as they may prove hazardous.
WARNING: Be aware of the recoil caused by the water jet when the machine is
switched n.
OPERATING INSTRUCTIONS
This unit is to be connected to a cold water source ONLY
The motor of this pressure washer will NOT run, it will only operate when the trigger is
squeezed.
- Connect the outlet hose to the washer and connect the spray gun to the outlet hose.
- Connect nozzle and nozzle extension.
- Check gauze filter is clear of any blockage.
- Connect the water supply hose.
- Check that the hose has no kinks in it.
- Turn on water and check for leaks.
- Depress trigger to allow air to be expelled though the pump and hoses, lock trigger.
- Plug in machine and turn on switch.
- Unlock trigger and use the pressure washer.
6
Page 7
SHUT DOWN
1. Turn off the motor(push switch to the off position)
2. Unplug the unit from the power source.
3. Turn off the water supply.
4. Press the trigger of the gun to depressurize the system.
5. Disconnect the garden hose from the pressure washer.
6. Wipe all surfaces of the unit with a damp clean cloth.
7. Engage the gun safety lock.
CAUTION: ALWAYS turn off the unit’s motor BEFORE turning off the unit’s water supply.
Serious damage could occur to the motor if the unit is run without water.
CAUTION: NEVER disconnect the high-pressure discharge hose from the machine while
the system is still pressurized. To depressurize the unit, turn off the motor, turn off the
water supply and squeeze the trigger 2-3 times.
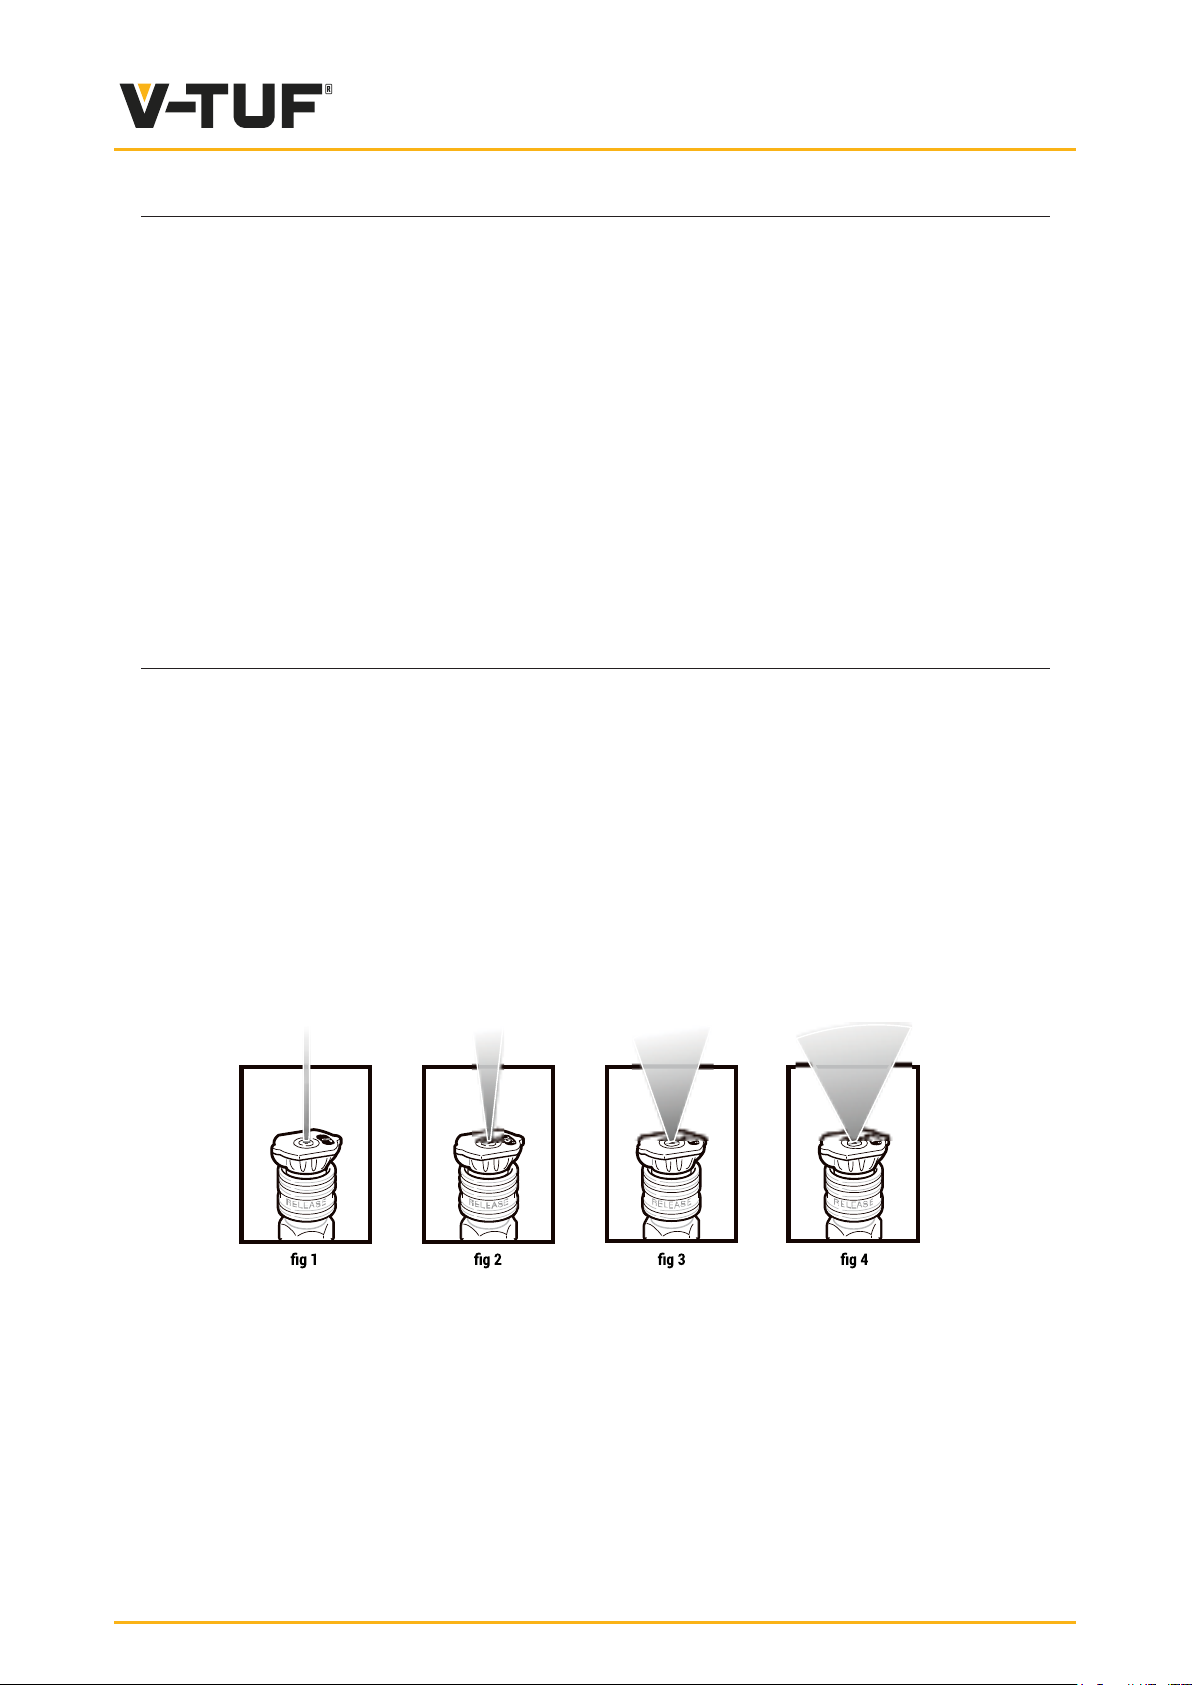
SPRAY NOZZLES
The Pressure Washer comes furnished with four spray nozzles. Each nozzle is colorcoded and
delivers a specific spray pattern and pressure for a particular cleaning job.
The size of the nozzle determines the size of the fan spray and the pressure out of the nozzle.
0°Nozzle – Red: This nozzle delivers a pinpoint stream of pressurized water and is extremely
powerful. It covers only a small area of cleaning. This nozzle should only be directed at surfaces
that can withstand high pressure such as metal or concrete. Do not use this nozzle to clean wood.
(fig 1)
15° Nozzle – Yellow: This nozzle delivers a powerful 15 degree spray pattern for intense cleaning
of small areas. This nozzle should only be used on areas and materials that can withstand high
pressure. (fig 2)
25° Nozzle – Green: This nozzle delivers a 25 degree spray pattern for intense cleaning of larger
areas. This nozzle should only be used on areas that can withstand pressure from this nozzle. (fig 3)
40° Nozzle – Yellow: This nozzle delivers a 40 degree spray pattern and a less powerful stream of
water. This nozzle can cover a wide area and should be used for most general cleaning jobs. (fig 4)
7
Page 8
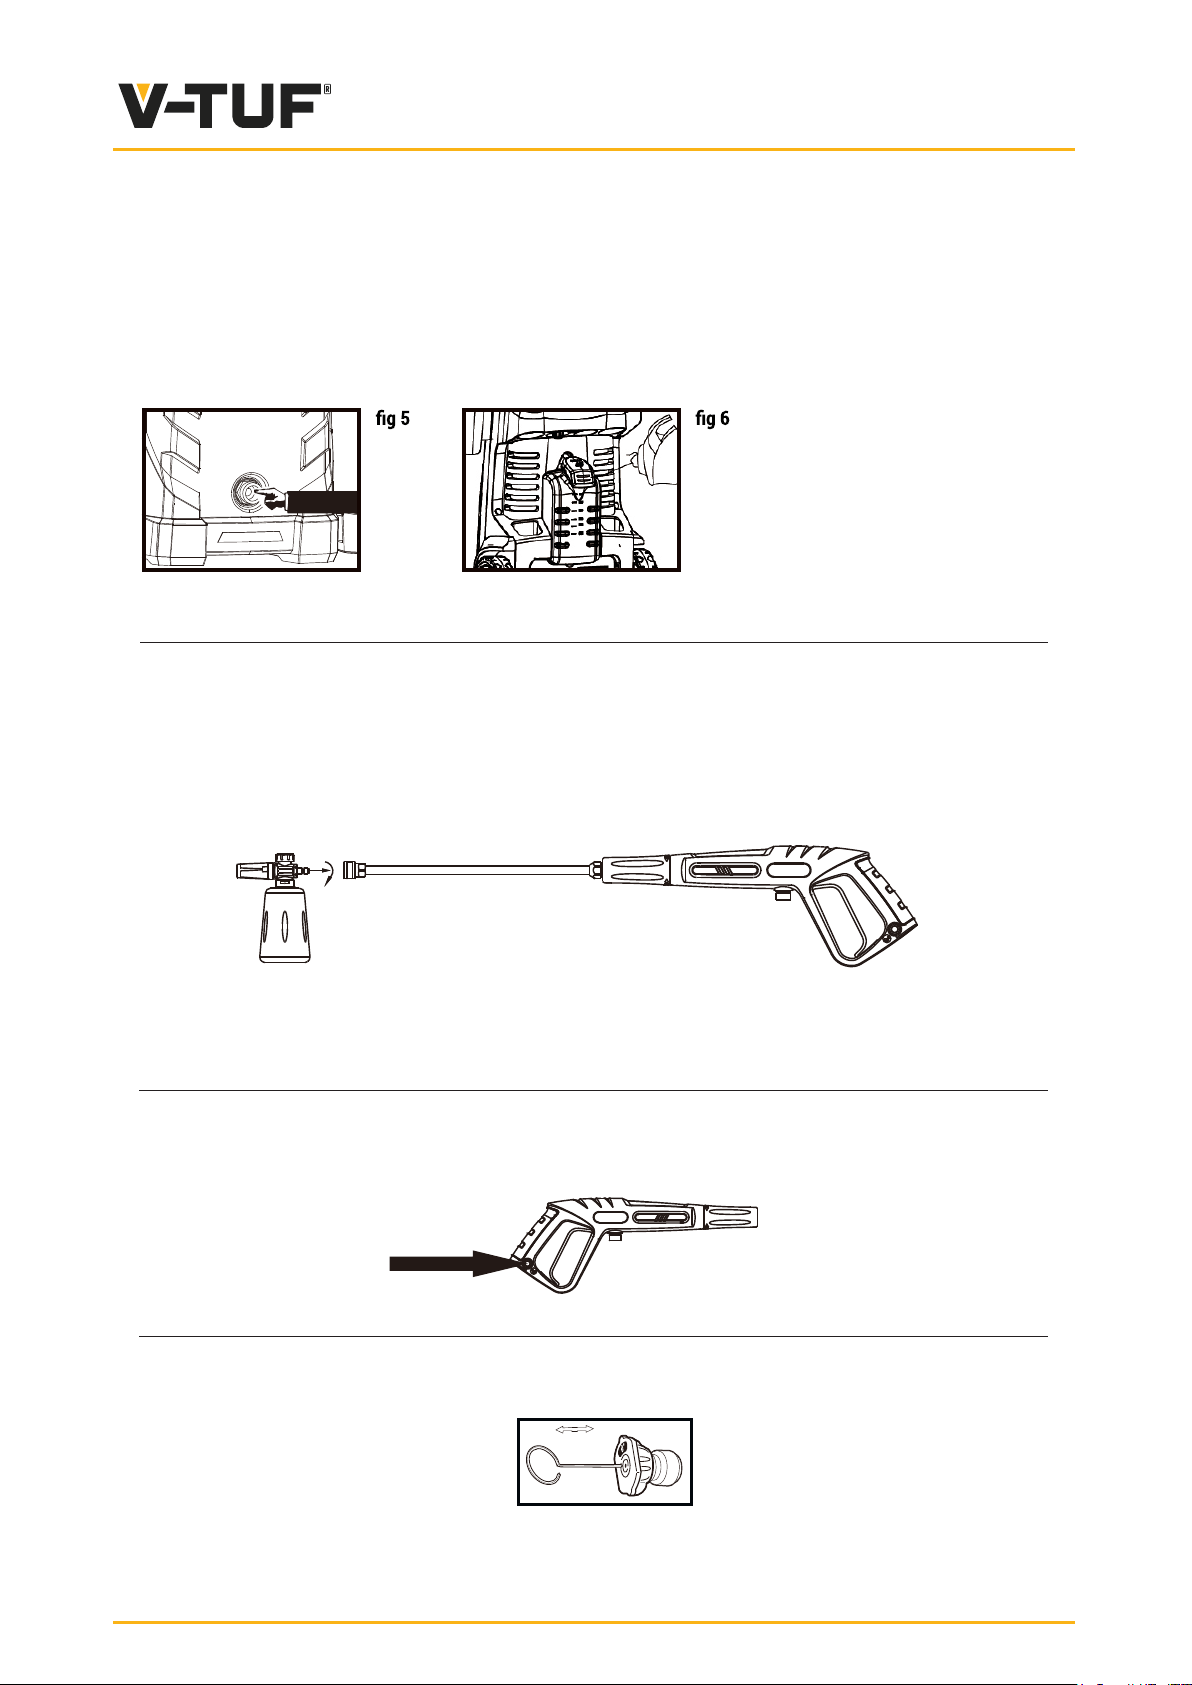
WATER INLET SCREEN
The water inlet filter must be inspected regularly, so as to avoid blockage and restriction in the
water supply to the pump (fig 5).
USING DETERGENT
Add detergent to the container. Set the Adjustable Spray Want at low pressure position. (fig 6). Trigger
gun to spray detergent.
ATTACHING SOAP DISPENSER BOTTLE
Insert metal end of the spray lance into the opening of spray gun (making sure to match the locking
tabs on either side of the spray lance to the notches of the spray gun), Push in and twist in a clockwise
motion to lock spray lance and spray gun together (make sure there is a tight and secure fitting between
both). Insert end of soap dispenser bottle with the plastic locking tabs into opening of the spray lance.
Push in, turn, and lock so the soap dispenser bottle and spray lance are firmly secure.
GUN SAFETY DEVICE
Whenever you use the high pressure washer, we suggest you grip the in the right position, with
one hand on the handle and the other on the lance, When you stop the machine it is necessary to
use the safety lock placed on the gun in order to avoid accidental.
CLEANING PIN INSTRUCTION
• Using included tip cleaner, or an unfolded paper clip, insert wire into the nozzle hole and move
back and forth until debris is dislodged.
• Remove additional debris by back-flushing water through the nozzle. To do this, place end of a
garden hose ( with water running ) to the end of nozzle for 30-60 seconds.
8
Page 9
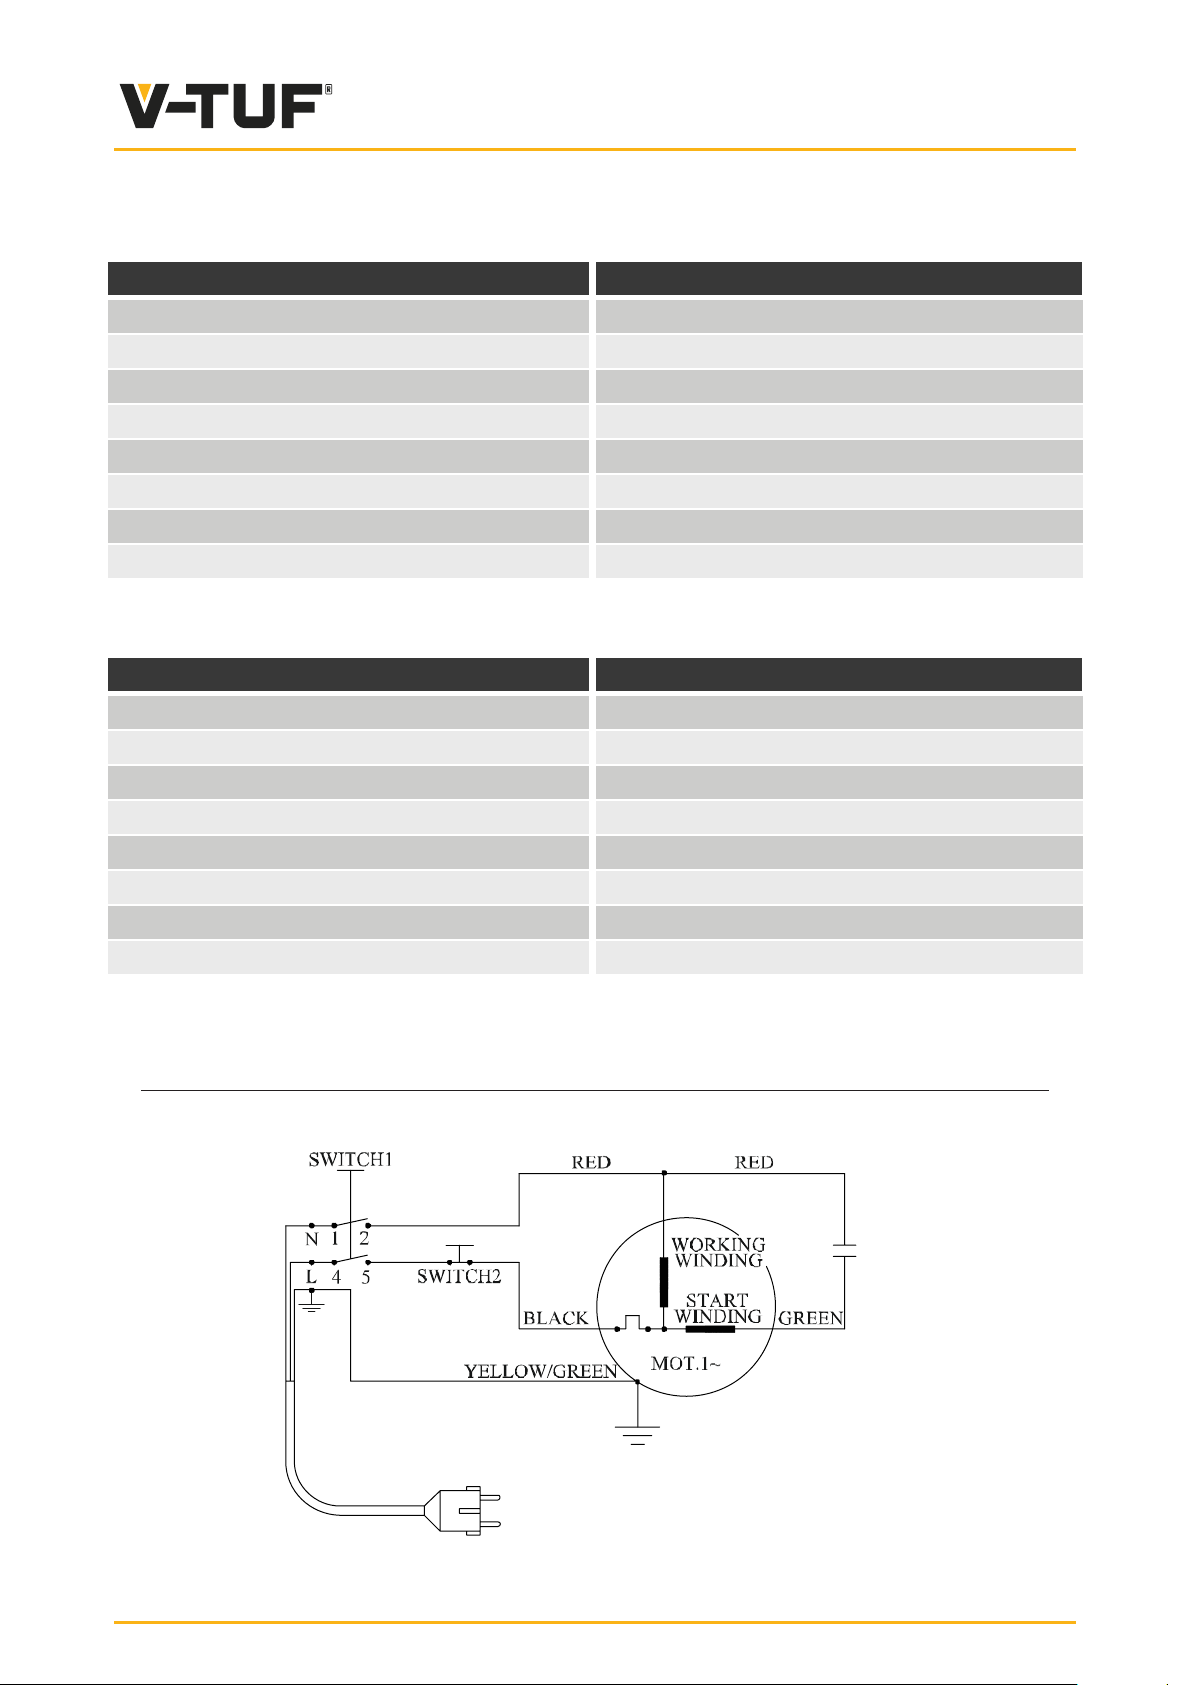
TECHNICAL DATA:
ITEM V7 (110V)
Working pressure 11MPa(110 bar)
Max. pressure 15MPa(150 bar)
Flow 5.2 l/min
Max. flow 6.0 l/min
Max. pressure water supply 0.4MPa(4bar)
Motor Capacity 2100W
Power Supply Voltage 110V~50Hz
Max. Water Temperature 50 °C
ITEM V7 (240V)
Working pressure 13MPa(130 bar)
Max. pressure 19.5MPa(195 bar)
Flow 6.7 l/min
Max. flow 8.0 l/min
Max. pressure water supply 0.4MPa(4bar)
Motor Capacity 2500W
Power Supply Voltage 240V~50Hz
Max. Water Temperature 50 °C
ELECTRICAL DIAGRAM
9
Page 10
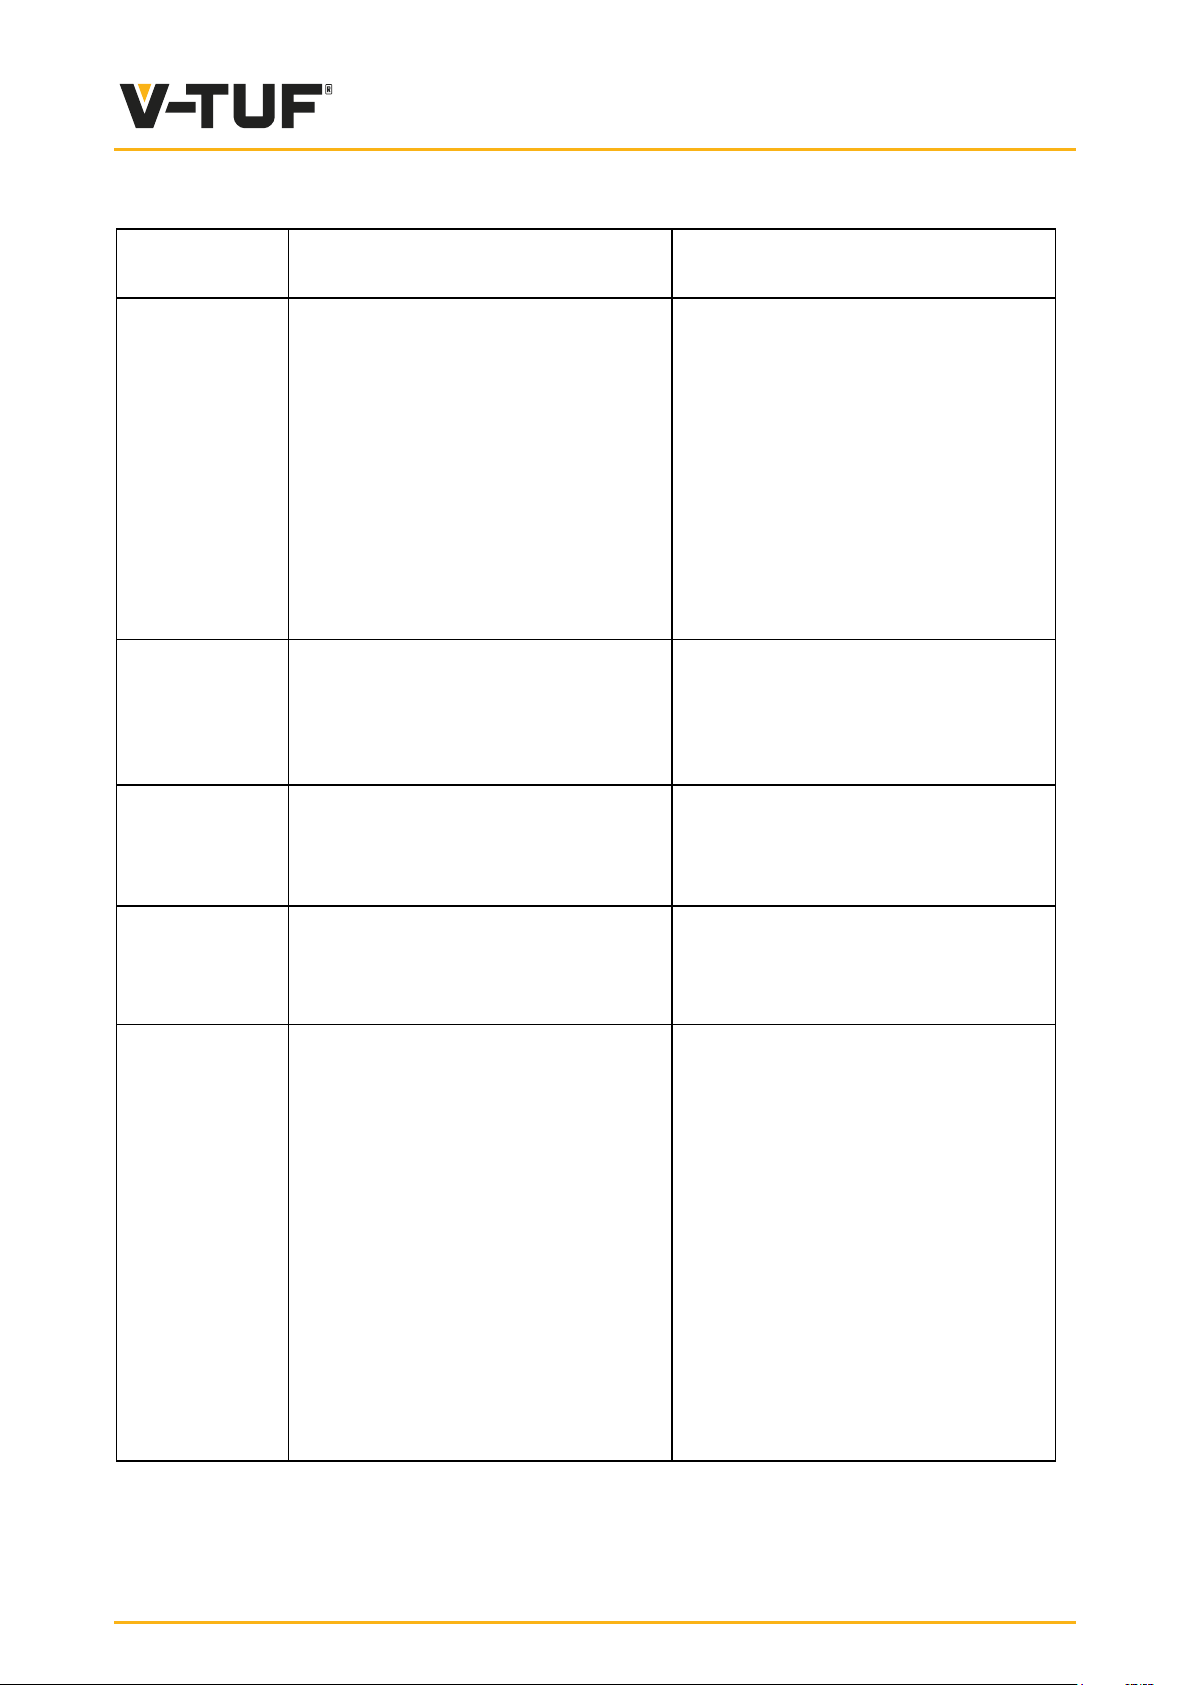
TROUBLE SHOOTING
few minutes.
FAULT PROBABLE CAUSE REPAIR
When switched
on the
machine will
not start
working
Fluctuating
Pressure
Water leaking
from the pump.
Plug is not well connected or electric
socket is faulty
The main voltage is insufficient, lower
than minimum requirement
The pump is stuck.
Thermal safety switch has tripped
Pump sucking air.
Valves dirty, worn out or stuck.
Pump seals worn out.
Seals worn out.
Check plug, socket
Check that the main voltage is
adequate.
Refer to after storage instructions.
Switch off the unit and let the motor
cool for a few minutes
Leave the lance open
Check that hoses and connections are
airtight.
Clean and replace, or refer to dealer..
Check and replace, or refer to dealer.
The motor
stops
suddenly.
The pump
doesn’t reach
the necessary
pressure.
Thermal safety switch has tripped due
to overheating.
Water inlet filter is clogged.
Pump sucking air from connections or
hoses.
Suction/ delivery valves are clogged or
worn out.
Unloaded valve is stuck.
Lance nozzle incorrect or worn out.
Check that the main voltage
corresponds to specifications.
Switch off the unit and let it cool for a
Clean the water inlet filter.
Check that all supply connections are
tight
Check that the water feeding hose is
not leaking.
Clear or replace valves.
Loosen and re-tighten regulation
screw.
Check and/or replace
10
Page 11
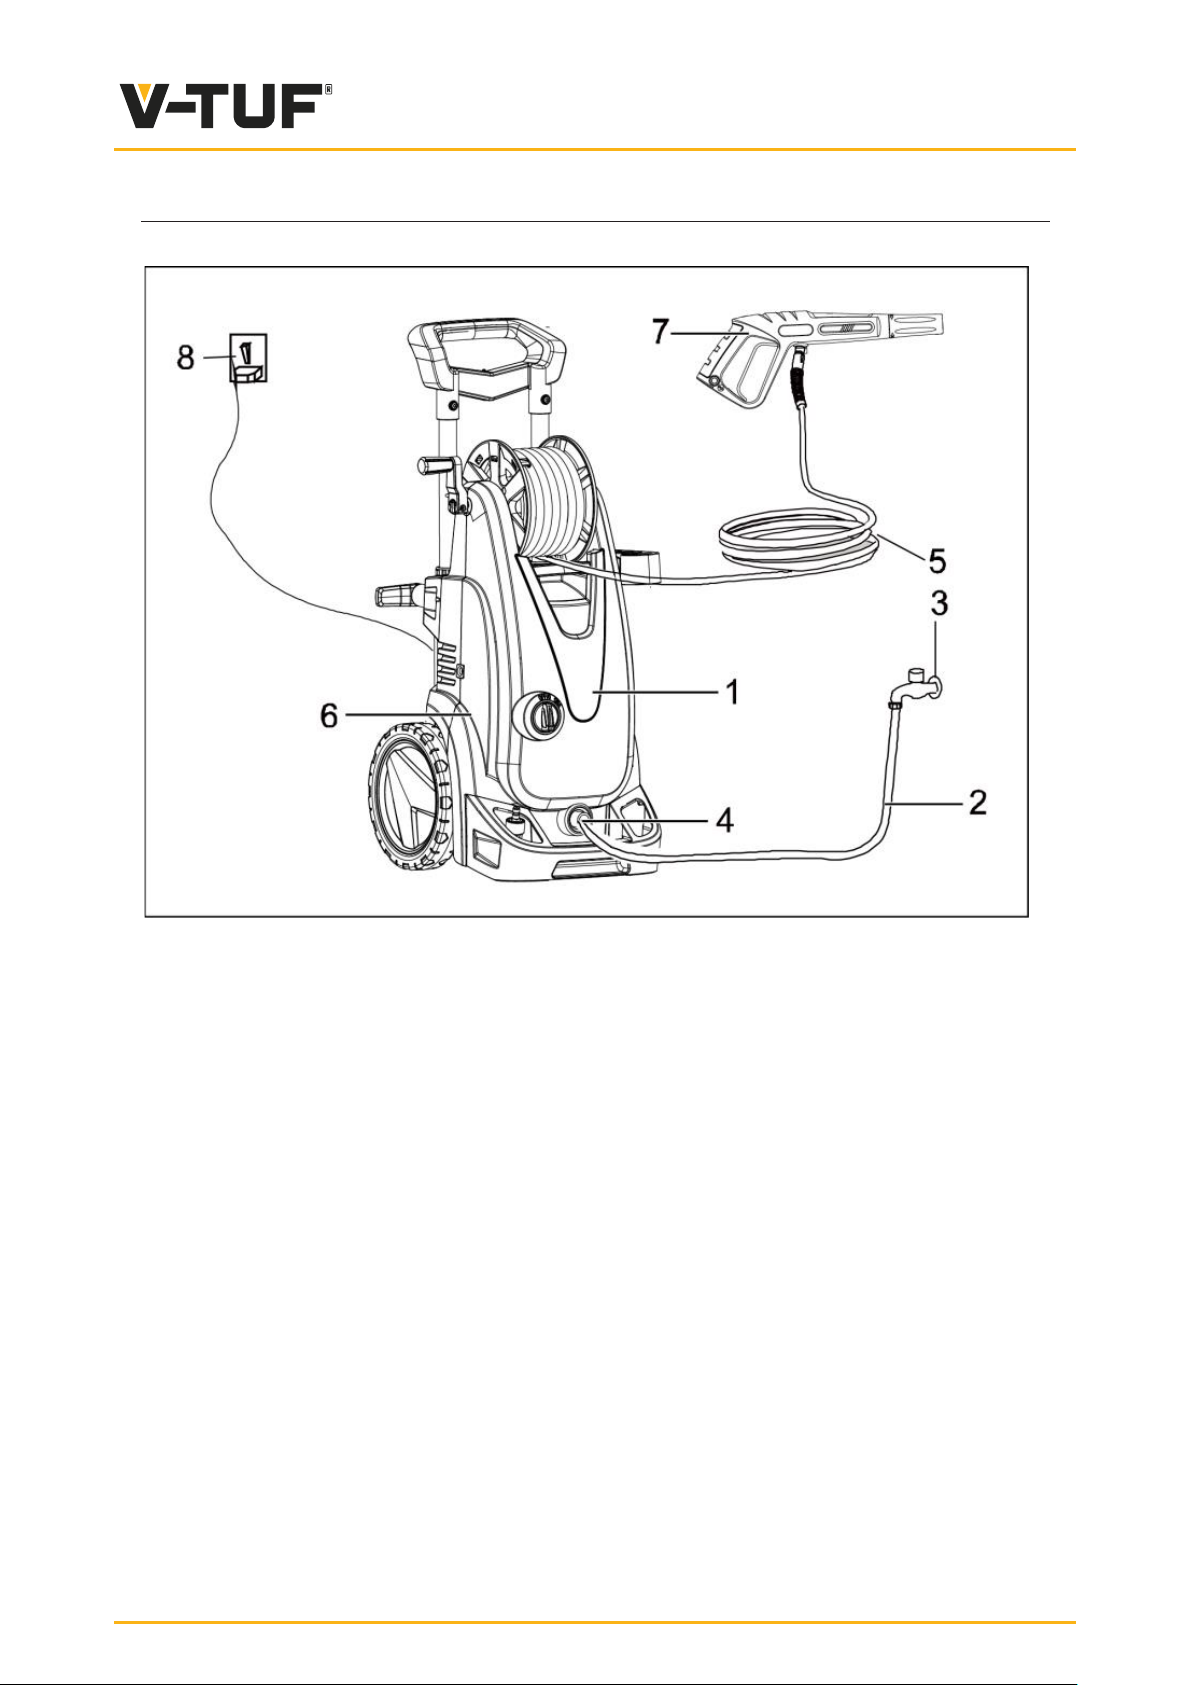
INSTALLATION, ELECTRICAL AND WATER CONNECTIONS
1. PRESSURE CLEANER
2. WATER SUPPLY HOSE(not include)
3. WATER CONNECTION
4. WATER INLET
5. HIGH PRESSURE TUBE
6. HIGH-PRESSURE, WATER OUTLET
7. SPRAY GUN
8. POWER SUPPLY
Note: The company reserves the right to modify its product specifications without given any notice; for up to date information please visit our website.
11
Page 12

Meaning of crossed –out wheeled dustbin:
Do not dispose of electrical appliances as unsorted municipal waste, use separate collection facilities.
Contact you local government for information regarding the collection systems available.
If electrical appliances are disposed of in landfills or dumps, hazardous substances can leak into the
groundwater and get into the food chain, damaging your health and well-being.
When replacing old appliances with new ones, the retailer is legally obligated to take back your old
appliance for disposals at least free of charge.
This appliance is not intended for use by persons (including children) with reduced physical, sensory
or mental capabilities, or lack of experience and knowledge, unless they have been given supervision
or instruction concerning use of the appliance by a person responsible for their safety.
Children should be supervised to ensure that they do not play with the appliance
12
Page 13
NOTES
13
Page 14

14
 Loading...