

Page 1
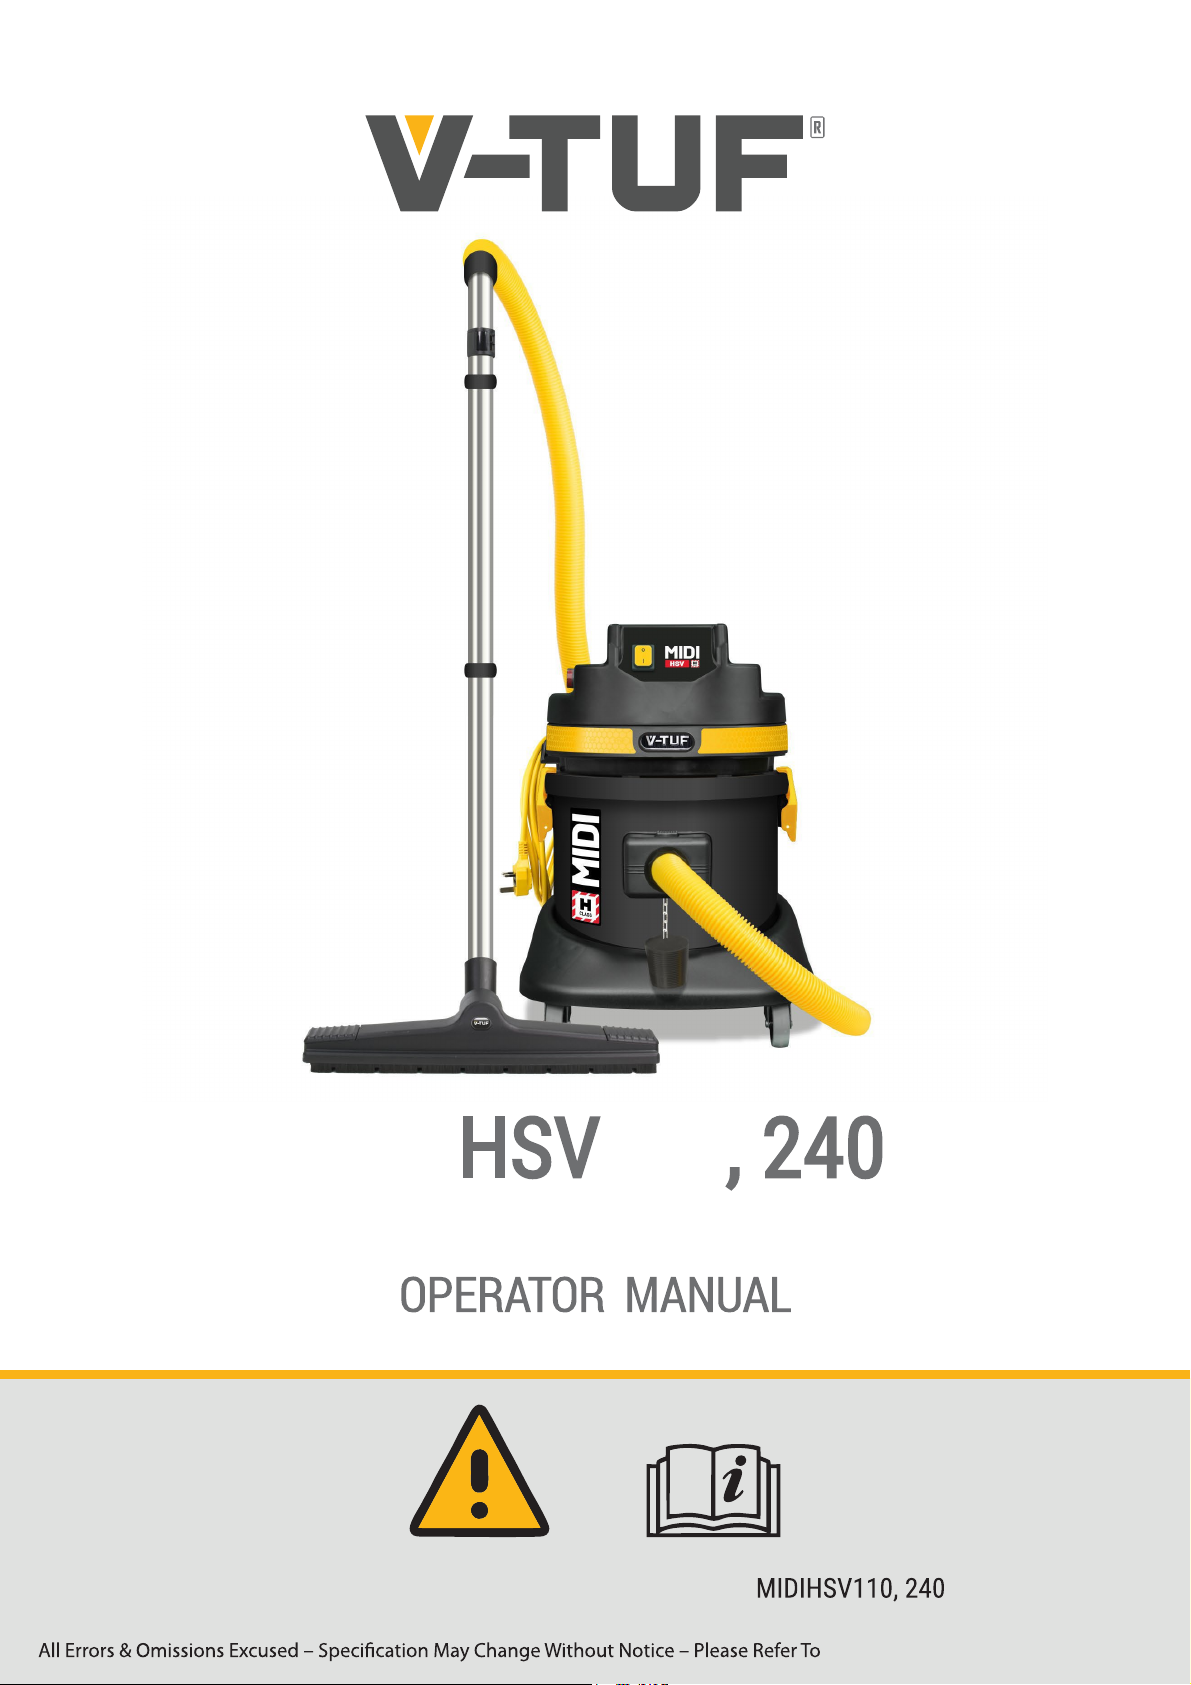
MIDI 110
INDUSTRIAL VACUUM CLEANER
Version 080724 - This superseded and should be used instead of all previous versions.
Please read this manual before using the
www.v-tuf.co.uk For the Latest Version
Page 2
MIDIHSV
1.
2.
3.
6.
4.
5.
7.
8.
10.
9.
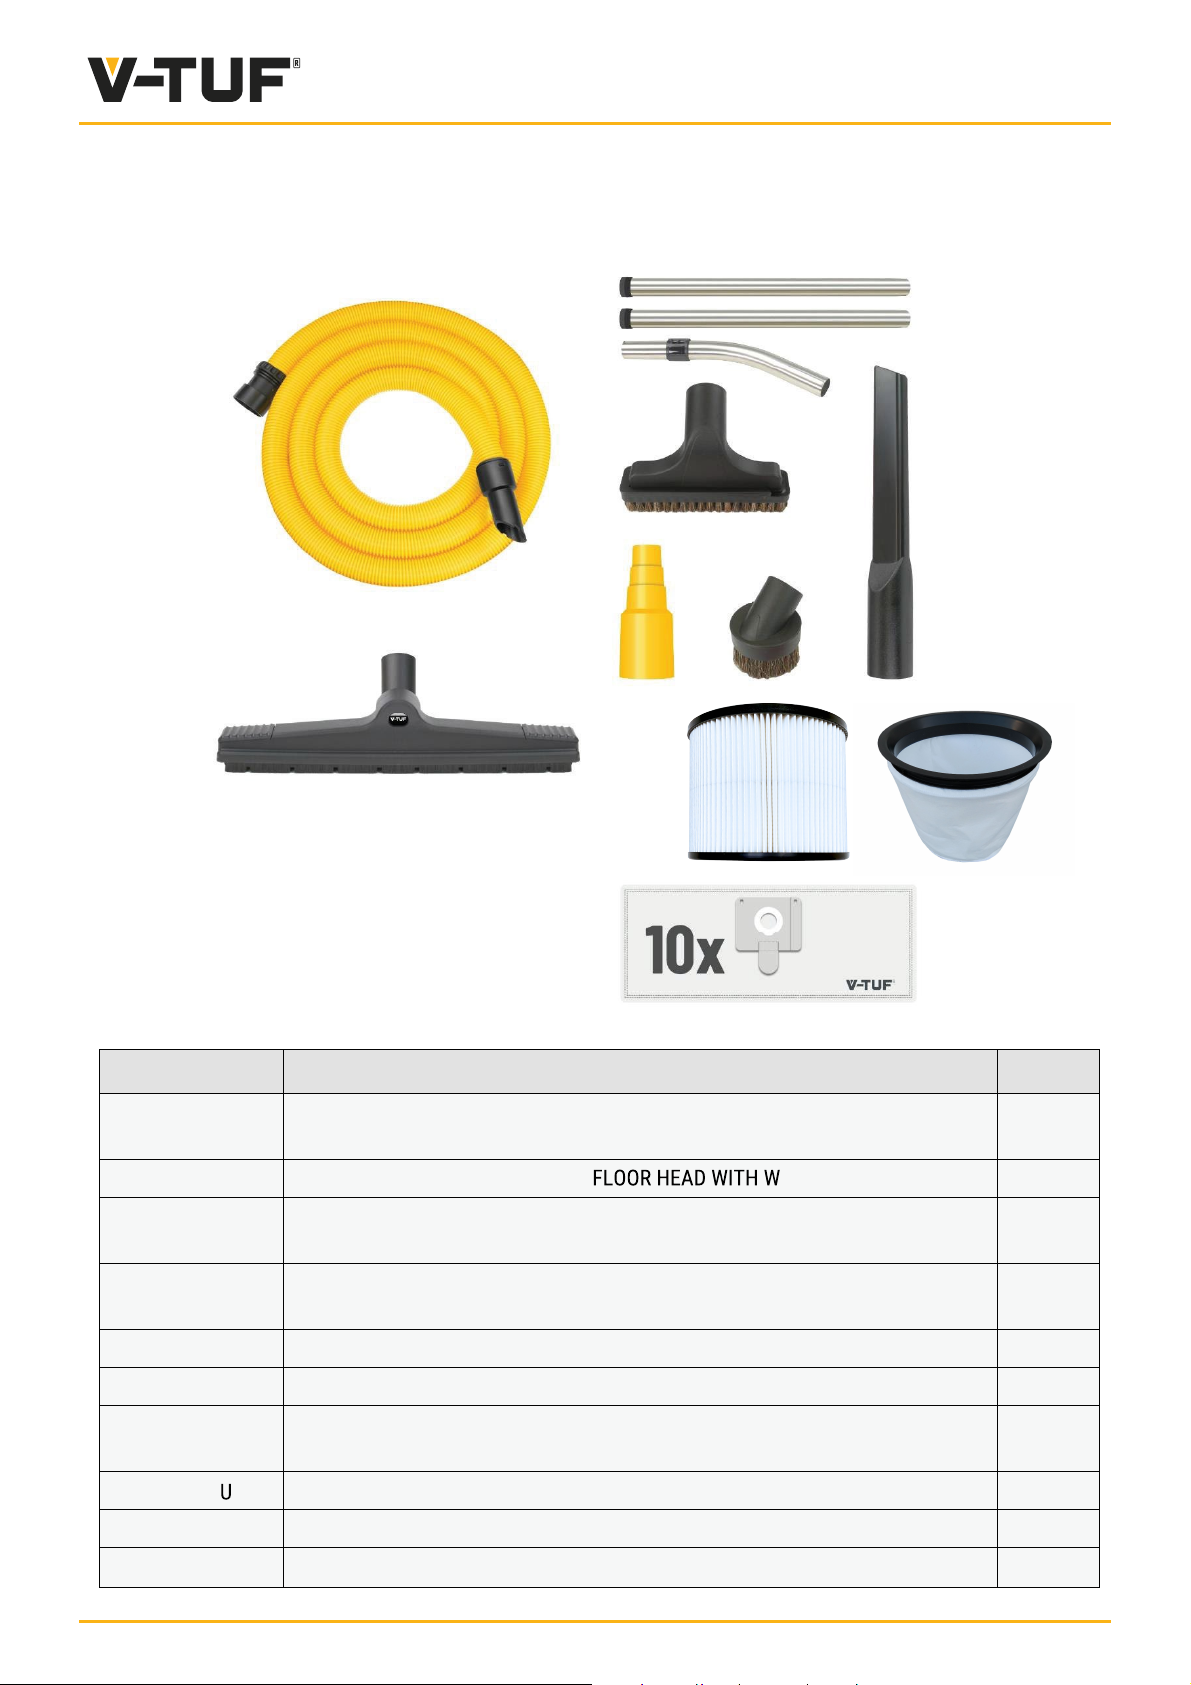
Parts No Pos
VTVS7023 HOSE - 5M 32mm Yellow Vacuum Hose With End To Fit WND/1
- for NEW MIGHTY, NEW MIDI
BIO324WD
WND/1 V-TUF PROFESSIONAL TUBE SET - 32MM STAINLESS STEEL 3 PIECE
VLX13 UPHOLSTERY TOOL WITH BRUSH - 32 MM for V-TUF VACUUM
VLX15
VTM103
VLX10 ROUND BRUSH - WITH HORSE HAIR 32 MM for V-TUF VACUUM
FLOOR HEAD - 420MM WIDE
WAND SET
CLEANER
CREVICE TOOL - 200MM LONG V-TUF 32MM
V-TUF Universal Power tool Adaptor For MINI, MIDI, MIDI SYNCRO
CLEANER
HEELS 32 MM
1
2
3
4
5
6
7
VTVS7021 8
VTVS7007
VTVS7008
V-TUF ULPA15 Cartridge Essential Filter - For MIDIHSV, MAXI50
DUST BAGS - for M & H CLASS (Pack of 10) - FSC Certified
CONED FILTER BASKET - FOR MIDI, MIDIS, MIDIHSV
2
9
10
Page 3
MIDIHSV
MIDIHSV
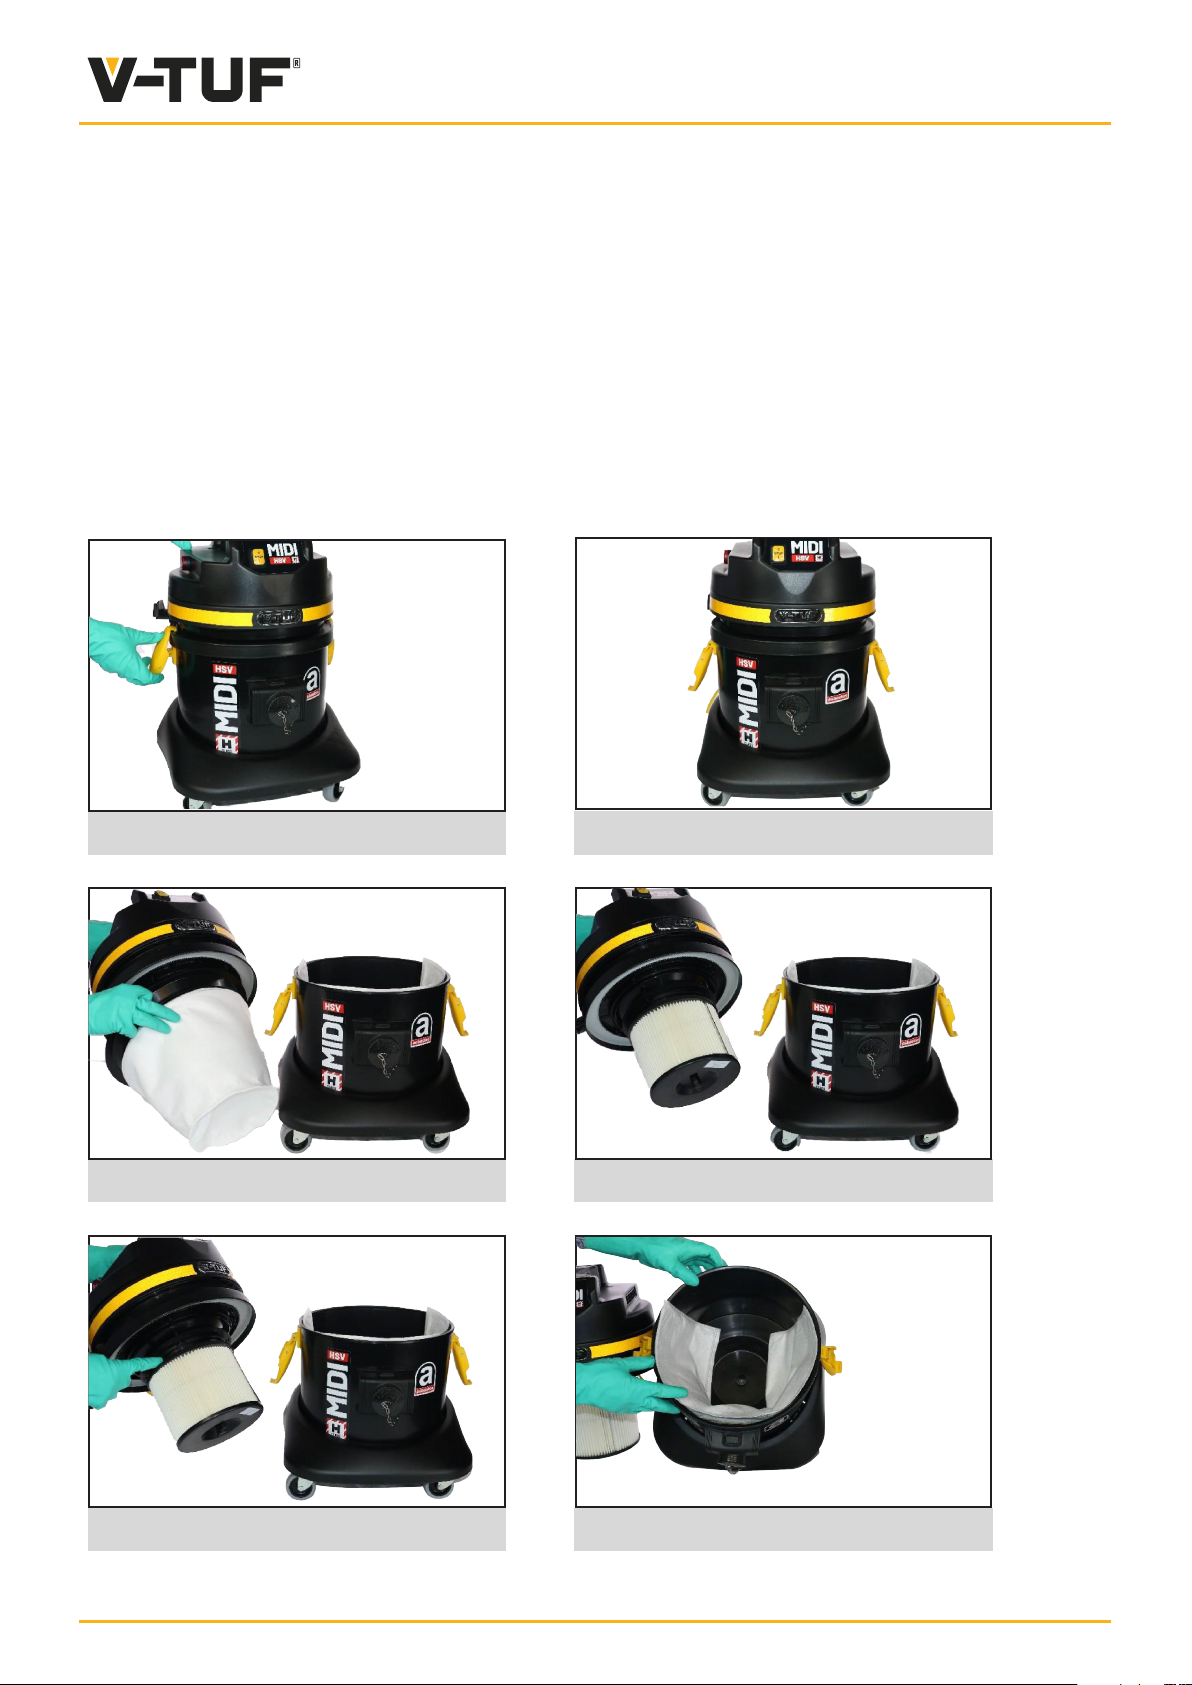
Follow these steps
BEFORE USE
ENSURE FULL FILTRATION IS IN PLACE.
NEVER OPERATE WITHOUT FULL FILTRATION
Un-clip head
Basket Filter
Essential Filter
Fully sealed with no gaps
Waste bag tted correctly
3
Page 4
MIDIHSV
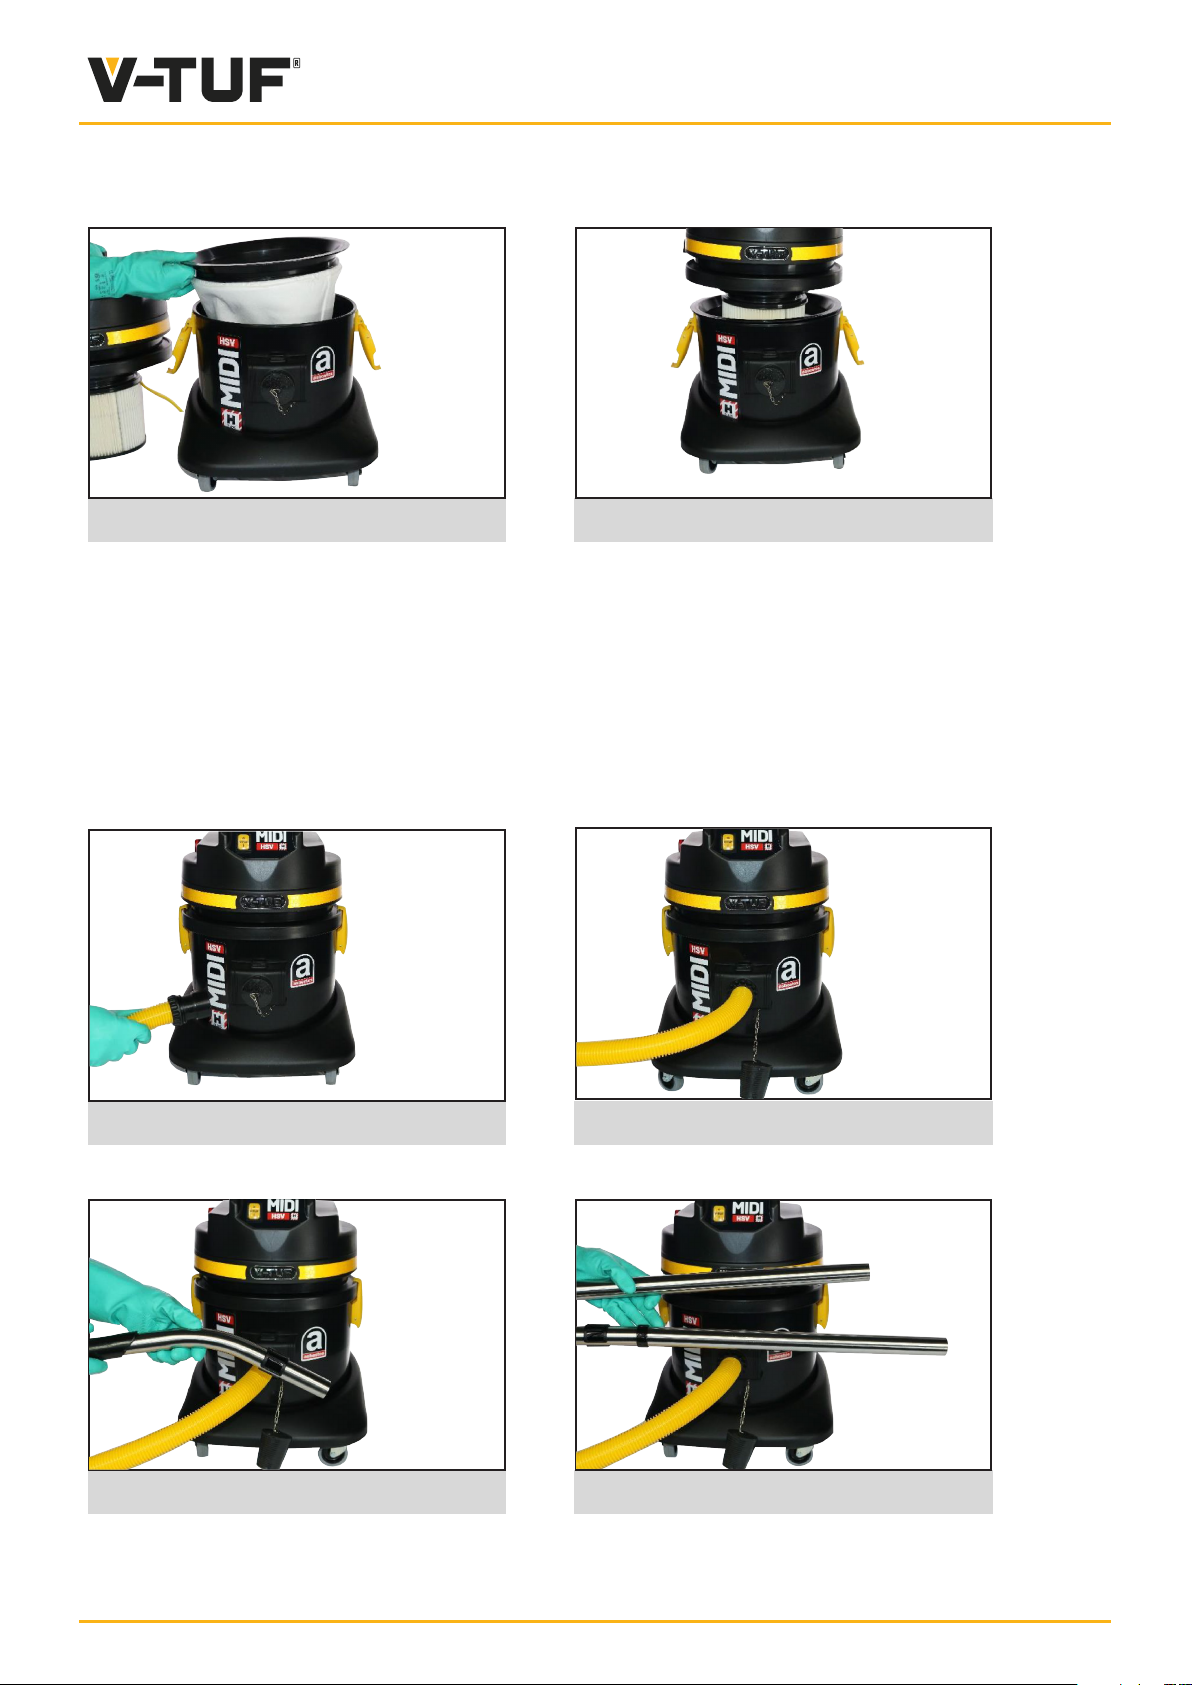
Place basket lter in tank. No gaps.
Fit head ensuring that it is sealed
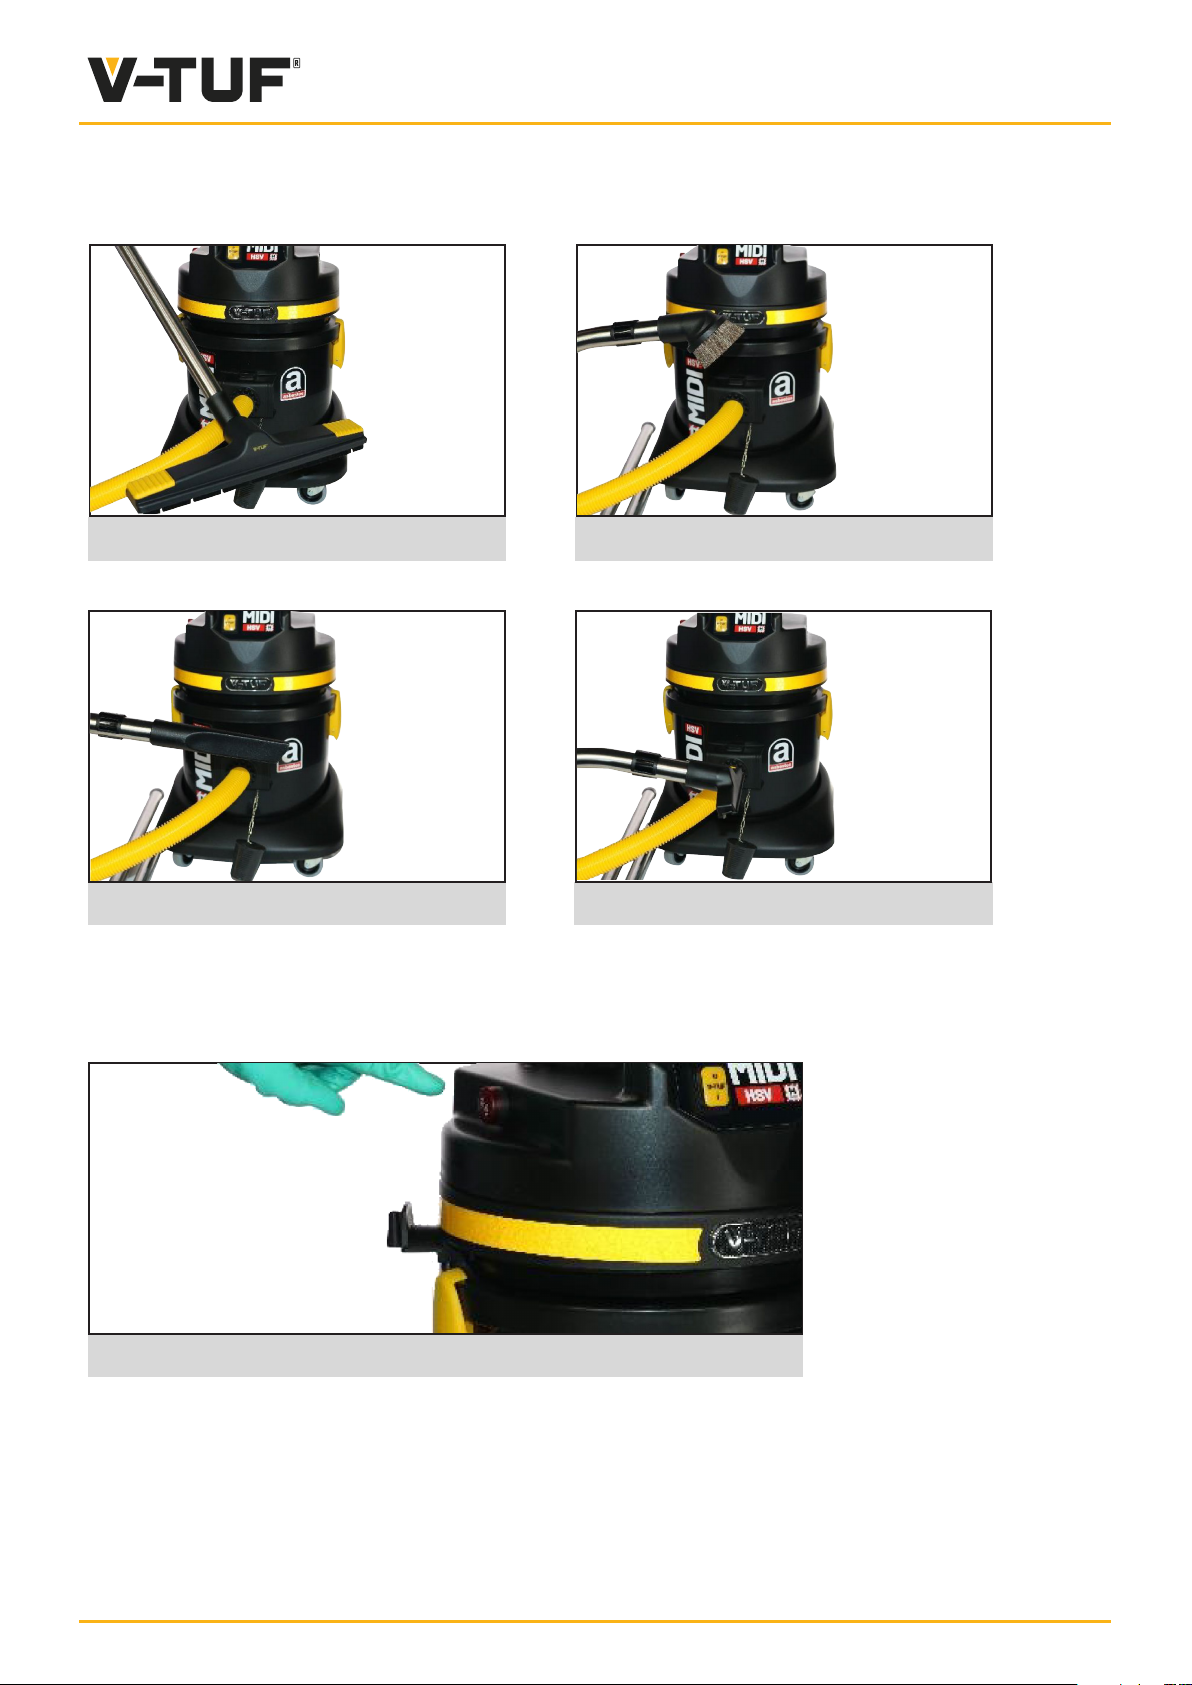
ADD HOSE AND ACCESSORIES AS REQUIRED
Remove tank bung and t hose
Fit wand elbow
Ensure hose locked in place
Push t extensions
4
Page 5
MIDIHSV
MIDIHSV
Crevice tool onto elbowFloor head
Crevice tool onto elbow
Upholstery tool onto elbow
CONNECT TO POWER SOURCE AND TURN ON
Air Flow indicator
5
Page 6
MIDIHSV
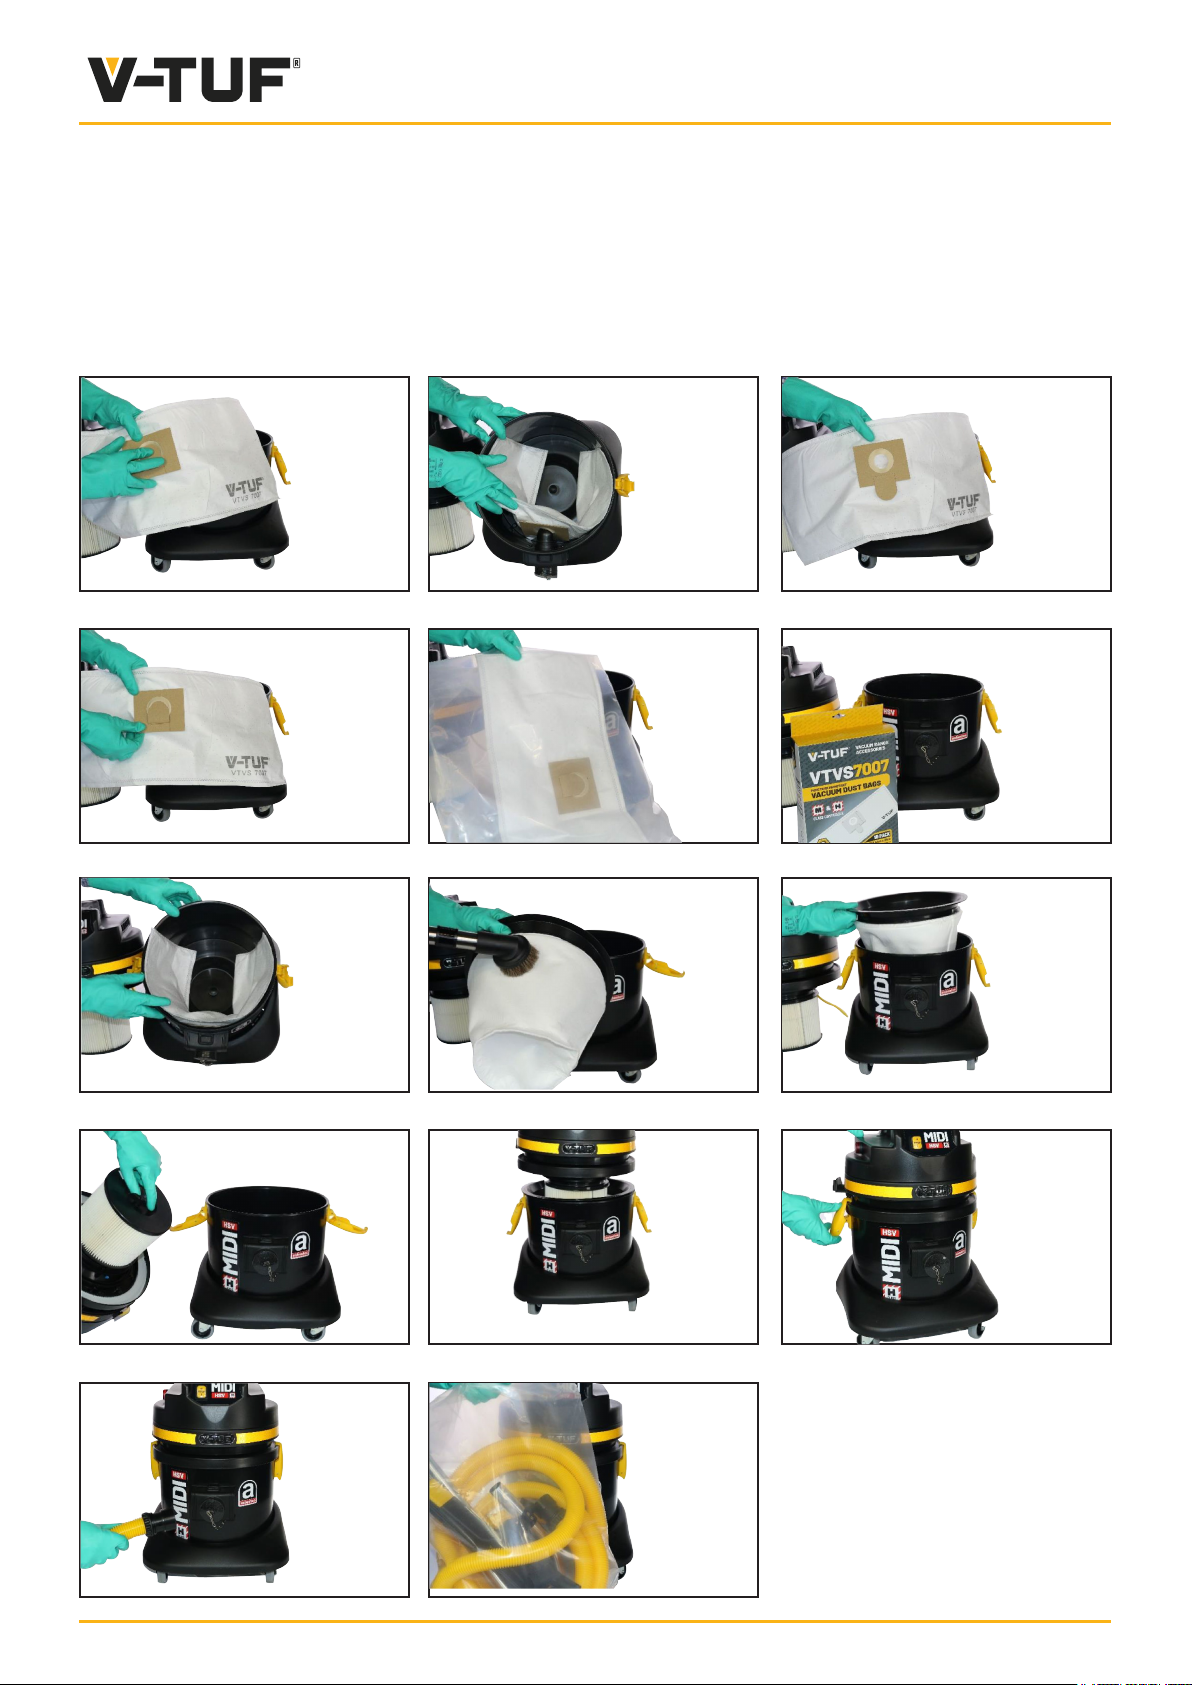
WASTE DISPOSAL
For best practice follow BS8520-1:2009 Operation, cleaning and maintenance
of class H vacuum cleaners. - Code of practice.
6
Page 7
MIDIHSV
7
Page 8
MIDIHSV
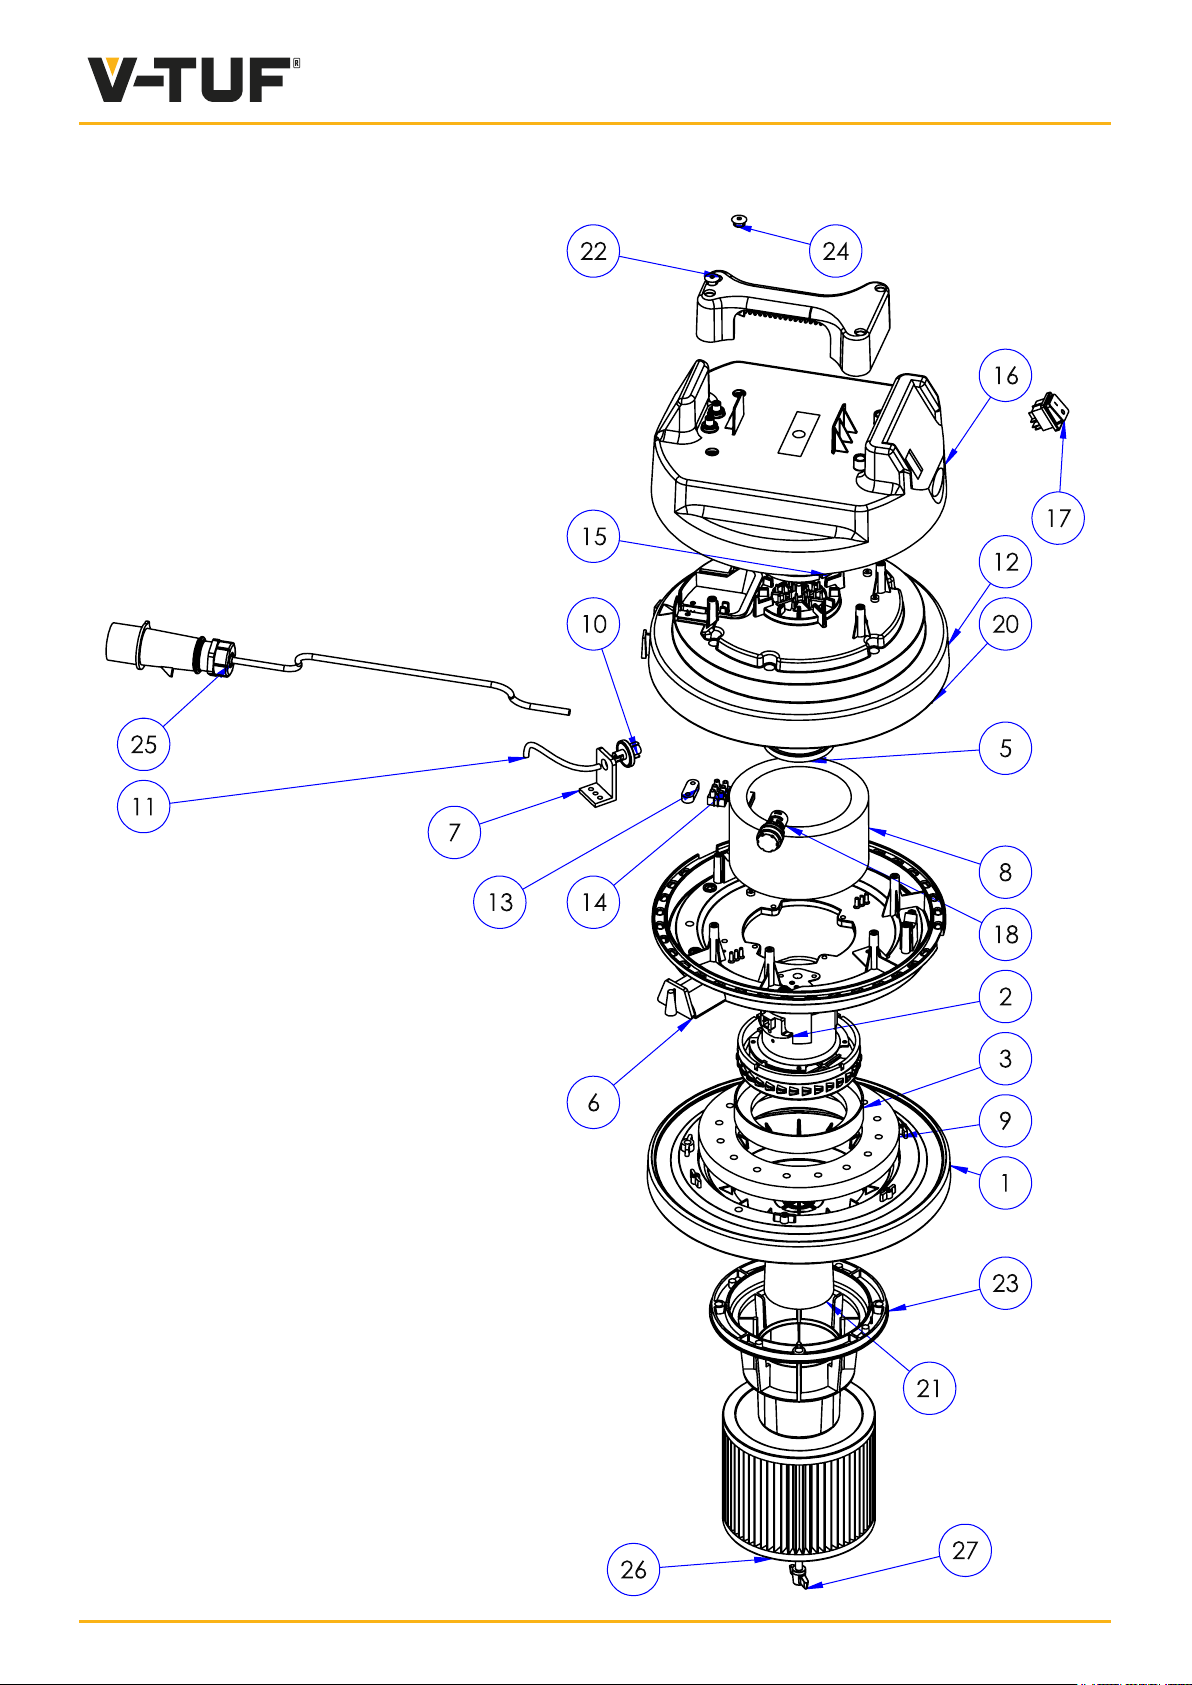
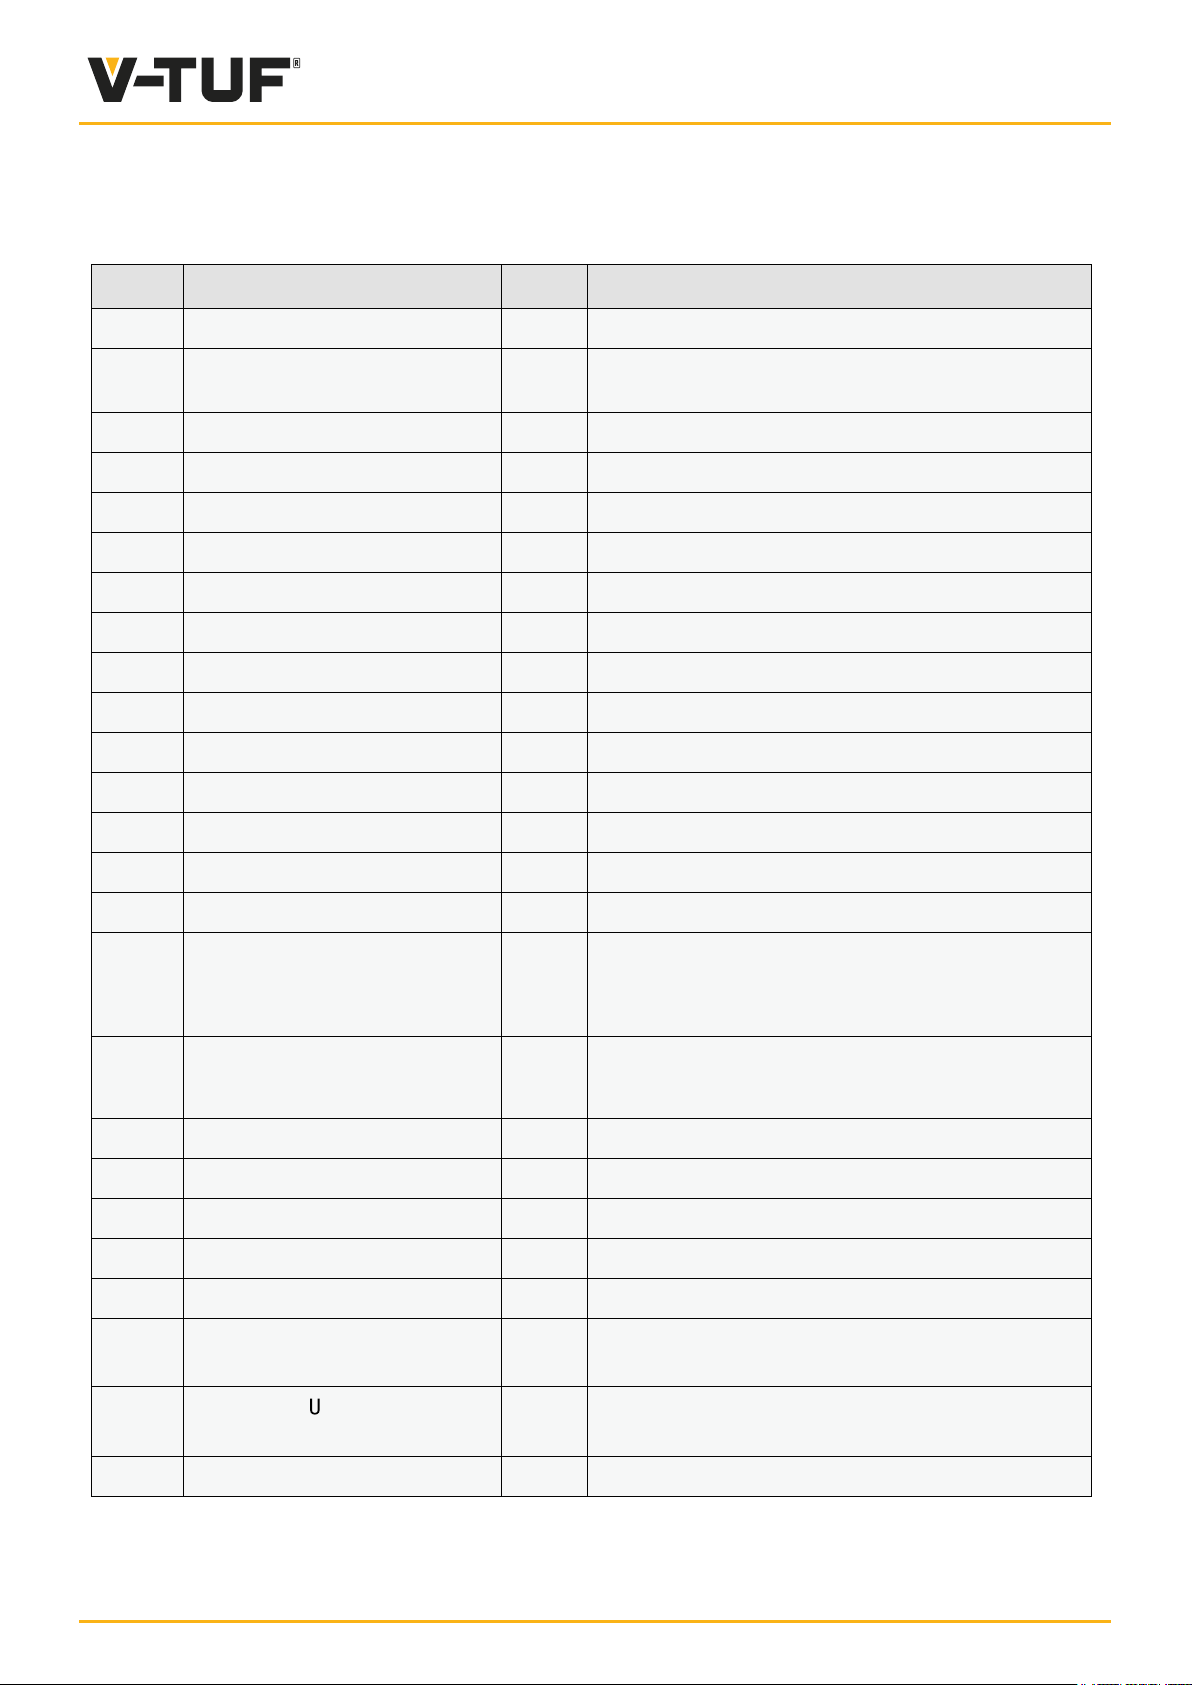
Pos. Cod. Q.ty Description
1 VTVS7471 1 Black Single stage base motor
2
3 VTVS7452 1 "L" Gasket h=10 mm
5 VTVS7482 1 Motor Plastic Spacer H=27
6 VTVS7486 1 Black Motor Holder
7 VTVS7432 1 Pump Bracket
8 VTVS7445 1 Filter MTP30 D160x120x88
9 VTVS7449 1 Filter MTP30 D230x145x20+16F
10 VTVS7431 1 Pressure switch
11 VTVS7504 1 Crystal Hose
12 VTVS7484 1 Black Motor Cover
13 VTVS7483 1 Cable jaw
14 VTVS7421 1 electrical terminal
15 VTVS7163 1 Gasket MTP 30/AU waved 10+10
16 VTVS7478 1 E.2 Black Cover Ø40
a. VTVS7615 - 240v motor
b. VTVS7616 - 110v motor
1 Motor Mono By-Pass PC25 Slim
17 VTVS7422Y 1 SWITCH - VRS SEALED & YELLOW V-TUF 'VRS'
TYPE 10AMP - fits RAPIDS, MIDI, Mighty, MAXI,
VACW&D, RAPID - VTVS7422Y
18 VTVS7437 1 LIGHT BUZZER FOR DUSTEX, MIDI,
MIDI SYNCRO, MAXi 50
20 VTVS7490 1 Plastic Grid
21 VTVS7494F 1 Float
22 VTVS7492 1 Handle E.2
23 VTVS7494 1 Float Support
24 VTVS7515 2 CAP 14,0X18.0X7.0
25 a. I10.1505C = 110v Cable
b. I10.1605C = 240v Cable
26 VTVS7021
27 VTVS7506 1 Filter Wing Nut
1 Electric Plug
1 V-TUF ULPA15 Cartridge Essential
Filter - For MIDIHSV, MAXI50
8
Page 9
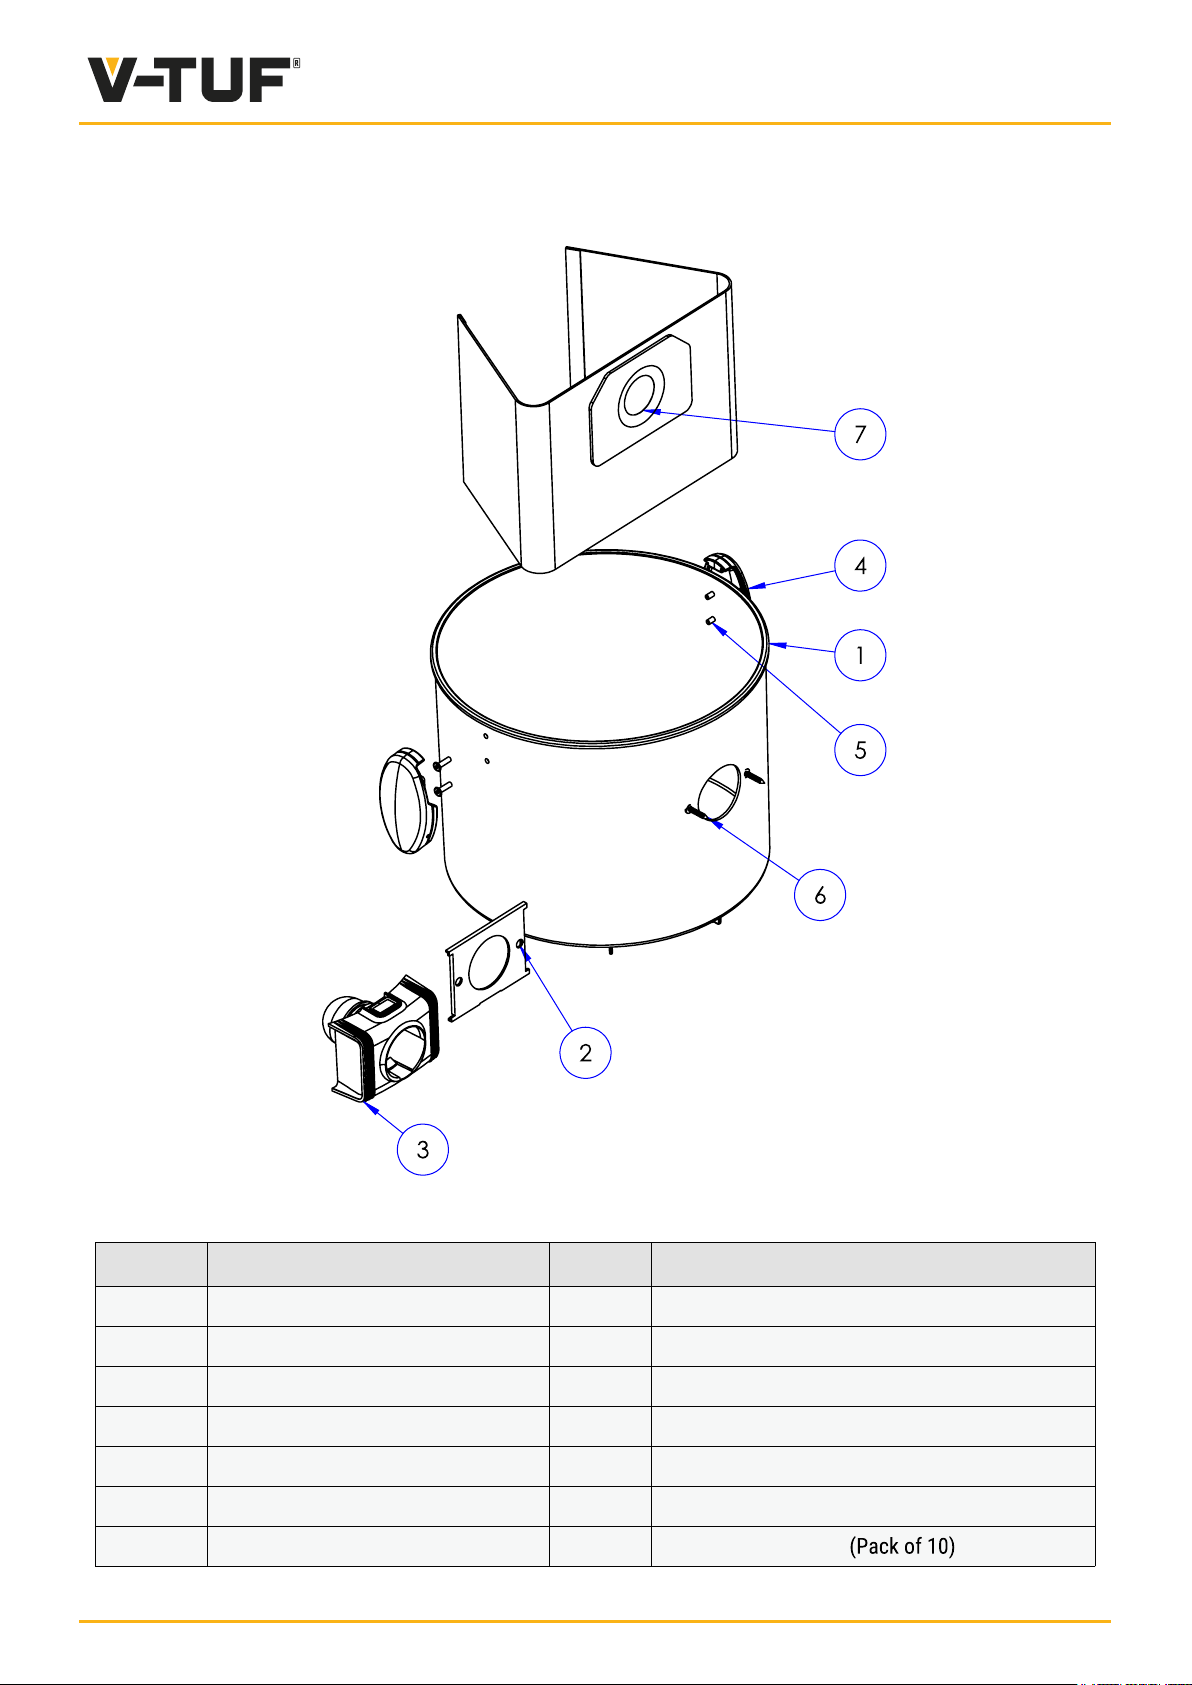
MIDIHSV
Pos. Cod. Q.ty Description
1 VTVS7473 1 Black Plastic Barrel H=250
2
3 VTVS7165M 1 Inlet Ø48
4 VTVS7491 2 Barrel Hook
5 VTVS7514 4 Blind Rivet 4,8x17
6 VTVS7512 2 Self tapping screw 5x25 ZN
7 VTVS7007 1 Polyester Bag 21 l
VTVS7164
1 Gasket Inlet Ø48
9
Page 10
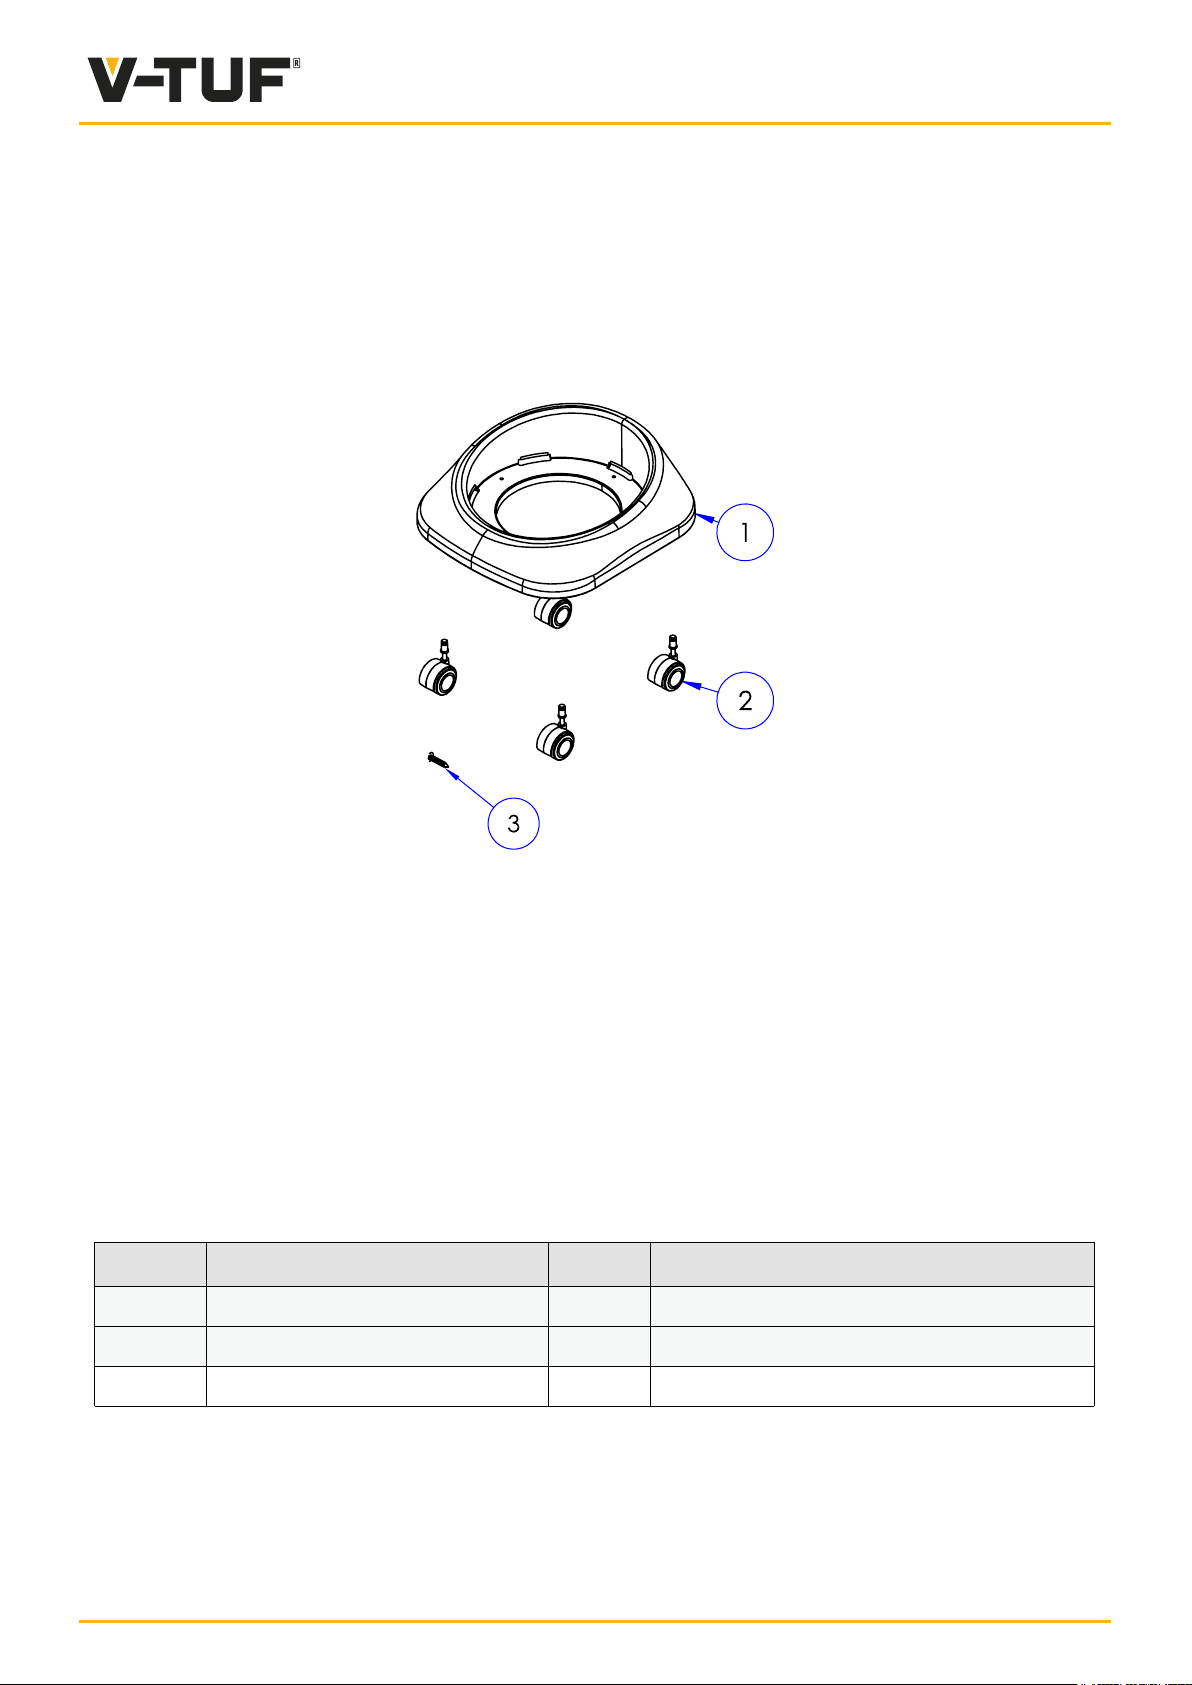
MIDIHSV
Pos. Cod. Q.ty Description
1 VTVS7497 1 black trolley 400x420
2
3
VTVS7496
VTVS7511
1 Pivot wheel Ø50
4 Self Tipping Screw 5x16 ZN
10
Page 11

INTRODUCTION
Thank you for purchasing V-TUF product.
V-TUF is focused on research and development to make sure you are fully satisfied with our products.
Please read this manual carefully and follow the instructions to ensure you get the best performance from
this machine.
Congratulations on your choice.
GENERAL INFORMATION
1. Before use operators must be provided with information, instruction and training for the use of the
machine and the substances for which it is to be used, including the method of operation, cleaning
and maintenance and disposal of the material being collected.
2. This manual has been included as an integral part of the appliance and should be carefully read
through before using the machine.
3. Take the appliance out of its packaging and make sure it is in perfect condition, including
accessories and any optional extras you have purchased from the V-TUF range.
4. Make sure that the electrical data of the appliance, shown on the label, corresponds to those of the
mains supply.
5. The appliance must only be used with V-TUF accessories and spare parts
6. The manufacturer disclaims all liability for injury to persons and animals and damage to things due to
the irresponsible use of the appliance and to the use of non-original accessories and spare parts.
7. The repair and/or replacement of the various component parts, especially electrical parts, must be
done by competent, trained personnel.
INSTALLATION
1. Check the full filtration system is in place correctly and the clips that fasten the head to the tank
are in the clamped position and that the head is seated all round the perimeter and secure.
2. Fit the hose to the vacuum connector; fit the required accessory to the end of the hose.
3. Connect the power cable of the appliance to the power socket with switches on "0" (OFF POSITION).
4. The noise level is below 72 dB(A)
OPERATION INSTRUCTIONS
1. Ensure that there is sufficient ventilation for the machine and the operator
2. Make sure the machine on a sound and stable surface.
3. Ensure the machine is switched to the off position, connect to the correct and sufficient power
source,switch machine on, use according to the guidelines and turn machine off, empty and
clean after operation.
IMPORTANT
1. Never use this machine in wet conditions.
2. Do not use your machine if it is not functioning correctly. Regularly inspect electrical leads and
connections, filters and listen for unusual noises. If in doubt, contact your nearest service centre for
advice.
3. For best practice follow BS8520-3:2009 Operation, cleaning and maintenance of class H vacuum
cleaners. - Code of practice.
MAINTENANCE
1. Ensure all maintenance is carried out in a suitable, controlled environment.
2. The filter elements can be cleaned by vacuuming them with a suitable unit that has the full
filtration system in place.
3. Replace the vacuum filter if it is damaged in any way.
4. Damaged filters could allow the dust / materials to penetrate the filter area and become the
cause of serious damage to the user and surrounding people, and the appliance.
11
Page 12
5. Check and free the blocked parts (vacuum pipes, connector, brushes, etc.) from any deposited
materials.
6. Items that cannot be cleaned satisfactory need to be disposed of in an impervious plastic bag in
accordance with current regulations. replace the items with genuine parts.
7 If necessary, clean the tank ever leave dust in the tank for long
periods of time.
IMPORTANT INFORMATION
Never use the machine if you are unsure or become uncertain due to any faults of any kind, including
those not mentioned in this manual.
Ensure that the machine has an up to date electrical and functional safety test and that nothing has been
moved or replaced since the test was carried out.
Technical Information
Model
MIDIHSV
Capacity 21 Litres
Working Voltage
110 & 240 Volts
Motor Power 1150 Watts
Function Dry Only Vacuuming
Air Velocity
40m/sec (Monitored at 20m/sec)
Tank Diameter 320mm
Height 250mm
Accessories Ø32mm Accessories Kit
Power Cable 5m
Safety Instructions
These instructions are for the user’s safety. All users of the V-TUF cleaning equipment should ensure to
have read this literature before using the machine.
• This machine shall be used only be trained, competent and experienced operators. Operators
should observe any safety regulations appropriate to the materials being handled.
• Do not run over the cable.
• Do not use in the presence of flammable gasses.
• Do not use with a damaged cable.
• This machine should be kept out of the reach of children and pets at all times.
• Do not clean up any hot material, e.g. ash.
• Always turn off the machine, and then unplug it, before you se
this machine without the filters, as this is a health hazard and will damage and contaminate the
internals of the vacuum cleaner.
• All repairs on V-TUF products should be done by an authorised service representative.
• If the machine shuts down, be sure to turn off the machine and unplug it before
troubleshooting.
• For safety, the machine contains an electronic overload protection.
• Always turn off and unplug the machine when it is not in use.
• If any part of the appliance becomes damaged or fractured, it must be replaced with genuine
V-TUF replacement parts only
rvice the machine. Do NOT use
12
Page 13
Caution: what to do
1. All power conduction parts must be protected against water. SHORT-CIRCUIT RISK.
2. All services or maintenance performed on the appliance must always be done with the plug
disconnected from the power supply.
3. Operation with a residual current circuit breaker provides extra protection for the operator
(I_n=30 mA).
4. Only ever use the appliance for the purposes for which it has been designed and
manufactured. ACCIDENT RISK.
5. If vacuum exhaust starts emitting dust, turn off immediately and ensure all correct filtration is
present. If any substance has penetrated beyond the essential filter, ensure that the vacuum
is decontaminated and has the correct filtration fitted prior to use.
6. Keep Filters Clean
7. Use genuine V-TUF Filter Bags
8. Keep the machine clean
9. Only use the accessories provided with the machine
10. Never reuse the dust bag.
11. Replace worn or damaged parts immediately.
12. Keep hoses and airways clear.
13. Inspect the power cable regularly. If damaged in any way, get a qulified person to replace it
with a genuine part.
14. Ensure that the machine has an up to date electrical and functional safety test and that
nothing has been moved or replaced since the test was carried out.
Caution: what not to do
1. Do not leave the machine running and unguarded nor within reach of children, animals or
persons that are not responsible for their own actions.
ACCIDENT RISK.
2. Do not vacuum inflammable combustion substance (e.g.: hot ashes), explosive and toxic
substances, electrostatic or substances that are dangerous for health. EXPLOSION OR
POISONING HAZARD
3. Do not rest the vacuum inlet on or move this close to delicate parts of the body (eyes,
ears, mouth, etc.). ACCI
4. Do not touch the plug and/or socket with wet hands. ELECTRIC SHOCK RISK.
5. Do not soak the appliance or spray it with liquid substances. SHORT-CIRCUIT.
6. Do not pull or lift the appliance using the power cable. SHORT-CIRCUIT RISK.
7. Do not leave the device plugged into the mains power supply when not in use.
8. Do not suck up hot ashes or debris
9. Do not immerse in water or rinse off with hose. Do not expose to precipitation.
10. Do not add air fresheners or any foreign objects upstream/behind the filtration systems.
DENT RISK.
13
Page 14
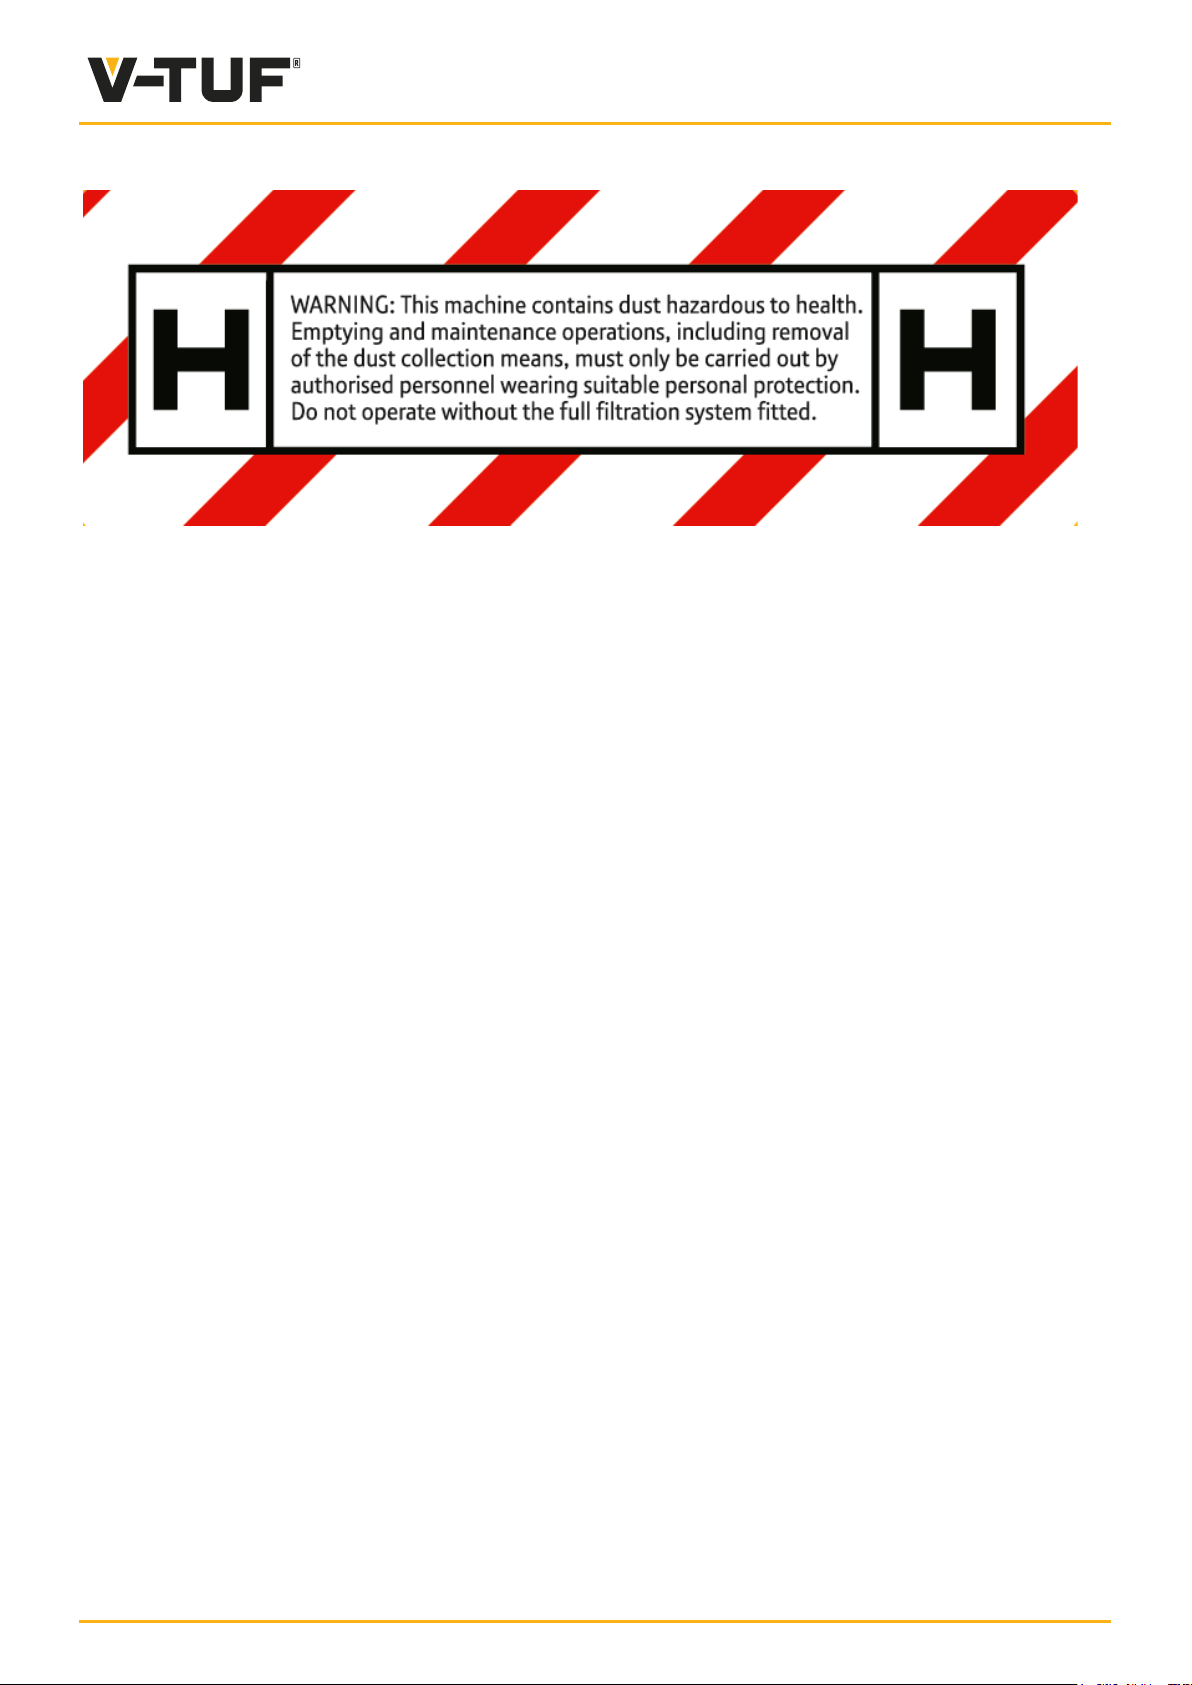
VACUUM CLEANER – CLASS H
SAFETY INDICATIONS
Operator safety
This manual is to be considered as an integral part of the general user manual and provides the necessary
instructions for the special class H dust vacuum cleaners.
Therefore, the supplied general instruction booklet must be read before operation.
In addition to the user instructions and the current regulations in the country of use, the sector’s recognised
technical regulations for the safe and appropriate use of this equipment must also be followed. The UNI
10720 standard (Guidelines for selection and use of respiratory protective devices) establishes the guidelines
for the criteria of selection, use and maintenance of respiratory protective devices. For best practice follow
BS8520-3:2009 Operation, Cleaning and Maintenance of class H vacuum cleaners. – Code of practice
Transport and handling
Be sure to close all the dirt container’s locking hooks before transport. Do not turn the device upside down.
Ensure that the vacuum cleaner and accessories are transported in the appropriate manner relating to the
type of material being handled.
Ensure that all hazardous dusts are contained and not transmitted to beyond the controlled area.
Possible uses for the vacuum cleaner
The vacuum appliances to which these user instructions refer are suitable for professional use and, in
particular, for the control of dusts with an exposure limit value as per the class rating of the vacuum cleaner.
This is stated on the side of the tank. H CLASS
The collection of the following materials is forbidden:
- Incandescent materials.
- Hazardous liquids.
- Flammable and explosive dusts (for example, magnesium dusts, aluminium dusts, etc.).
The use of this device for the elimination of dusts must be performed in rooms or environments which
are sufficiently ventilated whenever the device’s exhaust returns into the environment itself. The user
must respect the current national regulations in the country in which the device is being employed.
The equipment’s end user must be read and understood for its use before beginning any work
activities, taking note of the safe usage regulations. The user must also receive instruction regarding
the dangers deriving from the aspirated materials and the methods for their safe disposal.
Maintenance, cleaning and repair
Care and attention must be exercised at all times during use. Routine and preventative maintenance is
carried out periodically to ensure safe operation.
14
Page 15

Failure to carry out maintenance as necessary, include the replacement of parts to the correct standard
could render the equipment unsafe and the manufacturer can accept no responsibility in this respect.
Before performing any cleaning or maintenance operations on the device, make sure
disconnected from the mains power supply by removing the plug from the socket.
Treat the device in a responsible manner so as to avoid creating situations which could be dangerous to
both yourself, as well as to others.
A filtered, forced air ventilation system must be employed during maintenance activities. The user must
wear any appropriate safety PPE during such operations, especially respiratory protection.
The environment in which maintenance activities are to be performed must be controlled in order to
prevent the dispersion of hazardous substances into the surroundings.
When transporting the device away from or within an area that is contaminated with hazardous
substances, the external portion of the device must be vacuumed and wiped down with a cloth before
sealing it in an air-tight container.
Any parts which cannot be cleaned must be packaged in air-tight bags and/or disposed of in
compliance with the current regulations for the disposal of hazardous substances in the country of use.
The manufacturer requires that the vacuum be subjected to an annual technical inspection.
This inspection may be performed by an authorised distributor’s technician and must include the
examination of the filters, the air-tight seals, as well as the signalling components/indicators.
that it is
DESCRIPTIVE INFORMATION Detailed use of the machine
ATTENTION The vacuum cleaner is suitable for extracting dry non-flammable dusts,
BEFORE FIRST USE
Vacuum assembly and testing
Before using the device, check that:
No foreign elements are present within the container.
Ensure that the head if fastened down with the head clips to form an air-tight seal.
The relevant filters and bag have been installed. The bag is fitted with with a membrane seal which must
be fitted over the internal slot of the tank intake. It also has a complete orifice seal tag which must be
applied once the used bag is removed from the tank intake for safe disposal. This is important to ensure
that the contained dust does not escape. The hose is correctly connected to the tank. the machine is
connected to the correct electrical supply.
Initial working phase check
Before beginning to vacuum dusts check that the full filtration system is in place and within the device and
that they are positioned correctly.
Once the vacuum has been activated, block the filtration tube and check whether an acoustic signal
sounds. The acoustic signal is activated before the speed of the air within the tube falls below 20m/sec.
This must be calibrated.
In normal usage conditions, the acoustic signal turns on to signal a reduction in pressure / air flow.
Once this sounds the filter must be cleaned and the bag must be replaced.
USE OF THE DEVICE
ATTENTION flammable or explosive dusts/substances
The sector’s reference standard, EN 60335-2-69/A1:2004, lists the dusts which present a risk of
explosion when brought into contact with ignition sources. A filter bag must always be fitted. Never
reuse a filter bag.
15
Page 16
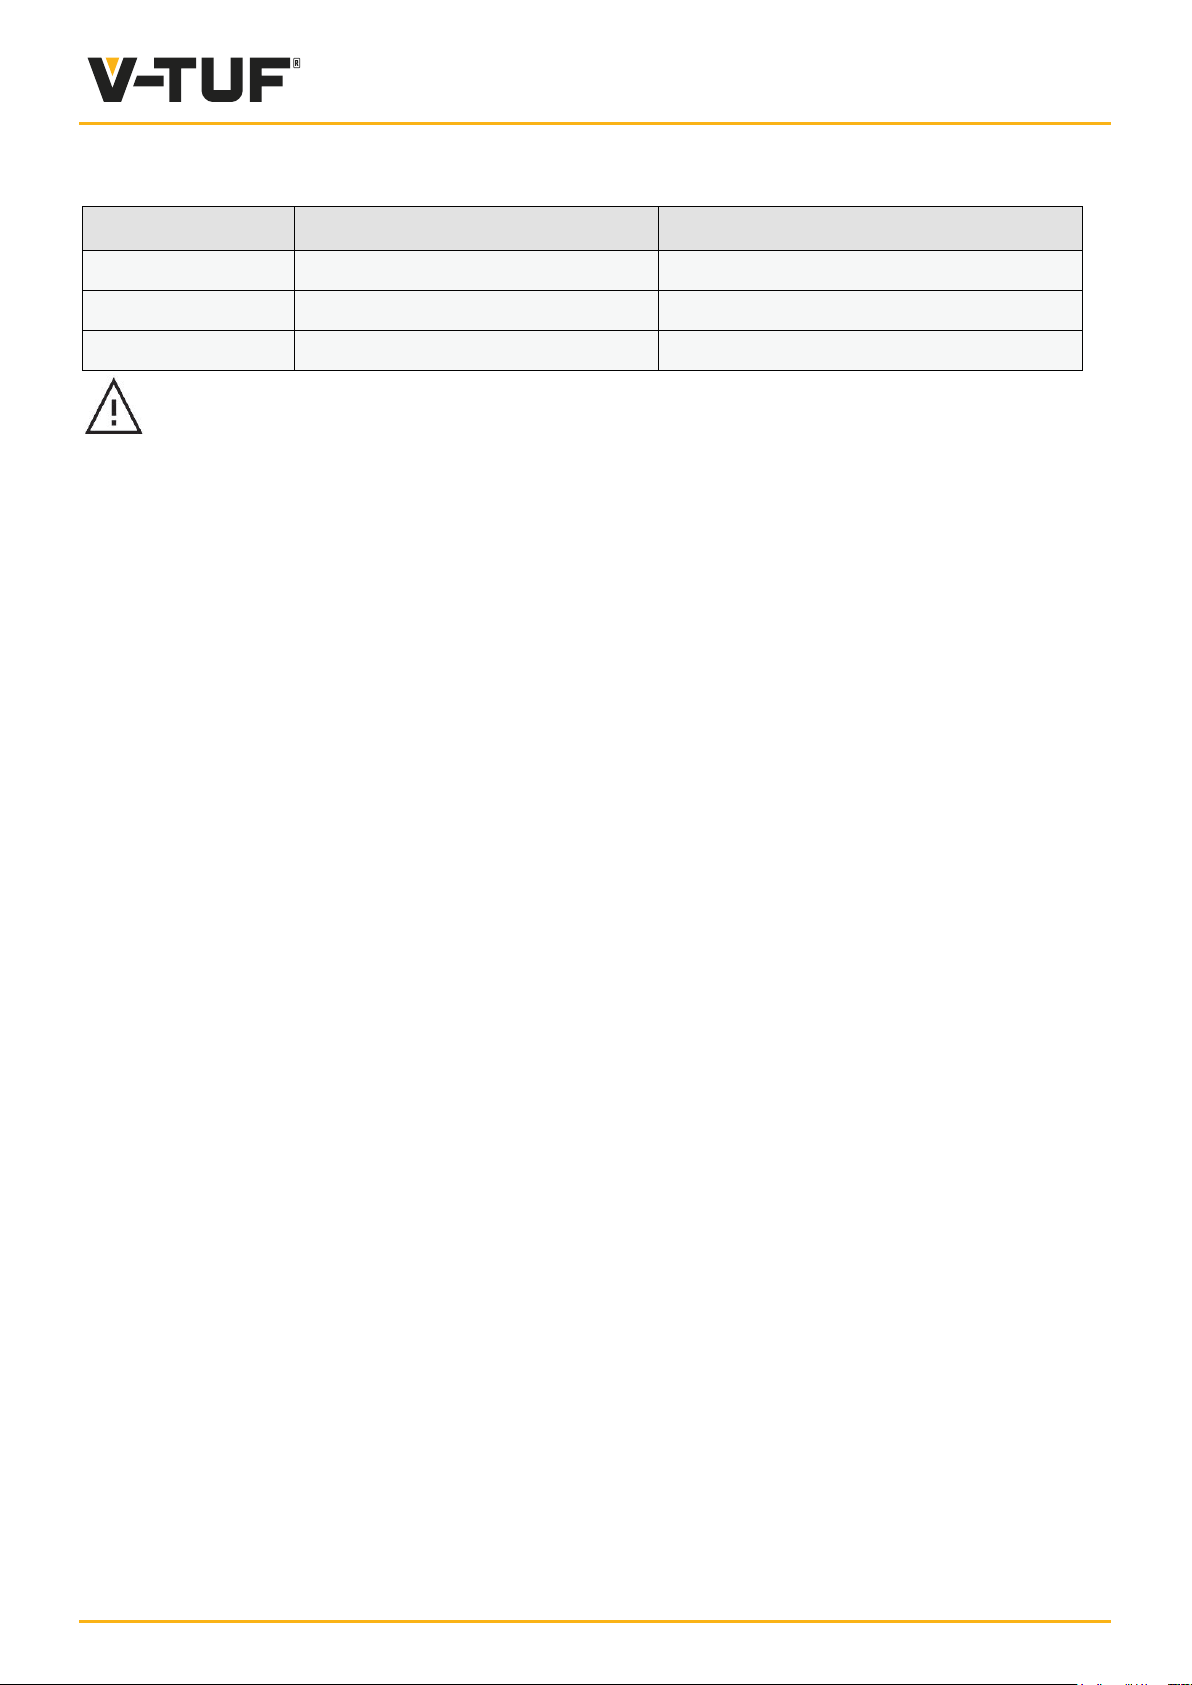
FILTER BAG REFERENCE TABLE:
CODE DESCRIPTION VACUUM MODEL
VTVS7021U
VTVS7007
VTVS7008
ATTENTION
The dust collection bag must not be filled past 3⁄4 of their capacities. Check periodically during use.
Do not vacuum liquids or particularly humid substances.
V-TUF UILPA15 Essential Filter
Polyester Filter Bag
Coned Filter Basket
MIDIHSV
MIDIHSV
MIDIHSV
END OF WORK ACTIVITIES
Must be carried out in a suitable, controlled are area with the relevant PPE and methodology being used.
Disconnect the device’s power supply by removing its electrical plug from the outlet.
Empty the waste container and dispose of the material according to the relevant regulations appropriate to
the materials being handled.
Ensure the container is clean and fit a fresh dust collection bag.
The outside of the machine should be decontaminated by vacuum cleaning methods and wiped clean or
treated with sealant before being taken out of a hazardous area. All the machine parts shall be regarded as
contaminated when removed from the hazardous area and appropriate action taken to prevent dust
dispersal.
Store the vacuum in a safe place where it cannot be accessed by unauthorised personnel.
Replacing the filter bag:
This dust bag holding the dust and debris must be removed, disposed of correctly and replaced by
authorised persons that are wearing appropriate PPE and in a specified de-contamination only.
Never run the vacuum cleaner without the full filtration system, in place.
Never reuse the bags
Remove the hose. Ensure that the rubber bung is firmly in place providing an airtight seal.
Remove head and place in a level location
Remove basket filter
Remove the filter bag, close bag inlet tab. Place inside and impervious plastic bag ensuring it has an
airtight seal. Dispose of in the correct manner according to the type of waste. Ensure that the tank is
empty and clean.
Fit the new filter bag, making sure that the bag’s membrane seal fits perfectly over the internal slot of the
tank inlet and that the bag fits neatly around the edge of the tank internal.
Refit the head ensuring that the clips are completely closed and there full, airtight seal around the rim of
the tank.
MAINTENANCE
All parts should be regarded as contaminated and kept or disposed of in the appropriate manner.
Ensure that the machine is disconnected from the power supply. Maintenance must be carried out by a
competent, trained, authorised personnel donning the appropriate PPE and within the specified zone.
Check the supply cables and seals for damage. If damaged, replace before further use. Ensure that the
machine is decontaminated in a specified environment prior to mainte
nance work being carried out.
16
Page 17
All contaminated items which cannot be satisfactorily cleaned are to be disposed of; such items shall be
disposed of in impervious bags in accordance with any current regulation for the disposal of such waste.
Be careful to not disturb dusts when performing cleaning operations, filter checks or filter replacements.
Use the correct PPE, equipment and procedures according to BS8520-3:2009
Replacing the
Open the closure hooks, lift the vacuum’s cover from the container and set it down in a way that you can
unscrew the essential filter retainer screw.
Unscrew the essential filter retainer screw, slowly remove the filter, place it in an impervious bag with
airtight seal. Dispose of in compliance with current local laws.
Ensure that you have the correct replacement filter.
Check that all seals are in place and that there is no objects or dust that are in the seal areas.
Place the filter in the correct position and tighten the essential filter retainer screw.
Ensure there is a full seal and that there are no gaps.
Never use the vacuum cleaner without the full filtration system in place.
Essential Filter element
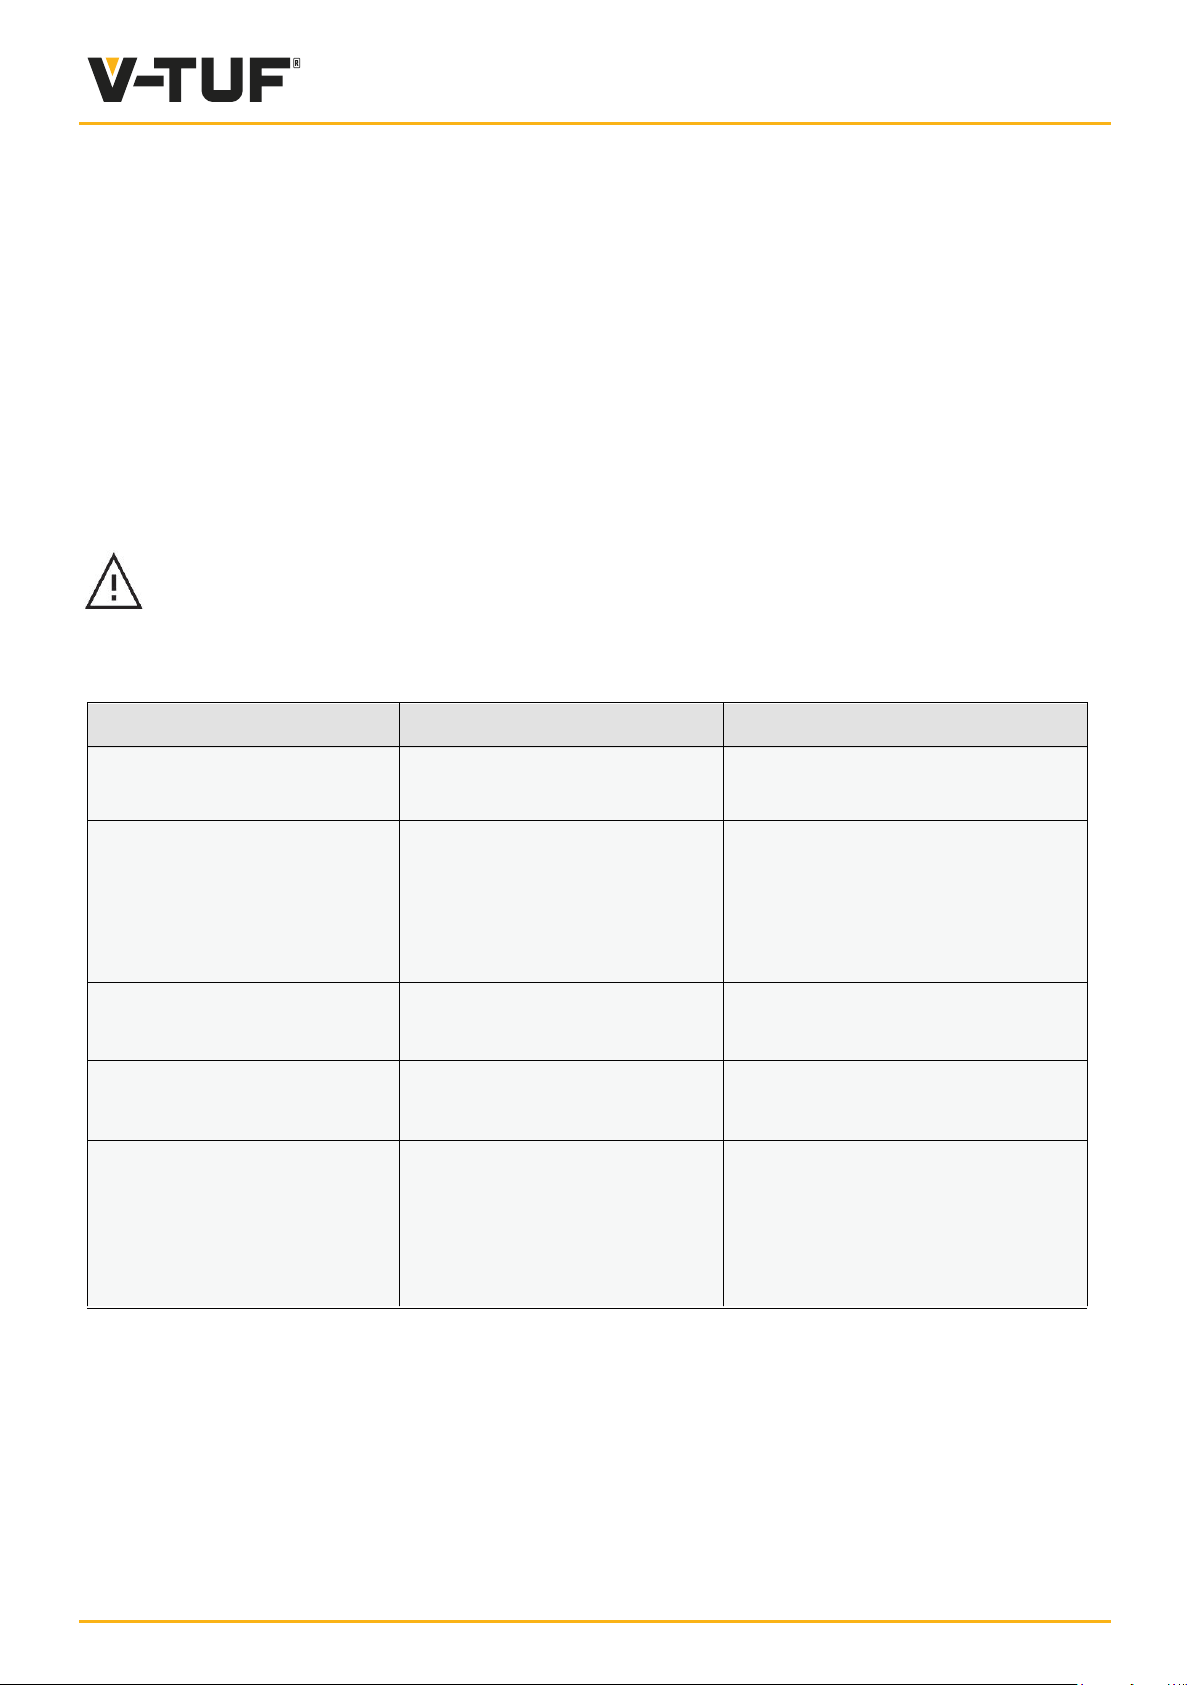
TROUBLESHOOTING
PROBLEM PROBABLE CAUSE PROBABLE SOLUTION
The machine does not
start
The machine suddenly
stops
No current. Check main fuse, power cord,
plug and outlet.
Because of overheating,
the thermal protection turns
the Machine off (feature only
available on extraction
After the machine has cooled
down, you can turn the power
on again and begin to use the
appliance again.
machines).
Reduced suction power. Filter, nozzle, hose or tube
clogged.
Suction power suddenly
Tank full. Stop the machine and
drops
RED LIGHT/BEEPER
SHOWING
Blocked hose, Blocked
poles, Blocked floor tool.
Full Bag, Blocked filter.
Power tool has poor
airflow allowance.
Check and clean
empty the tank.
Remove the items causing
the blockage, change the
bag, clean the lter.
17
Page 18
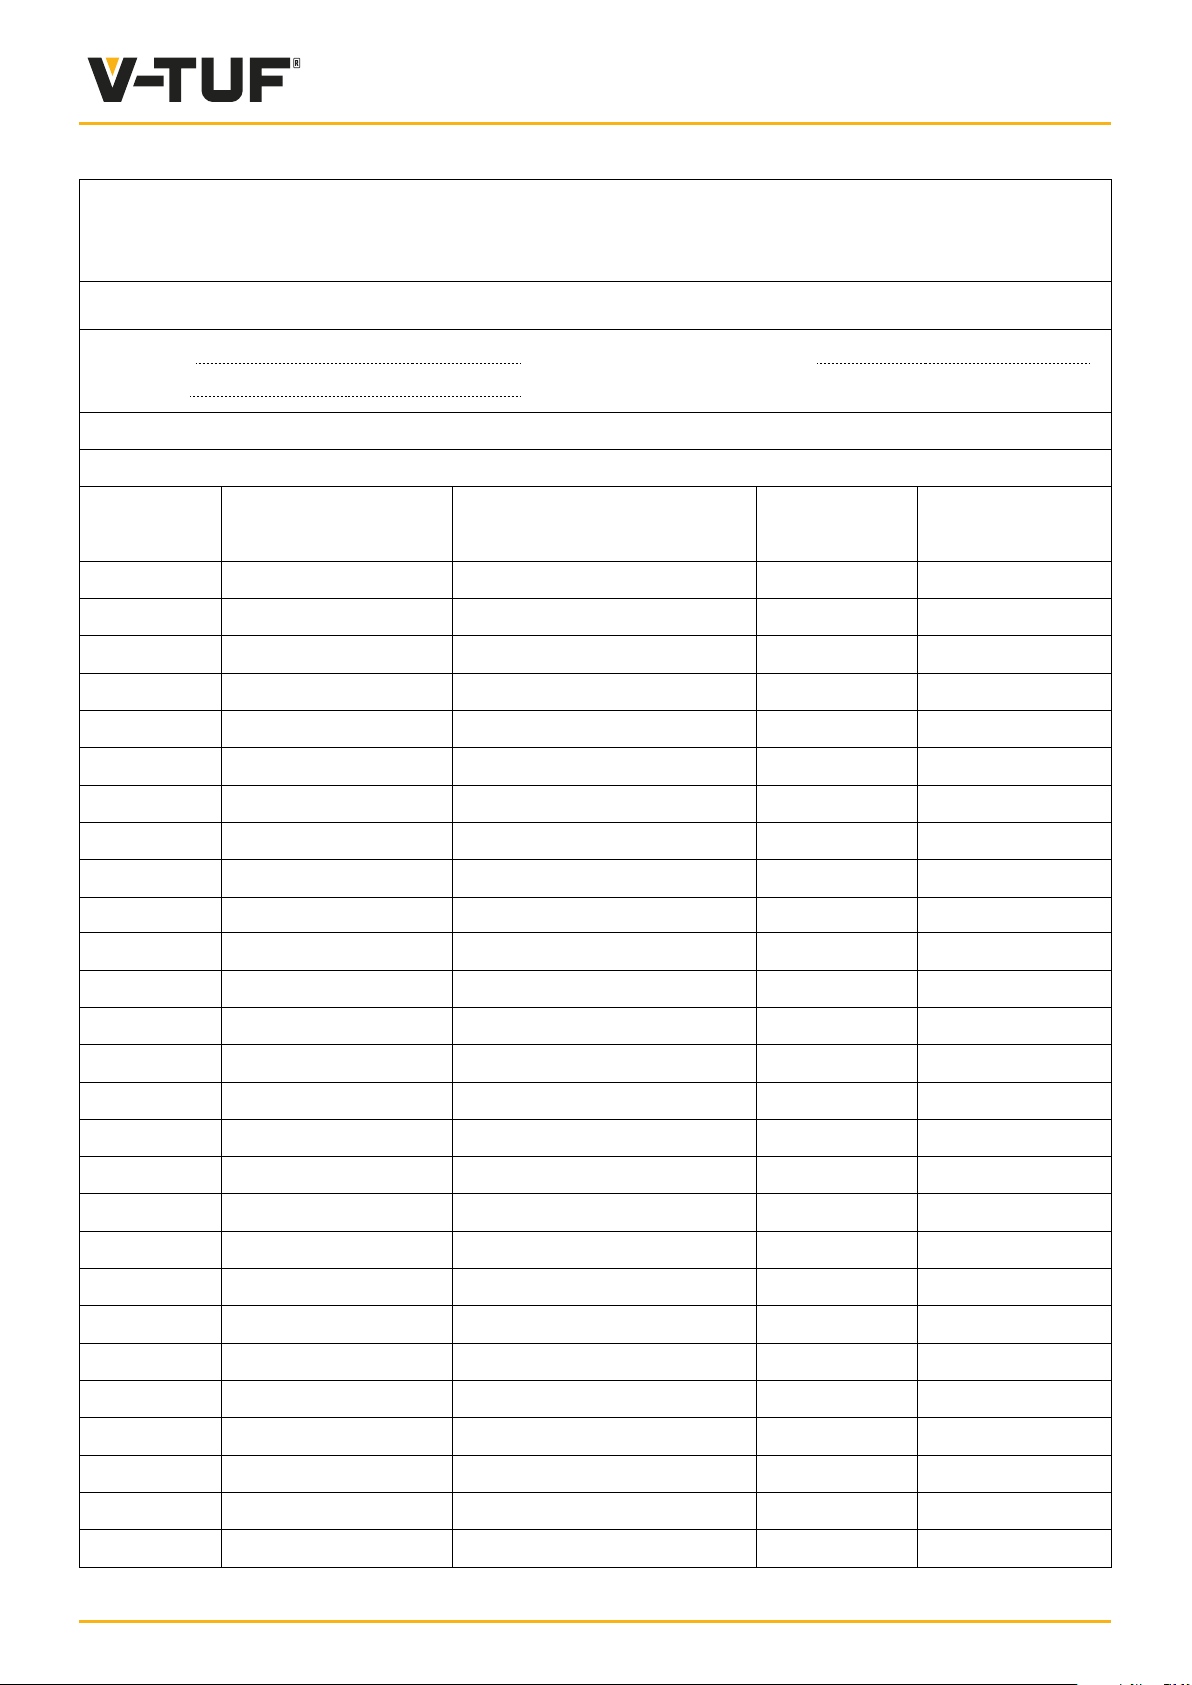
MAINTENANCE LOG
EQUIPMENT HISTORY SHEET
Unit:
Model:
Log all electrical and product safety and performance tests
Date of last test : / / Date of next test : / /
Date Approx Hours Run
(Company, print name, sign)
Inspected By
Serial Number:
Satisfactory
YES/NO
Defects and or
remarks
18
Page 19
NOTES
19
Page 20

20
 Loading...