

Page 1

EN
to your Windows or Mac OS computer
USB Audio Capture Analog
and Digital Audio
AV202 EN
USB Audio Capture
Page 2

Introducon
This AV202 USB audio capture is designed to help users to convert their old collecon of cassees,
vinyl records and LPs to crisp, clear digital audio files for music on the go and then create audio CDs
or MP3 CDs for personal audio library and archive those precious voices and memories. With the
help of the USB audio capture, you can rediscover the beauty of the classical music.
Specificaon
Item Name USB Audio Capture
Interface USB standard (USB 2.0)
Recording Format Wave, MP3
Input Audio L/R (RCA), 3.5” Stereo Audio (Male)
1GB free HDD space
System Requirements
Requested OS
Windows: Windows 10 / 8 / 7 / Vista / XP
Mac OS: OS X 10.6 and later
(Notes: v2.1.2 does not support PPC Macs.)
2GHz CPU or above and 4G RAM or above
Power Supply USB Bus
Consumed Power ≤ 1.5W
Applicaon Soware Audacity (Version 2.1.1 in this CD)
Dimension / Weight 73(L)×26(W)×11(H)mm / 62g
Cable Length 80cm(USB), 15.8cm(Audio)
1 x USB 2.0 Port , CD-ROM for installaon
and accessible Internet
Thank you for choosing AV202!
Before using this product, please read the user manual carefully.
>1<
AV202 EN
USB Audio Capture
Page 3
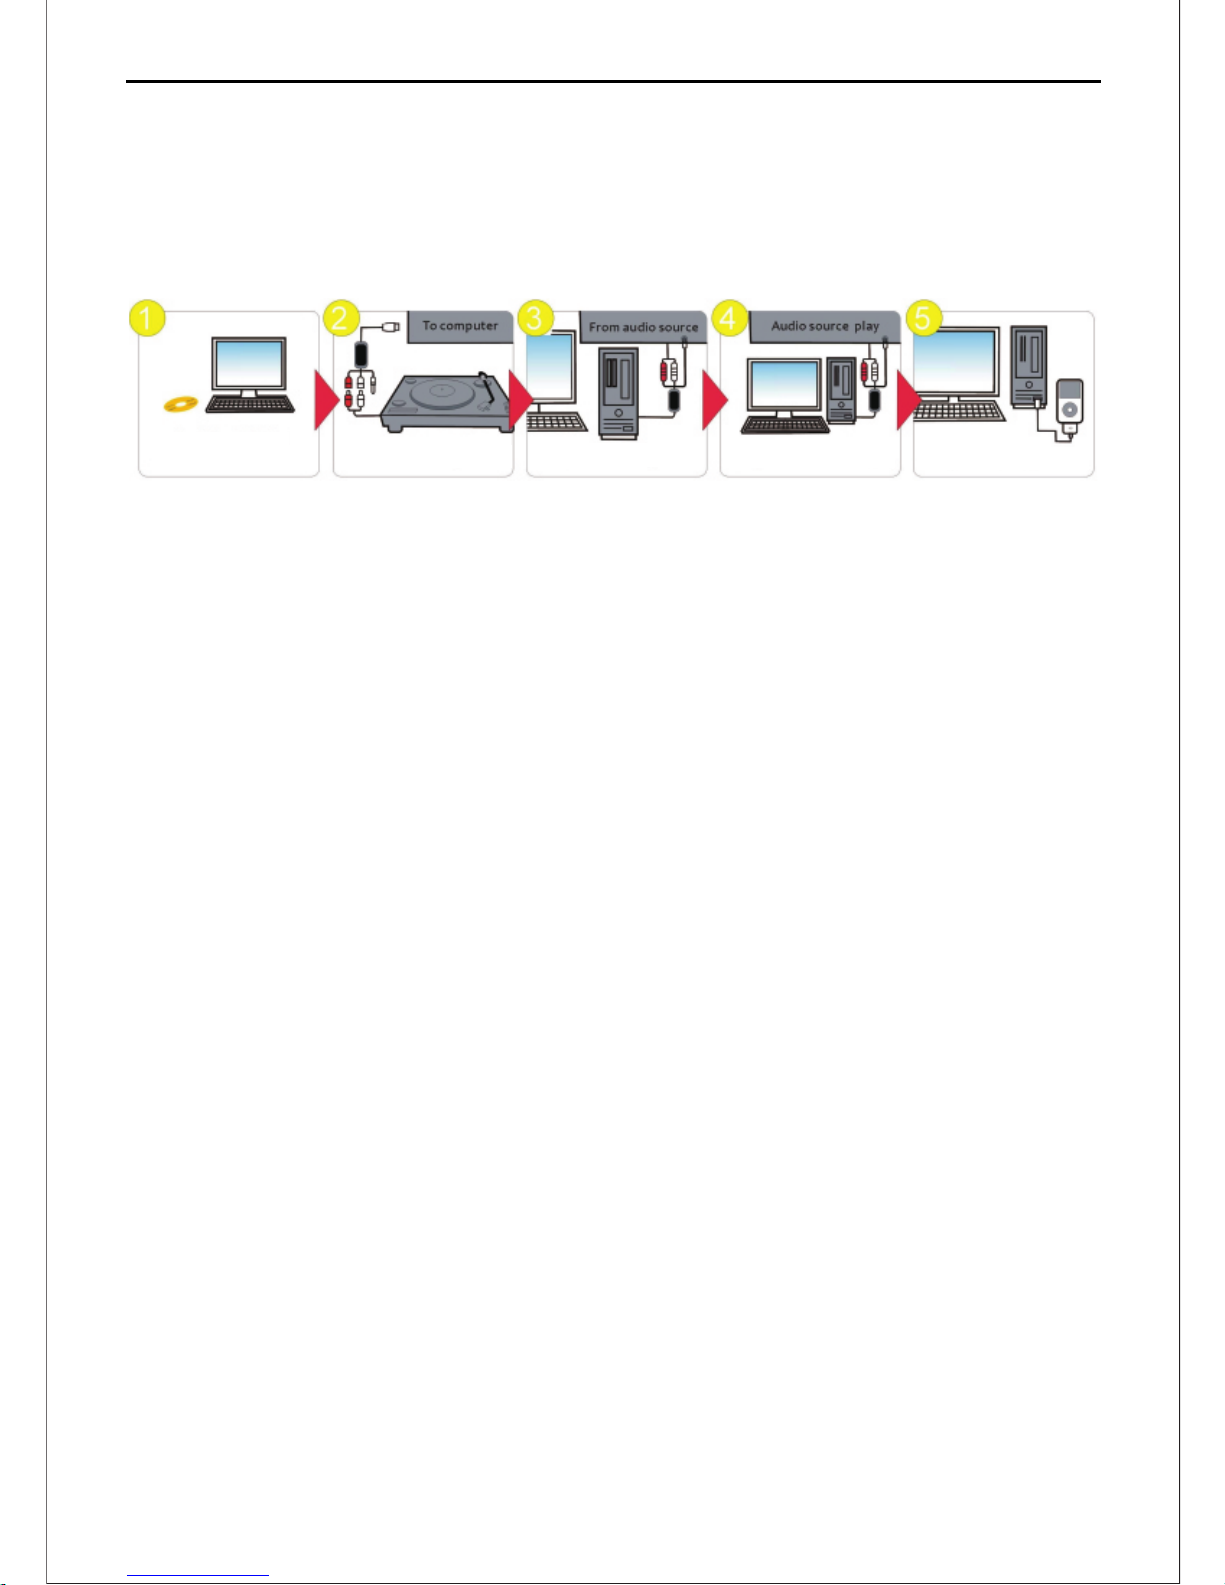
Step 1: Install Audacity and LAME MP3 Encoder
The soware can be found in the CD or downloaded from the website, and the download
address is:
hp://www.audacityteam.org/download/
Declaraon: LAME is a library that allows some programs to encode MP3 files. LAME is free,
but in
some countries users may need to pay a license fee in order to legally encode MP3 files.
For Windows OS Users:
a.First, install \Windows_V2.1.2\Audacity_v2.1.2.exe
b.Then, install \ Windows_V2.1.2\ Plug-Ins\Lame_v3.99.3.exe
For Mac OS Users:
a.First, install \Mac_OS_v2.1.2\Audacity-v2.1.2.dmg
b.Then, install \Mac_OS_v2.1.2 \Plug-Ins\Lame_Library_v3.98.2.dmg
Note: Install Audacity as main applicaon soware; and you may install LAME MP3 encoder
based
on your own personal needs.
Step 2: Hardware Installaon - Connect your analog audio source to audio input jack of this
AV202.
Step 3: Plug the USB end of AV202 into Computer’s available USB Port, and make sure your
computer does recognize the AV202. (Refer to secon of “Hardware Installaon”)
Step 4: Run the Audacity Soware for Capturing, Eding your desired music. (Audacity
Soware’s
Operaon Manual is contained in the CD.)
Step 5: Transfer the digital audio files to your device.
Install a ppl ica tion Audio source i npu t
Conn ect to co mpute r
Capt ur e and edit au di o
Output to iPod by iTu ne s
Quick Installaon
Note: Before installing the Audacity Applicaon Soware, you need to close the An-Virus
Soware.
>2<
AV202 EN
USB Audio Capture
Page 4
Hardware Installaon
The Operaon System will install the driver automacally. Some Operaon Systems might
require an Internet for updang.
Connect the AV202 to the computer. The system message “Your new hardware is installed and
ready to use” will appear aer a while. It means that the driver has been installed or updated
successfully.
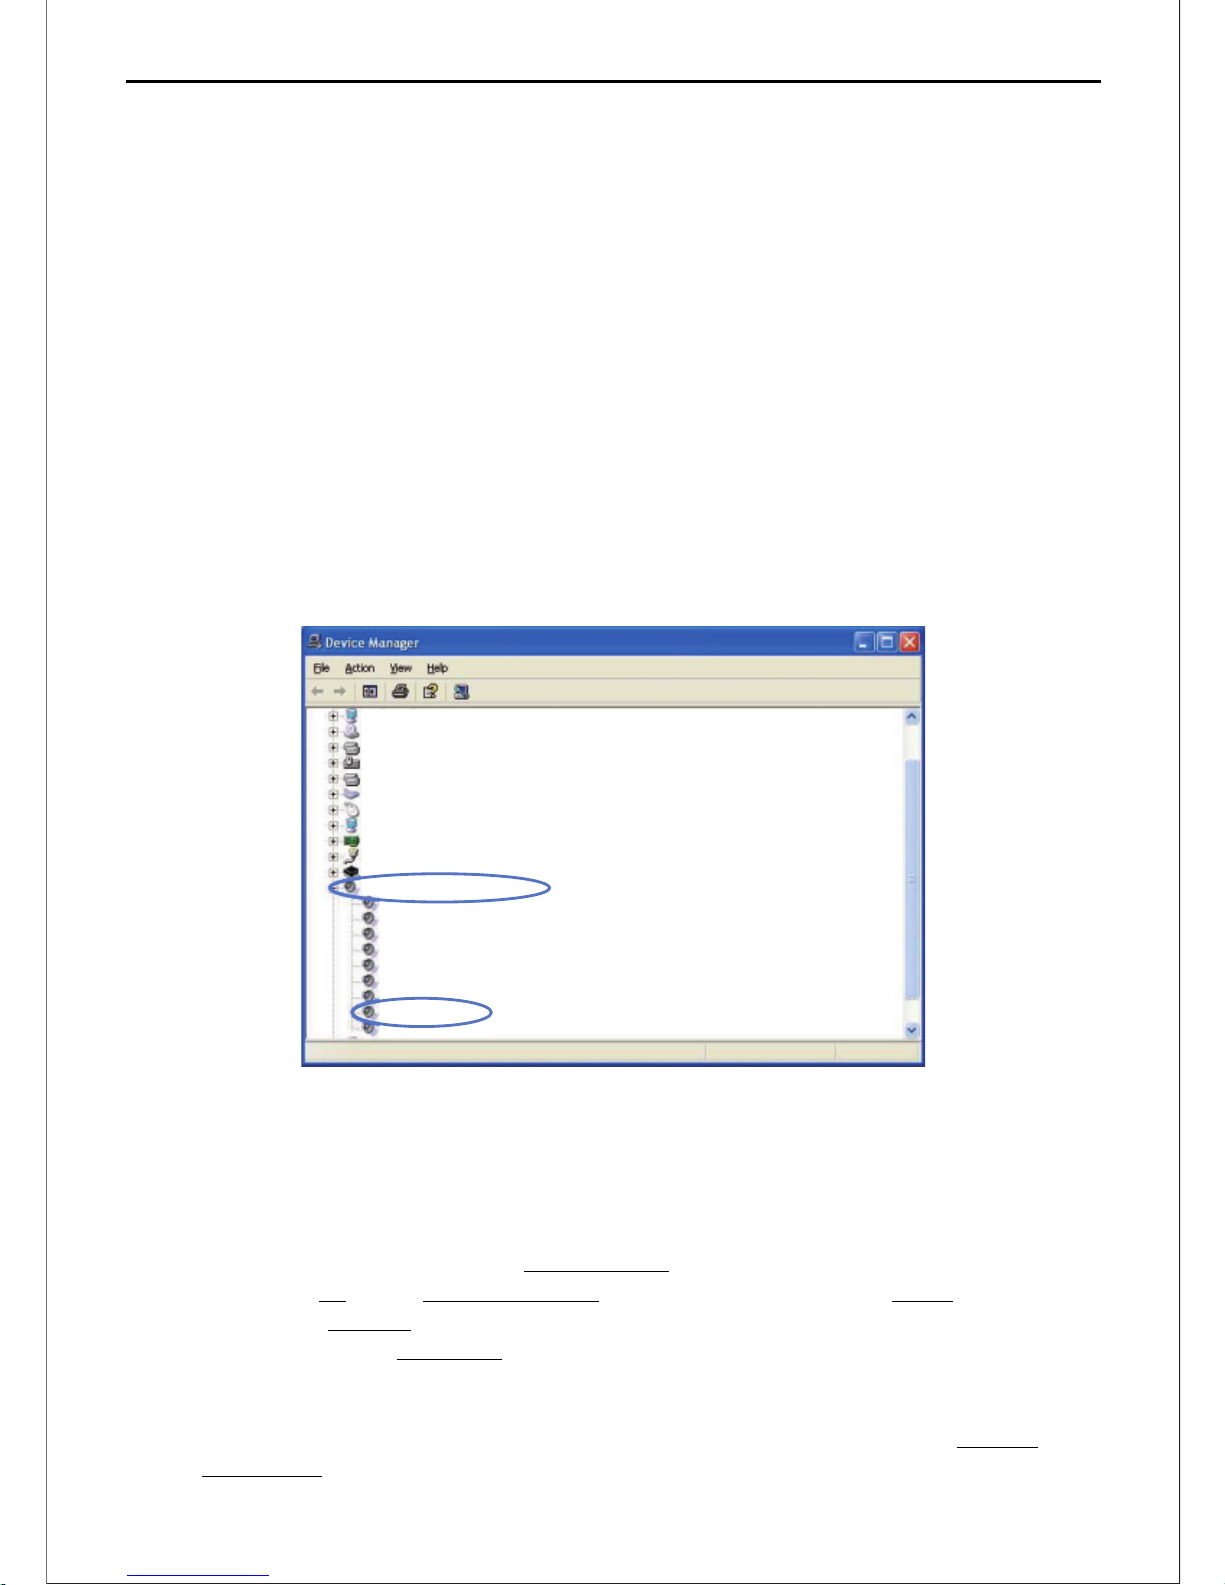
1.Connect the AV202 to your computer, and open Device Manager. Click on the “Sound, video
and game controllers”, and you can see “USB Audio Device” if AV202 is recognized by the
computer correctly. (Please close An-Virus Soware before installaon.)
2.While if a Yellow Mark appears, you will have to remove the driver and disconnect AV202
from the computer and reconnect it to install/update the driver again. (We strongly suggest
an Internet is available.)
FAQ
1. What is an opmal recording level to aim for?
Using the Recording Volume Slider on Mixer Toolbar to adjust the level, aim for a maximum
peak of around –6 dB on the Recording Meter (or 0.5 if the meter is set to linear scale). This
should ensure that clipping will be avoided. The recording will only show a maximum peak of
around 0.5 on the default waveform display, but given how the ear hears sound, this is
actually much louder than apparent "half volume”.
You can boost the level if necessary aer recording and eding by using Effect > Amplify or
Effect > Normalize.
Displ ay a da pt ers
DVD/C D- RO M drive s
Flopp y di sk c ontro ll er s
Human I nr er face De vi ce s
IDE ATA/ATAPI c on troll er s
Keybo ar ds
Mice an d ot he r po intin g de vi ces
Monit or s
Netwo rk a da pters
Ports ( CO M& LPT)
Proce ss er s
Sound ,v id eo a nd ga me c on tr oller s
Audio C od ec s
Legac y Aud io D ri ver s
Legac y Vi deo Cap tu re D ev ice s
Media C on tr ol Devi ce s
MPU-4 01 C om patib le M ID I De vice
Realt ek Ac ’9 7 Aud io
Stand ar d Ga me Port
USB Audi o De vi ce
Vid eo C od ecs
>3<
AV202 EN
USB Audio Capture
Page 5

2. How do I record from vinyl records, cassee tapes or MiniDiscs? (Or the Recorded voice is
very low from vinyl)
Vinyl or shellac records can also be recorded into Audacity with a special type of turntable
that connects to the USB port of your computer. These turntables need to be set up
differently from those that connect to line-in. See Recording with USB turntables or USB
cassee decks for setup instrucons, then Basic Recording, Eding and Exporng in the main
tutorial.
3.I cannot find how to use Audacity, it is bad.
Do not worry. We have placed detailed operaon manual in this CD.
4.Why I have issues with Windows 10?
Make sure that your computer's CPU supports SSE2 (any CPU made aer 2003 should support
it). Please use the legacy Audacity 2.0.6 version if your computer does not support SSE2.
Connecon hints:
Do not connect a turntable directly to your computer.
The signal from a turntable must be passed through a phono pre-amplifier or a receiver with a
“phono” input that provides phono amplificaon. Otherwise, it will be too quiet and will also
sound "nny" due to incorrect equalizaon.
Do not plug stereo equipment into your computer ’s “Microphone” port.
This port is usually designed only for low level, mono microphone input. It will produce
distoron if you connect phono amplified output. Use the “Line In” port if you have one (on
some laptops or other portable computers, the "Mic" port can be switched to a line-level
input).
Plug one end of a stereo cable into the "Line Out" or "Headphone" connector on your tape
deck, MiniDisc player, or stereo system.
Plug the other end into your computer’s "Line In" port. If you do not have a suitable cable, you
can find one at an electronics store.
Choose "Line In" as the recording source in Audacity's Device Toolbar or Devices Preferences.
Press the red Record buon. While Audacity is recording, start playing your tape or disc.
When you have captured the audio you want to record, press the yellow Stop buon. You can
also press the blue Pause buon to pause recording, and Pause again to resume recording on
the same track.
For a detailed tutorial, see Copying tapes, LPs or MiniDiscs to CD. This covers all the steps
from recording your records, cassees or MiniDiscs to exporng as an audio file and burning
to an audio CD.
>4<
AV202 EN
USB Audio Capture
Page 6

5.Why can't I export files to MP3 format?
You might neglect installing Lame MP3 encoder, which allows Audacity to export MP3 files:
a.For Windows Users, please install the file: \ Windows_V2.1.2\ Plug-Ins\Lame_v3.99.3.exe
b.For Mac OS Users, please install the
file:\Mac_OS_v2.1.2\PlugIns\Lame_Library_v3.98.2.dmg
6.When I record audio from my converter, I don't get any sound.
a. Check the volume dial on the right side of your cassee converter. Make sure it is turned up
to halfway.
b. Make sure you have the correct recording device set. In the soware, click Edit Preferences
and set the “Recording Device” to “USB Audio Device”.
7. How do I use the Converter with iTunes?
First, you need to convert your recorded files to WAV or MP3 format and save it on your
computer; and then you can import your recordings into iTunes and put them on your iPod
/iPad / iPhone.
8. My audio recordings don't sound good.
a. Turn down the volume control on the player; high volumes may cause distorted recordings.
b. Turn down the “Recording” / “Microphone” volume in the soware.
c. Under Edit Preferences, set “Channels” to “2 (Stereo).”
d. If your recordings are sll in low quality, it is likely that the sound of your original music has
degraded over me or the audio sources are not sasfactory.
9. Audacity records audio correctly, but I can't hear anything during playback.
a. First, unplug AV202 from your computer. Then, export your recording as a WAV or MP3 file
and
exit the soware. Finally, play it in the soware such as Windows Media Player or iTunes.
b. Make sure that you have set up the recording device correctly. In the soware, click Edit
Preferences and set the “Recording Device” to something like “USB Audio Device”.
10. How do I split up my recording into individual tracks?
First, select a track by clicking and dragging between the silences (flat lines). Use the “Zoom
In/Out ” tool if necessary.Then, click the file “Export Selecon As WAV” or “Export Selecon
As MP3.” Select a locaon such as the Music (or My Music) folder inside the My Documents
folder.Repeat the process for the remaining tracks that are recorded. You can exit Audacity
thereaer and say “no” when asked to save the file.
11. Is there a way to make the audio transfer faster?
No. Transfers must be done at the normal speed, because AV202 is designed to record the
actual audio that is emied by the playing sources.
>5<
AV202 EN
USB Audio Capture
 Loading...