

Page 1

EX1401
16-CHANNEL ISOLATED
THERMOCOUPLE/VOLTS INSTRUMENT
USER’S MANUAL
P/N: 82-0156-000
June 20th, 2017
VTI Instruments Corp.
2031 Main Street
Irvine, CA 92614-6509
(949) 955-1894
Page 2

Page 3

www.vtiinstruments.com
EX1401 Preface 3
TABLE OF CONTENTS
INTRODUCTION
Certification .......................................................................................................................................................... 8
Warranty ............................................................................................................................................................... 8
Limitation of Warranty ......................................................................................................................................... 8
Restricted Rights Legend ...................................................................................................................................... 8
DECLARATION OF CONFORMITY ............................................................................................................................... 9
GENERAL SAFETY INSTRUCTIONS ........................................................................................................................... 10
Terms and Symbols ............................................................................................................................................ 10
Warnings ............................................................................................................................................................. 10
SUPPORT RESOURCES ............................................................................................................................................. 12
SECTION 1.................................................................................................................................................................. 13
INTRODUCTION ................................................................................................................................ ....................... 13
Overview ............................................................................................................................................................ 13
Features ............................................................................................................................................................... 13
Combined Thermocouple and Analog Inputs ................................................................................................ 13
Scalable for Synchronized High-Speed, High-Channel Count ...................................................................... 14
Open Thermocouple Detection (OTD) .......................................................................................................... 14
Cold Junction Compensation (CJC) .............................................................................................................. 14
Simplified Installation, Setup and Control .................................................................................................... 14
Channel Independence .................................................................................................................................. 15
Custom Thermocouple support ..................................................................................................................... 15
Analog Filter ................................................................................................................................................. 15
Digital Filter .................................................................................................................................................. 15
Input Connectors ........................................................................................................................................... 15
Sampling Rate ............................................................................................................................................... 15
Digital I/O and Limits ................................................................................................................................... 15
Triggering ...................................................................................................................................................... 16
Multi-Function Display ................................................................................................................................. 16
USB Data Recording ..................................................................................................................................... 16
End-to-End Self-test ...................................................................................................................................... 16
EX1401 Specifications ....................................................................................................................................... 17
EX1401 Dimensional Diagram ........................................................................................................................... 21
EX1401 Rack Mount Kit Dimensional Diagram ................................................................................................ 22
Maximizing Measurement Performance ............................................................................................................. 22
Utilize self-test .............................................................................................................................................. 22
Allow for cold junction thermal stabilization ................................................................................................ 22
Select the proper filter ................................................................................................................................... 22
Choose an appropriate sampling rate ............................................................................................................ 23
Select proper location for installation ............................................................................................................ 23
Use correct wiring ......................................................................................................................................... 23
SECTION 2.................................................................................................................................................................. 25
PREPARATION FOR USE ........................................................................................................................................... 25
Unpacking EX1401 ............................................................................................................................................ 25
Installation Location ........................................................................................................................................... 25
Location of connectors ....................................................................................................................................... 26
Installation Options ............................................................................................................................................. 27
Rack-shelf Installation Option of EX1401 .................................................................................................... 27
Tabletop Installation Option .......................................................................................................................... 28
Warm-Up Time................................................................................................................................................... 28
Powering Up and Grounding .............................................................................................................................. 28
Software Installation ........................................................................................................................................... 29
Page 4

VTI Instruments Corp.
4 EX1401 Preface
Driver Installation ............................................................................................................................................... 29
IVI Shared Components Installation (Windows Only) ................................................................................. 30
Instrument Driver Installation ....................................................................................................................... 30
Platform/LXISync Instrument Driver Installation ......................................................................................... 31
Network Configuration ....................................................................................................................................... 31
Network Configuration Reset for EX1401 .................................................................................................... 32
Network Troubleshooting ................................................................................................................................... 32
Using Multiple Network Cards ..................................................................................................................... 33
Time Configuration ............................................................................................................................................ 35
Input Connections/Wiring .................................................................................................................................. 35
Thermocouple Connections ........................................................................................................................... 35
Voltage Connections ..................................................................................................................................... 36
SECTION 3.................................................................................................................................................................. 37
BASIC OPERATION .................................................................................................................................................. 37
Introduction ........................................................................................................................................................ 37
Engineering Unit (EU) Conversion .................................................................................................................... 37
Linear Correction .......................................................................................................................................... 37
Voltage Measurement Ranges ............................................................................................................................ 38
Hardware/Analog Anti-Alias Filter .................................................................................................................... 38
Digital Filter ....................................................................................................................................................... 38
Measurement Range/Input Protection ................................................................................................................ 38
Cold Junction Compensation (CJC) ................................................................................................................... 39
Temperature Units .............................................................................................................................................. 39
Sampling Rate/Filters/Noise Floor ..................................................................................................................... 39
Open Transducer Detection/Overload Conditions .............................................................................................. 40
LED Indications .................................................................................................................................................. 41
Power LED (PWR) ........................................................................................................................................ 41
LAN LED ...................................................................................................................................................... 41
IEEE 1588 LED ............................................................................................................................................ 42
LEDs on Network Port .................................................................................................................................. 42
Channel LED Indicators ................................................................................................................................ 42
Overload and Trigger Outputs ............................................................................................................................ 42
Digital I/O ........................................................................................................................................................... 42
Triggering ........................................................................................................................................................... 43
Data Format ........................................................................................................................................................ 43
Acquiring Data ................................................................................................................................................... 44
Retrieving Data ................................................................................................................................................... 44
User-defined Conversions .................................................................................................................................. 45
LCD Display ....................................................................................................................................................... 45
Hostname ....................................................................................................................................................... 45
IPv4 Address ................................................................................................................................................. 46
IPv6 Addresses .............................................................................................................................................. 46
MAC Address ................................................................................................................................................ 46
LAN Reset ..................................................................................................................................................... 46
Self-Test ........................................................................................................................................................ 47
USB ............................................................................................................................................................... 47
USB Memory Devices ........................................................................................................................................ 48
Storage Devices APIs .................................................................................................................................... 48
Stored Configurations.................................................................................................................................... 48
Data Logging ................................................................................................................................................. 48
SECTION 4.................................................................................................................................................................. 49
WEB PAGE OPERATION ........................................................................................................................................... 49
Introduction ........................................................................................................................................................ 49
Common Issues................................................................................................................................................... 50
Multiple Network Ports ................................................................................................................................. 50
Firewall ......................................................................................................................................................... 50
Page 5

www.vtiinstruments.com
EX1401 Preface 5
General Web Page Operation ............................................................................................................................. 50
Login................................................................................................................................................................... 52
Index ................................................................................................................................................................... 53
Cards ................................................................................................................................................................... 54
Soft Front Panel .................................................................................................................................................. 55
USB Storage ....................................................................................................................................................... 58
Network Configuration ....................................................................................................................................... 59
Instrument Health ............................................................................................................................................... 61
Time Configuration ............................................................................................................................................ 62
LXI Synchronization .......................................................................................................................................... 63
LXI Identification ............................................................................................................................................... 64
Blink LAN Indicator ........................................................................................................................................... 65
Change Password ................................................................................................................................................ 66
Nonvolatile Memory ........................................................................................................................................... 66
Upgrade .............................................................................................................................................................. 67
Reset ................................................................................................................................................................... 67
Reboot................................................................................................................................................................. 67
SECTION 5.................................................................................................................................................................. 68
INSTRUMENT DRIVERS ............................................................................................................................................ 68
Overview ............................................................................................................................................................ 68
IVI Drivers .......................................................................................................................................................... 68
Header and Library Files ............................................................................................................................... 68
Drivers for Linux OS .......................................................................................................................................... 69
Header and Library Files ............................................................................................................................... 69
Building and Running Example Programs ......................................................................................................... 69
Windows Examples ....................................................................................................................................... 69
Linux Examples............................................................................................................................................. 70
COMPATIBILITY ...................................................................................................................................................... 70
Driver and Firmware Revisions .......................................................................................................................... 70
Driver API and Instruments ................................................................................................................................ 70
DRIVER STRUCTURE ............................................................................................................................................... 72
Measurement ...................................................................................................................................................... 72
Channels and Channel Groups ............................................................................................................................ 72
Start, Arm, Trigger, and Alarm........................................................................................................................... 73
Sync ............................................................................................................................................................... 74
Start ............................................................................................................................................................... 74
Arm ............................................................................................................................................................... 74
Trigger ........................................................................................................................................................... 74
Trigger Holdoff ............................................................................................................................................. 76
Alarms ........................................................................................................................................................... 78
Retrieving Data ................................................................................................................................................... 79
FIFO Read ..................................................................................................................................................... 79
Streaming ...................................................................................................................................................... 79
Reference Clock and Time Stamps ..................................................................................................................... 80
LXI and LAN Events .......................................................................................................................................... 80
IVI Class Compliant Interfaces........................................................................................................................... 80
MULTIPLE INSTRUMENTS ........................................................................................................................................ 81
Initializing with Multiple Instruments ................................................................................................................ 81
Multiple Instrument Coordination ...................................................................................................................... 81
DATA ACQUISITION ................................................................................................................................................ 83
Data Flow ........................................................................................................................................................... 83
FIFO ................................................................................................................................................................... 83
Data Streaming ................................................................................................................................................... 83
Memory Streaming ........................................................................................................................................ 84
Disk Streaming .............................................................................................................................................. 84
Callback Streaming ....................................................................................................................................... 84
Sampling Rates ................................................................................................................................................... 84
Page 6

VTI Instruments Corp.
6 EX1401 Preface
ClockFrequency ............................................................................................................................................ 85
Prescaler ........................................................................................................................................................ 85
DownsamplingFactor .................................................................................................................................... 85
FilterType ...................................................................................................................................................... 85
SampleRate ................................................................................................................................................... 85
Span ............................................................................................................................................................... 85
FilterCoefficients ........................................................................................................................................... 86
GroupDelay ................................................................................................................................................... 86
RecordSize .................................................................................................................................................... 86
Setting The Sample Rate ............................................................................................................................... 86
DIO Sample Rate .......................................................................................................................................... 87
Overloads and Open Transducer Detection ........................................................................................................ 87
Time Stamps ....................................................................................................................................................... 88
Additional Data................................................................................................................................................... 88
MEASUREMENT PROCESS ....................................................................................................................................... 89
Measurement Setup ............................................................................................................................................ 89
Sync and Coordination .................................................................................................................................. 89
Start, Arm, and Trigger ................................................................................................................................. 89
Sampling Parameters ..................................................................................................................................... 89
Analog Front End .......................................................................................................................................... 90
Measurement Initiation ....................................................................................................................................... 90
Measurement Loop ............................................................................................................................................. 90
Arming ................................................................................................................................................................ 90
Self-arming .................................................................................................................................................... 90
Arming by User’s Command ........................................................................................................................ 90
Arming at a Certain Time Interval ................................................................................................................ 90
Arming by External Pulse ............................................................................................................................. 90
Arming from DIO Lines ................................................................................................................................ 90
Arming from LAN Events by Other Instruments .......................................................................................... 91
Triggering ........................................................................................................................................................... 91
Self-triggering ............................................................................................................................................... 91
Triggering by User’s Command .................................................................................................................... 91
Triggering at a Certain Time Interval ............................................................................................................ 91
Triggering by Analog Signal ......................................................................................................................... 91
Triggering by External Pulse ................................................................ ................................ ......................... 91
Triggering from DIO Lines ........................................................................................................................... 91
Triggering from LAN Events by Other Instruments ..................................................................................... 91
Data Retrieval ..................................................................................................................................................... 92
Pipeline Delay and Latency ........................................................................................................................... 92
Events ................................................................................................................................................................. 92
WHERE TO FIND MORE INFORMATION .................................................................................................................... 93
Driver API Reference ......................................................................................................................................... 93
Specification Information ................................................................................................................................... 93
SECTION 6.................................................................................................................................................................. 95
OPERATION OF DATA LOGGER ............................................................................................................................... 95
Introduction ........................................................................................................................................................ 95
USB Disk Selection and Preparation .................................................................................................................. 95
USB Disk Insertion and Safe Removal ............................................................................................................... 95
Configuration of USB Disk ................................................................................................................................ 96
Saving Data to USB Disk ................................................................................................................................... 96
HDF5 File Hierarchy .......................................................................................................................................... 96
SECTION 7.................................................................................................................................................................. 99
THEORY OF OPERATION .......................................................................................................................................... 99
Introduction ........................................................................................................................................................ 99
Voltage/Thermocouple Input .............................................................................................................................. 99
Programmable Gain Amplifier ......................................................................................................................... 100
Page 7

www.vtiinstruments.com
EX1401 Preface 7
Analog to Digital Conversion ........................................................................................................................... 100
Built In Self-test and CJC measurement ........................................................................................................... 100
Thermocouple Calculations .............................................................................................................................. 101
SECTION 8................................................................................................................................................................ 103
CALIBRATION ....................................................................................................................................................... 103
Introduction ...................................................................................................................................................... 103
Required Resources .......................................................................................................................................... 103
Equipment Needed ...................................................................................................................................... 103
Cables Needed ............................................................................................................................................. 103
Software Needed ......................................................................................................................................... 103
Preliminary Setup ............................................................................................................................................. 103
Clearing user coefficients and loading defaults ................................................................................................ 103
Obtain Offset coefficients ................................................................................................................................. 104
Obtain Gain coefficients ................................................................................................................................... 105
Save Offset and Gain Coefficients .................................................................................................................... 105
Obtain 2.5V reference voltages ........................................................................................................................ 107
Save 2.5V references ........................................................................................................................................ 108
Custom Calibration Cable Build Instructions ................................................................................................... 108
SECTION 9................................................................................................................................................................ 109
ONBOARD MEMORY ............................................................................................................................................. 109
Onboard Memory and Clearing Procedure ....................................................................................................... 109
APPENDIX A ............................................................................................................................................................. 110
MULTIPLE INSTRUMENT SYSTEM .......................................................................................................................... 110
Overview .......................................................................................................................................................... 110
Master and Slave .............................................................................................................................................. 110
Synchronization Performance ........................................................................................................................... 110
INDEX ................................................................................................................................................................... 113
Page 8

VTI Instruments Corp.
8 EX1401 Preface
CERTIFICATION
VTI Instruments Corp. (VTI) certifies that this product met its published specifications at the time of shipment from
the factory. VTI further certifies that its calibration measurements are traceable to the United States National Institute
of Standards and Technology (formerly National Bureau of Standards), to the extent allowed by that organization’s
calibration facility, and to the calibration facilities of other International Standards Organization members.
WARRANTY
The product referred to herein is warranted against defects in material and workmanship for a period of one year from
the receipt date of the product at customer’s facility. The sole and exclusive remedy for breach of any warranty
concerning these goods shall be repair or replacement of defective parts, or a refund of the purchase price, to be
determined at the option of VTI.
For warranty service or repair, this product must be returned to a VTI Instruments authorized service center. The
product shall be shipped prepaid to VTI and VTI shall prepay all returns of the product to the buyer. However, the
buyer shall pay all shipping charges, duties, and taxes for products returned to VTI from another country.
VTI warrants that its software and firmware designated by VTI for use with a product will execute its programming
when properly installed on that product. VTI does not however warrant that the operation of the product, or software,
or firmware will be uninterrupted or error free.
LIMITATION OF WARRANTY
The warranty shall not apply to defects resulting from improper or inadequate maintenance by the buyer, buyersupplied products or interfacing, unauthorized modification or misuse, operation outside the environmental
specifications for the product, or improper site preparation or maintenance.
VTI Instruments Corp. shall not be liable for injury to property other than the goods themselves. Other than the limited
warranty stated above, VTI Instruments Corp. makes no other warranties, express or implied, with respect to the
quality of product beyond the description of the goods on the face of the contract. VTI specifically disclaims the
implied warranties of merchantability and fitness for a particular purpose.
RESTRICTED RIGHTS LEGEND
Use, duplication, or disclosure by the Government is subject to restrictions as set forth in subdivision (b)(3)(ii) of the
Rights in Technical Data and Computer Software clause in DFARS 252.227-7013.
VTI Instruments Corp.
2031 Main Street
Irvine, CA 92614-6509 U.S.A.
Page 9

www.vtiinstruments.com
EX1401 Preface 9
DE C L A R A T I O N O F C O N F O R M I T Y
Declaration of Conformity According to ISO/IEC Guide 22 and EN 45014
MANUFACTURER’S NAME VTI Instruments Corp.
MANUFACTURER’S ADDRESS 2031 Main Street
Irvine, California 92614-6509
PRODUCT NAME Precision Voltage/Temperature Measurement Instrument
MODEL NUMBER(S) EX1401
PRODUCT OPTIONS All
PRODUCT CONFIGURATIONS All
VTI Instruments Corp. declares that the aforementioned product conforms to the requirements of the Low
Voltage Directive 2014/35/EU and the EMC Directive 2014/30/EU and carries the “CE” mark
accordingly. The product has been designed and manufactured according to the following specifications:
SAFETY EN 61010-1:2010 (3rd Edition)
EMC European Standards CISPR 11
EN 61000-3-2, EN 61000-3-3
EN 61326-1 (which is a product family of EMC standards which
references EN 61000-4-2, EN 61000-4-3, EN 61000-4-4, EN 610004-5, EN 61000-4-6, EN 61000-4-8, and EN 61000-4-11)
SHOCK AND VIBRATION MIL-PRF-28800F, Paragraphs 4.5.5.3.1, 4.5.5.3.2, & 4.5.5.4.1
(Unit operated without error during test process)
ROHS RoHS2 Directive 2011/65/EU dated 08 June 2011
This product was tested in a typical configuration, with a shielded cable to the Digital I/O port.
I hereby declare that the aforementioned product has been designed to be in compliance with the relevant sections of the
specifications listed above as well as complying with all essential requirements of the Low Voltage Directive.
June 2017
Steve Mauga, QA Manager
Page 10
VTI Instruments Corp.
10 EX1401 Preface
GENERAL SAFETY INSTRUCTIONS
Review the following safety precautions to avoid bodily injury and/or damage to the product. These
precautions must be observed during all phases of operation or service of this product. Failure to
comply with these precautions, or with specific warnings elsewhere in this manual, violates safety
standards of design, manufacture, and intended use of the product. Note that this product contains
no user serviceable parts or spare parts.
Service should only be performed by qualified personnel. Disconnect all power before servicing.
TERMS AND SYMBOLS
These terms may appear in this manual:
WARNING
Indicates that a procedure or condition may cause bodily injury or death.
CAUTION
Indicates that a procedure or condition could possibly cause damage to equipment
or loss of data.
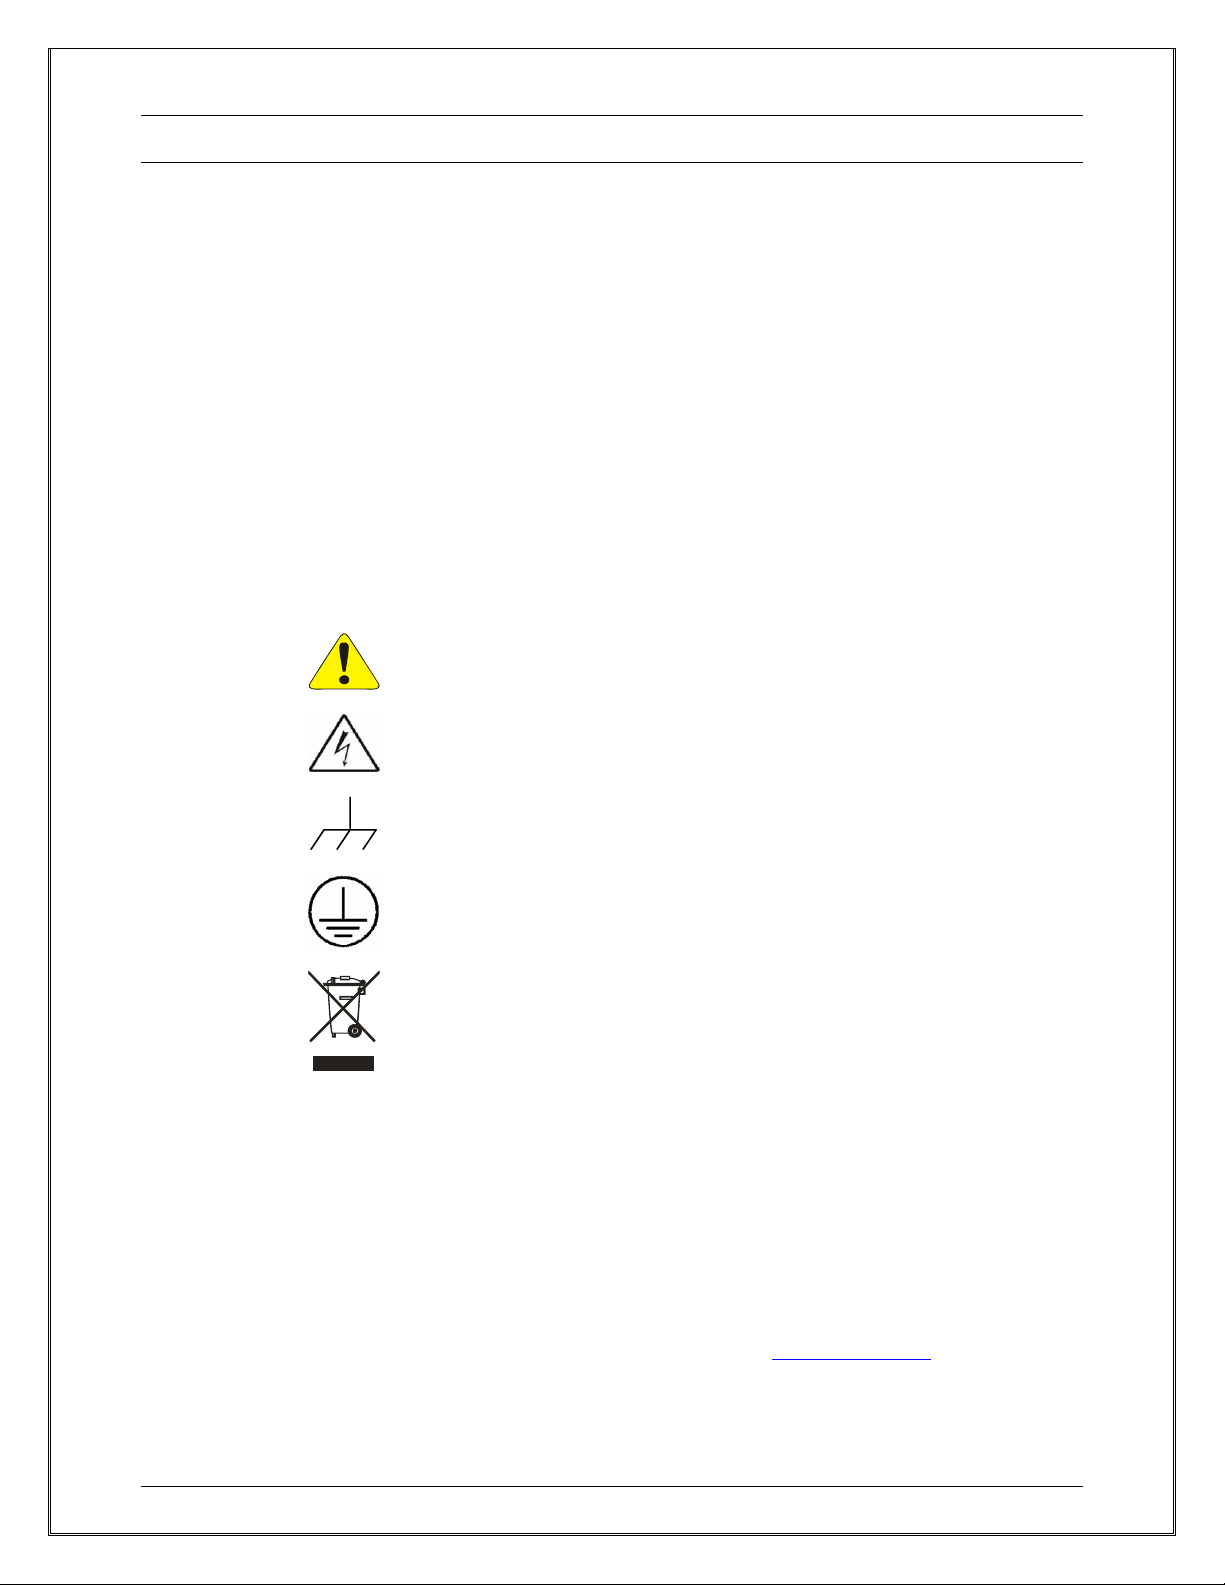
These symbols may appear on the product:
Attention and Warning - Important safety instructions, refer to manual
Warning, possibility of electric shock, refer to manual
Frame or chassis ground
Safety ground, required to be connected to local earth ground
Indicates that the product was manufactured after August 13, 2005. This mark is
placed in accordance with EN 50419, Marking of electrical and electronic
equipment in accordance with Article 11(2) of Directive 2002/96/EC (WEEE).
End-of-life product can be returned to VTI by obtaining an RMA number. Fees
for take-back and recycling will apply if not prohibited by national law.
WARNINGS
Follow these precautions to avoid injury or damage to the product:
Apply local earth ground
The safety earth ground cable provided with this instrument meets
the required regulatory and statutory safety standards as indicated by
this product’s declaration of conformity. The green/yellow safety
cable must be applied between the safety ground on the rear of the
unit and the local safety earth ground. This is required for safe
operation of the equipment. Refer to the manual on how to apply
the safety earth ground cable.
Page 11
www.vtiinstruments.com
EX1401 Preface 11
Use Proper PoE+ Source
This unit can be powered over Ethernet via PoE+ (IEEE 802.3at).
When using PoE+ to power your unit, only use VTI recommended
powered Ethernet switches, a list is available in this manual. Using
a powered switch that is not on VTI’s recommended list may not
work.
Use Proper AUX Source
This unit can be optionally powered with an external DC source.
When using the AUX DC Input to power your unit, VTI recommends
using external supply (VTI# 56-0739-000). If desired, a different DC
supply can be used if it meets the voltage, power, connector, and
safety requirements. Use a power source that meets the same safety
and CE requirements listed on the declaration of conformity for this
product. Verify that the connector pin-out is the same as required
for this product.
Avoid Electric Shock
To avoid electric shock or fire hazard, do not operate this product
with the covers removed. Do not connect or disconnect any cable,
probes, test leads, etc. while they are connected to a voltage source.
Remove all power and unplug unit before performing any service.
Service should only be performed by qualified personnel.
Operating Conditions
To avoid injury, electric shock or fire hazard:
-
Do not operate in wet or damp conditions.
-
Do not operate in an explosive atmosphere.
-
Operate or store only in specified temperature range.
-
Provide proper clearance for product ventilation to prevent
overheating.
-
DO NOT operate if any damage to this product is suspected.
Product should be inspected or serviced only by qualified
personnel
Improper Use
The operator of this instrument is advised that if the equipment is
used in a manner not specified in this manual, the protection
provided by the equipment may be impaired.
Conformity is checked by inspection.
Page 12

VTI Instruments Corp.
12 EX1401 Preface
SUPPORT RESOURCES
Support resources for this product are available on the Internet and at VTI Instruments customer
support centers.
VTI Instruments Corp.
World Headquarters
VTI Instruments Corp.
2031 Main Street
Irvine, CA 92614-6509
Phone: (949) 955-1894
Fax: (949) 955-3041
VTI Instruments
Cleveland Instrument Division
5425 Warner Road
Suite 13
Valley View, OH 44125
Phone: (216) 447-8950
Fax: (216) 447-8951
AMETEK Instruments India Pvt. Ltd.
4th Floor, Block A, Divyashree NR Enclave,
Site#1, EPIP Industrial Area, Whitefield
Bangalore – 560 052 India
Phone: +91 80 6782 3200
Fax: +91 80 67823232
Asia Support
Phone: +852 9177 6127
Technical Support
Phone: (949) 955-1894
Fax: (949) 955-3041
E-mail: [email protected]
Visit http://www.vtiinstruments.com for worldwide support sites and service plan information.
Page 13

www.vtiinstruments.com
EX1401 Introduction 13
SECTION 1
INTRODUCTION
OVERVIEW
The EX1401 provides a total of 16 isolated channels for precision voltage and temperature
measurement. Its combination of measurement performance and integrity, configuration flexibility,
package density, and network connectivity make it the most powerful, yet easy-to-use, instrument
of its kind. The EX1401 is a complete, self-contained temperature measurement system that
communicates over Ethernet and can be optionally powered over the same Ethernet cable. Unlike
other data acquisition offerings in its class, the EX1401 offers a tightly integrated solution that frees
the user from the complexity of marrying terminal blocks, signal conditioning cards, digitizer, power
supply, and chassis together.
The EX1401 also provides a level of measurement integrity and channel independence that far
exceeds the typical data acquisition system. Absent are caveats about scanning speed, channel order,
and overload effects. In the EX1401, channels have no influence on each other, regardless of
scanning speed or channel state. Excellent common mode rejection performance provides immunity
from not only power line interference, but also high frequency noise. Moreover, it aids in
maintaining overall system integrity by offering a high-performance open transducer detection
system. The EX1401 provides isolation from earth and channel to channel. This provides worry free
measurements in high voltage environments like automotive and battery test.
The EX1401 provides a high level of configuration flexibility as well. Each channel can be
configured independently with regards to measurement function, filter setting, and limit values. In
addition to measuring all standard thermocouples, the EX1401 can be programmed with userdefined thermocouple polynomial equations or be used as a low-noise voltmeter. Scanning speed is
programmable up to a maximum of 20 kSa/s (kilosamples per second), independent of the number
of channels being scanned. This combination of filtering and scanning speed provides the EX1401
with the low noise performance required for sensitive applications as well as the speed necessary to
measure fast, fine-gauge thermocouples.
For highest accuracy and stability, the EX1401 provides a precision analog temperature sensor, per
channel, to measure the cold-junction of the mini TC connector. The accuracy of this reference
junction temperature sensor is typically within +/- 0.05°C (20°C to 30°C operating temp.)
Thermocouple accuracy is detailed in the specifications.
The EX1401 is as easy-to-use as it is powerful. An integrated web page provides a convenient way
to instantly verify communications and instrument functionality, while industry standard IVI drivers
provide a familiar application programming interface to reduce integration and program
development time.
FEATURES
Combined Thermocouple and Analog Inputs
Easily combine thermocouple and analog signals on these versatile instruments with sampling rates
up to 20 kSa/s per channel. Each input incorporates an independent signal conditioning path with
Page 14
VTI Instruments Corp.
14 EX1401 Introduction
software selectable filters for maximum flexibility. Complete channel independence ensures data
integrity regardless of sample speed or input overload conditions.
Scalable for Synchronized High-Speed, High-Channel Count
In addition to base class LXI compliance, this instrument also provides extended capabilities like
LXI Clock Synchronization, LXI Event Messaging, and LXI Time Stamped Data, to support easy
integration and synchronization of multiple devices, including existing VXI/PXI/PXIe bus
instrumentation.
Open Thermocouple Detection (OTD)
While the integration of the EX1401 removes many of the reliability and connectivity problems
typically faced by system designers, they still must contend with the reliability of the sensor
connections. Fortunately, the EX1401 aids a great deal in that regard as well. Each thermocouple
input channel generates a very small current (< 10 nA/channel) which drives the input to an opencircuit state if the transducer is disconnected. Implemented in this way, open transducer detection is
continuous and requires no discrete function call on the part of the user to be activated, offering
more protection than systems that only check on command, as a broken sensor can occur at any time
during testing, not just at installation. In a typical application, the OTD has no effect on the
measurement.
NOTE Many thermocouple simulators have a much higher impedance than a thermocouple so an offset
may be introduced into the reading when using a simulator. In general, the OTD should only be
active on channels that are being used with actual thermocouples.
The EX1401 additionally offers a front panel OTD LED for each channel that illuminates upon the
recognition of a fault condition. This provides for quick and easy problem channel identification.
Moreover, to ensure that even intermittent problems are identified, the fault recognition is a latching
mechanism, retaining the information of the current acquisition sequence until a new acquisition is
initiated.
Cold Junction Compensation (CJC)
For highest accuracy and stability, the EX1401 provides a precision, analog temperature sensor, per
channel, to measure the reference/cold-junction of the mini TC connector. CJC channels are
measured with a separate, dedicated ADC, per channel and are time correlated to the thermocouple
channel. For those users that prefer to employ an external cold junction, the EX1401 also allows
for the programming input of up to sixteen unique external cold junction temperatures, one for every
input channel. Moreover, the use of internal and external CJC inputs can be mixed throughout the
unit on a per channel basis. As the CJC sensors are placed in an isothermal environment, they are
not disturbed by instrument air cooling fan, as well as thermal disturbances from adjacent channels.
Triggering
The EX1401 supports a full function trigger model with a separate arm source and trigger source
event structure. Trigger and arm source events can be independently programmed from a variety of
sources including Immediate, Software, External TTL, Digital I/O, LAN events, and LXI alarms.
Simplified Installation, Setup and Control
In addition to compliance to LXI base specifications, the EX1401 also implemented the LXI Clock
Synchronization, and LXI Event Messaging, Time Stamps and Event Logs. These features make the
EX1401 instruments ideal for distributed measurements throughout a facility – reducing cabling and
installation expense. The ability to connect directly to an Ethernet network using industry standard
Ethernet cable and connections makes it easy for network administrators to oversee the installation.
Using a PoE+ enabled Ethernet switch allows both power and measurement data on a single wire.
Experience how IVI Digitizer class driver compliance simplifies installation and setup.
Page 15

www.vtiinstruments.com
EX1401 Introduction 15
An onboard, web-accessible user interface allows you to instantly verify communications and
instrument functionality, while IVI drivers provide a familiar application programming interface to
further reduce integration and program development time. For comprehensive, programming-free
data recording setup, management and viewing, use EX1401 instruments with one of VTI’s fullfeatured, turnkey software solutions, such as EXLab.
Channel Independence
Each of the EX1401’s 16 differential input channels is an independent signal conditioning path,
complete with amplification and continuous open transducer detection. This independence frees the
user from the problem of channel-to-channel crosstalk that is pervasive in most multi-channel data
acquisition systems. In the EX1401, channels have no influence on each other, regardless of
scanning speed or channel state. Specifically, open or significantly overloaded channels do not affect
the measurement results of any other channels.
Custom Thermocouple support
When configured in thermocouple mode, each input can be individually configured to support
specific type of thermocouple. In addition to supporting standard thermocouple types (J, K, T, E, S,
R, B and N), the EX1401 can also support custom thermocouple types (e.g., C-Type) through the
input of user-defined thermocouple polynomial coefficients. Each of the EX1401’s channels can be
configured with a unique custom 12th order polynomial for both voltage-to-temperature and
temperature-to-voltage conversions.
Analog Filter
Each EX1401 input channel has a fixed, 2-pole, 30kHz low pass filter with an RC response
providing anti-alias filtering. The analog signals after the anti-alias filter are over sampled at 320kHz
to 640kHz by the ADCs. This combination of anti-alias filter with ADC oversampling provides
60dB of rejection at the aliasing band.
Digital Filter
The EX1401 allows the user to configure different types of digital filters per channel. These digital
filters are implemented inside the FPGA of the device, such that they perform consistently and
without loading the host computer resources. Users can optimize the filter settings for aggressive
filter performance or lower data latency time. In addition, users can customize the FIR filter
performance by editing the coefficients of the filter. This provides ultimate flexibility in designing
a filter to suit the application needs.
Input Connectors
The EX1401 employs uncompensated (Cu-Cu) mini-thermocouple female jacks as an input
connector. This connector provides a solid, reliable connection that is also easily changeable. Since
it is not thermocouple-type specific, different thermocouple types can be mixed throughout the unit
without hardware modification.
Sampling Rate
The EX1401 is designed for sampling speeds up to a 20 kSa/s per channel, regardless of the number
of enabled channels. The lowest sampling speed is 0.000002328 Hz (approximately one sample
every 5 days.)
Digital I/O and Limits
The EX1401 allows the users to define a unique set of programmable limits that are used for open
transducer detection as well as general purpose input channel monitoring. These limits are
programmable on a per channel basis and are evaluated, within the instrument with each completed
Page 16

VTI Instruments Corp.
16 EX1401 Introduction
scan. The output of limit evaluations is presented via front panel LEDs, digital I/O port, LAN events,
and through the instrument driver.
The EX1401 features an 8-channel digital I/O port on the rear panel of the instrument. This port
can be used as an arm/trigger source, for presentation of limit evaluation information, and as a
general purpose output device. As a general purpose output device, each DIO channel can be
independently programmed with regards to its output functionality and its static level to assume
when enabled as an output. For expanded and more automated operation, each DIO channel can be
independently linked to one or multiple limit conditions on one or more input channels. The digital
I/O port is bank isolated to reduce ground loop noise issues with external equipment.
Triggering
The EX1401 supports a full function trigger model with a separate arm source and trigger source
event structure. Trigger and arm source events can be independently programmed from a variety of
sources including Immediate, Software, External TTL, Digital I/O, LAN events, and LXI alarms.
Multi-Function Display
The menu driven LCD display available on the rear side of the instrument provides instrument
status, diagnostic reports, network details, and can also start, stop, and monitor measurement
sequences that log data to an external USB disk without PC control.
USB Data Recording
The EX1401 can export acquisition data at full speed to an external USB memory device, so that it
can be used as a standalone data logger. This will also be useful to keep a redundant back up of data
for high reliability applications, while streaming data over the Ethernet interface. It supports
standard maximum partition size of all of EXT2, EXT3, EXT4, VFAT/FAT32, and MSDOSFS
filesystems. The data will be stored in Hierarchical Data Format, HDF5 file format. HDF5 being an
open standard data file format, users can choose from a wide variety of tools to decompress, view
and export the time stamped measurement data. For more information on HDF5 file formats and
tools, visit the HDF Group’s website: https://www.hdfgroup.org. The external USB memory device
can also be used to store the user’s desired instrument configuration.
End-to-End Self-test
The EX1401 can perform internal diagnostics through self-test mechanism. This Built-In-Self-Test
(BIST) checks for internal board voltage levels, system temperature, various status indicators,
LEDs, cooling fan, LCD display and +2.5V reference voltage on every input channel, and health of
internal CJC sensors. This self-test will be performed automatically upon power-up, and can be
initiated though software or the rear panel LCD interface, any time after the instrument is booted.
This Built-In-Self-Test provides test system confidence and peace of mind by ensuring that the
complete instrumentation measurement path is functional and delivers the most accurate result
possible.
Page 17
www.vtiinstruments.com
EX1401 Introduction 17
EX1401 SPECIFICATIONS
GENERAL SPECIFICATIONS
NUMBER OF CHANNELS
EX1401
16 electrically isolated and fully differential inputs
INPUT POWER
Input voltage
Power (AUX)
10V to 50V DC, must be isolated to 1500Vrms
12 W typical, 15 W max
PoE+ Power
12 W typical, 15 W max
CHANNEL TYPES
Input channel type
Thermocouple or Voltage (software selectable, per channel)
VOLTAGE INPUT RANGE
Voltage Input Mode
Thermocouple Input Mode
±0.01 V, ±0.10 V, ±1.0 V, ±10.0 V; 10% Over-Range
±0.10 V for temperature measurement
INPUT OVERVOLTAGE PROTECTION
Up to ±100V peak between the two terminals of any mini TC connector
INPUT IMPEDANCE
20 MΩ differential (DC input)
1.7 MΩ differential (60 Hz input)
180 kΩ differential (1000 Hz input)
INPUT COUPLING
DC only
RESOLUTION
±10.0 V
±1.0 V
±0.1 V
±0.01 V
Thermocouple
1.7 uV
150 nV
13.5 nV
1.7 nV
< 0.001 °C
ACCURACY (10SPS)
± (% of reading + offset), see Conditions for Accuracy
Voltage Mode
±10.0 V
±1.0 V
±0.1 V
±0.01 V
Thermocouple Mode
Type J, K, T, E, N
Type S, R
Type B
Typical: ± (0.020% + 400uV); Max: ± (0.030% + 500uV)
Typical: ± (0.020% + 40uV); Max: ± (0.030% + 50uV)
Typical: ± (0.020% + 7uV); Max: ± (0.035% + 15uV)
Typical: ± (0.050% + 5uV); Max: ± (0.045% + 9uV)
Typical: ± (0.020% + 0.2°C); Max: ± (0.040% + 0.4°C)
Typical: ± (0.020% + 0.6°C); Max: ± (0.040% + 1.3°C)
Typical: ± (0.020% + 0.9°C); Max: ± (0.040% + 1.8°C)
STABILITY
Voltage Mode
±10.0 V
±1.0 V
±0.1 V
±0.01 V
Thermocouple
Type J, K, T, E, N
Type S, R
Type B
Typical: ± (5PPM/°C + 1.20uV/°C); Max: ± (9PPM/°C + 2.7uV/°C)
Typical: ± (5PPM/°C + 0.12uV/°C); Max: ± (9PPM/°C + 0.27uV/°C)
Typical: ± (5PPM/°C + 0.08uV/°C); Max: ± (9PPM/°C + 0.16uV/°C)
Typical: ± (9PPM/°C + 0.08uV/°C); Max: ± (14PPM/°C + 0.16uV/°C)
Typical: ± (8PPM/°C + 0.006°C/°C); Max: ± (14PPM/°C + 0.012°C/°C)
Typical: ± (8PPM/°C + 0.020°C/°C); Max: ± (14PPM/°C + 0.040°C/°C)
Typical: ± (8PPM/°C + 0.030°C/°C); Max: ± (14PPM/°C + 0.060°C/°C)
INPUT NOISE, TYPICAL
Sample Rate (SPS)
10V
1V
100mV
10mV
Temp (Type T)
10,000
900 uVpp
60 uVpp
14.0 uVpp
13.0 uVpp
0.34 °C pp
1,000
200 uVpp
13 uVpp
3.0 uVpp
2.5 uVpp
0.08 °C pp
100
60 uVpp
4 uVpp
1.0 uVpp
0.8 uVpp
0.04 °C pp
10
20 uVpp
1.5 uVpp
0.5 uVpp
0.33 uVpp
0.03 °C pp
Page 18
VTI Instruments Corp.
18 EX1401 Introduction
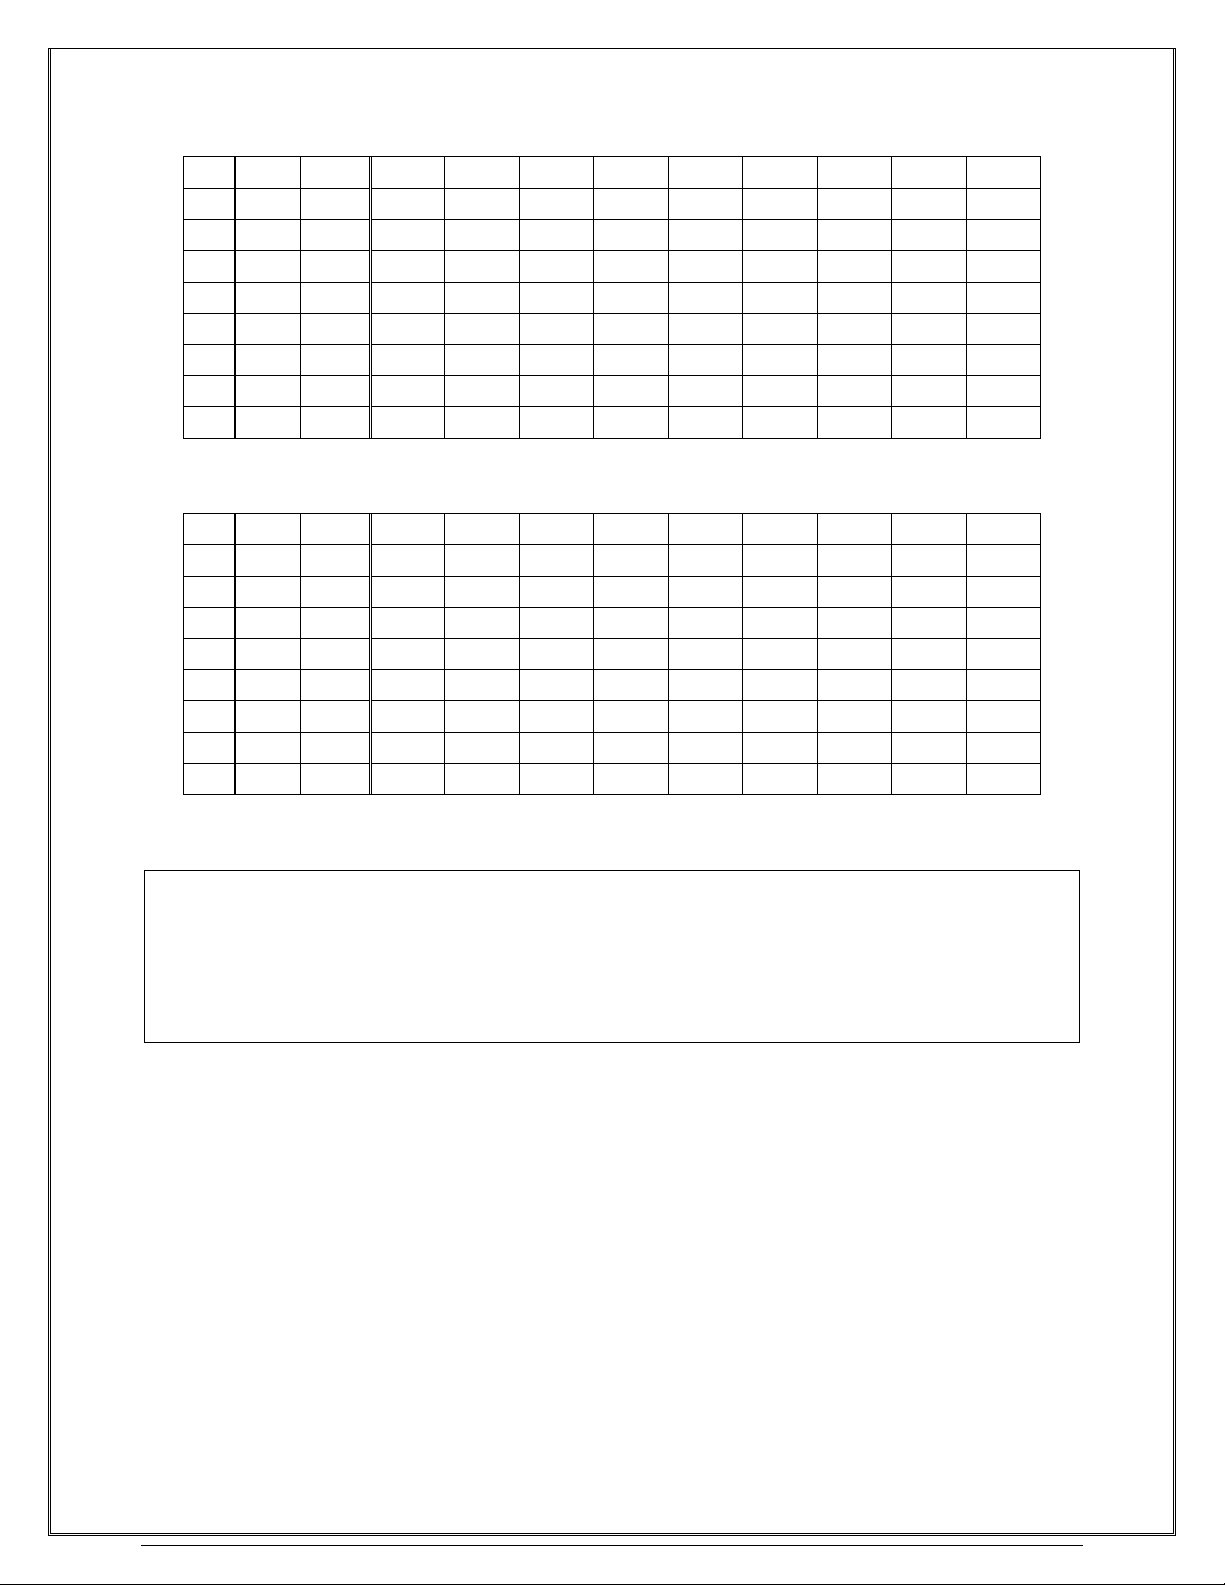
Type
Min
Max
-100°C
0°C
100°C
300°C
500°C
700°C
900°C
1100°C
1400°C
J
-200°C
1200°C
±0.30°C
±0.20°C
±0.20°C
±0.30°C
±0.30°C
±0.30°C
±0.40°C
±0.40°C
K*
-200°C
1372°C
±0.30°C
±0.30°C
±0.30°C
±0.30°C
±0.40°C
±0.40°C
±0.50°C
±0.50°C
±0.60°C
T**
-200°C
400°C
±0.40°C
±0.30°C
±0.20°C
±0.30°C
±0.30°C E -200°C
900°C
±0.30°C
±0.20°C
±0.20°C
±0.20°C
±0.30°C
±0.30°C
±0.30°C S -50°C
1768°C
±1.40°C
±1.00°C
±0.90°C
±0.90°C
±0.90°C
±0.90°C
±0.90°C
±0.90°C
R
-50°C
1768°C
±1.40°C
±1.00°C
±0.80°C
±0.80°C
±0.80°C
±0.80°C
±0.80°C
±0.80°C
B
250°C
1820°C ±2.40°C
±1.60°C
±1.20°C
±1.10°C
±1.00°C
±1.00°C
N
-200°C
1300°C
±0.40°C
±0.30°C
±0.30°C
±0.30°C
±0.40°C
±0.40°C
±0.40°C
±0.50°C
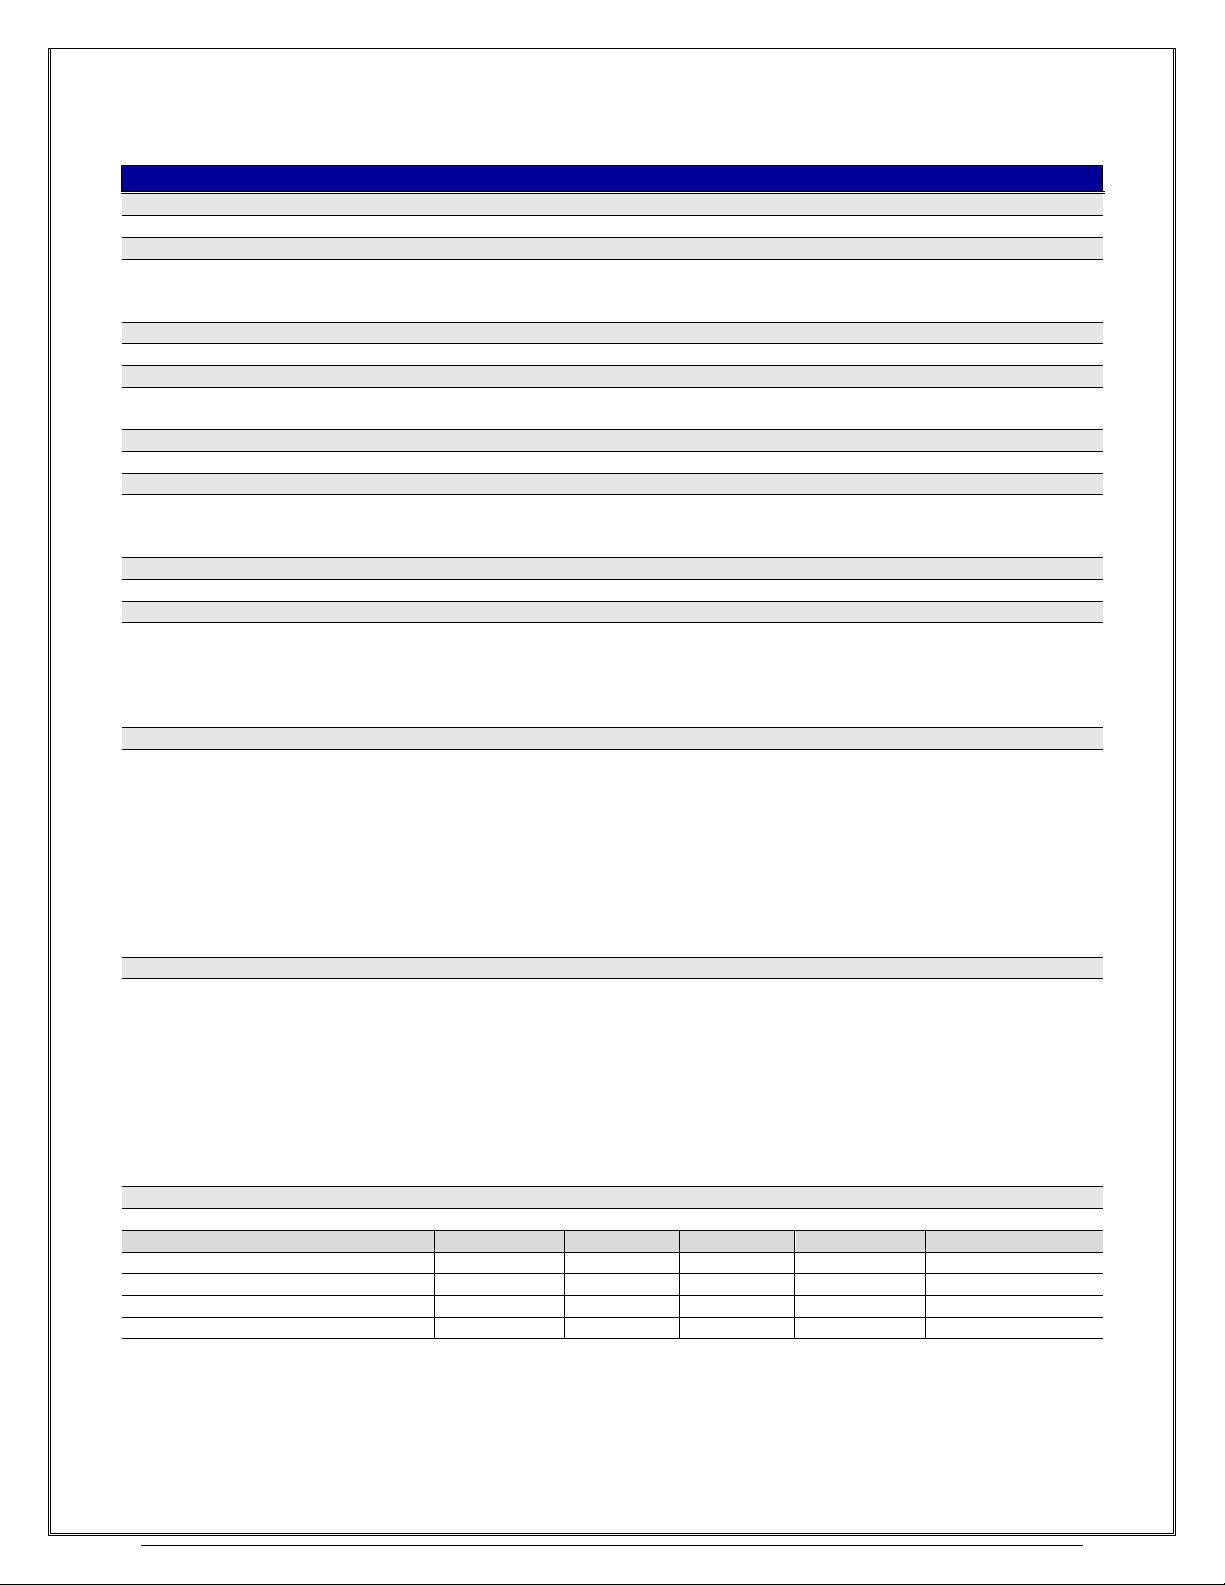
TABLE 1-1: THERMOCOUPLE TYPICAL ACCURACY (°C)
Type
Min
Max
-100°C
0°C
100°C
300°C
500°C
700°C
900°C
1100°C
1400°C
J
-200°C
1200°C
±0.50°C
±0.40°C
±0.40°C
±0.50°C
±0.50°C
±0.60°C
±0.60°C
±0.70°C
K*
-200°C
1372°C
±0.60°C
±0.50°C
±0.50°C
±0.60°C
±0.60°C
±0.70°C
±0.80°C
±0.90°C
±1.00°C
T**
-200°C
400°C
±0.70°C
±0.50°C
±0.40°C
±0.40°C
±0.50°C E -200°C
900°C
±0.40°C
±0.30°C
±0.30°C
±0.40°C
±0.40°C
±0.50°C
±0.60°C S -50°C
1768°C
±2.90°C
±2.20°C
±1.80°C
±1.80°C
±1.70°C
±1.70°C
±1.70°C
±1.80°C
R
-50°C
1768°C
±2.90°C
±2.10°C
±1.70°C
±1.60°C
±1.60°C
±1.50°C
±1.50°C
±1.60°C
B
250°C
1820°C ±5.10°C
±3.20°C
±2.50°C
±2.20°C
±2.00°C
±1.90°C
N
-200°C
1300°C
±0.80°C
±0.70°C
±0.60°C
±0.60°C
±0.60°C
±0.70°C
±0.80°C
±0.90°C
TABLE 1-2: THERMOCOUPLE MAXIMUM ACCURACY (°C)
Conditions for Temperature Accuracy and Voltage Accuracy
• 30-minute warm-up after turn ON and TC plug connected. 10 SPS acquisition rate, Low Latency CIC filter
• 20 °C to 30 °C, 1 year from full calibration. Typical is defined as ± 2*Sigma (95% confidence)
• Fan must be ON. Add ±0.22°C to Typical, or ±0.34°C to Maximum if FAN is OFF
• Exclusive of externally induced noise, Common Mode Voltages (CMV), thermocouple and cable length errors
* 1400 accuracy is for 1372 °C
** 500 accuracy is for 400 °C
TABLE 1-3: CONDITIONS FOR ACCURACY
Page 19
www.vtiinstruments.com
EX1401 Introduction 19
GENERAL SPECIFICATIONS
ISOLATION – ANALOG INPUTS
Basic insulation, IEC 61010-1 (3rd): Pollution degree II, Material IIIa, Altitude < 5000m, Overvoltage Category II, applicable
for secondary circuits derived from the Mains
Input channel to Ground
±500 V Peak continuous working voltage
Input channel to channel
±1000 V Peak continuous working voltage between channels
Impedance across barrier
100pF || Gas Discharge Tube rated for 600V
COMMON MODE REJECTION RATIO (CMRR), TYPICAL
DC
50/60 Hz
400 Hz
1000 Hz
10mV range
-140 dB
-140 dB
-130 dB
-110 dB
100mV range
-140 dB
-140 dB
-130 dB
-90 dB
1V range
-140 dB
-140 dB
-130 dB
-80 dB
10V range
-140 dB
-140 dB
-130 dB
-80 dB
The 10V input range is reduced by increasing common mode AC voltage above
100Vpk/60Hz.
CHANNEL TO CHANNEL CROSSTALK, TYPICAL
-145 dB < 1kHz
TOTAL HARMONIC DISTORTION (THD), 100 HZ
Voltage Mode
±10.0 V
±1.0 V
±0.1 V
Typical: -90dB
Typical: -87dB
Typical: -85dB
MEASUREMENT SAMPLING RATE
Minimum: 0.000002328 Samples per Second, per channel
Maximum: 20,000 Samples per Second, per channel
PROGRAMMABLE DIGITAL FILTERS
None (No Filter)
High Performance (FIR)
Low Latency (CIC)
Medium Latency (CIC+CFIR)
Post Filter Blind Divider
Raw data
1 to 16 number of /2 stages (Selectable & Customizable)
/4 to /8192 (Selectable)
Low latency CIC filter, followed by /4 FIR Filter (Customizable)
1 - 65536 (selectable)
CHANNEL TO CHANNEL PHASE MATCHING
<±1.5 μS
PASSBAND RIPPLE
<±0.005 dB over the passband of 0.45 * Sample Rate
CLOCK AND TRIGGER SPECIFICATIONS
ELECTRICAL SPECIFICATIONS
Maximum Input Voltage
Input Impedance
Minimum Input Pulse Width
Maximum Output Frequency (CLK)
VIL
V
IH
VOL
V
OH
I
MAX
-0.5V to 5.5V, ESD protected
50 Ohm series terminated with a 10k Ohm pulldown resistor
1 μs
10 MHz
< 0.8V
> 3.5V
< 0.65V @ 32 mA
> 3.0 V @ 32 mA
50mA max
Page 20
VTI Instruments Corp.
20 EX1401 Introduction
DIO SPECIFICATIONS
NUMBER OF DIO CHANNELS
8
ELECTRICAL SPECIFICATIONS
Maximum Input Voltage
Input Impedance
Minimum Input Pulse Width
Minimum Output Pulse Width
VIL
V
IH
VOL
V
OH
I
MAX
-0.5V to 5.5V, ESD protected
Signal is pulled low by a 10k Ohm resistor
100 μs
100 μs, updated synchronously with the ADC sampling, prior to decimation
< 0.8V
> 2.0V
< 0.55V @ 10 mA
> 2.0 V @ 10 mA
10mA max per channel, 20mA max per bank
ISOLATION - DIGITAL
Basic insulation, IEC 61010-1 (3rd): Pollution degree II, Material IIIa, Altitude < 5000m, Overvoltage Category II, applicable
for secondary circuits derived from the Mains
Input channel to Ground
±250 V Peak continuous working voltage
Input channel to channel
None, all channels share one ground pin
Impedance across barrier
1000pF || 10MΩ || Gas Discharge Tube rated for 600V
CONNECTOR
9 pin standard D-Sub Female socket
LXI SPECIFICATIONS
NETWORK CONNECTION
10/100 Base-T (auto MDI-X)
LXI CLASS COMPLIANCE (V1.4)
LXI Core + Clock Synchronization + Event Messaging + Event Logs + Time Stamped
Data + IPv6 Support
CLOCK SPECIFICATIONS
Clock oscillator accuracy
Synchronization accuracy
Default 1588 Sync threshold
Timestamp
Accuracy
Resolution
±20 ppm (when free running as Master, with no other clocks)
±20 ns typical (with high-quality IEEE 1588 grandmaster and transparent clocks).
Reports “synchronized” when < ±300 ns of the 1588 master clock
Configurable (default is 300 ns)
As good as time synchronization down to 40 ns
40 ns
IEEE 1588-BASED TRIGGER TIMING
Alarm
Trigger time accuracy
Time to trigger delay
Receive LAN[0-7] Event
Trigger time accuracy
Time to trigger delay
Future timestamp
Past/zero timestamp
As good as time synchronization down to 40 ns
40 ns
As good as time synchronization down to 40 ns
40 ns typical
Unspecified (Based on processor workload)
HARDWARE TRIGGER TIMING
DIO IN time to trigger delay
Min: 50 ns, Max: 100 ns
EXT TRIG in to timestamp delay
Min: 46 ns, Max: 86 ns
Internal event/state to EXT TRIG
OUT time delay
Min: 40ns, Max: 80ns
Internal event/state to DIO OUT
time delay
Min: 50 ns, Max: 100 ns
LAN event in with event time !=0
0 to 40ns (because of clock granularity)
LAN event in with event time == 0
(unspecified)
LAN event out timestamp
granularity
40ns
INTERNAL DATA STORAGE
64 MSamples, shared among all enabled channels
(~6.6 minutes when sampling all 16 inputs at 10kSPS)
Page 21
www.vtiinstruments.com
EX1401 Introduction 21
ENVIRONMENTAL SPECIFICATIONS FOR EX1401
OPERATING LOCATION
This module should be operated indoors in a controlled environment, protected from
exposure to the elements (i.e. direct sunlight, precipitation, wind, etc.)
INPUT CONNECTORS
Thermocouple
Clock & Trigger
Cu-Cu mini-TC jack (Thin spade plug polarity is positive)
SMB
DIMENSIONS
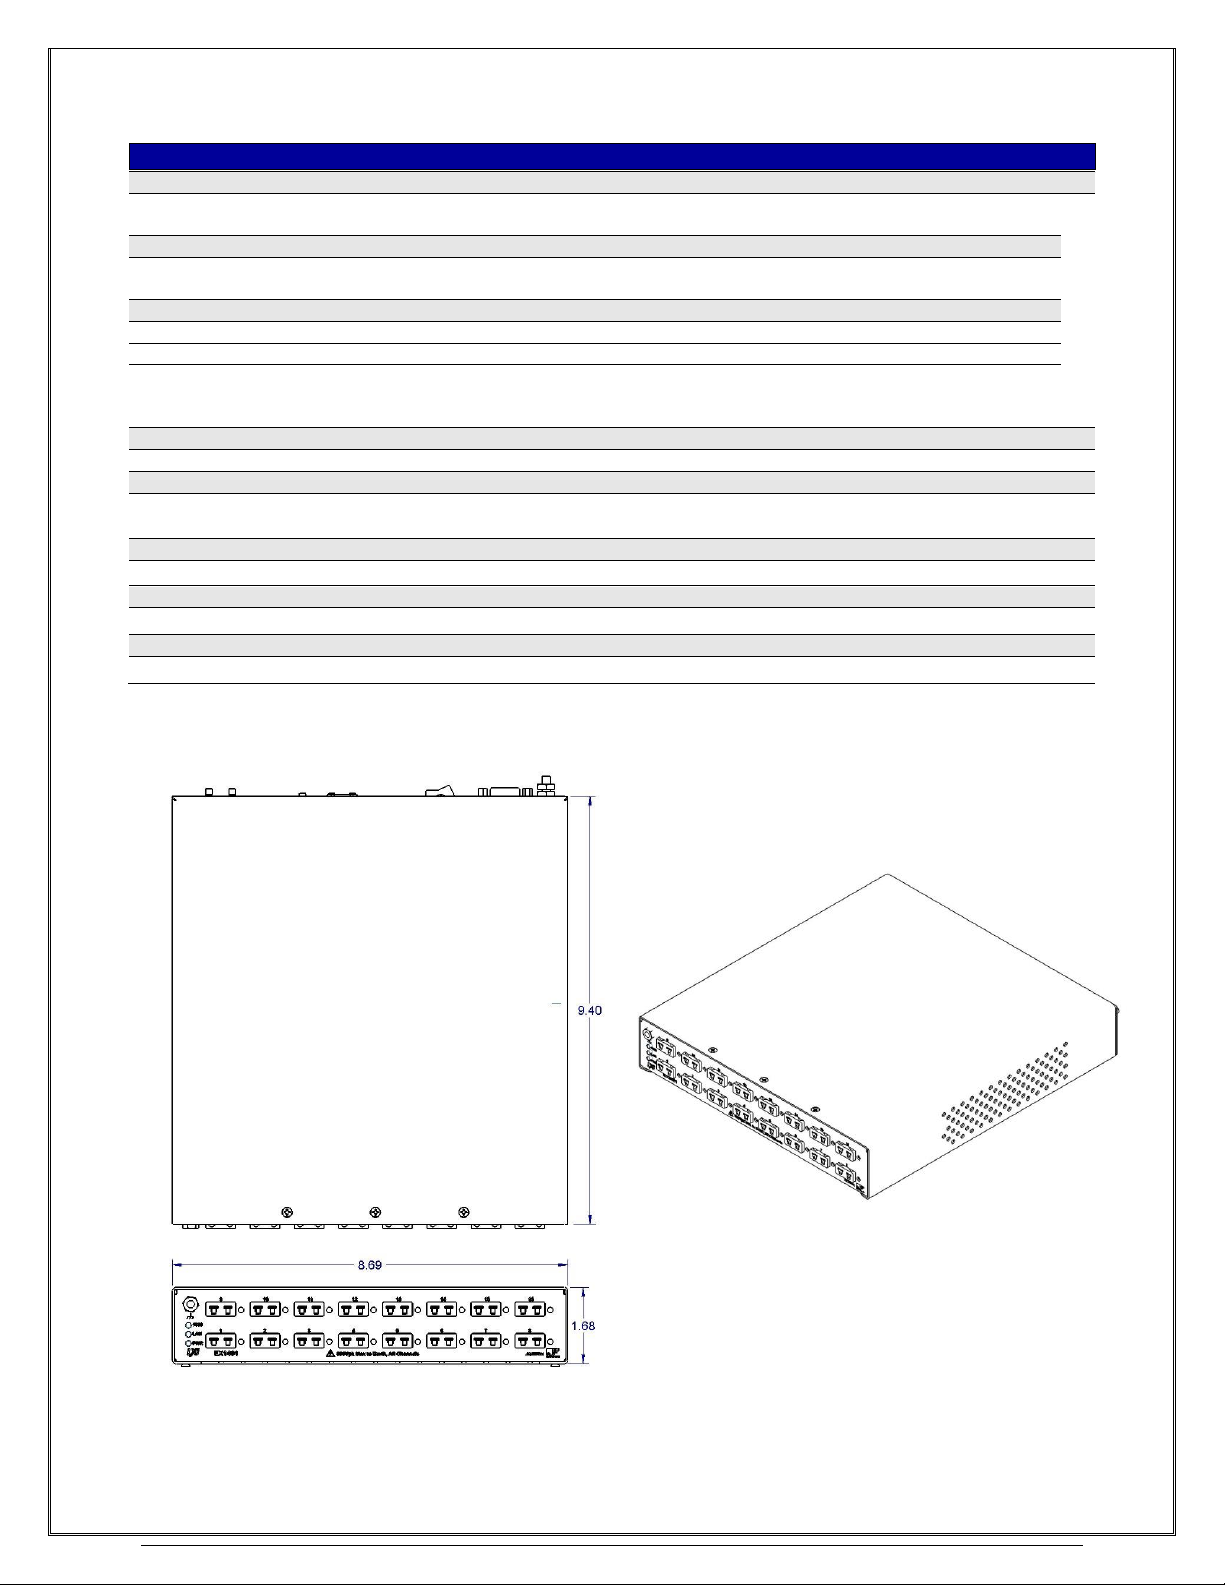
1.68” H x 8.69” W x 10.00” D (all dimensions are in inches)
RELIABILITY
MTBF
Methodology
> 225,000 hours
Telcordia (Bellcore) SR-332, Issue 3
Environment = GB, Quality Level = II, 25C ambient environment, 90% UCL
WEIGHT
4.7 lbs (2.1 kg)
TEMPERATURE
Operating
Storage
-5 C to +50 C
-40 C to +70 C (MIL-PRF-28800 Class 3)
HUMIDITY
5% – 95% (non-condensing) (MIL-PRF-28800 Class 3)
ALTITUDE
Up to 4600 Meters, above MSL (MIL-PRF-28800 Class 3)
SHOCK AND VIBRATION
Conforms to MIL-PRF-28800 Class 3
EX1401 DIMENSIONAL DIAGRAM
Note: All dimensions are in inches
Page 22
VTI Instruments Corp.
22 EX1401 Introduction
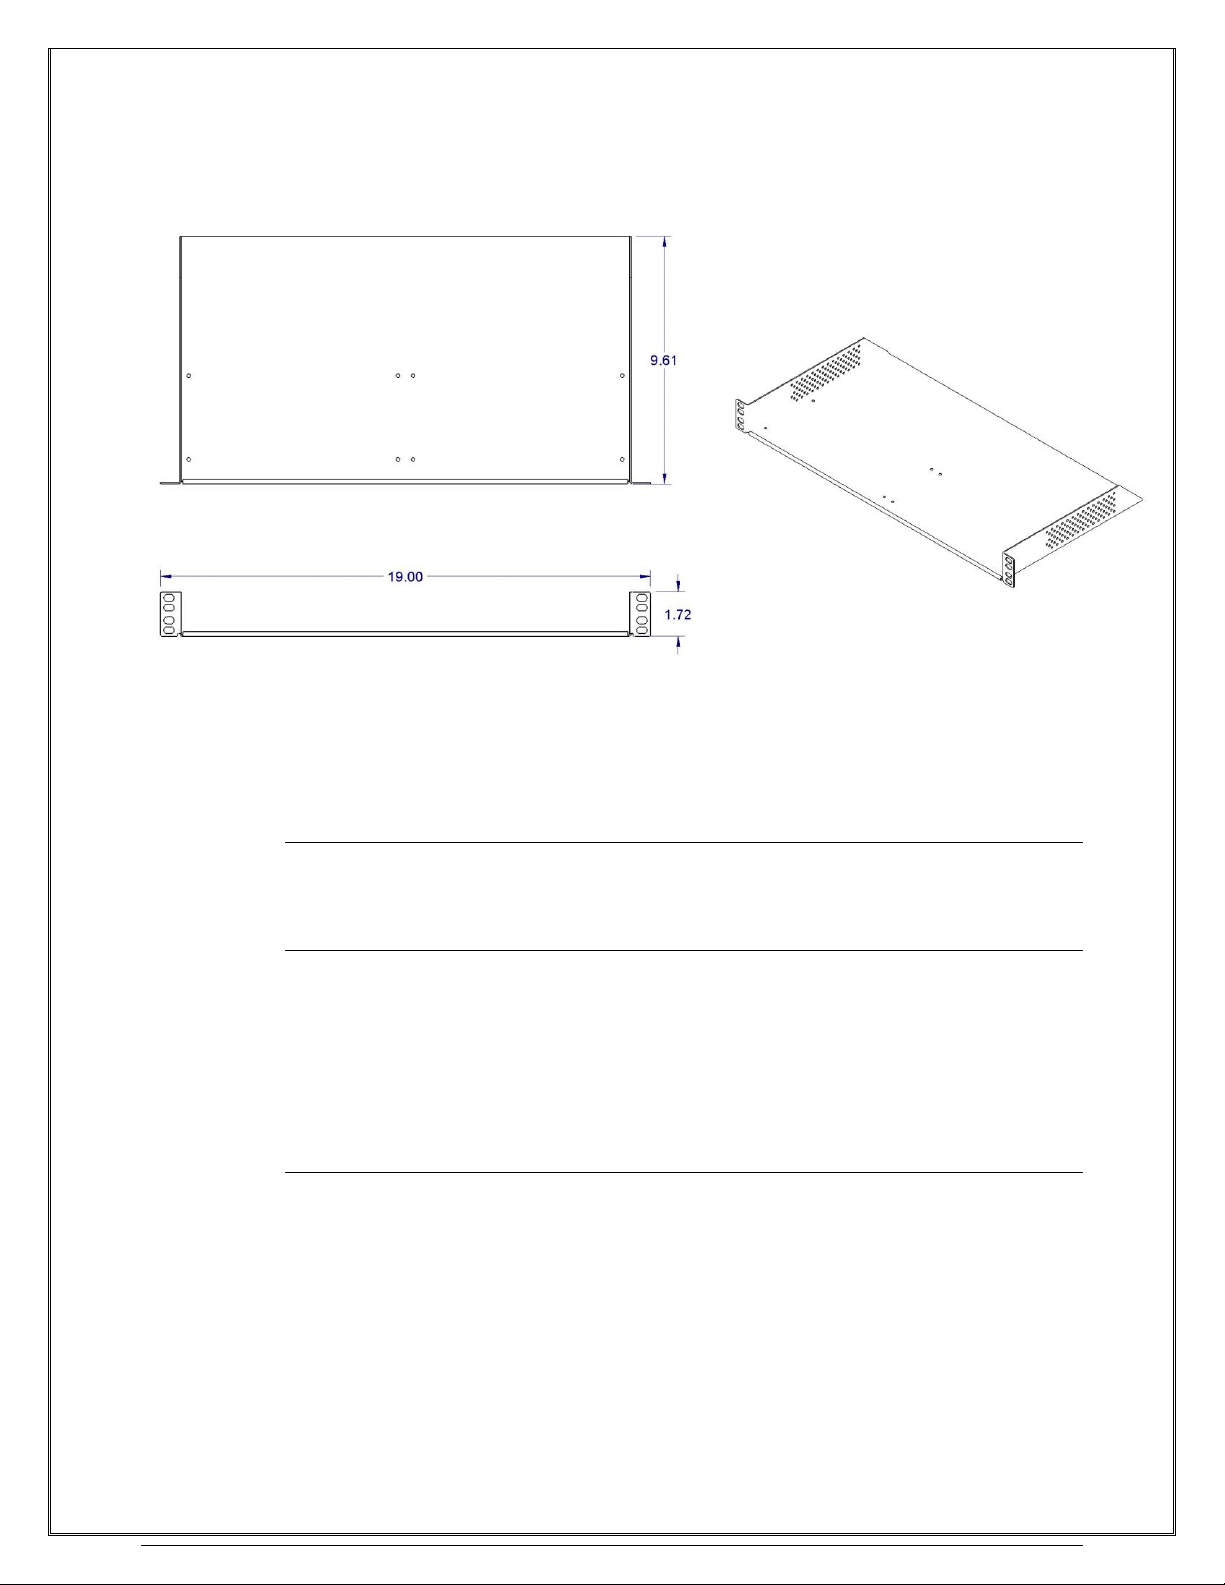
EX1401 RACK MOUNT KIT DIMENSIONAL DIAGRAM
Note: All dimensions are in inches
MAXIMIZING MEASUREMENT PERFORMANCE
This section discusses tips and procedures that can help maximize the actual performance realized
with the EX1401 and aid the user in avoiding some common pitfalls associated with measurement.
Utilize self-test
Self-test should be conducted to check the working condition of measurement path, CJC thermistor
and digital control section.
Allow for cold junction thermal stabilization
The performance of any thermocouple measurement instrument is largely determined by the
stability of the cold junction sensing mechanism. For maximum accuracy and stability, the EX1401
is designed with a CJC sensor per channel. However, while this lowers the sensitivity to thermal
disturbances, transient measurement errors are still possible under certain operating conditions.
Awareness of these conditions will help achieve the maximum performance from the EX1401. Some
of the common sources of such thermal disturbance include steep changes in ambient temperature
and insertion of the input connector.
Select the proper filter
The EX1401 provides flexibility to choose from different types of digital filters and also facilitates
the customization of same. This provides a large combination data rates, filter types, group delays,
data latency, and decimation settings. Unless the sensor requires a higher instrument bandwidth, it
is usually recommended to use lower frequency spans with the Low Latency filter, as it provides
the greater immunity to external electrical and magnetic interference. Use of only the unfiltered
Downsampling Factor directly (without any filter) is not recommended, since the spectral purity of
the output is lower than with filtered decimation, but pairing it with a filter can achieve very low
sample rates with good performance. Choice of the proper filter must be optimized for a given
application, and all filters are not suited to all applications.
Page 23

www.vtiinstruments.com
EX1401 Introduction 23
Choose an appropriate sampling rate
For best instrument noise performance, the sampling rate should be set as low as the data collection
requirements allow. For more details, see Sampling Ratein Section 3.
Select proper location for installation
The EX1401 unit should be located away from sources of high or low temperature, strong air
currents, and high magnetic fields.
Use correct wiring
Best results will be achieved with the shortest and thickest thermocouple wire that the physical
requirements of the application can support. In addition, shielded thermocouples can be employed
to raise the system’s rejection of electrical interference. For more details, see Input
Connections/Wiring in Section 2.
Page 24

Page 25

www.vtiinstruments.com
EX1401 Preparation for Use 25
SECTION 2
PREPARATION FOR USE
UNPACKING EX1401
When the EX1401 is unpacked from its shipping carton, the contents should include the following
items:
• EX1401 Precision Thermocouple & Voltage Measurement Instrument
• LXI Quick Start Guide
• VTI Instruments Corp. Drivers and Product Manuals CD
• Auxiliary Power Adaptor
• Gnd Cable
All components should be immediately inspected for damage upon receipt of the unit.
CD Contents:
• LXI Quick Start Guide
• EX1401 User’s Manual (this manual)
• Product Drivers and Product Manuals CD
• EXLab Software/Manual (Optional)
It also contains IVI shared components required to be installed for the device identification purpose.
The LXI discovery utility provided on the CD is helpful to discover the EX1401 and other LXI
devices connected in the network.
INSTALLATION LOCATION
The EX1401 is designed to be largely insensitive to external electrical, magnetic, and thermal
disturbances. However, as with all precision instrumentation, certain precautions, if taken into
consideration, can help achieve maximum performance.
1) The unit, particularly its front panel, should be located away from sources of high or low
temperatures. When used in a rack-mount application with other heat-generating instruments,
the EX1401 should be located as far away from the other instruments as possible, 1U minimum.
Multiple EX1401 units, however, can be stacked directly on top of one another without any
performance degradation.
2) The front panel of the EX1401 should not be exposed to strong air currents. Typical problematic
sources include building ventilation and instrument or cabinet fans.
3) The unit should be located away from sources of high magnetic fields such as motors,
generators, and power transformers.
Page 26
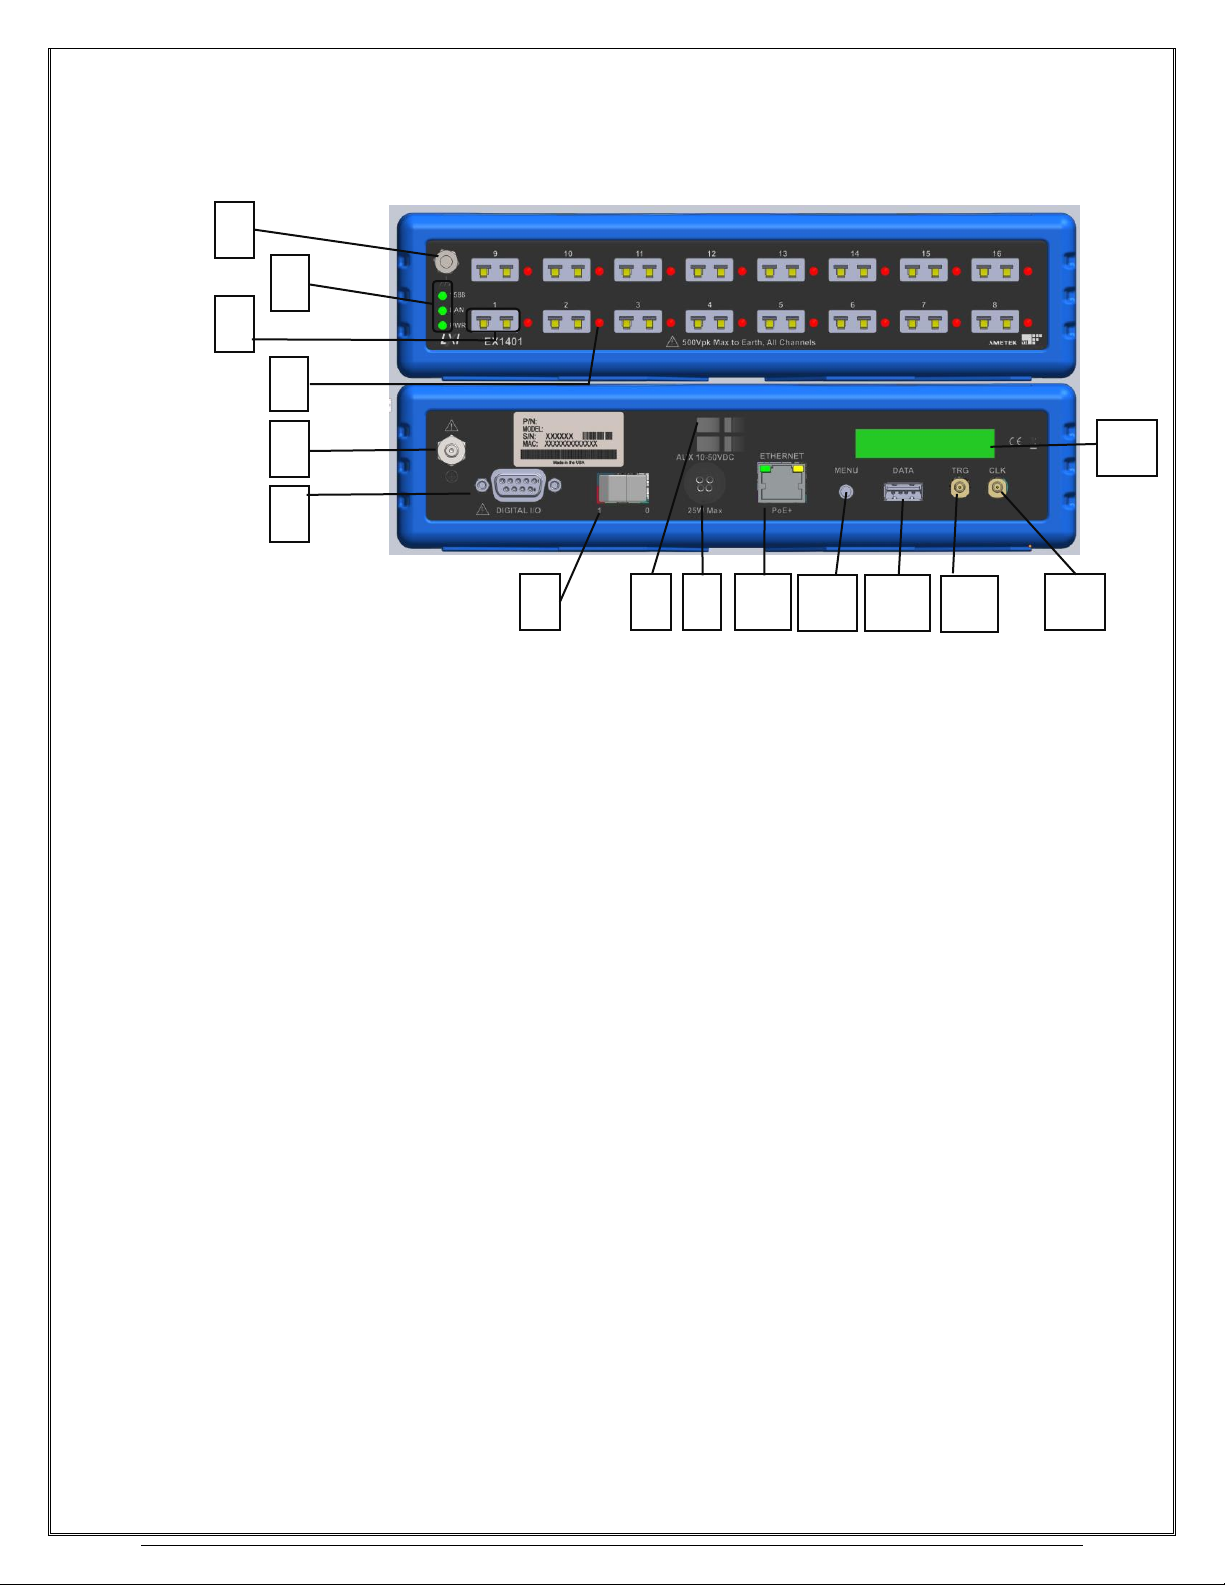
VTI Instruments Corp.
26 EX1401 Basic Operation
LOCATION OF CONNECTORS
Given below are the locations of various buttons, indicators and connectors on EX1401.
1. Earth point socket (standard Banana socket)
2. LXI System status indicators
3. Input connector (Mini Thermocouple Socket Cu-Cu)
4. Open thermocouple fault indication LED
5. Chassis Earth point stud, Safety ground
6. Digital IO port (Standard D-Sub 9 pin Female/Socket)
7. Power Switch
8. Cooling fan exhaust
9. Auxiliary power connector
10. Ethernet/LAN Port (PoE+ enabled)
11. Menu Button
12. USB 2.0 host port (Type A Female) for external data logging disk drive
13. Trigger Connector (Standard SMB Male)
14. External Clock Connector (Standard SMB Male)
15. Display
5 6 7 8 9
10
11
12
13
14
15 1 2
3
4
Page 27
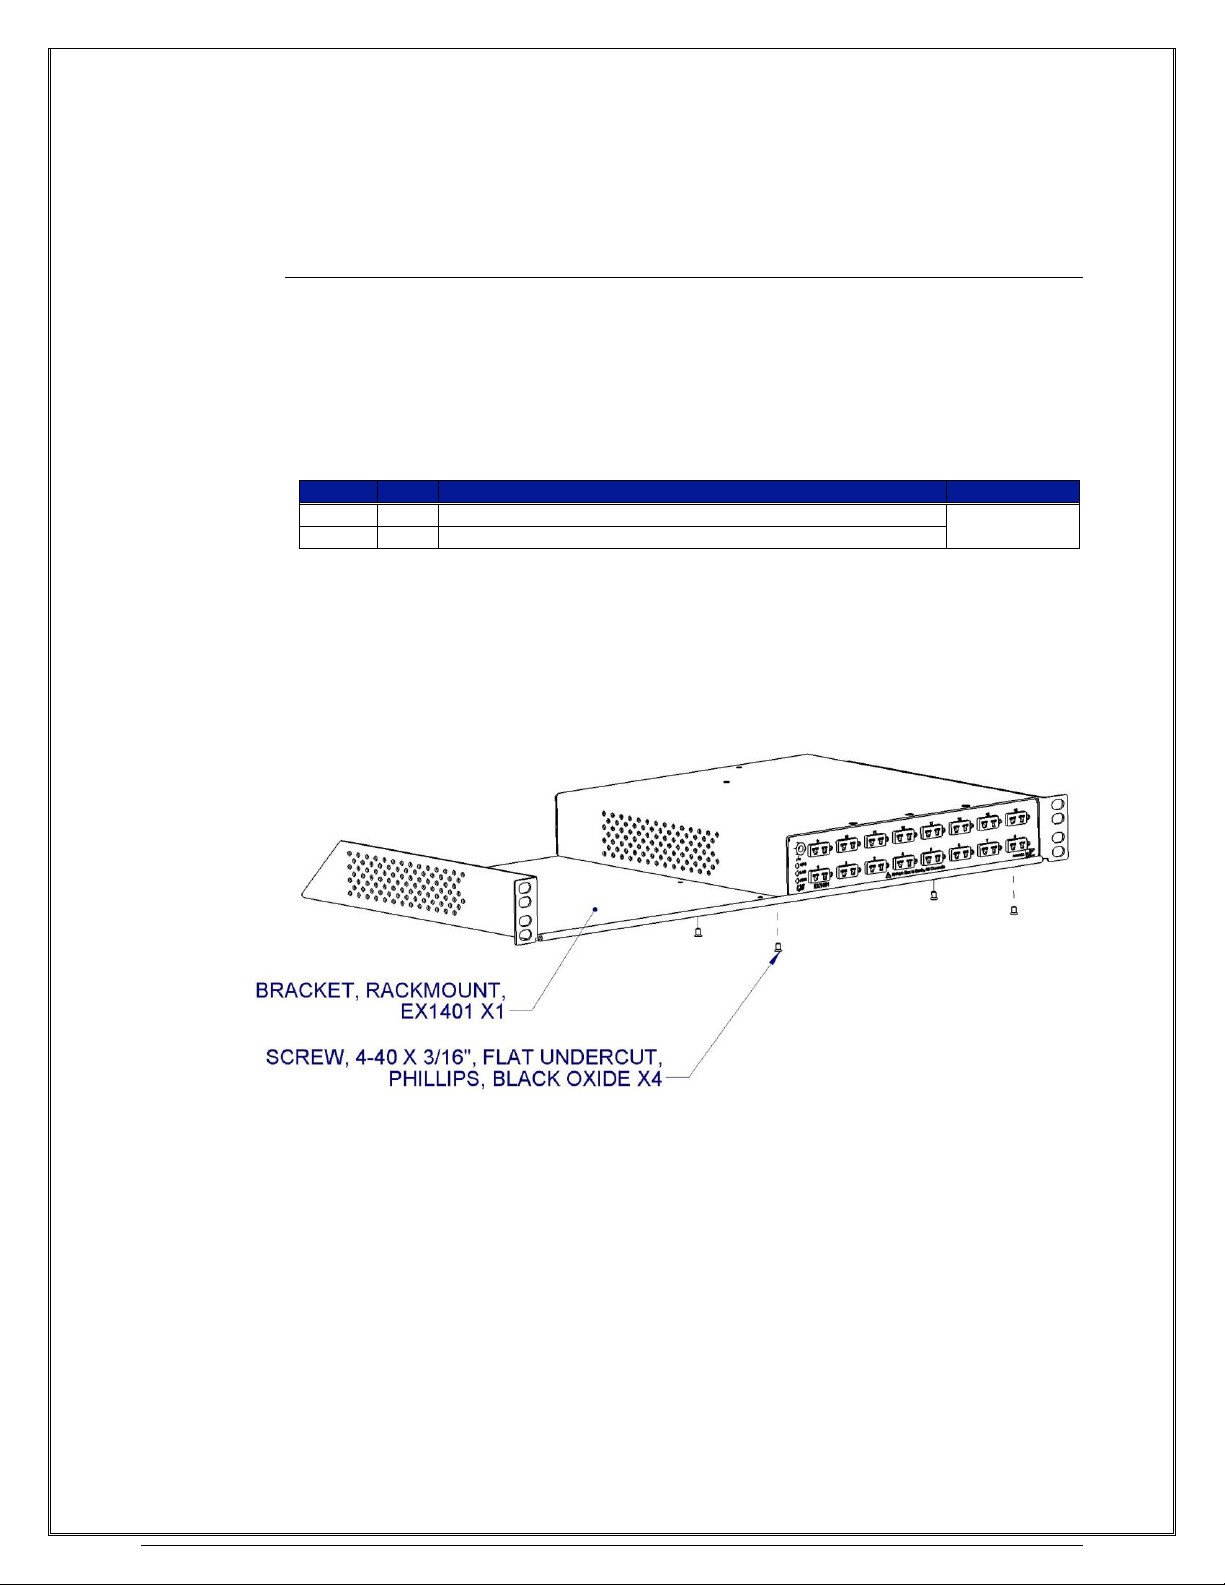
www.vtiinstruments.com
EX1401 Preparation for Use 27
INSTALLATION OPTIONS
The EX1401 can be optionally rack mounted, using the rack mount kit accessory (P/N: 70-0626-
900). This must be installed prior to installation into the rack. This option is not included with the
EX1401 and must be ordered separately, if needed.
Rack-shelf Installation Option of EX1401
The shelf/tray installation option includes all the parts necessary to mount the EX1401 to the front
of a standard test rack.
Required Tools
1) #2 Phillips screwdriver
Parts List
Item#
Qty
Description
VTI P/N
1 1 Bracket, Rackmount, EX1401 Chassis
70-0626-900
2 4 Screw, 4-40 x 3/16", Flat 82° Undercut Phillips, Black Oxide
Assembly Procedure
1) Place the chassis on a protected work surface with its input connectors facing front.
2) Using a #2 Phillips screwdriver, install the rack shelf/tray on the bottom of the EX1401 using
four (4) 4-40 x 3/16", Flat 82° Undercut Phillips, Black Oxide screws, as shown in below
diagram.
FIGURE 2-1: RACK SHELF INSTALLATION DIAGRAM
Page 28
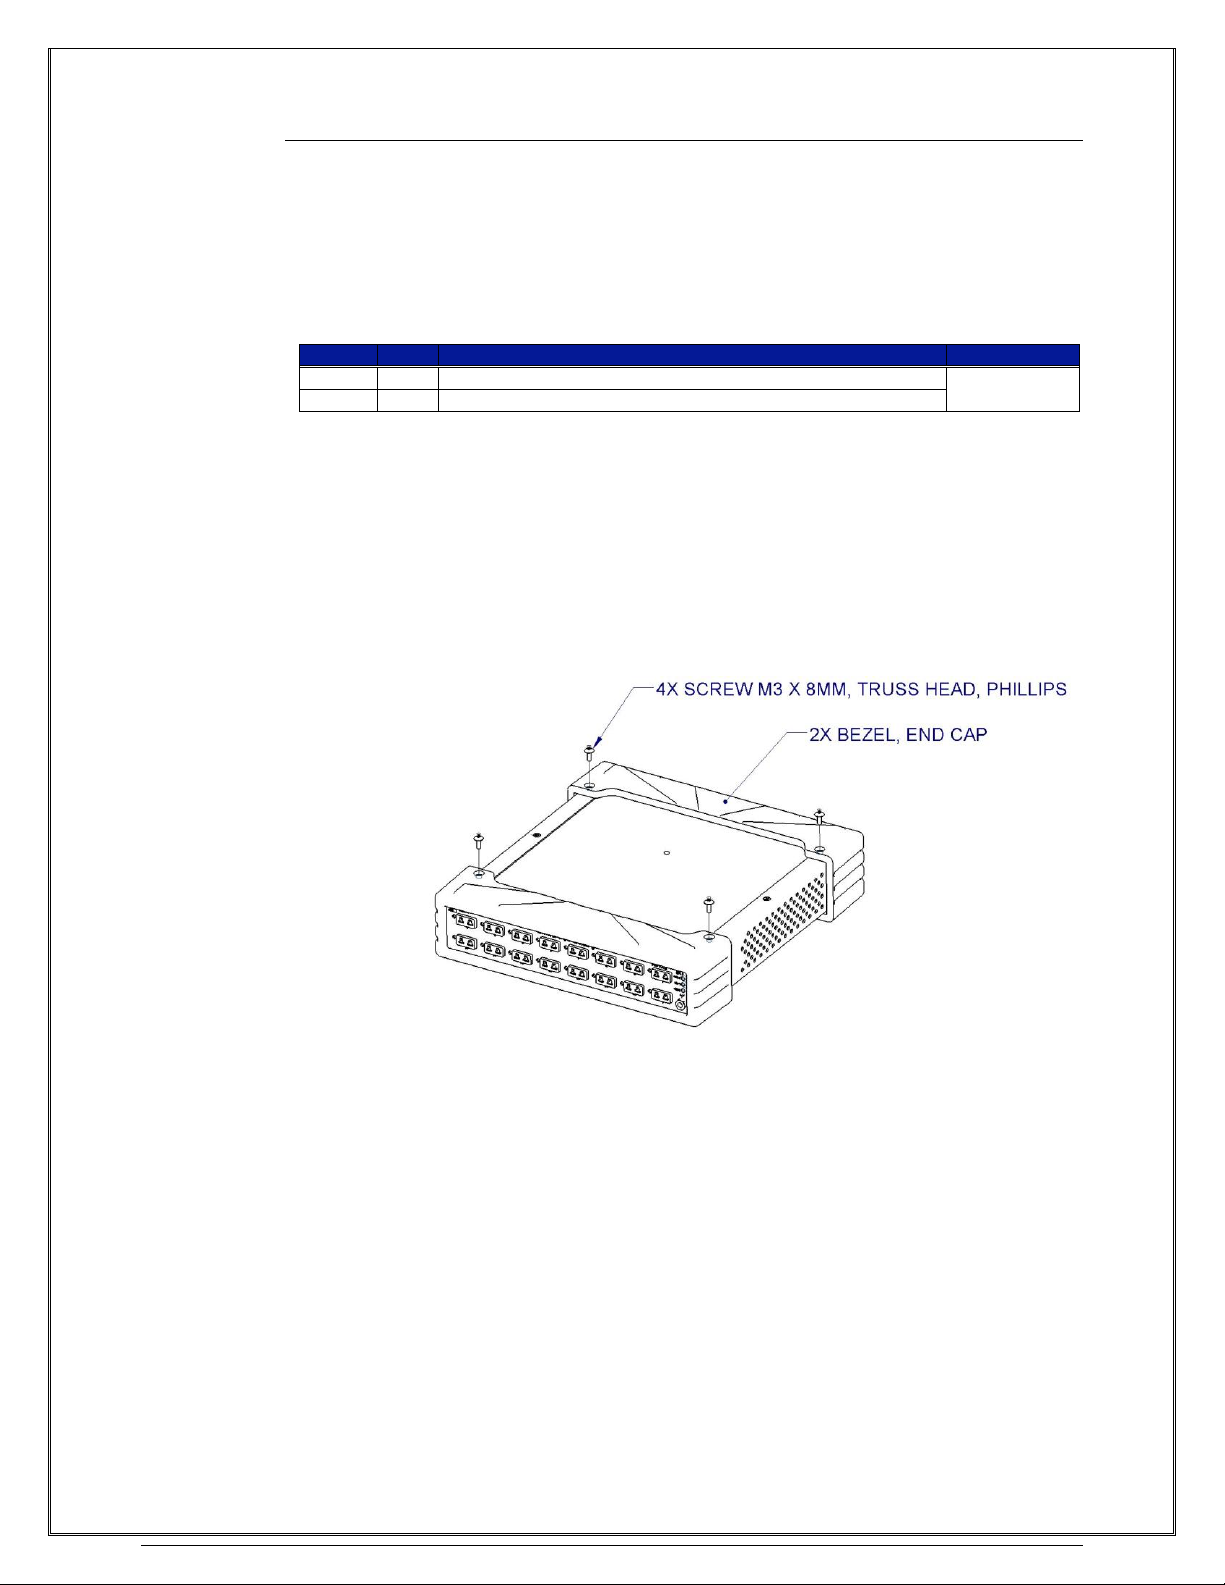
VTI Instruments Corp.
28 EX1401 Basic Operation
Tabletop Installation Option
The tabletop installation option can be used when the EX1401 will not be installed in a rack, but
will be employed as a bench top or desktop instrument.
Required Tools
1) #2 Phillips screwdriver
Parts List
Item#
Qty
Description
VTI P/N
1 4 Screw, 6-32 x 3/8”, Pan Head Phillips
41-0620-003
2 2 Bezel, Cap, EX1401 Chassis
Assembly Procedure
1) Place the chassis on a protected work surface, upside down, with its input connectors facing
front.
2) Using Figure 2-2, locate the installation locations (on the bottom of the chassis) for each rubber
cap bezel.
3) Using the #2 Phillips screw driver, install the four rubber feet using four (4) 6-32 x 3/8” pan
head Phillips screws to secure the bottom.
FIGURE 2-2: TABLE TOP FEET INSTALLATION DIAGRAM
WARM-UP TIME
The specified warm-up time of the EX1401 is 60 minutes. If, however, the unit is being subjected
to an ambient temperature change greater than 5 ºC, extra stabilization time is recommended to
achieve maximum performance.
POWERING UP AND GROUNDING
The EX1401 is designed to be powered by a DC power source. It can be provided by either using a
PoE+ enabled Ethernet port (which injects DC power into the network lines, such that there is no
need of additional wiring), or through an external DC power adaptor. Many PoE+ enabled switches
are compatible with EX1401. Some of the PoE+ switches that have been tested for compatibility are
listed below.
Page 29
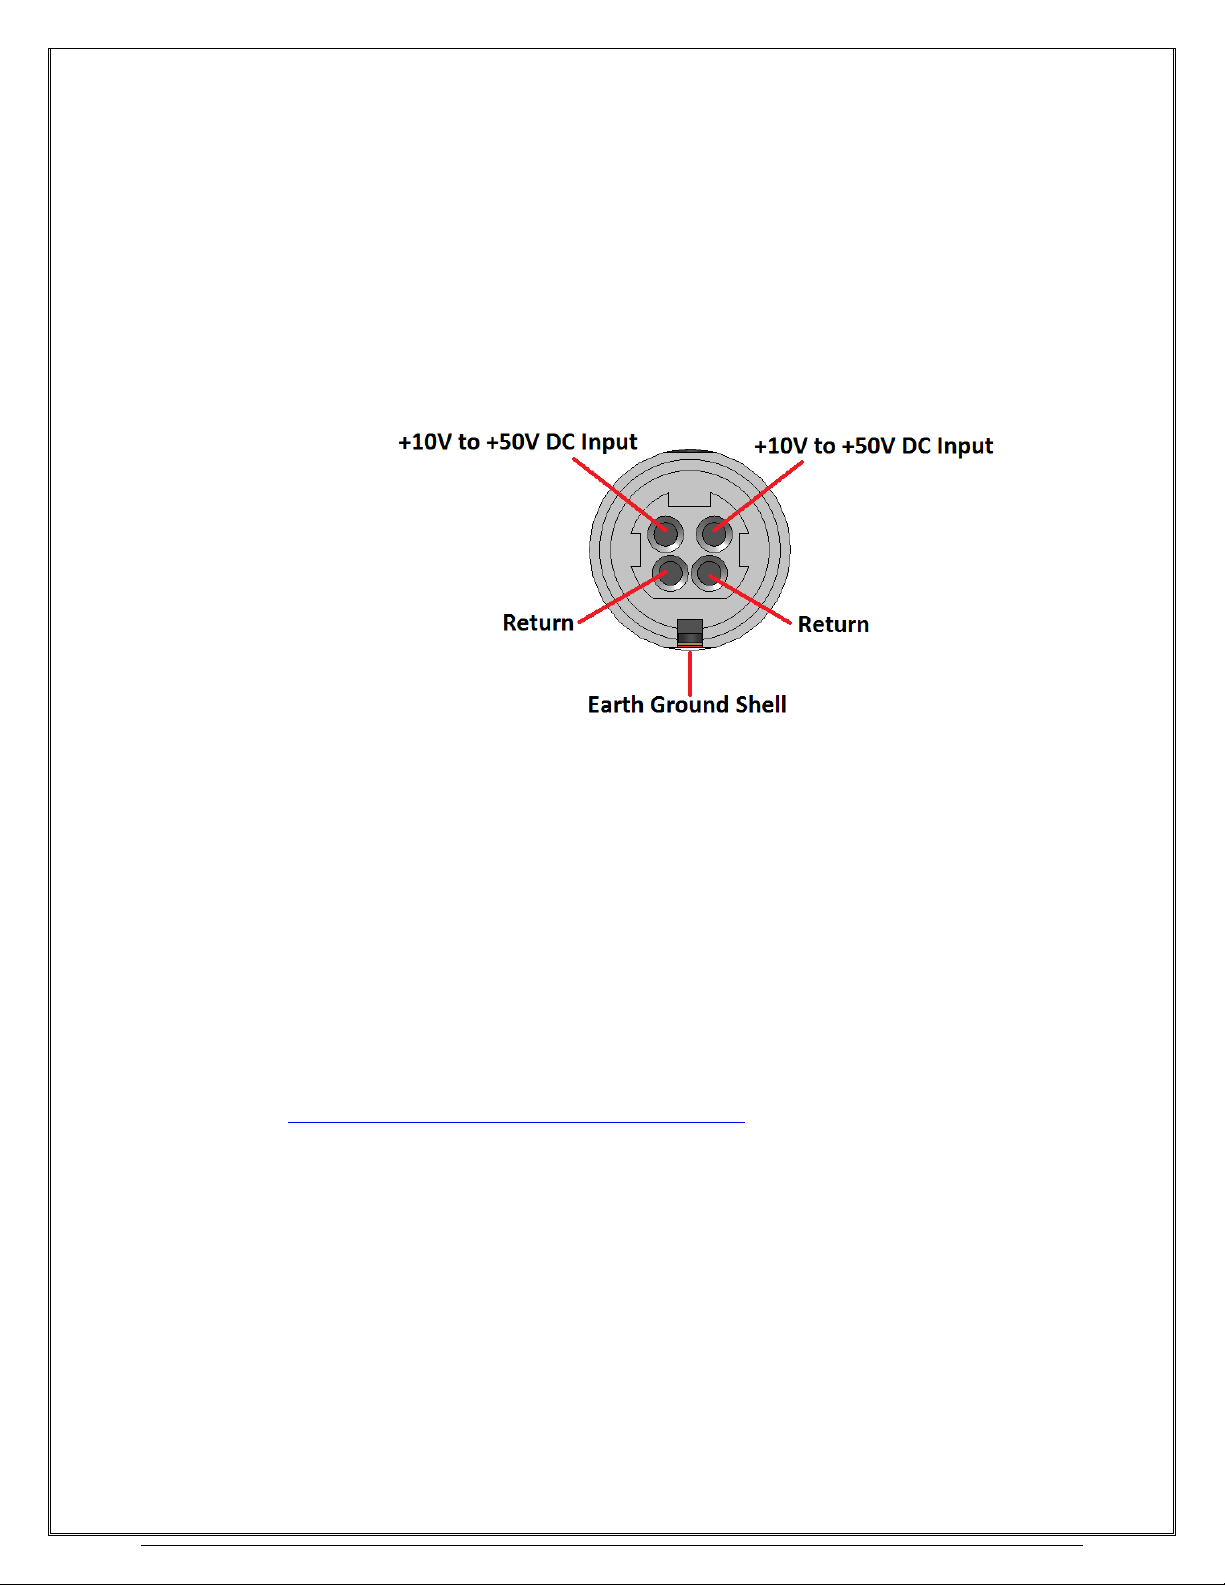
www.vtiinstruments.com
EX1401 Preparation for Use 29
• Cisco SF302-08PP (8-port PoE+ managed switch)
• Intellinet Model 560856 (8-port PoE+ switch)
• Trendnet TPE-115I/A (Power Injector)
The maximum power consumption of the unit is 15W. The unit accepts and performs within the
specifications, when the Auxiliary Supply voltage is between +10VDC to +50VDC. The power inputs
are protected for reverse polarity by up to 50V in reverse direction. If the AUX input connector is
used to supply power to the unit, then the power supplied must be isolated from earth ground by
1500Vrms to maintain isolated Ethernet. (The AUX negative terminal is connected to one side of
the Ethernet’s twisted pair common mode.)
FIGURE 2-3: AUX DC IN CONNECTOR PINOUT
The power inputs (both POE+ and AUX DC IN) are isolated from chassis, as are the analog inputs
and digital IO. Hence users are required to earth ground the EX1401 chassis for safe operation. The
safety ground connection is on the rear panel and is required to be connected to the local earth
ground using the provided cable (VTI# 53-0070-072). Do not use the banana jack on the front panel
for earth grounding the EX1401. This connector is for reference only, and is not meant to be a safety
ground connection. The front side connector is a standard Banana socket (ITT Pomona 3267), while
the rear side connector is 10-32 size stud.
SOFTWARE INSTALLATION
The fastest way to begin controlling an EX1401 is to discover the unit using the LXI Discovery
Tool utility (a free tool available from LXI Consortium). For more information, refer to:
http://lxistandard.org/Resources/LXIDiscoveryTool.aspx
The LXI Discovery Tool searches for all LXI Devices on the LAN Subnet. It uses mDNS and VXI-
11 protocols to detect the LXI Instruments. It may be necessary to download “Apple Bonjour Print
Services”in order to use mDNS service as the discovery mechanism. However, it is not mandatory
to install this service, since the EX1401 can also be discovered via VXI-11.
DRIVER INSTALLATION
VTI Instruments provides two types of drivers for this instrument. For Windows, there is an IVI
driver, based on the industry standard IVI driver architecture specifications. The IVI driver exposes
both IVI-COM and IVI-C interface APIs. The IVI-COM interface can be used from any
programming language that supports Microsoft COM (Component Object Model). For Linux, there
is a driver that provides a C++ API. Both Windows and Linux drivers have a consistent API design
Page 30
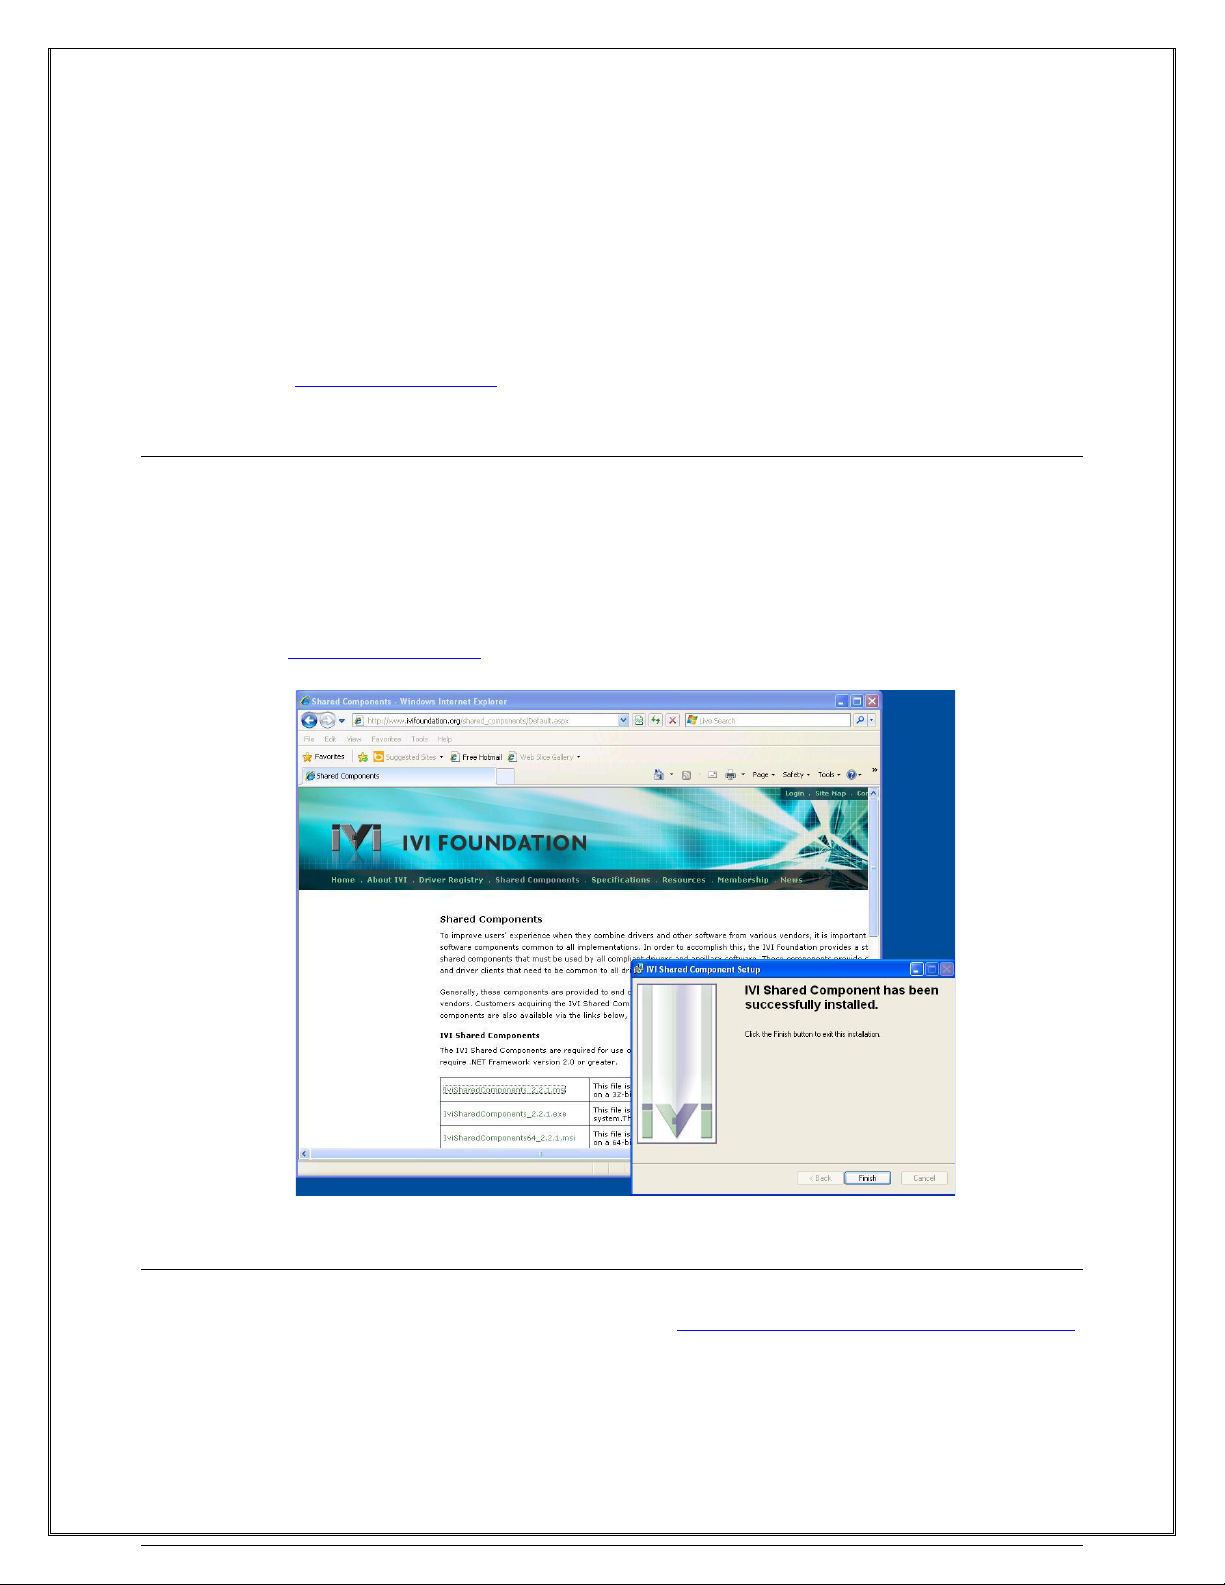
VTI Instruments Corp.
30 EX1401 Basic Operation
so that the application software developed for one can be easily migrated to the other. The drivers
are compatible with both 32-bit and 64-bit operating systems. In general, the API descriptions in
this document apply to both the Windows and Linux drivers unless otherwise specified.
To control the EX1401 series instruments programmatically (via a user generated program or
through tools such as Agilent VEE®, NI LabVIEW®, Mathworks Matlab®, etc.), two additional
components must be installed: the IVI Shared Components library (for Windows OS only) or the
VTI Common Library (for Linux OS only) and the provided VTI Instruments driver. For 32-bit
Windows OS, install the 32-bit driver. For Windows 7 (64-bit), Windows 8 (64-bit), and Windows
10 (64-bit), the 64-bit driver installer includes both 64-bit and 32-bit compatible drivers. These
drivers are available for free download on the VTI Instruments web portal
(www.vtiinstruments.com), in the respective product page, under download tab. The following
sections describe installing the required software.
IVI Shared Components Installation (Windows Only)
If this component was installed during a previous LXI instrument installation, please proceed to
Instrument Driver Installation. First, close all other open programs, leaving only Windows Explorer
open. Navigate to the <CD-ROM Drive>:\EX Platform Requisites directory on the CD
and run the IVISharedComponentsX.X.X.exe program. Next, follow the on-screen
instructions. Do not proceed to the next step until this installation completes successfully. If
instructed to reboot the PC, it will be necessary to do so at that time. Alternatively, the latest IVI
shared components can be downloaded and installed from IVI Foundation Web page,
www.ivifoundation.org.
FIGURE 2-4: IVI SHARED COMPONENT INSTALLATION
Instrument Driver Installation
If the VTEXDigitizer instrument driver was installed previously on the host PC, you may skip this
step of the installation process, and proceed to Platform/LXISync Instrument Driver Installation.
The previously installed driver may need to be updated to the most recently released version to
support the EX1401. To install the VTEXDigitizer instrument driver, navigate to <CD-ROM
Drive>:\Drivers\LXI Drivers\EX Series, on the CD, open the appropriate zip file in
this directory, and then run the .msi installer. Alternately the drivers are available for free
Page 31
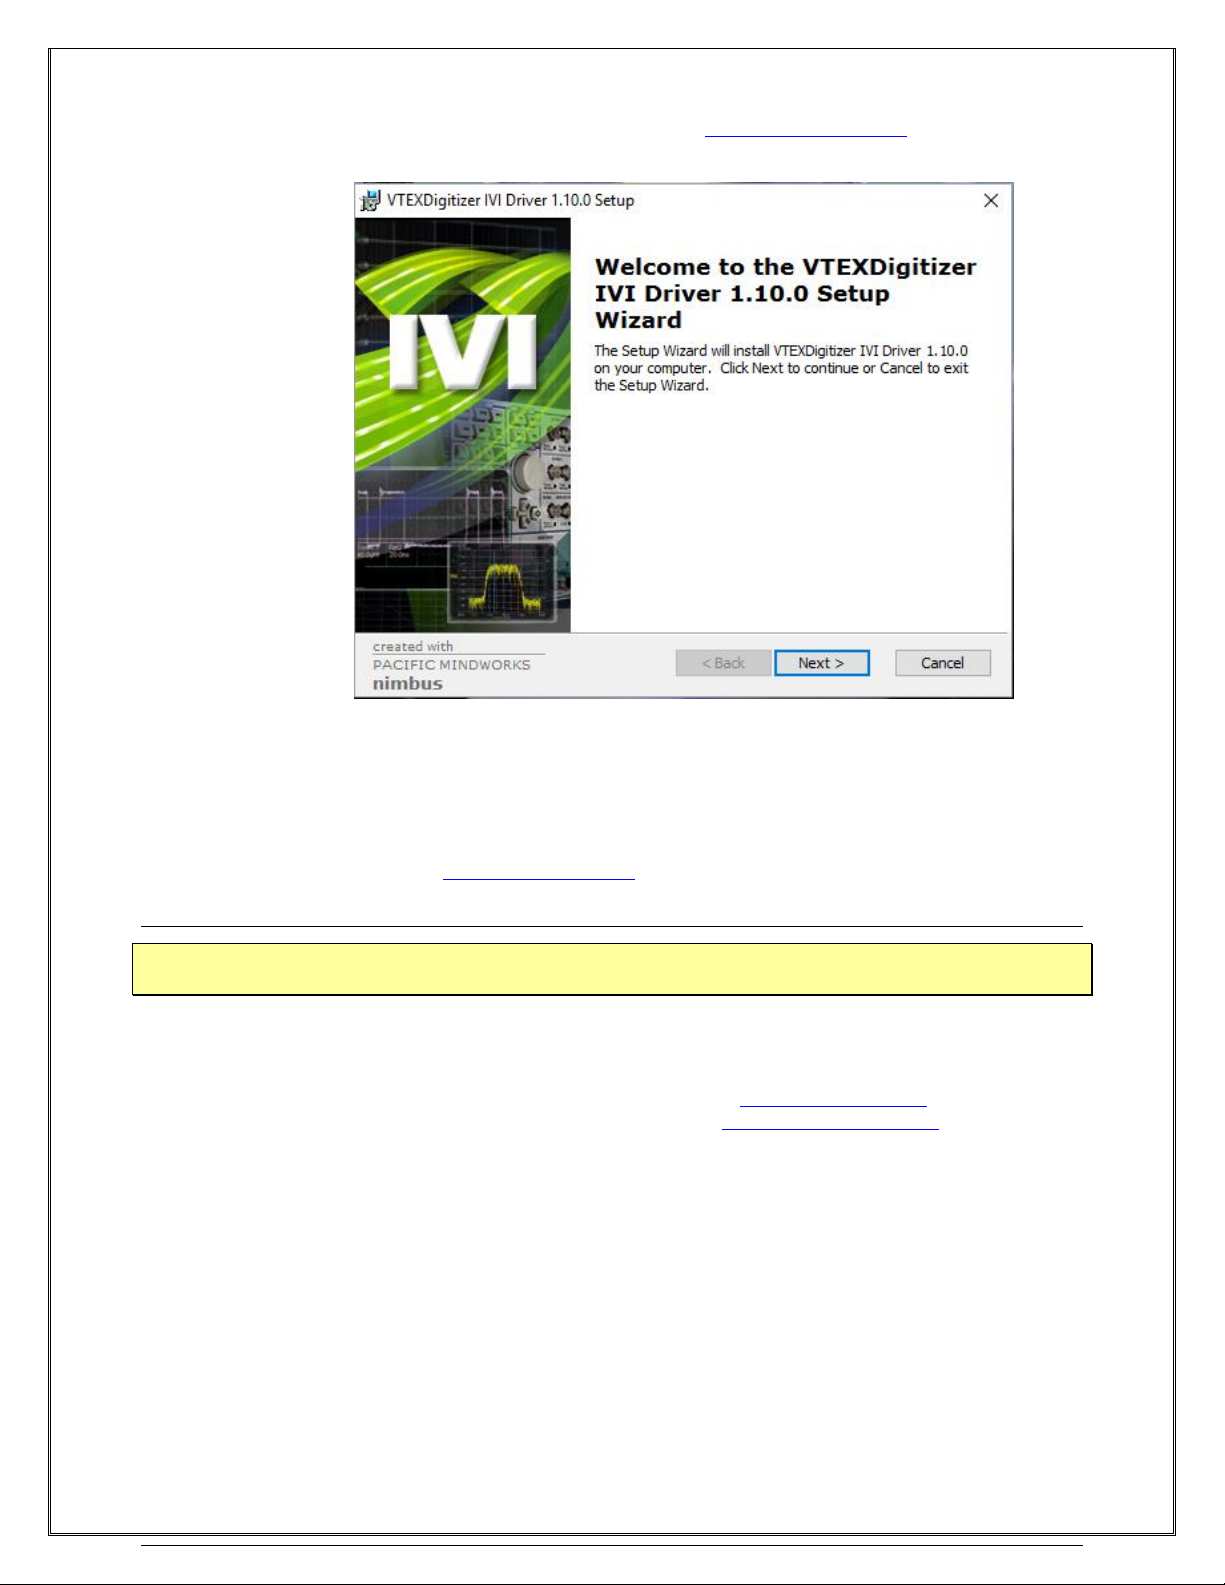
www.vtiinstruments.com
EX1401 Preparation for Use 31
download from VTI Instruments online portal (www.vtiinstruments.com) under the specific
product’s download page.
FIGURE 2-5: INSTRUMENT DRIVER INSTALLATION
The Linux driver (32-bit and 64-bit) is located under <CD-ROM Drive>:\Drivers\Linux
Drivers\Linux EX Series. Open the appropriate zip file in this directory and then run the RPM
Installer. Alternately the instrument drivers for Linux OS are also available for free download from VTI
Instrument website, www.vtiinstruments.com
Platform/LXISync Instrument Driver Installation
NOTE Complete this step only if the LXISync capabilities of the EX platform are required. If this
driver was installed previously on the host PC, software installation is now complete.
To install the Platform/LXISync Instrument driver, navigate to <CD-ROM Drive>:\LXI
Drivers\EMX Platform Driver, IVI on the CD and run the .msi installer located in this directory.
Please refer to the VTEX Digitizer Driver’s online help file for programming guidelines. Additional
information about IVI drivers can be found on the web at http://ivifoundation.org. Information about
the LXI standard and LXI technology can be found at http://www.lxistandard.org.
NETWORK CONFIGURATION
By default, the EX1401 will attempt to locate a DHCP server. If one is found, the IP address assigned
by the DHCP server will be assumed. Otherwise, after a timeout of 20 seconds, the unit will attempt
to obtain an IP address by using Auto IP.
Auto IP is a mechanism for finding an unused IP address in the range 169.254.X.Y where X is in
the range 1 - 254 and Y is in the range 0 - 255. The device will first attempt to obtain the specific
address 169.254.X.Y, where X and Y are the second-to-last and last octets of the device’s MAC
address. However, X will be set to 1 if it is 0 in the MAC address, and to 254 if it is 255 in the MAC
address. If this address is already in use, the unit will attempt to obtain other IP addresses in a
pseudorandom fashion until it finds one that is available.
Page 32

VTI Instruments Corp.
32 EX1401 Basic Operation
To illustrate the Auto IP mechanism, Table 2-1 lists the Auto IP default address for some example
MAC addresses.
MAC Address
Auto IP Default Address
00:0D:3F:01:00:01
169.254.1.1
00:0D:3F:01:01:01
169.254.1.1
00:0D:3F:01:A3:28
169.254.163.40
00:0D:3F:01:FE:FE
169.254.254.254
00:0D:3F:01:FF:FE
169.254.254.254
TABLE 2-1: AUTO IP DEFAULT ADDRESS ASSIGNMENT
If a static IP address assignment is preferred, one can be optionally assigned via the embedded web
page interface. This is done by clicking the Network Configuration link, disabling DHCP, and
then assigning a static IP address.
However, a much more convenient and recommended way to obtain the benefits of a static IP
address is to employ DHCP, but assign the instrument a reserved IP address in your company’s
DHCP server configuration. This reserved address, linked to the EX1401’s MAC address on the
DHCP server, would be assigned to the EX1401 at power up initialization without having to
manually set it on the EX1401. The DHCP server configuration provides a centralized, controlled
database of assigned IP addresses, preventing accidental assignment of the same IP address to
multiple instruments. Consult your company’s Information Technology department for assistance.
VXI-11, and mDNS Device discovery methods are supported by the EX1401. This allows all
EX1401s on a local network to be found without knowledge of their MAC address or IP address
with the use of a broadcast message. Also, the LCD display on the EX1401 provides the current IP
Address configuration of the instrument, at any given instant. Refer to IPv4 Address in Section 3
for more details on LCD menu operation.
Network Configuration Reset for EX1401
There is no dedicated network reset button on the EX1401. The "menu" button cycles through
different screens on the LCD display. On the LAN Reset page, holding the menu in for more than 4
seconds will initiate a LAN Reset. The screen counts down as you hold in the button, and releasing
the button during this stage will abort the reset operation.
The LAN Reset is useful for recovery from an incorrect or unknown network configuration. Note
that the LXI reset function is not a processor reset or reboot. Initiating a LAN Reset will:
1) Enable DHCP and AutoIP
2) Disable Static IP
3) Set the mDNS hostname and service name to the last user-configured values, or the factory
default values if the user hasn't changed those values
4) Enable IPv6
5) Remove the password (if any)
6) Set the time source to PTPv2 (if it was set to Manual or NTP)
7) Set the LXI event domain to 0
NETWORK TROUBLESHOOTING
If an error occurs, when trying to discover the EX1401 you may refer to Common Issues in Section 4
If none of these resolutions help resolve the network connectivity issue, it may be necessary to
change the network settings for the EX1401 and the host PC. By using the following methodology,
most network-related issues can be resolved:
1. Navigate to the IPv4 address status page on the LCD screen using the menu button
2. Note the current IP address and subnet details which are currently assigned to the instrument
Page 33
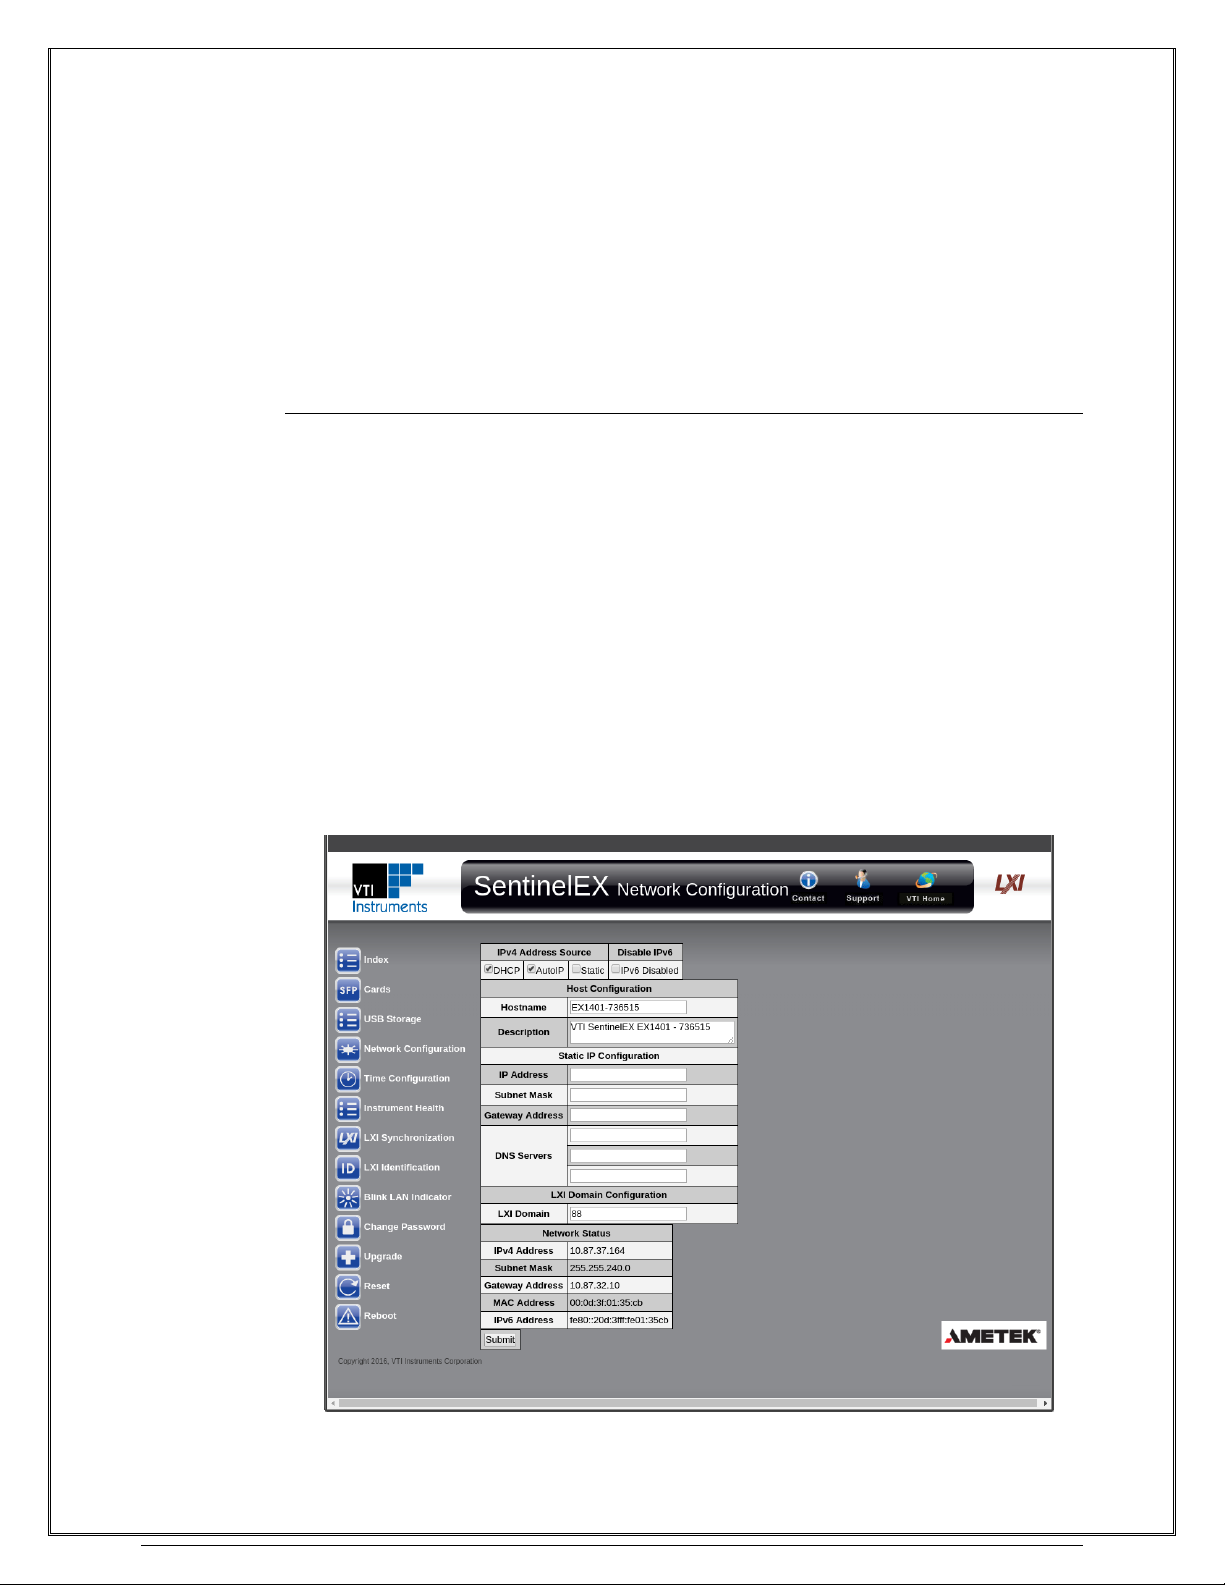
www.vtiinstruments.com
EX1401 Preparation for Use 33
3. Note the current network configuration of the PC, and get ready to change the IP address
4. Change the IP address of the PC, such that it will be compatible with EX1401 network
5. Disable all network interfaces (including WiFi) except that wired network, which is connected
to the EX1401 mainframe
6. Connect the EX1401 to PC directly through Ethernet cable. Since EX1401 supports auto
MDI-X feature, either Direct cable or Cross cable can be used to connect to the PC.
7. Open the embedded SFP webpage, of EX1401 and navigate to Network Configuration page
8. Make changes to the network as you need, and remember to “submit” the changes
9. Power cycle the EX1401 instrument
10. You can now disconnect the EX1401 instrument from PC, and change the PC Network
configurations again, as needed.
Using Multiple Network Cards
When multiple network cards exist in a single PC, it may be necessary to define a static IP address
to both the host PC NIC card that will interface with the EX1401 instrument as well as the EX1401
instrument itself. This process is only necessary if a DCHP server is not connected to the network
to which the device is connected and typically occurs when the NIC is connected directly to the
instrument.
The following process can be used to ensure proper functionality:
1) Navigate to Start → Settings → Network Connections.
2) Disable all network interfaces except the one that is connected to the EX1401 mainframe.
This is done by right clicking on the interface, then selecting Disable.
3) Open the web page of the EX1401 mainframe.
4) Click the IP Configuration link. A prompt may appear to log into the EX1401 mainframe.
5) Unselect DHCP and AutoIP and ensure that Static is selected.
6) Enter an IP address into the IP Address field. For more information on valid IP addresses,
please consult with an IT administrator.
7) Set the Subnet Mask.
FIGURE 2-6: COMPLETED EX1401 MAINFRAME STATIC IP CONFIGURATION
Page 34
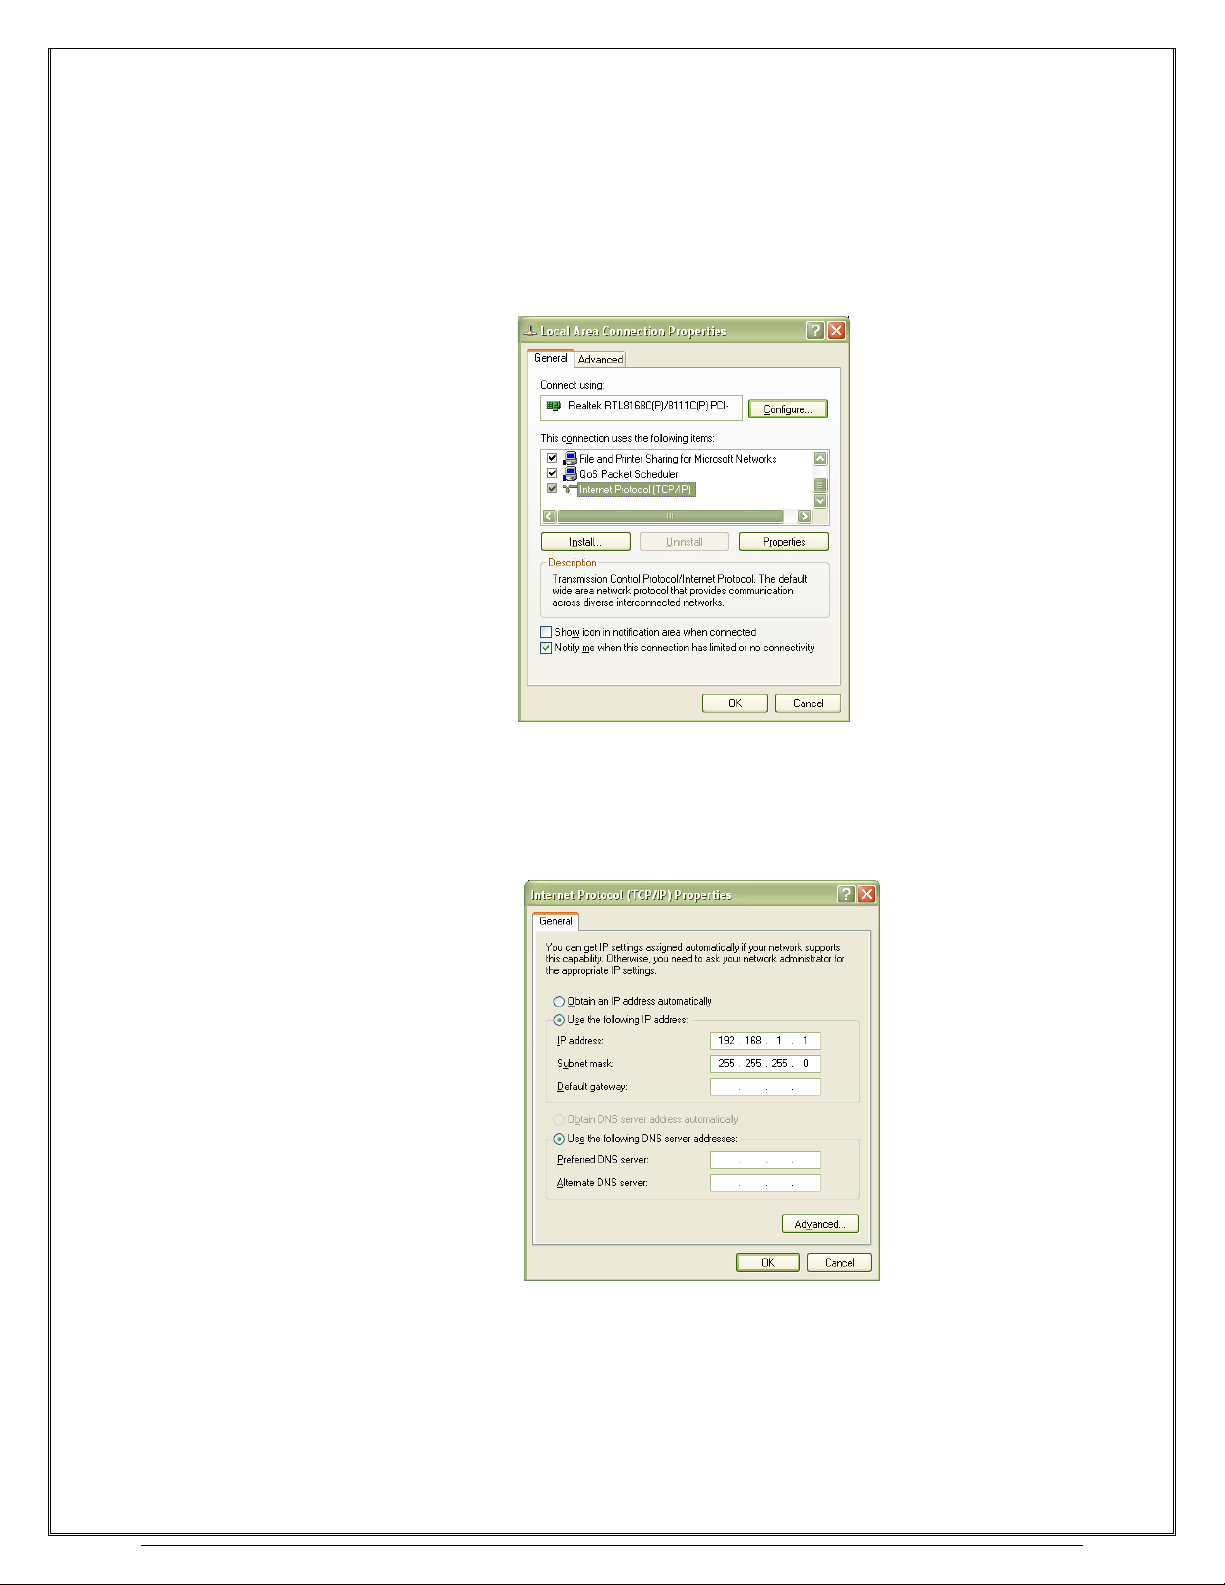
VTI Instruments Corp.
34 EX1401 Basic Operation
8) Click the Submit button. Once this is done, it is no longer possible to communication with the
EX1401 mainframe. This is normal and is addressed in the following steps.
9) Set a static IP address for the NIC card by doing the following:
a) Navigate to Start → Settings → Network Connections.
b) Right click on the NIC card that the EX1401 mainframe is connected to and select
Properties.
c) Select Internet Protocol (TCP/IP) and click Properties.
FIGURE 2-7: TCI/IP SELECTION
d) Click the Use the following IP address radio button.
e) Enter the desired IP address.
f) If not automatically completed after the IP address is entered, set the Subnet mask field
to suitable address range
FIGURE 2-8: COMPLETED NIC STATIC IP CONFIGURATION
g) Click OK to exit the network configuration properties.
Page 35
www.vtiinstruments.com
EX1401 Preparation for Use 35
TIME CONFIGURATION
By default, the EX1401 will be configured to receive its time through PTPv2 (Precision Time
Protocol). The user can also set time using SNTP (Simple Network Time Protocol) or the time can
be set manually. The manual setting is necessary if the network environment is such that the unit
cannot reach the Internet/Intranet time server. For more information, see Time Configuration in
Section 4.
INPUT CONNECTIONS/WIRING
Thermocouple Connections
The EX1401 employs an uncompensated (Cu-Cu) mini-thermocouple female jack as its input
connector. This connector provides a solid, reliable connection that is also easily changeable. Since
it is not thermocouple-type specific, different thermocouple types can be mixed throughout the unit
without hardware modification. The input jack is polarized and will only accept its mating connector
in one orientation. The mating connector is a standard mini-thermocouple male jack. A popular
source is the SMPW series from Omega Engineering. For specified accuracy performance, the input
connector must be of the same thermocouple type as the wire being connected.
Thermocouple wire is polarized, and it is critical to consider this polarity when connecting the
thermocouple wire to the thermocouple jack. For reference, the color designations and polarizations
of the most popular thermocouple types are listed in Table 2-2 for both ANSI (American) and IEC
(European) standards.
ANSI Thermocouple Standard
IEC Thermocouple Standard
Thermocouple
+
-
Thermocouple
+ - Type J
White
Red Type J
Black
White
Type K
Yellow
Red Type K
Green
White
Type T
Blue
Red Type T
Brown
White
Type E
Violet
Red Type E
Violet
White
Type S
Black
Red Type S
Orange
White
Type R
Black
Red Type R
Orange
White
Type B
Gray
Red Type B
Gray
White
Type N
Orange
Red Type N
Pink
White
TABLE 2-2: STANDARD THERMOCOUPLE REFERENCE DESIGNATIONS
In most applications, the length and gauge of the thermocouple wire do not affect the accuracy of
the measurement. Due to the high input impedance and lack of switching in the signal conditioning
circuitry of the EX1401, the resistance and capacitance of the thermocouple wire are normally not
important factors. If, however, maximum system accuracy is desired, the resistance of the
thermocouple wire must be considered as a system error source. As an example, 650 feet of 24 gauge
type T wire has a resistance of about 500 Ω. Against the EX1401’s typical input bias current of
7 nA, this creates a voltage error of:
V 5.2nA 5Ω 500
=
To convert this error to its representative temperature error, it is then divided by the slope of the
thermocouple characteristic at the temperature of interest. For example, the slope of the type T
characteristic at 0 ºC is 39 µV/ºC. The error at this point is then:
C 0.064CV/ 39V 2.5 =
This example demonstrates how to evaluate the potential error that a specific wire installation
represents. The user is encouraged to evaluate each individual application to ensure that the error is
Page 36
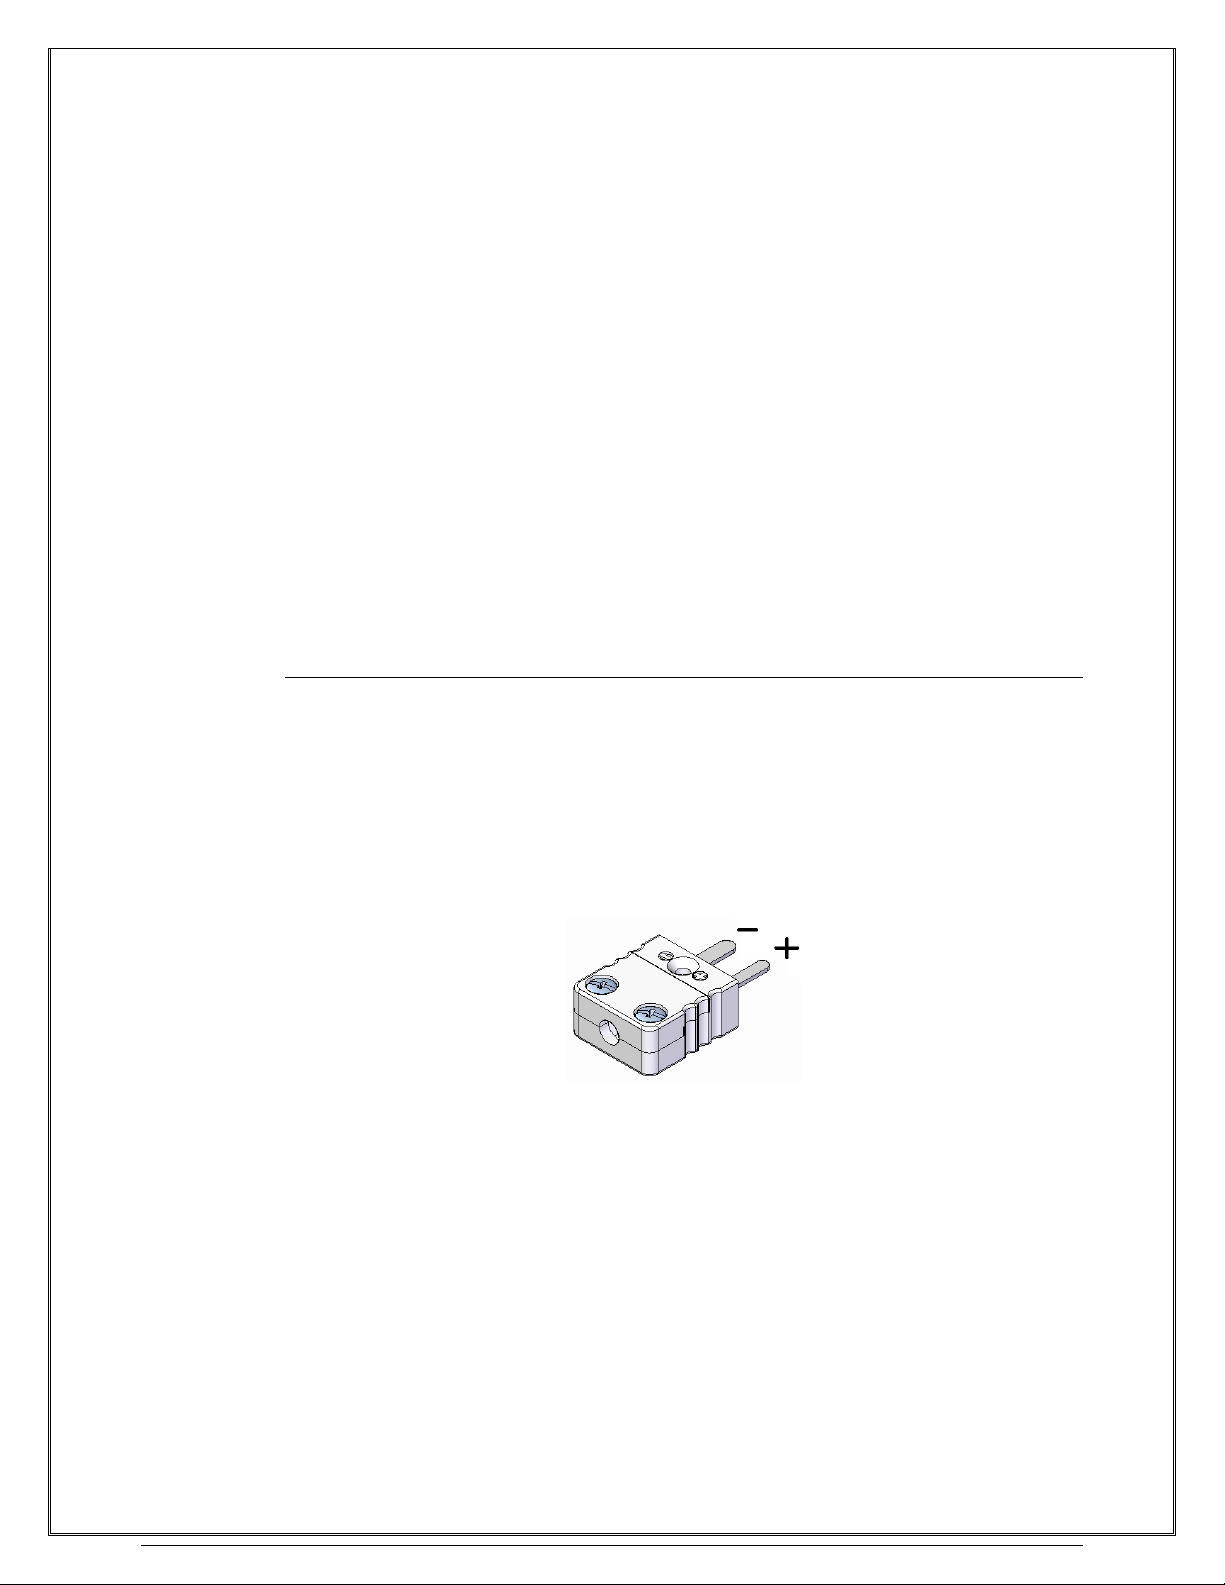
VTI Instruments Corp.
36 EX1401 Basic Operation
within acceptable bounds. In general, best results will be achieved with the shortest and thickest
wire that the physical requirements of the application can support.
The EX1401 offers excellent noise rejection through its high common mode rejection and selectable
bandwidth limiting, which allows for high integrity, noise-free measurements with even less-thanideal wiring setups. However, some common instrumentation wiring practices can be used to
achieve or ensure maximum performance.
Shielded thermocouple wire can be used to raise the system’s rejection of electrical interference.
Shielded wire encloses the two thermocouple wires with a low impedance conductor that should be
terminated by the user to a convenient earth ground. The EX1401 provides an external ground stud
that can be used for this purpose, but any earth ground point is acceptable.
Magnetic interference, which is present wherever high currents are flowing, is conversely decreased
by minimizing the loop area represented by the two thermocouple wires. That is, the wires should
be run closely together from the thermocouple junction to the connections in the thermocouple jack.
Fortunately, most thermocouple wire comes with a sheath that covers the two thermocouple
conductors, inherently creating a small loop area.
Many test applications involve the monitoring of a test article in a chamber, requiring the routing of
numerous types of signals through the chamber’s cable access ports. It is recommended that the
thermocouple wires be run through a separate port and conduit from cables carrying power or high
frequency signals.
Voltage Connections
Each input channel of EX1401 can be independently configured to measure differential voltage
signals. Since the EX1401 employs an uncompensated (Cu-Cu) mini-thermocouple female jack as
its input connector, measurements are not affected by the thermocouple effect. Users are
recommended to use suitable Cu-Cu mini thermocouple male plugs, with proper polarity. A popular
source is the SMPW series from Omega Engineering.
Note: The Cu-Cu type uncompensated thermocouple hardware is sometimes called as Type-U or
Calibration type. They will be generally available in White Color. The wider pin represents the
negative polarity, while the narrow pin is marked for positive polarity.
FIGURE 2-9: VOLTAGE CONNECTOR POLARITY IDENTIFICATION
Page 37
www.vtiinstruments.com
EX1401 Basic Operation 37
SECTION 3
BASIC OPERATION
INTRODUCTION
This section expands on the description of the EX1401’s features and explains how to best use them.
ENGINEERING UNIT (EU) CONVERSION
Each EX1401 input channel can be individually configured for measuring thermocouples or voltage.
The following thermocouple types are supported:
Voltage The instrument will return the raw voltage measured at its input
with units of volts (V). It is unaffected by the measured or input
CJC temperature for that channel.
Type J, K, T, E, S, R, B, N The instrument will return the compensated thermocouple
temperature measured at its input with units of temperature (ºC or
ºF). The thermocouple calculations are performed using the fullorder polynomial equations and coefficients from the NIST ITS90 Thermocouple Database.
Custom The instrument will return the compensated thermocouple
temperature measured at its input with units of temperature (ºC or
ºF). The thermocouple calculations are performed using userdefined coefficients for the polynomial equations. More
information on this is given under User-defined Conversions. The
custom coefficients can be unique for each channel.
The default selection is voltage.
NOTE In a mixed thermocouple system, it is very easy to accidentally mismatch the hardware setup
and the software configuration setup. Care is especially warranted, as the resultant errors
may not be large enough to obviously indicate a problem, but may be significantly larger than
the accuracy specification of the instrument.
Linear Correction
The EX1401 provides the capability to apply a linear transformation on voltage-mode measurement
data after EU conversion. Each channel can be programmed with a gain and offset which are applied
as (gain*data) + offset.
Gains default to 1.0 and offsets default to 0.0.
Page 38
VTI Instruments Corp.
38 EX1401 Basic Operation
VOLTAGE MEASUREMENT RANGES
The EX1401 provides ±0.01 V, ±0.10 V, ±1.0 V, and ±10.0 V voltage measurement ranges on all
input channels. Channels which are configured for thermocouple inputs will use ±0.10 V range.
Voltage measurement range is programmable on a per-channel basis.
The default selection for voltage channels is the ±10 V range.
HARDWARE/ANALOG ANTI-ALIAS FILTER
Each EX1401 input channel has a fixed, 2-pole, 30kHz RC low pass filter for anti-alias filtering.
The analog signals after the anti-alias filter are over sampled at 320kHz to 640kHz by the ADCs.
This combination of anti-alias filter with ADC oversampling provides 60dB of rejection at the
aliasing band.
DIGITAL FILTER
The EX1401 allows the user to configure different types of digital filters per channel. These digital
filters are implemented inside the FPGA of the device, such that they perform consistently and
without loading the host computer resources. Users can optimize the filter settings for aggressive
filter performance or lower data latency time. In addition, users can customize the FIR filter
performance by editing the coefficients of the filter. This provides ultimate flexibility in designing
a filter to suit the application needs. The digital filter parameters for each channel can be defined
independently. Final data throughput is a complex parameter and depends on the basic sampling
rate and digital filter selection. Choosing the correct sampling rate and digital filter parameters is
critical for achieving optimum performance levels of common model signal rejection, roll-off rate,
and data latency. Please refer to Sampling Rate/Filters/Noise Floor for more details.
MEASUREMENT RANGE/INPUT PROTECTION
The specified input voltage range of the EX1401 thermocouple channels is up to ±10V for voltage
measurements. This level refers to the maximum differential voltage, or voltage that is applied
between the (+) and (–) input terminals, that can be measured without distortion, and range where
the specifications are guaranteed. The native input range of amplifier is 14.4V, but the outer 4.4V
is left out since the performance in this region will not be linear.
The measurement range of the EX1401 in terms of temperature is a function of its input voltage
range and the capabilities of the thermocouple sensors themselves. Specifically, the measurement
range of the EX1401 for the standard thermocouple types is the following:
Type
Min (°C)
Max (°C)
Min (°F)
Max (°F)
J
-210
1200
46
2192
K
-200
1372
-328
2502
T
-200
400
-328
752 E -200
1000
-328
1832
S
-50
1768
-58
3214
R
-50
1768
-58
3214 B 250
1820
482
3308
N
-200
1300
-328
2372
TABLE 3-1: EX1401 MEASUREMENT RANGE
The maximum common mode voltage (the voltage level, that is applied to the + and – inputs
together, with reference to chassis ground), that can be applied without causing out-of-specification
distortion of the differential measurement is ±500 V
PEAK
. Application of differential voltages
Page 39

www.vtiinstruments.com
EX1401 Basic Operation 39
exceeding ±10V level will result in measurements reported as the floating-point representation of
NaN (Not a Number). The instrument will be damaged permanently, if differential voltage across
any channel, exceeds ±100 V
peak
.
NOTE The application of differential voltages beyond ±100 Vpeak may permanently damage the EX1401.
All inputs are protected from EMI using 100pF feed through capacitors to chassis ground. Also they
are protected from accidental electro static discharges (ESD).
COLD JUNCTION COMPENSATION (CJC)
For highest accuracy and stability, the EX1401 provides embedded isothermal input sections that
are monitored by high precision thermistors, one for each thermocouple input channel. Although
internal compensation capabilities are present, it is still possible to disable this feature and define
CJC temperatures externally. To ensure that CJC information is current and time correlated with the
input channels, CJC channel measurements are synchronized with input sampling clock, providing
a maximum time separation of less than 200 ms between the input channel measurement and its
associated CJC measurement. Internal CJC channels are measured via a separate 16-bit ADC, which
is synchronously clocked at 10 SPS to 20 SPS.
NOTE The health of internal CJC channels is verified during the instrument self-test.
The user has configuration control over the reporting of the measured CJC data. This control only
affects the display of their data, not the actual measurement of them. They are updated with every
scan, regardless of their reporting status.
The EX1401 also accommodates the use of an external cold junction that is maintained and
measured by the user. In this application, the cold junction temperature in ºC is entered into the
EX1401 and enabled on a per channel basis. That is, the use of internal and user-defined CJC inputs
can be mixed throughout the unit.
The default selections are:
• CJC reporting is disabled
• User-defined CJC temperatures are 0.0
• User-defined CJC temperatures are disabled for all channels
TEMPERATURE UNITS
The EX1401 can output its temperature data with units of ºC or ºF. This is controlled on a global
basis, such that all input channels are configured with one setting. This selection applies to input
channel data only. Input channels configured for an EU conversion of voltage are unaffected by this
setting.
The default selection is °C.
SAMPLING RATE/FILTERS/NOISE FLOOR
The EX1401 supports a large range of sampling rates, due to its flexible ADC sampling clock and
programmable digital filters. Sampling rate is dependent on the decimation filters performance
expectation, and latency of first data that can be tolerated by your application. Figure 3-1 represents
the general architecture of the EX1401 ADC and filter scheme.
Page 40
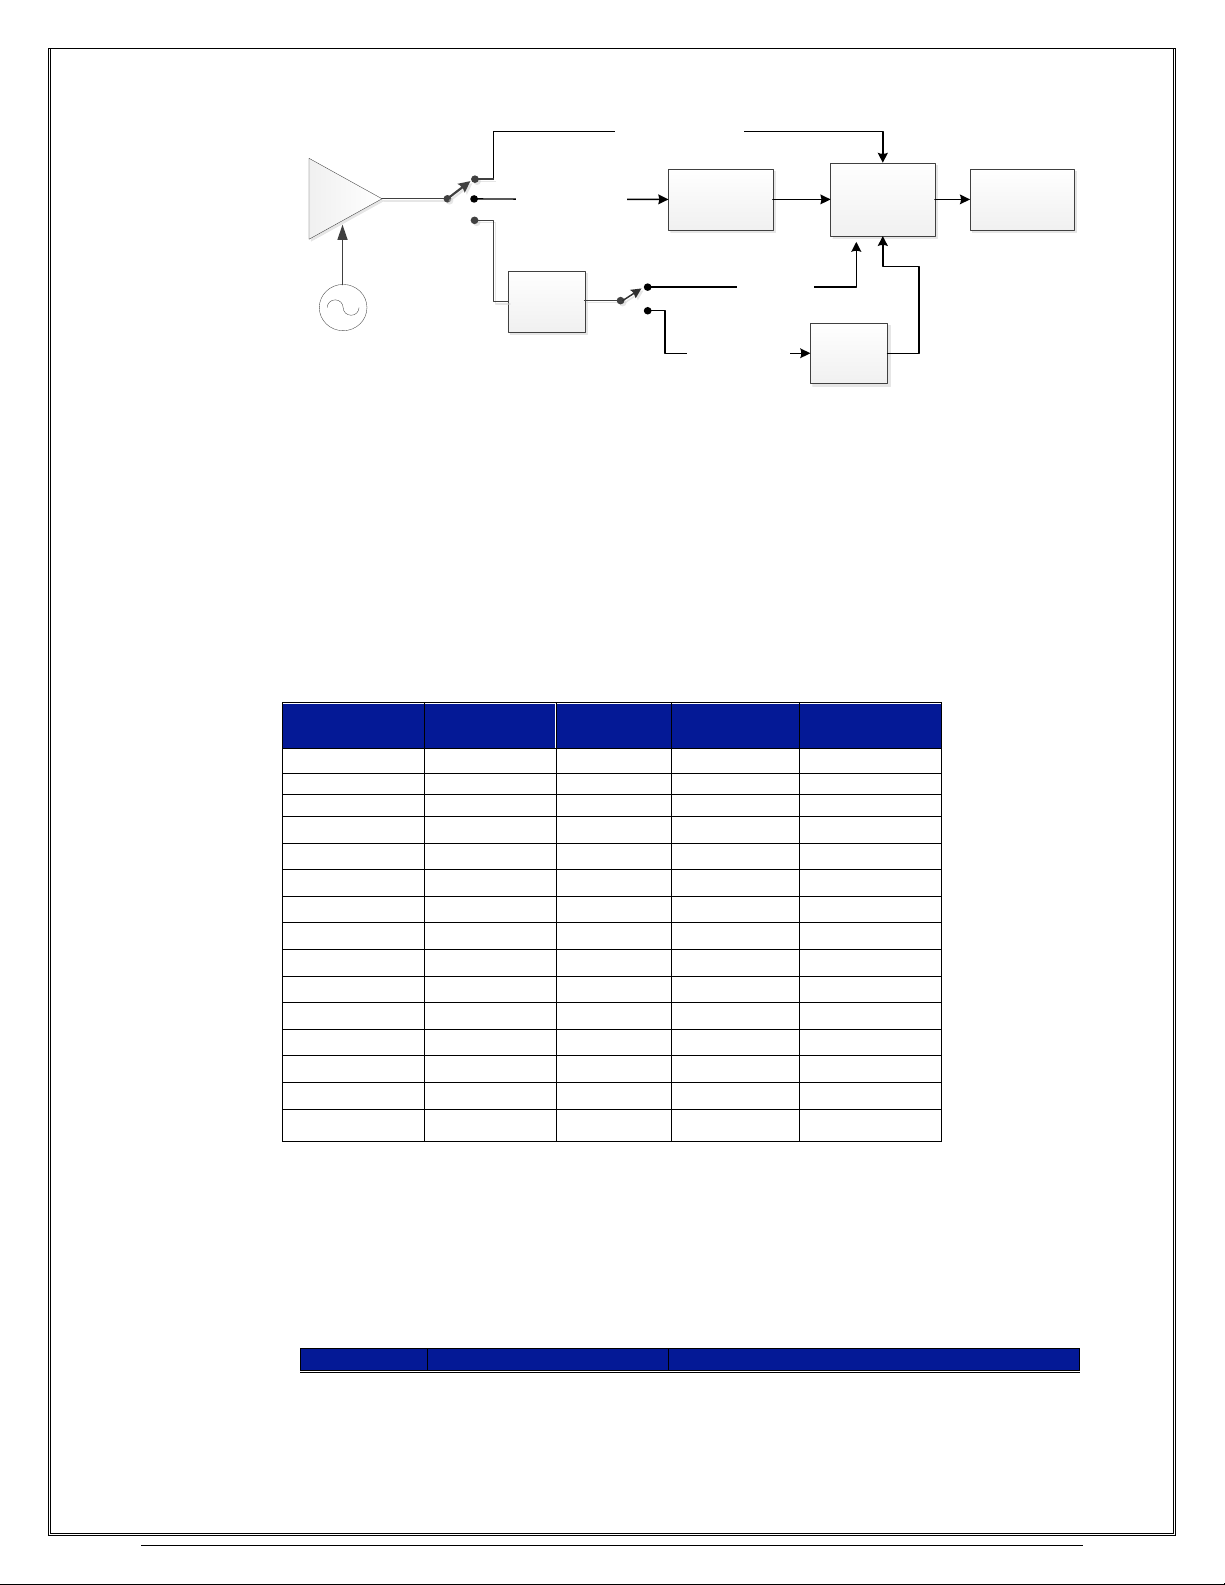
VTI Instruments Corp.
40 EX1401 Basic Operation
ADC
PLL
CLK=32*2^n*fs
Decimate 2^n
FIR (Customizable)
(n=1 to 16)
CIC
(/4 to /8192)
CFIR
(/4)
Customizable
Medium Latency
Blind
Downsampling
(/1 to /65536)
2^n*fs
Raw | (Filter = None)
Gain/Offset/
Engineering
Unit Conversion
High Performance
Low Latency
FIGURE 3-1: ADC AND FILTER SCHEME
It is possible to specify the sampling rate two ways. In the first method you can specify each
parameter of the data decimation chain; including ADC sample clock frequency, filter type and
configuration, downsampling factor etc., to produce a required data output rate. In the second
method you may simply specify the final data sample rate (or the frequency span of interest), and
desired filter type, such that all other dependent parameters will be automatically adjusted, to
produce output at desired sample rate.
The noise floor performance of the system also depends heavily on the decimation rate, since higher
decimation factors will help improve the signal-to-noise ratio. Given below are typical noise level
performance specifications at various input voltage ranges.
Voltage Range
Full Scale Vin
Decimation
factor
V
Noise
(uVpp)
S/N Ratio (dB)
±100mV
100mV
1
16.20
65.3 dB
±100mV
100mV
10
5.12
75.3 dB
±100mV
100mV
100
1.62
85.3 dB
±100mV
100mV
1000
0.51
95.3 dB
±100mV
100mV
10000
0.16
105.3 dB
±1V
1V
1
65.00
77.4 dB
±1V
1V
10
20.55
87.4 dB
±1V
1V
100
6.50
103.4 dB
±1V
1V
1000
2.06
107.4 dB
±1V
1V
10000
0.65
117.4 dB
±10V
10V
1
966.00
75.6 dB
±10V
10V
10
305.48
85.6 dB
±10V
10V
100
96.60
95.6 dB
±10V
10V
1000
30.55
105.6 dB
±10V
10V
10000
9.66
115.6 dB
TABLE 3-2: VOLTAGE MEASUREMENT NOISE PROFILE VS. DECIMATION (SAMPLING RATE)
OPEN TRANSDUCER DETECTION/OVERLOAD CONDITIONS
The EX1401 provides the ability to detect several different signal overload conditions, as well as
several ways to report them. They are reported on a per-channel basis as a 32-bit mask of active
conditions, via the Channel.Overload.Status property. The following bits are supported for the
EX1401:
Bit Mask
Name
Description
Page 41

www.vtiinstruments.com
EX1401 Basic Operation 41
0x00000002
Transducer Upper Limit
The signal is above the defined range of the
transducer’s EU conversion. This is either the limit of
the NIST polynomials, for standard thermocouple
types, or the user-supplied value of
Channel.Tranducer.UpperLimit.
0x00000004
Transducer Lower Limit
The signal is below the defined range of the
transducer’s EU conversion. This is either the limit of
the NIST polynomials, for standard thermocouple
types, or the user-supplied value of
Channel.Tranducer.LowerLimit.
0x00000008
User Upper Limit
The signal is above the user-defined value of
Channel.Overload.UserUpperLimit, and
Channel.Overload.UserLimitEnabled is True.
0x00000010
User Lower Limit
The signal is below the user-defined value of
Channel.Overload.UserLowerLimit, and
Channel.Overload.UserLimitEnabled is True.
0x00000020
Open Transducer
The OTD trickle current is enabled and has caused
the input voltage to rise above the upper limit of the
ADC’s valid input range.
0x00010000
ADC Overload
The signal is outside of the ADC’s valid input range,
either too high or too low.
0x00100000
ADC Sync
The channel’s ADC has become unsynchronized
from the others in the instrument, likely due to
electrostatic discharge. While this status bit remains
set, the firmware is resynchronizing it.
TABLE 3-3: OVER LOAD CONDITIONS AND INDICATIONS
Any of these bits can be enabled to drive the state of the front-panel LEDs or any of the instrument’s
trigger outputs (EXT, DIO0-7, LAN0-7). For more information, see the LED Indications and
Overload and Trigger Outputs sections.
Any of these bits can also be enabled as latching. If this is set, the bit will only become unset in the
status at the beginning of a new acquisition, or when explicitly cleared by the user.
Each block of data read from the instrument will include a single bit indicating whether any overload
status bits were set for any of the included samples. This provides a simple, quick indication of
whether the data is valid for a particular block.
LED INDICATIONS
As an LXI standard compliant instrument, the EX1401 instrument provides multiple LED indicators
on the front and rear of the instrument to indicate the power, network connectivity and
synchronization status.
Power LED (PWR)
This is a single colored LED. If the LED is glowing Solid Green, it indicates that power is applied
to instrument, and is in active states.
LAN LED
This is a Bi-color LED (Red/Green), used for indicating the basic network connectivity status. The
LED glows in solid green color, when the device is successfully connected to a network, without
any conflict/error. If there is a problem with the LAN connectivity, this indicator turns to solid red
Page 42
VTI Instruments Corp.
42 EX1401 Basic Operation
color. If the LED is blinking/flashing green, it indicates that the Device Identification command was
received over the LAN. The status indicator shall continue to flash green until commanded to do
otherwise. Refer Blink LAN Indicator section under web page operation section for more details.
IEEE 1588 LED
The IEEE 1588 Clock Status Indicator is designed to show both the status and the type of clock in
the EX1401 device. This indicator is a single, bi-color LED (Red/Green) whose states are identified
as follows:
State of LED
PTP Clock/Sync State
LED Color (s)
Single (Green)
Off
Not Slave, Not Master, and Not Faulty
On – Solid Green
Slave
On – Blinking Green once every second
Master but not Grandmaster
On – Blinking Green once every two seconds
Master and also Grandmaster
On – Solid Red
Faulty
TABLE 3-4: IEEE 1588 LED STATES
LEDs on Network Port
There are two LEDs present on the RJ45 Ethernet connector, placed on the rear side of EX1401.
The right-yellow LED indicates network activity. The blink rate is roughly proportional to amount
of network traffic. The left-bicolor (green/amber) LED indicates connectivity and rate. Green
indicates connected at 100Mbs and amber indicates connected at 10Mbs. If both LEDs are off, it
indicates that network is not connected. Network connectivity does not mean the device has obtained
an IP address or has access to the connected network. The LAN indicator on the front provides that
function.
Channel LED Indicators
In addition to the system status indicators, the EX1401 also features a red LED for each channel on
its front panel, mounted next to the mini-TC connector. The behavior of this LED can be controlled
by setting the Channel.Overload.Indicator property. This is a mask with the same bit values as the
Overload Status described above. Whenever Channel.Overload.Status &
Channel.Overload.Indicator != 0, the LED be will be lit. Otherwise, the LED will be off. By default,
only the OTD bit is set in the Indicator mask, so the LED will indicate open transducer status until
configured otherwise.
OVERLOAD AND TRIGGER OUTPUTS
The EX1401 features three methods of trigger output: an 8-channel DIO port, an External trigger
SMB, and 8 LAN Events. Any of these can be tied to the Overload status of one or more channels.
First set the Channel.Overload.EventEnabled mask, which has the same bit definitions as the
Channel.Overload.Status described above. Whenever Channel.Overload.EventEnabled &
Channel.Overload.Status != 0, any associated trigger outputs will be driven high. Otherwise, they
will be driven low.
To associate trigger outputs with channel overloads, the Events interface is used. Set the Source
property of the desired trigger output’s Event interface to Overload_CH<N>, where <N> can be
either a single channel number or a range of channels. For instance, setting
Events.Item[“DIO3”].Source = “Overload_CH1,8,12-16” will cause DIO3 to be driven high
whenever any of channels 1, 8, 12, 13, 14, 15, or 16 have any overload condition.
DIGITAL I/O
The EX1401 features an 8-channel digital I/O port on the rear panel of the instrument. This port can
be used for various functions, such as arm/trigger source, for presentation of limit evaluation
Page 43
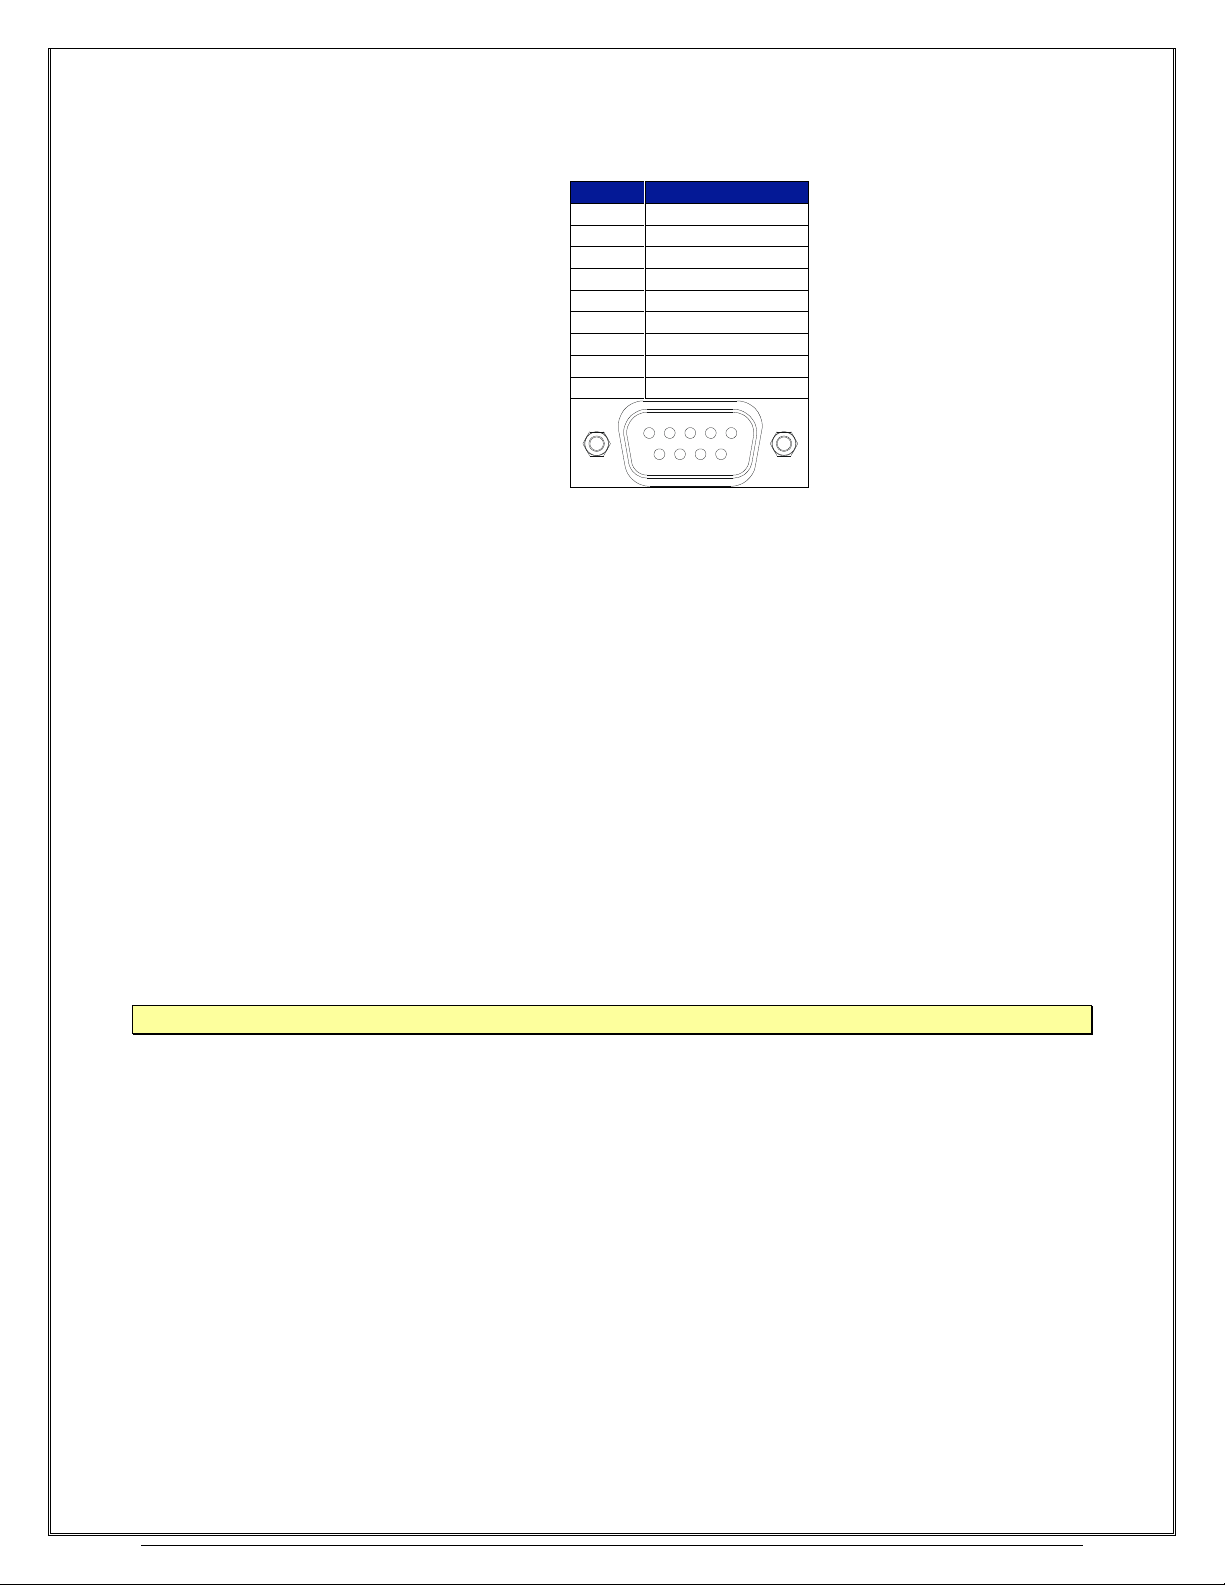
www.vtiinstruments.com
EX1401 Basic Operation 43
information, and as a general purpose input/output device. The digital I/O connector is a standard
DB-9 with the following pin assignment:
Pin
Function
1
DIO Channel 0
2
DIO Channel 1
3
DIO Channel 2
4
DIO Channel 3
5
DIO Channel 4
6
DIO Channel 5
7
DIO Channel 6
8
DIO Channel 7
9
GND
1 2 3 4 5
6 7 8 9
TABLE 3-5: DIGITAL I/O CONNECTOR & PIN ASSIGNMENT
As a general-purpose output device, each DIO channel can be independently programmed with
regards to its output functionality and its logic state, when enabled as an output. When not enabled
as an output, a channel becomes tri-stated, preventing conflict with other potential voltage drivers.
Refer the port’s electrical specifications for voltage tolerance limits and output drive capabilities.
Regardless of output functionality, each channel provides constant input functionality. That is, the
input level on each channel can be accessed without a specific enable function call. It is also possible
for the DIO data to be acquired and reported along with the analog channel data. Unless linked to a
limit condition, as discussed below, the DIO port’s operation is completely autonomous.
The default selections for each DIO channel are:
• output enable is off
• output level is 0
The electrical specifications for the digital I/O port are provided in EX1401 Specifications.
The Digital IO port is bank isolated from chassis ground/earth potential for up to ±250VPEAK.
However, there is no inter-channel isolation between digital channels. The Digital I/O port is ESD
protected on all IO pins. Use a shielded cable when connecting to the Digital IO port for CE.
NOTE Each Input channel of Digital IO port is pulled down through 10K Ohm resistor to its ground
TRIGGERING
The EX1401 supports a full function trigger model with a separate arm source and trigger source
event structure. For a complete explanation of the trigger model, see Start, Arm, Trigger, and Alarm
in Section 5. In summary, an acquisition sequence is enabled with a trigger initialize command.
Scanning is then initiated upon the receipt of the programmed arm source event followed by the
receipt of the programmed trigger source event. Trigger and arm source events can be independently
programmed from a variety of sources including Immediate, Software, External trigger, Digital I/O,
LAN Events, and LXI alarms.
DATA FORMAT
By default, the data returned during data retrieval is limited to the channel readings and the absolute
time of measurement initiation. If enabled, the EX1401 can also return the measured CJC
temperatures.
Page 44
VTI Instruments Corp.
44 EX1401 Basic Operation
ACQUIRING DATA
In general, the acquisition and retrieval of data on the EX1401 are conducted with discrete
commands that are often separated in time to a large degree. The EX1401 utilizes a 256 MB FIFO
memory storage to buffer acquisition data prior to retrieval. This reading buffer is cleared upon
receipt of the trigger initialize command in preparation for reading storage, and begins storing new
data in a circular buffer immediately. Then, upon fulfillment of the programmed trigger model
conditions, the EX1401 marks one or more records in the circular buffer for user retrieval. It
continues scanning and storing the acquisition data until the trigger and arm count quantities are
reached or the acquisition is aborted. At that point, data acquisition ceases and the trigger model is
returned to the Idle state.
The amount of records that can be buffered within the memory is dependent on the number of
channels enabled and the requested record size. Specifically, the number of records that can be
buffered (Record_Count) is determined by the following formula:
Sample_Size = 4
Record_Bytes = Record_Size * Sample_Size * (Channel_Count + DIO_Reporting)
Record_Count = 268435456 / Record_Bytes
where: Channel_Count 0-16 (number of channels enabled)
Record_Size 1-65527 (number of samples per record)
DIO_Reporting 0 or 1 (1 – YES, 0 – NO)
Regardless of the RecordSize, each channel’s circular buffer is then truncated to make its total size
evenly divisible by 4096.
Record_Count sizes for some typical configurations are the following:
Channel_Count
DIO_Reporting
Record Size
Record Count
1 0 1024
65536 0 1
1024
65536 8 0
1024
8192
16 0 1024
4096
16 0 4096
1024
16 0 1
4194304
16 1 1024
3852
16 1 4096
963
TABLE 3-6: EXAMPLE RECORD COUNT SIZES
If the circular buffer fills to the point that it would overwrite a record marked for retrieval by a
trigger before it has been read out, the instrument will abort the acquisition and return to the Idle
state.
NOTE The reading buffer memory is volatile and is cleared upon an instrument reset or power cycle.
RETRIEVING DATA
Acquisition data can be retrieved from the EX1401 with any of three methods. First, it can be
manually read out of the instrument’s FIFO sometime after it is measured. This method is the
simplest, but runs the risk of aborting the measurement early if the data is not retrieved before the
256MB circular buffer is filled. The data can also be streamed to one or more endpoints. Streaming
endpoints can include one instrument driver session and any number of attached USB storage
devices. When streaming to the instrument driver is enabled, the instrument will send binary
encoded data directly to the driver as soon as it becomes available. The instrument driver can then
either buffer the data in PC memory for retrieval at the user’s convenience, save the data directly to
hard disk, or call a user callback with the new data. When a USB storage device is enabled for
Page 45

www.vtiinstruments.com
EX1401 Basic Operation 45
streaming data, the data will be written directly to the device as soon as it becomes available in the
HDF5 file format.
In either case, retrieved data is fully calibrated and compensated by the EX1401 and output directly
in the requested units. No post-acquisition user manipulations are required. In order to provide the
maximum reading buffer capacity for future acquisitions, data is deleted from the FIFO memory
upon retrieval.
Applications may retrieve data from this FIFO using either the Read FIFO or Streaming Data
interfaces. Please refer to Data Acquisition in Section 5 for further details. Once data is retrieved
from the FIFO, via any method, it is no longer kept within the FIFO.
USER-DEFINED CONVERSIONS
The EX1401 nominally accepts standard thermocouple types and performs its thermocouple
calculations using polynomial coefficients from the NIST ITS-90 Thermocouple Database. In some
applications, however, a user may want to override the embedded coefficients with a user-defined
coefficient set. One reason to do this is if the transfer function of the specific thermocouple being
used has been completely characterized to an accuracy level that exceeds standard thermocouple
limits of error. Another reason to do this is if a non-standard thermocouple is used. One unique set
of coefficients can be entered for each channel. Specifically, the use of custom thermocouple
equations requires the user to know or generate the coefficients for two conversion polynomials.
The forward conversion polynomial is used to convert a CJC temperature into a compensating cold
junction voltage and has the form of:
12
12
2
2
1
10
*** tctctccE ++++=
where E is in volts, t is in ºC, and c0 - c12 are the coefficients.
The inverse conversion polynomial is used to convert a compensated input voltage into temperature
and has the form of:
12
12
2
2
1
10
*** EdEdEddt ++++=
where E is in volts, t is in ºC, and d0 - d12 are the coefficients.
The default values for the coefficients are [0.0, 1.0].
NOTE The entry of user-defined coefficients does not automatically enable their use. The enabling is done
by setting the Thermocouple Type to “Custom”.
LCD DISPLAY
The display on the rear side of EX1401 is a 20 x 2 backlit LCD. It can display several screens that
can be cycled through using the Menu button. Some screens allow you to initiate an action. This is
done by holding the menu button in for several seconds. A countdown of remaining seconds is
shown while the button is pressed. The action is activated on release of the menu button; releasing
before the countdown completes will cancel the action. Screens with actions are LAN Reset, SelfTest, USB Eject, and USB Data Logging.
Hostname
Hostname
EX1401-681514_______
Page 46
VTI Instruments Corp.
46 EX1401 Basic Operation
IPv4 Address
IPv4 Address********
10.87.37.24_______
If the device does not have an IPv4 address, the display will show “Network unavailable” instead
of the IPv4 address.
IPv4 Address********
Network unavailable
IPv6 Addresses
The IPv6 address screens show one or two addresses on two or three screens. Because an IPv6
address is too large to fit on a screen the addresses are split between the HostID, which is the lower
64-bits, and the Subnet, which is the upper-64 bits. If the device does not have a global IPv6 address,
it will show as “Network unavailable”. If IPv6 is disabled, then all IPV6 screens will show “Network
unavailable”. Note that the HostID portion is common to both the Local and Global addresses and
so is only displayed once.
IPv6 Local Subnet
fe80:0000:0000:0000*
IPv6 HostID
020d:3fff:fe01:1f9c*
IPv6 Global Subnet*
Network unavailable
MAC Address
MAC Address
00:0d:3f:01:1f:9c
LAN Reset
LAN Config Reset
Hold MENU to reset
Page 47
www.vtiinstruments.com
EX1401 Basic Operation 47
Self-Test
Self Test
Hold MENU to start
The results of the self-test will show “Passed” or “Failed”. Use the web interface for detailed results
of the last self-test.
Self Test
Passed
USB
USB at sda1
SP UFD U3
USB at sda1
Safe to remove
A USB device screen shows both the unique device name and the volume label. Holding the Menu
button on a USB device screen will safely eject the device.
Data Logger: sda1
SP UFD U3
Each USB device also has a screen for use as a Data Logger. Holding the Menu button on this screen
will cause the instrument to load a stored configuration file from the USB device and start a
measurement. If the stored configuration file specifies, measured data may also be saved to the USB
device during a Data Logger measurement. While a Data Logger measurement is in progress, a
status screen will be displayed.
Meas 10 recs
15% Trigs 1:42m
The status screen shows four items: Measurement State, Acquired Records, Completed Triggers,
and Trigger Time Remaining.
• Measurement State: This indicates the current state of the measurement’s trigger state
machine. Possible values are:
o Idle: Not running
o Settle: Waiting for digital filters to settle
o Start: Waiting for the configured Start event to occur
o ArmWait: Waiting for the configured Arm event to occur
o TrigWait: Waiting for the configured Trigger event to occur
o PreTrig: Waiting for pre-trigger samples to be buffered
o Meas: Measuring data after a trigger
• Acquired Records: The number of records measured so far this measurement.
• Completed Triggers: If Trigger Count is finite, the percentage of total triggers completed
so far. If infinite, the number of triggers completed.
Page 48

VTI Instruments Corp.
48 EX1401 Basic Operation
• Trigger Time Remaining: The amount of time remaining until the current trigger’s data
collection phase is complete. This is only displayed when Measurement State is Meas.
USB MEMORY DEVICES
The EX1401 provides a single USB 2.0 port on its rear panel. Any USB 2.0 or earlier compatible
memory device can be attached. A USB hub may also be used to attach many USB memory devices
at the same time. For more information, related to standalone data logging and USB memory device
configuration, please refer to Operation of Data Logger in Section 6
Storage Devices APIs
The Instrument Driver includes a repeated capability exposing all attached USB memory devices at
Storage.Devices. If any devices are attached or removed after initializing the instrument driver, the
Storage.Devices.Update method will refresh the list. The Enabled parameter of each Storage Device
item controls whether data will be saved to the storage device during measurement. The other
properties allow querying information about the storage device and configuring the filename and
other parameters about how data is saved.
All data stored to USB storage devices is written in HDF5 format, identical to that used by the Disk
Streaming feature of the Instrument Driver. Files generated by either method can be read by the
same software in the same way.
Stored Configurations
The EX1401 has the ability to store its configuration parameters as a JSON file on any attached
USB memory device. This configuration file can then be loaded via the instrument driver at a later
date, in order to restore the precise configuration at the time of saving. This configuration file is
also used when a Data Logger measurement is performed via the instrument’s rear-panel LCD
display. Use the Instrument Driver’s Configuration.SaveConfigurationToStorageDevice,
Configuration.LoadConfigurationFromStorageDevice,
Configuration.ClearConfigurationFromStorageDevice, and
Configuration.GetConfigurationDigestFromStorageDevice APIs to access the configuration file.
Each of these APIs takes the Storage Devices repeated capability name as an argument.
Data Logging
The Storage Devices APIs and Stored Configurations features, along with the rear-panel LCD
display, enable the EX1401 to act as a stand-alone Data Logger device.
To make use of stand-alone data logging with a USB memory device, the instrument should first be
configured using the Soft Front Panel or Instrument Driver for the desired measurement parameters.
This includes using the Storage.Devices APIs to enabling saving data to the USB device, if desired.
The Configuration.SaveConfigurationToStorageDevice method should then be called to save the
desired measurement configuration to the USB device. The USB device can then be inserted into
any EX1401 and used to perform the configured measurement via the rear-panel LCD display. For
more information on using the LCD display for Data Logging, see Operation of Data Logger in
Section 6.
Page 49
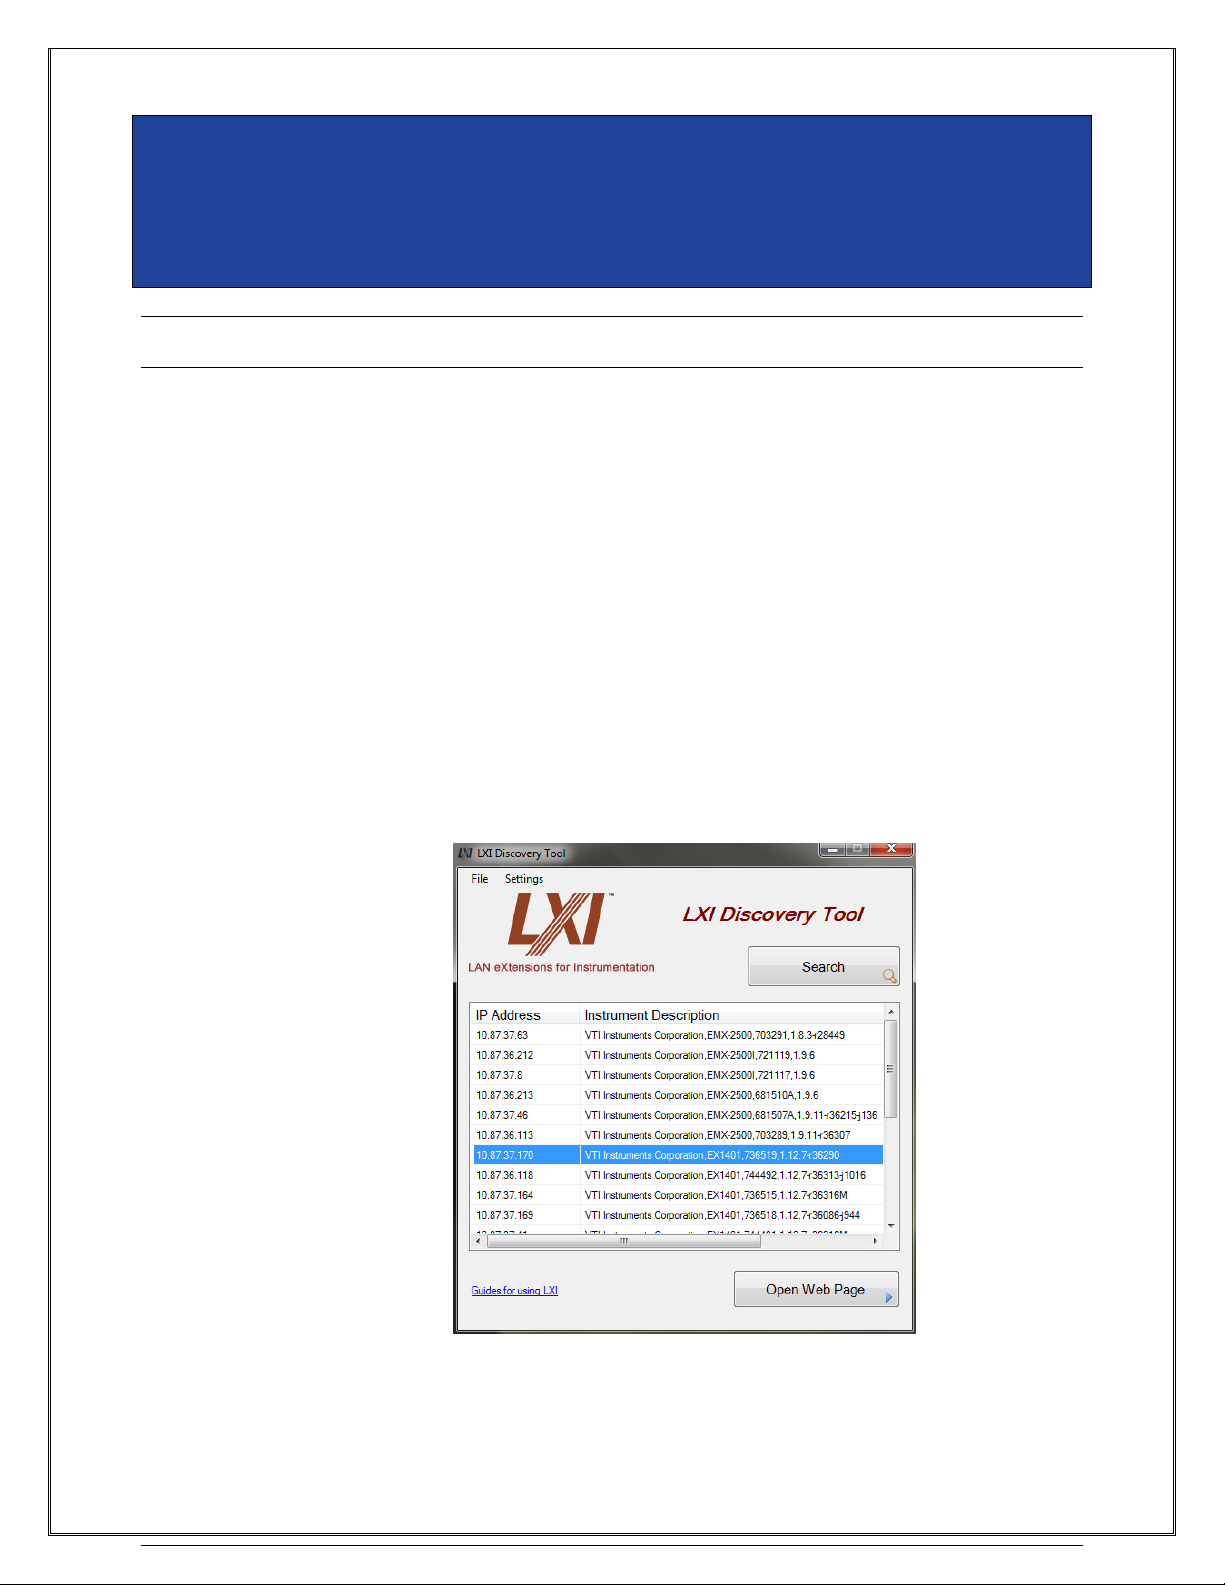
www.vtiinstruments.com
EX1401 Web Page Operation 49
SECTION 4
WEB PAGE OPERATION
INTRODUCTION
The EX1401 instrument hosts an internal web page, which allows easy configuration, management
and troubleshooting of the device. This internal Soft Front Panel (SFP) is a JavaScript based
application which is designed to work within any modern web browser. It can be accessed by typing
the instrument IP address or hostname into the browser address bar.
There are several methods to determine the instrument IP address, hostname, and other network
settings. The simplest option is to refer to the display on the rear of the device and use the menu
button to navigate between pages. If the device display is not physically accessible, the instrument
can be discovered using the LXI Discovery tool, National Instruments Measurement and
Automation Explorer (MAX), or Keysight (formerly Agilent) Connection Expert (ACE). The
EX1401 also supports the mDNS protocol; any tool for Zero Configuration networking, such as
Apple ® Bonjour ® or Avahi, can also be used to discover the instrument. For more information on
installation of these software utilities, please refer to their respective vendors.
The LXI Discovery tool is a free utility, available for download from the LXI Consortium. It uses
the VXI-11 and mDNS protocols to detect any LXI instruments present on the network. Once
installed, this software will discover EX1401 instruments, if available, as shown below.
FIGURE 4-1: LXI DISCOVERY TOOL WITH EX1401 SELECTED
Alternatively, the EX1401 may also be discovered using Internet Explorer’s Bonjour for Windows
plug-in. By default, the EX1401 will first attempt to use DHCP to set its IP Address. If DHCP is not
Page 50
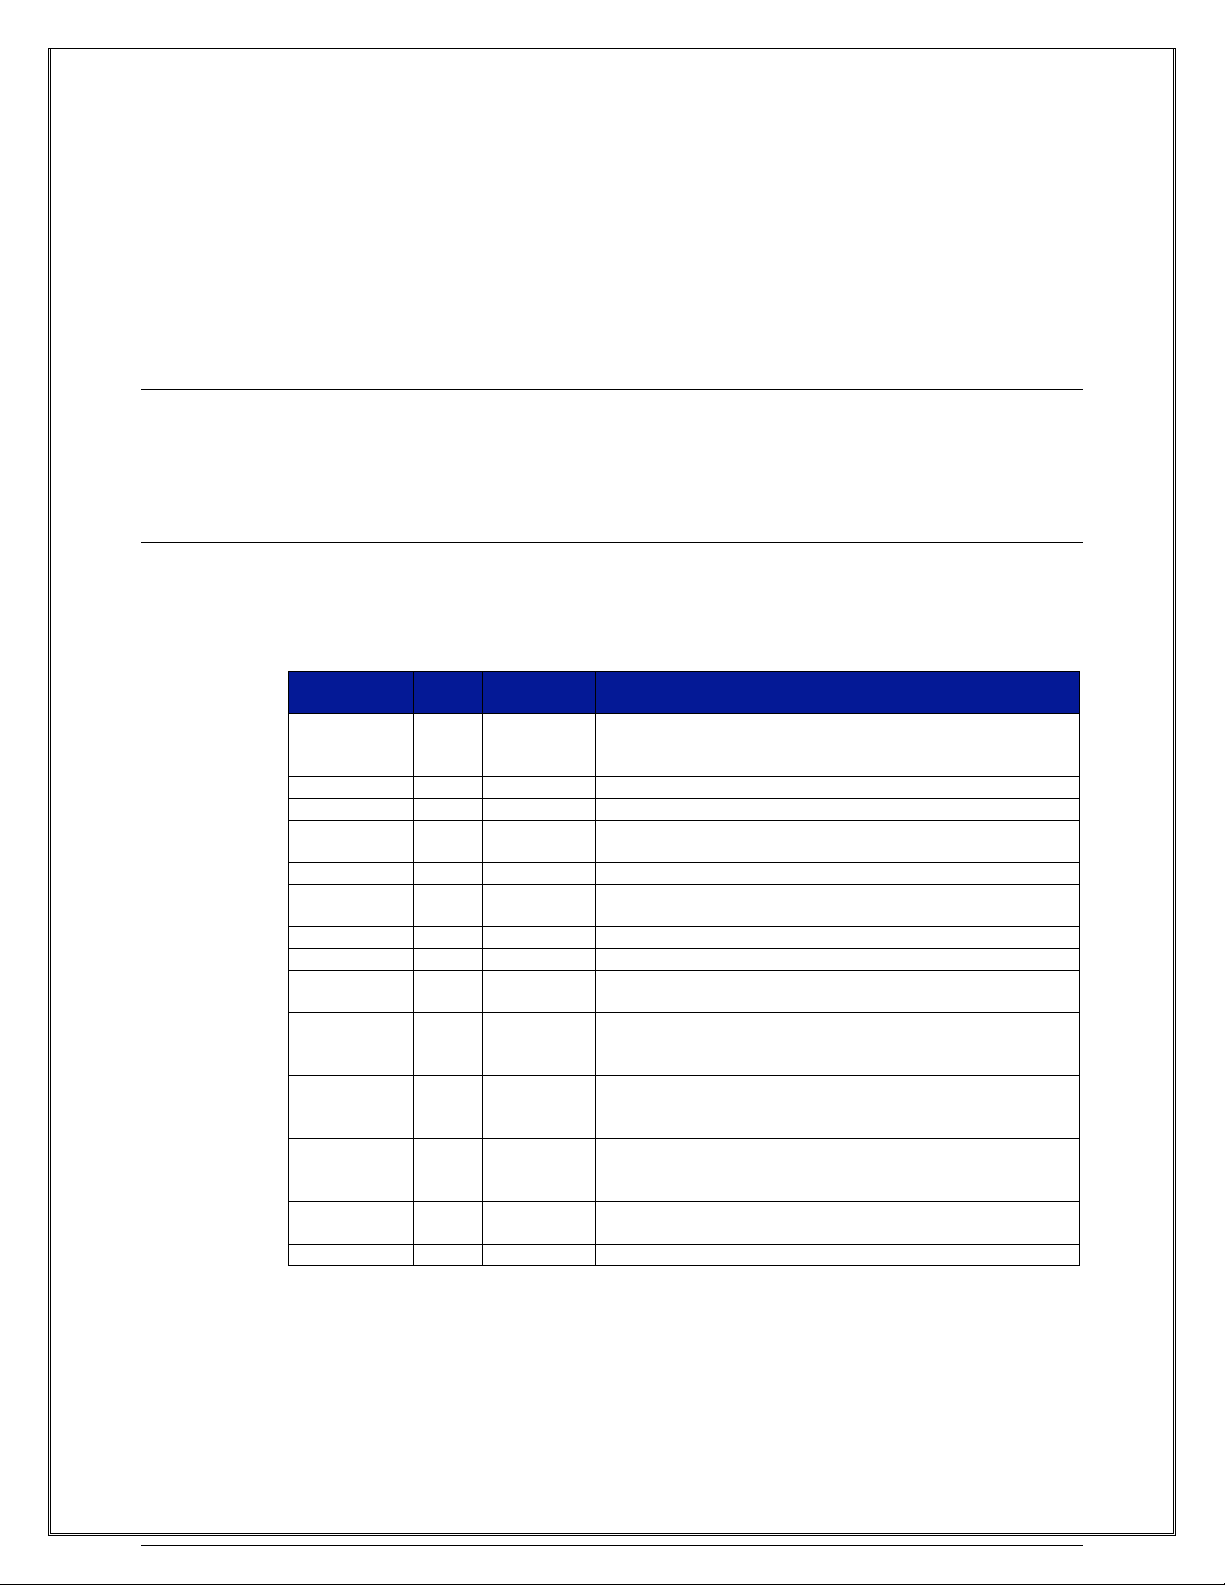
VTI Instruments Corp.
50 EX1401 Web Page Operation
available on the network it is connected to, it will instead use Auto IP. Determining the Auto IP
address is discussed in the Network Configuration portion of Section 2. Other discovery methods,
such as VXI-11, can be used as well.
COMMON ISSUES
Certain networking issues may prevent instrument discovery, such as connecting the instrument and
host computer to different sub-nets. You may need to contact your network administrator for
assistance with these issues. This section describes possible solutions for other common issues.
Multiple Network Ports
Your computer may have multiple physical or virtual network adaptors. For example, a laptop may
have wi-fi enabled as well as a wired Ethernet connection to the network containing the LXI device.
Some applications also create virtual network adaptors. To resolve this problem, disable all other
network adaptors to force the computer to select the network used by the instrument.
Firewall
A firewall may block some or all network traffic between your computer and the LXI device.
Contact your network administer for assistance with creating exceptions in the firewall
configuration to communication with the instrument. See the table below for a list of ports and
protocols typically used by the EX1401 and other LXI devices.
Protocol /
Service
Port
Base
Protocol
Remarks
mDNS
5353
UDP/TCP
Zero-config protocol for
<hostname>.local address resolution; service discovery;
Multicast 224.0.0251, FF02::FB
HTTP
80
TCP
Instrument web pages (SFP) and driver communication
ICMPv4
ICMP
Typically enables echo request/respond for ping
ICMPv6
ICMP
Optional - Typically enables echo request/respond for ping, also
SLAAC for IPv6 addresses, RDDNS
Arp Arp
Used to confirm address assignments
DHCPv4
67/68
UDP/TCP
IPv4 address assignment, DNS Server, Dynamic DNS,
Gateway
DNS
53
UDP
Naming service
SSH
22
TCP
Bidirectional interactive text oriented communication
RPC portmapper
111
UDP/TCP
Builds upon Sun-RPC and port-mapper
VXI-11
Varies
TCP
VXI-11 instrument discovery
The exact port number varies; query the RPC port-mapper to
determine which port is current in use
LXI-eventsvc
5044
UDP/TCP
LXI Event support for instrument triggering; multicast
224.0.23.159, FF02::138. LXI Events can use other ports also,
but default port number is 5044
Ptp-event
319
UDP/TCP
LXI Profile IEEE 1588
Precision Time Protocol (PTP);
multicast 224.0.1.129, FF02::181
Ptp-general
320
UDP/TCP
LXI Profile IEEE 1588 Precision Time Protocol (PTP);
multicast 224.0.1.129, FF02::181
Data stream
9900
TCP
Driver data stream
TABLE 4-1: STANDARD PORTS, PROTOCOLS, AND SERVICES
GENERAL WEB PAGE OPERATION
When initial connection is made to the EX1401, the instrument home page, or Index, appears. This
page displays instrument-specific information. This page is accessible from any other instrument
page by clicking on the EX1401 web page header. The EX1401 Navigation Menu is displayed on
Page 51

www.vtiinstruments.com
EX1401 Web Page Operation 51
the left-hand side of every internal web page. The entries on the Navigation Menu represent two
types of pages:
Status: These pages perform no actions and accept no entries. It provides operational status and
information only. The Index page is an example of a status page.
Entry: These pages display and accept changes to the configuration of the instrument. The Network
Configuration page is an example of an entry page. Use of the entry-type web pages in the EX1401
are governed by a common set of operational characteristics:
• Pages initially load with the currently-entered selections displayed.
• Each page contains a Submit button to accept newly entered changes. Leaving a page
before submitting any changes has the effect of canceling the changes, leaving the
instrument in its original state.
• Navigation through a parameter screen is done with the Tab key. The Enter key has
the same function as clicking the Submit button and cannot be used for navigation.
Page 52
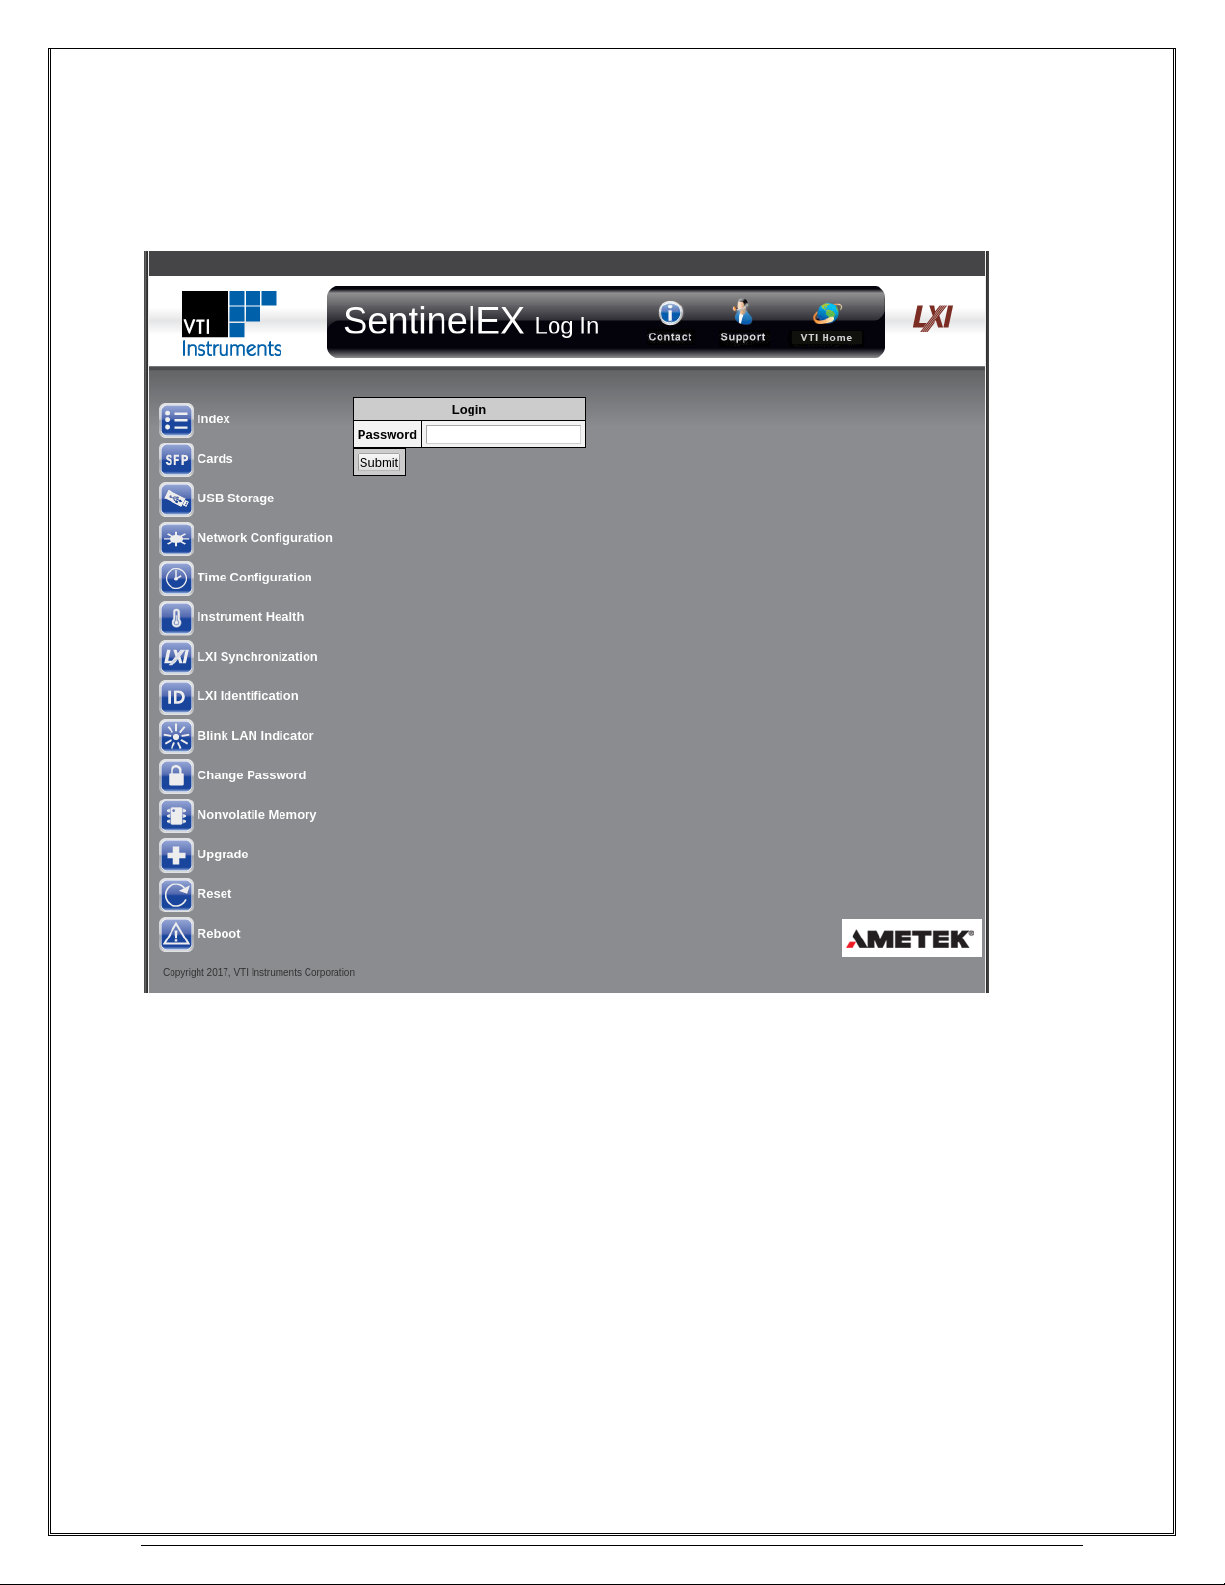
VTI Instruments Corp.
52 EX1401 Web Page Operation
LOGIN
When accessing a page that allows changing configuration parameters of the EX1401, a password
may be required. If so, the Login page will appear.
To log in, simply enter the password in the given text field, and press the Submit button. By default,
the EX1401 has no password. To change the password, visit the Change Password page. If the
password is unknown, performing a network reset operation will reset the EX1401 to no password.
Page 53
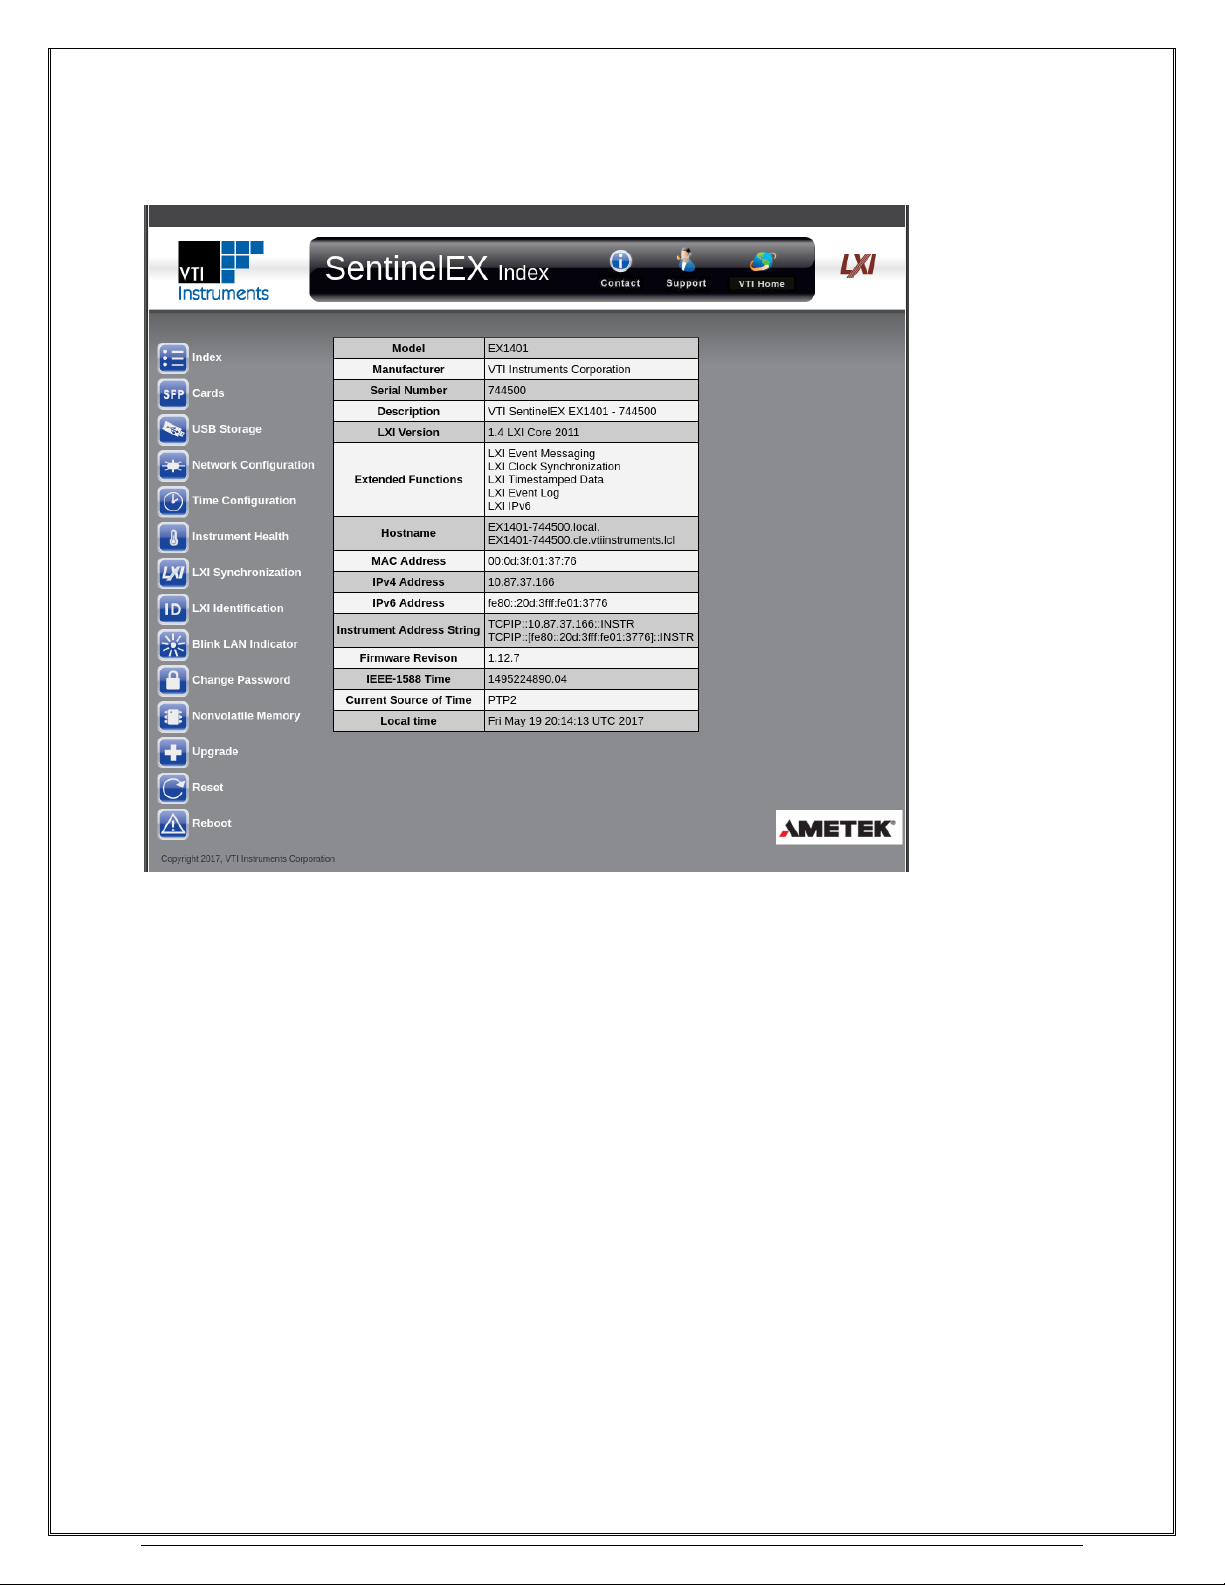
www.vtiinstruments.com
EX1401 Web Page Operation 53
INDEX
The Index page provides the general information about the EX1401.
• Model: The model number of the module.
• Manufacturer: The module manufacturer.
• Serial Number: The module’s serial number.
• Description: A brief, user-configurable description of the module.
• LXI Version: Indicates which version of the LXI specification the module conforms to.
• Extended Functions: Indicates which LXI Extended functions are supported.
• Hostname: Indicates the Full Qualified Domain Names of the module. The first part of
each FQDN is the user-configured hostname.
• MAC Address: Indicates the factory-assigned MAC address of the module.
• IPv4 Address: Indicate the current IPv4 address of the module.
• IPv6 Address: Indicates the current IPv6 address(es) of the module.
• Instrument Address String: Indicates the resource string(s) by which the module can be
accessed via its instrument driver.
• Firmware Revision: Indicates the current revision of the module’s firmware.
• IEEE-1588 Time: The current IEEE-1588 time.
• Current source of time: Indicates from which source the module is deriving its time.
• Local time: The module’s current time, as expressed in the currently configured time
zone.
Page 54
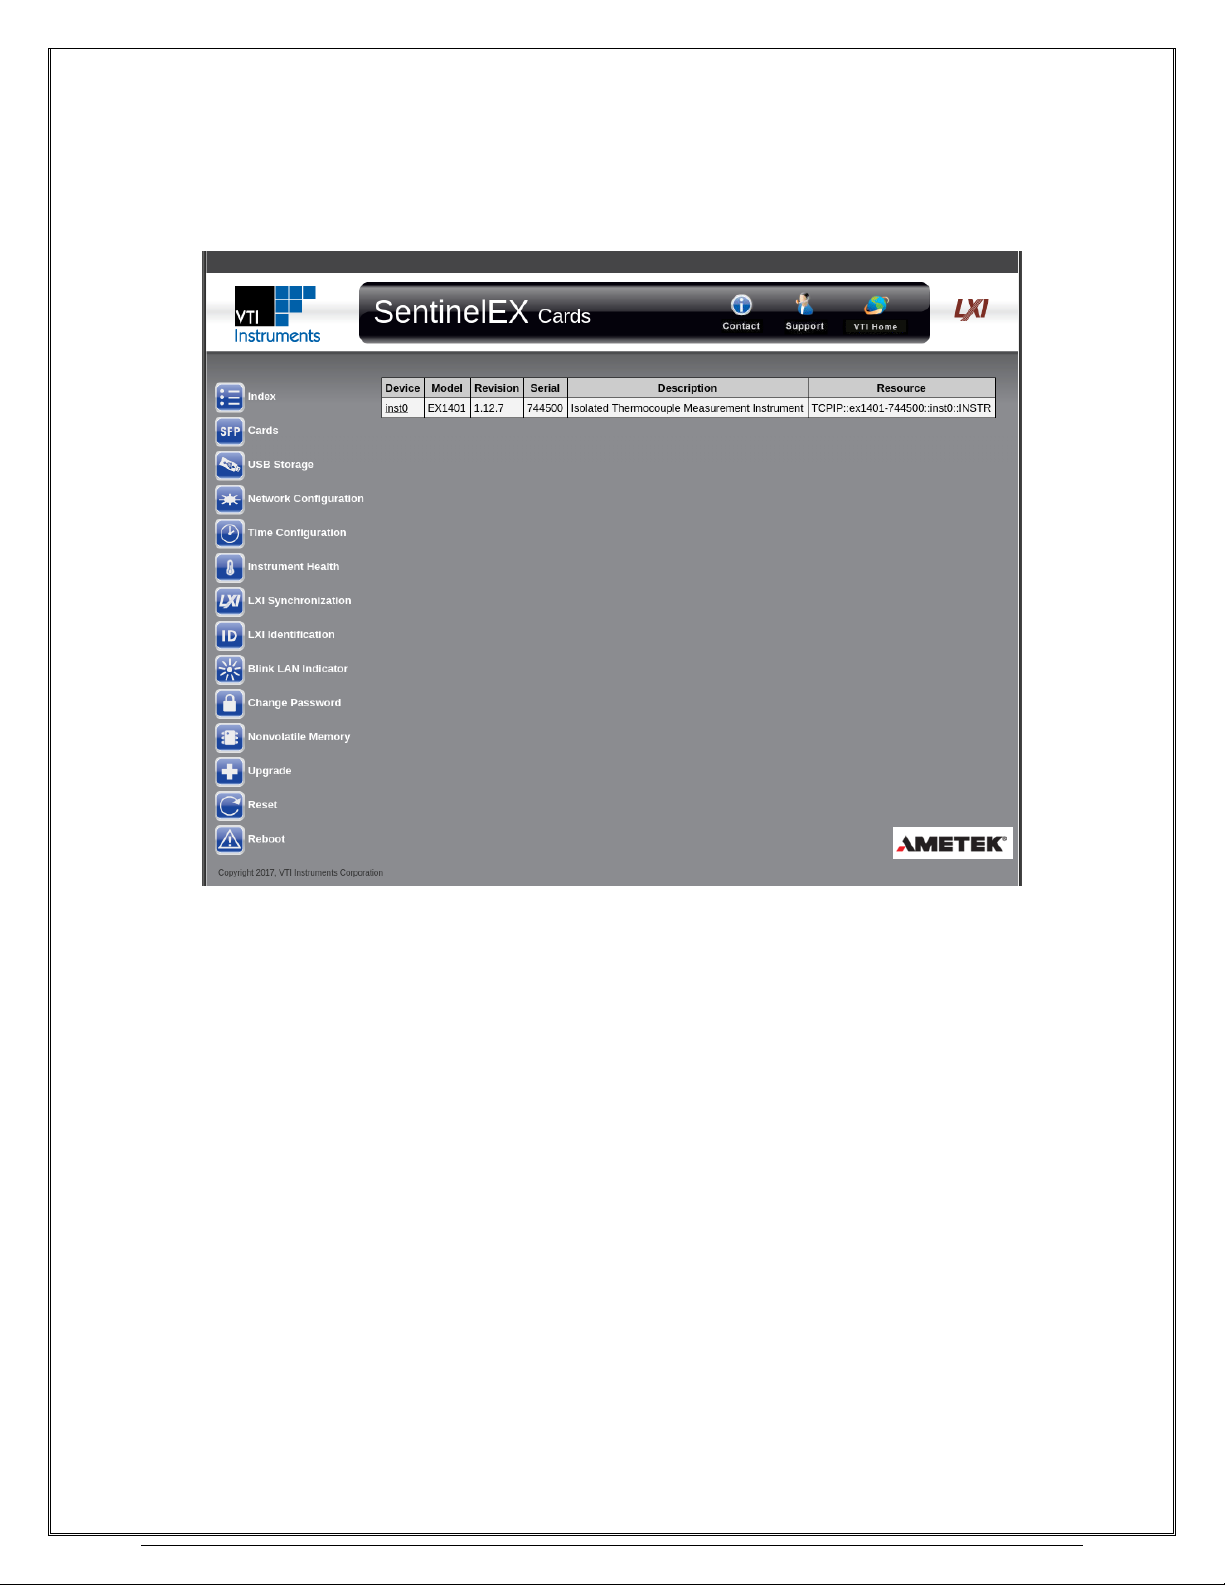
VTI Instruments Corp.
54 EX1401 Web Page Operation
CARDS
The Cards page lists all modules of the EX1401. Because the EX1401 is not a modular instrument,
this consists solely of one module: inst0.
The following information is provided for each module:
• Device: The bus and slot number of the module. Clicking on the name will launch the
instrument control Soft Front Panel.
• Model: The model number of the module.
• Revision: The firmware version of the module.
• Serial: The serial number of the module.
• Description: A brief description of the module.
• Resource: A resource string that can be used to access the module via its instrument
driver.
Page 55
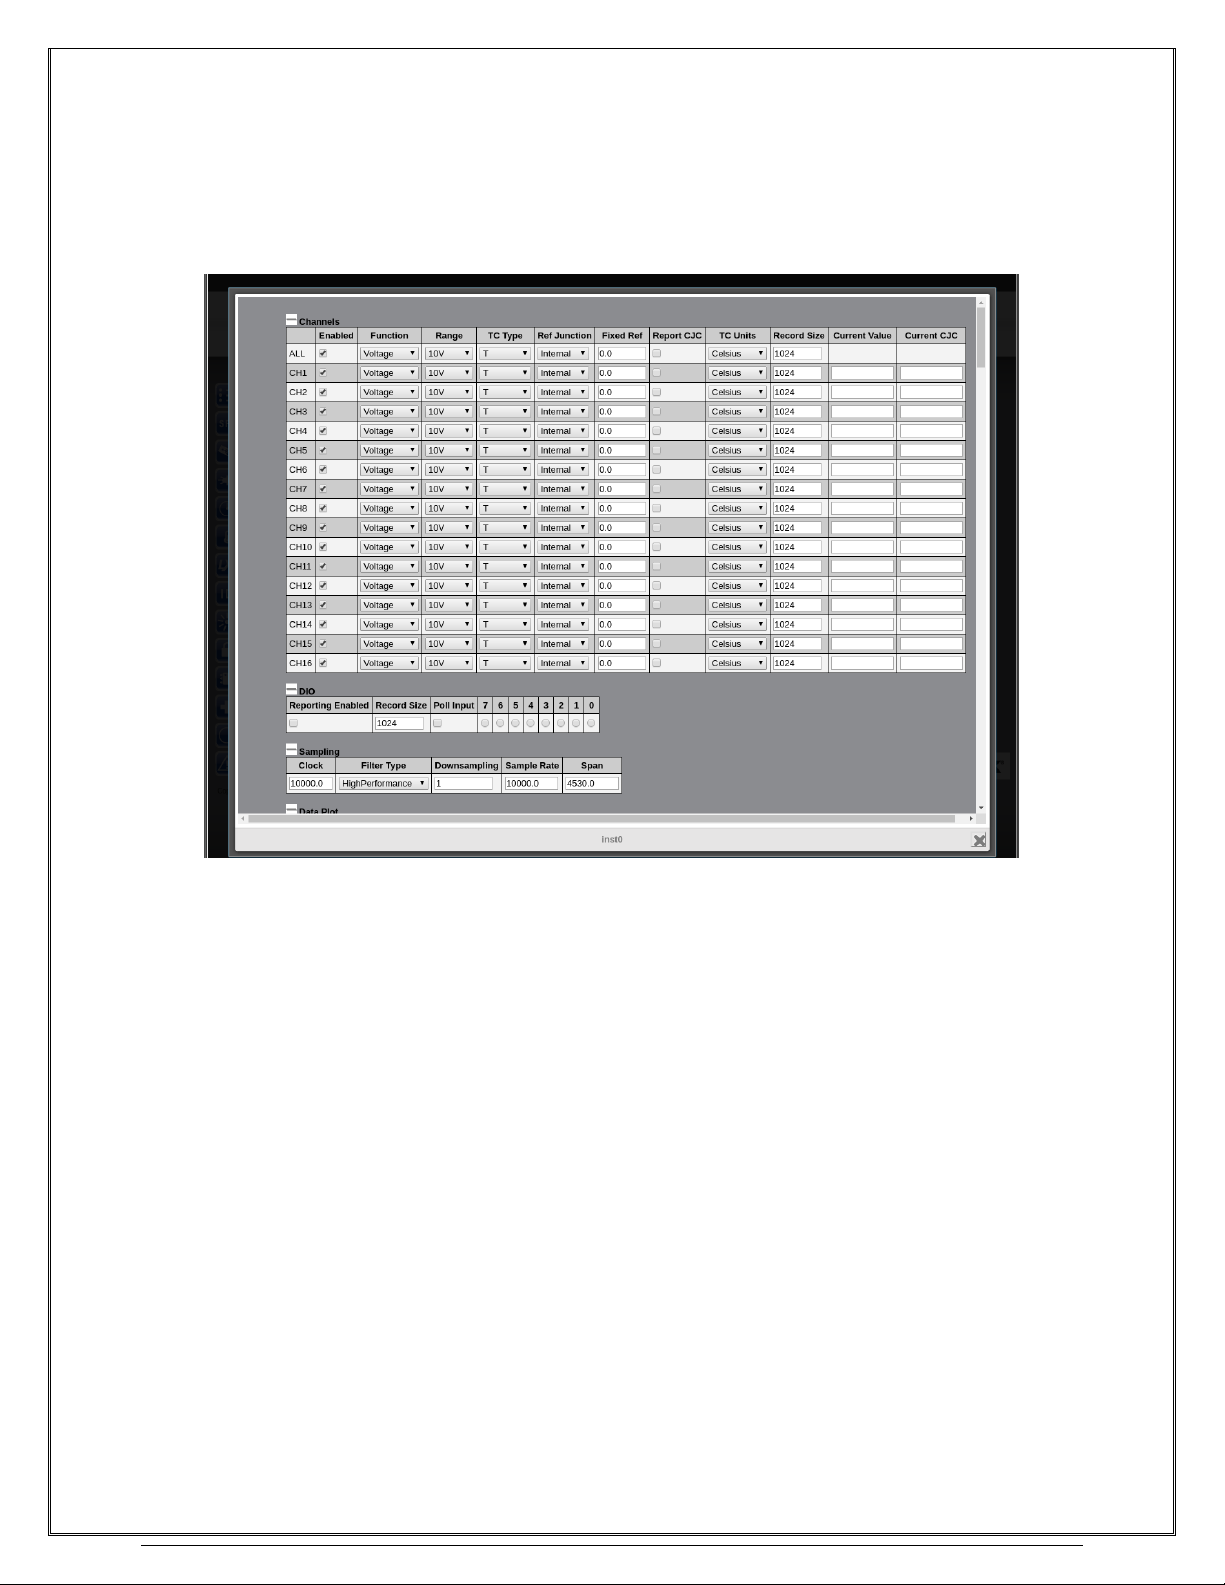
www.vtiinstruments.com
EX1401 Web Page Operation 55
SOFT FRONT PANEL
The Soft Front Panel popup allows configuration and control of the instrument. It includes access
to all firmware APIs exposed by the instrument driver and presents them via an AJAX-enabled web
page.
Most the Soft Front Panel’s fields correspond 1-to-1 with the APIs of the Instrument Driver. Refer
to the Driver Structure section for basic information on how to configure the instrument, which is
all applicable to the SFP as well.
Changing the value in most of the text entry, drop-down menu, and check box controls of the SFP
will cause your browser to send an HTTP PUT request to the instrument, changing the appropriate
setting. The browser will then immediately send a GET request for the same property, and update
the contents of the field with the result. This allows the SFP to keep up to date when the firmware
coerces or rejects a value. Some settings can also affect the value of other properties. When this
happens, the response to the HTTP PUT will include a cache invalidation header for those
properties, prompting the SFP to submit HTTP GET requests for those fields as well.
Some fields in the SFP (such as Overload Status, FIFO Records, and Time) are read-only. These
can be polled for updates by clicking on them. The firmware will submit a GET request for any
read-only field whenever it is clicked.
To begin a measurement in the SFP, click the “Initiate Measurement” button in the Measurement
section. While the measurement is running, the State, FIFO Records, and Acquired Records fields
will be updated up to 4 times per second, showing the state of the measurement. The “Current Value”
field of the Channels table (as well as “Current CJC” if “Report CJC” is checked) will also be
updated with the latest measured value from each enabled channel while the measurement is
running. If the DIO setting “Reporting Enabled” is checked, then the current input state of the DIO
port will also be updated during measurement in the “7” through “0” fields. Note that the data shown
Page 56

VTI Instruments Corp.
56 EX1401 Web Page Operation
under “Current Value” is not necessarily part of a record – it is simply the newest data in the
instrument’s circular buffer FIFO.
Any records in the instrument FIFO can be downloaded by clicking the “Download CSV” button in
the Measurement section. The “Download Records” field indicates how many records will be
removed from the FIFO and converted to CSV format for download. Checking the “All” box causes
the SFP to download all available records instead.
Measured data can also be plotted in the Data Plot section of the SFP. The following options are
available:
• Plot Type controls the plot’s mode of operation and has two options:
o Poll Current Value Table will plot each new data point that is polled from the
Current Value Table in real time, whenever a measurement is running. When
this mode is selected, the following parameters are available:
▪ CVT Polling Frequency (ms) controls the amount of time waited
between polling of the instrument’s measurement state and Current
Value Table. Valid values are from 100 to 10000 ms.
▪ Maximum CVT Points is the maximum number of Current Value
Table points to plot at one time. After this many points is reached, the
oldest will be removed from the plot whenever a new one is added.
Valid values are from 8 to 512.
o Download Records From FIFO allows records to be downloaded from the
instrument’s FIFO and plotted directly in the SFP. When this mode is selected,
the following buttons are available:
▪ Plot Next FIFO Record pops a record from the FIFO, downloads it,
and adds it to the current plot.
▪ Clear Plotted Records removes all currently plotted records. Because
all data is plotted on a common time-axis, adding data that was
acquired far apart in time can create a large gap in the plot. It is
recommended to clear the plot before adding more data if the next
record is not close in time to the already plotted data.
▪ Save Plotted Records downloads all currently plotted data in CSV
format.
• Draw Points controls whether a marker is drawn on each plotted data point, in addition
to the line. Turning this on is helpful with small data sets, but with large amounts of data,
it can slow down plotting significantly, as well making the plot itself less readable.
All channel data is plotted via a shared Y-axis, in the selected units for each channel, even if not all
channels are configured to use the same units. If Report CJC is enabled for any channels, the CJC
data is plotted on a separate Y-axis, which is placed to the right of the plot area.
The plot’s X-axis is always the time axis, in units of seconds. The values on the axis will always be
offset by the seconds portion of the first plotted point’s time value after clearing the plot (FIFO
mode) or starting a new measurement (CVT mode). The offset value will be displayed next to the
X-axis label. For instance, if the timestamp of the first plotted value is 34.567, the X-axis label will
read “Seconds (+34)” and the first plotted value will appear at 0.567 seconds on the plot. This allows
large IEEE 1588 time values to be plotted without crowding the X-axis tick labels.
Hovering the mouse pointer over any plotted point will pop up a message identifying the channel
name, as well as both the X- and Y-axis values for the point. X-axis values in this message are the
full offset-corrected values.
DIO data cannot be plotted via the SFP. But, if the DIO Reporting Enabled property is True, any
DIO records associated with plotted channel data records will be included in CSV data that is
downloaded via the Save Plotted Records button.
Page 57
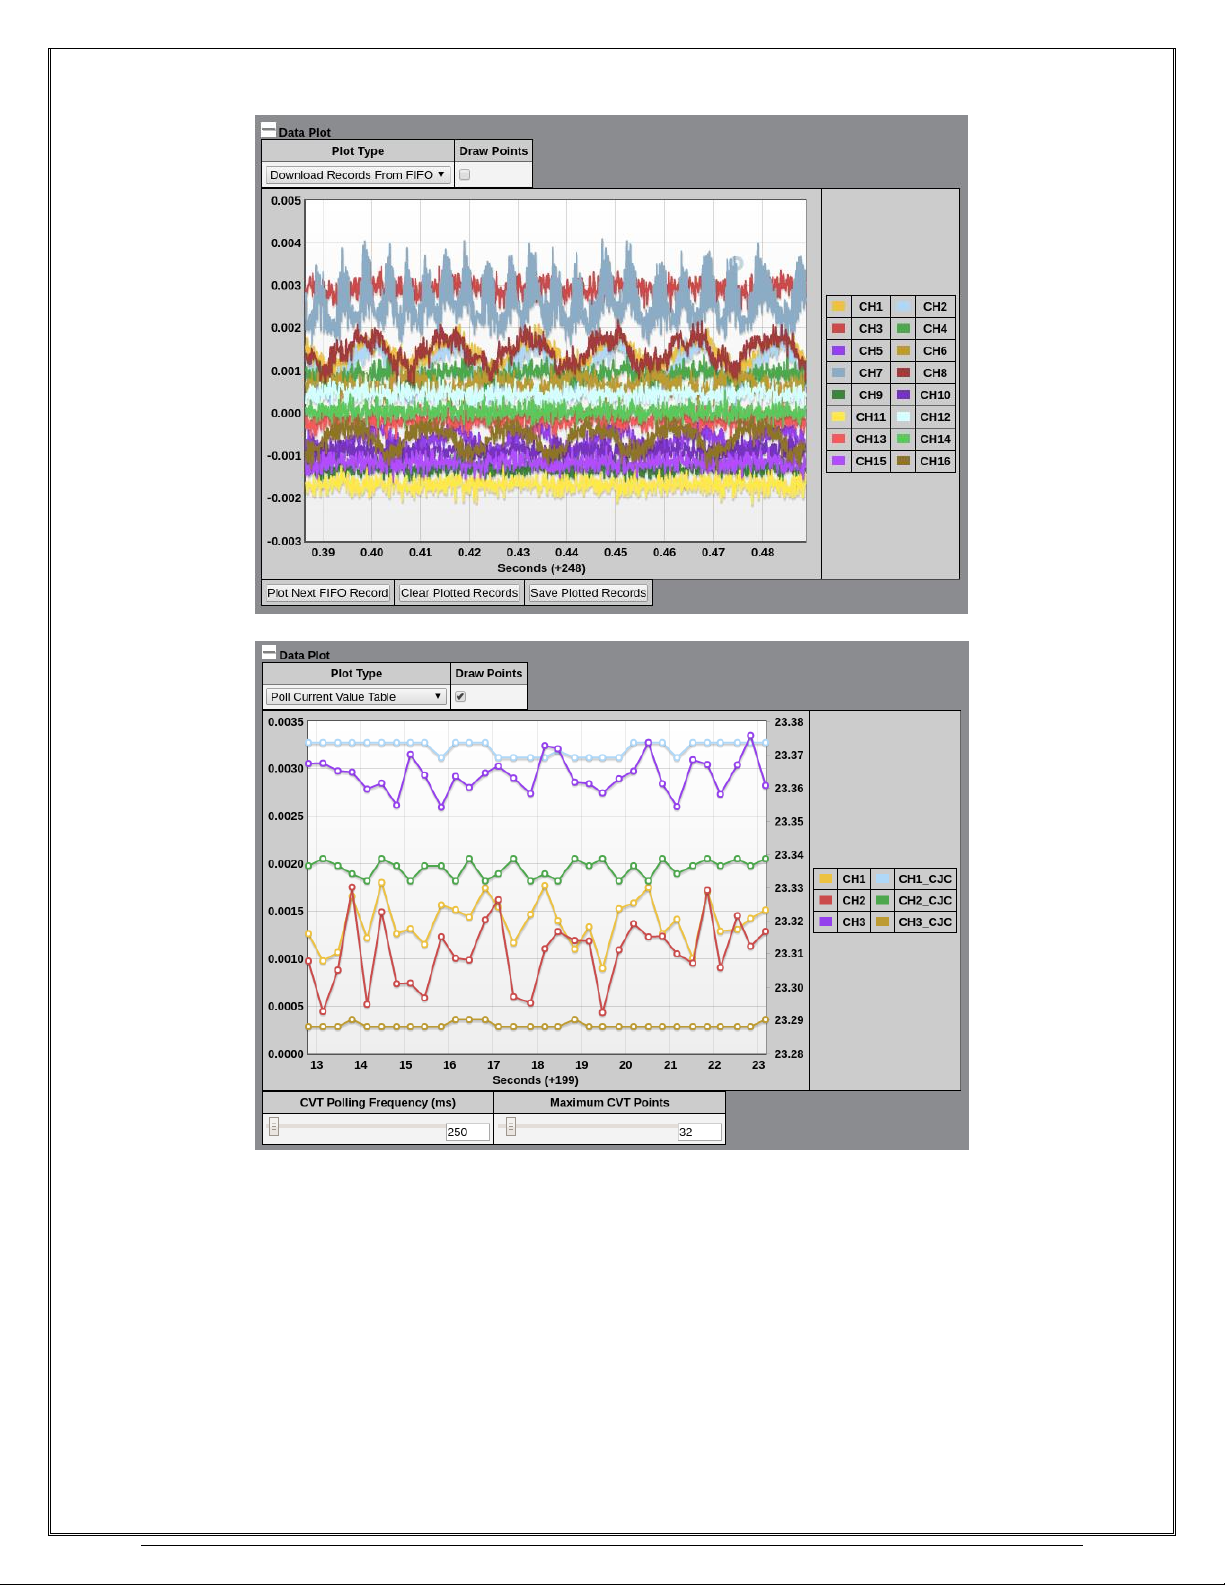
www.vtiinstruments.com
EX1401 Web Page Operation 57
Page 58
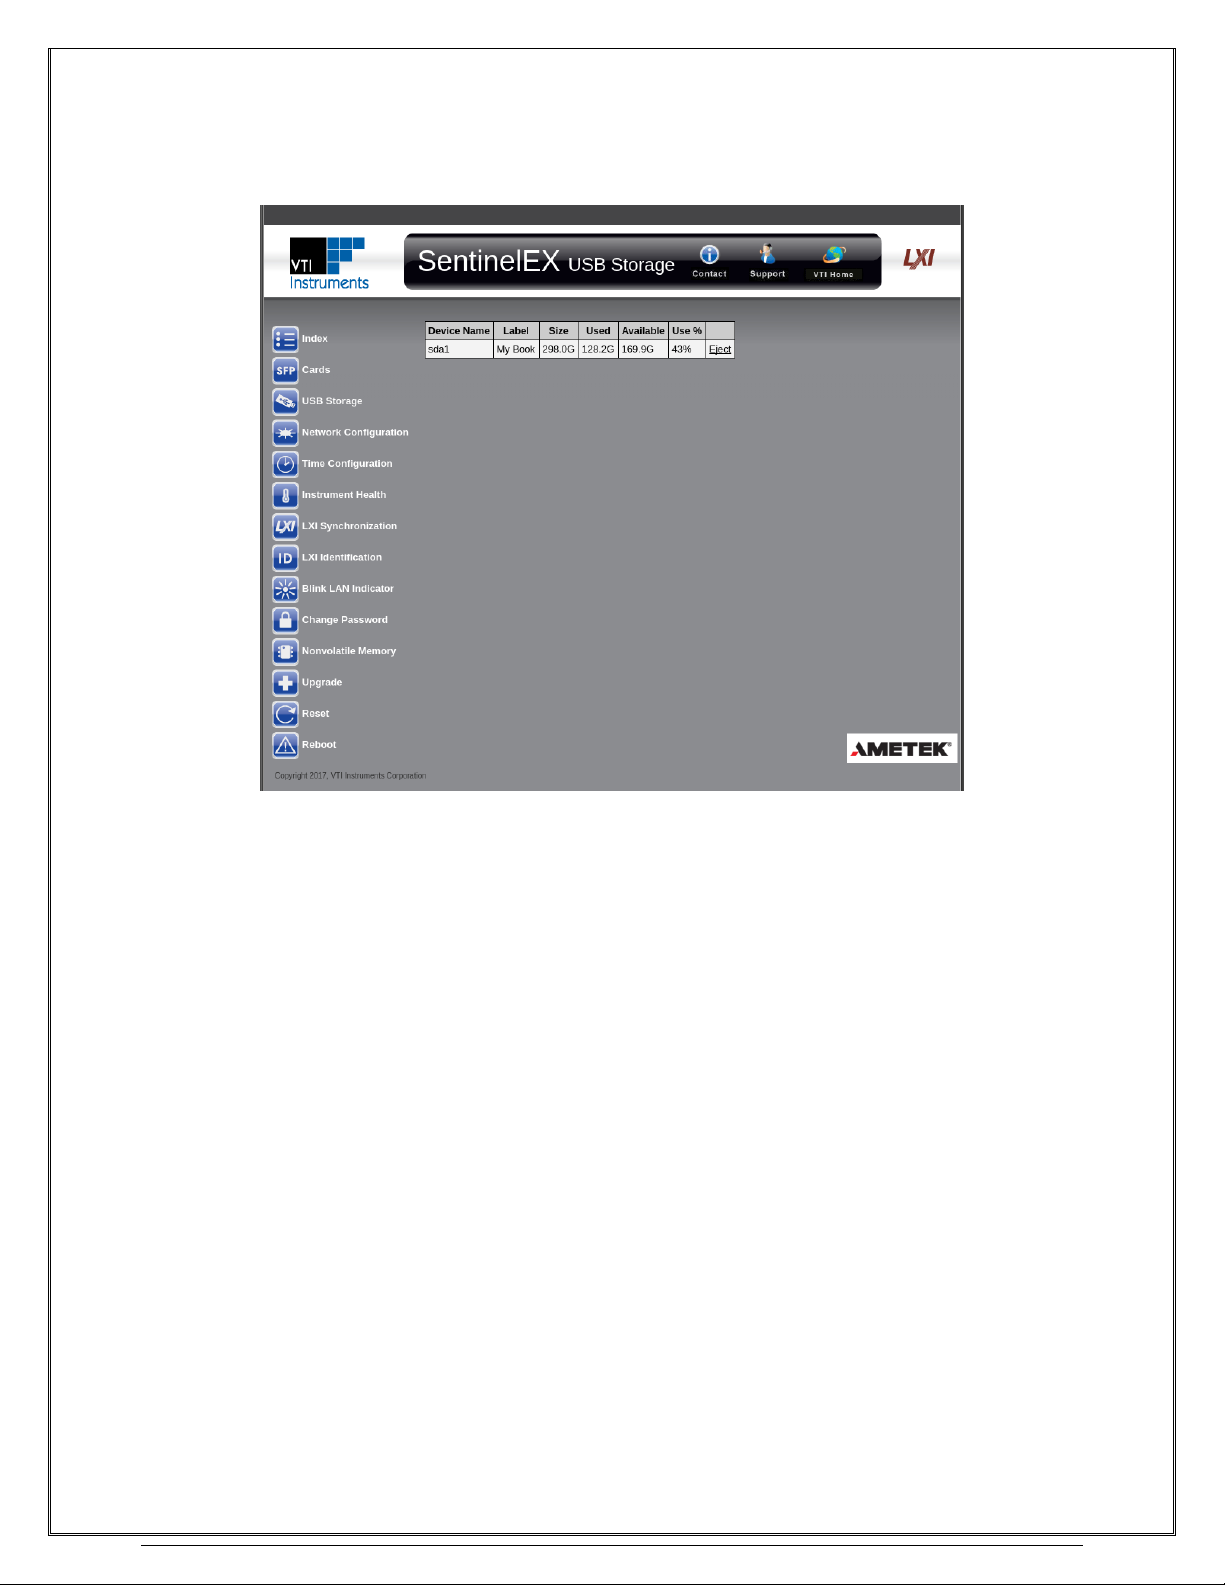
VTI Instruments Corp.
58 EX1401 Web Page Operation
USB STORAGE
The USB Storage page lists all USB storage devices connected to the instrument.
The following information is provided for each USB Storage device:
• Device Name: The unique name of the storage device.
• Label: The volume label.
• Size: The total amount of storage space available.
• Used: The amount of space used.
• Use %: The percentage of total space used.
Each device also includes an Eject link. Clicking this will cause the instrument to disconnect the
storage device so that it can be safely removed.
Page 59
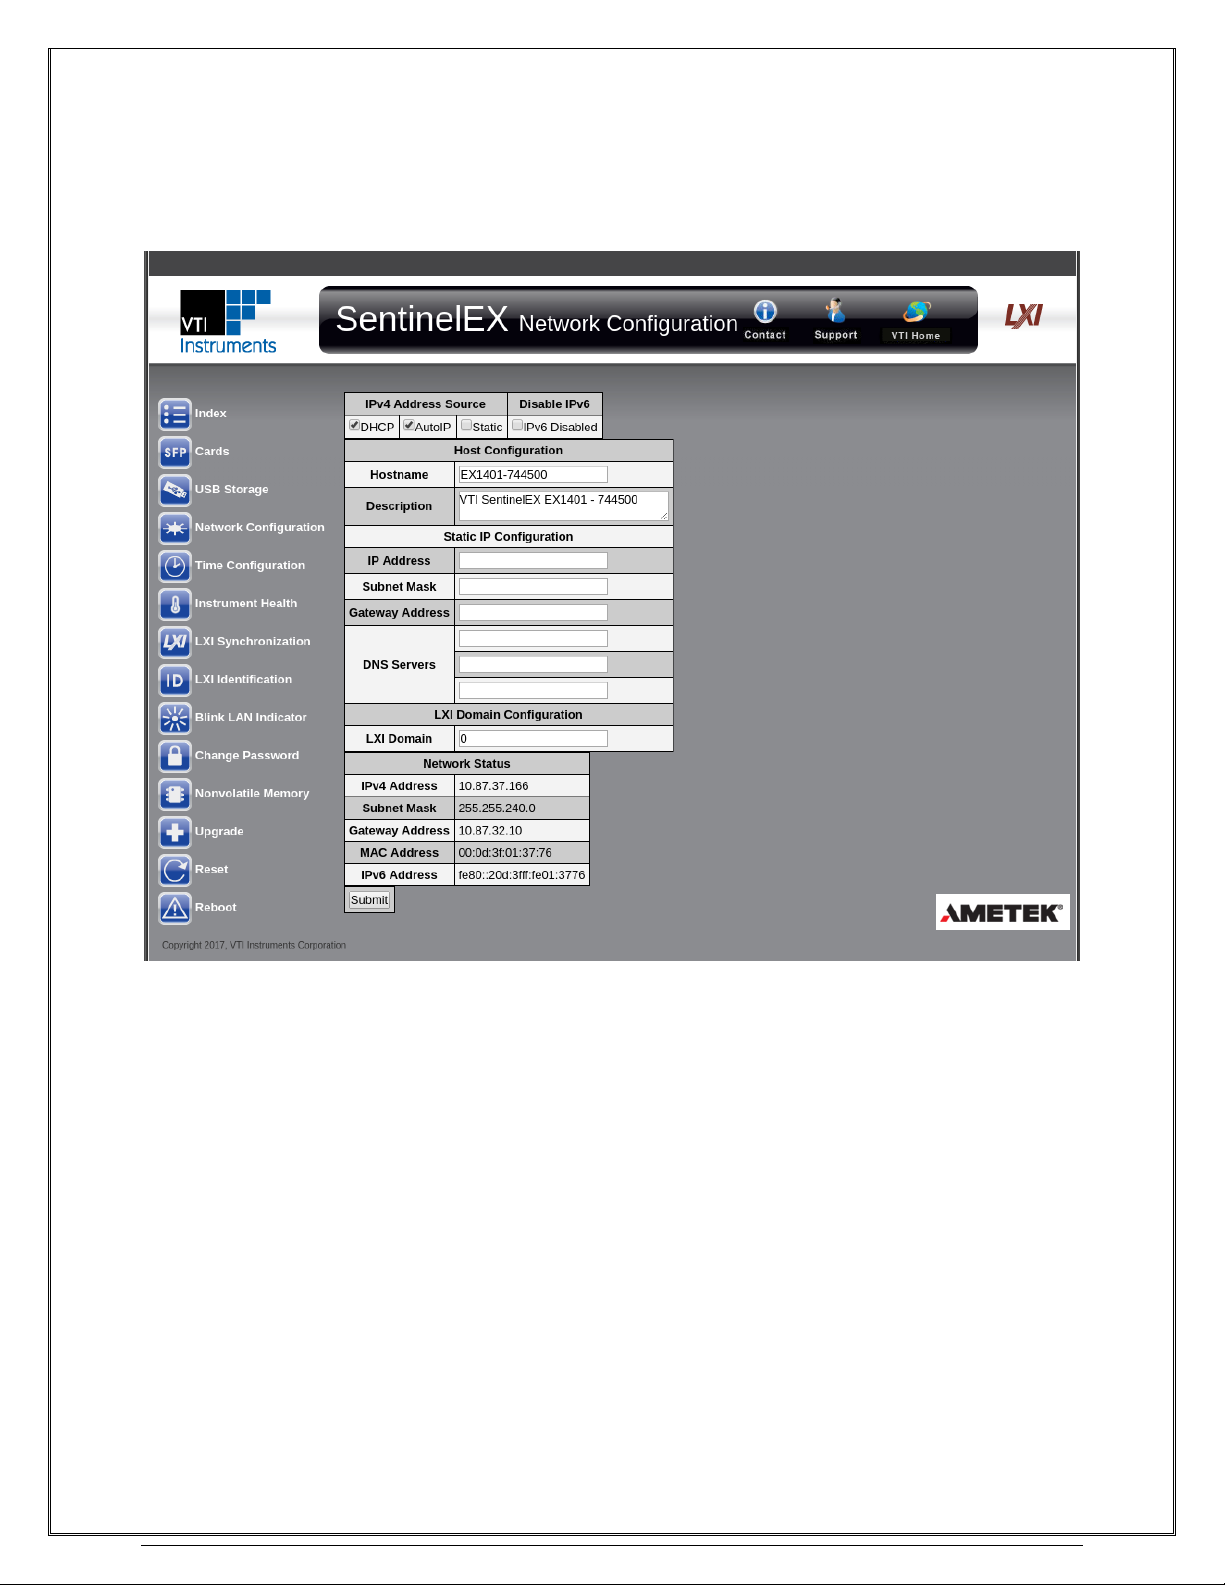
www.vtiinstruments.com
EX1401 Web Page Operation 59
NETWORK CONFIGURATION
The Network Configuration Page contains information concerning the configuration of the
EX1401’s network interfaces and provides the ability to modify it.
• IPv4 Address Source: The IPv4 address for the EX1401 is determined by one of three
sequenced mechanisms: DHCP → AutoIP → Static. If an IP address cannot be obtained
with the first mechanism, it will progress to the next method. The user also has the ability
to enable or disable either of these methods by utilizing the adjacent checkboxes.
o DHCP: A protocol that obtains an IP address automatically if the EX1401 is
connected to a network with a DHCP server. By default, the EX1401 will
attempt to locate a DHCP server. If one is found, the IP address assigned by the
DHCP server will be assumed. Otherwise, after a timeout of 20 seconds, the unit
will attempt to obtain an IP address by using AutoIP.
o AutoIP: A protocol that automatically creates a link-local IP address based on
theEX1401’s MAC address. If the IP address created is not available on a
network, another IP will be chosen randomly.
o Static: A user-configured IP address which remains constant. Both DHCP and
AutoIP generated IP addresses may change after a reset condition.
• Disable IPv6: When checked, IPv6 addressing will be disabled, and the EX1401 will
only be accessible via IPv4.
• Hostname: Indicates a name which other devices may use to communicate with the
EX1401 instead of using its IP address. When mDNS service discovery is used, the host
Page 60

VTI Instruments Corp.
60 EX1401 Web Page Operation
name for the unit will appear. The default hostname is “EX1401-[serial number]”. To
reset the hostname to the factory default, delete the current value and submit the page
with nothing in this field.
• Device Description: This user-configurable field can be used to provide additional
information regarding the module (i.e. location, use, etc.). This is visible on the Index
page without the need for a password. If set, this description will be used as the Service
Name for mDNS service discover instead of the hostname above. To reset the description
to the factory default, delete the current value and submit the page with nothing in this
field.
• Static IP Configuration: This configuration section is used to create a Static IP address.
o IP Address: The user-configured IP address is entered into this text field.
o Subnet Mask: Defines the range of IP addresses the EX1401 will attempt to
connect to directly (255.255.255.0 means match all but the last number, etc.).
o Gateway Address: The IP address of a server that EX1401 can use to contact IP
addresses external to its network.
o DNS Servers: This field is used to provide the IP Addresses of servers that the
EX1401 module may use to look up hostnames (e.g. www.vtiinstruments.com).
• Network Status: Indicates the current network settings for the EX1401’s IPv4 Address,
Subnet Mask, Gateway Address, MAC Address, and IPv6 Address.
Page 61
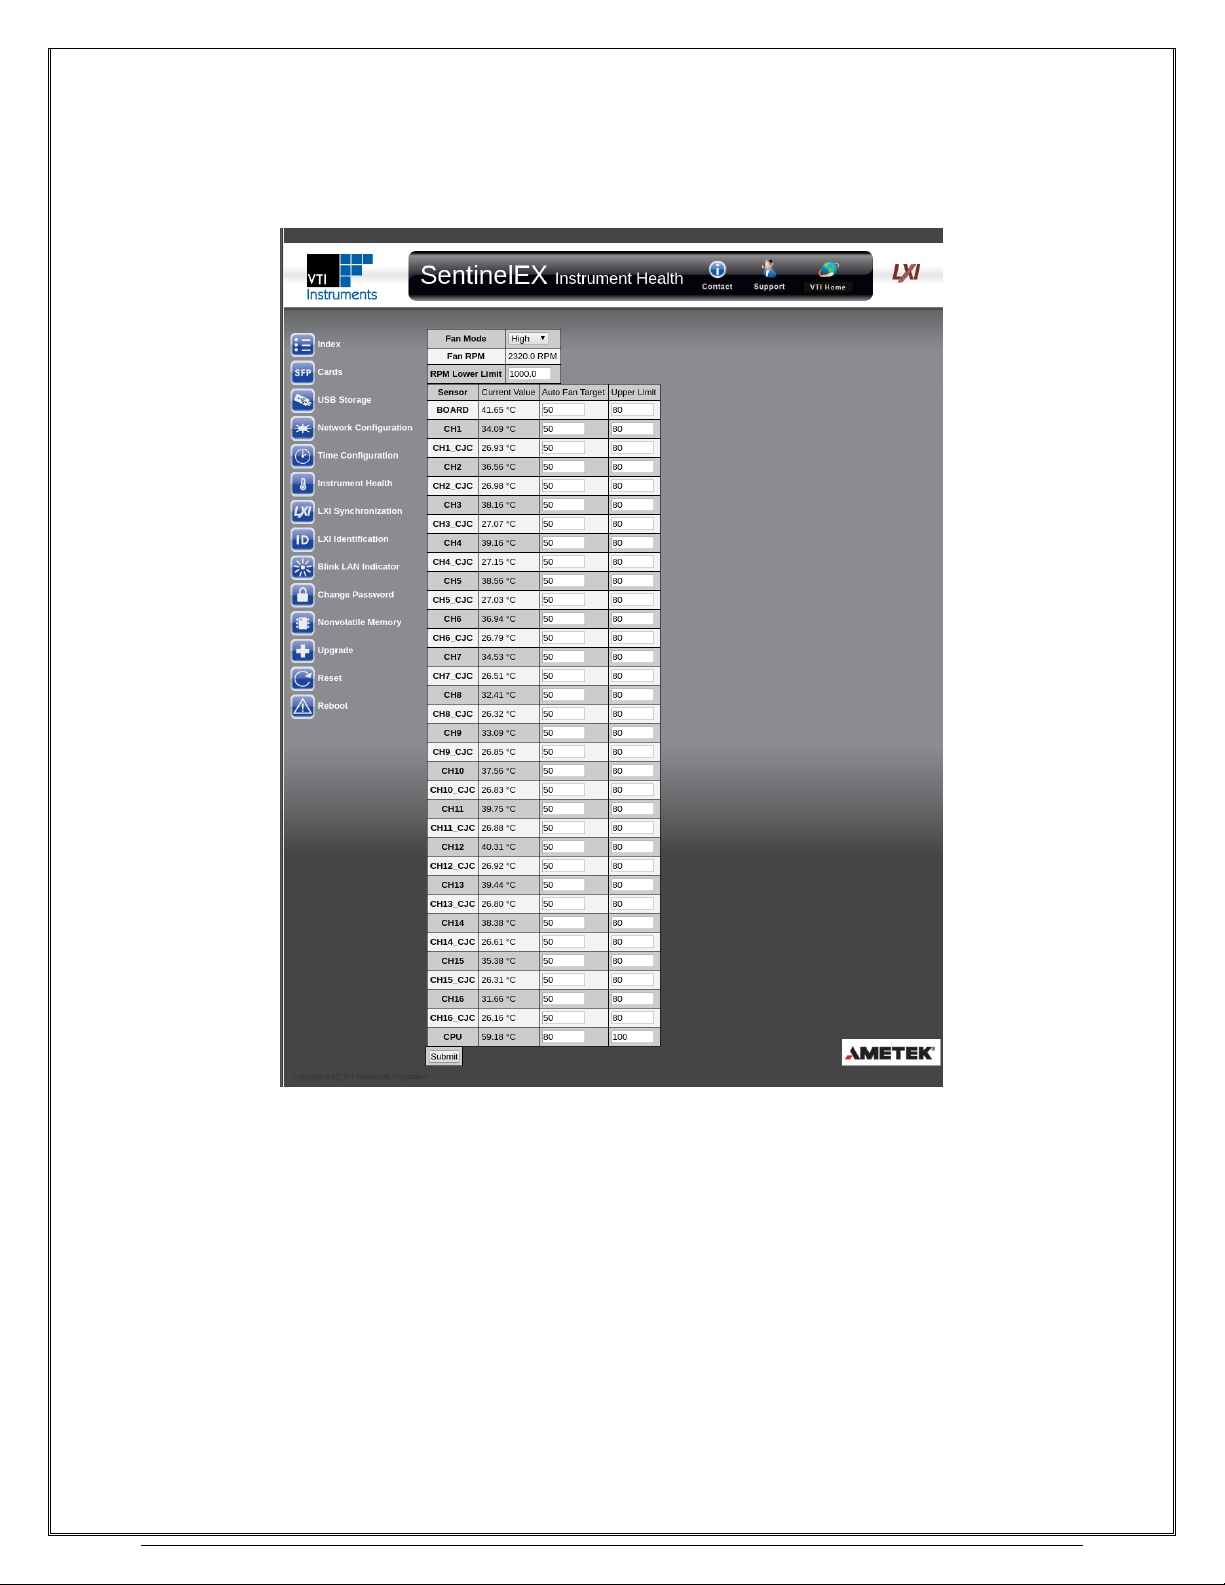
www.vtiinstruments.com
EX1401 Web Page Operation 61
INSTRUMENT HEALTH
The Instrument Health Page contains information concerning the EX1401’s temperate sensors and
fan controls.
• Fan Mode:
o Off: The fan will remain off at all times.
o On: The fan will run at all times.
o Auto: The fan will turn on whenever any of the temperature sensors’ Current
Value is above its Auto Fan Target.
• Temperature Sensors: This table lists all of the available temperature sensors in the
instrument, along with their Current Value and Auto Fan Target.
o BOARD: This temperature sensor is located in the digital section near the rear
of the instrument, directly attached to the main circuit board.
o CPU: This is the embedded temperature sensor in the CPU die.
o CH1-16: These temperature sensors are embedded in the low-speed auxiliary
ADC of each channel.
o CH1-16_CJC: These are the actual Cold Junction Compensation sensors.
Page 62
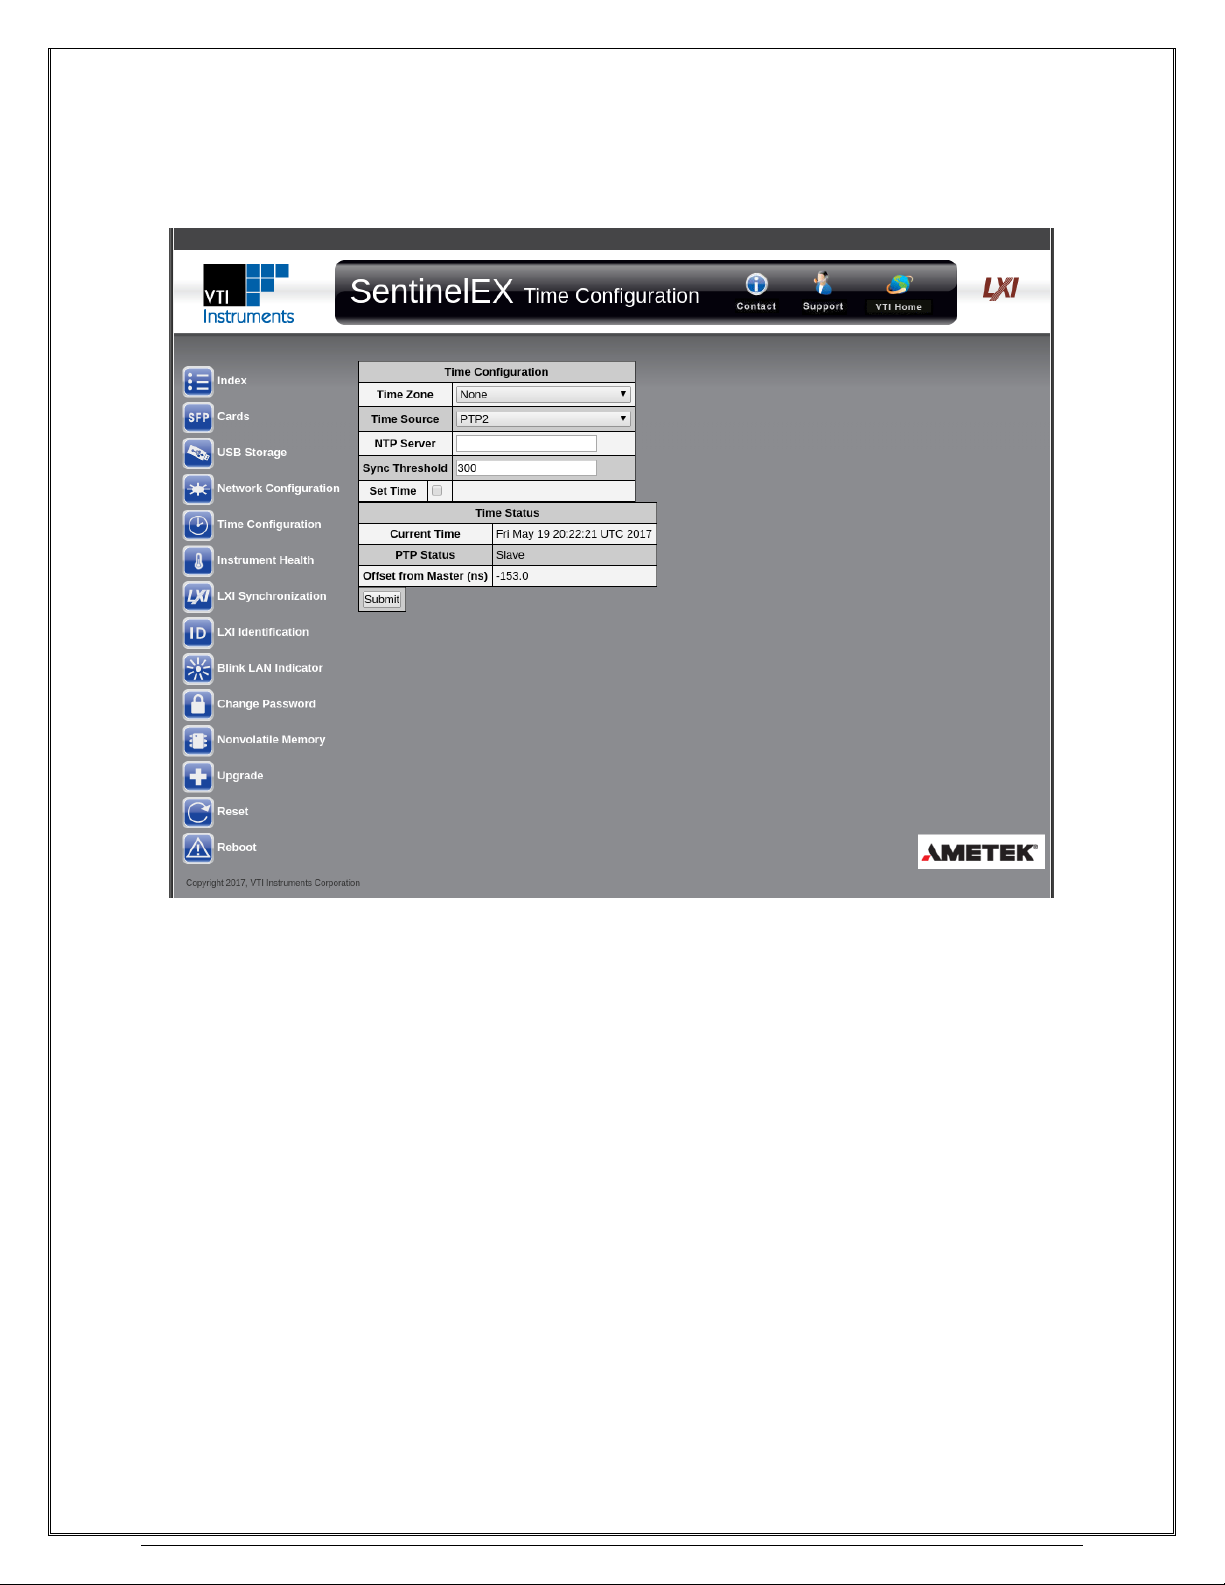
VTI Instruments Corp.
62 EX1401 Web Page Operation
TIME CONFIGURATION
The Time Configuration Page contains information concerning the configuration of the EX1401’s
source of time, and provides the ability to modify it.
• Time Configuration:
o Time Zone: Allows the user to select the time zone for displaying the current local time.
o Time Source: Selects the method to use for setting the EX1401’s time.
▪ PTP2: Precision Time Protocol Version 2 (IEEE 1588-2008) will be used to synchronize
the EX1401’s time with a master clock on the network, or to act as master clock, based
on the IEEE 1588 Best Master Clock algorithm.
▪ NTP: Network Time Protocol will be used to synchronize the EX1401’s time to a remote
server, which is specified in the NTP Server field below.
▪ Manual: The time will be set manually by the user via the Set Time option below.
o NTP Server: The IP Address or hostname of the server from which to derive time when the NTP
option is selected. If this is left blank, one of the following values will be used by instead:
▪ If the EX1401 is configured for DHCP, and if the DHCP server supplies the address of an
NTP server, that will be used.
▪ Otherwise, the default value of pool.ntp.org will be used.
o Set Time: Checking the Set Time box causes the Date and Time fields to appear. They will be
automatically populated with the current time of the user’s PC. When using the Manual option,
this sets the EX1401’s current date and time. When using the PTP2 option, this causes a message
to be sent to the current master clock, requesting that it set its time.
• Time Status:
Page 63
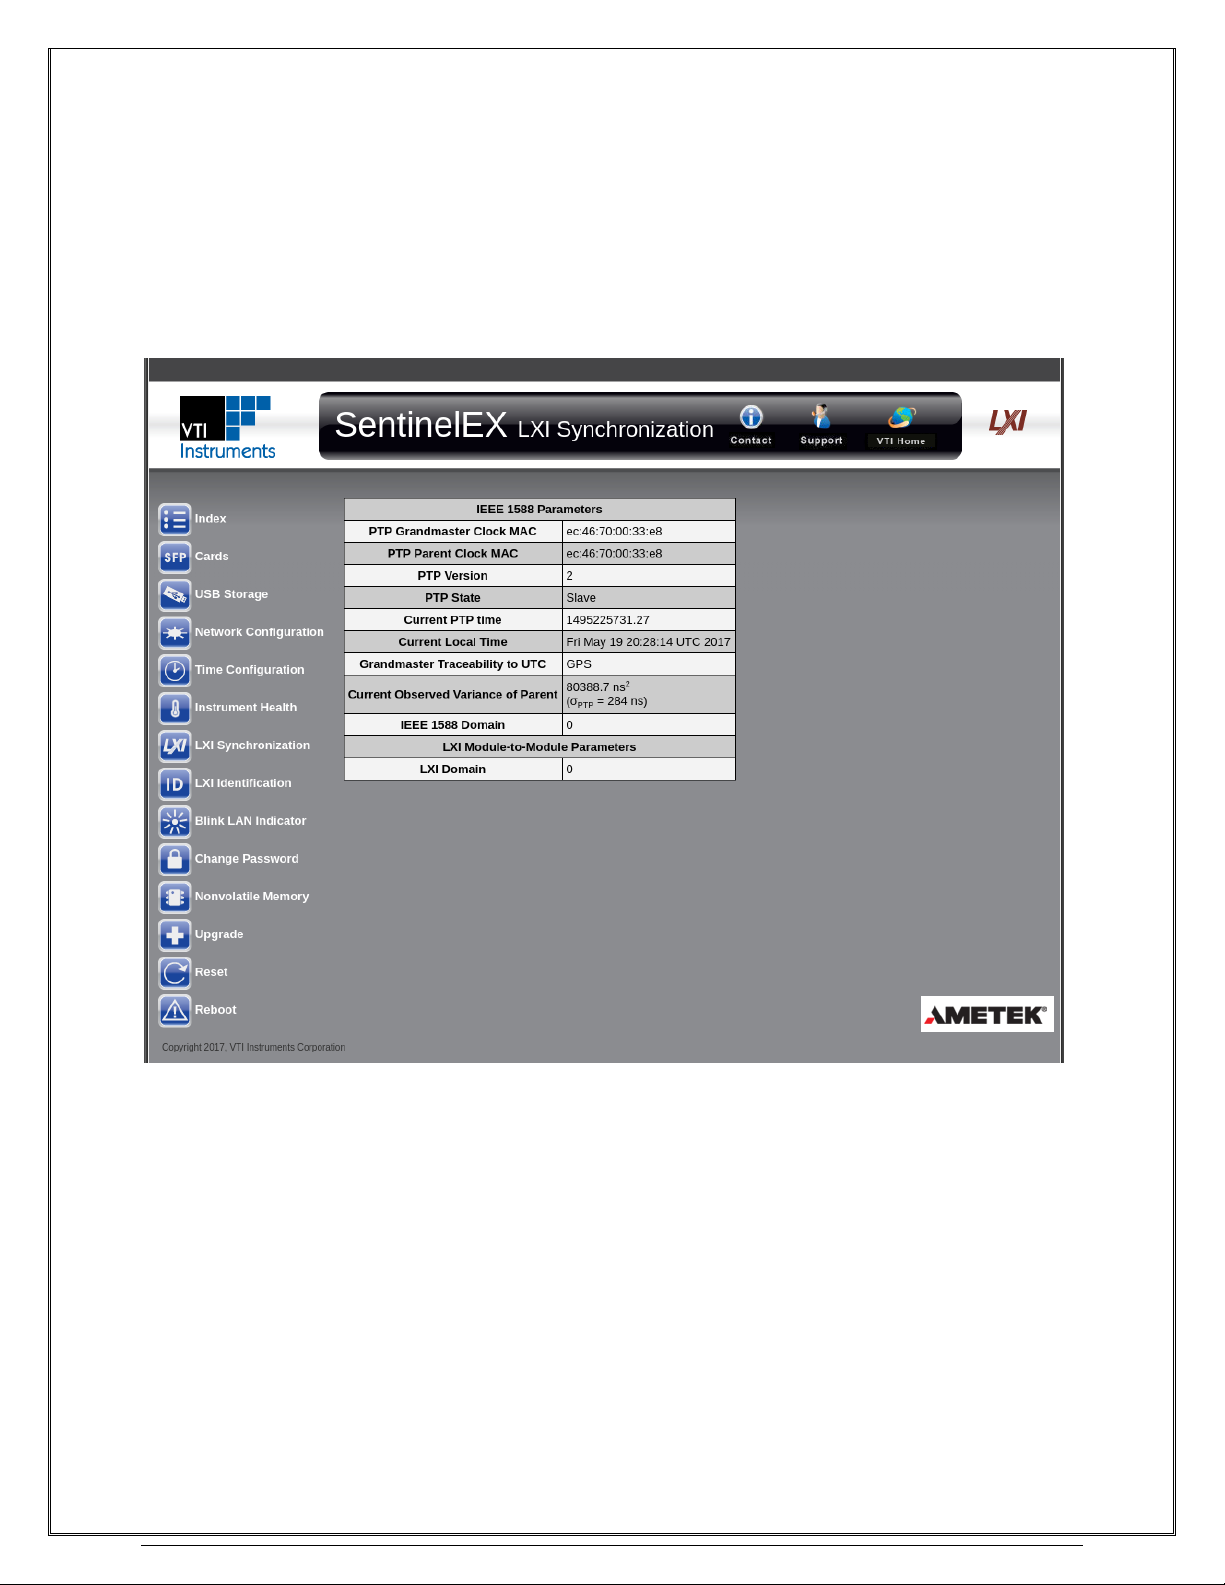
www.vtiinstruments.com
EX1401 Web Page Operation 63
o Current Time: The current date and time of the EX1401, translated to the UTC time-base and the
selected time zone.
o PTP Status: The current state of the PTP2 protocol within the EX1401.
o Offset from Master (ns): An estimate of the current error, in nanoseconds, of the EX1401’s time
from that of its PTP master.
LXI SYNCHRONIZATION
The LXI Synchronization page provides status on the EX1401’s synchronization status.
• IEEE 1588 Parameters
o PTP Grandmaster Clock MAC: The MAC address of the device on the network
to which all other IEEE 1588 compliant devices are synchronized.
o PTP Parent Clock MAC: The MAC address of the device to which the EX1401
is synchronized. In a hierarchical IEEE 1588 system with boundary clocks, this
indicates the MAC address of the parent clock on the local link.
o PTP State: Indicates whether the EX1401 is initializing, faulty, disabled,
listening, pre-master, master, passive, uncalibrated, or slave.
o Current PTP Time: The current time on the EX1401, expressed as the number of
seconds since midnight January 1, 1970 TAI.
o Current Local Time: The current date and time of the EX1401, translated to the
UTC time-base and the selected time zone.
Page 64
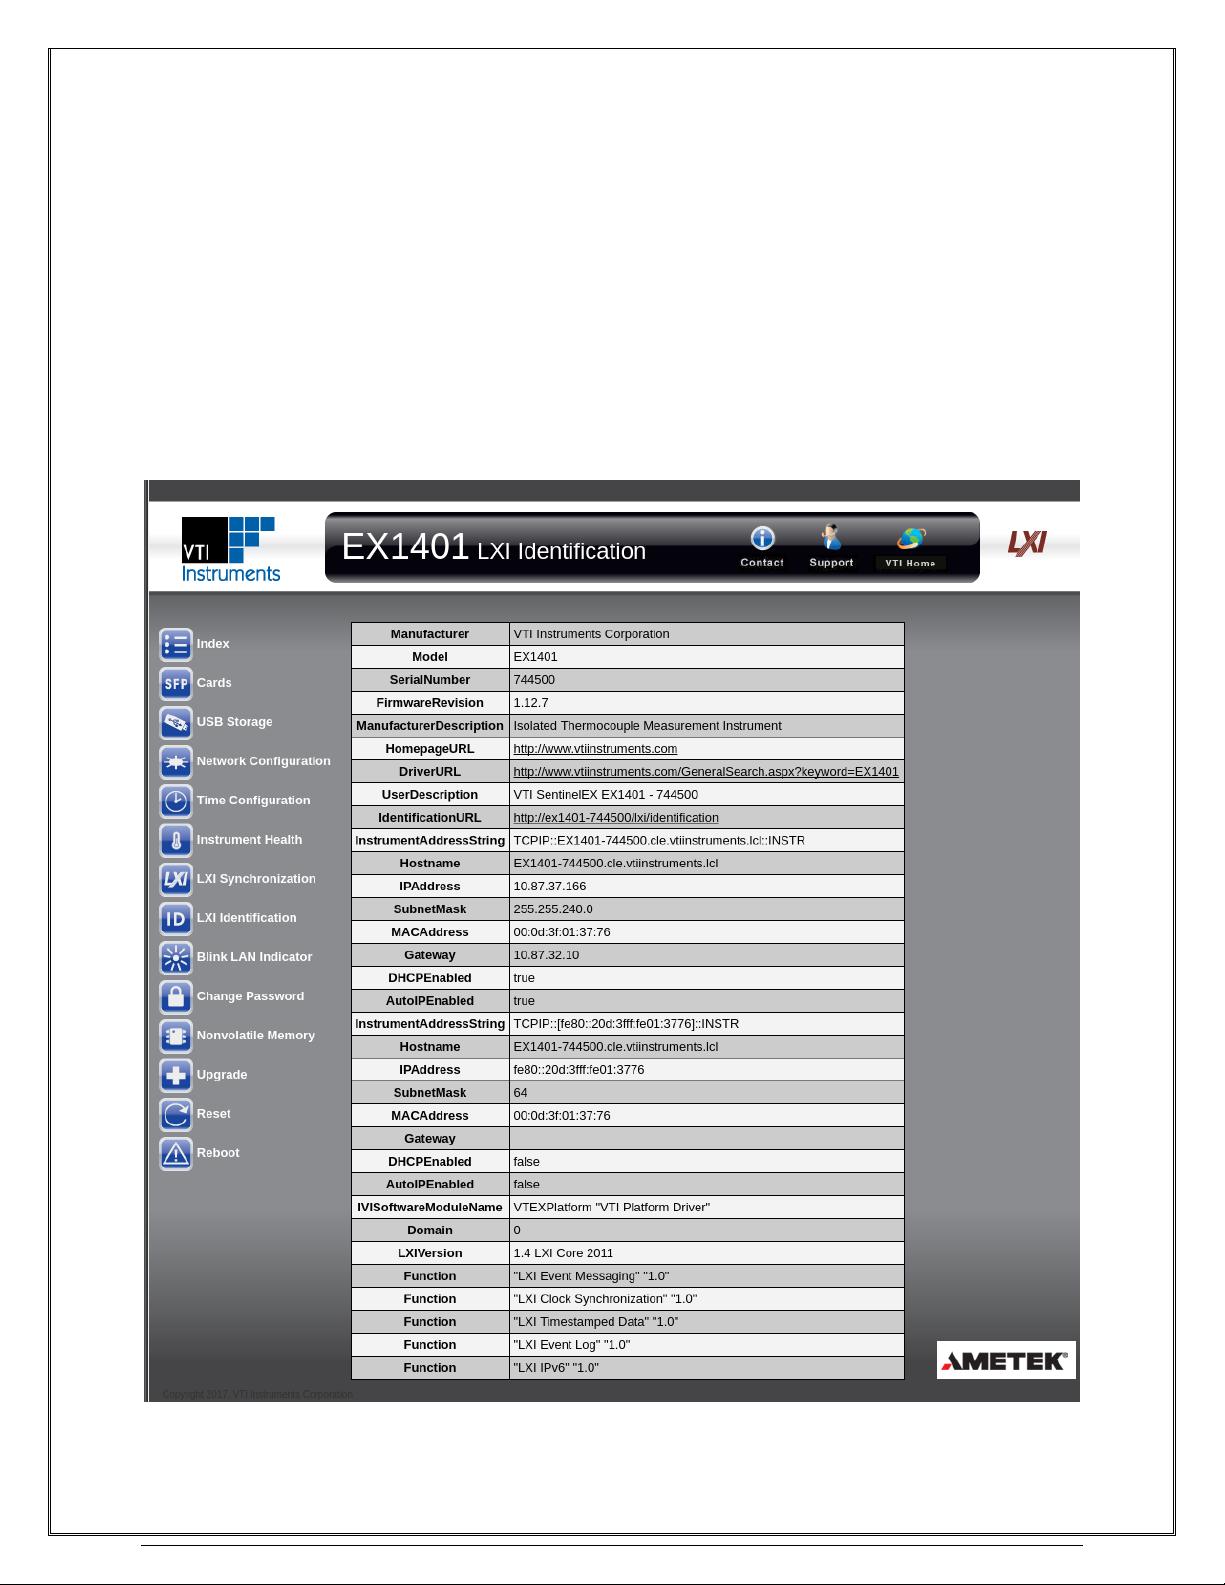
VTI Instruments Corp.
64 EX1401 Web Page Operation
o Grandmaster Traceability to UTC: Indicates how the grandmaster is
synchronized to UTC. The values provide an indicator of how closely
synchronized the grandmaster is to UTC time.
o Current Observed Variance of Parent: This function is not supported by the
EX1401.
o IEEE 1588 Domain: The instrument’s PTP domain. Typically, this indicator is 0.
• LXI Module to Module Parameters
o LXI Domain: An 8-bit number, 0 to 255, which indicates the domain the EX1401
is using for LAN Events. All events sent by this device will include this number.
Likewise, the device will only accept events that include the same LXI Domain
number.
LXI IDENTIFICATION
The LXI Identification page is a XML document providing identifying information on the EX1401.
Page 65
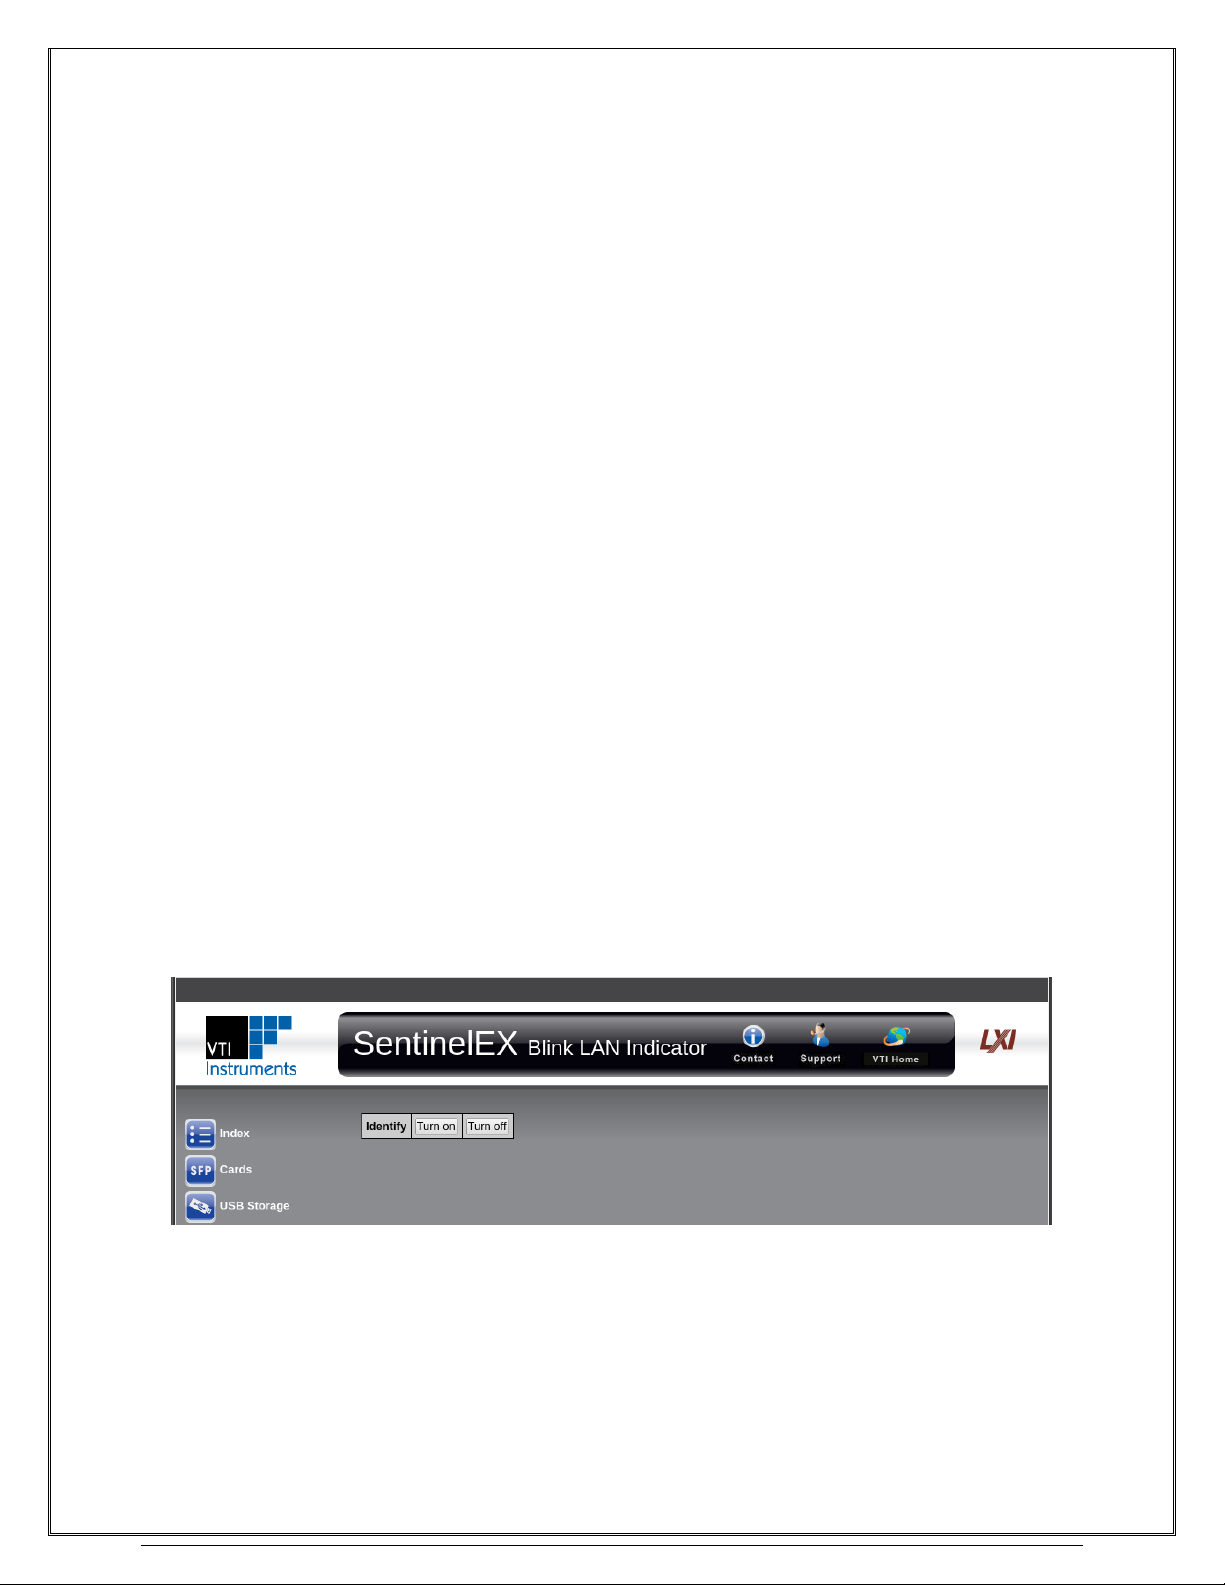
www.vtiinstruments.com
EX1401 Web Page Operation 65
• Manufacturer: The module manufacturer.
• Model: The model number of the module.
• SerialNumber: The module’s serial number.
• FirmwareRevision: Indicates the current revision of the module’s firmware.
• ManufacturerDescription: A brief description of the module.
• HomepageURL: The address of the manufacturer home page.
• UserDescription: The user-configurable description field.
• IdentificationURL: The canonical URL of this document.
• Network Interface Information: The following fields will be repeated once for each
network interface present in the module:
o InstrumentAddressString: Indicates the resource string by which the module
can be accessed via its instrument driver.
o Hostname: Indicates the Full Qualified Domain Name of the module. The first
part of the FQDN is the user-configured hostname.
o IP Address: Indicate the current IP address of the module.
o SubnetMask: Indicates the range of IP addresses the EX1401 will attempt to
connect to directly.
o MAC Address: Indicates the factory-assigned MAC address of the module.
o Gateway: The IP address of a server that EX1401 can use to contact IP
addresses external to its network.
o DHCPEnabled: Indicates whether DHCP is enabled on the interface.
o AutoIPEnabled: Indicates whether AutoIP is enabled on the interface.
• IVISoftwareModuleName: Indicates the name and description of an IVI-compliant
instrument driver that can be used to control the instrument.
• Domain: The LXI LAN Event Domain number, 0-255.
• LXIVersion: Indicates which version of the LXI specification the module conforms to.
• Function: Indicates an LXI Extended Function, and its version, that is supported by the
module.
BLINK LAN INDICATOR
The Blink LAN Indicator page allows identification of the device being accessed by causing its
LAN LED to blink. This is helpful when there are multiple instruments present in your system and
you need to identify a specific device by its IP address.
• Turn On: Cause the EX1401’s LAN LED to blink.
• Turn Off: Cause the EX1401’s LAN LED to stop blinking.
Page 66
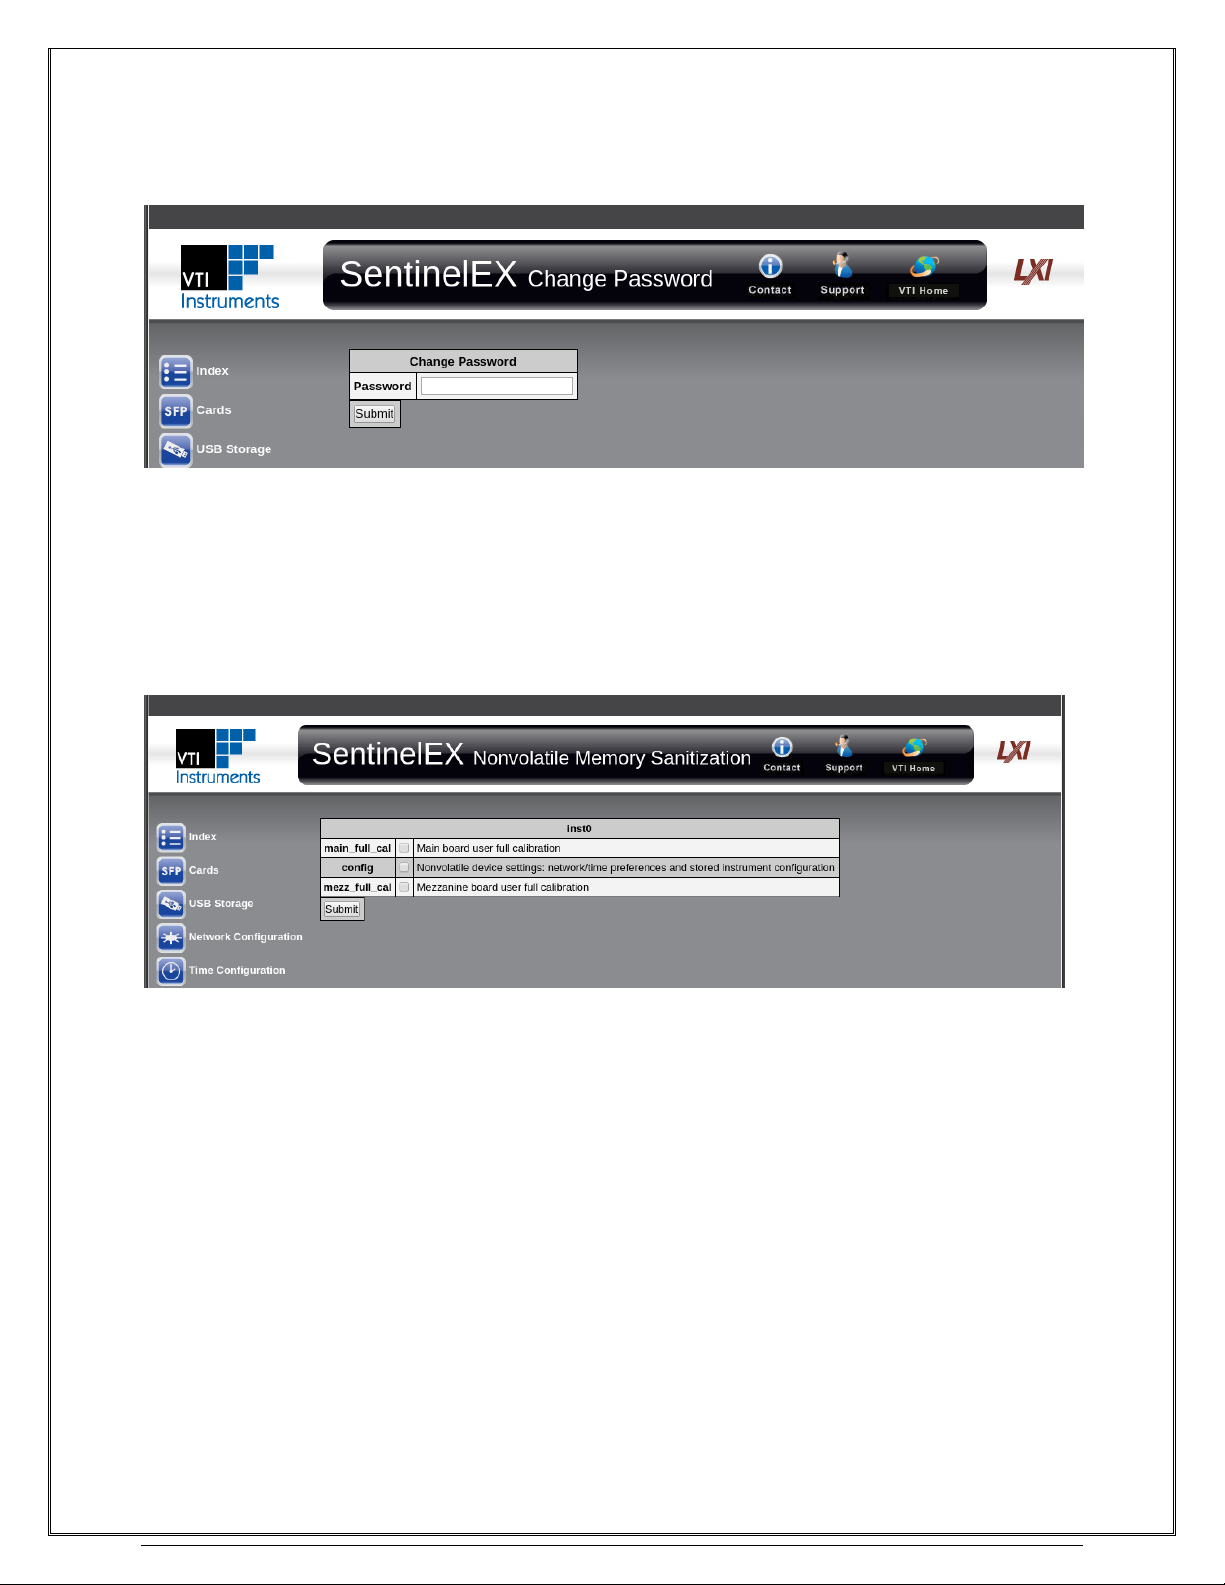
VTI Instruments Corp.
66 EX1401 Web Page Operation
CHANGE PASSWORD
The Change Password page allows the password to be updated.
• Password: Set a new password to control access to configuring the EX1401. Setting an
empty password disables password requirements.
NONVOLATILE MEMORY
The Nonvolatile Memory web page provides the ability to securely erase the contents of the
EX1401’s user-writable memory devices.
• config: Securely erases the instrument configuration partition of the main instrument
flash. This includes all settings that can be configured through the instrument web page
and any stored instrument configurations saved via the instrument driver of Soft Front
Panel.
• main_full_cal: Securely erases the user full calibration portion of the main board’s
calibration and identification EEPROM. This contains all of the user-supplied calibration
information for CH1-8. The factory-supplied full calibration will not be affected.
• mezz_full_cal: Securely erases the user full calibration portion of the mezzanine board’s
calibration and identification EEPROM. This contains all of the user-supplied calibration
information for CH9-16. The factory-supplied full calibration will not be affected.
Page 67
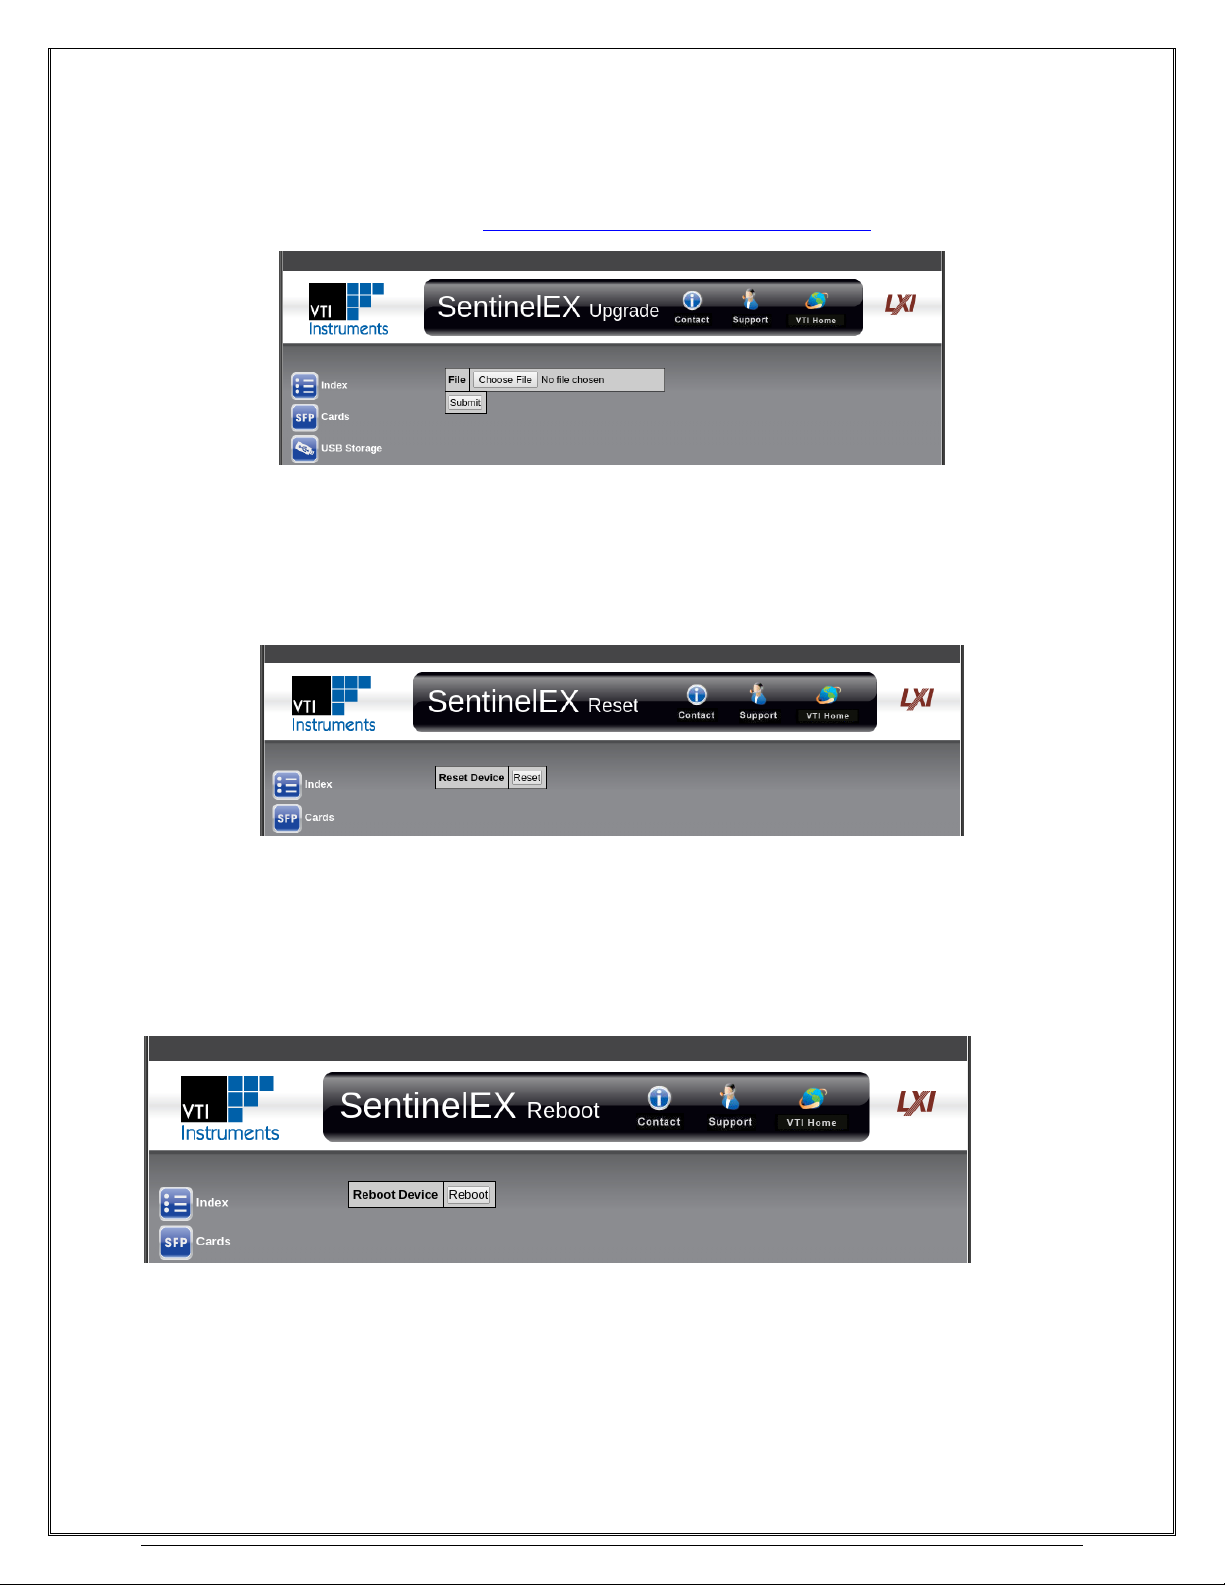
www.vtiinstruments.com
EX1401 Web Page Operation 67
UPGRADE
The Upgrade web page provides the ability to upgrade the firmware of the EX1401. Upgrade files
are available from the VTI Instruments User’s Manuals and Drivers CD, or from the VTI
Instruments web site, at http://www.vtiinstruments.com/Downloads.aspx.
• File: Choose an upgrade file.
RESET
The Reset web page allows the EX1401 to be returned to power-on default settings. This operation
is faster than a reboot, but does not load new firmware.
• Reset: Click this button to reset the EX1401 to power-on defaults.
REBOOT
The Reboot web page allows the EX1401 to reboot. This operation has the same effect as powercycling the unit – it will re-load firmware from nonvolatile memory and return to power-on defaults.
• Reboot Device: Click this button to reboot the EX1401.
Page 68

VTI Instruments Corp.
68 EX1401 Instrument Drivers
SECTION 5
INSTRUMENT DRIVERS
OVERVIEW
Three drivers, VTEXDigitizer, VTEXDsa, and VTEXPlatform (or libDigitizer, libDsa, and
libPlatform, respectively, for Linux), are used to program the EX1401 instruments. The “Digitizer”
drivers are common drivers used by all EX Series and EMX Series digitizer devices provided by
VTI Instruments. For a simple data acquisition application, the “Digitizer” driver may be the only
driver the user needs to use. The “DSA” driver is essentially a super set of the “Digitizer” driver. In
addition to the data acquisition functionalities in the “Digitizer” driver, the “DSA” driver also
supports the EMX-1434’s signal output and tachometer input capabilities. The “Platform” driver is
used to configure the EX1401’s LXI device specific features, as per IVILXISync API guidelines.
IVI DRIVERS
The IVI Foundation defines IVI driver specifications. IVI specification information is available at
the IVI Foundation website, www.ivifoundation.org. The IVI-3.2 Inherent Capability Specification
defines a common set of basic functionality that all IVI driver must support. This ensures that users
can perform basic operations and identify its capability for any IVI driver using the exact same API
functions. The IVI drivers are implemented using a common code provided by the IVI Foundation
in order to guarantee this consistent behavior. This common code is called the IVI Shared
Components. The IVI Shared Components must be installed separately prior to any IVI drivers from
VTI. The shared components installer is available for download from the IVI Foundation website.
The IVI Foundation specifies that the IVI driver be based on Microsoft Component Object Model,
called IVI-COM and an IVI driver using standard C language API, called IVI-C. For those who
develop applications in Windows .NET languages, such as C#, VB.NET, or other Object Oriented
Language, such as C++, IVI-COM gives APIs logically organized by interfaces. IVI-C gives more
traditional C language functions.
While VTI’s IVI drivers are architected based on IVI-COM, the driver installer also installs a
wrapper library that exposes IVI-C functions so that the user can use develop in both types of
environment.
Header and Library Files
The IVI driver specification defines the install directory structure and software components to be
installed. For 32-bit Windows systems, the root of install directory is C:\Program Files\IVI
Foundation\IVI. For 64-bit Windows systems, the 32-bit driver is installed at C:\Program
Files (x86)\IVI Foundation\IVI and the 64-bit driver is installed at C:\Program
Files\IVI Foundation\IVI. Driver header files and library files are installed in several sub
directories. The Bin subdirectory contains IVI-COM and IVI-C driver DLL files. The Component
subdirectory contains IVI-COM and IVI-C shared components files. The Drivers subdirectory
contains the driver specific sub directories. The driver’s online help files and example programs are
installed here. The Include subdirectory contains header files. The Lib subdirectory contains 32-bit
import library files. The Lib_x64 subdirectory contains 64-bit import library files.
Page 69

www.vtiinstruments.com
EX1401 Instrument Drivers 69
DRIVERS FOR LINUX OS
In addition to the IVI drivers for Windows OS, C++ libraries are provided for the Linux operating
system. The Linux drivers are supported on distributions running Linux kernel version 2.6.32 or
later. In addition, the Linux drivers require GCC version 4.4 or later and glibc 2.12 or later. The
driver for Linux organizes and names each C++ class and members consistent to the IVI-COM
driver. The driver description in this manual applies to both IVI driver and the library for Linux OS.
The Linux drivers are supplied as RPM packages which are supported by a wide variety of
distributions. In distributions which natively support RPM packages, such as Red Hat Enterprise
Linux, Fedora Linux, or CentOS, the driver packages can be installed by running the command:
rpm –Uvh packagename.rpm
There are many other popular Linux distributions which do not natively support RPM packages, but
instead use third-party tools to install them. Debian and Ubuntu Linux are both very popular, but do
not support RPM packages out of the box. To use these packages on these systems, ‘alien’ is
recommended which should be available in the package repository for these distributions. To install
the drivers using alien, run the command:
alien –i packagename.rpm
Currently, there are both 32- and 64-bit driver packages for libDigitizer, and libPlatform. There is
also a package which installs common libraries and dependencies used by all drivers, libCommon.
The appropriate libCommon package (32-bit or 64-bit) must be installed before installing any of the
other driver packages. The release notes for the libCommon package include information on the
exact compiler version used for a particular release.
Header and Library Files
/opt/vti/include sub directory contains header files.
/opt/vti/lib sub directory contains driver shared object files.
/opt/vti/share/doc sub directory contains release notes, driver online help and example
programs
BUILDING AND RUNNING EXAMPLE PROGRAMS
Windows Examples
The instrument drivers come with example programs that the user can build and execute. Example
programs are in C++ and C# (Windows only) programming language. They are installed in the
Examples sub-folder under the standard IVI driver installation folder, which is usually found at
C:\Program Files (x86)\IVI Foundation\IVI\Drivers\VTEXDigitizer\Examples or C:\Program
Files\IVI Foundation\IVI\Drivers\VTEXDigitizer\Examples. A link to the example programs can
also be found in the Start Menu.
Page 70
VTI Instruments Corp.
70 EX1401 Instrument Drivers
Linux Examples
Linux examples are stored at /opt/vti/share/doc/digitizer/examples/. To build them, copy that folder to a
writable location, change directory to the examples folder and run make.
COMPATIBILITY
DRIVER AND FIRMWARE REVISIONS
The instrument driver and firmware have three revision fields: <Major>, <Minor>, and <Build>.
For the firmware installed on the instrument to be compatible with the driver being used, the
<Major> version number must be equal and the <Minor> version must be equal or newer than the
driver. Otherwise, the firmware needs to be updated. It is recommended to use the same <Major>
and <Minor> version pair, if possible.
DRIVER API AND INSTRUMENTS
The Digitizer driver is designed to work with many digitizer products from VTI Instruments. Not
all API functions defined in the driver apply to every digitizer product, since each model has a
unique feature set. Calling unsupported API functions will result in a property not supported or
method not supported error. See the manuals for the other digitizer products for more details on their
supported features.
Digitizer APIs
EX1401 Support
EMX-4250/4350/4380
Alarms
Supported
Not Supported
Arm
Supported
RPM (DSA), Pattern (DSA) not
supported by digitizer devices
Supported
RPM (DSA), Pattern (DSA) not
supported by digitizer devices
Calibration
Supported
Self-calibration not supported
Supported
Channels
Supported, including Temperature and
Transducer
AutoCal, AutoRange, Filter, Offset,
Measurement, Strain, Weighting are not
supported
See manual
Configuration
Supported
APIs for storage devices are not
supported
~$ cd /tmp
/tmp$ cp -r /opt/vti/share/doc/digitizer/examples/ .
/tmp$ cd examples/
/tmp/examples$ make
g++ -o Initialization Initialization.cpp I/opt/vti/include -
L/opt/vti/lib -Wl,-rpath=/opt/vti/lib -lDigitizer
/tmp/examples$ ./Initialization 10.20.10.158
Page 71

www.vtiinstruments.com
EX1401 Instrument Drivers 71
Digitizer APIs
EX1401 Support
EMX-4250/4350/4380
Dio
Supported
Not supported
Events
Supported
Pulse not supported
Supported
Pulse not supported
Measurement
Supported
DataFormat: EUReal32, RawInt32
FIFOMode: Stop only
Supported
DataFormat: EUFixedPoint32,
RawInt32
FIFOMode: Stop only
Sampling
(Measurement and
Channel interfaces)
Supported
Multipass, Oversample not supported
Prescaler: must be 1
DownsamplingFactor, FilterType,
Get/SetFilterCoefficients, Multipass,
Oversample not supported
Platform
Supported
Supported
ReferenceOscillator
Supported
PXIClk10 not supported
Supported
OutputEnabled not supported
SelfTest
Supported
Not supported
Start
Supported
Supported
Storage Devices
Supported
Not supported
StreamingData
Supported
Supported
Sync
Supported
Supported
Temperature
Supported
Supported
Time
Supported
Supported
Trigger
Supported
MaxQueueSize, QueueEnabled not
supported
Supported
MaxQueueSize, QueueEnabled not
supported
TABLE 5-1: SUPPORTED FUNCTIONS IN COMMON DIGITIZER APIS
Page 72

VTI Instruments Corp.
72 EX1401 Instrument Drivers
DRIVER STRUCTURE
MEASUREMENT
This section provides information related to configuring the basic measurement setup and control.
The basic measurement configuration and control can be done through the driver’s Measurement
interface. The Measurement interface configures parameters that are global to entire system, rather
than individual channels, or instrument modules when more than one module is included in the
driver.
The parameters the user can set using the Measurement interface are:
• Sampling parameters, including ADC sampling rate, digital decimation filters, span, and
data record size
• Number of data acquisition records at each trigger event
• FIFO mode of operation
• Data format
The Measurement interface can be used to query the current measurement state information:
• Measurement state machine state
• Total number of records available in FIFO
Methods to control measurement, such as:
• Initiating measurement
• Aborting measurement
• Retrieving acquired data
CHANNELS AND CHANNEL GROUPS
This section provides information related to using channels and channel groups. For more detailed
information, see the online help file provided with the Digitizer driver.
The Channels interface contains both channel objects and channel group objects in the same array.
A channel object represents an individual analog input channel. A channel group object represents
one or more analog input channels as a group. When a driver is initialized or reset, the repeated
capability contains the analog channels, one channel group representing all of the analog channels,
and one or more channel groups representing the analog channels from each digitizer model in the
driver session. For example, when there are two EX1401 instruments and one EMX-4350 in a single
driver session, the Channels interface contains an array totaling 39 channel objects. Those channels
are 32 individual EX1401 analog input channels (16 from each EX1401), four EMX-4350 individual
analog input channels, one channel group object that represents all 36 analog input channels, one
channel group for all 32 EX1401 inputs, and one channel group for all four EMX-4350 inputs. These
channel groups are named “All”, “EX1401”, and “EMX-4350”.
The channel array is created in ascending slot order for modular instruments (such as the EMX
family). The first element in the array is the first analog input of the digitizer card that is installed at
the lowest slot in a chassis. When more than one instrument is included in the total system, the
channel order is determined by the resource string used in the driver’s Initialize call.
The individual channel objects are used to configure or query individual input channel properties.
The channel group objects can be used to configure multiple channels to the same value. In general,
the user can configure multiple channels faster using a channel group than setting channels
Page 73
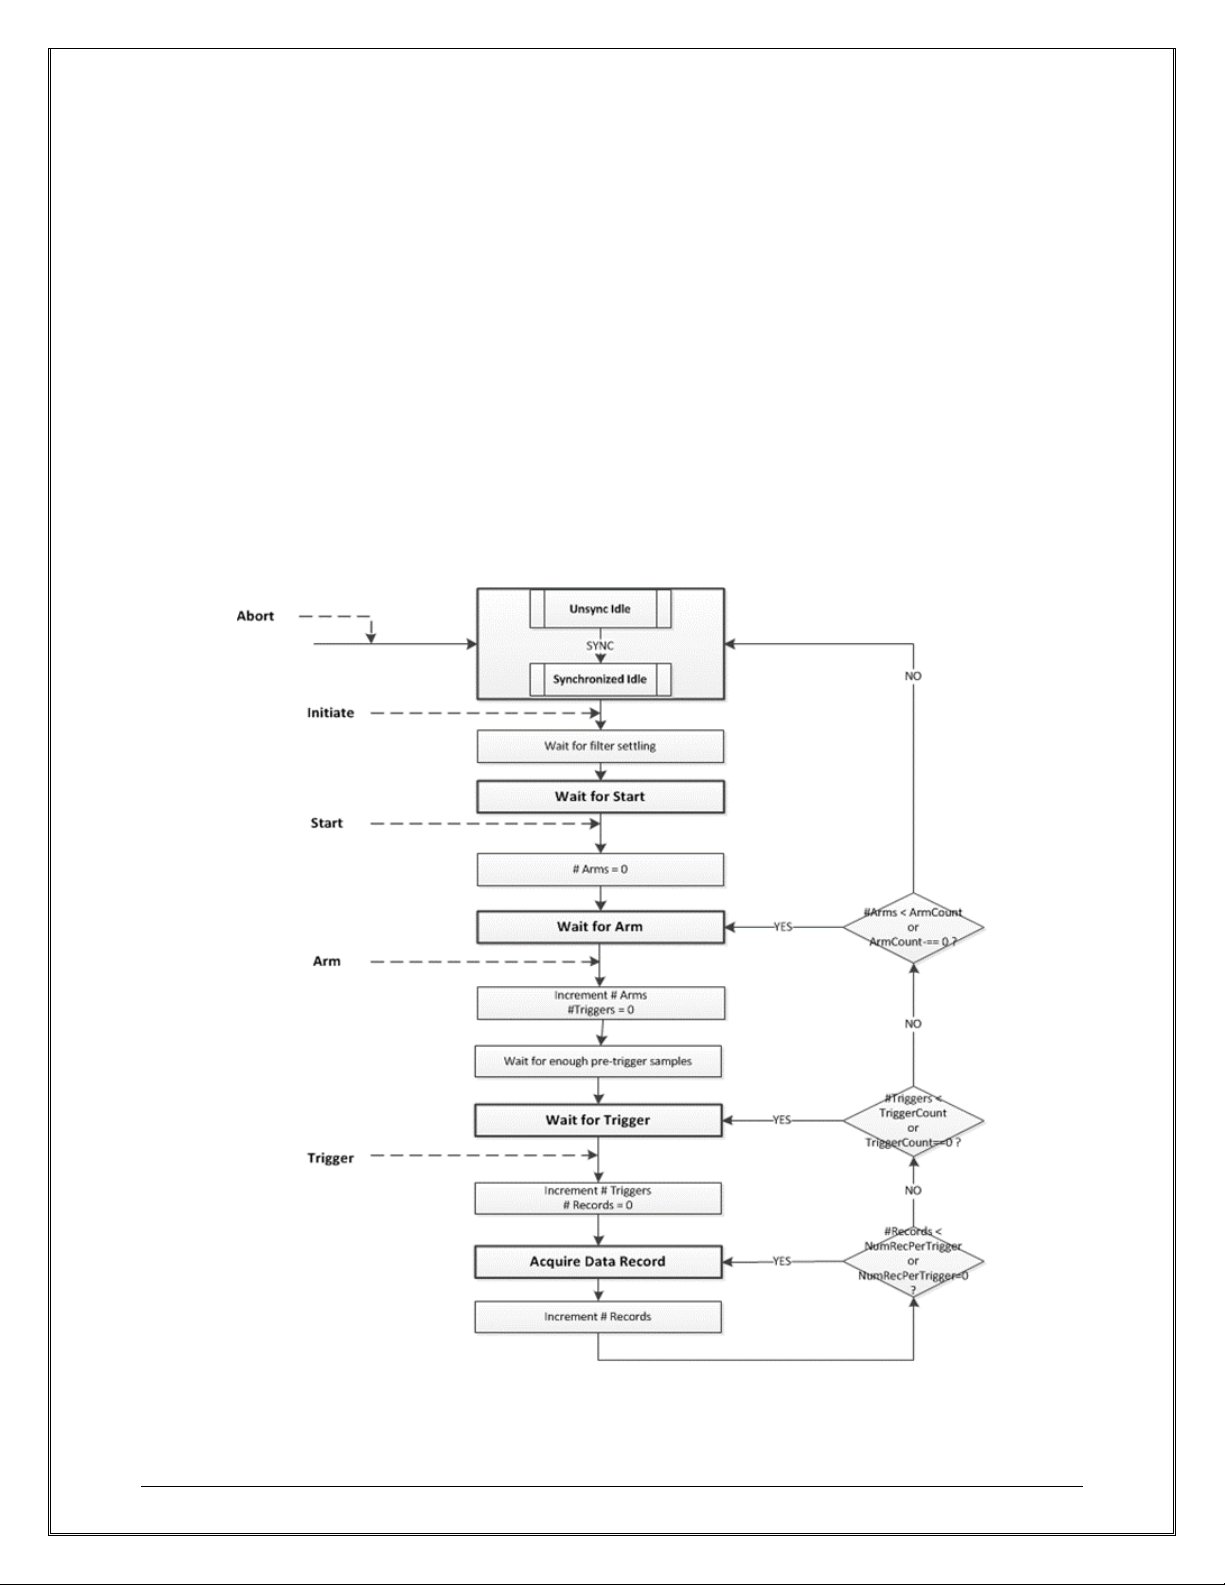
www.vtiinstruments.com
EX1401 Instrument Drivers 73
individually. Querying the current setting through channel groups works only when all channels are
set to the same value.
The channel name is defined as <slot no>!CH<channel no>. For example, 2!CH2 indicates the 2nd
channel of a card installed at slot2 of a chassis. The predefined channel group names are “ALL” or
an instrument model number such as “EX1401”. Optionally, the user can create new custom channel
groups using AddChannelGroup method. When more than one instrument are in the session, the
channel name of the 2nd instrument adds 100 to the slot number, such as 102!CH2, and 200 for the
3rd instrument, 300 for the 4th, etc. The RX0124 and RX0224 instruments each consist of only one
digitizer slot, slot 2, to maintain compatibility with EMX products. The EX1401 instrument consists
of a single digitizer slot called inst0.
The NumChannels property gives the total number of individual input channels, while the Count
property is the total number of channel or channel group objects in the array.
START, ARM, TRIGGER, AND ALARM
The EX1401 implements a sophisticated Arm/Trigger model as show in Figure 5-1. This trigger
model conforms to industry stand trigger models defined in the IVI Digitizer specification and IVI
LXI Sync specification, with some additional features.
FIGURE 5-1 TRIGGER MODEL
Page 74

VTI Instruments Corp.
74 EX1401 Instrument Drivers
Sync
Sync is an event that synchronizes the entire system. The Sync interface is used to configure the
synchronization between cards. All cards are simultaneously started by the SYNC signal and then
they synchronize the state machine transition with each other through a coordination signal. The
Line and CoordinationLine properties define which PXI trigger lines and/or Alarms to use to send
these signals.
Start
Once the measurement is initiated by the Initiate command, the instrument completes all preparation
and becomes ready to start taking data immediately. Then the state machine moves to the Wait for
Start state. The Start interface provides methods and properties to advance to the next state. The
amount of time it takes to reach to Wait for Start after measurement Initiate command varies
depending on the measurement configuration. For example, it takes longer when the measurement
sample rate (or measurement span) is low because the filter settling time is longer. The Start
interface is useful when the user wants to have the instrument complete all the preparation and hold
in that state, so that it can start taking data immediately without any delay.
Arm
The instruments must be armed before triggering data acquisition. The Arm interface is used to
configure this arming condition. The Sources property in the Arm interface defines the arming event
sources. The default arming source is Immediate, which means automatic arming. The
SourceOperator property allows the user to define an arming condition by logically combining
multiple arming sources. The Delay property defines amount of time the instrument waits before
moving out from Wait for Arm state after the defined arming conditions are met. The ArmCount
property defines how many times the measurement repeats arming and triggering before it
completes. The default is once. Setting ArmCount to 0 forces the measurement to repeat arm and
trigger indefinitely until it is aborted by Abort command.
Trigger
Data acquisition begins when a triggering condition is met. The triggering condition is configured
using the Trigger interface. Similar to Arm interface, the Sources property in the Trigger interface
define the triggering event sources. Trigger sources can be logically combined using
SourceOperator in the Trigger interface. The Delay property defines the amount of time between
the trigger event and the beginning of the data acquisition. The Delay value can be negative
indicating pre-trigger data acquisition. In this case, the acquired data block starts earlier than the
trigger event. This is achieved by buffering the data in the instrument’s FIFO prior to the trigger
event. For more information, see the Data Acquisition section.
Page 75
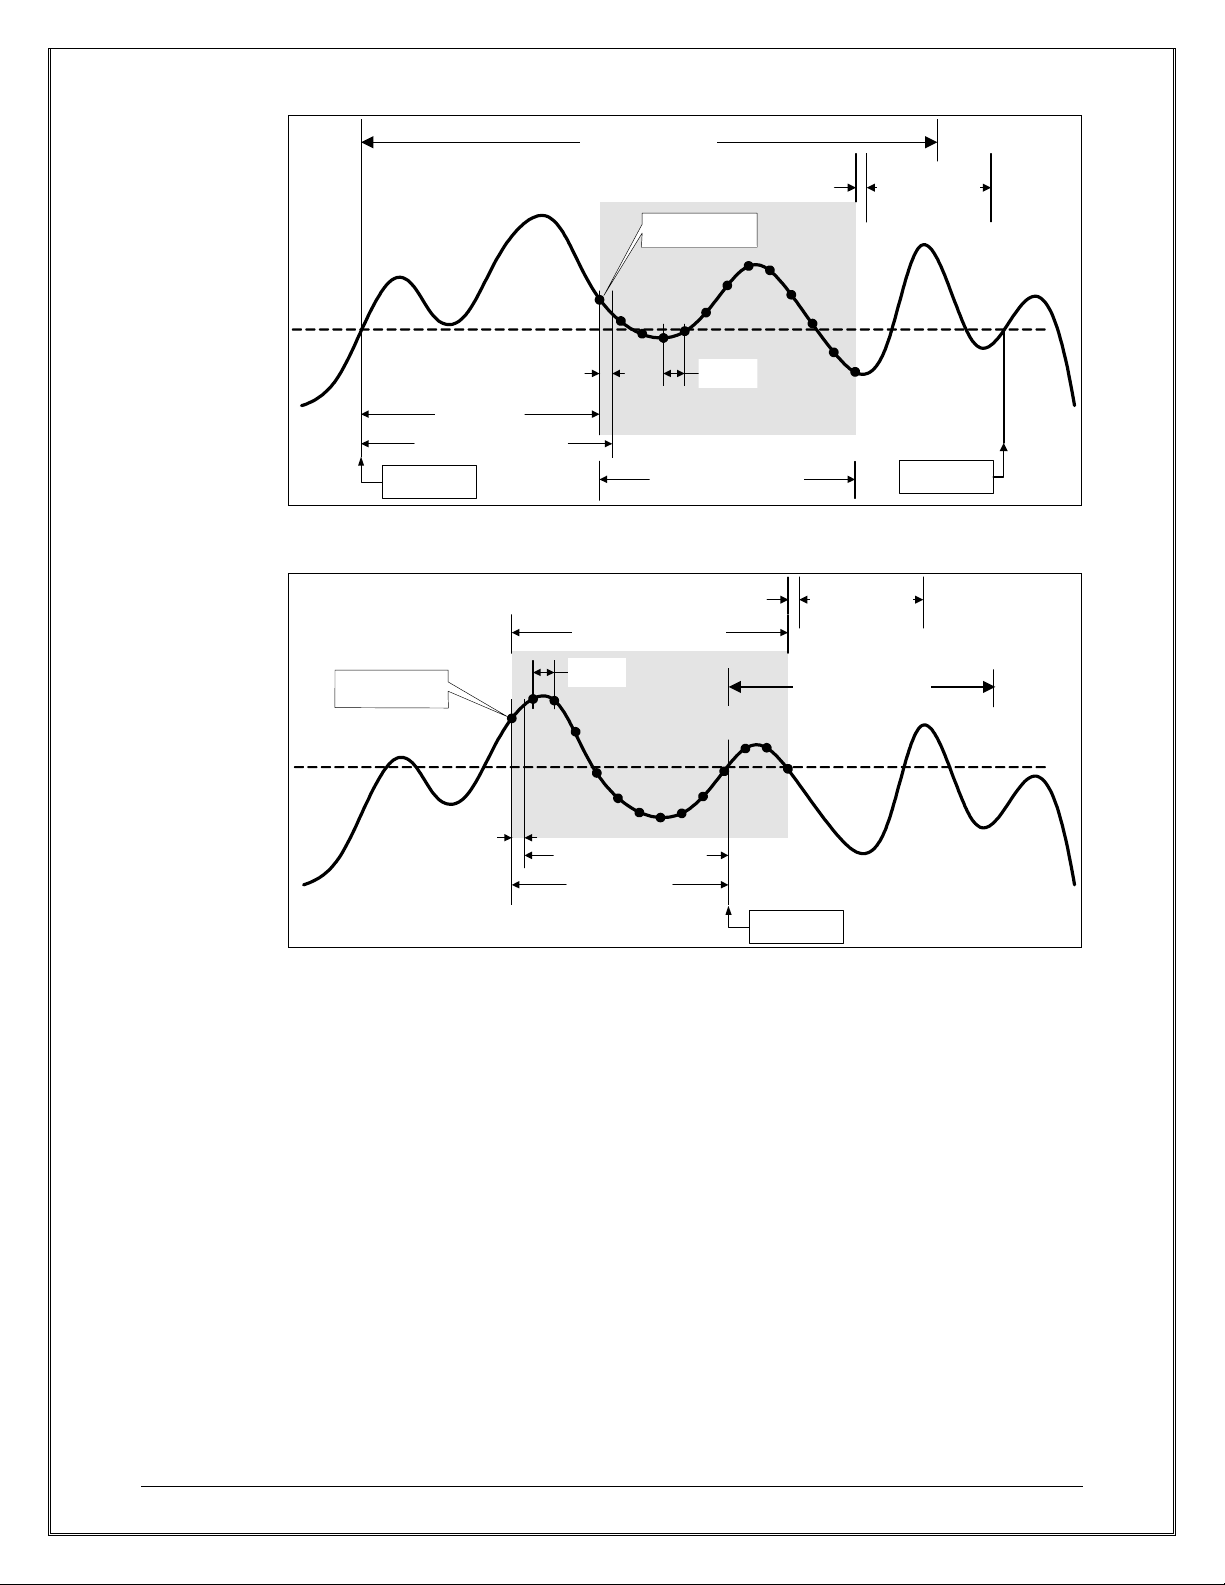
www.vtiinstruments.com
EX1401 Instrument Drivers 75
Trigger Offset
(always zero if
TTI is used)
Trigger Delay > 0
Trigger
First data point
Sample
Interval
InitialX > 0
Waveform
Record
Trigger Holdoff
Trigger
Pre-Trigger
Samples
Re-arm Time
FIGURE 5-2: POSITIVE TRIGGER DELAY
Trigger
Offset
Trigger Delay< 0
Trigger
First data point
Sample
Interval
InitialX < 0
Waveform Record
Pre-Trigger
Samples
Re-arm Time
Trigger Holdoff
FIGURE 5-3: NEGATIVE TRIGGER DELAY
The TriggerCount property defines how many times the trigger events are accepted and data blocks
are acquired. After “TriggerCount” triggers are processed, the measurement waits for the next
arming condition or finishes. The Holdoff time specifies the minimum amount of time the
measurement has to wait before it can be triggered again once a trigger is detected. Any trigger
Page 76
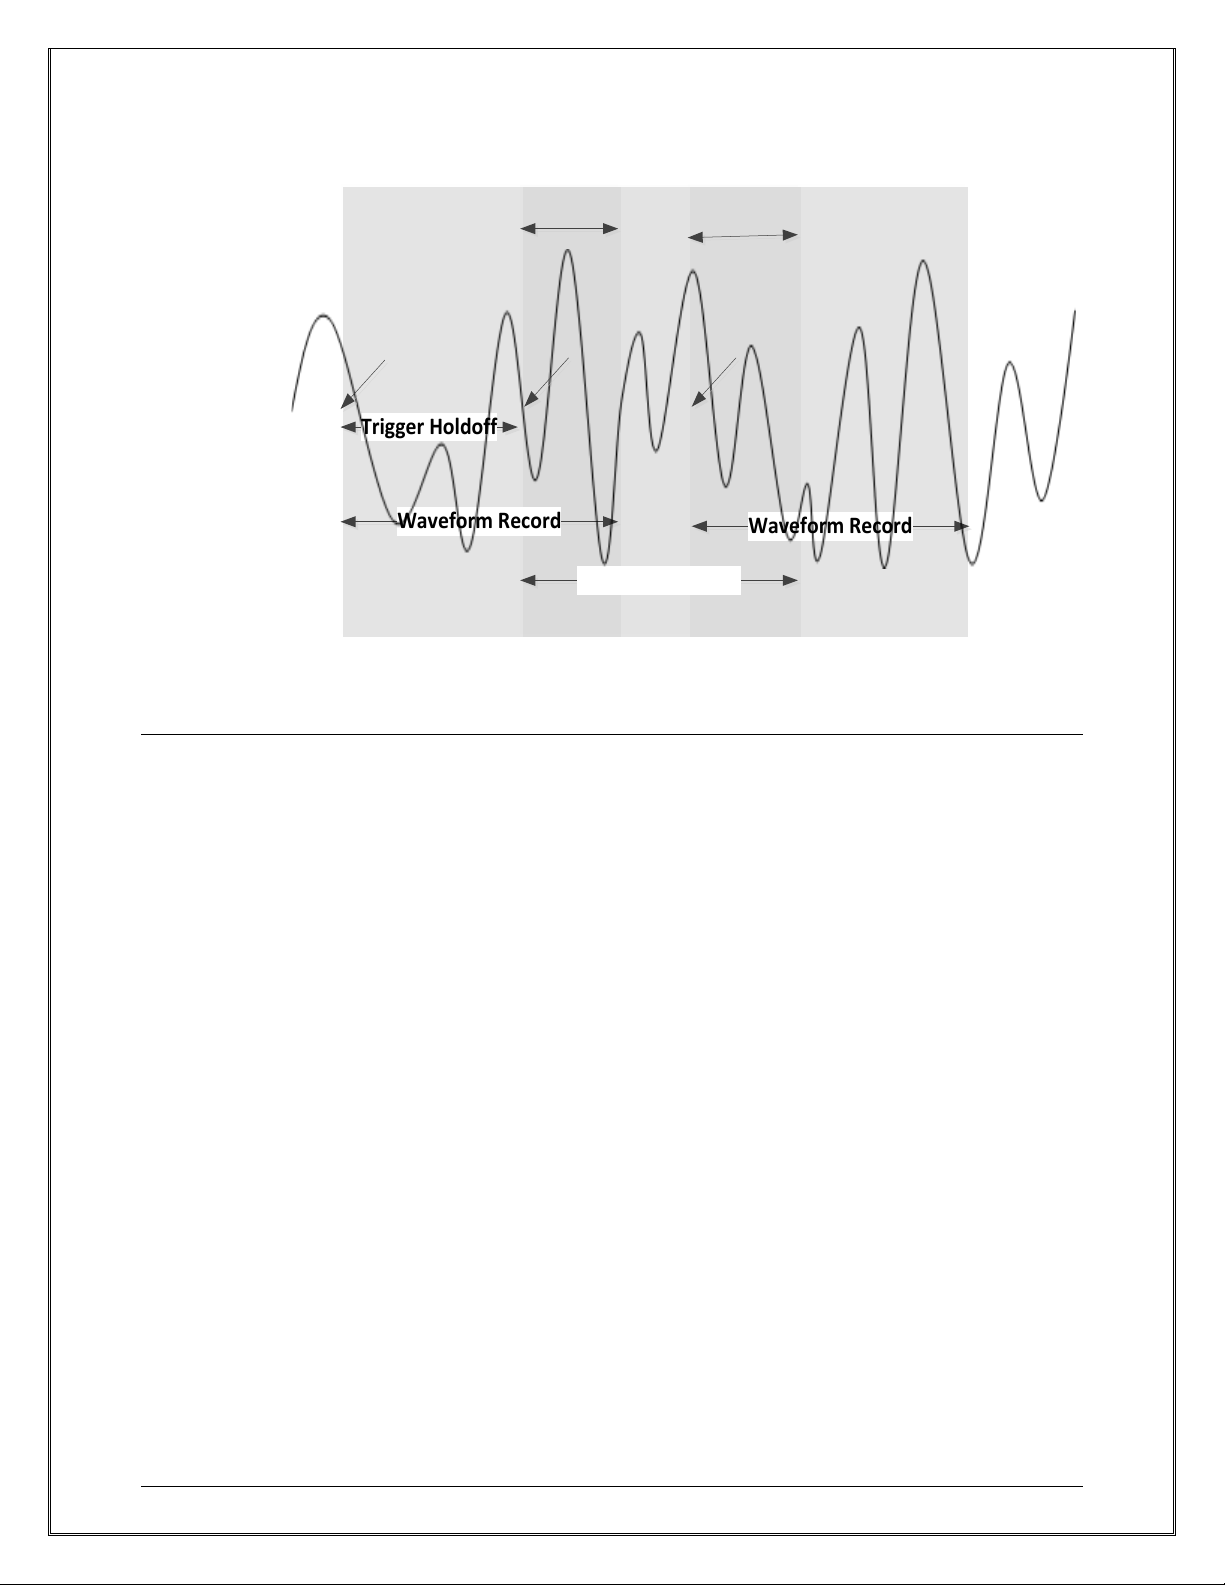
VTI Instruments Corp.
76 EX1401 Instrument Drivers
events that occurred during the Holdoff time are ignored. When the specified Holdoff time is shorter
than one data record period, the two successive data records may be overlapped.
Waveform Record
Waveform Record
Waveform Record
Trigger Holdoff
Trigger
Trigger Trigger
Overlap
Overlap
FIGURE 5-4: OVERLAPPED DATA ACQUISITION
Trigger Holdoff
The ability to configure the TRIG event source to be an external event such as a Digital I/O channel
level or a Trigger Bus channel edge is a powerful test feature, allowing measurements to be precisely
correlated with external events. External events, however, could nominally be generated at a rate far
faster than the EX1401 can completely and correctly execute the DEVICE layer. To prevent the
instrument from being overdriven, the trigger model contains an internal holdoff timer. Once the
trigger event has been satisfied, this timer disables the recognition of all trigger events for a time
period of 1 sample period. Trigger events that occur during this period are ignored, not buffered.
This is similar in concept to the fact that, for example, additional ARM events are ignored if the
trigger model is not specifically waiting for an ARM event. Due to this action, triggering the
EX1401 with a burst of external pulses that exceeds the configured sample rate will result in not
only fewer readings than trigger events, but also a reading rate that is potentially far less than the
maximum rate.
Consider an example in which the trigger model is set to the following configuration:
Start Source Immediate
Arm Source Immediate
Arm Count 1
Arm Delay 0
Trig Source DIO Channel 0 Positive Edge
Trig Count 100
Trig Delay 0
SampleRate 1000
Once initialized, the EX1401 is driven by a burst of 100 positive edge transitions at a rate of 1.5
kHz. At 1.5 kHz, the time between trigger events is 667 µs. Since this time is less than 1 ms, every
other trigger event will be ignored. Consequently, this burst will generate 50 readings at a rate of
Page 77

www.vtiinstruments.com
EX1401 Instrument Drivers 77
750 Hz. Note that the actual reading output rate is far less than the 1 kSa/s maximum rate. To achieve
the maximum output rate, the TRIG event source should be set to Immediate.
Start, Trigger and Arm events
There are three events that control the progress through the trigger model: The Start, Arm, and
Trigger events. Each of these events can be programmed independently to be activated from any of
the External Trigger, Digital I/O port, LAN events, Channel Analog Levels, and LXI alarms. In
addition, each event can be programmed to be Immediate, creating a permanent satisfaction of the
event monitor. Each event monitor can also be bypassed on command with the issuance of a
Software Start, Software Arm, or Software Trigger, as appropriate. The full list of sources includes:
• Digital Sources:
o Immediate
o Software
o ALARM0-1
o EXT
o DIO0-7
o LAN0-7
• Analog Sources:
o CH1 to CH16
The Start event source can be any one of the Digital sources, and is always a Falling Edge event.
The Arm event source can be any combination of the Digital sources, via either a Boolean AND or
a Boolean OR of all enabled sources. Each enabled source can be a High Level, Low Level, Rising
Edge, or Falling Edge event.
The Trigger event source can be a combination of either any of the Digital or any of the Analog
sources, via either a Boolean AND or a Boolean OR of all enabled sources. Each enabled source
can be a High Level, Low Level, Rising Edge, or Falling Edge event. Analog and Digital trigger
sources cannot be enabled at the same time.
The Digital I/O port and the External Trigger monitor the digital hardware ports on the rear panel
of the instrument. An Arm or Trigger event can be controlled by any combination of the eight
channels of each port.
LAN Events are triggered through the eight LAN Event channels via Ethernet packets
(UPD/multicast or TCP messages). They are configured in a manner similar to the Digital I/O port.
These events can occur in “past time”, “now”, or “future time”. “Past time” events have an IEEE
1588 time that occurred in the past. These will cause data starting from the time indicated in the
packet to be marked for retrieval. But, if the instrument was not in the WaitingForTrigger state at
the specified time, the packet will be ignored. “Now” events have a IEEE 1588 time of “0”,
indicating that the event will occur immediately after it is received. Because they have a time of “0”,
the event log will only identify when this event was received. “Future time” events have an IEEE
1588 time that has not yet occurred. Because these events occur in the future, they can be prepared
for and provide a better response time than either “past” or “now” events.
LXI alarms are specified by IVI 3.15, IVILxiSync specification. The LXI alarm will cause an event
based on IEEE 1588 time and always occur at the pre-programmed time. The alarm period can be
set for this event as well, allowing the LXI alarm to fire repeatedly at a defined interval.
NOTE: The extensive flexibility of the trigger model system permits the creation of very specialized trigger
conditions, which is a powerful application tool. However, it also permits the creation of trigger
conditions that would be very difficult to satisfy in practice. For example, if edge conditions are
specified on multiple digital hardware channels, the edges must occur within 25 ns of each other to
be recognized as having occurred simultaneously.
Page 78

VTI Instruments Corp.
78 EX1401 Instrument Drivers
Alarms
LXI alarms are a mechanism that generates events at a fixed time interval as specified by IVI 3.15,
IVILxiSync specification. When the Enabled property is true, the alarm starts at the time specified
by TimeSeconds and TimeFraction and repeats for RepeatCount times. The Period property defines
the interval between the two successive alarm events. Setting the RepeatCount property to 0 causes
the alarm to continue firing at the specified Period until the Enabled property is set to false. Setting
the Period to 0 causes the alarm to fire only once. The alarm properties can only be modified when
the alarm is disabled.
As an extension to the LXI alarm capabilities, the EX1401 also supports “now” alarms (similar to
“now” LAN events). Setting the TimeSeconds and TimeFraction properties to 0 causes the alarm to
fire as soon as it is enabled.
Alarms can be used as an arm or a trigger event source.
Page 79
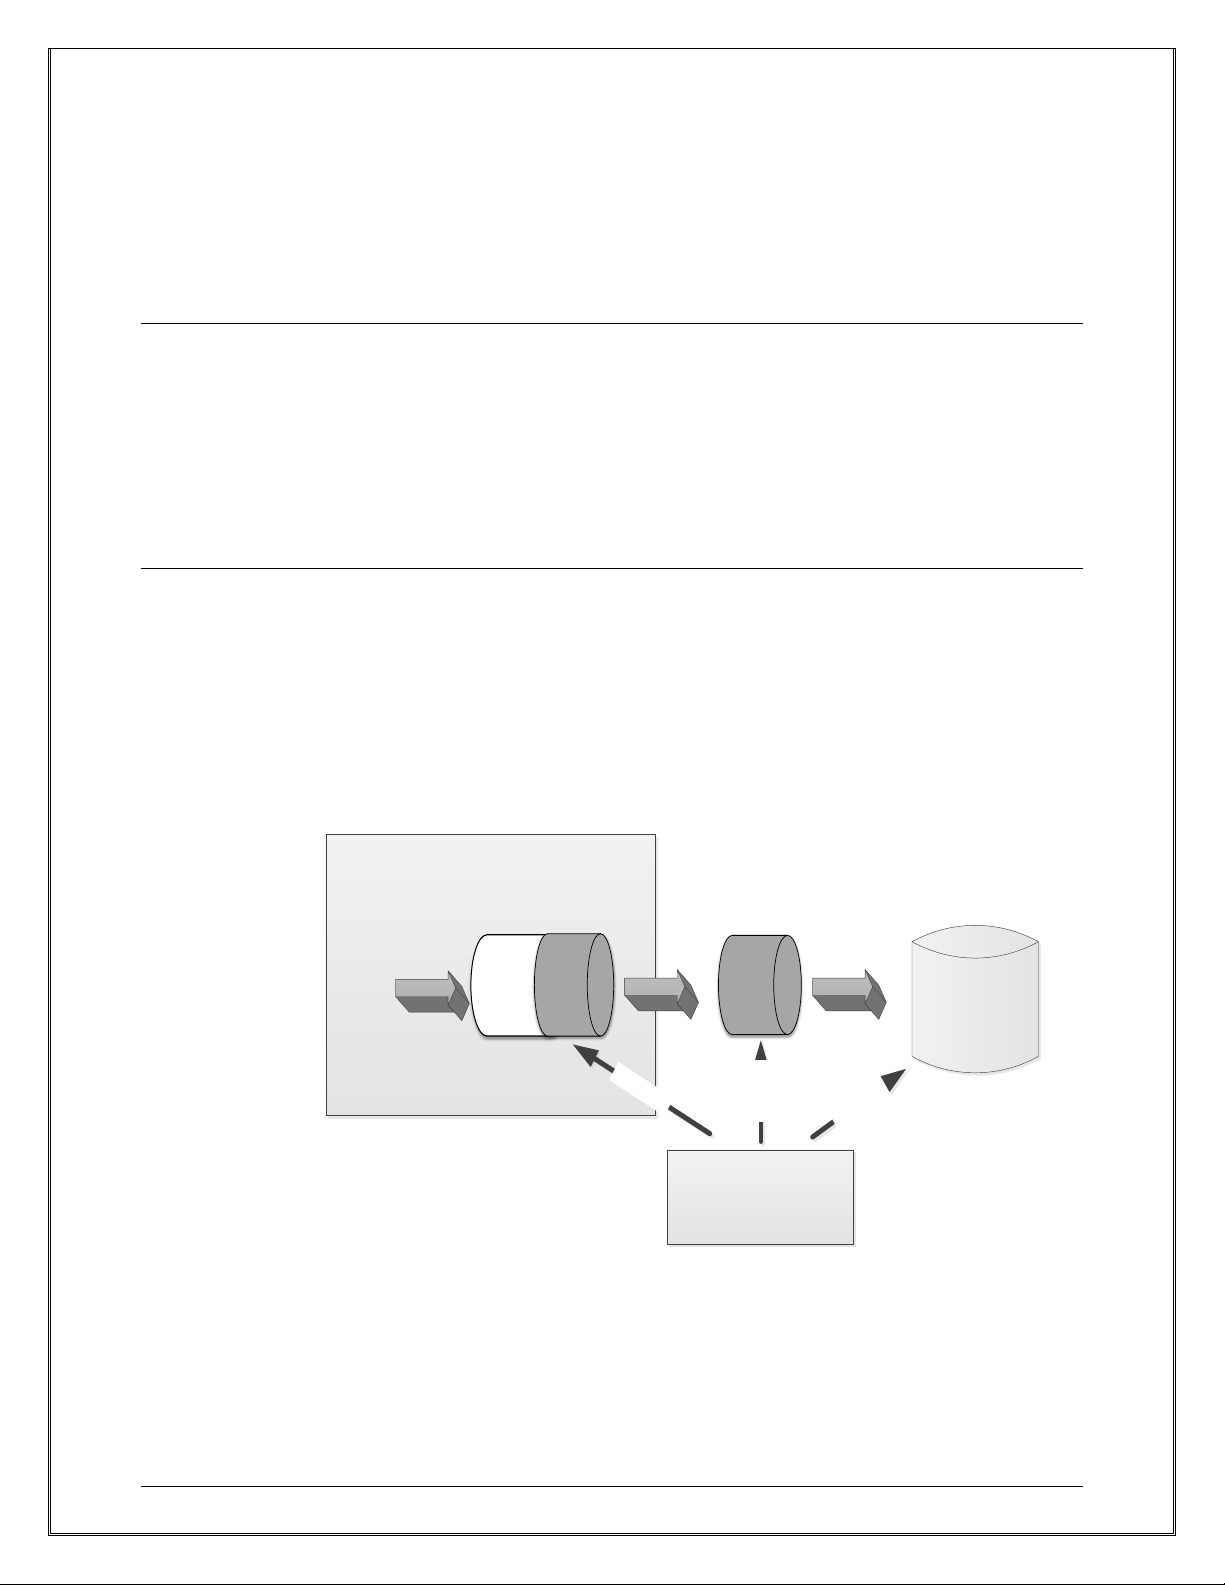
www.vtiinstruments.com
EX1401 Instrument Drivers 79
RETRIEVING DATA
The Digitizer driver provides two ways to retrieve data from EX1401. By default, the acquired data
is stored in the instrument’s FIFO buffer. The data in the FIFO can then be read using the standard
Read method. An alternative option is to use data streaming. The streaming mechanism makes it
possible to transfer data with less latency and overhead than the standard FIFO Read method;
complete records will be pushed to the driver by the firmware as soon as they become available.
FIFO Read
Once the measurement is triggered and data becomes available in the instrument’s FIFO buffer, data
can be retrieved using the Read method in the Measurement interface. The Read method returns the
specified number of data records from all enabled input channels in a channel order in the Channels
array. The NumFIFORecords property in Measurement interface returns the number of data records
currently available in the instrument’s FIFO buffer. This value decreases when the data is retrieved
by the host, and increases when new trigger events are processed. FIFO buffer overflow may happen
when the trigger events arrive faster than the host can retrieve data. See the FIFO description in the
Data Acquisition section for more information.
Streaming
Streaming data is an alternative method for retrieving data from the EX1401. Unlike the FIFO read
function, instruments send new data records to the host PC as soon as it becomes available when
streaming data. The data is kept in the host memory buffer managed by Digitizer driver. The data
in this memory buffer is then retrieved to the user’s application through the MemoryRead method.
The streamed data can be directly written into disk files or passed to a user’s callback method. In
order to use this streaming mechanism, it must be enabled by calling the EnableStreaming method
in the StreamingData interface.
The key advantage of the streaming method over the FIFO Read method is data transfer speed and
latency.
User Application
Memory
Read
FIFO
Buffer
Host
Memory
Disk
Stream
Streaming
Stream
Files
File Read
Sampled
Data
FIFO Read
Host Disk
EX1401
FIGURE 5-5: FIFO READ AND STREAMING
Page 80
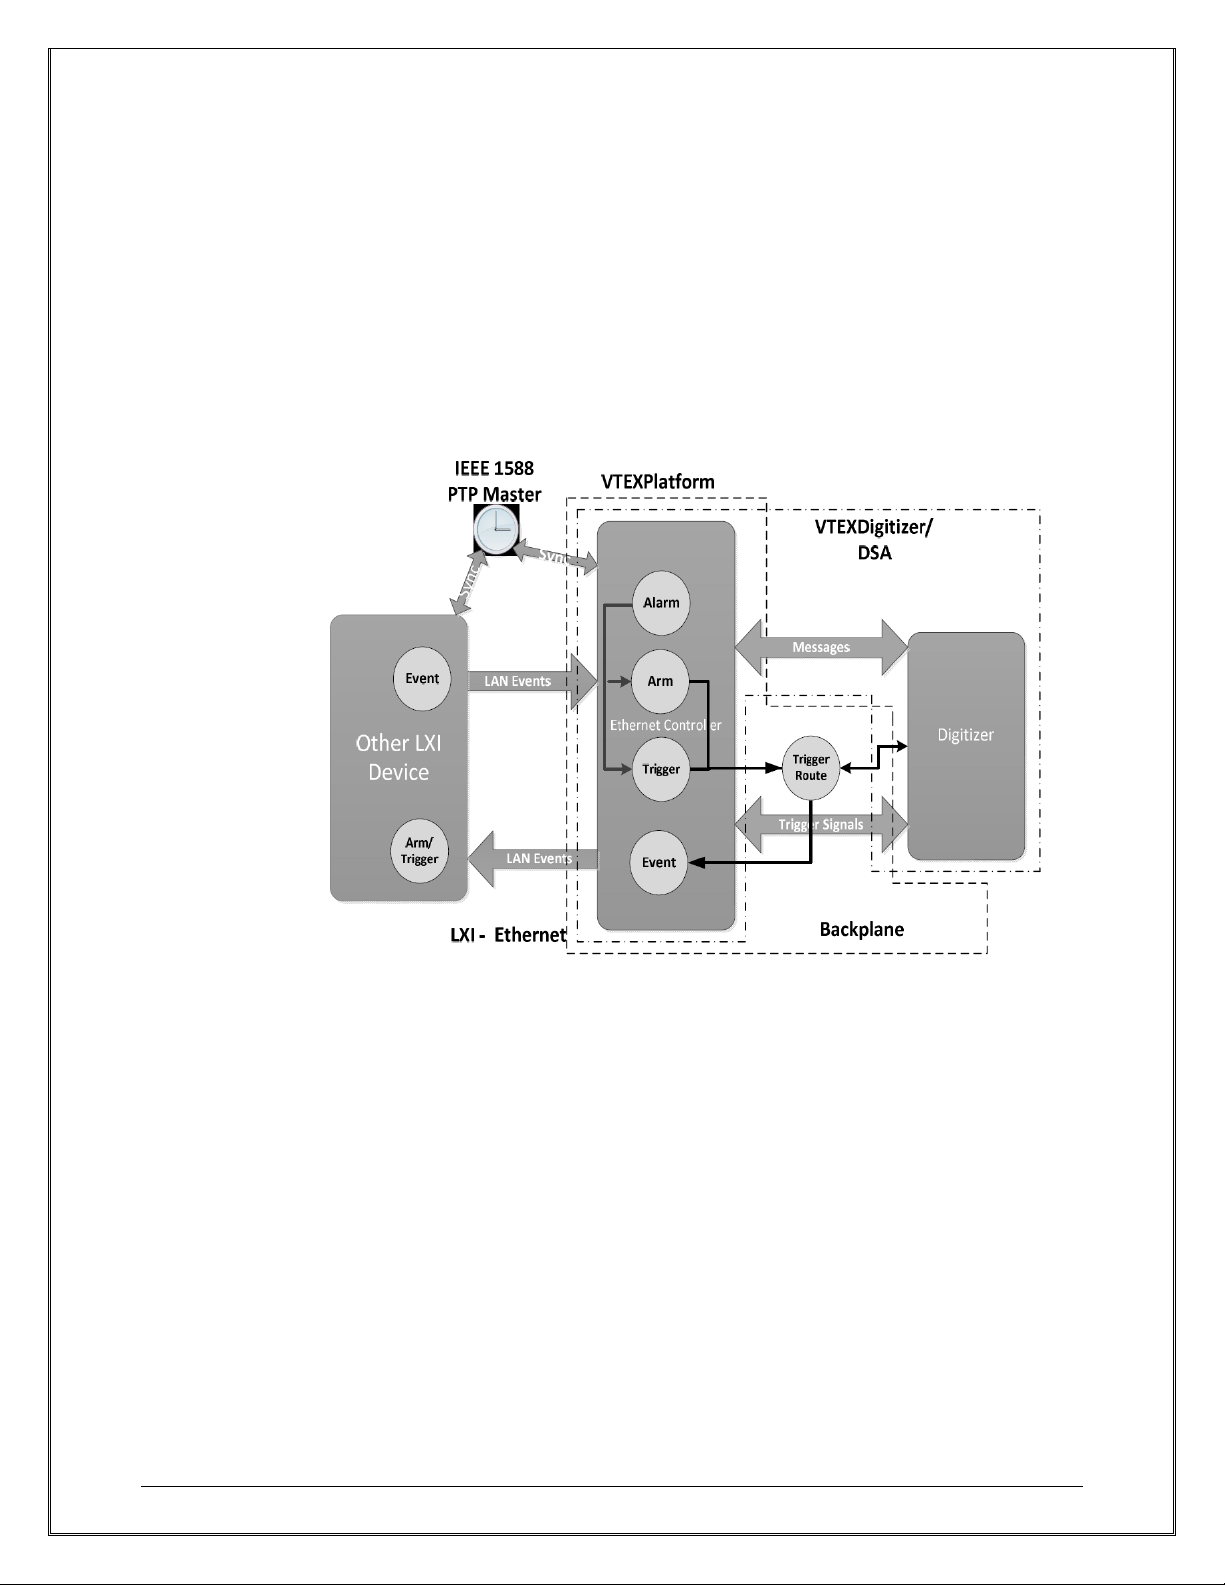
VTI Instruments Corp.
80 EX1401 Instrument Drivers
REFERENCE CLOCK AND TIME STAMPS
The Source property and TimestampSource property in the ReferenceOscillator interface configure
the reference oscillator to generate an ADC sampling clock and data time stamp clock. The
PXIe_CLK100 (100 MHz) reference signal is used by default. When the system is synchronized to
the IEEE 1588 PTP grand master via Ethernet, the IEEE 1588 clock can be used as a reference
oscillator be selecting “System”.
LXI AND LAN EVENTS
The EX1401 can act as an LXI device. These instruments can be synchronized to an IEEE 1588
PTP grand master clock. They can be armed or triggered by LAN events or they can generate LXI
LAN events to synchronize with other LXI devices through the IVI-LXISync interface defined in
the IVI driver specifications.
FIGURE 5-6: LXI AND LAN EVENTS
IVI CLASS COMPLIANT INTERFACES
In addition to the IVI-LXISync interface, the VTEXDigitizer/VTEXDsa drivers expose the IVIDigitizer and IVI-Scope class compliant interfaces. These interfaces are exposed for the instruments
interchangeability, but their use is not recommended. These IVI interfaces do not support the full
capabilities of the EX1401’s sophisticated trigger model and many other features.
Page 81

www.vtiinstruments.com
EX1401 Instrument Drivers 81
MULTIPLE INSTRUMENTS
INITIALIZING WITH MULTIPLE INSTRUMENTS
Unlike many typical instrument drivers, the Digitizer drivers allow multiple EX1401 devices and
other EMX devices to be controlled as if they were a single, collective instrument. The user can
initialize a single driver for two EX1401 devices and treat them as a single, 32-channel instrument
instead of creating two driver sessions with 16 input channels each. Multiple types of device can
also be included in the driver session.
When initializing the driver session, the resource name is passed as an argument to the Initialize
method that specifies which instruments will communicate. The resource name has the following
syntax:
<address 1>[ ::<slot 1>,<slot 2>,..,slot N> ] | <address 2> [
::<slot 1>,<slot 2>,…,<slot M> ] | …
Where:
<address x> is the IP address or host name of the EX1401 or EMX-2500 controller (of the PXIe
chassis, where EMX series cards are installed)
<slot x> is the slot number identifier of the instrument in a chassis. The slot number identifier is
a string such as “slot0_5” which indicates the 5th slot of the first chassis controlled by an EMX-
2500. An identifier such as “slot1_6” indicates the 6th slot of the 2nd chassis extended by a bus
extender. (Bus extenders are not supported by all devices.)
The slot numbers are optional. When no slot numbers are specified, all supported instruments within
the chassis will be used. The slot number for all EX1401 instruments is “inst0”, but this can always
be safely omitted.
When connecting to more than one EX1401 or EMX-2500 controller, the addresses must be
concatenated with the “|” (pipe) character.
The resource string to connect to a particular device can be found on the Index web page (see Index
in Section 4.
MULTIPLE INSTRUMENT COORDINATION
When the driver session contains multiple EX1401 and EMX devices, the Sync and
ReferenceOscillator interfaces must be used to synchronize the sampling clocks and trigger models
on each device to have the best sample-to-sample alignment during measurements.
Page 82
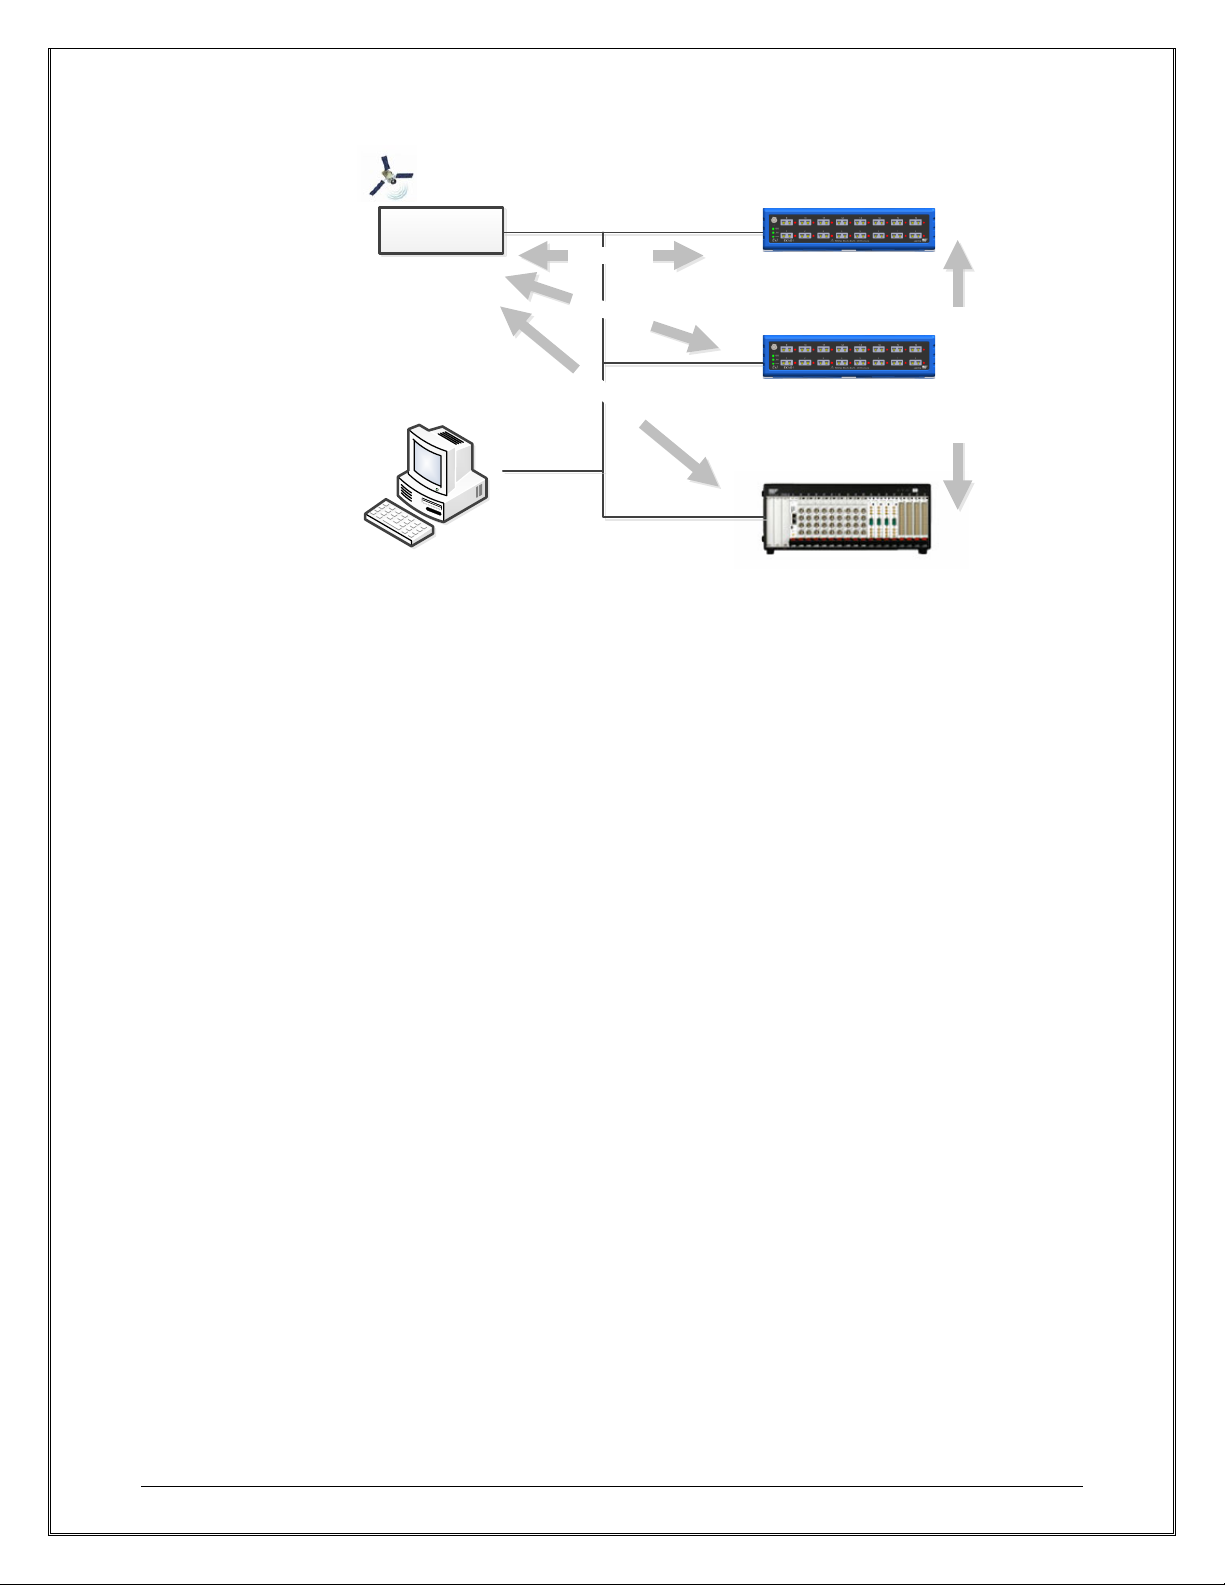
VTI Instruments Corp.
82 EX1401 Instrument Drivers
FIGURE 5-7: LAN COORDINATION
Before enabling LAN coordination, each EX1401 and EMX-2500 controller must be configured to
use PTP2 as the time source (see Time Configuration in Section 4). All devices must use the same
value for the PTP Domain. They must also be configured to use the same value for LXI Domain via
the web page or using the Platform driver.
After opening the Digitizer/DSA driver session, the ReferenceOscillator.Source and
ReferenceOscillator.TimestampSource properties must be set to “System” (IEEE 1588). The
Sync.Line property must be set to a comma-separated list of sources for the sync signal, such as
“ALARM0” or “ALARM0,PXI0”. The Sync.CoordinationLine property must be set to a comma-
separated list of signals (beginning with “LAN”) to use for the coordination subsystem, e.g., “LAN”
or “LAN,PXI0”. Note that EMX devices require specifying a hardware line in addition to LAN
when setting the Sync.CoordinationLine property. See the Digitizer/DSA driver documentation for
more information.
The most convenient way to ensure the correct settings for synchronization/coordination is to
configure the desired arm sources, events, and trigger sources, then call the Sync.AutoConfigure
method. This selects the best values for the Sync.Line and Sync.CoordinationLine properties based
on the devices in the driver session. See the Digitizer/DSA driver documentation for more
information.
LAN coordination may cause unexpected confusion in rare circumstances if the devices are
separated by a long distance or network communication is slow. For example, when an analog
channel detects a trigger, it sends a LAN message to all devices so that they trigger at the same time.
If another channel from a different device also detects a trigger condition before it receives the LAN
event from the device that detected the previous trigger condition, the multiple triggers cannot be
processed correctly. In order to avoid this scenario, the user may need to set restrictions so that only
certain channels can detect trigger events.
IEEE1588
Grandmaster
Ethernet LAN
IEEE1588 Clock
IEEE
1588
Clock
IEEE
1588
Clock
LAN Event Coordination
GPS
Host PC
EX1401 (1)
EX1401 (n)
EMX-2500
Page 83
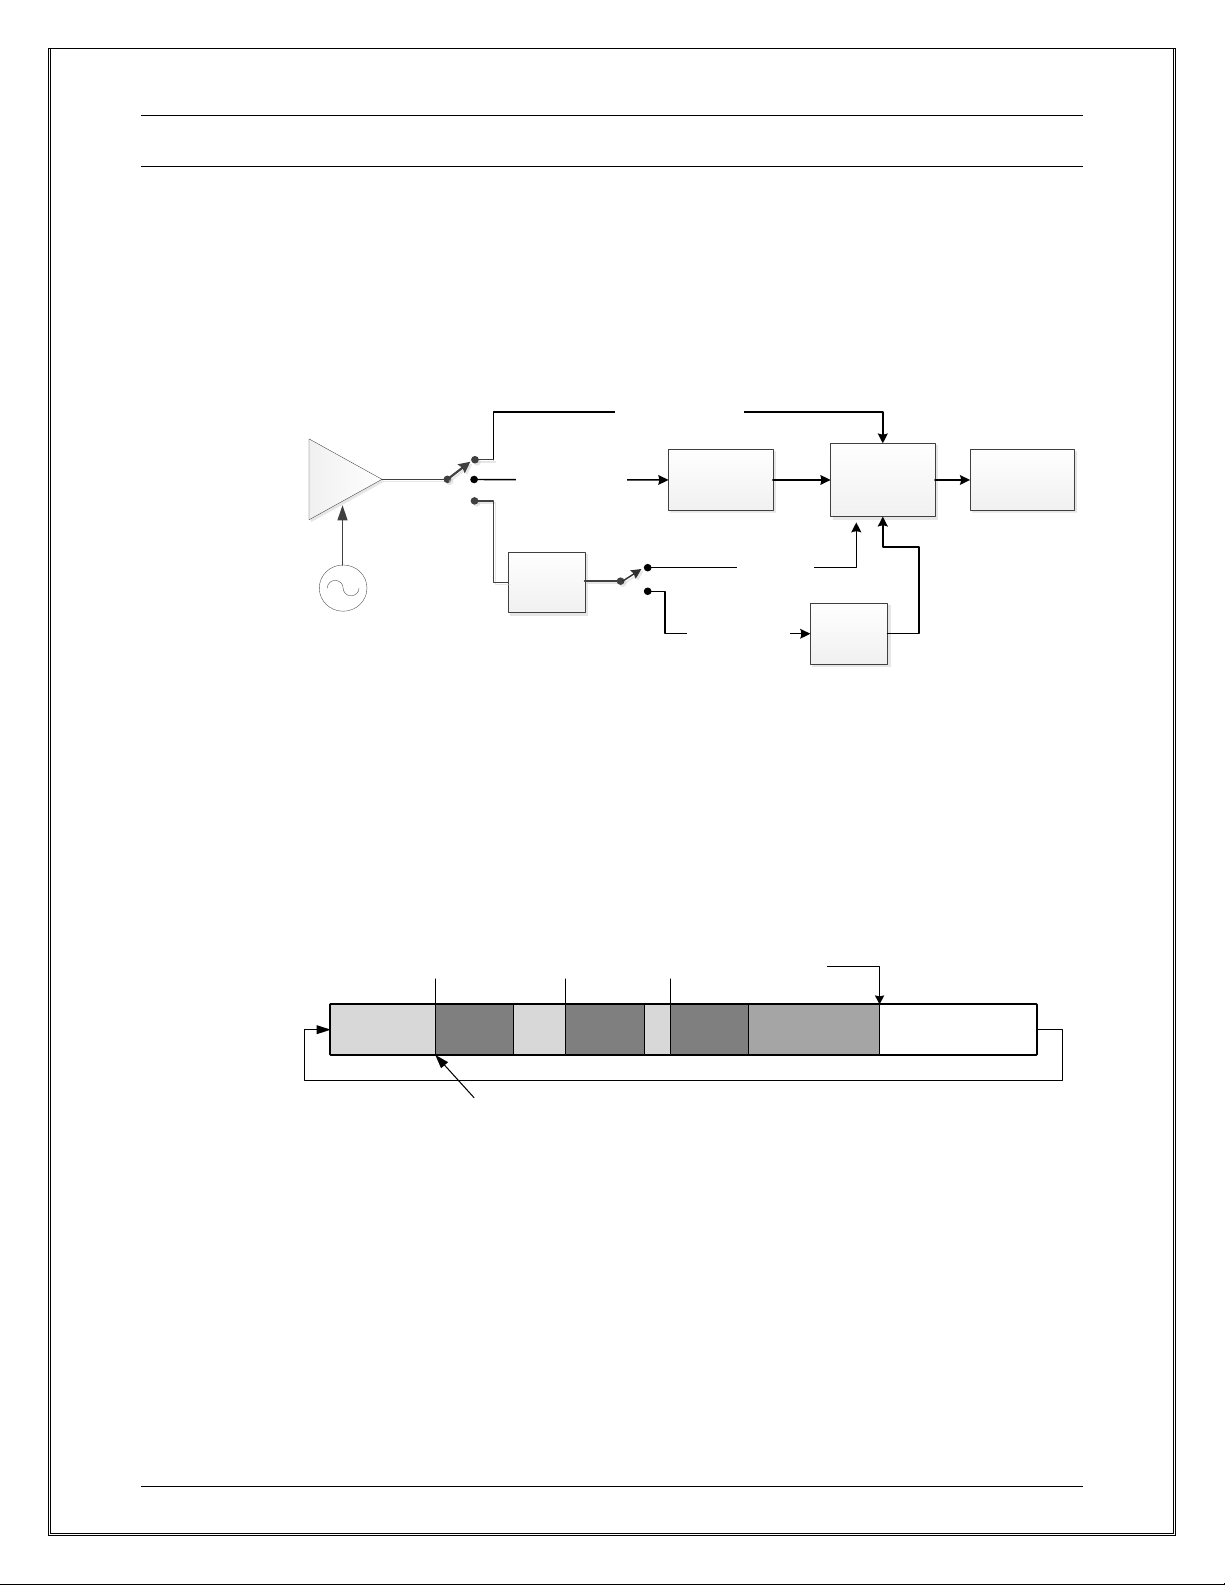
www.vtiinstruments.com
EX1401 Instrument Drivers 83
DATA ACQUISITION
DATA FLOW
The EX1401 instruments have a dedicated A/D converter at each analog input channel. The A/D
converter samples analog data at fixed frequency specified by a multiple of the ClockFrequency
(FC). The output data rate of the ADC is FC. The digitized data by the A/D converter can then be
decimated and filtered by any one of three selectable types of digital filters until the signal is band
limited to the desired frequency span and the sample rate (FS). These band-limited samples are
constantly sent to the FIFO memory buffer located in DRAM.
ADC
PLL
CLK=32*2^n*fs
Decimate 2^n
FIR (Customizable)
(n=1 to 16)
CIC
(/4 to /8192)
CFIR
(/4)
Customizable
Medium Latency
Blind
Downsampling
(/1 to /65536)
2^n*fs
Raw | (Filter = None)
Gain/Offset/
Engineering
Unit Conversion
High Performance
Low Latency
FIGURE 5-8: DECIMATION FILTER AND MEASUREMENT SPAN
FIFO
The decimated and band-limited samples by decimation filters are temporarily stored in a circular
buffer (or FIFO) until the data is read out and transferred to the host.
Figure 5-9 illustrates the circular data buffer (FIFO). The figure shows three unread data records in
the data buffer. The white unused space and over-writable space are the areas where new data can
be written until this data buffer becomes full.
Record N
Record
N+1
Record
N+2
Trig N Trig N+1 Trig N+2
From ADC
FIFO Overflow Limit
Overwritable Unused SpaceNew Data
FIGURE 5-9: CIRCULAR FIFO
When the FIFO buffer is full and there is no more space to write new data to the FIFO, the
measurement is aborted. After the last data record in the FIFO is read, a FIFO overflow error will
be issued to indicate why the acquisition was stopped.
DATA STREAMING
The Digitizer driver comes with an optimized data-reading interface for high speed and/or lowlatency acquisitions. This interface relies on a separate thread which receives data asynchronously
from the instrument as soon as it is available and acts on it immediately based on user-set
preferences. There are three streaming modes, any of which can be enabled at the same time.
Page 84

VTI Instruments Corp.
84 EX1401 Instrument Drivers
Memory Streaming
Memory streaming is the default mode for these instruments. When the user enables Streaming
without any configuration, the data is streamed into a dynamically allocated buffer on the host PC
and then retrieved via a Read-like interface. This is the fastest streaming interface, since memory is
the fastest storage device on the PC. However, this mode is unsuited for long acquisitions because
it can grow beyond the memory limits of the device and start paging to disk. The internal buffer
grows as needed but does not shrink until streaming is disabled.
Additionally, this mode can be set to watch only select channels of interest. If the
MemoryChannelsList property is set, the data for only the selected channels will be streamed to
memory.
If another type of streaming is enabled while memory streaming is enabled, memory streaming is
disabled unless the MemoryChannelList property is set.
Disk Streaming
Disk streaming is intended for high performance applications and/or long acquisitions. When
enabled by setting a filename, the driver optimizes the data path by not converting the data from the
native VRT data format. The data is written to disk in the HDF5 data format. For more information
on HDF5 file formats and tools, visit the HDF Group’s website: https://www.hdfgroup.org.
The Digitizer driver uses an HDF5 file hierarchy that is very similar to the layout used for the Data
Logger feature. See HDF5 File Hierarchy in Section 6 for more details.
The disk streaming file includes several HDF attributes that describe the instrument configuration
at the time that an acquisition was initiated. Additional user-defined attributes can be set by using
the SetCustomAttributes method. The GetCustomAttributes method allows the user to inspect the
attributes that are currently set. RemoveCustomAttribute and RemoveAllCustomAttributes can be
used to remove attributes that are no longer needed.
If Measurement.Initiate is called multiple times without changing the Filename property, the
existing file will be overwritten with the new acquisition data.
Disk streaming has the same limitations as the underlying filesystem. For example, a FAT32
filesystem cannot support files larger than 4GB. If disk streaming is used on a FAT32 filesystem
and the file grows too large, errors and data loss may occur. In addition, disk streaming throughput
may suffer when the underlying filesystem is very slow, such as a USB 2.0 external drive.
Callback Streaming
Callback streaming is enabled when the user registers one or more callback functions, which are
called with available data when it is ready. The user’s code may then act on the data. To register a
callback, the user will have to override the COM abstract interface (when using the IVI driver) or
C++ pure-virtual callback class (when using the Linux driver), and then pass this class to the
RegisterStreamingCallback method. The data is returned in the same format as the MemoryRead
method, as can be determined from examining these classes.
Support for registering a callback to receive data only from certain channels, similar to using the
MemoryChannelList, is scheduled for a future driver release.
SAMPLING RATES
The properties in the Sampling interface configure the A/D converter and decimation filters to
specify the sampling rate and frequency span of the data to be acquired. Some properties in this
interface are interrelated. Changing one property value can affect the other.
Page 85

www.vtiinstruments.com
EX1401 Instrument Drivers 85
There is a Sampling interface in the Measurement interface as well as the individual Channel
interface. The properties in the global Sampling interface that apply to all channels as well as DIO
can be configured from the Measurement interface, while the Channel interface allows the user to
configure each channel independently.
ClockFrequency
The ClockFrequency specifies the A/D conversion rate. This property determines the highest
SampleRate of the data acquisition session. The highest rate can be achieved by bypassing all
decimation filters. The EX1401 supports all integers from 10000 to 20000 as valid values of
ClockFrequency. ClockFrequency can also be set to -1 to allow the firmware to choose the value
automatically based on the requested SampleRate. ClockFrequency is a global parameter. It cannot
have different values for each channel.
Prescaler
This is the sampling rate divider before the ADC data is decimated by the ½ decimation filter stages.
The EX1401 only supports a value of 1 for Prescaler, which has no effect on measurement data.
DownsamplingFactor
This is the amount of unfiltered downsampling that will be performed after the decimation filtering
by the selected FilterType. The EX1401 supports all integers from 1 to 65536.
FilterType
This specifies the type of digital filter that will be used to decimate and filter the data. Four
options are available; High Performance, Medium Latency, Low Latency, and None. None disables
all digital filtering, such that effective SampleRate is equal to ClockFrequency divided by
DownsamplingFactor. HighPerformance is an FIR filter with 0-16 divide-by-2 stages. This
provides optimal performance but has high group delay. The decimation ratio can only be powers
of two up to 216. This filter’s response can be customized by providing normalized filter
coefficients. LowLatency is a CIC filter capable of any integer decimation ratio from 4 to 8192.
This provides the lowest group delay, but is only suitable for use with DC inputs. MedLatency
pairs the CIC filter with a Compensating FIR (with decimation ratio of 4) at its output. This
increases the group delay, slightly, while providing a better response across a variety of input
frequencies. Valid decimation ratios are all multiples of 4 from 16 to 65536. The MedLatency
filter’s CFIR can also be customized by supplying normalized filter coefficients.
SampleRate
This is the effective data rate. The inverse of SampleRate specifies the interval between data samples
that the user can obtain. The ClockFrequency, DownsamplingFactor, and SampleRate determines
the amount of decimation and filtering performed by the filter indicated by FilterType. Some
instruments support setting different SampleRate values on channels in a single instrument. For
EX1401, the SampleRate is a global property and will always be the same for all channels in the
same instrument. The decimation ratio of the selected filter will be set to ClockFrequency /
DownsamplingFactor / SampleRate, rounded down to the next valid value for the chosen FilterType.
Span
The Span is the nominal frequency range of the acquired signal. The value of Span is determined
by the decimation filter’s cutoff frequency. The ratio between Span and SampleRate varies based
on the selected FilterType. See the instrument specifications table for the precise value for each
filter.
Page 86
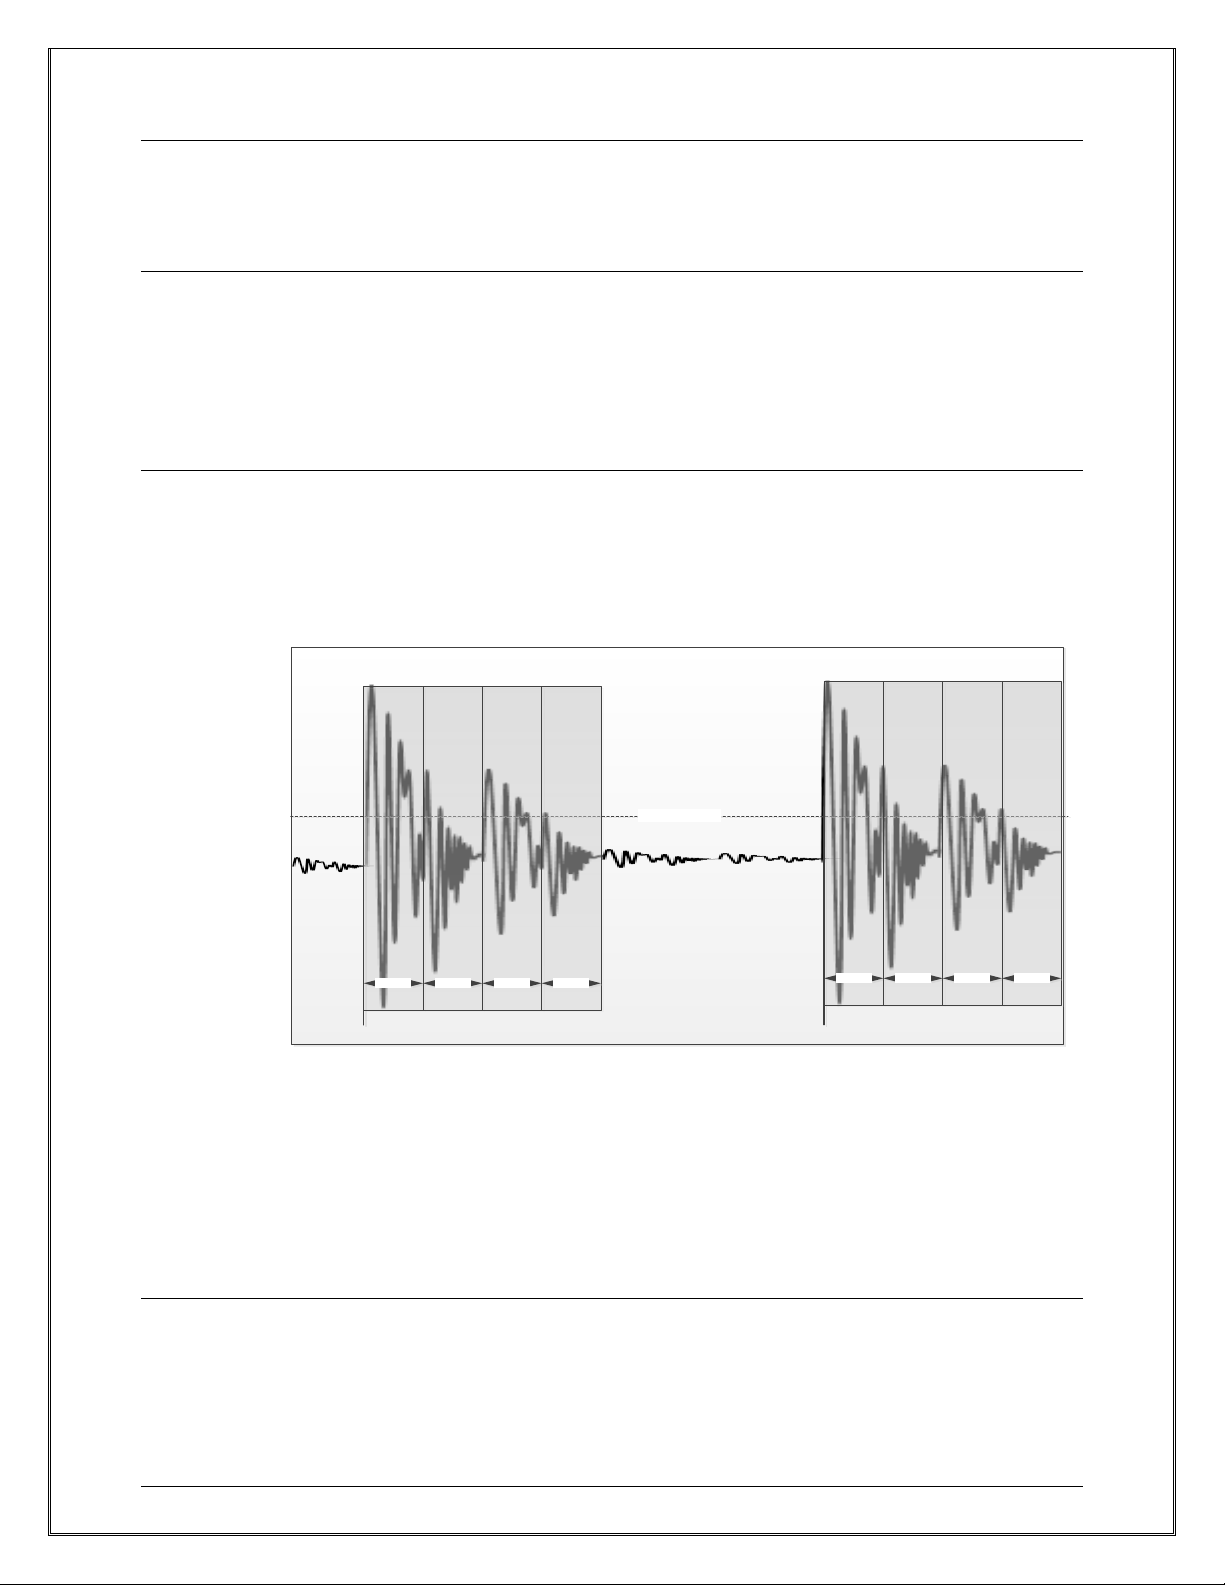
VTI Instruments Corp.
86 EX1401 Instrument Drivers
FilterCoefficients
The normalized filter coefficients of the HighPerformance and MedLatency filters can be
programmed by the user to achieve optimal results for their particular application. These are each
32-tap FIR filters with 64 coefficients.
GroupDelay
The GroupDelay parameter specifies the delay of each stage of the FIR and CFIR filters used by the
HighPerformance and MedLatency filters, respectively, in units of undecimated samples. By
default, this value will be correct for the preprogrammed value of FilterCoefficients. If, however, a
custom set of coefficients is supplied, this property should be set with the correct group delay for
those coefficients. This allows the firmware to perform group delay compensation on measured data
correctly with the customized filter response.
RecordSize
The RecordSize specifies the number of data samples read back from the instrument at a time. The
total number of data samples captured for each trigger is equal to the product of RecordSize and the
Measurement.NumRecordsPerTrigger property – that is, NumRecordsPerTrigger records are
captured, and each is of size RecordSize. Figure 5-9 shows the case where NumRecordsPerTrigger
= 4. As a special case, when NumRecordsPerTrigger is set to 0, an infinite number of data records
are returned in RecordSize sample chunks after a trigger event until the measurement is aborted.
Trigger Level
Trigger Trigger
Record Record Record Record
Record Record Record Record
FIGURE 5-10: RECORD SIZE AND NUMRECORDSPERTRIGGER
The minimum RecordSize is 1 and the maximum value is 65527. The maximum value for
RecordSize that is also a power of two is 32768. Since each data packet transferred from the
instrument to the host contains one data record from a single ADC channel, the user can achieve
higher data transfer rates by using a larger RecordSize to reduce overhead. Doing so will affect the
data update interval, as the record period (the amount of time to acquire one data record) is: T =
RecordSize/SampleRate.
Setting The Sample Rate
There are four key properties to configure when setting the EX1401’s sample rate. These are
ClockFrequency, FilterType, DownsamplingFactor, and SampleRate. ClockFrequency defines the
rate at which the instruments ADCs produce data. The other properties all define how that data is
digitally decimated and filtered. When possible, choosing higher ClockFrequency and higher
amount of decimation for the same final sample rate is generally better, providing better signal
Page 87
www.vtiinstruments.com
EX1401 Instrument Drivers 87
characteristics. If the ClockFrequency is set to -1, the firmware will automatically select the largest
possible value that best achieves the user-specified SampleRate. FilterType selects which type of
digital decimation filter will be used, and will affect both the granularity of available sample rates
and the spectral performance of the decimated output. DownsamplingFactor is applied after all
digital filtering to reduce sample rate with no group delay by simply throwing away N-1 in N
samples. Finally, setting SampleRate will specify the decimation ratio of the chosen filter so that
SampleRate = ClockFrequency / DecimationRatio / DownsamplingFactor. DecimationRatio will be
rounded down to the next valid value (and thus SampleRate rounded up) if the supplied value is not
exactly possible.
DIO Sample Rate
The EX1401’s DIO port can record its input state at the same rate as the analog input channels.
Because this data is purely digital and binary, it cannot be decimated. All DIO data is downsampled
with no filtering such that the DIO sample rate is always equal to the analog channels’ final sample
rate. For that reason, only ClockFrequency and SampleRate are available in the DIO.Sampling
interface – FilterType is not supported. Attempting to set either the channel or DIO sample rate will
always cause the other to be set to the same value.
OVERLOADS AND OPEN TRANSDUCER DETECTION
When the analog signal amplitude exceeds the input range, the digitized samples are truncated
resulting in a distorted waveform. To avoid this, users can increase the input range of the instrument,
attenuate the signal level, or discard overloaded data from processing. Apart from over-range, there
are other fault conditions that can invalidate measurement data, such as an open transducer. The
EX1401 is capable of detecting some of these common fault conditions and reporting them, allowing
the user to act.
The fault status can be queried from the Digitizer driver’s API. The status can be indicated at the
front panel LED, external trigger, and DIO outputs. The information is also associated to the
acquired data record and returned in the AdditionalData string.
The Digitizer driver defines each fault status as an Overload Status bit field. The user can configure
which fault conditions to reported, if an LED indicator is shown, or it can latch so that a momentarily
fault won’t be overlooked.
Bit Mask
Name
Description
0x00000002
Transducer Upper Limit
The signal is above the defined range of the
transducer’s EU conversion. This is either the limit of
the NIST polynomials, for standard thermocouple
types, or the user-supplied value of
Channel.Tranducer.UpperLimit.
0x00000004
Transducer Lower Limit
The signal is below the defined range of the
transducer’s EU conversion. This is either the limit of
the NIST polynomials, for standard thermocouple
types, or the user-supplied value of
Channel.Tranducer.LowerLimit.
0x00000008
User Upper Limit
The signal is above the user-defined value of
Channel.Overload.UserUpperLimit, and
Channel.Overload.UserLimitEnabled is True.
0x00000010
User Lower Limit
The signal is below the user-defined value of
Channel.Overload.UserLowerLimit, and
Channel.Overload.UserLimitEnabled is True.
Page 88
VTI Instruments Corp.
88 EX1401 Instrument Drivers
0x00000020
Open Transducer
The OTD trickle current is enabled and has caused
the input voltage to rise above the upper limit of the
ADC’s valid input range.
0x00010000
ADC Overload
The signal is outside of the ADC’s valid input range,
either too high or too low.
0x00100000
ADC Sync
The channel’s ADC has become unsynchronized
from the others in the instrument, likely due to
electrostatic discharge. While this status bit remains
set, the firmware is resynchronizing it.
TABLE 5-2: INSTRUMENT-SPECIFIC FAULT STATUS BIT SUPPORT
TIME STAMPS
During data acquisition, the EX1401 returns timestamps along with digitized analog data. The
timestamps are created based on the TimestampSource clock specified in the ReferenceOscillator
interface. When IEEE 1588 synchronized time stamps are desired, the TimestampSource property
must be set to ReferenceOscillatorTimestampSourceSystem. Otherwise, the time returned will be
the time elapsed since the SYNC signal was received.
When measurement data is retrieved, both a timestamp of the data record and a timestamp of trigger
event are returned. The combination of TimeSeconds and TimeFraction parameters indicate the time
of the first data sample in each retrieved data record. The time of trigger event is returned in the
AdditionalData parameter.
Timestamp Source
Timestamp value
Resolution
System (IEEE 1588)
PTP or TAI (International Atomic Time)
40 ns
PXIe_CLK100
Elapsed time from last SYNC
40 ns
TABLE 5-3: TIMESTAMP SOURCE AND RESOLUTION
ADDITIONAL DATA
The additional information associated with the data records are returned as a JSON (Java Script
Object Notation) array of name/value pairs:
[[JSON array for channel 1’s first record], [JSON array for channel
2’s first record], …]
The JSON object array for each channel is:
[{Object1}, {Object2}, …]
Each object is a list of name/value pairs:
{name1:value1, name2: value2, …}
JSON objects can be parsed using the following defined name strings.
Page 89

www.vtiinstruments.com
EX1401 Instrument Drivers 89
Object
Name String
Value
Cold Junction
Temperature
Sensor Reading
Reference Junction
The temperature of the CJC sensor, in the same
units as the channel data.
timestamp_sec
The seconds portion of the timestamp of the
first TC sample that this CJC measurement was
used to compute.
timestamp_frac
The fractional portion of the timestamp of the
first TC sample that this CJC measurement was
used to compute.
Over range
Over-Range
True when any overload status bit is set.
Trigger time
Trigger Timestamp
Seconds
The trigger timestamp in seconds
Trigger Timestamp
Fraction
The fraction portion of the trigger timestamp.
Dropped trigger
timestamp_sec
The timestamp of when the trigger would have
occurred.
timestamp_frac
The fraction portion.
Trigger Dropped
The channel name of the lost trigger.
TABLE 5-4: ADDITIONAL DATA JSON NAMES AND VALUES
MEASUREMENT PROCESS
MEASUREMENT SETUP
When the driver session is initialized by the Initialize method, the driver session is reset, or after the
previous measurement is finished, the instrument is in the Idle state. While in the Idle state, the user
prepares for the next data acquisition by configuring the setup parameters. For more information,
please refer to IVILXISync standard API documentation
Sync and Coordination
The Sync interface controls how the EX1401 synchronizes its ADCs and its timestamp counter.
When a sync event occurs, all ADCs in the system are synchronized to each-other, and all data
timestamp counters are reset and, if using the System Timestamp Source, synchronized to the IEEE
1588 clock. If the Sync.CoordinationLine property is set to “LAN”, all instruments in the driver
session will use LXI Lan Event messages to coordinate their trigger state machines, ensuring that
all arm and trigger events are shared between all instruments in the system.
Start, Arm, and Trigger
Properties in the Start, Arm, and Trigger interfaces configure the data acquisition gating condition
and timing. Start determines when the data acquisition starts and when the instrument is ready for
the next acquisition. All hardware configuration and filters settling should be completed before the
Start event in order to ensure valid data is acquired.
Sampling Parameters
The sampling parameters are specified by properties in Sampling interface. Sampling in the
Measurement interface configures parameters common to the entire system. Optionally, the user can
configure the parameters of individual input channels using the Channels interface (with some
restrictions).
Page 90

VTI Instruments Corp.
90 EX1401 Instrument Drivers
Analog Front End
While some parameters can be changed during data acquisition, most configuration options should
be performed prior to data acquisition to avoid data glitches. Most front end parameters can be
configured independently for each input channel. The front end configuration includes input range,
voltage/temperature input function, and cold junction settings. Note that not all of these properties
are supported by the EX1401.
MEASUREMENT INITIATION
After the user has completed configuring the instrument, the user can initiate the data acquisition
process by calling the Initiate method in the Measurement interface. During measurement initiation,
the instrument starts to prepare for the actual data acquisition. If the ADC has not been synchronized,
the SYNC signal is sent and ADC then begins digitization. When the ADC’s reference oscillator
has been changed, the ADC sampling clock must be re-locked with the PLL. Filter settling also
occurs at this time. Once the filters have settled and the instrument is ready to acquire valid data,
the measurement moves to the Wait for Start state. The source of the Start event is Immediate by
default. In this case, the measurement starts automatically. Otherwise, it must be started by an event
specified by the Source property of the Start interface.
During this period, the digitized signal from the A/D converter is continuously filtered and discarded
until the filters have settled. Once settled, the filtered data samples are stored in the internal data
buffer.
MEASUREMENT LOOP
Once the measurement begins, the state machine cycles through arming and triggering for the
number of times specified by ArmCount and TriggerCount. The measurement stops when the
specified number of arm and trigger loops are completed, when it is aborted by an Abort command,
or when the FIFO buffer becomes full and the FIFO mode is set to Stop.
ARMING
Arm is the gating condition to acquire data. In order to trigger data acquisition, the measurement
must be armed first. There are several ways to arm a measurement. The default condition is to arm
automatically (or Immediate arming).
Self-arming
When the Immediate arm source is enabled, the EX1401 arms by itself.
Arming by User’s Command
The EX1401 arms by the SendSoftwareArm method when a Software arm source is enabled.
Arming at a Certain Time Interval
The EX1401 can be armed at a specific time interval using the ALARM0-1 arm sources. In addition
to enabling the alarm as an arm source, it must be configured and enabled using the Alarm interface.
Arming by External Pulse
The EX1401 can receive an arm from the back panel trigger SMB connector by enabling the EXT
arm source.
Arming from DIO Lines
The EX1401 can receive an arm event from the digital I/O port by enabling the DIO arm sources.
Page 91
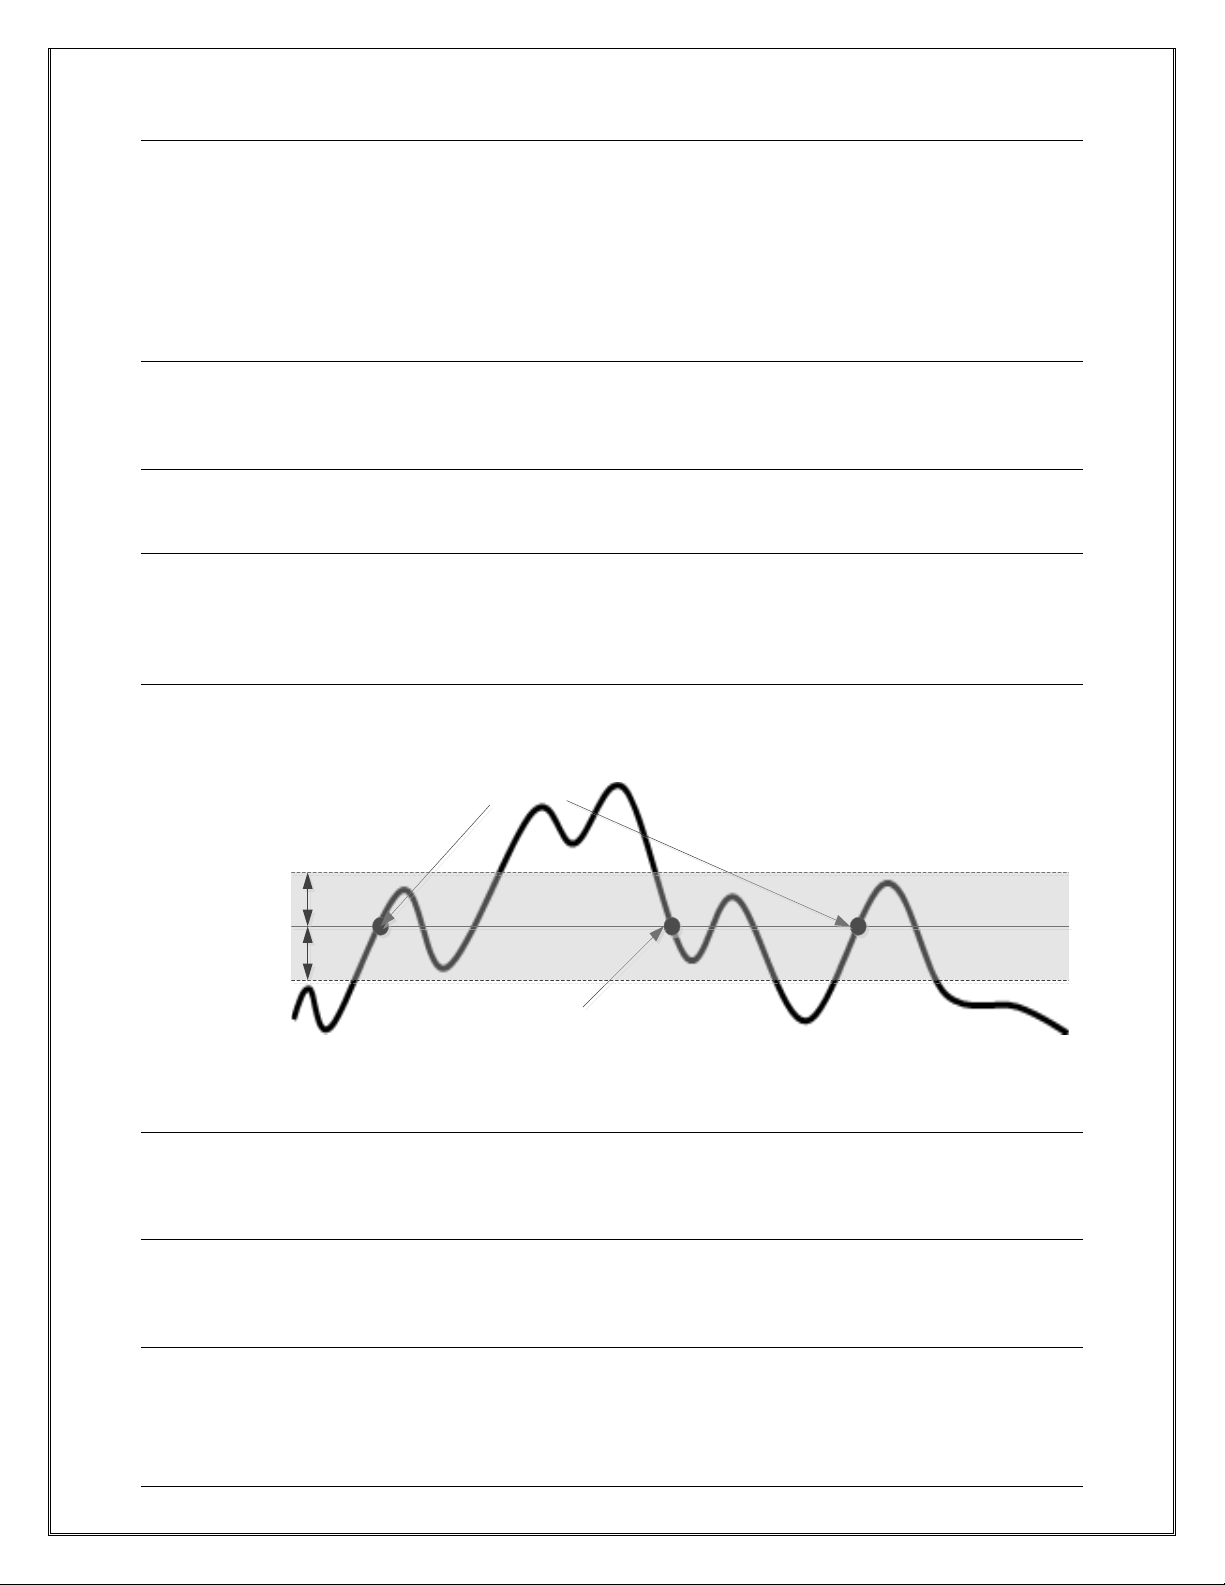
www.vtiinstruments.com
EX1401 Instrument Drivers 91
Arming from LAN Events by Other Instruments
The user, or another LXI device, can send LAN events to arm the EX1401 using the Digitizer driver.
Alternatively, a LAN event can be sent to the EX1401 using the Platform driver.
TRIGGERING
When the measurement is armed and when there are enough digitized samples already collected in
the FIFO for pre-trigger delay, the measurement becomes ready to receive a trigger event.
Self-triggering
When the Immediate trigger source is enabled, the EX1401 triggers automatically and acquires data
records as soon as it is ready to receive a new trigger event.
Triggering by User’s Command
The EX1401 triggers by the SendSoftwareTrigger method when a software trigger source is enabled.
Triggering at a Certain Time Interval
The EX1401 can be triggered at a specific time interval using the ALARM0-1 trigger sources. In
addition to enabling the alarm as a trigger source, it must be configured and enabled using the Alarm
interface.
Triggering by Analog Signal
The EX1401 is triggered when an analog signal at an input channel crosses the trigger threshold
level. In order to trigger from the analog signal, the channel must be enabled as a trigger.
Trigger Level
Trigger at Rising Edge
Trigger at Falling Edge
Hysteresis
FIGURE 5-11: TRIGGERING BY ANALOG SIGNAL
Triggering by External Pulse
The EX1401 can receive a trigger from the back panel trigger SMB connector by enabling the EXT
trigger source.
Triggering from DIO Lines
The EX1401 can receive a trigger event from the digital I/O port by enabling the DIO trigger
sources.
Triggering from LAN Events by Other Instruments
The user, or other LXI device, can send a LAN event to trigger the EX1401 using the Digitizer
driver. Alternatively, a LAN event can be sent to the EX1401 using the Platform driver.
Page 92
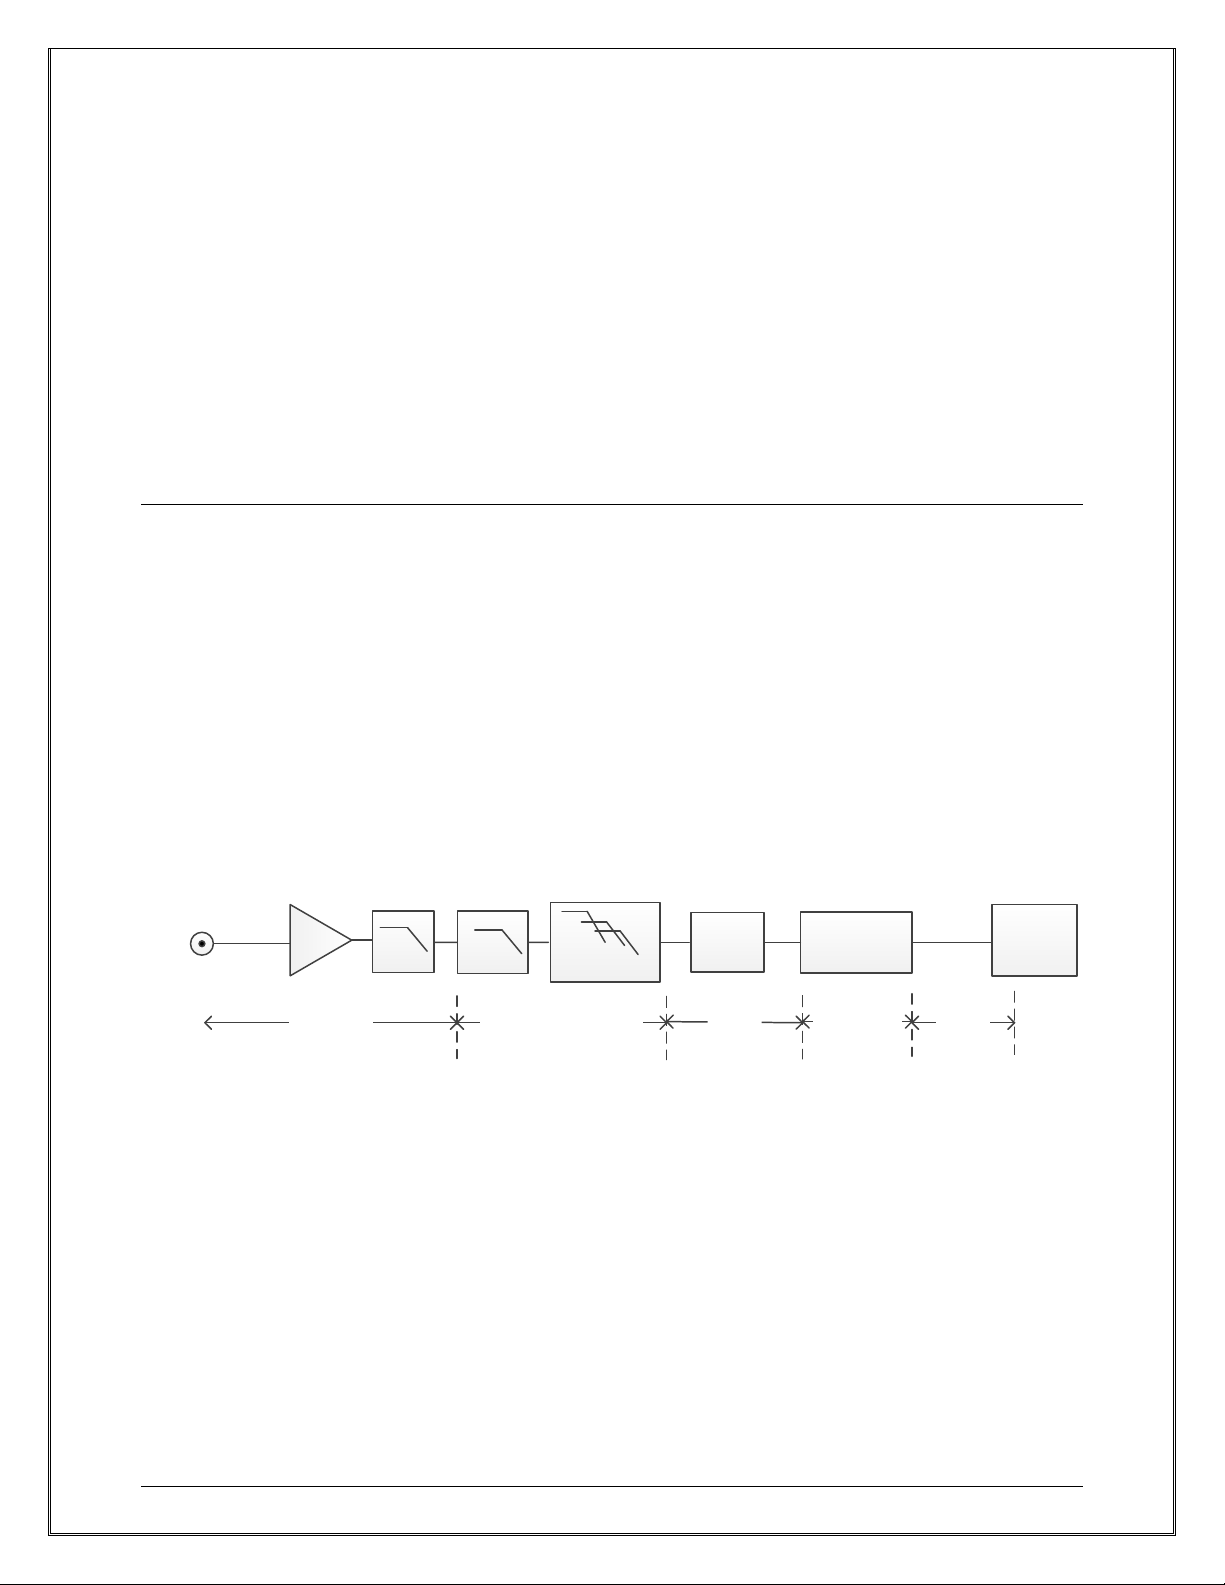
VTI Instruments Corp.
92 EX1401 Instrument Drivers
DATA RETRIEVAL
After a measurement is triggered and at least one record of data (the number of samples specified
by RecordSize property in Sampling) is available in FIFO buffer, it can be retrieved using the Read
method in Measurement interface or via the Streaming method described in the Data Acquisition
section in this manual. At each trigger event, the number of contiguous records specified by
NumRecordsPerTrigger are acquired. Multiple records can be read separately or all in once if they
are available in the instrument’s FIFO buffer. The Read method in Measurement returns at least one
record from all enabled channels.
When the user wishes to acquire continuous samples indefinitely after a single trigger event, set the
NumRecordsPerTrigger property to 0 (infinite) and set FIFO mode to Stop. The data acquisition
stops when the user aborted using the Abort method or when the FIFO buffer becomes full (FIFO
overflow). In this setup, the user must retrieve data faster than the ADC data filling into FIFO in
order to avoid FIFO buffer from overflowing.
Pipeline Delay and Latency
For high speed data recording, data transfer speed is key. For applications that require real-time data
monitoring or processing, on the other hand, the data update rate becomes more important. A realtime closed loop control is an example. It is necessary to understand that there are delays at almost
every stage of the data acquisition process. Some are within the instrument while others occur
outside of the instrument, such as at the transducer or in the user’s application.
The analog signal conditioning circuit introduces some delay before the signal reaches the A/D
converter. Usually the delay in the analog section is small and negligible.
In the digital section, the digital filters in the A/D converter and decimation filters introduce a group
delay. With the LowLatency filter, it is 24.75 ms at 100 Sa/s and increases at lower frequency spans.
The filtered data is transferred to the FIFO buffer at a specified interval (enough sample periods to
cover at least 3.2 ms). Once a trigger is detected, the data in the FIFO can be read out to the user’s
application in blocks of RecordSize samples.
FIGURE 5-12: DELAYS IN DATA PATH
EVENTS
Events are an optional feature allowing the EX1401 to send notifications to the user, or other
instruments, when a specified event occurs. The notification can be via LAN message, EXT trigger
line, or DIO output. The user can specify an event when the measurement state is armed, triggered,
finished, or when an overload condition is detected on one or more channels. See the Digitizer
driver’s online help for more information.
ADC
Transfer
Buffer
FIFO
Analog
Input
Range
Selection
Host PC
Analog Delay Digital Filter Group Delay
Block
Transfer
FIFO
Accumulation
Block
Transfer
Analog Anti-
Alias Filter
Decimation
Filters
ADC
Page 93

www.vtiinstruments.com
EX1401 Instrument Drivers 93
WHERE TO FIND MORE INFORMATION
DRIVER API REFERENCE
The complete driver’s API reference is available as online help. Each driver comes with a .chm
format help file in both Windows and Linux. Newer driver revisions also integrate the driver help
content into the Microsoft Help Viewer, which is used by Visual Studio 2010 and later.
Each driver comes with several useful example programs in C++ and C#.
SPECIFICATION INFORMATION
The EX1401 conforms to many industry standards in both hardware and software architecture.
Although products can be used without knowing these standards, some knowledge can be useful to
take full advantage of VTI Instruments products.
• LXI specification is available from LXI consortium at www.lxistandard.org
• IVI driver specification is available from IVI Foundation at www.ivifoundation.org
• IEEE 1588 Precision Synchronization Protocol Standard at www.nist.gov/el/isd/ieee
• ANSI/VITA 49.0 (VRT) is specified as a part of VITA specification at www.vita.com
Page 94

Page 95

www.vtiinstruments.com
EX1401 Operation of Data Logger 95
SECTION 6
OPERATION OF DATA LOGGER
INTRODUCTION
The EX1401 can be used as a data logger, in conjunction with an external USB disk. There are two
major use cases to this feature. First, it can be used for standalone operation, where the instrument
has no connectivity to host computer. Secondly, it can be used as non-volatile storage space, where
the measured data will be stored during network/host computer fault.
USB DISK SELECTION AND PREPARATION
The standard USB host port available on EX1401 supports USB 1.1 and USB 2.0 standard disks,
which are formatted with EXT2, EXT3, EXT4, VFAT/FAT32, and MSDOSFS file journaling
formats.
NOTE Typical USB thumb/pen drives may be formatted using NTFS file system, which is widely
supported on latest Windows OS. However, this file system is not yet supported by EX1401
instrument, so data transfer will not take place. Before using a particular USB disk for critical
applications, users are advised to test the configuration by performing a dummy acquisition.
The maximum current available on the USB port is limited to 0.5A @ 5V. USB disks which requires
more than 2.5W of power for their operation (such as USB hard disk drives) must be externally
powered.
The data will be stored in Hierarchical Data Format, HDF5 file format. HDF5 is an open-source
data file format with a wide variety of tools available to decompress, view and export the time
stamped measurement data. For more information on HDF5 file formats and tools, visit the HDF
Group’s website: https://www.hdfgroup.org. The measurement data can be stored across any
number of files, optionally overwriting the oldest file when the maximum is reached.
USB DISK INSERTION AND SAFE REMOVAL
It is recommended to use an empty USB disk which is containing no other data files, other than
device configuration file. Whenever a USB memory device that can support data logging is inserted
into the USB port of EX1401 instrument, it will be detected by EX1401 instrument, which will add
a menu page to the LCD menu containing "Data Logger: sda1", "Hold MENU to run" (assuming
the device is mounted at sda1). Pressing and holding MENU button for 5 seconds on this page will
then begin data logging. Pressing and holding MENU button again for 5 seconds, on this page,
before completion, will abort data logging.
Note If the USB disk is disconnected or the instrument is powered off abruptly while data logging
operations are in progress, the data files may be corrupted.
Page 96

VTI Instruments Corp.
96 EX1401 Operation of Data Logger
In order to safely remove a USB disk, first abort any measurement that is saving data to the disk,
then navigate to the “USB at sda1” (assuming the device is mounted at sda1) page of the LCD menu
and hold the MENU button for 5 seconds. Upon releasing the MENU button, the screen should
change to read “Safe to remove” in place of the volume label on the second row. If an error is
displayed instead, the disk is still in use by an active measurement.
CONFIGURATION OF USB DISK
In order to configure the data logger session, the user must place a device configuration file in the
top-level directory of the attached USB Memory Disk. It will be the same format used internally by
the Configuration.StoreCurrent API. The user can construct this file manually or use the
Configuration.SaveConfigurationToStorageDevice method to save the current instrument
configuration to the attached USB Memory Disk. This and the other storage device configuration
methods all take the repeated capability name of a StorageDevice item as an argument, and act on
the file config.json within that device. The StorageDevice item must have the Enabled property set
to true before the configuration is saved to that storage device.
SAVING DATA TO USB DISK
A new repeated capability, Storage.Devices, has been added to the VTEXDigitizer/VTEXDsa
drivers to represent the attached storage devices. The data will be saved to any enabled storage
devices in the HDF5 format. This API allows multiple storage devices to be enabled at the same
time, or for VRT streaming to be enabled alongside them. In that case, identical data will be sent to
all enabled devices and streaming sockets. FIFO polling via Measurement.Read, however, is only
supported when all streaming protocols and storage devices are disabled, as the data is removed
from the FIFO when it is sent to the storage devices and streaming sockets.
HDF5 FILE HIERARCHY
HDF5 is a hierarchical file format based on string group names, which contain datasets, which are
arrays of like key-value pair collections. The root group of the HDF5 file will be "inst0", which is
the same as the slot name of the instrument. This will contain one group per channel, named the
same as that channel, "CH1" to "CH16", as well as "DIO". Each channel group will contain one
dataset for each VRT packet type. HDF5’s Packet Table type will be used to pack the raw VRT
data into these datasets. Attributes will be set on the "inst0" and channel groups to indicate the
instrument’s configuration state at the time that the measurement was initiated.
▪ inst0 (group)
• <channel> (group)
o IF_MEAS_INFO (dataset)
▪ Packet info - The upper 16 bits of the VRT Header word
▪ Packet size - The total number of 32-bit words in the packet
▪ Stream ID - The VRT Stream identifier
▪ OUI - VTI’s IEEE Organizationally Unique Identifier
▪ Information class code - The VRT information class identifier
▪ Packet class code - The VRT packet class identifier
▪ Time seconds - The seconds portion of the packet timestamp
▪ Time picoseconds upper - The upper 32 bits of the
picoseconds portion of the packet timestamp
▪ Time picoseconds lower - The lower 32 bits of the
picoseconds portion of the packet timestamp
▪ Context Indicator Field - A mask indicating which items are
included in Context Fields
▪ Context Fields - A list of 32-bit words comprising the data
payload of the context packet
Page 97

www.vtiinstruments.com
EX1401 Operation of Data Logger 97
o EX_MEAS_INFO (dataset)
▪ Packet info - The upper 16 bits of the VRT Header word
▪ Packet size - The total number of 32-bit words in the packet
▪ Stream ID - The VRT Stream identifier
▪ OUI - VTI’s IEEE Organizationally Unique Identifier
▪ Information class code - The VRT information class identifier
▪ Packet class code - The VRT packet class identifier
▪ Time seconds - The seconds portion of the packet timestamp
▪ Time picoseconds upper - The upper 32 bits of the
picoseconds portion of the packet timestamp
▪ Time picoseconds lower - The lower 32 bits of the
picoseconds portion of the packet timestamp
▪ Context Indicator Field - A mask indicating which items are
included in Context Fields
▪ Context Fields - A list of 32-bit words comprising the data
payload of the context packet
o EX_MEAS_FLOAT32 (dataset)
▪ Packet info - The upper 16 bits of the VRT Header word
▪ Packet size - The total number of 32-bit words in the packet
▪ Stream ID - The VRT Stream identifier
▪ OUI - VTI’s IEEE Organizationally Unique Identifier
▪ Information class code - The VRT information class identifier
▪ Packet class code - The VRT packet class identifier
▪ Time seconds - The seconds portion of the packet timestamp
▪ Time picoseconds upper - The upper 32 bits of the
picoseconds portion of the packet timestamp
▪ Time picoseconds lower - The lower 32 bits of the
picoseconds portion of the packet timestamp
▪ Samples - A list of 32-bit floating point data samples
▪ Trailer - The 32-bit VRT trailer word
o EX_MEAS_INT32 (dataset)
▪ Packet info - The upper 16 bits of the VRT Header word
▪ Packet size - The total number of 32-bit words in the packet
▪ Stream ID - The VRT Stream identifier
▪ OUI - VTI’s IEEE Organizationally Unique Identifier
▪ Information class code - The VRT information class identifier
▪ Packet class code - The VRT packet class identifier
▪ Time seconds - The seconds portion of the packet timestamp
▪ Time picoseconds upper - The upper 32 bits of the
picoseconds portion of the packet timestamp
▪ Time picoseconds lower - The lower 32 bits of the
picoseconds portion of the packet timestamp
▪ Samples - A list of 32-bit integer data samples
▪ Trailer - The 32-bit VRT trailer word
Page 98

Page 99
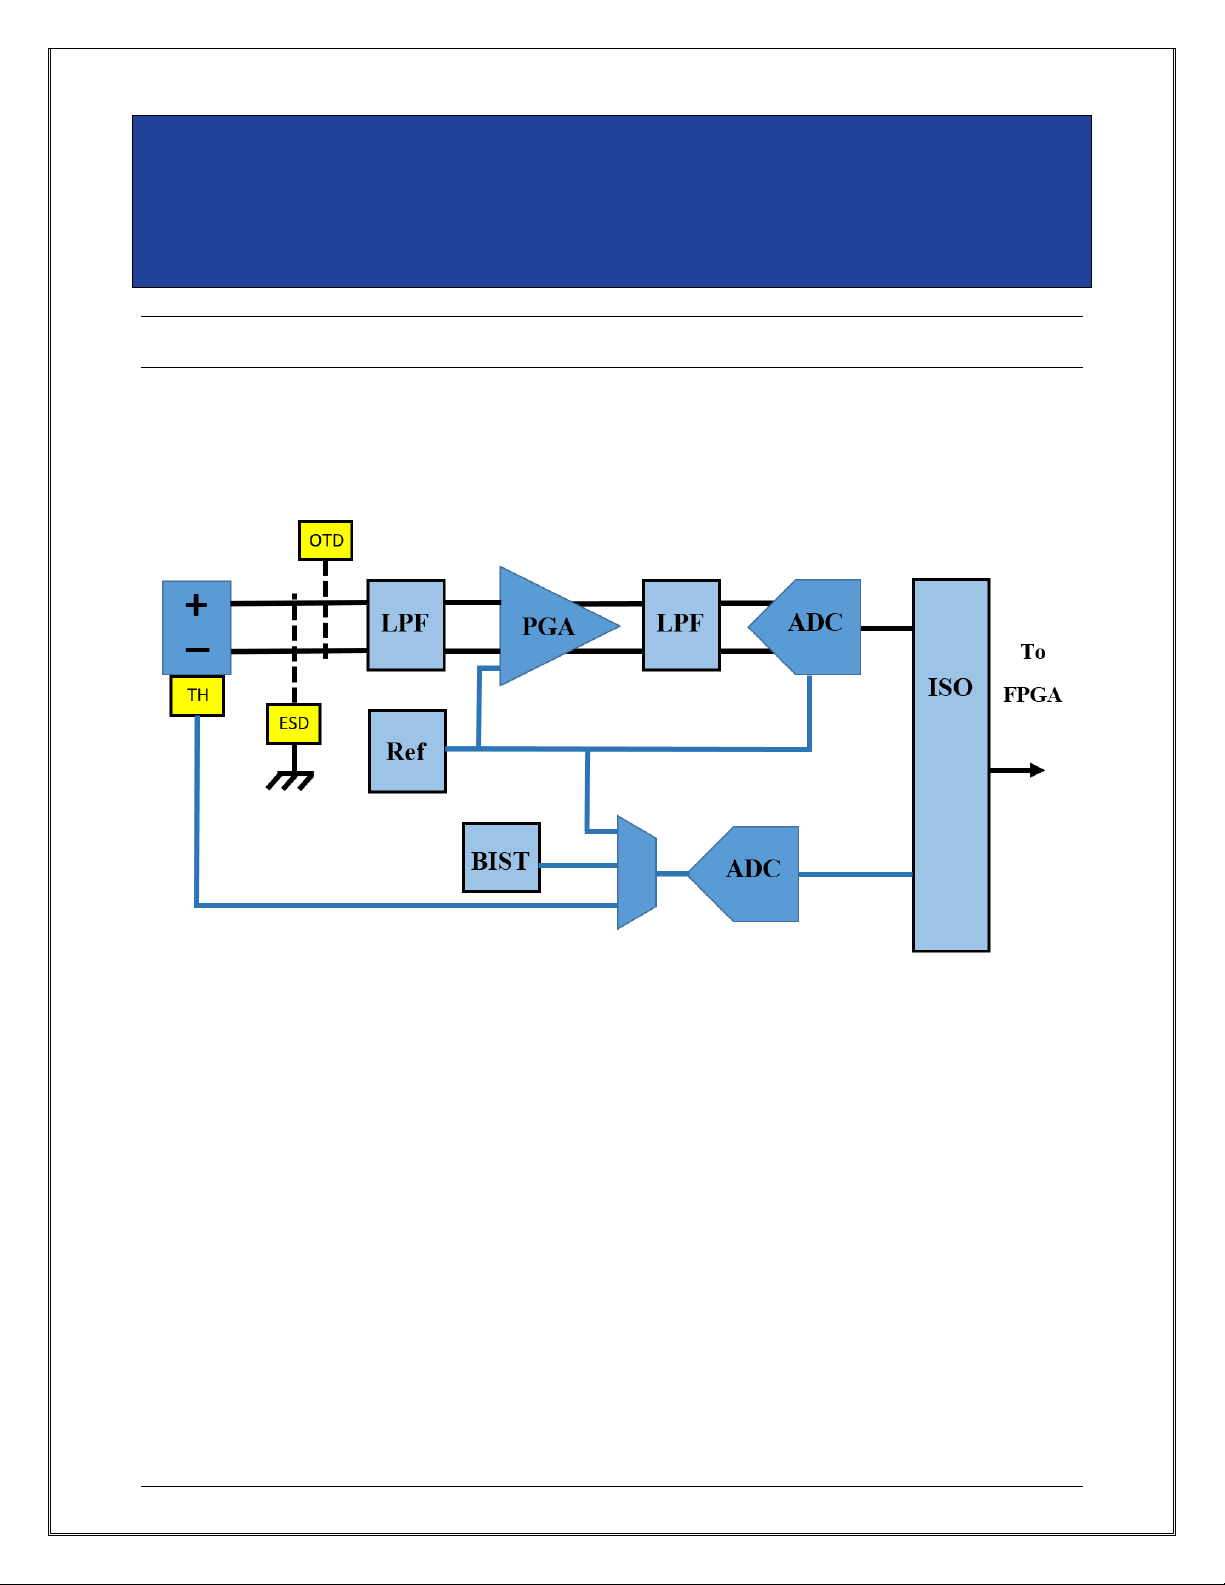
www.vtiinstruments.com
EX1401 Theory of Operation 99
SECTION 7
THEORY OF OPERATION
INTRODUCTION
The block diagram in Figure 7-1 illustrates the key components of the analog circuitry. Each of the
main blocks is described below.
FIGURE 7-1: EX1401 ANALOG CIRCUITRY BLOCK DIAGRAM (PER CHANNEL)
VOLTAGE/THERMOCOUPLE INPUT
Each input channel has a type “U” (universal, copper) miniature thermocouple connector that is
used for both temperature and voltage measurement. Each connector has a dedicated thermistor
mounted internally for cold junction compensation. Good mechanical design insures that the CJC
is thermally isolated from the active electronics and maintained close to ambient temperature to
ensure best in class performance.
Each input is protected with ESD clamping circuits that present a small capacitance to earth ground
(i.e., the metal enclosure, which is also grounded to your local earth ground by the ground cable
included.) There are also gas discharge tubes on both inputs that will arc (short to ground) for any
common mode voltage greater than 600V. Each input can have up to +/-500V common mode
working voltage with respect to earth ground.
Each input is protected from a sustained, normal mode overvoltage condition, as long as the
overvoltage does not exceed +/- 100V between the two inputs of each connector. This is done with
a series resistance in each input signal along with clamping diodes. The diodes clamp outside the
Page 100

VTI Instruments Corp.
100 EX1401 Theory of Operation
normal operating range of the PGA and do not disturb the accuracy of the measurement (for normal
mode measurements.) When a channel is in overvoltage mode, it can (optionally) be detected by the
software and that channel’s LED will light.
Each input has open transducer detection. This is particularly useful if a thermocouple connection
opens up. This condition can be (optionally) detected by the software and that channel’s LED will
light. The open transducer detection presents a very small current (typically less than 10nA) into
both sides of the mini TC connector inputs. The current will normally flow through the
thermocouple wire from the (+) side to the (-) side. As long as the thermocouple wire presents a
short circuit (as it normally does) then there is no fault detected. These current sources are small
enough not to affect measurement accuracy, but large enough to drive the high-impedance input of
the instrumentation amplifier (IA) deterministically into saturation in the event of an open condition.
When enabled, they provide continuous monitoring of the input and will generate an open indication
event when the open is intermittent in nature. An important feature of the OTD is that the current
sources can be enabled or disabled on a per channel basis. This permits the user to choose which of
their input signals require open circuit detection.
PROGRAMMABLE GAIN AMPLIFIER
Each channel has its own dedicated analog signal conditioning chain as well as a dedicated ADC,
reference, and BIST circuit.
There are two low pass filters in the chain, one prior to the programmable gain amplifier (PGA) and
one prior to the ADC. Both are single pole filters with a nominal 3dB cutoff at 30kHz. These two
filters, along with a filter in the PGA section, provide the Nyquist frequency rejection for the ADC.
These analog filters keep anti-aliasing of high frequency to a minimum so the digital data output of
the ADC can then be confidently filtered by the subsequent digital filters inside the FPGA.
The PGA amplifies the input differential signal and outputs a differential signal to the subsequent
LPF. The ADC then converts the differential signal to digital sampled data. The PGA provides
excellent common mode rejection (typically -130dB at 50/60Hz and -120dB at 1kHz).
ANALOG TO DIGITAL CONVERSION
Each channel has its own, dedicated ADC that samples the analog signal at some rate between
320kSPS and 640kSPS (depending upon customer selected sample rate.) The ADC is a successive
approximation with register (SAR) type converter. The ADC oversamples the analog input signal
by a factor of 32 and then performs digital filtering (linear phase response) to eliminate out of band
noise. The ADC generates 24-bit samples at the reduced output data rate of 10kSPS to 20kSPS.
Therefore, the effective analog sample rate is somewhere between 10kSPS and 20kSPS, depending
upon customer selected sample rate. The ADC has excellent AC and DC characteristics that allow
the EX1401 to perform more than just thermocouple measurements. The AC response, along with
the analog and digital filtering allow applications beyond thermocouples.
All channels on the EX1401 are totally independent, but are synchronized by the same clock.
Therefore, all ADCs in the system sample their analog inputs at the same time and generate output
data at the same rate.
BUILT IN SELF-TEST AND CJC MEASUREMENT
Each channel has its own, dedicated built-in-self-test circuit which includes a separate ADC from
the measurement path. The BIST ADC operates at a slower rate, 50 to 100 Samples/Sec depending
upon customer selected sample rate. This lower sample rate provides the high accuracy needed for
CJC measurement and reference measurement.
The BIST ADC is responsible for measuring the output of the thermistor used for CJC. The
thermistor is part of a resistor divider circuit driven by the on board reference. The BIST ADC can
measure both the reference and the thermistor output so only a ratio metric calculation needs to be
 Loading...