

Page 1

Abridged user’s manual
T
Compatible with
Hearing Aid T-Coil
TIA-1083
(Canada version)
DS6673-2/DS6673-3/
DS6673-6/DS6673-6C
DECT 6.0 cordless telephone with
DECT 6.0 cordless headset and
BLUETOOTH® wireless technology
Telephones identied with this logo have reduced noise and
interference when used with most T-coil equipped hearing aids and
cochlear implants. The TIA-1083 Compliant Logo is a trademark of
the Telecommunications Industry Association. Used under license.
The ENERGY STAR® program (www.energystar.gov) recognizes and
encourages the use of products that save energy and help protect our
environment. We are proud to mark this product with the ENERGY STAR®
label indicating it meets the latest energy efciency guidelines.
Introduction
To protect our environment and conserve natural resources, this
Abridged user’s manual provides you with the basic installation and use
instructions. A limited set of features are described in abbreviated form.
Please refer to the online Complete user’s manual for a full set of installation and
operation instructions at www.vtechcanada.com.
Before using this VTech product, please read Important safety instructions on
page 13 of this user’s manual.
ECO mode
This power conserving technology reduces power
consumption for optimal battery performance.
The ECO mode activates automatically during calls.
When this mode is on, the handset displays ECO.
Home 0:00:01
ECO
10:15PM
12/18
ECO
1
Page 2
Parts checklist
Battery Pack / Bloc-piles :
(2.4V Ni-MH)
WARNING / AVERTISSEMENT :
DO NOT BURN OR PUNCTURE BATTERIES.
NE PAS INCINÉRER OU PERCER LES PILES.
Made in China / Fabriqué en chine
THIS SIDE UP / CE CÔTÉ VERS LE HAUT
Your telephone package contains the following items. Save your sales receipt and
original packaging in the event warranty service is necessary.
Ear hooks (3) Additional
Ear pad
earbuds (3)
Telephone
line cord
Cordless
headset with an
earbud attached
Head band
Telephone base
power adapter
Handset charger and
charger adapter
(1 for DS6673 -3)
(4 for DS6673 -6/DS 6673-6C)
Telephone base
Handset battery
compartment covers
(1 for DS6673 -2)
(2 for DS6673-3)
(5 for DS6673-6/D S6673- 6C)
Abridged
user’s manual
Abridged
user’s manual
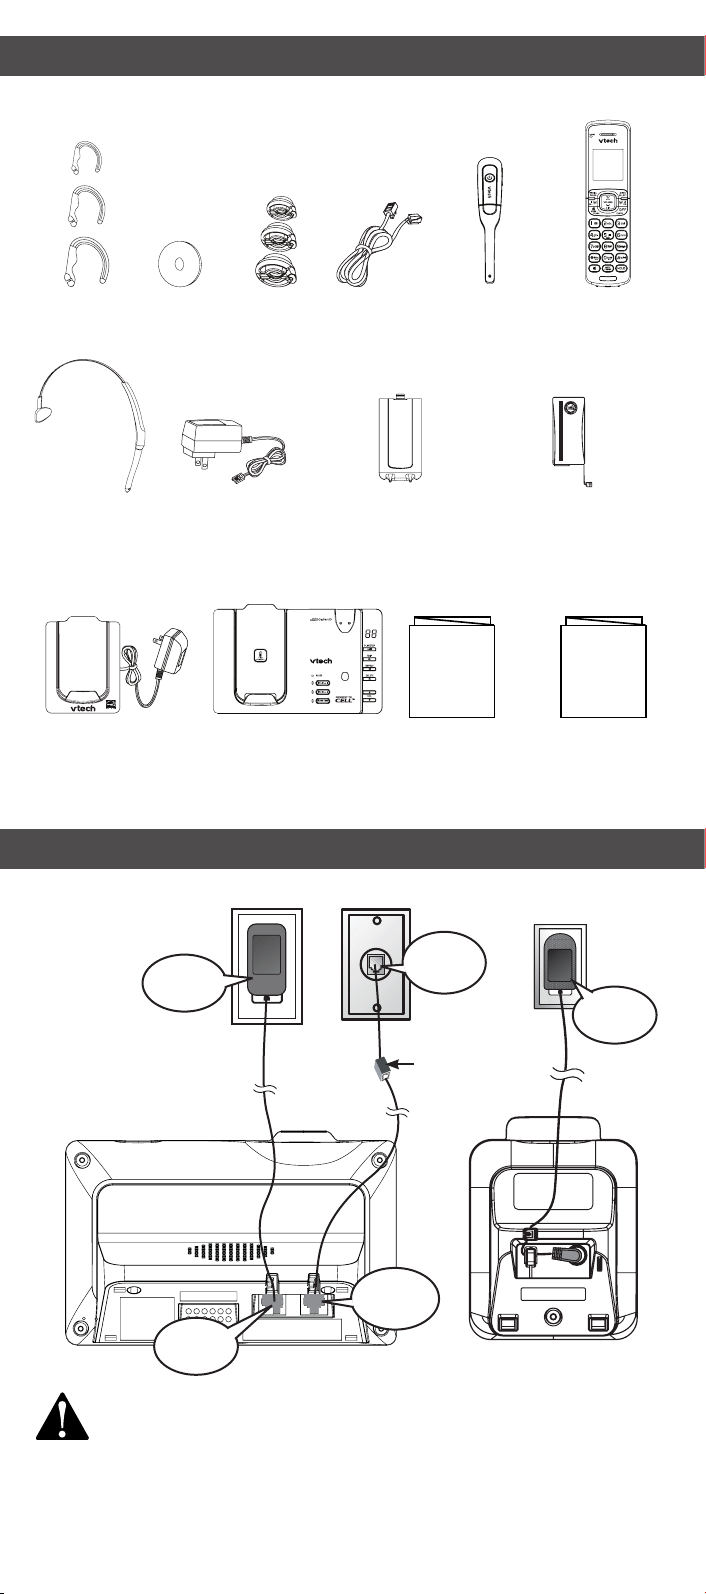
Telephone base and charger installation
Install the telephone base and charger as shown below.
Handsets
(1 for DS6673 -2)
(2 for DS6673-3)
(5 for DS6673-6/
DS6673 -6C)
Handset batteries
(1 for DS6673 -2)
(2 for DS6673-3)
(5 for DS6673-6/D S6673- 6C)
Quick start
guide
Quick start guide
Click!
Plug!
Plug!
DSL lter
Click!
Plug!
Even if you do not subscribe to any conventional telephone service, you
•
can still use the cell lines alone without plugging in a telephone line cord.
Use only the power adapters and batteries supplied with this product. To
•
order a replacement, visit our website at www.vtechcanada.com or call
1 (800) 267-7377.
If you subscribe to telephone service from a cable company or a
•
VoIP service provider, contact your cable/VoIP service provider for
more information.
2
Page 3

Battery installation and charging
Battery Pack / Bloc-piles :
(2.4V Ni-MH)
WARNING / AVERTISSEMENT :
DO NOT BURN OR PUNCTURE BATTERIES.
NE PAS INCINÉRER OU PERCER LES PILES.
Made in China / Fabriqué en chine
THIS SIDE UP / CE CÔTÉ VERS LE HAUT
CR1232
Battery Pack / Bloc-piles :
(2.4V Ni-MH)
WARNING / AVERTISSEMENT :
DO NOT BURN OR PUNCTURE BATTERIES.
NE PAS INCINÉRER OU PERCER LES PILES.
Made in China / Fabriqué en chine
THIS SIDE UP / CE CÔTÉ VERS LE HAUT
CR1232
Battery Pack / Bloc-piles :
(2.4V Ni-MH)
WARNING / AVERTISSEMENT :
DO NOT BURN OR PUNCTURE BATTERIES.
NE PAS INCINÉRER OU PERCER LES PILES.
Made in China / Fabriqué en chine
THIS SIDE UP / CE CÔTÉ VERS LE HAUT
CR1232
Install the battery as shown below.
1
4
Light on!
2 3
Click!
Plug!
Charge for at least 30 minutes before initial settings.
Charge for 12 hours before initial use.
IMPORTANT:
Check for a dial tone by pressing /HOME, CELL 1 or CELL 2. If you hear a
dial tone, the installation is successful.
If you do not hear a dial tone:
Make sure the installation procedures described above are properly done.
•
It may be a wiring problem. If you have changed your telephone service to
•
digital service from a cable company or a VoIP service provider, the telephone
line may need to be rewired to allow all existing telephone jacks to work.
Contact your cable/VoIP service provider for more information.
Headset charging
1 2
Light on!
Charge for 3 hours before initial use.
3
Page 4

Telephone base overview
FIND HANDSET
IN USE
light
CELL 1
Handset overview
CHARGE light
CELL 2
Message window
/PLAY/STOP
/SKIP
/REPEAT
X/DELETE
/VOL
/VOL
ANS ON/OFF
PUSH TO TALK
REDIAL/PAUSE
CELL 1
/HOME/FLASH
1
Dialing keys
/auA
Headset overview
On/Off
VOLUME/ /
MENU/SELECT
CELL 2
OFF/CANCEL
VOLUME/ /CID
HOLD
MUTE/DELETE
Earpiece
Volume/+/-
Rotating clip
Microphone
MUTE/FLASH
RESET recessed button
4
Page 5

Headset attachments
Earbud
To remove the earbud from the headset earpiece:
Hold both sides of the earbud and then pull the earbud until it separates from
the earpiece.
To attach the earbud to the headset earpiece:
Choose an appropriate earbud.
1.
Press the earbud towards the earpiece until it clicks into place. Move the earbud
2.
around so that the protruding bump on the earbud is pointing towards your
mouth when placed on your ear. The protruding bump on the earbud holds the
headset securely in your ear.
Protruding bump
Ear hook
To attach the ear hook to the headset:
Remove any headset attachment (earbud excluded) connected to the headset.
1.
Insert the ear hook [A] into the rotating clip [B] on the headset until it clicks
2.
into place.
[A]
Hook the headset on your right ear. Adjust the angle of the headset until the
3.
[B]
microphone is pointing towards your mouth. Firmly grip the earpiece with one
hand whenever adjusting the headset microphone up or down.
To adjust the headset to wear on your left ear:
1. Hold the headset with one hand.
2. Twist the ear hook 180 o clockwise.
Lift the ear hook upward.
3. Push the ear hook downward. 4. Hook the headset on your left ear.
Adjust the angle of the headset until the
microphone is pointing towards
your mouth
.
5
Page 6

>%@
>$@
To remove the ear hook from the headset:
Hold the headset with one hand and the ear hook with
1.
your other hand.
Pull the end of the ear hook up until it separates from the
2.
rotating clip on the headset.
Headband
To attach the head band to the headset:
Remove any headset attachment
1.
connected to the headset.
To wear the headset on your right ear,
3.
insert the end [A] of the head band into
the rotating clip [B] on the headset until
it clicks into place.
Attach the ear pad to the headset
2.
earpiece.
Adjust the head band to t your
4.
head. Adjust and rotate the angle of
the headset until the microphone is
pointing towards your mouth. Firmly
grip the earpiece with one hand
whenever adjusting the headset
microphone up or down.
To wear on your left ear, hold the headset with one hand and the head band with
•
your other hand. Rotate the head band within the rotating clip on the headset.
To remove the head band from the headset:
Hold the headset with one hand and the head band with your
1.
other hand.
Pull the end of the head band until it separates from the
2.
rotating clip on the headset.
Bluetooth
To use a Bluetooth enabled cell phone with your DS6673, you must rst pair and
connect your Bluetooth cell phone(s) with the telephone base. All DS6673 handsets
can be used to make or answer calls on the cell lines.
Bluetooth wireless technology operates within a short range (a maximum of
approximately 30 feet). When you pair a Bluetooth cell phone to the telephone
base, place your Bluetooth cell phone closer to the telephone base to maintain
sufcient signal strength. For optimal performance, keep your cell phone within
15 feet of the telephone base while using the cell line.
Pair and connect your rst Bluetooth cell phone
Press and hold CELL 1/ CELL 2 on the telephone base for about four
1.
seconds. You hear a tone and the CELL 1/ CELL 2 light blinks.
Turn on the Bluetooth feature of your cell phone. Once your cell phone nds
2.
your VTech phone (VTech DS6673), press the appropriate key on your cell
phone to continue the pairing process.
Your cell phone may prompt you to enter the PIN of the telephone base. The
•
default PIN of the telephone base is 0000.
6
 Loading...