

Page 1

Abridged user’s manual
T
Compatible with
Hearing Aid T-Coil
TIA-1083
CS6719/CS6719-15/
CS6719-16/CS6719-2/
CS6719-3/CS6719-4/
CS6719-5
DECT 6.0 cordless telephone
Telephones identied with this logo have reduced
noise and interference when used with most T-coil
equipped hearing aids and cochlear implants. The
TIA-1083 Compliant Logo is a trademark of the
Telecommunications Industry Association. Used under
license.
The ENERGY STAR® program (www.energystar.gov)
recognizes and encourages the use of products that
save energy and help protect our environment. We are
proud to mark this product with the ENERGY STAR
label indicating it meets the latest energy efciency
guidelines.
®
Introduction
To help protect the environment, this Abridged user’s manual provides
you with the basic installation and use instructions. A limited set of
features are described in abbreviated form.
Please refer to the online Complete user’s manual for a full set of
installation and operation instructions at www.vtechphones.com.
Before using this VTech product, please read Important safety
instructions on pages 11 and 12 of this user’s manual.
1
Page 2
Parts checklist
Your telephone package contains the following items. Save your
sales receipt and original packaging in the event warranty service is
necessary.
Handset
(1 for CS6719/
CS6719-15/
CS6719-16
(2 for CS6719-2)
(3 for CS6719-3)
(4 for CS6719-4)
(5 for CS6719-5)
Charger and
charger adapter
(1 for CS6719-2)
(2 for CS6719-3)
(3 for CS6719-4)
(4 for CS6719-5)
Telephone base
Battery
(1 for CS6719/
CS6719-15/
CS6719-16
(2 for CS6719-2)
(3 for CS6719-3)
(4 for CS6719-4)
(5 for CS6719-5)
Impor tant
information
Important
information sheet
Telephone base
power adapter
Abridged user’s manual
Abridged user’s
manual
Battery compartment
cover
(1 for CS6719/
CS6719-15/CS6719-16
(2 for CS6719-2)
(3 for CS6719-3)
Telephone base and charger installation
Install the telephone base and charger as shown below.
Electrical outlet
(not controlled
by a wall switch)
Telephone base
power adapter
Telephone wall jack
A DSL lter
(not included) is
required if you have
DSL high-speed
Internet service.
The DSL lter must
be plugged into the
telephone wall jack.
Telephone
line cord
Wall mount
bracket
Electrical outlet
(not controlled
by a wall switch)
Telephone
line cord
Telephone base
Use only the power adapters and batteries supplied with this product.
•
To order a replacement, visit our website at www.vtechphones.com or
call 1 (800) 595-9511. In Canada, go to www.vtechcanada.com or call
1 (800) 267-7377.
Charger
Charger
adapter
CAUTION:
If you subscribe to telephone service from a cable company or a VoIP
service provider, contact your telephone service provider for more
information
2
Page 3
Battery installation
Install the battery as shown below.
Plug the battery connector
1.
securely into the socket.
Slide the battery compartment
3.
cover towards the center of the
handset until it clicks into place.
Place the battery with the label
2.
THIS SIDE UP facing up and
the wires inside the battery
compartment.
Place the handset in the
4.
telephone base or charger to
charge.
CHARGE light
remains on
when charging.
IMPORTANT:
Check for a dial tone by pressing . If you hear a dial tone, the
installation is successful.
If you do not hear a dial tone:
Make sure the installation procedures described above are properly
•
done.
It may be a wiring problem. If you have changed your telephone
•
service to digital service from a cable company or a VoIP service
provider, the telephone line may need to be rewired to allow all
existing telephone jacks to work. Contact your telephone service
provider for more information.
Battery charging
Once you have installed the battery, the screen indicates the battery
status (see the table below). For best performance, keep the handset
in the telephone base or charger when not in use. The battery is fully
charged after 11 hours of continuous charging.
Battery indicators Battery status Action
The screen is blank,
or displays Put in
charger and ashes.
The screen displays
Low battery and
ashes.
The screen displays
HANDSET X.
The battery has no or
very little charge. The
handset cannot be used.
The battery has enough
charge to be used for a
short time.
The battery is charged. To keep the battery
Charge without
interruption (at least
30 minutes).
Charge without
interruption (about
30 minutes).
charged, place it in the
telephone base or charger
when not in use.
3
Page 4
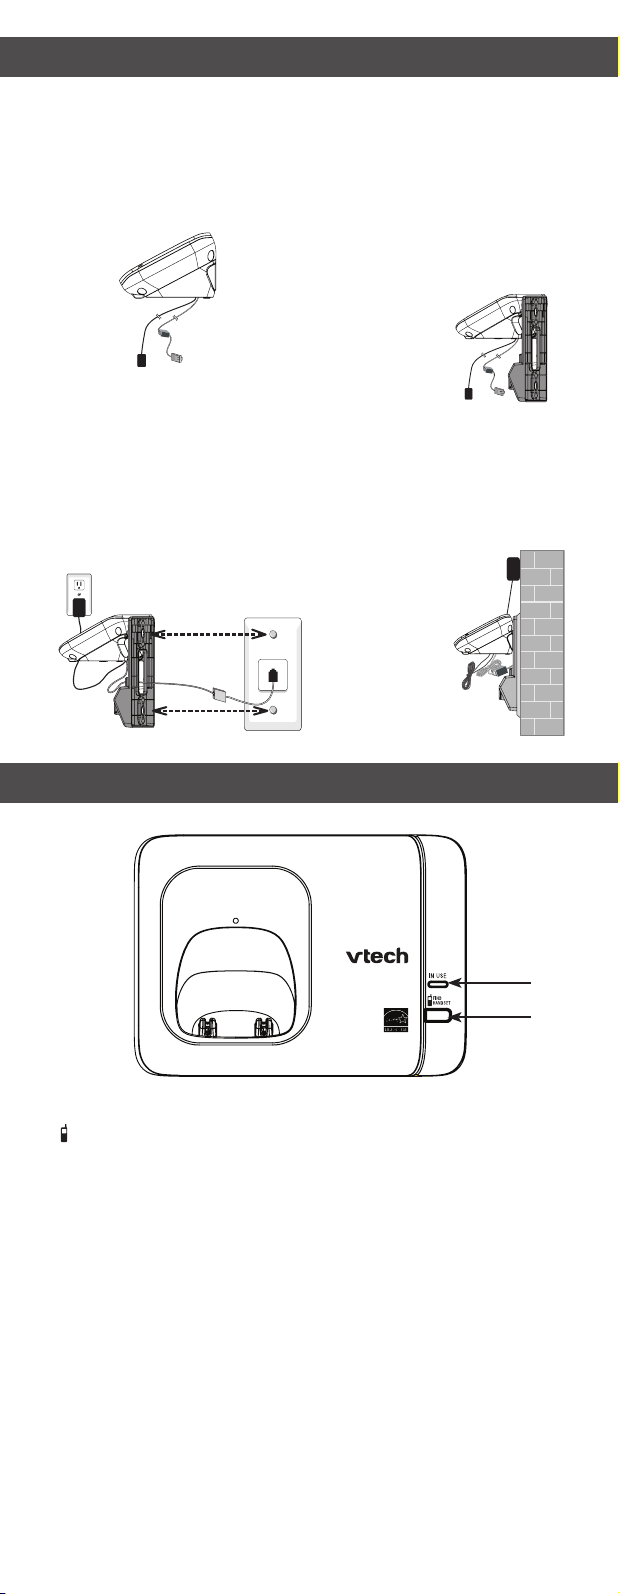
Wall mounting (optional)
To mount your telephone on a wall:
1.
cord from the telephone
wall jack, and the telephone
base power adapter from the
electrical outlet (if necessary).
Route the telephone line cord
3.
through the hole on the wall
mount bracket and plug it
into the telephone wall jack.
Route the power cord out of
the telephone base and plug
it into an electrical outlet not
controlled by a wall switch.
2.Remove the telephone line
4.
Position the telephone base
against the wall mount bracket
with the extended tabs marked
B on top. Insert the extended
tabs marked B on the wall
mount bracket into the slots
marked B on the back of the
telephone base. Push the
telephone base down until it
clicks securely.
Align the holes on the bracket
with the standard wall plate and
slide the bracket down until
it locks securely. Bundle the
telephone line cord
and power adapter cord neatly
with twist ties.
Telephone base overview
IN USE light
1.
FIND HANDSET
2.
Page all system
•
handsets.
1
2
4
Page 5

Handset overview
1
2
8
9
3
4
5
6
7
1. CHARGE light
2. REDIAL/PAUSE
Review the redial list.
•
Insert a dialing pause.
•
3. /FLASH
Make or answer a call.
•
Answer another incoming call
•
during a call.
4. 1
Set or dial your voicemail number.
•
5. Dialing keys
6. TONE
Switch to tone dialing temporarily
•
during a call
7. MUTE/DELETE
Mute the microphone.
•
Silence the ringer temporarily
•
while the handset is ringing.
Delete the displayed entry while
•
in the directory, caller ID log or
redial list.
8. / /VOLUME
Review the directory
•
Increase the listening volume.
•
Scroll up while in a menu, or in
•
the directory, caller ID log or redial
list.
.
10
11
12
13
14
9. MENU/SELECT
Show the menu.
•
Select an item, or save an entry or
•
setting in a menu.
10. OFF/CANCEL
Hang up a call.
•
Silence the ringer temporarily
•
while the handset is ringing.
To return to the previous menu
•
or idle mode, without making
changes.
11. CID/ /VOLUME
Review the caller ID log.
•
Decrease the listening volume.
•
Scroll down while in a menu, or
•
in the directory, caller ID log or
redial list.
12. QUIET#
Press and hold to set and turn on
•
the quiet mode, or turn it off.
Press repeatedly to show other
•
dialing options when reviewing a
caller ID log entry.
13. INT
Start an intercom conversation or
•
transfer a call.
14.
Make or answer a call
•
Switch between the speakerphone
•
and the handset.
.
Using the menu
Press MENU when the phone is not in use.
1.
Press or until the screen displays the desired feature menu.
2.
Press SELECT.
3.
To return to the previous menu, press CANCEL.
•
To return to idle mode, press and hold CANCEL.
•
Telephone settings
Default settings are indicated by asterisks (*).
Settings menu Description Options
LCD language Set the screen display language. English*
Français
Español
Voicemail # Set the speed dial voicemail number. Voicemail #
5
-
Page 6

Clr voicemail Turn off the voicemail indicators (see
Key tone Set whether the handset beeps
Home area
code
Dial mode Set the telephone to be touch-tone or
Use the Clr voicemail feature when the telephone indicates there is
new voicemail but there is none. For example, when you have accessed
your voicemail while away from home. The Clr voicemail feature only
turns off the indicators; it does not delete your voicemail messages.
As long as you have new voicemail messages, your telephone service
provider continues to send the signal that turns on the indicators.
the note below).
whenever a key is pressed.
Set the home area code so that the
caller ID log stores only seven digits
for local telephone numbers.
pulse dialing.
Reset VM Icon?
Key tone:On*
Key tone:Off
Home area code
_ _ _
Touch-tone*
Pulse
The following are some of the telephone features you may wish to set.
Refer to Telephone settings in the online Complete user’s manual for
complete instructions on setting all telephone features.
Ringer volume (handset)
You can adjust the ringer volume level, or turn the ringer off.
Press MENU when the handset is not in use.
1.
Scroll to Ringers and then press SELECT twice.
2.
Press or to sample each volume level, then press SELECT
3.
to save.
When the ringer volume is set to Off, the handset still rings when you
press FIND HANDSET on the telephone base.
Troubleshooting
If you have difculty with your telephone, please try the suggestions
below.
For customer service, visit our website at www.vtechphones.com or call
1 (800) 595-9511. In Canada, go to www.vtechcanada.com or
call 1 (800) 267-7377.
My telephone does not work at all.
Make sure the battery is installed and charged correctly. For optimum daily
•
performance, return the handset to the telephone base or charger after use.
Make sure the power adapter is securely plugged into an outlet not controlled
•
by a wall switch.
Make sure the telephone line cord is plugged rmly into the telephone base
•
and the wall jack.
Unplug the electrical power to the telephone base. Wait for approximately 15
•
seconds, then plug it back in. Allow up to one minute for the cordless handset
and telephone base to synchronize.
Charge the battery in the handset for up to 11 hours.
•
If the battery is completely depleted, charge the handset for at least 30
•
minutes before use.
Remove the battery and then install it again. If that still does not work, it may
•
be necessary to purchase a new battery.
Disconnect the telephone base from the telephone wall jack and plug in
•
a working telephone. If the other telephone does not work, the problem is
probably in the wiring or the telephone service. Contact your telephone
service provider.
I cannot dial out.
Try all the above suggestions.
•
Make sure there is a dial tone before dialing. It is normal if the handset takes a
•
second or two to synchronize with the telephone base before producing a dial
tone. Wait an extra second before dialing.
If other telephones in your home are having the same problem, the problem
•
is in the wiring or telephone service. Contact your telephone service provider
(charges may apply).
Eliminate any background noise. Mute the cordless handset before dialing, or
•
dial from another room in your home with less background noise.
If you have changed your telephone service to digital service from a cable
•
company or a VoIP service provider, the telephone line may need to be
rewired to allow all existing telephone jacks to work. Contact your service
provider for more information.
I have accidentally set my LCD language to Spanish or French, and
I don’t know how to change it back to English.
While the phone is not in use, press MENU once then enter 364#.
•
While on a call, press MENU once then enter 364#. Then the call
•
ends automatically.
Common cure for electronic equipment.
If the telephone is not responding normally, put the cordless handset in the
•
telephone base. If it does not respond, try the following (in the order listed):
1. Disconnect the power to the telephone base.
2. Disconnect the battery on the cordless handset.
6
Page 7

3. Wait a few minutes before connecting power to the telephone base.
4. Install the battery again and place the cordless handset in the telephone base.
5. Wait for the cordless handset to synchronize with the telephone base.
Allow up to one minute for this to take place.
Important safety instructions
When using your telephone equipment, basic safety precautions should always be followed to
reduce the risk of re, electric shock and injury, including the following:
Read and understand all instructions.
1.
Follow all warnings and instructions marked on the product.
2.
Unplug this product from the wall outlet before cleaning. Do not use liquid or aerosol
3.
cleaners. Use a damp cloth for cleaning.
Do not use this product near water such as near a bath tub, wash bowl, kitchen sink,
4.
laundry tub or a swimming pool, or in a wet basement or shower.
Do not place this product on an unstable table, shelf, stand or other unstable surfaces.
5.
Slots and openings in the back or bottom of the telephone base and handset are provided
6.
for ventilation. To protect them from overheating, these openings must not be blocked by
placing the product on a soft surface such as a bed, sofa or rug. This product should never
be placed near or over a radiator or heat register. This product should not be placed in any
area where proper ventilation is not provided.
This product should be operated only from the type of power source indicated on the marking
7.
label. If you are not sure of the type of power supply in your home or ofce, consult your
dealer or local power company.
Do not allow anything to rest on the power cord. Do not install this product where the cord
8.
may be walked on.
Never push objects of any kind into this product through the slots in the telephone base or
9.
handset because they may touch dangerous voltage points or create a short circuit. Never
spill liquid of any kind on the product.
To reduce the risk of electric shock, do not disassemble this product, but take it to an
10.
authorized service facility. Opening or removing parts of the telephone base or handset
other than specied access doors may expose you to dangerous voltages or other risks.
Incorrect reassembling can cause electric shock when the product is subsequently used.
Do not overload wall outlets and extension cords.
11.
Unplug this product from the wall outlet and refer servicing to an authorized service facility
12.
under the following conditions:
When the power supp ly cord or plug is damaged or frayed.
•
If liquid has been s pilled onto the product.
•
If the product has been exposed to rain or water.
•
If the product do es not operate normally by following the operating instruc tions.
•
Adjust only those controls that are covered by t he operation instructions. Improper
adjustment of other controls may result in damage and often requires ex tensive work
by an authorized technician to restore the pro duct to normal operatio n.
If the product has been dropped and the telephone base and /or handset has
•
been damaged.
If the product exhibits a distinc t chang e in performan ce.
•
Avoid using a telephone (other than cordless) during an electrical storm. There is a remote
13.
risk of electric shock from lightning.
Do not use the telephone to report a gas leak in the vicinity of the leak. Under certain
14.
circumstances, a spark may be created when the adapter is plugged into the power outlet,
or when the handset is replaced in its cradle. This is a common event associated with the
closing of any electrical circuit. The user should not plug the phone into a power outlet, and
should not put a charged handset into the cradle, if the phone is located in an environment
containing concentrations of ammable or ame-supporting gases, unless there is
adequate ventilation. A spark in such an environment could create a re or explosion. Such
environments might include: medical use of oxygen without adequate ventilation; industrial
gases (cleaning solvents; gasoline vapors; etc.); a leak of natural gas; etc.
Only put the handset of your telephone next to your ear when it is in normal talk mode.
15.
The power adapters are intended to be correctly oriented in a vertical or oor mount
16.
position. The prongs are not designed to hold the plug in place if it is plugged into a ceiling,
under-the-table or cabinet outlet.
SAVE THESE INSTRUCTIONS
Precautions for users of implanted cardiac pacemakers
Cardiac pacemakers (applies only to digital cordless telephones):
Wireless Technology Research, LLC (WTR), an independent research entity, led a
multidisciplinary evaluation of the interference between portable wireless telephones and
implanted cardiac pacemakers. Supported by the U.S. Food and Drug Administration, WTR
recommends to physicians that:
Pacemaker patients
Should keep wireless telephones at least six inches from the pacemaker.
•
Should NOT place wireless telephones directly over the pacemaker, such as in a breast
•
pocket, w hen it is turned ON.
Should use the wireless telephone at the ear opposite the pacemaker.
•
WTR’s evaluation did not identify any risk to bystanders with pacemakers from other persons
using wireless telephones.
Operating range
This cordless telephone operates with the maximum power allowed by the Federal
Communications Commission (FCC). Even so, this handset and telephone base can
communicate over only a certain distance - which can vary with the locations of the telephone
base and handset, the weather, and the layout of your home or ofce.
When the handset is out of range, the handset displays Out of range or no pwr at base.
If there is a call while the handset is out of range, it may not ring, or if it does ring, the call may
not connect well when you press . Move closer to the telephone base, then press to
answer the call.
If the handset moves out of range during a telephone conversation, there may be interference.
To improve reception, move closer to the telephone base.
ECO mode
This power conserving technology reduces power consumption for optimal battery
performance. The ECO mode activates automatically whenever the handset is synchronized
with the telephone base.
7
Page 8

Maintenance
Taking care of your telephone
Your cordless telephone contains sophisticated electronic parts, so it must be treated with
care.
Avoid rough treatment
Place the handset down gently. Save the original packing materials to protect your telephone if
you ever need to ship it.
Avoid water
Your telephone can be damaged if it gets wet. Do not use the handset outdoors in the rain, or
handle it with wet hands. Do not install the telephone base near a sink, bathtub or shower.
Electrical storms
Electrical storms can sometimes cause power surges harmful to electronic equipment. For
your own safety, take caution when using electrical appliances during storms.
Cleaning your telephone
Your telephone has a durable plastic casing that should retain its luster for many years. Clean
it only with a soft cloth slightly dampened with water or mild soap. Do not use excess water or
cleaning solvents of any kind.
Remember that electrical appliances can cause serious injury if used when you are wet or
standing in water. If the telephone base should fall into water, DO NOT RETRIEVE IT UNTIL
YOU UNPLUG THE POWER CORD AND TELEPHONE LINE CORD FROM THE WALL.
Then remove the telephone by the unplugged cords.
About cordless telephones
Privacy: The same features that make a cordless telephone convenient create some
•
limitations. Telephone calls are transmitted between the telephone base and the
cordless hand set by radio waves, so there is a possibility that the cordless telephone
conversations c ould be intercepted by radio receiving equipment within range of
the cordless handset. For this reason, you s hould not think of cordless telephone
conversations as being as private as those on c orded telephones.
Electrical power: The telephone base of this cordles s telephone must be connected to
•
a working electrical outlet. The electrical outlet should not be controlled by a wall switch.
Calls cannot be made from the cordless handset if the telephone base is unplugged,
switched off or if the electrical power
is interrupted.
Potential TV interference: Some cordless telephones operate at frequencies that may
•
cause interference to televisions and VCRs. To minimize or prevent such interference, do
not place the telephone base of the cordless telephone near or on top of a T V or VCR. If
interference is experienced, moving the cordless telephone farther away from the TV or
VCR often re duces or eliminates
the inter ference.
Rechargeable batteries: Exercise care in handling bat teries in order not to create a
•
short c ircuit with conducting mater ial such as rings, bracelets, and keys. The bat tery or
conductor may over heat and c ause harm. Obser ve proper polarity between the battery
and the bat tery charger.
Nickel-metal hydride rechargeable batteries: Dispose of these batteries in a safe
•
manner. Do not burn or pun cture the battery. Like other batteries of this type, if burned or
punctured, they c ould release caustic material which could cause injur y.
The RBRC® seal
The RBRC® seal on the nickel-metal hydride battery indicates that
Inc. is voluntarily participating in an industry program to collect and recycle these batteries at
the end of their useful lives, when taken out of service within the United States and Canada.
The RBRC® program provides a convenient alternative to placing used nickel-metal hydride
batteries into the trash or municipal waste, which may be illegal in your area.
VTech’s participation in RBRC® makes it easy for you to drop off the spent battery at local
retailers participating in the RBRC® program or at authorized VTech product service centers.
Please call 1 (800) 8 BATTERYTM for information on Ni-MH battery recycling and disposal
bans/restrictions in your area. VTech’s involvement in this program is part of its commitment to
protecting our environment and conserving natural resources.
RBRC® is a registered trademark of Rechargeable Battery Recycling Corporation.
VTech Communications,
Limited warranty
What does this limited warranty cover?
The manufacturer of this VTech Product warrants to the holder of a valid proof of purchase
(“Consumer” or “you”) that the Product and all accessories provided in the sales package
(“Product”) are free from defects in material and workmanship, pursuant to the following
terms and conditions, when installed and used normally and in accordance with the Product
operating instructions. This limited warranty extends only to the Consumer for Products
purchased and used in the United States of America and Canada.
What will VTech do if the Product is not free from defects in materials and
workmanship during the limited warranty period (“Materially Defective Product”)?
During the limited warranty period, VTech’s authorized service representative will repair or
replace at VTech’s option, without charge, a Materially Defective Product. If we repair the
Product, we may use new or refurbished replacement parts. If we choose to replace the
Product, we may replace it with a new or refurbished Product of the same or similar design.
We will retain defective parts, modules, or equipment. Repair or replacement of the Product,
at VTech’s option, is your exclusive remedy. VTech will return the repaired or replacement
Products to you in working condition. You should expect the repair or replacement to take
approximately 30 days.
How long is the limited warranty period?
The limited warranty period for the Product extends for ONE (1) YEAR from the date of
purchase. If VTech repairs or replaces a Materially Defective Product under the terms of this
limited warranty, this limited warranty also applies to the repaired or replacement Product for
a period of either (a) 90 days from the date the repaired or replacement Product is shipped to
you or (b) the time remaining on the original one-year warranty; whichever is longer.
8
Page 9

What is not covered by this limited warranty?
This limited warranty does not cover:
1. Product that has been subjected to misuse, accident, shipping or other physical damage,
improper installation, abnormal operation or handling, neglect, inundation, re, water or
other liquid intrusion; or
2. Product that has been damaged due to repair, alteration or modication by anyone other
than an authorized service representative of VTech; or
3. Product to the extent that the problem experienced is caused by signal conditions, network
reliability, or cable or antenna systems; or
4. Product to the extent that the problem is caused by use with non-VTech accessories; or
5. Product whose warranty/quality stickers, product serial number plates or electronic serial
numbers have been removed, altered or rendered illegible; or
6. Product purchased, used, serviced, or shipped for repair from outside the United States
of America or Canada, or used for commercial or institutional purposes (including but not
limited to Products used for rental purposes); or
7. Product returned without a valid proof of purchase (see item 2 below); or
8. Charges for installation or set up, adjustment of customer controls, and installation or repair
of systems
How do you get warranty service?
To obtain warranty service in the USA, please visit our website at www.vtechphones.com or
call 1 (800) 595-9511. In Canada, go to www.vtechcanada.com or call 1 (800) 267-7377.
NOTE: Before calling for service, please review the user’s manual - a check of the Product’s
controls and features may save you a service call.
Except as provided by applicable law, you assume the risk of loss or damage during transit and
transportation and are responsible for delivery or handling charges incurred in the transport of
the Product(s) to the service location. VTech will return repaired or replaced Product under this
limited warranty. Transportation, delivery or handling charges are prepaid. VTech assumes
no risk for damage or loss of the Product in transit. If the Product failure is not covered by this
limited warranty, or proof of purchase does not meet the terms of this limited warranty, VTech will
notify you and will request that you authorize the cost of repair prior to any further repair activity.
You must pay for the cost of repair and return shipping costs for the repair of Products that are not
covered by this limited warranty.
outside the unit.
What must you return with the Product to get warranty service?
1. Return the entire original package and contents including the Product to the VTech service
location along with a description of the malfunction or difculty; and
2. Include a “valid proof of purchase” (sales receipt) identifying the Product purchased
(Product model) and the date of purchase or receipt; and
3. Provide your name, complete and correct mailing address, and telephone number.
Other limitations
This warranty is the complete and exclusive agreement between you and VTech. It supersedes
all other written or oral communications related to this Product. VTech provides no other
warranties for this Product. The warranty exclusively describes all of VTech’s responsibilities
regarding the Product. There are no other express warranties. No one is authorized to make
modications to this limited warranty and you should not rely on any such modication.
State/Provincial Law Rights: This warranty gives you specic legal rights, and you may also
have other rights, which vary from state to state or province to province.
Limitations: Implied warranties, including those of tness for a particular purpose and
merchantability (an unwritten warranty that the Product is t for ordinary use) are limited to one
year from the date of purchase. Some states/provinces do not allow limitations on how long an
implied warranty lasts, so the above limitation may not apply to you. In no event shall VTech be
liable for any indirect, special, incidental, consequential, or similar damages (including, but not
limited to lost prots or revenue, inability to use the Product or other associated equipment, the
cost of substitute equipment, and claims by third parties) resulting from the use of this Product.
Some states/provinces do not allow the exclusion or limitation of incidental or consequential
damages, so the above limitation or exclusion may not apply to you.
Please retain your original sales receipt as proof of purchase.
FCC, ACTA and IC regulations
FCC Part 15
This equipment has been tested and found to comply with the requirements for a Class B
digital device under Part 15 of the Federal Communications Commission (FCC) rules. These
requirements are intended to provide reasonable protection against harmful interference in
a residential installation. This equipment generates, uses and can radiate radio frequency
energy and, if not installed and used in accordance with the instructions, may cause harmful
interference to radio communications. However, there is no guarantee that interference will not
occur in a particular installation. If this equipment does cause harmful interference to radio or
television reception, which can be determined by turning the equipment off and on, the user is
encouraged to try to correct the interference by one or more of the following measures:
Reorient or relocate the receiving antenna.
•
Increase the separation between the equipment and receiver.
•
Connec t the equipment into an outlet on a cir cuit different from that to which t he receiver
•
is connected.
Consult the deal er or an experienc ed radio/T V technician for help.
•
Changes or modications to this equipment not expressly approved by the party responsible
for compliance could void the user’s authority to operate the equipment.
This device complies with Part 15 of the FCC rules. Operation is subject to the following two
conditions: (1) this device may not cause harmful interference, and (2) this device must accept
any interference received, including interference that may cause undesired operation. Privacy
of communications may not be ensured when using this telephone.
To ensure safety of users, the FCC has established criteria for the amount of radio frequency
energy that can be safely absorbed by a user or bystander according to the intended usage
of the product. This product has been tested and found to comply with the FCC criteria. The
handset may be safely held against the ear of the user. The telephone base shall be installed
and used such that parts of the user’s body other than the hands are maintained at a distance
of approximately 20 cm (8 inches) or more.
This Class B digital apparatus complies with Canadian ICES-003.
FCC Part 68 and ACTA
This equipment complies with Part 68 of the FCC rules and with technical requirements
adopted by the Administrative Council for Terminal Attachments (ACTA). The label on the back
or bottom of this equipment contains, among other things, a product identier in the format US:
AAAEQ##TXXXX. This identier must be provided to your telephone service provider upon
request.
The plug and jack used to connect this equipment to premises wiring and the telephone
network must comply with applicable Part 68 rules and technical requirements adopted
by ACTA. A compliant telephone cord and modular plug is provided with this product. It is
designed to be connected to a compatible modular jack that is also compliant. An RJ11 jack
should normally be used for connecting to a single line and an RJ14 jack for two lines. See the
installation instructions in the user’s manual.
9
Page 10

The Ringer Equivalence Number (REN) is used to determine how many devices you may
connect to your telephone line and still have them ring when you are called. The REN for this
product is encoded as the 6th and 7th characters following the US: in the product identier
(e.g., if ## is 03, the REN is 0.3). In most, but not all areas, the sum of all RENs should be ve
(5.0) or less. For more information, please contact your telephone service provider.
This equipment may not be used with Party Lines. If you have specially wired alarm dialing
equipment connected to your telephone line, ensure the connection of this equipment does not
disable your alarm equipment. If you have questions about what will disable alarm equipment,
consult your telephone service provider or a qualied installer.
If this equipment is malfunctioning, it must be unplugged from the modular jack until the
problem has been corrected. Repairs to this telephone equipment can only be made by the
manufacturer or its authorized agents. For repair procedures, follow the instructions outlined
under the Limited warranty.
If this equipment is causing harm to the telephone network, the telephone service provider may
temporarily discontinue your telephone service. The telephone service provider is required to
notify you before interrupting service. If advance notice is not practical, you will be notied as
soon as possible. You will be given the opportunity to correct the problem and the telephone
service provider is required to inform you of your right to le a complaint with the FCC. Your
telephone service provider may make changes in its facilities, equipment, operation, or
procedures that could affect the proper functioning of this product. The telephone service
provider is required to notify you if such changes are planned.
If this product is equipped with a corded or cordless handset, it is hearing aid compatible.
If this product has memory dialing locations, you may choose to store emergency telephone
numbers (e.g., police, re, medical) in these locations. If you do store or test emergency
numbers, please:
Remain on the line and briey explain the reason for the call before hanging up.
Perform such activities in off-peak hours, such as early morning or late evening.
Industry Canada
Operation is subject to the following two conditions: (1) this device may not cause harmful
interference, and (2) this device must accept any interference, including interference that may
cause undesired operation.
The term ‘’IC:‘’ before the certication/registration number only signies that the Industry
Canada technical specications were met.
The Ringer Equivalence Number (REN) for this terminal equipment is 1.0. The REN is
an indication of the maximum number of devices allowed to be connected to a telephone
interface. The termination on an interface may consist of any combination of devices subject
only to the requirement that the sum of the RENs of all the devices does not exceed ve.
This product meets the applicable Industry Canada technical specications.
Technical specications
Frequency control Crystal controlled PLL synthesizer
Transmit frequency Handset: 1921.536-1928.448 MHz
Channels 5
Nominal effective range Maximum power allowed by FCC and IC. Actual operating range
Power requirements Handset: 2.4V Ni-MH battery
Memory Handset directory:
Telephone base: 1921.536-1928.448 MHz
may vary according to environmental conditions at the time of use.
Telephone base: 6V AC @ 300mA
Charger: 6V AC @ 300mA
50 memory locations; up to 30 digits and 15 characters
Handset caller ID log:
50 memory locations; up to 24 digits and 15 characters
VTECH TELECOMMUNICATIONS LTD.
A member of THE VTECH GROUP OF COMPANIES.
Distributed in the U.S.A. by VTech Communications, Inc., Beaverton, Oregon
97008.
Distributed in Canada by VTech Technologies Canada Ltd., Richmond, B.C. V6W 1L5.
VTech is the registered trademark of VTech Holdings Limited.
Copyright © 2012 for VTECH TELECOMMUNICATIONS LTD.
All rights reserved. Printed in China.
10
Page 11

Guide d’utilisation
T
Compatible with
Hearing Aid T-Coil
TIA-1083
(version canadienne)
CS6719/CS6719-15/
CS6719-16/CS6719-2/
CS6719-3/CS6719-4/
CS6719-5
DECT 6.0 cordless telephone
Les téléphones identiés par ce logo offrent une réduction
du bruit et des interférences lorsqu’utilisés avec des
appareils auditifs et des implants cochléaires dotés d’une
bobine T-Coil. Le logo d’homologation TIA-1083 est une
marque de commerce de Telecommunications Industry
Association. Utilisé sous licence.
Le programme ENERGY STARMD
(www.energystar.gov) reconnaît et encourage l’utilisation
de produits qui économisent l’énergie et contribuent à
la protection de l’environnement. Nous sommes ers
d’apposer le logo ENERGY STARMD sur ce produit,
indiquant ainsi qu’i répond aux normes de rendement
énergétique les plus récentes.
Introduction
An d’aider à protéger l’environnement, ce guide d’utilisation vous offre
des instructions d’installation et d’utilisation de base. Une description
brève des
caractéristiques de base y est expliquée.
Veuillez consulter le guide d’utilisation complet en ligne au
www.vtechcanada.com.
Avant d’utiliser ce produit VTech, veuillez lire la section Mesures de
sécurité importantes de la page 11 de ce guide d’utilisation.
1
Page 12

Nomenclature des pièces
L’emballage de votre téléphone comporte les articles suivants.
Conservez votre facture d’achat et le matériel d’emballage original pour
le cas où vous auriez besoin de service sous garantie.
Couvercle du
compartiment des piles
(1 pour le CS6719/
CS6719-15/CS6719-16)
(2 pour le CS6719-2)
(3 pour le CS6719-3)
(4 pour le CS6719-4
(5 pour le CS6719-5)
Socle
Chargeur et
adaptateur du
chargeur
(1 pour le CS6719-2)
(2 pour le CS6719-3)
(3 pour le CS6719-4)
(4 pour le CS6719-5)
Bloc-piles
(1 pour le CS6719/
CS6719-15/CS6719-16)
(2 pour le CS6719-2)
(3 pour le CS6719-3)
(4 pour le CS6719-4
(5 pour le CS6719-5)
Fil téléphonique
Wall mount
bracket
Gui de de dépa rt
rap ide
Combiné
(1 pour le CS6719/
CS6719-15/CS6719-16)
(2 pour le CS6719-2)
(3 pour le CS6719-3)
(4 pour le CS6719-4
(5 pour le CS6719-5)
Adaptateur du
socle
Guide
d’utilisation
Guide d’utilisation
Important
information
Gu id e de dé par t rapid e
Installation du socle et du chargeur
Installez le socle tel que démontré ci-dessous.
Prise téléphonique
Prise de
courant qui
n’est pas
contrôlée par
un interrupteur
Adaptateur du
socle
Socle
N’utilisez que l’adaptateur et le bloc-piles inclus avec cet appareil. Pour
•
Filtre DSL
(non inclus)
est nécessaire
si vous êtes
abonné au
service Internet
DSL haute
vitesse
Fil téléphonique
commander une pièce de rechange, visitez notre site Web au www.
vtechcanada.ou composez le
1-800-267-7377.
Ces adaptateurs ont été conçus pour être branchés en position verticale
•
ou dans une prise de courant dans le plancher. Les lames n’ont été
conçues pour être maintenues en place lorsqu’elles sont branchées au
plafond, sous une table ou une armoire.
Prise de courant
qui n’est pas
contrôlée par un
interrupteur
Chargeur
Important
information sheet
Adaptateur
du socle
2
Page 13

Installation du bloc-piles
Installez le bloc-piles tel que démontré.
Branchez le connecteur
1.
correctement dans la prise.
Glissez le couvercle du
3.
compartiment vers le centre
du combiné, jusqu’à ce qu’il se
verrouille en place.
Placez les ls du bloc-piles à
2.
l’intérieur du compartiment.
Déposez le combiné sur le socle
4.
ou le chargeur.
Le voyant
CHARGE
demeure
allumé pendant
la recharge.
IMPORTANT:
Si vous n’utilisez pas le combiné pendant une période prolongée,
•
débranchez-le et retirez le bloc-piles an de prévenir les fuites.
If you do not hear a dial tone:
Make sure the installation procedures described above are properly
•
done.
It may be a wiring problem. If you have changed your telephone
•
service to digital service from a cable company or a VoIP service
provider, the telephone line may need to be rewired to allow all
existing telephone jacks to work. Refer to Rewiring of telephone
line for cable/VoIP service users on page 10 for more information.
Charge du bloc-piles
Lorsque vous avez installé le bloc-piles, l’écran indiquera le statut de
la pile (voir le tableau ci-dessous). Pour une meilleure performance,
veuillez déposer le combiné sur le socle ou le chargeur lorsque vous ne
l’utilisez pas. Le bloc-piles est complètement chargé après 16 heures
de charge continue. Consultez le guide d’utilisation en ligne pour plus
de détails en rapport avec l’autonomie des piles.
Voyants des piles Statut de la pile Action
L’écran clignotera
ou afchera Déposer
sur chargeur et
clignotera.
L’écran afche Pile
faible et clignote.
L’écran afche
COMBINÉ X et -:-
- --/--.
Le bloc-piles n’a plus
de charge et ne peut
être utilisé.
La charge du bloc-piles
est sufsante pour
conversation brève.
Le bloc-piles est
chargé.
Chargez sans interruption (au
moins 30 minutes).
Chargez sans interruption (au
moins 30 minutes).
Pour conserver la charge
du bloc-piles, replacez le
combiné sur le socle après
utilisation.
3
Page 14

Options d’installation
Le support d’installation sur un bureau est préinstallé sur le socle. Si vous
désirez l’installer au mur, vous devrez utiliser une plaque téléphonique
modulaire dotée de montant.
Placez le socle tel que démontré ci-
1.
la che TEL LINE à l’arrière du
socle. Branchez la petite partie de
l’adaptateur d’alimentation dans la
che POWER à l’arrière du socle.
Acheminez le l téléphonique (ou le
3.
ltre DSL) à travers les ouvertures
du support de xation. Acheminez
le l dans le canal moulé à cet effet.
Branchez l’adaptateur à une prise de
courant qui n’est pas contrôlée par un
interrupteur.
2.Branchez le l téléphonique dans
dessous. Insérez les montants (inscrits
B) à travers les ouvertures (inscrites
B)de la base. Glissez le téléphone vers
le bas jusqu’à ce qu’il se verrouille en
place.
Alignez les ouvertures du support
4.
avec la plaque téléphonique est
glissez le support de xation vers
le bas pour le verrouiller en place.
Enroulez et attachez le l à l’aide
d’une attache torsadée.
Handset overview
1
2
3
4
5
6
7
1. CHARGE light
2. REDIAL/PAUSE
Appuyez successivement pour
•
réviser la liste de recomposition.
3. /FLASH
Faire ou recevoir un appel.
•
Répondre à un autre appel
•
entrant pendant un appel.
4. Touches de composition
5. 1
Appuyer successivement pour
•
ajouter ou retirer le 1 devant
l’entrée du répertoire de
l’afcheur avant de composer ou
de sauvegarder dans le répertoire
téléphonique.
6. TONE
Permuter au mode de
•
composition à tonalité temporaire
pendant un appel.
7. MUTE/DELETE
Mise en sourdine du microphone
•
pendant un appel.
Effacer des chiffres ou des
•
caractères à l’aide du clavier.
Mise en sourdine temporaire
•
de la sonnerie pendant que le
combiné sonne.
8. / /VOLUME
9. MENU/SELECT
10. OFF/CANCEL
11. CID/ /VOLUME
12. QUIET#
4
8
9
10
11
12
Réviser le répertoire lorsque
•
le téléphone n’est pas en cours
d’utilisation.
Accéder au menu.
•
Sélectionner une option ou
•
sauvegarder un réglage dans un
menu.
Raccrocher un appel.
•
Mettre la sonnerie
•
temporairement en sourdine
pendant que le combiné sonne.
Réviser le répertoire de l’afcheur
•
lorsque le téléphone n’est pas en
cours d’utilisation.
Diminuer le niveau de volume de
•
l’écoute pendant un appel.
Appuyez successivement pour
•
afcher les autres options de
composition pendant la révision
du répertoire de l’afcheur.
Page 15

Telephone base overview
1
2
1. IN USE light
2. FIND HANDSET
Appuyez une fois et relâchez pour envoyer un télé-signal à tous les
•
combinés.
Utilisation du menu
Accéder au menu du combiné :
Appuyez sur MENU lorsque le téléphone n’est pas en cours
1.
d’utilisation.
Appuyez sur CID ou jusqu’à ce que l’écran afche la fonction
2.
désirée du menu.
Appuyez sur SELECT.
3.
Pour retourner au menu précédent, appuyez sur CANCEL.
•
Pour retourner en mode d’attente, maintenez enfoncée CANCEL.
•
Réglages du téléphone
Les réglages par défaut sont indiqués par un astérisque (*).
Afché à
Fonction Options
l’écran
Langage ACL
Réglez le langage de l’écran.
English*
Français
Español
Ann. B.
vocale
Mettre les voyants de messagerie
vocale hors fonction. Voir la remarque
Eff icône VM?
ci-dessous pour plus de détails.
Tonal touches
Rég. date/
heure
Ind rég domes
Réglez la tonalité des touches an que
la touche émette un bip lorsque vous
l’enfoncez.
Réglez la date et l’heure afchées sur
le combiné.
Réglez l’indicatif régional domestique
En fonction*
Hors fonction
-:-- --/--
_ _ _
de manière à ce que le répertoire de
l’afcheur conser ve en mémoire les
sept chiffres du numéro de téléphone
local.
Type compo.
Réglez le téléphone au mode de
composition à tonalité ou à impulsions.
Utilisez la fonction Ann. B. vocale lorsque le téléphone indique que
•
vous avez un nouveau message vocal, mais que vous n’en avez pas.
Par exemple, lorsque vous accédez à votre boîte vocale à distance.
La fonction Ann. B. vocale permet uniquement d’éteindre les voyants;
elle n’efface pas les messages de la boîte vocale. Tant que vous avez
des messages dans la boîte vocale, votre fournisseur de services
téléphoniques continuera de faire allumer les voyants.
Tonalité*
Impulsions
Les caractéristiques suivantes pourraient être des fonctions que vous
aimeriez régler. Consultez la section Réglages du téléphone du guide
d’utilisation en ligne pour plus de détails en rapport aux réglages des
caractéristiques du téléphone.
Volume de la sonnerie
Vous pouvez régler le niveau de volume de la sonnerie, ou mettre la
sonnerie hors fonction.
Appuyez sur MENU lorsque le combiné n’est pas en cours
1.
d’utilisation.
Délez jusqu’à l’option Sonneries et appuyez deux fois sur
2.
SELECT.
Appuyez sur VOL- ou VOL+ pour entendre un échantillon de chaque
3.
sonnerie.
Appuyez sur SELECT pour sauvegarder.
4.
5
Page 16

Dépannage
Si vous avez de la difculté à faire fonctionner votre téléphone, les suggestions
ci-dessous devraient régler le problème. Pour communiquer avec le service à la
clientèle, visitez notre site Web au www.vtechcanada.com ou communiquez au
1-800-267-7377.
Mon téléphone ne fonctionne pas du tout.
Assurez-vous que le bloc-piles est installé et chargé correctement. Pour une
•
performance optimale, replacez le combiné sans l sur le socle après chaque
utilisation.
Assurez-vous que l’adaptateur secteur est branché solidement dans une prise de
•
courant qui n’est pas contrôlée par un interrupteur.
Assurez-vous que le l téléphonique est branché solidement dans le socle et la prise
•
modulaire murale.
Débranchez le téléphone de la prise de courant et retirez le bloc-piles du
•
combiné. Attendez 15 secondes puis replacez le bloc-piles et rebranchez
l’alimentation. Attendez une minute an que le combiné se synchronise avec le
socle.
Chargez le bloc-piles dans le combiné sans l pendant au moins 16 heures.
•
Si le bloc-piles est complètement épuisé, cela pourrait prendre jusqu’à 10
•
minutes avant que l’indication Pile faible apparaisse à l’écran.
Retirez et réinsérez le bloc-piles. Si ceci ne règle pas le problème, il est possible
•
que vous deviez vous procurer un nouveau bloc-piles.
Débranchez le socle de la prise modulaire et branchez-y un autre téléphone
•
fonctionnel. Si ce téléphone ne fonctionne pas, le problème se situe probablement
dans le câblage ou le service téléphonique local
Il n’y a aucune tonalité.
Tentez d’abord toutes les suggestions ci-dessus.
•
Rapprochez le combiné sans l du socle. Il est possible que vous soyez hors de
•
portée.
Il est possible que votre l téléphonique ne fonctionne pas correctement. Installez
•
un nouveau cordon de ligne téléphonique.
Débranchez le l téléphonique du socle et rebranchez un autre téléphone. Si
•
vous n’avez toujours pas de tonalité sur ce téléphone, le problème se situe sur le
câblage de votre compagnie de téléphone locale. Contactez votre compagnie de
téléphone locale
.
Il st impossible de composer.
Essayez d’abord les suggestions mentionnées ci-dessus.
•
Assurez-vous d’obtenir un signal de tonalité avant de composer. Le combiné peut
•
prendre une à deux secondes pour localiser le socle, ceci est normal. Attendez une
seconde de plus avant de composer.
Si vous avez toujours des problèmes avec votre téléphone, le problème se situe
•
au niveau du câblage. Contactez votre compagnie de téléphone locale (certaines
charges pourraient s’appliquer).
Éliminez les parasites sur la ligne. Les interférences provenant des téléviseurs,
•
radio ou autres appareils peuvent empêcher le téléphone de composer
correctement. Si vous ne pouvez éliminer complètement les interférences, mettez
d’abord le combiné en sourdine avant de composer ou composez à partir d’une
autre pièce an de diminuer les interférences
“Non initialisé” apparaît à l’écran et le combiné ne fonctionne pas
du tout.
L’initialisation du combiné au socle pourrait être effacée. Procédez tel que
•
décrit ci-dessous pour initialiser le combiné au socle.
1. Retirez le combiné du socle.
2. Maintenez enfoncée /FIND HANDSET du socle pendant environ quatre
secondes, jusqu’à ce que le voyant rouge IN USE s’allume.
3. Appuyez sur # (dièse) du combiné. Il afchera Initialisation... et prendra
environ 60 secondes an de terminer l’initialisation. Le combiné afchera
Initialisé pendant quelques secondes et vous entendrez une tonalité de
conrmation lorsque le processus d’initialisation sera terminé.
L’inscription “Pile faible” apparaîtra à l’écran du combiné.
Déposez le combiné sur le socle ou le chargeur pour la recharge.
•
Retirez et réinstallez le bloc-piles, utilisez-le jusqu’à ce qu’il soit épuisé puis
•
rechargez-le sur le socle ou le chargeur pendant 16 heures.
Si les suggestions ci-dessus ne règlent pas le problème, vous devrez remplacer le
•
bloc-piles
.
Le bloc-piles ne se recharge pas dans le combiné ou le bloc-piles
du combiné n’accepte pas la charge.
Assurez-vous que le combiné est déposé correctement sur le chargeur. Le voyant
•
CHARGE du socle ou du chargeur devrait s’allumer.
Retirez et réinstallez le bloc-piles dans un autre combiné et utilisez le téléphone
•
normalement,
jusqu’à ce que le bloc-piles soit complètement épuisé. Ensuite,
rechargez-le pendant 16 heures.
Si le combiné sans l repose sur le chargeur ou le socle, mais que le voyant
•
CHARGE ne s’allume pas, consultez la section Le voyant de charge est éteint
ci-dessous.
Si le bloc-piles est complètement épuisé, cela pourrait prendre jusqu’à 10
•
minutes avant que l’indication Pile faible apparaisse à l’écran.
Il peut être nécessaire d’acheter un nouveau bloc-piles, veuillez consulter la
•
section Installation du bloc-piles de la page 2
Le voyant CHARGE est éteint.
Nettoyez les bornes du combiné sans l en utilisant une efface à crayon ou un chiffon
•
sec non abrasif.
.
.
.
Page 17

Assurez-vous que l’adaptateur secteur et les ls téléphoniques sont correctement
•
branchés.
Débranchez le téléphone de la prise de courant et retirez le bloc-piles du
•
combiné. Attendez 15 secondes puis replacez le bloc-piles et rebranchez
l’alimentation. Attendez une minute an que le combiné se synchronise avec le
socle
.
Le téléphone ne sonne pas lorsqu’il y a un appel entrant.
Assurez-vous que la sonnerie est activée et que le volume de la sonnerie du socle
•
n’est pas réglé à zéro.
Assurez-vous que le l téléphonique et l’adaptateur secteur sont correctement
•
branchés (page 2).
Votre combiné peut être trop éloigné du socle. Rapprochez-vous du socle.
•
Il est possible que vous ayez trop de postes auxiliaires branchés sur la même
•
ligne pour qu’ils puissent tous sonner en même temps. Tentez d’en débrancher
quelques-uns.
Si d’autres appareils dans votre résidence ont le même problème, le problème se
•
situe alors avec votre câblage ou le service local. Contactez votre compagnie de
téléphone locale.
D’autres appareils électroniques tels que des radios HAM et autres téléphones
•
DECT peuvent causer de l’interférence à votre téléphone sans l. Tentez
d’installer votre téléphone à l’écart de ces appareils électroniques : routeurs
sans l, radios, tours de radiodiffusion, tours de téléavertisseurs, téléphones
cellulaires, interphones, moniteurs pour bébé, téléviseurs, magnétoscopes,
ordinateurs personnels, appareils électroménagers ainsi que d’autres téléphones
sans l.
Vériez en utilisant un téléphone qui fonctionne dans la même prise
•
téléphonique. Si l’autre téléphone a le même problème, le problème se situe au
niveau de la prise téléphonique. Contactez votre compagnie de téléphonique
locale (des frais peuvent être exigibles).
Le l téléphonique peut être défectueux. Utilisez un nouveau l téléphonique.
•
Retirez et réinstallez le bloc-piles dans le combiné et le socle.
•
Attendez que le combiné sans l se synchronise avec le socle. Attendez une
•
minute pour que ce processus s’accomplisse
.
Mon combiné sans l émet des bips et ne fonctionne pas
normalement.
Assurez-vous que le cordon d’alimentation est branché dans le socle. Branchez-
•
le dans une autre prise de courant qui n’est pas contrôlée par un interrupteur
mural.
Rapprochez le combiné sans l du socle. Il est possible qu’il soit hors de portée.
•
Débranchez le téléphone de la prise de courant et retirez le bloc-piles du
•
combiné. Attendez 15 secondes puis replacez le bloc-piles et rebranchez
l’alimentation. Attendez une minute an que le combiné se synchronise avec le
socle.
D’autres appareils électroniques tels que des radios HAM et autres téléphones
•
DECT peuvent causer de l’interférence à votre téléphone sans l. Tentez d’installer
votre téléphone à l’écart de ces appareils électroniques : routeurs sans l,
radios, tours de radiodiffusion, tours de téléavertisseurs, téléphones cellulaires,
interphones, moniteurs pour bébé, téléviseurs, ordinateurs personnels, appareils
électroménagers ainsi que d’autres téléphones sans l
.
J’obtiens des interférences pendant les conversations
téléphoniques.
Mes appels s’estompent ou se coupent lorsque j’utilise le combiné
sans l.
Le combiné peut être hors de portée. Rapprochez-vous du socle.
•
Avez-vous le service DSL? Si oui, vous devez installer un ltre DSL sur chaque
•
prise téléphonique sur laquelle est branché un téléphone. Communiquez avec
votre fournisseur de service DSL pour plus de renseignements à ce sujet.
D’autres appareils sont branchés à la même prise téléphonique que votre
•
téléphone sans l. Tentez de déplacer l’appareil ou de le brancher à une autre
prise de courant.
D’autres appareils électroniques tels que des radios HAM et d’autres téléphones
•
DECT peuvent causer de l’interférence à votre téléphone sans l. Tentez d’installer
votre téléphone à l’écart de ces appareils électroniques : routeurs sans l, radios,
tours de radiodiffusion, tours de téléavertisseurs, téléphones cellulaires, interphones,
moniteurs pour bébé, téléviseurs, magnétoscopes, ordinateurs personnels, appareils
électroménagers, ainsi que d’autres téléphones sans l.
Si votre téléphone est branché avec un modem ou un limiteur de tension, branchez
•
le téléphone (ou le modem/limiteur de tension) dans une prise différente. Ce ceci ne
règle pas le problème, déplacez votre téléphone ou votre modem à l’écart l’un de
l’autre ou utilisez un autre limiteur de tension.
L’aménagement des pièces de votre maison ou bureau restreint peut-être la portée
•
de fonctionnement du combiné sans l. Pour une performance optimale, veuillez
installer le socle dans un endroit central de votre maison ou bureau, à l’écart des murs
ou autres obstacles. Installez le socle dans un endroit élevé an d’en améliorer la
réception.
Débranchez le socle de la prise modulaire et branchez un téléphone à cordon. Si
•
les appels ne sont toujours pas clairs, le problème provient probablement de votre
câblage ou de votre service local. Contacter votre compagnie de téléphone locale
(des frais peuvent vous être exigés).
Si d’autres téléphones dans votre résidence ont le même problème, le problème
•
se situe alors avec votre câblage. Contactez votre compagnie de téléphone (des
frais pourraient être exigés).
J’entends d’autres appels lorsque j’utilise le téléphone.
Débranchez le socle de la prise téléphonique. Branchez un téléphone différent.
•
Si vous entendez toujours d’autres appels, le problème provient probablement
de votre câblage ou de votre service local. Veuillez contacter votre compagnie de
téléphone locale
.
Page 18

J’entends des interférences sur mon combiné sans l et aucune
touche ne fonctionne.
Assurez-vous que le l téléphonique soit branché correctement.
•
Mon afcheur ne fonctionne pas correctement.
Le service de l’afcheur est disponible en abonnement. Vous devez vous
•
abonner an que bénécier de cette fonction.
Votre appelant doit vous appeler d’une région offrant les services de l’afcheur.
•
Les deux compagnies de téléphone, celle de l’appelant et la vôtre, doivent utiliser
•
des équipements compatibles avec les services de l’afcheur.
Les données de l’afcheur apparaîtront après la première ou la seconde
•
sonnerie.
Si vous êtes abonné au service DSL, installez un ltre DSL sur la ligne
•
téléphonique entre le socle et la prise téléphonique. Le ltre DSL prévient les
interférences et les problèmes de l’afcheur causés par les interférences DSL.
Contactez votre fournisseur de services DSL
.
Je suis abonné à un service téléphonique non traditionnel qui
utilise mon ordinateur pour établir la connexion et mon téléphone
ne fonctionne pas.
•
Assurez-vous que votre ordinateur est en fonction.
• Assurez-vous que la connexion Internet fonctionne correctement.
• Assurez-vous que le logiciel est installé et fonctionne pour votre service non
traditionnel.
• Assurez-vous d’avoir branché l’adaptateur USB dans un port USB dédié de votre
ordinateur. Ne le branchez pas dans un concentrateur USB qui n’est pas alimenté.
• Dans de rares circonstances, le port USB de votre ordinateur peut ne pas avoir
sufsamment de puissance, tentez d’utiliser un concentrateur USB alimenté.
Si vous avez un mur coupe-feu, il pourrait empêcher l’accès au fournisseur de
•
service non traditionnel. Contactez votre fournisseur de service pour plus de
détails
.
Solutions communes pour les appareils électroniques.
•
Si l’appareil ne semble pas fonctionner normalement, tentez de déposer le
combiné sur le socle. Sinon, tentez l’une des solutions ci-dessous (dans l’ordre
énuméré) :
• Débranchez l’alimentation du socle.
• Débranchez le bloc-piles du combiné sans l.
• Attendez quelques minutes.
• Réinstallez le bloc-piles et déposez le combiné sur le socle ou le chargeur pour le
recharger.
• Attendez que le combiné rétablisse le lien avec le socle (synchronisation).
Attendez au moins une minute pour que ce processus se termine
.
Mesures de sécurité importantes
An de réduire les risques d’incendie, de blessures corporelles ou d’électrocution,
suivez toujours ces mesures préventives de base lorsque vous utilisez votre téléphone :
1. Lisez et comprenez bien toutes les instructions.
2. Observez toutes les instructions et mises en garde inscrites sur l’appareil.
3. Débranchez ce téléphone de la prise murale avant de le nettoyer. N’utilisez pas
de nettoyeurs liquides ni en aérosol. N’utilisez qu’un chiffon doux et légèrement
humecté.
4. N’utilisez pas cet appareil près d’une source d’humidité (par exemple, près d’une
baignoire, évier de cuisine ou piscine).
5. Ne déposez pas ce téléphone sur un chariot, support ou table chancelants.
L’appareil pourrait tomber et être sérieusement endommagé.
6. Le boîtier de l’appareil est doté de fentes et d’ouvertures d’aération situées à
l’arrière ou en dessous. An d’empêcher la surchauffe, ces ouvertures ne doivent
pas être obstruées en plaçant l’appareil sur un lit, divan, tapis ou autre surface
similaires. Ne placez pas cet appareil à proximité d’un élément de chauffage ni
d’une plinthe électrique. De plus, ne l’installez pas dans une unité murale ou un
cabinet fermé qui ne possède pas d’aération adéquate.
7. Ne faites fonctionner cet appareil qu’avec le type d’alimentation indiqué sur les
étiquettes de l’appareil. Si vous ne connaissez pas le voltage de votre maison,
consultez votre marchand ou votre fournisseur d’électricité.
8. Ne déposez rien sur le cordon d’alimentation. Installez cet appareil dans un
endroit sécuritaire, là où personne ne pourra trébucher sur la ligne d’alimentation
ni le cordon téléphonique modulaire.
9. N’insérez jamais d’objets à travers les fentes et ouvertures de cet appareil, car
ils pourraient toucher à des points de tension dangereux ou court-circuiter des
pièces, ce qui constituerait un risque d’incendie ou d’électrocution. N’échappez
pas de liquides dans l’appareil.
10. An de réduire les risques d’électrocution, ne démontez pas l’appareil, mais
apportez-le plutôt à un centre de service qualié s’il doit être réparé. En enlevant
le couvercle, vous vous exposez à des tensions dangereuses ou autres dangers
similaires. Un remontage inadéquat peut être à l’origine d’une électrocution lors
d’une utilisation ultérieure de l’appareil.
11. Ne surchargez pas les prises de courant ni les rallonges électriques, car ceci peut
constituer un risque d’incendie ou d’électrocution.
12. Débranchez cet appareil de la prise de courant et communiquez avec le
département de service à la clientèle de VTech dans les cas suivants :
A. Lorsque le cordon d’alimentation est endommagé ou écorché.
B. Si du liquide a été échappé dans l’appareil.
C. Si l’appareil a été exposé à une source d’humidité telle que la pluie ou l’eau.
D. Si l’appareil ne fonctionne pas normalement en suivant les directives du
guide. N’ajustez que les commandes couvertes dans le guide d’utilisation,
car un mauvais réglage de celles-ci peut être à l’origine de dommages, ce qui
nécessiterait des réparations considérables pour remettre l’appareil à son état
de fonctionnement normal.
E. Si l’appareil a été échappé ou son boîtier, endommagé.
F. Si le produit afche une nette diminution de sa performance.
Page 19

13. Évitez d’utiliser un téléphone (autre qu’un sans l) pendant un orage. Les éclairs
peuvent être à l’origine d’une électrocution.
14. N’utilisez pas le téléphone pour rapporter une fuite de gaz à proximité de celle-ci.
15. Placez uniquement le combiné de votre appareil près de votre oreille lorsqu’il est
en mode de conversation normal.
16. Ce bloc d’alimentation a été conçu pour être orienté en position verticale ou monté
au sol. Les broches ne sont pas conçues pour maintenir l’adaptateur en place si
celui-ci est branché dans une prise au plafond ou sous une table/armoire.
CONSERVEZ INSTRUCTIONS
Mesures préventives pour les utilisateurs de
sti m ula t eur s c ard i aqu e s imp l ant é s da n s
l’organisme
L’organisme ‘Wireless Technology Research, LLC (WTR)’, une rme de recherche
indépendante, a mené une évaluation pluridisciplinaire des interférences entre les téléphones
sans l portatifs et les stimulateurs cardiaques implantés dans l’organisme. Appuyée par
l’Administration des aliments et drogues (FDA) des États-Unis, la rme WTR recommande aux
médecins :
Avis aux détenteurs de stimulateurs cardiaques
Ils doivent tenir le téléphone sans l à une distance d’au moins six pouces du stimulateur
•
cardiaque.
Ils ne doivent PAS placer le téléphone sans l directement sur le stimulateur cardiaque, tel
•
que dans une poche de chemise, lorsque celui-ci est en marche.
Ils doivent utiliser le téléphone sans l en l’appuyant sur l’oreille qui se trouve dans la
•
direction opposée au stimulateur cardiaque.
L’étude effectuée par l’organisme WRS n’a pas identié de risque pour les détenteurs de
simulateurs cardiaques causé par les gens qui utilisent un téléphone sans l à proximité de
ceux-ci.
Portée de fonctionnement
Ce téléphone sans l utilise la capacité de puissance maximale permise par la Commission
fédérale des communications (FCC). Malgré ceci, ce combiné et ce socle téléphonique ne
peuvent communiquer que sur une portée de fréquences restreinte - qui peut varier selon
l’emplacement du socle et du combiné, la météo et le plan des pièces de votre maison ou
votre bureau.
Lorsque le combiné est hors de portée, celui-ci afchera Hors de portée ou pas alim.
socle.
S’il y a un appel pendant que le combiné est hors de portée, celui-ci peut ne pas sonner ou
s’il sonne, l’appel peut ne pas se connecter en appuyant sur /FLASH. Rapprochez-vous
du socle du téléphone, puis appuyez sur /FLASH pour répondre à l’appel.
Si le combiné se déplace hors de portée pendant une conversation, ceci pourrait causer des
interférences. Pour améliorer la réception, rapprochez-vous du socle
.
Entretien
Prenez soin de votre téléphone
Votre téléphone sans l contient des pièces électroniques sophistiquées; vous devez donc
le manipuler avec soin.
Évitez de le manipuler rudement
Déposez le combiné doucement. Conservez les matériaux d’emballage originaux an de
protéger votre téléphone si vous devez l’expédier.
Évitez d’exposer votre téléphone aux sources d’humidité
Vous pouvez endommager votre téléphone s’il est exposé à une source d’humidité.
N’utilisez pas le combiné à l’extérieur lorsqu’il pleut ou ne le manipulez pas si vous avez les
mains mouillées. N’installez pas votre socle près d’un évier, baignoire ou douche.
Orages
Les orages peuvent parfois causer des surcharges de tension qui peuvent nuire aux
composants électroniques internes de l’appareil. Pour votre sécurité, soyez prudent(e)
lorsque vous utilisez l’appareil pendant un orage.
Nettoyage de votre téléphone
Votre téléphone possède un boîtier de plastique durable; il devrait conserver son ni brillant
pendant de nombreuses années. Ne le nettoyez qu’avec un chiffon doux légèrement humecté
d’eau ou de solution savonneuse légère. N’appliquez pas une quantité excessive d’eau ni
aucun type de dissolvant.de nombreuses années. Ne le nettoyez qu’avec un chiffon doux
légèrement humecté d’eau ou de solution savonneuse légère. N’appliquez pas une quantité
excessive d’eau ni aucun type de dissolvant
N’oubliez jamais que les appareils électriques peuvent causer de graves blessures lorsque
vous êtes mouillé(e) ou si vous vous tenez dans l’eau. Si le socle de votre téléphone
tombe dans l’eau, NE LE RÉCUPÉREZ PAS AVANT D’AVOIR DÉBRANCHÉ LE CORDON
D’ALIMENTATION ET LES CORDONS DE LIGNE TÉLÉPHONIQUE DES PRISES
MURALES. Ensuite, sortez l’appareil en tirant sur les cordons débranchés.
.
À propos des téléphones sans l
Condentialité : Les mêmes caractéristiques qui constituent des avantages pour les
•
téléphones sans l afchent également des restrictions. Les appels téléphoniques
sont transmis entre le combiné sans l et le socle par le biais d’ondes radio ; il y a donc
la possibilité que vos conversations téléphoniques sans l soient interceptées par des
équipements de réception radio se trouvant dans la portée du combiné sans l. Pour
cette raison, vous ne devez pas percevoir les communications téléphoniques sans l
comme étant aussi condentielles que celles des téléphones à cordon.
Alimentation électrique : Le socle de ce téléphone sans l doit être branché à une prise
•
électrique fonctionnelle. La prise électrique ne doit pas être contrôlée par un interrupteur
mural. Les appels ne pourront pas être effectués du combiné sans l si le socle est
débranché ou mis hors tension ou si le courant est coupé.
Possibilité d’interférences aux téléviseurs : Certains téléphones sans l
•
fonctionnent sur des fréquences pouvant causer des interférences aux téléviseurs
et aux magnétoscopes. Pour réduire ou prévenir de telles interférences, ne placez
pas le socle du téléphone sans l près ou sur un téléviseur ou magnétoscope. S’il y a
présence de parasites, il est conseillé d’éloigner le téléphone sans l du téléviseur ou du
magnétoscope an de réduire possiblement les interférences.
Page 20

Piles rechargeables : Cet appareil contient des piles rechargeables au nickel-cadmium
•
(NiCd) ou à l’hydrure métallique de nickel (NiMh). Manipulez les piles avec soin an de
ne pas les court-circuiter avec des bagues, bracelets ou clés. Les piles ou le conducteur
peut surchauffer et causer des blessures. Respectez la polarité adéquate entre les piles
et le chargeur.
Piles rechargeables à l’hydrure métallique de nickel (NiMh) : Jetez ces piles de manière
écologique et sécuritaire. Ne pas les brûler ni les percer. Comme les autres piles de ce type,
si elles sont brûlées ou percées, elles pourraient dégager une matière toxique qui peut causer
des blessures corporelles.
Le sceau RBRC
Le sceau de l’organisme de recyclage RBRCmd sur les piles à l’hydrure métallique de
nickel signie que VTech Communications, Inc. participe volontairement au programme
industriel visant à reprendre et recycler ce type de piles lorsqu’elles ne servent plus au
sein du territoire des États-Unis et du Canada.
Le programme RBRCmd propose une solution intéressante à la pollution causée
par les piles à l’hydrure métallique de nickel usées qui sont jetées dans les rebuts
domestiques et les sites d’enfouissement municipaux, ce qui peut même être illégal
dans certaines provinces ou certains états.
En participant au programme RBRCmd , VTech vous facilite la tâche en vous
proposant de jeter le bloc-piles chez un marchand participant ou un centre de service
autorisé par VTech. Pour plus de renseignements au sujet du recyclage des piles à
l’hydrure métallique de nickel et des interdictions de jeter ce type de rebut dans votre
région, composez le 1-800-8-BATTERYmc. La participation de VTech à ce programme
représente une part de son implication dans la protection de notre environnement et
la conservation de nos ressources naturelles.
RBRCmd est une marque de commerce de Rechargeable Battery Recycling
Corporation..
md
Garantie limitée
Que couvre cette garantie limitée?
Le fabricant de ce produit VTECH (ci-après ‘VTECH’), garantit au détenteur d’une
preuve d’achat valide (ci-après, le ‘consommateur’ ou ‘vous’) que ce produit et tous
ses accessoires (ci-après, le ‘produit’), tels que fournis par VTECH dans l’emballage,
seront libres de tout défaut, selon les conditions énumérées dans les présentes, s’ils
ont été installés et utilisés dans des conditions normales et selon les instructions
de ce guide d’utilisation. Seul l’acheteur original peut se prévaloir des avantages
de cette garantie limitée, pour des produits achetés et utilisés aux États-Unis et au
Canada.
Que fera VTECH si le produit s’avère défectueux (ci-après, le ‘produit défectueux’),
dans ses pièces et sa main-d’oeuvre, pendant la période de la garantie?
Pendant la période de la garantie limitée, le centre de service autorisé par VTECH
réparera ou remplacera, à la seule discrétion de VTECH, sans frais de pièces ni de
main-d’oeuvre pour le consommateur, tout produit défectueux. Si nous réparons
le produit, nous pourrons utiliser des pièces neuves ou remises à neuf. Si nous
décidons de le remplacer, nous pourrons le faire avec un produit neuf ou remis à neuf
possédant des caractéristiques similaires. VTECH retournera au consommateur
le produit réparé ou remplacé en bon état de fonctionnement, mais conservera
les pièces, modules et autres équipements défectueux. La réparation ou le
remplacement du produit, à la seule discrétion de VTECH, constitue le seul et unique
recours du consommateur. Ce remplacement ou cette réparation devrait prendre
environ trente (30) jours.
Quelle est la durée de la période de garantie limitée?
Ce produit est couvert par une garantie limitée d’UNE (1) ANNÉE à partir de la date
d’achat. Si nous réparons ou remplaçons un produit défectueux selon les termes
de cette garantie limitée, cette garantie s’applique également aux produits réparés
ou remplacés pendant une période de : (a) 90 jours à partir de la date où le produit
réparé ou remplacé vous a été expédié ou; (b) la durée résiduelle de la garantie
originale d’une année, selon la période qui est la plus longue.
Qu’est-ce que cette garantie ne couvre pas?
Cette garantie limitée ne couvre pas :
1. Les produits soumis à une mauvaise utilisation, un accident, un transport ou tout
autre dommage physique, installation inadéquate, utilisation ou manipulation
anormale, négligence, inondation, feu, eau ou toute autre inltration de liquide; ou
2 Les produits endommagés à la suite d’une réparation, modication ou
manipulation par une entité autre qu’un centre de service autorisé par VTECH; ou
3 .Les produits si le mauvais fonctionnement est causé par des conditions de signal,
de manque de abilité du réseau de diffusion via un système d’antenne ou de
câblodistribution; ou
4. Les produits si le problème est causé par l’utilisation de dispositifs ou
d’accessoires électriques qui ne proviennent pas de VTECH; ou
5. Les produits dont les autocollants de garantie/certications de garantie et les
inscriptions de numéros de série électroniques sur une plaque ont été enlevés,
effacés, modiés ou rendus illisibles; ou
6. Les produits achetés, utilisés, réparés ou expédiés à des ns de réparation à
l’extérieur des États-Unis et du Canada, ou utilisés à des ns commerciales ou
industrielles (n’incluant, mais ne s’y limitant pas, les produits loués); ou
7. Les produits retournés sans preuve d’achat (référez-vous au point 2 ci-dessous);
ou
8. Les frais reliés à l’installation, aux commandes et réglages pouvant être effectués
par le consommateur ni les coûts d’installation ou de réparation des dispositifs
connexes au produit.
Page 21

Comment se procurer le service sous garantie?
Pour vous procurer du service sous garantie au Canada, composez le 1-800-267-
7377.
REMARQUE : Avant d’appeler, veuillez lire le guide d’utilisation. Une vérication des
commandes et caractéristiques du produit peut vous épargner un appel de service.
À moins que cela ne soit prévu par les lois en vigueur, vous assumez les risques de
perte ou de dommage en cours de transport; de plus, vous êtes tenu(e)
responsable de la livraison ou des frais de manutention encourus lors de l’expédition
au centre de service. VTECH vous retournera le produit après l’avoir réparé ou
remplacé, selon les termes de cette garantie limitée, et assumera les frais de
transport, de livraison et de manutention. VTECH n’assume pas les dommages
ou les pertes que peut subir le produit en cours de transport. Si la défectuosité du
produit n’est pas couverte par cette garantie limitée, ou si la preuve d’achat ne répond
pas aux conditions de ladite garantie, VTECH communiquera avec vous et vous
demandera si vous autorisez le coût de la réparation avant d’effectuer tout travail.
Vous devez débourser les frais de la réparation et du transport des produits qui ne
sont pas couverts par cette garantie limitée.
Que devez-vous inclure avec le produit pour obtenir du service sous garantie?
Retournez la boîte d’emballage originale complète, incluant le contenu et le
1.
produit, au centre de service VTECH le plus près de chez vous, accompagné
d’une note décrivant la défectuosité du produit;
Vous devez inclure une ‘preuve d’achat’ valide (facture) identiant clairement le
2.
produit (numéro de modèle) et la date d’achat;
Inscrivez vos nom et adresse complète, ainsi que les numéros de téléphone où
3.
nous pourrons vous rejoindre, s’il y a lieu.
Autres restrictions
Cette garantie représente l’entente complète et exclusive entre vous, le
consommateur, et VTECH. Elle a préséance sur toutes les autres communications
écrites ou orales en rapport avec ce produit. VTECH n’offre aucune autre garantie
pour ce produit. Cette garantie décrit toutes les responsabilités de VTECH en rapport
avec ce produit. Il n’y a pas d’autres garanties expresses. Personne n’est autorisé à
apporter des changements à cette garantie limitée et vous ne devez pas vous er à
de telles modications.
Droits légaux de l’État ou la province : Cette garantie vous donne des droits légaux
spéciques et il se peut que vous jouissiez d’autres droits pouvant varier d’un État ou
d’une province à l’autre.
Restrictions : Les garanties implicites, y compris celles en qualité loyale et
marchande, ainsi que toute adaptation à un usage particulier (une garantie non écrite
spéciant que le produit est apte à être utilisé normalement), se limitent à la durée
d’une année à partir de la date d’achat. Certains états ou provinces ne permettent
pas de restrictions en ce qui a trait à la durée d’une garantie implicite et il se peut
que les restrictions ci-dessus ne s’appliquent pas à votre cas. En aucun cas, VTECH
ne sera pas tenue responsable des dommages-intérêts directs, indirects, spéciaux,
accessoires, ou autres dommages similaires (incluant, mais ne s’y limitant pas, la
perte de prots ou de revenus, l’incapacité d’utiliser le produit ou tout autre dispositif
connexe, le coût des appareils de remplacement et les réclamations faites par un
tiers) résultant de l’utilisation de ce produit. Certains états ou certaines provinces ne
permettent pas de restrictions en ce qui a trait à l’exclusion des dommages-intérêts
directs ou indirects et il se peut que les restrictions ci-dessus ne s’appliquent pas à
votre cas.
Veuillez conserver votre facture d’achat originale
comme preuve d’achat.
Renseignements relatifs aux règlements de la FCC et du
Conseil administratif des unités de connexion ‘ACTA’ et
d’Industrie Canada
Artice 15 des règlements de la FCC
Cet appareil a été testé et s’avère conforme aux restrictions relatives aux équipements
numériques de classe B, d’après l’article 15 des règlements de la Commission fédérale
des communications (FCC). Ces restrictions ont été instaurées pour offrir une protection
raisonnable contre les interférences nuisibles au sein d’une installation résidentielle. Cet
appareil génère, utilise et peut émettre des fréquences radio et s’il n’est pas installé selon
les instructions, peut nuire aux radiocommunications. Toutefois, rien ne garantit que des
parasites ne surviendront pas dans une installation particulière. Si cet appareil cause des
interférences nuisibles à la réception du téléviseur ou de la radio, ce que vous pouvez
déterminer en ouvrant et en fermant votre appareil, nous vous invitons à essayer l’une des
mesures correctives suivantes :
Réorientez l’antenne de réception installée sur l’appareil qui manifeste les parasites.
•
Éloignez l’appareil du composant qui reçoit les ondes.
•
Branchez l’appareil dans une prise de courant CA différente de celle du composant qui
•
reçoit les ondes.
Au besoin, consultez votre marchand électronique ou un technicien spécialisé dans le
•
service des radios/téléviseurs pour des suggestions supplémentaires.
Toute modication ou tout changement effectués à cet appareil, sans l’accord des parties
responsables de l’homologation, peut retirer à l’utilisateur son droit d’utiliser ledit appareil.
Cet appareil est conforme à l’article 15 des règlements du FCC. Son utilisation est sujette
aux conditions suivantes: 1) Cet appareil ne doit pas causer d’interférences nuisibles et; 2)
Il doit pouvoir supporter les parasites qu’il reçoit, incluant les parasites pouvant nuire à son
fonctionnement. Les conversations faites avec ce téléphone ne sont pas garanties privées.
An de garantir la sécurité des utilisateurs, la FCC a établi les critères relatifs à l’énergie
générée par les fréquences radio pouvant être absorbée en toute sécurité par un utilisateur
ou par quelqu’un se trouvant à proximité, dépendamment de l’utilisation prévue du produit.
Ce produit a été testé et s’avère conforme aux normes de la FCC. Le combiné produit si
peu de puissance qu’il n’a pas besoin d’être testé. Il peut être déposé contre l’oreille de
l’utilisateur en toute sécurité. L’utilisateur doit installer et se servir du socle de façon à ce
que les parties de son corps, à l’exception de ses mains, demeurent à une distance de 20
cm (8 po) ou plus.
Cet appareil numérique de classe B est conforme aux normes canadiennes ICES-003.
Article 68 de la FCC et exigences de l’ACTA
Cet appareil est conforme à l’article 68 de la réglementation de la Commission fédérale
des communications ‘FCC’ aux États-Unis et aux exigences adoptées par le Conseil
d’administration du matériel terminal ‘ACTA’. Vous trouverez, sous l’appareil, une étiquette
qui contient, entre autres renseignements, une plaque signalétique dans le format ‘US :
AAAEQ##TXXXX’. Si on vous le demande, vous devez fournir ce numéro à la compagnie
de téléphone. Cette homologation doit vous être fournie par votre compagnie de téléphone
locale, sur demande.
Page 22

La che et la prise utilisées pour brancher cet appareil au câblage du bâtiment et au réseau
téléphonique doivent être conformes avec les règlements de l’article 68 et les exigences
techniques adoptées par l’ACTA. Un cordon téléphonique et une che modulaire conformes
sont fournis avec cet appareil. Celui-ci a été conçu pour être raccordé à une prise modulaire
compatible qui est également conforme. Une prise RJ11 doit être utilisée pour le raccord à
une ligne simple et une prise RJ14, pour le raccord à deux lignes. Consultez les instructions
d’installation du guide d’utilisation.
La che et la prise utilisées pour brancher cet appareil au câblage du bâtiment et au réseau
téléphonique doivent être conformes avec les règlements de l’article 68 et les exigences
techniques adoptées par l’ACTA. Un cordon téléphonique et une che modulaire conformes
sont fournis avec cet appareil. Celui-ci a été conçu pour être raccordé à une prise modulaire
compatible qui est également conforme. Consultez les instructions d’installation du guide
d’utilisation pour plus de détails à ce sujet.
Le numéro ‘REN’ sert à déterminer combien de dispositifs téléphoniques peuvent être
raccordés à votre ligne téléphonique sans perdre leur capacité de sonner lorsqu’on vous
appelle. Le numéro ‘REN’ est encodé dans le numéro d’identication en tant que sixième
et septième caractères, suivis des deux-points. Par exemple, le code d’identication est
compris entre le 6 et le 7e caractère indiquerait un numéro ‘REN’ de 0,3. Le numéro ‘REN’
sert à déterminer combien de dispositifs téléphoniques peuvent être raccordés à votre ligne
téléphonique sans perdre leur capacité de sonner lorsqu’on vous appelle. Dans la plupart
des régions, la somme de tous les numéros ‘REN’ devrait être de cinq (5.0) ou moins. Pour
plus de détails à ce sujet, nous vous suggérons de communiquer avec votre compagnie de
téléphone locale. Cet appareil ne peut pas être utilisé conjointement avec des téléphones
publics ni des lignes partagées. Si vous avez des composants de systèmes d’alarme
connectés sur votre ligne téléphonique, assurez-vous que le raccord de cet appareil ne
désactive pas votre système d’alarme. Si vous avez des questions se rapportant à ce qui
peut désactiver votre système d’alarme, consultez votre compagnie de téléphone ou un
installateur qualié.
Si cet appareil nuit au réseau téléphonique, la compagnie de téléphone peut décider
d’arrêter temporairement votre service téléphonique. Elle est tenue de vous avertir avant
d’interrompre le service ; si elle ne peut pas vous avertir d’avance, elle le fera dès qu’elle
le pourra. On vous donnera la possibilité de rectier le problème et la compagnie doit vous
informer de votre droit de porter plainte à la FCC. Votre compagnie de téléphone peut
apporter des modications à ses installations, ses équipements et ses procédures pouvant
altérer le fonctionnement normal de votre appareil.
Si cet appareil st doté d’un combiné sans l, celui-ci est compatible avec les appareils
auditifs.
Si cet appareil possède des adresses mémoire, vous pouvez y entrer les numéros de
téléphone des services d’urgence de votre municipalité (police, incendie et ambulance). Si
vous en entrez en mémoire ou désirez effectuer un test, veuillez vous rappeler des points
suivants :
Demeurez sur la ligne et expliquez brièvement la raison de votre appel avant de raccrocher.
Effectuez de telles procédures en dehors des heures de pointe, tel que tôt le matin ou tard
le soir.
Industrie Canada
Le fonctionnement de cet appareil est assujetti à deux conditions :
1) Cet appareil ne doit pas causer d’interférences nuisibles et; 2) Il doit pouvoir supporter
les parasites qu’il reçoit, incluant les parasites pouvant nuire à son fonctionnement.
L’abréviation ‘IC’ se trouvant avant cette homologation signie que les normes d’Industrie
Canada ont été rencontrées.
Le numéro d’équivalence de sonnerie ‘REN’ assigné à cet appareil est 1,0. Ce numéro
attribué à chaque appareil détermine le nombre de dispositifs téléphoniques que l’on peut
brancher dans le circuit téléphonique de la maison sans surcharger le système. Le circuit
téléphonique peut comporter n’importe quelle combinaison de dispositifs téléphoniques, à la
seule condition que la somme du numéro ‘REN’ n’excède pas cinq (5,0).
Cet appareil est conforme aux spécications d’Industrie Canada.
Spécications techniques
Contrôle des
fréquences
Fréquence de
transmission
Canaux 5
Portée nominale
efcace
Alimentation Combiné : Pile de 2,4 V Ni-MH
Mémoire Répertoire du combiné : 50 adresses mémoire d’un maximum de 30
VTECH TELECOMMUNICATIONS LTD.
Un membre de THE VTECH GROUP OF COMPANIES.
Distributé aux É.-U. par VTech Communications, Inc., Beaverton, Oregon 97008.
Distribué au Canada par VTech Technologies Canada Ltd., Richmond, B.C. V6W 1L5.
VTech est une marque de commerce de VTech Holdings Limited.
Copyright © 2011 pour VTECH TELECOMMUNICATIONS LTD.
Tous droits réservés. Imprimé en Chine.
Synthétiseur double à boucle de verrouillage de phase contrôlé par cristal
Combiné : 1921,536-1928,448 MHz
Socle : 1921,536-1928,448 MHz
Puissance maximale permise par le Conseil supérieur de l’audiovisuel
américain “FCC” et d’Industrie Canada. La portée réelle peut varier
selon les conditions de l’environnement au moment de l’utilisation.
Socle : 6 V CA @ 300 mA
Chargeur: 6 V CA @ 300 mA
chiffres et 15 caractères
Répertoire de l’afcheur : 50 adresses mémoire d’un maximum de 24
chiffres et de 15 caractères
 Loading...