

Page 1

USER MANUAL
PHONE-DEX
MODEL: PHONE-DEX USC
Page 2

Table of contents
Handset layout � � � � � � � � � � � � � � � � � � � � � � � � � � � � � � � � � � � � � � � � � � � 1
Information � � � � � � � � � � � � � � � � � � � � � � � � � � � � � � � � � � � � � � � � � � � � � 2
Parts checklist � � � � � � � � � � � � � � � � � � � � � � � � � � � � � � � � � � � � � � � � 2
Installation� � � � � � � � � � � � � � � � � � � � � � � � � � � � � � � � � � � � � � � � � � � � � � 2
Connection � � � � � � � � � � � � � � � � � � � � � � � � � � � � � � � � � � � � � � � � � � � 2
Battery � � � � � � � � � � � � � � � � � � � � � � � � � � � � � � � � � � � � � � � � � � � � � � 3
Range � � � � � � � � � � � � � � � � � � � � � � � � � � � � � � � � � � � � � � � � � � � � � � � 4
The display � � � � � � � � � � � � � � � � � � � � � � � � � � � � � � � � � � � � � � � � � � � � � 5
Telephone settings � � � � � � � � � � � � � � � � � � � � � � � � � � � � � � � � � � � � � � � � 6
Using the handset menu � � � � � � � � � � � � � � � � � � � � � � � � � � � � � � � � � � 6
Turn on the telephone for the rst time � � � � � � � � � � � � � � � � � � � � � � � 6
Display settings � � � � � � � � � � � � � � � � � � � � � � � � � � � � � � � � � � � � � � � � 7
Sound settings � � � � � � � � � � � � � � � � � � � � � � � � � � � � � � � � � � � � � � � � � 7
Call settings � � � � � � � � � � � � � � � � � � � � � � � � � � � � � � � � � � � � � � � � � � � 8
Operation � � � � � � � � � � � � � � � � � � � � � � � � � � � � � � � � � � � � � � � � � � � � � � � 9
Calling � � � � � � � � � � � � � � � � � � � � � � � � � � � � � � � � � � � � � � � � � � � � � � 9
Directory � � � � � � � � � � � � � � � � � � � � � � � � � � � � � � � � � � � � � � � � � � � � � � 10
Caller ID � � � � � � � � � � � � � � � � � � � � � � � � � � � � � � � � � � � � � � � � � � � � � � 12
Intercom � � � � � � � � � � � � � � � � � � � � � � � � � � � � � � � � � � � � � � � � � � � � � � 13
Find handset � � � � � � � � � � � � � � � � � � � � � � � � � � � � � � � � � � � � � � � � � 13
Add and register additional handset � � � � � � � � � � � � � � � � � � � � � � � � � 13
To join a call � � � � � � � � � � � � � � � � � � � � � � � � � � � � � � � � � � � � � � � � � 14
Intercom (two or more handsets) � � � � � � � � � � � � � � � � � � � � � � � � � � � 14
Troubleshooting � � � � � � � � � � � � � � � � � � � � � � � � � � � � � � � � � � � � � � � � � 15
IMPORTANT SAFETY INFORMATION � � � � � � � � � � � � � � � � � � � � � � � � � � 16
Equipment Approval Information � � � � � � � � � � � � � � � � � � � � � � � � � � � � � 18
Disclaimer and limitation of liability � � � � � � � � � � � � � � � � � � � � � � � � � � � 21
Warranty and other information � � � � � � � � � � � � � � � � � � � � � � � � � � � � � � 21
Support � � � � � � � � � � � � � � � � � � � � � � � � � � � � � � � � � � � � � � � � � � � � � 23
Page 3
1
2
3
4
5
6
7
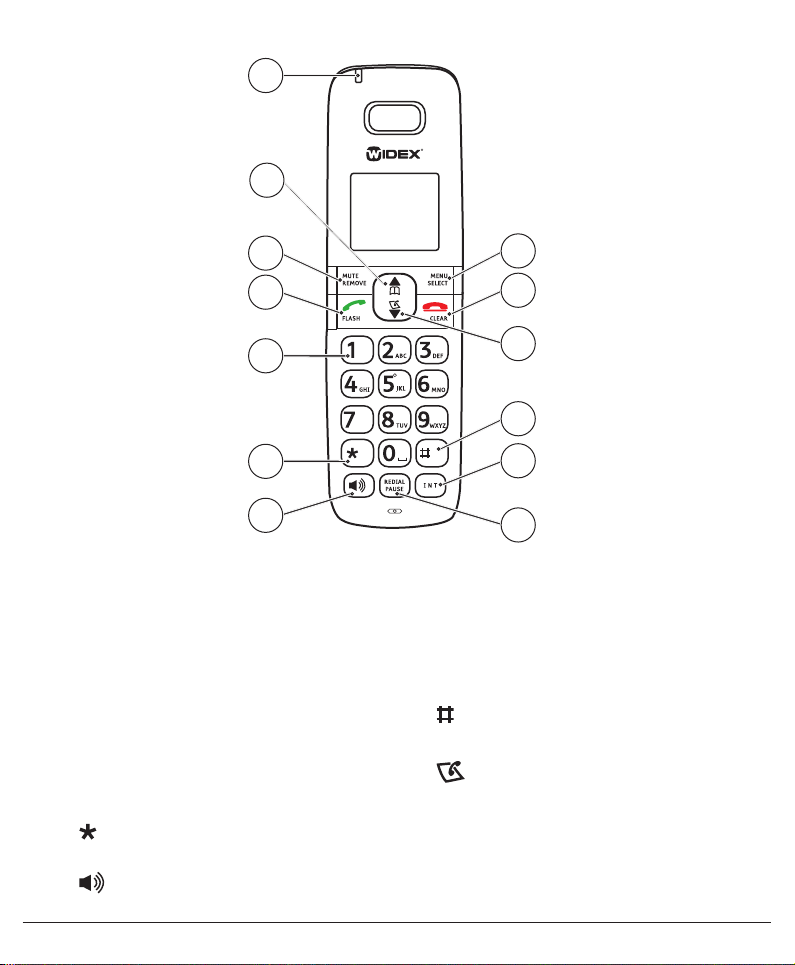
Handset layout
1� Charge light
2� { scroll up, increase volume,
b
directory
3� MUTE / REMOVE entered digits or
characters, or delete entry
4� q/ FLASH
5� Dialing keypad
6� switch to tone dialing temporarily
when using the pulse service
7� speakerphone
13
12
11
PQRS
10
9
8
8� REDIAL / press and hold PAUSE to
insert a dialing pause
9� INT Intercom
10� dialing options for call log
11� } scroll down, decrease volume,
call log
L
12�
13� MENU / SELECT show menu or save an
/ CLEAR silence the ringer
temporarily or exit menus
entry or setting
1
Page 4
English
'6/
ILOWHU
Information
Before using this telephone, please read “IMPORTANT SAFETY INFORMATION” on pages 16-17�
The PHONE-DEX is made for use in USA and Canada only�
The PHONE-DEX is a cordless phone that streams sound directly to your hearing aids�
It is incredibly easy to use – the only thing you need to do is hold the phone normally against
the ear using the hearing aid�
The PHONE-DEX works as a conventional phone as well� So family and friends can use it�
See “Operation” on page 9 for more information�
Parts checklist
Your package contains the following items� Save your sales receipt and original packaging in
case it is necessary to ship your telephone for warranty service�
• Battery compartment cover
• Battery
• Telephone line cord
• Telephone base
• Power adapter
• Handset
• User’s manual
Installation
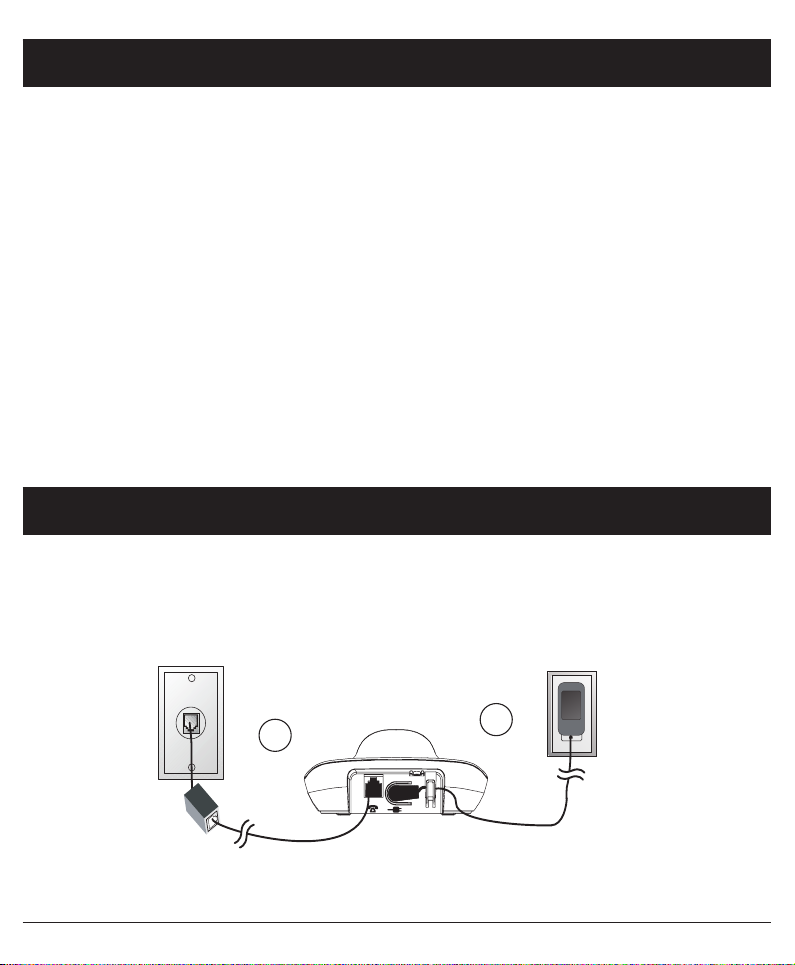
Connection
1� Connect the telephone line cord to the telephone wall jack and to the telephone base (T)�
Note! If you subscribe to digital subscriber line (DSL) high-speed Internet service through
your telephone line, you may need to install a DSL filter between the telephone line cord
and the telephone wall jack. Contact your DSL service provider for more information.
1
2� Connect the telephone base power adapter to an electrical outlet not controlled by a wall
switch and to the telephone base (Y)�
2
2
Page 5

English
3� Insert the battery connector in accordance with the markings for the
batteries (2�4V NiMH 500mAh) inside the handset battery compartment�
4� Replace the battery cover� Align the cover flat against the battery
compartment, then slide it towards the center of the handset until it
clicks into place�
5� Place the handset into the base unit with the keypad facing outwards to
charge� The charge light is on when charging�
Note!
The power adapter is the disconnect device between the product and
wall power. The wall socket outlet must be close to the equipment and
easily accessible.
Battery
When the batteries are relatively new (less than 6 months) and fully-charged (10 hours) they
will last for approx 100 hours standby time or approx 10 hours call time� Full battery capacity
will not be reached until the batteries have been charged 4–5 times� It is not possible to
overcharge or damage the batteries by charging them for ”too long”�
Warning!
Risk of explosion if battery is replaced by an incorrect type� Use only original
type of batteries� The guarantee does not cover any damage caused by using the
wrong batteries�
Note!
When the battery is low or when there is too great a distance to the base unit the
telephone will be unable to connect to a line. Do not place the base unit close to other
electrical equipment, in direct sunlight or other strong heat sources! This is to minimize
the risk of any interference. It is normal for the device to become warm during charging
and this is not dangerous. Dispose of used batteries according to the instructions.
3
Page 6

English
Charging
To keep the battery charged, place the handset in the telephone base or telephone charger
when not in use� The battery is fully charged after 10 hours of continuous charging�
If the screen is blank, you need to charge the handset without interruption for at least 30
minutes to give the handset enough charge to use the telephone for a short time�
When the batteries are running low a warning tone is heard and LOW BATTERY and flashes
on the display�
After you install your telephone or power returns following a power outage, date and time needs
to be set� See “Date / Time” on page 7 for more information�
Range
This cordless telephone operates with the maximum power allowed by the Federal
Communications Commission (FCC)� Even so, this handset and telephone base can
communicate over only a certain distance - which can vary with the locations of the telephone
base and handset, the weather, and the layout of your home or office�
When the handset is out of range, the handset displays OUT OF RANGE OR NO PWR AT BASE�
If there is a call while the handset is out of range, it might not ring, or if it does ring, the call
might not connect well when you press / FLASH� Move closer to the telephone base, then
press / FLASH to answer the call�
If the handset moves out of range during a telephone conversation, there might be interference�
To improve reception, move closer to the telephone base� Coverage can be improved by turning
the head so that the handset is facing the base unit�
4
Page 7
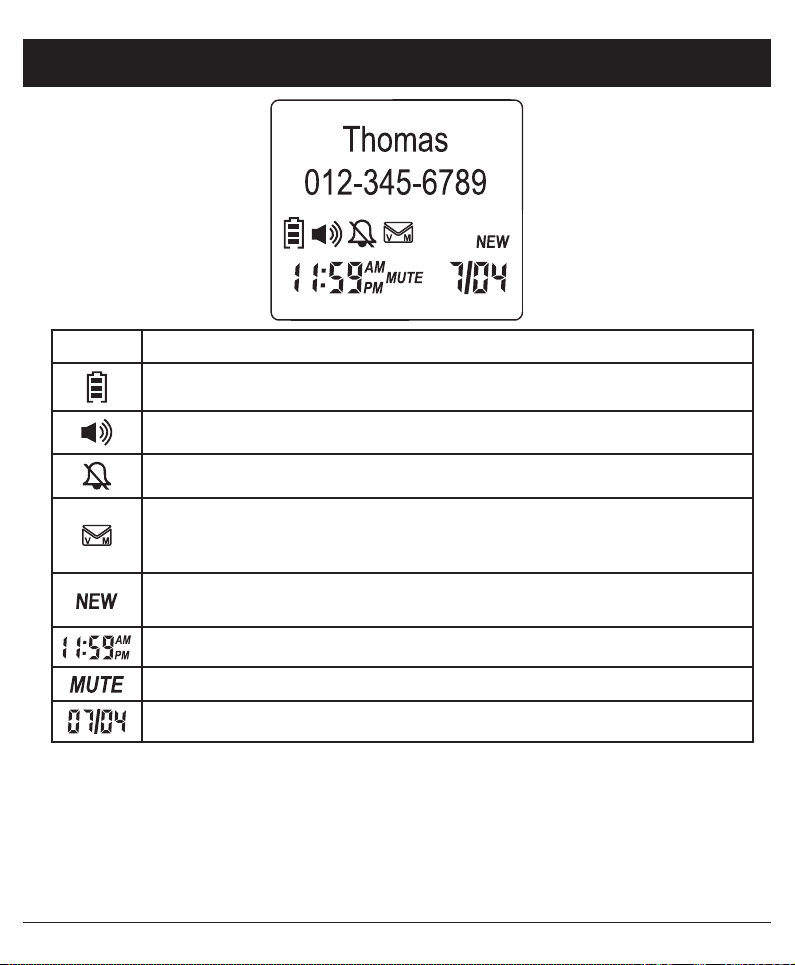
Indicator Function
Battery status� Flashes while charging
Speakerphone mode activated
Ringer volume Off
Voicemail indicator�
Note! This function requires a subscription from your service provider!
See also “Clear voicemail indicators” on page 8
New Caller ID
Note! This function requires a subscription from your service provider!
English
The display
Time� See also “Date / Time” on page 7
Microphone is muted during a call
Date� See also “Date / Time” on page 7
5
Page 8

English
Telephone settings
Using the handset menu
The settings described in this chapter are carried out in idle mode�
The handset menu contains feature menus with submenus� The selected menu is marked with >�
To enter the handset menu:
1� Press MENU / SELECT�
2� Press { / } to scroll the feature menu:
DIRECTORY (b)
• REVIEW
• ADD CONTACT
• SPEED DIAL
3� Press MENU / SELECT to enter a menu�
• To return to the previous menu, press
• To return to idle mode, press and hold
CALL LOG ( )
• REVIEW
• DEL ALL
CALLS
RINGERS
• RINGER
VOLUME
• RINGER
TONE
L
/ CLEAR�
L
/ CLEAR�
SETTINGS
• LCD
LANGUAGE
• CLR
VOICEMAIL
• KEY TONE
• SET DATE /
TIME
• HOME AREA
CODE
• DIAL MODE
REGISTRATION
Turn on the telephone for the first time
The first time you turn on your telephone, you need to set date and time� See “Date / Time” on
page 7 for more information�
6
Page 9

English
Display settings
LCD language
1� Press MENU / SELECT�
2� Select SETTINGS â LCD LANGUAGE�
3� Select language and press MENU / SELECT to save�
Date / Time
1� Press MENU / SELECT�
2� Select SETTINGS â SET DATE / TIME�
3� Press the dialing keys (0-9) to enter the month (mm), date (dd) and year (yy)� When done,
press MENU / SELECT�
• If needed, press MUTE / REMOVE to delete a digit� Press and hold MUTE / REMOVE to
delete the entire entry�
4� Press the dialing keys (0-9) to enter hour and minute� Press { / } to choose AM or PM�
When done, press MENU / SELECT to save�
Sound settings
Ringer volume
1� Press MENU / SELECT�
2� Select RINGERS â RINGER VOLUME:
• Press { to increase the volume (max 6)�
• Press } to decrease the volume or to silence the ringer�
3� When done, press MENU / SELECT to save�
Tip!
You can also press MUTE / DELETE or CLEAR to temporarily silence the ringer when the
handset is ringing.
Ringer tone
1� Press MENU / SELECT�
2� Select RINGERS â RINGER TONE� Make sure that the ringer volume is not off�
3� Press { / } to listen to the 10 different ringer tones�
4� When done, press MENU / SELECT to save�
7
Page 10

English
Key tone
1� Press MENU / SELECT�
2� Select SETTINGS â KEY TONE�
3� Select ON or OFF and press MENU / SELECT to save�
Call settings
Home area code
1� Press MENU / SELECT�
2� Select SETTINGS â HOME AREA CODE�
3� Press the dialing keys (0-9) to enter home area code�
• If needed, press MUTE / REMOVE to delete a digit� Press and hold MUTE / REMOVE to
delete the entire entry�
4� When done, press MENU / SELECT to save�
Dial mode
1� Press MENU / SELECT�
2� Select SETTINGS â DIAL MODE�
3� Select TONE or PULSE and press MENU / SELECT to save�
Clear voicemail indicators
If you subscribe to a voicemail service offered by your telephone service provider, NEW
VOICEMAIL appears on the handset when you have new voice mail messages� After listened to
the message, the indicators on the handset turns off automatically� You can manually turn off
the indicator if you for example access your voicemail while away from home�
1� Press MENU / SELECT�
2� Select SETTINGS â CLR VOICEMAIL and TURN OFF INDICATOR? is shown�
3� Press MENU / SELECT to save or press
Tip!
This only turns off the indicator, it does not delete your voicemail messages.
L
/ CLEAR to return to the previous menu�
8
Page 11

English
Operation
Your telephone is also specially adapted to work with wireless Widex hearing aids�
This means that the sound from the telephone is transmitted directly into your
hearing aid(s)� When you place the telephone near one of your ears wearing a hearing
aid, a ‘dong’ sound in the hearing aid will indicate that the function is activated�
Hold the phone close to one ear using the hearing aid�
When the telephone is moved out of range, your hearing aid(s) will return to the listening program
chosen as program number 1 (usually the Master program)�
If the telephone sound is too weak or too loud, you can use the volume keys } / { to adjust the
volume� If you need further information, please consult your hearing health care professional�
For users who do not wear hearing aids, the telephone works as otherwise described in this manual�
Calling
Make a call
• Press q/ FLASH or and dial the telephone number�
• Dial the telephone number and press q/ FLASH or � If needed, delete number with
MUTE / REMOVE�
Receive a call
When the handset rings, press q/ FLASH, or any dialing key (0-9, or )�
End a call
L
Press
/ CLEAR or put the handset in the telephone base�
Use the speakerphone
During a call, press to switch between speakerphone and normal handset use�
Redial
The handset stores the last 10 telephone numbers dialed�
1� Press REDIAL / PAUSE�
2� Press } / { or REDIAL / PAUSE repeatedly until the desired entry is displayed�
3� Press / FLASH or to dial�
9
Page 12

English
Call waiting
If you subscribe to a call waiting service from your telephone service provider, you hear an alert
tone when there is an incoming call while you are on another call�
1� Press q/ FLASH to put the current call on hold to take the new call�
2� Press q/ FLASH to switch back�
Volume control
During a call, press { / } to adjust the listening volume�
Note!
The handset earpiece volume setting and speakerphone volume setting are independent.
Mute
1� During a call press MUTE / REMOVE to turn off your microphone� MUTE is displayed when
activated�
2� Press MUTE / REMOVE to turn on your microphone� The screen temporarily displays
MICROPHONE ON�
Temporary silent mode
When someone calls, you can press
off the handset ringsignal� RINGER MUTED is displayed� The next call rings automatically at
the present volume�
L
/ CLEAR or MUTE / REMOVE on the handset to turn
Directory
You can save up to 50 entries in the directory� Only one handset can review the directory at a
time� Any modifications made on one handset apply to all�
Save contact
1� Press MENU / SELECT�
2� Select DIRECTORY â ADD CONTACT�
3� Press the dialing keys (0-9) to enter the number (up to 30 digits)� When done, press MENU
/ SELECT�
• If needed, press MUTE / REMOVE to delete a digit� Press and hold MUTE / REMOVE to
delete the entire entry�
4� Press the dialing keys (0-9) to enter name (up to 15 characters)� Press the equivalent key
several times for the wanted letter� When done, press MENU / SELECT to save�
• If needed, press 0 to add a space�
10
Page 13

English
Tip!
You can copy number from the redial list, when entering number press REDIAL / PAUSE
and locate the number, then press MENU / SELECT to copy. Then press MENU / SELECT
again to edit number and to enter name.
Make a call from the directory
1� Press { / b�
2� Press { / } to scroll between contacts or quick search by pressing the corresponding
number key for the first letter�
3� When the wanted contact appears, press q/ FLASH or to dial�
Edit number
1� Press { / b�
2� Scroll to wanted contact and press MENU / SELECT�
3� When EDIT NUMBER is displayed, use the dialing keys (0-9) to edit� Press MENU / SELECT
to continue�
4� When EDIT NAME is displayed, use the dialing keys (0-9) to edit�
5� Press MENU / SELECT to save�
Delete number
1� Scroll to wanted contact and press MUTE / REMOVE�
2� When the screen displays DELETE CONTACT?, press MUTE / DELETE�
Store a speed dial entry
You can add up to 10 entries�
1� Press MENU / SELECT�
2� Select DIRECTORY â SPEED DIAL and scroll to the wanted speed dial location, then press
MENU / SELECT�
3� Scroll to wanted directory entry, then press MENU / SELECT to save�
Speed dial an entry
1� Press and hold the corresponding dialing key (0-9) to display the wanted speed dial entry�
2� Press q/ FLASH or to dial�
11
Page 14

English
Caller ID
The telephone supports caller ID service offered by most telephone service providers� Caller
ID allows you to see the name, number, date and time of calls� The call log stores the 50 most
recent calls� Any modifications made on one handset apply to all�
Contact your service provider for more information about the service�
The handset shows missed calls as NEW, after reviewing them the indicator is no longer shown�
If you don’t want to review the missed calls one by one, press and hold
entries are then considered as old and kept in the call log�
Review and dial from the call log
1� Press } /
2� Scroll to browse through the call log� When the dialed number appears:
• Press repeatedly to show different dialing options�
• Press 1 repeatedly if you need to add 1 in front of the telephone number�
3� Press q/ FLASH or to dial�
Save number from the call log
1� Scroll to browse through the call log, when the wanted number is displayed press MENU /
SELECT�
2� When EDIT NUMBER is displayed, use the dialing keys (0-9) to edit� Press MENU / SELECT
to continue�
3� When EDIT NAME is displayed, use the dialing keys (0-9) to edit�
4� Press MENU / SELECT to save�
L
/ CLEAR� All
Delete number in the call log
To delete one entry, when the wanted entry displays press MUTE / REMOVE�
Delete all entries:
1� Press MENU / SELECT�
2� Select CALL LOG â DEL ALL CALLS�
3� When the screen displays DELETE ALL CALLS?, press MENU / SELECT�
12
Page 15

English
Intercom
Your handset and base station is pre-registered� Up to five handsets can be registered to the
base station� Each new handset is assigned in sequential order� The number is shown on the
display� The base unit should be positioned centrally so that the coverage area is roughly equal
for all handsets�
If for some reason, the handset is not registered to the base station (OUT OF RANGE OR NO
PWR AT BASE is displayed even when the handset is near the base station), register your
handset according to the following procedure�
Find handset
Press the find handset icon (J) on the telephone base once� The handset rings and the
display shows **PAGING**� To stop:
• Press the find handset icon on the telephone base again�
• Press q/ FLASH, or any dialing key (0-9, or )�
• Place the handset in the telephone base or charger�
Add and register additional handset
1� Place the new handset in the telephone base or charger�
2� On the telephone base: press and hold the find handset icon J for 5-8 seconds�
3� On the handset: remove the handset from the telephone base or charger�
Press MENU / SELECT â REGISTRATION OR press and REGISTERING��� PLEASE WAIT
is displayed�
When the registration is complete, HANDSET REGISTERED is displayed�
If the handset registration is successful, you will hear a confirmation tone� The handset will
automatically be allocated the next available handset number� If the handset registration is
unsuccessful, the OUT OF RANGE OR NO PWR AT BASE will again be displayed�
Replace handset
If you want to replace a handset or reassign the designated handset number, you must
unregister all handsets and then individually register each handset�
On the telephone base: press and hold the find handset icon J for about 10 seconds, then
press J again�
13
Page 16

English
To join a call
1� When a handset is in a call, press q/ FLASH or on another handset�
2� Press
L
/ CLEAR to exit the call� The call continues until all handsets hungs up�
Intercom (two or more handsets)
1� Press INT on your handset when it is not in use� If having more than three handsets, use
the dialing keys to enter a destination handset number�
2� To answer the intercom call, press q/ FLASH, , INT or any dialing keys (0-9, or )
on the other handset�
3� To end the call, press
Answer incoming call during intercom call
If you receive a call during an intercom call, an alert tone is heard�
• To answer the incoming call: press q/ FLASH and the intercom call ends automatically�
• To end the intercom call and not answering the incoming call: press
the intercom call ends and the telephone continues to ring�
Transferring calls
During an intercom call, you have the following options:
• Add an destination handset to the outside call in a three-way conversation� Press and
hold INT on the original handset�
• Transfer a call� Press
The destination handset automatically connects to the outside call�
• Switch between the outside call (OUTSIDE CALL) and the intercom (INTERCOM) call by
pressing INT�
• End the intercom call by pressing
telephone base/charger� The outside call continues with the original handset�
L
/ CLEAR or place the handset in the telephone base or charger�
L
L
/ CLEAR or place the handset in the telephone base/charger�
L
/ CLEAR or by placing the handset back in the
/ CLEAR and
14
Page 17

English
Troubleshooting
Check that the telephone line cord is undamaged and properly plugged in� Disconnect any
additional equipment, extension cords and other telephones� If the problem is resolved, the
fault is with some other equipment�
Test the equipment on a known working line (e�g� at a neighbor’s house)� If the equipment
works there, the fault is probably with your telephone line� Please report this to your network
operator�
No number shown when ringing
• This function requires a Caller ID subscription from your service provider�
Warning tone/Not possible to make calls
• The batteries may be running low (charge the handset)�
• The hand unit may be nearly out of range� Move closer to a base unit�
Telephone does not work
• Check that the power adapter/telephone line cord is connected correctly�
• Check that you have selected Tone Dial, see System Settings�
• Check the charge status of the handset batteries�
• Connect another functioning telephone to the network wall socket�
The telephone continues to ring
Some of the telephone’s ringers do not follow the line signal, which means that the signal may
continue for up to 8 seconds after answering a call�
If the telephone still does not work, please contact the place of purchase for service� Don’t
forget the receipt or a copy of the invoice�
15
Page 18

English
IMPORTANT SAFETY INFORMATION
Your unit is a technically advanced product and should be treated with the greatest care� Negligence may
void the warranty�
When using your unit, basic safety precautions should always be followed to reduce the risk of fire, electric
shock and injury to persons, including the following:
1� Read and understand all instructions�
2� Follow all warnings and instructions marked on the product�
3� Unplug this product from the wall outlet before cleaning� Do not use liquid or aerosol cleaners�
Use a damp cloth for cleaning�
4� Do not use this product near water such as near a bath tub, wash bowl, kitchen sink, laundry tub
or swimming pool, or in a wet basement or shower�
5� Do not place this product on an unstable table, shelf, stand or other unstable surfaces�
6� Slots and openings in the back or bottom of the telephone base and handset are provided for
ventilation� To protect them from overheating, these openings must not be blocked by placing the
product on a soft surface such as a bed, sofa or rug� This product should never be placed near
or over a radiator or heat register� This product should not be placed in any area where proper
ventilation is not provided�
7� This product should be operated only from the type of power source indicated on the marking
label� If you are not sure of the type of power supply in your home or office, consult your dealer
or local power company�
8� Do not allow anything to rest on the power cord� Do not install this product where the cord may
be walked on�
9� Never push objects of any kind into this product through the slots in the telephone base or
handset because they may touch dangerous voltage points or create a short circuit� Never spill
liquid of any kind on the product�
10� To reduce the risk of electric shock, do not disassemble this product, but take it to an authorized
service facility� Opening or removing parts of the telephone base or handset other than specified
access doors may expose you to dangerous voltages or other risks� Incorrect reassembling can
cause electric shock when the product is subsequently used�
11� Do not overload wall outlets and extension cords�
12� Unplug this product from the wall outlet and refer servicing to an authorized service facility under
the following conditions:
13� When the power supply cord or plug is damaged or frayed�
14� If liquid has been spilled onto the product�
15� If the product has been exposed to rain or water�
16� If the product does not operate normally by following the operating instructions� Adjust only
those controls that are covered by the operation instructions� Improper adjustment of other
controls may result in damage and often requires extensive work by an authorized technician to
restore the product to normal operation�
Save these instructions
16
Page 19

English
IMPORTANT SAFETY INFORMATION
17� If the product has been dropped and the telephone base and/or handset has been damaged�
18� If the product exhibits a distinct change in performance�
19� Avoid using a telephone (other than cordless) during an electrical storm� There is a remote risk of
electric shock from lightning�
20� Do not use the telephone to report a gas leak in the vicinity of the leak� Under certain
circumstances, a spark may be created when the power adapter is plugged into the power
outlet, or when the handset is replaced in its cradle� This is a common event associated with the
closing of any electrical circuit� The user should not plug the telephone into a power outlet, and
should not put a charged handset into the cradle, if the telephone is located in an environment
containing concentrations of flammable or flame-supporting gases, unless there is adequate
ventilation� A spark in such an environment could create a fire or explosion� Such environments
might include: medical use of oxygen without adequate ventilation; industrial gases (cleaning
solvents; gasoline vapors; etc�); a leak of natural gas; etc�
21� Only put the handset of your telephone next to your ear when it is in normal talk mode�
22� The power adapters are intended to be correctly oriented in a vertical or floor mount position�
The prongs are not designed to hold the plug in place if it is plugged into a ceiling, under-thetable or cabinet outlet�
The advice applies to the unit, battery, power adapter and other accessories� If the telephone is not working as it should, please contact the place of purchase for service� Don’t forget the receipt or a copy of the
invoice�
Precautions for users of implanted cardiac pacemakers
Cardiac pacemakers (applies only to digital cordless telephones):
Wireless Technology Research, LLC (WTR), an independent research entity, led a multidisciplinary evalua-
tion of the interference between portable wireless telephones and implanted cardiac pacemakers�
Supported by the U�S� Food and Drug Administration, WTR recommends to physicians that:
Pacemaker patients
• Should keep wireless telephones at least six inches from the pacemaker�
• Should NOT place wireless telephones directly over the pacemaker, such as in a breast pocket,
when it is turned ON�
• Should use the wireless telephone at the ear opposite the pacemaker� WTR’s evaluation did not
identify any risk to bystanders with pacemakers from other persons using wireless telephones�
Save these instructions
17
Page 20

English
Equipment Approval Information
FCC, ACTA and IC regulations
This equipment has been tested and found to comply with the requirements for a Class B digital device
under Part 15 of the Federal Communications Commission (FCC) rules� These requirements are intended
to provide reasonable protection against harmful interference in a residential installation� This equipment
generates, uses and can radiate radio frequency energy and, if not installed and used in accordance with
the instructions, may cause harmful interference to radio communications� However, there is no guarantee that interference will not occur in a particular installation� If this equipment does cause harmful interference to radio or television reception, which can be determined by turning the equipment off and on, the
user is encouraged to try to correct the interference by one or more of the following measures:
• Reorient or relocate the receiving antenna�
• Increase the separation between the equipment and receiver�
• Connect the equipment into an outlet on a circuit different from that to which the receiver is
connected�
• Consult the dealer or an experienced radio/TV technician for help�
Changes or modifications to this equipment not expressly approved by the party responsible for compliance
could void the user’s authority to operate the equipment� This device complies with Part 15 of the FCC
rules� Operation is subject to the following two conditions:
(1) this device may not cause harmful interference, and (2) this device must accept any interference
received, including interference that may cause undesired operation� Privacy of communications may not
be ensured when using this telephone�
To ensure safety of users, the FCC has established criteria for the amount of radio frequency energy that
can be safely absorbed by a user or bystander according to the intended usage of the product� This product has been tested and found to comply with the FCC criteria� The handset may be safely held against
the ear of the user� The telephone base shall be installed and used such that parts of the user’s body other
than the hands are maintained at a distance of approximately 8 inches (20 cm) or more�
This Class B digital apparatus complies with Canadian ICES-003�
FCC Part 68 and ACTA
This equipment complies with Part 68 of the FCC rules and with technical requirements adopted by the
Administrative Council for Terminal Attachments (ACTA)� The label on the back or bottom of this equipment contains, among other things, a product identifier in the format US:AAAEQ##TXXXX� This identifier
must be provided to your local telephone company upon request�
The plug and jack used to connect this equipment to premises wiring and the telephone network must
comply with applicable Part 68 rules and technical requirements adopted by ACTA� A compliant telephone
cord and modular plug is provided with this product� It is designed to be connected to a compatible modular jack that is also compliant� An RJ11 jack should normally be used for connecting to a single line and an
RJ14 jack for two lines� See Installation Instructions in the user’s manual�
18
Page 21

English
The Ringer Equivalence Number (REN) is used to determine how many devices you may connect to your
telephone line and still have them ring when you are called� The REN for this product is encoded as the
6th and 7th characters following the US: in the product identifier (e�g�, if ## is 03, the REN is 0�3)�
In most, but not all areas, the sum of all RENs should be five (5�0) or less� For more information, please
contact your local telephone company�
This equipment may not be used with Party Lines� If you have specially wired alarm dialing equipment connected to your telephone line, ensure the connection of this equipment does not disable your alarm equipment� If you have questions about what will disable alarm equipment, consult your telephone company or a
qualified installer�
If this equipment is malfunctioning, it must be unplugged from the modular jack until the problem has
been corrected� Repairs to this telephone equipment can only be made by the manufacturer or its authorized agents� For repair procedures, follow the instructions outlined under the Warranty�
If this equipment is causing harm to the telephone network, the telephone company may temporarily discontinue your telephone service� The telephone company is required to notify you before interrupting service� If advance notice is not practical, you will be notified as soon as possible� You will be given the
opportunity to correct the problem and the telephone company is required to inform you of your right to file
a complaint with the FCC� Your telephone company may make changes in its facilities, equipment, operation, or procedures that could affect the proper functioning of this product� The telephone company is
required to notify you if such changes are planned�
If this product is equipped with a corded or cordless handset, it is hearing aid compatible�
If this product has memory dialing locations, you may choose to store emergency telephone numbers (e�g�,
police, fire, medical) in these locations� If you do store or test emergency numbers, please:
• Remain on the line and briefly explain the reason for the call before hanging up�
• Perform such activities in off-peak hours, such as early morning or late evening�
19
Page 22

English
Industry Canada
This Class B digital apparatus complies with Canadian ICES-003�
Operation is subject to the following two conditions: (1) this device may not cause interference, and (2)
this device must accept any interference, including interference that may cause undesired operation of the
device�
The abbreviation, “IC:”, before the registration number signifies that registration was performed based on
a Declaration of Conformity indicating that Industry Canada technical specifications were met�
The Ringer Equivalence Number (REN) assigned to each terminal device provides an indication of the maximum number of terminals allowed to be connected to a telephone interface� The termination on an interface may consist of any combination of devices subject only to the requirement that the sum of the Ringer
Equivalence Numbers of all the devices does not exceed 5�
The Ringer Equivalence Number (REN) for this terminal equipment is 0�1�
This equipment meets the applicable Industry Canada Terminal Equipment Technical Specifications�
Avis d’Industrie Canada
Cet appareil numérique de la classe B est conforme à la norme NMB-003 du Canada�
L’utilisation de ce dispositif est autorisée seulement dans les conditions suivantes : (1) il ne doit pas pro-
duire de brouillage et (2) l’utilisateur du dispositif doit être prêt à accepter tout brouillage radioélectrique
reçu, même si ce brouillage est susceptible de compromettre le fonctionnement du dispositif�
Le sigle IC, placé devant le numéro d’enregistrement, signifie que l’enregistrement s’est effectué conformément à une déclaration de conformité et indique que les spécifications techniques d’Industrie
Canada ont été respectées�
L’indice d’équivalence de la sonnerie (IES) assigné à chaque dispositif terminal indique le nombre maximal
de terminaux qui peuvent être raccordés à une interface� La terminaison d’une interface téléphonique
peut consister en une combinaison de quelques dispositifs, à la seule condition que la somme d’indices
d’équivalence de la sonnerie de tous les dispositifs n’excède pas 5�
L’indice d’équivalence de la sonnerie (IES) du présent matériel est de 0�1�
Le présent matériel est conforme aux spécifications techniques d’Industrie Canada applicables au maté-
riel terminal�
US: EW7W401B80-893800
FCC ID: EW780-8938-00
IC: 1135B-80893800
20
Page 23

English
Disclaimer and limitation of liability
Doro AB and its affiliates or licensees assume no responsibility for any damage or loss resulting from the
use of this guide� Doro AB and its affiliates or licensees assume no responsibility for any loss or claims by
third parties that may arise through the use of this software� Doro AB and its affiliates or licensees assume
no responsibility for any damage or loss caused by deletion of data as a result of malfunction, dead battery, or repairs� Be sure to make backup copies of all important data on other media to protect against
data loss�
TO THE MAXIMUM EXTENT PERMITTED BY APPLICABLE LAW, UNDER NO CIRCUMSTANCES SHALL
DORO AB OR ANY OF ITS AFFILIATES OR LICENSEES BE RESPONSIBLE FOR ANY LOSS OF DATA OR
INCOME OR ANY SPECIAL, INCI-DENTAL, CONSEQUENTIAL OR INDIRECT DAMAGES HOWSOEVER
CAUSED� THE CONTENTS OF THIS DOCUMENT ARE PROVIDED “AS IS�” EXCEPT AS REQUIRED BY
APPLICABLE LAW, NO WARRANTIES OF ANY KIND, EITHER EXPRESS OR IMPLIED, INCLUDING, BUT
NOT LIMITED TO, THE IMPLIED WARRANTIES OF MERCHANTABILITY AND FITNESS FOR A PARTICULAR PURPOSE, ARE MADE IN RELATION TO THE ACCURACY, RELIABILITY, OR CONTENTS OF THIS
DOCUMENT� DORO AB RESERVES THE RIGHT TO REVISE THIS DOCUMENT OR WITHDRAW IT AT ANY
TIME WITHOUT PRIOR NOTICE�
Warranty and other information
Guarantee
This product is guaranteed for a period of 12 months from the date of purchase� In the unlikely event of a
fault occurring during this period, please contact the place of purchase� Proof of purchase is required for
any service or support needed during the guarantee period� This guarantee will not apply to a fault caused
by an accident or a similar incident or damage, liquid ingress, negligence, abnormal or improper usage,
non-maintenance or any other circumstances on the user’s part� Furthermore, this guarantee will not apply
to any fault caused by a thunderstorm or any other voltage fluctuations� As a matter of precaution, we recommend disconnecting the charger during a thunderstorm�
Except as required by applicable law, batteries are consumables and are not included in any guarantee�
This guarantee does not apply if batteries other than DORO original batteries are used�
EXCEPT FOR THE WARRANTY EXPRESSLY SET FORTH HEREIN, WIDEX USA INC� /WIDEX CANADA
LTD� DISCLAIMES AND EXCLUDES ALL REPRESENTATIONS, WARRANTIES AND CONDITIONS,
WHETHER WRITTEN OR ORAL, EXPRESS OR IMPLIED, STATUTORY OR OTHERWISE WITH RESPECT
TO THE UNIT AND ELEMENTS OR ACCESSORIES THEREOF, INCLUDING, BUT NOT LIMITED TO, WITHOUT LIMITATION, IMPLIED WARRANTIES AND CONDITIONS OF MERCHANTABILITY, DURABILITY,
QUALITY OR FITNESS FOR PARTICULAR PURPOSE, INCLUDING ANY AND ALL WARRANTIES AND
CONDITIONS FOUND IN APPLICABLE LEGISLATION�
21
Page 24

English
About
Technical specifications
Transmit frequency
Channels
Nominal effective range
Power
cordless
•
Privacy: The
Telephone calls are transmitted betwee
waves,
radio receiving equipment within
think of c
•
Electrical
electrical
be made from the c
electrical
•
Potential
interference to
the
telephone
experienced,
eliminates the
•
Rechargeable batteries: Exercise care in handling batteries in order not to create a short circuit
with conducting material such as rings, bracelets, and keys. The battery or conductor may
overheat and
•
Nickel-metal hydride rechargeable batteries: Dispose
burn or puncture the b
r
elease
When
to your local
batteries, go to: h
telephones
same features
so there is a possibility that the cordless telephone conversations
ordless telephone conversations as being as private as those on corded telephones.
power: The telephone base
outlet.
The electrical outlet should not be controlled by a wall switch.
power
TV
caustic material which could
the battery in this unit has
ordless
is inte
interference:
televisions
base
of the cordless telephone
moving the cordless telephone
interference.
cause harm.
environmental laws and regulations.
ttp://www.rbrc.org.
requirements
that make a cordless telephone
n the telephone base
range
of the cordless handset.
of this cordless telephone
handset if the telephone base
rrupted.
Some cordless telephones operate at frequencies that may cause
and VCRs. To minimize or prevent such interference, do not place
Observe
proper polarity betwee
attery. Like other batteries of this type, if burned or punctured, they could
reached
near or on top of a
farther
cause injury.
the end of its useful life, please dispose
For information about recycling cell phone
convenient create
and the cordless handset by radio
For this
must be connected to a working
is unplugged, switched off or if the
TV
away
from the
n the battery and the battery charger.
of these batteries in a safe manner. Do not
or VCR.
TV
or
some limitations
could be intercepted by
reason,
you should not
Calls cannot
If interference is
VCR
often
of it according
reduces
or
Handset:
T
Widex-Link
5
Maximum
according to environment conditions at the time of
Handset: 2․4V
Telephone
Adaptor Input:
Adaptor Output:
1921.536-1928.448
elephone base:
10.6
power
500mAh AAA x 2 Ni-MH battery
base
MHZ
1921.536-1928.448
MHz
allowed by
voltage:
100-120V, AC voltage, 60Hz
5V DC @
22
FCC
300mA
MHZ
and IC.
Actual operating
range
may vary
use.
.
Page 25

English
Support
For assistance, please contact an Authorized Widex Hearing Care Professional:
23
Page 26

Widex USA Inc�
Website: www�widexusa�com
Telephone: 1 718 360 1150
English
24
Page 27

English
25
Page 28

PHONE-DEX
Model: PHONE-DEX USC
English
Version 1�0
© 2013 Doro AB� All rights reserved�
CIB306/0313
9 514 0248 041
Page 29

MANUEL D’UTILISATION
PHONE-DEX
MODÈLE: PHONE-DEX USC
Page 30

Table des matières
Présentation du combiné � � � � � � � � � � � � � � � � � � � � � � � � � � � � � � � � � � � � 1
Informations� � � � � � � � � � � � � � � � � � � � � � � � � � � � � � � � � � � � � � � � � � � � � 2
Liste des composants � � � � � � � � � � � � � � � � � � � � � � � � � � � � � � � � � � � 2
Installation� � � � � � � � � � � � � � � � � � � � � � � � � � � � � � � � � � � � � � � � � � � � � � 2
Raccordement � � � � � � � � � � � � � � � � � � � � � � � � � � � � � � � � � � � � � � � � � 2
Pile � � � � � � � � � � � � � � � � � � � � � � � � � � � � � � � � � � � � � � � � � � � � � � � � � 3
Portée � � � � � � � � � � � � � � � � � � � � � � � � � � � � � � � � � � � � � � � � � � � � � � � 4
L’écran � � � � � � � � � � � � � � � � � � � � � � � � � � � � � � � � � � � � � � � � � � � � � � � � 5
Réglages du téléphone � � � � � � � � � � � � � � � � � � � � � � � � � � � � � � � � � � � � � 6
Utilisation du menu du combiné � � � � � � � � � � � � � � � � � � � � � � � � � � � � 6
Allumer le téléphone pour la première fois � � � � � � � � � � � � � � � � � � � � � 6
Réglages de l’écran � � � � � � � � � � � � � � � � � � � � � � � � � � � � � � � � � � � � � 6
Réglages sonores � � � � � � � � � � � � � � � � � � � � � � � � � � � � � � � � � � � � � � � 7
Réglages des appels � � � � � � � � � � � � � � � � � � � � � � � � � � � � � � � � � � � � � 8
Fonctionnement � � � � � � � � � � � � � � � � � � � � � � � � � � � � � � � � � � � � � � � � � � 9
Appels � � � � � � � � � � � � � � � � � � � � � � � � � � � � � � � � � � � � � � � � � � � � � � 9
Répertoire � � � � � � � � � � � � � � � � � � � � � � � � � � � � � � � � � � � � � � � � � � � � � 10
Présentation du numéro � � � � � � � � � � � � � � � � � � � � � � � � � � � � � � � � � � � 12
Intercommunication � � � � � � � � � � � � � � � � � � � � � � � � � � � � � � � � � � � � � � 13
Trouver un combiné � � � � � � � � � � � � � � � � � � � � � � � � � � � � � � � � � � � � 13
Ajouter et associer un combiné supplémentaire � � � � � � � � � � � � � � � � � 13
Rejoindre une conversation � � � � � � � � � � � � � � � � � � � � � � � � � � � � � � � 14
Intercommunication (au moins deux combinés) � � � � � � � � � � � � � � � � � 14
Dépannage � � � � � � � � � � � � � � � � � � � � � � � � � � � � � � � � � � � � � � � � � � � � � 15
CONSIGNES DE SÉCURITÉ � � � � � � � � � � � � � � � � � � � � � � � � � � � � � � � � � 16
Informations relatives à l’homologation de l’appareil � � � � � � � � � � � � � � � 18
Avis de non-responsabilité et limite de responsabilité � � � � � � � � � � � � � � � 21
Garantie et autres informations � � � � � � � � � � � � � � � � � � � � � � � � � � � � � � 21
Assistance � � � � � � � � � � � � � � � � � � � � � � � � � � � � � � � � � � � � � � � � � � � 23
Page 31

1
2
3
4
5
PQRS
6
7
Présentation du combiné
1� Témoin de charge
{ défiler vers le haut,
2�
augmenter le volume, b répertoire
3� MUTE/REMOVE effacer les chiffres ou les
caractères saisis, ou supprimer une entrée
q/FLASH
4�
5� Clavier numérique
6� passer temporairement à la
numérotation par pression de touches
lors de l’utilisation du service par
impulsions
7�
haut-parleur
13
12
11
10
9
8
8� REDIAL/PAUSE appuyez sans relâcher
pour ajouter une pause
9� INT intercommunication
options de composition pour le
10�
journal des appels
} défiler vers le bas, baisser le volume
11�
journal des appels
L/CLEAR mettre la sonnerie en
12�
sourdine temporairement ou quitter les
menus
13� MENU/SELECT afficher le menu ou
enregistrer une entrée ou un réglage
1
Page 32

Français
'6/
ILOWHU
Informations
Avant d’utiliser ce téléphone, veuillez lire la section “CONSIGNES DE SÉCURITÉ” à la page
16 - 17
Le PHONE-DEX est conçu pour une utilisation aux États-Unis et au Canada seulement�
Le PHONE-DEX est un téléphone sans fil qui transmet le son directement à vos aides auditives�
Son utilisation est extrêmement simple: il vous suffit de tenir le téléphone normalement contre
l’oreille appareillée�
Le PHONE-DEX fonctionne également comme un téléphone traditionnel� Votre famille et vos
amis peuvent donc l’utiliser�
Pour en savoir plus, reportez-vous à la section “Fonctionnement” à la page 9�
Liste des composants
Votre produit comprend les éléments suivants� Conservez votre preuve d’achat et l’emballage
d’origine au cas où vous auriez besoin d’envoyer votre téléphone au service de garantie�
• Couvercle du compartiment de la pile
• Pile
• Cordon de ligne téléphonique
• Socle de téléphone
• Adaptateur secteur
• Combiné
• Manuel d’utilisation
Installation
Raccordement
1� Branchez le cordon de la ligne téléphonique à la prise téléphonique murale et au socle du
téléphone (T)�
Remarque! Si vous avez souscrit à un service Internet haut débit par ligne d’abonné
numérique (DSL) via votre ligne téléphonique, vous devez installer un filtre DSL entre le
cordon de la ligne téléphonique et la prise téléphonique murale. Contactez votre opérateur
DSL pour obtenir de plus amples renseignements.
1
2� Connectez l’adaptateur secteur du socle du téléphone à une prise électrique qui n’est pas
contrôlée par un interrupteur mural et au socle du téléphone (Y)�
2
2
Page 33

Français
3� Insérez le connecteur de la pile dans le compartiment de pile du combiné
en respectant les repères de polarité de la pile (2,4V NiMH 500mAh).
4� Replacez le couvercle de la pile� Mettez le couvercle à plat contre
le compartiment de pile, puis glissez-le vers le milieu du combiné
jusqu’au déclic�
5� Pour charger la pile, placez le combiné dans le socle de façon à ce que
les touches soient orientées vers l’avant� Le témoin de charge s’allume
pendant le chargement�
Remarque!
L’adaptateur secteur est le dispositif qui permet de brancher le produit
à l’alimentation secteur. La prise de courant doit se trouver à proximité
de l’appareil et être facilement accessible.
Pile
Quand la pile est relativement neuve (moins de 6 mois) et complètement chargée (10 heures),
elle offre une autonomie d’environ 100heures en veille ou 10heures en conversation. La
pile n’est totalement chargée qu’au bout de 4 à 5 cycles de charge� Vous ne risquez pas de
surcharger ou d’endommager la pile si vous la laissez se recharger «trop longtemps».
Avertissement!
Risque d’explosion si vous remplacez la pile par un modèle incompatible�
N’utilisez que des piles originales� La garantie ne s’applique pas aux dommages
consécutifs à l’utilisation de piles inadaptées�
Remarque!
Quand le niveau de pile est faible ou lorsque le socle est trop éloigné, le téléphone
ne parvient pas à établir la connexion. Ne placez pas le socle à proximité d’autres
équipements électriques, en pleine exposition à la lumière solaire ou près de toute autre
source de chaleur importante! Cette précaution permet de réduire au minimum le risque
d’interférences. Il est normal que l’appareil s’échauffe pendant un cycle de charge et ce
phénomène ne présente pas de danger. Veuillez jeter les piles usagées en respectant les
réglementations en vigueur.
3
Page 34

Français
Chargement
Pour que la pile reste chargée, placez le combiné dans le socle ou dans le chargeur du
téléphone lorsque vous ne l’utilisez pas� La pile est complètement chargée au bout de
10heures de chargement continu.
Si l’écran n’affiche rien, il faut charger le combiné sans interruption pendant au moins
30minutes pour pouvoir utiliser le téléphone pendant un court instant.
Quand la pile s’épuise, un signal d’avertissement retentit et PILE FAIBLE et clignotent à
l’écran�
Une fois le téléphone installé ou le courant revenu après une coupure, l’heure et la date doivent
être réglées. Consultez la section «Date/heure» à la page 7 pour plus d’informations.
Portée
Ce téléphone sans fil fonctionne avec la puissance maximale autorisée par la Commission
fédérale des communications (FCC)� Le combiné et le socle du téléphone peuvent néanmoins
communiquer que jusqu’à une certaine distance, qui varie selon l’emplacement du socle et du
combiné, la météo et l’agencement du domicile ou du bureau�
Lorsque le combiné est hors de portée, il affiche HORS PORTÉE OU PAS ALIM� SOCLE�
Si un appel est reçu alors que le combiné est hors de portée, il peut ne pas sonner ou s’il
sonne, l’appel peut ne pas être reçu correctement lorsque vous appuyez sur /FLASH�
Rapprochez-vous du socle du téléphone, puis appuyez sur /FLASH pour prendre l’appel�
Si le combiné est déplacé hors de portée au cours d’une conversation téléphonique, des
interférences peuvent avoir lieu� Pour améliorer la réception, rapprochez-vous du socle du
téléphone� Vous pouvez améliorer la couverture en orientant la tête de sorte que le combiné soit
en face du socle�
4
Page 35

Témoin Fonction
État de la pile� Clignote pendant le chargement�
Mode haut-parleur activé
Volume de sonnerie Off
Témoin de boîte vocale
Remarque! Cette fonction nécessite un abonnement auprès de votre
opérateur!
Reportez-vous également à la section «Supprimer les témoins de boîte
vocale» à la page 8.
Nouveau numéro
Remarque! Cette fonction nécessite un abonnement auprès de votre
opérateur!
Français
L’écr a n
Heure. Reportez-vous également à la section «Date/heure» à la page 7.
Le microphone est désactivé pendant un appel�
Date. Reportez-vous également à la section «Date/heure» à la page 7.
5
Page 36

Français
Réglages du téléphone
Utilisation du menu du combiné
Les réglages indiqués dans ce chapitre sont effectués en mode veille�
Le menu du combiné contient des menus et des sous-menus� Le menu sélectionné est indiqué
par >�
Pour entrer dans le menu du combiné:
1� Appuyez sur MENU/SELECT�
2� Appuyez sur {/} pour parcourir le menu des fonctionnalités:
RÉPERTOIRE
(b )
• RÉVISER
• A JOUT�
CONTACT
• C OMP�
ABRÉGÉE
3� Appuyez sur MENU/SELECT pour accéder à un menu�
• Pour revenir au menu précédent, appuyez sur L/CLEAR�
• Pour revenir au mode veille, appuyez sans relâcher sur L/CLEAR�
HIST APPEL
( )
• RÉVISER
• EFF TS
APPELS
SONNERIES
• VOL�
SONNERIE
• TONAL�
SONNERIE
RÉGLAGES
• LANGAGE ACL
• ANN� B� VOCALE
• TONAL
TOUCHES
• RÉG�DATE /
HEURE
• IND RÉG DOMES
• TYPE COMPO�
INITIALISATION
Allumer le téléphone pour la première fois
La première fois que vous allumez le téléphone, vous devez configurer la date et l’heure�
Consultez la section «Date/heure» à la page 7 pour plus d’informations.
Réglages de l’écran
Langue de l’affichage
1� Appuyez sur MENU/SELECT�
2� Sélectionnez RÉGLAGES â LANGAGE ACL�
3� Sélectionnez la langue et appuyez sur MENU/SELECT pour enregistrer�
6
Page 37

Français
Date/heure
1� Appuyez sur MENU/SELECT�
2� Sélectionnez RÉGLAGES â RÉG�DATE/HEURE�
3� Appuyez sur les touches numériques (0-9) pour saisir le mois (mm), le jour (jj) et l’année
(aa)� Lorsque vous avez terminé, appuyez sur MENU/SELECT�
• Si nécessaire, appuyez sur MUTE/REMOVE pour effacer un chiffre� Appuyez sur MUTE/
REMOVE et maintenez enfoncé pour supprimer toute l’entrée�
4� Appuyez sur les touches numériques (0-9) pour saisir les heures et les minutes� Appuyez
sur { / } pour choisir AM ou PM� Lorsque vous avez terminé, appuyez sur MENU/
SELECT pour enregistrer�
Réglages sonores
Volume de la sonnerie
1� Appuyez sur MENU/SELECT�
2� Sélectionnez SONNERIES â VOL. SONNERIE:
• Appuyez sur { pour augmenter le volume (6 max�)�
• Appuyez sur } pour baisser le volume ou pour mettre en sourdine la sonnerie�
3� Lorsque vous avez terminé, appuyez sur MENU/SELECT pour enregistrer�
Conseil!
Vous pouvez aussi appuyer sur MUTE/DELETE ou sur CLEAR pour mettre temporairement
en sourdine la sonnerie lorsque le combiné sonne.
Tonalité de la sonnerie
1� Appuyez sur MENU/SELECT�
2� Sélectionnez SONNERIES â TONAL� SONNERIE� Assurez-vous que le volume de la
sonnerie n’est pas au plus bas�
3� Appuyez sur { / } pour écouter les 10 tonalités de sonnerie disponibles�
4� Lorsque vous avez terminé, appuyez sur MENU/SELECT pour enregistrer�
Tonalité des touches
1� Appuyez sur MENU/SELECT�
2� Sélectionnez RÉGLAGES â TONAL TOUCHES�
3� Sélectionnez EN FONCTION ou HORS FONCTION et appuyez sur MENU/SELECT pour
enregistrer�
7
Page 38

Français
Réglages des appels
Indicatif local
1� Appuyez sur MENU/SELECT�
2� Sélectionnez RÉGLAGES â IND RÉG DOMES�
3� Appuyez sur les touches numériques (0-9) pour saisir l’indicatif local�
• Si nécessaire, appuyez sur MUTE/REMOVE pour effacer un chiffre� Appuyez sur MUTE/
REMOVE et maintenez enfoncé pour supprimer toute l’entrée�
4� Lorsque vous avez terminé, appuyez sur MENU/SELECT pour enregistrer�
Mode de composition
1� Appuyez sur MENU/SELECT�
2� Sélectionnez RÉGLAGES â TYPE COMPO�
3� Sélectionnez TONALITÉ ou IMPULSIONS et appuyez sur MENU/SELECT pour enregistrer�
Supprimer les témoins de boîte vocale
Si vous avez souscrit à un service de boîte vocale auprès de votre opérateur, NOUV MESS
VOCAL s’affiche sur le combiné lorsque vous avez de nouveaux messages vocaux� Une fois le
message écouté, le témoin sur le combiné disparaît automatiquement� Vous pouvez effacer
manuellement le témoin si, par exemple, vous avez écouté votre boîte vocale à distance�
1� Appuyez sur MENU/SELECT�
2� Sélectionnez RÉGLAGES â ANN� B� VOCALE et VOYANTS HORS FONCTION? s’affiche�
3� Appuyez sur MENU/SELECT pour enregistrer ou sur L/CLEAR pour revenir au menu
précédent�
Conseil!
Cette action ne fait qu’éteindre le témoin; elle n’efface pas les messages de votre boîte
vocale.
8
Page 39

Français
Fonctionnement
Votre téléphone est également conçu spécialement pour fonctionner avec les
aides auditives sans fil Widex� Cela signifie que le son issu du téléphone est
transmis directement dans votre ou vos aide(s) auditive(s)� Lorsque vous placez
le téléphone près d’une oreille pourvue d’une aide auditive, un «dong» retentit
dans l’aide auditive pour indiquer que la fonction est activée�
Tenez le téléphone près d’une oreille appareillée�
Lorsque le téléphone est déplacé hors de portée, vos aides auditives reviennent au programme
d’écoute choisi en programme numéro 1 (généralement le programme principal)�
Si le son du téléphone est trop bas ou trop fort, vous pouvez utiliser les touches de volume } / {
pour ajuster le volume� Si vous avez besoin de plus amples informations, consultez votre professionnel
en audiologie�
Pour les utilisateurs ne portant pas de aides auditives, le téléphone fonctionne comme décrit
dans ce manuel�
Appels
Passer un appel
• Appuyez sur q/FLASH ou et composez le numéro de téléphone�
• Composez le numéro de téléphone et appuyez sur q/FLASH ou � Si nécessaire,
appuyez sur MUTE/REMOVE pour effacer un chiffre�
Recevoir un appel
Lorsque le combiné sonne, appuyez sur q/FLASH, ou sur une touche du clavier (0-9,
ou )�
Raccrocher
Appuyez sur L/CLEAR ou remettez le combiné dans le socle�
Utiliser le haut-parleur
Pendant un appel, appuyez sur pour basculer entre haut-parleur et combiné normal�
Recomposition d’un numéro
Le combiné garde en mémoire les 10 derniers numéros de téléphone composés�
1� Appuyez sur REDIAL /PAUSE�
2� Appuyez sur } / { ou sur REDIAL/PAUSE à plusieurs reprises jusqu’à ce que l’entrée
souhaitée s’affiche�
3� Appuyez sur /FLASH ou sur pour composer le numéro�
9
Page 40

Français
Appel en attente
Si vous avez souscrit à un service d’appel en attente auprès de votre opérateur, vous
entendrez un signal d’alarme lorsque vous recevrez un autre appel alors que vous êtes déjà en
communication�
1� Appuyez sur q/FLASH pour mettre l’appel en cours en attente et prendre l’appel entrant�
2� Appuyez sur q/FLASH pour revenir à l’appel précédent�
Réglage du volume
Pendant un appel, appuyez sur { / } pour régler le volume d’écoute�
Remarque!
Les réglages du volume de l’écouteur du combiné et du volume du haut-parleur sont
indépendants.
Sourdine
1� Pendant un appel, appuyez sur MUTE/REMOVE pour désactiver le microphone� MUET
s’affiche lorsque la sourdine est activée�
2� Appuyez sur MUTE/REMOVE pour activer le microphone� L’écran affiche temporairement
MICROPHONE E/F�
Mode silence temporaire
Lorsqu’un correspondant appelle, vous pouvez appuyer sur L/CLEAR ou MUTE/REMOVE
sur le combiné pour couper la sonnerie du combiné� SONN� SOURDINE s’affiche� L’appel
suivant sonne automatiquement au volume actuel�
Répertoire
Vous pouvez enregistrer jusqu’à 50 entrées dans le répertoire� Un seul combiné à la fois peut
avoir accès au répertoire� Les modifications effectuées sur un combiné s’appliquent à tous�
Enregistrer un contact
1� Appuyez sur MENU/SELECT�
2� Sélectionnez RÉPERTOIRE â AJOUT� CONTACT�
3� Appuyez sur les touches numériques (0-9) pour saisir le numéro (jusqu’à 30 chiffres)�
Lorsque vous avez terminé, appuyez sur MENU/SELECT�
• Si nécessaire, appuyez sur MUTE/REMOVE pour effacer un chiffre� Appuyez sur MUTE/
REMOVE et maintenez enfoncé pour supprimer toute l’entrée�
4� Appuyez sur les touches numériques (0-9) pour saisir le nom (jusqu’à 15 caractères)�
Appuyez sur la touche correspondante à plusieurs reprises jusqu’à obtenir la lettre
souhaitée� Lorsque vous avez terminé, appuyez sur MENU/SELECT pour enregistrer�
10
Page 41

Français
• Si nécessaire, appuyez sur 0 pour ajouter un espace�
Conseil!
Vous pouvez copier un numéro de la liste de rappel: au moment de la saisie du numéro,
appuyez sur REDIAL/ PAUSE et allez jusqu’au numéro, puis appuyez sur MENU/SELECT pour
le copier. Appuyez de nouveau sur MENU/SELECT pour modifier le numéro et saisir le nom.
Passer un appel à partir du répertoire
1� Appuyez sur { / b�
2� Appuyez sur { / } pour parcourir les contacts ou effectuez une recherche rapide en
appuyant sur la touche numérique correspondant à la première lettre du nom recherché�
3� Une fois le contact souhaité affiché, appuyez sur q/FLASH ou sur pour composer le
numéro�
Modifier un numéro
1� Appuyez sur { / b�
2� Parcourez la liste jusqu’au contact souhaité et appuyez sur MENU/SELECT�
3� Une fois ÉDITER NUMÉRO affiché, utilisez les touches numériques (0-9) pour modifier le
numéro� Appuyez sur MENU/SELECT pour continuer�
4� Une fois ÉDITER LE NOM affiché, utilisez les touches numériques (0-9) pour modifier le nom�
5� Appuyez sur MENU/SELECT pour enregistrer�
Supprimer un numéro
1� Parcourez la liste jusqu’au contact souhaité et appuyez sur MUTE/REMOVE�
2� Une fois EFF� CONTACT? affiché, appuyez sur MUTE/DELETE�
Enregistrer un numéro abrégé
Vous pouvez ajouter jusqu’à 10 entrées�
1� Appuyez sur MENU/SELECT�
2� Sélectionnez RÉPERTOIREâ CO MP� A BR É GÉE et allez jusqu’au numéro abrégé souhaité,
puis appuyez sur MENU/SELECT�
3� Allez jusqu’à l’entrée de répertoire souhaitée, puis appuyez sur MENU/SELECT pour
enregistrer�
Composer un numéro abrégé
1� Appuyez sans relâcher sur la touche numérique correspondante (0-9) pour afficher le
numéro abrégé souhaité�
2� Appuyez sur q/FLASH ou pour composer le numéro�
11
Page 42

Français
Présentation du numéro
Le téléphone prend en charge le service de présentation du numéro proposé par la plupart des
opérateurs téléphoniques� La présentation du numéro vous permet de voir le nom, le numéro, la
date et l’heure des appels� Le journal des appels garde en mémoire les 50 derniers appels�
Les modifications effectuées sur un combiné s’appliquent à tous�
Contactez votre opérateur pour obtenir de plus amples renseignements sur ce service�
Le combiné présente les appels manqués sous NEW� Une fois qu’ils ont été vus, le témoin
disparaît� Si vous ne souhaitez pas voir les appels manqués un par un, appuyez sans relâcher
sur L/CLEAR� Toutes les entrées sont ensuite considérées comme lues et conservées dans
le journal des appels�
Afficher et composer un numéro à partir du journal des appels
1� Appuyez sur } / �
2� Parcourez le journal des appels. Une fois le numéro composé affiché:
• Appuyez à plusieurs reprises sur pour afficher les différentes options de composition�
• Appuyez à plusieurs reprises sur 1 si vous souhaitez ajouter un 1 au début du numéro
de téléphone�
3� Appuyez sur q/FLASH ou pour composer le numéro�
Enregistrer un numéro à partir du journal des appels
1� Parcourez le journal des appels� Une fois le numéro souhaité affiché, appuyez sur MENU/
SELECT�
2� Une fois ÉDITER NUMÉRO affiché, utilisez les touches numériques (0-9) pour modifier le
numéro� Appuyez sur MENU/SELECT pour continuer�
3� Une fois ÉDITER LE NOM affiché, utilisez les touches numériques (0-9) pour modifier le
nom�
4� Appuyez sur MENU/SELECT pour enregistrer�
Supprimer un numéro dans le journal des appels
Pour supprimer une entrée, appuyez sur MUTE/REMOVE lorsqu’elle s’affiche�
Supprimer toutes les entrées:
1� Appuyez sur MENU/SELECT�
2� Sélectionnez HIST APPEL â EFF TS APPELS�
3� Lorsque l’écran affiche EFFACER TOUS LES APPELS?, appuyez sur MENU/SELECT�
12
Page 43

Français
Intercommunication
Votre combiné et votre socle sont pré-enregistrés� Il est possible d’associer jusqu’à cinq
combinés au socle� Les numéros sont assignés à chaque nouveau combiné dans l’ordre� Le
numéro s’affiche à l’écran� Le socle doit être installé en un point central afin que la zone de
couverture soit à peu près identique pour tous les combinés�
Si, pour quelque raison, le combiné n’est pas associé au socle (HORS PORTÉE OU PAS ALIM�
SOCLE s’affiche même lorsque le combiné est près du socle), suivez la procédure ci-dessous
pour appairer votre combiné�
Trouver un combiné
Appuyez une fois sur l’icône Trouver le combiné (J) sur le socle du téléphone� Le combiné
sonne et l’écran affiche **TÉLÉ-SIGNAL**. Pour arrêter:
• Appuyez de nouveau sur l’icône Trouver le combiné sur le socle du téléphone�
• Appuyez sur q/FLASH, ou sur une touche du clavier (0-9, ou )�
• Placez le combiné dans le socle ou le chargeur du téléphone�
Ajouter et associer un combiné supplémentaire
1� Placez le nouveau combiné dans le socle ou le chargeur du téléphone�
2� Sur le socle du téléphone: appuyez sur l’icône Trouver le combiné J pendant 5 à
8secondes.
3� Sur le combiné: retirez le combiné du socle ou du chargeur.
Appuyez sur MENU/SELECT â INITIALISATION ou appuyez sur et INITIALISATION�
S�V�P� ATTENDRE s’affiche�
Une fois l’enregistrement terminé, COMBINÉ INITIALISÉ s’affiche�
Si l’enregistrement du combiné est réussi, vous entendez un signal de confirmation� Le numéro
suivant disponible est automatiquement attribué au combiné� Si l’enregistrement du combiné
échoue, HORS PORTÉE OU PAS ALIM� SOCLE s’affiche de nouveau�
Remplacer un combiné
Si vous souhaitez remplacer un combiné ou réattribuer un numéro de combiné, vous devez
désassocier tous les combinés, puis enregistrer chacun d’eux l’un après l’autre�
Sur le socle du téléphone: appuyez sur l’icône Trouver le combiné J pendant 10secondes,
puis appuyez de nouveau sur J�
13
Page 44

Français
Rejoindre une conversation
1� Si un combiné est déjà utilisé pour un appel, appuyez sur q/FLASH ou sur sur un
autre combiné�
2� Appuyez sur L /CLEAR pour quitter l’appel� L’appel continue jusqu’à ce que tous les
combinés soient raccrochés�
Intercommunication (au moins deux combinés)
1� Appuyez sur INT sur votre combiné lorsqu’il n’est pas utilisé� S’il y a plus de trois combinés,
utilisez les touches numériques pour saisir un numéro de combiné de destination�
2� Pour répondre à l’appel en intercommunication, appuyez sur q/FLASH, , INT ou sur
l’une des touches du clavier (0-9, ou ) sur l’autre combiné�
3� Pour terminer l’appel, appuyez sur L/CLEAR ou placez le combiné dans le socle du
téléphone ou dans le chargeur�
Répondre à un appel entrant pendant un appel en intercommunication
Si vous recevez un appel pendant un appel en intercommunication, un signal d’alerte retentit�
• Pour répondre à l’appel entrant: appuyez sur q/FLASH et l’appel en
intercommunication s’arrête automatiquement�
• Pour terminer l’appel en intercommunication et ne pas répondre à l’appel entrant:
appuyez sur L/CLEAR� L’appel en intercommunication s’arrête et le téléphone
continue de sonner�
Transférer des appels
Pendant un appel en intercommunication, vous avez les options suivantes:
• Ajoutez un combiné de destination à l’appel externe pour avoir une conversation à trois�
Appuyez sans relâcher sur INT sur le combiné d’origine�
• Transférez un appel� Appuyez sur L /CLEAR ou placez le combiné dans le socle/
chargeur du téléphone� Le combiné de destination se connecte automatiquement à
l’appel externe�
• Basculez entre l’appel externe (APPEL EXTÉRIEUR) et l’appel en intercommunication
(INTERPHONE) en appuyant sur INT�
• Terminez l’appel en intercommunication en appuyant sur L/CLEAR ou en remettant
le combiné dans le socle/chargeur du téléphone� L’appel externe se poursuit avec le
combiné d’origine�
14
Page 45

Français
Dépannage
Vérifiez que le cordon de la ligne téléphonique est en bon état et correctement branché�
Débranchez tout autre équipement, rallonge et téléphone� Si l’appareil fonctionne alors
normalement, l’anomalie est causée par le matériel supplémentaire�
Testez l’équipement sur une ligne certifiée en bon état de fonctionnement (chez un voisin par
exemple)� Si l’équipement fonctionne ailleurs, l’anomalie concerne probablement votre propre
ligne téléphonique� Veuillez signaler l’anomalie à votre opérateur téléphonique�
Aucun numéro ne s’affiche lorsque le téléphone sonne
• Cette fonction suppose de s’abonner à un service de présentation du numéro auprès de votre
opérateur�
Signal d’avertissement/impossible de passer des appels
• Les piles sont peut-être épuisées (rechargez le combiné)�
• Le combiné est peut-être quasiment hors de portée� Rapprochez-vous du socle�
Le téléphone ne fonctionne pas
• Assurez-vous que l’adaptateur secteur et le cordon de ligne téléphonique sont correctement
branchés�
• Assurez-vous d’avoir sélectionné la numérotation par tonalités, voir la section Réglages du
téléphone.
• Vérifiez l’état de charge des piles du combiné�
• Branchez un autre téléphone fonctionnel à la prise téléphonique murale�
Le téléphone continue de sonner
Certaines sonneries du téléphone ne suivent pas le signal de la ligne, ce qui signifie que la
sonnerie peut continuer à retentir jusqu’à 8 secondes après la prise d’appel�
Si le téléphone ne fonctionne toujours pas correctement, portez-le au S�A�V� de votre revendeur�
N’oubliez pas de vous munir du ticket de caisse ou d’une copie de la facture�
15
Page 46

Français
CONSIGNES DE SÉCURITÉ
Votre appareil est un produit à la fine pointe de la technologie et doit être traité avec le plus grand soin�
Les actes de négligence peuvent invalider la garantie�
Lorsque vous utilisez votre appareil, des consignes de sécurité de base doivent toujours être respectées afin
de réduire le risque d’incendie, de choc électrique et de blessure personnelle. En voici quelques-unes:
1� Lisez et comprenez bien toutes les instructions�
2� Tenez compte de tous les avertissements et toutes les instructions inscrits sur le produit�
3� Débranchez ce produit de la prise murale avant de le nettoyer� N’utilisez pas de produits
nettoyants liquides ou en aérosol� Utilisez un chiffon humide pour nettoyer l’appareil�
4� N’utilisez pas ce produit près de l’eau, par exemple près d’une baignoire, d’une bassine, d’un
évier, d’un bac à laver, d’une piscine ou dans une cave humide ou une douche�
5� Ne placez pas ce produit sur une table, une étagère, un support instables ou sur toute autre
surface instable�
6� Les fentes et les orifices à l’arrière ou en dessous du socle du téléphone et du combiné sont
destinés à l’aération� Ces orifices servant de protection contre la surchauffe, ils ne doivent pas
être obstrués en plaçant le produit sur une surface souple telle qu’un lit, un fauteuil ou un tapis�
Ce produit ne doit jamais être placé près de ou sur un radiateur ou une bouche de chaleur� Ce
produit ne doit pas être placé à un endroit où l’aération n’est pas adéquate�
7� Ce produit ne doit être branché qu’au type d’alimentation indiqué sur l’étiquette de marquage�
Si vous n’êtes pas sûr du type d’alimentation électrique disponible dans votre maison ou votre
bureau, consultez votre revendeur ou votre fournisseur d’électricité local�
8� Ne laissez rien posé sur le cordon d’alimentation� N’installez pas ce produit à un endroit où le
cordon risque d’être piétiné�
9� N’insérez aucun objet dans les orifices du socle du téléphone ou du combiné car ils sont
susceptibles de toucher des points de tension dangereux ou de créer un court-circuit� Ne versez
aucun liquide sur le produit�
10� Pour réduire le risque de choc électrique, ne démontez pas ce produit, mais apportez-le à un centre de
service agréé� L’ouverture ou le retrait de pièces du socle du téléphone ou du combiné, autres que des
trappes d’accès spécifiées, peut vous exposer à des tensions dangereuses ou à d’autres risques� Un
remontage incorrect peut causer des chocs électriques lors d’une utilisation ultérieure du produit�
11� Ne surchargez pas les prises murales et les rallonges�
12� Débranchez ce produit de la prise murale et confiez la réparation à un centre de service agréé
dans les cas suivants:
13� Lorsque le cordon d’alimentation ou la prise sont endommagés ou effilochés�
14� Si du liquide a été déversé sur le produit�
15� Si le produit a été exposé à la pluie ou à des projections d’eau�
16� Si le produit ne fonctionne pas normalement alors que vous suivez les consignes d’utilisation�
Réglez seulement les commandes traitées par le manuel d’utilisation� Tout ajustement incorrect
d’autres commandes peut entraîner des dommages et nécessite souvent un travail considérable
par un technicien agréé pour remettre le produit en état de fonctionnement normal�
Conservez ces instructions
16
Page 47

Français
CONSIGNES DE SÉCURITÉ
17� Si le produit est tombé et que le socle du téléphone et/ou le combiné sont endommagés�
18� Si le produit affiche une nette diminution de ses performances�
19� Évitez d’utiliser un téléphone (autre que sans fil) pendant un orage électrique� Il y a un risque
distant de choc électrique à cause de la foudre�
20� N’utilisez pas le téléphone pour signaler une fuite de gaz à proximité de la fuite� Dans certaines
circonstances, une étincelle peut apparaître lorsque l’adaptateur secteur est branché à la prise
de courant ou lorsque le combiné est replacé dans son socle� Cet événement courant est dû à
la fermeture d’un circuit électrique� L’utilisateur ne doit pas brancher le téléphone à une prise
de courant et ne doit pas placer un combiné chargé dans le socle si le téléphone se trouve dans
un environnement contenant des concentrations de gaz inflammables, sauf si la ventilation est
adéquate� Une étincelle dans un tel environnement pourrait créer un incendie ou une explosion�
De tels environnements sont notamment: utilisation médicale d’oxygène sans ventilation
adéquate; gaz industriels (solvants nettoyants, vapeurs d’essence, etc�); fuite de gaz naturel; etc�
21� Ne mettez le combiné près de l’oreille que si le téléphone est en mode de conversation normal�
22� Les adaptateurs secteur sont destinés à être posés verticalement ou montés au sol� Les broches
ne sont pas conçues pour maintenir la fiche en place si elle est branchée dans une prise au
plafond ou sous une table ou une armoire�
Ce conseil vaut pour l’appareil, la pile, l’adaptateur secteur et les autres accessoires� Si le téléphone ne
fonctionne pas correctement, portez-le au S�A�V� de votre revendeur� N’oubliez pas de vous munir du ticket
de caisse ou d’une copie de la facture�
Précautions destinées aux utilisateurs munis de stimulateurs cardiaques
Stimulateurs cardiaques (ne s’applique qu’aux téléphones numériques sans fil):
Wireless Technology Research, LLC (WTR), organisme de recherche indépendant, a mené une évaluation
pluridisciplinaire des interférences entre les téléphones sans fil portatifs et les stimulateurs cardiaques
implantés�
Avec le soutien de la FDA (Food and Drug Administration), agence fédérale américaine des produits ali-
mentaires et médicamenteux, WTR recommande aux médecins d’indiquer aux:
Patients munis de stimulateurs cardiaques
• qu’ils doivent tenir les téléphones sans fil à au moins six pouces du stimulateur cardiaque�
• qu’ils NE doivent PAS placer les téléphones sans fil directement au-dessus du stimulateur
cardiaque, par exemple dans une poche de chemise, lorsqu’il est allumé�
• qu’ils doivent utiliser le téléphone sans fil sur l’oreille se trouvant à l’opposé du stimulateur
cardiaque� L’évaluation de WTR n’a identifié aucun risque pour les personnes munies de
stimulateurs cardiaques se trouvant à proximité d’utilisateurs de téléphones sans fil�
Conservez ces instructions
17
Page 48

Français
Informations relatives à l’homologation de l’appareil
Réglementations de la FCC, de l’ACTA et de l’IC
Cet équipement a été testé et prouvé conforme aux exigences relatives à un appareil numérique de classe
B de la partie 15 des règles de la FCC� Ces exigences sont destinées à fournir une protection raisonnable contre les interférences nuisibles dans une installation résidentielle� Cet équipement génère, utilise et
peut émettre de l’énergie radiofréquence et, s’il n’est pas installé et utilisé conformément aux instructions,
peut causer une interférence nuisible aux communications radio� Toutefois, il n’est pas garanti que l’interférence ne se produira pas dans une installation particulière� Si cet équipement cause une interférence
nuisible à la réception radio ou de programmes de télévision, laquelle peut être déterminée en éteignant et
en allumant l’équipement, l’usager est encouragé à essayer de corriger l’interférence par l’une ou plusieurs
des mesures suivantes :
• Réorientez ou relocalisez l’antenne de réception�
• Augmentez la distance de séparation entre l’équipement et le receveur�
• Connectez l’équipement à une prise sur un circuit différent de celui auquel le receveur est
connecté�
• Consultez le vendeur ou un technicien radio/de télévision pour obtenir de l’aide�
Les changements ou modifications apportés à cet équipement qui n’ont pas été approuvés expressément
par la partie responsable de la conformité peuvent entraîner la révocation de l’autorisation d’utilisation de
l’appareil� Cet appareil est conforme aux dispositions de la partie 15 des règles de la FCC� Son utilisation
est assujettie aux deux conditions suivantes :
(1) cet appareil ne doit pas causer d’interférences nuisibles et (2) cet appareil doit supporter toutes les
interférences reçues, même si elles sont susceptibles de compromettre le fonctionnement� La confidentialité des communications peut ne pas être assurée lors de l’utilisation de ce téléphone�
Pour assurer la sécurité des utilisateurs, la FCC a établi des critères relatifs à la quantité d’énergie
radiofréquence pouvant être absorbée en toute sécurité par un utilisateur ou une personne à proximité de
l’utilisateur en fonction de l’usage prévu du produit� Ce produit a été testé et prouvé conforme aux critères
de la FCC� Le combiné peut être placé en toute sécurité contre l’oreille de l’utilisateur� Le socle du téléphone doit être installé et utilisé de sorte que les parties du corps de l’utilisateur, autres que les mains,
soient maintenues à une distance de 20cm (8pouces) ou plus.
Cet appareil numérique de la classe B est conforme à la norme NMB-003 du Canada�
Partie 68 de la FCC et ACTA
Cet équipement est conforme à la partie 68 des règles de la FCC et aux exigences techniques adoptées
par l’ACTA (Conseil d’administration du matériel terminal)� L’étiquette à l’arrière ou en dessous de cet équi-
pement indique, entre autres, un identifiant produit au format US:AAAEQ##TXXXX. Cet identifiant doit
être fourni à votre compagnie de téléphone locale sur demande�
La prise et la fiche utilisées pour raccorder cet équipement au câblage du bâtiment et au réseau téléphoni-
que doivent être conformes aux dispositions en vigueur de la partie 68 et aux exigences techniques adoptées par l’ACTA� Un cordon téléphonique et une fiche modulaire conformes sont fournis avec ce produit�
18
Page 49

Français
Ils sont destinés à être connectés à une fiche modulaire compatible, également conforme� Une prise RJ11
doit normalement être utilisée pour un raccord à une ligne simple et une prise RJ14 pour un raccord à
deux lignes� Reportez-vous aux consignes d’installation données dans le manuel d’utilisation�
L’indice d’équivalence de la sonnerie (IES) sert à déterminer le nombre d’appareils que vous pouvez raccorder à votre ligne téléphonique en étant assuré qu’ils sonneront lorsque vous recevrez un appel� L’IES de
ce produit est indiqué par les 6e et 7e caractères suivant US: dans l’identifiant produit (p. ex si ## est 03,
l’IES est de 0,3)�
Dans la plupart des régions, mais pas toutes, la somme de tous les IES doit être inférieure ou égale à cinq
(5,0)� Pour plus d’informations, veuillez contacter votre compagnie de téléphone locale�
Cet équipement ne peut pas être utilisé avec des lignes partagées� Si vous avez des composants de systè-
mes d’alarme connectés sur votre ligne téléphonique, vérifiez que le raccordement de cet équipement ne
désactive pas votre système d’alarme� Si vous avez des questions au sujet de ce qui peut désactiver les
systèmes d’alarme, consultez votre compagnie de téléphone ou un installateur compétent�
Si cet équipement fonctionne mal, il doit être débranché de la fiche modulaire jusqu’à ce que le problème
soit corrigé� Les réparations apportées à cet équipement téléphonique peuvent être effectuées uniquement
par le fabricant ou par des représentants agréés� Pour les procédures de réparation, suivez les instructions
indiquées dans la Garantie�
Si cet équipement nuit au réseau téléphonique, la compagnie de téléphone peut interrompre temporairement votre service téléphonique� La compagnie de téléphone est tenue de vous avertir avant de couper la
ligne� Si elle ne peut pas vous informer par avance, elle le fera dès que possible� Vous aurez la possibilité
de corriger le problème et la compagnie de téléphone est tenue de vous informer de votre droit à déposer
une plainte auprès de la FCC� Votre compagnie de téléphone peut apporter des modifications à ses installations, son équipement, son exploitation ou ses procédures qui peuvent affecter le bon fonctionnement de
ce produit� La compagnie de téléphone est tenue de vous avertir si de tels changements sont prévus�
Si ce produit est équipé d’un combiné filaire ou sans fil, il est compatible avec les aides auditives�
Si ce produit peut garder en mémoire des numéros, vous pouvez choisir d’enregistrer des numéros de télé-
phone d’urgence (p� ex� police, pompiers, ambulance)� Si vous enregistrez ou testez des numéros d’ur-
gence, veuillez:
• rester en ligne et expliquer brièvement pourquoi vous appelez avant de raccrocher�
• réaliser ces tâches en heures creuses, tôt le matin ou tard le soir par exemple�
19
Page 50

Français
Industry Canada
This Class B digital apparatus complies with Canadian ICES-003�
Operation is subject to the following two conditions: (1) this device may not cause interference, and (2)
this device must accept any interference, including interference that may cause undesired operation of the
device�
The abbreviation, “IC:”, before the registration number signifies that registration was performed based on
a Declaration of Conformity indicating that Industry Canada technical specifications were met�
The Ringer Equivalence Number (REN) assigned to each terminal device provides an indication of the
maximum number of terminals allowed to be connected to a telephone interface� The termination on an
interface may consist of any combination of devices subject only to the requirement that the sum of the
Ringer Equivalence Numbers of all the devices does not exceed 5�
The Ringer Equivalence Number (REN) for this terminal equipment is 1�0�
This equipment meets the applicable Industry Canada Terminal Equipment Technical Specifications�
Avis d’Industrie Canada
Cet appareil numérique de la classe B est conforme à la norme NMB-003 du Canada�
L’utilisation de ce dispositif est autorisée seulement dans les conditions suivantes: (1) il ne doit pas pro-
duire de brouillage et (2) l’utilisateur du dispositif doit être prêt à accepter tout brouillage radioélectrique
reçu, même si ce brouillage est susceptible de compromettre le fonctionnement du dispositif�
Le sigle IC, placé devant le numéro d’enregistrement, signifie que l’enregistrement s’est effectué conformément à une déclaration de conformité et indique que les spécifications techniques d’Industrie Canada
ont été respectées�
L’indice d’équivalence de la sonnerie (IES) assigné à chaque dispositif terminal indique le nombre maximal
de terminaux qui peuvent être raccordés à une interface� La terminaison d’une interface téléphonique
peut consister en une combinaison de quelques dispositifs, à la seule condition que la somme d’indices
d’équivalence de la sonnerie de tous les dispositifs n’excède pas 5�
L’indice d’équivalence de la sonnerie (IES) du présent matériel est de 1�0�
Le présent matériel est conforme aux spécifications techniques d’Industrie Canada applicables au maté-
riel terminal�
US: EW7W401B80-893800
FCC ID: EW780-8938-00
IC: 1135B-80893800
20
Page 51

Français
Avis de non-responsabilité et limite de responsabilité
Doro AB et ses sociétés affiliées ou porteurs de licences ne peuvent être tenus responsables des dommages ou des pertes résultant de l’utilisation de ce guide� Doro AB et ses sociétés affiliées ou porteurs de
licences ne peuvent être tenus responsables en cas de perte ou de recours de tiers pouvant survenir suite
à l’utilisation de ce logiciel� Doro AB et ses sociétés affiliées ou porteurs de licences ne peuvent être tenus
responsables des dommages ou des pertes causés par la suppression de données par suite d’une défectuosité, d’une pile déchargée ou de réparations� Veillez à faire des copies de sauvegarde de toutes les données importantes sur d’autres supports afin de vous protéger contre la perte de données�
DANS LES LIMITES PRÉVUES PAR LA LOI EN VIGUEUR, DORO AB ET SES SOCIÉTÉS AFFILIÉES OU
PORTEURS DE LICENCES NE PEUVENT EN AUCUN CAS ÊTRE TENUS RESPONSABLES DE TOUTE
PERTE DE DONNÉES OU DE REVENU, OU DE TOUT DOMMAGE SPÉCIAL, ACCIDENTEL, CONSÉCUTIF
OU INDIRECT, PEU IMPORTE SA CAUSE. LE CONTENU DU PRÉSENT DOCUMENT EST FOURNI «TEL
QUEL». SOUS RÉSERVE DES LOIS APPLICABLES, AUCUNE GARANTIE SOUS QUELQUE FORME QUE
CE SOIT, EXPLICITE OU IMPLICITE, Y COMPRIS, MAIS SANS S’Y LIMITER, LES GARANTIES IMPLICITES DE QUALITÉ MARCHANDE ET D’ADÉQUATION À UN USAGE PARTICULIER, N’EST ACCORDÉE
QUANT À L’EXACTITUDE, À LA FIABILITÉ OU AU CONTENU DU PRÉSENT DOCUMENT� DORO AB SE
RÉSERVE LE DROIT DE MODIFIER LE PRÉSENT DOCUMENT OU DE LE RETIRER À TOUT MOMENT
SANS AVIS PRÉALABLE�
Garantie et autres informations
Garantie
Ce produit est garanti 12 mois à partir de la date d’achat� En cas d’anomalie de votre appareil au cours
de cette période, contactez votre revendeur� Pour toute intervention du service après-vente ou d’assistance pendant la période de garantie, veuillez vous munir de votre preuve d’achat� Cette garantie ne s’applique pas en cas de dysfonctionnement dû à un accident, à un incident ou à une détérioration similaire,
à une pénétration de liquide, à une négligence, à une utilisation anormale ou incorrecte, à un défaut d’entretien ou à d’autres causes relevant de la responsabilité de l’utilisateur� De plus, cette garantie ne s’appliquera pas en cas d’anomalie causée par un orage ou toute autre variation de tension� Par précaution, nous
recommandons de débrancher le chargeur en cas d’orage�
Sauf indication contraire dans la loi en vigueur, les piles sont des articles consommables et ne sont couvertes par aucune garantie�
Cette garantie ne s’applique pas en cas d’utilisation de piles autres que les piles originales DORO�
À L’EXCEPTION DE LA GARANTIE EXPRESSÉMENT PRÉVUE AUX PRÉSENTES, WIDEX USA INC� /
WIDEX CANADA LTD� NE FAIT AUCUNE DÉCLARATION NI NE DONNE AUCUNE GARANTIE OU CONDITION EXPRESSE OU IMPLICITE, ÉCRITE OU ORALE, LÉGALE OU AUTRE CONCERNANT L’APPAREIL ET
LES ÉLÉMENTS OU ACCESSOIRES, Y COMPRIS, SANS S’Y LIMITER, LES GARANTIES IMPLICITES ET
LES CONDITIONS DE COMMERCIALISATION, DE DURABILITÉ, DE QUALITÉ OU D’ADAPTABILITÉ POUR
UN USAGE PARTICULIER, Y COMPRIS TOUTES LES GARANTIES ET CONDITIONS PRÉSENTES DANS
LA LÉGISLATION APPLICABLE�
21
Page 52

Français
À propos des téléphones sans fil
• Confidentialité: les mêmes caractéristiques qui constituent des avantages pour les téléphones sans
fil présentent également des restrictions� Les appels téléphoniques sont transmis entre le socle du
téléphone et le combiné sans fil par le biais d’ondes radio; il est donc possible que vos conversations
téléphoniques sans fil soient interceptées par des équipements de réception radio se trouvant à
portée du combiné sans fil� Pour cette raison, vous ne devez pas envisager les communications par
téléphone sans fil comme étant aussi confidentielles que celles par téléphone filaire�
• Alimentation électrique: le socle de ce téléphone sans fil doit être branché à une prise électrique
fonctionnelle� La prise électrique ne doit pas être contrôlée par un interrupteur mural� Les appels
ne peuvent pas être effectués à partir du combiné sans fil si le socle est débranché ou mis hors
tension ou si l’alimentation électrique est coupée�
• Possibilité d’interférences avec les téléviseurs: certains téléphones sans fil fonctionnent à des
fréquences pouvant causer des interférences avec les téléviseurs et avec les magnétoscopes� Pour
réduire ou prévenir de telles interférences, ne placez pas le socle du téléphone sans fil près de ou
sur un téléviseur ou un magnétoscope� Si des interférences apparaissent, il est conseillé d’éloigner le
téléphone sans fil du téléviseur ou du magnétoscope afin de réduire ou d’éliminer les interférences�
• Piles rechargeables: manipulez les piles avec soin afin de ne pas les court-circuiter avec
des matériaux conducteurs tels que bagues, bracelets ou clés� La pile ou le conducteur peut
surchauffer et causer des blessures� Respectez la polarité adéquate entre la pile et le chargeur de
pile�
• Piles rechargeables à l’hydrure métallique de Nickel: jetez ces piles de manière écologique� Ne
les brûlez pas et ne les percez pas� Comme les autres piles de ce type, si elles sont brûlées ou
percées, elles peuvent dégager une matière corrosive qui peut causer des blessures�
Lorsque la pile de cet appareil a atteint la fin de sa vie utile, veuillez l’éliminer conformément aux
lois et réglementations environnementales locales� Pour en savoir plus sur le recyclage des piles de
cellulaires, allez sur le site : http://www.rbrc.org�
Caractéristiques techniques
Fréquence de transmission
Canaux
Portée réelle nominale
Exigences d’alimentation
Combiné: 1921,536-1928,448MHz
Socle de téléphone: 1921,536-1928,448MHz
Widex-Link 10,6MHz
5
Puissance maximale autorisée par FCC et IC� La portée de fonctionnement
réelle peut varier en fonction des conditions de l’environnement au moment
de l’utilisation�
Combiné: pile 2,4V 500mAh Ni-MH
Tension du socle du téléphone:
Entrée de l’adaptateur: 100-120V, tension CA, 60Hz
Sortie de l’adaptateur: 5V CC à 300mA
22
Page 53

Français
Assistance
Pour de l’aide, s’il vous plaît contacter un audioprothésiste agréé Widex professionnel:
Widex USA Inc�
Site Internet: www.widexusa.com
Téléphone : 1 718 392 6020
23
Page 54

Français
24
Page 55

Français
25
Page 56

PHONE-DEX
Model: PHONE-DEX USC
French
Version 1�0
© 2013 Doro AB� All rights reserved�
CIB306/0313
9 514 0248 053
 Loading...