

Page 1

This equipment has been tested and found to comply with the requirements for a Class B digital device under Part 15 of the Federal
US
Communications Commission (FCC) rules. These requirements are intended to provide reasonable protection against harmful
interference in residential installation. This equipment generates, uses and can radiate radio frequency energy and, if not installed and
used in accordance with the instructions, may cause harmful interference to radio communications. However, there is no guarantee
that interference will not occur in a particular installation. If this equipment does cause harmful interference to radio or television
reception, which can be determined by turning the equipment off and on. The user is encouraged to try and correct the interference
by one or more of the following measures:
· Reorient or relocate the recieving antenna.
· Increase the separation between the equipment and receiver.
· Connect the equipment into an outlet on a circuit different from that to which the receiver is connected.
· Consult the dealer or an experienced radio/TV technician for help.
Changes or modifications to this equipment not expressly approved by the party responsible for compliance could void the user’s
authority to operate the equipment.
This device complies with Part 15 of the FCC rules. Operation is subject to the following two conditions:
(1) this device may not cause harmful interference. and (2) this device must accept any interference recieved, including interference
that may cause undesired operation.
This Class B digital apparatus complies with Canadian ICES-003.
Caution: to maintain the compliance with the RF exposure guideline, place the baby unit at least 20cm from nearby persons.
For body worn operation, this parent unit has been tested and meets the FCC RF exposure guidelines when used with its permanently
affixed belt clip. Use of other accessories may not ensure compliance with FCC RF exposure guidelines.
Distributed by Mayborn USA Inc. PO Box 5003, Westport, CT 06881 – 5003
Copyright © Mayborn USA Inc. 2010. TOMMEE TIPPEE and CLOSER TO NATURE are registered trademarks.
Model 1082S Made in China Leaflet #
Este equipo se ha probado debidamente y cumple con los requerimientos de un dispositivo digital Clase B bajo la Parte 15 de las
ES
reglas de la Comisión Federal de Comunicaciones (CFC). El objetivo de estos requerimientos es proporcionar protección razonable
contra la interferencia en una instalación residencial. Este equipo genera, utiliza y puede irradiar energía de radiofrecuencia y, si no
se instala y utiliza como lo indican las instrucciones, puede causar interferencia en las comunicaciones por radio. Sin embargo, no
garantizamos que no haya interferencia con la recepción de radio o televisión en determinada instalación. En caso de que este
equipo cause interferencia con la recepción de radio o televisión, que puede determinarse prendiendo y apagando el equipo, se
alienta al usuario a que trate de corregir la interferencia realizando una o más de las siguientes acciones:
· Reorientar o cambiar la antena receptora de lugar.
· Aumentar la separación entre el equipo y el receptor.
· Conectar el equipo a un enchufe de un circuito diferente al que está conectado el receptor.
· Buscar la ayuda del vendedor o de un técnico experimentado de radio/televisión.
Los cambios o modificaciones a este equipo que no estén claramente aprobados por la parte responsable del cumplimiento
podrían invalidar la autoridad del usuario para operar el equipo.
Este dispositivo cumple con la Sección 15 de las reglas de la CFC. Su operación está sujeta a las siguientes dos condiciones: 1) Este
dispositivo tal vez no cause interferencia, y 2) este dispositivo debe aceptar cualquier interferencia recibida, incluyendo la
interferencia que pueda ocasionar una operación no deseada.
Este aparato digital Clase B cumple con la Norma canadiense ICES -003.
Advertencia: para cumplir con el lineamiento de exposición a radiofrecuencia, coloque la unidad del bebé al menos 20cm de las
personas cercanas.
Esta unidad de padres se ha probado para su operación portátil y cumple con los lineamientos de exposición a radiofrecuencia de
la CFC cuando se utiliza con el clip de fijación permanente para cinturón. El uso de otros accesorios puede no garantizar el
cumplimiento con los lineamientos de exposición a radiofrecuencia de la CFC.
Distribuido por Mayborn USA Inc, PO Box 5003, Westport, CT 06881-5003
Copyright© Mayborn USA Inc. 2010. TOMMEE TIPPEE y CLOSER TO NATURE son marcas registradas.
Modelo 1082S Fabricado en China Folleto número #
Ce produit a été testé et déclaré conforme aux exigences relatives à un appareil numérique de classe B, en vertu de la section 15
FR
des règles de la Commission fédérale des communications (FCC). Ces exigences visent à assurer une protection raisonnable contre
les interférences nuisibles dans une installation résidentielle. Cet appareil utilise et émet une énergie de fréquence radio et, s’il n’est
pas installé et utilisé conformément aux instructions, il peut causer des interférences dans les radiocommunications. Il n’y a
toutefois pas de garantie qu’aucune interférence ne se produira dans une installation particulière. Si l’appareil brouille la réception
de la radio ou de la télévision, ce qu’on peut déterminer en éteignant puis en rallumant l’appareil, nous vous encourageons à
essayer de corriger le problème en prenant une ou plusieurs des mesures suivantes :
• réorienter ou déplacer l’antenne de réception;
• augmenter la distance entre le matériel et le récepteur;
• brancher le matériel sur une prise de courant faisant partie d’un autre circuit que celui sur lequel est branché le récepteur;
• consulter le fournisseur ou un technicien expérimenté en radio / télévision afin d’obtenir de l’assistance.
Tout changement ou toute modification non expressément approuvés par la partie responsable de la conformité pourrait annuler
l’autorisation accordée à l’utilisateur d’utiliser cet appareil.
Cet appareil est conforme à la Section 15 des règles de la FCC. Son fonctionnement est soumis aux deux conditions suivantes : 1)
Ce produit ne risque pas de causer d’interférences nuisibles, et 2) ce produit doit accepter toutes les interférences reçues, y compris
celles qui risquent d’entraîner un fonctionnement indésirable.
Cet appareil numérique de classe B est conforme à la norme canadienne NMB-003.
Avertissement : Afin de respecter les lignes directrices d’exposition à la fréquence radio, placez l’unité bébé à au moins 20 cm des
personnes à proximité.
L’unité parents a été testée et peut être portée : elle respecte les lignes directrices d’exposition à la fréquence radio de la FCC quand
elle est utilisée avec l’attache pour ceinture qui y est jointe de façon permanente. L’utilisation d’autres accessoires ne permet pas
d’assurer la conformité avec les lignes directrices d’exposition à la fréquence radio de la FCC.
Distribué par Mayborn USA Inc. PO Box 5003, Westport, CT ÉTATS-UNIS 06881-5003
Tous droits réservés © Mayborn USA Inc. 2010. TOMMEE TIPPEE et CLOSER TO NATURE sont des marques de
commerce déposées.
Modèle 1082S Fabriqué en Chine Livret no ??????
44
US
closer to nature DECT digital monitor
with movement sensor pad
model 1082S
instructions
ES
monitor digital DECT con almohadilla
sensora de movimiento
modelo 1082S
instrucciones
FR
appareil de surveillance pour bébé
DECT numérique avec tapis
détecteur de mouvement
modèle 1082S
instructions
www.tommeetippee.com
Page 2
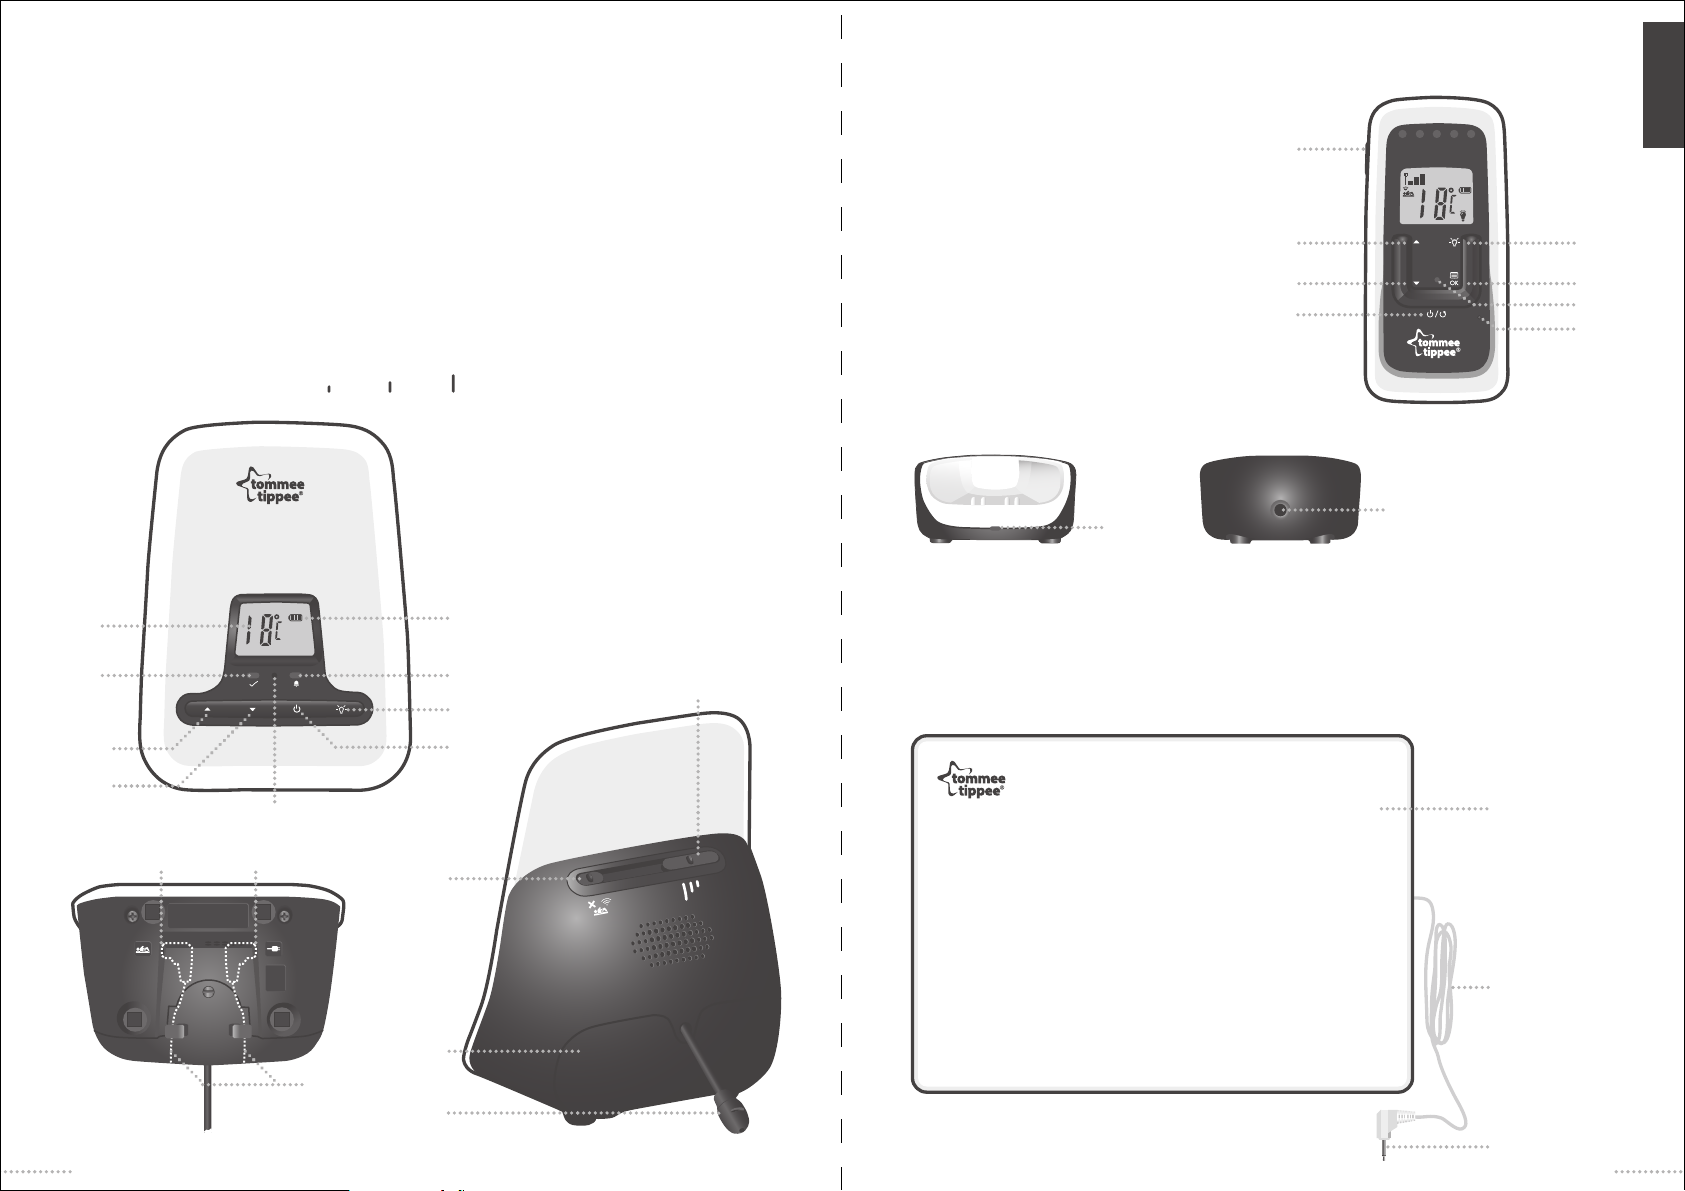
baby unit (=BU) 1082SB, Adapter: PN: 26-460045-2UL-100
parent unit (=PU) 1082SP,Adapter: PN: 26-460045-3UL-100
1 Power on/off. Screen illuminates when power is on.
2 Nightlight control (low, medium, high).
3 No movement sensor alarm.
4 Low battery indicator flashes if battery is low.
5 Room temperature display.
6 Movement sensor light flashes green with each movement baby makes.
7 Volume control. 7a) increase 7b) decrease
8 Microphone.
9 Sensor pad input socket.
10 Mains adaptor input socket.
11 Sensor pad on/off.
12 Battery compartment takes 4 x AA batteries (not included). Remove casing using a screwdriver.
13 Thermometer sensor.
14 Sensor pad sensitivity switch, (low, medium and high).
5
6
4
3
14
2
15 Mains power on/off/menu scroll back.
16 Volume Control. 16a) increase 16b) decrease.
17 Nightlight control - low, medium, high.
18 Menu/ok.
19 Power on light.
20 Talkback button.
21 Microphone.
parent unit docking station
22 Charging indicator.
23 Mains adaptor input socket.
22
movement sensor pad
24 Sensor pad.
25 Connection lead plugs into baby unit.
26 Connecting plug.
20
16a
16
15
US
2
17
b
23
18
19
21
2
7a
7b
1
8
24
109
11
25
12
position
for leads
13
26
3
Page 3

parent unit icons
NIGHT LIGHT
High
Medium
Caution
Risk of explosion if battery is replaced by an incorrect type. Dispose of used batteries according
3
to the instructions. Use only rechargeable batteries with rating: AAA 1.2V/750mAh NiMH AAA.
US
parent unit LEDs
2
CDE
B
A
SPEAKER OFF
TEMPERATURE
SENSOR PAD
NO MOVEMENT ALARM
BATTERY
SIGNAL STRENGTH
ON
FLASH
ON
OFF
ON
FLASH
OFF
ON
Low
Degree
Celsius
Fahrenheit
Display when the Sensor Pad is
connected securely and turned ON
Flashes when the Sensor Pad is ON
but not securely connected or
disconnected
Show as constant when Sensor
Pad is connected but switched off
at Baby Unit
OFF when Sensor Pad function
is OFF and not connected
Display when the ALARM is
triggered
Flashes if alarmed but child then
starts to move again
Off
Empty and needs to be recharged
Low
Medium
Full
Signal obtained
Signal weak
Signal good
Signal excellent
1
PAD OFF
LED
NO LED
A
B
C
D
E
F
G
FUNCTION
Sound
Sound
Sound
Sound
Sensor Pad
Power
Connection
F
COLOUR
None
Blue
Blue
Blue
Blue
Green
Red
Flashing red
Orange
Red
G
INDICATION
Sound level in nursery does not exceed
recognition threshold
Sound level 1
Sound level 2
Sound level 3
Maximum sound level
Movement is detected
NO movement is detected at least in last 20s
Baby has started to move again, but there has
been an issue with the baby
Parent unit ON
Parent unit is securely docked on the station
and connection is good
4
5
Page 4
baby unit icons
TEMPERATURE
BATTERY
baby unit LEDs
ON
Degree
Celsius
Fahrenheit
Empty and needs to be recharged
Low
Medium
Full
charging your monitor before rst use:
THE PARENT UNIT:
1
The parent unit is supplied with rechargeable batteries 2 x AAA (LR3) that should be inserted before use.
To insert batteries, open the battery casing with a screwdriver. Insert the supplied 2 x AAA (LR3)
2
rechargeable batteries. Take extra care to ensure that the batteries are inserted correctly and the right
way round. Refit the battery casing securely with a screwdriver.
3
DO NOT use non-rechargeable batteries.
4
Place the parent unit on the docking station and recharge for 10 hours before use.
5
The charging icon on the LCD will show the charging status.
6
Turn on the parent unit by pressing the POWER key (15) for 3 seconds.
7
The docking station will light red to show that the parent unit is securely docked on the station and
connection is good.
8
Turn off the parent unit by pressing the power key (15) for 5 seconds.
THE BABY UNIT:
1
The baby unit does not require batteries if powered from the mains.
2
If mains usage is not available, the baby unit will operate on batteries 4 x AA (LR6), which are not supplied.
3
To insert batteries, open the battery casing with a screwdriver. Insert 4 x AA (LR6) batteries (rechargeable
or non-rechargeable, but not mixed) and close casing securely with screwdriver. Take extra care to
ensure that the batteries are inserted correctly and the right way round.
4
There is NO charging function on the baby unit for rechargeable batteries.
The screen will illuminate on the baby unit when switched on.
5
The battery icons will indicate if the battery is low.
6
Battery power is disconnected automatically when the mains adaptor is in use. If the adaptor is turned
7
off at the mains and still remains connected to the monitor then the batteries will be automatically activated.
8
When the baby unit is connected to the power supply, the LCD backlight will be on. With battery power
only, the LCD backlight will last only approx. 20 seconds.
9
Turn on the baby unit by pressing the POWER key (1).
US
LED
H
I
6
FUNCTION
Sensor pad
status
Alarm
COLOUR
Green
Red
Flashing red
IH
INDICATION
Sensor pad connection is good and movement
is detected from the sensor pad
No movement is detected at least in last 20s
Baby has started to move again, but there has
been an issue with the baby
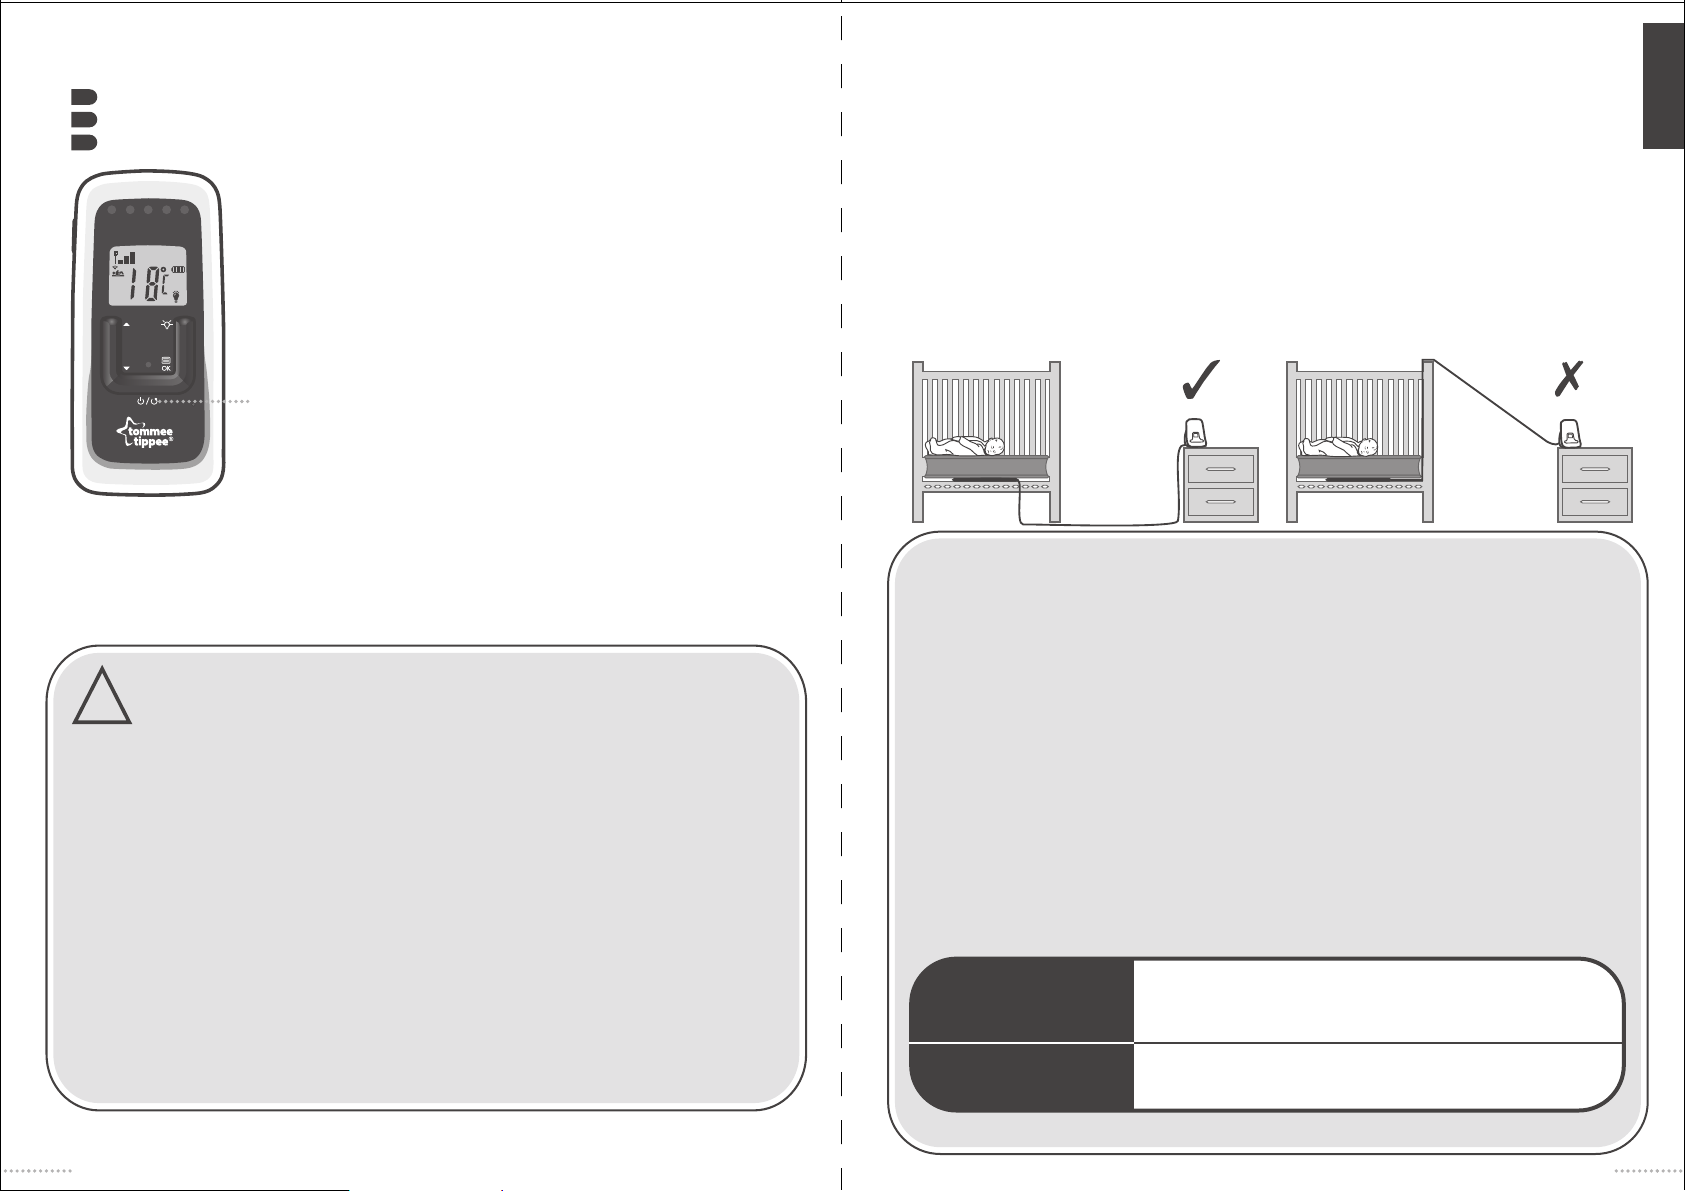
WARNING about using the baby unit!
• The baby unit should be 1 to 1.5 metres away from the baby’s cot on a flat surface.
• Never place the baby unit in the baby’s cot.
correct use of batteries
• Non-rechargeable batteries are not to be recharged.
• Rechargeable batteries are to be removed from the baby unit before being charged.
• Rechargeable batteries are only to be charged under adult supervision.
• Different types of batteries or new and used batteries are not to be mixed.
• Only batteries of the same or equivalent type as recommended are to be used.
• Batteries are to be inserted with the correct polarity.
• Exhausted batteries are to be removed
from the monitor.
CAUTION: risk of severe malfunction if battery
•
is replaced by an incorrect type. Dispose of
used batteries according to the instructions.
setting up your baby unit
1
Connect the mains adaptor into a
nearby wall socket in your baby’s
nursery and switch on the power
at the mains.
Press and hold (1) for 3 seconds
2
until the LCD/Power LED illuminates.
3
Ensure that the sensor pad on-off
switch (11) is turned OFF.
11
1
7
Page 5
setting up your parent unit
1
Connect the mains adaptor into a nearby wall socket.
Press and hold (15) for 3 seconds until the LCD/Power LED illuminates.
2
A link will now be made between the parent unit and baby unit.
3
testing the parent unit
•
First ensure that the baby unit has been set up and is working
correctly following the previous instructions.
• To test the parent unit you must ensure that it is at least 5 metres away
from the baby unit.
2
baby unit at all times. The monitor will work up to a distance range of 300 metres approximately.
Depending on the surrounding conditions as well as spatial and structural factors, the range may
be reduced. The range indoors is normally less than outdoors.
• If you lose the signal from the baby unit an alert tone will be emitted from the parent unit every
10 seconds and the LCD will flash until the link is restored. The LCD will show 'No Link'.
If this happens, move closer to the baby unit.
• Turn the sensor pad OFF by means of switch (11).
• Place a sound source such as a radio in the nursery at least 1 to 1.5
metres away from the baby unit, close the nursery door and go to
another room.
• Set up the parent unit in the docking station.
• Turn on the power (15) and adjust the volume up (16a) or down (16b)
15
to a comfortable level.
• You will hear sounds from your nursery and some of the sound lights
(A-E) will come on. The louder the sound the more lights will come on.
• Lift the parent unit from the docking station and walk around your
house and garden, ensuring that you can hear the sounds from the
WARNING about the danger of cords:
STRANGULATION HAZARD! - Keep cords out of the reach of children.
!
Do not use with an extension cord.
• Check immediately the location of corded monitors to make sure cords are out of arm’s reach of your
baby and other young children.
• Place cords more than a metre away from any part of the cot. The monitor must not be used in any other
sleep environment.
• Check the location of the monitor periodically, as what is within arm’s reach to a baby will change as the
baby grows.
• Make sure the sensor cords are taut and not dangling to reduce the strangulation hazard.
• Do not place furniture or other obstructions on the adaptor cords and be sure to posistion them so that
nobody can trip over them.
• Keep adaptor cords away from hot surfaces such as radiators and central heating pipes.
• Be careful not to posistion the adaptor where a child might try to step on it.
• Never use Tommee Tippee monitor adaptors with any other equipment. Nor should you use any other
adaptors with your Tommee Tippee monitor.
• Please note that the adaptors become warm in use - this is quite normal and not a hazard.
• The adaptors convert your AC power to safe low DC voltage.
• Use the power adaptor provided.
setting up the movement sensor pad
The monitor has the ability to monitor your baby’s movements via the highly sophisticated movement
sensor pad. It is designed for use in a cot with a flat, firm base. It should not be used in a travel cot or a
swinging crib.
• Place the sensor pad between the cot mattress and the cot base, directly under the area where your baby
will be sleeping.
• Ensure the sensor pad is positioned the correct way up and that the connecting cord is fed through the
base of the cot out of arm’s reach of your baby and other young children.
• If the cot has a solid base it may be necessary to make a small hole through which the connecting
cord can pass.
• Ensure the connecting cord plug is pushed fully into the socket underneath the baby unit.
IMPORTANT !
TEST YOUR SENSOR PAD BEFORE PROCEEDING FURTHER:
1 Turn the sensor pad switch to ON at the back of the baby unit (11). The sensor pad LED on the baby unit
will light up if movement is detected.
2 Check the sensor pad is working by touching the cot mattress gently anywhere near where your baby
will be sleeping.
3 Each touch should produce a flash of the green sensor light on the baby unit (H) and on the parent
unit (E) together with an audible tick sound. The volume of the tick can be adjusted.
4 Test the alarm by continuing to touch the mattress for a few moments and then step away from the cot
and stop all movement near the sensor pad.
5 After approximately 20 seconds the alarm will sound and the red alarm light will come on (I) on the
baby unit and (E) on the parent unit.
6 If movement is detected again after the alarm has activated then the red alarm light will flash (I) on the
baby unit and (E) on the parent unit to let you know that the alarm has activated.
7 To reset the alarm, switch the baby unit off and on again.
PROBLEM SOLVING IF YOUR SENSOR PAD TEST FAILS:
No alarm after 20 seconds
if NO movement
False alarm when there IS
movement
Make sure there is no movement or vibration around the
sensor pad and test again. If alarm triggers again, decrease
sensitivity setting and test again.
Check the connections are secure and test again. If alarm
triggers again, increase sensitivity setting and test again.
US
8
9
Page 6
8 If the parent unit is linked with the baby unit successfully, the sensor pad icon will indicate on the
parent unit. The 5th LED (E) will light up Green if movement is detected.
9 If the sensor pad switch is on without the sensor pad connected securely, there is an error tone from
the baby unit and the sensor pad icon with image of in the parent unit will flash. A Text Prompt
on the parent unit 'Connect Pad' will also flash.
10 If the sensor pad is securely installed, after 20 seconds without detecting any movement, the alarm will
be triggered on both parent unit and the baby unit and the red alarm light will come on. The LCD will
show 'CHECK BABY' until the sensor pad is reset.
11 If movement is detected again after the alarm has activated then the alarm will stop and the red alarm
light will flash in both the parent unit and the baby unit to let you know that a problem has occurred and
the baby should be checked. The LCD will show 'CHECK BABY' until the sensor pad is reset.
12 To reset the alarm, switch the sensor pad off and on again.
KEYS LCD DISPLAY
level
level
level
$#
d. Press to confirm the settings.
e. "SAVED" will display and back to previous screen.
level
level
adjusting the ticking sound:
EXPLANATION
level 5
level 4
level 3
level 2
level 1
US
testing the movement sensor pad function on the parent unit:
• To test the sensor pad function on the parent unit you will need someone else to carry out the sensor
pad functions on the baby unit.
• If the sensor pad switch has been turned on at the baby unit the 5th LED (E)on the parent unit will light
up GREEN, and you will hear the tick sound.
• When no movement has been detected for appro x. 20 seconds the 5th LED (E) on the parent unit will
light up RED and you will hear the sensor pad alarm.
• If movement is detected again after the alarm has activated then the red alarm light will change to
flashing mode.
• To reset the alarm it will be necessary to go to the baby unit and turn it off then on again.
if the movement sensor alarm sounds:
• The tommee tippee closer to nature sensor pad monitor is NOT a medical device and is NOT designed
to prevent cases of sudden infant death syndrome (SIDS). This tommee tippee closer to nature
monitor is intended to help you monitor your child and is NOT to be used as a substitute for adult
supervision.
• The alarm going off may not be a sign of a problem with your baby. It may be a sign that the baby has
moved away from the sensor pad area, or that batteries are running low if not mains power operated.
adjusting the sound sensitivity settings of the baby unit:
• The sound sensitivity settings of the baby unit can be changed only when parent unit is linked with
the baby unit.
TO CHANGE THE SENSITIVITY SETTINGS:
a. Press and +/- to go to SENSITIVITY menu in parent unit.
b. Press and the current sensitivity level is displayed.
c. Press +/- to adjust the sensitivity level from Level 1 to Level 5
The audible ticking sound gives reassurance that your sensor pad is correctly connected and the monitor is
sensing movement. If you wish to switch off the ticking sound:
Press and +/- to go to TICK TONE menu in parent unit.
1
Press and +/- to go to SENSITIVITY menu in parent unit.
2
Press and the current status is displayed.
3
Press +/- to select ON or OFF.
4
Press to confirm the settings.
5
"SAVED" will display and back to previous screen.
6
adjusting the sensitivity of the sensor pad:
• This monitor is compatible with standard cot mattresses. With thicker mattresses (ie spring interior) you
may need to adjust the sensitivity switch on the baby unit (14) from it’s preset ‘medium’ position to the ‘
high’ position. With some very thin mattresses you may need to change the sensitivity setting to ‘low’.
WARNINGS ABOUT USING THE SENSOR PAD!
• A moving or swinging cord may be interpreted by the sensor pad as a baby’s movement. To avoid this,
ensure that the cord is not positioned where it may be subject to movement.
• You should ensure there is no vibration in or near the nursery, so that the sensor pad is monitoring
only your baby’s movements.
• The sensor pad does not carry any electricity and will not affect your baby even if the mattress is
subject to bedwetting or vomiting.
• Never immerse the sensor pad in liquid. To clean, wipe with a dry, lint free cloth.
• Never place the connecting cord in contact with any moving objects, or near any heated surface.
• Always ensure wires and cables are out of reach from your baby and younger children and never place
connecting cords amongst your baby’s bedding, the child could be strangled.
• Ensure the sensor pad is used the correct way up.
• Do not immerse sensor pad in liquid and avoid contact with moisture.
10
11
Page 7
HELPFUL ADVICE ABOUT USING THE SENSOR PAD:
• If you remove your baby from the cot (e.g. for a feed) remember to turn off the sensor pad by turning
off switch (11) to prevent the alarm from sounding. Remember to switch the alarm back on when you
put the baby back into the cot.
• If you just wish to monitor the sound of your baby turn off the sensor pad function with switch (11) on
the baby unit
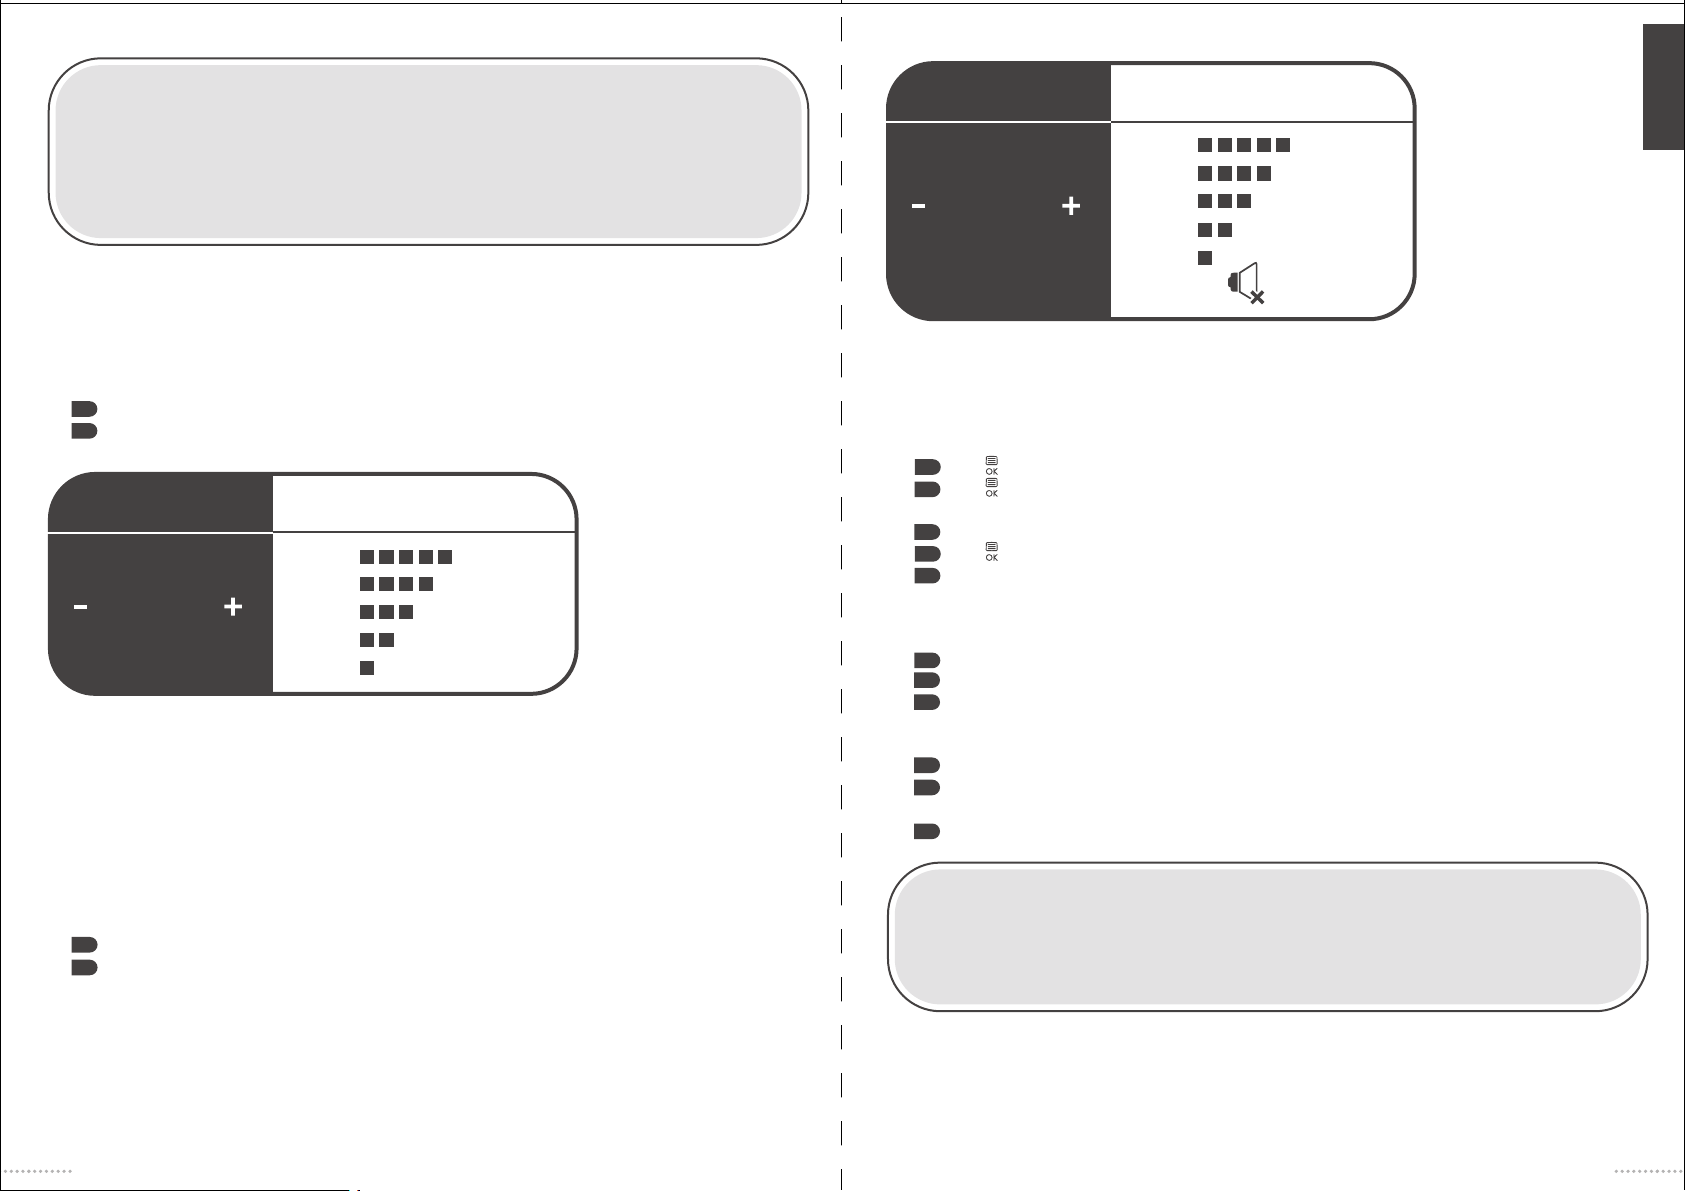
changing the baby unit volume
The baby unit volume is preset to level 3. Changing the volume will affect the loudness of voice from the
parent unit and the talkback mode. However, it will NOT affect the loudness of the sensor pad alarm.
To change volume level:
1
Press + (7a) to increase the speaker volume level (Level 1 to Level 5).
2
Press - (7b) to lower the speaker volume level (Level 1 to Level 5). There is no volume off option on
the baby unit.
KEYS LCD DISPLAY
volume
volume
volume
$#
The new volume level is shown on the display for 2 seconds then saved.
A warning tone is emitted on attaining the maximum or minimum volume level.
volume
volume
changing the parent unit volume
The parent unit volume is preset to level 3. Changing the volume will affect the loudness of voice from the
baby unit, so when volume is off there will be no sound from the baby unit. However, it will NOT affect the
loudness of the sensor pad alert tone.
To change volume level:
1
Press + (16a) to increase the speaker volume level (Level 1 to Level 5 and OFF).
Press - (16b) to lower the speaker volume level (Level 1 to Level 5 and OFF).
2
KEYS LCD DISPLAY
volume
volume
volume
$#
The new volume level is shown on the display for 2s then saved.
A warning tone is emitted on attaining the maximum or minimum volume level.
volume
volume
volume off
changing volume of baby unit from parent unit
1
Press (18) and +/- to go to BABY VOLUME menu in parent unit.
2
Press and the current Volume level is displayed. If volume is not changed within 2 seconds,
it will go back to idle.
3
Press +/- to adjust the Volume level from Level 1 to Level 5
4
Press to confirm the settings.
5
SAVED will display temporarily.
using the nightlight
To turn on the nightlight, press key (17) on parent unit or (2) on baby unit.
1
2
To adjust the brightness or turn it off, press the key again with the sequence L-M-H-Off.
3
If operating the baby unit on batteries the brightness of the nightlight is limited to the lowest level to
conserve energy. In battery mode, both the parent unit and the baby unit will have the key sequence
L-O ff.
4
The nightlight on the baby unit operates even if the parent unit is out of battery power or turned off.
5
Nightlight settings and the corresponding icons are synchronized between baby unit and parent unit if
they are connected successfully.
The nightlight fades out after 5 minutes in battery mode.
6
HELPFUL ADVICE ABOUT USING THE NIGHTLIGHT
• You may find it useful to use a lower brightness if you wish your baby not to sleep in complete
darkness and then adjust to a higher brightness for when baby needs attention during the night
and you do not wish to turn on the main bedroom lights.
US
12
13
Page 8

using talkback
Talkback allows you to communicate from the parent unit to the baby unit.
1
To use talkback press button (20) on parent unit and hold. The parent unit screen will show TALK.
2
The audio from baby unit will be muted and the parent will not be able to hear the baby until the
button (20) has been released.
3
If the volume of parent unit is set to OFF during TALKBACK, volume will be changed to default
volume level (medium).
paging to locate the parent unit
If both Up + (7a) and Down – (7b) keys for 3 seconds are pressed on the baby unit at the same time,
1
the paging tone is emitted.
2
Both parent unit and baby unit will display PAGING on the LCD.
If volume is OFF before paging start, reset it to default volume level (medium).
3
4
During paging, any key pressed on the parent unit or baby unit will stop the paging tone.
5
If the link is lost between the parent unit and the baby unit, the paging tone will not be emitted when
both Up + (7a) and Down – (7b) keys are pressed together. There will be no change on baby unit.
6
If paging is not stopped, it will expire in 2 minutes.
7
Paging function does not work if parent unit is turned off.
the room temperature display
The temperature surrounding the baby unit will be displayed on both the baby unit and the parent unit
between 10°C and 30°C. Both PU and BU will state LO below 10°C and HI above 30°C. To ensure accuracy
of the temperature display, do not position the baby unit in direct sunlight or near a source of heat.
selecting CELSIUS or FAHRENHEIT:
1. The monitor is preset to measure temperature in CELSIUS.
1
2
2. To change this setting press (18) to access main menu.
3
3. Press +/- to select FORMAT then press
4
4. Press +/- to select CELSIUS or FAHRENHEIT.
5
5. Press to confirm.
6
6. "SAVED" will display and back to previous screen.
7
7. Both parent unit and baby unit will change to the temperature format selected.
8
8. Temperature format in baby unit and parent unit will be synchronized automatically when parent
unit is linked with baby unit.
selecting a dierent language
1
The monitor is preset in English.
2
To change to another language press (18) on the parent unit and +/- to go to language menu.
3
Press and the current language is displayed.
4
Press +/- to select desired language and press to confirm the settings
5
"SAVED" will display and back to previous screen.
to reset settings to default
Press and +/- to go to Reset menu.
1
2
Press and "CONFIRM?" is displayed.
3
Press to confirm reset or press to ignore the reset request and back to previous
menu level.
GENERAL SAFETY INFORMATION:
• Warning! Adult use only – Keep out of reach of children at all times. Do not allow a child to play
with it – It is not a Toy
• Make sure you store your monitor in a safe place when not in use, away from heat and water.
• Take care not to drop either unit as this may affect the functioning of you monitor.
technical specications
RF frequency
channels
operating temperature
baby unit voltage
parent unit battery
charger voltage
Use only with class 2 power source
!
1921.536-1928.448MHz
5
0-40ºC
input: 100-240Vac 50-60Hz
output: 6Vdc 450mA
2x 1.2V 750mAh NiMH AAA
input: 100-240Vac 50-60Hz
output: 6Vdc 450mA
IMPORTANT SAFETY INSTRUCTIONS
When using your equipment, basic safety precautions should always be followed to reduce the risk of fire,
electric shock and injury to persons, including the following:
1 Do not use this product near water, for example, near a bath tub, wash bowl, kitchen sink or laundry
tub, in a wet basement or near a swiming pool.
2 Use only the power cord and batteries indicated in this manual. Do not dispose of batteries in a fire.
they may explode. Check with local codes for possible special disposal instructions.
US
14
15
Page 9

Unidad del bebé (=BU) 1082SB, Adaptador: PN: 26-460045-2UL-100
unidad de padres (=PU) 1082SP, Adaptador: PN: 26-460045-3UL-100
1 Encendido/apagado. La pantalla se ilumina cuando el monitor está encendido.
2 Control de la luz nocturna (baja, media, alta).
3 Alarma de cese de movimiento.
4 El indicador de bajo nivel de batería emite una luz intermitente cuando las pilas se están gastando.
5 Indicador de la temperatura de la habitación.
6 La luz del sensor de movimiento se ilumina intermitentemente en verde cada vez que el bebé se
mueve.
7 Control del volumen. 7a) Aumentar 7b) Reducir.
8 Micrófono.
9 Clavija de entrada de la almohadilla sensora.
10 Clavija de entrada del adaptador de conexión a red eléctrica.
11 Interruptor de encendido/apagado de la almohadilla sensora.
12 El compartimento para las pilas necesita 4 pilas AA (no van incluidas). La tapa se abre usando un
destornillador.
13 Sensor de temperatura.
14 Botón de sensibilidad de la almohadilla sensora (baja, media, alta).
5
6
4
3
14
2
15 Encendido/apagado/ir hacia atrás en el
menú.
16 Control del volumen. 16a) Aumentar 16b)
Reducir.
17 Control de la luz nocturna (baja, media,
alta).
18 Menú/ok.
19 Luz de encendido.
20 Botón para hablar por el intercomunicador.
21 Micrófono.
20
16a
16
b
15
base de conexión de la unidad de los padres
22 Indicador de recarga.
23 Clavija de entrada del adaptador de conexión a la red eléctrica.
22
almohadilla sensora de movimiento
24 Almohadilla sensora de movimiento.
25 El cable de conexión se conecta a la unidad del bebé.
26 Enchufe de conexión.
23
2
17
ES
18
19
21
16
7a
7b
1
24
8
109
11
25
12
position
for leads
13
26
17
Page 10

íconos de la unidad de padres indicadores led de la unidad de padres
CDE
B
A
LUZ NOCTURNA
Alta
3
ALTAVOZ APA
(APAGADO)
TEMPERATURA
ALMOHADILLA
SENSORA DE
MOVIMIENTO
ALARMA DE
CESE DE
MOVIMIENTO
BATERÍA
ENC (Encendida)
LUZ INTERMITENTE
ENC (Encendida)
APA (Apagada)
ENC (Encendida)
LUZ INTERMITENTE
APA (Apagada)
ENC (Encendida)
Media
Baja
GRADOS
CENTÍGRADOS
FARENHEIT
Se muestra cuando la almohadilla sensora
está ENC (encendida) y conectada de forma
segura.
Emite una luz intermitente cuando la
almohadilla sensora está ENC (encendida)
pero no está bien conectada.
Se muestra constante cuando la almohadilla
sensora está conectada pero desactivada en la
unidad del bebé.
Está apagada cuando la función de la
almohadilla sensora está desactivada (APA).
Se muestra cuando la ALARMA se activa.
Emite una luz intermitente si se activa la
alarma pero el niño se vuelve a mover.
La almohadilla sensora no está conectada.
Descargada. Necesita recarga.
Baja
Media
2
1
PAD OFF
LED
Sin luz LED
indicadora
A
B
C
D
E
FUNCIÓN
Sonido
Sonido
Sonido
Sonido
Almohadilla
sensora de
movimiento
F
COLOR
Ninguno
Azul
Azul
Azul
Azul
Verde
Roja
ES
G
INDICACIÓN
El nivel de ruido en la habitación del bebé no
alcanza el límite de reconocimiento.
Nivel de sonido 1
Nivel de sonido 2
Nivel de sonido 3
Nivel de sonido máximo.
Se detecta movimiento
NO se ha detectado movimiento al menos en
los últimos 20 segundos.
INTENSIDAD
DE LA SEÑAL
18
Llena
Señal captada
Señal débil
Señal buena
Señal excelente
Luz roja
intermitente
F
G
Encendido
Conexión
Naranja
Roja
El bebé se ha vuelto a mover, pero ha habido
algún problema.
Unidad de padres ENC (encendida).
La unidad de padres está dentro de la base y
la conexión es buena.
19
Page 11

baby unit icons
TEMPERATURA
BATERÍA
ENC
(Encendida)
Grados
Centígrados
Farenheit
Descargada. Necesita recarga.
Baja
Media
Llena
indicadores led de la unidad del bebé
carga del monitor antes de usarlo por primera vez:
UNIDAD DE PADRES:
1
La unidad de padres se suministra con 2 pilas recargables AAA (LR3) que es necesario introducir antes de usar.
2
Para introducirlas, abra la tapa de las pilas con un destornillador. Introduzca las 2 pilas recargables AAA
(LR3) suministradas. Asegúrese de que las ha insertado bien y en la posición correcta. Vuelva a atornillar la tapa del
compartimento de las pilas con un destornillador.
3
Utilice SÓLO pilas recargables.
4
Coloque la unidad de padres en la base de conexión y recárguela durante 10 horas antes de usar.
5
El ícono de recarga de la pantalla LCD muestra el estado de carga.
6
Encienda la unidad de padres mantenidendo presionado el botón de ENC/APA (encendido/apagado)
(15) durante 3 segundos.
7
La base de conexión se iluminará en rojo para indicar que la unidad de padres está bien colocada en la
base y que la conexión es buena.
Apague la unidad de padres manteniendo presionado el botón de ENC/APA (encendido/apagado) (15) durante 5
8
segundos.
UNIDAD DEL BEBÉ:
1
La unidad del bebé no requiere pilas si está conectada a la red eléctrica.
La unidad puede funcionar con 4 pilas AA (LR6) (no suministradas) si no se puede conectar a la red eléctrica.
2
Para introducirlas, abra el compartimento de las pilas con un destornillador. Introduzca 4 pilas x AA (LR6) (recargables o
3
no recargables, pero sin mezclar) y vuelva a cerrar la tapa de forma segura usando un destornillador. Asegúrese de que
las ha insertado bien y en la posición correcta.
4
La unidad del bebé NO tiene función de recarga.
5
La pantalla de la unidad del bebé se iluminará al encenderse.
6
Los íconos de batería indican si el nivel de carga es bajo.
7
Cuando se está usando el adaptador de conexión a red eléctrica, la alimentación por pilas se desconecta
automáticamente. Si el adaptador se desconecta de la red eléctrica, y sigue conectado al monitor, la alimentación por
pilas se activa automáticamente.
8
La luz LED de la pantalla se ilumina cuando la unidad del bebé se conecta al suministro eléctrico. Con la alimentación
por pilas la luz de la pantalla LCD sólo dura 20 segundos.
9
Encienda la unidad del bebé presionando el botón de ENC/APA (encendido/apagado) (1).
ES
LED
FUNCIÓN
H
Estado de la almohadilla
sensora de movimiento
I
Alarma
20
COLOR
Verde
Roja
Luz roja
intermitente
INDICACIÓN
La conexión al sensor es correcta y
detecta un movimiento continuo
procedente de la almohadilla.
NO se ha detectado movimiento al
menos en los últimos 20 segundos.
El bebé se ha vuelto a mover, pero ha
habido algún problema.
WARNING about using the baby unit!
• The baby unit should be 1 to 1.5 metres away from the baby’s cot on a flat surface.
• Never place the baby unit in the baby’s cot.
IH
uso correcto de las pilas
• No intente recargar pilas no recargables.
• Es necesario sacar las pilas recargables de la unidad del bebé antes de recargarlas.
• Para recargar las pilas es necesaria la supervisión de un adulto.
• No utilice pilas de distintos tipos ni mezcle pilas nuevas y usadas.
• S recomienda usar sólo el mismo tipo de pila o uno equivalente.
• Las pilas se deben instalar con la polaridad correcta.
• No deje pilas gastadas dentro del monitor.
AVISO: existe el riesgo de que el aparato funcione mal si se utiliza el tipo incorrecto de pila. Deseche las pilas usadas
•
siguiendo las instrucciones.
instalación de la unidad del
bebé
1
Conecte el adaptador de conexión a la
red eléctrica en un enchufe de pared
cercano en la habitación del bebé.
Presione y mantenga presionado (1)
2
durante 3 segundos hasta que se
ilumine la pantalla LCD o luz LED.
3
Asegúrese de que el interruptor de
encendido y apagado de la almohadilla
sensora (11) está en posición APA
(apagado).
11
1
21
Page 12

instalación de la unidad de padres
1
Enchufe el adaptador de red en un enchufe de pared cercano.
Preione y mantenga presionado (15) durante 3 segundos hasta que se ilumine la pantalla LCD/luz LED.
2
3
Una vez conectados ambos aparatos se establece un enlace entre ellos.
prueba de la unidad de padres:
•
Asegúrese primero de haber seguido las instrucciones anteriores para instalar la
unidad del bebé y que ésta funciona correctamente.
•
Para probar la unidad de padres debe asegurarse primero de que se encuentra
alejada al menos 5 metros de la unidad del bebé.
•
2
de 300 metros aproximadamente, el alcance dependerá de las condiciones del entorno y de factores espaciales y
estructurales. El alcance en el interior suele ser menor que en el exterior.
•
Si pierde la señal de la unidad del bebé su unidad emitirá un tono de alerta cada 10 segundos y la pantalla LCD/LED de
encendido producirá una luz intermitente hasta que se restablezca la conexión. La pantalla mostrará el mensaje 'No
Link'. Si esto ocurre, acérquese a la unidad del bebé.
APAGUE la almohadilla sensora presionando el interruptor (11).
•
Coloque una fuente emisora de sonido, por ejemplo una radio, en la habitación del
bebé al menos entre 1 y 1.5 metros de distancia de la unidad. Cierre la puerta de la
habitación del bebé y vaya a otra habitación.
•
Instale la unidad de padres en la base de conexión.
•
Enciéndala (15) y ajuste el volumen aumentándolo (16a) o reduciéndolo
(16b) hasta alcanzar un nivel confortable.
15
•
Podrá oír sonidos provenientes de la habitación del bebé y observará
que algunas luces de sonido (A-E) se encienden.
•
Cuanto más alto sea el sonido más luces se encienden.
•
Saque la unidad de padres de la base de conexión y desplácese con ella por la casa
y el jardín para asegurarse de que puede oír los sonidos provenientes de la
habitación del bebé en todo momento. El monitor funcionará hasta una distancia
ADVERTENCIAS sobre la instalación del monitor:
STRANGULATION HAZARD! - Keep cords out of the reach of children.
!
Do not use with an extension cord.
• La unidad del bebé debe encontrarse entre 1 y 1.5 metros como máximo de la cuna y en una superficie
plana.
• No coloque nunca la unidad del bebé dentro de la cuna.
• Asegúrese de que el adaptador y el cable están fuera del alcance del bebé y de otros niños pequeños.
• No coloque muebles ni ningún otro obstáculo sobre los cables del adaptador. Coloque los cables de
forma que nadie pueda tropezarse con ellos.
• Mantenga los cables del adaptador alejados de superficies que desprendan calor, como radiadores o
tuberías de la calefacción central.
• Procure no colocar el adaptador en ningún lugar donde un niño pueda intentar pisarlo.
• No utilice nunca los adaptadores del monitor Tommee Tippee en otros aparatos. Asimismo, tampoco
utilice nunca ningún otro adaptador en el monitor Tommee Tippee.
• Los adaptadores se calientan con el uso: esto
es normal y no representa ningún peligro.
• Los adaptadores convierten la alimentación
de CA en un voltaje bajo de CC cuyo uso es
totalmente seguro.
• Utilice el adaptador para red eléctrica que se
suministra.
MODELO
Entrada
Salida
S004LB0600045 or S004LV0600045
100 - 240V~ 50/60Hz 150mA
6V - 450mA
instalación de la almohadilla sensora de movimiento
El monitor puede detectar los movimientos más leves del bebé a través de una almohadilla sensora de
movimiento altamente sofisticada. Se ha diseñado para usar en una cuna con una base plana y firme. No
debe usarse en una cuna de viaje o cuna mecedora.
• Coloque la almohadilla sensora entre el colchón y la base de la cuna, justo debajo de la zona donde
duerme el bebé.
• Asegúrese de colocarla en la posición correcta y de que el cable conector está situado al pie de la cuna.
• Debe pasar el cable a través de la cuna, en la parte más alejada de la cabecera. Si la cuna tiene una base
sólida tal vez sea necesario hacer un pequeño agujero a través del cual se pueda pasar el cable.
• Asegúrese de que la clavija del cable conector está bien metida en el puerto de conexión situado debajo
de la unidad del bebé.
¡IMPORTANTE!:
PRUEBE LA ALMOHADILLA SENSORA ANTES DE CONTINUAR:
1 Ponga el interruptor de la almohadilla sensora, en la parte posterior de la unidad del bebé (11), en la
posición de ENC (encendido). El indicador LED de la almohadilla sensora de la unidad del bebé se
encenderá cuando se detecte algún movimiento.
2 Toque suavemente el colchón de la cuna en cualquier punto cercano a la zona donde duerme el bebé
para comprobar que la almohadilla sensora funciona.
3 Cada toque deberá producir un destello de la luz sensora verde, (H) en la unidad del bebé y (E) en la
unidad de padres, junto con un “tic” audible. El volumen del “tic” se puede ajustar.
4 Pruebe la alarma tocando el colchón durante unos momentos y, a continuación, alejándose de la cuna y
deteniendo todo tipo de movimiento alrededor de la almohadilla.
5 La alarma sonará aproximadamente al cabo de 20 segundos y se encenderá una luz roja, (I) en la unidad
del bebé y (E) en la unidad de padres.
6 Si una vez activada la alarma se vuelve a detectar movimiento, la luz roja se pondrá intermitente, (I) en la
unidad del bebé y (E) en la unidad de padres, para indicarle que se ha activado la alarma.
7 Para restablecer la alarma apague y vuelva a encender la unidad del bebé.
RESOLUCIÓN DE PROBLEMAS EN CASO DE QUE LA ALMOHADILLA SENSORA FALLE AL PROBARLA:
La alarma no se activa a los
20 segundos de NO haber
movimiento.
Falsa alarma cuando HAY
movimiento.
Asegúrese de que no hay movimiento o vibraciones en el
entorno de la almohadilla sensora y vuelva a probar.
Si sigue sin producirse la alarma transcurridos 20 segundos,
aumente el valor de sensibilidad y vuelva a probar.
Compruebe que las conexiones están bien y pruebe de
nuevo. Si la alarma se vuelve a activar, reduzca el valor de
sensibilidad y vuelva a probar.
ES
22
23
Page 13

8 El ícono de la almohadilla sensora indicará si las dos unidades están bien enlazadas en la pantalla de la
unidad de padres. El quinto indicador LED (E) se iluminará en verde cuando se detecte algún
movimiento.
9 Si la almohadilla sensora está encendida pero no está bien conectada, la unidad del bebé emitirá un tono
de error y el ícono de la almohadilla sensora de la unidad de padres se mostrará intermitente. La
unidad de padres también mostrará el mensaje 'CONNECT PAD'.
10 Si la almohadilla sensora está instalada de forma segura, se disparará la alarma y se encenderá una luz
roja en ambas unidades si no se detecta ningún movimiento en 20 segundos. La pantalla LCD mostrará el
mensaje 'CHECK BABY' hasta que se restablezca la almohadilla sensora.
11 Si una vez activada la alarma se vuelve a detectar movimiento ésta cesará y la luz roja se pondrá
intermitente en ambas unidades para indicarle que se ha producido un “evento”. La pantalla LCD
mostrará el mensaje 'CHECK BABY' hasta que se restablezca la almohadilla sensora.
12 Para restablecer la alarma apague y vuelva a encender la almohadilla sensora.
TECLAS PANTALLA LCD
nivel
nivel
nivel
$#
d. Presione (15) para confirmar los valores.
e. Aparecerá la palabra ‘SAVED’ y volverá a la pantalla anterior.
nivel
nivel
ajuste del “tic”:
EXPLICACIÓN
nivel 5
nivel 4
nivel 3
nivel 2
nivel 1
ES
comprobación de la función de la almohadilla sensora de
movimiento en la unidad de padres:
• Para probar la función de la almohadilla sensora necesita que otra persona lleve a cabo las funciones de
la almohadilla en la unidad del bebé.
• Si el interruptor de la almohadilla sensora está encendido en la unidad del bebé, el quinto indicador LED
(E) de la unidad de padres se encenderá en VERDE y podrá oír un “tic”.
• Si no se detecta ningún movimiento durante 20 segundos, el quinto indicador LED (E) de la unidad de
padres se encenderá en ROJO y podrá oír la alarma de la almohadilla sensora.
• Si se vuelve a detectar movimiento tras la activación de la alarma, la luz roja se pondrá intermitente.
• Para restablecer la alarma es necesario apagar y volver a encender la unidad del bebé.
si suena la alarma del sensor de movimiento:
• La almohadilla sensora de movimiento tommee tippee closer to nature NO es un aparato médico y NO
se ha diseñado para evitar casos del síndrome de la muerte súbita del recién nacido. Este monitor
tommee tippee closer to nature se ha diseñado para ayudar a vigilar al niño y NO para usar en
sustitución de la supervisión de un adulto.
• La activación de la alarma puede no significar necesariamente que haya un problema con el bebé.
Puede deberse a que el bebé se haya salido fuera del área de la almohadilla o a que las pilas se están
acabando si el aparato no está conectado a la red eléctrica.
ajuste de los valores de sensibilidad del sonido en la unidad del bebé:
• Los valores de sensibilidad del sonido de la unidad del bebé sólo pueden cambiarse cuando ambas
unidades están enlazadas.
PARA CAMBIAR LOS VALORES DE SENSIBILIDAD:
a. Presione (15) y +/- para ir al menú SENSITIVITY de la unidad de padres.
b. Presione (15) y se mostrará el nivel de sensibilidad actual.
c. Presione +/- para ajustar el nivel de sensibilidad del nivel 1 al 5.
El “tic” audible proporciona la tranquilidad de saber que la almohadilla sensora está conectada
correctamente y que el sensor está detectando movimiento. Si desea apagar el “tic”:
Presione (15) y +/- para ir al menú TICK TONE de la unidad de padres.
1
Presione (15) y +/- para ir al menú SENSITIVITY de la unidad de padres.
2
Presione (15) y se mostrará el estado actual.
3
Presione +/- para seleccionar ON o OFF.
4
Presione (15) para confirmar los valores.
5
Aparecerá la palabra ‘SAVED’ y volverá a la pantalla anterior.
6
ajuste de la sensibilidad de la almohadilla sensora:
• Este monitor funciona con los colchones de cuna estándar. Para los colchones más gruesos (los de
muelles) puede ser necesario cambiar el nivel de la sensibilidad de la unidad del bebé (14) de medio
(preconfigurado) a alto. En determinados casos, si el colchón es muy delgado, puede ser necesario
cambiar el nivel de sensibilidad a bajo.
ADVERTENCIAS SOBRE EL USO DE LA ALMOHADILLA SENSORA
• La almohadilla puede confundir el movimiento o balanceo del cable con el movimiento del bebé. Para
evitarlo asegúrese de que el cable está colocado de forma que no pueda moverse.
• Deberá asegurarse de que no hay vibraciones dentro o cerca de la habitación del bebé, para que todo lo
que pueda detectar la almohadilla sea el movimiento del niño.
• La almohadilla sensora no conduce electricidad y no afecta al bebé, ni siquiera si el colchón se moja con
orina o vómito.
• No sumerja nunca la almohadilla sensora en líquidos. Para limpiarla, frótela con un paño seco y sin
pelusa.
• No ponga nunca el cable conector en contacto con objetos en movimiento o cerca de una superficie
caliente.
• Asegúrese siempre de que los cables están fuera del alcance del bebé y de otros niños pequeños. No
coloque nunca los cables conectores entre la ropa de cama del bebé ya que puede haber peligro de
estrangulamiento.
• Asegúrese de que la almohadilla sensora se coloca en la posición correcta.
• No sumerja la almohadilla sensora en líquidos y evite que entre en contacto con la humedad.
24
25
Page 14

CONSEJOS ÚTILES SOBRE EL USO DE LA ALMOHADILLA SENSORA
• Acuérdese de desactivar la almohadilla sensora, apagando el interruptor (11), cuando saque al bebé
de la cuna (por ejemplo cuando vaya a darle de comer) para evitar que se active la alarma. Acuérdese
de volverla a conectar al volver a poner al bebé en la cuna.
• Si sólo desea vigilar los sonidos del bebé, desconecte la almohadilla sensora usando el interruptor (11)
de la unidad del bebé.
cambio del volumen de la unidad del bebé:
El volumen de la unidad del bebé está preconfigurado en el nivel 3. El cambio del volumen tendrá un
efecto sobre la intensidad de la voz de la unidad de padres y sobre el modo intercomunicador, pero NO
afecta al volumen de la alarma de la almohadilla sensora.
Para cambiar el nivel de volumen:
Presione + (7a) para aumentar el volumen del altavoz (niveles del 1 al 5).
1
Presione - (7b) para reducir el volumen del altavoz (niveles del 1 al 5). En la unidad del bebé no se
2
puede desactivar el volumen.
TECLAS PANTALLA LCD
volumen
volumen
volumen
$#
El nuevo nivel de volumen se muestra en la pantalla durante 2 segundos y luego se guarda.
El aparato emite un tono de aviso cuando el volumen se establece al nivel máximo o mínimo.
volumen
volumen
cambio del volumen en la unidad de padres
El volumen de la unidad de padres está preconfigurado en el nivel 3. El cambio del volumen afectará a la
intensidad de la voz de la unidad del bebé. Si el volumen está desactivado no se podrá oír ningún sonido
procedente de la unidad del bebé. NO afecta, sin embargo, al volumen de la alarma de la almohadilla
sensora.
Para cambiar el nivel de volumen:
1
Presione + (16a) para aumentar el volumen del altavoz (niveles del 1 al 5 y APA).
Presione - (16b) para reducir el volumen del altavoz (niveles del 1 al 5 y APA).
2
TECLAS PANTALLA LCD
volumen
volumen
volumen
$#
El nuevo nivel de volumen se muestra en la pantalla durante 2 segundos y luego se guarda.
El aparato emite un tono de aviso cuando el volumen se establece al nivel máximo o mínimo.
volumen
volumen
volumen apagado
cambio del volumen de la unidad del bebé desde la unidad de padres
1
Presione (15) y +/- para ir al menú BABY VOLUME de la unidad de padres.
2
Presione (15) y se mostrará el nivel de volumen actual. Si no cambia el volumen en un
periodo de 2 segundos la función volverá a la posición de reposo.
3
Presione +/- para ajustar el volumen del nivel 1 al 5.
4
Presione (15) para confirmar los valores.
5
La palabra SAVED se mostrará en la pantalla.
uso de la luz nocturna
Para encender la luz nocturna presione la tecla (17) en la unidad de padres o la (2) en la del bebé.
1
2
Para ajustar el brillo o para apagarla, presione de nuevo esta tecla con la secuencia 1 – 2 – 3 – APA.
3
Si la unidad del bebé está funcionando con pilas, el brillo de la luz nocturna está limitado al nivel mínimo
para ahorrar energía. En el modo de pilas, tanto la unidad de padres como la del bebé presentarán la
secuencia de tecla 1-APA.
4
La luz nocturna de la unidad del bebé funciona incluso cuando la unidad de padres está descargada o
apagada.
5
Los valores de la luz nocturna y sus íconos correspondientes están sincronizados en ambas unidades si
éstas están conectadas correctamente.
6
La luz nocturna se apaga a los 5 minutos en el modo de pila.
CONSEJOS ÚTILES SOBRE EL USO DE LA LUZ NOCTURNA
• Puede que prefiera usar un brillo menos intenso, si no quiere que el bebé duerma en total oscuridad, y
aumentar la intensidad cuando el niño necesite atención durante la noche y no quiera encender la luz
principal de la habitación.
ES
26
27
Page 15

uso de la función intercomunicadora (responder)
La función intercomunicadora (RESPONDER) le permite comunicarse desde la unidad de padres con la del
bebé.
1
Para usar esta función presione el botón (20) de la unidad de padres y manténgalo presionado. La
pantalla de la unidad de padres mostrará la palabra TALK.
2
El sonido de la unidad del bebé se silenciará y no se podrá oír al bebé hasta que se deje de pulsar el
botón (20).
3
Si el volumen de la unidad de padres está APA (apagado), durante la función TALKBACK el nivel
cambia a predeterminado (medio).
función de llamada de búsqueda de la unidad de padres
Si se presionan a la vez las teclas + (7a) y - (7b) de la unidad del bebé durante 3 segundos se emite un
1
tono de llamada.
2
Tanto la unidad de padres como la del bebé mostrarán la palabra PAGING en la pantalla.
Si el volumen está APA (apagado) antes de iniciar la función de llamada, restablézcalo al nivel
3
predeterminado (medio).
4
Al presionar cualquier tecla en cualquiera de las dos unidades durante esta función se desactivará el
tono de llamada.
5
Si se pierde el enlace entre las dos unidades el tono de llamada no se emitirá al pulsar a la vez las
teclas + (7a) y – (7b).
6
La unidad del bebé no cambia.
7
La función de llamada remite en 2 minutos si no se detiene antes.
selección de idioma
1
El idioma del monitor está preconfigurado en inglés.
2
Para cambiarlo a otro idioma presione (15) en la unidad de padres y +/- para ir al menú de idiomas.
3
Presione (15) y se mostrará el idioma actual.
4
Presione +/- para seleccionar el idioma deseado y luego presione (15) para confirmarlo.
5
Aparecerá la palabra SAVED y volverá a la pantalla anterior.
restablecimiento a los valores precongurados
1
Presione (15) y +/- para ir a RESET.
2
Presione (15) y se mostrarán las letras CONFIRM?
3
Presione (15) para confirmar el restablecimiento o presione para cancelarlo y volver al nivel de
menú anterior.
INFORMACIÓN GENERAL SOBRE SEGURIDAD:
• ¡Advertencia! Este aparato sólo se ha diseñado para que lo usen personas adultas: manténgalo siempre
fuera del alcance de los niños. No deje que los niños jueguen con el aparato. No es un juguete.
• Asegúrese de que guarda el monitor en un sitio seguro cuando no lo está usando. Manténgalo alejado
de fuentes de calor y de líquidos.
• Tenga cuidado de que no se le caiga ninguna de las unidades ya que la caída podría afectar al
funcionamiento del monitor.
ES
representación de la temperatura ambiental
La temperatura del entorno de la unidad del bebé se muestra en la pantalla de ambas unidades si está
entre los 10 y los 30º C. Ambas unidades mostrarán la palabra LO cuando la temperatura esté por debajo
de los 10º C y HI cuando supere los 30º C.
Para garantizar la precisión del valor de temperatura que muestra el aparato, no coloque la unidad de
forma que quede expuesta a la luz solar directa o cerca de una fuente de calor.
selección de grados CENTÍGRADOS o FAHRENHEIT:
1
El monitor está preconfigurado para medir la temperatura en grados CELSIUS.
2
Para cambiar este parámetro presione (15) para acceder al menú principal.
3
Presione + / - para seleccionar FORMAT y a continuación presione (15).
4
Presione +/- para seleccionar CELSIUS o FAHRENHEIT.
5
Presione (15) para confirmar.
6
Aparecerá la palabra SAVED y volverá a la pantalla anterior.
7
Tanto la unidad de padres como la del bebé cambiarán el formato de temperatura al elegido.
8
El formato de temperatura en las dos unidades se sincroniza automáticamente cuando ambas están
enlazadas.
28
especicaciones técnicas
radiofrecuencia
canales
temperatura de operación
voltaje de la unidad del bebé
pila de la unidad de padres
voltaje del cargador
Use sólo fuente de energía Clase 2.
!
1921.536-1928.448MHz
5
0-40ºC
ientrada: 100~240Vac 50~60Hz
salida: 6Vdc 450mA
2x 1.2V 750mAh NiMH AAA
entrada: 100-240Vac 50-60Hz
salida: 6Vdc 450mA
INSTRUCCIONES DE SEGURIDAD IMPORTANTES
Cuando utilice el equipo, siempre debe seguir las precauciones básicas de seguridad para reducir el riesgo
de incendio, choque eléctrico y lesiones a personas, incluyendo lo siguiente:
1 No utilizar este producto cerca del agua, por ejemplo cerca de una tina de baño, lavabo, fregadero o
lavadero, en un sótano mojado o cerca de una alberca.
2 Utilizar únicamente el cable y pilas indicados en este manual. No desechar las baterías en el fuego.
Pueden explotar. Revise los códigos locales para posibles instrucciones especiales de eliminación.
29
Page 16

unité bébé (=BU) 1082SB, Adaptateur: PN: 26-460045-2UL-100
unité parents (=PU) 1082SP, Adaptateur: PN: 26-460045-3UL-100
1 Touche Marche/Arrêt. Illumination de l’écran dès la mise en marche de l’appareil.
2 Touche de réglage de la veilleuse (luminosité faible, moyenne, forte).
3 Alarme en cas d’absence de mouvement.
4 Clignotement du voyant en cas de piles faibles.
5 Affichage de la température de la pièce.
6 Clignotement, en vert, du voyant de détection de mouvement à chaque mouvement de bébé.
7 VTouche de réglage du volume 7a) Augmentation 7b) Baisse.
8 Microphone.
9 Prise d’alimentation du tapis détecteur de mouvement.
10 Prise d’alimentation de l’adaptateur électrique.
11 Bouton Marche/Arrêt du tapis détecteur de mouvement.
12 Compartiment pour 4 piles AA (non comprises). Ouvrir le compartiment à l’aide d’un tournevis.
13 Détecteur de température.
14 Sélecteur de sensibilité du tapis détecteur de mouvement (basse, moyenne et élevée).
5
6
4
3
14
2
15 Touche Marche/Arrêt/Défilement du menu.
16 Touche de réglage du volume
16a) augmentation 16b) baisse.
17 Touche de réglage de la veilleuse
(luminosité faible, moyenne, forte).
18 Menu/ok.
19 Voyant d’alimentation.
20 Touche de réponse.
21 Microphone.
16a
16
station d’accueil de l’unité parents
22 Voyant de charge.
23 Prise d’alimentation de l’adaptateur électrique.
22
tapis détecteur de mouvement
24 Tapis.
25 Cordon de raccord pour l’unité bébé.
26 Fiche de contact.
20
15
2
17
b
18
19
21
FR
23
30
7a
7b
1
8
24
109
11
25
12
position
for leads
13
26
31
Page 17

icônes - unité parents voyants del - unité parents
CDE
B
A
VEILLEUSE
Luminosité forte
3
HAUT-PARLEUR
ÉTEINT
TEMPÉRATURE
TAPIS TAPIS EN MARCHE
CLIGNOTEMENT
TAPIS EN MARCHE
TAPIS ÉTEINT
ALARME EN CAS
D’ABSENCE DE
MOUVEMENT
TAPIS EN MARCHE
CLIGNOTEMENT
TAPIS ÉTEINT
PILES
TAPIS EN MARCHE
FORCE DU
SIGNAL
Luminosité moyenne
Luminosité faible
DEGRÉS
CELSIUS
FAHRENHEIT
S’affiche lorsque le tapis détecteur de
mouvement est correctement branché et en
marche
Débute lorsque le tapis détecteur de
mouvement est en marche mais est
débranché ou n’est pas correctement branché
S’affiche de manière constante lorsque le tapis
détecteur de mouvement est branché mais
éteint au niveau de l’unité bébé
S’affiche lorsque le tapis détecteur de
mouvement est éteint
S’affiche lorsque l’ALARME s’est déclenchée
Débute lorsque bébé recommence à bouger
après que l’alarme s’est déclenchée
S’affiche lorsque le tapis détecteur de
mouvement n’est pas branché
S’affiche lorsque les piles sont
vides et doivent être rechargées
Piles faibles
Piles moyennement pleines
Piles pleines
Signal confirmé
Faible signal
Bon signal
2
1
PAD OFF
F
G
VOYANT
LED
Pas de
VOYANT
A
B
C
D
E
F
G Rouge Unité parents correctement installée dans la
FONCTION
COULEUR
Aucune
INDICATION
Niveau sonore dans la chambre de bébé ne
dépassant pas le seuil d’identification
Son
Son
Son
Son
Tapis
détecteur
de
mouvement
Bleu
Bleu
Bleu
Bleu
Vert
Rouge
Rouge,
clignotant
Niveau sonore 1
Niveau sonore 2
Niveau sonore 3
Niveau sonore maximal
Mouvement détecté
AUCUN mouvement détecté depuis au moins
20 secondes
Reprise des mouvements de bébé, mais
problème détecté
Alimentation Orange Unité parents EN MARCHE
Branchement
station d’accueil et branchement adéquat
FR
32
Excellent signal
33
Page 18

icônes - unité bébé
TEMPÉRATURE
PILES
TAPIS EN
MARCHE
voyants LED - unité bébé
Degrés
Celsius
Fahrenheit
S’affiche lorsque les piles sont vides
et doivent être rechargées
Piles faibles
Piles moyennement pleines
Piles pleines
chargement de l’appareil de surveillance avant la première utilisation :
UNITÉ PARENTS :
1
L’unité parents est accompagnée de 2 piles AAA (LR3) rechargeables qui doivent être insérées dans l’appareil avant
l’utilisation.
Pour insérer les piles, ouvrez le compartiment à piles à l’aide d’un tournevis. Insérez les 2 piles AAA (LR3) rechargeables
2
fournies. Veillez à ce que les piles soient insérées correctement et dans le bon sens. Refermez bien le compartiment à
l’aide d’un tournevis.
N’UTILISEZ PAS de piles non rechargeables.
3
Placez l’unité parents dans la station d’accueil et rechargez les piles pendant 16 heures avant l’utilisation.
4
L’icône de charge de l’écran ACL montre la progression du chargement.
5
Mettez l’unité parents en marche en appuyant sur la touche Marche/Arrêt (15) pendant 3 secondes.
6
La station d’accueil s’illumine alors en rouge pour indiquer que l’unité parents y est correctement installée et que le
7
branchement est bon.
8
Éteignez l’unité parents en appuyant sur la touche Marche/Arrêt (15) pendant 5 secondes.
UNITÉ BÉBÉ :
L’unité bébé n’a pas besoin de piles si elle est alimentée à partir de l’adaptateur électrique.
1
2
S’il n’est pas possible d’utiliser l’adaptateur, l’unité bébé nécessite alors 4 piles AA (LR6) qui ne sont pas fournies avec
l’appareil.
Pour insérer les piles, ouvrez le compartiment à piles à l’aide d’un tournevis. Insérez 4 piles AA (LR6) et refermez bien le
3
compartiment à l’aide d’un tournevis. Vous pouvez utiliser des piles rechargeables ou non, mais évitez de mélanger des
piles de types différents ou de nouvelles et vieilles piles. Veillez à ce que les piles soient insérées correctement et dans le
bon sens.
L’unité bébé NE comporte PAS de fonction de charge électrique.
4
L’écran de l’unité bébé s’illumine dès sa mise en marche.
5
Les icônes de piles indiquent si les piles sont faibles.
6
7
L’alimentation par piles est automatiquement désactivée lorsque l’adaptateur électrique est utilisé. Si l’adaptateur est
éteint directement mais demeure branché à l’appareil de surveillance, l’alimentation par piles est alors
automatiquement activée.
Lorsque l’unité bébé est branchée à la source d’alimentation électrique, le rétroéclairage de l’écran LCD est activé.
8
Lorsqu’elle est alimentée par piles, le rétroéclairage ne demeure activé qu’environ 20 secondes.
Mettez l’unité bébé en marche en appuyez sur la touche Marche/Arrêt (1).
9
FR
VOYANT
LED
H
I
34
FONCTION
État du tapis détecteur
de mouvement
Alarme
COULEUR
Vert
Rouge
Rouge,
clignotant
IH
INDICATION
Tapis correctement branché et détectant
des mouvements de manière continue
AUCUN mouvement détecté depuis au
moins 20 secondes
Reprise des mouvements de bébé, mais
problème détecté
AVERTISSEMENT relatif à l’utilisation de l’unité bébé!
• L’unité bébé devrait être placée à une distance d’un mètre à un mètre et demi du lit de bébé,
sur une surface plane.
• Ne placez jamais l’unité bébé dans le lit de bébé.
utilisation correcte des piles :
• Les piles non rechargeables ne peuvent être rechargées.
• Les piles rechargeables doivent être retirées de l’unité bébé avant d’être rechargées.
• Les piles rechargeables ne doivent être rechargées que sous la supervision d’un adulte.
• Ne mélangez pas de piles de types différents et ne mélangez pas de nouvelles et de vieilles piles.
• N’utilisez que des piles du même type ou de type équivalent.
• Les piles doivent être insérées dans le bon sens.
• Les piles mortes doivent être retirées de l’appareil de surveillance.
•
AVERTISSEMENT : Il y a risque de grave défaillance lorsque les piles sont remplacées par d’autres de types inadéquats.
Défaites-vous des piles mortes conformément aux directives du fabricant. Pour l’unité parents, n’utilisez que les piles
rechargeables suivantes : BYD, modèle no H-AAA750A.
installation de l’unité bébé :
Branchez l’adaptateur électrique dans une
1
prise murale située à proximité dans la
chambre de bébé et mettez l’adaptateur en
marche.
2
Appuyez sur la touche Marche/Arrêt (1)
pendant 3 secondes, jusqu’à ce que le voyant
d’alimentation LED s’illumine à l’écran LCD.
3
Assurez-vous que la touche Marche/Arrêt du
tapis détecteur de mouvement (11) est bien à
la position Arrêt (OFF).
11
1
35
Page 19

installation de l’unité parents :
Branchez l’adaptateur électrique dans une prise murale située à proximité.
1
Appuyez sur la touche Marche/Arrêt (15) pendant 3 secondes, jusqu’à ce que le voyant d’alimentation LED s’illumine à
2
l’écran LCD.
3
L’unité parents et l’unité bébé sont dès lors reliées entre elles.
mise à l’essai de l’unité parents :
•
Veillez tout d’abord à ce que l’unité bébé ait été installée conformément aux
instructions fournies ci-dessus et qu’elle fonctionne comme il se doit.
•
Pour mettre à l’essai l’unité parents, vous devez vous assurer qu’elle est placée à
une distance d’au moins 5 mètres de l’unité bébé.
•
2
distance maximale d’environ 300 mètres, selon les conditions environnantes et certains facteurs spatiaux et structurels.
La portée de l’appareil est généralement moindre à l’intérieur qu’à l’extérieur.
•
Si le signal de l’unité bébé est perdu, l’unité parents émet une alerte toutes les 10 secondes et le voyant d’alimentation
LED clignote à l’écran LCD jusqu’à ce que lien entre les deux unités soit rétabli. À l’écran LCD apparaît alors la mention «
No Link ». Dans un tel cas, rapprochez-vous de l’unité bébé.
Éteignez le tapis détecteur de mouvement à l’aide de la touche Marche/Arrêt (11).
•
Placez une source sonore, comme un poste de radio par exemple, dans la chambre
de bébé, à au moins un mètre ou un mètre et demi de l’unité bébé et près de la
porte de la chambre. Rendez-vous ensuite dans une autre pièce.
•
Placez l’unité parents dans la station d’accueil.
•
Mettez l’unité en marche (15) et augmentez (16a) ou baissez (16b) le volume selon
votre préférence.
15
•
Des sons sont alors entendus en provenance de la chambre de bébé et certains
des voyants de son (A à E) s’allument. Plus fort est le son, plus nombreux sont les
voyants qui s’allument.
•
Retirez l’unité parents de la station d’accueil et promenez-vous dans votre
demeure ou votre cour, vous assurant d’être en mesure de bien entendre en tout
temps les sons qu’émet l’unité bébé. L’appareil de surveillance fonctionne à une
AVERTISSEMENT relatif aux risques liés aux cordons :
RISQUES D’ÉTRANGLEMENT! – Garder les cordons hors de la portée des enfants.
!
Ne pas utiliser de rallonge.
• Vérifiez immédiatement l’emplacement des unités avec cordon pour vous assurer que tous les cordons sont
hors de la portée de votre bébé et de jeunes enfants.
• Placez les cordons à plus d’un mètre de toute partie du lit de bébé. L’appareil de surveillance doit être utilisé
uniquement avec un lit de bébé dont la base est ferme et plane.
• Vérifiez l’emplacement de l’appareil de temps à autre afin de bien le garder hors de la portée de bébé à mesure
où il grandit.
• Pour réduire les risques d’étranglement, vérifiez que le cordon du tapis détecteur de mouvement est toujours
bien tendu et ne traîne pas.
• Ne déposez rien sur les cordons de l’adaptateur électrique et assurez-vous que personne ne trébuche dessus.
• Gardez les cordons de l’adaptateur loin des sources de chaleur comme les radiateurs ou les tuyaux du système
de chauffage central.
• Faites attention de ne pas mettre l’adaptateur à un endroit où un enfant pourrait sauter dessus.
• N’utilisez jamais l’adaptateur de l’appareil de surveillance Tommee Tippee avec un autre appareil. N’utilisez
toujours que l’adaptateur Tommee Tippee avec votre appareil de surveillance Tommee Tippee.
• Veuillez noter que l’adaptateur devient chaud
lorsqu’il fonctionne – c’est un phénomène
normal et sans danger.
• L’adaptateur convertit le courant alternatif en
tension continue de faible intensité.
• Utilisez l’adaptateur électrique fourni.
MODÈLE
Entrée
Sortie
S004LB0600045 or S004LV0600045
100 - 240V~ 50/60Hz 150mA
6V - 450mA
installation du tapis détecteur de mouvement :
L’appareil de surveillance peut détecter les moindres mouvements de bébé grâce au tapis détecteur
hautement perfectionné.
Le tapis est conçu pour être utilisé dans un lit de bébé dont la base est ferme et plane. Il ne doit pas être
utilisé dans un lit d’enfant transportable ou berçant.
• Placez le tapis entre le matelas et la base du lit, directement sous l’endroit où dort votre bébé. Veillez à ce
que le tapis soit bien placé face vers le haut et que le cordon de branchement se trouve au pied du lit.
• Le cordon doit être tiré à travers le bas du lit. Si le lit a une base solide, il pourrait être nécessaire de
percer une petite ouverture afin que le cordon puisse traverser.
• Assurez-vous de bien pousser le cordon de raccord dans la prise située sous l’unité bébé.
IMPORTANT!
METTEZ LE TAPIS DÉTECTEUR DE MOUVEMENT À L’ESSAI AVANT DE POURSUIVRE :
1 Mettez le tapis en marche en appuyant sur la touche Marche/Arrêt (11) située à l’arrière de l’unité bébé.
Le voyant LED de l’unité bébé qui indique la mise en marche du tapis s’allume si un mouvement est
détecté.
2 Confirmez le fonctionnement du tapis en touchant doucement le matelas du lit à l’endroit où dort votre
bébé.
3 Chaque toucher devrait faire en sorte que les voyants verts de détection de mouvement de l’unité bébé
(H) et de l’unité parents (E) s’allument et qu’un bip se fasse entendre. Le volume du bip peut être réglé.
4 Mettez l’alarme à l’essai en continuant de toucher le matelas pendant quelques instants, puis en vous
éloignant du lit et en cessant tout mouvement à proximité du tapis détecteur.
5 Après une vingtaine de secondes, l’alarme sonne et les voyants d’alarme rouges de l’unité bébé (I) et de
l’unité parents (E) s’allument.
6 Si un mouvement est détecté de nouveau après que l’alarme s’est déclenchée, les voyants d’alarme
rouges de l’unité bébé (I) et de l’unité parents (E) se mettent à clignoter pour vous indiquer que l’alarme
a été activée.
7 Pour réinitialiser l’alarme, éteignez et remettez en marche l’unité bébé.
RÉSOLUTION DES PROBLÈMES EN CAS D’ÉCHEC DES ESSAIS :
Aucune alarme après 20
secondes SANS mouvement
Fausse alarme EN PRÉSENCE
de mouvement
Assurez-vous qu’il n’y a ni mouvement ni vibration à proximité du
tapis et répétez l’essai. Si l’alarme ne s’active toujours pas après 20
secondes, augmentez le réglage de sensibilité et répétez l’essai.
Vérifiez tous les branchements et répétez l’essai. Si l’alarme se
déclenche de nouveau, diminuez le réglage de sensibilité et
répétez l’essai.
FR
36
37
Page 20

8 Si l’unité parents est branchée correctement à l’unité bébé, l’icône du tapis détecteur l’indique alors
sur l’unité parents. Le 5e voyant LED (E) s’allume en vert si un mouvement est détecté.
9 Si le tapis a été mis en marche sans avoir été branché correctement, l’unité bébé émet un signal
d’erreur et l’icône du tapis détecteur de l’unité parents se met à clignoter. Le message « CONNECT
PAD » se met également à clignoter à l’écran de l’unité parents.
10 Si le tapis est correctement installé, les alarmes des unités bébé et parents se déclenchent après toute
période de 20 secondes sans détection de mouvement et les voyants d’alarme rouges s’allument. Le
message « CHECK BABY » s’affiche alors à l’écran LCD jusqu’à la réinitialisation du tapis détecteur de
mouvement.
11 Si un mouvement est détecté de nouveau après que l’alarme s’est déclenchée, l’alarme s’arrête et les
voyants d’alarme rouges de l’unité bébé et de l’unité parents se mettent à clignoter pour vous indiquer
que « quelque chose » s’est passé. Le message « CHECK BABY » s’affiche alors à l’écran LCD jusqu’à la
réinitialisation du tapis détecteur de mouvement.
12 Pour réinitialiser l’alarme, éteignez et remettez en marche le tapis détecteur de mouvement.
mise à l’essai de la fonction de mise en marche du tapis de l’unité
parents :
• Pour mettre à l’essai la fonction de mise en marche du tapis de l’unité parents, vous aurez besoin qu’une
autre personne active les fonctions de l’unité bébé liées au tapis détecteur.
• Si la touche de mise en marche du tapis de l’unité bébé est à la position Arrêt, le 5e voyant LED (E) de
l’unité parents s’allume en VERT et un bip se fait entendre.
• Quand aucun mouvement n’a été détecté pendant environ 20 secondes, le 5e voyant LED (E) de l’unité
parents s’allume en ROUGE et l’alarme du tapis se fait entendre.
• Si un mouvement est détecté de nouveau après que l’alarme s’est déclenchée, le voyant d’alarme rouge
passe alors au mode clignotant.
• Pour réinitialiser l’alarme, il est nécessaire d’aller à l’unité bébé, de l’éteindre puis de la remettre en
marche.
déclenchement de l’alarme en cas d’absence de mouvement :
• Le tapis détecteur de mouvement closer to nature de Tommee Tippee N’EST pas un dispositif médical
et N’EST PAS conçu pour prévenir la mort subite du nourrisson(MSN). Cet appareil de surveillance
closer to nature de Tommee Tippee est conçu en effet pour vous aider à surveiller votre enfant et NON
pour remplacer la supervision d’un adulte.
• Le déclenchement de l’alarme pourrait ne pas signaler un problème du côté de votre bébé. Il pourrait
indiquer que celui-ci s’est éloigné de la zone que couvre le tapis ou encore que les piles sont faibles
lorsque l’appareil n’est pas alimenté à partir de l’adaptateur.
réglage de la sensibilité sonore de l’unité bébé :
• Le réglage de la sensibilité sonore de l’unité bébé peut être modifié seulement lorsque l’unité parents
est bien reliée à l’unité bébé.
POUR MODIFIER LE RÉGLAGE DE LA SENSIBILITÉ SONORE :
a. Appuyez sur (15) et sur +/- pour vous rendre au menu SENSITIVITY de l’unité parents.
b. Appuyez sur (15) et le niveau actuel de sensibilité s’affiche.
c. Appuyez sur +/- pour régler la sensibilité (niveaux 1 à 5).
TOUCHES AFFICHAGE À L’ÉCRAN
niveau
niveau
niveau
$#
niveau
niveau
d. Appuyez sur OK (15) pour confirmer le réglage choisi.
e. Le message « SAVED » s’affiche et l’unité revient à l’écran précédent.
EXPLICATION
niveau 5
niveau 4
niveau 3
niveau 2
niveau 1
réglage du niveau sonore du bip :
Le bip vient confirmer que le tapis est correctement branché et que l’appareil détecte bien les mouvements.
Si vous désirez désactiver le bip :
Appuyez sur (15) et sur +/- pour vous rendre au menu TICK TONE de l’unité parents.
1
Appuyez sur (15) et sur +/- pour vous rendre au menu SENSITIVITY de l’unité parents.
2
3 Appuyez sur (15) et le niveau sonore actuel est affiché.
3
4 Appuyez sur +/- pour sélectionner ON (en marche) ou OFF (éteint).
4
5 Appuyez sur (15) pour confirmer le réglage choisi.
5
6 Le message « SAVED » s’affiche et l’unité revient à l’écran précédent.
6
réglage du niveau de sensibilité du tapis détecteur de mouvement :
• Cet appareil de surveillance est compatible avec tous les matelas de taille standard pour lits de bébé. Si
vous utilisez un matelas plus épais (avec ressorts, par exemple), vous pourriez vouloir faire passer le
réglage du niveau de sensibilité de l’unité bébé (14) de moyen à élevé. Au contraire, avec certains
matelas très minces, vous pourriez vouloir passer à un réglage plus bas.
AVERTISSEMENT RELATIF AU TAPIS DÉTECTEUR DE MOUVEMENT!
• Un cordon qui bouge ou qui balance peut être perçu par le tapis comme un mouvement de votre bébé.
Pour éviter ce problème, assurez-vous que le cordon est placé de manière à ne pas bouger.
• Vous devriez vous assurer qu’il n’y a pas de vibration dans la chambre de bébé ou à proximité, de
manière à ce que le tapis ne surveille que les mouvements de votre bébé.
• Le tapis ne transmet pas d’électricité; il n’y a donc pas de risque pour bébé même s’il urine ou régurgite
sur le matelas.
• N’immergez jamais le tapis détecteur de mouvement. Pour le nettoyer, essuyez-le au moyen d’un linge
sec et non pelucheux.
• Ne laissez jamais le cordon de raccord entrer en contact avec des objets en mouvement et ne le placez
jamais sur une surface chaude.
• Assurez-vous que les câbles et cordons sont toujours hors de portée de votre bébé et des jeunes
enfants. Ne placez jamais de cordons de raccord parmi les éléments de la literie de votre bébé au risque
de provoquer la strangulation.
• Assurez-vous que le tapis est bien placé face vers le haut.
• N’immergez jamais le tapis et gardez-le loin de l’humidité.
FR
38
39
Page 21

CONSEIL UTILE AU SUJET DU TAPIS DÉTECTEUR DE MOUVEMENT :
• Lorsque vous sortez votre bébé du lit (pour le nourrir par exemple), rappelez-vous d’éteindre le tapis
au moyen de la touche Marche/Arrêt (11) afin d’empêcher l’alarme de sonner. N’oubliez pas de
remettre le tapis en marche lorsque vous remettez bébé au lit.
• Si vous désirez seulement surveiller les sons émis par votre bébé, éteignez le tapis au moyen de la
touche Marche/Arrêt de l’unité parents (11).
modication du réglage du volume de l’unité bébé :
Le volume de l’unité bébé est réglé par défaut au niveau 3. Modifier ce réglage aura un effet sur le volume
de l’unité parents et sur le mode de réponse. Toutefois, cela n’aura aucun effet sur le volume de l’alarme
du tapis détecteur de mouvement.
Pour modifier le réglage du volume :
1
Appuyez sur + (7a) pour augmenter le volume du haut-parleur (niveaux 1 à 5).
2
2. Appuyez sur - (7b) pour baisser le volume du haut-parleur (niveaux 1 à 5). L’unité bébé ne comporte
aucune fonction permettant d’éteindre complètement le volume de l’unité bébé.
TOUCHES AFFICHAGE À L’ÉCRAN
volume
volume
volume
$#
Le nouveau réglage du volume est affiché à l’écran pendant 2 secondes, puis sauvegardé.
Un signal d’avertissement est émis une fois atteint le niveau de volume maximal ou minimal.
volume
volume
modication du réglage du volume de l’unité parents :
Le volume de l’unité parents est réglé par défaut au niveau 3. Modifier ce réglage aura un effet sur le
volume de l’unité bébé. Ainsi, lorsque le volume de l’unité parents est éteint, l’unité bébé n’émet plus
aucun son. Toutefois, la modification du réglage n’a aucun effet sur le volume de l’alerte qu’émet le tapis
détecteur de mouvement.
Pour modifier le réglage du volume :
Appuyez sur + (16a) pour augmenter le volume du haut-parleur (niveaux 1 à 5 et éteint).
1
Appuyez sur 1 (16b) pour monter le volume du haut-parleur (niveaux 1 à 5 et éteint).
2
TOUCHES AFFICHAGE À L’ÉCRAN
volume
volume
volume
$#
Le nouveau réglage du volume est affiché à l’écran pendant 2 secondes, puis sauvegardé.
Un signal d’avertissement est émis une fois atteint le niveau de volume maximal ou minimal.
volume
volume
volume éteint
modication du réglage du volume de l’unité bébé à partir de l’unité
parents :
1
Appuyez sur (15) et sur +/- pour vous rendre au menu BABY VOLUME de l’unité parents.
2
2. Appuyez sur (15) et le niveau actuel du volume s’affiche. Si le réglage du volume n’est pas modifié dans
les 2 secondes, la fonction se place en attente.
3
3. Appuyez sur +/- pour régler le volume (niveaux 1 à 5).
4
4. Appuyez sur (15) pour confirmer le réglage choisi.
5
5. Le message « SAVED » s’affiche temporairement.
utilisation de la veilleuse :
Pour mettre la veilleuse en marche, appuyez sur la touche de réglage de la veilleuse de l’unité parents
1
(17) ou de l’unité bébé (2).
Pour régler la luminosité de la veilleuse ou pour l’éteindre, appuyez de nouveau sur la touche (luminosité
2
faible – L; moyenne – M; forte – H; ou veilleuse éteinte - OFF).
3
Toutefois, lorsque l'appareil est alimenté à partir de l'adaptateur, tant l'unité parents que l'unité bébé
proposent la séquence de touches allant de luminosité faible (L) à veilleuse éteinte (OFF).
La veilleuse de l’unité bébé fonctionne même si l’unité parents n’est pas alimentée par piles ou est éteinte.
4
5
Les réglages de la veilleuse et les icônes correspondantes sont synchronisés si les deux unités sont
correctement branchées l’une à l’autre.
Lorsqu’elle est alimentée par piles, la veilleuse s’éteint graduellement après 5 minutes.
6
CONSEIL UTILE AU SUJET DE L’UTILISATION DE LA VEILLEUSE :
• Vous pourriez trouver utile d’opter pour une luminosité plus faible si vous ne voulez pas que votre bébé
dorme dans l’obscurité totale, puis de régler à une luminosité plus forte lorsque bébé demande votre
attention pendant la nuit et que vous ne souhaitez pas allumer l’éclairage principal de la chambre.
FR
40
41
Page 22

utilisation du mode de réponse :
Le mode de réponse permet les communications entre l’unité parents et l’unité bébé.
1
Pour utiliser le mode de réponse, appuyez sur la touche de réponse de l’unité parents (20) et
tenez-la. Le message « TALK » apparaît alors à l’écran de l’unité parents.
2
L’unité bébé est alors mise en sourdine et vous ne pouvez plus entendre bébé jusqu’à ce que la
touche de réponse (20) ait été relâchée.
3
Si le volume de l’unité parents est réglé à « éteint » (OFF) pendant qu’est activé le mode de réponse
(TALKBACK), le volume est alors ramené automatiquement au réglage par défaut, soit au niveau
moyen.
localisation de l’unité parents :
3
3. Appuyez sur (15) et la langue actuelle est affichée.
4
Appuyez sur +/- pour sélectionner la langue désirée et appuyez sur (15) pour confirmer le réglage
choisi.
5
Le message « SAVED » s’affiche alors et l’unité revient à l’écran précédent.
retour aux réglages par défaut :
1
Appuyez sur (15), puis sur +/- pour vous rendre à la fonction de réinitialisation (RESET).
2
Appuyez sur (15) et le message « CONFIRM? » s’affiche alors à l’écran.
3
Appuyez sur (15) pour confirmer la réinitialisation ou sur pour que l’appareil ignore la
demande de réinitialisation et revienne aux réglages précédents.
Si vous appuyez simultanément sur les deux touches + (7a) et - (7b) de l’unité bébé pendant 3
1
secondes, le signal de localisation est émis.
2
Le message « PAGING » apparaît alors à l’écran LCD des unités bébé et parents.
Si le volume est réglé à « éteint » (OFF) avant le début de la localisation, ramenez-le au réglage par
3
défaut (moyen).
Pendant la localisation, le fait d’appuyer sur n’importe quelle touche de l’unité bébé ou de l’unité
4
parents fait en sorte d’arrêter le signal de localisation.
5
Si le lien est perdu entre les deux unités, le signal de localisation n’est pas émis lorsque vous appuyez
simultanément sur les touches + (7a) et – (7b). Aucun changement ne survient du côté de l’unité
bébé.
6
À moins que vous n’y mettiez fin, le signal de localisation s’arrête après 2 minutes.
achage de la température de la pièce :
La température ambiante que détecte l’unité bébé est affichée sur les unités bébé et parents dans une
échelle de 10 ºC à 30 ºC. Les deux unités affichent LO (température basse) lorsque la température chute
sous les 10 ºC et HI (température élevée) quand elle dépasse les 30 ºC.
Pour garantir l’exactitude de la température affichée, ne placez jamais l’unité bébé sous la lumière directe
du soleil ou à proximité d’une source de chaleur.
choix de l’achage en degrés CELSIUS ou FAHRENHEIT :
1
L’appareil de surveillance est réglé par défaut pour mesurer la température en degrés CELSIUS.
2
Pour modifier ce réglage, appuyez sur (15) pour accéder au menu principal.
3
Appuyez sur + / - pour sélectionner FORMAT, puis appuyez sur (15).
4
Appuyez sur +/- pour sélectionner CELSIUS ou FAHRENHEIT.
5
Appuyez sur (15) pour confirmer le réglage choisi.
6
Le message « SAVED » s’affiche alors et l’unité revient à l’écran précédent.
7
Le type d’affichage sélectionné se trouve alors activé tant pour l’unité parents que pour l’unité bébé.
8
L’affichage de la température à l’écran des unités bébé et parents se trouve automatiquement
synchronisé si les deux unités sont branchées correctement l’une à l’autre.
passage à une autre langue :
GÉNÉRALITÉS EN MATIÈRE DE SÉCURITÉ :
• Avertissement! Usage réservé aux adultes seulement – Garder hors de la portée des enfants en tout
temps. Ne pas autoriser un enfant à jouer avec l’appareil - Il ne s’agit pas d’un jouet.
• Veiller à ranger l’appareil en lieu sûr lorsqu’il n’est pas utilisé et loin de la chaleur ou de l’eau.
• Avoir soin de ne pas laisser échapper l’une ou l’autre des deux unités, car le fonctionnement de
l’appareil pourrait s’en trouver diminué.
spécications techniques
fréquence radio
chaînes
température d’utilisation
tension de l’unité bébés
pile de l’unité parents
tension du chargeur
Utiliser uniquement avec une source d’alimentation de classe 2
!
de 1921,536 à 1928,448 mhz
5
de 0 à 40 °c
entrée : de 100 à 240 v (ca), de 50 à 60 hz
sortie : 6 v (cc) 450 ma
2 x 1,2 v 750 mah ninh aaa
entrée : de 100 à 240 v (ca), de 50 à 60 hz
sortie : 6 v (cc) 450 ma
INSTRUCTIONS DE SÉCURITÉ IMPORTANTES
Lors de l’utilisation de l’appareil, toujours prendre des précautions de sécurité de base afin de réduire les
risques d’incendie, de choc électrique et de blessures, dont les suivantes :
1 Ne pas utiliser ce produit près de l’eau, par exemple près d’une baignoire, d’un lavabo, d’un évier ou
d’un bac à laver, ou encore dans un sous-sol humide ou près d’une piscine.
2 Utiliser uniquement le cordon électrique et les piles indiqués dans le manuel. Ne pas jeter les piles au
feu. Elles risquent d’exploser. Vérifier avec les codes locaux pour connaître d’éventuelles instructions
spéciales d’élimination.
FR
L’appareil de surveillance est réglé par défaut à la langue anglaise.
1
2
Pour passer à une autre langue, appuyez sur (15) de l’unité parent, puis sur +/- pour vous rendre au
menu des langues.
42
43
Page 23

 Loading...