

Page 1
Models:
DS6421-2/DS6421-3/
DS6421-4
User’s manual
w w w.v t e c h p h o n e s . c o m
Page 2

Congratulations
on purchasing your new VTech product. Before using this telephone, please
read the Important safety instructions on page 105 of this manual.
This manual has all the feature operations and troubleshooting necessary
to install and operate your new VTech telephone. Please review this manual
thoroughly to ensure proper installation and operation of this innovative and
feature rich VTech product. For support, shopping, and everything new at
VTech, visit our website at www.vtechphones.com. In Canada, please visit
www.vtechcanada.com.
The ENERGY STAR® program (www.energystar.gov)
recognizes and encourages the use of products that save
energy and help protect our environment. We are proud to
mark this product with the ENERGY STAR® label indicating it
meets the latest energy efciency guidelines.
The Bluetooth® word mark and logos are registered trademarks owned by
Bluetooth SIG, Inc. and any use of such marks by VTech Holdings Limited
is under license. VTech Holdings Limited is a member of Bluetooth SIG, Inc.
Other trademarks and trade names are those of their respective owners.
Page 3

Table of contents
Getting started .........................1
Parts checklist ............................1
Installation ..................................2
Telephone base and charger
installation ...............................3
Battery installation .....................4
Battery charging .........................5
Installation options .....................6
Tabletop to wall mount
installation ..............................6
Wall mount to tabletop
installation ...............................7
Handset layout ...........................8
Telephone base layout ...............11
Handset main menu ...................13
BLUETOOTH® ...........................15
Introducing Bluetooth .................15
Glossary of terms ......................16
Bluetooth setup ..........................17
Add a cell phone ........................17
Add a headset ............................19
Auto connection .........................20
Paired devices ............................21
Rename a device .......................21
Remove a device ........................22
Devices connection ....................23
Review the device list .................23
Connect/Disconnect an active
device ......................................23
Replace an active device ...........24
Bluetooth connection from
idle mode ................................24
Download directory ....................25
Interruption to directory
download .................................27
View the directory download
information ..............................27
Change PIN ................................28
Telephone settings ..................29
Ringers (handset) .......................29
Ringer volume (handset) ............29
Ringer tone .................................30
Set date/time ..............................31
Settings ......................................32
LCD language ............................32
Display alerts ..............................33
Use caller ID to automatically
set date and time ....................34
Rename handset ........................35
Key tone .....................................35
Dial mode ...................................36
Voice announce caller ID ...........36
Website.......................................37
Home area code .........................37
Cell area code ............................38
Telephone operation ................39
Make, answer or end a
home call ................................39
Call waiting on the home line .....41
Make, answer or end a cell call .41
Call waiting on the cell line .........41
Answer a cell call while on a
home call .................................42
Cell phone voicemail ..................42
Answer a home call while on a
cell call ....................................42
Conference home and cell calls .43
Using the home and cell lines
together ...................................43
Handset speakerphone ..............44
Volume control ...........................44
Silence the ringer .......................44
Mute ...........................................44
Temporary tone dialing ...............44
Hold ............................................45
Handset locator ..........................45
Equalizer.....................................45
Chain dialing...............................46
Redial list ....................................47
Review the redial list ..................47
Dial a redial entry .......................47
Save a redial entry to the
directory ..................................48
Delete a redial entry ...................48
Intercom .....................................49
i
ii
Page 4

Table of contents
To transfer an incoming call .......50
Answer an incoming call during an
intercom call ............................50
Transfer an incoming call ...........51
Share an outside call ..................51
Hold a call and intercom.............52
Telephone operation ................53
Push-to-talk (PTT) ......................53
PTT On/Off .................................53
PTT to a single handset .............54
PTT to all handsets ....................55
Answering a PTT ........................56
Switch a one-to-one PTT
to intercom ..............................56
End PTT .....................................57
Answer an incoming call
during PTT ..............................57
Make an outgoing call
during PTT ..............................57
Directory .....................................58
Area code cross guard ...............58
Create a new entry in the home
directory ..................................59
Character chart ..........................60
Review the directory...................61
3-character alphabetical search 61
Dial a directory entry ..................62
Edit a directory entry ..................62
Edit the type of a directory entry 63
Delete a directory entry ..............63
Remove a downloaded
directory ..................................63
Speed dial ..................................64
Make a call using speed dial ......64
Assign a speed dial slot .............64
Reassign a speed dial slot .........64
Unassign a speed dial slot .........64
About caller ID ............................65
Caller ID history ..........................66
Missed calls indicator ................66
Memory match ..........................67
Review the caller ID log ............67
Make a caller ID log entry
ready to dial ............................68
Dial a caller ID log entry ............68
Save a caller ID log entry to the
directory ..................................69
Delete from the caller ID log .......70
Caller ID log display screen
messages ................................70
Answering system settings ....71
Answer ON/OFF .........................71
Announcement ...........................72
Play your announcement ...........72
Record your own
announcement ........................72
Delete your announcement ........73
Answering system setup ............74
Call screening ............................74
Number of rings ..........................74
Remote access code .................75
Message alert tone.....................75
Recording time setting ...............76
Answering system operation ..77
Answering system and
voicemail .................................77
Message capacity ......................77
New message indication ............78
Call intercept ..............................78
Telephone base ringer volume ...78
Message playback .....................79
Delete all old messages .............80
Record and play memos ............80
Message window displays..........81
Remote access ..........................82
Appendix ...................................83
Display screen messages ..........83
Handset and telephone base
indicators ................................88
Battery ........................................90
Expand your telephone system ..91
iii
Page 5

Add and register a handset
(optional) .................................91
Replace a handset .....................92
Add and register a DECT
headset (optional) ...................92
Troubleshooting ..........................93
Important safety instructions ......103
Precautions for users of implanted
cardiac pacemakers ................104
Operating range .........................104
Maintenance ...............................104
About cordless telephones.........105
The RBRC® seal .........................105
Warranty .....................................106
FCC, ACTA and IC regulations ..108
Technical specications .............110
Index ..........................................111
iv
Page 6
Getting started
Getting started
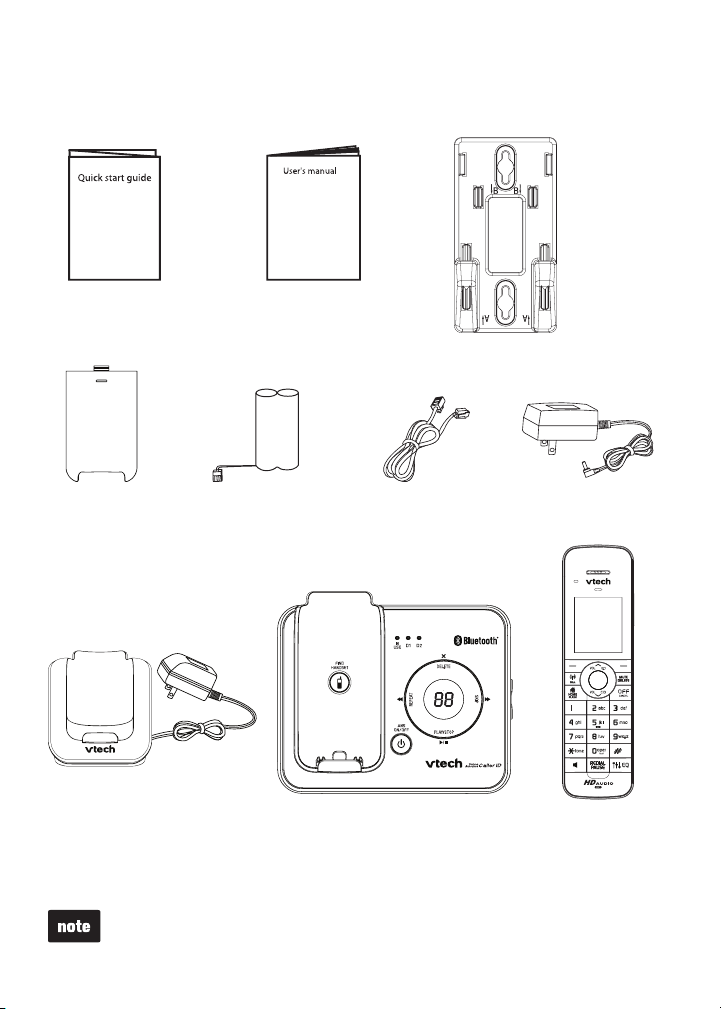
Parts checklist
Your telephone contains the following items. Save your sales receipt and
original packaging in the event warranty service is necessary.
Quick star t guide
Batte ry
compartme nt
covers
(2 for DS6 421-2,
3 f or D S6 421- 3 a nd
4 f or D S6 421- 4)
Charg er and
power adapter
(1 f or DS6 421- 2,
2 f or D S6 421- 3 a nd 3 fo r
DS6421-4)
User’s manu al
Batte ries
(2 for DS6 421-2,
3 f or D S6 421- 3 a nd
4 f or D S6 421- 4)
Tele phone
line cord
Tele phone base
Wall b racket
Tele phone base
power adapter
Handsets
(2 for DS6 421-2,
3 f or D S6 421- 3 a nd
4 f or D S6 421- 4)
To purchase a replacement battery or power adapter, visit our website at
www.vtechphones.com or call 1 (800) 595-9511. In Canada, go to
www.vtechcanada.com or dial 1 (800) 267-7377.
1
Page 7

Getting started
Installation
Install the telephone base close to a telephone jack and a power outlet not
connected to a wall switch. For optimum range and better reception, place
the telephone base in a central and open location.
When using a Bluetooth wireless technology enabled cell phone with this
telephone, make sure the cell phone is within 15 feet of the telephone base to
maintain a reliable connection between the cell phone and telephone base.
This product may be shipped with a protective sticker covering the handset
and/or telephone base display. Remove it before use.
Avoid placing the telephone base too close to:
Communication devices such as personal computers, computer routers,
•
television sets, VCRs, wireless routers (wireless broadband, Wi-Fi, or
802.11) or other cordless telephones.
Excessive heat sources.
•
Noise sources such as a window with trafc outside, motors, microwave
•
ovens, refrigerators, or uorescent lighting.
Excessive dust sources such as a workshop or garage.
•
Excessive moisture.
•
Extremely low temperature.
•
Mechanical vibration or shock such as on top of a washing machine or
•
work bench.
2
Page 8
Getting started
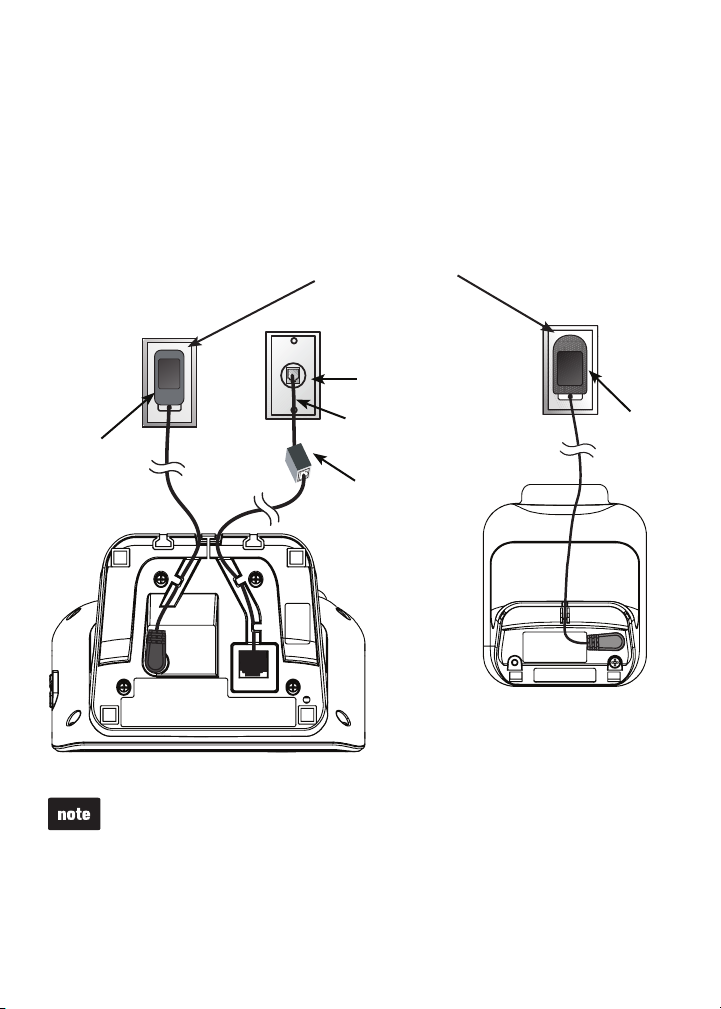
Telephone base and charger installation
Install the telephone base and charger(s) as shown below.
Make sure that the electrical outlet is not controlled by a wall switch.
If you subscribe to digital subscriber line (DSL) high-speed Internet service
through your telephone line, you must install a DSL lter between the
telephone line cord and the telephone wall jack. The lter prevents noise and
caller ID problems caused by DSL interference. Contact your DSL service
provider for more information about DSL lters.
Elect ri cal outlet
not controlled
by a wall switch
Tele phone
wall jac k
Tele phone
base power
adapter
•
•
Tele phone line cord
DSL filt er (not
include d) is
requi red if you
have DSL high
speed Internet
service
Charg er
Tele phone base
Use only the power adapters supplied with this product. To order a
replacement, visit our website at www.vtechphones.com or call
1 (800) 595-9511. In Canada, go to www.vtechcanada.com or dial
1 (800) 267-7377.
The power adapters are intended to be correctly oriented in a vertical or
oor mount position. The prongs are not designed to hold the plug in place
if it is plugged into a ceiling, under-the-table or cabinet outlet.
Power
adapter
3
Page 9

Getting started
BT183482/BT283482
BT183482/BT283482
2
Battery installation
Install the battery as shown below.
If the battery compartment cover is on the handset, press the indentation
1.
and push the cover down to remove.
Plug the battery connector securely into the socket inside the handset
2.
battery compartment, matching the color-coded label.
Place the battery with the label THIS SIDE UP facing up and the wires
3.
inside the battery compartment.
Align the cover at against the battery compartment, then slide it towards
4.
the center of the handset until it clicks into place.
Charge the handset by placing it in the telephone base or charger. The
5.
CHARGE light is on when the handset charges.
1
4
If the handset will not be used for a long time, disconnect and remove the
•
battery to prevent possible leakage.
To purchase a replacement battery, visit our website at
•
www.vtechphones.com or call 1 (800) 595-9511. In Canada, go to
www.vtechcanada.com or dial 1 (800) 267-7377.
2
5
CHARGE light
3
4
Page 10

Getting started
Battery charging
Once you have installed the battery, the screen indicates the battery status
(see the table below). If necessary, place the handset in the telephone base
or charger to charge the battery. For best performance, keep the handset in
the telephone base or charger when not in use. The battery is fully charged
after 16 hours of continuous charging. See the table on page 92 for battery
operating times.
If the screen is blank, you need to charge the handset without interruption for
at least 10 minutes to give the handset enough charge to use the telephone
for a short time. When the battery is low, the handset shows Low battery
and a ashing . If you are on a call in low battery mode, the handset beeps
every minute.
The following table summarizes the battery charge indicators and actions
to take.
Battery indicators Battery status Action
The screen is blank
or shows Place in
charger and ashes.
The screen shows
Low battery and
ashes.
The screen shows
HANDSET X.
Battery has very little
or no charge and the
handset cannot be used.
Battery has enough
charge to be used for a
short time.
Battery is charged. To keep the battery charged,
Charge without interruption
until the screen shows
HANDSET X (at least
30 minutes).
Charge without interruption
until the screen shows
HANDSET X (at least
30 minutes).
place it in the telephone base
or charger when not in use.
After you install your telephone or power returns following
a power outage, the handset will prompt you to set the date
and time. For instructions, see Set date/time on page 31 .
To skip setting the date and time, press OFF/CLEAR
or BACK.
5
SET DATE
09/30/09
MM/DD/YY
BACK
SET
Page 11

Getting started
Installation options
Your telephone base is ready for tabletop use. If you want to mount yourIf you want to mount your
telephone on a wall, use the provided wall bracket to connect with a standard
dual-stud telephone wall mounting plate. If you do not have this mounting
plate, you can purchase one from many hardware or consumer electronics
retailers. You may need a professional to install the mounting plate.
Tabletop to wall mount installation
Plug the power cord and
1.
telephone line into the telephone
base. If you are using DSL
lter, plug the other end of the
telephone line into the lter.
Route the telephone line cord (or
DSL lter) through the wall mount
bracket hole.
Position the telephone base as
2.
shown below. Insert the extended
tabs (marked B) of the wall
bracket into the slots on the back
of the telephone base (marked
B). Push the telephone base
down until it clicks securely
in place.
Plug the telephone line cord (or
3.
DSL lter) into the wall jack. Plug
the power adapter into a power
outlet not controlled by a
wall switch.
Align the holes on the bracket
4.
with the standard wall plate
and slide the bracket down until
it locks securely. Bundle the
telephone line cord and power
adapter cord neatly with
twist ties.
6
Page 12

Getting started
Wall mount to tabletop installation
If the telephone line cord and power adapter cord are bundled, untie
1.
them rst.
Slide the black wall bracket up and remove it from the wall plate. Unplug
2.
the telephone line cord (or DSL lter) from the wall. Unplug the power
adapter from the power outlet.
Slide the telephone base up and remove it from the wall bracket.
3.
See Telephone base and charger installation on page 3.
4.
7
Page 13

Getting started
Handset layout
CHARGE light
On when the handset i s cha rging in the telep hone base
or charger.
SOFT KE YS
Pre ss to se lect a menu i tem displayed ab ove the key.
While in a menu, pr ess to s elect an item , or save an
entry or s etting.
/CELL
Pre ss to ma ke or answer a ce ll call (page 42).
Durin g a cell call, p ress to answer an incoming call
when you hear a cal l waitin g alert (p age 42).
Flash es quickly when ther e i s an inc oming cell call.
Flash es sl owly when a cell call is on hold.
/H OM E/FLASH
Pre ss to ma ke or answer a ho me call (page 40).
Durin g a home call, p ress to answer an incoming ca ll
when you hear a cal l waitin g alert (p age 42).
Flash es quickly when ther e i s an inc oming home call.
Flash es sl owly when a home call is on hold.
1
While reviewi ng a cal ler ID log entry, pres s rep eated ly
to add or remove 1 i n front of the teleph one number
before d ialin g or saving it in t he directo ry (page 6 8).
Pre ss to switch to ton e dia ling tem poraril y d uring a call
if you have pulse service (page 46).
Pre ss to ma ke or answer a ho me call using the
handset sp eakerphone (page 4 0).
Durin g a call , p ress to switc h bet ween speakerpho ne
and handset ( page 45).
REDIAL/PAUSE
Press to review the redial list (page 49).
While dialing or entering numbers into the directory,
press and hold to insert a dialing pause (page 60).
8
Page 14

Getting started
Handset layout
Handset layout (continued)
/VOL /
While in a menu, pr ess to s croll up.
Durin g a call , p ress to increase t he listening volum e
(page 45).
When the hand set i s n ot in us e, press to en ter the
direc tory (p age 61).
MUTE/DELETE
While on a call, press to mute the microphone (page 45).
While reviewing the caller ID log, directory or redial list,
press to delete an individual entry (page 70, page 63 and
page 50 respectively).
Press to delete digits when predialing (page 40).
While enterin g or edi ting a d irector y entry, pres s t o
erase a digit or char acter.
OFF/CANCEL
Durin g a call , p ress to hang up (page 40).
While the han dset is ringing , p ress to silen ce th e rin ger
tempo rarily (page 45).
Pre ss an d hol d w hile the tele phone is not in use to
erase the displ ayed m essages (XX Missed calls and
Downl oad d ir ab or te d).
While in a menu, pr ess to exit with out making chan ges
or press and hold to return to idle mode.
VOL/CI D/
While in a menu, pr ess to s croll down.
Durin g a call , p ress to decreas e t he li steni ng volum e
(page 45).
When the hand set i s n ot in us e, press to review the
caller ID log (p age 67).
#
While reviewi ng a cal ler ID log entry or a directory
entry, pres s rep eatedly to show other di aling options
(page 68 and pag e 62 res pe ctive ly).
Durin g an out side call, intercom call, message or
annou nc ement playbac k, press to c hange the qua lity of
the audio to bes t suit your hearing (pag e 47).
9
Page 15

Getting started
Handset layout
PUSH -TO -TAL K ( PT T)
Pre ss to be gin a on e- to -o ne or one-to-all
broad ca st message (page 54).
When the hand set i s n ot in us e, press
and hold to begin a one-to -all broadcast
message(page 56).
10
Page 16

Getting started
Telephone base layout
/REPEAT
Press to repeat a message
or press twice to play the
previous message
(page 80).
/FIND HANDSET
Press to page all system
handsets (page 46).
/ANS ON/OFF
Press to turn the answering
system on or off (page 71).
X/DELETE
Press to delete the message
currently playing (page 80).
When the phone is not in
use, press twice to delete all
previously reviewed messages
(page 82).
/SKIP
Press to skip to the
next message
(page 80).
/PLAY/STOP
Press to play messages
(page 80).
Press to stop message
playback (page 80).
11
Page 17

Getting started
Telephone base layout
Telephone base layout (continued)
VOL
Press to adjust the
volume during playback
(page 80).
When the phone is not in
use, press to adjust the
telephone base ringer
volume (page 79).
IN USE light
On when the handset is
in use.
Flashes when another
telephone sharing the
same line is in use or
on hold.
Flashes quickly when
there is an incoming
home call, transfer or
intercom.
D1/D2 lights
On when the telephone
base is paired and
connected with a
Bluetooth device.
Flashes while pairing
a Bluetooth device,
or when there is an
incoming cell call.
Message window
Shows the number of
messages and other
answering system
information (page 83).
12
Page 18

Getting started
Handset main menu
To enter the main menu:
Press MENU when the handset is not in use.
1.
Press
2.
enter that menu.
To return to the previous menu, press OFF/CANCEL.
To return to idle mode, press and hold OFF/CANCEL.
Play messa ge s - Playbac k mes sages
from the answering syste m.
or
to highlight a handset feature menu, then press
Answe ring sys - recor d mem os
and change yo ur answering system
setting s.
SELECT
to
Play messages
Answe ring sys
Directory
Caller ID log
Intercom
BACK
SELECT
Directory - store and sea rch for
names and num bers.
Play messages
Answe ring sys
Directory
Caller ID log
Intercom
BACK
SELECT
Intercom - make inter co m cal l t o a
system handse t.
Play messages
Answe ring sys
Directory
Caller ID log
Intercom
BACK
SELECT
Play messages
Answe ring sys
Directory
Caller ID log
Intercom
BACK
SELECT
Caller ID log - review the call er ID
history or dele te all caller ID lo g
entri es.
Play messages
Answe ring sys
Directory
Caller ID log
Intercom
BACK
SELECT
Bluetoo th - set up and man age your
Bluetooth enabled devices .
Answe ring sys
Directory
Caller ID log
Intercom
Bluet ooth
BACK
SELECT
13
Page 19

Getting started
Handset main menu (continued)
Ringers - set up ringer s for th e hom e
and cell line s.
Directory
Caller ID log
Intercom
Bluet ooth
Ringers
BACK
SELECT
Sett ings - c hange your telepho ne
setting s.
Intercom
Bluet ooth
Ringers
Set date/time
Settings
BACK
SELECT
Set d at e/ ti me - set up the dat e a nd
time of you r t elephone.
Caller ID log
Intercom
Bluet ooth
Ringers
Set date/time
BACK
SELECT
Websi te - dis plays th e VTec h websit e
addre ss.
Bluet ooth
Ringers
Set date/time
Settings
Website
BACK
SELECT
14
Page 20

Bluetooth
Introducing Bluetooth
Your new DS6421 telephone system with Bluetooth wireless technology has
the following features:
Pair up to four Bluetooth enabled devices (cell phones or headsets) with
•
the telephone base.
Connect a maximum of two cell phones to make and receive cell calls.
•
Only one cell phone can be active on a call at a time.
Connect one Bluetooth enabled headset for making and receiving
•
home calls.
Conference cell and home calls.
•
Make and receive calls using your cell phone plan while utilizing the ease
•
and comfort of your home telephone system.
IMPORTANT INFORMATION
After plugging in the telephone base, wait at least 20 seconds before
•
connecting a Bluetooth device. The screen shows Bluetooth system busy
if you try to connect too soon.
Refer to the user's manual of your Bluetooth enabled cell phone or
•
headset for more information about how that device uses Bluetooth
connectivity.
Bluetooth wireless technology operates within a short range (a maximum
•
of approximately 30 feet) from the telephone base. Keep connected cell
phones and headset within this range.
If your cell phone has poor reception in your home, the DS6421 cannot
•
improve the reception. However, if there is a location in your house with
better reception, you can leave your cell phone at that location while you
use the DS6421 cell line. In order for this to work, the telephone base
must be within 30 feet of the cell phone.
Charge your cell phone while it is connected to the telephone base.
•
Your cell phone's battery will discharge faster while it is connected to the
telephone base via Bluetooth wireless technology.
Monitor your cell phone's usage because minutes are deducted from your
•
cellular plan for the duration of all cell calls.
Refer to the Bluetooth setup section (page 17) to learn how to set up and
manage your Bluetooth enabled device(s). Refer to the Telephone operation
section (page 40) on how to operate your Bluetooth devices with your new
DS6421 telephone system with Bluetooth wireless technology. Refer to the
Troubleshooting section (page 95) if you experience difculty using the
telephone system.
The Bluetooth® word mark and logos are owned by Bluetooth SIG, Inc. and
any use of such marks by VTech Holdings Limited is under license.
VTech Holdings Limited is a member of Bluetooth SIG, Inc. Other trademarks
and trade names are those of their respective owners.
15
Page 21

Bluetooth
Glossary of terms
Below are some terms used in this user’s manual to help you become
familiar with using your Bluetooth enabled devices and your new DS6421
telephone system.
Active device slots - the Device list has two active slots for two cell
phones, or one cell phone and one headset. When a device in the list is
active it will have a D1 or D2 in front of the device name. In order to use a
Bluetooth device on a call, it must be in an active slot and be connected.
Bluetooth cell phone - refers to a Bluetooth enabled cellular telephone.
Cell line - the telephone line associated with your cell phone service. On
your DS6421/6401 handset, press /CELL to use the cell line.
Connected - when you pair a Bluetooth device to the DS6421/6401 it
is placed in a active slot and automatically connected. When a device is
connected a 1 and/ or 2 will display after on the handset screen and the
D1 and/or D2 light on the telephone base will be on. If a device loses its’
connection to the telephone base, it must be reconnected before you can use
the device with the DS6421/6401.
Disconnected - when a device is disconnected a 1 and/or 2 will display after
on the handset screen and the D1 and/or D2 light on the telephone base
will be on.
Discoverable mode - before a Bluetooth enabled device can be paired, it
must be set to this mode. When pairing your cell phone, the telephone base
will be set to this mode. When pairing a headset, the headset must be set to
this mode. Depending on the manufacturer, this mode is sometimes referred
to as Find Me or Visibility.
Home line - your conventional telephone land line. On your DS6421/6401
handset, press /HOME/FLASH to use the home line.
Paired devices - once Bluetooth enabled devices have been paired with the
telephone base, they will appear in the device list. A maximum of four devices
can be paired with the telephone base.
Pairing - this refers to the process of Bluetooth enabled devices registering
device information with each other. The telephone base must be paired with a
Bluetooth enabled cell phone or headset before the Bluetooth device can be
used. Depending on the manufacturer, this is also referred to as Bonding.
PIN - by default, the PIN is 0000 for the telephone base and for most
Bluetooth devices. PIN information must be exchanged between
Bluetooth devices before they can be used. This is also known as a
Passkey or Passcode.
16
Page 22

Bluetooth
Bluetooth setup
To use a Bluetooth enabled cell phone or headset with your DS6421, you
must rst pair and connect your Bluetooth device(s) with the telephone base.
All DS6421/6401 handsets can be used to make or answer on the cell
phone line.
Bluetooth wireless technology operates within a short range (30 feet). When
you pair a Bluetooth cell phone or Bluetooth headset to the telephone base,
move closer to the telephone base to maintain sufcient signal strength.
Add a cell phone
Before you begin, make sure that you have cellular coverage and your
Bluetooth enabled cell phone is not connected to any other Bluetooth device.
Refer to your cell phone user's manual to learn how to
search for or add new Bluetooth devices.
To pair and connect a cell phone:
Press MENU on the handset when it is not in use.
1.
Press or to highlight Bluetooth, then
2.
press SELECT.
Press SELECT to choose Add device, then press
3.
SELECT to choose Add cellular. The screen displays
Please wait... followed by 1. If cell is connected to BT
device, please disconnect it.
If there are already four paired devices on the
•
device list, the 4th device on the device list will be
automatically removed, regardless of whether the
new device pairing is successful or not (page 24).
If there are already two active devices on the device
•
list with prex D1: or D2:, the handset shows Only
2 devices can be ready for connection. You are
prompted to deactivate an active device.
Press NEXT. The screen displays 2. Place cell phone
4.
next to base.
All devices that are connected to the telephone
•
base are disconnected until the pairing process is
completed.
Directory
Caller ID log
Intercom
Bluetooth
Ringers
BACK
Add device
Device list
Download dir
Change PIN
BACK
Add cellular
Add headset
BACK
search base:
VTech DS6421
discoverable
SELECT
BLUETOOTH
SELECT
ADD DEVICE
SELECT
Set cell to
PIN:0000
17
Page 23

Bluetooth
Add a cell phone (continued)
Press NEXT to turn on the telephone base discoverable
5.
mode. The screen displays Set cell to search base:
VTech DS6421 discoverable PIN: 0000. Promptly turn
on the Bluetooth feature of your cell phone and search
for or add new devices.
Your cell phone may require a passcode. In this case
•
the handset screen displays Check cellular. ENTER
PASS CODE. Enter the cell phone passcode into the
handset and press SET to save.
Enter the PIN of the telephone base (the default PIN
6.
is 0000) into your cell phone to continue the pairing
process. The handset displays Adding Cell Phone A
to device list... on the screen.
When a device is successfully connected, the handset displays Cell
7.
Phone A is added and connected to base. You hear a conrmation
tone. The corresponding status icon ( 1 or 2) displays. The
corresponding device light on the telephone base (D1 or D2)
turns on.
If you have trouble pairing your cell phone, it may not be compatible
with your DS6421. Check the Bluetooth compatibility list at
www.vtechphones.com.
The pairing process may take up to one minute. If the pairing process fails,
•
try again.
The steps for the pairing process may vary for different cell phones. If
•
this happens, follow the prompts on your cell phone and your DS6421 to
complete the pairing process.
If you put the handset back in the telephone base or charger while pairing,
•
the pairing is cancelled and the handset returns to idle mode.
Adding
Cell Phone A
to device
list...
Cell Phone A
is added
and connected
to base.
18
Page 24

Bluetooth
Add a headset
Before you begin, make sure that your Bluetooth enabled
headset is not connected to any other Bluetooth device.
Refer to your headset user's manual to learn how to search
for or add new Bluetooth devices.
To pair and connect a headset:
Press MENU on the handset when it is not in use.
1.
Press or to highlight Bluetooth, then
2.
press SELECT.
Press or to highlight Add device, then press
3.
SELECT.
Press or to highlight Add headset, then
4.
press SELECT. The screen displays If headset is
connected to cell, please disconnect it.
Press NEXT.
If there is another headset already active, the screen
•
will show Only 1 headset in device list can be
ready for connection and prompt you to replace an
existing paired device (page 24).
When you already have two active devices, the
•
handset shows Only 2 devices can be ready for
connection. The telephone base will deactivate
another headset from active slot automatically.
Press NEXT. The screen displays Pls set headset to
4.
discoverable mode, then press NEXT.
All devices that are connected to the telephone base
•
are temporarily disconnected.
The screen displays Searching for Bluetooth
5.
headsets... Set your headset to discoverable mode
(refer to the user’s manual of your headset).
When the screen displays the found devices, press
6.
or to highlight your headset and then press NEXT.
Enter the PIN of your headset. The PIN for most
7.
Bluetooth devices is 0000 (refer to the user’s manual of
your headset). Then press NEXT.
Directory
Caller ID log
Intercom
Bluetooth
Ringers
BACK
Add cellular
Add headset
BACK
If headset is
connected to
cell, please
disconnect it.
Pls set headset
to discoverable
mode
BAC K NEXT
Searching for
SELECT
ADD DEVICE
SELECT
NEXT
Bluetooth
headsets...
19
FOUND DEVICES
Headset A
Headset B
BACK
SELECT
 Loading...