

Page 1
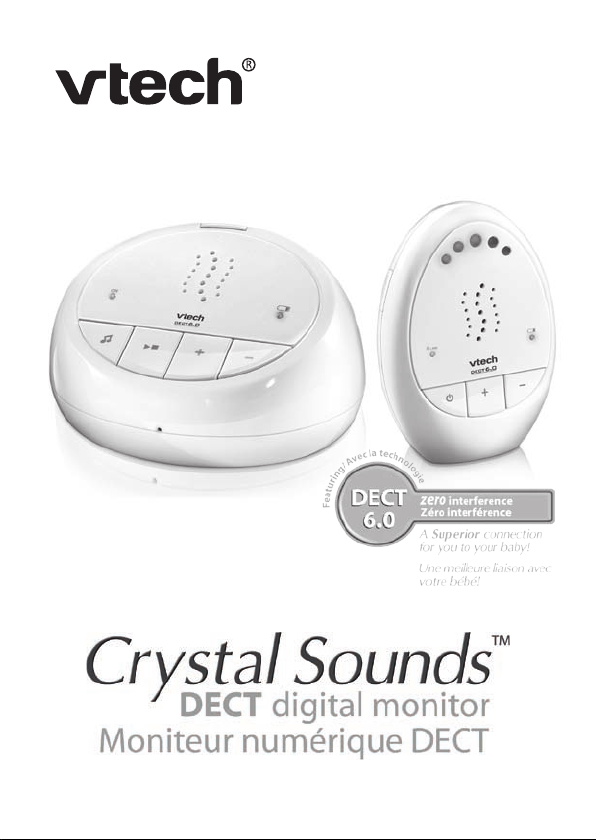
DECT digital monitor
™
Page 2

Page 3

ENGLISH……………02
FRANÇAIS………… 27
Page 4

Contents
02………………………… Welcome
ENGLISH
03………………………… Important Safety Instructions
06………………………… Parts Checklist
07………………………… Quick Reference Guide
09………………………… Preparing Your Baby Monitor
- Default Settings
- Power
- Positioning and Operating Range
13………………………… Baby Monitor Features
- Turning the Units On/Off
- Adjusting Speaker Volume
- Adjusting Microphone Sensitivity
- Sound Level Indicators & Sound Alert
- Paging the Parent Unit
- Playing Lullabies
- Out of Range Alert
Contents
17………………………… Troubleshooting
21………………………… Frequently Asked Questions
22………………………… Appendix
- Cleaning and Maintenance
- Storage
- Replacement
- Environmental Notices
- FCC and IC Regulations
- RF Radiation Exposure Statement
25………………………… Assistance
2
Page 5

Welcome
Thank you for purchasing the VTech® Crystal SoundsTM DECT
Digital Monitor. VTech® is dedicated to producing reliable
telecommunications, baby gear and toy products that give parents the
reassurance they need. This VTech® baby monitor provides support by
ensuring you can hear your baby clearly within a long range without
any distracting noise and offers you personal settings to help keep
your baby healthy and comfortable.
DECT Digital Technology
The DECT (Digital Enhanced Cordless Telecommunications) technology
digitally transmits sound across multiple channels using the newly
available DECT frequency band. This technology guarantees zero
interference from other wireless appliances and a crystal clear signal
between the baby unit and the parent unit.
ENGLISH
Welcome
3
Page 6

SAVE THESE INSTRUCTIONS
ENGLISH
When using your equipment, basic safety precautions should always
1. Do not use this product near water, for example, near a bath tub,
2. Use only the power cord and batteries indicated in this manual.
3. Use only the adaptors included with this product. Incorrect
Baby Unit Adaptor:
Input: 117V AC 60Hz
Output: 6V DC 500mA
Parent Unit Adaptor:
Input: 117V AC 60Hz
Output: 6V DC 300mA
4. There is a risk of explosion if the batteries are replaced by an
Use 1.5V AA (AM-3/LR6) alkaline batteries only for baby unit
Important Safety Instructions
Use 1.2V AAA 750mAh Ni-MH rechargeable batteries only for
One of the following two brands of battery will be supplied for
1) Brand name: BYD Model No: H-AAA750A-UN
2) Brand name: GP Model No: GN75AAAHC
Important Safety Instructions
be followed to reduce the risk of fire, electric shock and injury to
persons, including the following:
wash bowl, kitchen sink or laundry tub, in a wet basement or near
a swimming pool.
Do not dispose of batteries in a fire. They may explode. Check
with local codes for possible special disposal instructions.
adaptor polarity or voltage can seriously damage the product.
Class 2
incorrect type. Dispose of used batteries according to the
instructions.
(batteries not supplied).
parent unit (batteries supplied).
parent unit:
SAVE THESE INSTRUCTIONS
4
Page 7

Warning
Read this user manual carefully before you use the appliance and save
it for future reference.
1. This baby monitor is intended as an aid. It is not a substitute for
responsible and proper adult supervision and should not be used
as such.
2. Never immerse any part of the baby monitor in water or any other
liquid.
3. Check that the voltage indicated on the included adaptors
corresponds to the voltage of your electrical outlets before you
connect the appliance.
4. Only use the included adaptors to connect the parent and baby
units to your electrical outlets.
5. Do not cut off the adaptors to replace them with other plugs, as
this causes a hazardous situation.
6. If the adaptors are damaged, please only replace them with the
same type in order to avoid a hazard. For the correct type of
adaptor, please see the ‘Replacement’ section of this manual.
7. Never use the baby monitor in moist places or close to water.
8. Except for the battery compartments, do not open the housing of
the baby unit or parent unit in order to prevent electric shock.
9. The appliance is not intended for use by persons (including
children) with reduced physical, sensory or mental capabilities, or
lack of experience and knowledge, unless they have been given
supervision or instruction concerning use of the appliance by a
person responsible for their safety.
10. Children should be supervised to ensure that they do not play
with the appliance.
11. Use only the specified type of battery. Warranty is voided if other
batteries are used. Please contact VTech® for a replacement
battery pack. Contact information can be found on the last page
of these instructions.
12. Unplug the rechargeable battery pack when the product is stored
for long periods of non-use.
13. Unplug power cord before replacing batteries.
ENGLISH
Important Safety Instructions
5
Page 8
Caution
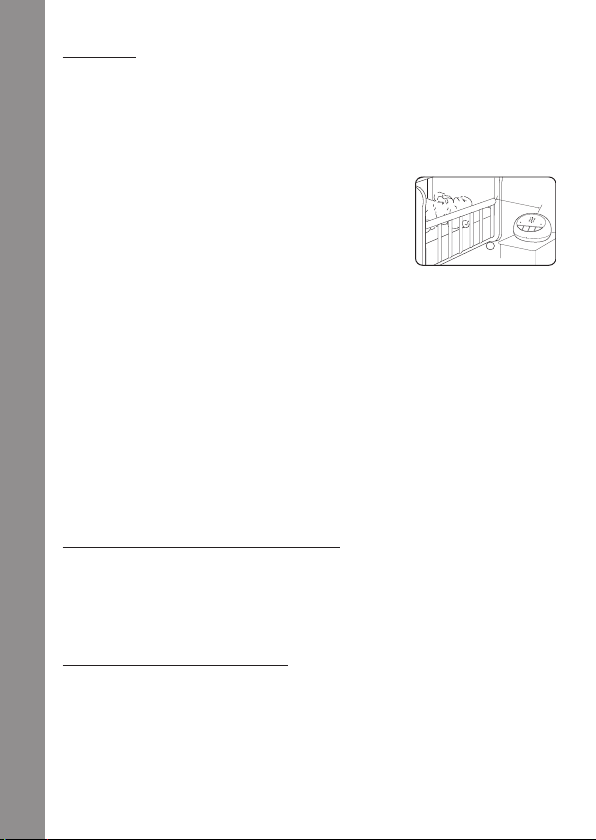
3 feet (at least)
1. Use and store the appliance at a temperature between 32°F and
ENGLISH
104°F.
2. Do not expose the baby unit or parent unit to extreme cold, heat
or direct sunlight. Do not put the baby unit or the parent unit close
to a heating source.
3. Make sure the baby unit and the adaptor
cord are always out of reach of the baby (at
least 3 feet away).
4. Never place the baby unit inside the baby’s
crib or playpen.
5. Never cover the parent unit or baby unit with anything (eg. a towel
or blanket).
6. Always place alkaline batteries of the correct type in the baby
unit.
7. Always use the included rechargeable batteries for the parent unit
to avoid a hazard.
8. If you place the parent unit next to a transmitter or another DECT
appliance (eg. a DECT telephone), the connection with the baby
unit may be lost.
9. Batteries should not be exposed to excessive heat such as bright
sunshine or fire.
Electromagnetic Fields (EMF)
This VTech® baby monitor appliance complies with all standards
regarding electromagnetic fields (EMF). If handled properly and
Important Safety Instructions
according to the instructions in this user manual, the appliance is safe
to use based on scientific evidence available today.
Technical Specifications
Frequency band: 1920MHz - 1930MHz
Frequency channels: 5
Operating temperature: 32°F-104°F
Effective range: 1000ft (outdoors), 150ft (indoors)
6
Page 9
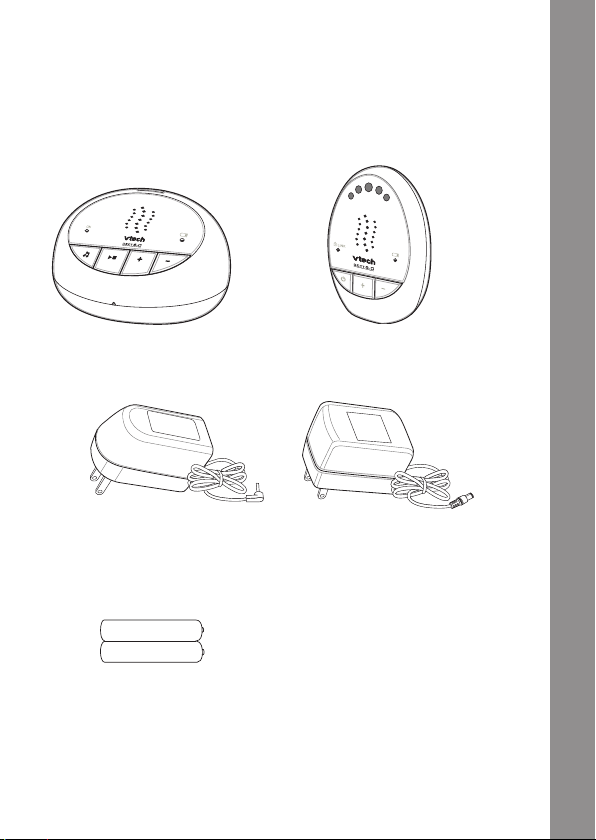
Parts Checklist
Included in this package:
• User’s manual
• Baby unit
Model: 1022 Model: 1022C
• Two adaptors
6V DC 300mA
(for parent unit only)
• Ni-MH Rechargeable batteries
• Parent unit
6V DC 500mA
(for baby unit only)
ENGLISH
Parts Checklist
2 x AAA (AM-4/LR03), 1.2V, 750mAh
7
Page 10

ON
!
Quick Reference Guide
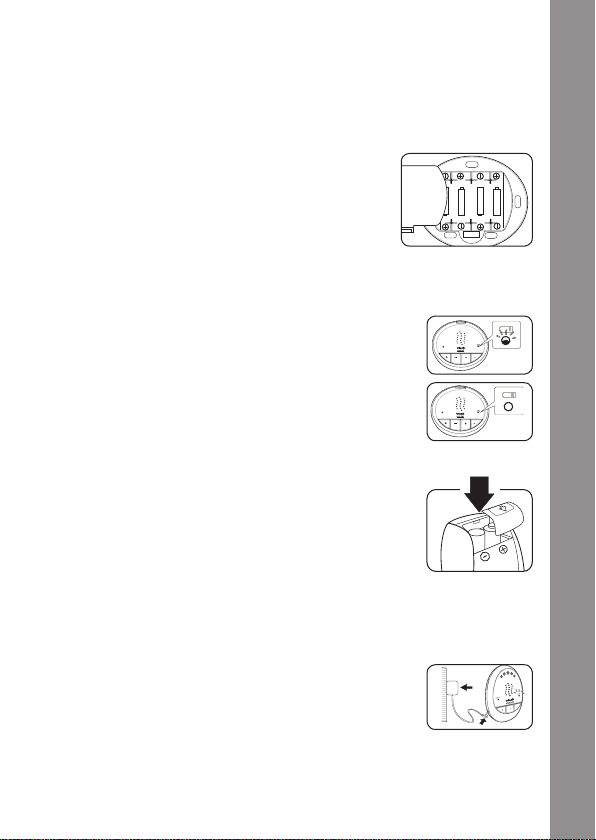
Baby Unit
ENGLISH
1. On/off button
2. PAGE button
3. Power-on light
4. Battery light
5. Volume (+) button
6. Volume (-) button
7. Lullaby button
8. Play/stop button
9. Microphone
13
3
7
8
9
Quick Reference Guide
10 11
10. Adaptor
11. Large appliance plug
12. Socket for large
appliance plug
13. Speaker
14. Battery compartment
15. Battery compartment
cover
1 2
4
6
5
14
15
12
8
Page 11
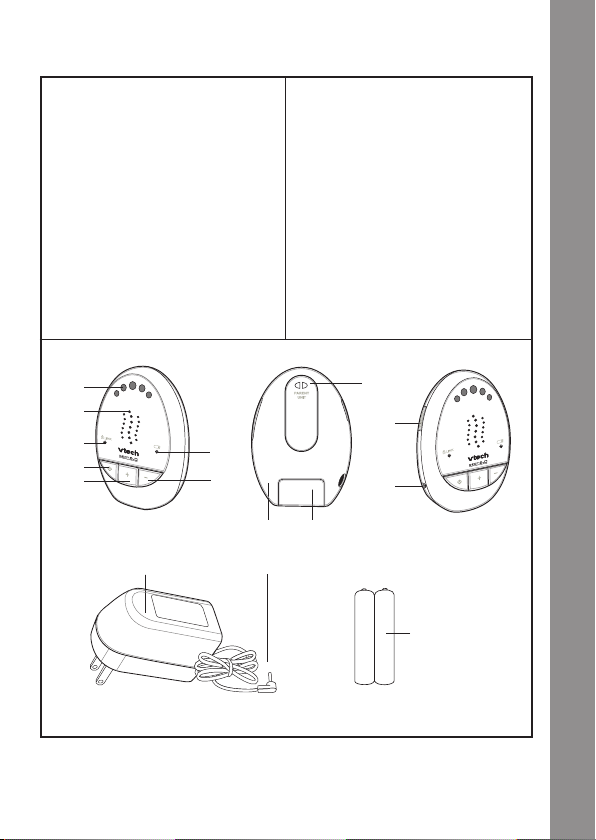
Parent Unit
1. On/off button
2. Secure link indicator
3. Battery light
4. Speaker
5. Sound level indicators
6. Volume(+) button
7. Volume(-) button
8. Sensitivity adjustment
button
9. Adaptor
5
4
2
1
6
3
7
9
10. Socket for small
appliance plug
11. Small appliance plug
12. Rechargeable batteries
compartment
13. Battery compartment
cover
14. Rechargeable batteries
(included)
15. Belt clip
15
8
10
1312
11
ENGLISH
Quick Reference Guide
14
9
Page 12
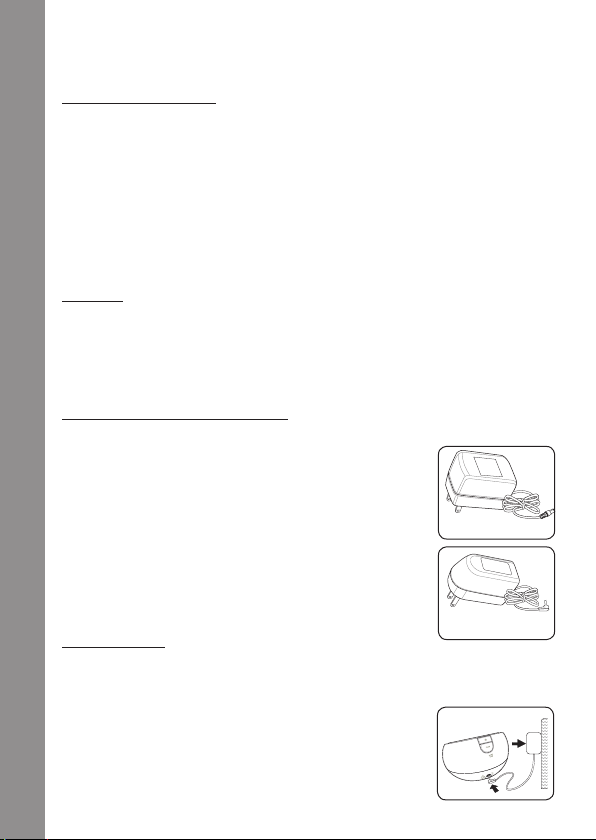
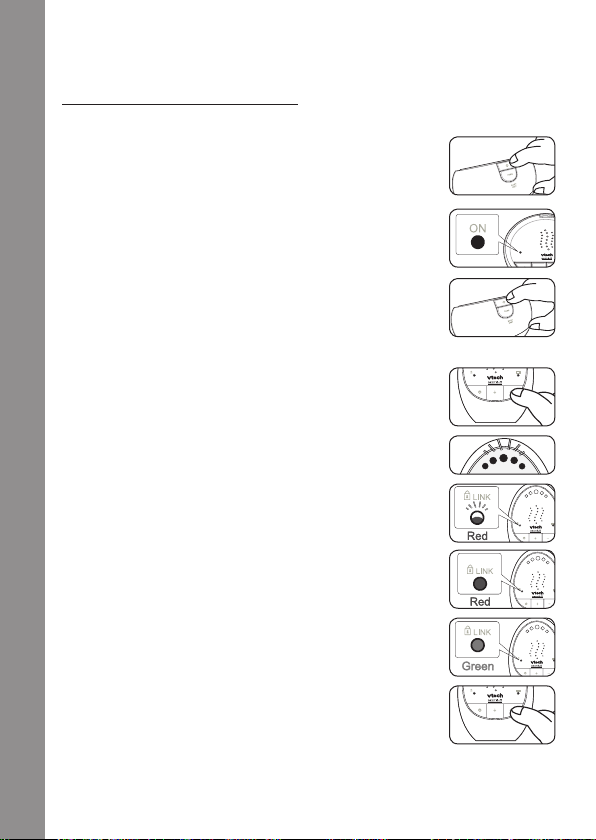
Preparing Your Baby Monitor
!
Adaptor
w all socke
Default Settings
ENGLISH
The first time you turn on the parent and baby units, they are
operating with default settings. Adjustments can be made. Please see
corresponding sections in this manual for instructions.
Speaker volume setting (baby and parent unit)
Default: level 3 (out of 5 levels)
Sensitivity setting (parent unit)
....page 15
Default: level 3 (out of 5 levels)
Power
The baby unit can be connected to a power source or powered by
batteries. Even if the baby unit is connected to a power source, we
recommend also inserting batteries. This guarantees automatic
backup in case of a power outage.
Technical Specifications:
• Baby Unit
- 1 x AC power adaptor 6V DC 500mA (included)
- 4 x AA (AM-3/LR6) 1.5V alkaline batteries (NOT
included)
• Parent Unit
- 1 x AC power adaptor DC 6V 300mA (included)
- 2 x AAA (AM-4/LR03) 1.2V 750mAh Ni-MH
Preparing Your Baby Monitor
rechargeable batteries (included)
Operation:
• Baby Unit
Adaptor operation
Put the large appliance plug into the baby unit’s
socket, and then plug the adaptor into a wall
socket. The power-on light will glow. The baby
unit is ready for use.
10
....page 15
6V DC 500mA
6V DC 300mA
Page 13
Battery operation
ON
ON
Adaptor
wall socke
1. The baby unit runs on 4 pcs 1.5V AA (AM-3/LR6) batteries (not
included). Please use alkaline batteries for best performance.
2. Do NOT use rechargeable batteries, as the baby unit does not
have a charging function.
3. Place 4 pcs 1.5V AA (AM-3/LR6) batteries
into the baby unit’s battery compartment,
noting the + and - configuration. Replace the
battery compartment cover. The power-on
light will glow. The baby unit is ready for use.
4. Note the + and – configuration inside the
battery compartment for using alkaline batteries.
Battery level indication
1. Battery light will flash when the baby unit’s
battery power is low.
Low
battery
2. The light will be off when the baby unit
batteries have sufficient charge or it is plugged in
to an electrical outlet.
Full
battery
• Parent Unit
Rechargeable battery operation
1. The parent unit runs on 2 x AAA, 1.2V, 750mAh,
Ni-MH rechargeable batteries.
ENGLISH
2. Charge the parent unit before you use it for the first time or
when the battery light indicates that the battery is low (the battery
light glows). The parent unit indicates that the battery power is
low 30 minutes before the battery power is completely empty.
3. To charge the parent unit, insert the small
appliance plug into the parent unit, then plug
the adaptor into a wall socket. The battery light
flashes while charging.
4. When the batteries in the parent unit are fully charged, the low
battery light goes off. The parent unit is ready for use.
Preparing Your Baby Monitor
11
Page 14
Note:
LINK
LINK
LINK
• When you charge the parent unit for the first time or after a long
period of non-use, turn it off and let it charge continuously for at
ENGLISH
least 10 hours.
• Charging normally takes 12-14 hours, but it takes longer when
the parent unit is on while charging. To keep the charging time as
short as possible, turn off the parent unit during charging.
• When the battery power is fully charged, the parent unit can be
used cordlessly for about 24 hours.
• After a long period of non-use, recharge the parent unit before
using.
Battery level indication
1. The light will flash when the parent unit
batteries are low.
2. The light will be off when the parent unit
batteries have sufficient charge.
3. The light will be on steadily when the parent
unit is being charged.
Positioning and Operating Range
Positioning the Baby Monitor
Place the baby unit at least 3 feet away from your baby. Place the
Preparing Your Baby Monitor
parent unit within the operating range of the baby unit. Make sure
the parent unit is at least 3 feet away from the baby unit to avoid
acoustic feedback.
Operating Range
The operating range of the baby monitor is about 1000 feet in
open air. Depending on the surroundings and other interfering
factors such as walls, doors and ceilings, the range may be shorter.
Indoors, the operating range is up to 150 feet.
Low
battery
Full
battery
Charging
12
Page 15
Technical Specifications:
Dry Materials
Wood, plaster, cardboard, glass
(without metal, wires or lead)
Brick, plywood
Reinforced concrete
Metal grills or bars
Metal or aluminium sheets
Note:
For wet and moist materials, the loss of range may be up to 100%.
Material
Thickness
< 12 inches
< 12 inches
< 12 inches
< 1/2 inch
< 1/2 inch
Loss of
Range
30-100%
90-100%
ENGLISH
0-10%
5-35%
100%
Preparing Your Baby Monitor
13
Page 16
Baby Monitor Features
ON
LINK
LINK
LINK
LINK
LINK
Turning the Units On/Off
ENGLISH
Baby unit
1. Press and hold the on/off button for about 2
seconds to turn on the unit.
2. The ON light on the baby unit will briefly light
up.
3. Press and hold the on/off button for about 2
seconds to turn off the unit.
Parent unit
1. Press and hold the on/off button for about 2
seconds to turn on the unit.
2. The light indicators on the parent unit will briefly
light up.
3. The secure link indicator will blink red as the
parent unit searches for a secure connection to
the baby unit.
4. If a secure connection is not made within about 30
Baby Monitor Features
seconds to one minute, the secure link indicator
will shine steadily red.
5. When a secure connection is found, the light will
shine steadily green.
6. Press and hold the on/off button for about 2
seconds again to turn off the unit.
14
Page 17
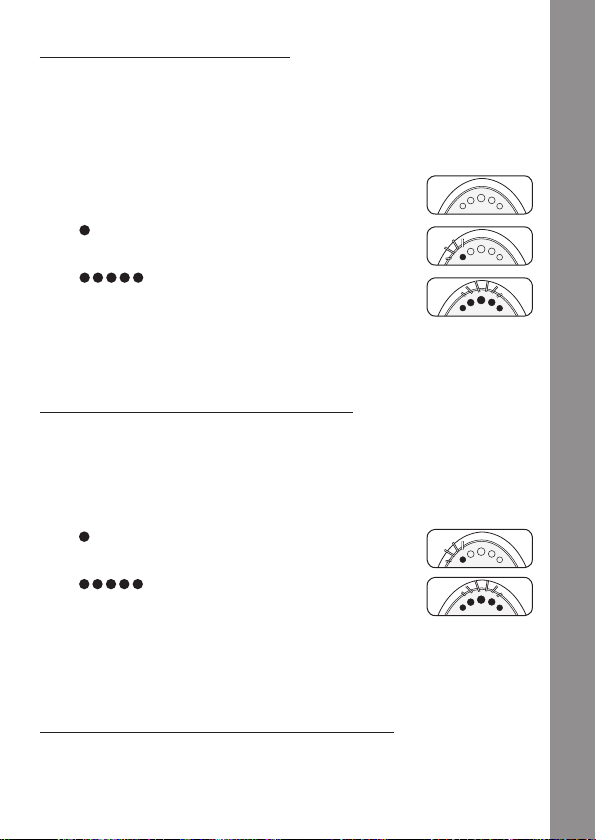
Adjusting Speaker Volume
1. Press the volume control buttons (+,-) on the parent unit until the
desired speaker volume for the parent unit has been reached.
There are 5 volume levels.
2. The sound level indicators show the volume level during
adjustment:
- OOOOO = Parent unit volume is off
- OOOOO = Minimum volume
- OOOOO = Maximum volume
Note:
If the volume is set to a high level, the parent unit consumes more
power.
Adjusting Microphone Sensitivity
1. Press the sensitivity adjustment button on the parent unit until
the desired microphone sensitivity for the baby unit has been
reached. There are 5 sensitivity levels.
2. The sound level indicators show the sensitivity level during
adjustment:
- OOOOO = Minimum sensitivity level
- OOOOO = Maximum sensitivity level
Note:
If the microphone sensitivity level is set to a high level, more
sounds are transmitted and the parent unit consumes more
power.
ENGLISH
Baby Monitor Features
Sound Level Indicators & Sound Alert
The baby unit continuously monitors the sound level in your baby’s
room, and the sound level indicators on the parent unit let you know
if there is any activity. If your baby cries, you will see the sound level
indicators light up on the parent unit.
15
Page 18

1. As long as the baby unit does not detect a sound, the sound level
indicators on the parent unit will not be lit.
2. When the baby unit picks up a sound, one or more sound level
ENGLISH
indicators light up on the parent unit. The number of sound level
indicators that light up corresponds to the loudness of the sound
picked up by the baby unit.
3. For silent baby monitoring, when the baby unit picks up a high
volume of sound, all 5 sound level indicators will light up and the
parent unit will beep as a sound alert.
Paging the Parent Unit
If you have misplaced the parent unit, you can use the PAGE button
on the baby unit to locate the parent unit.
Note: The paging function only works when the parent unit is on.
1. Press the PAGE button on the baby unit. The parent unit will emit
a paging alert tone.
2. To stop the paging alert tone, press the PAGE button again, or
press any button on the parent unit.
Playing Lullabies
1. When there is no lullaby playing, press the lullaby button or
the play/stop button on the baby/parent unit to start playing
lullabies.
2. Press the play/stop button again to play or stop a lullaby.
Baby Monitor Features
3. Press the lullaby button to skip to the next lullaby.
4. Press +/- buttons on baby unit to adjust lullaby volume.
Note:
• The lullabies will play continuously for approximately 15 minutes. To
preserve battery life, the unit will automatically stop playing lullabies after
approximately 15 minutes without input. To reactivate the lullabies, press
the lullaby button or play/stop button.
• The lullaby volume on the baby unit cannot be changed using the parent
unit.
16
Page 19

Lullabies
LINK
LINK
LINK
1. Rock-A-Bye, Baby - Traditional
2. Fais Do Do - French Traditional
3. Au Clair de la Lune - French Traditional
4. Berceuse - Chopin
5. Twinkle, Twinkle - Traditional
6. La Berceuse - Brahms
7. Minuet - Mozart
8. Minuet - Bach
9. Canon in D - Pachelbel
10. Sleeping Beauty Waltz - Tchaikovsky
11. A Little Night Music - Mozart
12. Air - Bach
13. Klipp Klapp Gallop - Strauss
14. Beautiful Dreamer - Foster
15. Rondeau - Mouret
16. Minuet - Boccherini
17. Nocturne in Eb #2 - Chopin
18. Piano Concerto A - Mozart
19. Happy Farmer - Schumann
Out of Range Alert
1. When the parent unit is out of range of the baby
unit, the secure link indicator on the parent unit
will flash.
2. After about 20 seconds, the parent unit will beep
and the secure link indicator will shine steadily
red.
3. To regain reception move the parent unit closer
to the baby unit.
4. Once the connection between the parent and
baby units has been established, the secure link
indicator will shine steadily green.
ENGLISH
Baby Monitor Features
17
Page 20

Troubleshooting
ENGLISH
Problem
Secure link
indicator on
parent unit does
not light up when
the on/off button
is pressed.
Secure link
indicator on
parent unit
flashes.
Troubleshooting
Battery light
on baby unit
flashes.
Battery light
on parent unit
flashes.
Possible causes Solutions
No power from
parent unit.
No power from
baby unit.
Baby unit and parent
unit may be out of
range of each other.
Baby unit and parent
unit may be out of
range of each other.
Baby unit may be
turned off.
Alkaline batteries in
baby unit are running
low.
Rechargeable
batteries in parent
unit are running low.
Recharge parent unit
by connecting it to a
power supply.
Replace with new
alkaline batteries or
connect the baby
unit to the power
supply.
Move the parent unit
closer to the baby
unit, but not closer
than 3 feet.
Reduce the distance
between the units,
but not closer than
3 feet.
Turn on the baby
unit.
Replace alkaline
batteries or connect
the baby unit to the
power supply.
Recharge the
parent unit with the
adaptor.
18
Page 21

Problem Possible causes Solutions
Parent unit
beeps.
Monitor emits
a high-pitched
noise.
Cannot hear
sound or baby
cry from parent
unit.
Parent unit has lost
connection with
baby unit.
Rechargeable
batteries in parent
unit are running low.
Baby unit’s sound
level has reach
maximum level.
Baby unit and parent
unit are too close to
each other.
Parent unit volume is
too high.
Parent unit volume is
too low or completely
turned off.
Baby unit microphone
sensitivity level is too
low.
Baby unit and parent
unit may be out of
range of each other.
Reduce the distance
between the units,
but not closer than
3 feet.
Turn on the baby
unit.
Recharge the parent
unit by connecting it
to the power supply.
Make sure the parent
unit and baby unit are
at least 3 feet away
from each other.
Decrease parent unit
volume level.
Increase parent unit
volume level.
Use the parent unit
to increase the baby
unit’s microphone
sensitivity level.
Reduce the distance
between the units,
but not closer than
3 feet.
ENGLISH
Troubleshooting
19
Page 22

ENGLISH
Parent unit reacts
too slowly to
sounds from the
baby unit.
Problem Possible causes Solutions
Baby unit microphone
sensitivity level is too
low.
Use the parent unit
to increase the baby
unit’s microphone
sensitivity level.
Parent unit reacts
too quickly to
environmental
sounds.
Baby unit battery
power drains too
quickly.
Troubleshooting
Monitor
operating range
is less than the
specified 1000
feet.
Baby unit picks up
sounds other than
those of your baby.
Baby unit microphone
sensitivity level is too
high.
Baby unit microphone
sensitivity level is too
high and consumes
power quickly.
Baby unit volume
level is too high and
consumes power
quickly.
The 1000-feet
specified operating
range is only valid
outdoors in open air.
Inside a home, the
number and type of
walls and ceilings
between the baby
and parent units
limit the operating
range. Indoors, the
operating range is up
to 150 feet.
Move baby unit
closer to the baby,
but not closer than
3 feet.
Use the parent unit
to decrease the baby
unit’s microphone
sensitivity level.
Use the parent unit
to decrease the baby
unit’s microphone
sensitivity level.
Decrease the baby
unit’s volume level.
20
Page 23

Problem Possible causes Solutions
Parent unit
operating
time is shorter
than specified
operating time
of at least 24
hours
Baby unit
microphone
sensitivity level is too
high and consumes
power quickly.
Baby unit volume
level is too high and
consumes power
quickly.
Use the parent
unit to decrease
the baby unit’s
microphone
sensitivity level.
Decrease the baby
unit’s volume level.
ENGLISH
Troubleshooting
21
Page 24

Frequently Asked Questions
1. The technical specifications show an operating range of 1000
ENGLISH
Frequently Asked Questions
22
feet. Why does my monitor lose connection at a much shorter
distance?
The 1000-feet specified operating range is only valid outdoors in
open air. Inside a home, the number and type of walls and ceilings
between the baby and parent units limit the operating range.
Indoors, the operating range is up to 150 feet.
2. The link between the baby and parent units is lost every now
and then, and I’m experiencing sound interruptions.
You may be approaching the outer limits of the operating range.
Try a different location, or decrease the distance between the
units (but not closer than 3 feet). Please note that it takes about
30 seconds to one minute before a new link is established.
3. What happens during a power outage?
If batteries are installed in both the baby and parent units, they
will automatically switch to battery power if the power goes out.
4. Is my DECT baby monitor secure from eavesdropping and
interference?
The 60 channels in the DECT spectrum and the monitor’s secure
channel search technology guarantee no interference from other
appliances.
5. The technical specifications show that a fully charged parent
unit has an operating time of up to 24 hours. Why is my parent
unit out of battery power in much less time?
When the parent unit batteries are charged for the first time, the
operating time will be less than 24 hours. The batteries reach their
full capacity after charging and draining at least 4 times.
The parent unit’s volume level may be too high. When the volume
is set too high, the parent unit consumes more power. Decrease
the volume level.
The baby unit’s microphone sensitivity level may be too high.
When the microphone sensitivity level is high, it picks up more
sounds and transmits them to the parent unit. The parent unit
then consumes more power. Use the parent unit to adjust the
baby unit’s microphone sensitivity level.
Page 25

Appendix
Cleaning and Maintenance
Do not immerse the parent unit or the baby unit in water and do
not clean them under the tap. Do not use cleaning spray or liquid
cleaners.
1. Unplug the baby and parent units if they are connected to a power
source.
2. Clean the baby and parent units with a damp cloth. Make sure
they are dry before re-connecting them to a power source.
3. Unplug the adaptors and clean them with a dry cloth.
4. Dispose of used batteries in an environmentally friendly manner.
5. If the baby unit is connected to a power supply, check its batteries
for leakage every six months.
Storage
When you are not going to use the baby monitor for some time, remove
the alkaline batteries from the baby unit and remove the rechargeable
batteries from the parent unit. Store in a clean, dry place.
Replacement
Baby Unit
• Batteries
Only replace the baby unit’s batteries with 4 x AA (AM-3/LR6),
1.5V batteries.
• Adaptor
Only replace the adaptor of the baby unit with an adaptor of the
same type. Contact Consumer Services at 1-800-521-2010 in the
US or 1-877-352-8697 in Canada for replacement parts.
Parent Unit
• Batteries
Only replace the rechargeable batteries of the parent unit with
2 x AAA (AM-4/LR03), 1.2V, 750mAh, Ni-MH rechargeable
batteries.
ENGLISH
Appendix
23
Page 26

• Adaptor
Only replace the adaptor of the parent unit with an adaptor of the
ENGLISH
same type. Contact Consumer Services at 1-800-521-2010 in the
US or 1-877-352-8697 in Canada for replacement parts.
Environmental Notices
1. This baby monitor is designed and manufactured with high quality
materials and components that can be recycled and reused.
2. Do not throw away the baby monitor with the normal household
waste. Deposit it at an official collection center for electronics
recycling. Always remove all batteries before recycling the baby
monitor. By doing this, you help to preserve the environment.
3. Alkaline batteries contain substances that may pollute the
environment. Do not throw away alkaline batteries with the normal
household waste. Deposit them at an official collection center for
battery recycling.
FCC and IC Regulations
FCC Part 15
This equipment has been tested and found to comply with the limits
for a Class B digital device, pursuant to Part 15 of the FCC Rules and
Appendix
applicable Industry Canada specifications. These limits are designed
to provide reasonable protection against harmful interference in
a residential installation. This equipment generates, uses and can
radiate radio frequency energy and, if not installed and used in
accordance with the instructions, may cause harmful interference
to radio communications. However, there is no guarantee that
interference will not occur in a particular installation. If this equipment
does cause harmful interference to radio or television reception, which
can be determined by turning the equipment off and on, the user is
encouraged to try to correct the interference by one or more of the
following measures:
1. Reorient or relocate the receiving antenna.
2. Increase the separation between the equipment and receiver.
3. Connect the equipment into an outlet on a circuit different from
that to which the receiver is connected.
4. Consult the dealer or an experienced radio/TV technician for help.
24
Page 27

Caution: changes or modifications to this equipment not expressly
approved by the party responsible for compliance could void the
user’s authority to operate the equipment.
This device complies with Part 15 of the FCC rules. Operation is
subject to the following two conditions: (1) this device may not cause
harmful interference, and (2) this device must accept any interference
received, including interference that may cause undesired operation.
This Class B digital apparatus complies with Canadian ICES-003.
For body worn operation, parent unit has been tested and meets
the FCC RF exposure guidelines. Use of accessories may not ensure
compliance with FCC RF exposure guidelines.
Industry Canada
Operation is subject to the following two conditions: (1) this device
may not cause harmful interference, and (2) this device must accept
any interference, including interference that may cause undesired
operation.
The term ‘’IC:‘’ before the certification/registration number only
signifies that the Industry Canada technical specifications were met.
This product meets the applicable Industry Canada technical
specifications.
RF Radiation Exposure Statement
Baby Unit complies with FCC RF radiation exposure limits set forth
for an uncontrolled environment. Baby Unit should be installed and
operated with a minimum distance of 20 cm or 8 in between the
radiator and your body. For hand held operation, the parent unit
has been tested and meets the FCC RF exposure guidelines. Use of
other accessories may not ensure compliance with FCC RF exposure
guidelines. For body worn operation, the parent unit has been tested
and meets the FCC RF radiation exposure guideline when used
with the belt clip. User must maintain a separation distance of 0.1 in
between the back of the unit and the body to ensure compliance. Use
of other accessories may not ensure compliance with FCC RF exposure
guidelines. This transmitter must not be co-located or operating in
conjunction with any other antenna or transmitter. This equipment
complies also with Industry Canada RSS-102 with respect to Canada’s
Health Code 6 for Exposure of Humans to RF Fields.
ENGLISH
Appendix
25
Page 28

Assistance
If a problem persists, please call our Consumer Services Department
at 1-800-521-2010 in the U.S. or 1-877-352-8697 in Canada, and a
ENGLISH
service representative will be happy to help you.
For information on this product’s warranty, please call VTech® at
1-800-521-2010 in the U.S. or 1-877-352-8697 in Canada.
Or visit our website: www.vtechcanada.com
Assistance
26
Page 29

ENGLISH
27
Page 30

29…………………….... Bienvenue
30…………………….... Instructions importantes relatives à la sécurité
35…………………….... Liste de vérification des pièces
FRANÇAIS
FRANÇAIS
36…………………….... Guide de référence rapide
38…………………….... Préparer votre moniteur de bébé
- Réglages par défaut
- Mise en marche
- Positionnement et portée de fonctionnement
42…………………….... Caractéristiques du moniteur de bébé
- Mettre les unités en/hors fonction
- Ajuster le volume du haut-parleur
- Ajuster la sensibilité du microphone
- Voyants du niveau sonore et alerte sonore
- Envoyer un télé-signal à l’unité du parent
- Jouer des berceuses
- Alerte hors de portée
47…………………….... Guide de dépannage
51…………………….... Questions fréquentes
Sommaire
53…………………….... Appendice
- Nettoyage et entretien
- Rangement
- Remplacement
- Avis relatif à l’environnement
- Réglementations de la FCC et d’IC
- Énoncé sur l’exposition aux radiations RF
57…………………….... Assistance
28
Page 31

Bienvenue
Nous vous remercions d’avoir acheté le moniteur de bébé Crystal
SoundsTM DECT. VTech® a pour mission de produire des produits de
télécommunication, ainsi que des jouets et accessoires pour bébé qui
rassurent les parents tout en leur procurant la satisfaction de produits
de haute qualité. Ce moniteur de bébé de VTech® deviendra vos
oreilles en vous permettant d’entendre clairement votre tout-petit sur
une longue distance sans interférences dérangeantes, tout en vous
offrant des réglages personnels qui aideront votre bébé à demeurer à
l’aise, en santé et en sécurité.
Technologie numérique DECT
La technologie DECT (Digital Enhanced Cordless Technology)
transmet numériquement le son par l’entremise de plusieurs canaux
qui utilisent la nouvelle bande de fréquence de la norme DECT. En
plus d’offrir un signal clair comme le cristal entre l’unité du bébé et
celle du parent, cette technologie assure l’absence de tout parasite
provenant d’autres unités sans fil.
FRANÇAIS
FRANÇAIS
Bienvenue
29
Page 32

CONSERVEZ CES INSTRUCTIONS EN LIEU SÛR
INSTRUCTIONS IMPORTANTES RELATIVES À LA
SÉCURITÉ
FRANÇAIS
Lorsque vous utilisez votre appareil, vous devriez toujours suivre certaines
mesures de précaution de base afin de réduire les risques d’incendie,
d’électrocution et de blessure corporelle, dont celles qui suivent :
1. N’utilisez pas cet appareil près de l’eau ni de toute autre source
d’humidité, par exemple, près d’une baignoire, cuve à lessive,
évier de cuisine, dans un sous-sol humide ni près d’une piscine.
2. N’utilisez que le cordon d’alimentation et les piles indiquées
dans ce guide. Ne jetez pas les piles au feu, car elles peuvent
exploser. Consultez les autorités locales afin de connaître les
façons spéciales de jeter ce produit, s’il y a lieu.
3. N’utilisez que les adaptateurs inclus avec ce produit. L’utilisation
d’un adaptateur dont la polarité ou la tension serait inadéquate
risque d’endommager sérieusement le produit et mettre votre
sécurité en péril.
Adaptateur de l’unité du bébé :
Entrée : 117V CA, 60Hz
Sortie : 6V CC, 500mA
Bienvenue
Adaptateur de l’unité du parent :
Entrée : 117V CA, 60Hz
Sortie : 6V CC, 300mA
4. Il y a un risque d’explosion si vous remplacez les piles par des
piles de type incorrect. Jetez les piles mortes en respectant les
directives mentionnées dans ces instructions.
Utilisez des piles alcalines AA (AM-3/LR6) de 1,5 volt pour l’unité
du bébé (les piles ne sont pas incluses).
Utilisez des piles rechargeables AAA (1,2V 750 mAh) NiMh pour
l’unité du parent (les piles sont incluses).
L’une des deux marques de piles seront fournies pour l’unitée aux
parents :
1) Marque : BYD, no. modèle : H-AAA-750A-UN
2) Marque : GP, no. modèle : GN75AAAHC
30
CONSERVEZ CES INSTRUCTIONS EN LIEU SÛR
Classe 2
Page 33

Avertissement
Veuillez lire attentivement ce guide avant de procéder à l’utilisation
de l’appareil; conservez-le en lieu sûr pour toute référence ultérieure.
1. Ce moniteur de bébé est destiné à être utilisé en tant qu’aide
aux parents. Il ne doit pas servir de substitut pour la supervision
responsable par un adulte et ne devrait jamais être utilisé comme
tel.
2. N’immergez jamais une partie du moniteur de bébé dans l’eau ni
tout autre liquide.
3. Avant de brancher l’appareil, vérifiez si la tension indiquée sur les
adaptateurs inclus correspond à celle de vos prises de courant.
4. N’utilisez que les adaptateurs inclus pour brancher les unités du
parent et du bébé dans les prises de courant.
5. Ne coupez pas les fiches des adaptateurs secteur inclus pour
les remplacer par d’autres fiches, car ceci peut compromettre la
sécurité de votre bébé.
6. Si les adaptateurs sont endommagés, ne les remplacez que par
des adaptateurs du même type afin d’éviter tous les dangers. Pour
connaître le type exact de votre adaptateur, veuillez consulter la
section se rapportant au “Remplacement” de ce guide.
7. N’utilisez jamais le moniteur de bébé dans les endroits humides ni
près de l’eau.
8. À l’exception des compartiments des piles, n’ouvrez pas le boîtier
de l’unité du bébé ni de celui du parent afin d’éviter les risques
d’électrocution.
9. Cet appareil électrique n’a pas été conçu pour être utilisé par
des personnes (y compris des enfants) aux capacités physiques,
sensorielles ou mentales réduites, ni par celles qui n’ont pas
l’expérience ou les connaissances nécessaires, à moins qu’elles
n’aient reçu l’instruction ou la formation adéquate en ce qui
concerne l’utilisation de cet appareil par une personne responsable
de leur sécurité.
10. Assurez-vous que les enfants ne jouent pas avec l’appareil.
FRANÇAIS
Avertissement
31
Page 34

11. N’utilisez que le type de piles spécifié dans les instructions. La
garantie sera annulée si vous utilisez d’autres types de piles.
Veuillez communiquer avec VTech pour vous procurer un bloc-
FRANÇAIS
piles de rechange. Vous trouverez les renseignements pour entrer
en contact avec VTech à la dernière page de ces instructions.
12. Débranchez le bloc-piles rechargeable lorsque vous décidez de
ne pas utiliser ou d’entreposer l’appareil pendant une longue
période de temps.
13. Débranchez le cordon d’alimentation avant de remplacer les
piles.
Avertissement
32
Page 35

Mise en garde
1. Utilisez et entreposez l’appareil à des températures se trouvant
entre 32˚ F et 104 ˚ F.
2. N’exposez pas l’unité du bébé ou celui du parent à des froids ou
des chaleurs extrêmes, ainsi qu’à la lumière directe du soleil. Ne
les installez pas près d’une source de chauffage.
3. Assurez-vous que l’unité du bébé et le
cordon de l’adaptateur secteur soient
toujours hors de portée du bébé (à une
distance d’au moins 3 pieds).
4. Ne positionnez jamais l’unité du bébé à l’intérieur du berceau ou
du parc du bébé.
5. Ne recouvrez jamais l’unité du parent ou du bébé (par exemple,
une couverture ou une serviette).
6. Insérez toujours des piles alcalines du type adéquat dans l’unité
du bébé.
7. Afin d’éviter les dangers, utilisez toujours les piles rechargeables
incluses dans l’unité du parent.
8. Si vous installez l’unité du parent près d’un transmetteur ou un
autre appareil DECT (par exemple, un téléphone DECT), il se peut
que vous perdiez la liaison avec le moniteur de bébé.
9. Vous ne devriez pas exposer les piles à une source de chaleur
excessive telle que la lumière directe du soleil ou un feu.
Champs électromagnétiques (EMF)
Ce moniteur de bébé de
rapportant aux champs électromagnétiques (EMF) standard. Si vous
le manipulez correctement en suivant les instructions de ce guide, son
utilisation sera sécuritaire pendant de nombreuses années, selon les
meilleures évidences scientifiques dont nous disposons aujourd’hui.
VTech® est conforme à toutes les normes se
FRANÇAIS
Mise en garde
33
Page 36

Spécifications techniques
Bande de fréquences : 1920 MHz – 1930 MHz
Canaux de fréquences : 5
FRANÇAIS
Température de fonctionnement : 32˚ F – 104 ˚ F
Portée efficace : 1000 pi. (à l’extérieur), 150 pi. (à l’intérieur)
Mise en garde
34
Page 37

Liste de vérification des pièces
Accessoires inclus dans cet emballage :
• Guide d’utilisation
• Unité du bébé • Unité du parent
• Deux adaptateurs secteur
FRANÇAIS
(pour l’unité du bébé seulement)
6V CC 500mA
• Piles rechargeables au NiMh
2 x AAA (AM-4/LR03) de 1,2V
(pour l’unité du parent seulement)
6V CC 300mA
Liste de vérification des pièces
35
Page 38

Guide de référence rapide
!
Unité du bébé
FRANÇAIS
1. Bouton de mise en marche/
arrière
2. Bouton de télé-signal ‘PAGE’
3. Voyant de la mise en marche
4. Voyant des piles
5. Bouton d’augmentation du
volume (+)
6. Bouton de diminution du
volume (-)
7. Bouton de berceuse
‘LULLABY’
13
8. Bouton de lecture/pause
9. Microphone
10. Adaptateur secteur
11. Fiche de type baril
12. Douille de la fiche de type baril
13. Haut-parleur
14. Compartiment des piles
16. Piles alcalines (non incluses)
1 2
3
7
8
9
Guide de référence rapide
10
16
36
4
6
5
11
14
15
12
Page 39

Unité du parent
1. Bouton de mise en marche/
arrière
2. Voyant de liaison sécuritaire
3. Voyant des piles
4. Haut-parleur
5. Voyants du niveau sonore
6. Bouton d’augmentation du
volume (+)
7. Bouton de diminution du
volume (-)
8. Bouton de réglage de la
sensibilité
5
4
2
1
6
9
3
7
11
9. Adaptateur secteur
10. Douille pour la fiche de type
baril des petits appareils
électriques
11. Fiche de type baril des petits
appareils électriques
12. Compartiment des piles
rechargeables
13. Couvercle du compartiment
des piles
14. Piles rechargeables (incluses)
15. Attache-ceinture
15
8
10
1312
14
FRANÇAIS
Guide de référence rapide
37
Page 40

Préparer votre moniteur de bébé
Réglages par défaut
FRANÇAIS
La première fois que vous mettez les unités du parent et du bébé, ceuxci fonctionnent avec les réglages par défaut. Vous pouvez effectuer
les réglages désirés. Veuillez consulter les sections correspondantes
dans ce guide.
Réglage du volume du haut-parleur (unités du bébé et du
parent)...page 43
Réglage de la sensibilité (unité du parent)...page 43
Par défaut : niveau 3 (sur 5 niveaux)
Mise en marche/arrêt
L’unité du bébé peut être raccordée à une source d’alimentation
ou alimentée par piles. Même si l’unité est raccordée à une source
d’alimentation, nous vous recommandons aussi d’insérer les piles.
Ceci garantit une sauvegarde automatique de la mémoire en cas de
panne de courant.
Spécifications techniques :
• Unité du bébé
- 1 x adaptateur secteur CA de 6V CC 500mA
(inclus)
- 4 x piles alcalines AA (AM-3/LR6) de 1,5V (NON
incluses)
• Unité du parent
- 1 x adaptateur secteur CA de 6V CC 300mA
Préparer votre moniteur de bébé
(inclus)
- 2 x piles alcalines AAA (AM-4/LR03) de 1,2V au
NiMh rechargeables (incluses)
6V CC 500mA
6V CC 300mA
38
Page 41

Fonctionnement :
!
Adaptor
ON
ON
• Unité du bébé
Fonctionnement de l’adaptateur
Insérez la grande fiche de type baril dans la prise
de l’unité du bébé, puis branchez l’adaptateur
secteur dans une prise murale. Le voyant
lumineux de mise en marche brillera. L’unité du
bébé est prête à être utilisée.
Fonctionnement sur piles
1. L’unité du bébé fonctionne sur 4 piles AA (AM-3/LR6) de 1,5 V
(non incluses). Pour obtenir une meilleure performance, veuillez
utiliser des piles alcalines.
2. N’utilisez PAS des piles rechargeables, car l’unité du bébé ne
possède pas de fonction de charge.
3. Insérez les 4 piles AA (AM-3/LR6) de 1,5 V
dans le compartiment des piles de l’unité du
bébé, en prenant note des polarités + et -.
Replacez le couvercle du compartiment des
piles. Le voyant de mise en marche brillera.
L’unité du bébé est prête à fonctionner.
4. Lorsque vous utilisez des piles alcalines, remarquez la
configuration des polarités + et - à l’intérieur du compartiment
des piles.
Niveau d’alimentation des piles
1. Le voyant lumineux des piles clignotera lorsque
le niveau d’alimentation des piles de l’unité du
bébé s’affaiblit.
2. Le voyant sera éteint lorsque les piles de l’unité
du bébé posséderont une charge suffisante ou si
l’unité est branchée dans une prise de courant.
• Unité du parent
Fonctionnement sur piles rechargeables
1. L’unité du parent fonctionne sur 2 piles AAA
(AM-4/LR03) de 1,2V rechargeables au NiMh.
Piles
faibles
Piles
pleines
FRANÇAIS
Préparer votre moniteur de bébé
39
Page 42

2. Chargez l’unité du parent avant la première utilisation ou lorsque
Adaptor
LINK
LINK
LINK
le voyant lumineux des piles indique que la pile est faible (le voyant
des piles brille). L’unité du parent indique que la charge des piles
FRANÇAIS
est faible 30 minutes avant que celle-ci ne soit complètement
vide.
3. Pour charger l’unité du parent, insérez la petite
fiche dans celle-ci, puis branchez l’adaptateur
secteur dans une prise de courant murale. Le
voyant lumineux des piles clignote pendant la
recharge.
4. Lorsque les piles sont entièrement chargées dans l’unité du parent,
le voyant de piles faibles s’éteint. L’unité du parent est prête à être
utilisée.
Remarque :
• La première fois que vous chargez l’unité du parent ou après
une longue période d’inutilisation, mettez celle-ci hors tension
et laissez-la se charger continuellement pendant au moins 10
heures.
• Une charge prend normalement de 12 à 14 heures, mais elle
prend plus longtemps lorsque l’unité du parent est en marche
pendant la charge. Pour raccourcir le temps de charge le plus
que possible, mettez l’unité du parent hors fonction pendant la
charge.
• Lorsque l’alimentation des piles est pleine, vous pouvez utiliser
l’unité du parent sans fil pendant environ 24 heures.
• Après une longue période d’inutilisation, rechargez l’unité du
parent avant de l’utiliser.
Indication du niveau de charge des piles
Préparer votre moniteur de bébé
1. Le voyant lumineux clignotera lorsque les piles
de l’unité du parent sont faibles.
2. Le voyant lumineux s’éteindra lorsque les piles de
l’unité du parent possèdent une charge suffisante.
3. Le voyant lumineux sera allumé et demeurera
40
constant lorsque l’unité du parent est en cours de
charge.
Piles
faibles
Piles
pleines
Charge
en cours
Page 43

Positionnement et portée de fonctionnement
Positionner le moniteur de bébé
Placez l’unité du bébé à au moins 3 pieds de votre bébé. Placez l’unité
du parent à l’intérieur de la portée de fonctionnement de l’unité du
bébé. Assurez-vous que l’unité du parent se trouve à au moins 3 pieds
de l’unité du bébé afin d’éviter toute rétroaction acoustique.
Portée de fonctionnement
La portée de fonctionnement du moniteur de bébé est d’environ 1 000
pieds à aire ouverte. Selon les conditions environnantes et d’autres
facteurs pouvant créer des interférences tels que des murs, des portes
et des plafonds, la portée peut être plus courte. À l’intérieur, la portée
de fonctionnement est d’environ 150 pieds.
Spécifications techniques :
Matériaux
Bois, placoplâtre, carton, verre
(sans métal ni câbles)
Épaisseur du
matériel
< 12 pouces 0-10%
Perte de
la portée
FRANÇAIS
Brique, contreplaqué
Béton armé
Grillages ou barres métalliques
Feuilels de métal ou d’aluminium
Remarque :
Pour les matériaux humides, la perte de portée peut être jusqu’à 100 %.
< 12 pouces
< 12 pouces
< 12 pouces
< 12 pouces
5-35%
30-100%
90-100%
100%
Préparer votre moniteur de bébé
41
Page 44

Caractéristiques du moniteur de bébé
ON
MISE EN
MARCHE
LINK
LINK
LINK
Rouge
LINK
Vert
LINK
Rouge
Mettres les unités en/hors fonction
FRANÇAIS
Unité du bébé
1. Maintenez enfoncée la touche de mise en
marche/arrêt pendant environ 2 secondes afin
de mettre l’appareil en marche.
2. Le voyant lumineux de la mise en marche de
l’unité du bébé s’allumera brièvement.
3. Maintenez enfoncée la touche de mise en
marche/arrêt pendant environ 2 secondes afin
de mettre l’appareil hors fonction.
Unité du parent
1. Maintenez enfoncée la touche de mise en
marche/arrêt pendant environ 2 secondes afin
de mettre l’appareil en marche.
2. Les voyants lumineux de l’unité du parent
s’allumeront brièvement.
3. Le témoin lumineux connecté clignote pendant
quelques secondes (recherche de connexion
avec l’unité Bébé).
4. Le voyant de liaison sécuritaire clignotera en
rouge pendant que l’unité du parent recherche
une connexion sécurisée à l’unité du bébé.
5. Lorsqu’une connexion sécurisée est trouvée,
Caractéristiques du moniteur de bébé
le voyant lumineux brillera en vert de façon
constante.
6. Maintenez enfoncée la touche de mise en
marche/arrêt pendant environ 2 secondes afin
de mettre l’unité hors fonction.
42
Page 45

Ajuster le volume du haut-parleur
1. Appuyez sur les touches (+, -) de contrôle du volume de l’unité du
parent, jusqu’à ce que le volume désiré soit atteint. Vous disposez
de 5 niveaux de volume.
2. Les voyants du niveau sonore indiquent le niveau du volume
pendant le réglage :
- OOOOO = Le volume de l’unité du parent est
éteint
- OOOOO = Le volume est au minimum
- OOOOO = Le volume est au maximum
Remarque :
Si le volume est réglé à un niveau élevé, l’unité du parent
consomme plus de courant.
Ajuster la sensibilité du microphone
1. Appuyez sur la touche de réglage de la sensibilité de l’unité
du parent, jusqu’à ce que la sensibilité du microphone désirée
soit atteinte sur l’unité du bébé. Vous disposez de 5 niveaux de
sensibilité.
2. Les voyants du niveau sonore indiquent le niveau de sensibilité
pendant le réglage :
- OOOOO = Niveau de sensibilité minimum
- OOOOO = Niveau de sensibilité maximum
FRANÇAIS
Remarque :
Si la sensibilité du microphone est réglée à un niveau élevé, l’unité
du bébé transmettra plus de sons et l’unité du parent consommera
plus de courant.
Caractéristiques du moniteur de bébé
43
Page 46

Voyants du niveau sonore et alerte sonore
L’unité du bébé surveille continuellement le niveau sonore dans la
chambre de bébé et les voyants du niveau sonore de l’unité du parent
vous permettent de savoir s’il y a de l’activité dans la pièce. Si votre
FRANÇAIS
bébé pleure, vous verrez les voyants du niveau sonore s’allumer sur
l’unité du parent.
1. Tant que l’unité du bébé ne détectera pas de son, les voyants du
niveau sonore de l’unité du parent ne s’allumeront pas.
2. Lorsque l’unité du bébé détecte un son, un ou plusieurs voyants
du niveau sonore s’allumeront sur l’unité du parent. Le nombre
de voyants qui s’allument correspond à la force du son capté par
l’unité du bébé.
3. Pour le monitorage silencieux de l’enfant, lorsque l’unité du bébé
capte un niveau de volume élevé, tous les 5 voyants du niveau
sonore s’allumeront et l’unité du parent émettra un bip en guise
d’alerte sonore.
Envoyer un télé-signal à l’appareil du parent
Si vous avez égaré l’unité du parent, vous pouvez utiliser la touche de
télé-signal “PAGE” de l’unité du bébé pour trouver celle-ci.
Remarque : La fonction de télé-signal ne fonctionne que lorsque
l’unité du parent est mise en marche.
1. Appuyez sur la touche “PAGE” de l’unité du bébé. L’unité du
parent émettra une tonalité d’alerte de télé-signal.
2. Pour arrêter la tonalité d’alerte de télé-signal, appuyez de nouveau
sur la touche “PAGE” ou appuyez sur n’importe quelle touche de
l’unité du parent.
Jouer les berceuses
Caractéristiques du moniteur de bébé
1. Lorsqu’aucune berceuse ne joue, appuyez sur la touche “Lullaby”
ou la touche de lecture/arrêt “play/stop” de l’unité du parent
pour lancer la lecture des berceuses.
2. Appuyez de nouveau sur la touche “play/stop” pour jouer ou
arrêter une berceuse.
3. Appuyez sur la touche “lullaby” pour sauter à la berceuse
suivante.
4. Appuyez sur les touches +/- de l’unité du bébé pour ajuster le
44
volume de la berceuse.
Page 47

Remarques :
• Les berceuses jouent en continu pendant environ 15 minutes. Pour
préserver la durée de vie des piles, l’unité cessera automatiquement de
jouer les berceuses après environ 15 minutes si vous n’appuyez sur aucune
touche. Pour réactiver les berceuses, appuyez sur la touche des berceuses
ou sur la touche de lecture/arrêt.
• Le volume des berceuses de l’unité du bébé ne peut pas être changé par
le biais de l’unité du parent.
Berceuses
1. Rock-A-Bye, Baby - chanson traditionnelle
2. Fais dodo - chanson traditionnelle française
3. Au clair de la lune - chanson traditionnelle française
4. Berceuse - Chopin
5. Twinkle, Twinkle - chanson traditionnelle
6. La berceuse - Brahms
7. Menuet - Mozart
8. Menuet - Bach
9. Canon en D - Pachelbel
10. Valse de la Belle au bois dormant - Tchaikovsky
11. Petite musique de nuit - Mozart
12. Air - Bach
13. Klipp Klapp Gallop - Strauss
14. Beautiful Dreamer - Foster
15. Rondeau - Mouret
16. Menuet - Boccherini
17. Nocturne en mi bémol no 2 - Chopin
18. Concerto pour piano en la - Mozart
19. Happy Farmer - Schumann
FRANÇAIS
Caractéristiques du moniteur de bébé
45
Page 48

Alerte hors de portée
LINK
LIAISON
LINK
Vert
LINK
Rouge
1. Lorsque l’unité du parent est hors de la portée de
l’unité du bébé, le voyant de liaison sécuritaire
FRANÇAIS
clignote sur l’unité du parent.
2. Après environ 20 secondes, l’unité du parent
émettra un bip et le voyant de la liaison sécuritaire
brillera en rouge de façon constante.
3. Pour rétablir la communication entre les deux
unités, rapprochez l’unité du parent de celle du bébé.
4. Lorsque la communication entre les deux unités
est rétablie, le voyant de liaison sécuritaire brillera
en vert de façon constante.
Caractéristiques du moniteur de bébé
46
Page 49

Guide de dépannage
Problème
Le voyant de
liaison sécurisée
de l’unité du
parent ne
s’allume pas
lorsque vous
appuyez sur la
touche de mise
en marche/arrêt.
Le voyant de
liaison sécuritaire
clignote sur
l’unité du parent.
Le voyant des
piles clignote sur
l’unité du bébé.
Le voyant des
piles clignote sur
l’unité du parent.
Causes probables Solutions
Aucune alimentation
n’est fournie à l’unité
du parent.
Remplacez les piles
de l’unité du bébé
par des piles neuves
ou branchez-la à une
source d’alimentation.
Rapprochez l’unité
du parent de celle du
bébé, mais pas plus
près que 3 pieds.
Les unités du parent
et du bébé peuvent
être hors de portée
l’une de l’autre.
Mettez l’unité du
bébé en marche.
Les piles alcalines de
l’unité du bébé sont
faibles.
Les piles rechargeables
de l’unité du parent
sont faibles.
Rechargez l’unité
du parent en la
raccordant à une
source d’alimentation.
Rapprochez l’unité
du parent de celle du
bébé, mais pas plus
près que 3 pieds.
Remplacez les
piles alcalines ou
branchez l’unité du
bébé à une source
d’alimentation.
Rechargez l’unité du
parent à l’aide de
l’adaptateur secteur.
FRANÇAIS
Guide de dépannage
47
Page 50

Problème Causes probables Solutions
L’unité du parent
FRANÇAIS
émet un bip.
Le moniteur
émet un bruit
très aigu.
Les sons ou les
pleurs du bébé
ne peuvent être
entendus sur
l’unité du parent.
Guide de dépannage
La communication
entre l’unité du
parent et celle du
bébé est perdue.
Rechargez l’unité du
parent à l’aide de
l’adaptateur secteur.
Les unités du bébé et
du parent sont trop
rapprochées l’une de
l’autre.
Diminuez le niveau
de volume de l’unité
du parent.
Le volume de l’unité
du parent est trop bas
ou réduit au minimum.
Utilisez l’unité
du parent pour
augmenter le niveau
de sensibilité du
microphone de
l’unité du bébé.
Rapprochez l’unité
du parent de celle
du bébé, mais pas
plus près que 3
pieds.
Réduisez la distance
entre les unités,
mais pas plus près
que 3 pieds.
Éloignez les deux
unités l’une de l’autre,
en vous assurant qu’il
y ait au moins 3 pieds
entre les deux.
Augmentez le niveau
de volume de l’unité
du parent.
48
Page 51

Problème Causes probables Solutions
L’unité du parent
réagit trop
lentement aux
sons provenant
de l’unité du
bébé.
L’unité du
parent réagit
trop rapidement
aux bruits de
l’environnement.
Les piles de
l’unité du bébé
se vident trop
rapidement.
Le niveau de
sensibilité du
microphone de
l’unité du bébé est
trop bas.
L’unité du bébé capte
les sons autres que
ceux de votre bébé.
Utilisez l’unité du
parent pour réduire le
niveau de sensibilité
du microphone de
l’unité du bébé.
Le niveau de
sensibilité du
microphone de l’unité
du bébé est trop
élevé et consomme
l’alimentation trop
rapidement.
Réduisez le niveau de
volume de l’unité du
bébé.
Utilisez l’unité
du parent pour
augmenter le niveau
de sensibilité du
microphone de
l’unité du bébé.
Rapprochez l’unité du
bébé de votre enfant,
mais pas plus près
que 3 pieds.
Utilisez l’unité
du parent pour
réduire le niveau
de sensibilité du
microphone de
l’unité du bébé.
FRANÇAIS
Guide de dépannage
49
Page 52

Problème Causes probables Solutions
La portée de
FRANÇAIS
fonctionnement
du moniteur
est inférieure
à la portée de
1 000 pieds
mentionnée dans
les spécifications.
La portée de
1 000 pieds
mentionnée dans
les spécifications
se rapporte au
fonctionnement
à aire ouverte,
à l’extérieur. À
l’intérieur d’une
maison, le nombre
et le type de murs,
de plafonds et de
planchers se trouvant
entre les unités du
bébé et du parent,
limitent la portée
de leur utilisation. À
l’intérieur, la portée
de fonctionnement
est d’au plus 150
pieds.
Guide de dépannage
50
Page 53

Questions fréquentes
1. Les spécifications techniques indiquent une portée de
fonctionnement de 1 000 pieds. Pourquoi mon moniteur perdil la communication à une distance beaucoup plus courte.
La portée de 1 000 pieds mentionnée dans les spécifications est
valide uniquement à aire ouverte, à l’extérieur de la maison. À
l’intérieur d’une maison, le nombre et le type de murs, de plafonds
et de planchers se trouvant entre les unités du bébé et du parent,
limitent la portée de leur utilisation. À l’intérieur, la portée de
fonctionnement est d’au plus 150 pieds.
2. De temps à autre, la liaison se perd entre les unités du bébé
et du parent et j’éprouve des interruptions sonores.
Il se peut que vous approchiez les limites extérieures de la portée
de fonctionnement. Essayez un emplacement différent ou réduisez
la distance entre les deux unités (mais pas plus près que 3 pieds).
Veuillez noter qu’il faut environ de 30 secondes à 1 minute avant
qu’une nouvelle liaison soit établie.
3. Que se passe-t-il pendant une panne de courant?
Si les piles sont installées dans les deux unités, celles-ci
commuteront automatiquement au mode d’alimentation par piles
si le courant est coupé.
4. Mon moniteur de bébé DECT est-il sécurisé contre l’écoute
clandestine et les interférences?
Les 60 canaux du spectre DECT et la technologie de recherche
sécuritaire de canaux du moniteur garantissent qu’il n’y aura pas
d’interférences provenant d’autres appareils.
5. Les spécifications techniques indiquent qu’une unité de
parent possédant une charge pleine produit une durée de
fonctionnement d’au plus 24 heures. Pourquoi l’alimentation
de mon unité de parent s’affaiblit-elle en beaucoup moins de
temps?
Lorsque les piles d’une unité de parent sont chargées pour la
première fois, la durée de fonctionnement sera inférieure à 24
heures. Les piles atteignent leur pleine capacité après au moins 4
cycles de charge/drainage.
Le niveau de volume de l’unité du parent peut être trop élevé.
FRANÇAIS
Questions fréquentes
51
Page 54

Lorsque le volume est trop élevé, l’unité du parent consomme
plus de courant. Baissez le niveau de volume.
Le niveau de sensibilité du microphone de l’unité du bébé est peut-
FRANÇAIS
être trop élevé. Lorsque le niveau de sensibilité du microphone est
trop élevé, il capte plus de sons et les transmet à l’unité du parent.
L’unité du parent consomme alors plus de courant. Utilisez l’unité
du parent pour ajuster le niveau de sensibilité du microphone de
l’unité du bébé.
Questions fréquentes
52
Page 55

Appendice
Nettoyage et entretien
N’immergez pas l’unité du parent ni celui du bébé dans l’eau et ne
les nettoyez pas sous l’eau du robinet. N’utilisez pas de nettoyant en
aérosol ni de liquide.
1. Débranchez les unités du parent et du bébé s’ils sont branchés à
une prise de courant.
2. Nettoyez les deux unités à l’aide d’un chiffon humide et propre.
Assurez-vous que celles-ci soient bien sèches avant de les
rebrancher dans la prise de courant.
3. Débranchez les adaptateurs et nettoyez-les à l’aide d’un chiffon
sec.
4. Jetez les piles mortes de façon écologique.
5. Si l’unité du bébé est branchée dans une prise de courant, vérifiez
si les piles coulent tous les six mois.
Entreposage
Lorsque vous prévoyez ne pas utiliser le moniteur de bébé pendant
un certain temps, retirez les piles alcalines de l’unité du bébé et retirez
les piles rechargeables de l’unité du parent. Entreposez-les dans un
endroit propre et sec.
Remplacement
Unité du bébé
• Piles
Ne remplacez les piles de l’unité du bébé que par 4 piles AA
(AM-3/LR6) de 1,5 volt.
• Adaptateur secteur
Ne remplacez l’adaptateur secteur de l’unité du bébé que par
un adaptateur du même type. Communiquez avec le service aux
consommateurs en composant le 1-877-352-8697 au Canada
ou 1-800-521-2010 aux États-Unis afin d’obtenir des pièces de
rechange.
FRANÇAIS
Appendice
53
Page 56

Unité du parent
• Piles
Ne remplacez les piles rechargeables de l’unité du parent que par
FRANÇAIS
2 piles AAA (AM-4/LR03) de 1,2V rechargeables au NiMh.
• Adaptateur secteur
Ne remplacez l’adaptateur secteur de l’unité du parent que par
un adaptateur du même type. Communiquez avec le service aux
consommateurs en composant le 1-877-352-8697 au Canada
ou 1-800-521-2010 aux États-Unis afin d’obtenir des pièces de
rechange.
Avis relatif à l’environnement
1. Ce moniteur de bébé est conçu et fabriqué avec des matériaux
et composantes de haute qualité qui peuvent être recyclés et
réutilisés.
2. Ne jetez pas le moniteur de bébé dans les rebuts domestiques
normaux. Déposez-le dans un centre de cueillette officiel où on
peut recevoir et recycler les appareils électriques et électroniques.
Retirez toujours les piles d’un appareil avant de recycler le
moniteur de bébé. En faisant ceci, vous contribuerez à préserver
l’environnement.
Appendice
3. Les piles alcalines contiennent des substances pouvant polluer
l’environnement. Ne jetez pas les piles alcalines dans les rebuts
domestiques normaux. Déposez-les dans un centre de cueillette
officiel où on peut recevoir et recycler les piles alcalines.
Réglementations de la FCC et de l’IC
Article 15 des règlements de la FCC
Cet appareil a été testé et s’avère conforme aux restrictions relatives
aux équipements numériques de classe B, d’après l’article 15 des
règlements de la FCC. Ces restrictions ont été instaurées pour offrir
une protection raisonnable contre les interférences nuisibles au
sein d’une installation résidentielle. Cet appareil génère, utilise et
peut émettre des fréquences radio et s’il n’est pas installé selon les
instructions, peut nuire aux radiocommunications. Toutefois, rien ne
garantit que des parasites ne surviendront pas dans une installation
particulière. Si cet appareil cause des interférences nuisibles à la
54
Page 57

réception du téléviseur ou de la radio, ce que vous pouvez déterminer
en ouvrant et en fermant votre appareil, nous vous invitons à essayer
l’une des mesures correctives suivantes :
• Réorientez l’antenne de réception installée sur l’appareil qui
manifeste les parasites.
• Éloignez l’appareil du composant qui reçoit les ondes.
• Branchez l’appareil dans une prise de courant CA différente de
celle du composant qui reçoit les ondes.
• Au besoin, consultez votre marchand électronique ou un
technicien spécialisé dans le service des radios/téléviseurs pour
des suggestions supplémentaires.
Tous les changements et toutes les modifications apportés à cet
appareil par son propriétaire, s’ils ne sont pas approuvés expressément
par la partie responsable de sa conformité, risquent de retirer à celuici son droit d’utiliser ledit appareil.
Cet appareil est conforme à l’article 15 de la réglementation de la
Commission fédérale des communications (FCC). Son fonctionnement
est soumis aux deux conditions suivantes :
(1) cet appareil ne doit pas causer d’interférences nuisibles, et;
(2) cet appareil doit accepter toutes les interférences qu’il reçoit,
incluant les parasites pouvant nuire à son fonctionnement.
Cet appareil numérique de classe B est conforme avec la norme
ICES-003 du Canada.
Industrie Canada
Le fonctionnement de cet appareil est soumis aux deux conditions
suivantes : (1) cet appareil ne doit pas causer d’interférences nuisibles,
et; (2) cet appareil doit accepter toutes les interférences qu’il reçoit,
incluant les parasites pouvant nuire à son fonctionnement.
L’abréviation “IC” apparaissant avant le numéro d’homologation/
enregistrement signifie uniquement que l’appareil répond aux normes
et spécifications d’Industrie Canada.
Ce produit répond aux spécifications techniques d’Industrie Canada
qui s’appliquent.
FRANÇAIS
Appendice
55
Page 58

Énoncé sur l’exposition aux radiations RF
L’unité du bébé est conforme aux restrictions d’exposition aux
radiations RF de la FCC établies pour les environnements incontrôlés.
L’unité du bébé doit être installée et utilisée en respectant une distance
FRANÇAIS
minimum de 20 cm ou 8 po entre l’appareil qui émet les ondes RF et
le corps du bébé. Pour le fonctionnement à main, l’unité du parent a
été testée et répond aux directives sur l’exposition aux radiations RF
mises de l’avant par la FCC. L’utilisation d’autres accessoires peut ne
pas être conforme aux normes d’exposition aux fréquences RF de la
FCC. Pour le port de l’appareil sur le corps, l’unité du parent a été
testée et s’avère conforme aux normes d’exposition aux radiations RF
établies par la FCC, lorsque celui-ci est utilisé avec l’attache-ceinture
incluse. L’utilisateur doit garder une distance de 0,1 po entre l’arrière
de l’unité et le corps afin d’assurer une conformité aux règlements.
L’utilisation d’autres accessoires risque de ne pas répondre aux
normes de la FCC relativement à l’exposition aux radiations RF. Ce
transmetteur ne doit pas fonctionner de pair ni être partagé avec
une autre antenne ou un autre transmetteur. Cet équipement est
également conforme à Industrie Canada RSS-102 en ce qui a trait au
Code 6 de Santé Canada pour l’exposition des humains aux champs
de radiofréquences.
Appendice
56
Page 59

Assistance
Si un problème persiste, veuillez appeler notre département des
services à la clientèle en composant le 1-877-352-8697 au Canada ou
le 1-800-521-2010 aux États-Unis et un représentant du service à la
clientèle se fera un plaisir de vous aider.
Pour plus de renseignements sur la garantie de ce produit, veuillez
appeler VTech au 1-877-352-8697 au Canada ou au 1-800-521-2010
aux États-Unis.
Ou visitez notre site Web : http://www.vtechcanada.com
FRANÇAIS
Assistance
57
Page 60

1022/1022C
© 2009 VTech
Printed in China
91-102206-000
 Loading...