

Page 1
User’s Guide
SB67030 Deskset
Page 2

Page 3

Voice Make Call Answer
Install Overview PC UI Setup Mail Directory CallLog Call Manage Call Handset Trouble
C
ONTENT
Content
Preface
Introduction........................................................................................................................................................................................................................................................10
Navigation............................................................................................................................................................................................................................................................11
In This Manual..................................................................................... ..............................................................................................................................................................12
Procedures . . . . . . . . . . . . . . . . . . . . . . . . . . . . . . . . . . . . . . . . . . . . . . . . . . . . . . . . . . . . . . . . . . . . . . . . . . . . . . . . . . . . . . . . . . . 13
Additional Documentation....................................................................................................................................................................................................................... 14
Installation
Introduction........................................................................................................................................................................................................................................................15
Initial Precautions...........................................................................................................................................................................................................................................16
SB67030 Desk Set Components.......................................................... ................................................................................................................................................17
Attaching Deskset Stand...........................................................................................................................................................................................................................18
Cable Connection........................................................................................ ...................................................................................................................................................19
Wall Mounting...................................................................................................................................................................................................................................................21
Technical Specification...............................................................................................................................................................................................................................23
Typical Network Configurations............................................................................................................................................................................................................24
Overview
Introduction........................................................................................................................................................................................................................................................25
Display and Key Functions........................................................................................................................................................................................................................27
Liquid Crystal Display (LCD) Screen...................................................................................................................................................................................................28
Programmed Operations Keys.................................. .............................................................................................................................................................................29
Call Appearance (CA)...................................................................................................................................................................................................................................30
Call Appearance (CA) Icons. . . . . . . . . . . . . . . . . . . . . . . . . . . . . . . . . . . . . . . . . . . . . . . . . . . . . . . . . . . . . . . . . . . . . . . . . . . . . 31
Call Appearance (CA) Operation . . . . . . . . . . . . . . . . . . . . . . . . . . . . . . . . . . . . . . . . . . . . . . . . . . . . . . . . . . . . . . . . . . . . . . . . 32
SB67030 Deskset User’s Guide - Content 3
Page 4

Voice Make Call Answer
Install Overview PC UI Setup Mail Directory CallLog Call Manage Call Handset Trouble
Call Appearance (CA) Timer . . . . . . . . . . . . . . . . . . . . . . . . . . . . . . . . . . . . . . . . . . . . . . . . . . . . . . . . . . . . . . . . . . . . . . . . . . . . 34
Function Keys.................................................................................................................................................................................................................................................... 35
Programmed Keys..........................................................................................................................................................................................................................................36
The Idle Screen........................................ .........................................................................................................................................................................................................41
Status Indication . . . . . . . . . . . . . . . . . . . . . . . . . . . . . . . . . . . . . . . . . . . . . . . . . . . . . . . . . . . . . . . . . . . . . . . . . . . . . . . . . . . . . . 42
Extension . . . . . . . . . . . . . . . . . . . . . . . . . . . . . . . . . . . . . . . . . . . . . . . . . . . . . . . . . . . . . . . . . . . . . . . . . . . . . . . . . . . . . . . . . . . . . 42
Keypad Data Entry..........................................................................................................................................................................................................................................43
Search Rules . . . . . . . . . . . . . . . . . . . . . . . . . . . . . . . . . . . . . . . . . . . . . . . . . . . . . . . . . . . . . . . . . . . . . . . . . 44
Browser Interface
Introduction........................................................................................................................................................................................................................................................45
Accessing the User Interface (UI)........................................................................................................................................................................................................46
Call Forward-No Answer Settings . . . . . . . . . . . . . . . . . . . . . . . . . . . . . . . . . . . . . . . . . . . . . . . . . . . . . . . . . . . . . . . . . . . . . . . 48
Editing Quick Dial Entries....................................................................... ...................................................................................................................................................49
Setup Menus
Introduction........................................................................................................................................................................................................................................................51
Setup Menus.......................................................................................................................................................................................................................................................52
Deskset Settings..............................................................................................................................................................................................................................................54
Display . . . . . . . . . . . . . . . . . . . . . . . . . . . . . . . . . . . . . . . . . . . . . . . . . . . . . . . . . . . . . . . . . . . . . . . . . . . . . . . . . . . . . . . . . . . . . . . 55
Sounds . . . . . . . . . . . . . . . . . . . . . . . . . . . . . . . . . . . . . . . . . . . . . . . . . . . . . . . . . . . . . . . . . . . . . . . . . . . . . . . . . . . . . . . . . . . . . . . 56
Language. . . . . . . . . . . . . . . . . . . . . . . . . . . . . . . . . . . . . . . . . . . . . . . . . . . . . . . . . . . . . . . . . . . . . . . . . . . . . . . . . . . . . . . . . . . . . 57
Preferred Audio . . . . . . . . . . . . . . . . . . . . . . . . . . . . . . . . . . . . . . . . . . . . . . . . . . . . . . . . . . . . . . . . . . . . . . . . . . . . . . . . . . . . . . . 58
User Settings......................................................................................................................................................................................................................................................59
Greetings. . . . . . . . . . . . . . . . . . . . . . . . . . . . . . . . . . . . . . . . . . . . . . . . . . . . . . . . . . . . . . . . . . . . . . . . . . . . . . . . . . . . . . . . . . . . . 61
Recording A Greeting. . . . . . . . . . . . . . . . . . . . . . . . . . . . . . . . . . . . . . . . . . . . . . . . . . . . . . . . . . . . . . . . . . 62
Call Forwarding All . . . . . . . . . . . . . . . . . . . . . . . . . . . . . . . . . . . . . . . . . . . . . . . . . . . . . . . . . . . . . . . . . . . . . . . . . . . . . . . . . . . . 63
Call Fwd All Voicemail (VM). . . . . . . . . . . . . . . . . . . . . . . . . . . . . . . . . . . . . . . . . . . . . . . . . . . . . . . . . . . . . . . . . . . . . . . . . 64
Call Fwd All - Extension . . . . . . . . . . . . . . . . . . . . . . . . . . . . . . . . . . . . . . . . . . . . . . . . . . . . . . . . . . . . . . . 65
Call Fwd All - Outside Line . . . . . . . . . . . . . . . . . . . . . . . . . . . . . . . . . . . . . . . . . . . . . . . . . . . . . . . . . . . . . 66
Call Forward Notification . . . . . . . . . . . . . . . . . . . . . . . . . . . . . . . . . . . . . . . . . . . . . . . . . . . . . . . . . . . . . . . . 67
SB67030 Deskset User’s Guide - Content 4
Page 5

Voice Make Call Answer
Install Overview PC UI Setup Mail Directory CallLog Call Manage Call Handset Trouble
Voicemail Memory. . . . . . . . . . . . . . . . . . . . . . . . . . . . . . . . . . . . . . . . . . . . . . . . . . . . . . . . . . . . . . . . . . . . . . . . . . . . . . . . . . . . . 68
Name Recording . . . . . . . . . . . . . . . . . . . . . . . . . . . . . . . . . . . . . . . . . . . . . . . . . . . . . . . . . . . . . . . . . . . . . . . . . . . . . . . . . . . . . . 69
Personal Name Recording . . . . . . . . . . . . . . . . . . . . . . . . . . . . . . . . . . . . . . . . . . . . . . . . . . . . . . . . . . . . . . 70
Pre-Set Name . . . . . . . . . . . . . . . . . . . . . . . . . . . . . . . . . . . . . . . . . . . . . . . . . . . . . . . . . . . . . . . . . . . . . . . . 71
Cordless Registration . . . . . . . . . . . . . . . . . . . . . . . . . . . . . . . . . . . . . . . . . . . . . . . . . . . . . . . . . . . . . . . . . . . . . . . . . . . . . . . . . . 72
Register a Cordless Device. . . . . . . . . . . . . . . . . . . . . . . . . . . . . . . . . . . . . . . . . . . . . . . . . . . . . . . . . . . . . . 73
Deregister a Cordless Device. . . . . . . . . . . . . . . . . . . . . . . . . . . . . . . . . . . . . . . . . . . . . . . . . . . . . . . . . . . . 74
Password . . . . . . . . . . . . . . . . . . . . . . . . . . . . . . . . . . . . . . . . . . . . . . . . . . . . . . . . . . . . . . . . . . . . . . . . . . . . . . . . . . . . . . . . . . . . . 75
Change User Password. . . . . . . . . . . . . . . . . . . . . . . . . . . . . . . . . . . . . . . . . . . . . . . . . . . . . . . . . . . . . . . . . 76
Admin Settings.................................................................................................................................................................................................................................................77
Call Fwd - NA . . . . . . . . . . . . . . . . . . . . . . . . . . . . . . . . . . . . . . . . . . . . . . . . . . . . . . . . . . . . . . . . . . . . . . . . . . . . . . . . . . . . . . . . . 78
Call Forward - No Answer to Voicemail . . . . . . . . . . . . . . . . . . . . . . . . . . . . . . . . . . . . . . . . . . . . . . . . . . . 79
Call Forward - No Answer to an Extension. . . . . . . . . . . . . . . . . . . . . . . . . . . . . . . . . . . . . . . . . . . . . . . . . 80
Call Forward - No Answer to an Outside Line . . . . . . . . . . . . . . . . . . . . . . . . . . . . . . . . . . . . . . . . . . . . . . 81
Fwd/Trans to line. . . . . . . . . . . . . . . . . . . . . . . . . . . . . . . . . . . . . . . . . . . . . . . . . . . . . . . . . . . . . . . . . . . . . . . . . . . . . . . . . . . . . . 82
Restore Default Settings . . . . . . . . . . . . . . . . . . . . . . . . . . . . . . . . . . . . . . . . . . . . . . . . . . . . . . . . . . . . . . . . . . . . . . . . . . . . . . . 83
Event Log. . . . . . . . . . . . . . . . . . . . . . . . . . . . . . . . . . . . . . . . . . . . . . . . . . . . . . . . . . . . . . . . . . . . . . . . . . . . . . . . . . . . . . . . . . . . . 84
IP Settings . . . . . . . . . . . . . . . . . . . . . . . . . . . . . . . . . . . . . . . . . . . . . . . . . . . . . . . . . . . . . . . . . . . . . . . . . . . . . . . . . . . . . . . . . . . . 85
IP Configuration . . . . . . . . . . . . . . . . . . . . . . . . . . . . . . . . . . . . . . . . . . . . . . . . . . . . . . . . . . . . . . . . . . . . . . 86
Set/Edit Static IP. . . . . . . . . . . . . . . . . . . . . . . . . . . . . . . . . . . . . . . . . . . . . . . . . . . . . . . . . . . . . . . . . . . . . . 87
IP Status . . . . . . . . . . . . . . . . . . . . . . . . . . . . . . . . . . . . . . . . . . . . . . . . . . . . . . . . . . . . . . . . . . . . . . . . . . . . 88
Reset User Password . . . . . . . . . . . . . . . . . . . . . . . . . . . . . . . . . . . . . . . . . . . . . . . . . . . . . . . . . . . . . . . . . . . . . . . . . . . . . . . . . . 89
Software Upgrade . . . . . . . . . . . . . . . . . . . . . . . . . . . . . . . . . . . . . . . . . . . . . . . . . . . . . . . . . . . . . . . . . . . . . . . . . . . . . . . . . . . . . 90
Deskset Information......................................................................................................................................................................................................................................91
Setting up Do Not Disturb.......................... ..............................................................................................................................................................................................92
Voice Mail
Access Voicemail............................................................................................................................................................................................................................................94
Messages Feature...........................................................................................................................................................................................................................................95
Message Playback................................. .........................................................................................................................................................................................................97
Forwarding a Message................................................................................................................................................................................................................................99
SB67030 Deskset User’s Guide - Content 5
Page 6

Voice Make Call Answer
Install Overview PC UI Setup Mail Directory CallLog Call Manage Call Handset Trouble
Forward to Additional Extensions . . . . . . . . . . . . . . . . . . . . . . . . . . . . . . . . . . . . . . . . . . . . . . . . . . . . . . . . . . . . . . . . . . . . . .101
Recording an Audio Annotation. . . . . . . . . . . . . . . . . . . . . . . . . . . . . . . . . . . . . . . . . . . . . . . . . . . . . . . . . 102
Status Notifications. . . . . . . . . . . . . . . . . . . . . . . . . . . . . . . . . . . . . . . . . . . . . . . . . . . . . . . . . . . . . . . . . . . . . . . . . . . . . . . . . . .103
Deleting Messages ......................................................................................................................................................................................................................................104
Clear Message Flags..................................................................................................................................................................................................................................106
Voicemail Remote Operations............................................................................................................................................................................................................107
Directory
Introduction.....................................................................................................................................................................................................................................................110
Using the Directory.....................................................................................................................................................................................................................................111
List Scrolling Rules . . . . . . . . . . . . . . . . . . . . . . . . . . . . . . . . . . . . . . . . . . . . . . . . . . . . . . . . . . . . . . . . . . . . . . . . . . . . . . . . . . .112
Creating a New Directory Entry.............................................. .................................. .........................................................................................................................113
Editing a Directory Entry.........................................................................................................................................................................................................................114
Deleting a Directory Entry.....................................................................................................................................................................................................................115
Directory Sort.................................................................................................................................................................................................................................................116
Directory List...................................................................................................................................................................................................................................................117
Non-alphabetical character sort rules. . . . . . . . . . . . . . . . . . . . . . . . . . . . . . . . . . . . . . . . . . . . . . . . . . . . 118
Call Log
Introduction.....................................................................................................................................................................................................................................................119
Using the Call Log.......................................................................................................................................................................................................................................120
List Scrolling Rules . . . . . . . . . . . . . . . . . . . . . . . . . . . . . . . . . . . . . . . . . . . . . . . . . . . . . . . . . . . . . . . . . . . 121
Missed Call Notification...........................................................................................................................................................................................................................122
Reviewing the Call Log list:...................................................................................................................................................................................................................123
Voicemail messages in Call Logs. . . . . . . . . . . . . . . . . . . . . . . . . . . . . . . . . . . . . . . . . . . . . . . . . . . . . . . . . . . . . . . . . . . . . . .124
Storing Call Log Entries................................................. ..........................................................................................................................................................................125
Deleting Call Log Entries........................................................................................................................................................................................................................126
Making a Call
Dialing Rules...................................................................................................................................................................................................................................................129
The Idle Screen........................................ ......................................................................................................................................................................................................130
SB67030 Deskset User’s Guide - Content 6
Page 7

Voice Make Call Answer
Install Overview PC UI Setup Mail Directory CallLog Call Manage Call Handset Trouble
Pre-Dialing........................................................................................................................................................................................................................................................131
Active Call Screen.......................................................................................................................................................................................................................................132
Live Dialing.......................................................................................................................................................................................................................................................133
Using the Extension List..........................................................................................................................................................................................................................134
Calling an Extension in Idle Mode . . . . . . . . . . . . . . . . . . . . . . . . . . . . . . . . . . . . . . . . . . . . . . . . . . . . . . . . . . . . . . . . . . . . . .135
Calling an Extension from Dial . . . . . . . . . . . . . . . . . . . . . . . . . . . . . . . . . . . . . . . . . . . . . . . . . . . . . . . . . . . . . . . . . . . . . . . . .136
Calling from the Directory.....................................................................................................................................................................................................................137
Calling from the Call Log ......................................................................................................................................................................................................................138
Calling from Call Log Details...............................................................................................................................................................................................................139
Calling from Voicemail.............................................................................................................................................................................................................................140
Using Quick Dial...........................................................................................................................................................................................................................................141
Calling from Quick Dial. . . . . . . . . . . . . . . . . . . . . . . . . . . . . . . . . . . . . . . . . . . . . . . . . . . . . . . . . . . . . . . . . . . . . . . . . . . . . . . .142
Using the Redial List..................................................................................................................................................................................................................................143
Calling from Redial . . . . . . . . . . . . . . . . . . . . . . . . . . . . . . . . . . . . . . . . . . . . . . . . . . . . . . . . . . . . . . . . . . . . . . . . . . . . . . . . . . .145
Calling from Redial Details . . . . . . . . . . . . . . . . . . . . . . . . . . . . . . . . . . . . . . . . . . . . . . . . . . . . . . . . . . . . . . . . . . . . . . . . . . . .146
Storing Redial Entries . . . . . . . . . . . . . . . . . . . . . . . . . . . . . . . . . . . . . . . . . . . . . . . . . . . . . . . . . . . . . . . . . . . . . . . . . . . . . . . . .147
Deleting Redial Entries. . . . . . . . . . . . . . . . . . . . . . . . . . . . . . . . . . . . . . . . . . . . . . . . . . . . . . . . . . . . . . . . . . . . . . . . . . . . . . . .148
Call Management
Introduction.....................................................................................................................................................................................................................................................149
Call Management.........................................................................................................................................................................................................................................150
Transferring a Call................................................................................................... ....................................................................................................................................151
Transfer to an Internal Extension. . . . . . . . . . . . . . . . . . . . . . . . . . . . . . . . . . . . . . . . . . . . . . . . . . . . . . . . . . . . . . . . . . . . . . .153
Transfer to an External Number. . . . . . . . . . . . . . . . . . . . . . . . . . . . . . . . . . . . . . . . . . . . . . . . . . . . . . . . . . . . . . . . . . . . . . . .154
Transferring to Call Log . . . . . . . . . . . . . . . . . . . . . . . . . . . . . . . . . . . . . . . . . . . . . . . . . . . . . . . . . . . . . . . . . . . . . . . . . . . . . . .155
Transferring to Directory . . . . . . . . . . . . . . . . . . . . . . . . . . . . . . . . . . . . . . . . . . . . . . . . . . . . . . . . . . . . . . . . . . . . . . . . . . . . . .156
Transferring to Redial List . . . . . . . . . . . . . . . . . . . . . . . . . . . . . . . . . . . . . . . . . . . . . . . . . . . . . . . . . . . . . . . . . . . . . . . . . . . . .157
Transferring to Held Calls . . . . . . . . . . . . . . . . . . . . . . . . . . . . . . . . . . . . . . . . . . . . . . . . . . . . . . . . . . . . . . . . . . . . . . . . . . . . .158
Transferring to Quick Dial . . . . . . . . . . . . . . . . . . . . . . . . . . . . . . . . . . . . . . . . . . . . . . . . . . . . . . . . . . . . . . . . . . . . . . . . . . . . .159
Conference a Call........................................................................................................................................................................................................................................160
Conference with Extension List . . . . . . . . . . . . . . . . . . . . . . . . . . . . . . . . . . . . . . . . . . . . . . . . . . . . . . . . . . . . . . . . . . . . . . . .162
Conference with Call Log . . . . . . . . . . . . . . . . . . . . . . . . . . . . . . . . . . . . . . . . . . . . . . . . . . . . . . . . . . . . . . . . . . . . . . . . . . . . .163
SB67030 Deskset User’s Guide - Content 7
Page 8

Voice Make Call Answer
Install Overview PC UI Setup Mail Directory CallLog Call Manage Call Handset Trouble
Conference with Redial List . . . . . . . . . . . . . . . . . . . . . . . . . . . . . . . . . . . . . . . . . . . . . . . . . . . . . . . . . . . . 164
Conference with Park List . . . . . . . . . . . . . . . . . . . . . . . . . . . . . . . . . . . . . . . . . . . . . . . . . . . . . . . . . . . . . . . . . . . . . . . . . . . . .165
Conference with Directory. . . . . . . . . . . . . . . . . . . . . . . . . . . . . . . . . . . . . . . . . . . . . . . . . . . . . . . . . . . . . . . . . . . . . . . . . . . . .166
Conference with Quick Dial. . . . . . . . . . . . . . . . . . . . . . . . . . . . . . . . . . . . . . . . . . . . . . . . . . . . . . . . . . . . . . . . . . . . . . . . . . . .167
Conference with a Held Call. . . . . . . . . . . . . . . . . . . . . . . . . . . . . . . . . . . . . . . . . . . . . . . . . . . . . . . . . . . . . . . . . . . . . . . . . . .168
Conference Two Held Calls. . . . . . . . . . . . . . . . . . . . . . . . . . . . . . . . . . . . . . . . . . . . . . . . . . . . . . . . . . . . . . . . . . . . . . . . . . . . 169
Canceling a Conference. . . . . . . . . . . . . . . . . . . . . . . . . . . . . . . . . . . . . . . . . . . . . . . . . . . . . . . . . . . . . . . . . . . . . . . . . . . . . . .170
Call on Hold.....................................................................................................................................................................................................................................................171
Parking a Call.................................................................................................................................................................................................................................................173
Retrieving A Parked Call.........................................................................................................................................................................................................................174
Paging..................................................................................................................................................................................................................................................................175
Answer a Call
Answer Screens.............................................................................................................................................................................................................................................177
Answering a Call in Idle...........................................................................................................................................................................................................................179
Answer From Predial................................... .................................................................. ............................................................................................................................180
Answer While on a Call...........................................................................................................................................................................................................................182
Answer With a Call on Hold............................... ..................................................................................................................................................................................183
Answer a Call from Within a Menu..................................................................................................................................................................................................184
Answer With Multiple Incoming Calls............................................................................................................................................................................................185
Answer a Call From Voicemail............................................................................................................................................................................................................186
Ignoring a Call................................................................................................................................................................................................................................................187
Handset Interaction
Introduction.....................................................................................................................................................................................................................................................188
Idle Screen...................................... ..................................................................................................................................................................................................................189
Locating the Handset................................................. ...............................................................................................................................................................................191
Ignoring a Call................................................................................................................................................................................................................................................192
Incoming Ring: Deskset Answers........................................ ............................... ............................................................................................................................... 193
Incoming Ring Event: Handset Answers................................................................. ......................................................................................................................194
Held Calls on Both Devices...................................................................................................................................................................................................................195
SB67030 Deskset User’s Guide - Content 8
Page 9

Voice Make Call Answer
Install Overview PC UI Setup Mail Directory CallLog Call Manage Call Handset Trouble
Troubleshooting
Important Safety Instructions . . . . . . . . . . . . . . . . . . . . . . . . . . . . . . . . . . . . . . . . . . . . . . . . . . . . . . . . . . . . . . . . . . . . . . . . . .198
Maintenance....................................................................................................................................................................................................................................................199
Avoid rough treatment. . . . . . . . . . . . . . . . . . . . . . . . . . . . . . . . . . . . . . . . . . . . . . . . . . . . . . . . . . . . . . . . 199
Avoid water. . . . . . . . . . . . . . . . . . . . . . . . . . . . . . . . . . . . . . . . . . . . . . . . . . . . . . . . . . . . . . . . . . . . . . . . . 200
Electrical storms . . . . . . . . . . . . . . . . . . . . . . . . . . . . . . . . . . . . . . . . . . . . . . . . . . . . . . . . . . . . . . . . . . . . . 200
Cleaning your unit . . . . . . . . . . . . . . . . . . . . . . . . . . . . . . . . . . . . . . . . . . . . . . . . . . . . . . . . . . . . . . . . . . . 200
Warranty............................................................................................................................................................................................................................................................200
Technical Specifications..........................................................................................................................................................................................................................200
Glossary
ACTIVE CALL . . . . . . . . . . . . . . . . . . . . . . . . . . . . . . . . . . . . . . . . . . . . . . . . . . . . . . . . . . . . . . . . . . . . . . . . 202
DIAL. . . . . . . . . . . . . . . . . . . . . . . . . . . . . . . . . . . . . . . . . . . . . . . . . . . . . . . . . . . . . . . . . . . . . . . . . . . . . . . 203
Held Calls . . . . . . . . . . . . . . . . . . . . . . . . . . . . . . . . . . . . . . . . . . . . . . . . . . . . . . . . . . . . . . . . . . . . . . . . . . 203
IDLE . . . . . . . . . . . . . . . . . . . . . . . . . . . . . . . . . . . . . . . . . . . . . . . . . . . . . . . . . . . . . . . . . . . . . . . . . . . . . . . 203
SB67030 Deskset User’s Guide - Content 9
Page 10

Voice Make Call Answer
Install Overview PC UI Setup Mail Directory CallLog Call Manage Call Handset Trouble
P
REFACE
Introduction
This User’s Guide provides a complete set of instructions to guide you through operation of your
SB67030 Deskset. Operating these devices does not require the technical expertise of a
traditional system administrator or IT professional, However, we recommend that you make one
person responsible for controlling the system-wide features described in this guide.
Before using this AT&T product, please read “Important Safety Instructions” on page 198 of this
manual. Please thoroughly read this user’s manual for all the feature operations and
troubleshooting information necessary to install and operate your new AT&T product.
Note For customer service or product information, visit our website at
www.telephones.att.com or call 1 (800) 222-3111. In Canada,
dial
1 (866) 288-4268.
1. “Navigation” on page 11
2. “In This Manual” on page 12
3. “Procedures” on page 13
SB67030 Deskset User’s Guide - Preface 10
Page 11
Voice Make Call Answer
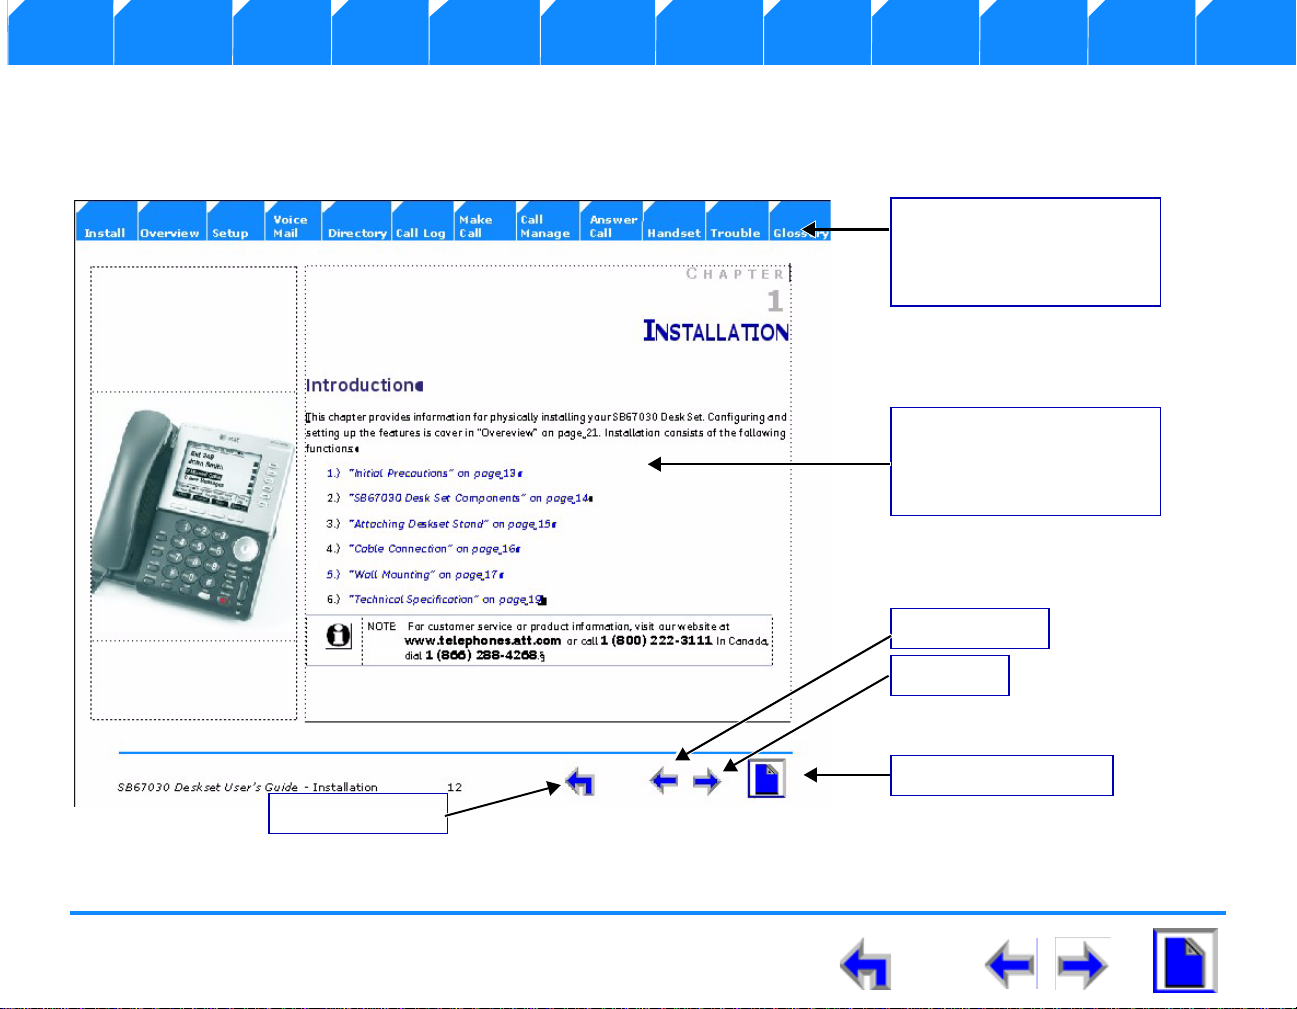
Chapter Tabs
Click on these tabs to open
the chapter covered by that
topic.
Primary Topic
Click on this link to move to
the first page covering that
topic.
Previous Topic
Previous Page
Next Page
First Page in Chapter
Install Overview PC UI Setup Mail Directory CallLog Call Manage Call Handset Trouble
Navigation
Your SB67030 Deskset User Guide provides the ability to move from topic to topic easily, and to return to your original or previous
topic.Figure 1 illustrates the navigation conventions for this user guide.
Figure. 1 User Guide Navigation
SB67030 Deskset User’s Guide - Preface 11
Page 12

Voice Make Call Answer
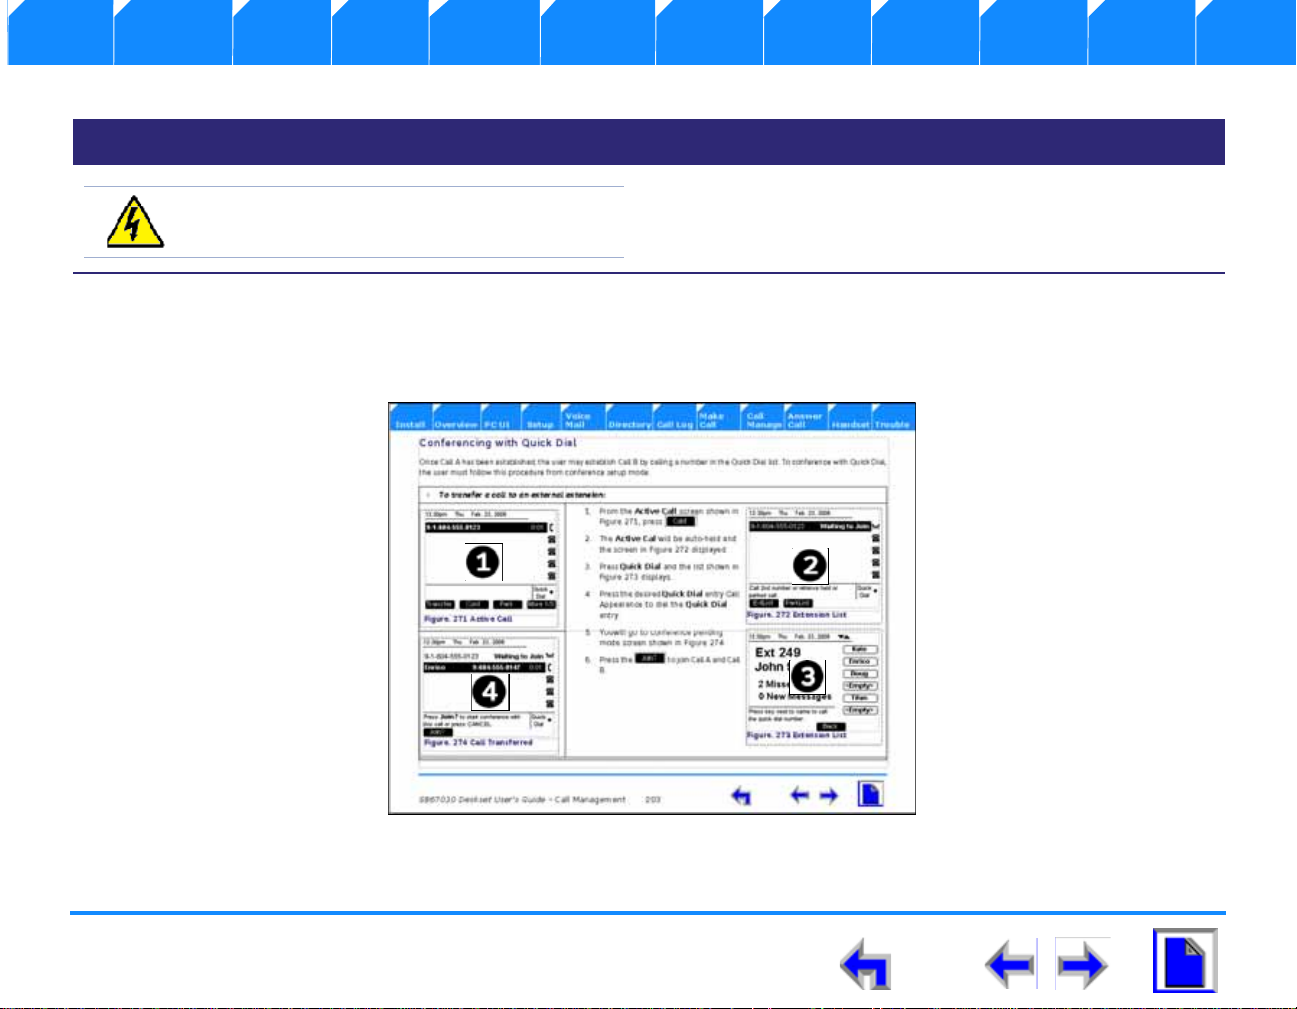
Note Notes are added to give more information,
usually in a procedure.
CAUTION A caution means that damage to
equipment is possible.
Tip A tip provides information that can assist
you in performing a procedure.
Install Overview PC UI Setup Mail Directory CallLog Call Manage Call Handset Trouble
In This Manual
Table 1 lists text formats used in this manual to assist you in identifying items referenced within procedures.
Table 1 Description of Text Formats
Text Format Description
Screen
FUNCTION KEY
Figure 1, Table 1, or “Navigation” on page 11 This identifies a reference to a figure, procedure, table, or section
“Introduction” This identifies a hyperlink to a primary topic.
This identifies text that appears on the screen in a menu or prompt.
This identifies a Function key. See “The Idle Screen” on page 41 for a
complete description of the Function keys.
This identifies a Programmed key. See “Programmed Operations Keys” on
page 29 for a complete description of the Function keys.
within this manual.
Notes are added to give more information, usually in a procedure.
A caution means that damage to equipment is possible.
A tip provides information that can assist you in performing a
procedure.
SB67030 Deskset User’s Guide - Preface 12
Page 13
Voice Make Call Answer
WARNING A warning means that injury or death
is possible if the instructions are not obeyed.
Install Overview PC UI Setup Mail Directory CallLog Call Manage Call Handset Trouble
Table 1 Description of Text Formats
Text Format Description
A warning means that injury or death is possible if the instructions
are not obeyed.
Procedures
The procedures in this manual are contained on a single page, unless otherwise noted. Each page contains the topic heading and a
procedure table as shown in Figure 2. The screen images appear in clockwise order as ind icated by the numbers in Figure 2.
Figure. 2 Sample Procedure
SB67030 Deskset User’s Guide - Preface 13
Page 14

Voice Make Call Answer
Install Overview PC UI Setup Mail Directory CallLog Call Manage Call Handset Trouble
Additional Documentation
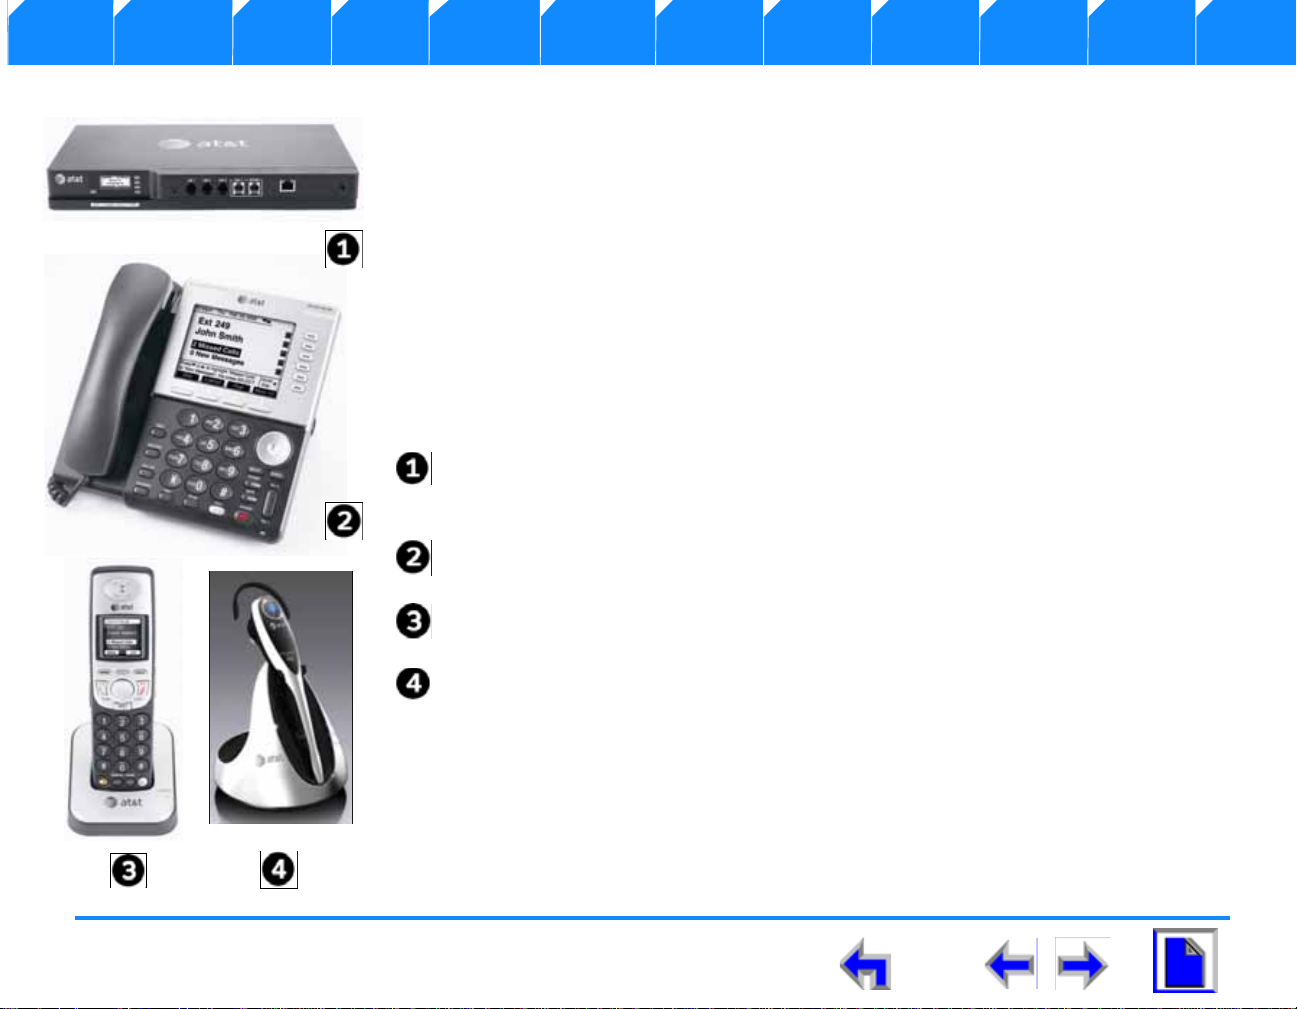
This CD contains a complete documentation set for the SB67030 Deskset, SB67040 Remote Handset (Optional), 67020 Gateway, and
the 7610 Cordless Headset (Optional). The documentation set includes;
n 67020 Gateway System Administrators Guide
n 7610 Cordless Headset User’s Guide
n SB67040 Remote Handset User’s Guide
SB67030 Deskset User’s Guide - Preface 14
Page 15
Voice Make Call Answer
Install Overview PC UI Setup Mail Directory CallLog Call Manage Call Handset Trouble
C HAPTER
1
I
NSTALLATION
Introduction
This chapter provides information for physically installing your SB67030 Desk Set. Configuring and
setting up the features is cover in “Overview” on page 25. Installation consists of the following
functions:
1. “Initial Precautions” on page 16
2. “SB67030 Desk Set Components” on page 17
3. “Attaching Deskset Stand” on page 18
4. “” on page 19
5. “Wall Mounting” on page 21
6. “Technical Specification” on page 23
Note For customer service or product information, visit our website at
www.telephones.att.com or call 1 (800) 222-3111. In Canada,
dial
1 (866) 288-4268.
SB67030 Deskset User’s Guide - Installation 15
Page 16

Voice Make Call Answer
Install Overview PC UI Setup Mail Directory CallLog Call Manage Call Handset Trouble
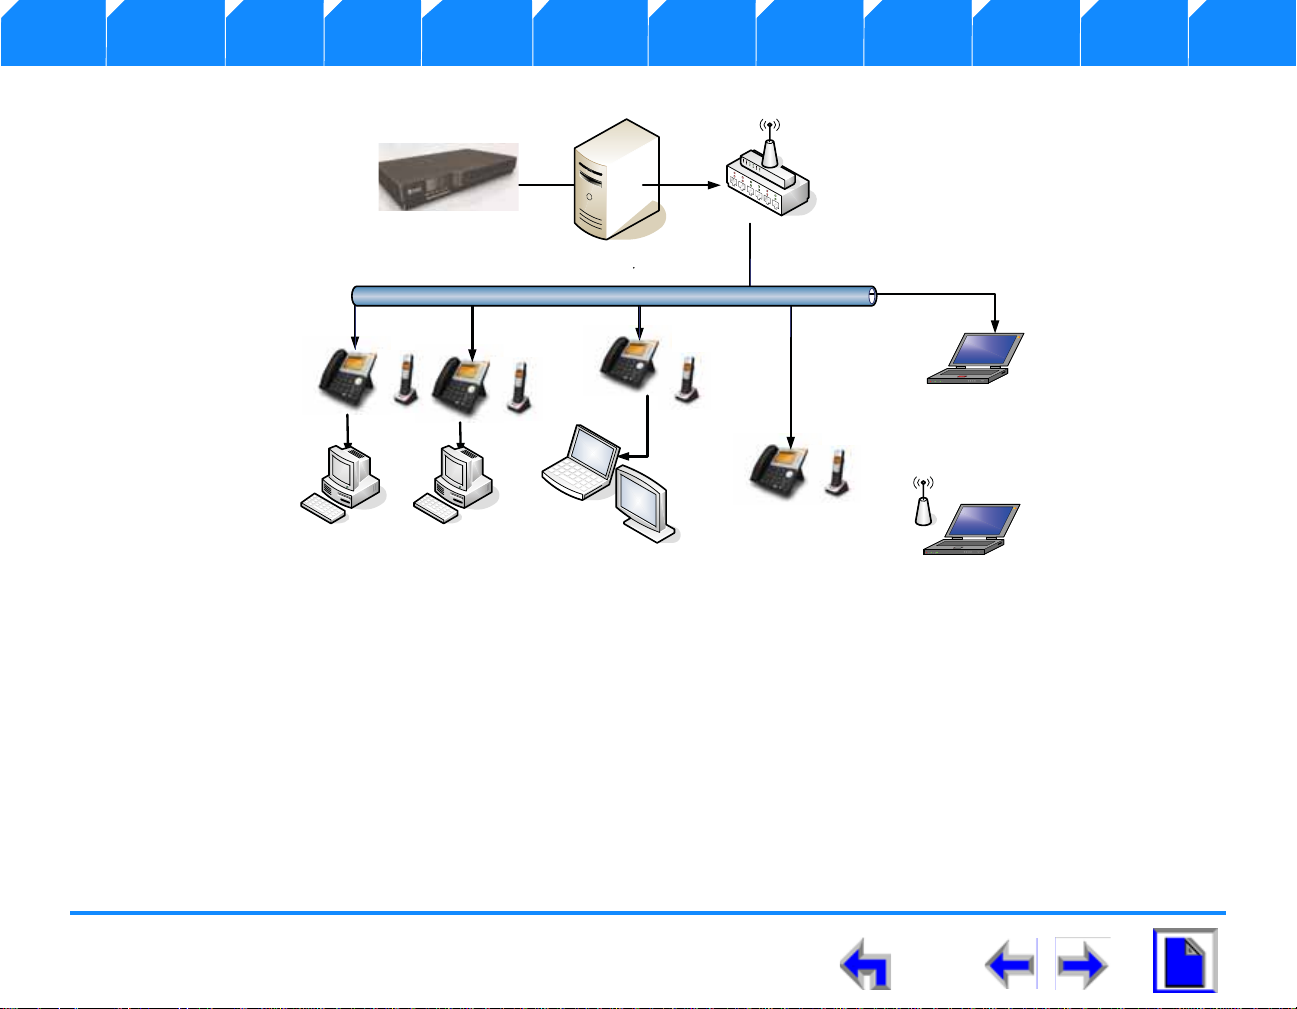
The AT&T Small Business System (SBS) consists of a set of devices that work together to create a small-office telephone network. The
AT&T SBS differs from conventional telephone systems in that calls are not coordinated by a central controller. Instead, The SBS
connects to your office computer network to intelligently route traffic and handle calls..
This (internet Protocol (IP)-based system integrates itself seamlessly into an existing Local Area Network (LAN). Once the Deskset
phones are connected they find each other and automatically self-configure. Once configuration is complete, calls can be made
between extensions within the private network. Additional telephony and network configuration is administered through a Browserbased User Interface (UI).
To make external calls, a Public Switched Telephone Network (PSTN) Gateway must also be connected to the network. Each Gateway
can connect up to four outside phone lines to the private Synapse network. Up to four Gateways can be connected to the system,
providing up to 16 PSTN lines. In addition, each Deskset can be registered with a Cordless Handset or Headse t, which extends
functionality of the system to a portable device.
Initial Precautions
Avoid placing the telephone base too close to:
n Communication devices such as: television sets, VCRs, or other cordless telephones.
n Excessive heat sources.
n Noise sources such as a window with traffic outside, motors, microwave ovens, refrigerators, or fluorescent lighting.
n Excessive dust sources such as a workshop or garage.
n Excessive moisture.
n Extremely low temperature.
n Mechanical vibration or shock such as on top of the washing machine or workbench.
SB67030 Deskset User’s Guide - Installation 16
Page 17
Voice Make Call Answer
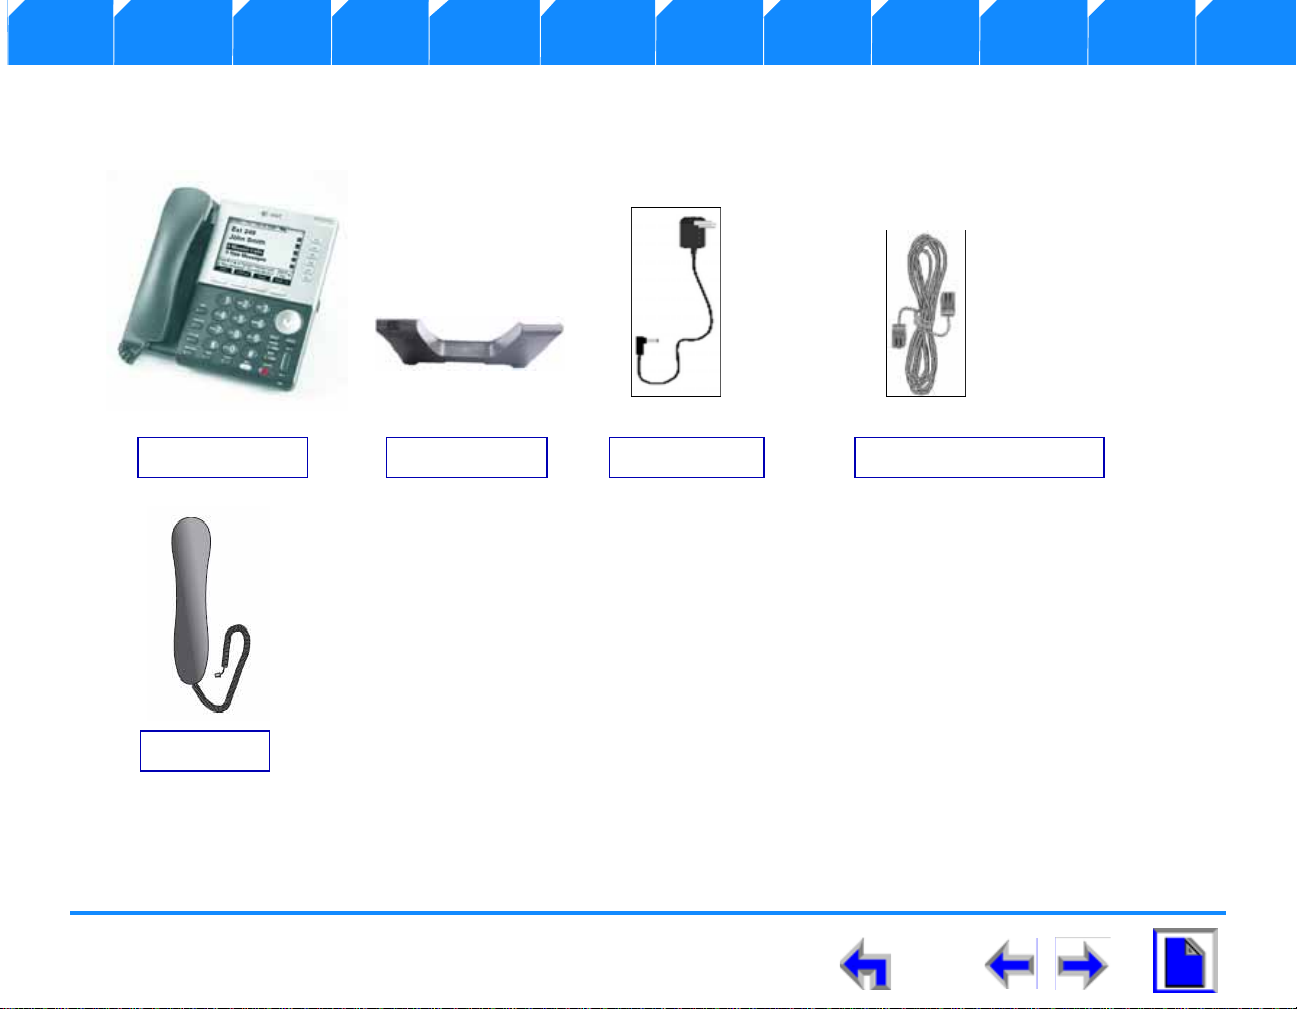
Deskset Base Deskset Base Power Cable Ethernet Network Cable
Handset
Install Overview PC UI Setup Mail Directory CallLog Call Manage Call Handset Trouble
SB67030 Desk Set Components
Figure 3 illustrates the components shipped with the SB67030 Desk Set
Figure. 3 SB67030 Desk Set Components
SB67030 Deskset User’s Guide - Installation 17
Page 18
Voice Make Call Answer
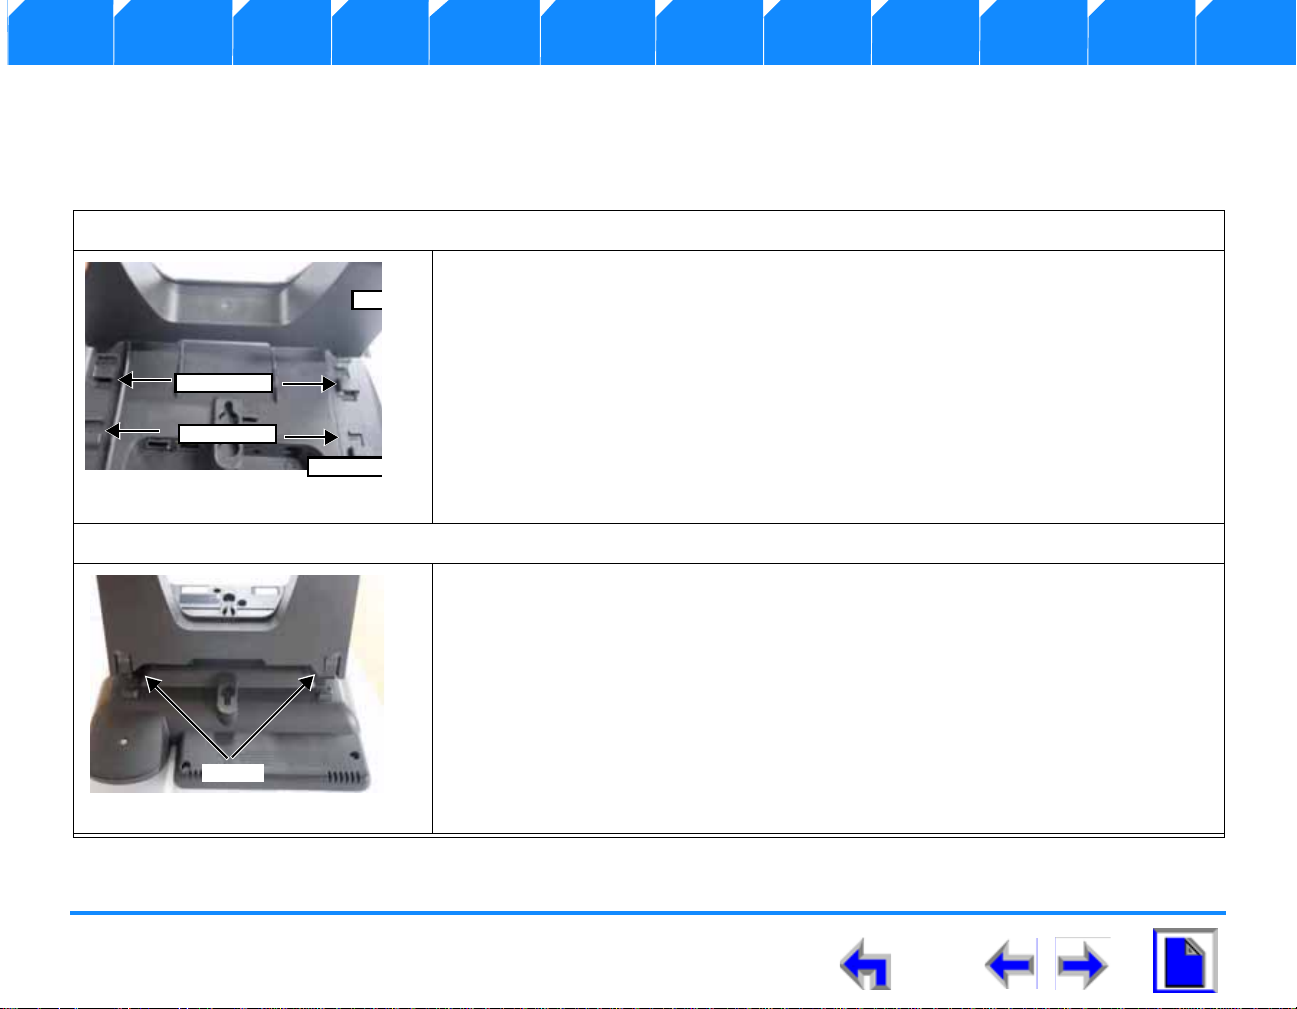
Sta
Deskset
Option 1
Option 2
Tabs
Install Overview PC UI Setup Mail Directory CallLog Call Manage Call Handset Trouble
Attaching Deskset Stand
The SB67030 Desk Set operates either on the desktop or mounted on the wall. The desktop setup provides for two positions, Option 1
at 45
° and Option 2 at 60°.
To attach the deskset stand:
1. Place the deskset base on a flat surface with the connector side towards you
as illustrated in Figure 4
2. Place the stand on the base with the flexible tab side illustrated in Figure 4
away from you.
3. Insert the solid tabs into the slots on the base for the desired option in the
direction of the arrows as shown in Figure 4
4. Rotate the stand away from you until it rests against the base.and you hear a
click as it locks into place.
To remove the deskset stand:
1. Place the deskset on a flat surface with the connector side towards you as
illustrated in Figure 4
2. Press both flexible tabs at the same time.
3. Rotate the stand towards from you until it disengages from the base.
SB67030 Deskset User’s Guide - Installation 18
Page 19
Voice Make Call Answer
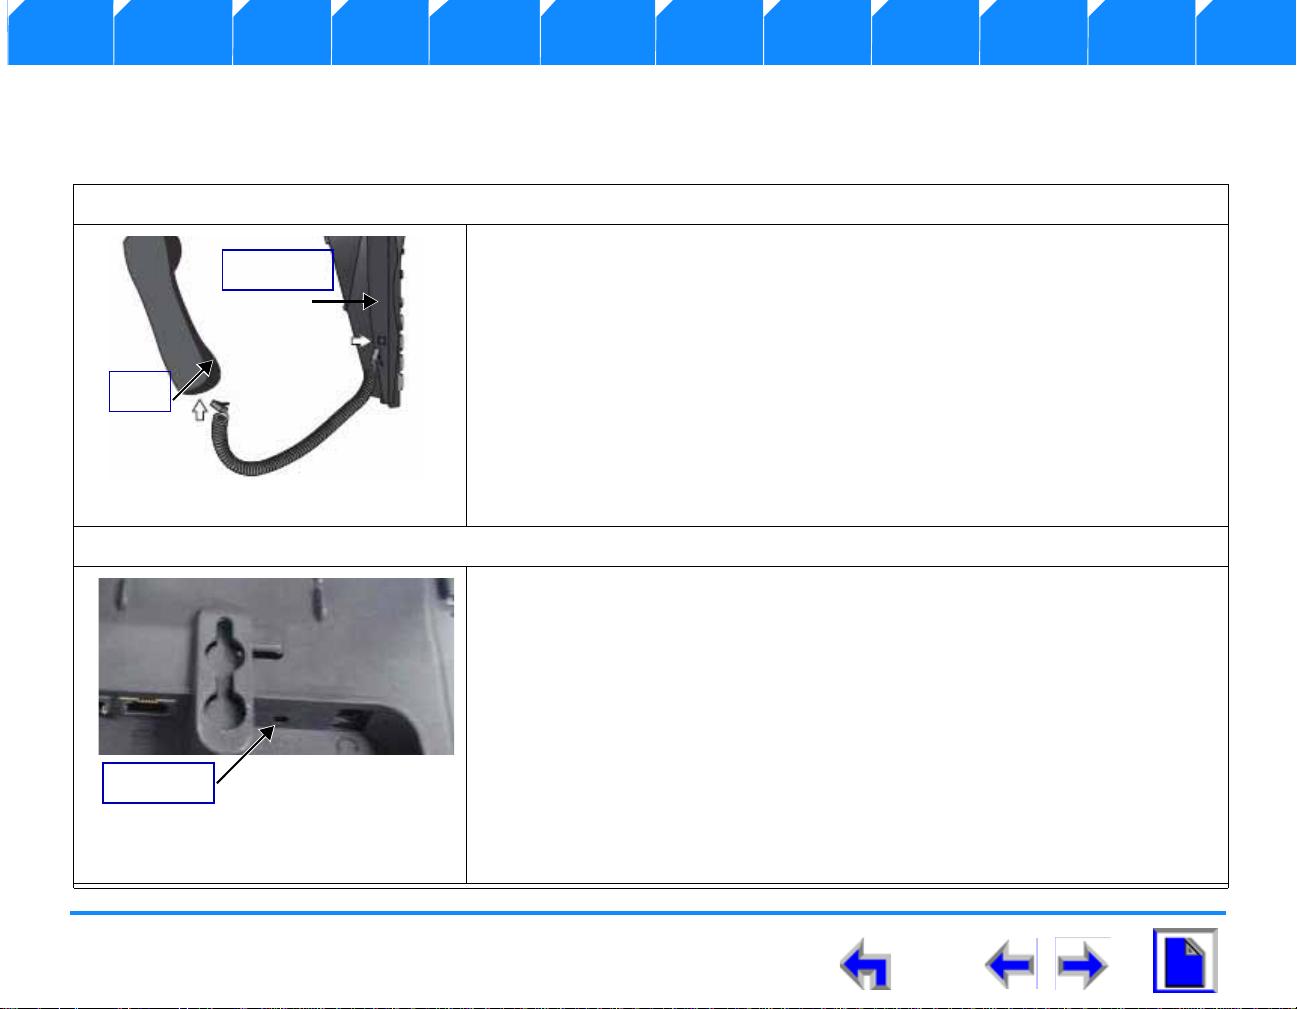
Figure. 6 Handset Plug
Connector
Plug
Figure. 7 Power Connector
DC Power
Install Overview PC UI Setup Mail Directory CallLog Call Manage Call Handset Trouble
Cable Connection
Connect the handset:
1. Plug the coiled handset cord into the handset jack on the left side of the
telephone identified in Figure 6.
1. Plug the other end of the coiled handset cord into the handset, then hang
up.
To Connecti ng Power:
1. Plug the power adapter into the connector on the back of the deskset
identified in Figure 7.
SB67030 Deskset User’s Guide - Installation 19
2. Plug the power adapter into a power outlet not controlled by a wall switch.
3. Observe that the keys flash and th e LCD d isp lay illuminates.
Page 20
Voice Make Call Answer
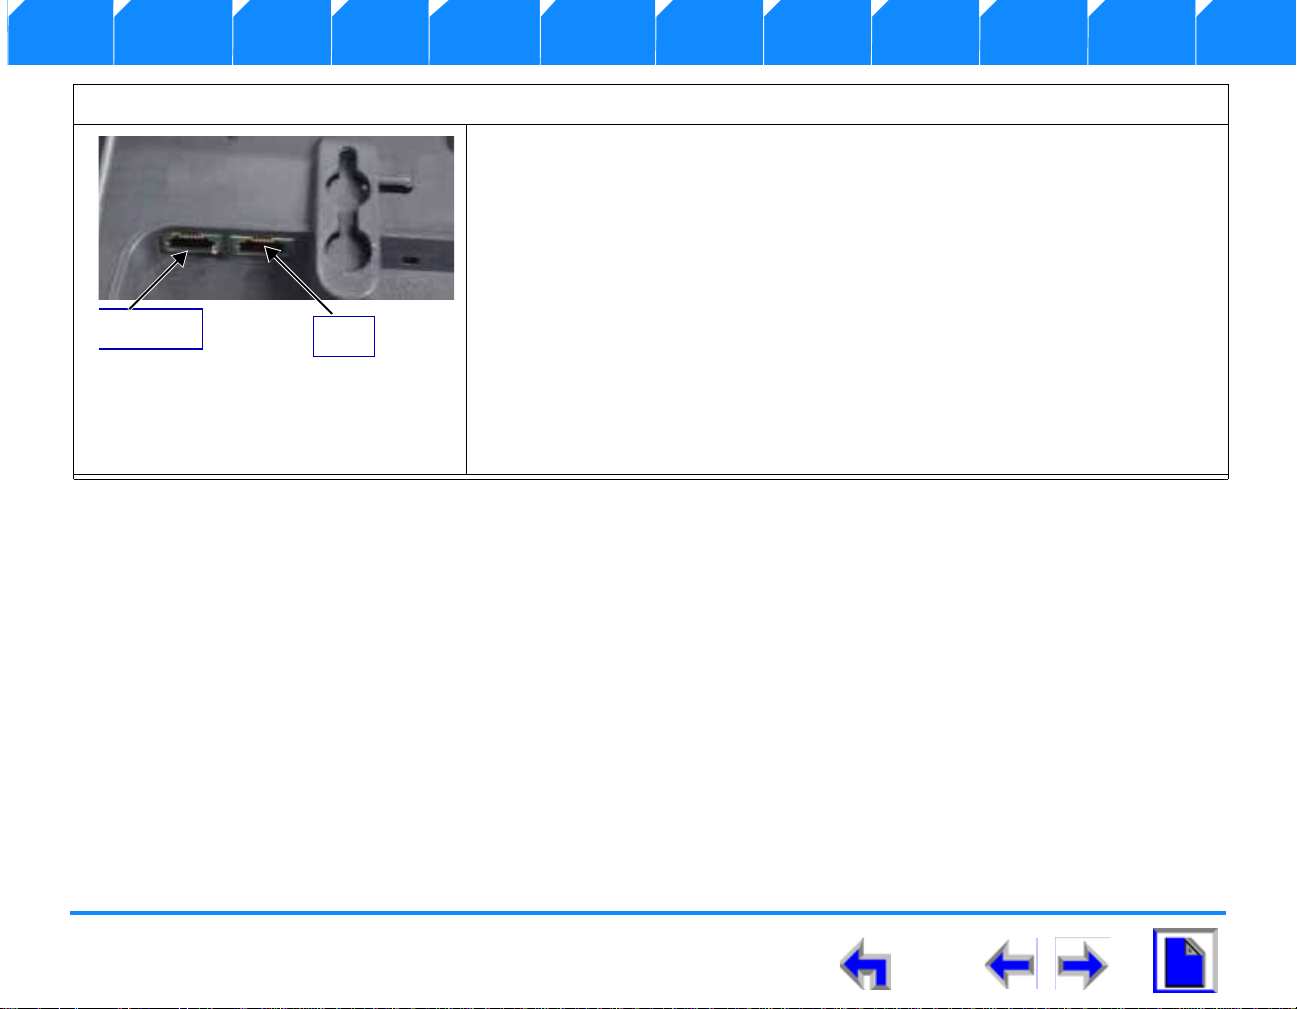
Figure. 8 Network Connections
Network
PC
Install Overview PC UI Setup Mail Directory CallLog Call Manage Call Handset Trouble
To connect the Ethernet Cable
If you currently have a PC connected to the networ k:
1. Unplug the RJ-45 ethernet network cable from your PC.
2. Plug the RJ-45 ethernet network cable into the jack on the back of the
deskset identified in Figure 8.
3. Plug an ethernet cable into the PC jack on the deskset.
4. Plug the other end of the ethernet cable into the PC.
If you do not have PC connected to the network:
1. Plug the network cable into the jack on the back of the deskset identified
in Figure 8.
SB67030 Deskset User’s Guide - Installation 20
Page 21
Voice Make Call Answer
Figure. 9 Wall M ount Deskset
Swithchook
Handset Tab
Figure. 10 Wall Mount Deskset
Note You will not need the bracket for wall mounting.
Install Overview PC UI Setup Mail Directory CallLog Call Manage Call Handset Trouble
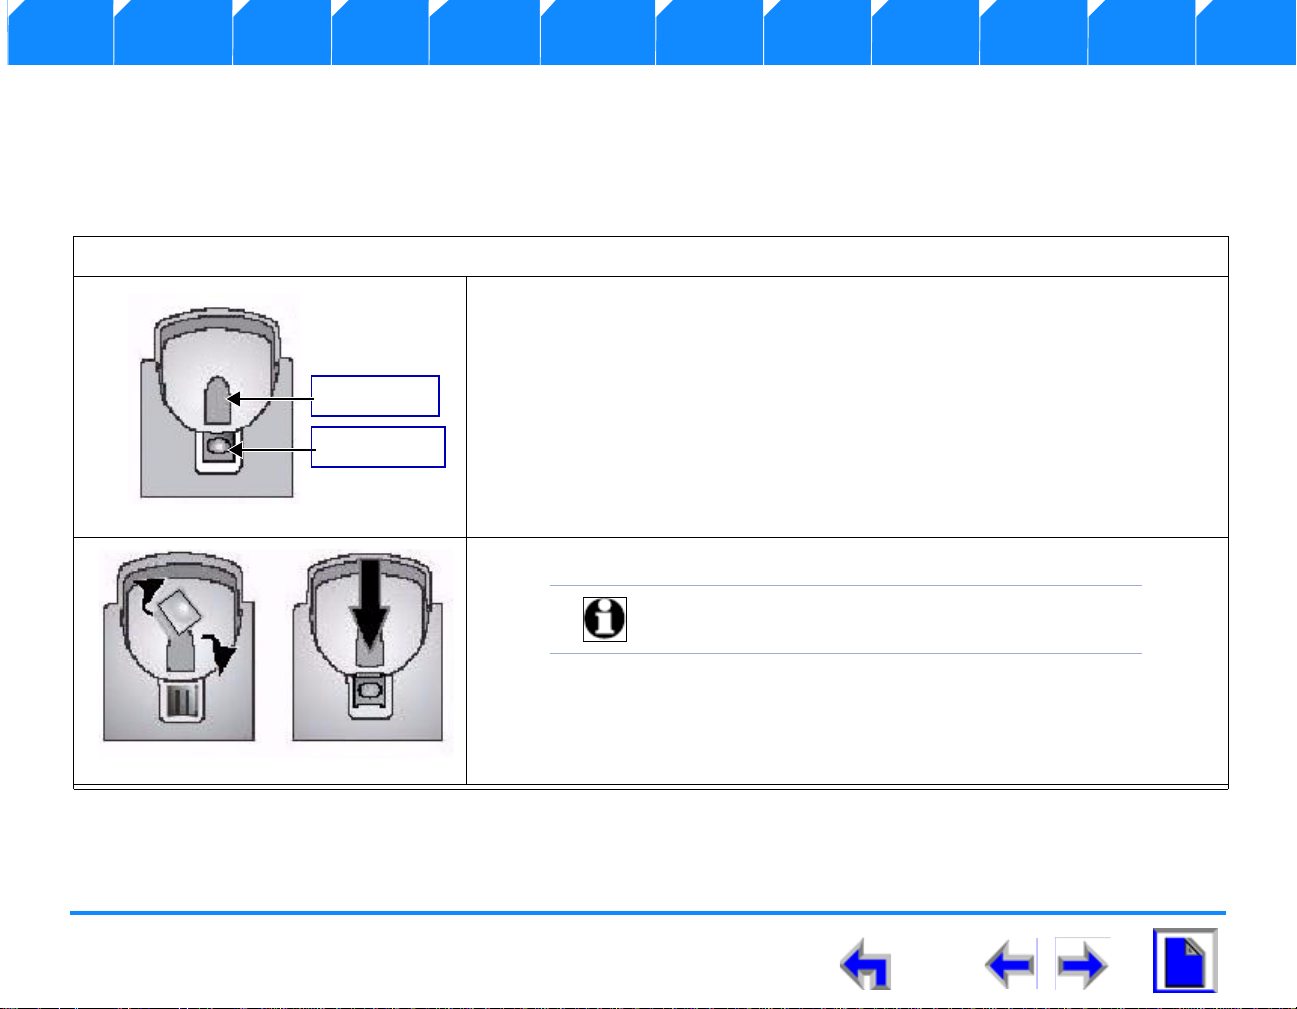
Wall Mounting
The telephone base comes with the bracket for desktop use (See “SB67030 Desk Set Components” on page 17). Wall mounting
requires a telephone outlet wall mounting plate with mounting studs that you must purchase from a hardware or consumer electronics
retailer.
To attach the deskset stand:
1. .Press the switchhook tab and slide it towards the top of the base as shown in
Figure 9.
SB67030 Deskset User’s Guide - Installation 21
2. Rotate the tab 180
3. Insert the tab back into the base.
° as shown in Figure 10.
Page 22
Voice Make Call Answer
Figure. 11 Mounting Brackets
Install Overview PC UI Setup Mail Directory CallLog Call Manage Call Handset Trouble
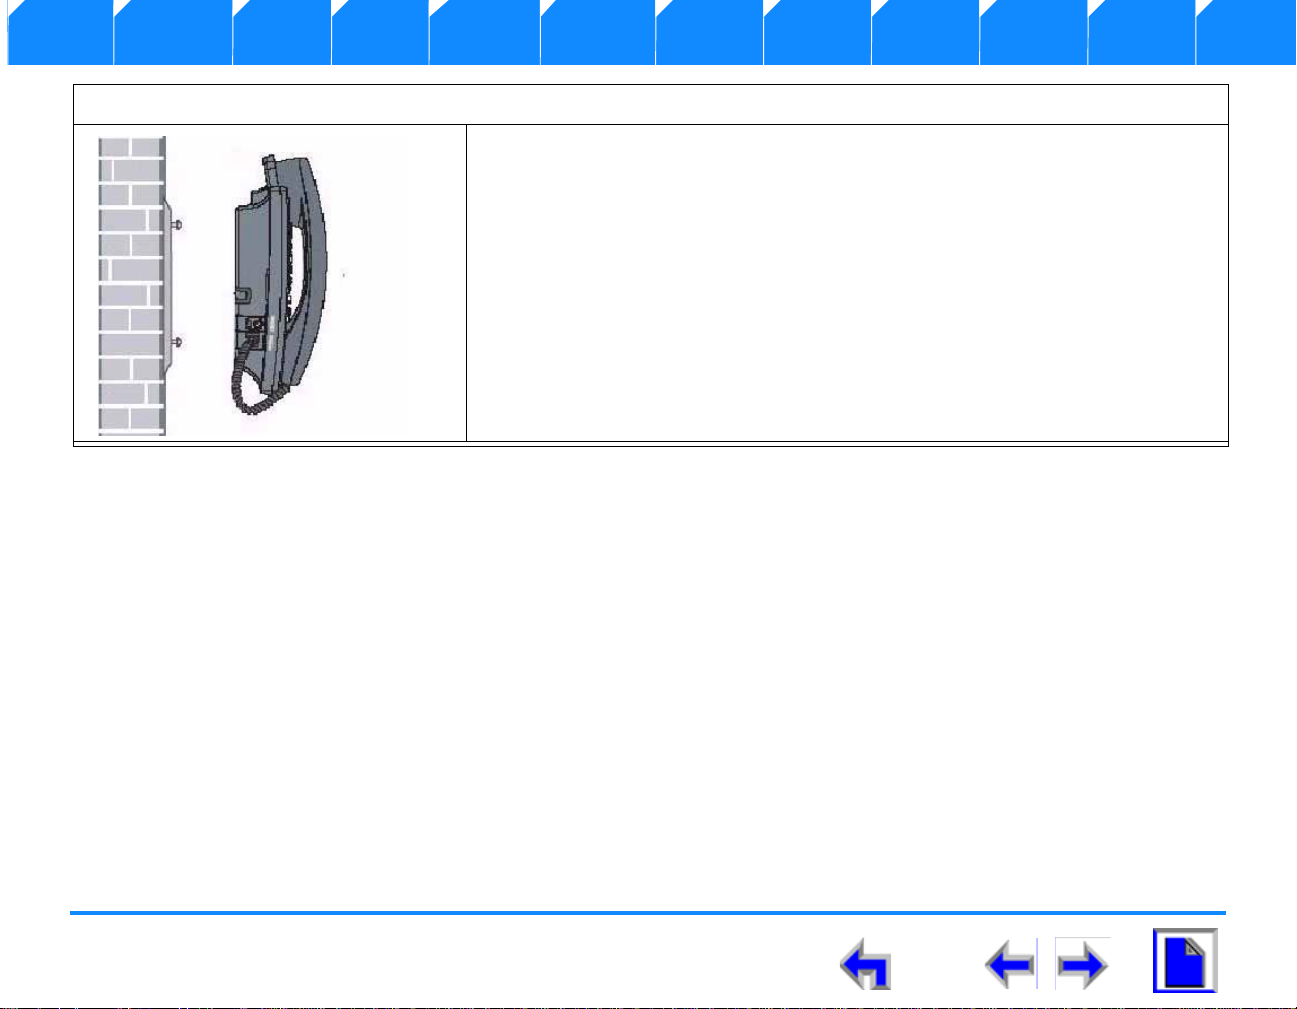
To mount the SB67030 Desk set:
1. Plug the ethernet cable into the jack on the back of the deskset.
2. Plug the power adapter into the connector on the back of the deskset.
3. Place the telephone base mounting plate above the mounting studs as
shown in Figure 11.
4. Slide the telephone base down until secure.
5. Plug the ethernet cable into the wall jack.
6. Plug the power adapter into a power outlet not controlled by a wall switch.
SB67030 Deskset User’s Guide - Installation 22
Page 23
Voice Make Call Answer
Install Overview PC UI Setup Mail Directory CallLog Call Manage Call Handset Trouble
Technical Specification
Table 2 identifies the SB67030 Desk Set features and associated technical specifica tions.
Table 2 Technical Specifications
Feature Specification
Frequency control Crystal controlled PLL synthesizer
Transmit Frequency Cordless Handset: 1921.536-1928.448 MHZ
Base: 1921.536-1928.448 MHZ
Channel 5
Nominal Effective Range Maximum power allowed by FCC and IC. Actual operating range
might vary according to environmental conditions at the time of use
Size Cordless Handset: 1.77 X 1.30 X 6.97 in (45 X 33 X 177 mm)
Charger: 3.15 X 4.13 X 2.36 in (80 X105 X 60 mm)
Base: 8.86 X 6.89 X 7.87 in (225 X 175 X 47 mm)
Gateway: 13.4 X 8.07 X 1.85 in (340 X 205 X 47 mm)
Weight Cordless Handset: 7.05 ounce (200g) (including battery)
Charger: 7.05 ounce (200g) (including adapter)
Base:59.96 ounce (1700g) (including adapter)
Gateway:88.18 ounce (2500g) (including adapter)
Power Requirements Handset:2.4V 550mAh Ni-MH battery
Charger:6V DC @ 200mA
SB67030 Deskset User’s Guide - Installation 23
Page 24
Voice Make Call Answer
Install Overview PC UI Setup Mail Directory CallLog Call Manage Call Handset Trouble
Table 2 Technical Specifications
Feature Specification
Base:5.1V DC @1700mA
Gateway:5.1V DC @1700mA
Typical Network Configurations
SB67030 Deskset User’s Guide - Installation 24
Page 25
Voice Make Call Answer
Install Overview PC UI Setup Mail Directory CallLog Call Manage Call Handset Trouble
C HAPTER
2
O
VERVIEW
Introduction
This s section provides a description of the functions and features of the SB67030 Deskset. The
Deskset provides a user interface for the Business Telephone System. The complete
telecommunications system includes:
SB67020 System Gateway - The System Gateway provides control for system
components and access to external communications networks. Use the Gateway to
add and remove users. (See The System Gateway Adm inistrators Guide).
SB67030 Deskset - The Deskset provides up to 50 desk set user interface for the
system..
SB67040 Remote Handset (Optional)- The remote handset duplicates many of the
Deskset features and provides a high degree of mobility.
7610 Headset (Optional) - The headset replaces the deskset local handset to provide
hands-free operation.
SB67030 Deskset User’s Guide - Overview 25
Page 26
Voice Make Call Answer
Laptop
`
`
Install Overview PC UI Setup Mail Directory Call Log Call Manage Call Handset Trouble
Figure 12 illustrates the AT&T Business System network diagram.
Figure. 12 AT&T Business System Network
This chapter covers the following:
1. “Display and Key Functions” on page 27
2. “Programmed Operations Keys” on page 29
3. “Call Appearance (CA)” on page 30
4. “Function Keys” on page 35
5. “Liquid Crystal Display (LCD) Screen” on page 28
6. “The Idle Screen” on page 41
SB67030 Deskset User’s Guide - Overview 26
Page 27
Voice Make Call Answer
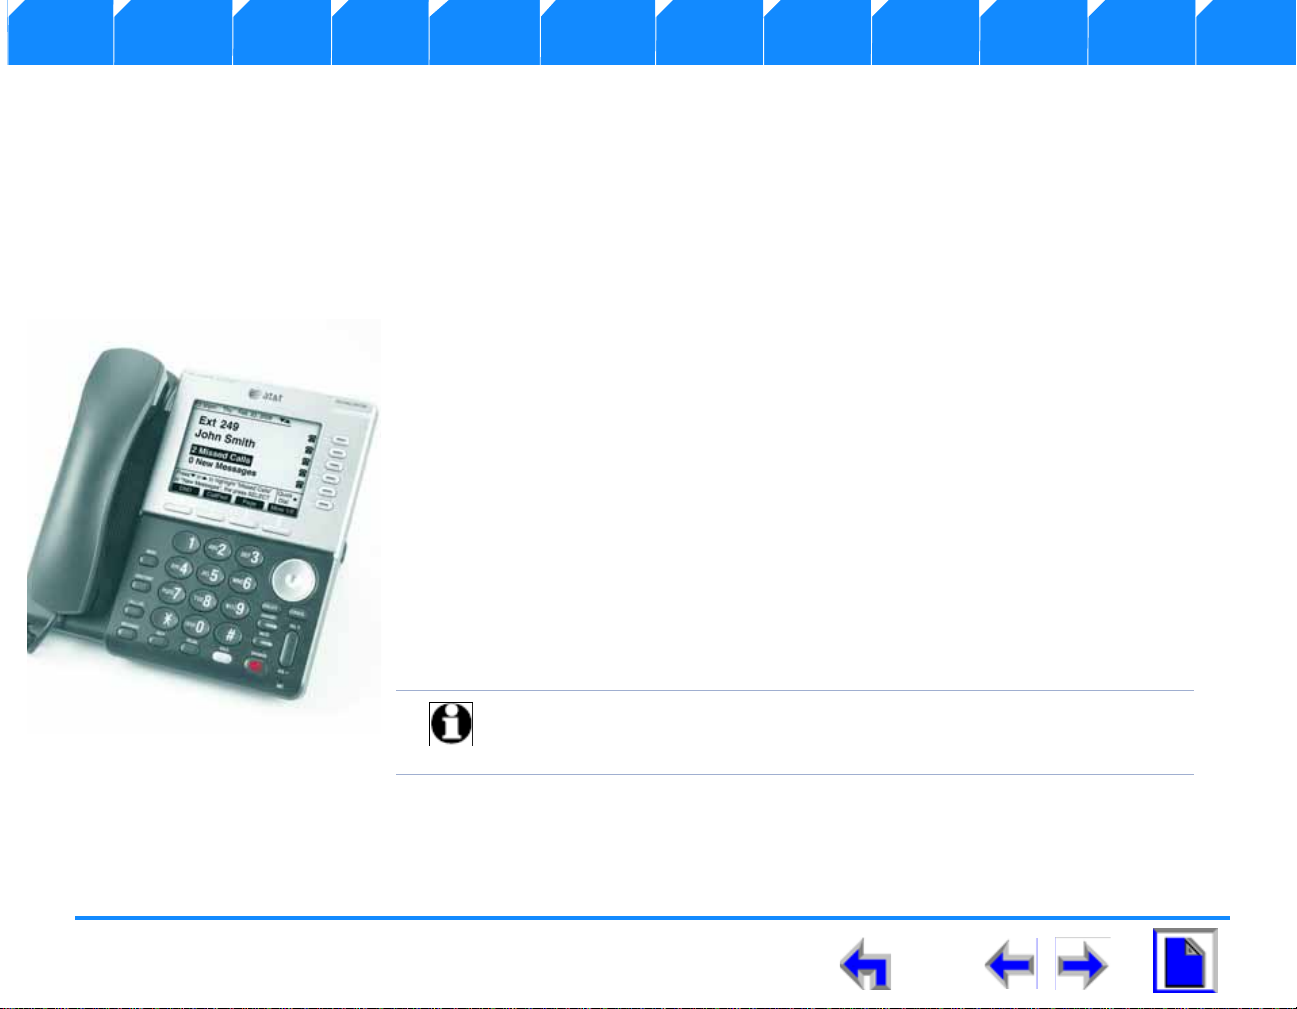
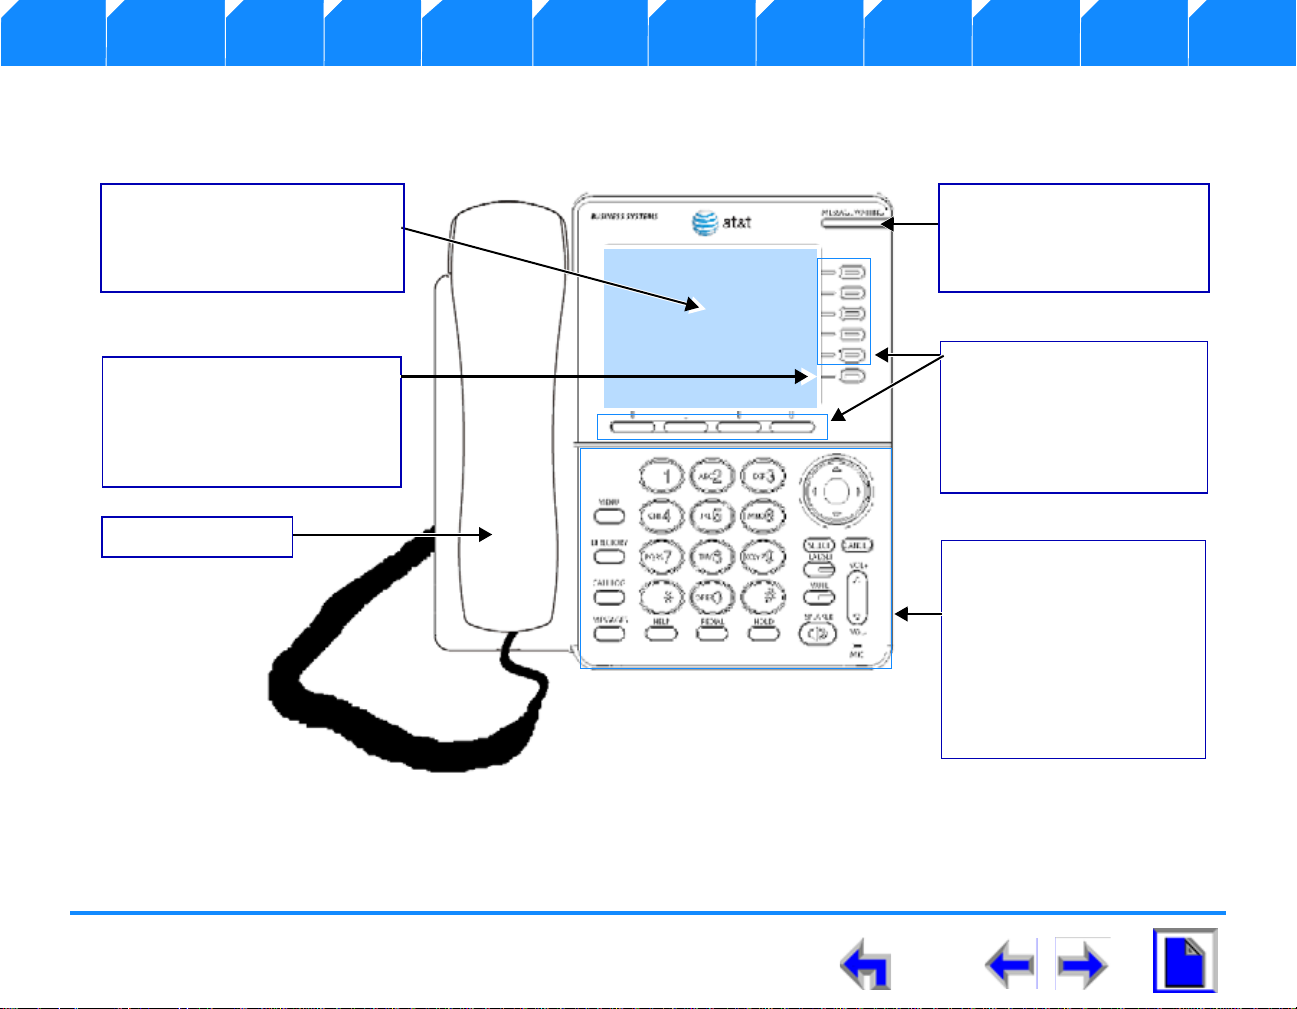
Liquid Crystal Display (LCD)
Provides the Graphical User
Interface (GUI) for the business
system
Voicemail Indicator
Illuminates when a message
or messages has been
received
Function Keys
a complete set of standard
deskset keys with a series of
fixed-function keys for
operation. The Predefined
key’s function depends on
the task being performed
and are disabled for certain
tasks.
Quick Dial
used to access quick dials. The 6
quick dial locations take their
name/number from the
directory entry
Call Appearance and
Programmed Keys
A set of 9 programmed
operation keys provides user
interaction based on the LCD
display activity
Corded Handset
Install Overview PC UI Setup Mail Directory Call Log Call Manage Call Handset Trouble
Display and Key Functions
Figure 13 identifies and describes the main display and key functional areas for the SB67030 Deskset
Figure. 13 SB67030 Deskset Layout
SB67030 Deskset User’s Guide - Overview 27
Page 28
Voice Make Call Answer
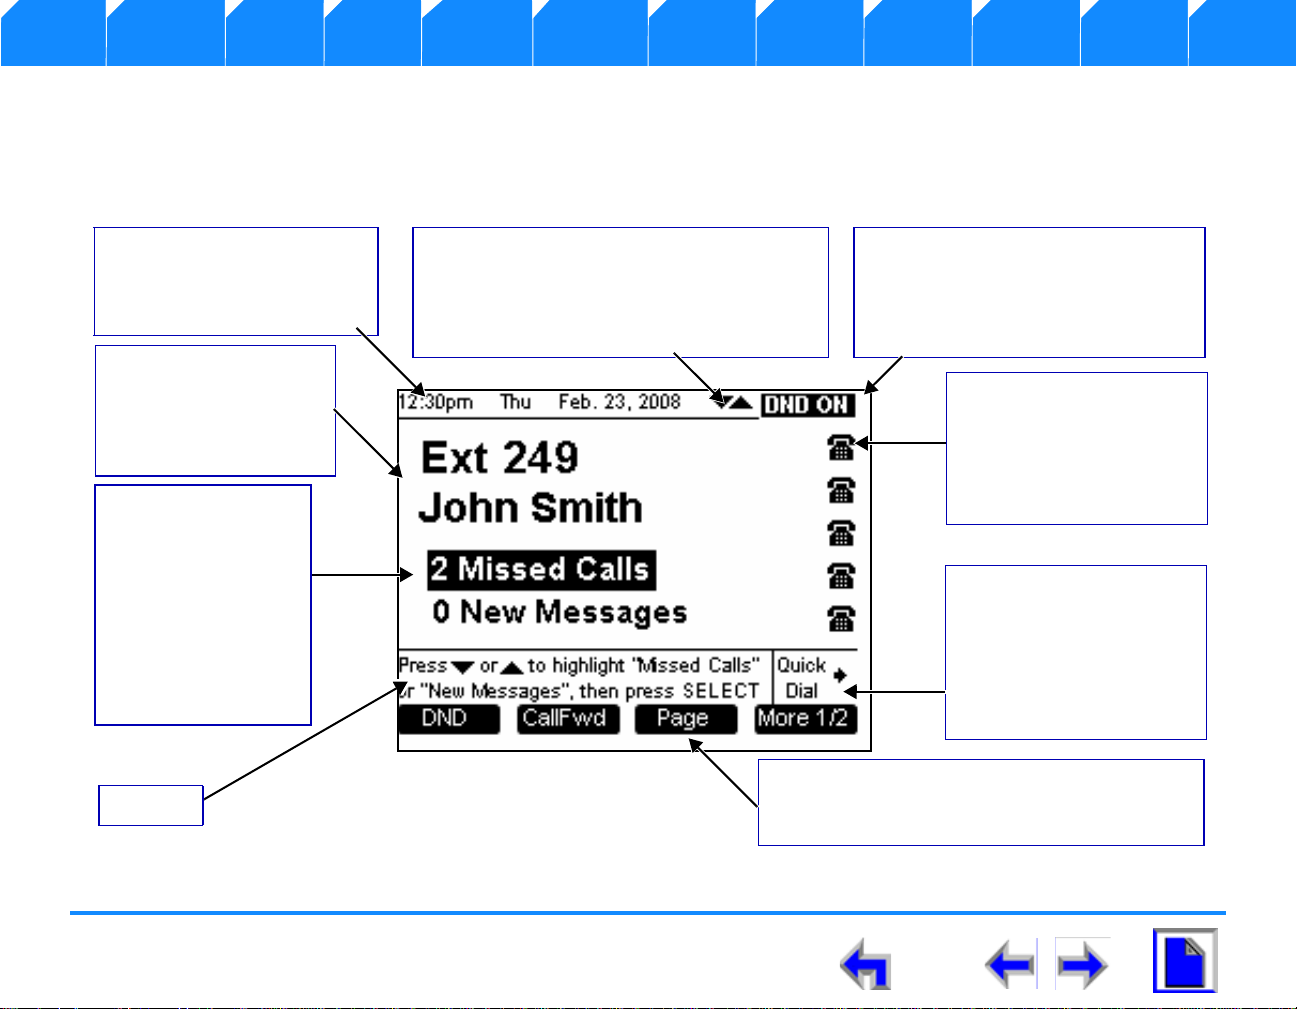
Date
Visible at all times, in every
screen in the format:
12:00AM Day MMM, DD, YYYY.
Navigation Arrows
The two navigation arrows display solid until
animated. The arrows will change to an open
arrow for 1 second and return to solid when
you press the NAVIGATION key.
DND or Call Forward
The Do Not Disturb (DND) or Call
forward indicator illuminates when
one of these functions has been
activated.
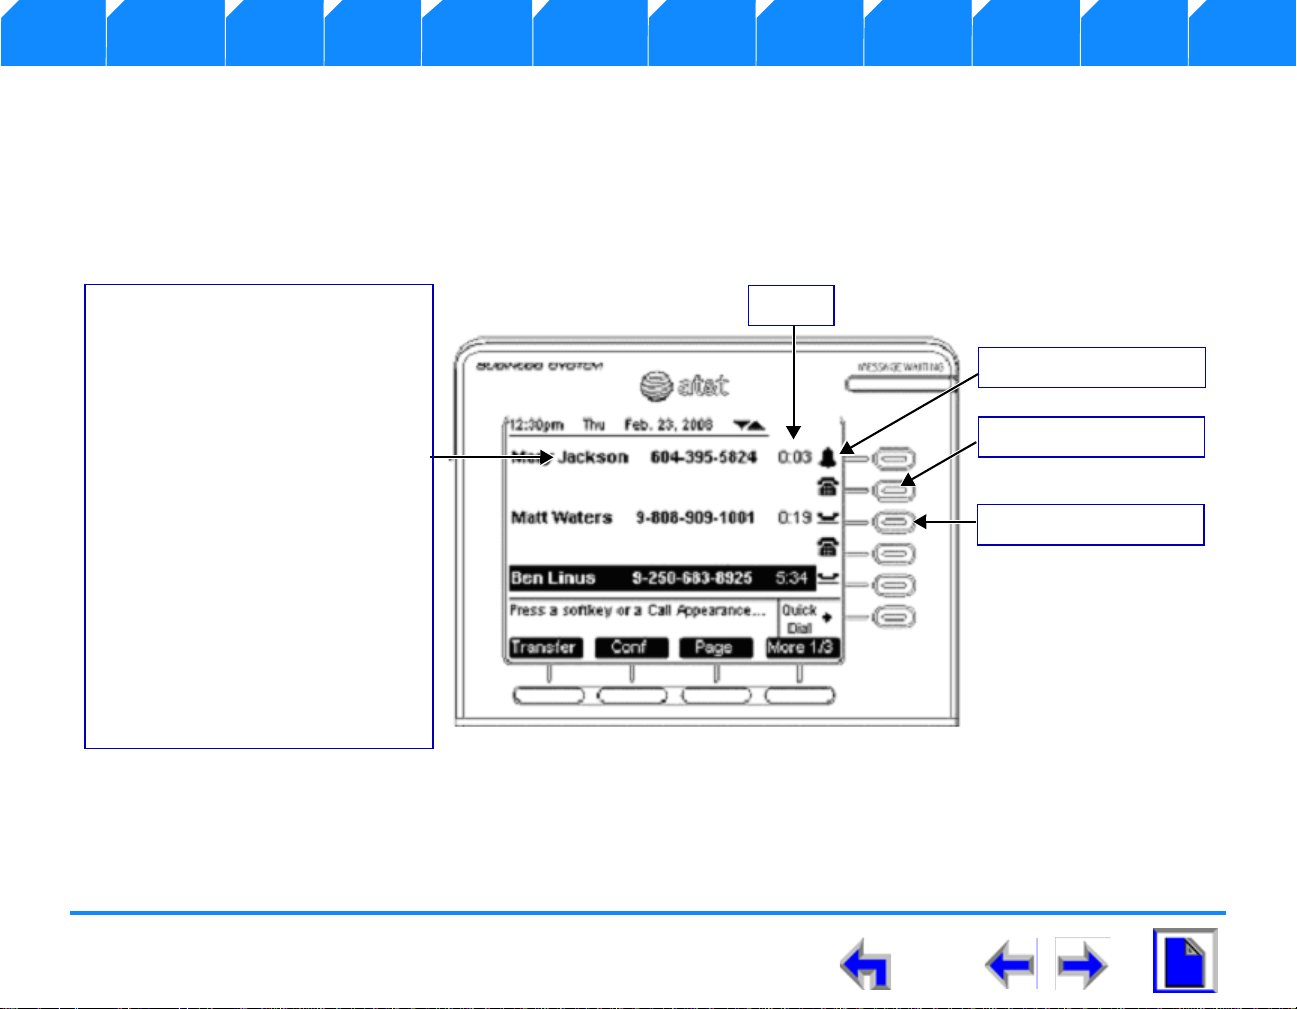
Call Appearance Icons
Call Appearance icons show
call status, that compliment
LED status indications.
There will always be 5
displayed.
Quick Dial
This programmed key
provides a two-touch quick
dial feature. When pressed,
it changes call appearance
icons to directory or feature
shortcuts.
Programmed Keys
A set of context-sensitiv e keys that provide user
interaction based on the LCD display activity.
Extension Number
Name
The extension number
and name display when in
the Idle screen.
New Calls
New Messages
Displays the name,
number, and time of
recently received calls
that have not been
acted upon.Identifies
the existence of new
messages and how
many.
Help
Install Overview PC UI Setup Mail Directory Call Log Call Manage Call Handset Trouble
Liquid Crystal Display (LCD) Screen
Figure 14 identifies the basic elements and describes the call functions. of the Liquid Crystal Display. This display provides the user
interface for the SB67030. Desk Set, and changes based on the task being performed. The initial screen (See “The Idle Screen” on
page 41) displays when the system is first turned on or when there is no call activity.
Figure. 14 LCD Screen Description
SB67030 Deskset User’s Guide - Overview 28
Page 29
Voice Make Call Answer
Call Appearance Keys
Programmed Keys
Install Overview PC UI Setup Mail Directory Call Log Call Manage Call Handset Trouble
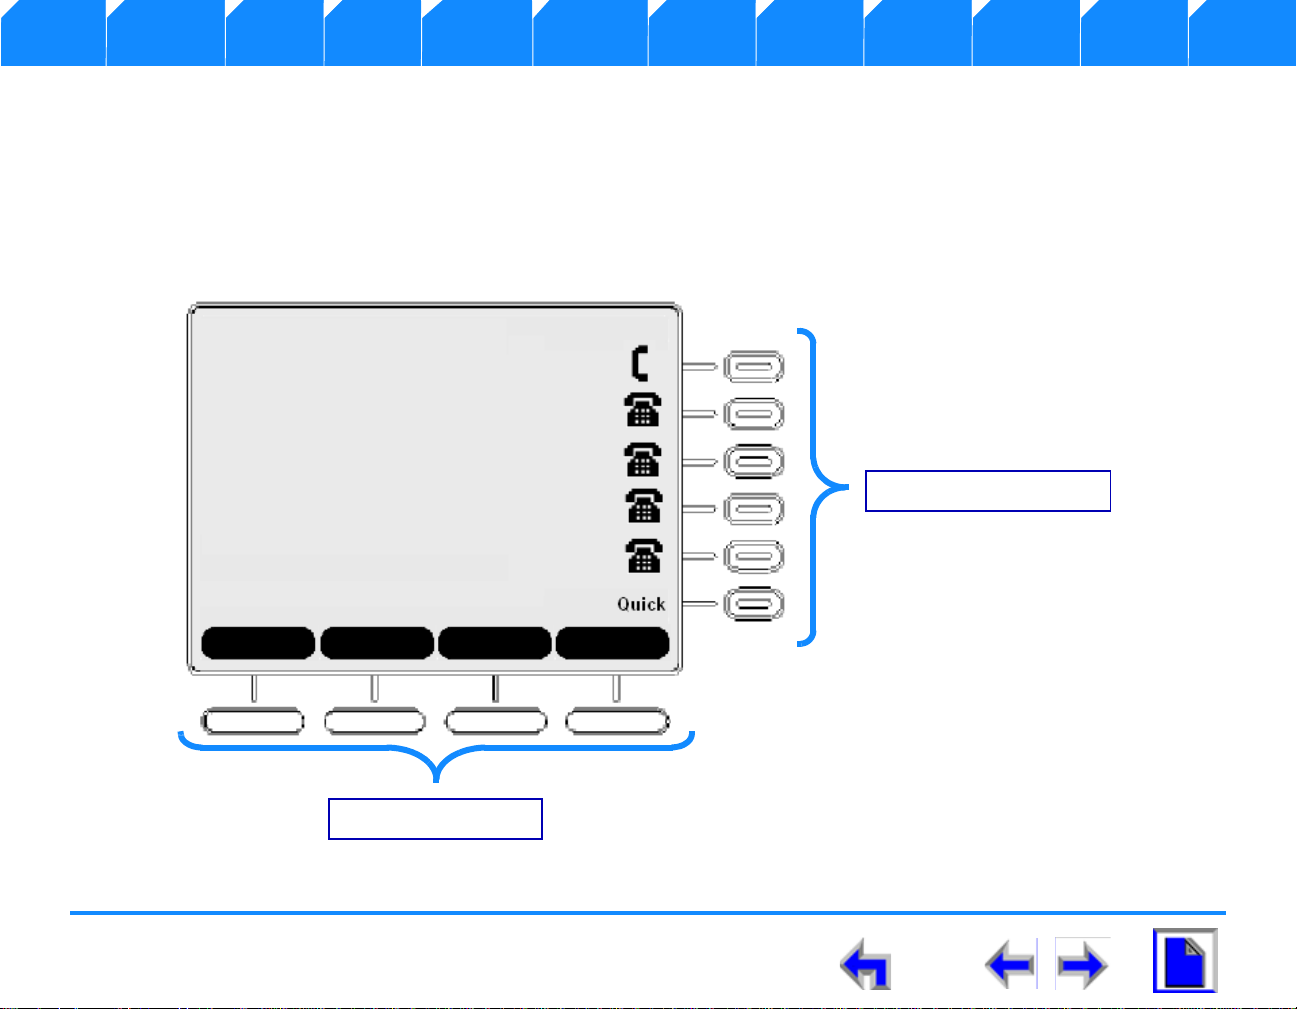
Programmed Operations Keys
The SB67030 Desk Set provides two sets of programmed operation keys, Call Appearance and Programmed, as illustrated in Figure 15.
The keys function changes according to the current operation being performed. The five Call Appearance keys on the righ t si de allow
you to handle multiple calls. The system uses icons displayed on the LCD screen to identify operations for Call Appearance keys. The
four programmed keys on the bottom handle operations based on the current function or task The current function of the Programmed
keys is identified by a screen label.
Figure. 15 Sample Call Appearance
SB67030 Deskset User’s Guide - Overview 29
Page 30
Voice Make Call Answer
Timer
Call Information
Call information consists of name and
number fields for both incoming and
outgoing calls. The following are cases
in which the name field may not be
displayed:
n You dial the outgoing call by
entering digits
n You dial the outgoing call from
Call Log, Redial, and Directory
where there is no name
information in the record
n There is no name information
in the CID with an external
incoming call
Call Appearance Icon
Call Appearance LED
Call Appearance Keys
Install Overview PC UI Setup Mail Directory Call Log Call Manage Call Handset Trouble
Call Appearance (CA)
Call Appearance feature illustrated in Figure 16, identifies the call information state of the call represented by five backlit CA keys and
an associated icon. See “Call Appearance (CA) Icons” on page 31 for a complete description of the available icons. The deskset presents
call information in-line with the call appearance programmed key at the side of the display. When there is an incoming call, the CA LED
on the key flashes with the incoming ring.
Figure. 16 Sample Call Appearance Screen
SB67030 Deskset User’s Guide - Overview 30
Page 31

Voice Make Call Answer
Install Overview PC UI Setup Mail Directory Call Log Call Manage Call Handset Trouble
Call Appearance (CA) Icons
The SB67030 Desk Set displays call appearance icons at any given time for the five programmed operation keys, allowing you to
handle multiple calls. Call Appearance icons show call status, and compliment the LED status indications in the programmed operation
keys. There will always be five displayed to reflect the five call limit. If a sixth call comes in, that call will be forwarded to the CallFwd no
answer setting, for example Voicemail. If the Corded Handset, Corded or Cordless headset, Speakerphone or Cordless handset goes offhook, the next available call appearance icon will change. Table 3 on page 31 describes the available Call Appearance icons.
Table 3 Call Appearance Icons
Icon Function Description Icon Function Description
Available CAThis icon displays for a free CA. Lifting the
corded handset from the cradle changes
the call appearance icon from Available CA
to Active Call-Off-Hook.
Active
Call Off-
This icon indicates that the corded handset
has been lifted from the cradle.
Hook
Pre-dial This CA icon identifies user pre-dial digits
prior to an off hook request.
Ringing This Animation Behavior Icon flashes on 1
second, off 1 second, and on. Match ringing
cadence during ring ON – flash at 100ms
intervals.
Silenced
Ring
If the ringer is silenced, this icon appears
during an incoming call instead of the
incoming ring icon.
On Hold This Animation Behavior icon displays for
call or conference on Hold. The animation
sequence is the same as the Ringing icon.
ConferenceThis icon shows for all calls on conference Conferen
ce On
This Animation Behavior icon displays for
conference on Hold.
Hold
Cordless
Handset
This icon indicates that the Cordless
Handset is currently in control of
Headset This icon indicates that the Cordless
Headset is currently in control of operation.
operations.
SB67030 Deskset User’s Guide - Overview 31
Page 32

Voice Make Call Answer
Install Overview PC UI Setup Mail Directory Call Log Call Manage Call Handset Trouble
Call Appearance (CA) Operation
When there is an incoming call, the Call Appearance LED flashes and a ring will be heard. A one-time two-second splash screen appears
to notify you who is calling. The highlight will move automatically to an incoming call to bring attention to the event treating it as the
highest priority. Press CANCEL to get out of the Feature List menu to view the CID info in the call appearance screen. Use one of the
following methods to answer the call:
1. Press the flashing CA key.
2. Press the Answer
3. Lift the receiver.
4. Press SPEAKER to route audio to the speaker.
5. Press HEADSET to route audio to headset output.
The highlight will move automatically to another occupied CA when the current CA ends. The status of the call determines the available
programmed operation keys. The following defines the Highlight auto-navigation priority based on the mode of the CA with (1) being
the highest priority.
1. Incoming ring
2. Active Call
3. Pre-dial & Dial state
4. Held Calls
The system fills Call Appearance slots from the top down for both incoming calls as well as outgoing calls. The system forces the
incoming call to a free CA slot closest to the top. When you press a CA key in an unoccupied slot, the system will go off-hook in that
CA slot. When all the Call Appearances are in use, you will not be able to gain a Call Appearance by lifting the receiver, or by pressing
SPEAKER, or HEADSET. You will be notified of this condition and prompted to free up a Call Appearance.
key.
SB67030 Deskset User’s Guide - Overview 32
Page 33

Voice Make Call Answer
Install Overview PC UI Setup Mail Directory Call Log Call Manage Call Handset Trouble
You can park a held call, or unhold a call and then terminate it. If an incoming call event occurs when all the Call Appearance is full, the
system applies the Call Forward No Answer setting to the incoming call. The default setting for Call Forward No Answer is to
send the call to voicemail.
Conferencing or transferring a call requires two CA slots (for Call A and Call B). If you do not want to transfer or conference one of the
calls that are already held, there will not be enough slots available to make a new call. If an attempt to go off-hook is made by lifting
the receiver, or by pressing SPEAKER, or HEADSET; the user will be prompted to free up a Call Appearance.
When you are in a feature such as the Directory, Call Log, Redial, or Voicemail, pressing a Call Appearance key will not dial out a
highlighted list entry. For example, if a number is highlighted in the Call Log, pressing the CA next to that entry will not call the listed
number. Pressing a Call Appearance will reserve an available Call Appearance and the Call Appearance screen displays.
SB67030 Deskset User’s Guide - Overview 33
Page 34

Voice Make Call Answer
Install Overview PC UI Setup Mail Directory Call Log Call Manage Call Handset Trouble
Call Appearance (CA) Timer
The Call Appearance Timer displays the length of the state of the call, such as how long the call has been held. The CA timer will always
increase in one-second increments. If there are multiple calls displayed, all CA timers will increment in sync with each other. Table 4
lists and describes the CA operations.
Table 4 Call Appearance Timer
Mode Description
Dial and Pre-dial The call timer will be active as long as the call is off-hook.
From Dial: The CA timer starts as soon as the MMI Dialing rules have been met.
From Pre-Dial: The CA timer starts as soon as an off-hook method is activated.
From Held: The CA timer starts as soon as a call is unheld.
From Park: Same timer rules as Held.
From Incoming ring: The CA timer starts as soon as the call is in Active state (Audio active). The timer
will start at zero.
Active Call There is no Call timer during Dial or Pre-dial states.
Held Call The CA timer will reset to zero. The Active time will be stored and added to the Active call timer once
the call is unheld.
Incoming Ring The call timer will start as soon as the Caller ID information is displayed on the screen.
SB67030 Deskset User’s Guide - Overview 34
Page 35

Voice Make Call Answer
Menu
Accesses the configuration
menu. Available in Idle only.
Redial
Accesses the outgoing call
log.
Directory
Accesses the local
directory.
Call Log
Accesses the incoming
calls log.
Message
Accesses the voicemail
feature.
Help
Accesses context-sensitive
help.
Hold
Places current active call on
hold.
Speaker
Routes audio to speakerphone.
Can be used to go off-hook.
Mute
Toggles mute on active call.
Volume
Increases/Decreases the
ringer, audio, or call volume.
Headset
Routes audio to headset.
Can be used to go off-hook.
Cancel
Cancels the most recent
operation and returns to
previous function.
Navigation
Moves the cursor up/down/
left/.right on the display.
Select
Selects a highlighted option in
most cases.
Numeric
keypad
Install Overview PC UI Setup Mail Directory Call Log Call Manage Call Handset Trouble
Function Keys
The Function keys include the standard telephone numeric keys and a set of function keys defined in Figure 17 and
Figure. 17 SB67030 Desk Set Function Keys
SB67030 Deskset User’s Guide - Overview 35
Page 36

Voice Make Call Answer
Install Overview PC UI Setup Mail Directory Call Log Call Manage Call Handset Trouble
Programmed Keys
The Programmed keys provide a variety of functions determined by the current user task. If you are working in call forwarding. the call
function keys displayed will be different from those displayed if you are making a call.
Programmed keys are located in the same position for consistency. This means that some key positions will remain blank. Some modes
have more than four soft keys available. To view the additional keys, press the More 1/2 or More 1/3 keys. Table 5 shows soft key
positions for most major modes.
Table 5 Programmed Key By Position
Mode Key 1 Key 2 Key 3 Key 4
Idle
Directory
Extension List
Call Log
Pre-Dial
Redial
Dial
Voicemail
SB67030 Deskset User’s Guide - Overview 36
Page 37

Voice Make Call Answer
Install Overview PC UI Setup Mail Directory Call Log Call Manage Call Handset Trouble
Table 5 Programmed Key By Position
Mode Key 1 Key 2 Key 3 Key 4
Play/Record Greeting
Incoming Ring
Quick Dial
Page
Park List
DND Settings
Active Call
Held Call
Register/De Register
SB67030 Deskset User’s Guide - Overview 37
Page 38

Voice Make Call Answer
Install Overview PC UI Setup Mail Directory Call Log Call Manage Call Handset Trouble
Table 6 provides an alphabetical list of the labels that appear above the Programmed keys.
Table 6 Programmed Key Screen Labels
Function Description Function Description
Adds an extension destination when forwarding a
Rewinds message in playback mode.
voicemail message.
Answers incoming call. Forwards message in playback mode.
Goes back to Idle. Toggles First and Last name sort in Directory and
Extension list.
Performs the backspace function. Opens the sort options menu in Directory.
Initiates Call Forward. If the Cordless Handset is registered, locates
handset.
Cancels action and returns user to previous mode.
Moves to next set of programmed operation keys. If
this button is present, there are more than four
programmed operation keys available. Numeric
designation indicates current page. For example,
More 1/2 indicates that user is on page one of two.
Clears all entries.
Moves to next set of programmed operation keys. If
this button is present, there are more than four
programmed operation keys available. Numeric
designation indicates current page. More 1/3
indicates that user is on page one of three
SB67030 Deskset User’s Guide - Overview 38
Page 39

Voice Make Call Answer
Install Overview PC UI Setup Mail Directory Call Log Call Manage Call Handset Trouble
Table 6 Programmed Key Screen Labels
Function Description Function Description
Clears all new messages. Marks all new messages.
Initiates a conference call. Creates a new entry.
Confirms DND setting ON or OFF. Declines choice.
Performs deletion of multiple records. Pages internal extensions.
Performs a permanent deletion. Parks call.
Removes an extension destination when forwarding
Goes to Park List.
a voicemail message.
Deletes highlighted voicemail message in message
list.
De-registers Cordless Handset or Headset in
Inserts a two-second pause in digit string or pause s
message playback.
Plays recorded audio clip.
registration menu.
Shows you more details for a particular entry. Plays all messages in Voicemail feature.
Initiates Do Not Disturb. Plays message.
Saves message annotation and goes to next step in
Records an audio clip.
message forward function.
Drops selected call in conference. Registers Cordless Handset or Headset in
registration menu.
SB67030 Deskset User’s Guide - Overview 39
Page 40

Voice Make Call Answer
Install Overview PC UI Setup Mail Directory Call Log Call Manage Call Handset Trouble
Table 6 Programmed Key Screen Labels
Function Description Function Description
Allows you to change previously entered
Retrieves a parked call.
information.
Ends conference, but keeps calls on hold. Saves information entered.
Ends paging of extensions. Forwards voic em ail message to selected
extensions.
Goes to Extension List. Sets the selected option as the default choice.
Toggles First and Last name sort in Directory and
Stops recording of audio clip.
Extension list.
Initiates Message Forward function. Stores number in local directory.
Forwards incoming call to voicemail. Initiates transfer of a call.
Silences ringer during incoming call event and
Transfer confirmation.
either goes back to previous mode or goes to next
incoming call.
Initiates recording of annotation when forwarding a
Positive confirmation of choice.
voicemail message.
Conference confirmation.
SB67030 Deskset User’s Guide - Overview 40
Page 41

Voice Make Call Answer
Install Overview PC UI Setup Mail Directory Call Log Call Manage Call Handset Trouble
The Idle Screen
All SB67030 Desk Set operation begin from the Idle screen shown in Figure 18. This screen is displayed when the Desk Set is first
turned on or at the end of any operation such as completion of a call, or when the extension does not have any Active or Held Calls.
“Liquid Crystal Display (LCD) Screen” on page 28 provides a complete description of the Idle screen operation. Customization functions
can only be accessed from the Idle screen
Figure. 18 The SB67030 Desk Set Idle Screen
Table 7 Idle Screen Programmed Keys
Key Description Key Description Key Description Key Description
Initiates Do Not
Disturb.
Goes to Extension
Initiates Call
Forward.
Goes to Park List.
Pages internal
extensions.
List.
SB67030 Deskset User’s Guide - Overview 41
Moves to next set
of programmed
operation keys.
Page 42

Voice Make Call Answer
Install Overview PC UI Setup Mail Directory Call Log Call Manage Call Handset Trouble
Status Indication
The upper right-hand corner area is reserved for displaying Major status messages, as shown inFigure 19and Figure 20. Status indicators
appear in Idle and Call Appearance modes only. Voicemail, has it’s own set of status indicators.
Figure. 19 Example of DND On
Figure. 20 Example of Call Forward On
Status messages include:
n DND ON Appears if Do Not Disturb is on.
n FWD ON Appears if Call Forward is on.
n VMFull Appears if voicemail is full.
n < 5 minimum Appears only in Voicemail feature to indicate less than five minutes recording time available
If more than one status indicator is active, the display will switch between each indicator. The status indicator will alternate every two
seconds.
Extension
The extension name and number will be shown when on the Idle screen. The extension and name can only be modified in the Web GUI
application with the ADMIN login, not the USER login.
SB67030 Deskset User’s Guide - Overview 42
Page 43

Voice Make Call Answer
12 3
45 6
7
89
0
ABC DEF
GHI JKL MNO
PQRS TUV WXYZ
OPER
#
*
Figure. 21 Keypad Data Entry
##&‘,-.@
* !()*+?
Install Overview PC UI Setup Mail Directory Call Log Call Manage Call Handset Trouble
Keypad Data Entry
Keypad Data Entry allows you use the dialing keys to enter alphabetical characters into a text field
or search the Directory or Extension list based on the first character of the entry. Digits 2, 3, 4, 5,
6, and 8 have three assigned letters, while digits 7 and 9 have four assigned letters as shown in
Figure 21. Pressing the dialing key once will enter the first letter, twice will enter the second letter,
three times will enter the third letter. Pressing the key further will cycle through the letters again.
If the list is sorted by First Name, the Deskset will search for the first letter of the First Name. If the
list is sorted by last name, the Deskset will search for the first letter of the Last Name. The user may
toggle between First Name and Last Name sort by pressing ./
Note Keypad Data Entry is available in the Directory and Extension list only
The “1” dialing key searches for a space. The “#” and “*” keys have been assigned special characters
as shown in Figure 22. Pressing these keys will cycle through each special character in the order shown.
Figure. 22 Special Character Assignment
SB67030 Deskset User’s Guide - Overview 43
Page 44

Voice Make Call Answer
Figure. 23 Exact Match
Figure. 24 Closest Match
Install Overview PC UI Setup Mail Directory Call Log Call Manage Call Handset Trouble
Search Rules
To search for a list entry:
1. Press DIRECTORY to display the directory list.
2. Press a dialling key in the Directory list cause the SB67030 Desk Set to
search for either an exact match or the closest match as follows:
l If you press K [Press 5 twice] and an exact match is found, the highlight bar
moves to that entry as shown in Figure 23. The highlighted entry appears at
the top of the display regardless of its relative position within the list unless it
falls in the bottom six entries of the list. If the entry falls in the bottom six, the
highlighted entry will appear in its correct relative position.
l If you press L [Press 5 three times] and the SB67030 Deskset cannot find an
exact match, the highlight bar will move to the entry with the closest
alphabetical match as shown in Figure 24. The highlighted entry will appear in
the middle of the display regardless of its relative position within the list unless
it falls in the top or bottom three of the list. If the entry falls in the top or
bottom three, the highlighted entry will appear in its correct relative position.
SB67030 Deskset User’s Guide - Overview 44
Page 45

Voice Make Call Answer
Install Overview PC UI Setup Mail Directory CallLog Call Manage Call Handset Trouble
C HAPTER
3
B
ROWSER INTERFACE
Introduction
:You can configure certain functions of the AT&T Small Business System through the Browser
Interface that is embedded in every SB67030 Desk Set and SB67020 Gateway. All global settings,
as well as the System Directory, are distributed across the network. The Browser Interface consists
of web pages with editable settings.
CAUTION In most cases there are multiple settings on one page. Changing a
setting does not instantly apply the new value. Pressing the “Apply” button will save
all changes on that page.
Changes made on the WebUI are transmitted to all Desksets when applied. If changes are being
made on the Deskset and WebUI simultaneously, a first-come-first-serve policy on resource
allocation will apply. As system configuration is session based, changes will only be transmitted
globally when the session ends (either by pressing “Save” on the Deskset, or clicking “Apply” on
the WebUI).
If the user types an invalid value into one of the fields on the web page, clicking “Apply” will not
save the page. An error message will be generated and displayed at the top of the page. The field
with the incorrect value will be highlighted, as shown below.
SB67030 Deskset User’s Guide - Browser Interface 45
Page 46

Voice Make Call Answer
Figure. 25 Menu - Deskset Settings
IP Address
Figure. 26 Menu - Deskset Settings
Install Overview PC UI Setup Mail Directory CallLog Call Manage Call Handset Trouble
Accessing the User Interface (UI)
To access the Browser Interface:
1. Press MENU.
2. Press the down NAVIGATION button to highlight Deskset Information and
press SELECT, or press 4.
3. Find your IP Address, as shown in Figure 25 the Deskset Information screen.
4. On your computer, open your preferred Internet Browser such as Internet
Explorer, Firefox, Safari, or Chrome.
5. Type in the Deskset IP add ress in the address bar and press Enter. Note that the
IP address of any Deskset or Gateway on the Synapse network can be used for
access.
6. You will go to a Login screen, as shown below.
7. Enter in your administrator User ID and password, then click Login.
8. If this is the first time using the Web UI, type “admin” in the User ID field and
“12345” in the password field, then click Login. You may change your User ID and
password once you are logged in.
SB67030 Deskset User’s Guide - Browser Interface 46
Note: Logging in as administrator allows you to configure global settings. Logging in as a
user will allow you to access local phone settings only. .
Page 47

Voice Make Call Answer
Figure. 27 Menu - Deskset Settings
Install Overview PC UI Setup Mail Directory CallLog Call Manage Call Handset Trouble
SB67030 Deskset User’s Guide - Browser Interface 47
Page 48

Voice Make Call Answer
Figure. 28 Menu - Deskset Settings
Install Overview PC UI Setup Mail Directory CallLog Call Manage Call Handset Trouble
Call Forward-No Answer Settings
Only a system administrator may alter Call Forward-No Answer (CFNA) settings. CFNA may also be configured on the Deskset.
Log in as administrator.
Click Phone Settings in the left navigation menu.
Click Basic Settings.
Locate “Call Forward No Answer Settings:” and make your selections from the
following options:
Call Forwarding On / Off: Turns CFNA on or off. Caution: Turning CFNA off will
cause the Deskset to ring continuously until the far-end caller hangs up.
Target Type: Voicemail / Extension / Line.
Seconds before forwarding. The user may select a range from 5 to 45 seconds (in
five-second increments).
Extension / External Line Target Number. Enter target extension and external line
numbers here
SB67030 Deskset User’s Guide - Browser Interface 48
Page 49

Voice Make Call Answer
Install Overview PC UI Setup Mail Directory CallLog Call Manage Call Handset Trouble
Editing Quick Dial Entries
SB67030 Deskset User’s Guide - Browser Interface 49
Page 50

Voice Make Call Answer
s
e
e
a
Install Overview PC UI Setup Mail Directory CallLog Call Manage Call Handset Trouble
To add or edit Quick Dial entries,
Log in as user or administrator.
Click Phone Settings in the left navigation menu.
Click QuickDial Keys.
Note: If logged in as administrator, you may select which individual exten
edit
Fill out name and number fields.
The associated Call Appearance icons indicate which Call Appearance key
used. Due to limited space on the Deskset display, names will be truncat
ellipses if they do not fit on the Deskset display. If both name and numb
are left blank, then the Deskset display will show <Empty> next to the C
Appearance.
Click Apply.
SB67030 Deskset User’s Guide - Browser Interface 50
Page 51

Voice Make Call Answer
Install Overview PC UI Setup Mail Directory CallLog Call Manage Call Handset Trouble
C HAPTER
4
S
ETUP
Introduction
Your SB67030 Desk Set ships with a factory or default settings for a variety of settings in the
following categories:
1. “Setup Menus” on page 52
2. “Deskset Settings” on page 54
3. “User Settings” on page 59
4. “Admin Settings” on page 77
5. “Deskset Information” on page 91
M
ENUS
6. “Setting up Do Not Disturb” on page 92
SB67030 Deskset User’s Guide - Setup Menus 51
Page 52

Voice Make Call Answer
Install Overview PC UI Setup Mail Directory CallLog Call Manage Call Handset Trouble
Setup Menus
All SB67030 Desk Set operation begin from the Idle screen shown in Figure 29. This screen displays when the Desk Set is first turned
on or at the end of any operation such as completion of a call, or when the extension does not have any Active or Held calls.See “Liquid
Crystal Display (LCD) Screen” on page 28 for a complete description of the Idle screen operation. Customization functions can only be
accesses from the Idle screen.
SB67030 Deskset User’s Guide - Setup Menus 52
Page 53

Voice Make Call Answer
Figure. 30 Menu Screen
Install Overview PC UI Setup Mail Directory CallLog Call Manage Call Handset Trouble
Figure. 29 The SB67030 Desk Set Idle Screen
To access the SB67030 Deskset setup menus:
1. Press MENU and observe that the Menu screen shown in Figure 30
displays.
2. To display the Deskset Settings menu press SELECT . or press 1 on the
keypad.
3. Go to “Deskset Settings” on page 54 for further instructions.
4. To display the User Settings menu press the down NAVIGATION arrow once
to move the highlight and press SELECT , or press 2 on the keypad.
5. Go to “User Settings” on page 59 for further instructions.
6. To display the Admin Settings menu press the down NAVIGATION arrow
twice to move the highlight and press SELECT , or press 3 on the
keypad.
7. Go to “Admin Settings” on page 77 for further instructions.
8. To display the Deskset Information menu press the down NAVIGATION
arrow three times to move the highlight and press SELECT , or press 4
on the keypad.
9. Go to “Deskset Information” on page 91 for further instructions\++.
SB67030 Deskset User’s Guide - Setup Menus 53
Page 54

Voice Make Call Answer
Figure. 32 Menu - Deskset Settings
Install Overview PC UI Setup Mail Directory CallLog Call Manage Call Handset Trouble
Deskset Settings
To display the Deskset Settings men:
1. Press MENU and observe that the Menu screen shown in Figure 30 on page 53
displays.
2. To display the Deskset Settings menu shown in Figure 32 press SELECT . or
press 1 on the keypad.
The Deskset Settings menu provides access to the four functions and the related submenus listed in Table 8.
Table 8 Deskset Settings Menu Structure
Function Submenu
1. “Display” on page 55 1. Contrast [1-9]
2. Backlight Hi/Lo/Off]
2. “Sounds” on page 56 1. Ring Volume [0-8]
2. Ringtones [1-9]
SB67030 Deskset User’s Guide - Setup Menus 54
3. Key Beeps [On-Off]
3. “Language” on page 57 1. English (Preset)
2. Francais
3. Espanol
4. “Preferred Audio” on page 58 1. Speakerphone (Set)
2. Headset
Page 55

Voice Make Call Answer
Figure. 33 Display Menu
Install Overview PC UI Setup Mail Directory CallLog Call Manage Call Handset Trouble
Display
The Display menu provides the ability to adjust your SB67030 Desk Set LCD contrast and backlight.
To access the Display menu:
1. Press SELECT to display the Deskset Settings menu shown in
Figure 32 on page 54.
2. Press SELECT . or press 1 on the keypad to access the Display menu
shown in Figure 33.
3. To set the desired Contrast level from 1 to 9 press the left or right
NAVIGATION arrow. The default is 3.
4. To set the desired Backlight level press 2 on the keypad.
OR
5. Press the down NAVIGATION arrow to move the highlight and press SELECT
.
6. Press the left or right NAVIGATION arrow to cycle through Hi, Lo, or Off. The
default is Hi.
SB67030 Deskset User’s Guide - Setup Menus 55
7. Press to accept the adjustments and return to the Deskset
Settings menu shown in Figure 32 on page 54.
Page 56

Voice Make Call Answer
Figure. 34 Sounds
Figure. 35 Sounds Menu
Install Overview PC UI Setup Mail Directory CallLog Call Manage Call Handset Trouble
Sounds
The Sounds menu provides the ability to set the ring volume, pick one of nine Ringtones, or turn key beeps on and off.
To access the Sounds customization function submenus:
1. Press MENU to display the Menu screen shown in Figure 30 on page 53
displays.
2. Press SELECT to display the Deskset Settings menu shown in Figure 34.
3. Press 2 on the keypad or press the down NAVIGATION arrow to move the
highlight to Sounds.
4. Press SELECT and observe that the Sounds menu shown in Figure 35
appears.
5. To adjust the Ring Volume from 0 to 9, press the left or right NAVIGATION
arrow. The default is 1. Decreasing the volume to zero turns off the ringer. The
ringer will sound as adjusted.
6. To choose Ringtones, press 2 on the keypad or press the down NAVIGATION
once and press SELECT .
SB67030 Deskset User’s Guide - Setup Menus 56
7. To select the desired one of nine ringtones press the left or right NAVIGATION
arrow.The default is 4. The ringtone will play when selected.
8. To turn the Key Beeps On or Off, press 3 on the keypad or press the down
NAVIGATION arrow twice to highlight Key Beeps.
9. Press the left or right NAVIGATION arrow to select On or Off. The default is On.
10. Press to accept the adjustments and return to the Deskset Settings
menu shown in Figure 32 on page 54.
Page 57

Voice Make Call Answer
igure. 36 Deskset Settings - Language
Install Overview PC UI Setup Mail Directory CallLog Call Manage Call Handset Trouble
Language
The Language menu enables your SB67030 Desk Set to display information in English, French, or Spanish.
To access the Language customization function submenus:
1. Press MENU and observe that the Menu screen shown in
Figure 30 on page 53 displays.
2. Press SELECT to display the Deskset Settings menu shown in
Figure 32 on page 54.
3. Press 3 on the keypad or press the down NAVIGATION arrow twice to
move the highlight to Language and press SELECT as shown in
Figure 36.
4. Observe that the Language menu shown in Figure 37 appears.
5. Press 1, 2, or 3 on the keypad or press the down NAVIGATION arrow
to select the desired language.
6. Press to set the desired language as the default preference.
SB67030 Deskset User’s Guide - Setup Menus 57
7. Observe that all on-screen text displays in the chosen language.
8. Press to accept the changes and return to the Deskset
Settings menu shown in Figure 32 on page 54.
Page 58

Voice Make Call Answer
Figure. 38 Deskset Settings - Audio
Note Once the preference is set pressing a Call Appearance key will take
the system Off Hook via the preferred method. If the headset is not
available, the Deskset will go Off Hook via speakerphone. If you are
on a call, pressing the Call Appearance will route the audio to the
preferred audio setting. Lifting the handset while on a call via
speakerphone or headset will re-route audio to the handset.
Figure. 39 Preferred Audio Menu
Install Overview PC UI Setup Mail Directory CallLog Call Manage Call Handset Trouble
Preferred Audio
The Preferred Audio menu allows you to set the audio preference to head set or speakerphone. Lifting the handset takes first priority
in all instances.
To access the Language customization function submenus:
1. Press MENU and observe that the Menu screen shown in Figure 30
on page 53 displays.
2. Press SELECT to display the Deskset Settings menu shown in
Figure 32 on page 54
3. Press 4 on the keypad or press the down NAVIGATION arrow three times
to move the highlight to Preferred Audio Mode as shown in Figure 38, and
press SELECT .
4. Observe that the Preferred Audio Mode menu shown in Figure 39
appears.
5. Press 1 or 2 on the keypad or press the down NAVIGATION arrow and press
SELECT to select the desired setting.
SB67030 Deskset User’s Guide - Setup Menus 58
6. Press to set your audio preference.
7. Press to accept the selection and return to the Deskset Settings
menu shown in Figure 32 on page 54.
Page 59

Voice Make Call Answer
Figure. 40 Menu
Figure. 41 User Password
Install Overview PC UI Setup Mail Directory CallLog Call Manage Call Handset Trouble
User Settings
The User Settings menu provides the ability to modify the functions listed in Table 9 on page 60.
To display the User Settings menus:
1. Press MENU and observe that the Menu screen shown in Figure 40
displays.
2. To display the User Settings menu press the down NAVIGATION arrow once
to move the highlight and press SELECT , or press 2 on the keypad.
3. Observe that the Enter User Password screen shown in Figure 41 displays.
4. Enter the user password and press SELECT .
5. Use the key to correct errors.
6. Press at any time to cancel all entries.
7. Observe that the User Settings menu shown in Figure 42 on page 60
displays.
SB67030 Deskset User’s Guide - Setup Menus 59
Page 60

Voice Make Call Answer
Figure. 42 Menu - User Settings
Install Overview PC UI Setup Mail Directory CallLog Call Manage Call Handset Trouble
Table 9 Deskset Menu - User Settings
Function Submenu
1.“Greetings” on page 61 1.Current Greeting (Primary/Alternate/PreSet)
2. Play or record Primary Greeting
3. Play or record Secondary Greeting
4. Play Pre-Set Greeting
2.“Call Forwarding All” on
page 63
1. Call Forward All Target (Ext/VM/Lime)
2. to Ext: xxx
3. to Line: xxx-xxx-xxxx
3.“Voicemail Memory” on
Shows remaining minutes left in Voicemail
page 68
4. “Name Recording” on
Current Name (Personal/Pre-Set)
page 69
Play/Rec Personal Name
Play/Rec Personal Name
5.“Cordless Registration” on
Handset (Not registered)
page 72
Headset (Not registered)
6.“Password” on page 75 1. Set/Change Password
2. Clear Password
SB67030 Deskset User’s Guide - Setup Menus 60
Page 61

Voice Make Call Answer
Figure. 43 Message Greetings
Note You cannot delete or record over the Pre-Set Greeting. See
“Recording A Greeting” on page 62.
Figure. 44 Greeting Not Recorded
Install Overview PC UI Setup Mail Directory CallLog Call Manage Call Handset Trouble
Greetings
The Message Greeting menu provides the ability to play or record a primary and alternate greeting, play the Pre-set Greeting, and
determine which of three greetings will be used.
To access the Message Greeting menus:
1. Perform the procedure in “User Settings” on page 59 to display the User
Settings menu.
2. Press 1 on the keypad or press SELECT and observe that the Message
Greetings menu shown in Figure 43 appears.
3. Press the left or right NAVIGATION arrow to select the Primary or Alternate
greeting.
SB67030 Deskset User’s Guide - Setup Menus 61
4. Press Save
greeting has been recorded. If the greeting has been recorded, you will return
to the User Settings menu shown in Figure 42.
5. If a greeting has not been recorded the splash screen shown in Figure 44
appears and the Pre-Set greeting will be used.
6. To play the pre-set greeting press 4 on the keypad or press the down
NAVIGATION arrow three times to move the highlight to Play Pre-Set
Greeting and press SELECT .
7. Press the Play
8. To record a new greeting see “Recording A Greeting” on page 62.
to select the greeting and the system will check to see if the selected
to play the greeting.
Page 62

Voice Make Call Answer
Figure. 45 Record a Primary Greeting
Figure. 46 Record a Secondary Greeting
Install Overview PC UI Setup Mail Directory CallLog Call Manage Call Handset Trouble
Recording A Greeting
Your SB67030 Desk Set provides the ability to record a greeting up to 60-seconds long. The procedure for recording a Primary
and Secondary greeting are the same.
To record either a Primary or Alternate greeting:
1. Perform the procedure in “User Settings” on page 59.
2. Press 1 on the keypad or press SELECT and observe that the
Message Greetings menu shown in Figure 43 on page 61 appears.
3. Press 2 (Primary) or 3 (Alternate) on the keypad or press the down
NAVIGATION arrow to move the highlight, and press SELECT .
4. Observe that the Play/Rec Greeting display shown in Figure 45 or
Figure 46 appears.
5. Press and observe that changes to and the
word RECORDING displays.
SB67030 Deskset User’s Guide - Setup Menus 62
6. Begin recording your message and press Stop
7. Press to review the message.
8. Press
Figure 43 on page 61.
to return to the Message Greetings menu shown in
when you are finished.
Page 63

Voice Make Call Answer
Figure. 47 User Settings - Call FWD
Figure. 48 Call Forward All
Install Overview PC UI Setup Mail Directory CallLog Call Manage Call Handset Trouble
Call Forwarding All
This setting controls the destination of unconditional Call Forward. To turn Call Forward All on or off, press CallFwd when in Idle, held
calls, or Active mode. When activated, Call Forward All over-rides the Call Forward-No Answer setting. If Call Forward All is off, then the
Call Forward-No Answer setting applies. Set the Call Forward-No Answer in “Admin Settings” on page 77s
To determine the Call Forward settings:
1. Perform the procedure in “User Settings” on page 59.
2. Press the down NAVIGATION arrow once to move the highlight to Call
Forward All as shown in Figure 47 and press SELECT ,
OR
3. Press 2 on the keypad.
4. Observe that the Call Forward All menu shown in Figure 48 displays.
5. Press the left or right NAVIGATION key to toggle the setting to one of the
following targets:
SB67030 Deskset User’s Guide - Setup Menus 63
a. “Call Fwd All Voicemail (VM)” . as shown in Figure 48.
b. “Call Fwd All - Extension”
c. “Call Fwd All - Outside Line”
6. Verify that the indicator illuminates on the Idle screen and a call
forward splash screen appear as shown in “Call Forward Notification” on
page 67.
Page 64

Voice Make Call Answer
Figure. 49 Call Forward - VM
Figure. 50 Call Forward - VM Splash
Install Overview PC UI Setup Mail Directory CallLog Call Manage Call Handset Trouble
Call Fwd All Voicemail (VM)
Forwarding all calls to voicemail is the default option.
To set Call Forward All to go to Voicemail:
1. Perform the procedure in “Call Forwarding All” on page 63.
2. Press the left or right NAVIGATION key to toggle the setting to as
shown in Figure 49.
3. Press to confirm the change and return to the User Settings menu
shown in Figure 47 on page 63.
l Activating the Call Forward All setting causes all incoming calls to be re-
directed to Voicemail. The Deskset will not ring but displays the splash screen
shown in Figure 50 to notify you that the call was forwarded.
l The Deskset will not record the call in the Call Log unless the caller leaves a
message. A call with an associated message will be recorded in the Call Log,
but will not be tagged as NEW.
l If Call Forward All is activated, the FWD ON status notification appears in Idle
mode.
l Setting Call Forward All sets the Call Forward-No Answer settings to OFF.
SB67030 Deskset User’s Guide - Setup Menus 64
Page 65

Voice Make Call Answer
Figure. 51 Call Forward All - Extension
Figure. 52 Enter Extension
Install Overview PC UI Setup Mail Directory CallLog Call Manage Call Handset Trouble
Call Fwd All - Extension
To set Call Forward All to go to a desired extension:
1. Perform the procedure in “Call Forwarding All” on page 63.
2. Press the left or right NAVIGATION key to toggle the setting to
as shown in Figure 51
3. Press the down NAVIGATION key to move to the to Ext: editable
field. A blinking cursor appears in the number field as shown in
Figure 52.
4. Enter in a valid extension using the dialing keys.
5. Press to confirm the change and return to the User
Settings menu shown in Figure 47 on page 63.
l If an invalid, or no extension has been entered, an Invalid
Extension Number splash appears as shown and you will remain in
the Call Forward All screen.
SB67030 Deskset User’s Guide - Setup Menus 65
Page 66

Voice Make Call Answer
Figure. 53 Call Forward All - Line
Figure. 54 Call Forward Line
Install Overview PC UI Setup Mail Directory CallLog Call Manage Call Handset Trouble
Call Fwd All - Outside Line
To set Call Forward All to go to an outside line:
1. Perform the procedure in “Call Forwarding All” on page 63.
2. Press the left or right navigation key to toggle the setting to as
shown in Figure 53
3. Press down navigation key to move to the to Line: editable field. A blinking
cursor will appear in the number field as shown in Figure 54.
4. Enter in a valid outside phone number using the dialing keys.
5. Press to confirm the change and return to the User Settings menu
shown in Figure 47 on page 63.
l Calls may be forwarded to an
outside line only if this function is
enabled in the Admin Settings. If Call
Fwd/Transfer to outside line has
been disabled, then an error splash
appears.
SB67030 Deskset User’s Guide - Setup Menus 66
l Activating Call Forward All re-directs
the call to the assigned phone
number. The Deskset will not ring but
a splash appears notifying the user
that the call was forwarded. The
Deskset will not record the call in the Call Log. The target extension will
receive the incoming call with the CID of the original caller with no indication
that it is a forwarded call
l If Call Forward All is activated, the FWD ON status notification appears in Idle
mode.
Page 67

Voice Make Call Answer
Install Overview PC UI Setup Mail Directory CallLog Call Manage Call Handset Trouble
Call Forward Notification
1. Call Fwd All Voicemail (VM) notification
2. Call Fwd All - Extension indication
3. Call Fwd All - Outside Line Notification
SB67030 Deskset User’s Guide - Setup Menus 67
Page 68

Voice Make Call Answer
Figure. 55 User Settings - Voicemail
Install Overview PC UI Setup Mail Directory CallLog Call Manage Call Handset Trouble
Voicemail Memory
To access the Voicemail Memory screen:
1. Perform the procedure in “User Settings” on page 59.
2. Press 3 on the keypad or press the down NAVIGATION arrow twice to
move the highlight to Voicemail Memory as shown in Figure 55 and
press SELECT .
3. Observe that the Voicemail Memory menu shown in Figure 56
appears.
4. The Voicemail Memory screen displays the remaining minutes left for
recording a message in Voicemail. This screen is for informational
purposes only.
5. Press to return to the User Settings menu shown in
Figure 40.
SB67030 Deskset User’s Guide - Setup Menus 68
Page 69

Voice Make Call Answer
Figure. 57 User Settings - Name
Figure. 58 Name Recording
Install Overview PC UI Setup Mail Directory CallLog Call Manage Call Handset Trouble
Name Recording
To access the Name Recording:
1. Perform the procedure in “User Settings” on page 59.
2. Press 4 on the keypad or press the down NAVIGATION arrow three times
to move the highlight to Name Recording as shown in Figure 57 and
press SELECT .
3. Observe that the Name Recording menu shown in Figure 58 appears.
4. Press 1 on the keypad or press the up or down NAVIGATION arrow to
highlight Name Selected.
5. Press the left or right NAVIGATION arrow to select Personal name.
6. Press the system will
check to see if the personal name
has been recorded. If it has, the
User Settings menu displays. If it
has not, a splash screen appears
informing you that the personal
name has not been recorded and
to Press 4 to record your name or
the Pre-Set name will be used.
7. Pressing 4 displays the Name
Recording menu shown in Figure 58
8. To record your personal name see “Personal Name Recording” on page 70
9. To play the Pre-set name see “Pre-Set Name” on page 71.
SB67030 Deskset User’s Guide - Setup Menus 69
Page 70

Voice Make Call Answer
Figure. 59 Play/Rec Name
Install Overview PC UI Setup Mail Directory CallLog Call Manage Call Handset Trouble
Personal Name Recording
To play/record a personal name:
1. Follow the To access the Name Recording: procedure page 69.
2. Press 2 on the keypad or press the down NAVIGATION arrow to move the
highlight to Play/Rec Personal Name.
3. Press SELECT and observe that the Play/Rec Name menu shown in
Figure 59 appears.
4. Press the programmed key.
5. The key changes to .
l You are limited to a 10-second recording – Recording will stop automatically
if the limit is exceeded.
6. Press the key when you are finished recording. The screen changes
to display and .
7. Press to review the name
recording.
8. Press
when your review is
complete and the User Settings
menu displays.
SB67030 Deskset User’s Guide - Setup Menus 70
Page 71

Voice Make Call Answer
Figure. 61 Pre-Set Name
Figure. 62 Pre-Set Name
Install Overview PC UI Setup Mail Directory CallLog Call Manage Call Handset Trouble
Pre-Set Name
To play the Pre-Set name:
1. Perform the “To display the User Settings menus:” procedure on
page 59.
2. Press 3 on the keypad or press the down NAVIGATION arrow twice to
move the highlight to Play Pre-Set Name as shown in Figure 61.
3. Press SELECT and observe that the Pre-Set Name menu shown
in Figure 62 appears.
SB67030 Deskset User’s Guide - Setup Menus 71
4. Press
to listen to the Pre-Set Name. The Pre-Set Name is
“Extension XXX”, with X being the extension number. This voice tag will
be generated from the voice library
5. Press
when your review is complete and the User Settings
menu displays.
Page 72

Voice Make Call Answer
Figure. 63 User Settings Cordless
Note Only one Cordless Handset or Headset can be
registered with the Deskset.
WARNING The registration process must also be initiated on
the Handset otherwise registration cannot proceed. It does not
matter which device starts the registration process first.
Install Overview PC UI Setup Mail Directory CallLog Call Manage Call Handset Trouble
Cordless Registration
To access the Cordless Registration function:
1. Perform the “To display the User Settings menus:” procedure on page 59.
2. Press 5 on the keypad or press the down NAVIGATION arrow four times
to move the highlight to Cordless Registration as shown in Figure 63.
3. Press SELECT and observe that the Cordless Registration menu
shown in Figure 64 appears.
4. Press 1 or press SELECT to register or deregister the Handset.
5. Press 2 or press the down NAVIGATION and press SELECT to
register or deregister the Headset.
6. See “To register a cordless device:” on page 73.
7. See “To deregister a cordless device:” on page 74.
SB67030 Deskset User’s Guide - Setup Menus 72
Page 73

Voice Make Call Answer
Figure. 65 Handset Not Registered
Install Overview PC UI Setup Mail Directory CallLog Call Manage Call Handset Trouble
Register a Cordless Device
The following procedure describes registering the Cordless Handset, the process is identical for the Cordless Headset
To register a cordless device:
1. Perform the “To access the Cordless Registration function:” procedure on
page 72.
2. Press 1 or press SELECT to display the Cordless Handset
Registration menu shown in Figure 65.
3. Press and observe that the Registration in Progress splash
screen appears while the Deskset searches for the Handset (See
Figure 66).
4. Observe that the Cordless Handset Registration screen displays
Cordless Handset is currently Registered.
SB67030 Deskset User’s Guide - Setup Menus 73
5. Press , to return to the Cordless Registration screen (See
Figure 64 on page 72).
Page 74

Voice Make Call Answer
Figure. 67 Handset Registered
Figure. 68 Deregistration Confirmation
Install Overview PC UI Setup Mail Directory CallLog Call Manage Call Handset Trouble
Deregister a Cordless Device
To deregister a cordless device:
1. Perform the “To access the Cordless Registration function:” procedure on
page 72.
2. Press 1 or press SELECT to display the Cordless Handset
Registration menu shown in Figure 67.
3. Press and a confirmation splash screen appears (See Figure 68).
4. Press to confirm deregistration (See Figure 68).
5. Observe that the Cordless Handset Registration screen displays Cordless
Handset is currently Not Registered.
SB67030 Deskset User’s Guide - Setup Menus 74
l The Cordless Handset must also deregister itself from the Deskset to
complete the deregistration process.
Page 75

Voice Make Call Answer
Figure. 69 User Settings - Password
Figure. 70 Password
Install Overview PC UI Setup Mail Directory CallLog Call Manage Call Handset Trouble
Password
Note The User Settings menu contains six entries. To view the Password entry it is necessary to press the down
NAVIGATION arrow.
To access the Password function:
1. Perform the “To display the User Settings menus:” procedure on page 59.
2. Press 6 on the keypad or press the down NAVIGATION arrow five times to
move the highlight to Password as shown in Figure 69.
3. Press SELECT and observe that the Password menu shown in Figure 70
appears.
4. Press 1 or SELECT to set or change the password (See “To change the
user Password” on page 76).
5. Press 2 or the down NAVIGATION arrow and press SELECT to clear the
user password.
6. If you chose Clear User Password a
confirmation screen appears.
SB67030 Deskset User’s Guide - Setup Menus 75
7. Press the to confirm
password deletion.
8. The system returns to the Password
screen. Once the password has been
cleared, password entry will no longer
be necessary for User Settings and
Voicemail.
Page 76

Voice Make Call Answer
Figure. 72 Password Saved
Note Passwords must be a minimum of four digits and a
maximum of six.
Install Overview PC UI Setup Mail Directory CallLog Call Manage Call Handset Trouble
Change User Password
To change the user Password
1. Perform the “To access the Password function:” procedure on
page 75.
1. Press 1 or SELECT to access the Set/Change Password
screen shown in Figure 71.
2. Use the dialing keys to enter a password and press SELECT , or
press the down navigation key.
3. Press to correct errors, or the to start over.
4. Enter in the new password again to confirm.
5. Press to accept the change. The Password Saved splash
screen appears and you return to the User Settings menu shown in
Figure 42 on page 60.
SB67030 Deskset User’s Guide - Setup Menus 76
Page 77

Voice Make Call Answer
Figure. 74 Admin Settings
Install Overview PC UI Setup Mail Directory CallLog Call Manage Call Handset Trouble
Admin Settings
To display the Admin Settings menu
1. Press MENU and observe that the Menu screen shown in Figure 30 displays.
2. To display the Admin Settings menu shown in Figure 74 press the down
NAVIGATION arrow to move the highlight and press SELECT , or press 3.
Table 10 Deskset Menu - Admin Settings
Function Submenu
1.“Call Fwd - NA” on page 78 1. Call Forward All Target (Ext/VM/Lime)
2. to Ext: xxx
3. to Line: xxx-xxx-xxxx
Call Fwd-NA Delay <5/10/15/20…45>
2.“Fwd/Trans to line” on page 82
3.“Restore Default Settings” on page 83
4. “Event Log” on page 84 Shows event log
5.“IP Settings” on page 85 1. IP Configuration <Auto/Static>
2. Set/Edit Static IP
3. IP Status
6. “Reset User Password” on page 89
7.“Software Upgrade” on page 90 Software upgrade screen
SB67030 Deskset User’s Guide - Setup Menus 77
Page 78

Voice Make Call Answer
Figure. 75 Call Fwd NA Settings
Note This setting controls the Call Forward-No Answer destination. The
default setting is Call Fwd-NA to Voicemail. If Call Forward All is
on, these settings will not apply.
Install Overview PC UI Setup Mail Directory CallLog Call Manage Call Handset Trouble
Call Fwd - NA
To access Call Forward No Answer:
1. Perform the “To display the Admin Settings menu”procedure on page 77.
2. Press 1 or SELECT , and observe that the Call Fwd - NA Settings
menu shown in Figure 75 displays.
3. Press the left or right NAVIGATION key to toggle the setting to one of the
following targets:
a. “Call Forward - No Answer to Voicemail” . on page 79.
b. “Call Forward - No Answer to an Extension” on page 80
c. “Call Forward - No Answer to an Outside Line” on page 81
SB67030 Deskset User’s Guide - Setup Menus 78
4. Verify that the indicator illuminates on the Idle screen and a call
forward splash screen appear as shown in “Call Forward Notification” on
page 67
Page 79

Voice Make Call Answer
Figure. 76 Call Fwd NA Settings
Figure. 77 Call Fwd NA Confirmation
Note The minimum delay is five seconds and the maximum delay is
45 seconds. The default setting is 30 seconds.
Install Overview PC UI Setup Mail Directory CallLog Call Manage Call Handset Trouble
Call Forward - No Answer to Voicemail
To forward all unanswered calls to Voicemail:
1. Perform the “To display the Admin Settings menu”procedure on page 77.
2. Press 1 or SELECT , and observe that the Call Fwd - NA Settings
menu shown in Figure 75 displays.
3. Press the left or right NAVIGATION key until . is highlighted as
shown in Figure 76.
4. Press the down NAVIGATION key three times to highlight Call Fwd-NA
Delay.
5. Press the left or right NAVIGATION key to adjust the delay in five-second
increments.
6. Press to accept the change and display the Admin Settings menu
SB67030 Deskset User’s Guide - Setup Menus 79
7. Observe that the Call Fwd - NA Confirmation screen shown in Figure 77
displays when a call is received.
Page 80

Voice Make Call Answer
Figure. 78 Call Fwd NA Settings
Figure. 79 Call Fwd NA Confirmation
Note The minimum delay is five seconds and the maximum delay is
45 seconds. The default setting is 30 seconds.
Install Overview PC UI Setup Mail Directory CallLog Call Manage Call Handset Trouble
Call Forward - No Answer to an Extension
To forward all unanswered calls to an extension:
1. Perform the “To display the Admin Settings menu”procedure on page 77.
2. Press 1 or SELECT , and observe that the Call Fwd - NA Settings
menu shown in Figure 75 displays.
3. Press the left or right NAVIGATION key until . is highlighted as
shown in Figure 78.
4. Press the down NAVIGATION key to move to the to Ext: editable field. A
blinking cursor appears in the number field.
5. Enter in a valid extension using the dialing keys.
6. Press the down NAVIGATION key to highlight Call Fwd-NA Delay.
7. Press the left or right NAVIGATION key to adjust the delay in five-second
increments.
SB67030 Deskset User’s Guide - Setup Menus 80
8. Press to accept the change and display the Admin Settings menu
9. Observe that the Call Fwd - NA Confirmation screen shown in Figure 79
displays when a call is received.
Page 81

Voice Make Call Answer
Figure. 80 Call Fwd NA Settings
Figure. 81 Call Fwd NA Confirmation
Note The minimum delay is five seconds and the maximum delay is
45 seconds. The default setting is 30 seconds.
Install Overview PC UI Setup Mail Directory CallLog Call Manage Call Handset Trouble
Call Forward - No Answer to an Outside Line
To forward all unanswered calls to an outside line
1. Perform the “To display the Admin Settings menu”procedure on page 77.
2. Press 1 or SELECT , and observe that the Call Fwd - NA Settings
menu shown in Figure 75 displays.
3. Press the left or right NAVIGATION key until . is highlighted as
shown in Figure 78.
4. Press the down NAVIGATION key to move to the to Line: editable field. A
blinking cursor appears in the number field.
5. Enter in a valid phone number using the dialing keys.
6. Press the down NAVIGATION key to highlight Call Fwd-NA Delay.
7. Press the left or right NAVIGATION key to adjust the delay in five-second
increments.
SB67030 Deskset User’s Guide - Setup Menus 81
8. Press to accept the change and display the Admin Settings menu
9. Observe that the Call Fwd - NA Confirmation screen shown in Figure 81
displays when a call is received.
Page 82

Voice Make Call Answer
Figure. 82 Fwd/Trans to line
Figure. 83 Toggle Fwd/Trans
Install Overview PC UI Setup Mail Directory CallLog Call Manage Call Handset Trouble
Fwd/Trans to line
The system administrator may enable or disable the ability to forward or transfer a call to an outside line. This function is enabled by
default. Disabling this function will prohibit the user from sending a call to an outside line via the Gateway.
To toggle the Forward/Transfer to an outside line:
1. Perform the “To display the Admin Settings menu”procedure on page 77.
2. Press 2 on the keypad. or press the down NAVIGATION arrow to move the
highlight to Fwd/Trans to Line and press SELECT ,
3. Observe that the Fwd/Trans to line menu shown in Figure 82 displays.
4. Press the left or right navigation key to toggle the setting from [Enabled] to
[Disabled]. as shown in Figure 83.
5. Press to accept the changes and return to the Admin Settings
menu shown in Figure 74 on page 77.
SB67030 Deskset User’s Guide - Setup Menus 82
Page 83

Voice Make Call Answer
Install Overview PC UI Setup Mail Directory CallLog Call Manage Call Handset Trouble
Restore Default Settings
To restore the default settings:
1. Perform the “To display the Admin Settings menu”procedure on
page 77.
2. Press 3 on the keypad or press the down NAVIGATION arrow to
highlight the Restore Default Settings and press SELECT to
display Figure 84.
3. Press to confirm.
SB67030 Deskset User’s Guide - Setup Menus 83
Page 84

Voice Make Call Answer
Figure. 85 Admin Settings - Event Log
Note The text is not circular so when you reach the end of the
available text, pressing the down NAVIGATION key will
do nothing. If you are at the top of the page, pressing the
up NAVIGATION key will do nothing.
Figure. 86 Admin Settings - Event Log
Note This screen is for informational purposes only.
Install Overview PC UI Setup Mail Directory CallLog Call Manage Call Handset Trouble
Event Log
To access the Event Log:
1. Perform the “To display the Admin Settings menu”procedure on
page 77.
2. Press 4 on the keypad or press the down NAVIGATION arrow to
highlight Restore Default Settings and press SELECT to
display Figure 85.
3. Press the up or down NAVIGATION arrow to view logged events that
are not shown on-screen.
To clear the Event Log:
1. With the Event Log shown in Figure 85 displayed, press .
SB67030 Deskset User’s Guide - Setup Menus 84
2. The confirmation screen shown in Figure 86 appears.
3. Press to confirm deletion.
4. All events in the Event Log are cleared and the system displays an
empty Event Log.
Page 85

Voice Make Call Answer
Install Overview PC UI Setup Mail Directory CallLog Call Manage Call Handset Trouble
IP Settings
To display the IP status:
1. Perform the “To display the Admin Settings menu”procedure on
page 77.
2. Press 6 on the keypad or press the down NAVIGATION arrow to
highlight IP Settings and press SELECT .
3. Observe that the IP Settings menu shown in Figure 87 displays.
4. Perform one of the following:
a. Press 1 on the keypad or press SELECT and observe that
the IP Configuration menu shown in Figure 88 on page 86
appears.
b. Press 2 or on the keypad or press the down NAVIGATION arrow
to move the highlight, and press SELECT and observe that
the Set/Edit Static IP menu shown in Figure 89 on page 87
appears.
c. Press 3 on the keypad or press the down NAVIGATION arrow to
move the highlight, and press SELECT and observe that the
IP Status menu shown in Figure 88 on page 86 appears.
Tip IP Address format: Each octet of the IP address ranges from 0 to 255. The system will,
however, not check for the accuracy of the address entered. you can enter single or double
digits and do not need to use zeros as place-markers. For example, enter “192.168.0.1”
instead of “192.168.000.001”
SB67030 Deskset User’s Guide - Setup Menus 85
Page 86

Voice Make Call Answer
Figure. 88 IP Configuration
Install Overview PC UI Setup Mail Directory CallLog Call Manage Call Handset Trouble
IP Configuration
To access the IP Configuration menu and edit the IP Address:
1. Perform the “To display the Admin Settings menu”procedure on page 77.
2. Press 6 on the keypad or press the down NAVIGATION arrow to highlight IP
Settings and press SELECT .
3. Observe that the IP Settings menu shown in Figure 87 on page 85 displays.
4. Press the left or right NAVIGATION arrow to toggle between [Auto] and
[Static].
5. Press to accept the changes and return to the Admin Settings
menu shown in Figure 74 on page 77.
SB67030 Deskset User’s Guide - Setup Menus 86
Page 87

Voice Make Call Answer
Figure. 89 Set/Edit Static IP
Note Pressing the hash (#) will insert a dot. Pressing when
the cursor is positioned next to a dot will delete the dot and
the digit to the left of the dot.
Install Overview PC UI Setup Mail Directory CallLog Call Manage Call Handset Trouble
Set/Edit Static IP
To access the IP Configuration menu and edit the IP Address:
1. Perform the “To display the Admin Settings menu”procedure on page 77.
2. Press 6 on the keypad or press the down NAVIGATION arrow to highlight the
IP Settings and press SELECT . The menu shown in Figure 87 on page
85 displays.
3. Press 2 on the keypad o r press the do wn NAVIGATION arrow to highlight the
Set/Edit Static IP and press SELECT .
4. The Static IP Edit menu shown in Figure 89 displays.
5. Enter in digits using dialing keys. There is a 12-digit limit on the number field
(not including dots).
6. Press the up or down NAVIGATION arrow to cycle through the four different
fields.
.
Note When enters the edit mode for the first time, the cursor will be positioned at the beginning of the top field. If all
the fields have been filled, the cursor will be positioned at the end of the top field.
SB67030 Deskset User’s Guide - Setup Menus 87
7. Press to accept the changes and return to the Admin Settings
menu shown in Figure 74 on page 77.
Page 88

Voice Make Call Answer
Figure. 90 IP Status
Note The text is not circular so when you reach the end of the
available text, pressing the down NAVIGATION key will do
nothing. If you are at the top of the page, pressing the up
NAVIGATION key will do nothing.
Install Overview PC UI Setup Mail Directory CallLog Call Manage Call Handset Trouble
IP Status
This screen is for informational purposes only.
To access the IP Configuration menu and edit the IP Address:
1. Perform the “To display the Admin Settings menu”procedure on page 77.
2. Press 6 on the keypad or press the down NAVIGATION arrow to highlight the
IP Settings and press SELECT . The menu shown in Figure 87 on page
85 displays.
3. Press 3 on the keypad or press the down NAVIGATION arrow to highlight the
IP Status and press SELECT . The menu shown in Figure 90 displays.
4. Press the up or down NAVIGATION arrow to view status entries that are not
shown on-screen.
5. Press
displays.
SB67030 Deskset User’s Guide - Setup Menus 88
when your review is complete and the User Settings menu
Page 89

Voice Make Call Answer
Figure. 91 Reset User Password
Note The user will now be able to access User settings and Voicemail
without entering a password.
Install Overview PC UI Setup Mail Directory CallLog Call Manage Call Handset Trouble
Reset User Password
Note The Admin Settings menu contains seven entries. To view the Password entry
it is necessary to press the down NAVIGATION arrow.
To reset the user password:
1. Perform the “To display the Admin Settings menu”procedure on page 77.
2. Press 6 on the keypad or press the down NAVIGATION arrow to highlight the
Reset User Password and press SELECT .
3. The confirmation screen shown in Figure 91 appears.
4. Press to confirm password reset.
5. The splash screen shown in Figure 92 appears. informing the administrator
that the password has been reset.
SB67030 Deskset User’s Guide - Setup Menus 89
Page 90

Voice Make Call Answer
Figure. 93 Software Upgrade
Install Overview PC UI Setup Mail Directory CallLog Call Manage Call Handset Trouble
Software Upgrade
Note The User Settings menu contains six entries. To view the Software Upgrade
entry it is necessary to press the down NAVIGATION arrow.
To access the Software upgrade feature:
1. Perform the “To display the Admin Settings menu”procedure on
page 77.
2. Press 7 on the keypad or press the down NAVIGATION arrow six times
to highlight the Software Upgrade and press SELECT to
display Figure 91.
3. Press
menu displays.
SB67030 Deskset User’s Guide - Setup Menus 90
when your review is complete and the User Settings
Page 91

Voice Make Call Answer
Figure. 94 Deskset Information
Figure. 95 Deskset Information
Install Overview PC UI Setup Mail Directory CallLog Call Manage Call Handset Trouble
Deskset Information
To access the deskset information menu:
1. Press MENU and observe that the Menu screen shown in
Figure 30 on page 53 displays.
2. Press 4 on the keypad or press the down NAVIGATION arrow to
highlight Deskset Information and press SELECT to display
Figure 94.
3. Press the down NAVIGATION arrow to access the additional
information shown in Figure 95.
4. Press
menu displays.
SB67030 Deskset User’s Guide - Setup Menus 91
when your review is complete and the User Settings
Page 92

Voice Make Call Answer
Figure. 96 Idle Screen
Figure. 98 DND Set
Install Overview PC UI Setup Mail Directory CallLog Call Manage Call Handset Trouble
Setting up Do Not Disturb
To enable or disable DND:
1. From the Idle screen shown in Figure 96, press .
2. Observe that the DND Settings screen shown in Figure 98 displays.
3. Press the left or right NAVIGATION key to set DND - Do Not
Disturb [ON] to enable. or DND - Do Not Disturb [OFF] to disable.
4. Press to save changes.
5. DND ON will now disappear or appear in the top right of the display
as shown in Figure 97.
6. Press to return to
Idle at any time.
SB67030 Deskset User’s Guide - Setup Menus 92
Page 93

Voice Make Call Answer
Message LED
Install Overview PC UI Setup Mail Directory CallLog Call Manage Call Handset Trouble
C HAPTER
5
V
OICE
Your SB67030 Deskset Voicemail system provides the ability to capture important messages and
save, replay, or forward those messages. The message LED shown in Figure 99 lights up when
there are one or more new message and the # New Messages displays on the Idle screen.
.
Figure. 99 Message Waiting LED
1. “Access Voicemail” on page 94
M
AIL
2. “Messages Feature” on page 95
3. “Message Playback” on page 97
4. “Forwarding a Message” on page 99
5. “Deleting Messages” on page 104
6. “Clear Message Flags” on page 106
7. “Voicemail Remote Operations” on page 107
SB67030 Deskset User’s Guide - Voice Mail 93
Page 94

Voice Make Call Answer
Figure. 100 New Message Notification
Note Pressing the up or down navigation key will move the
highlight bar.
Figure. 101 Message List
Install Overview PC UI Setup Mail Directory CallLog Call Manage Call Handset Trouble
Access Voicemail
To access the voicemail:
1. Your SB67030 Deskset
voicemail messages during idle as shown in Figure 100. A message is
considered new if it has not been played.
2. Pressing SELECT . when the notification is highlighted to display
the Message list shown in Figure 101 where only new messages are
displayed.
OR
3. Press MESSAGES. to view the available message list.
4. Once a new message is played, the new message count will go down by
one. If there are no new messages, 0 New Messages displays.
5. You can play messages when in Idle or when calls are on hold,.
Voicemail system displays the number of new
SB67030 Deskset User’s Guide - Voice Mail 94
Page 95

Voice Make Call Answer
Left and right arrow
indicate dialing options
available
Name and number CID
displayed
Message icon.
(Icon accompanied by
exclamation mark (!)
indicates message is new)
Time and date message
was recorded
Status notification area
(“FULL” indicates that no
more messages can be
recorded)
Message Counter
Install Overview PC UI Setup Mail Directory CallLog Call Manage Call Handset Trouble
Messages Feature
The programmed keys are available when viewing the message list from Idle. There are no programmed keys available in Active mode
or if the message list is empty.
Table 11 Voicemail Programmed Keys
Key Description Key Description Key Description Key Description
Plays recorded
audio clip.
Deletes
highlighted
voicemail
Plays all
messages in
Voicemail feature.
message in
message list.
Initiates Message
Forward function.
Marks all new
messages.
Performs deletion
of multiple
records.
Clears all new
messages.
SB67030 Deskset User’s Guide - Voice Mail 95
Moves to next set
of programmed
keys. If this button
is present, there
are more than
four programmed
operation keys
available. More 1/
3 indicates that
user is on page
one of three
Page 96

Voice Make Call Answer
Install Overview PC UI Setup Mail Directory CallLog Call Manage Call Handset Trouble
The SB67030 Deskset Voicemail system features include:
n There is a maximum of 30 minutes recording time (no limit on number of messages). If this limit is reached while recording is
in progress, the message will cut short and the far-end caller will be notified with a voice prompt.
n If a caller tries to leave a message when voicemail is full, a voice prompt notifies them that a message cannot be recorded at
this time.
n The highlighted message displays both name and number CID (if available) as well as both the time and date of the message
recording. Un-highlighted messages in the list will display either name or number field only and time or date only.
n There is a 22-character limit on the name field. Oversized entries will be truncated with ellipses.
n If the message was left before 12:00am on the current day, then the date of the message only will be displayed. If the message
was left after 12:00am on the current day, then the time of message recording only will be displayed.
n When reviewing the message list, you may call the number listed in the highlighted message.
n Pressing the up or down NAVIGATION key cycles through messages in the list while pressing the left or right NAVIGATION
key cycles through dialing options.
SB67030 Deskset User’s Guide - Voice Mail 96
Page 97

Voice Make Call Answer
Figure. 102 Message List
Figure. 103 Message Details
Install Overview PC UI Setup Mail Directory CallLog Call Manage Call Handset Trouble
Message Playback
The SB67030 Deskset Voicemail system provides the ability to play a single message or all of the messages in the system.
Play a single message
1. Press SELECT . when the notification is highlighted to display the
Message list shown in Figure 102.
OR
Press MESSAGES. to view the available message list.
2. Press the up or down NAVIGATION button to highlight the desired message
and press or press SELECT to play the Highlighted message
as shown in Figure 103.
3. The Message screen provides the following information:
l Name and number CID displayed (if available)
l Time message recorded
l Message progress bar
SB67030 Deskset User’s Guide - Voice Mail 97
l Message counter (30 minutes maximum recording time)
l NEW tag displays upon first playback of message
l Duration of message and time remaining in playback.
Page 98

Voice Make Call Answer
Figure. 104 Play All Messages
Install Overview PC UI Setup Mail Directory CallLog Call Manage Call Handset Trouble
You have the following options during message playback:
n Press to pause message playback.
n Press to delete the message. If there are more messages, the user will
go to the next message.
n Press to rewind the message in 8 second increments.
n Press to forward the message in 8 second increments.
n Press the up NAVIGATION key once to rewind to the start of the current
message, or twice to skip to the previous message.
n Press the down NAVIGATION key to skip to the next message.
To play all messages in the messages list:
1. Press . The message details screen displays for each message,
starting with the oldest, and ending with the most recent. A short tone (beep)
will emit between each message.
l You have the option of skipping to the next message by pressing the down
NAVIGATION key or playing the previous message by pressing the up
NAVIGATION key.
SB67030 Deskset User’s Guide - Voice Mail 98
l If all messages play without interruption, you will return to the messages list
with the highlight on the last played message.
l Press CANCEL to return to the messages list with the highlight on the last
played message.
l All messages played will have the NEW tag removed.
l There will be no Time Stamp announcements.
Page 99

Voice Make Call Answer
Figure. 105 Message List
Figure. 106 Forward Message
Install Overview PC UI Setup Mail Directory CallLog Call Manage Call Handset Trouble
Forwarding a Message
To forward a voicemail message:
1. Press SELECT . when the notification is highlighted to display the
Message list shown in Figure 105.
OR
Press MESSAGES. to view the available message list.
2. Press the up or down NAVIGATION button to highlight the desired message
and press to display the programmed keys illustrated in Figure 106.
3. Press to display the Forward
Message screen.
4. Enter in the extension number using the
dialing keys OR press
choose an extension from the
Extension List shown in Figure 107 on
page 100.
to
SB67030 Deskset User’s Guide - Voice Mail 99
5. Highlight the desired extension in the
extension list, if used, and press
SELECT .
6. will not be available after a digit is entered
7. appears after a digit is entered. This key deletes the character before the
blinking cursor.
8. Pressing the left or right NAVIGATION key will move the blinking cursor.
Page 100

Voice Make Call Answer
Figure. 107 Forward Message
Figure. 108 Message Extension
Install Overview PC UI Setup Mail Directory CallLog Call Manage Call Handset Trouble
9. Press SELECT ., the extension name tag and number will appear as shown
in Figure 108.
10. You have the following options:
a. Press to add another extension (up to a maximum of three
extensions).
b. Press to remove the currently highlighted extension from the list.
c. Press to record an audio annotation.
d. Press to forward the message to the extension.
11. Observe that the Message Forwarded screen shown below appears.
SB67030 Deskset User’s Guide - Voice Mail 100
12. The forwarded message will appear in the recipient’s Message list.
 Loading...