


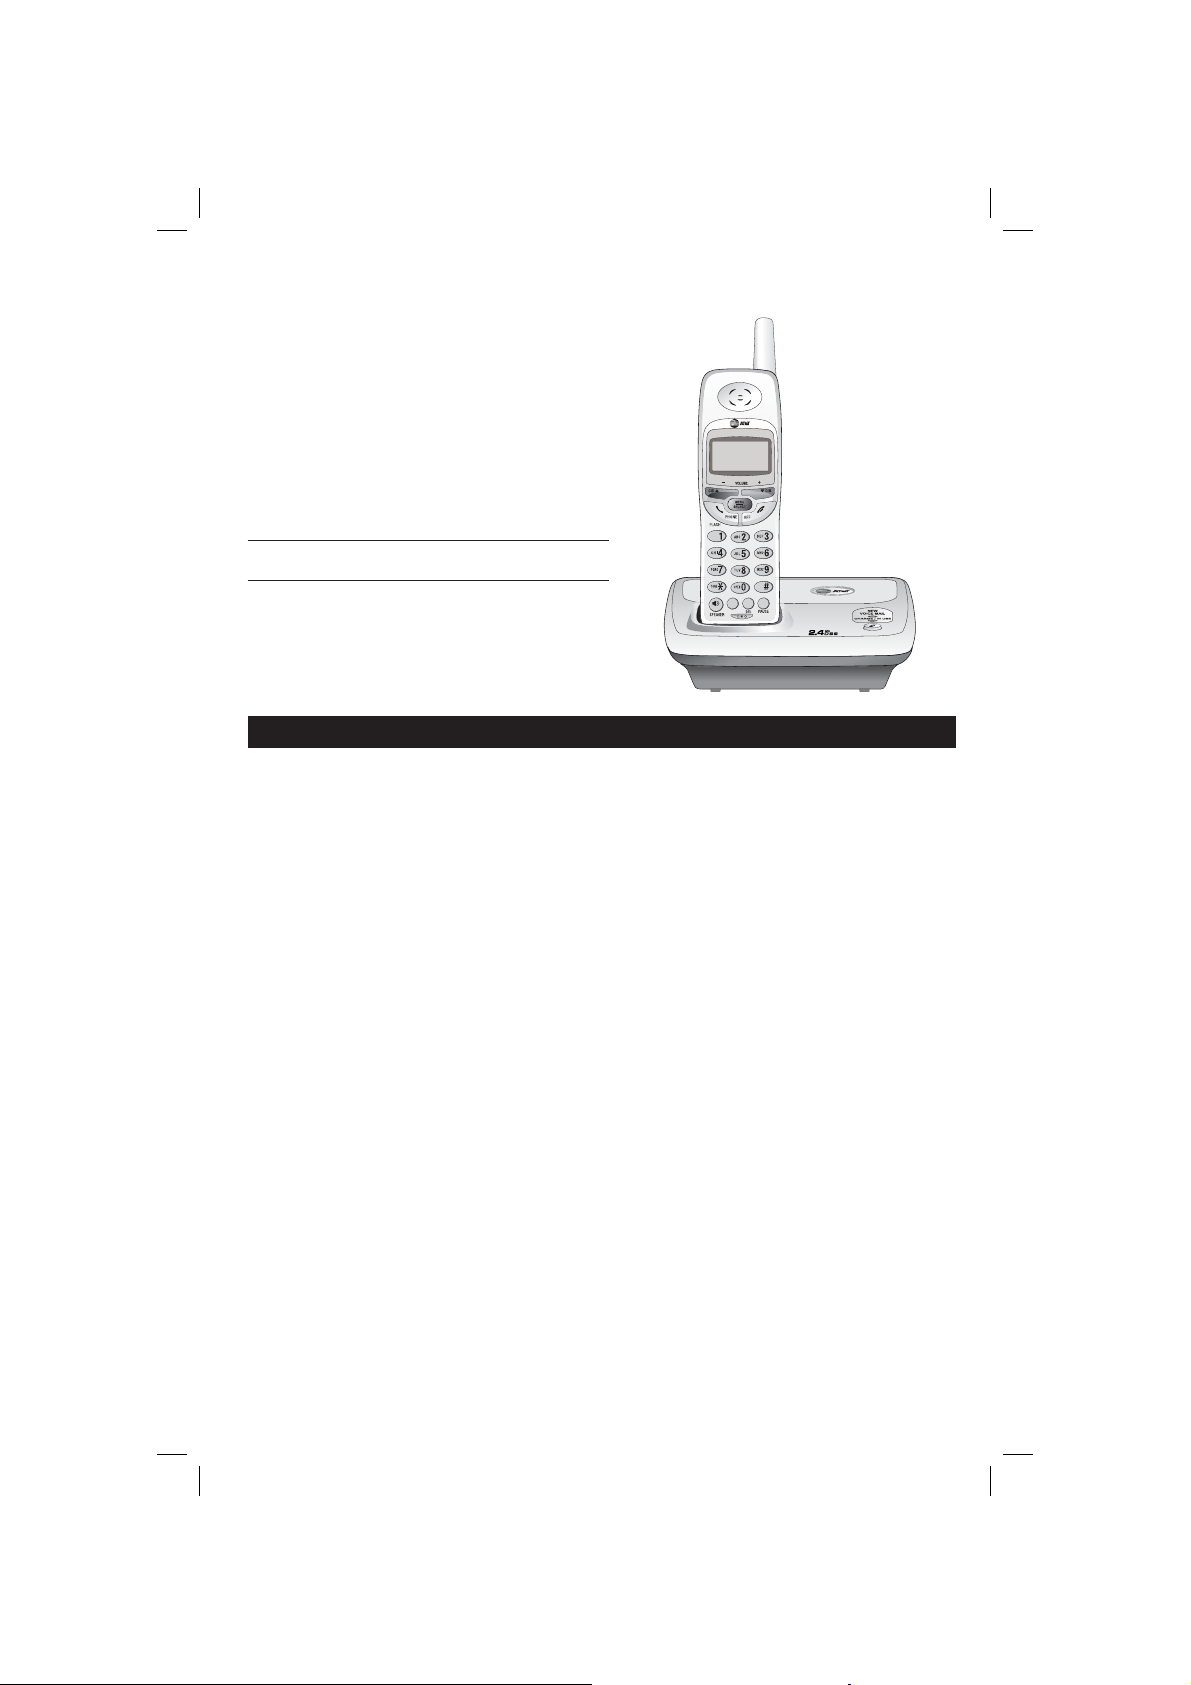
User Manual
2.4 GHz Cordless
Telephone E2116
with Caller ID & Call Waiting
REDIAL
MUTE
CHAN

Congratulations on your purchase
of this AT&T product.
Before using this telephone system, please
read Important Safety Instructions in the
Appendix of this manual.
NEED HELP?
Our representatives are here
to help you with any questions concerning the
operation of this product, available accessories,
or any other related issues.
Call Toll Free
1 (800) 222-3111
In Canada, Call
1 (866) 288-4268
or visit our website at
www.telephones.att.com
Model No.: AT&T E2116
Product Name: 2.4 GHz Cordless Telephone
Serial No.: SN:
(found at the bottom of the base unit)
Purchase Date:
Dealer:

IMPORTANT
Information about Caller ID with Call Waiting
This product has a Caller ID with Call Waiting feature that works
with service from your local phone service provider.
Caller ID with Call Waiting lets you see who’s calling before you
answer the phone, even when you’re on another call.
You may need to change your phone service to use this
feature. Contact your phone service provider if:
• You have both Caller ID and Call Waiting, but as separate services (you may need combined service).
• You have only Caller ID service, or only Call Waiting service.
• You don’t subscribe to any Caller ID or Call Waiting services.
You can use this product with regular Caller ID service, you can
use this product’s other features without subscribing to either
Caller ID or combined Caller ID with Call Waiting service.
There are fees for Caller ID services, and they may not be
available in all areas.
Depending on your service subscription, you may see the caller’s number, or the
caller’s name and number. This product can provide information only if both
you and the caller are in areas offering Caller ID service, and if both telephone
companies use compatible equipment. The time and date are sent by the
service provider along with the call information.
Copyright © 2005 Advanced American Telephones. All Rights Reserved.
AT&T and the Globe Design are trademarks of AT&T Corp.,
licensed to Advanced American Telephones.
You must install and
charge the battery before
using the telephone.
STOP!
See page 7
for easy instructions.
For customer service or product
information, visit our web site at
www.telephones.att.com
or call 1-800-222-3111.
In Canada, call 1-866-288-4268.
CAUTION: To reduce the risk of fire or injury to persons or damage
to the telephone, read and follow these instructions carefully:
• Use only replacement battery model 3301(Part number 80-5071-00-00 or
Please also read
Important Product Information
on page 32.
AT&T SKU 23403).
• Do not dispose of the battery in a fire, it could explode. Check with local codes
for special disposal instructions.
• Do not open or mutilate the battery. Released electrolyte is corrosive and may
cause damage to the eyes or skin. It may be toxic if swallowed.
• Exercise care in handling batteries in order not to create a short circuit with
conducting materials such as rings, bracelets, and keys. The battery or conductor may overheat and cause harm.
• Charge the battery provided with or identified for use with this product only in
accordance with the instructions and limitations specified in this manual.
• Observe proper polarity orientation between the battery and battery charger.
Do not disassemble your telephone. There are no user-serviceable parts inside.
Refer for servicing to qualified service personnel.
Copyright © 2005 Advanced American Telephones. All Rights Reserved.
AT&T and the Globe Design are trademarks of AT&T Corp.,
licensed to Advanced American Telephones.
User Manual
2.4 GHz Cordless
Telephone E2116
with Caller ID & Call Waiting
Table of contents
REDIAL
MUTE
CHAN
Getting Started
Quick reference guide ........................2
Parts checklist ......................................4
Before you begin .................................. 5
Telephone base installation ................ 6
Battery installation & charging ..........7
Wall mounting ......................................8
Belt clip & optional headset ..............9
Telephone Operation
Handset Operation ...........................10
Handset Settings ................................12
Base Operation ..................................13
Messages Waiting ...............................14
Speed Dial ...........................................16
Directory
Store/Edit an entry ............................19
Delete/Move an entry to Speed Dial
................................................................20
Dial a number from the Directory ...20
Caller ID Log
How Caller ID works .......................21
To review the call log ........................23
Appendix
Troubleshooting ................................. 28
Important Product Information ..... 33
Save /these Instructionsn ................. 34
FCC Part 68 and ACTA .... ...............36
FCC Part 15 ....................................... 37
Limited Warranty .............................. 38
Technical Specifi cations .................... 41
1
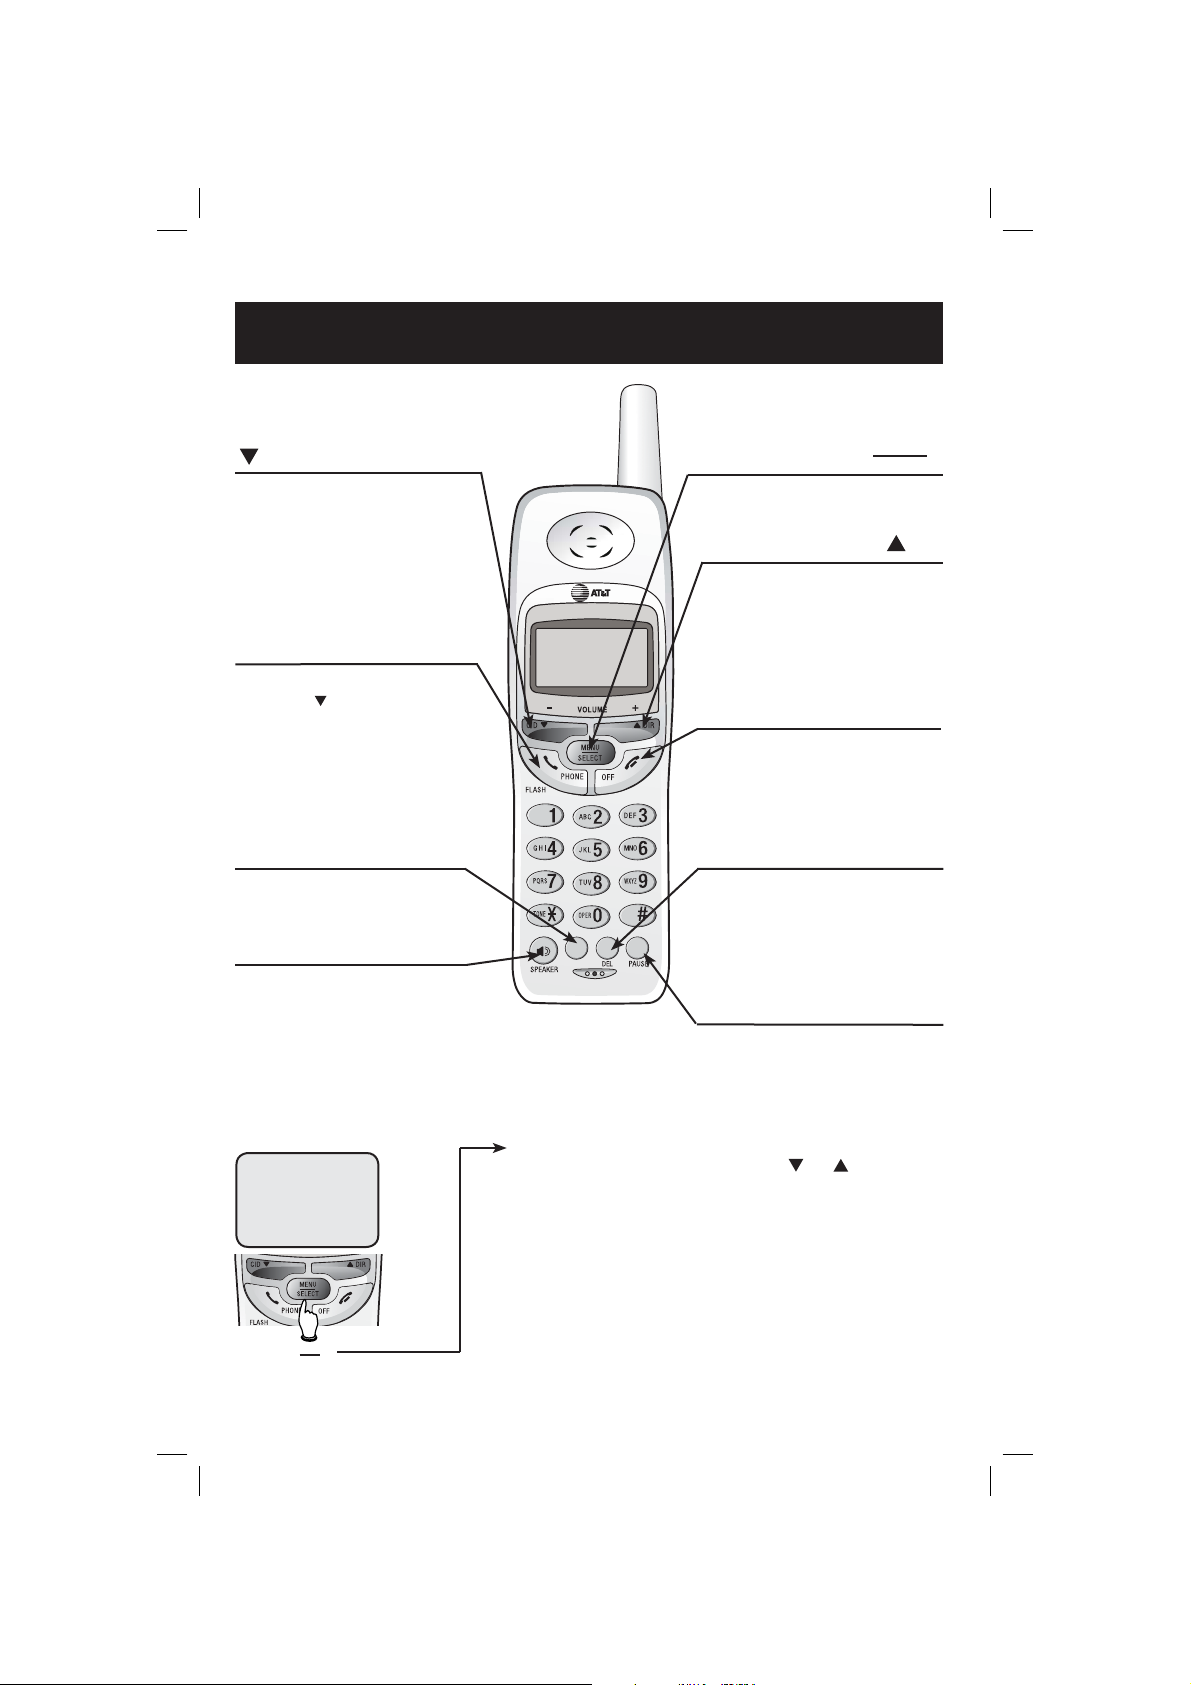
Getting Started
Quick reference guide
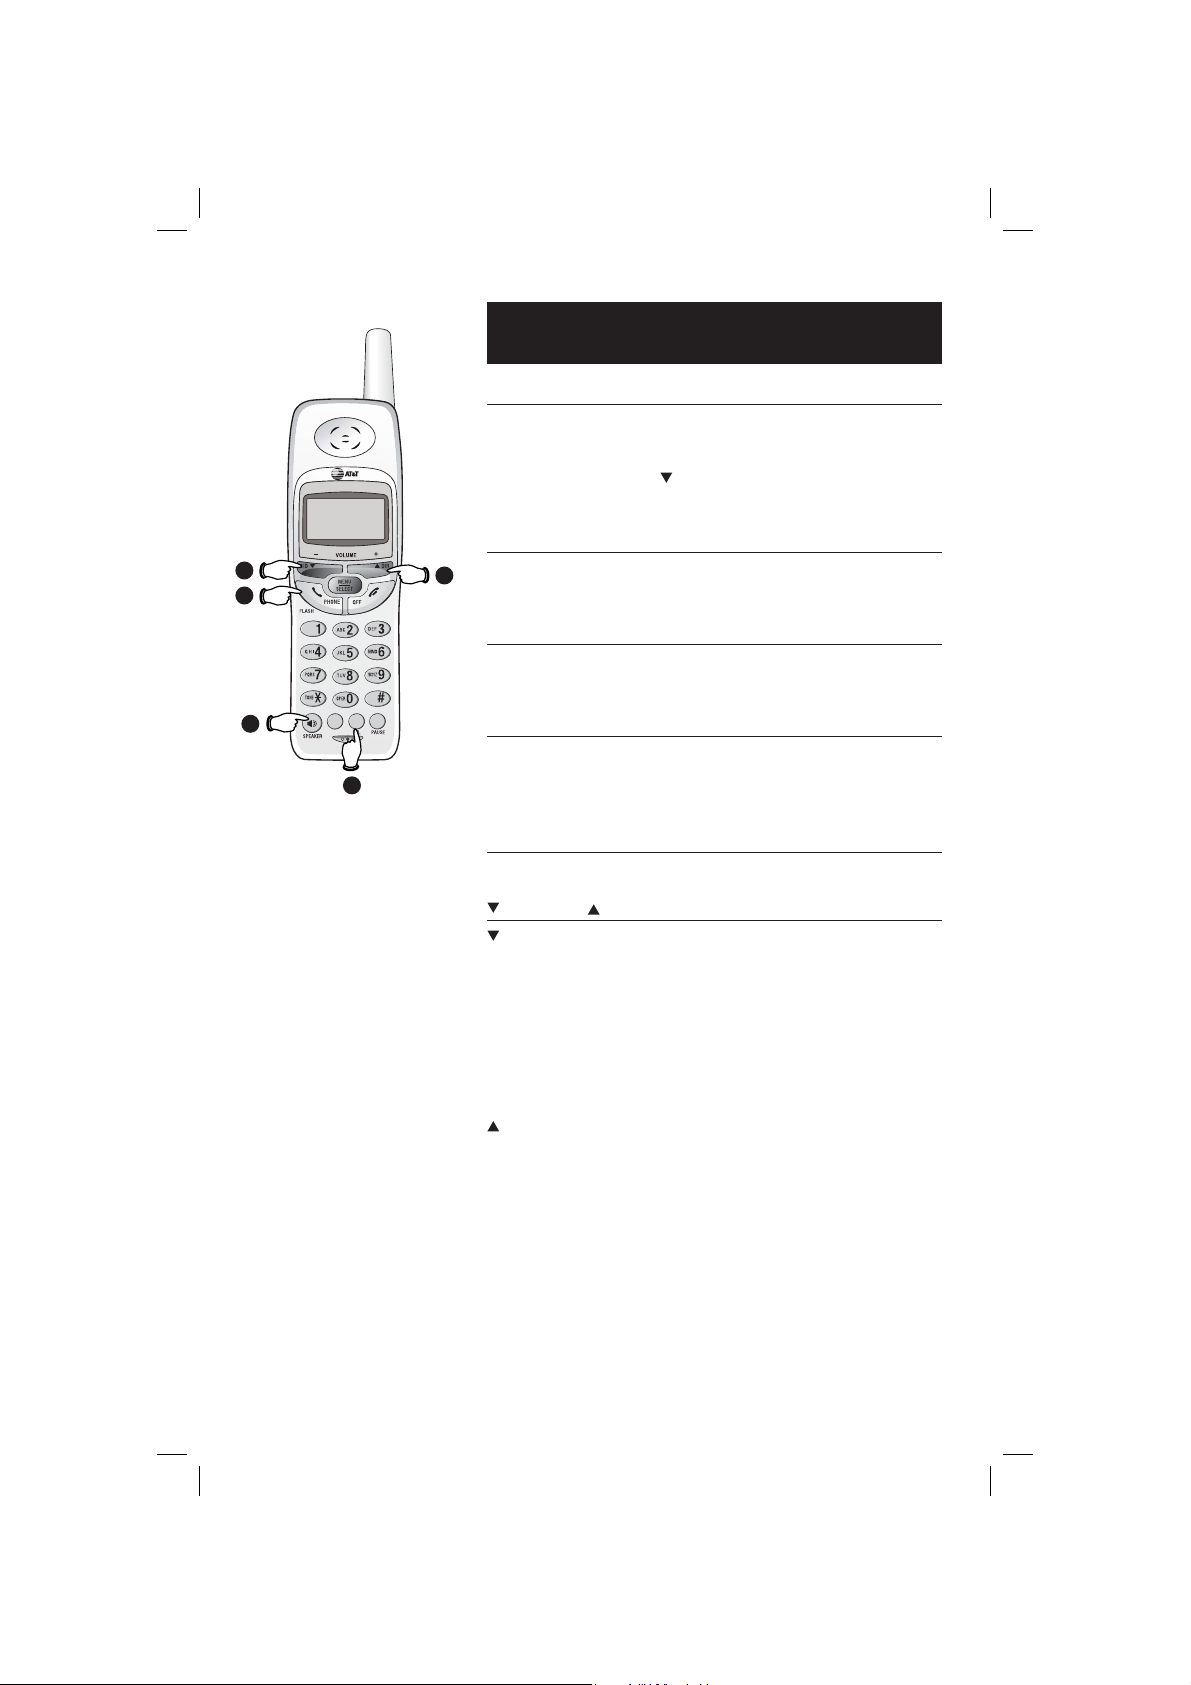
Handset
CID
While on a call, press to lower the
volume. A double beep will sound when
you reach the lowest setting.
While the phone is not in use, press to
display caller ID information.
While entering names or numbers into
memory, press to delete last character
entered.
PHONE/FLASH
Press to make or answer a call or dial the
number (use to backspace and make
corrections), then press PHONE to call.
During a call, press to put current call on
hold and receive an incoming call, if call
waiting service is subscribed.
MUTE
While on a call, press to mute microphone.
SPEAKER
Press to activate handset speakerphone.
Press again to resume normal handset use
(earpiece).
Feature menu
MUTE
CHAN
REDIAL
MENU
SELECT
Press to display menu, or to select highlighted item from menu.
DIR
While on a call, press to increase the
volume. A double beep will sound when
you reach the highest setting.
While the phone is not in use, press to
display directory entries.
While entering names or numbers, press
to add a space.
OFF
While on a call, press to temporarily
mute the ringer. While using menus,
press to cancel an operation, back up,
or exit the menu display.
When ringing, press to temporarily mute
the ringer.
While on a call, press CHAN to switch to
a different channel for better reception.
When viewing the call log, press to
delete the current record. While handset
is in idle mode, press and hold to delete
all records in the call log.
Press to view redial memory.
While entering numbers, press and hold
to insert a dialing pause.
CHAN/DEL
Redial/Pause
DIRECTORY
MENU
SELECT
Feature Menu
DIRECTORY.................See page 19
SPEED DIAL.................See page 16
RINGER TYPE..............See page 12
RINGER VOLUME ........See page 12
DATE/TIME ...................See page 12
DIAL MODE ..................See page 12
MESSAGE WAITING....See page 12
LANGUAGE.... ..............See page 12
2
Press or to scroll
through menu items.
Press SELECT to select or
modify a highlighted item.
Press OFF to cancel an
operation, return to the previous
menu, or exit the menu display.
Getting Started
Quick reference guide
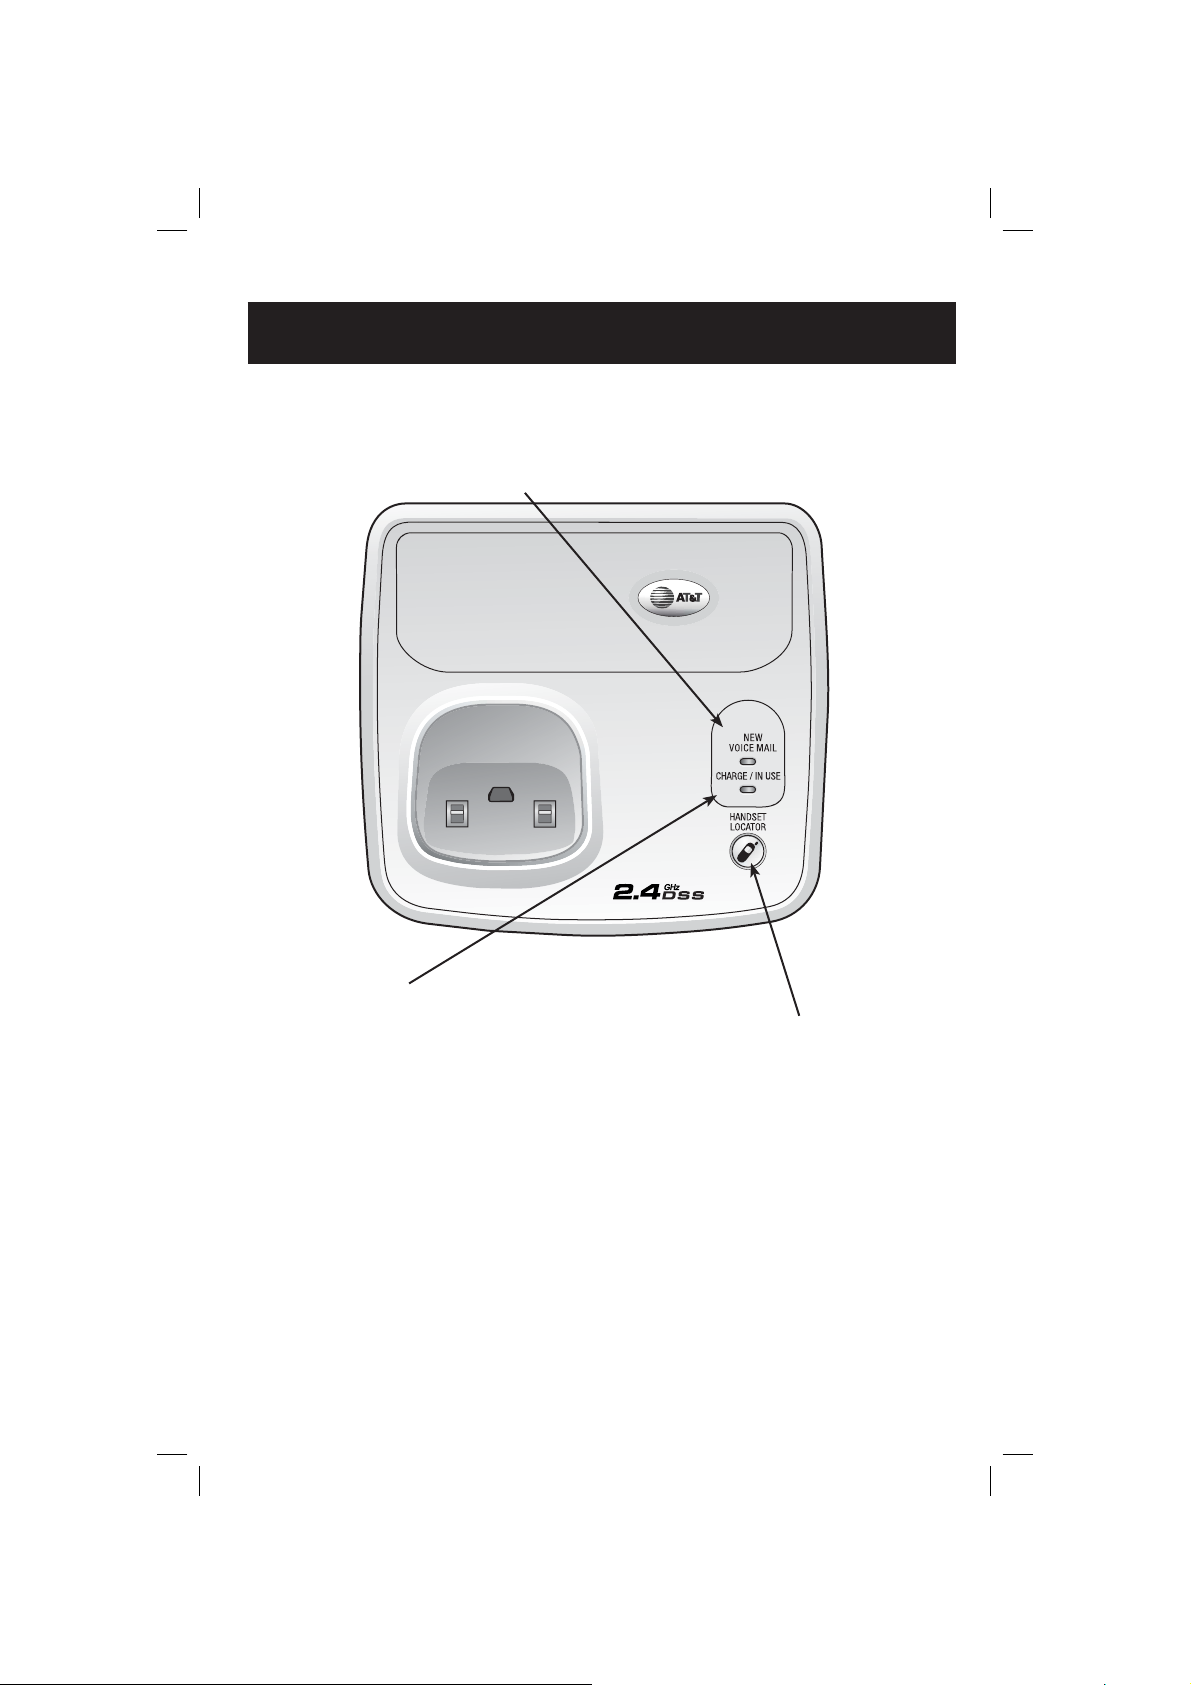
Telephone Base
New Voicemail
If you subscribe to telephone company voicemail with a visual message
waiting signal, this light fl ashes, and MESSAGE WAITING displays
on the handset screen when you have voicemail waiting.
Charge/In Use
Flashes slowly when the handset is in use.
Glows steadily when the handset is charging in its base.
Flashes in cadence with incoming ringing.
Handset Locator
Press to page the handset.
Press again, press OFF on handset, or place
handset in the base to cancel the page.
3

Getting Started
Parts checklist
Remember to save your sales receipt and original packaging in case you ever need to ship
your telephone for warranty service. Check to make sure the telephone package includes
the following:
MUTE
REDIAL
CHAN
a. Telephone base
d. Wall mount bracket
a. Telephone base
b. Telephone handset
c. Power adaptor
d. Wall mount bracket
e. Belt clip
f. Telephone line cord
g. Battery pack
b. Telephone handset
e. Belt clip
g. Battery pack
c. Power adaptor
f. Telephone line cord
4

Getting Started
Before you begin
About Caller Identification
Caller ID with Call Waiting features in
this telephone let you see who’s calling before you answer the phone, even
when you’re on another call. These features require services provided by your
local telephone company.
Contact your telephone service provider if:
• You have both Caller ID and Call
Waiting, but as separate services
(you may need combined service)
• You have only Caller ID service, or
only Call Waiting service
• You don’t subscribe to any Caller
ID or Call Waiting services.
You can use this phone with regular
Caller ID service, and you can use its
other features without subscribing to
either Caller ID or combined Caller ID
with Call Waiting service. There may be
fees for these services, and they may
not be available in all areas.
Caller ID features will work only if both
you and the caller are in areas offering
Caller ID service, and if both telephone
companies use compatible equipment.
Telephone operating range
This cordless telephone operates within
the maximum power allowed by the
Federal Communications Commission
(FCC). Even so, this handset and base
can only communicate over a certain
distance — which can vary with the
locations of the base and handset, the
weather, and the construction of your
home or office.
If there is a call while the handset
is out of range, the handset might
not ring — or if it does ring, the call
might not connect well when you press
PHONE. Move closer to the base, then
press PHONE to answer the call.
If the handset moves out of range
during a phone conversation, there
may be interference on the line. To
improve reception, move closer to the
base.
If you move out of range without
pressing OFF, your phone will be left
off the hook. To hang up properly, walk
back toward the telephone base, periodically pressing OFF until the call is
disconnected.
Note: For better reception while on the line,
press CHAN/DEL button until all interference is eliminated.
See Caller ID, on page 20, for more
details about how these features work.
5
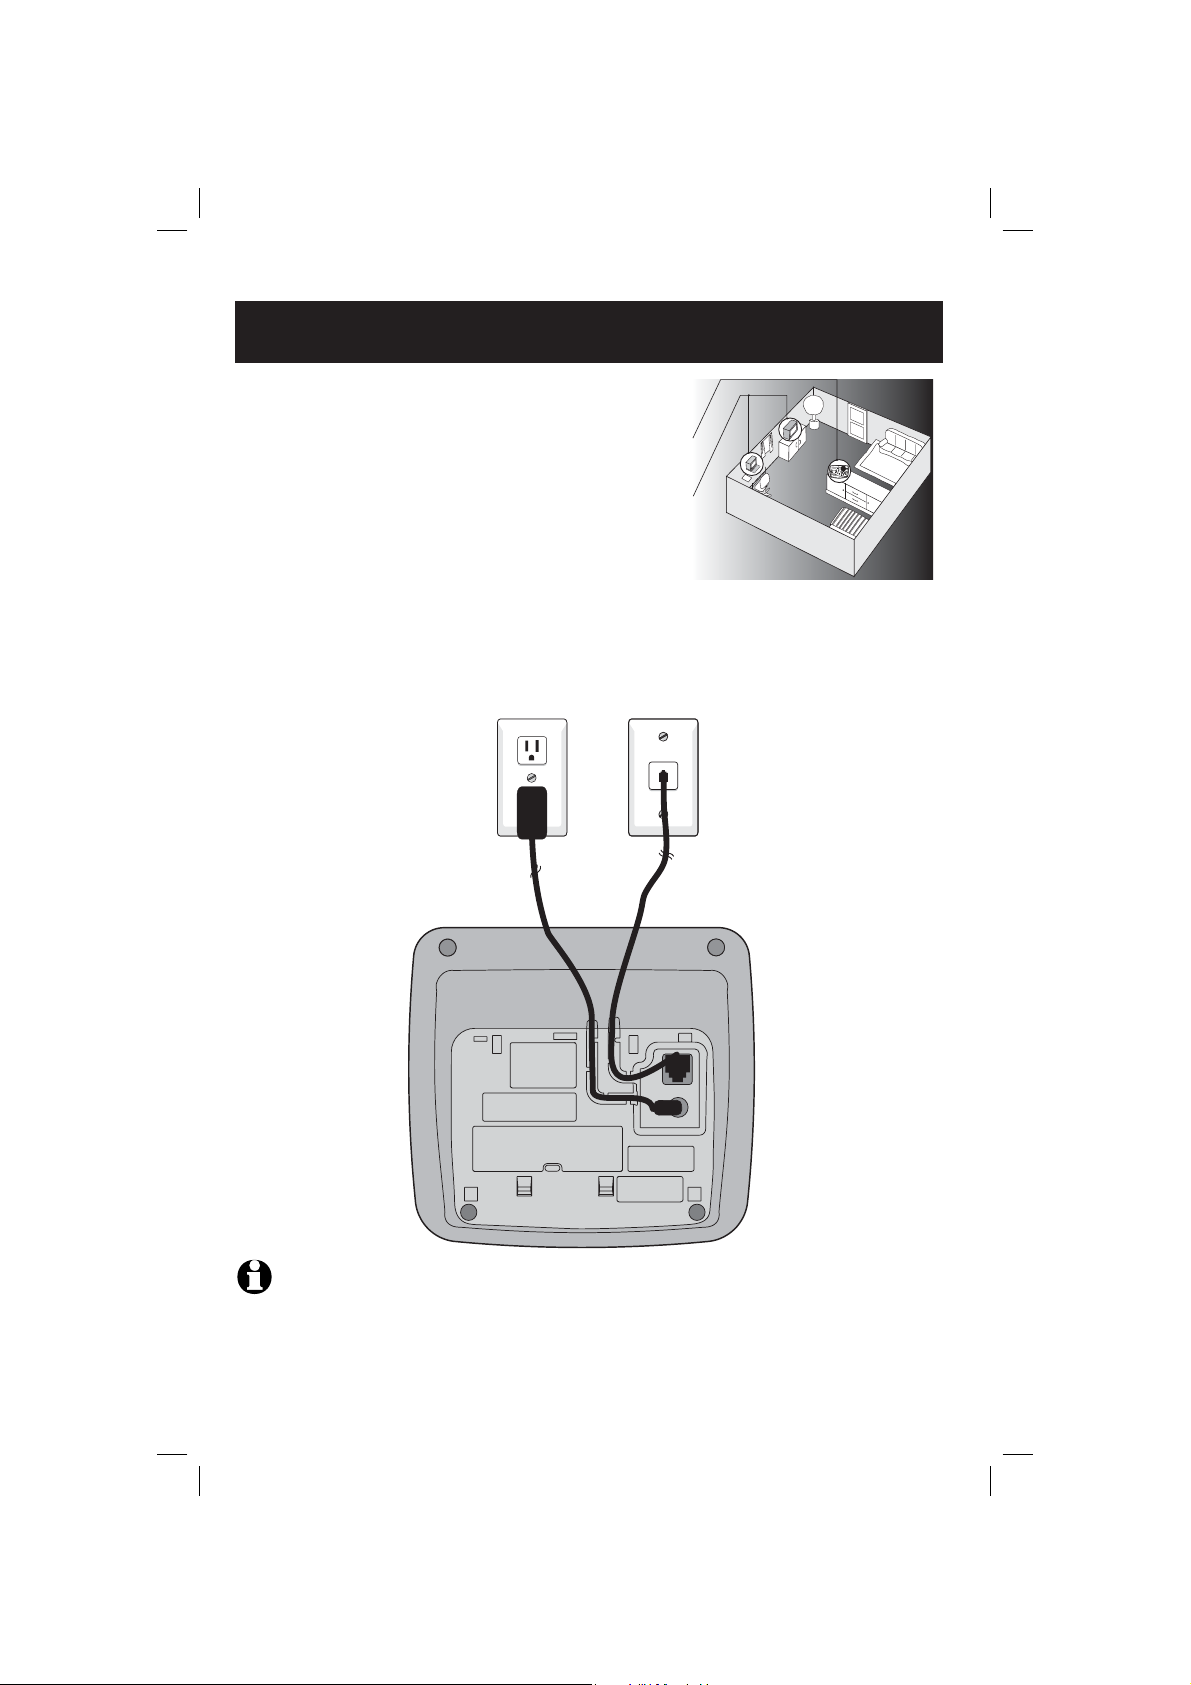
Getting Started
Telephone base installation
IMPORTANT! FOR MAXIMUM PERFORMANCE OF
YOUR CORDLESS TELEPHONE SYSTEM:
1. Choose a central location for your base unit.
2. Install your base unit and extension handsets away
from electronic equipment, such as personal computers, television sets and microwave ovens.
3. In locations where there are multiple cordless
telephones, separate the base units as far away as
possible.
4. Install your telephone equipment away from heat
sources and sunlight.
5. Avoid excessive moisture, dust or extreme cold.
Install the telephone base as
shown below.
Plug power adaptor
into electrical outlet.
NOTE: Use only the power cord supplied with this product. If you need a replacement, call 1-800-222–3111 in
the U.S. In Canada, call 1-866-288-4268. Be sure to use an electrical outlet not controlled by a wall switch.
6
Plug telephone
line cord into
telephone jack.

Getting Started
Battery installation & charging
After battery installation, place the handsets in the base unit or charger and allow to
charge for at least 16 hours before use.You can keep the batteries charged by returning
the handsets to the base unit or charger after each use. Recharging of a fully depleted battery may take up to 14 hours. A fully charged battery could provide up to 5 hours of talk
time, or 8 days of standby time. Actual battery life depends on usage condition and age of
battery.
NEEDS RECHARGING
Low battery indicator.
Return handset to base
or charger to recharge
when this symbol flashes.
(Handset will beep when
battery is low.)
Insert supplied battery. Ensure the plug
on the battery pack is
securely inserted into
the socket of the compartment according
to the colour-coded
label.
Press tab to open
battery compartment.
Plug charger power
cord into jack on underside of charger, then
plug power adaptor into
electrical outlet.
Caution: Use only the supplied
rechargeable battery or AT&T
replacement battery model 3301 (SKU
23403, Part number 80-5071-00-00).
7
Replace compartment cover.
Place handset in base or charger
to charge for at least 16 hours
before first use.
REDIAL
MUTE
CHAN
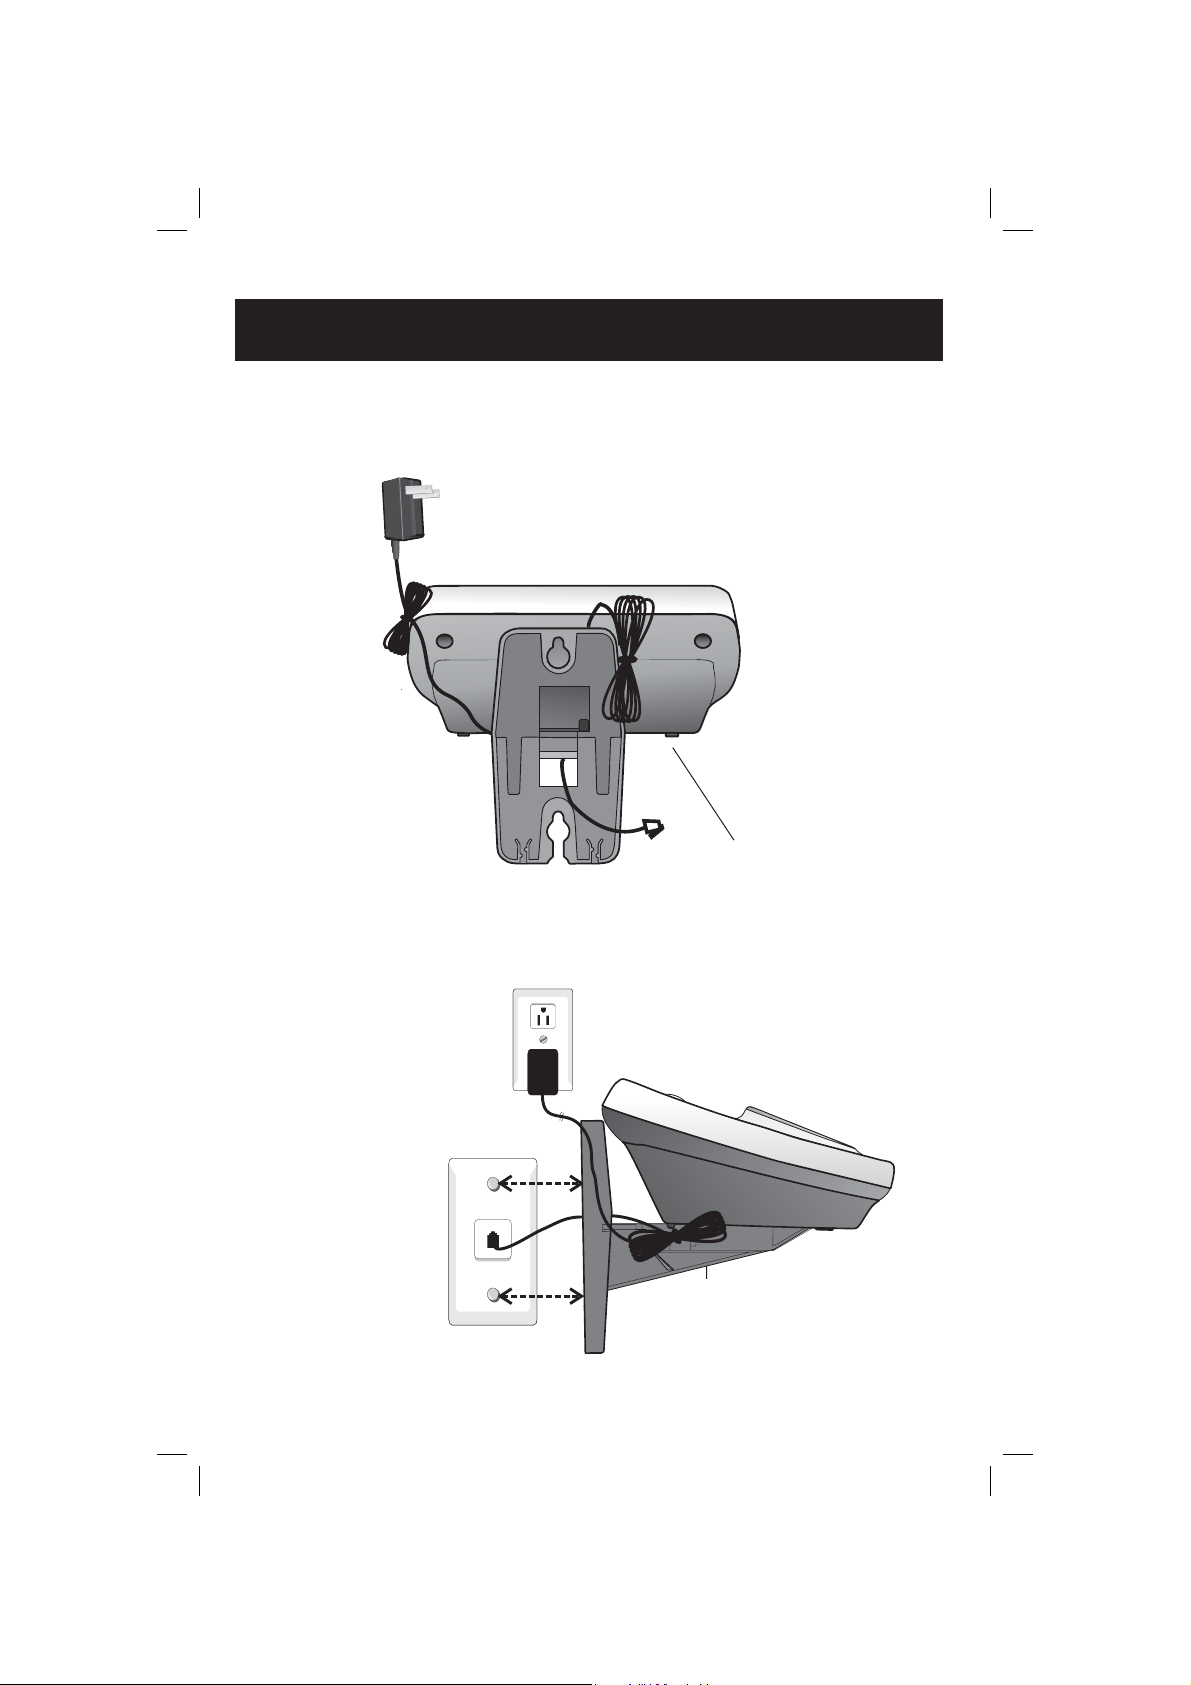
Getting Started
Wall mounting
The line cord of the base unit can be plugged into any standard wall-phone outlet as
shown below. Choose a location away from electronic equipment such as personal computers, television sets or microwave ovens. Avoid excessive heat, cold, dust or moisture.
Install the line cord as
shown in the diagram.
Connect cords as shown on page 6, then press and slide the cords
down firmly so the base is held securely on outlet mounting pegs.
Plug power adaptor
into electrical outlet.
Plug telephone line
cord into telephone jack.
8
Clip wall-mount bracket
securely into notches on
underside of base.
Getting Started
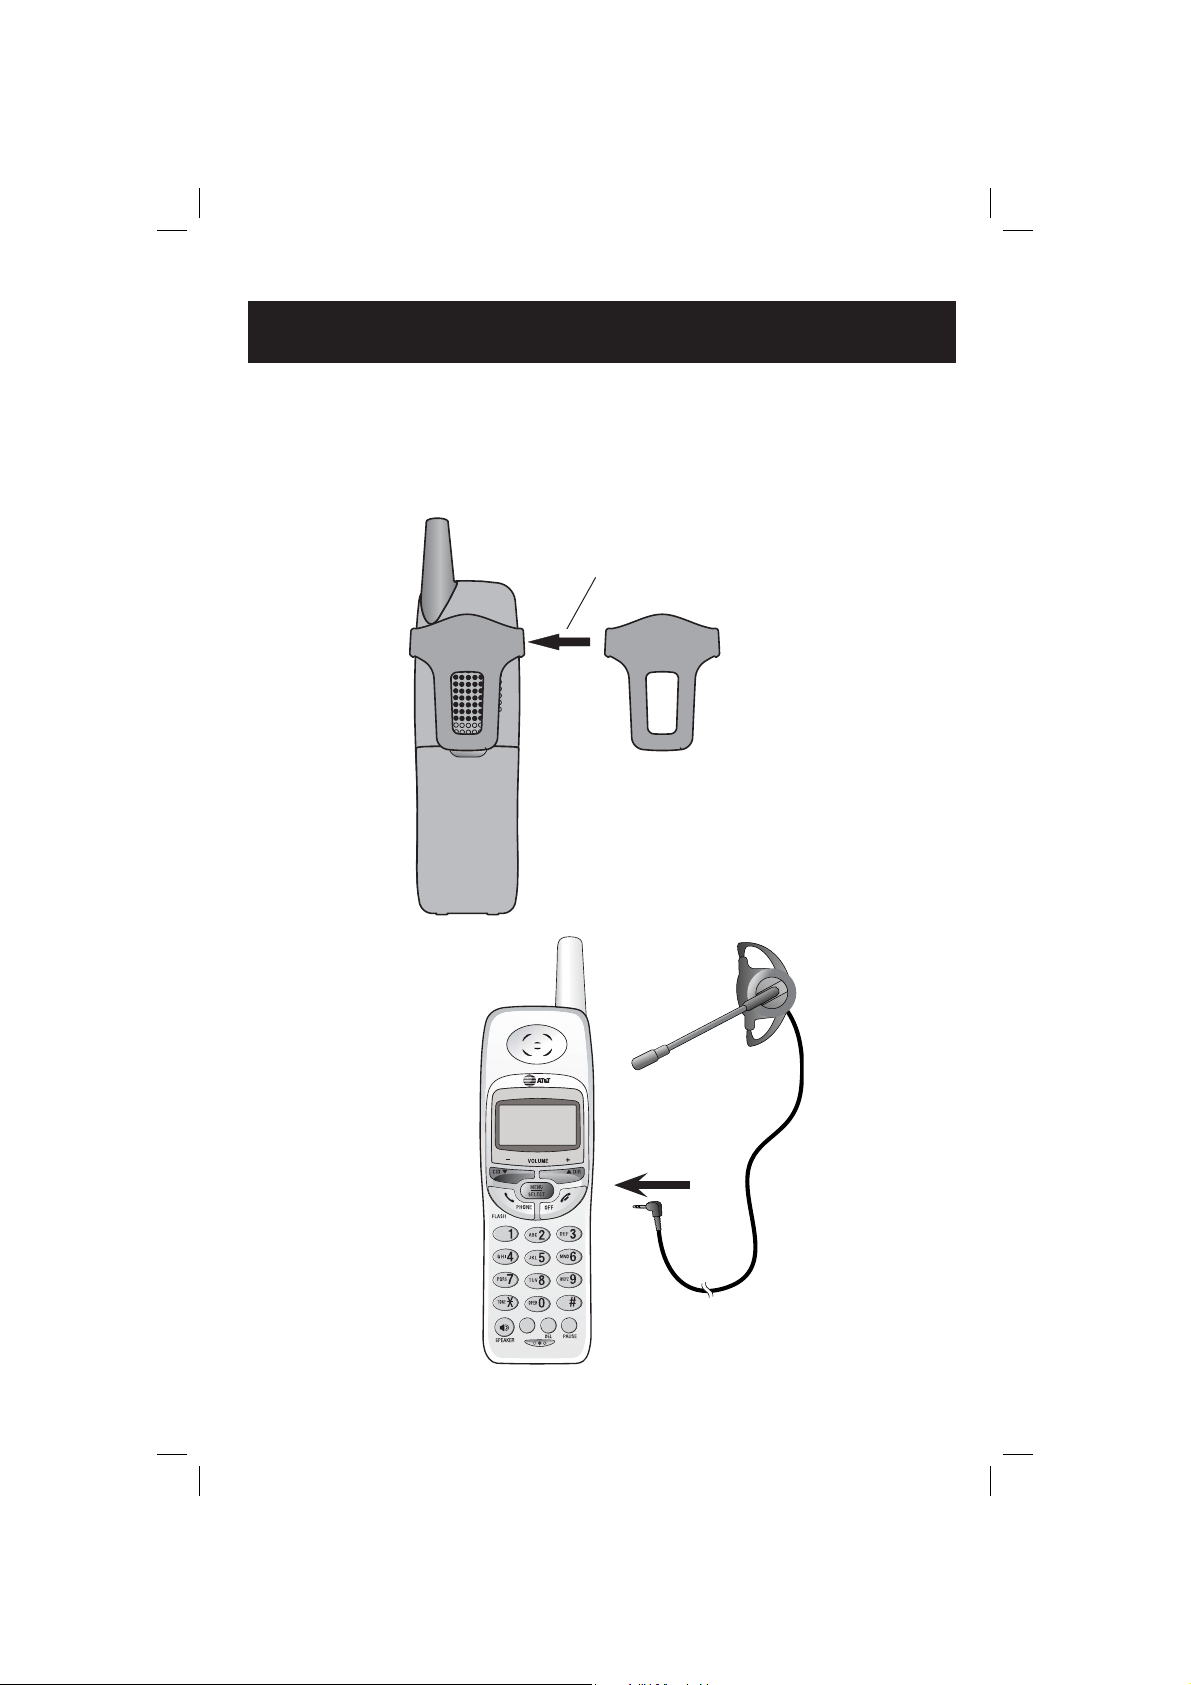
Belt clip & optional headset
Install belt clip as shown below if desired.
For hands-free telephone conversations, use any industry standard 2.5 mm headset
(available separately). For best result, use an AT&T 2.5 mm headset.
Snap belt clip into notches on
side of handset. Rotate and pull
to remove.
Plug 2.5 mm headset
into jack on side of
handset (beneath
small rubber cap).
MUTE
REDIAL
CHAN
9
D
A
B
Flash
Telephone Operation
Handset Operation
Making a Call
Press
PHONE (A) or SPEAKER (B), then dial the number.
-OR-
Dial the number (use to backspace and make corrections), then press PHONE (A) or SPEAKER (B) to call.
Call Waiting
During a call, press FLASH (A) to receive the new incom-
E
ing call if call waiting is activated.
Channel
Press CHAN (C) to switch to a clear channel without
interference while on a call.
MUTE
REDIAL
CHAN
C
Deleting
When viewing the call log, press DEL (C) to delete the
current record displayed. While the handset is in idle
mode, press and hold to delete all records in the call log.
Answer a Call
Press any key (except OFF) to answer a call.
/CID and /DIR
/CID (D)
• While on a call, press to lower the volume. A double
beep will sound when you reach the lowest setting.
• While the phone is not in use, press to display caller
ID information.
• While entering names or numbers into memory,
press to delete the last character entered.
/DIR (E)
• While on a call, press to increase the volume. A
double beep will sound when you reach the highest
setting.
• While the phone is not in use, press to display directory entries.
• While entering names or numbers, press to add a
space.
10
 Loading...