

Page 1

Use Artwork For: Product Color: Printed Material:
p
A
A
A
T
A
A
Y
A
A
j
o
s
T
r
T
A
Y
✔
✔
PP-USA
PP-USA
PP-USA
PP-USA
PP-USA
CTAP
CTAP
CTAP
CTAP
FTRI
FTRI
FTRI
FTRI
FTRI COMBO
FTRI COMBO
FTRI COMBO
FTRI COMBO
U.K.
JAPAN
ITAL
BELL SOUTH
RADIO SHACK CANADA
color of lens
color of button
color of LED
housing color
User Guide
Quick Guide
Product Graphics
Product Label
Battery Warning Label
Warning Label
Product Inlay
Function Inlay
emplate
Product Sticker
Battery Sticker
Box Sticker
ddendum
Gift Box
Product Directory
Others:
Product:
✔ ✔
Vendor:
Issued for:
Prepared by:
Reason for Revision:
Implement:
Artwork Provided:
Printing:
Color Scheme:
Size:
Paper Stock: Color of Stock:
Cut:
Binding/Folding: Others:
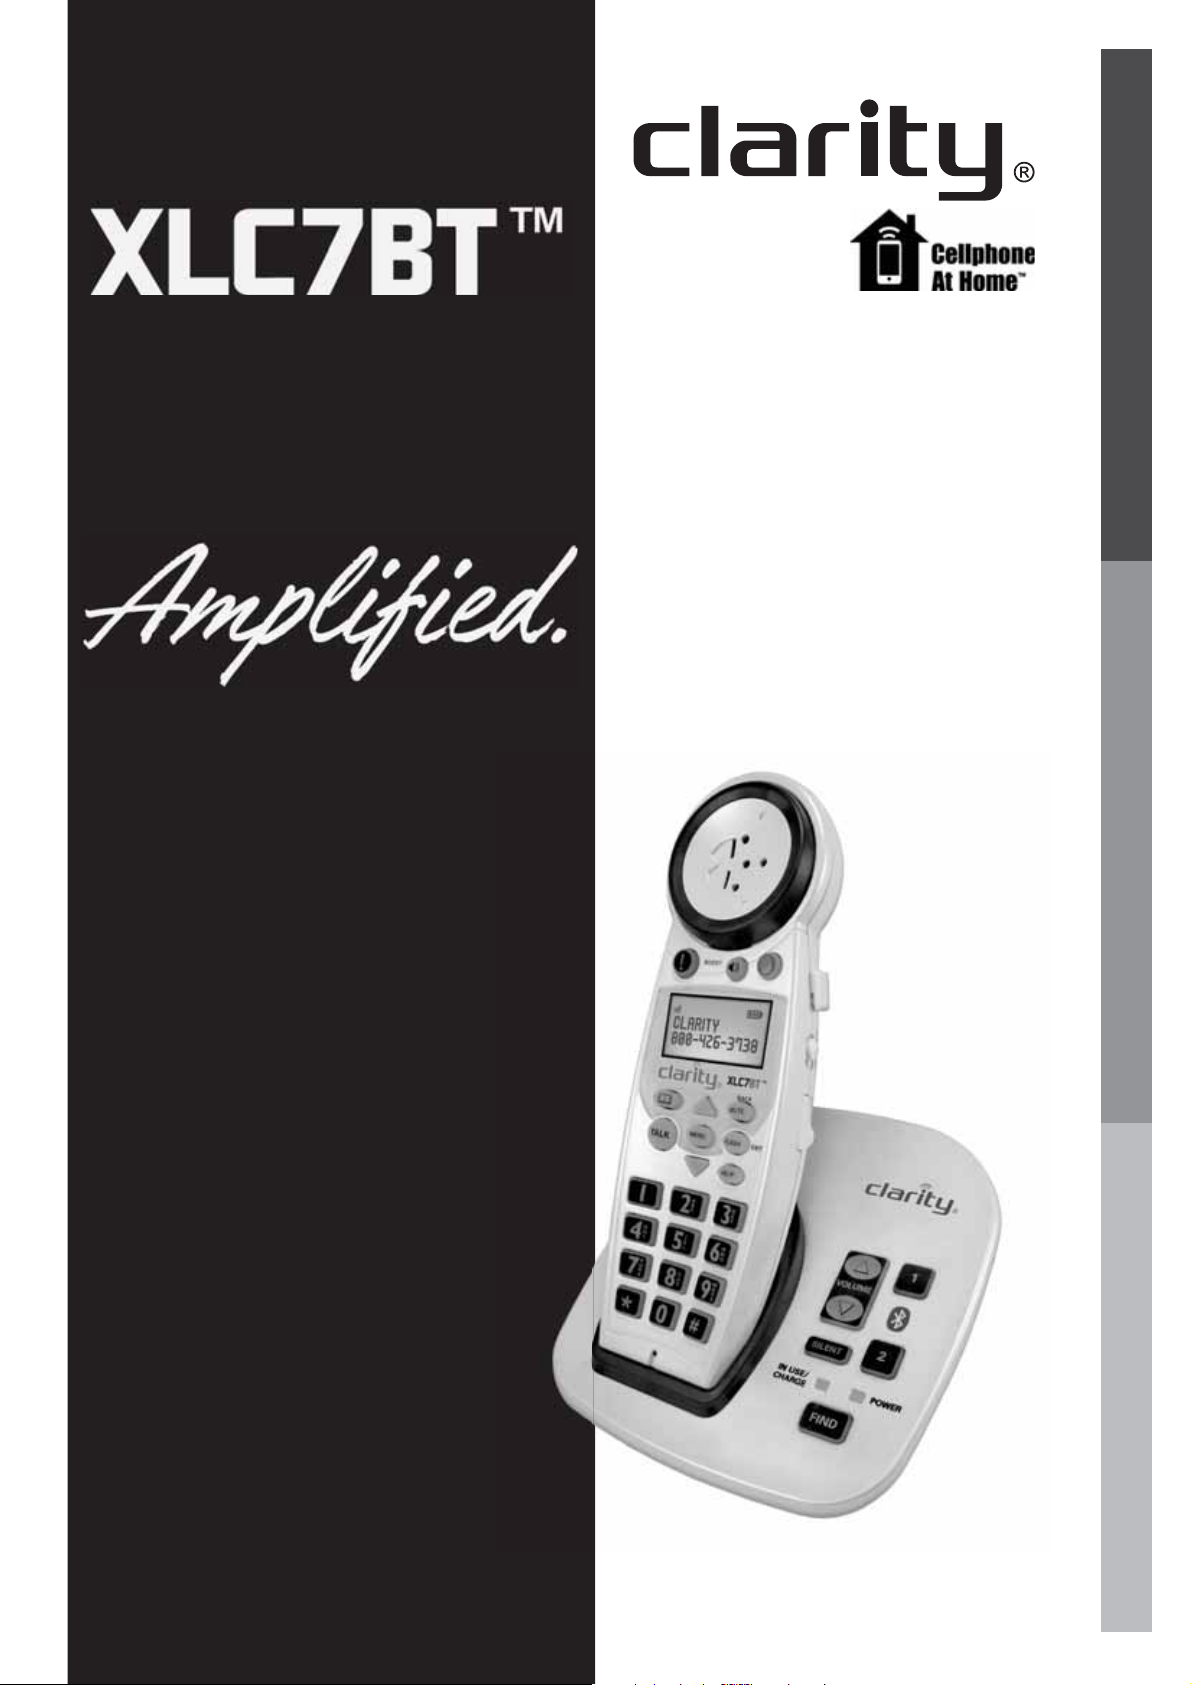
XLC7BT User Guide
English French Spanish Portuguese Japanese Italian
Vtech
Corina Sandulescu
Pms colors are:
4 Color Process
✔
Revision Creation
✔
Date:
09-04-17
Initial Release
✔
Immediately
Laser Output
✔
Lith
(color on one side only) 1/1 color (color on two sides) 2/0 colors (two colors on one side only)
1/0 Color
(CMYK) Spot Color(PMS) Gloss Varnish Dull Varnish
Film Pos Film Negs Lino CD Zip Email PDF
Silk Screen Digital Press
s Running Change
✔
Xerox
5.5" x 8.3"
Weight of Stock:
20 gm
Gloss c2s
Cover Paper Card Cardboard Corrugated Board
ransparent
Die-Cut
Fold Parallel Fold
(coated 2 sides)
✔
SelfAdhesive Sticker
Radius Corners
White
(coated 1 side)
c1
SelfAdhesive Sticker
Paper
ccordion Fold
✔
rim
Revision:
Colors:
Matte
Others:
Saddle Stitch
A
✔
Black White
SelfAdhesive Sticker
Myla
(Stapled) Perfect Bound
✔
Others:
✔
Mylar Inlay
pg
Supplied By:
Others:
Others:
Quantity:
N/A
✔
✔
ES NO
Prototype/Sample(s):
Provided Not Provided
Prior to production sample(s) approval required by Clarity:
Number of sam
les to be submitted for approval:
Special Instructions:
Page 2

Page 3

Clarity Products LLC
6131 Preservation Drive • Chattanooga, TN 37416
Tel: 800-426-3738 • Fax: 800-325-8871
Website: www.clarityproducts.com
©2017 Clarity Products LLC. Clarity, Clarity Professional, XLC7BT,XLC7HS and the
amplified figure are trademarks or registered trademarks of Clarity Products LLC.
The Bluetooth® word mark and logos are owned by Bluetooth SIG, Inc. and any use
of such marks by Clarity is under license. Clarity is a member of Bluetooth SIG, Inc.
Other trademarks and trade names are those of their respective owners.
Specifications are subject to change without notice.
Rev. A (8-17)
Printed in China
Page 4
User Guide
E
N
G
L
I
S
Home and
cellphone calls
MAKE CALLS WITH AND
WITHOUT A LANDLINE
PAIR UP TO TWO (2)
BLUETOOTH DEVICES
H
F
R
A
N
Ç
A
I
S
50 DB OF AMPLIFICATION AND
FOUR (4) TONE SETTINGS
EXPANDABLE UP TO THREE (3)
EXTRA HANDSETS (XLC7HS®)
E
S
P
A
~
N
O
L
Page 5

Page 6

XLC7BT
TABLE OF CONTENTS
Important Safety Instructions 2
E
N
Contents & Parts Checklist 5
Installation 6
Wall Mounting Your XLC7BT 8
Base - Quick Reference Guide 10
Handset - Quick Reference Guide 11
Battery Information 14
Bluetooth Function 16
Placing & Answering Calls 16
Volume & Tone Adjustments 17
G
L
I
S
H
CALLER ID Function 18
Mem Button 18
Phonebook 19
Screen Details 19
Telephone Menu 20
Handset Registration 27
Troubleshooting 29
Technical Information 32
Regulatory Compliance 33
Warranty Information 36
1
Page 7

XLC7BT
When using your telephone equipment, basic safety precautions should
always be followed to reduce the risk of fire, electric shock and injury to
persons, including the following:
1. Read and understand all instructions.
2. Follow all warnings and instructions marked on the telephone.
3. Avoid contact with liquids. Do not locate base unit or handset near
water, for example, near a bathtub, wash basin, sink or laundry tub, in a
wet basement or near a swimming pool.
4. Avoid using a telephone (other than a cordless type) during a storm.
There may be a remote risk of electrical shock from lightning.
5. Do not use the telephone to report a gas leak in the vicinity of the leak.
6. Unplug this telephone from the wall outlets before cleaning. Do not use
liquid cleaners or aerosol cleaners on the telephone. Use a damp cloth
for cleaning.
7. Place this telephone on a stable surface. Serious damage and/or injury
may result if the telephone falls.
8. Do not cover the slots and openings on this telephone. This telephone
should never be placed near or over a radiator or heat register. This
telephone should not be placed in a built-in installation unless proper
ventilation is provided.
9. Operate this telephone using the electrical voltage as stated on the base
unit or the owner’s manual. If you are not sure of the voltage in your
home, consult your dealer or local power company.
10. Do not allow anything to rest on the power cord or locate this product
in an area where the power cord is likely to be damaged by furniture or
foot trac.
11. Do not overload wall outlets or extension cords as this can increase the
risk of fire or electrical shock.
12. Never push any objects through the slots in the telephone. They can
touch dangerous voltage points or short out parts that could result
in a risk of fire or electrical shock. Never spill liquid of any kind on the
telephone.
13. To reduce the risk of electrical shock, do not take this phone apart.
Opening or removing covers may expose you to dangerous voltages
or other risks. Incorrect reassembly can cause electric shock when the
appliance is subsequently used.
14. Unplug this product from the wall outlet and refer servicing to the
manufacturer under the following conditions: when the power supply
cord or plug is frayed or damaged; if liquid has been spilled into the
IMPORTANT SAFETY INSTRUCTIONS
SAVE THESE INSTRUCTIONS
2
Page 8

XLC7BT
IMPORTANT SAFETY INSTRUCTIONS
product; if the telephone has been exposed to rain or water; if the
telephone has been dropped or the case has been damaged; if the
telephone exhibits a distinct change in performance; if the telephone
does not operate normally by following the operating instructions.
Adjust only those controls that are covered by the operating
instructions. Improper adjustment may require extensive work by a
qualified technician to restore the telephone to normal operation if
the telephone does not operate normally by following the operating
instructions.
15. This product should be operated only from the type of power source
indicated on the marking label. If you are not sure of the type of power
supply to your home, consult your local power company.
16. 16. Do not attempt to open the AC adapter. There are potentially
dangerous voltages inside, and there are no serviceable parts.
17. Discontinue use of product and contact Clarity if the product overheats,
has a damaged cord or plug, if the product has been dropped or
damaged or if the product has come into contact with liquids.
18. Use only the AC adapter provided with this product or a replacement AC
adapter provided by Clarity.
19. This phone amplifies sound to loud volumes. To prevent hearing
damage, all users of the phone should be informed of the high volume
capability of the phone and children should only use the phone when
supervised by an adult.
20. Exposure to high volume sound levels or excessive sound pressure may
cause temporary or permanent damage to your hearing. Although there
is no single volume setting that is appropriate for everyone, you should
always use your telephone with the volume set at moderate levels and
avoid prolonged exposure to high volume sound levels. The louder the
volume, the less time is required before your hearing could be aected.
If you experience hearing discomfort, you should have your hearing
checked by a doctor. To protect your hearing, you should:
A) Set the volume control in a low position and gradually increase
the volume as needed. Before pressing the BOOST button, reduce
the volume to the lowest level. Use the phone on the lowest volume
setting as possible.
B) Limit the amount of time you use the telephone at high volume
levels.
21. If you experience a skin irritation after using this product, discontinue
use and contact Clarity.
E
N
G
L
I
S
H
SAVE THESE INSTRUCTIONS
3
Page 9

XLC7BT
BATTERY SAFETY INSTRUCTIONS
Dispose of used batteries according to the instructions.
Caution: Disconnect telephone line before replacing batteries.
1. Do not dispose of the battery in a fire as it may explode. Check with local
codes for possible special disposal instructions.
2. Do not open or mutilate the battery. Released electrolyte is corrosive
and may cause damage to the eyes and skin. It may be toxic if
swallowed.
3. Exercise care in handling batteries in order not to short the battery with
conducting materials such as rings, bracelets and keys. The battery or
conduction material may overheat and cause burns.
4. Remove batteries when they are discharged and when the equipment
will not be used for an extended period of time. Dispose of batteries
according to local environmental laws.
5. Do not disassemble, heat, crush, deform or puncture batteries.
6. Do not attempt to charge non-rechargeable batteries.
7. Keep batteries out of the reach of children.
IMPORTANT SAFETY INSTRUCTIONS
WARNING: Risk of explosion if battery is replaced by an incorrect
type.
SAVE THESE INSTRUCTIONS
4
Page 10
XLC7BT
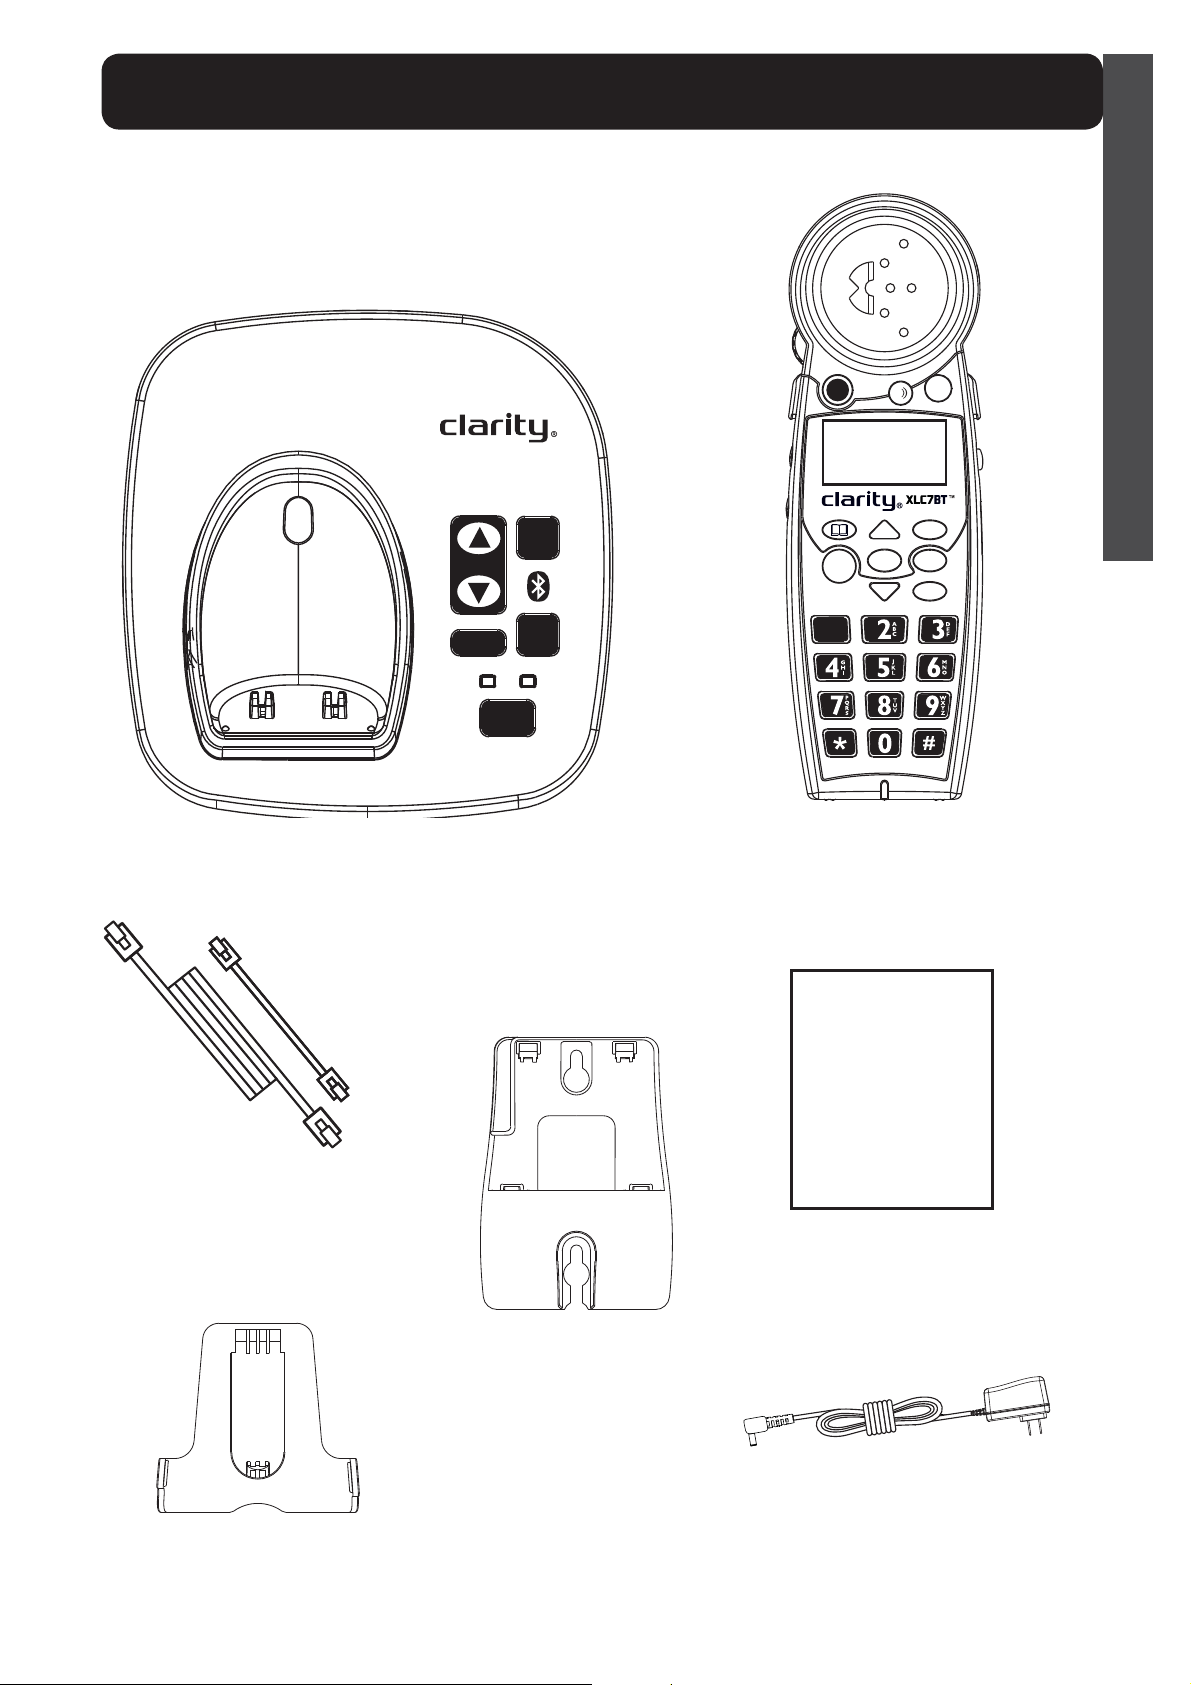
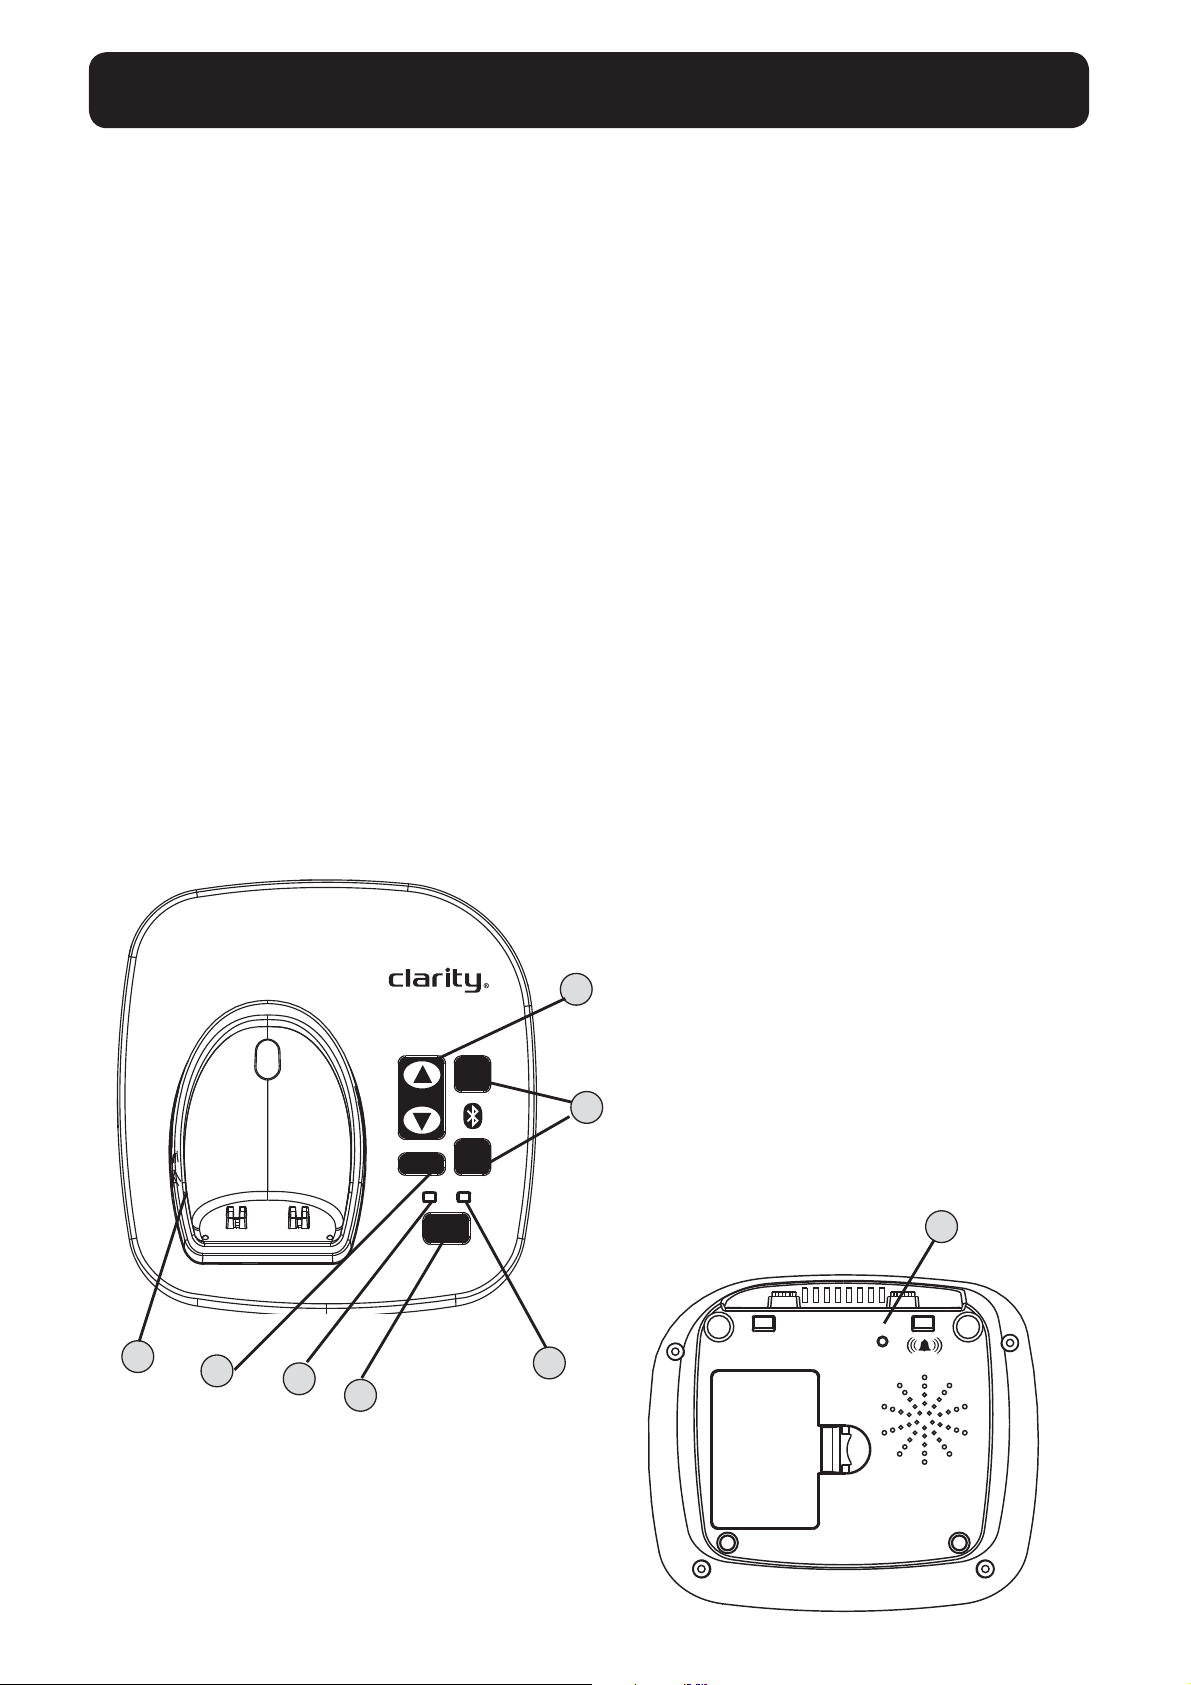
CONTENTS & PARTS CHECKLIST
E
N
G
L
I
Base
IN USE/
CHARGE
VOLUME
SILENT
FIND
1
2
POWER
BOOST
;
!
BACK
MUTE
MENU
TAL K
FLASH
1
Handset
MEM
S
H
EXIT
RD/P
Phone cords (1
long, 1 short)
Belt clip
XLC7BT
User Guide
User
guide
Wall mount
bracket
AC power
adapter
5
Page 11

XLC7BT
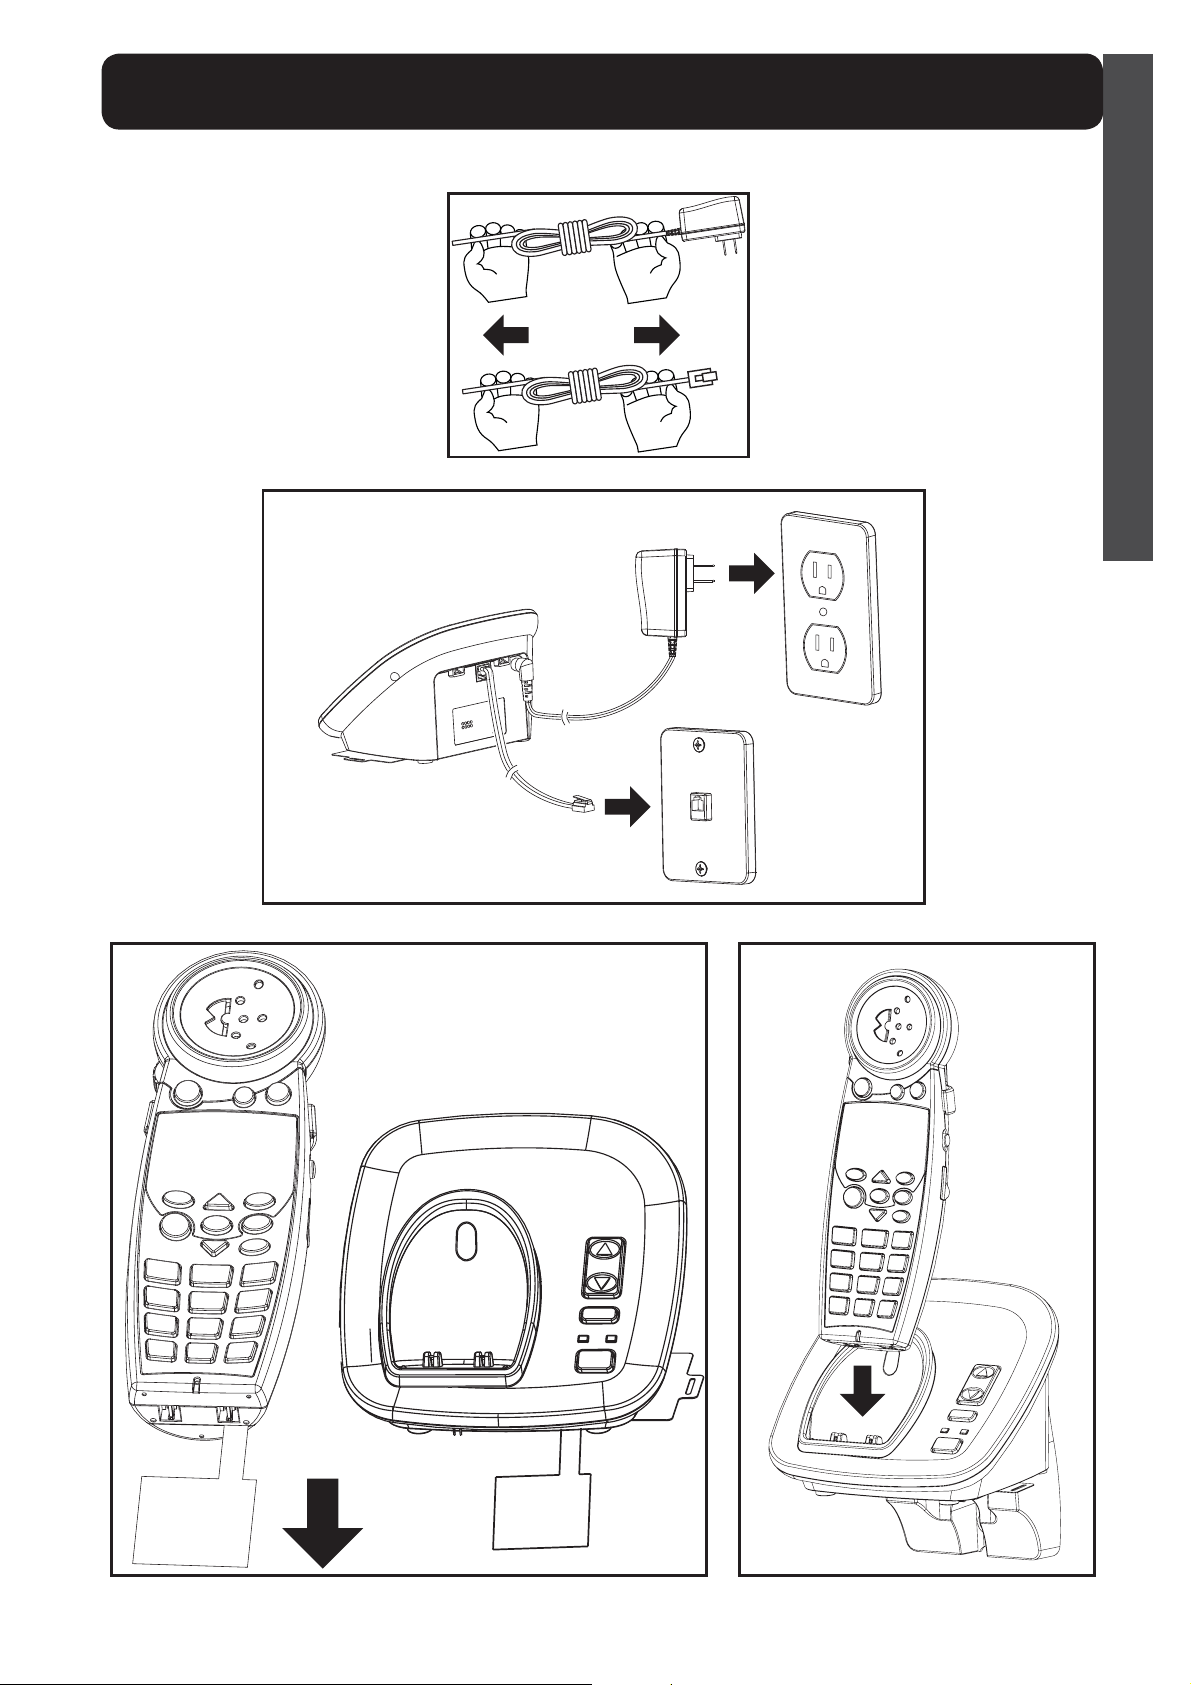
Your telephone should arrive pre-assembled. To install it:
1. Remove base from package; pull yellow tab in the direction of the
arrow.
INSTALLATION
2. Hold one end of your
correct end to hold should already be plugged into your phone’s
jack. Simultaneously pull the other end of the phone cord away
from the phone, unraveling it and allowing you to plug that end
of the cord into a wall telephone outlet.
3. Plug the loose end of the phone cord into the wall telephone
outlet.
4. Hold one end of your phone’s white power adapter cord tightly.
The correct end to hold should already be plugged into the back
of your telephone base unit. Simultaneously pull the other end of
the adapter cord away from the phone, unraveling it and allowing
you to plug that end of the cord into a wall electrical outlet.
5. Plug white power adapter cord on left rear of the base into a wall
electrical outlet.
6. Remove handset from package.
7. Pull the handset’s battery tab located on the bottom of the
XLC7BT’s long phone line cord tightly. The
device in the direction of the arrow.
8. Place the handset in the base charger. The batteries in the
handset must be fully charged for 16 hours before using the
telephone for the first time.
9. Lift handset and press TALK to test. If you hear a dial tone, your
telephone is ready for use. If not, check all connections again.
6
Page 12
XLC7BT
INSTALLATION
E
N
G
L
I
S
H
7
Page 13

XLC7BT
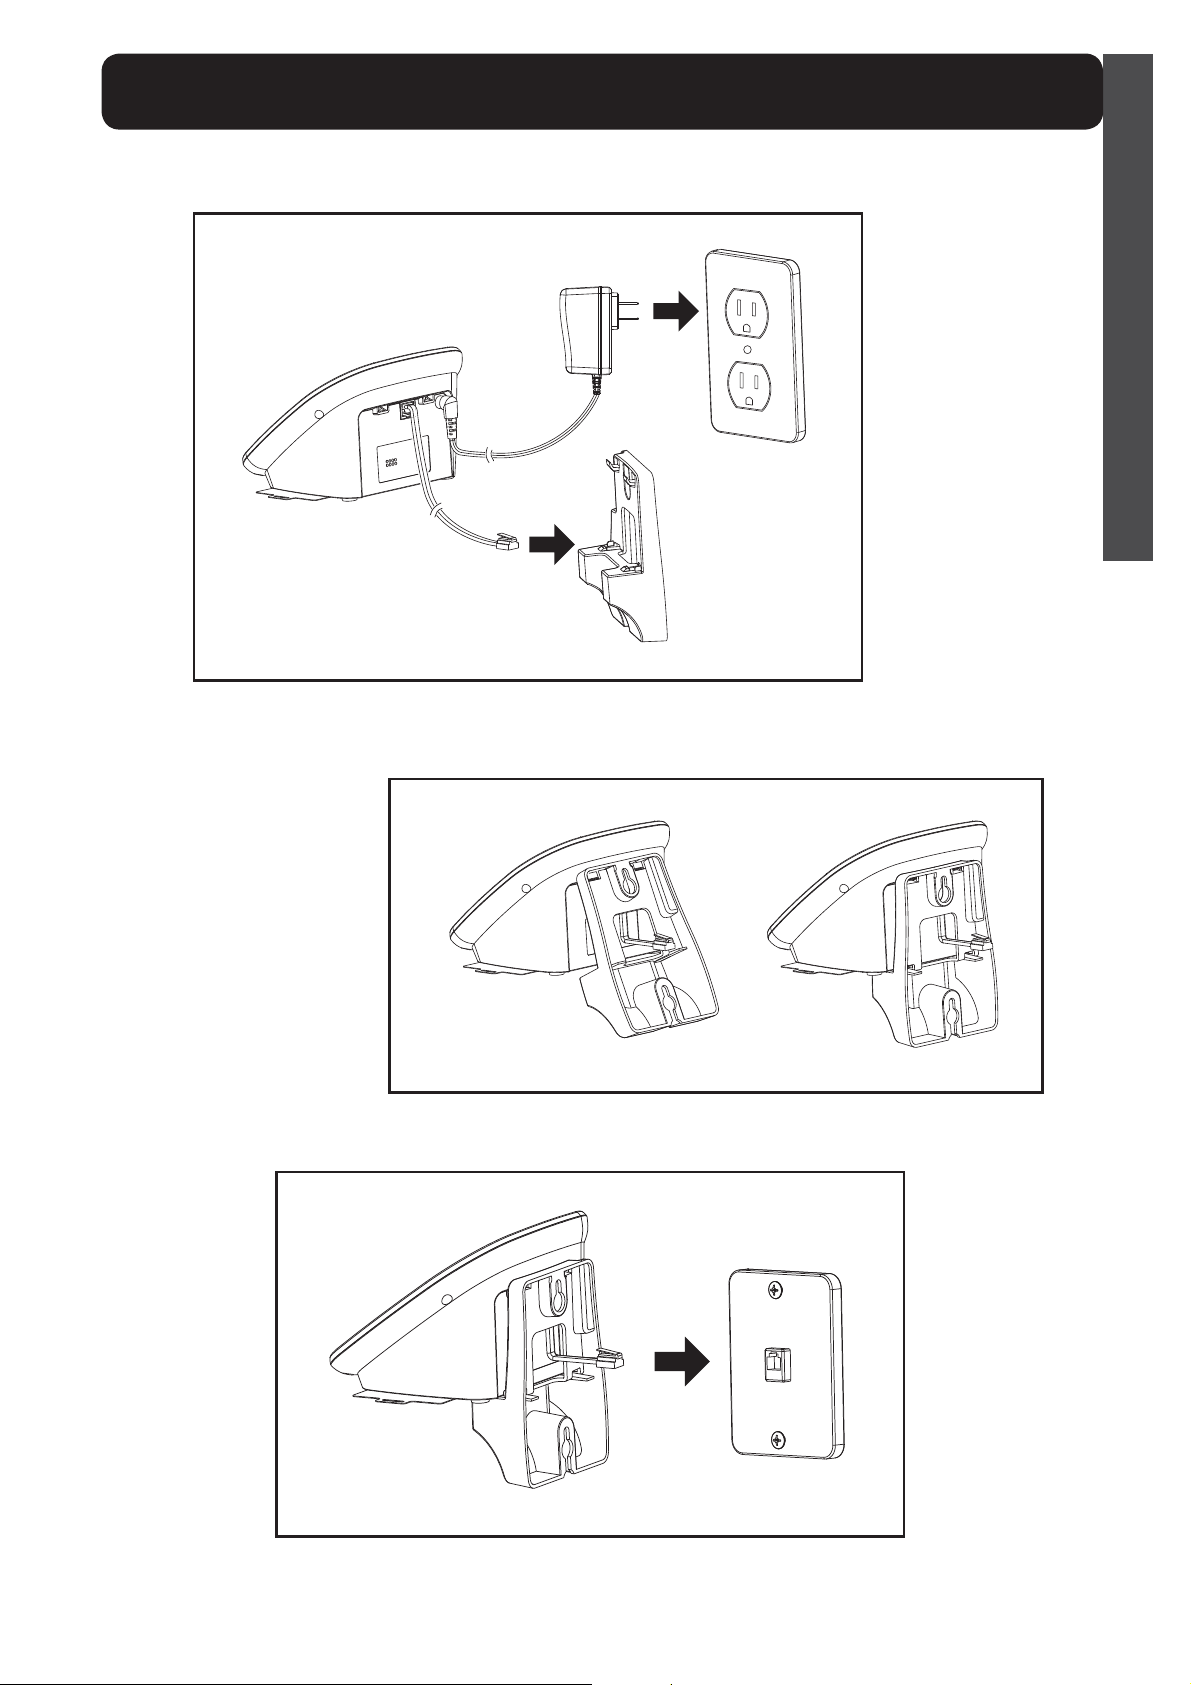
1. Follow the instructions in the Installation section on page 6 to
remove the base and handset from the base – steps 1, 4, 6.
2. Unplug the long phone line cord from the phone jack located on
WALL MOUNTING YOUR XLC7BT
the back of your
cord into the same jack identified by LINE on the back of your
base.
3. Install the
on page 9. Guide the short phone cord through the wall mount
bracket as shown in the diagram.
4. Using a screwdriver, loosen the screws on your phone wall outlet
(1-2 turns).
5. Plug the loose end of the short phone cord into the wall phone
outlet.
6. Attach the wall mount bracket (with the
wall phone outlet.
7. Plug the power adapter into a wall electrical outlet.
8. Pull the handset’s battery tab located on the bottom of the
device in the direction of the arrow.
9. Place the handset in the base and allow 16 hours for full charge.
XLC7BT base onto the wall mount bracket as shown
XLC7BT. Plug one end of the short phone line
XLC7BT base) onto the
8
Page 14
XLC7BT
WALL MOUNTING YOUR XLC7BT
E
N
G
L
I
S
H
9
Page 15
XLC7BT
BASE - Quick Reference Guide
1 Visual Ringer
Lights up when phone rings;
turns on when phone is in use.
2 IN USE / CHARGE Light
The light turns red when the
phone is charging, and it turns
green when the phone is in
use.
3 POWER Light
Light is lit green when the
power adapter is plugged in.
During a power outage, the
POWER light will blink green
once every two seconds when
base backup batteries are
installed.
4 FIND
Press this key to locate
handset.
5 SILENT
Press if you want to turn o
the base ringer. The button
lights up red when the ringer is
turned o.
6 VOLUME (UP / DOWN)
Use these keys to increase or
decrease the ringer volume.
7 BLUETOOTH BUTTONS (1,2)
Use these keys to pair
the Bluetooth enabled
cellphone(s) you wish to use
with your
XLC7BT.
8 RINGER STYLE (Base)
Use this key to choose the
most comfortable base ring
tone for your environment.
6
There are six ring tones
available.
1
VOLUME
NOTE (Base): You can only set
7
the ringer volume or style
FIND
2
POWER
when the phone is not in use.
8
RINGER
STYLE
HIGH OUTPUT
3
RINGER
SILENT
IN USE/
CHARGE
1
5
2
4
10
Page 16
XLC7BT
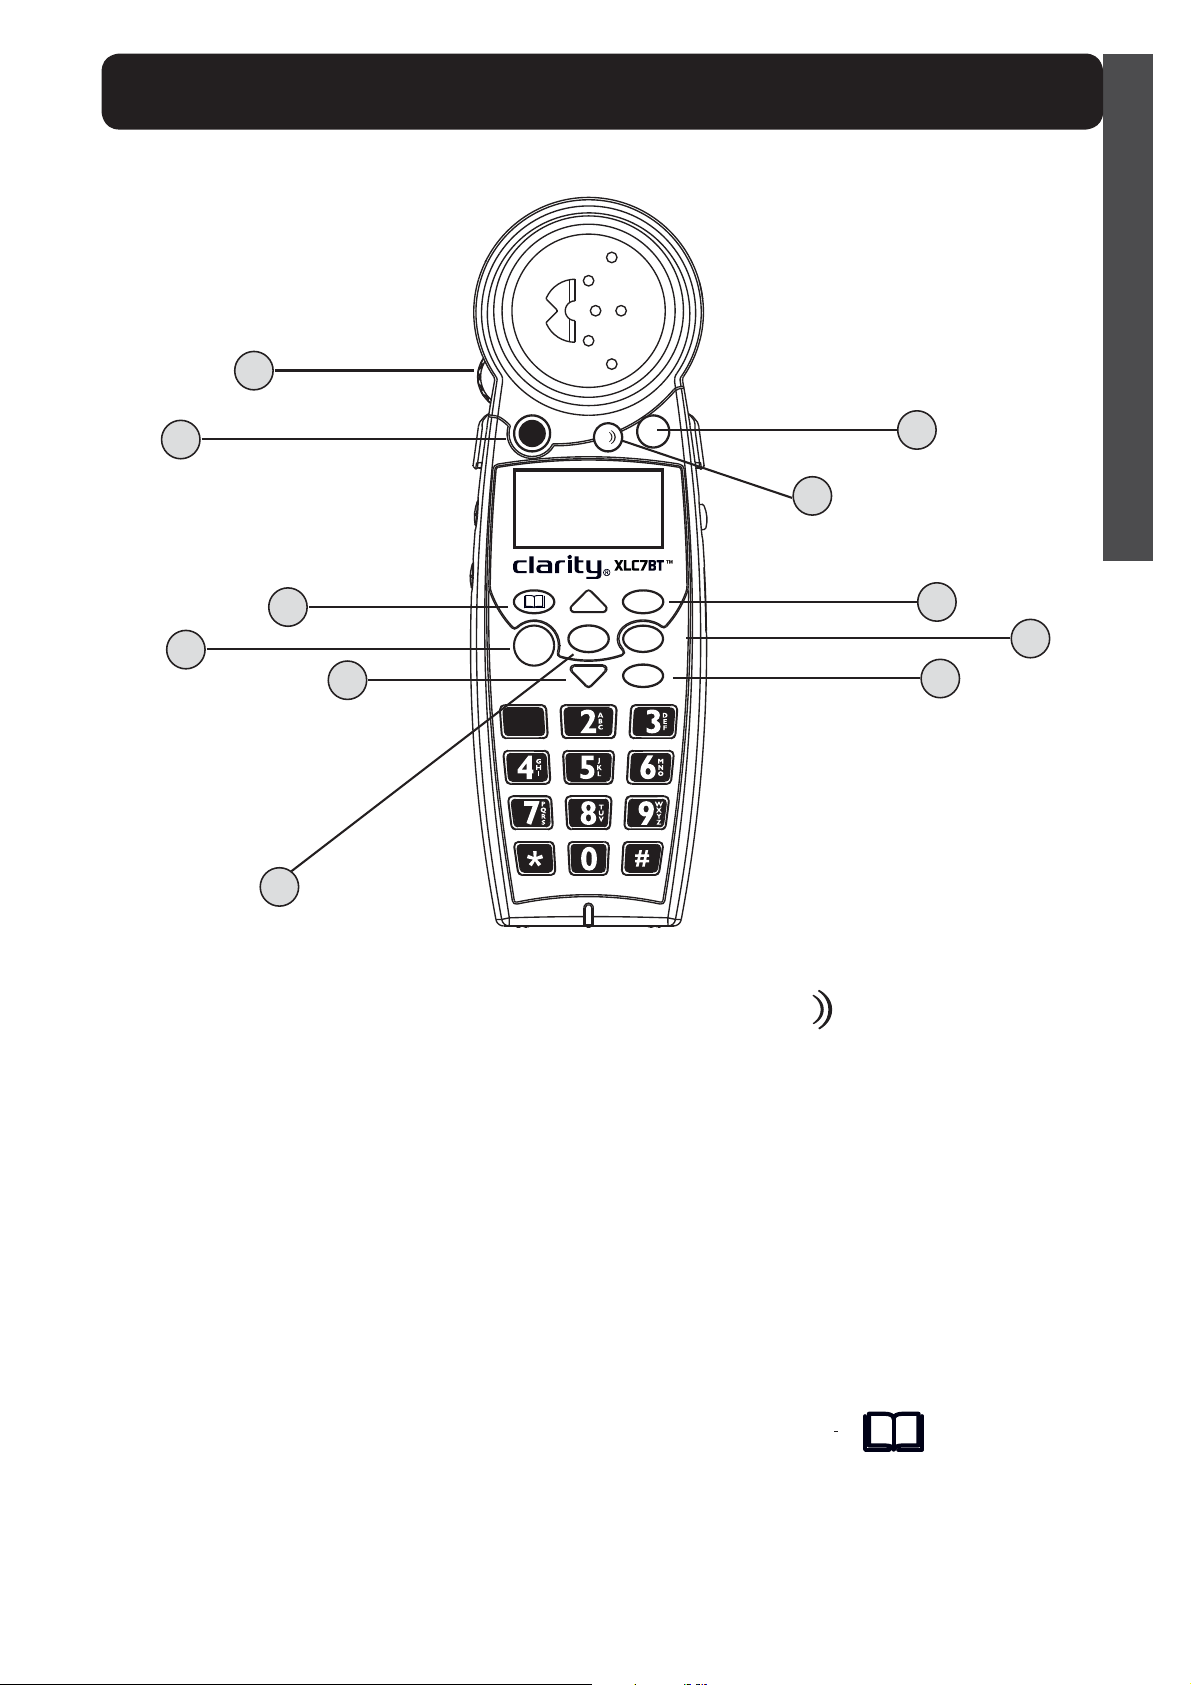
HANDSET - Quick Reference Guide
1
E
N
G
L
I
S
2
4
5
6
7
1 VOLUME Control Wheel
Use the rotary control to
increase or decrease the
volume of the incoming call.
The volume level is displayed
on the screen, lower right
corner.
2 BOOST
Press this button to engage
the extra amplification.
The BOOST button turns
red when Boost function is
active.
For more details on the Boost
function, see page 17.
TALK
1
BOOST
!
MENU
MEM
;
BACK
MUTE
EXIT
FLASH
RD/P
3 Speaker
;
8
3
9
10
11
H
During a call, press to activate
handset speakerphone.
Press again to switch back to
earpiece.
When in speakerphone mode,
the speakerphone icon is
displayed on the screen (to
the left of the battery icon),
and the speakerphone button
lights up red.
4 Phonebook
This button allows you to
access your
XLC7BT’s list of
saved names and numbers.
See page 23.
11
Page 17

XLC7BT
HANDSET - Quick Reference Guide
5 TALK
This button allows you to
make or answer phone calls. It
lights up green during a call.
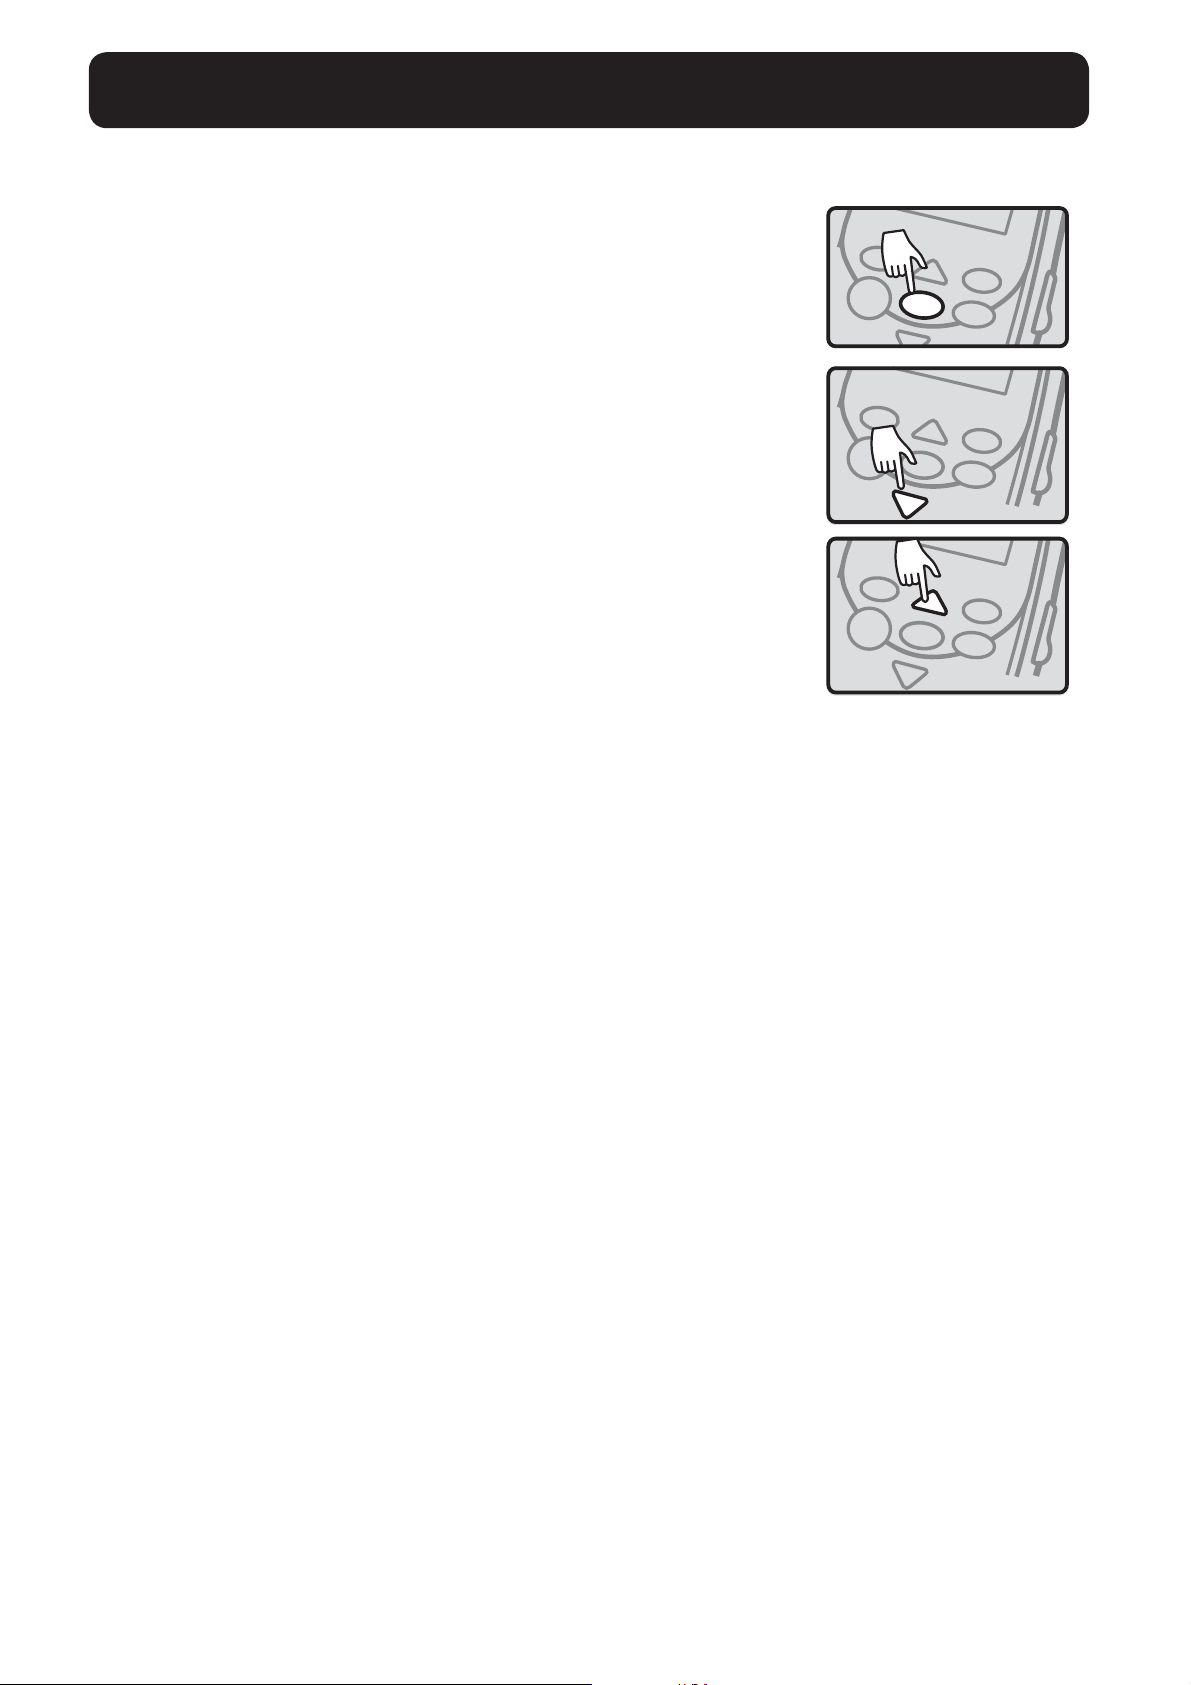
6 Arrow Buttons (UP / DOWN)
Press UP or DOWN arrows to
navigate through the menus.
In standby mode, press UP or
DOWN to access your Caller
List.
7 MENU Button
Press this button to engage
your phone’s available
options. See page 20 for detail
8 MEM Button: press this button
for one-touch dial from
you to return to standby
mode.
11 RD / P (Redial / Pause)
Press to redial last number
dialed or insert pause (two
seconds) when programming
memories or pre-dialing.
12 Headset
A 2.5 mm headset can be
used in the Headset Port. (We
recommend the Plantronics
M175C headset.)
13 TONE
Press to select the audio tone
setting for the handset. See
page 17.
standby mode.
9 MU TE / BACK (EDIT) Button
Mute: Allows you to conduct
private conversations you
don’t want heard (during a
call).
Back: In MENU mode, allows
you to return to the previous
screen.
(Edit): When a phone number
is displayed, allows you to
toggle between 7/10/11 digit
formats for the number you
are viewing.
10 FLASH / EXIT
14 Intercom
Press to call other handset on
system.
15 RINGER ON / OFF
Switch to turn handset ringer
on or o.
16 NECKLOOP
A 3.4B mm neckloop can be
used in the Neckloop Port.
(We recommend the Clarity
CE30 Neckloop.)
17 Belt Clip
Belt clip available upon request.
FLASH: While on a call, press
FLASH / EXIT to receive
another incoming call. (Call
Waiting service is required.)
EXIT: In MENU mode, allows
12
18 Speaker Grill
19 Battery Compartment
Page 18

XLC7BT
HANDSET - Quick Reference Guide
E
N
G
L
I
12
TONE
VOLUME
13
19
17
S
H
18
INTERCOM
14
15
16
ON OFF
NECK
LOOP
13
Page 19

XLC7BT
HANDSET
The batteries in the handset must be fully charged for 16 hours before using
the telephone for the first time.
Battery life: Talk time is 6.5 hours, while standby is 130 hours without
usage. Actual times will vary depending on the amplifier settings used.
Replace batteries every two years.
Battery spec (as supplied with your phone): 3xAAA NiMH rechargeable
batteries, (1.2V 600mAh NiMH - model 60AAAHC, GPI International Ltd. or
KH-44AAA-J600, Yiyang Corun Battery Co., Ltd).
To replace batteries, remove the handset battery cover and install new
batteries, then close battery cover.
BASE
The base backup batteries ensure the functionality of your cordless phone
(
3-4 hours) in case of a power outage.
When the base unit operates in battery mode (no AC power) the base
POWER light will blink once every two seconds.
BATTERY INFORMATION
Open battery
compartment
door here.
To install batteries in the base:
1. Turn base over and open battery compartment door.
2. Install batteries according to the polarity shown inside the battery
compartment.
NOTE: To replace handset batteries or to install base backup batteries,
use ONLY standard rechargeable AAA NiMH batteries - 600mAh.
LOW BATTERY INFORMATION
Handset
1. The battery icon on the screen shows no bars; the screen displays “Low
Battery”.
2. The handset beeps every two seconds in OFF HOOK mode.
3. The TALK button blinks green twice every 15 seconds in standby mode.
It will not flash an alert in OFF HOOK mode.
Base (if optional batteries are installed)
1. The POWER light will blink green once every five seconds.
14
WARNING: Use rechargeable batteries only.
Do NOT use alkaline batteries!
Page 20

XLC7BT BLUETOOTH FUNCTIONS
To use a Bluetooth enabled cell phone with your XLC7BT, you must first
pair and connect your Bluetooth cell phone(s) with the telephone base. All
XLC7BT andXLC7HS handsets can be used to make or answer calls on the
cell line. Your cell line is the telephone line associated with your cell phone
service.
Bluetooth wireless technology operates within a short range (a maximum
of approximately 30 feet). When you pair a Bluetooth cell phone to the
telephone base, place your Bluetooth cell phone closer to the telephone base
to maintain sucient signal strength. For optimal performance, keep your
cell phone within 15 feet of the telephone base while using the cell line.
PAIR AND CONNECT YOUR BLUETOOTH-ENABLED CELLPHONE
1. Choose a slot to pair the cell phone. Press and hold Bluetooth 1 or
Bluetooth 2 on the telephone base until you hear a confirmation tone, and
the Bluetooth 1 or Bluetooth 2 light flashes.
2. Turn on the Bluetooth feature of your cell phone. Once your cell phone
finds your Clarity phone (Clarity XLC7BT), press the appropriate key on
your cell phone to continue the pairing process.
• Your cell phone may prompt you to enter the PIN of the telephone base.
The default PIN of the telephone base is 0000.
E
N
G
L
I
S
H
When the cell phone is connected to the telephone base, the corresponding
status icon (Bluetooth 1 or Bluetooth 2) displays. The corresponding device
light (Bluetooth 1 or Bluetooth 2) turns on.
If the pairing fails, turn o the Bluetooth feature on your cell phone and on
the XLC7BT by pressing Bluetooth 1 or Bluetooth 2. Then repeat the steps
above to pair and connect again. In some cases, it may take you a few
attempts to complete the pairing process.
PAIR AND CONNECT YOUR BLUETOOTH-ENABLED HEADSET
1. Press MENU on the phone when it is not in use. Press MENU again to select
Bluetooth.
2. Press the SUBIR or BAJAR arrow keys to scroll to Add Headset, and then
press MENU. The screen displays Search headset….
3. Set your headset to discoverable mode. Once your handset finds your
headset, press MENU to select it.
• Enter the PIN of your headset if required. The PIN for most Bluetooth
devices is 0000 (refer to the user’s manual of your headset), and then
press MENU.
When the headset is successfully paired and connected to the telephone
base, the Bluetooth 2 icon displays, and the Bluetooth 2 light on the base
turns on.
15
Page 21

XLC7BT
PLACING & ANSWERING CALLS
TO PLACE A CALL:
1. Press TALK, then dial the
number using the numeric
keypad. See lighting pattern for
the TALK button on the bottom
of the page.
2. Adjust the volume to the most
comfortable level - using the
Volume Control and BOOST
button (if necessary).
3. Press the TONE button on the
side of the handset to adjust the
tonality of the incoming voice
to the most comfortable level.
WARNING: VOLUME MAY BE LOUD!
NOTE:
1. If the Voice Assist function is
enabled, you will hear the digits
of the incoming phone number.
2. Step 1 above can be replaced
with one of the following
options:
• Dial from CID records: Choose a
record from your Caller List (see
page 22), then press TALK.
• Dial from PHONEBOOK: Choose
a record from your Phonebook
(see page 23), then press TALK.
TO ANSWER A CALL:
1. When phone is ringing, press
TALK to answer the call.
2. Adjust the volume and tone of
the incoming voice according to
your preferences.
3. When finished, press TALK to
hang up.
NOTE:
1. For an explanation of the TALK
button light, see the bottom of
the page.
2. If you have CID service, note
the incoming phone number
displayed on your screen.
3. If the Voice Assist function is
enabled, you will hear the digits
of the incoming phone number.
4. At any point during the
conversation, press the
speakerphone button
switch to handsfree mode. Use
the volume control for adjusting
the level of the incoming audio.
Switch back to earpiece mode
by pressing the speakerphone
button again.
;
to
• Pre-dial: before pressing TALK,
dial the number you wish to call;
digits will display on the screen;
press TALK when the number is
complete.
NOTE: Pre-dial is not available
if your default dial option is a
mobile-enabled cellphone.
Follow with steps 2-3 above to
enjoy a clear and comfortable phone
conversation.
16
Talk Button Lighting Pattern
Green: Phone is in use.
Flashing Green every 15 seconds in
standby mode: Low batteries.
Page 22
XLC7BT
M
MEM
M
VOLUME & TONE ADJUSTMENTS
The BOOST button engages the amplifier, controlling the loudness of
the phone. When the VOLUME dial is adjusted and the BOOST button
is pressed, the phone can reach up to 50dB of gain.
E
N
G
WARNING: VOLUME MAY BE LOUD. PROCEED WITH CARE.
BOOST On / O
The BOOST button controls the loudness of the
receiver. Once the BOOST button is pressed, an
extra level of amplification is added over the entire
range of volume control.
VOLUME Control Wheel
During a call, the dial on the side controls the level
of volume for handset and speakerphone. The
volume dial provides up to 16dB of volume before
the BOOST button is activated. Once the BOOST
button is pressed, the XLC7BT will provide up to
50dB of amplification.
Auto Boost
(For turning Auto Boost On or O, see page 25.)
ON – When the Auto Boost is set to ON, the Boost
function will be ON every time a call starts. If the
phone hangs up, the Boost function will remain
ON.
L
I
S
H
!
!
BOOST
BOOST
MEM
;
MEM
;
OFF – When the Auto Boost is set to OFF, the
Boost function will be OFF at the beginning of all
calls. Every time a call starts, the user will need to
press the BOOST button in order to gain the extra
level of amplification.
TONE
Press the TONE button to change the style of
amplification. Switching audio tones will change
how the telephone conversation sounds to you.
In order to achieve the best audio experience, we
recommend the following:
1. Adjust the Volume Control and enable the Boost
function (if needed). (Lower the volume level to
minimum (VOL 0) before activating the Boost
feature.)
2. Press the TONE button to toggle between the
available tone settings.
TONE
INTERCOM
17
Page 23

XLC7BT
M
MEM
M
!
BOOST
VOLUME & TONE ADJUSTMENTS
Speakerphone
To switch to speakerphone mode, press the SPK
;
MEM
;
button
mode symbol.
. The display shows the speakerphone
XLC7BT
CALLER ID FUNCTION
Your XLC7BT is CID / CWCID compatible (optional service, purchased from
your local telephone service provider).
When your phone is ringing, the screen shows the name and number of the
person calling you. This information will be stored in the Caller List on your
phone.
To access this list, and for further details regarding this function, press UP
or DOWN in standby mode, and / or follow the instructions under CALLER
LIST (page 22).
NOTE: If you have CID service, the date and time will automatically be set
after the first incoming call.
XLC7BT
MEM BUTTON
The MEM button oers the convenience of easy dialing your most
frequently called phone number. Once the button is programmed, press this
key in standby mode and the phone calls that number without the need for
further key presses.
To program the MEM button:
Press and hold the MEM button; screen displays “MEM” and the blinking
cursor.
Enter the phone number using the numeric keypad; press MENU when
complete.
You will hear 5 beeps and the handset returns to standby mode. Your MEM
button is now programmed and ready to use.
18
Page 24
XLC7BT
PHONEBOOK
To access your phone’s stored records (Phonebook), and for further details
regarding this feature, press the Phonebook button
and / or follow the instructions under PHONEBOOK (page 23).
XLC7BT
IMPORTANT:
In standby mode, the screen displays the date and time, handset number
(for the first 10 seconds of inactivity), and date and time (after the first
10 seconds of inactivity).
SCREEN DETAILS
on the handset,
SCREEN ICONS AND SYMBOLS
Battery charge level. When the icon displays just one bar, return the
handset to the charger.
E
N
G
L
I
S
H
New calls indicator. There are new calls in your Caller List.
The phone is in a call, in speakerphone mode.
The phone is in a call, in earpiece mode.
New voicemail (separate service).
Handset is connected to base, and in range.
1
Bluetooth devices are paired and in range.
2
Indicates home phone line is default dial out mode.
19
Page 25
XLC7BT
TELEPHONE MENU
To start the setup process, press MENU. You will
see the list of features to be set up on your new
XLC7BT.
At any point during the navigation of the MENU
options, you can press MUTE / BACK to go back
to the previous screen, or you can press FLASH /
EXIT to return to standby mode (exit setup).
To navigate through the menu options, press UP
or DOWN arrows.
While in MENU mode, note the cursor on the top
row, to the left of the text. It indicates that the
feature displayed on the upper row is active.
Press MENU to select that feature or option.
The SETUP menu allows you to choose your
preferences for the following features of your
new XLC7BT:
TALK
TALK
MENU
MENU
087(
)/$6+
%$&.
087(
)/$6+
%$&.
087(
)/$6+
(;,7
(;,7
(;,7
• Bluetooth - to access cellphone/headset related settings;
• 1 Time Dial - to change the default dial out mode;
• Caller List - to view and manage the information for your incoming calls
- CID / CWCID service (required from your local telephone company);
• Phonebook - to view and manage your saved records (names and
numbers for your frequently dialed locations);
• Ringer Setup - to choose ringer tones, set ringer volume, turn keypad
tones on or o (default: On);
• Visual Ring - to turn your handset visual ringer on or o (default: On);
• Auto Boost - to enable Boost function to be active at the beginning of
all calls (default: O);
• Phone Setup - to re-establish registration to the base, to enable Auto
Talk function (default: O), to enable Voice Assist feature (default: On),
to enable Any Key Answer (default: O), to enable Outgoing Speech
Amplifiation (default: O), to choose the language you wish to use
(default: English), to choose the dial mode needed for your specific
setup (default: Tone), to adjust the contrast of your handset screen
(default: medium);
• Date & time - to allow you to manually set the date and time; the date
(month and day only) and time will be set during the first incoming
call, if you subscribe to CID service from your local telephone service
provider.
20
Page 26

XLC7BT
MENU - BLUETOOTH
In standby mode, press MENU. Press MENU again to select Bluetooth. Here
you will find menu settings for this feature.
Device List
In Bluetooth mode, press MENU to select “Device List”. You will see the
Bluetooth-enabled devices paired to your XLC7BT.
Download PB
In Bluetooth mode, press MENU to select “Download PB”. Scroll to select
the desired cellphone, then press MENU.
NOTE:
• For certain cell phones, you may need to press a key on your cell phone to
confirm the phonebook downloaded.
• The performance of the phonebook download feature depends on the
compatibility of your Bluetooth cell phone. Refer to the user’s manual
of your cell phone for more information about how that device uses
Bluetooth connectivity.
E
N
G
L
I
S
H
Add Headset
In Bluetooth mode, press MENU to select “Add Headset”. See page 15 for
complete instructions for this function.
Dial Default
If you have a mobile phone paired to the XLC7BT along with your home
phone line, you can choose the mobile phone to be your default device
when placing an outgoing call.
In Bluetooth mode, press MENU to select “Dial Default”. You will see list of
options for this function. Home is your regular phone line (wall outlet).
Use UP or DOWN to choose your default dial mode. Press MENU to save
your selection, or use FLASH / EXIT to return to the previous screen.
XLC7BT
If you wish to use a dierent mode of dialing for the next outgoing call,
before placing the call, use the “1 Time Dial” feature from the Menu options.
MENU - 1 TIME DIAL
1 Time Dial
In standby mode, press MENU. Press DOWN to select “1 Time Dial”. You will
see your list of additional options for dialing out. Select which one you wish
to use, then press MENU. The next screen displays the dierent methods of
dialing the number for the call: Manual, Phonebook, Caller List, Redial. Use
SUBIR or DOWN to make your selection, press MENU. Follow the prompts to
place the call.
21
Page 27

XLC7BT
Review/Call from Caller List
MENU - CALLER LIST
If you have new calls, you will notice the New Calls icon
battery level indicator (upper right corner).
In standby mode, press MENU. Scroll down to “Caller List”. Press MENU to
select.
Your screen displays the number of new calls (which have not been
reviewed yet). Scroll UP or DOWN to review the records in your call history
(up to 40 records).
For each record, the screen alternates between showing the date / time of
call and phone number, and the name associated with the phone number
that called you.
Press MUTE / BACK to review the available formats for the record: 7
digits (no area code), 10 digits (area code + number), 11 digits (1+area
code+number). The screen displays the new numbers.
When the format number is correct, press TALK if you wish to dial the
number back.
to the left of the
Delete/Save/Delete All from Caller List
If you wish to save or delete the record from your memory, press MENU
(after formatting the number). You will see the options available for that
record. From here, choose one of the paths described below:
Del Number:
Select by pressing MENU. The screen displays “Delete?”. Press MENU to
delete (screen displays OK and you hear five beeps), or MUTE / BACK to
return to previous screen.
Save Number:
Select by pressing MENU. You can edit the number and then the name
associated with the record. Press MUTE / BACK to delete the previous
character; press UP or DOWN to move cursor within name. Use keypad
to add characters to the name. Press MENU to save the record to your
phonebook.
Delete All:
Select by pressing MENU. The screen displays “Delete All?”. Press MENU to
delete all records (screen displays “OK” and you hear five beeps), or press
MUTE / BACK to return to previous screen.
22
Page 28

XLC7BT
MENU - PHONEBOOK
To access your phonebook from standby, press MENU once to enter the
menu, then scroll down to select Phonebook. Press MENU again. Use UP or
DOWN to browse through your saved records.
Call from Phonebook
To dial one of your saved numbers, select the record and press TALK.
Add/Edit/Delete/Delete All from Phonebook
To add a number, edit a number, delete a number or delete all numbers,
press MENU while viewing a saved record. From here, choose one of the
paths described below:
Add Number:
Select by pressing MENU to select “Add Number”. You will be prompted to
enter the number as you will dial it. To edit the number before saving it, use
MUTE / BACK to delete the last digit (one at a time); use UP or DOWN to
move within the number without deleting all digits. When finished, press
MENU to save the number.
You will be prompted to enter the name for the number you saved. Use the
numeric keypad to enter the name to be saved. When finished, press MENU
to save the number.
Screen will display “OK” and you will hear five beeps.
E
N
G
L
I
S
H
Edit Number:
While viewing the record, press DOWN to advance the row that reads “Edit
Number” to the top of the screen. Press MENU to select this option.
You will be prompted to edit the number - use UP or DOWN to move the
cursor, or use MUTE / BACK to delete the last digit. Press MENU when the
editing is complete.
You will be prompted to edit the name. Use the same controls as above.
Press MENU to save your edited record.
Screen will display “OK” and you will hear five beeps.
Del Number:
While viewing the record, scroll to “Del Number”. Press MENU to select this
option.
The screen displays “Delete?”. Press MENU to delete (screen displays “OK”
and you hear five beeps), or MUTE / BACK to return to previous screen.
Delete All:
While viewing the record, scroll to “Delete All”. Press MENU to select this
option.
The screen displays “Delete All?”. Press MENU to delete (screen displays
“OK” and you hear five beeps), or MUTE / BACK to return to previous screen.
23
Page 29

XLC7BT
In standby mode, press MENU, then scroll to select “Ring Setup”; press
MENU to enter the ringer setup. You will see the available options for your
ringer.
From here, choose one of the paths described below - for both the home
and the cellphone lines:
Ringer Vol:
In order to adjust the ringer volume, the RINGER ON / OFF switch on the
side of the XLC7BT handset must be set to the ON position. Use UP or
DOWN to reach the desired level of ring loudness. When finished, press
MENU to save your setting.
Screen will display “OK” and you will hear five beeps.
If the RINGER ON / OFF switch is set to OFF, the screen displays “Ringer O”
(middle of screen) with no sound made. Turn ringer volume switch ON or
return phone to standby.
MENU - RINGER SETUP
Ringer Tone:
To adjust the ringer tone, press DOWN to advance the row that reads
“Ringer Tone” to the top of the screen. Press MENU to select this option.
Use UP or DOWN to scroll through the available ring tones.
Press MENU to save the setting you selected. Screen will display “OK” and
you will hear five beeps.
Keypad Tone:
To turn the keypad tones high, low or o, press DOWN twice to advance
the row that reads “Keypad Tone” to the top of the screen. Press MENU to
select this option.
Use UP or DOWN to make your selection. Press MENU to save. Screen will
display “OK” and you will hear five beeps.
XLC7BT
In standby mode, press MENU.
MENU - VISUAL RINGER (Handset)
Press UP or DOWN to advance the row that reads “Visual Ring”.
Press MENU to enter the handset visual ringer On / O setup.
Use UP or DOWN to make your selection. Press MENU to save your
selection. Screen will display “OK” and you will hear five beeps.
NOTE: This option refers to the handset visual ringer only.
24
Page 30

XLC7BT
MENU - AUTO BOOST
In standby mode, press MENU.
Press UP or DOWN to advance the row that reads “Auto Boost”. Press MENU
to enter the Auto Boost On / O setup.
Use UP or DOWN to make your selection. Press MENU to save your
selection. Screen will display “OK” and you will hear five beeps.
XLC7BT
In standby mode, press MENU.
Press UP or DOWN to advance the row that reads “Phone Setup”. Press
MENU to enter the Phone Setup submenu.
The Phone Setup submenu allows you to adjust the following features:
• Register
• Auto Talk (On / O, default: O)
MENU - PHONE SETUP
E
N
G
L
I
S
H
• Voice Assist (Voice Asst: On / O; default: On) - English/French
• Any Key Answer (On / O; default: O)
• Language (English/French/Spanish, default: English)
• Dial Mode (Tone / Pulse, default: Tone)
• Contrast (1-5, default: 3)
Register
Press MENU to access this function. See details on page 27.
Auto Talk
Press UP or DOWN once to advance the row reading “Auto Talk”. Press
MENU to enter this option.
Use UP or DOWN to make your selection. Press MENU to save your
selection. Screen will display “OK” and you will hear five beeps.
Voice Assist
This option activates the audio numbers - both for the phone numbers
dialed, as well as the incoming phone numbers (with optional CID service
from your local phone service provider.)
Press UP or DOWN to advance the row reading “Voice Asst”. Press MENU to
enter this option.
Use UP or DOWN to make your selection. Press MENU to save your
25
Page 31

XLC7BT
selection. The screen will display “OK” and you will hear five beeps.
Any Key Answer
This feature allows you to answer the call by pressing any numeric key on
the handset, rather than pressing TALK and Speakerphone.
Press UP or DOWN to advance the row reading “Any Key Ans”. Press MENU
to enter this option.
Use UP or DOWN to make your selection. Press MENU to save your
selection. The screen will display “OK” and you will hear five beeps.
OSA (Outgoing Speech Amplification)
This feature allows you to make your voice louder during a call.
WARNING: Voice volume level may be loud. We recommend that you turn
on the OSA function ONLY if your voice is considered too quiet.
MENU - PHONE SETUP
Press UP or DOWN to advance the row reading “OSA”. Press MENU to enter
this option.
Use UP or DOWN to make your selection. Press MENU to save your
selection. The screen will display “OK” and you will hear five beeps.
Language
Press UP or DOWN to advance the row reading “Language”. Press MENU to
enter this option.
Use UP or DOWN to make your selection. Press MENU to save your
selection. The screen will display “OK” and you will hear five beeps.
Dial Mode (Tone/Pulse)
Press UP or DOWN to advance the row reading “Dial Mode”. Press MENU to
enter this option.
Use UP or DOWN to make your selection. Press MENU to save your
selection. The screen will display “OK” and you will hear five beeps.
Contrast
Press
enter this option.
Use UP or DOWN to make your selection. There are five levels available
(default: Level 3). Press MENU to save your selection. The screen will display
“OK” and you will hear five beeps.
26
UP or DOWN to advance the row reading “Contrast”. Press MENU to
Page 32

XLC7BT
MENU - DATE & TIME
In standby mode, press MENU. Press UP or DOWN arrow to advance the row
that reads “Date & Time”. Press MENU to enter the date and time setup.
Use the numeric keypad to enter the date (follow format on screen). Press
MENU to save your selection. Use the numeric keypad to enter the time
(follow format on screen).
Press MENU to save your selection. The screen will display “OK” and you
will hear five beeps.
XLC7BT
Registering theXLC7HS
In order to use theXLC7HS handset (sold separately), you must register it to
the XLC7BT base.
Pull the handset’s battery tab located on the bottom of the device, and
then press MENU to start registering or deregistering your handset from
your system.
HANDSET REGISTRATION
E
N
G
L
I
S
H
To register an unregistered handset
1. Press MENU to enter registration mode. You will see displayed on the
screen, “Handset Needs Registration.”
2. Press and hold the FIND key on the XLC7BT base for five seconds, until the
base visual ringer starts flashing. Release FIND key on the XLC7BT base.
3. Press MENU key on the handset.
4. The screen shows “Registering... ”, then “Registration Successful”
(accompanied by five quick beeps).
5. Your handset is now registered to your XLC7BT system. Your screen
will display “Handset X,” (where “X” is the number of the actual handset
registered, such as the second or fourth handset, etc.).
TO REGISTER YOUR HANDSET AGAIN (or to register to a dierent XLC7BT
system)
1. In standby mode, press MENU.
2. Press UP or DOWN to advance the row reading “Phone Setup”. Press
MENU to enter the setup section. The screen displays “Register” on the
screen’s top row now.
3. Press MENU to enter the Registration section.
4. Press MENU again to select “Register.”
5. Follow the Registration steps listed above.
27
Page 33

XLC7BT
To deregister the handset
1. See the five steps listed above, then press MENU to select “Deregister.”
2. Your handset will deregister from your base as soon as you press MENU.
The screen will show “Handset X Deregistered”(again, where “X” is the
number of the handset registered), then “Handset Needs Registration.”
HANDSET REGISTRATION (cont’d)
28
Page 34

XLC7BT
TROUBLESHOOTING
I cannot add and connect my cell phone or headset to the telephone base.
• Make sure you have cellular coverage and the Bluetooth function of your
cell phone or headset is turned on. See the user’s manual of your cell
phone or headset for more information.
• Make sure that the telephone base is in discoverable mode.
• Carefully follow the pairing instructions. Make sure that your Bluetooth
cell phone or headset is not connected to any other Bluetooth device, and
is connected to the telephone base and active on the device list.
• Remove Clarity XLC7BT from your cell phone’s hands free device history
list (see the user’s manual of your cell phone for more information).
• Turn o your cell phone or headset, and then turn it on again.
• For some cell phones, you must authorize Clarity XLC7BT device in your
cell phone’s Bluetooth feature. See the user’s manual of your cell phone
for more information.
• Most cell phones have the Bluetooth feature in the connection or setup
E
N
G
L
I
S
H
menus. Please refer and then look for the Bluetooth menu in the settings
or connection menu. In the Bluetooth menu, select the option to search
for or add new devices.
• Reset the telephone base. Unplug the unit’s electrical power. Wait for
approximately 15 seconds, and then plug it back in. Repeat the above suggestions.
The PIN on the telephone base does not work.
• Make sure you enter the correct PIN. The default PIN is 0000.
Can the XLC7BT help the poor cell phone reception in my house?
• If your cell phone has poor reception in your home, the XLC7BT cannot
improve the reception. However, if there is a location in your house with
better reception, you can leave your cell phone at that location while
you use the XLC7BT cell line. In order for this to work, the telephone base
must be within 30 feet of the cell phone.
The unit will not operate / no dial tone:
• Verify the AC adapter is securely plugged into the AC outlet, the base
and the telephone.
• Verify the telephone line cord is securely plugged into the wall jack and
the telephone.
• Make sure the handset battery is fully charged.
• Make sure the battery has been placed in the battery compartment
29
Page 35

XLC7BT
correctly. (The circular metal contacts on battery need to touch the
metal springs inside battery compartment.)
• Verify the telephone is in the correct dialing mode: Tone (touch) or Pulse
(rotary).
• Make sure you are in the usable range of the base station.
The phone does not ring when you receive a call:
• Make sure the RINGER switch on both handset and base is set to ON.
• Verify the AC adapter is securely plugged into the AC outlet,
the base and the telephone.
• Verify the telephone line cord is securely plugged into the wall jack and
the telephone.
• Make sure you are within the usable range of the base station.
• You may have too many extensions on your line. Try unplugging a few
TROUBLESHOOTING
devices.
Noise, interference or other calls heard while using the handset:
• Make sure you are within the usable range of the base station.
• Make sure the handset battery is fully charged.
• Try relocating the base unit to another location.
• Make sure the AC adapter is not plugged into the wall outlet with other
appliances.
Phone will not hold charge:
• Make sure the charging contacts on the handset and base are free of
dust and dirt. While unplugged, clean the contacts with a soft cloth.
• Make sure IN USE / CHARGE light on the base is lit when the handset is in
the cradle.
• If necessary, replace the handset battery.
Diculty in placing or receiving calls:
• Move closer to the base and try again.
• Make sure you have selected the correct dialing mode, tone or pulse.
• Make sure the AC adapter is not plugged into a wall outlet with other
appliances. Disconnect for 5-10 seconds then reconnect. Place the
handset back on the base and reinsert the AC adapter.
• Make sure the handset battery is fully charged.
30
Page 36

XLC7BT
Your handset screen is displaying “Searching...”:
• Verify that the AC adapter is plugged into the base and into the wall
outlet.
• The handset is out of range or the power to the base is unplugged.
• Move closer to the base.
TROUBLESHOOTING
E
N
G
L
I
• Place the handset into the base until the screen returns to standby
mode. It will take approximately 5-10 seconds for the handset to
register to the base.
• Handset may need to be re-registered to the base manually. Follow
instructions on page 27.
Screen displays “Battery Low”:
• Handset batteries are low on charge; return the handset to the base to
rechargw the batteries.
TALK button is blinking green (fast pace):
• The base is trying to locate the handset; press TALK to end the FIND
paging process and return the handset to the base.
Base POWER light blinks green once every second:
• The power adapter may not be plugged in. Verify AC adapter is plugged
into proper wall outlet.
S
H
Base POWER light blinks green every five seconds:
• The power adapter may not be plugged in. Verify AC adapter is plugged
into proper wall outlet.
• The base batteries may be “low” (their charge). If necessary, replace
batteries.
31
Page 37

XLC7BT
General
Frequency: 1.9GHz DECT6.0
Amplification: 50dB
Power Supply
AC Adapter: Input: 100V-120V AC
Output: 6VDC, 600 mA
Additional Handsets
Clarity part number: XLC7HS
The XLC7BT will support a maximum of four (4) handsets registered to a
base, and two (2) handsets maximum used in the same call.
(Additional Handsets sold separately.)
TECHNICAL SPECIFICATIONS
Battery information
Battery Type: 1.2V NiMH 600mAh rechargeable batteries
Battery Life Talk Time: 6.5 Hours
Battery Life standby: 130 Hours
Contact Clarity customer service for information on purchasing additional
handsets or replacement battery.
Customer Service: 800-426-3738
Address: 6131 Preservation Dr.
Chattanooga, TN 37421
32
Page 38

XLC7BT
REGULATORY COMPLIANCE
PARTY RESPONSIBLE FOR REGULATORY COMPLIANCE:
Clarity Products LLC
6131 Preservation Drive
Chattanooga, TN 37416
Phone: 800-426-3738
Part 68 of FCC Rules Information
a) This equipment complies with Part 68 of the FCC rules and the requirements
adopted by the ACTA. On the bottom of this equipment is a label that
contains, among other information, a product identifier in the format
US:AAAEQ##TXXXX. If requested, this number must be provided to the
telephone company.
b) A plug and jack used to connect this equipment to the premise’s wiring and
telephone network must comply with the applicable FCC Part 68 rules and
requirements adopted by the ACTA. A compliant telephone cord and modular
plug, RJ11C USOC, is provided with this product. It is designed to be connected to
a compatible modular jack that is also compliant. See installation instructions
for details.
E
N
G
L
I
S
H
c) The REN is used to determine the number of devices that may be connected
to a telephone line. Excessive RENs on a telephone line may result in the devices
not ringing in response to an incoming call. In most but not all areas, the sum
of RENs should not exceed five (5.0). To be certain of the number of devices
that may be connected to a line, as determined by the total RENs, contact
the local telephone company. For products approved after July 23, 2001,
the REN for this product is part of the product identifier that has the format
US:AAAEQ##TXXXX. The digits represented by ## are the REN without a
decimal point (e.g., 03 is a REN of 0.3).
For earlier products, the REN is separately shown on the label.
d) If this telephone equipment causes harm to the telephone network, the
telephone company will notify you in advance that temporary discontinuance
of service may be required. But if advance notice isn’t practical, the telephone
company will notify the customer as soon as possible. Also, you will be advised
of your right to file a complaint with the FCC if you believe it is necessary.
e) The telephone company may make changes in its facilities, equipment,
operations or procedures that could aect the operation of the equipment. If
this happens the telephone company will provide advance notice in order for
you to make necessary modifications to maintain uninterrupted service.
f) If trouble is experienced with this telephone equipment, for repair or warranty
information, please contact Clarity, 800-426-3738. If the equipment is causing
harm to the telephone network, the telephone company may request that you
disconnect the equipment until the problem is resolved.
g) This telephone equipment is not intended to be repaired and it contains no
repairable parts. Opening the equipment or any attempt to perform repairs will
void the warranty. For service call 800-426-3738.
33
Page 39

XLC7BT
h) Connection to party line service is subject to state taris. Contact the state
public utility commission, public service commission or corporation commission
for information.
i) If your home has specially wired alarm equipment connected to the telephone
line, ensure the installation of this telephone equipment does not disable
your alarm equipment. If you have questions about what will disable alarm
equipment, consult your telephone company or a qualified installer.
j) This telephone equipment is hearing aid compatible.
Customer-Owned Coin/Credit Card Phones
To comply with state taris, the telephone company must be given notification
prior to connection. In some states, the state public utility commission, public
service commission or corporation commission must give prior approval of
connection.
Part 15 of FCC Rules Information
REGULATORY COMPLIANCE
This device complies with Part 15 of the FCC Rules. Operation is subject to the
following two conditions: (1) This device may not cause harmful interference,
and (2) this device must accept any interference received, including interference
that may cause undesired operation.
Your equipment has been tested and found to comply with the limits of a Class
B digital device, pursuant to Part 15 of FCC rules. These limits are designed
to provide reasonable protection against harmful interference in residential
installation.
This equipment generates, uses and can radiate radio frequency energy and, if
not installed and used in accordance with the instructions, may cause harmful
interference to radio communications. However, there is no guarantee that
interference will not occur in a particular installation; if this equipment does
cause harmful interference to radio or television reception, which can be
determined by turning the equipment o and on, you are encouraged to try to
correct the interference by one of the following measures:
1. Where it can be done safely, reorient the receiving television or radio
antenna.
2. To the extent possible, relocate the television, radio or other receiver with
respect to the telephone equipment. (This increases the separation between
the telephone equipment and the receiver.)
3. Connect the telephone equipment into an outlet on a circuit dierent from
that to which the television, radio or other receiver is connected.
4. Consult the dealer or an experienced Radio/TV Technician for help.
Privacy of communications may not be ensured when using this phone.
WARNING: To maintain the compliance with the FCC’s RF exposure guideline,
place the base unit at least 20 cm from nearby persons.
34
Page 40

XLC7BT
REGULATORY COMPLIANCE
For body worn operation, this handset has been tested and meets the FCC
RF exposure guidelines when used with the Clarity accessories supplied
or designated for this product. Use of other accessories may not ensure
compliance with FCC RF exposure guidlines.
WARNING: Changes or modifications to this equipment not expressly approved
by the party responsible for compliance could void the user’s authority to
operate the equipment.
Industry Canada Technical Specifications
This device complies with Industry Canada license - exempt RSS standard(s).
Operation is subject to the following two conditions: (1) This device may not
cause interference, and (2) this device must accept any interference, including
interference that may cause undesired operation of the device.
This product meets the applicable Innovation, Science and Economic
Development Canada technical specifications.
Privacy of communications may not be ensured when using this phone.
Before installing this equipment, users should ensure that it is permissible to
be connected to the facilities of the local telecommunications company. The
equipment must also be installed using an acceptable method of connection.
In some cases, the company’s inside wiring associated with a single line
individual service may be extended by means of a certified connector assembly
(telephone extension cord). The customer should be aware that compliance
with the above conditions may not prevent degradation of service in some
situations. Repairs to certified equipment should be made by an authorized
Canadian maintenance facility designated by the supplier.
E
N
G
L
I
S
H
Any repairs or alterations made by the user to this equipment, or equipment
malfunctions, may give the telecommunications company cause to request the
user to disconnect the equipment.
Users should ensure for their own protection that the electrical ground
connections of the power utility, telephone lines and internal metallic water
pipe system, if present, are connected together. This precaution may be
particularly important in rural areas.
WARNING: Users should not attempt to make such connections themselves,
but should contact the appropriate electrical inspection authority, or electrician,
as appropriate.
The Ringer Equivalence Number is an indication of the maximum number of
terminals allowed to be connected to a telephone interface. The termination
on an interface may consist of any combination of devices subject only to the
requirement that the sum of the Ringer Equivalence Numbers of all the devices
does not exceed five.
This Class B digital apparatus complies with Canadian ICES-003.
(The term “IC:” before the certification/registration number only signifies that
the Industry Canada technical specifications were met.)
35
Page 41

XLC7BT
Incidental or Consequential Damages: Neither Clarity nor your retailer
dealer or selling distributors have any responsibility for any incidental
or consequential damages including without limitation, commercial
loss of profit, or for any incidental expenses, expenses, loss of time, or
inconvenience. Some states do not allow exclusion or limitation of
incidental or consequential damage, so the above limitation or exclusion
may not apply to you.
Other Legal Rights: This warranty gives you specific legal rights and you
may also have other rights which vary from state to state.
To obtain warranty service, please prepay shipment and return the unit to
the appropriate facility listed below.
Clarity Service Center
6131 Preservation Dr.
Chattanooga, TN 37421
Tel: 800-426-3738
Fax: 800-325-8871
WARRANTY INFORMATION
Agility Logistics
185 Courtneypark Drive East
Mississauga, ON L5T 2T6
Canada
Tel: 800-426-3738
Fax: 514-956-1825
Please use the original container, or pack the unit(s) in a sturdy carton
with sucient packing material to prevent damage. Include the following
information:
• A proof-of-purchase indicating model number and date of purchase;
• Bill-to address;
• Ship-to address;
• Number and description of units shipped;
• Name and telephone number of person to call, should contact be
necessary;
• Reason for return and description of the problem.
Damage occurring during shipment is deemed the responsibility of the
carrier, and claims should be made directly with the carrier.
The following warranty and service information applies only to products
purchased and used in the U.S. and Canada. For warranty information in
other countries, please contact your local retailer or distributor.
36
Page 42

XLC7BT
WARRANTY INFORMATION
Limited Warranty: Clarity Products LLC (“Clarity”) warrants to the original
consumer purchaser that, except for limitations and exclusions set forth
below, this product shall be free from defects in materials and workmanship
for a period of one (1) year from the date of original purchase (“Warranty
Period”). The obligation of Clarity under this warranty shall be at Clarity’s
option, without charge, of any part or unit that proves to be defective in
material or workmanship during the Warranty Period.
Exclusions from Warranty: This warranty applies only to defects in
factory materials and factory workmanship. Any condition caused by
accident, abuse, misuse or improper operation, violation of instructions
furnished by Clarity, destruction or alteration, improper electrical voltages
or currents, or repair or maintenance attempted by anyone other than
Clarity or an authorized service center, is not a defect covered by this
warranty. Telephone companies manufacture dierent types of equipment
and Clarity does not warrant that its equipment is compatible with the
equipment of a particular phone company.
E
N
G
L
I
S
H
Implied Warranties: Under state law, you may be entitled to the benefit of
certain implied warranties. These implied warranties will continue in force
only during the warranty period. Some states do allow limitations on how
long an implied warranty lasts, so the above limitation may not apply to
you.
37
Page 43

Page 44

XLC7BT
TABLE DES MATIÈRES
Importantes consignes de sécurité 40
Contenu & liste des pièces 43
Installation 44
Montage mural de votre XLC7BT 46
BASE - Guide de référence rapide 50
COMBINÉ - Guide de référence rapide 50
Informations sur les piles 53
Bluetooth 55
F
Faire & recevoir de appels 56
Réglage du volume & de la tonalité 58
Fonction d’identification de l‘appelant 59
Bouton MEM 60
Répertoire 60
Détails sur l’écran 60
Menu du téléphone 61
Enregistrement du combiné 69
Dépannage 71
R
A
N
Ç
A
I
S
Caractéristiques techniques 75
Conformité Réglementaire 76
Service et garantie 80
39
Page 45

XLC7BT
En utilisant votre équipement téléphonique, précautions fondamentales
toujours devraient être suivies pour réduire le risque de feu, la décharge
électrique et la blessure aux personnes, y compris le suivre:
1. Lire et comprendre toutes les instructions.
2. Respecter tous les avertissements et toutes les instructions indiquées sur
le téléphone.
3. Éviter tout contact avec des liquides. Ne pas placer l’unité de base ou le
combiné à proximité de l’eau, par exemple près d’une baignoire, d’un
lavabo, d’un évier de cuisine ou d’un bac, dans une cave mouillée ou à
proximité d’une piscine.
4. Éviter d’utiliser un téléphone (autre qu’un modèle sans fil) lors d’un orage
en raison des légers risques de chocs électriques associés à la foudre.
5. Ne pas utiliser le téléphone pour signaler une fuite de gaz lorsque vous
vous trouvez à proximité de la fuite en question.
IMPORTANTES CONSIGNES DE SÉCURITÉ
6. Débrancher ce téléphone de la prise de courant murale avant de le net-
toyer. Ne pas utiliser de produits de nettoyage liquides ou en aérosol sur
le téléphone. Utiliser un chion humide pour le nettoyage.
7. Placer ce téléphone sur une surface stable. La chute du téléphone peut
entraîner des dommages importants et/ou des blessures.
8. Ne pas couvrir les fentes et les orifices de ce téléphone. Ce téléphone ne
doit jamais être placé sur ou à proximité d’un radiateur ou d’un registre
de chaleur. Ce téléphone ne doit jamais être placé dans une installation
encastrée à moins qu’une ventilation adéquate soit fournie.
9. Utiliser ce téléphone en respectant la tension électrique indiquée sur
l’unité de base ou dans le guide de l’utilisateur. Si vous n’êtes pas
certain(e) de la tension de votre domicile, consultez votre détaillant ou
votre compagnie d’électricité locale.
10. Ne laisser aucun objet reposer sur le cordon d’alimentation et ne placer
as le téléphone dans une zone où le cordon d’alimentation risque d’être
endommagé par des meubles ou la circulation de personnes.
11. Ne pas surcharger les prises de courant murales ou les cordons
prolongateurs car cela peut augmenter le risque d’incendie ou de chocs
électriques.
12. Ne jamais introduire d’objets à travers les fentes du téléphone. Ils peuvent
entrer en contact avec des composants dont la tension est élevée ou
court-circuiter des pièces, ce qui pourrait provoquer un incendie ou
un choc électrique. Ne jamais renverser de liquide quel qu’il soit sur le
téléphone.
40
CONSERVEZ CES INSTRUCTIONS
Page 46

XLC7BT
13. Afin de réduire les risques de chocs électriques, ne pas démonter ce
téléphone. L’ouverture ou le retrait des couvercles peut vous exposer à
des tensions élevées ou d’autres risques. Un réassemblage inadéquat
peut entraîner un choc électrique lors d’une utilisation subséquente.
14. Débrancher ce produit de prise de courant murale et confier le service
au fabricant dans les cas suivants: lorsque le cordon d’alimentation
ou la prise sont elochés ou endommagés ; si du liquide étérenversé
à l’intérieur du produit; si le téléphone a été exposé à la pluie ou à de
l’eau ; si l’appareil est tombé ou si le boîtier est endommagé ; si l’appareil
manifeste un changement distinct de performance ; si le téléphone
ne fonctionne pas normalement en respectant les instructions
d’utilisation. Se limiter au réglage des commandes couvertes par les
instructions d’utilisation. Un réglage inapproprié peut compliquer le
travail du technicien qualifié pour rétablir le fonctionnement normal du
téléphone.
15. Ce produit devrait uniquement être utilisé suivant le type de source
d’alimentation indiqué sur l’étiquette. Si vous n’êtes pas certain(e) de
la tension utilisée à votre domicile, consultez votre détaillant ou votre
compagnie d’électricité locale.
IMPORTANTES CONSIGNES DE SÉCURITÉ
F
R
A
N
16. Ne pas tenter d’ouvrir l’adaptateur CC. Il y a à l’intérieur des tensions
potentiellement dangereuses et il n’y a pas de pièces remplaçables.
17. Cesser d’utiliser le produit et contacter Clarity si le produit surchaue,
comporte un cordon ou une prise endommagée, si le produit est tombé
ou est endommagé ou si le produit est entré en contact avec un liquide.
18. Utiliser uniquement l’adaptateur CC fourni avec ce produit ou un
adaptateur CC de remplacement fourni par Clarity.
19. Ce téléphone amplifie les sons jusqu’à des volumes élevés. Afin d’éviter
une diminution de l’acuité auditive, tous les utilisateurs du téléphone
devraient être informés de la capacité du téléphone à atteindre des
volumes élevés et les enfants devraient uniquement utiliser le
téléphone sous la supervision d’un adulte.
20. L’exposition à un volume sonore élevé ou à une pression sonore excessive
peut causer des dommages temporaires ou permanents de votre
audition. Même s’il n’existe pas un seul réglage de volume qui soit
approprié pour tous, vous devriez toujours utiliser votre téléphone à des
niveaux d’écoute modérés et éviter d’être exposé(e) pendant de longues
périodes à des niveaux sonores élevés. Plus le volume est élevé, plus vous
risquez d’endommager rapidement votre audition. Si vous ressentez une
gêne auditive, vous devriez faire contrôler votre audition par un médecin.
Afin de protéger votre audition, vous devriez:
Ç
A
I
S
CONSERVEZ CES INSTRUCTIONS
41
Page 47

XLC7BT
A) Régler le volume à un niveau faible et augmenter
progressivement le volume comme nécessaire. Avant d’appuyer sur
la touche BOOST, réduire le volume au niveau plus faible.Utiliser le
téléphone au niveau sonore le plus faible possible.
B) Limiter le temps passer à utiliser le téléphone à un niveau sonore
élevé.
21. Si vous ressentez une irritation de la peau après avoir utilisé ce produit,
cesser l’utilisation et contacter Clarity.
Jetez les piles usagées selon les instructions.
Attention: Déconnectez la ligne téléphonique avant de remplacer les piles.
1. Ne jetez pas les piles dans un feu, celles-ci pourraient exploser. Vérifier
dans les lois locales, les directives spéciales en matière de traitement
des déchets.
2. N’ouvrez pas ou n’endommagez pas les piles. L’électrolyte libéré est
corrosif et peut causer des dommages aux yeux et à la peau. Peut être
toxique si avalé.
3. Soyez prudent dans la manipulation de piles afin de ne pas courtcircuiter les piles avec des matériaux conducteurs, comme les bagues,
les bracelets et les clés. Les piles ou matériaux conducteurs peuvent
surchauer et provoquer des brûlures.
4. Retirez les piles quand elles sont déchargées et quand l’équipement
ne sera pas utilisé pendant une longue période. Jetez les piles
conformément aux lois locales sur la protection de l’environnement.
5. Ne pas démonter, chauer, écraser, déformer ou perforer les piles.
6. Ne tentez pas de recharger des piles non rechargeables.
7. Gardez les piles hors de portée des enfants.
IMPORTANTES CONSIGNES DE SÉCURITÉ
AVERTISSEMENT: Le risque d’explosion si la pile est remplacée par un type
inexact.
42
CONSERVEZ CES INSTRUCTIONS
Page 48

XLC7BT
CONTENU & LISTE DES PIÈCES
Base
IN USE/
CHARGE
VOLUME
SILENT
FIND
1
2
POWER
TAL K
BOOST
!
MENU
MEM
;
BACK
MUTE
FLASH
RD/P
1
Combiné
EXIT
F
R
A
N
Ç
A
I
Cordons de téléphone
(long/court)
S
XLC7BT
User Guide
Guide de
l’utilisateur
Suport de
fixation murale
Adaptateur secteur CA
Clip ceinture
43
Page 49

XLC7BT
Branchez votre téléphone comme indiqué dans le guide de démarrage
rapide joint.
Votre téléphone devrait arriver pré-assemblé. Pour l’installer:
1. Enlevez la base du paquet ; tirez l’étiquette jaune dans la direction de la
flèche.
2. Tenez fermement une extrémité du long cordon de ligne téléphonique
de votre XLC7BT. La bonne extrémité à tenir devrait déjà être branchée
dans la prise de votre téléphone. Simultanément, éloignez l’autre
extrémité du cordon téléphonique du téléphone, ce qui le démêle et
vous permet de brancher cette extrémité du cordon dans une prise
téléphonique murale.
3. Branchez l’extrémité libre du cordon téléphonique dans la prise
téléphonique murale.
INSTALLATION
4. Tenez fermement une extrémité du cordon blanc de l’adaptateur
secteur de votre téléphone. La bonne extrémité à tenir devrait déjà
être branchée à l’arrière de la base de votre téléphone. Simultanément,
éloignez l’autre extrémité du cordon de l’adaptateur, ce qui le démêle
et vous permet de brancher cette extrémité du cordon dans une prise
électrique murale.
5. Branchez le cordon blanc de l’adaptateur à l’arrière gauche de la base
dans une prise murale.
6. Retirez le combiné de l’emballage.
7. Tirez sur la languette des piles du combiné qui est située au bas de
l’appareil dans le sens de la flèche.
8. Placez le combiné dans le chargeur de la base. Les piles dans le combiné
doivent être complètement chargées pendant 16 heures avant d’utiliser
le téléphone pour la première fois.
9. Décrochez le combiné et appuyez sur TALK pour tester. Si vous
entendez la tonalité, votre téléphone est prêt à l’emploi. Si non, vérifiez
de nouveau tous les branchements.
44
Page 50

XLC7BT
INSTALLATION
F
R
A
N
Ç
A
I
S
45
Page 51

XLC7BT
1. Suivez les instructions dans la section Installation de la page 44 pour
retirer la base et le combiné de la base - étapes 1, 4 et 6.
2. Débranchez le long cordon de la ligne téléphone de la prise téléphonique
située à l’arrière de votre XLC7BT. Branchez une des extrémités du
cordon court de la ligne téléphonique dans la même prise identifiée par
LINE à l’arrière de votre base.
3. Installez la base du XLC7BT sur le support de fixation murale comme
indiqué sur la page 47. Guidez le cordon téléphonique court à travers le
support de fixation murale comme indiqué sur le schéma.
4. À l’aide d’un tournevis, desserrez les vis sur la prise murale du téléphone
(1 à 2 tours).
5. Branchez l’extrémité libre du cordon téléphonique court dans la prise
téléphonique murale.
6. Fixez le support de fixation murale (avec la base XLC7BT) sur la prise
téléphonique murale.
MONTAGE MURAL DE VOTRE XLC7BT
7. Branchez l’adaptateur secteur dans une prise électrique murale.
8. Tirez sur la languette des piles du combiné qui est située au bas de
l’appareil dans le sens de la flèche.
9. Placez le combiné dans la base et laissez-le 16 heures pour une charge
complète.
46
Page 52

XLC7BT
MONTAGE MURAL DE VOTRE XLC7BT
F
R
A
N
Ç
A
I
S
47
Page 53

XLC7BT
BASE - Guide de référence rapide
6
7
1
VOLUME
2
POWER
FIND
IN USE/
CHARGE
SILENT
5
4
1
3
2
8
RINGER
STYLE
48
HIGH OUTPUT
RINGER
Page 54

XLC7BT
BASE - Guide de référence rapide
1 Indication visuelle de
sonnerie
Elle s’allume lorsque le
téléphone sonne ; s’allume
lorsque le téléphone est en
cours d’utilisation.
2 Voyant IN USE /
CHARGE (EN COURS
D’UTILISATION / EN
CHARGE)
La lumière devient rouge
lorsque le téléphone est
en charge, et devient verte
lorsque le téléphone est en
cours d’utilisation.
7 BOUTONS BLUETOOTH (1,2)
Utilisez ces touches pour
jumeler les téléphone(s)
cellulaire(s) doté(s) de
Bluetooth que vous désirez
utilisez à votre XLC7BT.
8 TYPE DE SONNERIE
Utilisez cette touche pour
choisir la tonalité de la base
la plus confortable pour votre
environnement. Il y a six
sonneries disponibles.
REMARQUE (Base) : Vous ne
pouvez régler le volume ou
le style de la sonnerie que
F
R
3 Voyant POWER
(Alimentation)
Le voyant devient vert lorsque
l’adaptateur secteur est
branché. En cas de panne de
courant, le voyant POWER
clignote en vert une fois par
seconde.
4 FIND (rechercher)
Appuyez sur cette touche
pour localiser le combiné.
5 SILENT (SILENCIEUX)
Appuyez dessus si vous
souhaitez désactiver la
sonnerie de la base. Le bouton
lorsque le téléphone n’est pas
utilisé.
A
N
Ç
A
I
S
s’allume en rouge lorsque la
sonnerie est désactivée.
6 VOLUME (UP / DOWN)
(HAUT / BAS)
Utilisez ces touches pour
augmenter ou diminuer le
volume de la sonnerie.
49
Page 55

XLC7BT
COMBINÉ - Guide de référence rapide
1
BOOST
2
4
5
6
!
TALK
MENU
1
7
1 Molette de contrôle du
VOLUME
Utilisez la commande rotative
pour augmenter ou diminuer le
volume de l’appel entrant. Le
niveau de volume est aché
sur l’écran dans le coin inférieur
droit.
2 BOOST
(AMPLIFICATEUR)
Appuyez sur ce bouton
pour activer l’amplification
supplémentaire. Le bouton
BOOST s’allume en rouge
lorsque la fonction Boost est
active. Pour plus de détails sur
la fonction Boost, voir page 58.
MEM
;
3
BACK
MUTE
EXIT
FLASH
RD/P
3 Haut-parleur
8
9
10
11
;
Pendant un appel, appuyez
dessus pour activer le hautparleur du combiné. Appuyez
de nouveau pour revenir à
l’écouteur.
En mode haut-parleur, l’icône
haut-parleur s’ache à
l’écran (à gauche de l’icône
des piles), et la touche hautparleur s’allume en rouge.
4 Répertoire
Ce bouton vous permet
d’accéder à la liste de noms
et de numéros enregistrés de
votre
XLC7BT. Voir page 64.
50
Page 56

XLC7BT
COMBINÉ - Guide de référence rapide
5 TALK (CONVERSATION)
Ce bouton vous permet de
passer ou de recevoir des
appels téléphoniques. Il
s’allume en vert pendant un
appel.
6 Boutons fléchés (HAUT /
BAS)
Appuyez sur les flèches HAUT
ou BAS pour naviguer dans
les menus. En mode veille,
appuyez sur HAUT ou BAS
pour accéder à votre liste
d’appelants.
7 Bouton MENU
Appuyez sur ce bouton pour
activer les options disponibles
de votre téléphone. Voir page
61 pour plus de détails.
8 Bouton MEM: appuyez sur ce
bouton pour la composition
à une touche depuis le mode
veille.
9 Touche MUTE / BACK
(EDIT)
Mute (Muet) : Vous permet
d’avoir des conversations
que vous ne voulez pas que
d’autres personnes entendent
(lors d’un appel).
que vous voyez.
10 FLASH / EXIT
FLASH: Pendant un appel,
appuyez sur FLASH / EXIT
pour recevoir un autre appel
entrant. (Le service d’appel
mis en attente est nécessaire.)
EXIT (QUITTER): Dans le mode
MENU, vous permet de revenir
au mode veille.
11 RD / P (Recomposition /
Pause)
Appuyez dessus pour
rappeler le dernier numéro
composé ou insérer une pause
(deux secondes) lors de la
programmation des mémoires
ou de la pré-numérotation.
12 Casque
Un casque avec une prise de
2,5 mm peut être utilisé dans
cette prise casque. (Nous vous
recommandons d’utiliser le
casque Plantronics M175C.)
13 TONE (TONALITÉ)
Appuyez dessus pour
sélectionner la tonalité du
combiné. Voir page 59.
14 Intercom
F
R
A
N
Ç
A
I
S
Back (Retour) : Dans le mode
MENU, vous permet de revenir
à l’écran précédent.
(Modifier) : Quand un numéro
de téléphone s’ache, cette
touche vous permet de
basculer entre les formats à
7/10/11 chires pour le numéro
Appuyez dessus pour
appeler un autre combiné du
système.
15 SONNERIE ON / OFF
(MARCHE / ARRÊT)
Basculer pour allumer la
sonnerie du combiné ou pour
l’éteindre.
51
Page 57

XLC7BT
COMBINÉ - Guide de référence rapide
16 NECKLOOP
(PENDENTIF)
Un pendentif de 3,5 mm
peut être utilisé dans le
port Neckloop (pendentif).
(Nous vous recommandons
17
l’utilisation du pendentif
Clarity CE30.)
17 Clip ceinture
Clip de ceinture disponibles
sur demande.
18 Grille du haut-parleur
19 Compartiment à piles
15
19
18
ON OFF
LOOP
NECK
12
TONE
INTERCOM
16
VOLUME
13
14
52
Page 58

XLC7BT
INFORMATIONS SUR LES PILES
COMBINÉ
Les piles dans le combiné doivent être complètement chargées
pendant 16 heures avant d’utiliser le téléphone pour la première fois.
Autonomie : Le temps de communication est de 6,5 heures, et de 130
heures en veille sans utilisation. Les durées réelles peuvent varier en
fonction des réglages d’utilisation de l’amplificateur. Remplacez les
piles tous les deux ans.
Caractéristiques des piles (telles que fournies avec votre
téléphone): 3 piles rechargeables AAA NiMH (1.2V 600mAh NiMH -
model 60AAAHC, GPI International Ltd. or KH-44AAA-J600, Yiyang Corun
Battery Co., Ltd
).
Pour remplacer les piles, retirez le couvercle des piles du combiné et
installez de nouvelles piles, puis fermez le couvercle des piles
BASE
Les batteries de secours de la base garantissent le fonctionnement
de votre téléphone sans fil (3 à 4 heures) en cas de panne de courant.
Lorsque la base fonctionne en mode piles (aucune d’alimentation
CA), le voyant POWER de la base clignotera une fois toutes les deux
secondes.
Ouvrez le
couvercle du
compartiment
des piles.
F
R
A
N
Ç
A
I
S
Pour installer les piles dans la base :
1. Retournez la base et ouvrez le couvercle du compartiment des piles.
2. Installez les piles en respectant la polarité indiquée à l’intérieur du
compartiment des piles.
REMARQUE: Pour remplacer les piles du combiné ou pour installer
les piles de secours de la base, utilisez UNIQUEMENT des piles
rechargeables AAA standards NiMH de 600mAH.
53
Page 59

XLC7BT
INFORMATIONS DE PILES FAIBLES
Combiné
1. L’icône des piles sur l’écran ne montre aucune barre; l’écran
ache «Low Battery» (Piles faibles).
2. Le combiné émet un bip toutes les deux secondes en mode OFF
HOOK (DÉCROCHAGE).
3. Le bouton TALK clignote deux fois en vert toutes les 15 secondes
en mode veille. Aucune alerte ne clignotera en mode OFF HOOK.
Base
1. Le voyant POWER (alimentation) clignote en vert une fois toutes
les cinq secondes.
INFORMATIONS SUR LES PILES
AVERTISSEMENT: Utilisez uniquement des piles rechargeables.
N’utilisez PAS de piles alcalines !
54
Page 60

XLC7BT
BLUETOOTH
Pour utiliser un téléphone portable compatible Bluetooth avec votre
XLC7BT, vous devez d’abord jumeler et connecter votre téléphone
portable Bluetooth à la base du téléphone. Tous les combinés XLC7BT
peuvent être utilisés pour faire ou recevoir des appels sur la ligne du
téléphone portable. Votre lignée de téléphone portable est la ligne de
téléphone associée à votre ser vice de téléphone porta ble.
La technologie sans fil Bluetooth fonctionne sur une courte portée (un
maximum d’environ 30 pieds, soit 9 mètres). Lorsque vous jumelez
un téléphone portable Bluetooth à la base du téléphone, placez votre
téléphone portable Bluetooth plus près de la base du téléphone pour
maintenir une force de signal susante. Pour des performances optimales, gardez votre téléphone portable dans la limite d’une distance
de 15 pieds (4,5 mètres) de la base du téléphone lorsque vous utilisez la
ligne de téléphone portable.
JUMELER ET CONNECTER VOTRE TÉLÉPHONE PORTABLE COMPATIBLE
BLUETOOTH
1. Choisissez un emplacement pour jumeler le téléphone portable.
Appuyez et maintenez Bluetooth 1 ou Bluetooth 2 sur la base
du téléphone jusqu’à ce que vous entendiez une tonalité de
confirmation, et que le voyant Bluetooth 1 ou Bluetooth 2 clignote.
2. Activez la fonction Bluetooth de votre téléphone portable. Une fois
que votre téléphone portable trouve votre téléphone Clarity (Clarity XLC7BT), appuyez sur la touche appropriée de votre téléphone
portable pour continuer le processus de jumelage.
• Votre téléphone portable peut vous demander de saisir le code
PIN de la base du téléphone. Le code PIN par défaut de la base du
téléphone est 0000.
F
R
A
N
Ç
A
I
S
Lorsque le téléphone portable est connecté à la base du téléphone,
l’icône d’état correspondant (Bluetooth 1 ou Bluetooth 2) s’ache.
La lumière de l’appareil correspondant (Bluetooth 1 ou Bluetooth 2)
s’allume.
Si le jumelage échoue, désactivez la fonction Bluetooth de votre
téléphone portable et du XLC7BT en appuyant sur Bluetooth1 ou
Bluetooth 2. Ensuite, répétez les étapes ci-dessus pour jumeler et les
connecter à nouveau. Dans certains cas, plusieurs tentatives seront
nécessaires pour mener à bien le processus de jumelage.
55
Page 61

XLC7BT
JUMELER ET CONNECTER VOTRE KIT OREILLETTE COMPATIBLE
BLUETOOTH
1. Appuyez sur MENU lorsque le téléphone n’est pas en cours
d’utilisation.
2. Appuyez sur les touches fléchées vers le haut ou vers le bas pour
faire défiler jusqu’à Bluetooth, puis appuyez sur MENU.
3. Appuyez sur les touches fléchées vers le haut ou vers le bas pour
faire défiler jusqu’à << Aj. casque >>, puis appuyez sur MENU.
L’écran ache << Recherche du casque >>.
4. Réglez votre oreillette sur le mode identifiable. Lorsque votre
combiné détecte votre oreillette, appuyez sur MENU.
• Entrez le code PIN de votre oreillette si nécessaire. Le code PIN
pour la plupart des appareils Bluetooth est 0000 (reportez-vous au
BLUETOOTH
manuel de l’utilisateur de votre oreillette), puis appuyez sur MENU.
Lorsque l’oreillette est jumelée et connectée à la base du téléphone,
l’icône Bluetooth 2 s’ache. Le voyant Bluetooth 2 s’allume.
XLC7BT
POUR RÉALISER UN APPEL :
1. Appuyez sur TAL K, puis composez le numéro à l’aide du pavé
numérique. Voir conditions d’éclairage du bouton TALK en bas de la
page.
2. Réglez le volume au niveau le plus confortable - en utilisant la
commande du volume et le bouton BOOST (si nécessaire).
3. Appuyez sur le bouton TONE sur le côté du combiné pour ajuster la
tonalité de la voix entrante au niveau le plus confortable.
FAIRE & RECEVOIR DES APPELS
AVERTISSEMENT: LE VOLUME PEUT ÊTRE ÉLEVÉ !
REMARQUE :
1. Si la fonction Voice Assist (Assistance vocale) est activée, vous
entendrez les chires du numéro de téléphone entrant.
2. L’étape 1 ci-dessus peut être remplacée par une des options
suivantes :
• Appelez à partir des dossiers d’appelants: Choisissez un dossier de
votre liste d’appelants (voir page 63), puis appuyez sur TALK.
56
Page 62

XLC7BT
FAIRE & RECEVOIR DES APPELS
• Appelez à partir du répertoire téléphonique: Choisissez un dossier
de votre répertoire (voir page 64), puis appuyez sur TALK.
• Pré-numérotation : avant d’appuyer sur TAL K, composez le numéro
que vous souhaitez appeler ; les chires s’acheront sur l’écran ;
appuyez sur TALK lorsque le numéro est complet.
REMARQUE : La composition en bloc n’est pas disponible si votre
option de composition par défaut est un téléphone cellulaire
mobile
Suivez les étapes 2 à 3 ci-dessus pour profiter d’une conversation
téléphonique claire et confortable.
POUR RÉPONDRE A UN APPEL :
1. Lorsque le téléphone sonne, appuyez sur TALK pour répondre à
l’appel.
F
2. Réglez le volume et la tonalité de la voix entrante selon vos
préférences.
3. Lorsque vous avez terminé, appuyez sur TALK pour raccrocher.
REMARQUE :
1. Pour une explication de la lumière de la touche TALK , voir en bas de
la page.
2. Si vous bénéficiez du service d’identification des appelants, notez le
numéro de téléphone entrant qui s’ache sur votre écran.
3. Si la fonction Voice Assist (Assistance vocale) est activée, vous
entendrez les chires du numéro de téléphone entrant.
4. À tout moment pendant la conversation, appuyez sur la touche
haut-parleur pour
;
passer en mode mains libres. Utilisez la
commande du volume pour ajuster le niveau sonore de l’appel
entrant. Revenez en mode écouteur en appuyant de nouveau sur la
R
A
N
Ç
A
I
S
touche haut-parleur.
Caractéristiques d’éclairage de la touche Talk
Vert: Le téléphone est en cours d’utilisation.
Clignotement vert toutes les 15 secondes en mode veille : Piles
faibles.
57
Page 63

XLC7BT
M
MEM
M
RÉGLAGE DU VOLUME & DE LA TONALITÉ
Le bouton BOOST active l’amplificateur, en contrôlant le volume du
téléphone. Lorsque la touche VOLUME est réglée et le bouton BOOST est
enfoncée, le téléphone peut atteindre jusqu’à 50dB de gain.
AVERTISSEMENT: LE VOLUME PEUT ÊTRE ÉLEVÉ.
CONTINUEZ AVEC PRUDENCE.
Marche/Arrêt BOOST
Le bouton BOOST contrôle le volume sonore
du télérécepteur. Une fois que le bouton
BOOST est pressé, un niveau supplémentaire
d’amplification est ajouté à la plage complète
de contrôle du volume.
Molette de réglage du VOLUME
Pendant un appel, la molette sur le côté
contrôle le niveau de volume du combiné et
du haut-parleur. La molette de volume ore
jusqu’à 16dB de volume avant l’activation
du bouton BOOST. Une fois que le bouton
BOOST est enfoncé, le
XLC7BT fournira
jusqu’à 50dB d’amplification.
Auto Boost
(Pour activer ou désactiver la fonction Auto
!
!
BOOST
BOOST
MEM
;
MEM
;
Boost, voir page 66.)
ON (Marche) - Lorsque Boost Auto est activé,
la fonction Boost sera activée à chaque fois
qu’un appel est lancé. Si le téléphone est
raccroché, la fonction Boost restera activée.
OFF (Arrêt)- Lorsque Boost Auto est réglé sur
OFF (Arrêt), la fonction Boost sera éteinte au
début de tous les appels. À chaque fois qu’un
appel débute, l’utilisateur devra appuyer
sur le bouton BOOST pour obtenir le niveau
supplémentaire d’amplification.
58
Page 64

XLC7BT
M
MEM
M
RÉGLAGE DU VOLUME & DE LA TONALITÉ
TONE (TONALITÉ)
Appuyez sur le bouton TONE pour modifier
le style d’amplification. La commutation des
tonalités modifiera la façon dont la conversation
TONE
INTERCOM
téléphonique sonne pour vous.
Afin d’obtenir la meilleure expérience sonore,
nous recommandons ce qui suit:
1. Réglez le contrôle du volume et activez la
fonction Boost (si nécessaire). (Diminuez le
volume au minimum (VOL 0) avant d’activer la
fonction Boost.)
2. Appuyez sur le bouton TONE pour basculer
entre les diérents paramètres de tonalité
F
disponibles.
R
A
Haut-parleur
N
!
BOOST
MEM
;
Pour passer en mode haut-parleur, appuyez sur
la touche SPK.
;
L’écran ache le mode haut-
parleur.
Ç
A
I
XLC7BT
FONCTION D’IDENTIFICATION DE L’APPELANT
Votre XLC7BT est compatible CID / CWCID (service en option,
disponible chez votre fournisseur local de service téléphonique).
Lorsque votre téléphone sonne, l’écran ache le nom et le numéro
de la personne qui vous appelle. Cette information sera stockée dans
la liste des appelants de votre téléphone.
Pour accéder à cette liste, et pour obtenir plus de détails sur cette
fonction, appuyez sur les fléches HAUT ou BAS en mode veille, et /
ou suivez les instructions relatives à la LISTE DES APPELANTS (page
63).
REMARQUE: Si vous bénéficiez du service CID, la date et l’heure
seront automatiquement réglées après le premier appel entrant.
S
59
Page 65

XLC7BT
BOUTON MEM
Le bouton MEM vous permet de composer en toute facilité le
numéro de téléphone appelé le plus souvent. Une fois que le bouton
est programmé, appuyez sur celui-ci en mode veille pour que le
téléphone appelle ce numéro sans devoir appuyer sur d’autres
touches.
Pour programmer le bouton MEM :
Appuyez et maintenez enfoncé le bouton MEM; l’écran ache « MEM
» et un curseur clignotant.
Tapez le numéro de téléphone à l’aide du pavé numérique, puis
appuyez sur MENU.
Vous entendrez 5 bips, puis le combiné passera en mode veille. Votre
bouton MEM est maintenant programmé et prêt à être utilisé.
XLC7BT
RÉPERTOIRE
Pour accéder aux enregistrements de votre téléphone (Répertoire),
et pour obtenir plus de détails concernant cette fonctionnalité,
appuyez sur le bouton du Répertoire
du combiné, et / ou suivez
les instructions dans RÉPERTOIRE (page 64).
XLC7BT
DÉTAILS SUR L’ÉCRAN
ICÔNES ET SYMBOLES DE L’ÉCRAN
Niveau de charge des piles. Lorsque l’icône ache une seule
barre, replacez le combiné sur le chargeur.
Indicateur de nouveaux appels. Il y a de nouveaux appels dans
votre liste d’appelants.
Le téléphone est en cours d’appel, en mode haut-parleur.
60
Le téléphone est en cours d’appel, en mode écouteur.
Nouveau message vocal (service distinct).
Le combiné est connecté à la base, et à portée.
1
Les appareils Bluetooth sont jumelés et en contact.
2
Indique que la ligne téléphonique résidentielle est le mode de
composition sortante par défaut.
Page 66

XLC7BT
MENU DU TÉLÉPHONE
Pour démarrer le processus d’installation, appuyez
sur MENU. Vous verrez la liste des fonctionnalités à
configurer sur votre nouveau XLC7BT
À tout moment lors de la navigation dans les
options du MENU, vous pouvez appuyer sur MUTE
087(
)/$6+
(;,7
/ BACK pour revenir à l’écran précédent ou vous
pouvez appuyer sur FLASH / EXIT pour revenir au
mode veille (sortir de la configuration).
%$&.
Pour naviguer dans les options du menu, appuyez
sur les flèches HAUT ou BAS .
TALK
MENU
087(
)/$6+
(;,7
Lorsque vous êtes dans le mode MENU, remarquez
le curseur sur la ligne supérieure, à gauche du
texte. Il indique que la fonction achée sur la ligne
supérieure est active. Appuyez sur MENU pour
sélectionner cette fonction ou une option.
Le menu CONFIGURATION permet de choisir vos
TALK
MENU
%$&.
087(
)/$6+
(;,7
préférences pour les caractéristiques suivantes de
votre nouveau XLC7BT:
• Bluetooth - pour accéder aux réglages du téléphone cellulaire/des
écouteurs;
F
R
A
N
Ç
• Comp. 1 t. - pour changer le mode de composition sortante par défaut;
• Journal - pour visualiser et gérer les informations relatives à vos appels
entrants - service CID / CWCID (oert par votre opérateur de téléphonie
local);
• Répertoire - pour consulter et gérer vos enregistrements (noms et
numéros de vos appels fréquemment composés);
• Configuration de la sonnerie (Reg. Audio) - pour choisir les sonneries,
régler le volume de la sonnerie, activer ou désactiver la tonalité des
touches (par défaut : Activé) ;
• Sonnerie visuelle (Sonn. VIP) – pour activer ou désactiver le voyant de
signalisation d’appels de votre combiné (par défaut: Activé) ;
• Amplification auto (Auto Amplif) - pour permettre l’activation de la
fonction Boost au début de tous les appels (par défaut: Désactivé) ;
• Configuration du téléphone (Conf. Tel) - pour reprendre
l’enregistrement à la base, pour activer la fonction Auto Talk (Decro.
Auto - par défaut : Désactivé), pour activer la fonction d’assistance
vocale (par défaut : Activé), pour activer Réponse avec n’importe quelle
touche (TT Touch Re - par défaut : Désactivé), pour activer la fonction
OSA (par défaut : Désactivé), pour activer la fonction Bruit faible (par
défaut : Activé), pour choisir la langue que vous souhaitez utiliser (par
A
I
S
61
Page 67

XLC7BT
défaut : anglais), pour choisir le mode de numérotation nécessaire pour
votre configuration particulière (par défaut : Tonalité), pour régler le
contraste de l’écran de votre combiné (par défaut : moyen) ;
• Date et heure (Date/Heure) - pour vous permettre de régler
manuellement la date et l’heure, la date (mois et le jour uniquement) et
l’heure seront réglées lors du premier appel entrant, si vous êtes abonné
au service CID de votre compagnie de téléphonie locale.
MENU - LISTE D’APPELANTS
XLC7BT
En mode veille, appuyez sur MENU. Appuyez sur MENU pour sélectionner
Bluetooth. Vous trouverez les réglages pour cette option.
Liste App.
En mode Bluetooth, appuyez sur MENU pour sélectionner « Liste App. ».
Vous verrez les appareils compatibles Bluetooth jumelés à votre XLC7BT.
Téléch. PB
En mode Bluetooth, appuyez sur MENU pour sélectionner « Téléch. PB ».
Faites défiler pour sélectionner le téléphone portable désiré, puis appuyez
sur MENU.
Remarque :
• Pour certains téléphones portables, vous pourriez avoir à appuyer sur une
touche de votre téléphone portable pour confirmer le répertoire téléchargé.
• La performance de la fonction de téléchargement du répertoire dépend
de la compatibilité de votre téléphone portable Bluetooth. Reportez-vous au
manuel de l’utilisateur de votre téléphone portable pour plus d’informations
sur la façon dont ce dispositif utilise la connectivité Bluetooth.
MENU - BLUETOOTH
Aj. Casque
En mode Bluetooth, appuyez sur MENU pour sélectionner « Aj. Casque ».
Voir page
Num. défaut
Si vous avez un téléphone cellulaire jumelé au XLC7BT en plus de votre ligne
résidentielle, vous pouvez choisir le téléphone cellulaire comme appareil par
défaut lors d’un appel sortant.
En mode Bluetooth, appuyez sur MENU pour sélectionner « Num. défaut
». Vous verrez une liste d’options pour cette fonction. La maison est votre
ligne téléphonique normale (prise murale).
Utilisez HAUT ou BAS pour sélectionner votre mode de numérotation par
défaut. Appuyez sur MENU pour enregistrer votre sélection, ou utilisez
FLASH/EXIT pour revenir à l’écran précédent.
62
55 pour toutes les instructions concernant cette fonction.
Page 68

XLC7BT
Si vous désirez utilisez un autre mode de numérotation pour le prochain
appel sortant, avant d’appeler, utilisez la fonction « Comp. 1 t. » dans les
options du MENU.
En mode veille, appuyez sur MENU. Appuyez sur DOWN pour sélectionner
« Comp. 1 t. ». Vous verrez une liste d’options supplémentaires pour la
numérotation sortante. Sélectionnez celle que vous souhaitez utiliser, puis
appuyez sur MENU. L’écran suivant ache les diverses méthodes pour
composer le numéro à appeler : Recomp., Repertoire, Journal, Manuelle.
Défilez vers le UP ou le BAS pour faire votre choix, puis appuyez sur MENU.
Suivez les instructions pour appeler.
MENU - COMP. 1 T.
XLC7BT MENU - JOURNAL
Voir/Appeler à partir de la Journal
Si vous recevez de nouveaux appels, vous verrez l’icône Nouveaux appels à
gauche de l’indicateur de charge de la batterie (coin supérieur droit).
F
R
En mode veille, appuyez sur MENU. Déroulez jusqu’à la « Journal ». Appuyez
sur MENU pour sélectionner.
Votre écran ache le nombre de nouveaux appels (qui n’ont pas encore
été consultés). Défilez vers le ou le BAS pour voir votre historique d’appels
(jusqu’à 40 numéros).
Pour chaque appel, l’écran montre tour à tour la date/l’heure de l’appel et le
numéro de téléphone, et le nom associé au numéro qui vous a appelé.
Appuyez sur MUTE / BACK pour voir les formats disponibles pour
l’inscription : 7 chires (pas d’indicatif régional), 10 chires (indicatif
régional + numéro), 11 chires (1+indicatif régional+numéro). L’écran ache
les nouveaux numéros.
Lorsque le format est correct, appuyez sur TALK si vous désirez composer le
numéro.
Supprimer/Sauvegarder/Supprimer toute la Journal:
Si vous désirez enregistrer ou eacer l’inscription de votre mémoire,
appuyez sur MENU (après avoir formaté le numéro). Vous verrez les options
disponibles pour cette inscription. Vous pouvez alors sélectionnez l’une des
options ci-dessous :
A
N
Ç
A
I
S
Suprimmer :
Sélectionnez en appuyant sur MENU. L’écran ache « Suprimmer? ».
Appuyez sur MENU pour supprimer (l’écran ache OK et vous entendez 5
bips), ou sur MUTE / BACK pour revenir à l’écran précédent.
63
Page 69

XLC7BT
Enreg Num:
Sélectionnez en appuyant sur MENU. Vous pouvez modifier le numéro, puis
le nom associé à l’inscription. Appuyez sur MUTE / BACK pour supprimer
le caractère précédent, et sur UP ou BAS pour déplacer le curseur au sein
du nom. Utilisez le pavé numérique pour ajouter des caractères au nom.
Appuyez sur MENU pour enregistrer l’inscription dans votre annuaire.
Soup Tout :
Sélectionnez en appuyant sur MENU. L’écran ache « Soup Tout? ».
Appuyez sur MENU pour Soup Tout es les inscriptions (l’écran ache «
OK » et vous entendez 5 bips), ou sur MUTE / BACK pour revenir à l’écran
précédent.
MENU - LISTE D’APPELANTS
XLC7BT MENU – RÉPERTOIRE
Pour accéder à votre annuaire à partir du mode veille, appuyez une fois
sur MENU pour accéder au menu, puis défilez vers le bas pour sélectionner
Annuaire. Appuyez de nouveau sur MENU. Défilez vers le HAUT ou le BAS
pour parcourir les inscriptions sauvegardées.
Appeler à partir de l’annuaire
Pour composer l’un des numéros sauvegardés, sélectionnez l’inscription et
appuyez sur TALK.
Ajouter/Modifier/Supprimer/Supprimer tout de l’annuaire
Pour ajouter un numéro, modifier un numéro, supprimer un numéro
ou supprimer tous les numéros, appuyez sur MENU pendant que vous
consultez une inscription sauvegardée. Vous pouvez alors sélectionnez
l’une des options ci-dessous :
Ajouter:
Sélectionnez en appuyant sur MENU pour sélectionner « Ajouter » Vous
devrez inscrire le numéro tel qu’il sera composé. Pour modifier le numéro
avant de l’enregistrer, utilisez MUTE / BACK pour supprimer le dernier
chire (un à la fois); défilez vers le HAUT ou le BAS pour déplacer le curseur
au sein du numéro sans supprimer tous les chires. Lorsque vous avez
terminé, appuyez sur MENU pour enregistrer le numéro.
Vous devrez inscrire le nom pour le numéro que vous avez enregistré.
Utilisez le pavé numérique pour inscrire le nom à enregistrer. Lorsque vous
avez terminé, appuyez sur MENU pour enregistrer le numéro.
L’écran achera « OK » et vous entendrez cinq bips.
64
Page 70

XLC7BT
Modifier :
Pendant que vous consultez l’inscription, appuyez sur DOWN pour faire
défiler la ligne indiquant « Modifier » jusqu’en haut de l’écran. Appuyez sur
MENU pour sélectionner cette option.
Vous devrez modifier le numéro - défilez vers le HAUT ou le BAS pour
déplacer le curseur, ou utiliser MUTE / BACK pour supprimer le dernier
chire. Appuyez sur MENU lorsque la modification est terminée.
Vous devrez modifier le nom. Utilisez les mêmes touches que plus haut.
Appuyez sur MENU pour enregistrer votre inscription modifiée.
L’écran achera « OK » et vous entendrez cinq bips.
Suprimmer :
Pendant que vous consultez l’inscription, faites dérouler jusqu’à «
Suprimmer ». Appuyez sur MENU pour sélectionner cette option.
L’écran ache « Delete? ». Appuyez sur MENU pour supprimer (l’écran
ache « OK » et vous entendez 5 bips), ou sur MUTE / BACK pour revenir à
l’écran précédent.
MENU – RÉPERTOIRE
F
R
A
Soup Tout :
Pendant que vous consultez l’inscription, faites dérouler jusqu’à « Soup
Tout ». Appuyez sur MENU pour sélectionner cette option.
L’écran ache « Soup Tout? ». Appuyez sur MENU pour supprimer (l’écran
ache « OK » et vous entendez 5 bips), ou sur MUTE / BACK pour revenir à
l’écran précédent.
XLC7BT
En mode veille, appuyez sur MENU, puis déroulez pour sélectionner « Ring
Setup »; appuyez sur MENU pour passer au réglage de la sonnerie. Vous
verrez les options disponibles pour votre sonnerie.
Vous pouvez alors sélectionnez l’une des options ci-dessous :
Volsonn :
Pour régler le volume de la sonnerie, le commutateur RINGER ON / OFF sur
le coté du combiné XLC7BT doit être en position ON. Défilez vers le HAUT
ou le BAS pour choisir le volume de sonnerie approprié. Lorsque vous avez
terminé, appuyez sur MENU pour enregistrer le réglage.
MENU – CONFIGURATION SONNERIE
N
Ç
A
I
S
L’écran achera « OK » et vous entendrez cinq bips.
Si le commutateur RINGER ON / OFF est en position OFF, l’écran ache «
Silence » (milieu de l’écran), sans son. Mettez le commutateur du volume de
la sonnerie en position ON ou remettez le téléphone en mode veille.
65
Page 71

XLC7BT
Sonnerie :
Pour régler la sonnerie, appuyez sur la touche DOWN pour faire défiler la
ligne indiquant « Sonnerie » jusqu’en haut de l’écran. Appuyez sur MENU
pour sélectionner cette option.
Défilez vers le HAUT ou le BAS pour voir les sonneries disponibles.
Appuyez sur MENU pour enregistrer l’option sélectionnée. L’écran achera
« OK » et vous entendrez cinq bips.
Bips :
Pour augmenter le volume des touches, le diminuer ou l’éteindre, appuyez
deux fois sur BAS pour faire défiler la ligne indiquant « Bips » jusqu’en haut
de l’écran. Appuyez sur MENU pour sélectionner cette option.
Défilez vers le HAUT ou le BAS pour faire votre choix. Appuyez sur MENU
pour enregistrer. L’écran achera « OK » et vous entendrez cinq bips.
MENU – CONFIGURATION SONNERIE
XLC7BT
MENU – SIGNALISATION VISUELLE DES APPELS
(combiné)
En mode veille, appuyez sur MENU.
Appuyez sur HAUT ou BAS pour faire avancer la ligne indiquant « Sonn. VIP
».
Appuyez sur MENU pour accéder au réglage Allumée/Éteinte de la sonnerie
visuelle.
Défilez vers le HAUT ou le BAS pour faire votre choix. Appuyez sur MENU
pour enregistrer votre sélection. L’écran achera « OK » et vous entendrez
cinq bips.
REMARQUE : Cette option concerne uniquement la sonnerie visuelle.
XLC7BT
En mode veille, appuyez sur MENU.
MENU - AUTO AMPLIF
Appuyez sur HAUT ou BAS pour faire avancer la ligne indiquant « Auto
Amplif ». Appuyez sur MENU pour accéder au réglage Allumé/Éteint d’Auto
Amplif.
Défilez vers le HAUT ou le BAS pour faire votre choix. Appuyez sur MENU
pour enregistrer votre sélection. L’écran achera « OK » et vous entendrez
cinq bips.
66
Page 72

XLC7BT
En mode veille, appuyez sur MENU.
Appuyez sur HAUT ou BAS pour faire avancer la ligne indiquant « Phone
Setup ». Appuyez sur MENU pour accéder au sous-menu des réglages du
téléphone.
Le sous-menu des réglages du téléphone vous permet d’ajuster les
fonctions suivantes :
• Associer
• Réponse automatique (Decro. Auto - allumé/éteint, défaut : éteint)
• Aide vocale (Assistance vocale : Allumée/Éteinte; défaut : allumée) anglais/français
• Réponse toute touche (TT Touch Re - Allumé/Éteint; défaut : éteint)
• Langue (anglais/français/espagnol, défaut : anglais)
MENU - CONFIGURATION DU TÉLÉPHONE
• Mode de numérotation (tonalité/pulsation, défaut : tonalité)
• Contraste (1-5, défaut : 3)
Register
Appuyez sur MENU pour accéder à cette fonction. Voir les détails à la page
69.
Decro. Auto
Appuyez sur HAUT ou BAS pour faire défiler la ligne où il est inscrit « Decro.
Auto » Appuyez sur MENU pour accéder à cette option.
Défilez vers le HAUT ou le BAS pour faire votre choix. Appuyez sur MENU
pour enregistrer votre sélection. L’écran achera « OK » et vous entendrez
cinq bips.
Aide Vocale
Cette option active les numéros audio pour les numéros composés, ainsi
que les numéros d’appels entrants (avec service CID en option de votre
fournisseur de services téléphoniques).
F
R
A
N
Ç
A
I
S
Appuyez sur HAUT ou BAS pour faire défiler la ligne où il est inscrit « Aide
Vocale ». Appuyez sur MENU pour accéder à cette option.
Défilez vers le HAUT ou le BAS pour faire votre choix. Appuyez sur MENU
pour enregistrer votre sélection. L’écran achera « OK » et vous entendrez
cinq bips.
TT Touch Re
Cette option vous permet de répondre à un appel en appuyant sur
n’importe quelle touche du combiné au lieu d’appuyer sur TALK ou Haut-
67
Page 73

XLC7BT
parleur.
Appuyez sur HAUT ou BAS pour faire défiler la ligne où il est inscrit « TT
Touch Re ». Appuyez sur MENU pour accéder à cette option.
Défilez vers le HAUT ou le BAS pour faire votre choix. Appuyez sur MENU
pour enregistrer votre sélection. L’écran achera « OK » et vous entendrez
cinq bips.
OSA
Cette option vous permet d’amplifier votre voix lors d’un appel.
AVERTISSEMENT : Le volume de la voix peut être fort. Nous vous conseillons
d’activer l’option OSA SEULEMENT si votre voix est trop douce.
Appuyez sur HAUT ou BAS pour faire défiler la ligne où il est inscrit « OSA ».
Appuyez sur MENU pour accéder à cette option.
Défilez vers le HAUT ou le BAS pour faire votre choix. Appuyez sur MENU
pour enregistrer votre sélection. L’écran achera « OK » et vous entendrez
cinq bips.
MENU - CONFIGURATION DU TÉLÉPHONE
Langue
Appuyez sur HAUT ou BAS pour faire défiler la ligne où il est inscrit « Langue
». Appuyez sur MENU pour accéder à cette option.
Défilez vers le HAUT ou le BAS pour faire votre choix. Appuyez sur MENU
pour enregistrer votre sélection. L’écran achera « OK » et vous entendrez
cinq bips.
Mode Num (Tone/Pulse)
Appuyez sur HAUT ou BASpour faire défiler la ligne où il est inscrit « Mode
Num » Appuyez sur MENU pour accéder à cette option.
Défilez vers le HAUT ou le BAS pour faire votre choix. Appuyez sur MENU
pour enregistrer votre sélection. L’écran achera « OK » et vous entendrez
cinq bips.
Contraste
Appuyez sur HAUT ou BAS pour faire défiler la ligne où il est inscrit «
Contraste ». Appuyez sur MENU pour accéder à cette option.
Défilez vers le HAUT ou le BAS pour faire votre choix. Il y a cinq niveaux
disponibles (défaut : Niveau 3). Appuyez sur MENU pour enregistrer votre
sélection. L’écran achera « OK » et vous entendrez cinq bips.
68
Page 74

XLC7BT
En mode veille, appuyez sur MENU. Appuyez sur HAUT ou BAS pour faire
avancer la ligne indiquant « Date & Time ». Appuyez sur MENU pour accéder
aux réglages de la date et de l’heure.
Utilisez le pavé numérique pour écrire la date (respectez le format à
l’écran). Appuyez sur MENU pour enregistrer votre sélection. Utilisez le pavé
numérique pour écrire l’heure (respectez le format à l’écran).
Appuyez sur MENU pour enregistrer votre sélection. L’écran achera « OK »
et vous entendrez cinq bips.
MENU - DATE ET HEURE
XLC7BT
ENREGISTREMENT DU XLC7BT
Pour utiliser le XLC7BT (ouXLC7HS) combiné, vous devez l’enregistrer au
XLC7BT base.
Tirer l’étiquette de pile du combiné localisée dessous de l’appareil, et alors
appuyer MENU pour commencer enregistrer ou deregistering votre combiné
de votre système.
POUR ENREGISTRER UN COMBINÉ NON INSCRIT
1. Appuyer MENU pour entrer le mode d’enregistrement. Vous verrez aché
sur l’écran, «COMBINE BESOINS ASSOCIER».
2. Appuyez sur et tenez la touche de FIND sur la base XLC7BT pendant cinq
en second lieu, jusqu’à ce que la sonnerie visuelle basse démarre clignoter.
Libérez la clef de FIND sur la base XLC7BT.
3. MENU de presse clé sur le combiné.
ENREGISTREMENT DU COMBINÉ
F
R
A
N
Ç
A
I
S
4. L’écran montre la «ASSOCIATION… », puis «ASSOCIER REUSSI»
(accompagné de cinq signaux sonores rapides).
5. Votre combiné est maintenant enregistré à votre XLC7BT système. Votre
écran achera «X de COMBINE ,» (où «X» est le nombre du véritable
combiné inscrit, comme le deuxième ou quatrième combiné, etc.).
Vous pouvez étendre le nombre de combinés par l’utilisation
supplémentaireXLC7HS combinés (a vendu séparément).
POUR ENREGISTRER VOTRE COMBINE ENCORE (ou enregistrer à un
diérent XLC7BT système)
1. Dans le mode Veille, le MENU de presse.
2. Appuyer sur la flèche cinq fois pour avancer le rang qui lit «CONF. TEL.»
au sommet de l’écran.
69
Page 75

XLC7BT
3. Appuyer MENU pour entrer la section d’installation. L’écran ache «
ASSOCIER » sur le premier rang de l’écran maintenant.
4. Appuyer MENU pour entrer la section d’Enregistrement.
5. MENU de presse encore pour choisir le «ASSOCIER».
6. Suivre les étapes d’Enregistrement énumérées au-dessus.
ANNULER L’ENREGISTREMENT DU COMBINÉ
1. Voyez les six étapes énumérées ci-dessus, puis serrez le MENU pour choisir
«DEJUMELER ».
2. Votre combiné annulera l’enregistrement de votre base aussitôt que
vous appuyez sur MENU. L’écran achera «COMBINE X DÉCOUPLER »,
(Enregistrement du combiné X annulé), (encore, où «X» est le nombre du
combiné enregistré), puis «COMBINE BESOINS ASSOCIER».
ENREGISTREMENT DU COMBINÉ
70
Page 76

XLC7BT
Je ne peux pas ajouter et connecter mon téléphone portable ou un casque
à la base du téléphone.
• Assurez-vous que vous avez du réseau et que la fonction Bluetooth de
votre téléphone portable ou de votre casque est activée. Consultez le
manuel de l’utilisateur de votre téléphone portable ou de votre casque
pour plus d’informations.
• Assurez-vous que la base du téléphone est en mode détectable.
• Suivez attentivement les instructions de jumelage. Assurez-vous que
votre téléphone portable ou kit oreillette Bluetooth n’est pas connecté à
un autre appareil Bluetooth, et qu’il est relié à la base du téléphone et actif
sur la liste des périphériques.
• Retirez Clarity XLC7BT de l’historique du dispositif mains libres de votre
téléphone portable (voir le manuel de l’utilisateur de votre téléphone portable pour plus d’informations).
• Éteignez votre téléphone portable ou votre casque, puis rallumez-le.
• Pour certains téléphones portables, vous devez autoriser le dispositif
Clarity XLC7BT dans la fonction Bluetooth de votre téléphone portable.
Consultez le manuel de l’utilisateur de votre téléphone portable pour plus
d’informations.
• La plupart des téléphones portables ont la fonction Bluetooth dans les
menus de connexion ou de configuration. Veuillez vous reporter et ensuite chercher le menu Bluetooth dans le menu des réglages ou des connexions. Dans le menu Bluetooth, sélectionnez l’option pour rechercher
ou ajouter de nouveaux appareils.
DÉPANNAGE
F
R
A
N
Ç
A
I
S
• Réinitialisez la base du téléphone. Débranchez l’alimentation électrique
de l’appareil. Attendez environ 15 secondes, puis rebranchez-le. Répétez
les suggestions ci-dessus.
Le code PIN sur la base du téléphone ne fonctionne pas.
• Assurez-vous que vous entrez le code PIN correct. Le code PIN par défaut
est 0000.
Le XLC7BT peut-il améliorer la mauvaise réception du téléphone portable
chez moi ?
• Si votre téléphone portable a une mauvaise réception chez vous, le XLC7BT ne peut pas améliorer la réception. Cependant, s’il y a un endroit
dans votre maison avec une meilleure réception, vous pouvez laisser votre
téléphone portable à cet endroit pendant que vous utilisez la ligne portable XLC7BT . Pour que cela fonctionne, la base du téléphone doit être à
une distance maximale de 30 pieds (9 mètres) du téléphone portable.
71
Page 77

XLC7BT
L’appareil ne fonctionne pas / pas de tonalité:
• Vérifiez que l’adaptateur secteur est correctement branché dans la prise
secteur, la base et le téléphone.
• Vérifiez que le cordon de la ligne téléphonique est bien branché dans la
prise murale et le téléphone.
• Assurez-vous que les piles du combiné sont entièrement chargées.
• Assurez-vous que les piles ont été correctement placées dans le
compartiment des piles. (Les contacts métalliques circulaires sur les piles
doivent toucher les ressorts métalliques à l’intérieur du compartiment
des piles.)
• Vérifiez que le téléphone est dans le bon mode de numérotation:
Tonalité (toucher) ou Impulsion (rotatif).
• Assurez-vous que vous vous trouvez à portée utilisable de la station de
DÉPANNAGE
base.
Le téléphone ne sonne pas lorsque vous recevez un appel:
• Assurez-vous que le commutateur RINGER sur le combiné et la base est
réglé sur ON.
• Vérifiez que l’adaptateur secteur est correctement branché dans la prise
secteur, la base et le téléphone.
• Vérifiez que le cordon de la ligne téléphonique est bien branché dans la
prise murale et le téléphone.
• Assurez-vous que vous vous trouvez à portée utilisable de la station de
base.
• Il se peut que vous ayez un trop grand nombre d’extensions sur votre
ligne. Essayez de débrancher quelques appareils.
Bruits, interférences ou autres appels entendus lorsque vous utilisez le
combiné:
• Assurez-vous que vous vous trouvez à portée utilisable de la
station de base.
• Assurez-vous que les piles du combiné sont entièrement chargées.
• Essayez de déplacer l’unité de base à un autre endroit.
• Assurez-vous que l’adaptateur secteur n’est pas branché dans la prise
murale avec d’autres appareils.
72
Page 78

XLC7BT
Le téléphone ne maintient pas la charge:
• Assurez-vous que les contacts de charge du combiné et de la base ne
présentent pas de poussière ni de saleté. L’appareil étant débranché,
nettoyez les contacts avec un chion doux.
• Assurez-vous le voyant IN USE / CHARGE sur la base est allumé
lorsque le combiné se trouve dans son support.
• Si nécessaire, remplacez les piles du combiné.
Diculté à réaliser ou à recevoir des appels:
• Rapprochez-vous de la base et essayez de nouveau.
• Assurez-vous que vous avez sélectionné le mode de numérotation
approprié, par tonalité ou par impulsions.
• Assurez-vous que l’adaptateur secteur n’est pas branché dans une prise
murale avec d’autres appareils. Débranchez pendant 5 à 10 secondes,
puis rebranchez-le. Placez de nouveau le combiné sur la base et
DÉPANNAGE
F
R
réinsérez l’adaptateur secteur.
• Assurez-vous que les piles du combiné sont entièrement chargées.
L’écran de votre combiné ache «Searching...» (Recherche...):
• Vérifiez que l’adaptateur secteur est branché à la base et à la prise
murale.
• Le combiné est hors de portée ou l’alimentation de la base est
débranchée.
• Rapprochez-vous de la base.
• Placez le combiné dans la base jusqu’à ce que l’écran revienne au mode
veille. Il faudra environ 5 à 10 secondes pour que le combiné s’enregistre à
la base.
• Il peut être nécessaire d’enregistrer de nouveau manuellement le
combiné dans la base. Suivez les instructions de la page 69.
L’écran ache «Battery Low» (Piles faibles) :
A
N
Ç
A
I
S
• Les piles du combiné sont faiblement chargées, remettez le combiné sur
la base pour recharger les piles.
La touche TALK clignote en vert (très rapide):
• La base tente de localiser le combiné, appuyez sur TALK pour mettre
fin au processus de pagination FIND et remettez le combiné sur la
base.
73
Page 79

XLC7BT
Le voyant POWER de la base clignote en vert une fois par seconde:
• Il est possible que l’adaptateur secteur ne soit pas branché. Vérifiez que
l’adaptateur secteur est branché dans une prise murale appropriée.
Le voyant POWER de la base clignote en vert une fois toutes les cinq
secondes:
• Il est possible que l’adaptateur secteur ne soit pas branché. Vérifiez que
l’adaptateur secteur est branché dans une prise murale appropriée.
• Les piles de la base sont peut-être «faibles» (leur charge). Si nécessaire,
remplacez les piles.
DÉPANNAGE
74
Page 80

XLC7BT
Général
Fréquence: 1.9GHz DECT6.0
Amplification: 50dB
Unité du combiné
Produit en pouces: (L x l x h): 7,25 x 2 x 1,25
Poids en livres: 0,5 lb.
Base
Produit en pouces: (L x l x h): 5,3 x 4,5 x 3,6
Poids en livres: 0,44 lb.
Alimentation: Adaptateur CA: Entrée : 100V-120V CA; Sortie: 6VDC,
CARACTÉRISTIQUES TECHNIQUES
600 mA; Model: RJ-AS060600U501, Shenzhen Ruijing
Industrial Co., Ltd. or Model: S006AKU0600060, Ten Pao
International Ltd.
F
R
Combinés supplémentaires
Numéro de pièce Clarity:XLC7HS
Le XLC7BT soutiendra un maximum de quatre (4) combinés enregistrés
à une base, et deux (2) fixent le maximum à la main utilisé dans le même
appel. (Combinés supplémentaires vendus séparément).
Informations sur les piles
Type de piles : 1.2V 600mAh NiMH - model 60AAAHC, GPI International
Ltd. or KH-44AAA-J600, Yiyang Corun Battery Co., Ltd
Autonomie des piles en communication: 6,5 heures
Autonomie en veille: 130 heures
Contactez le service clientèle de Clarity pour des renseignements sur l’achat
de combinés supplémentaires ou le remplacement des piles.
A
N
Ç
A
I
S
Coordonnées de Clarity:
Service à la clientèle: 800-426-3738
Adresse:
Chattanooga, TN 37416
6131 Preservation Dr.
75
Page 81

XLC7BT
Le parti responsable pour la conformité réglementaire :
Clarity Products LLC
6131 Preservation Drive
Chattanooga, TN 37416
Téléphone : 800-426-3738
Partie 68 de L’information des Règlements du FCC
a) Cet équipement conforme avec Partie 68 des règlements et des conditions
du FCC adoptées par l’ACTA. Sur le fond de cet équipement est une étiquette qui
contient, parmi d’autre information, un identificateur de produit dans le format
US: AAAEQ##TXXXX. Si demander, ce numéro doit être fourni à la compagnie
téléphonique.
b) La prise et la fiche utilisée pour connecter cet équipement à la connexion
et au réseau téléphonique sur place doivent se conformer à la Partie 68
des règlements et les conditions du FCC adoptées par l’ACTA. Une corde
téléphonique conforme et une fiche modulaire, RJ11 USOC, est fournie avec ce
produit. Il est conçu pour être connecté à une prise modulaire compatible qui
est aussi conforme. Voir les directives de montage pour des renseignements.
CONFORMITÉ RÉGLEMENTAIRE
c) Le IES est employé pour déterminer le nombre d’appareils qui peuvent
être connectés à une ligne téléphonique. Les IES excessifs sur une ligne
téléphonique peut avoir comme résultat que les appareils ne sonnent pas
en réponse à un appel entrant. Dans la plupart, mais pas tous les endroits, la
somme des IES ne doit pas dépasser cinq (5,0). Pour
être certain du nombre d’appareils qui peuvent être connectés à une ligne,
comme déterminé par le total de IES, contactez la compagnie téléphonique
locale. Pour les produits approuvés après le 23 juillet 2001, le IES pour ce produit
fait partie de l’identificateur de produit qui a le format US: AAAEQ##TXXXX.
Les nombres représentés par ## sont les IES sans une virgule (ex., 03 est un
IES de 0,3). Pour les produits précédents, le IES est montré séparément sur
l’étiquette.
d) Si cet équipement téléphonique provoque du dommage au réseau
téléphonique, la compagnie téléphonique vous notifierez en avance qu’une
interruption temporaire de service peut être exigé. Mais si le préavis n’est pas
pratique, la compagnie téléphonique notifiera le client aussi tôt que possible.
En outre, vous serez conseillé de vos droits de déposer une plainte avec le FCC si
vous croyez que c’est nécessaire.
e) La compagnie téléphonique peut faire des changements dans ses facilités,
son équipement, ses opérations ou ses procédures qui pourraient aecter
l’opération de l’équipement. Si ceci arrive, la compagnie téléphonique fournira
le préavis pour que vous fassiez les modifications nécessaires pour maintenir le
76
Page 82

XLC7BT
service ininterrompu.
f) Si un problème est éprouvé ave cet équipement téléphonique, pour de
l’information de réparation ou de garantie, veuillez contacter Clarity au 800426-3738. Si l’équipement cause du tort au réseau téléphonique, la compagnie
téléphonique peut vous demandez de débrancher l’équipement jusqu’à ce que le
problème soit résolu.
g) Cet équipement téléphonique n’est pas prévu pour être réparé et ne contient
aucune pièce réparable. L’ouverture de l’équipement ou n’importe quelle
tentative pour exécuter des réparations annulera la garantie. Pour les services
ou les réparations, appelez 800-426-3738.
h) Une connexion au service de ligne de parti est objet à la déclaration des tarifs.
Contactez la commission d’utilité publique de l’État, la commission de service
public ou la commission de société commerciale pour de l’information.
CONFORMITÉ RÉGLEMENTAIRE
F
i) Si votre maison a de l’équipement de sécurité spécifiquement connecté
à la ligne téléphonique, assurez vous que l’installation de cet équipement
téléphonique ne désactivera pas votre système de sécurité. Si vous avez des
questions au sujet de ce qui désactivera votre système de sécurité, veuillez
contacter votre compagnie téléphonique ou un installateur qualifié.
j) Ce téléphone est compatible avec les appareils auditifs.
Téléphone Public à Pièces de Monnaies/Carte de Crédit
Pour se conformer aux tarifs des États, la compagnie téléphonique doit être
donnée une notification avant la connexion. Dans quelques États, la commission
d’utilité publique de l’État, la commission de service public ou la commission de
société commerciale doit donner l’approbation préalable à une connexion.
Partie 15 de L’information des Règlements du FCC
Cet appareil conforme avec partie 15 des Règlements du FCC. Le fonctionnement
est sujet au deux conditions suivantes : (1) Cet appareil ne peut causer de
l’interférence nuisible, et (2) cet appareil doit accepter de l’interférence reçue, y
compris l’interférence qui peut causer un fonctionnement non désiré.
R
A
N
Ç
A
I
S
Votre équipement téléphonique a été testé et a été trouvé de se conformer
aux limites d’un dispositif numérique de Classe B, conformément à la Partie 15
des règlements du FCC. Ces limites sont conçues pour fournir une protection
raisonnable contre l’interférence nuisible dans une installation résidentielle.
Cet équipement donne, utilise, et peut manifester de l’énergie de radio
fréquence et, si pas bien installé et utilisé conformément aux instructions, peut
causer de l’interférence nuisible aux communications de radio. Cependant, il n’y
a pas de garantie que cette interférence n’aura pas lieu dans une installation
77
Page 83

XLC7BT
particulière ; Si cet appareil cause de l’interférence nuisible à la réception de radio
ou de télévision, qui peut être déterminé en éteignant et allumant l’appareil,
vous êtes encouragé d’essayer de corriger l’interférence par une des mesures
suivantes :
1. Où il peut être fait sans accident, orientez la télévision de réception ou
l’antenne de radio.
2. À l’étendue possible, déménagez la télévision, la radio ou autre récepteur par
rapport à l’appareil téléphonique. (Ceci augmente la séparation entre
l’appareil téléphonique et le récepteur téléphonique.)
3. Connectez l’appareil téléphonique dans une prise de courant et sur un circuit
diérent à lequel la télévision, la radio, ou un autre récepteur est connecté.
4. Consultez le distributeur ou un Technicien de Radio/Télé expérimenté pour
de l’aide.
CONFORMITÉ RÉGLEMENTAIRE
L’intimité des communications ne peut être assurée à l’aide de ce téléphone.
AVERTISSEMENT : Pour maintenir la conformité à la directive d’exposition du
rf de la FCC, placez l’unité centrale au moins 20 centimètres des personnes
voisines.
Pour le corps l’opération portée, ce combiné a été examinée et rencontre les
directives d’exposition de la FCC rf une fois utilisée avec les accessoires de Clarity
et de Plantronics fournis ou indiqués pour ce produit. L’utilisation d’autres
accessoires peut ne pas assurer la conformité aux directives d’exposition de la
FCC rf.
AVERTISSEMENT: Les changements ou les modifications à cet équipement pas
expressément approuvé par le parti responsable de la conformité pourraient
annuler l’autorité de l’utilisateur pour fonctionner l’équipement.
Industrie Canada Spécifications Techniques
Cet appareil est conforme à la licence d’Industrie Canada - norme RSS exempté
(s). Le fonctionnement est soumis aux deux conditions suivantes: (1) Cet
appareil ne peut pas provoquer d’interférences et (2) cet appareil doit accepter
toute interférence, y compris les interférences qui peuvent causer un mauvais
fonctionnement de l’appareil.
Ce produit répond à l’innovation applicable, les spécifications techniques des
sciences et de Développement économique Canada.
La confidentialité des communications ne peut pas être garantie avec ce
téléphone.
78
Page 84

XLC7BT
Avant d’installer cet équipement, les utilisateurs doivent s’assurer que c’est
acceptable d’être connecté aux facilités de la compagnie de télécommunications
locale. Cet équipement doit aussi être installé utilisant une méthode de
connexion acceptable. Dans certainscas, le câblage intérieur de la compagnie
associé a un service de ligne individuelle, peut être prolongé avec un ensemble
de connexion certifié (fil de rallonge téléphonique). Le consommateur doit
être au courant que la conformité avec les conditions mentionnées ci-dessus
ne peut pas empêcher la dégradation du service dans certaines situations.
Les réparations à l’équipement certifié devraient êtes faites par un entrepos
Canadien autorisé, désigné par le fournisseur.
N’importe quelles réparations ou modifications faites par l’utilisateur
à cet équipement, ou fonctionnement défectueux de l’équipement, peut
donner une cause à la compagnie de télécommunication pour demander
à l’utilisateur de déconnecter l’équipement.
CONFORMITÉ RÉGLEMENTAIRE
Les utilisateurs doivent s’assurer pour leur propre protection que les mises à
terre d’utilité de pouvoir, les lignes téléphoniques et le système de conduite
d’eau métallique interne, si présent, sont connectées ensemble. Cette
précaution peut être particulièrement importante dans des endroits ruraux.
AVERTISSEMENT : Les utilisateurs ne doivent pas tenter de faire telles connexions, mais devraient contacter l’autorité d’inspection électrique appropriée, ou
un électricien, comme approprier.
L’indice d’équivalence de la sonnerie est une indication du nombre maximum de
terminaux permis d’être connectés à une interface téléphonique. La conclusion
sur une interface peut consister de n’importe quelle combinaison d’appareils
exposés seulement à la condition que la somme des Nombres de L’indice
D’équivalence de la Sonnerie de tous les appareils ne dépasse pas cinq.
(Le terme “IC :” devant le numéro de certification/ inscription signifie seulement
que les spécifications techniques de l’lndustrie Canada ont étés atteintes.)
F
R
A
N
Ç
A
I
S
Cet appareil numérique de la B est conforme à la norme NMB-003
du Canada.
Le parti responsable pour la conformité réglementaire :
Clarity Products LLC
6131 Preservation Drive
Chattanooga, TN 37416
Téléphone : 800-426-3738
79
Page 85

XLC7BT
Dommages accessoires ou indirects: Ni Clarity, ni votre détaillant ou
distributeur ne peut être tenu responsable des dommages accessoires
ou indirects, y compris, mais sans s’y limiter, les pertes commerciales
ou de profit, les frais accessoires, les dépenses, les arrêts de travail ou
les inconvénients. Certaines provinces ne permettent pas l’exclusion
ou la limitation des dommages accessoires ou indirects, la limitation ou
l’exclusion stipulée ci-dessus peut donc ne pas s’appliquer dans votre cas.
Autres droits reconnus par la loi: La présente garantie vous confère des
droits juridiques particuliers et vous pouvez également avoir d’autres droits
selon la province.
Pour faire réparer l’appareil dans le cadre de la présente garantie, veuillez
l’envoyer au centre de réparation approprié indiqué ci-dessous en veillant à
SERVICE ET GARANTIE
prépayer les frais d’expédition.
Clarity Service Center
6131 Preservation Dr.
Chattanooga, TN 37416
Tel : 800-426-3738
Fax: 800-325-8871
Agility Logistics
185 Courtneypark Drive East
Mississauga, ON L5T 2T6
Canada
Tel: 800-426-3738
Fax: 514-956-1825
Veuillez utiliser l’emballage original ou placer le(s) unité(s) dans une boîte
robuste en carton et le(s) emballer de manière à prévenir tout dommage.
Veuillez fournir les renseignements suivants:
• Une preuve d’achat stipulant le numéro de modèle et la date d’achat ;
• L’adresse de facturation ;
• L’adresse d’expédition ;
• Le nombre et la description des unités envoyées ;
• Le nom et le numéro de téléphone de la personne à contacter, le cas
échéant ;
• La raison du retour et la description du problème.
80
Page 86

XLC7BT
Tout dommage survenu au cours de l’expédition relève de la responsabilité du transporteur et les réclamations à ce sujet devront lui être
envoyées directement.
La garantie et les informations de service suivantes s’appliquent
uniquement aux produits achetés et utilisés aux États-Unis et au
Canada. Pour les informations relatives à la garantie dans d’autres
pays, veuillez contacter votre détaillant ou distributeur local.
Garantie limitée: Clarity Products LLC («Clarity») garantit à l’acheteur
original qu’à l’exception des limitations et exclusions énoncées
ci-dessous, ce produit sera exempt de tout défaut matériel et de
fabrication pour une période d’un (1) an à partir de la date d’achat
initiale («Période de garantie»). Clarity sera tenue aux fins de la
présente garantie à remplacer ou réparer sans frais et à sa seule
SERVICE ET GARANTIE
F
discrétion, toute pièce ou unité présentant un défaut matériel ou de
fabrication au cours de la période de garantie.
Exclusions de la garantie: Cette garantie ne s’applique qu’aux défauts
matériels et de fabrication en usine. Toute condition résultant d’un
accident, d’un abus, d’une utilisation inappropriée, d’une violation des
instructions fournies par Clarity, d’une destruction ou d’une altération,
de tensions ou courants inadéquats ou d’une tentative de réparation
ou d’entretien eectuée par une autre personne qu’un employé de
Clarity ou un centre de réparation autorisé, ne sera pas couverte par
cette garantie. Les compagnies de téléphonie fabriquent diérents
types d’équipement et Clarity ne peut garantir que son équipement
sera compatible avec l’équipement d’une compagnie de téléphonie
particulière.
Garanties implicites: Vous pourriez être en droit de bénéficier de
R
A
N
Ç
A
I
S
certaines garanties implicites en vertu d’une loi provinciale. Ces
garanties implicites ne demeureront en force que pour la durée de la
période de garantie. Certaines provinces permettent de limiter la durée
d’une garantie implicite, la limitation ci-dessus pourrait donc ne pas
s’appliquer dans votre cas.
81
Page 87

Page 88

XLC7BT
ÍNDICE
INSTRUCCIONES IMPORTANTES DE SEGURIDAD 84
LISTA DE VERIFICACIÓN DEL CONTENIDO Y LAS PIEZAS 86
INSTALACIÓN 88
MONTAJE PARA PARED DEL XLC7BT 89
BASE: guía de referencia rápida 91
AURICULAR: guía de referencia rápida 92
INFORMACIÓN SOBRE LA BATERÍA 95
BLUETOOTH 96
CÓMO HACER Y CONTESTAR LLAMADAS 98
AJUSTE DE VOLUMEN Y TONO 100
FUNCIÓN DE IDENTIFICACIÓN DE LLAMADAS 101
BOTON MEM 101
DIRECTORIO 102
DETALLES DE PANTALLA 102
MENÚ TELEFÓNICO 102
REGISTRO DEL AURICULAR 110
RESOLUCIÓN DE PROBLEMAS 112
E
S
P
ESPECIFICACIONES TÉCNICAS 115
CONFORMIDAD CON LOS REGLAMENT©OS 116
INFORMACIÓN SOBRE LA GARANTÍA 120
83
A
~
N
O
L
Page 89

XLC7BT
INSTRUCCIONES IMPORTANTES DE
SEGURIDAD
Cuando utilice su aparato telefónico, debe tomar precauciones básicas de seguridad para
reducir los riesgos de incendio, descarga eléctrica y lesiones a las personas, entre las que
se incluyen
las siguientes:
1. Lea y comprenda todas las instrucciones.
2. Siga todas las instrucciones y advertencias marcadas en el teléfono.
3. No utilice este teléfono cerca de una bañera, lavatorio, lavabo o el fregadero, en un
subsuelo húmedo, cerca de una piscina o cualquier otro lugar con agua.
4. Evite utilizar un teléfono (que no sea inalámbrico) durante una tormenta. Existe
el riesgo remoto de sufrir una descarga eléctrica por rayos.
5. No utilice el teléfono para avisar de una pérdida de gas, si se encuentra cerca a la
pérdida.
6. Desenchufe el teléfono de la pared antes de limpiarlo. No utilice limpiadores líquidos o
en aerosol para limpiar el teléfono. Utilice un trapo húmedo para limpiar ela parato.
7. Coloque este teléfono sobre una superficie firme. Si el teléfono se cayera, podría
causar daños y/o lesiones graves.
8. No cubra las ranuras o aberturas del teléfono. Este teléfono nunca deberá colocarse
cerca o sobre un radiador o fuente de calor. Este teléfono no debería instalarse en una
instalación empotrada a menos que cuente con la ventilación apropiada.
9. Utilice este teléfono al voltaje indica do en la unidad base o en el manual del
propietario. Si no está seguro del voltaje en su hogar, consulte con su distribuidor o
con la compañía de energía locales.
10. No coloque nada sobre el cable de energía. Instale el teléfono de manera que nadie
pise o se tropiece con el cable.
11. No sobrecargue las tomas en la pared o los cables alargadores, ya que esto puede
aumentar el riesgo de descarga eléctrica o incendio.
12. Nunca fuerce ningún objeto por as ranuras del teléfono. Podría tocar puntos
con voltaje peligroso o hacer cortocircuito en elementos que generen el riesgo
de descarga eléctrica o incendio. Nunca vuelque ningún tipo de líquido sobre el
teléfono.
13. Para reducir el riesgo de descarga eléctrica, no desarme el teléfono. Quitar o abrir las
carcasas puede exponerlo a voltajes peligrosos u otros riesgos. El re-armado incorrecto puede causar descarga eléctrica luego, cuando se utilice el aparato.
14. Desenchufe este producto del tomacorriente de pared y derívelo al servicio de
reparaciones el fabricante cuando se presenten las condiciones siguientes:
Cuando el cable de alimentación o el enchufe estén pelados o dañados; si se derramó
líquido en su interior; si estuvo expuesto al agua o la lluvia; si se cayó o la carcasa se dañó;
si muestra un cambio evidente en el funcionamiento; si no funciona normalmente al
seguir las instrucciones correspondientes. Ajuste únicamente los controles que estén
contemplados en las instrucciones operativas. Un ajuste inadecuado puede complicar el
trabajo del técnico calificado para conseguir que el aparato funcione de forma normal; si el
teléfono no funciona del modo habitual al seguir las instrucciones operativas.
15. Este producto debe funcionar sólo con el tipo de alimentación eléctrica indicada en la
GUARDE ESTAS INSTRUCCIONES
84
Page 90

XLC7BT
INSTRUCCIONES IMPORTANTES DE
SEGURIDAD
etiqueta de la marca. Si no está seguro del tipo de alimentación eléctrica que tiene en
su casa, consulte a su compañía eléctrica local.
16. No intente abrir el adaptador de CA. Contiene voltajes potencialmente peligrosos y no
tiene partes utilizables.
17. No siga utilizando el producto y contacte con Clarity si se recalienta, tiene un cable o
enchufe dañados, se cayó o dañó, o estuvo en contacto con líquidos.
18. Use solamente el adaptador de CA provisto con el producto o un repuesto provisto por
Clarity.
19. Este teléfono amplifica los sonidos. Para evitar daños auditivos, se debe
informar a todos los usuarios del teléfono de la capacidad del aparato de generar
volúmenes altos; los niños deben usar el teléfono únicamente si los supervisa un
adulto.
20. La exposición a niveles de sonido elevados o la presión sonora excesiva pueden
provocar daños auditivos temporales o permanentes. Si bien no existe una
configuración única de volumen que sea adecuada para todos, siempre debería usar
su teléfono con el volumen en niveles moderados y evitar la exposición prolongada
a los niveles sonoros elevados. Cuanto más alto sea el volumen, antes puede verse
afectada su audición. Si se siente molesto con su audición, debería consultar al
médico. Para proteger su audición, debería:
• Situar el control de volumen en una posición baja y aumentar el volumen
gradualmente según sea necesario. Antes de presionar el botón BOOST, reduzca
el volumen al nivel más bajo. Use el teléfono en la configuración de volumen más
baja posible.
• Limitar el tiempo que usa el teléfono a niveles de volumen elevados.
21. Si presenta irritación cutánea después de usar este producto, deje de utilizarlo y
póngase en contacto con Clarity.
INSTRUCCIONES DE SEGURIDAD PARA LAS BATERÍAS
Deseche las baterías usadas según las instrucciones.
Precaución: Desconecte la línea telefónica antes de cambiar las pilas.
1. No arroje la batería al fuego porque podría explotar. Verifique los códigos locales para
saber si existen instrucciones especiales para desecharlas.
2. No abra ni rompa la batería. El electrolito liberado es corrosivo y puede provocar
daños en los ojos y la piel. Puede ser tóxico si se ingiere.
3. Se debe tener cuidado cuando se manipulen las baterías para evitar que se produzca
un cortocircuito con materiales conductores, como anillos, brazaletes y llaves. La
batería o el material conductor pueden recalentarse y ocasionar quemaduras.
4. Retire las baterías cuando estén descargadas y cuando no vaya a utilizar el equipo
durante un período prolongado. Deseche las baterías de conformidad con las leyes
ambientales locales.
5. No desarme, caliente, aplaste, deforme ni pinche las baterías.
6. No intente cargar las baterías no recargables.
7. Mantenga las baterías fuera del alcance de los niños.
ADVERTENCIA: El riesgo de explosión si batería es reemplazada por un tipo inexacto.
E
S
P
A
~
N
O
L
GUARDE ESTAS INSTRUCCIONES
85
Page 91

XLC7BT
LISTA DE VERIFICACIÓN DEL CONTENIDO Y
LAS PIEZAS
Base
IN USE/
CHARGE
VOLUME
SILENT
FIND
1
2
POWER
BOOST
;
!
BACK
MUTE
MENU
TAL K
FLASH
RD/P
1
Auricular
MEM
EXIT
Cables telefónicos
(largo/corto)
Sujetador para
Soporte para
montaje en
pared
XLC7BT
Guía del
usuario
Guía del usuario
Adaptador de CA
86
cinturón
Page 92

XLC7BT
INSTALACIÓN
Su teléfono debe llegar pre-reunido. Para instalarlo:
1. Quite la base del paquete; tire de la lengüeta amarilla en la
dirección de la flecha.
2. Tenga un fin de su cuerda blanca de adaptador de poder de
teléfono apretadamente. El fin correcto tener ya debe ser
tapado en la espalda de su unidad telefónica de base. Tire
simultáneamente el otro fin de la cuerda de adaptador lejos del
teléfono, lo desenredando y le permitiendo tapar ese fin de la
cuerda en una toma de corriente de pared.
3. Tape cuerda blanca de adaptador de poder en el trasero izquierdo
de la base en una toma de corriente de pared.
4. Tenga un fin de su
XLC7BT’s mucho tiempo cuerda de teléfono
apretadamente. El fin correcto tener ya debe ser tapado en el
gato de su teléfono. Tire simultáneamente el otro fin de la cuerda
de teléfono lejos del teléfono, lo desenredando y le permitiendo
tapar ese fin de la cuerda en una pared salida telefónica.
5. Tape el fin flojo de la cuerda de teléfono en la pared salida
telefónica.
6. Quite microteléfono del paquete.
7. Tire etiqueta de la batería del microteléfono situada en el fondo
del dispositivo hacia la flecha.
8. Coloque el microteléfono en el corcel de base. Las baterías en el
microteléfono deben ser cargadas completamente durante 16
horas antes de utilizar el teléfono por primera vez.
9. Levante microteléfono y prensa TALK con prueba. Si oye un tono
de marcar, su teléfono está listo para el uso. Si no, verifique todas
las conexiones otra vez.
87
E
S
P
A
~
N
O
L
Page 93

XLC7BT
INSTALACIÓN
88
Page 94

XLC7BT
MONTAJE PARA PARED DEL XLC7BT
1. Siga las instrucciones que se encuentran en la sección Instalación
en la página 87 para quitar la base y el auricular de la base (pasos 1,
4, 6).
2. Desenchufe el cable telefónico largo de la toma del teléfono
ubicada en la parte posterior del
XLC7BT. Enchufe uno de los
extremos del cable telefónico corto en la misma toma identificada
con LINE (línea) en la parte posterior de la base.
3. Coloque la base del
XLC7BT en el soporte para montaje en pared
tal como se muestra en la página 88. Pase el cable corto a través
del soporte tal como se muestra en el diagrama.
4. Con un destornillador, desajuste los tornillos de la toma telefónica
de pared (1 ó 2 vueltas).
5. Enchufe el extremo libre del cable corto a la toma telefónica de
pared.
6. Fije el soporte para montaje en pared (con la base del
XLC7BT) a la
toma telefónica de pared.
7. Enchufe el adaptador al tomacorrientes de pared.
8. Tire de la lengüeta de la batería del auricular, ubicada en la parte
inferior del dispositivo, en la dirección que indica la flecha.
9. Coloque el auricular en la base y déjelo cargar 16 horas en forma
completa.
E
S
P
A
~
N
O
L
89
Page 95

XLC7BT
MONTAJE PARA PARED DEL XLC7BT
90
Page 96

XLC7BT
BASE: GUÍA DE REFERENCIA RÁPIDA
1 Visual Ringer (timbre
visual)
Se ilumina cuando el teléfono
suena; se enciende cuando el
teléfono está en uso.
2 Luz IN USE / CHARGE
(en uso/recarga)
Cuando el teléfono se está
cargando se enciende una luz
roja; cuando está en uso, se
enciende una luz verde.
3 Luz POWER (energía)
Se enciende una luz verde cuando el adaptador está enchufado.
5 SILENT (silencioso)
Presione esta tecla si desea
desactivar el timbre de la base.
El botón se ilumina en color rojo
cuando el timbre está desactivado.
6 VOLUME (volumen)
(SUBIR/BAJAR)
Utilice estas teclas para subir o
bajar el volumen del timbre.
7 BOTONES DE BLUETOOTH (1,2)
Use estas teclas para emparejar
los celulares habilitados para
Bluetooth que desea usar con
su XLC7BT.
Durante un corte de energía,
la luz POWER parpadeará en
verde una vez por segundo.
4 FIND (buscar)
Presione esta tecla para
localizar el auricular.
1
VOLUME
2
POWER
FIND
IN USE/
CHARGE
SILENT
8 RINGER STYLE (estilo de
timbre)
Utilice esta tecla para
seleccionar el tono de timbre
más acorde a su entorno. Hay
seis tonos disponibles.
NOTA (base): sólo se puede aju-
6
star el volumen o el estilo del
timbre cuando el teléfono no
está siendo utilizado.
8
7
RINGER
STYLE
HIGH OUTPUT
RINGER
5
E
S
P
A
~
N
3
O
L
1
2
4
91
Page 97

XLC7BT
AURICULAR: GUÍA DE REFERENCIA RÁPIDA
1
2
4
5
6
7
1 VOLUME Control
Wheel (rueda de ajuste
1
!
TALK
BOOST
MENU
MEM
;
BACK
MUTE
EXIT
FLASH
RD/P
8
3
9
10
11
(OSA; consulte la página
109). Cuando la función OSA
de volumen)
Utilice el control giratorio para
subir o bajar el volumen de las
llamadas entrantes. El nivel
del volumen se visualiza en la
pantalla, en el ángulo inferior
derecho.
2 BOOST (amplificación)
Presione este botón para
activar la amplificación
extra. El botón BOOST se
vuelve rojo cuando la función
Amplificación está activada.
Manténgalo presionado
durante tres segundos
para activar la función
Amplificación de voz saliente
está activada, en la pantalla
se visualiza “OSA On”. Para
conocer más detalles sobre
la función Amplificación,
consulte la página 108.
3 Speaker (altavoz)
;
Durante una llamada, presione
esta tecla para activar el
altavoz del auricular. Presiónela
nuevamente para regresar al
modo auricular.
Cuando está activado el modo
altavoz, el ícono del altavoz
se visualiza en la pantalla (a la
izquierda del ícono de batería),
y el botón del altavoz se
enciende en color rojo.
92
Page 98

XLC7BT
AURICULAR: GUÍA DE REFERENCIA RÁPIDA
4 Phonebook (directorio)
Este botón le permite
acceder a la lista de nombres
y números guardados en el
XLC7BT. Consulte la página
106.
5 TALK (hablar)
Este botón le permite
hacer o contestar llamadas
telefónicas. Se enciende
en color verde durante una
llamada.
6 Flechas (SUBIR/BAJAR)
Presione la flecha SUBIR o
BAJAR para navegar por los
menús. En modo de espera,
presione SUBIR o BAJAR para
acceder a la lista de llamadas
recibidas.
7 Botón MENU (menú)
Presione este botón para
acceder a las opciones
disponibles del teléfono.
Consulte la página 103 para
obtener más detalles.
8 Botón MEM: presione este
botón para marcar un número
con un toque desde el modo
de espera.
9 Botón MUTE / BACK
(EDIT) (silencio / volver
(editar))
Mute (silencio): le permite
hablar sin que se escuche la
conversación (durante una
llamada).
Back(volver): En el modo
MENU, le permite regresar a la
pantalla anterior.
(Edit)(editar): Cuando se
visualiza un número de
teléfono, le permite alternar
entre formatos de 7/10/11
dígitos para el número que
está visualizando.
10 FLASH / EXIT (corte
momentáneo/salir)
FLASH (corte momentáneo):
Cuando esté realizando una
llamada, presione FLASH /
EXIT para recibir otra llamada
entrante. (Debe contar con el
servicio de llamada en espera).
EXIT (salir): En el modo MENU,
esta tecla le permite regresar
al modo de espera.
11 RD / P (remarcar / pausa)
Presione esta tecla para volver
a marcar el último número
marcado o hacer una pausa
(de dos segundos) cuando
programe memorias o efectúe
premarcados.
12 Headset (Auricular)
Se puede utilizar un auricular
de 2,5 mm en el puerto para
auriculares. (Recomendamos
el auricular Plantronics M175C).
13 TONE (tono)
Presione esta tecla para
seleccionar el tono de audio
del auricular. Consulte la
página 101.
E
S
P
A
~
N
O
L
93
Page 99

XLC7BT
AURICULAR: GUÍA DE REFERENCIA RÁPIDA
14 Intercom
(intercomunicador)
Presione esta tecla para llamar
a otro auricular dentro del
12
sistema.
15 RINGER ON / OFF
(timbre activado/
desactivado)
Use esta tecla para activar y
desactivar el timbre del auricular.
16 NECKLOOP (cable para
auricular)
Se puede utilizar un cable
de 3,5 mm en el puerto
del cable para auricular.
(Recomendamos el cable para
auricular Clarity CE30).
17 Clip para cinturón
TONE
INTERCOM
VOLUME
14
13
15
16
17
ON OFF
NECK
LOOP
18
Clip de cinturón disponibles a
petición.
18 Rejilla del parlante
19 Compartimento para
baterías
19
94
Page 100

XLC7BT
INFORMACIÓN SOBRE LA BATERÍAA
AURICULAR
Las baterías del auricular se deben cargar en forma completa durante
16 horas antes de utilizar el teléfono por primera vez.
Duración de la batería: En horas de uso, 6,5. En modo de espera,
130 horas sin utilizarlo. Los tiempos reales variarán según la
configuración del amplificador. Reemplace las baterías cada dos
años.
Especificaciones de las baterías (proporcionadas con el teléfono): 3
baterías recargables AAA NiMH (
GPI International Ltd. or KH-44AAA-J600, Yiyang Corun Battery Co., Ltd
1.2V 600mAh NiMH - model 60AAAHC,
Para reemplazar las baterías, quite la tapa para las baterías en el
auricular y coloque las nuevas; luego, cierre con la tapa para las
baterías.
BASE
Las baterías de reserva en la base garantizan la funcionalidad
del teléfono inalámbrico (3 a 4 horas) en caso de que se corte la
Abra la puerta del
compartimento para
baterías aquí.
).
electricidad. Cuando la unidad de la base funcione en modo de batería
(sin energía de CA), la luz POWER de la base parpadeará cada dos
segundos.
Para instalar las baterías en la base:
1. Dé vuelta la base y abra la puerta del compartimento para baterías.
2. Coloque las baterías con los polos en la dirección indicada en el
compartimiento para baterías.
NOTA: para reemplazar las baterías del auricular o instalar las
baterías de reserva en la base, utilice ÚNICAMENTE baterías
recargables estándar AAA NiMH de 600 mAh.
95
E
S
P
A
~
N
O
L
 Loading...