

Page 1
User's Manual
First Steps
™
3-in-1 Cruiser
© 2001 VTech
Printed in China
91-01500-001-000
Page 2

Dear Parent:
At VTech® we know that a child has the ability to do great things.
That’s why all of our electronic learning products are uniquely
designed to develop a child’s mind and allow them to learn to the
best of their ability. Whether it’s introducing numbers and letters,
identifying colors and shapes, or stimulating senses with lights
and music, all VTech® infant and toddler learning products
encourage your child’s natural growth and discovery skills.
When it comes to providing electronic learning products that
enlighten, entertain and develop minds, at VTech® we see the
potential in every child.
1
Page 3
INTRODUCTION
Thank you for purchasing the VTech® First Steps™ 3-in-1 Cruiser
learning toy! We at VTech® are committed to providing the best possible
products to entertain and educate your child. Should you have any
questions or concerns, please call our Consumer Services Department
at 1-800-521-2010 in the U.S. or 1-800-267-7377 in Canada.
The VTech® First Steps™ 3-in-1 Cruiser is a walker, ride-on and wagon
for toddlers 6 months and up. Toddlers will have three times the fun
walking, riding and hauling around with their 3-in-1 Cruiser. The removable
activity panel attaches easily to all three modes and is packed with buttons,
lights, phrases and fun sound effects.
MAIN UNIT
Please Note:
The walker is intended for use with toddlers of approximately 6 months of
age. We suggest the ride-on and wagon modes not be used until your
child is walking. For your child's safety, adult supervision is recommended.
This unit should not be used by children weighing more than 50lbs,
excessive weight could damage this product.
INCLUDED IN THIS PACKAGE
- One electronic activity panel
- One walker/ride-on/wagon unit
- One steering wheel
- One instruction manual
WARNING: All packing materials, such as tape, plastic sheets, wire ties
and tags are not part of this toy, and should be discarded for
your child’s safety.
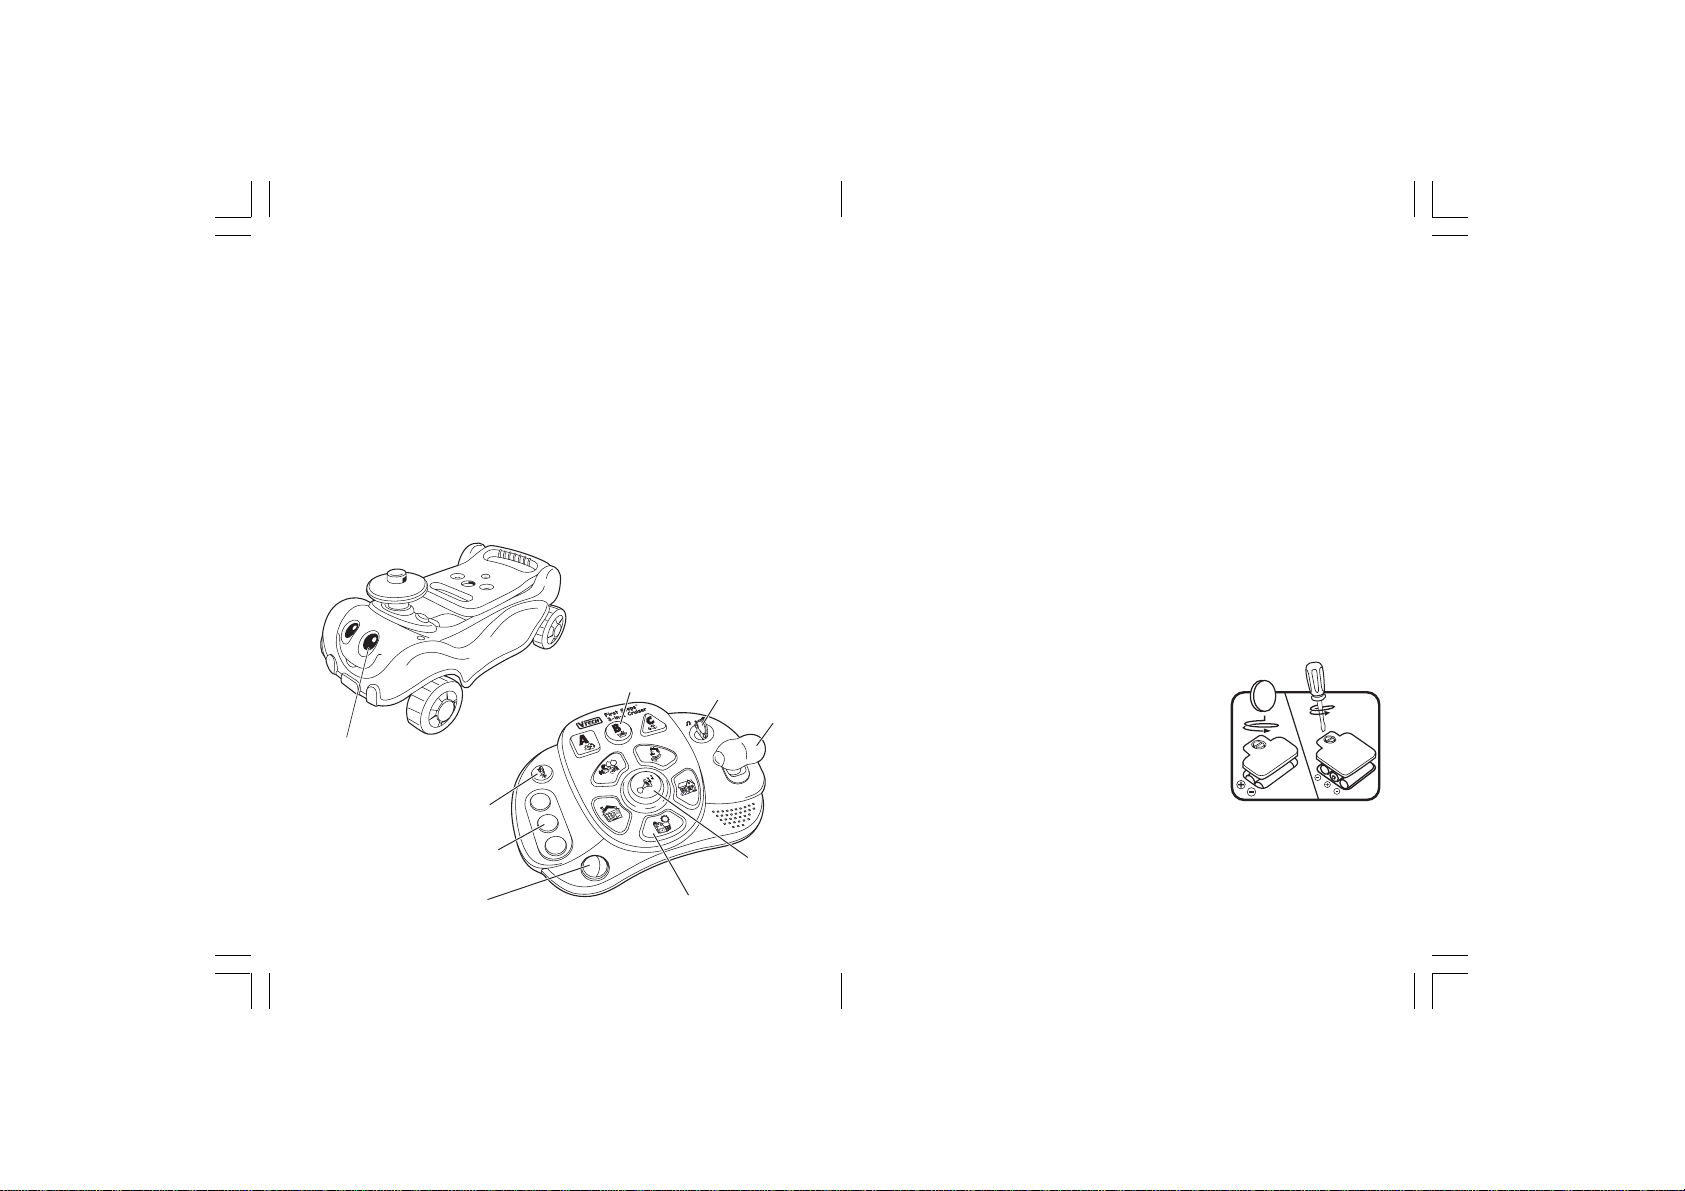
LIGHT-UP EYES
POLICE OFFICER
BUTTON
LIGHT-UP TRAFFIC
BUTTONS
ROLLER BALL
ACTIVITY PANEL
OBJECT/SHAPE BUTTONS ON/OFF/MODE SELECTOR
®
SWITCH
TRANSMISSION
KNOB
HORN BUTTON
LIGHT-UP LOCATION BUTTONS
BATTERY INSTALLATION
1. Make sure the unit is turned OFF.
2. Locate the battery covers on the back of the
activity panel and on the bottom of the main
unit. Use a coin or screwdriver to loosen
the screws.
3. Install 3 “AA” (UM-3/LR6) batteries into the
activity panel and 2 “AA” (UM-3/LR6) into the main unit. (The use of
new alkaline batteries is recommended for maximum performance.)
4. Replace the battery covers and tighten the screws to secure the
battery covers.
32
Page 4
BA TTERY NOTICE
• Install batteries correctly observing the polarity ( +, - ) signs to avoid
leakage.
• Do not mix old and new batteries.
• Do not use batteries of different types.
• Remove exhausted or new batteries from the equipment when the
unit will not be used for an extended period of time.
• Do not dispose of batteries in fire.
• Do not attempt to recharge ordinary batteries.
• The supply terminals are not to be short-circuited.
WE DO NOT RECOMMEND THE USE OF RECHARGEABLE BATTERIES.
NOTE: If for some reason the program/activity stops working, please
follow these steps:
1. Please turn the unit OFF.
2. Interrupt the power supply by removing the batteries.
3. Let the unit stand for a few minutes, then replace the batteries.
4. Turn the unit ON. The unit should now be ready to play again.
If the problem persists, please call our Consumer Services
Department at 1-800-521-2010 in the U.S. or 1-800-267-7377 in
Canada, and a service representative will be happy to help you.
With the VTech® First Steps™ 3-in-1 Cruiser safety comes first:
To ensure your child’s safety, the conversion of the walker, ride-on or
wagon is an adult activity, not a child’s activity. Please ensure the
walker, ride-on or wagon is securely locked in either the upright or folded
position to avoid injury.
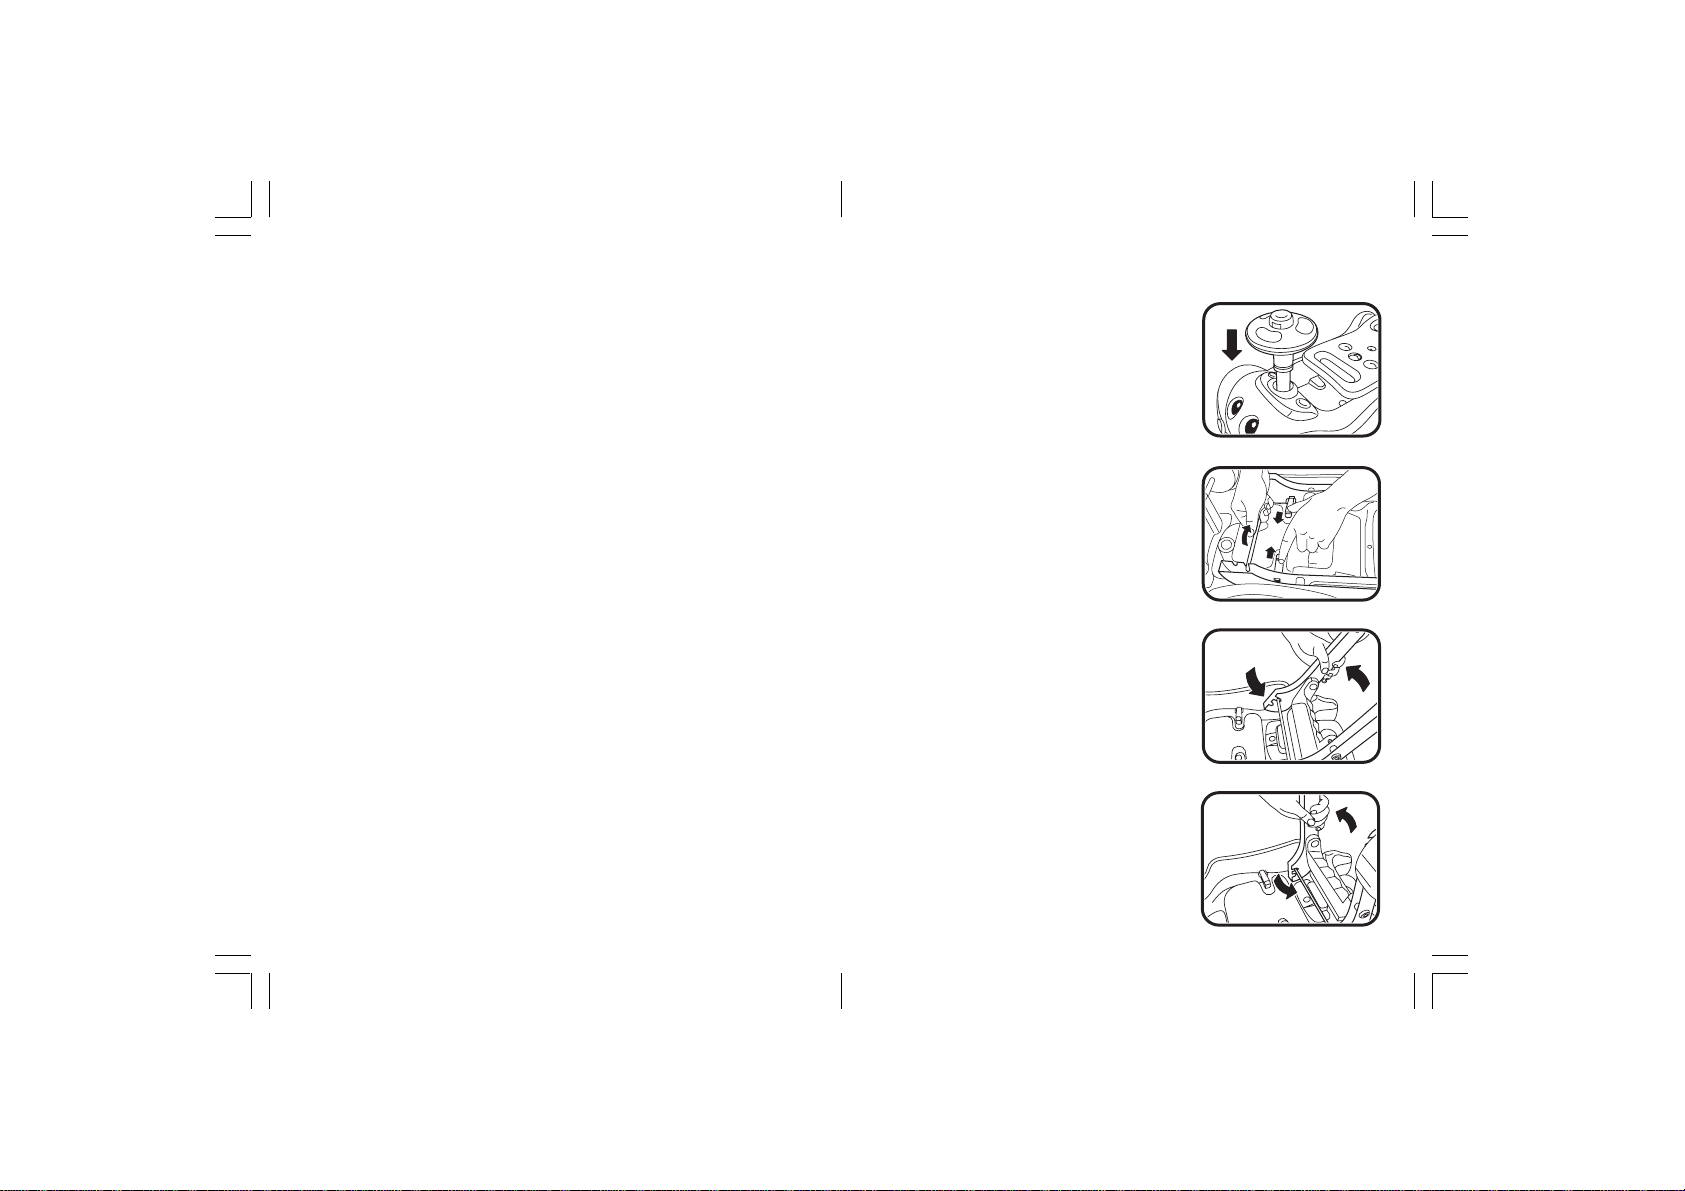
ASSEMBLY INSTRUCTIONS
Converting the ride-on to the walker
1. Insert the steering wheel into the hole
on the top of the main unit and press
down until it snaps into place. Once the
steering wheel is locked into the main
unit it cannot be removed.
2. Turn the main unit over . Pull the release
tabs inwards, then pull the metal rod
upwards.
3. To position the legs, rotate them to an
upright position.
4. Next, pull the legs towards you until the
metal rod goes over the large white
safety lock button and snaps into place.
Pull back on legs to ensure they are
securely locked.
54
Page 5
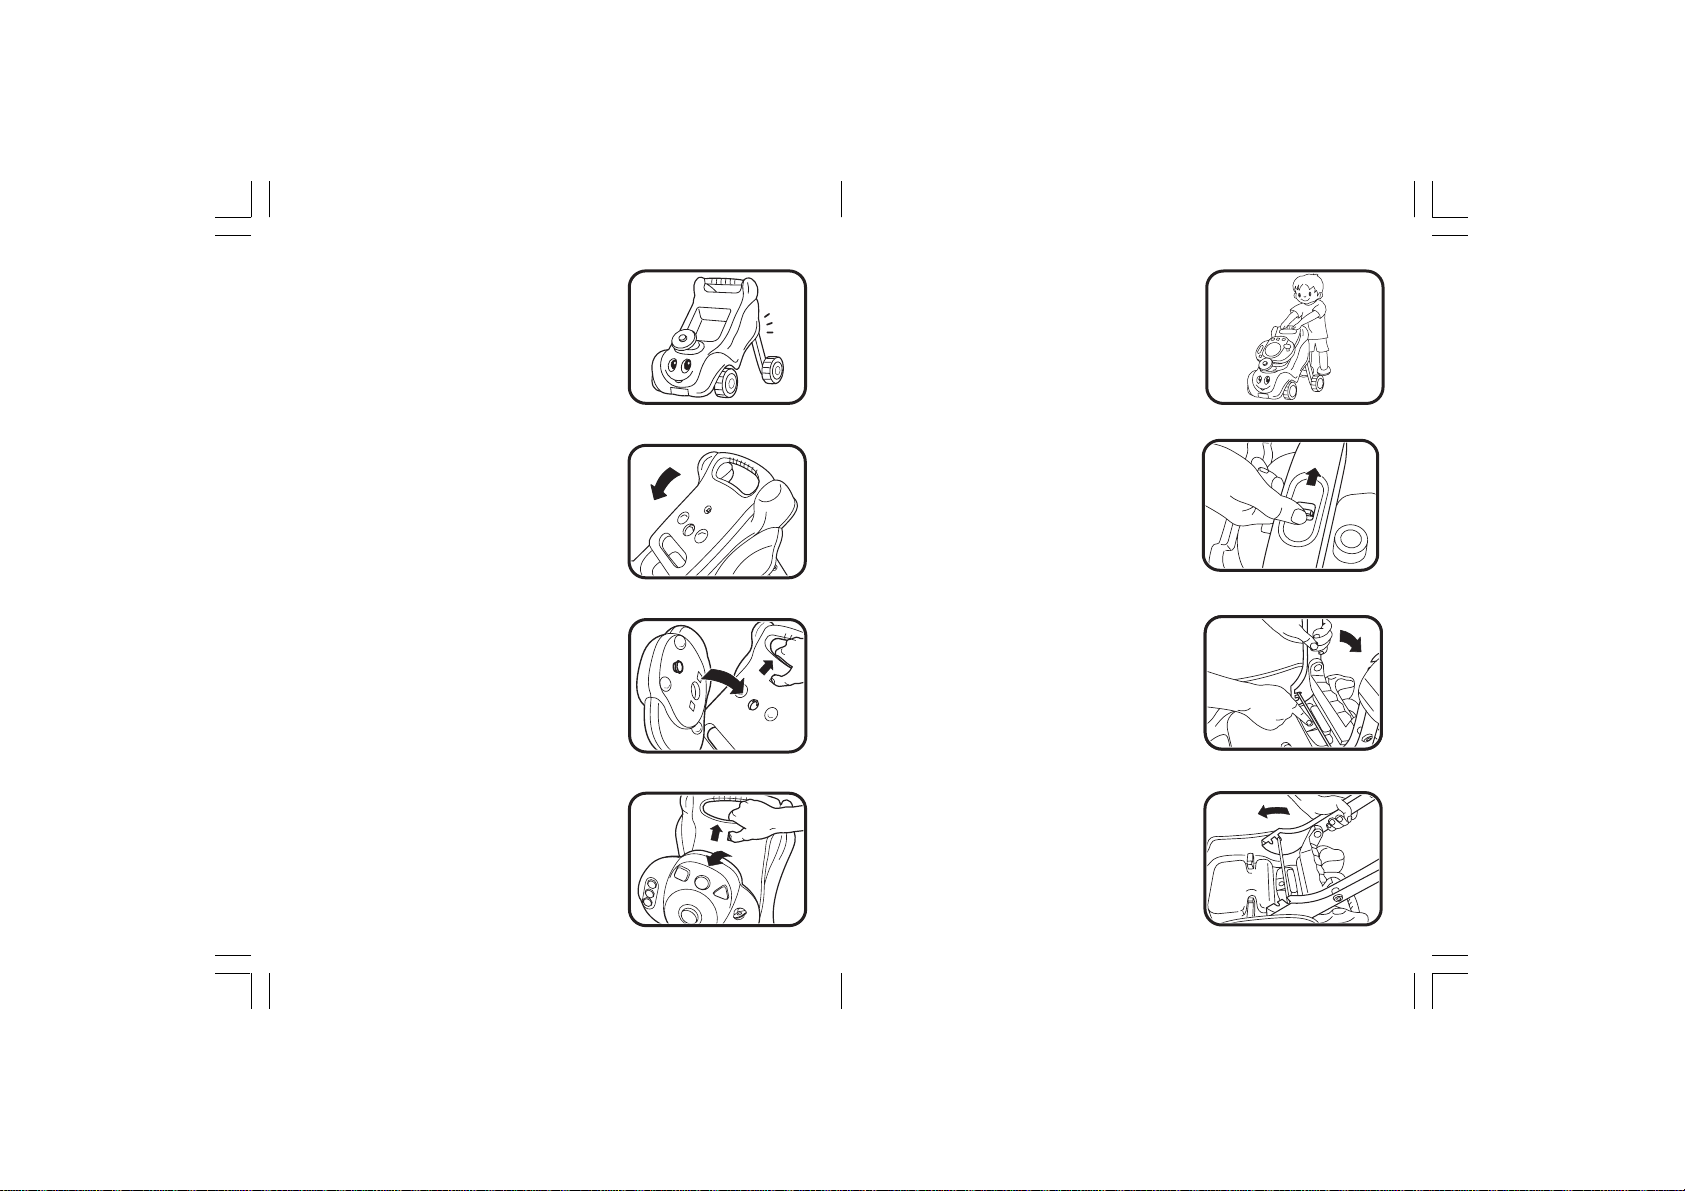
5. When the walker is in the upright
position, the legs MUST be secured in
the safety lock. Apply a small amount
of pressure on the handle to ensure the
legs are locked.
9. The assembly of the walker is now
complete and ready to be used.
6. Fold the seat panel down and snap it
into place.
7. To attach the activity panel, pull up on
the release tab and secure the activity
panel to the seat until it snaps.
8. T o detach the activity panel, pull up on
the release tab and remove the activity
panel.
10. To lock the front wheels, slide the brake
switch located on the bottom of the main
unit. Gently push on the walker to
ensure the wheels are securely locked.
Converting the walker to the ride-on
1. Turn the main unit over. Press down
on the safety lock button. Pull the metal
rod towards you, while the safety lock
button is being pressed. This will unlock
the metal rod allowing the legs to fold
into the main unit.
2. Hold the main body and fold in the legs.
76
Page 6

3. Press down on the legs until they snap
into the locked position.
7. The assembly of the ride-on is now
complete and ready to be used. Make
sure the seat is folded into the proper
position to avoid injury.
4. Pull up on the metal rod to ensure the
legs are securely locked.
5. To attach the activity panel to the
steering wheel, pull the release tabs out
and snap the panel into place. Gently
pull on the activity panel to ensure it is
securely locked.
6. To detach the activity panel, pull the
release tabs out and remove the panel.
Converting the ride-on to the wagon
1. When the main unit is in the ride-on
position, remove the activity panel.
2. Pull the seat panel towards you.
3. The assembly of the wagon is now
complete and ready to be used.
© VTECH
Printed in China
91-01500-000
98
Page 7
TO BEGIN PLAY
®
Beeping sound
effect
®
®
Revving sound
effect
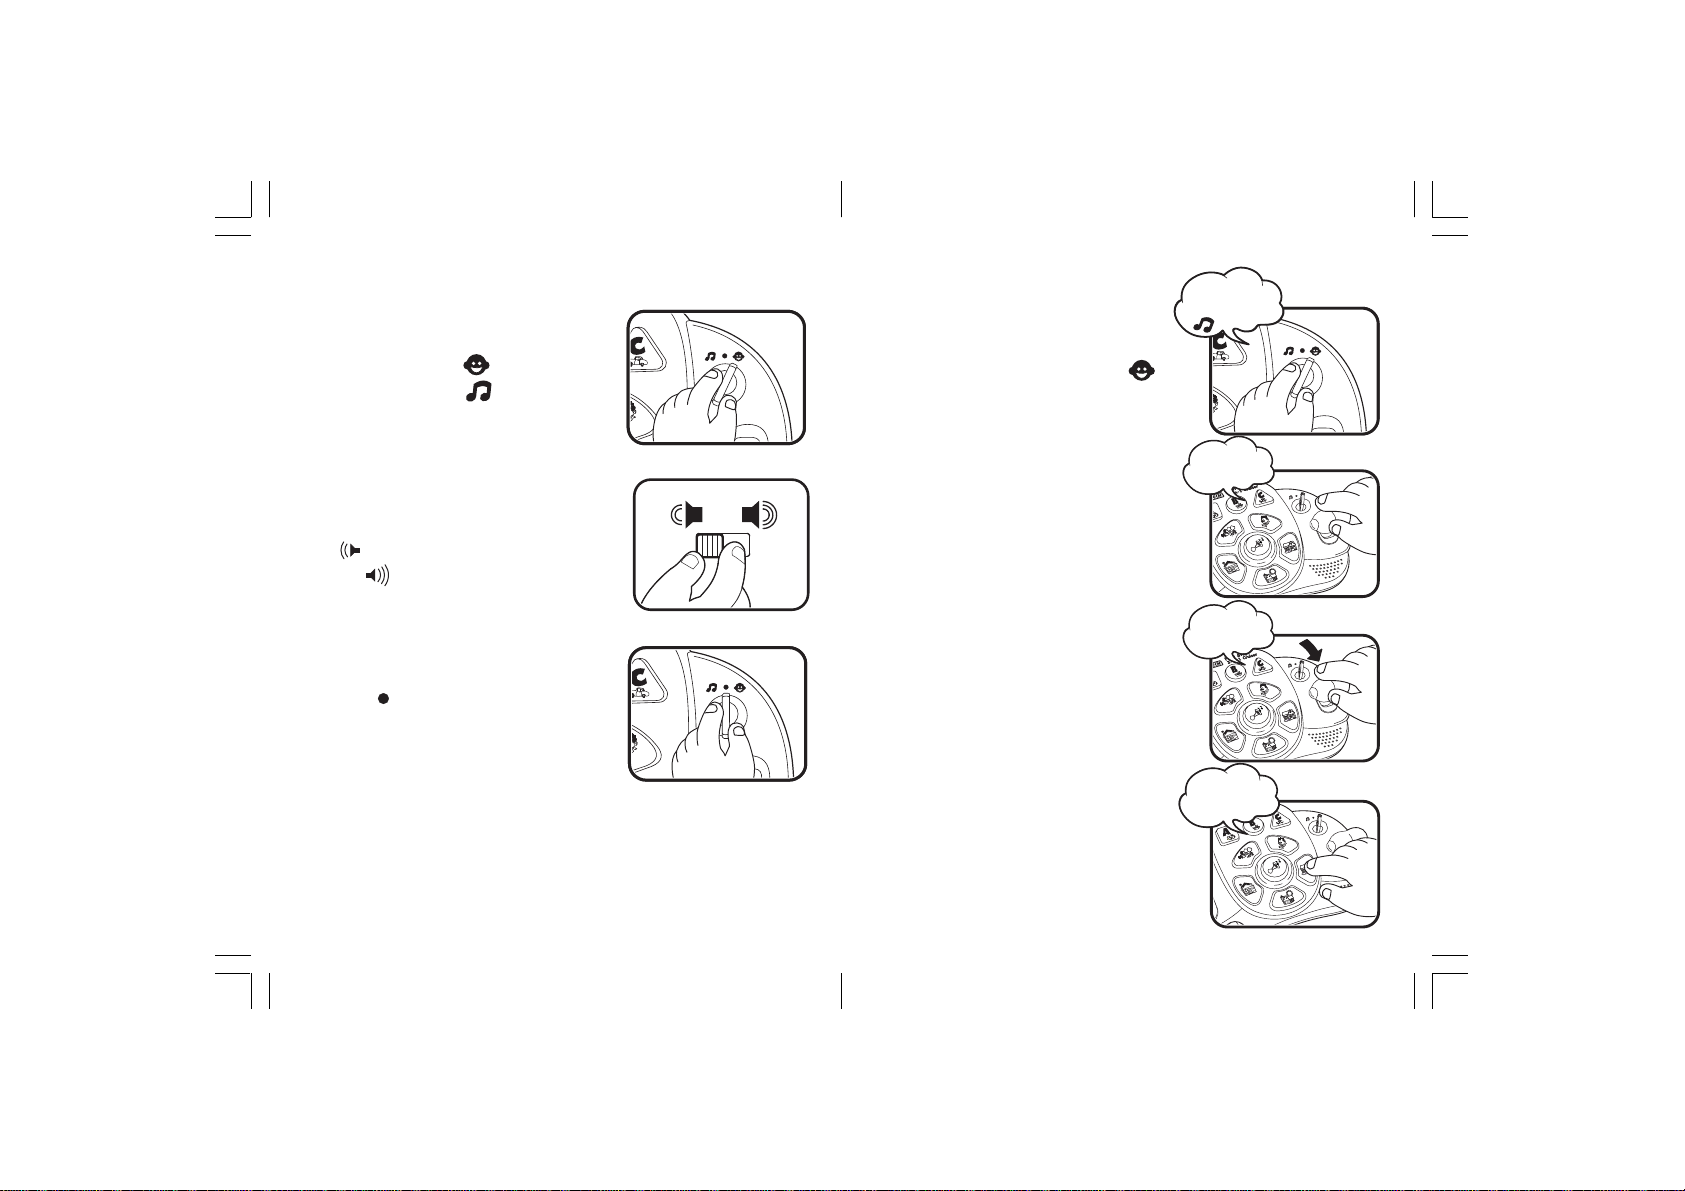
1. To turn the unit ON, turn the ON/OFF/
MODE SELECTOR SWITCH to the
TALKING MODE ( ) position or the
MELODY MODE ( ) position.
2. To adjust the volume, slide the
VOLUME CONTROL SWITCH located
on the back of the activity panel to the
( ) position for LOW VOLUME or to
the ( ) position for HIGH VOLUME.
ACTIVITIES
A. T ALKING MODE
1. Turn the ON/OFF/MODE SELECTOR
SWITCH to the TALKING MODE ( )
position. You will hear a start-up
engine sound effect followed by “Let’s
go on an adventure!” and a short tune.
The lights will flash randomly with the
sound.
2. Push the TRANSMISSION KNOB up
to hear a revving engine sound effect.
The 5 location buttons will light up one
by one with the sound.
Start-up engine sound
effect + “Let’s go on
an adventure !”
3. T o turn the unit OFF, turn the ON/OFF/
MODE SELECTOR SWITCH to the
OFF ( ) position.
NOTE: To preserve battery life, the VTech® First Steps™ 3-in-1 Cruiser
learning toy will automatically power-down after several minutes
without input. The unit can be turned on again by pressing any
button or by pulling/pushing the unit when the activity panel is
attached.
3. Pull the TRANSMISSION KNOB
down to hear a beeping sound effect.
The 5 location buttons will light up one
by one with the sound.
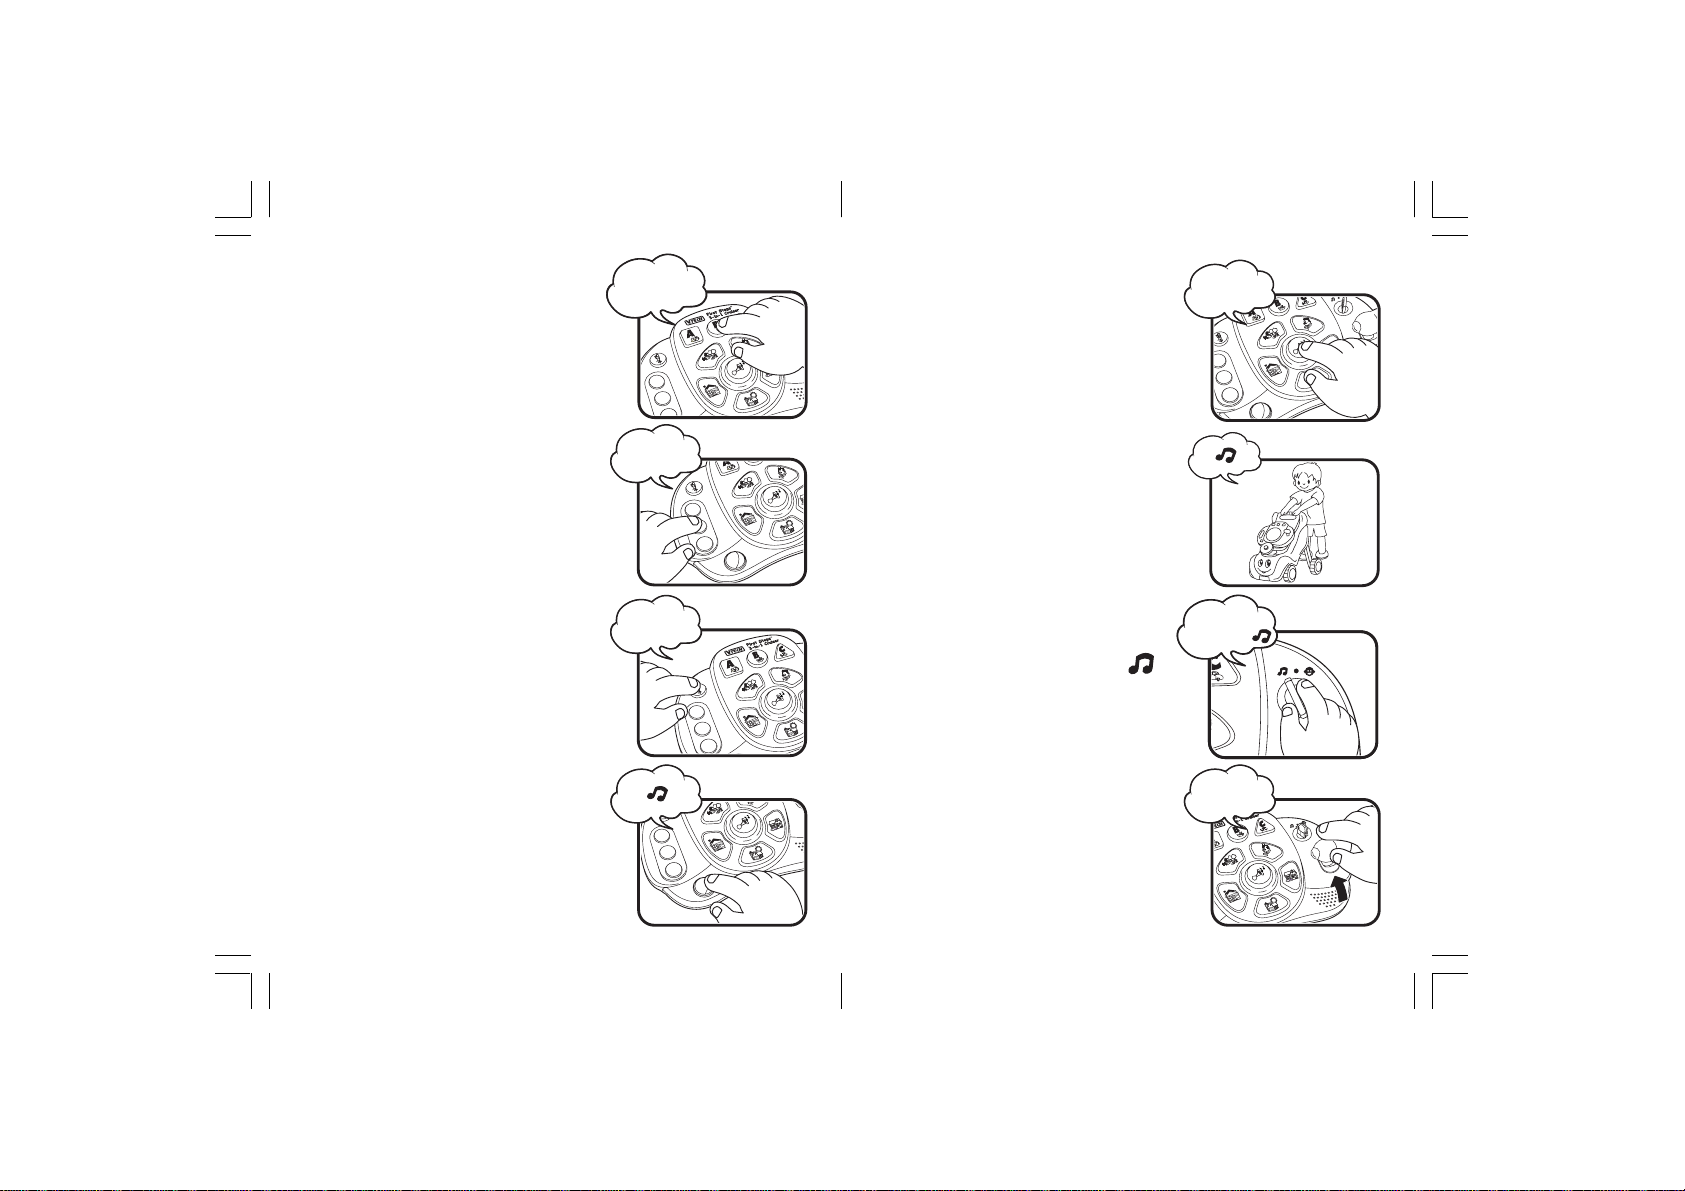
4. Press one of the five LIGHT-UP
LOCATION BUTTONS to hear a
friendly phrase that identifies the
location. The corresponding button
will flash randomly with the sound.
1110
“Let’s go to
Grandma’s house!”
Page 8
®
5. Press one of the three OBJECT/
®
®
SHAPE BUTTONS to hear the letter
and object identified followed by a
related sound effect. The lights will
flash randomly with the sound.
6. Press one of the three LIGHT-UP
TRAFFIC LIGHT BUTTONS to hear
the color identified and a short phrase.
The corresponding button will flash with
the sound.
“B is for boat!”+
Boat sound effect
“Yellow light,
slow down!”
9. Press the HORN BUTTON to hear
one of three silly horn sound effects.
The lights will flash randomly with the
sound.
10. Push or pull the unit to see the eyes
on the car flash. When the activity
panel is attached and turned on, you
will hear a random melody.
Silly horn
sound effect
7. Press the POLICE OFFICER BUTTON
to hear one of three random safety
phrases. The lights will flash randomly
with the sound.
“Buckle up!”
B. MELODY MODE
1. Turn the ON/OFF/MODE SELECTOR
SWITCH to the MELODY MODE ( )
position. You will hear a start-up
engine sound effect followed by “Let’s
Start-up engine
sound effect +
“Let’s go
!” +
go!” and a short tune. The lights will
flash randomly with the sound.
Revving sound
8. Spin the ROLLER BALL to hear a
random melody. The lights will flash
randomly with the sound.
2. Push the TRANSMISSION KNOB up
to hear a revving engine sound effect.
The 5 location buttons will light up one
effect
by one with the sound.
1312
Page 9

®
3. Pull the TRANSMISSION KNOB
®
®
®
®
down to hear a beeping sound effect.
The 5 location buttons will light up one
by one with the sound.
Beeping sound
effect
7. Press the POLICE OFFICER
BUTTON to hear a pre-programmed
melody. The lights will flash randomly
with the sound.
4. Press one of the five LIGHT-UP
LOCATION BUTT ONS to hear individual
music notes. The corresponding button
will light up.
5. Press one of the three OBJECT/
SHAPE BUTTONS to hear the color
and shape identified followed by a preprogrammed melody. The lights will
flash randomly with the sound.
6. Press one of the three LIGHT-UP
TRAFFIC LIGHT BUTTONS to hear
a pre-programmed melody. The lights
will flash randomly with the sound.
“Orange circle !”+
8. Spin the ROLLER BALL to hear a
random melody played one note at a
time. The speed at which the melody
is played depends on how quickly the
ball is turned. The lights will flash
randomly with the sound.
9. Press the HORN BUTTON to hear one
of three silly horn sound effects. The
lights will flash randomly with the
sound.
10. Push or pull the unit to see the eyes
on the car flash. When the activity
panel is attached and turned on, you
will hear a random melody.
1514
Silly horn
sound effect
Page 10

CHEERFUL MELODIES:
• Y ankee Doodle
• London Bridge
• My Bonnie Lies Over the Ocean
• Skip To My Lou
• Clementine
• Old MacDonald Had A Farm
• Turkey in the Straw
• Sing a Song of Sixpence
IMPORTANT NOTE
Creating and developing Infant/T oddler products is accompanied by
a responsibility that we at VTech® take very seriously. W e make every
effort to ensure the accuracy of the information which forms the value
of our products. However, errors sometimes can occur . It is important
for you to know that we stand behind our products and encourage
you to call our Consumer Services Department at 1-800-521-2010
in the U.S. or 1-800-267-7377 in Canada, with any problems and/or
suggestions that you might have. A service representative will be
happy to help you.
CARE AND MAINTENANCE
1. Please check the locks and hinges periodically to avoid injuries.
2. Keep the unit clean by wiping it with a slightly damp cloth.
3. Keep the unit out of direct sunlight and away from any direct heat source.
4. Remove the batteries when the unit is not in use for an extended
period of time.
5. Do not drop the unit on hard surfaces and do not expose the unit to
moisture or water.
Note:
This equipment generates and uses radio frequency energy and if not
installed and used properly, that is, in strict accordance with the
manufacturer’s instructions, it may cause interference to radio and
television reception. It has been type tested and found to comply within
the limits for a Class B computing device in accordance with the
specifications in Sub-part J of Part 15 FCC Rules, which are designed to
provide reasonable protection against such interference in a residential
installation. However, there is no guarantee that interference will not occur
in a particular installation. If this equipment does cause interference with
radio or television reception, which can be determined by turning the
equipment off and on, the user is encouraged to try to correct the
interference by one or more of the following measures:
• reorient the receiving antenna
• relocate this product with respect to the receiver
• move this product away from the receiver
1716
 Loading...