

Page 1

ErisTerminal® SIP Deskset
ET685
Administrator and Provisioning Manual
Rev. 1 06/18
Page 2

ET685 Administrator and Provisioning Manual
C
ONTENTS
Preface ...................................................................................................... 6
Text Conventions ................................................................................................................ 7
Audience............................................................................................................................. 7
Related Documents ............................................................................................................7
Introducing the ET685.............................................................................. 8
About the ET685 Deskset................................................................................................... 9
Quick Reference............................................................................................................... 11
Programmable Keys .........................................................................................................12
Configuration Methods ..................................................................................................... 13
Provisioning............................................................................................ 14
Auto Provisioning..............................................................................................................15
Requirements ...................................................................................................... 15
Saving Configuration Files...................................................................................15
Scenarios............................................................................................................. 16
DHCP Option 66/67 ...................................................................................... 16
DHCP Options...............................................................................................17
Plug & Play....................................................................................................19
Automatic Redirection Service ......................................................................20
TR-069 Provisioning......................................................................................21
Bootup Process ...................................................................................................23
Configuration File Types......................................................................................24
ASCII Format ....................................................................................................... 26
Structure........................................................................................................ 26
Hints ..............................................................................................................26
Flags ............................................................................................................. 26
General Setting File ......................................................................................26
Specific Setting File.......................................................................................27
Firmware Setting File ....................................................................................28
XML Format ......................................................................................................... 29
Structure........................................................................................................ 29
Setting Files Container <setting-files>........................................................... 30
Settings Container <settings> ....................................................................... 30
2
Page 3

ET685 Administrator and Provisioning Manual
Supported Container Tags and Sub Tags...................................................... 31
XML Syntax...................................................................................................51
Manual Software Update ..................................................................................................52
Phone Menu Reference.......................................................................... 53
Viewing the Phone Menu.................................................................................................. 54
Alphanumeric keypad ..........................................................................................54
Input modes and navigation .......................................................................... 54
Entering numerals, letters, special characters, and symbols ........................ 55
Using the Identity menu.................................................................................................... 57
Select Outgoing Identity menu............................................................................. 57
Reregister Identity menu...................................................................................... 57
Edit Identity menu ................................................................................................ 58
Edit Identity (Hotdesking) .............................................................................. 58
Edit Identity ................................................................................................... 59
Logging off identity............................................................................................... 63
Using the Network menu .................................................................................................. 64
IP Settings menu .................................................................................................64
IPv4 settings.................................................................................................. 64
IPv6 Settings .................................................................................................66
Webserver menu .................................................................................................67
VLAN menu .........................................................................................................69
WLAN menu ........................................................................................................70
Advanced menu................................................................................................... 72
802.1X menu................................................................................................. 72
Hardware menu.............................................................................................74
NTP menu ..................................................................................................... 76
DNS menu.....................................................................................................77
Using the Maintenance menu...........................................................................................79
Security menu...................................................................................................... 79
Putting your phone in User Mode.................................................................. 79
Putting your phone in Administrator Mode .................................................... 79
Changing the Keyboard Lock PIN.................................................................80
Reboot ................................................................................................................. 82
Reset Values........................................................................................................ 82
Using the Information Menu ............................................................................................. 84
Status Info............................................................................................................ 84
System Info.......................................................................................................... 85
Help ..................................................................................................................... 85
Web User Interface (WebUI) Reference................................................ 87
Using the Web User Interface (WebUI) ............................................................................ 88
Accessing the WebUI .......................................................................................... 88
Changing settings in the WebUI .......................................................................... 89
Operation pages ...............................................................................................................91
Home page .......................................................................................................... 91
Directory page .....................................................................................................93
Setup pages...................................................................................................................... 97
3
Page 4

ET685 Administrator and Provisioning Manual
Preferences page ................................................................................................ 97
Speed Dial page ................................................................................................ 103
Function Keys page ...........................................................................................105
Type ............................................................................................................ 106
Key Events .................................................................................................. 111
Identity n page ................................................................................................... 113
Login tab ..................................................................................................... 113
Features tab ................................................................................................ 117
SIP tab ........................................................................................................ 123
NAT tab ....................................................................................................... 130
RTP tab .......................................................................................................132
Action URL Settings page.................................................................................. 134
Advanced pages................................................................................................137
Network tab ................................................................................................. 137
Behavior tab ................................................................................................ 145
Audio tab ..................................................................................................... 151
SIP/RTP tab ................................................................................................ 154
QoS/Security tab ......................................................................................... 162
Update tab...................................................................................................166
Certificates page................................................................................................ 170
Unknown Certificates tab ............................................................................ 170
Custom Certificates..................................................................................... 171
802.1X Certificates...................................................................................... 171
Preinstalled Certificates...............................................................................172
Software Update................................................................................................172
Status pages...................................................................................................................175
System Information page................................................................................... 175
Log page............................................................................................................ 175
SIP Trace page.................................................................................................. 176
DNS Cache........................................................................................................ 177
Subscriptions .....................................................................................................177
PCAP Trace page.............................................................................................. 178
Memory page..................................................................................................... 179
Settings page..................................................................................................... 179
Configuration File Parameter Guide................................................... 181
Configuration File Parameters ........................................................................................182
Troubleshooting................................................................................... 421
Common Troubleshooting Procedures........................................................................... 421
Appendixes........................................................................................... 423
Appendix A: Maintenance............................................................................................... 423
4
Page 5

ET685 Administrator and Provisioning Manual
5
Page 6

P
REFACE
Congratulations on your purchase of this VTech product. Please thoroughly read this
manual for all the feature operations and troubleshooting information necessary to install
and operate your new VTech product. You can also visit our website at
businessphones.vtech.com or call 1 (888) 370-2006.
ET685 Administrator and Provisioning Manual
This administrator and provisioning manual contains detailed instructions for installing and
configuring your ET685 SIP Deskset with software version 8.10.1.x. See “System Info” on
page 85 for instructions on checking the software version on the ET685. Please read this
manual before installing the product.
Please print this page and record the following information regarding your product:
Model number: ET685
Type: Small to medium business SIP-endpoint deskset
Serial number: _______________________________
Purchase date: _______________________________
Place of purchase: ____________________________
Both the model and serial numbers of your VTech product can be found on the bottom of
the console.
Save your sales receipt and original packaging in case it is necessary to return your
telephone for warranty service.
Preface 6 Back to Contents
Page 7

ET685 Administrator and Provisioning Manual
CallFwd
Notes provide important information
about a feature or procedure.
A caution means that loss of data or
unintended circumstances may result.
Text Conventions
Table 1 lists text formats and describes how they are used in this guide.
Table 1. Description of Text Conventions
Text Format Description
Screen Identifies text that appears on a device screen or a
WebUI page in a title, menu, or prompt.
HARD KEY or DIAL-PAD KEY Identifies a hard key, including the dial-pad keys.
Identifies a soft key.
Example of a Note.
Example of a Caution.
Audience
This guide is written for installers and system administrators. It assumes that you are
familiar with networks and VoIP, both in theory and in practice. This guide also assumes
that you have ordered your IP PBX equipment or service and selected which PBX features
you want to implement. This guide references specific IP PBX equipment or services only
for features or settings that have been designed for a specific service. Please consult your
equipment supplier or service provider for recommended switches, routers, and firewall
and NAT traversal settings, and so on.
As the ET685 SIP Deskset becomes certified for IP PBX equipment or services, VTech may
publish interop guides for those specific services. The interop guides will recommend
second-party devices and settings, along with ET685-specific configurations for optimal
performance with those services. For the latest updates, visit our website at
businessphones.vtech.com.
Related Documents
The ET685 Quick Start Guide contains a quick reference guide to the ET685 external
features and brief instructions on connecting the ET685 to a working IP PBX system.
The ET685 User Guide contains a quick reference guide, full installation instructions,
instructions for making and receiving calls, and a guide to all user-configurable settings.
The documents are available from our website at businessphones.vtech.com.
Preface 7 Back to Contents
Page 8

I
NTRODUCING
THE
ET685 Administrator and Provisioning Manual
C HAPTER 1
ET685
This administrator and provisioning guide contains detailed instructions for configuring the
ET685 SIP Deskset. Please read this guide before attempting to configure the ET685.
This chapter covers:
“About the ET685 Deskset” on page 9.
“Quick Reference” on page 11.
“Programmable Keys” on page 12.
“Configuration Methods” on page 13.
Introducing the ET685 8 Back to Contents
Page 9

About the ET685 Deskset
The VTech ET685 SIP Deskset is a business phone designed to work with popular SIP
telephone (IP PBX) equipment and services. Once you have ordered and configured your
SIP equipment or service, the ET685 enables you to make and receive calls as you would
with any other business phone.
The ET685 Deskset features include:
Support for 12 SIP lines/accounts
Dual Ethernet ports, GigE
USB port
Power over Ethernet (PoE) support (AC adapter optional)
4.3-inch 480 x 272 pixels (w x h) color LCD display, providing 10 clear lines of
information
4 configurable soft keys
ET685 Administrator and Provisioning Manual
6 programmable feature keys with multi-color LEDs
4-way navigational pad
Zero touch provisioning
RJ9 headset port
RJ12 EHS port
Sensor hook switch
HD Voice for receiver and speakerphone
Full-duplex base speakerphone
Message waiting LED indicator
Local phonebook up to 1,000 entries
Call history up to 100 entries
There are two network ports, known as the Ethernet port and PC port, at the back of the
ET685. The Ethernet port allows the ET685 Deskset to connect to the IP PBX. The PC port
is for another device such as a personal computer to connect to the Ethernet network
through the ET685.
You can configure the ET685 using the menus on the phone, a browser-based interface
called the WebUI, or an automatic provisioning process (see “Auto Provisioning” on
page 15). The WebUI enables you to configure the ET685 using a computer that is
connected to the same Local Area Network. The WebUI resides on the ET685, and may
get updated with firmware updates.
Introducing the ET685 9 Back to Contents
Page 10

ET685 Administrator and Provisioning Manual
The ET685 SIP Deskset supports intercom and call transfers between system extensions
and can connect you and two other parties on the same conference call. The ET685 has
four programmable soft keys and 6 programmable feature keys. You can program these
keys for quick dial, busy lamp field, line access or any of the functions described in
“Function Keys page” on page 105.
Introducing the ET685 10 Back to Contents
Page 11

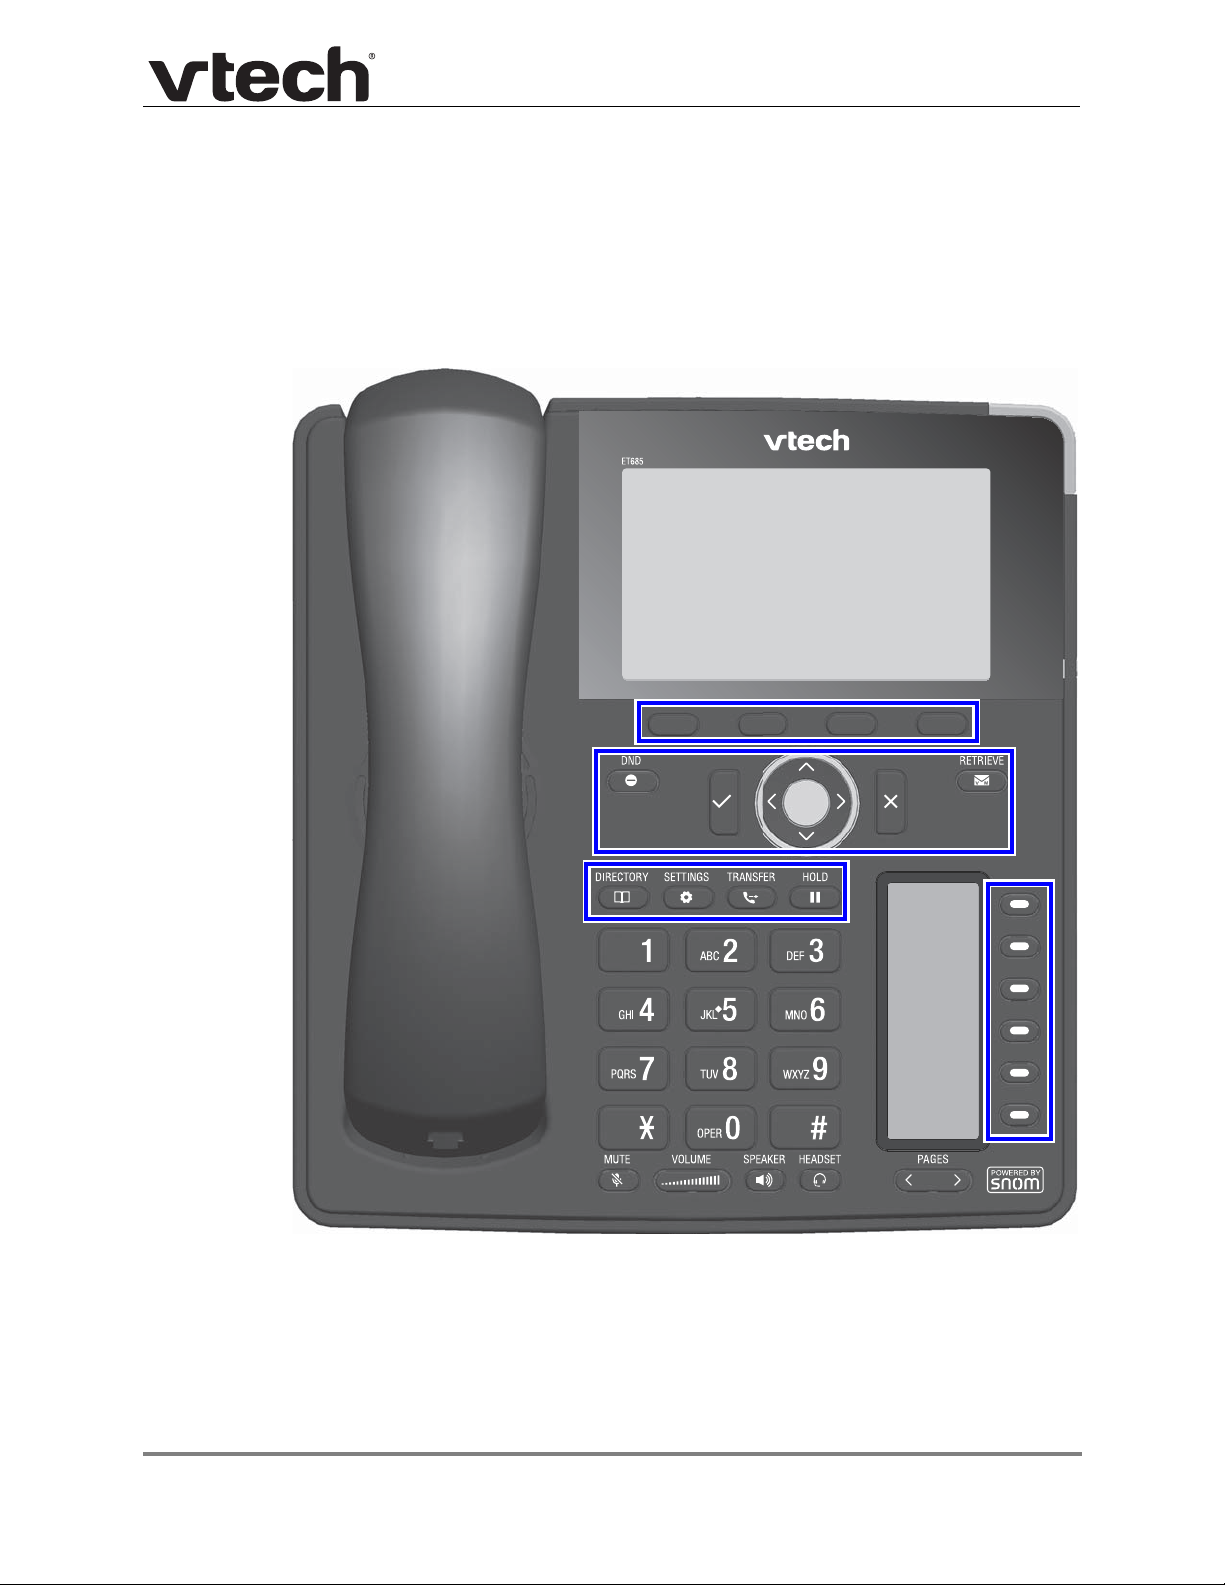
Quick Reference
The following diagram shows the ET685 external features and controls.
ET685 Administrator and Provisioning Manual
Introducing the ET685 11 Back to Contents
Page 12
Programmable Keys
You can use the WebUI to change the function of the four soft keys below the display,
navigation keys, customizable function keys, and programmable LED function keys.
For more information, see “Function Keys page” on page 105.
ET685 Administrator and Provisioning Manual
Introducing the ET685 12 Back to Contents
Page 13

Configuration Methods
You can use any of the following methods to configure your ET685 SIP Deskset:
Provisioning – see “Provisioning” on page 14.
Phone User Interface – see “Phone Menu Reference” on page 53.
Web User Interface (WebUI) – see “Web User Interface (WebUI) Reference” on
page 87.
ET685 Administrator and Provisioning Manual
Introducing the ET685 13 Back to Contents
Page 14

P
ROVISIONING
ET685 Administrator and Provisioning Manual
C HAPTER 2
Provisioning refers to the process of acquiring and applying new settings for the ET685
using configuration files retrieved from a remote computer. After a ET685 is deployed,
subsequent provisioning can update the ET685 with new settings; for example, if your
service provider releases new features.
With automatic provisioning, you enable the ET685 to get its settings automatically—the
process occurs in the background as part of routine system operation. Automatic
provisioning can apply to multiple devices simultaneously.
With Manual Software Update on the WebUI, you update the ET685 settings (configuration
and/or firmware) yourself via Setup > Software Update.
This chapter covers
“Auto Provisioning” on page 15
“Manual Software Update” on page 52
Provisioning 14 Back to Contents
Page 15

Auto Provisioning
Auto Provisioning (Mass deployment) enables remote administration (configuration and
maintenance) of the ET685 deskset.
Auto Provisioning is particularly useful for out-of-the-box scenarios in larger phone
installations.
Auto Provisioning can be used to provide general and specific configuration parameters
(Settings) to the phones and to manage firmware actualization.
Requirements
Auto Provisioning requires a central setting (or provisioning) server.The Auto Provisioning
Server stores the Auto Provisioning Configuration Files and provides them on request to
the phones. Firmware images may also be stored here.
The following setting server types/protocols can be used for provisioning of configuration
parameters and firmware images: TFTP Server, HTTP Server, and HTTPS Server.
Selected Configuration parameters can be stored in configuration files (phone type/MAC
address based) or can be created on request by means of script files (MAC address
based). See “Configuration File Types” on page 24. The location of these files is defined in
the parameter setting_server.
ET685 Administrator and Provisioning Manual
Please check the Bootup Process in order to select the appropriate auto provisioning
method. See “Bootup Process” on page 23.
Saving Configuration Files
You can save a sample configuration file from your phone using the WebUI interface.
1. Open the ET685 WebUI interface, and open the Settings page.
2. To save the settings, click the link for the file format you want.
The first link will save the settings in ASCII format.
Provisioning 15 Back to Contents
Page 16

ET685 Administrator and Provisioning Manual
NOTE: VTech recommends that you only work with XML format when saving
configuration files.
You can now make copies of the settings file, and edit them as required for auto
provisioning.
Scenarios
Depending on the installation environment, the following scenarios can be applied to
provide the setting (provisioning) URL to the phones:
1. DHCP Option 66/67 - see page 16.
The DHCP Server in the LAN may send the provisioning URL via Option 66/67.
2. Plug & Play - see page 19.
Any SIP Server in the LAN may send the provisioning URL by replying to SIP SUBSCRIBE Broadcast messages.
3. Automatic Redirection Service - see page page 20.
VTech’s public provisioning server will be contacted automatically and may redirect
MAC address based provisioning requests to any other server.
4. TR-069 Provisioning - see page page 21.
Either scenario 1/2/3 can be used to enable the phone for TR-69 Provisioning.
DHCP Option 66/67
This configuration method requires the following components:
DHCP Server
ONE DHCP Server per LAN supporting DHCP Option(s) 66 or/and 67.
See “DHCP Options” on page 17.
Auto Provisioning Server
Configuration files
See “Configuration File Types” on page 24.
VTech VOIP Phone Configuration
The DHCP Server must be configured with additional DHCP Options containing the URL of
the Auto Provisioning Server to the VTech VoIP phones on boot-up. The phones will then
request their configuration parameters from the Auto Provisioning Server which will result
in a ready-to-use phone setup without manual configuration.
Provisioning 16 Back to Contents
Page 17

DHCP Options
Option 66 (TFTP server name)
ET685 Administrator and Provisioning Manual
This option is used to identify a TFTP server when the 'sname' field in the DHCP header
has been used for DHCP options. The code for this option is 66, and its minimum length is
1.
VALIDVALUE
<protocol> : // <IP address> or <domain> e.g. http://10.0.0.2,
https://provisioning.company.com
<IP address> or <domain> e.g. 10.0.0.2, provisioning.company.com
where <protocol> = server type/protocol
where <IP address> = server IP address
where <domain> = server domain name
NOTE: Without specifying the <protocol> the firmware will attempt all supported server
protocol types consecutively:
1. tftp://...
2. http://...
3. https://...
Configuration Parameter: update_server
Option 67 (Bootfile name)
This option is used to identify a bootfile when the 'file' field in the DHCP header has been
used for DHCP options. The code for this option is 67, and its minimum length is 1.
Provisioning 17 Back to Contents
Page 18

ET685 Administrator and Provisioning Manual
VALIDVALUE
<path> e.g. settingfiles/vtech/VTechET685.cfg, settingfiles/vtech/ VTechET685.htm,
settingfiles/vtech/VTechET685.xml
<empty> or <not used>
where <path> = path to the location of the setting file/script file
NOTE: If this option is empty or not specified at all the firmware automatically requests the
following setting files, except the whole URL is encoded in option 66:
all ET685 phones request --> http://<domain>/VTechET685.htm
Configuration Parameter: update_filename
Option 43 (vendor-encapsulated-options)
Encapsulated Option 66, Option 67, Option 132, and Option 133 are supported.
Encapsulated DHCP options, for encoding see RFC 2132 Section 2. DHCP Option Field
Format; One can tunnel vendor specific DHCP options depending on the vendor-id (option
60) send before from the phone to the DHCP server. Vendor specific DHCP options may
be provided encapsulated in option 43, see RFC 2132 Section 8.4. Vendor Specific
Information. Values of options like 66/67/132/133, which are tunneled via option 43, take
precedence over direct options 66/67/132/133.
VALIDVALUE (Examples)
linux dhcpd3 syntax:
option vendor-encapsulated-options
42:0c:68:74:74:70:3a:2f:2f:74:65:73:74:00:43:12:73:6e:6f:6d:2f:73:65:74:74:6
9:6e:67:73:2e:70:68:70:00;
Which means tunnel opt 66 http://test and opt 67 vtech/settings.php via opt 43.
option vendor-encapsulated-options
84:02:33:00;
Which means tunnel opt 132 value 3 via opt 43.
option vendor-encapsulated-options
84:04:31:31:34:00:85:02:35:00;
Which means tunnel opt 132 value 114 and opt 133 value 5 via opt 43.
Option 60 (Vendor class identifier)
This option is used by DHCP clients to optionally identify the vendor type and configuration
of a DHCP client. The information is a string of n octets, interpreted by servers. Vendors
may choose to define specific vendor class identifiers to convey particular configuration or
other identification information about a client. For example, the identifier may encode the
client's hardware configuration. Servers not equipped to interpret the class-specific
Provisioning 18 Back to Contents
Page 19

ET685 Administrator and Provisioning Manual
information sent by a client MUST ignore it (although it may be reported). Servers that
respond SHOULD only use option 43 to return the vendor-specific information to the client.
The code for this option is 60, and its minimum length is 1.
The phone sends its type (i.e. VTechET685) via this option to the DHCP server.
NOTE: Vendor class identifier for VTech ET685: VTechET685
Plug & Play
Plug & Play (PnP) provides a proprietory method to enable Auto Provisioning on all VTech
VoIP phones. By default (Parameter pnp config = on) the phones send SIP SUBSCRIBES
messages to a multicast address. Any SIP server understanding that message may reply
with a SIP NOTIFY message containing the Auto Provisioning Server URL where the
phones can request their configuration from.
SIP Flow
ET685 phones send on boot-up a SIP SUBSCRIBE message to a multicast address:
Sent to udp:224.0.1.75:5060 at 24/12/2001 00:00:19:248 (448 bytes):
SUBSCRIBE sip:MAC%3a00135E874B49@intern.vtech.ca SIP/2.0
Via: SIP/2.0/UDP 192.168.10.67:5060;rport
From: <sip:MAC%3a00135E874B49@intern.vtech.ca>;tag=658512961
To: <sip:MAC%3a00135E874B49@intern.vtech.ca>
Call-ID: 1930770594@192.168.10.67
CSeq: 1 SUBSCRIBE
Event: ua-profile;profile-type=device;vendor=OEM;model=OEM;version=7.1.19
Expires: 0
Accept: application/url
Contact: <sip:192.168.10.67:5060>
Content-Length: 0
If any SIP application within one hop range understands this message a confirmation is
sent:
Received from udp:192.168.100.10:5060 at 24/12/2001 00:00:19:287 (480 bytes):
SIP/2.0 200 OK
Via: SIP/2.0/UDP 192.168.10.67:5060;rport=5060
Record-Route: <sip:127.0.0.1;lr;transport=tcp;route-id=fb4fb92b7775c2a7>
Record-Route:
<sip:192.168.100.10;lr;transport=UDP;route-id=fb4fb92b7775c2a7>
Contact: <sip:192.168.100.10;transport=TCP;handler=dum>
To: <sip:MAC%3a00135E874B49@intern.vtech.ca>;tag=91955270
From: <sip:MAC%3a00135E874B49@intern.vtech.ca>;tag=658512961
Call-ID: 1930770594@192.168.10.67
CSeq: 1 SUBSCRIBE
Expires: 0
Content-Length: 0
followed by a SIP NOTIFY message containing the Auto Provisioning URL
Provisioning 19 Back to Contents
Page 20

ET685 Administrator and Provisioning Manual
http://192.168.100.10/sipphone/sipphoneconfig.xml?mac={mac}:
Received from udp:192.168.100.10:5060 at 24/12/2001 00:00:19:293 (868 bytes):
NOTIFY sip:192.168.10.67:5060 SIP/2.0
Via: SIP/2.0/UDP
192.168.100.10:5060;branch=z9hG4bK-d8754z-c3ea5f0e74462613-1---d8754z-;rport
Via: SIP/2.0/TCP
127.0.0.1:5060;branch=z9hG4bK-d8754z-7ca96c30144f3e04-1---d8754z-;rport=4091
6
Max-Forwards: 20
Record-Route: <sip:192.168.100.10;lr;route-id=e3470eb400e9c0a4>
Record-Route: <sip:127.0.0.1;lr;transport=TCP;route-id=e3470eb400e9c0a4>
Contact: <sip:192.168.100.10;transport=TCP;handler=dum>
To: <sip:MAC%3a00135E874B49@intern.vtech.ca>;tag=658512961
From: <sip:MAC%3a00135E874B49@intern.vtech.ca>;tag=91955270
Call-ID: 1930770594@192.168.10.67
CSeq: 3 NOTIFY
Content-Type: application/url
Subscription-State: terminated;reason=timeout
Event: ua-profile;profile-type=device;vendor=OEM;model=OEM;version=7.1.19
Content-Length: 59
http://192.168.100.10/sipphone/sipphoneconfig.xml?mac={mac}
The phone accepts this message and confirms:
Sent to udp:192.168.100.10:5060 at 24/12/2001 00:00:19:315 (542 bytes):
SIP/2.0 200 Ok
Via: SIP/2.0/UDP
192.168.100.10:5060;branch=z9hG4bK-d8754z-c3ea5f0e74462613-1---d8754z-;rport
=5060
Via: SIP/2.0/TCP
127.0.0.1:5060;branch=z9hG4bK-d8754z-7ca96c30144f3e04-1---d8754z-;rport=4091
6
Record-Route: <sip:192.168.100.10;lr;route-id=e3470eb400e9c0a4>
Record-Route: <sip:127.0.0.1;lr;transport=TCP;route-id=e3470eb400e9c0a4>
From: <sip:MAC%3a00135E874B49@intern.vtech.ca>;tag=91955270
To: <sip:MAC%3a00135E874B49@intern.vtech.ca>;tag=658512961
Call-ID: 1930770594@192.168.10.67
CSeq: 3 NOTIFY
Content-Length: 0
Automatic Redirection Service
This redirection service enables customers to register/list/unregister the MAC addresses of
their VTech VoIP phones on VTech’s Redirect Server and assign a redirection URL pointing
to their own Auto Provisioning Server. Any ET685 updated to the latest firmware release
will have the Redirection Server URL available as the default Provisioning Server URL
Provisioning 20 Back to Contents
Page 21

ET685 Administrator and Provisioning Manual
NOTE: Using the Redirection Service requires contacting the VTech support team for an
account.
TR-069 Provisioning
TR-069 is a standard for remote management of CPE (Customer Premises Equipment)
defined by the DSL Broadband Forum. TR-069 uses common transport mechanisms
(HTTP and HTTPS) for communication with CPE. The HTTP(S) messages contain
XML-RPC methods defined in the standard for configuration and management of the
device.
Typically, one router on customer premises provides Internet connectivity to many phones
as indicated in the above diagram. The ACS can now manage the router and all phones
located behind it remotely.
What does remote management mean?
Where provisioning was used to provide configuration information to many phones at once,
remote management takes this one step further. Of course, it is still possible to configure
the phone remotely when it boots up, but with TR-069 the phone can actually be managed
remotely.
In addition to the configuration you can also, for example:
Reboot the phone
Customize the phone look and feel
Push XML-Minibrowser pages to the phone
Update the firmware of the device
Provisioning 21 Back to Contents
Page 22

ET685 Administrator and Provisioning Manual
Another difference is the way the actions are triggered. Unlike provisioning, where the
phone triggers the provisioning process according to a fixed schedule, TR-069 allows the
administrator to initiate provisioning via ACS at anytime. Another major difference is that in
case of TR-069 the server can be notified whenever a user changes a setting. This enables
the administrator to correct possible mistakes right away.
TR-069 specific phone settings
ACS settings are the settings specific to the ACS connection and need to be adjusted to
the specific environment. The following table describes the ACS settings with their data
types and default values.
Setting name Valid Values Default Description
tr69_acs_url URLs (STRING) empty URL of the TR-069 ACS. This is
the URL the phone will send
TR-069 messages to. Please
contact your ACS vendor to find
out about this URL.
tr69_acs_url URLs (STRING) empty URL of the TR-069 ACS. This is
the URL the phone will send
TR-069 messages to. Please
contact your ACS vendor to find
out about this URL.
tr69_acs_user STRING empty Username for HTTP
authentication against the ACS
tr69_acs_passwd STRING empty Password for HTTP
authentication against the ACS
tr69_use_acs BOOLEAN
(off, 0, on, 1)
tr69_bootstrap BOOLEAN
(off, 0, on, 1)
tr69_cnr_user STRING empt Username to authenticate
Internal settings (tr69_events, tr69_params, download_status) are used internally to
control the TR-069 stack and should not be modified manually.
off Turn TR-069 management on
and off.
on Send BOOTSTRAP event in
the Inform Message. Needs to
be set to on when a new ACS is
contacted.
incoming connection requests.
WARNING: modifying the internal settings manually may result in unexpected phone
behavior.
Provisioning 22 Back to Contents
Page 23

ET685 Administrator and Provisioning Manual
Bootup Process
1. The firmware loads the configuration parameters (Settings) stored on the phone's flash
memory (either factory defaults or previously changed).
2. The firmware performs a check if the Provisioning URL (parameter setting_server) has
been changed manually.
YES: The given Provisioning URL (parameter setting_server) will be requested.
NO: see next step.
3. If the DHCP parameter is enabled the firmware performs a check whether the
supported DHCP options have been received in the DHCP offer:
YES:
The value found in Option 66 will be stored in parameter update_server,
e.g. http://server
The value found in Option 67 will be stored in parameter update_filename,
e.g. vtech/vtech.xml
Initially the Provisioning URL will be composed using update_server and
update_filename and will be requested,
e.g. http://server/vtech/vtech.xml. If Option 67 is absent, the Provisioning
URL is composed using update_server and {phoneType}.htm, e.g.
http://server/VTechET685.htm
In a second attempt the MAC address, i.e.-{mac}, will be concatenated and
the resulting Provisioning URL will be requested,
e.g. http://server/vtech/vtech-0011A0YXXXX.xml or
http://server/VTechET685-0011A0YXXXX.htm respectively.
NO: see next step.
4. Since the pnp_config parameter is enabled by default, the phone will send a SIP
SUBSCRIBE message to the multicast address 224.0.1.75:5060. The firmware waits
for a limited time whether a SIP NOTIFY reply is received with the Provisioning URL in
the body, e.g. http://server/vtech/vtech.xml
YES:
Initially the Provisioning URL found in the body will be requested,
e.g. http://server/vtech/vtech.xml
In a second attempt the MAC address, i.e.-{mac}, will be concatenated and the
resulting Provisioning URL will be requested,
e.g. http://server/vtech/vtech-0011A0YXXXX.xml
NO: see next step.
5. If none of the above steps could be applied the firmware requests the factory default
Provisioning URL: http://provisioning.vtech.com/vtechXXX/vtechXXX.php?mac={mac}
Provisioning 23 Back to Contents
Page 24

ET685 Administrator and Provisioning Manual
6. IMPORTANT NOTE: If the parameter tr69_use_acs is enabled and will be delivered
back by any of the provisioning methods, the URL of the TR-069 ACS will be requested
immediately.
Configuration File Types
Setting files are container for a subset of configuration parameters needed to customize
and maintain the ET685 phone remotely.
Depending on the firmware version currently installed on the ET685 phone, two formats can
be distinguished:
ASCII text format (restrictions apply)
XML format
Provisioning 24 Back to Contents
Page 25

ET685 Administrator and Provisioning Manual
The following hints apply to both ASCII Text Format and XML Format.
Hints ASCII Text Format AND XML Format
Start 1. Start with a factory reset phone
Apply the desired modifications in your working (live)
phone environment first.
Observe the stability and performance of the applied
changes.
2. Do NOT use the complete parameter list as starting point,
instead:
Delete or uncomment unused configuration
parameters from the complete parameter list.
Specify only those parameters you really want to
change --> Check the meaning of each parameter
before usage.
Finally your setting file may contain only a few
parameters.
Flags 1. Do NOT use read-only flags at the beginning. They can be
added at the end in order to protect certain parameters to
be notified by the user!
2. Inside firmware setting files do NOT use any flags at all.
Network/System
1. Do NOT provide network settings when using DHCP.
Settings
2. Do NOT specify setting_server unless a redirection to a
different setting server is desired.
Remember the phone has already obtained the setting
file correctly - repeated usage of the same setting
server can have unpredictable side effects and is
NOT recommended.
Firmware Setting
Files
1. Do NOT specify neither bootloader nor firmware inside
setting files:
In order to perform automated firmware updates
specify a firmware setting file URL inside firmware
status which points to the firmware setting file
containing the firmware image URL.
2. Inside firmware setting files use ONLY the configuration
parameters bootloader or firmware.
Provisioning 25 Back to Contents
Page 26

ET685 Administrator and Provisioning Manual
ASCII Format
ASCII format provides limited provisioning support:
NO multiple language support. Only english phone user/web user interface
languages are pre-installed.
NO script dialplan
NO support of formerly used internal directory entries
[ Name (tn), Number (tu), Contact Type (tc), Outgoing Identity (to) ]
Structure
1. One general setting file per phone type, i.e. ET685, containing general configuration
parameters
2. One specific setting file per phone, i.e. (MAC address based), containing phone
specific configuration parameters.
3. One firmware setting file per phone type OR phone containing firmware related
configuration parameters in order to perform automated firmware updates.
Hints
Lines may end with newline or carriage return/newline pairs
Comments start with # or <
The < and > characters allow easy integration of HTML tags
Names may consist of the characters a-z, A-Z, 0-9 and _.
Flags
Parameter names can be followed by one specific character called flag:
A parameter followed by ! can be changed by the user. However the parameter
value will only be stored if that parameter has not been configured yet. Only
parameters followed by $ can be overwritten, DO NOT use ! in that case.
A parameter followed by &
(or no flag) becomes write-protected (read only)
A parameter followed by $ can be changed but will be overwritten on reboot.
$ will appear on the Settings page as !
General Setting File
General (phone type specific) setting files are requested from the setting server at first
example naming scheme: http://provisioning.mycompany.com/VTechET685.htm
in this case the general setting file was placed in the HTTP server root and will be requested
automatically by any ET685 --> necessary in mixed phone type environments
<html>
<pre>
Provisioning 26 Back to Contents
Page 27

ET685 Administrator and Provisioning Manual
# example VTech general setting file
# After each setting (before the colon) you can set a flag
# General language and time configuration parameter
language$: English
web_language$: English
timezone$: USA-5
date_us_format&: on
time_24_format&: off
</pre>
</html>
Specific Setting File
The Phone specific setting file is requested from the setting server right after the general
setting file by appending
"-MAC address" (dash+phone's MAC address)
to the general setting filename:
http://provisioning.mycompany.com/VTechET685.htm) -->
http://provisioning.mycompany.com/VTechnABLE 2.8.1 User
Guide/VTechET685-000413241111.htm
<html>
<pre>
# example VTech specific setting file
# After each setting (before the colon) you can set a flag
user_pname1$: AUTHUSER1
user_pass1$: AUTHPASSWORD1
user_name1$: LINEPORT1
user_realname1$: User1
user_host1$: proxy.net
user_srtp1$: off
user_dp_str1$: !([^#]%2b)#!sip:\1@\d!d
user_pname2$: AUTHUSER2
user_pass2$: AUTHPASSWORD2
user_name2$: LINEPORT2
user_realname2$: User2
user_host2$: proxy.net
user_srtp2$: off
user_dp_str2$: !([^#]%2b)#!sip:\1@\d!d
# You may add up to 12 ET685 accounts
Provisioning 27 Back to Contents
Page 28

ET685 Administrator and Provisioning Manual
# set 1st account to active outgoing identity
active_line$: 1
# the following parameters are only required to provide automated firmware
updates
# IMPORTANT: define the URL of the --> firmware setting file
firmware_status: http://provisioning.mycompany.com/VTechET685/firmware.htm
# additionally the --> update policy may be defined
update_policy: auto_update
# additionally the --> firmware update interval may be defined
firmware_interval: 2880
</pre>
</html>
Firmware Setting File
The firmware setting file is requested if the firmware_status URL has been defined either
in the general or --> specific setting file
example name: http://provisioning.mycompany.com/VTechET685/firmware.htm
<html>
<pre>
# example VTech firmware setting file
# Firmware setting specifies the URL of the firmware/root fs/linux image file
firmware:
http://provisioning.mycompany.com/firmware/VTechET685/VTechET685-X.X.bin
# Bootloader setting MUST NOT be used from Version 5.0 onwards
# bootloader:
</pre>
</html>
The firmware compares the URL (string) obtained from the firmware parameter with the last
firmware image URL successfully loaded by the phone --> if both strings are different the
provided firmware image URL is requested from the setting server otherwise no firmware
will be loaded.
Provisioning 28 Back to Contents
Page 29

ET685 Administrator and Provisioning Manual
XML Format
XML Format provides Full provisioning support
Default phone configuration support
Automatic firmware update support
Multiple language support
Extended dial plan support
Directory provisioning support
Structure
1. One general setting file container <setting-files> per phone type, i.e. ET685, etc.,
providing a list of setting file URLs linked to:
One settings container
(<settings>) per phone type
containing general configuration parameters grouped in XML tags
(<phone-settings>, <functionKeys>, <tbook>, <dialplan>) OR/AND individual XML
Settings Files per phone type
containing general configuration parameters:(Phone settings
setting file, Function key setting file, Directory setting file, Dial plan setting file).
One Phone user interface
language file container per phone type with a list of phone user
interface language file URLs.
One Web user interface language file container per phone type with a list of
web user user interface language file URLs.
2. One specific setting file container <setting-files> per phone, i.e. MAC address
based, providing a list of setting file URLs linked to:
One settings container (<settings>) per phone containing phone specific
configuration parameters grouped in XML tags (<phone-settings>,
<functionKeys>, <tbook>, <dialplan>) AND/OR individual XML Settings Files
one per phone containing phone specific configuration parameters:(Phone
settings setting file, Function key setting file, Directory setting file, Dial plan setting
file).
3. Firmware setting files containing a subset of firmware related configuration parameters
allowing automated firmware updates.
Containers are XML structures allowing to specify a list of setting file URLs/tags which will
be consecutively requested by the phone. There are currently two container types
supported:
Setting Files Container
Setting Container
Provisioning 29 Back to Contents
Page 30

ET685 Administrator and Provisioning Manual
Setting Files Container <setting-files>
Setting files container are XML files using the <setting-files> tag
They should be the first XML file provisioned.
They allow to specify a list of setting file URLs:
1. XML phone settings files
2. XML function key setting files
3. XML directory setting files
4. XML dial plan setting files
5. XML uploads setting files
6. XML certificate setting files
7. XML Language setting files
phone user interface language
web user interface language
The URLs are requested in the defined order.
tree:openlevels=3|root=Setting Files Container <setting-files>
Element:
Attributes:
File
url
Atribute values:
XML <phone-settings> file
XML <functionKeys> file
XML <ReplacementPlan> file
XML <tbook> file
XML <dialplan> file
XML <uploads> file
XML <certificates> file
XML <gui-languages> file
XML <web-languages> file
Settings Container <settings>
Setting container are XML files using the <settings> tag.
They allow to specify the following setting file tags in one file, e.g:
<phone-settings> tag
Provisioning 30 Back to Contents
Page 31

ET685 Administrator and Provisioning Manual
<functionKeys> tag
<tbook> tag
<dialplan> tag
<uploads> tag
<certificates> tag
tree:openlevels=2|root=Settings Container <settings>
Supported Container Tags and Sub Tags
<phone-settings> XML tag
The phone settings XML tag (<phone-settings>) contains the main part of the available
settings (configuration parameters).
This XML tag can be used either:
inside the <settings> tag:
<phone-settings e="2">
<parameter(1)> idx="<index>" perm="<permission flag>"
<value></<parameter>
...
<parameter(n)> idx="<index>" perm="<permission flag>"
<value></<parameter>>
</phone-settings>
or as an individual XML file whose URL is listed inside <setting-files> tag:
<?xml version="1.0" encoding="utf-8"?>
<phone-settings e="2">
<parameter(1)> idx="<index>" perm="<permission flag>"
<value></<parameter>
...
<parameter(n)> idx="<index>" perm="<permission flag>"
<value></<parameter>>
</phone-settings>
Level 1
Element:
Attributes:
phone-settings
e
e="2" defines that unicode-values inside xml-escapes (e.g. & # 6 4 ;) may be
greater than 255.
Level 2
Element:
<phone-settings-parameter>
Provisioning 31 Back to Contents
Page 32

ET685 Administrator and Provisioning Manual
Attributes:
idx representing a valid account index.
perm representing a valid permission flag.
value representing the parameter value. For a detailed list of parameter values,
see Chapter 5, Configuration File Parameter Guide
<functionKeys> XML tag
The function key settings XML (<functionKeys> or <function-keys>) tag contains the free
programmable function key configuration parameters.
The tags <functionKeys> and <function-keys> are equivalent. These XML tags can be used
either
inside the <settings> tag:
<functionKeys>
<fkey idx="<function_key_index)>" context="<function_key_context>"
label="<function_key_label>" [default_text="<label_default_text>"]
perm="<permission flag>"><value></fkey>
...
<fkey idx="<function_key_index>" context="<function_key_context>"
label="<function_key_label>" [default_text="<label_default_text>"]
perm="<permission flag>"><value></fkey>
</functionKeys>
or as an individual XML file whose URL is listed inside <setting-files> tag:
<?xml version="1.0" encoding="utf-8"?>
<functionKeys>
<fkey idx="<function_key_index)>" context="<function_key_context>"
label="<function_key_label>" [default_text="<label_default_text>"]
perm="<permission flag>"><value></fkey>
...
<fkey idx="<function_key_index>" context="<function_key_context>"
label="<function_key_label>" [default_text="<label_default_text>"]
perm="<permission flag>"><value></fkey>
</functionKeys>
Level 1
Element:
functionKeys
Level 2
Element:
Attributes:
fkey
idx string defines the free function key index n.
Provisioning 32 Back to Contents
Page 33

ET685 Administrator and Provisioning Manual
These are the function key index (fkey idx) ranges on ET685 phones with USB
ports for all ET6 expansion modules:
Self-labeling keys on ET685 phone:
Page 1: 0-5
Page 2: 6-11
Page 3: 12-17
Page 4: 18-23
ET6 USB expansion modules (UXM):
Module 1: 24-41
Module 2: 42-5
Module 3: 60-77
context string assigns the function key to a SIP Identity (1 to 12) registered on the
phone. “Active” assigns the current active identity to that function key.
label string defines the short label to be used to describe the fkey.
lp string defines if long press of the fkey on the phone can be used to display the
fkey’s configuration menu. Default value is “on”. NOTE: Value must be set to “off”
for the functions Push2Talk (p2t) and Line Info Layer. When setting a value that is
not the default value for this setting you have to also add clp="1".
default_text string defines what to show as decription for a key that has neither its
fkey_label setting set nor an XML-description that provides a label.
This attribute is optional and applicable only to self-labeling keys. It has no effect
when the key is not self-labeling. When omitted on a self-labeling key,
label_default_text remains unchanged.
You may define any arbitrary fixed text, but note that there are three key words that
allow to insert dynamic information related to the key:
$name :
on a (shared) line key:
– when there is an active call on the key:
the remote name (or number if no name is available) is inserted
– when there is no active call:
when context is 'active' and $type is not also included:
the key type is inserted
when context is a specific identity:
the local name or number is inserted
on other keys:
Provisioning 33 Back to Contents
Page 34

ET685 Administrator and Provisioning Manual
the destination configured on the key is inserted
$type will insert the key type
$state will insert the key state, when applicable (not all keys have states)
Setting with index 0 describes the format of the upper left key on the first ET6
attached on phones without self-labeling keys. On phones with self-labeling keys,
0 describes the format of the first key on page 1.
perm string defines the permission flag. See “Flags” on page 51.
value string defines the function key value, optionally followed by a space and a
value-specific argument. As of firmware versions 8.2.19 and 8.4 and above, XML
subtrees can be used instead.
List of valid values of the value string
The following table lists the available values for the value string.
value string Description
auto_answer
blf
button
BW-ACD
BW-Anywhere
BW-RemoteOffice
BW-ServerBLF
call_agent
Enables you to switch Auto Answer functionality on/off
for the first outgoing identity. If you don't provide the
identity, the auto answer functionality is switched for all
identities.
Busy Lamp Field (BLF). Enables users to monitor the
dislog state of another phone/user extension. This is
indicated by the LEDs adjacent to the particular key.
This is a button that is connected to your PBX.
BroadWorks Automated Call Distribution (ACD)
configuration.
BroadWorks Anywhere configuration.
BroadWorks Remote Office configuration.
Broadworks Busy Lamp Field (BLF) configuration.
The phone can be used as a Call Agent that
distinguishes five states:
AgentLoggedOnEvent (Sign-In)
AgentLoggedOffEvent (Sign-Out)
AgentNotReadyEvent (Unavailable)
AgentReadyEvent (Available)
AgentWorkingAfterCallEvent (Wrap-Up)
These states are governed by the function key ACD,
which is configured in the Function Keys section of the
webinterface.
Provisioning 34 Back to Contents
Page 35

ET685 Administrator and Provisioning Manual
value string Description
conference
Contact List
Buddy
dest
dtmf
icom
Press the key to set up a conference call and select
desired participants.
Let the key reflect one of the buddies from a
resource-list-subscription.
Extension/destination. This key type is used for:
Extension Monitoring (Busy Lamp Field (BLF))
& Call Pickup: This allows showing the status
(idle, ringing, held call, busy) of a distinct
phone extension on your phone
Speed Dial: Pressing this key during idle state
will dial the programmed extension ("number").
Call Deflection: Pressing this key during an
incoming call will deflect the incoming call to
the programmed extension ("number").
This option allows the specification of arbitrary key
sequences (allowed digits: "0-9", "*", "#", "A-D" and
flash: "!"), which will be sent via DTMF when this
button is pressed. This can only be done during an
active call.
Pressing the key bound to “Intercom” enables the
intercom mode: the phone will be directly connected to
the VTech phone if authentication is set up properly.
This feature is useful in an office environment as a
quick access key to connect to the operator or the
secretary.
ivr
keyevent
Provisioning 35 Back to Contents
The argument is a number that is dialed on key press
i.e. sending out an INVITE. Once the call has been
established, pressing the same IVR key would send
out dtmf digits comprising that number. This can be
used to control IVR applications by one key only.
Key events than can be mapped onto the predefined
or the usual function keys.
Use the text
of the key events in “List of valid key events” on
page 37. Example:
keyevent followed by a space, and one
keyevent F_ADR_BOOK
Page 36

ET685 Administrator and Provisioning Manual
value string Description
line
multicast
none
orbit
“Line” key can behave as a private or line shared line
key, according to the setting user_shared_line.
Private Line: Assigns local SIP identities
(lines) to programmable keys.
Shared Line: Enables subscribers to share
SIP lines and also provides status monitoring
of the shared line.
See also “Line” on page 109.
With this function key the phone can start a multicast
RTP stream.
You must insert the multicast destination address and
a port, e.g.: 239.255.255.245:5555
If you like to map a key to no functionality at all, use
this type.
Park Orbit. This feature is useful for call center
environments and all places where there is a great
inflow of calls and some kind of queuing is required to
manage them. Some PBX solutions provide its
customers with the opportunity to set up parking orbits,
where calls can be parked and picked up. The option
“Park Orbit” enables the phone to provide this feature.
p2t
presence
recorder
Push2Talk feature enables users to make Intercom
calls to a programmed destination via the function
keys. lp string (long press) must be turned “off” as it
blocks the Push2Talk (PTT) functionality.
See also “Push2Talk” on page 110.
The phone will subscribe to the presence state of the
destination url with event type presence. The
associated led will reflect the presence state of the
destination e.g. ringing, available etc. Hitting the
programmable key (usually when the destination is
available and can receive a call) shall dial that number.
Voice recorder. This feature can be used to record a
conversation during an active call or short messages
or memos for personal use. Another possible usage is
the recording of a debate or discussion, to keep audio
minutes of a meeting, or to record a conference. This
option can be set up with a valid voice recording
account.
Provisioning 36 Back to Contents
Page 37

ET685 Administrator and Provisioning Manual
value string Description
redirect
speed
Starcod
transfer
url
xml
XMPP-ContactPres
List of valid key events
Forward To. This option can be used to create a
shortcut for setting up call forwarding for the phone.
If you are using a programmable function key with
LED, the LED will indicate the current state of the call
forwarding.
Enables the key to speed dial a preset number.
See also “Speed Dial” on page 110.
For making SIP calls without audiovisual indication on
the phone user interface (PUI).
Transfers the current incoming/active call.
Action URLs are basically HTTP GET Requests. They
can be used to send various data from the phone to a
web server. See also “Action URL” on page 106.
XML Definition/Customizable via XML.
Enables you to publish a presence state to indicate
your current communication status in order to inform
your contacts of your availability and willingness to
communicate.
This tables lists the valid key events for value strings defined as keyevent.
See “keyevent” on page 35.
keyevent Description
F_ADR_BOOK
F_ACCEPTED_LIST
F_CALL_LIST
F_CONFERENCE
F_CONTACTS
F_DELETE_MSG
Provides access to the internal phone directory.
Provides access to the ACCEPTED call history list.
Provides access to the call history list (missed,
received, dialed calls).
Enables the user to press the key to set up a
conference call and select desired participants.
Provides access to the Contact List, where the
Presence State of selected users can be seen
(online, busy, offline).
Deletes a text message.
Provisioning 37 Back to Contents
Page 38

ET685 Administrator and Provisioning Manual
keyevent Description
F_DENYALL
F_DIALOG
F_DIRECTORY_SEARCH
F_DND
F_FAVORITES
F_HOLD
F_HOLD_PRIVATE
F_HOTELING
This key event will deny the incoming call and add
the number to the deny list.
Since firmware version 8.7.2, all phones with call
screen settings can alternatively do this by
long-pressing cancel key.
Shows the list of monitored extensions and allows
call pickup.
Since firmware version 8.7.2: will auto hide when not
applicable, i.e. when the list would be empty.
Enables the user to lookup remote directory while
dialing a number. Once set, this pressed key will
open up the Direcory Search window.
Toggles the Do Not Disturb (DND) status on the
phone. When mapped to a function key with a LED, it
will indicate the current DND state. Permanent light
is 'DND on' and no light means 'DND off'.
Opens the Favorites Address Book.
Places an active call on "Hold".
Places an active call on "Private Hold".
Hoteling feature enables users (guests) within an
office to use any cubicle phone (hosts) in the office
by logging in to the host phone and having the host
phone provisioned with guest’s device profile
settings.
F_LABEL_PAGE_NEXT
F_LABEL_PAGE_PREV
F_LOGOFF_ALL
F_MISSED_LIST
F_MUTE
F_NEXT_ID
F_NONE
Provisioning 38 Back to Contents
Opens the next label page in a round-robin fashion
on phones with self-labeling keys.
Opens the previous label page in a round-robin
fashion on phones with self-labeling keys.
Caution: This option will delete all account settings!!
Usage: Mainly useful for call centers with frequently
changing users.
Provides access to the MISSED call history list.
Mutes/Unmutes during an active call.
Please note that on some phones the mute key can
work as a DND when Idle. You can manage this
feature through the mute_is_dnd_in_idle setting.
Shows the next outgoing ID.
If you like to map a key to no functionality at all, use
this type.
Page 39

ET685 Administrator and Provisioning Manual
keyevent Description
F_OCIP
F_PRESENCE
F_PREV_ID
F_REBOOT
F_REC
F_REDIAL
F_REDIRECT
F_RETRIEVE
Access the Broadsoft directory via the Open Client
Interface-Provisioning (OCI-P) that allows third-party
applications to peform all business functions
peformed by BroadWorks.
Provides access to the Presence State list, where
the Presence State of each SIP Identity can be
defined e.g. online, offline, busy, invisible).
Shows the previous outgoing ID.
Displays a screen on the phone asking if you want to
reboot.
Toggle recording on/off during an active call.
Provides access to the DIALED call history list.
Can be used to create a shortcut for setting up call
forwarding for the phone. If you are using a
programmable function key with LED, the LED will
indicate the current state of the call forwarding.
Retrieves the mailbox messages. This key becomes
active after the phone has received a message
waiting indication (MWI) with a valid mailbox URI.
F_RINGER_SILENT
F_SERVER_AB
F_SETTINGS
F_STATUS
F_SUPPORT
F_TRANSFER
F_ZONES
HEADSET
Turns the ringer off/on.
Provides access to an external phone directory.
Shows the current MENU of the phone.
Shows a list of status messages.
Displays the Help screen as seen in “Help” on
page 85.
Transfers the current incoming/active call.
Multicast paging zones.
Turn Headset mode on/off.
<ReplacementPlan> XML tag
The xml replacement plans (<ReplacementPlan> tag) contain XMLs that get inserted into
the settings when certain conditions are met. The <ReplacementPlan> tag can be used
either:
inside the <settings> tag or
as an individual XML file whose URL is listed inside <setting-files> tag
Provisioning 39 Back to Contents
Page 40

ET685 Administrator and Provisioning Manual
Example:
<ReplacementPlan>
<key id="ResourceListBuddy"
wui_translation_key="fkeys_ssi_buddy_from_server_list">...</key>
<setting_replacement id="user_event_list_uri">...</setting_replacement>
</ReplacementPlan>
Level 1
Element:
ReplacementPlan
<ReplacementPlan> knows two sorts of subtrees: <key> and
<setting_replacement> (described below).
You may delete plans already on the phone by providing the <key> or
<setting_replacement> with the correct id-attribute set but without any
subtree-content.
Level 2
Element:
Attributes:
key defines a key-type that will get listed in fkey-WUI-page as type for a line-key.
id attribute is mandatory and used to define the key type, so it can be deleted or
altered in later provisions.
wui_translation_key attribute is mandatory and used to define the key type, so it
can be deleted or altered in later provisions.
If the wui_translation_key is not part of the translation-map, it will be used directly
to describe the key in the WUI. Note: renamed and moved to general tag since
firmware version 8.9.3.66).
The subtrees will get additional variables in the beginning of the init-section:
The variable "ui_argument" will hold whatever is entered in the
"Number"-text-field next to the type in the fkey-WUI-page.
The variable "ui_label" will hold whatever is entered in the "Short
Text"-text-field next to the number in the fkey-WUI-page.
Element:
setting_replacement defines a an XML that will be used should the named
setting get set up with non-XMLcontent.
Attributes:
id attribute names the setting, currently ONLY user_event_list_uri is valid.
The subtrees will get additional variables in the beginning of the init-section:
The variable "setting_value" contains the exact non-XML setting value that
was used for set up.
The variable "setting_index" contains the index of the setting.
Provisioning 40 Back to Contents
Page 41

ET685 Administrator and Provisioning Manual
<tbook> XML tag
The directory settings XML tag (<tbook> or <phone-book) contains a list of contact entries
to be provisioned into the internal phone directory.
The tags <tbook> and <phone-book> are equivalent: These XML tags can be used either
inside the <settings> tag:
<tbook complete="true">
<item context="<outgoing_SIP_identity>" type="<contact_category>"
index="<contact_index(0)>">
<name><contact_name</name>
<number><contact_name></number>
</item>
...
<item context="<outgoing_SIP_identity>" type="<contact_category>"
index="<contact_index(n)>">
<name><contact_name</name>
<number><contact_name></number>
</item>
</tbook>
or as an individual XML file whose URL is listed inside <setting-files> tag
<?xml version="1.0" encoding="utf-8"?>
<tbook complete="true">
<item context="<outgoing_SIP_identity>" type="<contact_category>"
index="<contact_index(0)>">
<name><contact_name</name>
<number><contact_name></number>
</item>
...
<item context="<outgoing_SIP_identity>" type="<contact_category>"
index="<contact_index(n)>">
<name><contact_name</name>
<number><contact_name></number>
</item>
</tbook>
Level 1
Element:
Attributes:
tbook
e
e="2" defines that unicode-values inside xml-escapes (e.g. & # 6 4 ;) may be
greater than 255.
complete
Provisioning 41 Back to Contents
Page 42

Level 2
ET685 Administrator and Provisioning Manual
When complete="true" is provisioned, the phones know that the provided tbook is
complete and thus the previous one can be deleted (this is the only way to delete
entries from the internal tbook via provisioning).
Element:
Item
Each Item tag defines one directory contact entry and requires the following
attributes:
Attributes:
context string defines the SIP identity (line/account) this contact should be called
with
type string defines the contact's category. Only provides either one of these
contact types: ""/"VIP"/"DENY"
fav marks a person as favorite
index provided is used to change the specific entry at that index. Previously, the
tbook tried to match the entries provided to the internal entries via the given
number string (and still does so when no index is provided), which allowed the
provisioner to change everything but this phone number. Now, with the help of the
index, even that can be done.
Elements:
name string defines the contact's name
number string defines the contact's number
number_type defines either one of ""/"sip"/"mobile"/"fixed"/"home"/"business"
first_name string defines a person’s first name
last_name string defines a person’s first name
title string defines a person’s company title like "Head of Finances"
organization string defines the organization/company the person works for
email string defines the person’s email address
note string defines a note.
photo_filename defines the file name of the person’s photo.
action_url string defines the action URL to request when the phone receives
or places a call with this directory entry.
group defines either one of ""/"work"/"colleague"/"family"/"friend"
birthday defines the birthday in either dd.mm.yyyy or mm/dd/yyyy format.
Multiple numbers per person are achieved by defining a Master-entry, which sets up
certain attributes that hold true for all its telephone numbers (like first_name and
last_name) and 2 or more Member-entries.
Provisioning 42 Back to Contents
Page 43

ET685 Administrator and Provisioning Manual
The Master-entry is defined through:
type="MASTER"
number=AnyUniqueNumber - must be one of the telephone numbers of
one of the members
Masters cannot define a context.
The Member-entries are defined by:
first_name=Member_Alias
last_name=UniqueNumberOfMaster
Members cannot define neither birthday nor fav attribute.
<dialplan> XML tag
The dial plan settings (<dialplan> or <dial-plan> tag) contains the global dial plan
parameters.
XML Dial plan can be placed either:
inside the <settings> tag
<?xml version="1.0" encoding="utf-8" ?>
<settings>
<phone-settings></phone-settings>
<functionKeys></functionKeys>
<tbook></tbook>
<uploads></uploads>
<certificates></certificates>
<dialplan e="2">
<!--Example North American Dialplan-->
<TEMPLATE MATCH="0" Timeout="1" User="Phone"/>
<TEMPLATE MATCH="9,011*" Timeout="6" User="Phone"/>
<TEMPLATE MATCH="9,0" Timeout="1" User="Phone"/>
<TEMPLATE MATCH="9,11" Timeout="0" User="Phone" Rewrite="9911"/>
<TEMPLATE MATCH="9,.11" Timeout="0" User="Phone"/>
<TEMPLATE MATCH="9,101..............." Timeout="0" User="Phone"/>
<TEMPLATE MATCH="9,10.............." Timeout="0" User="Phone"/>
<TEMPLATE MATCH="9,10*" Timeout="6" User="Phone"/>
<TEMPLATE MATCH="9,1.........." Timeout="0" User="Phone"/>
<TEMPLATE MATCH="9,......." Timeout="0" User="Phone"/>
<TEMPLATE MATCH="*" Timeout="15"/>
</dialplan>
</settings>
or as an individual XML file whose URL is listed inside <setting-files> tag
<?xml version="1.0" encoding="utf-8"?>
<dialplan e="2">
<!--Example North American Dialplan-->
Provisioning 43 Back to Contents
Page 44

Level 1
ET685 Administrator and Provisioning Manual
<TEMPLATE MATCH="0" Timeout="1" User="Phone"/>
<TEMPLATE MATCH="9,011*" Timeout="6" User="Phone"/>
<TEMPLATE MATCH="9,0" Timeout="1" User="Phone"/>
<TEMPLATE MATCH="9,11" Timeout="0" User="Phone" Rewrite="9911"/>
<TEMPLATE MATCH="9,.11" Timeout="0" User="Phone"/>
<TEMPLATE MATCH="9,101..............." Timeout="0" User="Phone"/>
<TEMPLATE MATCH="9,10.............." Timeout="0" User="Phone"/>
<TEMPLATE MATCH="9,10*" Timeout="6" User="Phone"/>
<TEMPLATE MATCH="9,1.........." Timeout="0" User="Phone"/>
<TEMPLATE MATCH="9,......." Timeout="0" User="Phone"/>
<TEMPLATE MATCH="*" Timeout="15"/>
</dialplan>
Element:
Attributes:
dialplan
e
e="2" defines that unicode-values inside xml-escapes (e.g. & # 6 4 ;) may be
greater than 255.
Level 2
Element:
TEMPLATE
Attributes:
MATCH=”pattern” is the dial pattern to match. While entering the pattern:
numbers 0-9, * and # represent the keys on the phone that are entered. Use a
period (.) to match any key. An asterisk (*) at the very end of the pattern matches
one or more characters. Matching just the * key without interference with the
wildcard character is done by escaping it with a backslash "\*". To have the phone
generate a secondary dial tone when the part of the template matches, use a
comma (,).
Timeout=”sec” is the number of seconds before a timeout will occur and the
number will be dialed as entered by the user. To have the number dial immediately,
specify 0.
User=”type” is the either IP or Phone. Enter User=phone or User=IP to have the
tag automatically added to the dialed number. Currently User=phone is supported.
Rewrite=”altstrng” is the alternate string to be dialed instead of what the user
enters. This field can be left empty.
identity=”number” is the identity that is used to establish the call. If no identity is
given, the active identity is used.
If desired, specify at the end of each string where comment defines the type of plan (for
example, Long Distance or Corporate Dial Plan).
Special note on dialplan nomenclature:
1. The special characters supported in 'match' include '.' for any digit between 0-9.
Provisioning 44 Back to Contents
Page 45

ET685 Administrator and Provisioning Manual
2. '*' as a wildcard for all charcaters and digits.
3. '[' & ']' to specify a range for single digit input e.g. match="[4-7].." would mean any three
digit number where the first digit is either 4, 5, 6 or 7 i.e. 4-7 inclusive of both limits.
4. ',' is used to indicate secondary local dialtone. It often follows a digit usually 9 or 0.
5. The closest logical match through all the dialplans would be selected for ay given input
match. Ascending or descending order does not over rule this feature.
6. If one doesn't want to specify a timeout, rewrite or user; either leave them empty or do
not include them at all. In this case the default for all would be used.
7. The dialplan attributes can be saved either in capital or small letters. The phone would
internally store them in lower case.
<uploads> XML tag
The <uploads> tag contains a list of the URLs for uploading new designs onto the phone.
This XML tag can be used either
inside the <settings> tag
<uploads>
<file url=URL type=TYPE />
</uploads>
or as an individual XML file whose URL is listed inside <setting-files> tag
<?xml version="1.0" encoding="utf-8" ?>
<uploads>
<file url=URL type=TYPE />
</uploads>
Level 2
Element:
file
Attributes:
url = The URL of the customization tarball file (*.tar) to be uploaded onto the phone.
type =
the following miscellaneous customization options:
gui allows replacing the default Phone User Interface background images and
icons by customized ones.
web allows replacing the default Web User Interface images and stylesheets
by customized ones.
font allows replacing the default Phone User Interface font by customized
ones.
defaults allows replacing the default configuration parameter values by
customized values.
Provisioning 45 Back to Contents
Page 46

ET685 Administrator and Provisioning Manual
license allows replacing the current phone license with a new license to
enable additional features. The license will be ignored if it's not valid (e.g. not
matching the mac address of the phone).
moh allows uploading a local music on hold file (RAW PCMU 20ms).
qml allows replacing the default QML description.
the following allow replacing the default behaviour of the respective PUI state
which is specified via XML:
gui_xml_state_settings allows replacing the default Phone User Interface
Menu by a customized menu, see PUI Menu
gui_xml_addperson
gui_xml_contactlist
gui_xml_state_conference state conference
gui_xml_state_details state details
gui_xml_state_holding state holding
gui_xml_state_multicast state multicast part 1
gui_xml_state_multicast_file state multicast part 2
gui_xml_state_status_message_file
gui_xml_call_lists_file
gui_xml_call_lists_list_file
gui_xml_contact_pool
gui_xml_message_file
gui_xml_call_lists_details
gui_xml_edit_user
gui_xml_templates
gui_xml_presence (from firmware Version 8.7.3.2 until 8.7.3.18/8.7.4.6) ->
since changed to gui_xml_broadsoft_acd_state_chooser
gui_xml_broadsoft_acd_state_chooser
gui_xml_decision
gui_xml_login_wizard
gui_xml_pkeys
gui_xml_ucmenu
Provisioning 46 Back to Contents
Page 47

ET685 Administrator and Provisioning Manual
<certificates> XML tag
The certificates settings (<certificates> tag) contains the trusted server certificates. This
XML tag can be used either
inside the <settings> tag or
as an individual XML file whose URL is listed inside <setting-files> tag
The tag contains an attribute with the URL of the certificate file to fetch:
<certificate url="http://some.url/certificate.der" />
Please note that the download of the certificate is delayed after all provisioning xml files
have been loaded and processed.
A second variant of this tag is supported, where the content of the certificate file is included
as a base64 encoded string:
<certificate type="base64">...</certificate>
The benefit of this variant is, that the certificate is immediately available after processing
the line in the provisioning XML
Level 1
Element:
Attribute:
certificates
url, type
Language File Container
Language file container may consist of a list of language file URLs each one representing
a different language. The following language file containers are currently supported:
Phone User Interface language file container (<gui-languages> tag)
Web User Interface language file container (<web-languages> tag)
<gui-languages> XML tag
Syntax:
<?xml version="1.0" encoding="utf-8" ?>
<gui-languages>
<language url="<Phone User Interface Language file URL(1)>"
name="<language_name(1)>" />
...
<language url="<Phone User Interface Language file URL(n)>"
name="<language_name(n)>" />
</gui-languages>
Level 1
Element:
gui-languages
Provisioning 47 Back to Contents
Page 48

Level 2
ET685 Administrator and Provisioning Manual
Element:
Attributes:
language
url string contains phone user interface language file URLs (1)..(n)
name string determines the language's name in the phone user interface language
list.
<web-languages> XML tag
Syntax:
<?xml version="1.0" encoding="utf-8" ?>
<web-languages>
<language url="<Web User Interface Language file URL(1)>"
name="<language_name(1)>" />
...
<language url="<Web User Interface Language file URL(n)>"
name="<language_name(n)>" />
</web-languages>
Level 1
Element:
web-languages
Level 2
Element:
language
Attributes:
url string contains Web User Interface language file URLs (1)..(n)
name string determines the language's name in the web user interface language
list.
Language files
Language files contain the language phrases. When selecting a new language from the
phone or web user interface language list the content of the associated file will be stored in
the phone´s RAM. The following language files are currently supported:
Phone User Interface language files (<phrases> tag)
Web User Interface language files (<w_phrases> tag)
Language files depend on the firmware version, i.e. each file is unique per firmware version.
However the language files of the latest release are always backwards compatible.
Provisioning 48 Back to Contents
Page 49

ET685 Administrator and Provisioning Manual
<phrases> XML tag
Syntax:
<?xml version="1.0" encoding="utf-8"?>
<phrases>
<phrase i="<index>" n="<name>" t="<translation>"/>
...
<phrase i="<index>" n="<name>" t="<translation>"/>
<language i="<index>" t="<language name>"/>
</phrases>
Level 1
Element:
phrases
Level 2
Element:
Attributes:
phrase tag defines one Phone User Interface phrase.
i string represents the running <index> of the phrases
n string represents the internally used (english) variable <name> used for the
translation
t string represents the <translation>
Element:
language tag defines the language name
Attributes:
i string represents the <index> of the language name, usually equal 0
t string represents the <language name>, should match the name string used in
(<gui-languages> tag)
<w-phrases> XML tag
Syntax:
<?xml version="1.0" encoding="utf-8"?>
<w_phrases>
<w_phrase i="<index>" n="<name>" t="<translation>"/>
...
<w_phrase i="<index>" n="<name>" t="<translation>"/>
<language i="<index>" t="<language name>"/>
</w_phrases>
Level 1
Element:
w-phrases
Level 2
Element:
w_phrase tag defines one Web User Interface phrase
Provisioning 49 Back to Contents
Page 50

ET685 Administrator and Provisioning Manual
Attributes:
i string represents the running <index> of the phrases
n string represents the internally used (english) variable <name> used for the
translation
t string represents the translation
Element:
language tag defines the language name
Attributes:
i string represents the index of the language name, usually equal 0
t string represents the <language name>, should match the name string used in
(<web-languages> tag)
<firmware-settings> XML tag (Firmware File)
The Firmware Configuration File (<firmware-settings> tag) contains the "firmware image"
URL. The Firmware Configuration File will only be requested if its URL had been specified
by the configuration parameter firmware_status before. firmware_status should only be
defined in the phone settings file (<phone-settings> tag).
NOTE: The firmware configuration file URL must not be specified in any container setting
file.
Phone firmware syntax
<?xml version="1.0" encoding="utf-8" ?>
<firmware-settings>
<firmware perm="<permission flag>"><value></firmware>
</firmware-settings>
Level 1
Element:
firmware-settings
Level 2
Element:
Attributes:
firmware tag represents the only allowed configuration parameter.
perm string represents the <permission flag> (see “XML Syntax” on page 51).
value string represents the phone firmware image file URL.
Expansion module firmware syntax
you can also update the expansion module via provisioning defining the firmware_uxm
parameter.
<?xml version="1.0" encoding="utf-8" ?>
<firmware-settings>
Provisioning 50 Back to Contents
Page 51

ET685 Administrator and Provisioning Manual
<firmware_uxm perm="<permission flag>"><value></firmware_uxm>
</firmware-settings>
Level 1
Element:
firmware-settings
Level 2
Element:
Attributes:
firmware_uxm tag represents the only allowed configuration parameter.
perm string represents the <permission flag> (see “XML Syntax” on page 51).
value string represents the expansion module firmware image file URL.
XML Syntax
Syntax XML Format
Description The syntax depends on the XML tag:
Container: <setting-files>, <settings>
Setting Files: <phone-settings>, <functionKeys>, <tbook>,
<dialplan>, <ReplacementPlan>
Firmware File: <firmware-settings>
Language Files: <gui-languages>, <phrases>, <web-languages>,
<w_phrases>
Coding UTF-8
Hints XML header is required.
<?xml version=1.0 encoding=utf-8?>
Flags Flags are defined as permission flags in the string perm within XML
tags. Valid values are:
perm=!: The configuration parameter can be changed by the user
and will not be overwritten by mass provisioning.
NOTE: If administrators want to be able to overwrite user parameter
definitions, they need to use perm=$. With perm=!, the settings can
be changed by mass provisioning only if the end user has not made
changes to the configuration on the phone itself or on its Web
interface.
perm=& or perm=R or perm= : The configuration parameters are
Read Only and cannot be changed by the end user.
perm=$ or perm=RW or perm=" The configuration parameters can
be changed by the end user but will be overwritten by mass
provisioning.
Provisioning 51 Back to Contents
Page 52

Manual Software Update
You can manually update the software of your phone by following these steps:
1. On a web browser, visit businessphones.vtech.com and open the ET685 downloads
page.
2. Read any release notes that are available.
3. Copy the URL link to the firmware update file.
This will be a .bin file. For example: VTechET685-SIP-8.10.1.11-0-SIP-r.bin
4. Open the ET685 WebUI interface, and open the Software Update page.
5. In the Firmware field, paste the link to the firmware update file
ET685 Administrator and Provisioning Manual
6. Click Load.
Your ET685 phone reboots and starts the software update.
Note: Do not disconnect the power at any time during this process!
7. After your phone has finished the software update, check the firmware version.
From the WebUI: open the System Information page.
The Firmware-Version is displayed on the page.
For example, VTechET685-SIP-8.10.1.11-0
From the phone menu:
In Administrator mode: Select 6 Information > 2 System info
In User mode: Select: 5 Information > 2 System Info
The firmware version is displayed in the first line of the display.
For example, VTechET685-SIP-8.10.1.11-0
Provisioning 52 Back to Contents
Page 53

P
HONE
M
ENU
R
ET685 Administrator and Provisioning Manual
C HAPTER 3
EFERENCE
This chapter describes how to use the phone menu to configure the phone settings.
This chapter covers:
“Viewing the Phone Menu” on page 54.
“Alphanumeric keypad” on page 54.
“Using the Identity menu” on page 57.
“Using the Network menu” on page 64.
“Using the Maintenance menu” on page 79.
“Using the Information Menu” on page 84.
For more information about the other phone menus, see the ET685 User Guide.
Phone Menu Reference 53 Back to Contents
Page 54

Viewing the Phone Menu
Input modes:
123: Numerals
abc: Small letters
ABC: Capital letters
Delete character to
the left of the cursor
Current input mode:
Next input mode:
Move cursor to the left
Move cursor to the right
X:
W:
Changing input mode:
To view the phone menu on the ET685 display:
Press the navigation key
–OR–
Press the function key below , if the symbol is available.
To select menu items and settings on the phone menu:
Press a number on the alphanumeric keypad
–OR–
Press and to scroll to the setting and press .
To cancel and return to the previous screen:
ET685 Administrator and Provisioning Manual
Press .
To return to the idle screen:
Press for two seconds.
Alphanumeric keypad
Input modes and navigation
Phone Menu Reference 54 Back to Contents
Page 55

ET685 Administrator and Provisioning Manual
On phone screens where you are keying in entries, the current input mode is indicated
underneath the cursor. Press the left function key underneath the display to switch to the
input mode indicated by the symbol directly above it in the function key line.
Text underneath cursor
= current input mode
Press function key to switch to input mode
indicated by symbol in function key line
Entering numerals, letters, special characters, and symbols
When entering letters and special characters, pause briefly after each character until the
cursor has moved forward so that you won't overwrite the last character you entered.
Pausing is not necessary when entering numerals.
Numerals: In numeral mode, press the respective number key to type the number printed
on the key.
Letters: When in input modes lower and upper case letters, press the alphanumeric key
with the respective letter one, two, three, or four times quickly to type the first, second, third,
or fourth letter printed on the key. Pause briefly after each letter.
Example: In lower case letter mode, press the "2" key once to type an "a", twice to type a
"b", and three times to type a "c".
Letters with accents and umlauts: When in input modes lower and upper case letters,
press the alphanumeric key with the basic form of the respective letter as many times as
necessary. Pause briefly after each letter. Available letters with accents and umlauts
depend on the phone's language setting.
Example: If the phone language is German, press key "2" four times to type "ä".
Entering special characters and symbols: In input modes lower and upper case letters,
press keys "0" and "1" one or more times quickly. Pause briefly after each character or
symbol.
Period. Press "1" once.
Space (" "). Press "0" once.
Underscore ("_"). Press "0" twice.
Special characters listed in the following table. Press "1" as many times as
indicated:
Phone Menu Reference 55 Back to Contents
Page 56

ET685 Administrator and Provisioning Manual
1x . 2x + 3x @ 4x 1 5x : 6x ,
7x ? 8x ! 9x - 10x _ 11x / 12x \ 13x (
14x ) 15x ; 16x & 17x & 18x * 19x #
20x < 21x = 22x > 23x $ 24x [ 25x ]
Phone Menu Reference 56 Back to Contents
Page 57

Using the Identity menu
The ET685 supports up to 12 accounts or "phone numbers" with one or more providers or
within an office or organization network. On VTech phones, these accounts or phone
numbers are called "identities".
In Administrator mode, you can configure identies on the 3 Identity phone menu.
Select Outgoing Identity menu
Use this menu item to select which identity the phone will use for outgoing calls.
1. Press > 3 Identity > 1 Select Outgoing Identity.
2. Select the identity you want for outgoing calls.
3. Press and hold for two seconds to return to the idle screen.
The selected outgoing identity is indicated by a lighter line.
ET685 Administrator and Provisioning Manual
Reregister Identity menu
Use this menu item to reregister one or all identities.
1. Press > 3 Identity > 2 Reregister identity.
2. Select the identity you want to log off.
–OR–
Select 1 All Identities.
3. The Identity menu appears.
4. Press and hold for two seconds to return to the idle screen.
Phone Menu Reference 57 Back to Contents
Page 58

ET685 Administrator and Provisioning Manual
After successful reregistration, the green person symbol is displayed beside each
identity.
Edit Identity menu
The Edit Identity menu item enables you to configure or edit an identity.
Edit Identity (Hotdesking)
Use this menu item to configure or edit an identity for hotdesking (one phone shared by
many users). If you need to enter more data, follow the steps described in “Edit Identity” on
page 59.
1. Press > 3 Identity > 3 Edit Identity > 1 Hotdesking.
2. Select a free identity with , or press its number in the menu.
3. Enter the account with which you register to a SIP registrar/proxy.
4. Enter the IP or DNS address of the registrar/proxy where you want to register this
account.
Phone Menu Reference 58 Back to Contents
Page 59

ET685 Administrator and Provisioning Manual
5. Enter the password for the account registered to a SIP registrar/proxy.
6. Press and hold for two seconds to return to the idle screen.
Edit Identity
Use this menu item to configure or edit an identity.
1. Press > 3 Identity > 3 Edit Identity > 2 Edit Identity.
2. Select a free identity with , or press its number in the menu.
3. Select each of the following menu items from the list, and enter the required
information. Note: Some of these menu items might not be available.
1 Active - Select until the slider is on and “Yes” is displayed. This will
make the identity active.
Phone Menu Reference 59 Back to Contents
Page 60

ET685 Administrator and Provisioning Manual
2 Displayname - Enter the name you would like to associate with the identity,
e.g. “John Smith”.
3 Displaynumber - Enter the display number for the idle screen.
4 Account - Enter the account with which you register to a SIP registrar/proxy.
Phone Menu Reference 60 Back to Contents
Page 61

ET685 Administrator and Provisioning Manual
5 Password - Enter the password for the account registered to a SIP
registrar/proxy.
6 Registrar - Enter the IP or DNS address of the registrar/proxy where you
want to register this account.
7 Outbound Proxy - Enter the outbound proxy in this field to ensure all SIP
packets are sent via the specified communication point.
Phone Menu Reference 61 Back to Contents
Page 62

ET685 Administrator and Provisioning Manual
8 Authentication Username - If your registrar environment needs a different
user name for registration and authentication, then enter the user name for
authentication. The user name in 3 Account will be used for registration.
If you leave this setting blank, then the user name in 3 Account is used f or bot h
authentication and regstration.
9 Mailbox - If you have set up a mailbox, specify the account name for that
mailbox here to associate it with this particular SIP identity.
Phone Menu Reference 62 Back to Contents
Page 63

ET685 Administrator and Provisioning Manual
4. Press and hold for two seconds to return to the idle screen.
5. Follow the steps in “Reregister Identity menu” on page 57.
Logging off identity
Select this menu item to log off an identity or all identities.
1. Press > 3 Identity > 4 Log off identity.
2. Select the identity you want to log off.
–OR–
Select 1 Log Off All Identities.
If the “VTECH Welcome!” screen appears, it means there are no identities configured
on the phone. You must press any button, and then enter the account, registrar, and
SIP password to register an identity.
3. If the Identity phone menu appears, press and hold for two seconds to return to
the idle screen.
The idle screen shows the identity has been removed.
Phone Menu Reference 63 Back to Contents
Page 64

Using the Network menu
In Administrator mode, you can configure network settings on the 4 Network phone menu.
IP Settings menu
Use this menu item to Internet Protocol (IP) settings for the phone.
NOTE: After changing these settings, you must reboot your phone.
IPv4 settings
1. Press > 4 Network > 1 IP Settings > 1 IPv4.
2. To turn on DHCP: Select 1 DHCP until the slider is on and “On” is displayed.
ET685 Administrator and Provisioning Manual
–OR–
To turn off DHCP: Select each of the following menu items from the list, and enter the
required information.
1 DHCP - Select until the slider is off and “Off” is displayed.
This will turn off DHCP.
Phone Menu Reference 64 Back to Contents
Page 65

ET685 Administrator and Provisioning Manual
2 IPv4 - Enter the phone’s IP address.
3 Netmask - Enter the netmask for the phone.
4 IP Gateway - Enter the IP address of the default IP gateway (NOT the VoIP
gateway). It is the address to which the packets get routed when the desired
packet address is not in the current subnet.
5 DNS Server1 - Enter the IP address of the DNS server for your network.
Phone Menu Reference 65 Back to Contents
Page 66

ET685 Administrator and Provisioning Manual
3. Press and hold for two seconds to return to the idle screen.
IPv6 Settings
NOTE: After changing these settings, you must reboot your phone.
1. Press > 4 Network > 1 IP Settings > 2 IPv6.
2. Select 1 IPv6 until the slider is on and “On” is displayed.
3. Select 2 Protocol.
4. Select 1 DHCP & SLAAC to assign the IP address with DHCPv6 and SLAAC
(Stateless Address AutoConfiguration).
–OR–
Select 2 SLAAC to assign the IP address with SLAAC only.
5. Press and hold for two seconds to return to the idle screen.
Phone Menu Reference 66 Back to Contents
Page 67

ET685 Administrator and Provisioning Manual
Webserver menu
Use this menu item to secure Web User Interface access to your phone.
1. Press > 4 Network > 2 Webserver.
2. To disable access to the web user interface (WebUI): Select 1 Webserver until the
slider is off and “Off” is displayed.
–OR–
To enable access to the Web user interface (WebUI): Select each of the following
menu items from the list, and enter the required information.
1 Webserver - Select until the slider is on and “On” is displayed.
2 Webserver Type - Select the type of connection the phone’s web server is
willing to answer to - HTTP & HTTPS, HTTP Only, or HTTPS only.
Phone Menu Reference 67 Back to Contents
Page 68

ET685 Administrator and Provisioning Manual
3 User Name - Enter a user name that will be required to access the web user
interface.
4 Password - Enter the password for the user name.
3. Press and hold for two seconds to return to the idle screen.
Phone Menu Reference 68 Back to Contents
Page 69

ET685 Administrator and Provisioning Manual
VLAN menu
Use this menu item to configure VLAN settings for your phone.
1. Press > 4 Network > 3 VLAN.
2. Select each of the following menu items from the list, and enter the required
information.
1 VLAN ID (1-4094) - Enter the VLAN ID for the phone to connect to.
2 VLAN Priority (0-7) - Enter the VLAN priority.
3. Press and hold for two seconds to return to the idle screen.
Phone Menu Reference 69 Back to Contents
Page 70

ET685 Administrator and Provisioning Manual
WLAN menu
Use this menu item to configure Wireless Local Area Network (WLAN) settings for your
phone.
1. Press > 4 Network > 4 WLAN.
2. To disable WLAN: Select 1 WLAN until the slider is off and “Off” is displayed.
–OR–
To e n able WLAN : Select each of the following menu items from the list, and enter the
required information.
1 WLAN - Select until the slider is on and “On” is displayed.
2 Scan WLAN - to scan for a WLAN.
Phone Menu Reference 70 Back to Contents
Page 71

ET685 Administrator and Provisioning Manual
To display WLAN details, press the Details button. To scan for a WLAN again,
press the Rescan button.
3 Manual Setup - Select each of the following menu items from the list, and
enter the required information.
1 Network Name – Enter the network name.
2 Encryption – Select the encryption method.
3 Encryption Key – Enter the encryption key.
Phone Menu Reference 71 Back to Contents
Page 72

ET685 Administrator and Provisioning Manual
Advanced menu
Use this menu item to configure advanced settings for your phone.
802.1X menu
Use this menu item to configure 802.1X settings for your phone.
1. Press > 4 Network > 5 Advanced > 1 802.1X.
2. To disable 802.1X: Select 1 802.1X until the slider is off and “Off” is displayed.
–OR–
To enable 802.1X: Select each of the following menu items from the list, and enter the
required information.
1 802.1X - Select until the slider is on and “On” is displayed.
Phone Menu Reference 72 Back to Contents
Page 73

ET685 Administrator and Provisioning Manual
2 Mode - Select the IEEE802.1X EAP authentication method.
3 User Name - Enter a user name that is used for IEEE802.1X EAP-MD5
authentication.
4 Password - Enter the password that is used for IEEE802.1X EAP-MD5
authentication.
Phone Menu Reference 73 Back to Contents
Page 74

ET685 Administrator and Provisioning Manual
3. Press and hold for two seconds to return to the idle screen.
Hardware menu
Use this menu item to configure hardware settings for your phone.
1. Press 5 Advanced > 2 Hardware.
2. Select each of the following menu items from the list, and enter the required
information.
1 Net Port Speed/Duplex - Select the NET port speed/duplex.
2 PC Port Speed/Duplex - Select the PC port speed/duplex.
Phone Menu Reference 74 Back to Contents
Page 75

ET685 Administrator and Provisioning Manual
3. To disable ethernet detection: Select 3 Ethernet Detection until the slider is off
and “Off” is displayed.
–OR–
To enable ethernet detection: Select the following menu items from the list, and enter
the required information.
3 Ethernet Detection - Select until the slider is on and “On” is
displayed.
Phone Menu Reference 75 Back to Contents
Page 76

ET685 Administrator and Provisioning Manual
4 Action on Ethernet Cable Replug - Select the action the phone should take
when the ethernet cable is replugged.
4. Press and hold for two seconds to return to the idle screen.
NTP menu
NOTE: After changing these settings, you must reboot your phone.
Use this menu item to configure NTP settings for your phone.
1. Press > 4 Network > 5 Advanced > 3 NTP.
2. Select each of the following menu items from the list, and enter the required
information.
1 NTP Server - Enter the domain name / IP address of the NTP server.
2 NTP Refresh Timer - Enter the interval after the phone will re-synchronize
the time from the NTP server, in seconds.
Phone Menu Reference 76 Back to Contents
Page 77

ET685 Administrator and Provisioning Manual
3. Press and hold for two seconds to return to the idle screen.
DNS menu
NOTE: After changing these settings, you must reboot your phone.
Use this menu item to configure NTP settings for your phone.
1. Press > 4 Network > 5 Advanced > 4 DNS.
2. Select each of the following menu items from the list, and enter the required
information.
1 DNS Domain - Enter the DNS domain for your phone.
2 DNS Server1 - Enter the IP address of the DNS server for your network.
Phone Menu Reference 77 Back to Contents
Page 78

ET685 Administrator and Provisioning Manual
3 DNS Server2 - Enter the IP address of a backup DNS server for your
network.
3. Press and hold for two seconds to return to the idle screen.
Phone Menu Reference 78 Back to Contents
Page 79

Using the Maintenance menu
In Administrator mode, you can perform maintenance functions on the 5 Maintenance
phone menu.
Maintenance functions include switching between user/administrator mode, setting your
keyboard lock PIN, rebooting your phone, or resetting your phone to factory default values.
Security menu
Use this menu item to switch your phone between user mode and administrator mode, and
to set your keyboard lock PIN.
Putting your phone in User Mode
1. Press > 5 Maintenance > 1 Security > 1 Administrator Mode until the slider
is off and “Off” is displayed.
The phone is now in user mode.
ET685 Administrator and Provisioning Manual
2. Press and hold for two seconds to return to the idle screen.
Putting your phone in Administrator Mode
1. Press > 4 Maintenance > 1 Security > 1 Administrator Mode until the slider
is on and “On” is displayed.
2. Enter the administrator password.
Phone Menu Reference 79 Back to Contents
Page 80

ET685 Administrator and Provisioning Manual
If you entered the password correctly, the phone is now in administrator mode.
NOTE: If you forgot the administrator password, and the default administrator pasword
0000 (4 x zero) does not work, you can factory reset the phone – on the web interface:
Go to the Advanced page > Update tab, and click the Reset button.
3. Press and hold for two seconds to return to the idle screen.
Changing the Keyboard Lock PIN
1. Press > 5 Maintenance > 1 Security > 2 Change keyboard-lock PIN.
2. Enter the current PIN (if prompted).
Phone Menu Reference 80 Back to Contents
Page 81

ET685 Administrator and Provisioning Manual
3. Enter the new PIN or press to clear the PIN.
4. Re-enter the new PIN or press to clear the PIN.
5. Press and hold for two seconds to return to the idle screen.
Phone Menu Reference 81 Back to Contents
Page 82

ET685 Administrator and Provisioning Manual
Reboot
Use this menu item to reboot your phone.
1. Press > 5 Maintenance > 2 Reboot.
2. At the “Reboot?” prompt, press to reboot or to cancel.
The phone reboots.
Reset Values
Use this menu item to reset your phone to factory default values.
1. Press > 5 Maintenance > 3 Reset Values.
2. Enter your administrator password.
The phone reboots. After rebooting, you will be prompted to select a language, time
zone, dial tone scheme, and to register an identity.
Phone Menu Reference 82 Back to Contents
Page 83

ET685 Administrator and Provisioning Manual
Phone Menu Reference 83 Back to Contents
Page 84

Using the Information Menu
In Administrator mode, you can display information about your phone on the 6 Information
phone menu. The information you can display includes:
Status messages
Firmware version number
IP address
MAC address
URL of the Web User Interface (WebUI)
Status Info
Use this menu item to display status messages - call forwarding status, passwords not set,
missed calls, reboot required, etc.
1. Press > 6 Information > 1 Status Info.
The status messages appear. If there are no status messages, the message “(no data
available) is displayed.
ET685 Administrator and Provisioning Manual
Phone Menu Reference 84 Back to Contents
Page 85

ET685 Administrator and Provisioning Manual
2. Press and hold for two seconds to return to the idle screen.
System Info
Use this menu item to display the firmware version number, IP address, and MAC address
of the phone.
1. Press > 6 Information > 2 System Info.
The phone displays the system info.
2. Press and to scroll through the information displayed on the screen.
3. Press and hold for two seconds to return to the idle screen.
Help
Use this menu item to display the URL for the phone’s web user interface (WebUI).
1. Press > 6 Information > 3 Help.
The phone displays the WebUI information.
Phone Menu Reference 85 Back to Contents
Page 86

ET685 Administrator and Provisioning Manual
2. Press and to scroll through the information displayed on the screen.
3. Press and hold for two seconds to return to the idle screen.
Phone Menu Reference 86 Back to Contents
Page 87

W
EB
U
SER INTERFACE
R
EFERENCE
ET685 Administrator and Provisioning Manual
C HAPTER 4
(W
EB
UI)
The WebUI allows you to configure all aspects of ET685 Deskset operation, including
account settings, programmable keys, network settings, contact lists, and provisioning
settings. The WebUI is embedded in the ET685 operating system. When you access the
WebUI, you are accessing it on the device, not on the Internet.
This chapter describes how to access the WebUI and configure ET685 settings.
This chapter covers:
“Using the Web User Interface (WebUI)” on page 88.
“Operation pages” on page 91.
“Setup pages” on page 97.
“Status pages” on page 175.
Web User Interface (WebUI) Reference 87 Back to Contents
Page 88

ET685 Administrator and Provisioning Manual
Using the Web User Interface (WebUI)
The Web User Interface (WebUI) resides on the ET685 Deskset. You can access it using
a web browser. After you log in to the WebUI, you can configure the ET685 on the following
pages.
Operation
Home (see page 91)
Directory (see page 93).
StatusSetup
Preferences (see page 97)
Speed Dial (see page 103)
Function Keys (see page 105)
Identity n (see page 113)
Action URL Settings (see page 134)
Advanced (see page 137)
Certificates (see page 170)
Software Update (see page 172)
System Information (see page 175)
Log (see page 175)
SIP Trace (see page 176)
DNS Cache (see page 177)
Subscriptions (see page 177)
PCAP Trace (see page 178)
Memory (see page 179)
Settings (see page 179)
Many of these pages are available only if your phone is in Administrator mode.
Accessing the WebUI
1. Ensure that your computer is connected to the same network as the ET685. Your
computer may already be connected to the network through the PC port on the back of
the ET685.
2. Find the IP address of the ET685:
Press > 6 Information > 2 System Info.
The phone displays the system info.
Web User Interface (WebUI) Reference 88 Back to Contents
Page 89

ET685 Administrator and Provisioning Manual
3. On your computer, open a web browser. (Depending on your browser, some of the
pages presented here may look different and have different controls. Ensure that you
are running the latest update of your preferred web browser).
4. Type the ET685 IP address, preceded by "http://" or "https://" in the web browser
address bar (for example: http://192.168.10.115) and press ENTER on your computer
keyboard.
The browser displays a window asking for your user name and password.
5. Enter your HTTP user name and password, if requested.
You can set the user name and password later on the WebUI: Advanced >
Qos/Security page > HTTP Server.
6. Click OK.
The WebUI appears.
7. Click topics from the navigation bar on the left of the WebUI, and then click the links
along the top to view individual pages.
Changing settings in the WebUI
When you make changes to the phone’s settings on the WebUI pages, click the Apply
button to apply your changes.
If the WebUI displays the following message at the top of the page, it means you have not
yet saved your changes to the phone.
Click the View Changes button to display what changes need to be saved.
Web User Interface (WebUI) Reference 89 Back to Contents
Page 90

ET685 Administrator and Provisioning Manual
Click the Save button to save your changes to the phone.
Some changes to settings require the phone to be rebooted. The WebUI displays the
following message.
Click the Reboot button to reboot your phone.
Web User Interface (WebUI) Reference 90 Back to Contents
Page 91

Operation pages
The Operation pages display information about the operation of your phone:
Dialing a number
Displaying Call History of dialed numbers, missed calls, and received calls.
Home page
The Home page enables you to dial a number or Uniform Resource identifier (URI) on your
ET685 Deskset, and also displays call history of dialed numbers, missed calls, and
received calls.
ET685 Administrator and Provisioning Manual
Setting Description
Dial a number Enter a phone number/SIP URI/IP address you want to call
from your phone.
Outgoing Identity Choose the outgoing identity of the number you want to call,
and then click the Set button.
Web User Interface (WebUI) Reference 91 Back to Contents
Page 92

ET685 Administrator and Provisioning Manual
Setting Description
Dial button - Click to dial the number on your phone. The
phone calls the number on the speakerphone. You can lift
the handset or press the headset button on your phone.
Hangup button - Click to disconnect the call.
Set button - Click to set the Outgoing Identity.
Dialed hyperlink - Go to the Dialed Numbers area of the
page.
Missed hyperlink - Go to the Missed Calls area of the page.
Received hyperlink - Go to the Received Calls area of the
page.
Dialed Numbers This area of the page displays the call history of recent calls
dialed from your phone. It shows date, time, and duration of
the call as well as Local Identity and Number. Local Identity
is the phone's outgoing identity chosen for the call, and
Number is the phone number.
Click next to Dialed Numbers to delete all
entries.
Click next to a line to delete the line.
Click the 1st to add/edit the number in the
Directory.
Click the 2nd to add/edit the URI in the
Directory.
Missed Calls This area of the page displays the call history of recent calls
missed by your phone. It shows date and time of the call as
well as Missed, Local Identity, and Number. Local Identity is
the phone's outgoing identity called by the phone number
listed under Number, and Missed shows the number of
times calls by this phone number were missed.
Click next to Missed Calls to delete all entries.
Click next to a line to delete the line.
Click the 1st to add/edit the number in the
Directory.
Click the 2nd to add/edit the URI in the
Directory.
Web User Interface (WebUI) Reference 92 Back to Contents
Page 93

ET685 Administrator and Provisioning Manual
Setting Description
Received Calls This area of the page shows the call history of calls received
by your phone. It shows date, time, and duration of the call
as well as Local Identity and Number. Local Identity is the
phone's outgoing identity which received the call, and
Number is the phone number it was received from.
Click next to Received Calls to delete all
entries.
Click next to a line to delete the line.
Click the 1st to add/edit the number in the
Directory.
Click the 2nd to add/edit the URI in the
Directory.
Directory page
On the Local Directory page, you can manage your local directory entries. You can edit,
delete, and add contact information for up to 1,000 entries. In order to back up your contacts
or import another local directory file, the page also enables you to export and import your
phone's local directory.
Web User Interface (WebUI) Reference 93 Back to Contents
Page 94

ET685 Administrator and Provisioning Manual
Setting Description
Directory: This area of the screen displays the entries in your phone's
directory.
Click to edit the entry.
Click to delete the entry.
Click call the number on your phone.
Add or Edit Entry: Displays information about the directory entry you are
adding or editing.
Number The person’s phone number
Number Type The number type - sip, cell, fixed, private, or business.
Web User Interface (WebUI) Reference 94 Back to Contents
Page 95

ET685 Administrator and Provisioning Manual
Setting Description
Contact Type The contact type:
None
VIP - Enables calls from the number, even if Do Not
Disturb (DND) is turned on.
Deny List - Blocks calls from the number, but the
caller can still leave a voicemail message.
Outgoing Identity The outgoing identity for this person’s directory entry.
Group A group in which the person belongs - None, Friends,
Family, Work, Colleagues.
Title The person’s company title. For example, Head of
Finances.
Organization The organization/company for which the person works.
Email The person’s email address.
Note A note about the person.
Photo Enables you to upload a photo to the directory entry.
Dimensions must not exceed VGA (640x480 pixels) in size.
Color depth: 32-bit. Format: JPEG (.jpg) / .gif / .png
Delete Photo Select this check box to delete the current Photo.
Visible only when a Photo is assigned to the directory entry.
Action-Url String that defines the action URL to request when the
phone receives or places a call with this directory entry.
Nickname The person's nickname
First Name The person’s first name
Family Name The person’s family name
Birthday The person’s birthday in either dd.mm.yyyy or mm/dd/yyyy
format
Favorite Marks the person as favorite
Add/Edit button - Click to either add a new entry, or save
your changes to the currently selected entry.
Add Sub button - Click to add a directory sub-entry.
Change button - Click to save your changes to the currently
selected entry.
Import directory (CSV): This area of the screen enables you to import directory
entries from a Comma-Separated Value (CSV) file.
Web User Interface (WebUI) Reference 95 Back to Contents
Page 96

ET685 Administrator and Provisioning Manual
Setting Description
Load from file:
Filename Select the file you want to upload.
Filetype Select the format of the file - CSV format or Unicode
TAB-separated.
Skip first Line Select “on” to skip the first line of the import file, such as a
heading line that describes field names.
Load button - Click to import the file.
The WebUI displays an import preview.
To delete your phone’s existing directory, select
“on” for Delete whole directory before.
Make any required changes to the import field
names, and click Save.
Delete whole directory Delete button - Click to delete your phone’s directory.
Click here to save the
current directory.
Click here to save the
current directory in XML
format.
The WebUI displays a warning message asking if
you really want to delete. Click the Yes or No
button.
Click the link to display the directory in CSV format.
Right-click to save in your web browser.
Click the link to display the directory in XML format.
Right-click to save in your web browser.
Web User Interface (WebUI) Reference 96 Back to Contents
Page 97

Setup pages
The Setup pages of the WebUI are for the setup and configuration of your phone:
Preferences page
On the Preferences page, you can configure some basic settings for the phone and set hold
ringtone, privacy, and keyboard settings. The Preferences page is also available to phone
users when they log on to the WebUI in user mode.
ET685 Administrator and Provisioning Manual
Setting phone preferences
Assigning speed dial numbers
Setting function keys
Settings for Identities (accounts), Action URLs, and Advanced features
Installing certificates
Updating the phone’s software
Setting Description
General Information:
Web User Interface (WebUI) Reference 97 Back to Contents
Page 98

Setting Description
ET685 Administrator and Provisioning Manual
Webinterface Language
Select a language used on the Web User Interface (WebUI).
This may be different from the language currently used on the
phone.
Language
Select the language used on the Phone User Interface of
your phone.
Number Display Style Specifies how incoming and outgoing calls are displayed:
Full Contact: The complete URL is shown
Name: Only the name is displayed
Number: Only the number is displayed
Name+Number: Name and number are displayed
Number+Name: Number and name are displayed
Tone Scheme Select the dialtone you prefer for your phone. Also, DTMF
echo will differ (on/off) on different schemes.
MWI Notification Specify the type of Message Waiting Indicator (MWI)
notification that will inform you when a new message
arrives. A short beep <beep> is reminding you once on
having mailbox messages waiting in which <reminder> is
doing that repeatedly. With <silent> this functionality can be
switched off.
MWI Dial Tone Your phone's dialtone can be changed into a stuttering tone
<stutter> to remind you on having waiting mailbox
messages. With <normal> this functionality can be switched
off.
Use Backlight On: Backlight is turned off or dimmed after the phone has
been inactive for approximately 20 seconds (default setting)
or after time in seconds set in text field of Preferences > Dim
after. On some phone models, it is additionally possible to
adjust the intensity of the backlight in active and idle mode.
Off: Backlight is turned off completely. Always: Backlight is
turned on permanently.
Dim after (in seconds) Number of seconds after which to dim (phones with color
display) or turn off the display backlight when nothing is
happening.
U.S. date format
(mm/dd)
With this setting, you can select either U.S. (month/day) or
European (day.month) format for displaying the time and
date.
24 Hour clock When you select “on”, the timestamps will be formatted in
24-hour format, otherwise in 12-hour format.
Web User Interface (WebUI) Reference 98 Back to Contents
Page 99

ET685 Administrator and Provisioning Manual
Setting Description
Show Clock Specifies whether or not clock and date should be displayed
(at the idle screen usually). Release 8.4.32 or higher: If
<false> phone name is displayed instead (if set).
U.S. dialnumber format When this setting is on AND the phone is set to a US time
zone, any numbers you dial will be formatted on the display
like the following examples:
1. National format: 9785550123 will be shown as (978)
555-0123; formatting will start when the 4th digit is
entered.
2. Service numbers (depending on availability in your
area): A service number beginning with 511, for
example, will be shown as (511) -xxxx; formatting will
start when the 4th digit is entered.
3. International access code (for dialing numbers outside
NANP): Numbers beginning with the international
access code 011 will be shown as 011-x-xxxxxx.
Formatting will start when the 4th digit is entered; the
country dialing code (the digit(s) enclosed by the two
hyphens) can consist of one or more digits.
Examples:
After you have entered the four digits 0114, the
display will show them as 011-4.
Entering 9 as a fifth digit will result in 011-49-
because 49 is an existing country dialing code
(Germany).
Entering 2 as a fifth digit will result in 011-42 without
the second hyphen because there is no 42 country
dialing code; entering 0 as the sixth digit will result
in 011-420- because 420 is an existing country
dialing code (Czech Republic).
Note: U.S. dialnumber format is the default setting, but will
only be activated when the selected time zone on the phone
is a US time zone.
Use Flash Plugin If you want to have a live reaction on incoming or outgoing
calls on the phone’s “Home” page, switch this option to “on”.
Your web browser has to support the Macromedia flash
movie format.
Web User Interface (WebUI) Reference 99 Back to Contents
Page 100

ET685 Administrator and Provisioning Manual
Setting Description
Redundant Softkeys When showing a list in minibrowser while the
minibrowser-xml does not define any context-keys on its
own: this setting decides if to show navi-keys instead or no
keys at all.
Show Image in Calls Defines whether or not to show a symbol/photo during a call.
Turning this off will leave more area for displaying the party
names and other information during a call.
Show IVR digits during
connected
This setting controls whether digits pressed during a
connected call are shown on the display or not. These digits
are usually used to control IVR prompts and to enter user
specific information e.g. calling card number, pin codes,
credit card number, billing info etc. Turning this setting off
ensures privacy by disabling the display of these digits. The
actual keys are either not shown at all or replaced replaced
by *.
Global counter for
Missed Calls
When set to <on>, the phone will count missed calls on all
registered lines and show them on the phone. If turned
<off>, missed calls for the active identity will be shown on
the display.
Active Identity Scrolling Turn on/off active line scrolling using navigation key in idle
state.
Scroll step interval Time in ms to make the next step for text scrolling.
Scroll step pause The setting describes for how many scroll-steps the
scrolling is paused when its beginning of a scrolling text is
shown. For phones that don't use circle-scroll-technique,
but instead scroll to the end and then start up front again,
this stop-time also describes the pause at the end.
Scroll step count Defines the number of steps a text is scrolled, e.g. when =1
a scrolling text would first show it's beginning and next its
end. For smoother scrolling, you will need a high number.
Text always scrolls at least 1 pixel per step.
Possible scroll pause when showing beginning or end do
not count as extra scroll steps.
Show identity index Shows local sip line index during call states in adition to the
remote user display name/number/url
Show call status info if turned on the call progress is shown in the headline of the
call progress window e.g. (100 Trying, 180 Ringing etc).
Advertisement This setting distinguishes whether an Advertisement page is
displayed on the VTech phone WebUI home page. This
setting is related to the setting advertisement_url.
Web User Interface (WebUI) Reference 100 Back to Contents
 Loading...