

Page 1

ErisTerminal® SIP Deskset
VSP861
User Guide
VSP861
Page 2

2
Page 3

3
Congratulations
on your purchase of this VTech product. Before using this product, please read
Important Safety Information on page 4 of this manual. Please thoroughly
read this user’s manual for all the feature operations and troubleshooting
information necessary to install and operate your product. You can also visit our
website at businessphones.vtech.com or call 1 (888) 370-2006.
Please note the serial number of your product, which can be found on the back
of the deskset. Save your sales receipt and original packaging in case it is
necessary to return your telephone for warranty service.
Page 4

4
Important Safety Information
This symbol is to alert you to important operating or servicing
instructions that may appear in this user’s manual. Always follow basic
safety precautions when using this product to reduce the risk of injury,
re, or electric shock.
Important safety instructions
When using your telephone equipment, basic safety precautions should always
be followed to reduce the risk of re, electric shock and injury, including the
following:
1. This product should be installed by a qualied technician.
2. This product should only be connected to the host equipment and never
directly to the network such as Public Switch Telephone Network (PSTN) or
Plain Old Telephone Services (POTS).
3. Read and understand all instructions.
4. Follow all warnings and instructions marked on the product.
5. Unplug this product from the wall outlet before cleaning. Do not use liquid or
aerosol cleaners. Use a damp cloth for cleaning.
6. Do not use this product near water such as near a bath tub, wash bowl,
kitchen sink, laundry tub or swimming pool, or in a wet basement or shower.
7. Do not place this product on an unstable table, shelf, stand or other unstable
surfaces.
8. Slots and openings in the back or bottom of the telephone base and handset
are provided for ventilation. To protect them from overheating, these
openings must not be blocked by placing the product on a soft surface such
as a bed, sofa or rug. This product should never be placed near or over a
radiator or heat register. This product should not be placed in any area where
proper ventilation is not provided.
9. This product should be operated only from the type of power source indicated
on the marking label. If you are not sure of the type of power supplied at the
premises, consult your dealer or local power company.
10. Do not allow anything to rest on the power cord. Do not install this product
where the cord may be walked on.
11. Never push objects of any kind into this product through the slots in the
telephone base or handset because they may touch dangerous voltage
points or create a short circuit. Never spill liquid of any kind on the product.
Page 5

5
12. To reduce the risk of electric shock, do not disassemble this product, but
take it to an authorized service facility. Opening or removing parts of the
telephone base or handset other than specied access doors may expose
you to dangerous voltages or other risks. Incorrect reassembling can cause
electric shock when the product is subsequently used.
13. Do not overload wall outlets and extension cords.
14. Unplug this product from the wall outlet and refer servicing to an authorized
service facility under the following conditions:
A. When the power supply cord or plug is damaged or frayed.
B. If liquid has been spilled onto the product.
C. If the product has been exposed to rain or water.
D. If the product does not operate normally by following the operating
instructions. Adjust only those controls that are covered by the
operation instructions. Improper adjustment of other controls may
result in damage and often requires extensive work by an authorized
technician to restore the product to normal operation.
E. If the product has been dropped and the telephone base and/or
handset has been damaged.
F. If the product exhibits a distinct change in performance.
15. Avoid using a telephone (other than cordless) during an electrical storm.
There is a remote risk of electric shock from lightning.
16. Do not use the telephone to report a gas leak in the vicinity of the leak. Under
certain circumstances, a spark may be created when the adapter is plugged
into the power outlet, or when the handset is replaced in its cradle. This is a
common event associated with the closing of any electrical circuit. The user
should not plug the phone into a power outlet, and should not put a charged
handset into the cradle, if the phone is located in an environment containing
concentrations of ammable or ame-supporting gases, unless there is
adequate ventilation. A spark in such an environment could create a re or
explosion. Such environments might include: medical use of oxygen without
adequate ventilation; industrial gases (cleaning solvents; gasoline vapors;
etc.); a leak of natural gas; etc.
17. Only put the handset of your telephone next to your ear when it is in normal
talk mode.
18. The power adapters are intended to be correctly oriented in a vertical or oor
mount position. The prongs are not designed to hold the plug in place if it is
plugged into a ceiling, under-the-table or cabinet outlet.
19. Use only the power cord and batteries indicated in this manual. Do not
dispose of batteries in a re. They may explode. Check with local codes for
possible special disposal instructions.
Page 6

6
20. For pluggable equipment, the socket-outlet shall be installed near the
equipment and shall be easily accessible.
21. In wall mounting position, make sure to mount the telephone base on the wall
by aligning the eyelets with the mounting studs of the wall plate. Then slide
the telephone base down on both mounting studs until it locks into place.
Refer to the full instructions in Deskset Installation in this user guide.
22. CAUTION: Keep small metallic objects such as pins and staples away from
the handset receiver.
SAVE THESE INSTRUCTIONS
Page 7

7
Important Safety Information
Important safety instructions.............. 4
Introduction
Deskset features................................ 9
Quick Reference Guide
Front panel features ........................ 10
Dial pad and audio keys ................. 11
Rear panel connection ports............ 11
Programmable Feature keys ........... 12
Deskset Installation
Overview.......................................... 13
Network requirements ..................... 13
Location ........................................... 14
Connecting the phone ..................... 15
Installing the phone ......................... 16
To mount the phone on the wall....... 17
Wall mount to tabletop installation ... 19
Using the Phone
Home screen ................................... 20
Home screen shortcuts.................... 20
Header icons ................................... 22
Feature key indicators ..................... 23
Using the menu ............................... 24
Main menu items ............................. 24
Making calls ..................................... 25
Answering calls................................ 27
Putting a call on hold ....................... 29
Managing calls with FLASH............. 30
Forwarding calls .............................. 31
Transferring calls ............................. 33
Making a conference call ................. 36
Setting up a Network Conference.... 37
Retrieving messages ....................... 38
Using a shared line .......................... 39
Call monitoring with shared lines ..... 39
Putting a shared-line call on hold .... 40
“Barging in” ...................................... 40
Busy lamp eld ................................ 42
Paging ............................................. 43
Phone Features
Using the local directory .................. 45
Using the Blacklist ........................... 49
Call history ....................................... 50
Call recording .................................. 52
Listening to call recordings .............. 53
Transferring call recordings to a
computer.......................................... 54
Viewing the Phone Status ............... 55
Finding the software version............ 55
Finding the IP Address .................... 56
Setting Do Not Disturb ..................... 56
Setting Call Forwarding ................... 57
Setting Anonymity ............................ 58
ErisTerminal SIP Deskset
VSP861
User Guide
Table of Contents
Page 8

8
Setting Call Alerts ........................... 60
Setting Auto Answer ........................ 60
Cordless Headset
Registering an optional cordless
headset ............................................ 62
Deregistering a cordless headset .... 63
Deregistering the cordless headset
without the deskset .......................... 63
Cordless accessory registration and
deregistration time-out ..................... 63
Cordless Handset
Registering an optional cordless
handset ............................................ 64
Deregistering the cordless handset . 65
Conguring the Phone
Using the App Settings menu .......... 66
Conguring the default screen......... 67
Conguring the Home screen shortcuts
68
Using the User Settings menu ......... 69
Display ............................................. 70
Audio ............................................... 71
Setting the date and time................. 72
Setting the language........................ 73
Setting the Key Unlock PIN ............. 74
Hiding In-Call Digits ......................... 75
Conguring the Feature keys .......... 76
Changing the password ................... 77
Restarting the phone ....................... 77
WebUI
Using the WebUI ............................. 78
Status .............................................. 80
Call Settings .................................... 81
User Preferences............................. 84
Programmable Keys ........................ 86
Speed Dial ....................................... 89
Directory .......................................... 90
Blacklist ........................................... 93
Remote XML ....................................93
Call History ...................................... 94
Servicing .......................................... 95
PIN Masking .................................... 96
Phone Lock...................................... 96
Troubleshooting
General issues................................. 97
Specications
Electrical and environmental
specications ................................... 98
Special Characters
Entering special characters ............. 99
Maintenance
Taking care of your telephone ....... 100
GPL License Information
GPL code requests ........................ 101
Page 9

9
Introduction
This user’s manual contains detailed instructions for using your VSP861 deskset.
Please read this user’s manual before using your telephone.
Deskset features
The VTech VSP861 deskset is full-featured SIP endpoint business phone designed
to work with popular hosted IP PBX services and on-premise SIP PBXs. Once
you have ordered and congured your PBX service, the deskset enables you to
make and receive calls as you would with any other business phone. The deskset
provides calling features such as hold, transfer, conferencing, speakerphone,
quick-dial numbers and one-touch voicemail access.
There are two ports, known as the Ethernet port and PC port, at the back of
the deskset. The Ethernet port allows the VSP861 deskset to connect to the
hosted IP PBX via a router. The PC port is for another device such as a personal
computer to connect to the local area network through the deskset.
The VSP861 deskset supports paging and call transfers between system extensions
and can connect you and two other parties on the same conference call.
The slot on the back of the phone accepts a micro SD card. The SD card allows call
recording, if your administrator has enabled this feature.
The telephone also has 30 virtual feature keys. You or your system administrator
can program these keys for functions such as quick dial, redial, Do Not Disturb,
call forwarding, message retrieval, and call parking.
The keys can also be programmed as Busy Lamp Field keys, to monitor other
desksets in the system. You can press the key for a monitored extension to
answer a call at your own deskset. The feature keys have two-color indicators to
indicate call activity. For more information about the feature keys, see page 23.
The VSP861 IP Phone features include:
• Large backlit color touchscreen
• Speakerphone, Hold, Redial and Mute keys
• Up to 8 lines
• Up to 10 active calls
• 3-way conferencing
• Message Waiting alert LED
• Dual GigE Ethernet ports
• Power over Ethernet enabled
• DECT cordless headset and headset support
• 1000-entry local directory
• MicroSD card slot and call recording
Page 10

10
Quick Reference Guide
Front panel features
SCREEN
Displays call information, menu
icons, and deskset menus.
CANCEL
Press to cancel an operation or exit a menu.
NAVIGATION PAD
Press q or p to scroll through
menus, highlight items or change
settings.
While entering text, press t or u
to move the cursor left or right.
Press OK to select a menu item
or save a setting.
MESSAGE WAITING indicator
Flashes when you have a new
voice message.
VSP861
Corded headset input (on side)
SPEAKER
Press to turn the speakerphone on or off.
REDIAL
Press to view list of previously dialed numbers.
HOLD
Press to put a call on hold.
MUTE
During a call,
press to mute
the microphone.
HEADSET
When a headset is connected
to the phone, press to make,
answer or hang up a call.
MIC (underneath)
– VOLUME +
Press to:
• adjust the listening volume
during a call.
• adjust the playback volume
during message playback.
• adjust the ringer volume
when the phone is idle.
SD card slot (on back)
Page 11

11
PoE Class 3
Use only
Supplied
Adapter
5.1V
Quick Reference Guide
Rear panel connection ports
Ethernet/LAN port
Power adapter jack
PC port Reserved for future use
Do not connect to other equipment.
Page 12

12
Programmable Feature keys
The table below lists the default settings for the feature keys. The key
assignments on your phone may be different. For the complete list of
programmable key options and how to edit them, see “Programmable Keys” on
page 85.
To view the feature keys, you can press:
• on the screen header.
• on the idle screen. You may need to press to view additional idle
screen icons.
The rst page of 15 feature keys appears.
Key Number Setting
1 Line 1*
2 Line 1
3 Line 1
4 Directory
5 Call History
6 Redial
7 Messages
8 Do Not Disturb
9 Call Forward All
10 None
11 None
12 None
13–30 None
* Your system administrator can assign more than one key to a line. For example, you might be
able to activate Line 1 with keys 1 and 2, and Line 2 with keys 3 and 4. Consult your administrator
regarding your phone’s conguration.
Quick Reference Guide
Page 13

13
Deskset Installation
Overview
This section assumes that your network infrastructure is established and that
your IP PBX service has been ordered and congured for your location.
Install the phone close to a router or network switch. You can power the phone
using the supplied power adapter or Power over Ethernet (PoE—Class 3). If you
are not using PoE, install the phone near a power outlet not controlled by a wall
switch. The phone can be placed on a at surface or vertically mounted on the wall.
For customer service or product information, visit our website at
businessphones.vtech.com or call 1 (888) 370-2006.
Network requirements
A switched network topology is recommended for your LAN. The ofce LAN
infrastructure should use Cat.-5/Cat.-5e cable.
The LAN connections to the deskset(s) should all be wired. However, wireless
connections to other devices (such as laptops) in your ofce will not impede
performance.
All desksets must reside on a single subnet. A Dynamic Host Conguration
Protocol (DHCP) server is recommended and must be on the same subnet as
the desksets so that IP addresses can be auto-assigned. In most cases, your
network router will have a DHCP server. By default, the deskset has DHCP
enabled for automatic IP address assignment.
NOTE
Some DHCP servers have default settings that limit the number of network
IP addresses assigned to devices on the network. You should log in to your
server to conrm that the IP range is sufcient.
If no DHCP server is present, you can assign static IPs to desksets. See the
Administrator and Provisioning Guide for more information. If you do not have a
DHCP server or do not manually assign static IPs, you will not be able to access
the WebUI and/or enable automatic time updates from an NTP server.
A DNS server is recommended to resolve the path to the Internet and to a server
for rmware and conguration updates. If necessary, the system administrator
can also download upgrade les and use the WebUI to update the deskset
rmware and/or conguration settings manually.
Page 14

14
Deskset Installation
Location
Avoid placing the deskset too close to:
• Communication devices such as television sets, DVD players, or other
cordless telephones
• Excessive heat sources
• Noise sources such as a window with trafc outside, motors, microwave
ovens, refrigerators, or uorescent lighting
• Excessive dust sources such as a workshop or garage
• Excessive moisture
• Extremely low temperature
• Mechanical vibration or shock such as on top of a washing machine or work
bench
Page 15

15
Deskset Installation
Connecting the phone
IMPORTANT INFORMATION
1. Use only a compatible VTech power adapter.
To get a replacement power adapter, visit our website at
businessphones.vtech.com, or call 1 (888) 370-2006.
2. The power adapter is intended to be correctly oriented in a vertical or oor
mount position. The prongs are not designed to hold the plug in place if it is
plugged into a ceiling, under-the-table or cabinet outlet.
Router
Plug the other end of
the Ethernet cable into
the router connecting
to your console.
Plug one end of the
Ethernet cable into the
Ethernet port at the back
of the phone.
Plug the small end
of the phone power
adapter into the power
jack at the back of the
phone (if PoE cannot
be provided through
Ethernet cable).
Plug the large end of the
phone power adapter
into an electrical outlet
not controlled by a wall
switch (if PoE cannot
be provided through
Ethernet cable).
Page 16

16
Make sure you plug in the Ethernet cable before powering up the phone.
1. If you plan to place the phone on a at surface, attach the stand. Line up the
tabs on the stand with the slots on the rear of the phone. Two sets of slots
allow you to attach the stand at different angles.
2. Plug the end of the coiled handset cord into the jack on the side of the
telephone.
3. Plug one end of the Ethernet cable into the Ethernet port on the rear of the
deskset (marked by ), and plug the other end of the cable into your
network router or switch.
If the deskset is not using power from a PoE-capable network router or switch:
a. Connect the supplied power adapter to the deskset power jack.
b. Plug the power adapter into an electrical outlet that is not controlled by a
wall switch.
If there is a networked computer and no extra Ethernet wall ports near the phone,
then the phone and PC can share the same network connection.
Deskset Installation
Installing the phone
VSP861
Handset cord jack
Page 17

17
To share a network connection with a PC:
1. Plug a Cat.-5 Ethernet cable into the PC port on the phone (marked by ).
2. Plug the other end of the Cat.-5 Ethernet cable into your computer’s Ethernet port.
• If a PC is connected to your network through a phone, any phone resets and
power or network interruptions will disrupt the PC’s connection to the network.
To insert a microSD card (optional):
1. Release the microSD card cover and swivel it out of the way.
2. Insert a microSD card (oriented as shown on the phone), pressing it down
with a ngernail until it clicks into place.
To mount the phone on the wall
1. Prepare the wall-mount screws. The deskset will t onto wall-mount screws
with centers 3 ¼ inches (8.2 cm) or 4 inches (10.2 cm) apart. Most standard
wall plates have screw centers 3 ¼ inches (8.2 cm) apart.
2. If the deskset stand is attached, detach the stand.
3. Put the corded handset aside. Use a coin to rotate the handset tab 180
degrees. The protruding edge holds the corded handset when the phone is
mounted on the wall.
Protruding edge
Handset tab
4. Plug one end of the Ethernet cable into the Ethernet port on the rear of the
deskset (marked by ).
5. If the deskset is not using power from a PoE-capable network router or
switch, connect a power adapter to the deskset power jack.
Deskset Installation
Installing the phone (continued)
Page 18

18
6. Align the upper wall mounting hole on the back of the phone with the upper
tab of the standard wall plate. Make sure the lower wall mounting hole on the
mounting bracket also aligns with the lower tab of the standard wall plate.
Push the phone down until it clicks securely in place.
7. Bundle the Ethernet cable and power adapter cord neatly with twist ties.
8. Plug the Ethernet cable into the router your console is connected to and the
power adapter into an electrical outlet not controlled by a wall switch if you
are not using PoE.
Deskset Installation
To mount the phone on the wall (continued)
Page 19

19
To change the phone from the wall mount position to tabletop position, follow the
steps below.
1. If the Ethernet cable and power adapter cord are bundled, untie them rst.
2. Push the phone up to remove it from wall. Unplug the Ethernet cable from
the router and the power adapter from the power outlet.
3. See “Installing the phone” on page 16.
Deskset Installation
Wall mount to tabletop installation
Page 20

20
Using the Phone
Home screen
The Home screen appears after the phone is connected and congured for your
SIP PBX service. The Home screen indicates that you have no active or held
calls. If you have an active call or are viewing a menu, you can view the Home
screen at any time by pressing .
Pressing the shortcuts on the Home screen performs the actions described
below. To view additional shortcuts, press .
NOTE
• The Home screen is one of three possible default screens. The default
screen appears when your phone is idle. You can select your prefered
default screen on the App Settings menu. See “Conguring the Phone”
on page 66.
• Your system administrator can add a custom background to the Home
screen. The appearance of your Home screen and the available
shortcuts may differ from that shown.
Home screen shortcuts
This table describes the Home screen shortcuts. Pressing these shortcuts opens
various applications on the phone.
To launch an application, you can either:
• Press the shortcut.
• Highlight the shortcut using the Navigation key and then press OK.
These are the icons that appear with default settings. Your system administrator
may include other icons on your deskset idle screen.
Icon Press to...
Select a line to use for a new call.
Make a call using the default line (when the key is labeled New Call) or using
the line specied by the label (Line 1, for example). The Live Dialing screen
opens.
Home screen
Home screen header
Page 21

21
Icon Press to...
No action. A red line icon indicates a disabled account. See your system
administrator for more information.
Make a call to a previously dialed number. The Dialed Calls list opens.
View the local Directory.
View the blacklist. The phone rejects calls from blacklist entries.
Access your messages on the Messages menu.
View your Call History, including your missed calls, received calls, and dialed
calls.
Select a paging zone for broadcasting a page.
Broadcast a page to a predened zone.
Change the phone settings, including Call Settings, App Settings, and User
Settings.
View the phone status, including network status, line status, product
information, and cordless accessory status.
Turn Do Not Disturb on and off for all lines, or the default line.
Turn Call Forward Always on and off for the default line.
Open the Call Manager to view and manage calls in progress.
View, use and congure the Feature keys.
Access your call recordings.
Immediately call back the last missed call.
Page 22

22
Using the Phone
Header icons
The header runs along the top of the screen, and is present at all times, no
matter what phone activity is taking place. The header displays phone status and
features two shortcut icons to display the idle screen and the feature keys. The
status and shortcut icons are shown and described below.
Icon Description
Press to view the Home screen, where you can view the rst page of
application shortcuts.
Press to view the Feature Keys.
Indicates the number of missed calls. Press to view to view your Call History.
You have a new message. Press to view the Messages menu. Depending on
your voicemail setup, you may be able to access your messages through the
Messages menu.
The phone has one or more calls (including active calls, held calls, incoming
calls, or pages). The number indicates the number of calls. Press to view the
Call Manager.
Auto Answer is enabled. The phone will answer calls after a delay without any
action from you. See “Setting Auto Answer” on page 60.
Call Forward Always is on for the default line. Press this icon to view the Call
Forward menu. See also “Setting Call Forwarding” on page 57.
The ringer is off. Press this icon to view the Audio menu.
Do Not Disturb is on for all lines, or the default line. Press this icon to view the
Do Not Disturb menu. See also “Setting Do Not Disturb” on page 56.
The Ethernet cable is unplugged or the network is down.
The phone is connected to a VPN (Virtual Private Network).
The VPN connection has failed.
Page 23

23
Using the Phone
Feature key indicators
The deskset offers 30 virtual feature keys that give you quick access to phone
features and call functions. You can program and recongure these keys to suit
your needs. See “Conguring the Feature keys” on page 75.
A multicolored indictor on each feature key shows you call status and other
information.
Key Light Activity Description
Line Flashing ORANGE
Solid GREEN
Quickly ashing GREEN
Slowly ashing GREEN
Line is unregistered
On a call or dialing
Ringing incoming call
Held call
Shared line key Same as Line, except:
Steady ORANGE
Quickly ashing ORANGE
Slowly ashing ORANGE
The shared line is on a call
Rejected incoming call
The shared line is on hold
Do Not Disturb Off
Steady ORANGE
DND is off
DND or DND All is on
Do Not Disturb All Off
Flashing ORANGE
Steady ORANGE
DND is off for all lines
DND is on for some lines
DND All is on
Call forward
(All, Busy, No Answer)
Off
Steady ORANGE
Call forward is off
Call forward is on
Busy lamp eld Off
Steady ORANGE
Quickly ashing ORANGE
Flashing ORANGE
Monitored phone is idle
Monitored phone is on a call or
has a held call
The monitored phone is ringing
Registration error
Multicast page Off
Steady GREEN
Idle
Outgoing page
Page 24

24
Key Light Activity Description
Automatic Call
Distribution
Quickly ashing GREEN
Steady GREEN
Slowly ashing GREEN
Steady ORANGE
Slowly ashing ORANGE
Quickly ashing ORANGE
ACD agent “wrap up” state
ACD agent ready state
ACD agent unavailable state
ACD logged on
ACD logged off
ACD subscription error
Call Handing Prole Off
Steady ORANGE
Feature is off
Feature is on
Hunt Group Off
Steady ORANGE
Feature is off
Feature is on
Secretarial Filtering Off
Steady ORANGE
Feature is off
Feature is on
Page 25

25
Using the phone
Making calls
You can make a call at any time by choosing an off-hook method (such as lifting
the handset, pressing a Line icon, or pressing HEADSET or SPEAKER), and
then dialing a number. When the phone is in idle mode or has calls on hold, you
can make a call by pre-dialing a phone number and then going off hook to call the
number.
To go off hook and make a call:
1. To use the default line, lift the handset, press a New Call or Line icon ,
press HEADSET, or press SPEAKER. To use a specic line, press the Select
Line icon
. You hear a dial tone.
2. Use the key pad to enter the desired phone number.
• Press if you enter an incorrect digit.
• Press
123
to change from entering digits to entering letters (if you
need to enter a domain name as part of the number).
3. Press
Dial
.
The phone also dials the number after a short delay when the phone accepts
the number as valid.
NOTE
If your administrator enables the Hotline feature, then the phone automatically
dials a pre-programmed number after going off hook.
Page 26

26
Using the phone
Making calls (continued)
To make a call by pre-dialing:
1. Use the key pad to enter the desired phone number.
• Press if you enter an incorrect digit.
• Press
123
to change from entering digits to entering letters (if you
need to enter a domain name as part of the number).
2. Dial the number by:
• Pressing
Dial
. The phone will use the preferred audio mode
(speaker or headset) until you lift the handset.
• Lifting the handset.
• Pressing SPEAKER or HEADSET.
When the call is answered, the active call screen appears.
To end the call, hang up or press . If you are on speakerphone and the
handset is “on hook,” press SPEAKER to end your call.
To make a call using quick dial:
• Press the desired quick dial feature key.
Page 27

27
Using the Phone
Answering calls
When the phone rings, the call manager icon
appears. The icon’s number
indicates the number of active calls.
To answer a call:
• Lift the handset, or press
Accept
, SPEAKER, or HEADSET.
On the incoming call screen, you can also press:
•
Reject
to terminate the incoming call.
•
Forward
to forward the call to another number.
•
Dismiss
to return to the home screen. The phone stops ringing.
If you don’t respond to an incoming call, a missed-call alert appears in the
header.
If a missed-call alert screen appears, press the icon to display the Missed Calls
list. On the Missed Calls list, you can view caller information and return calls.
Page 28

28
Using the Phone
Answering calls (continued)
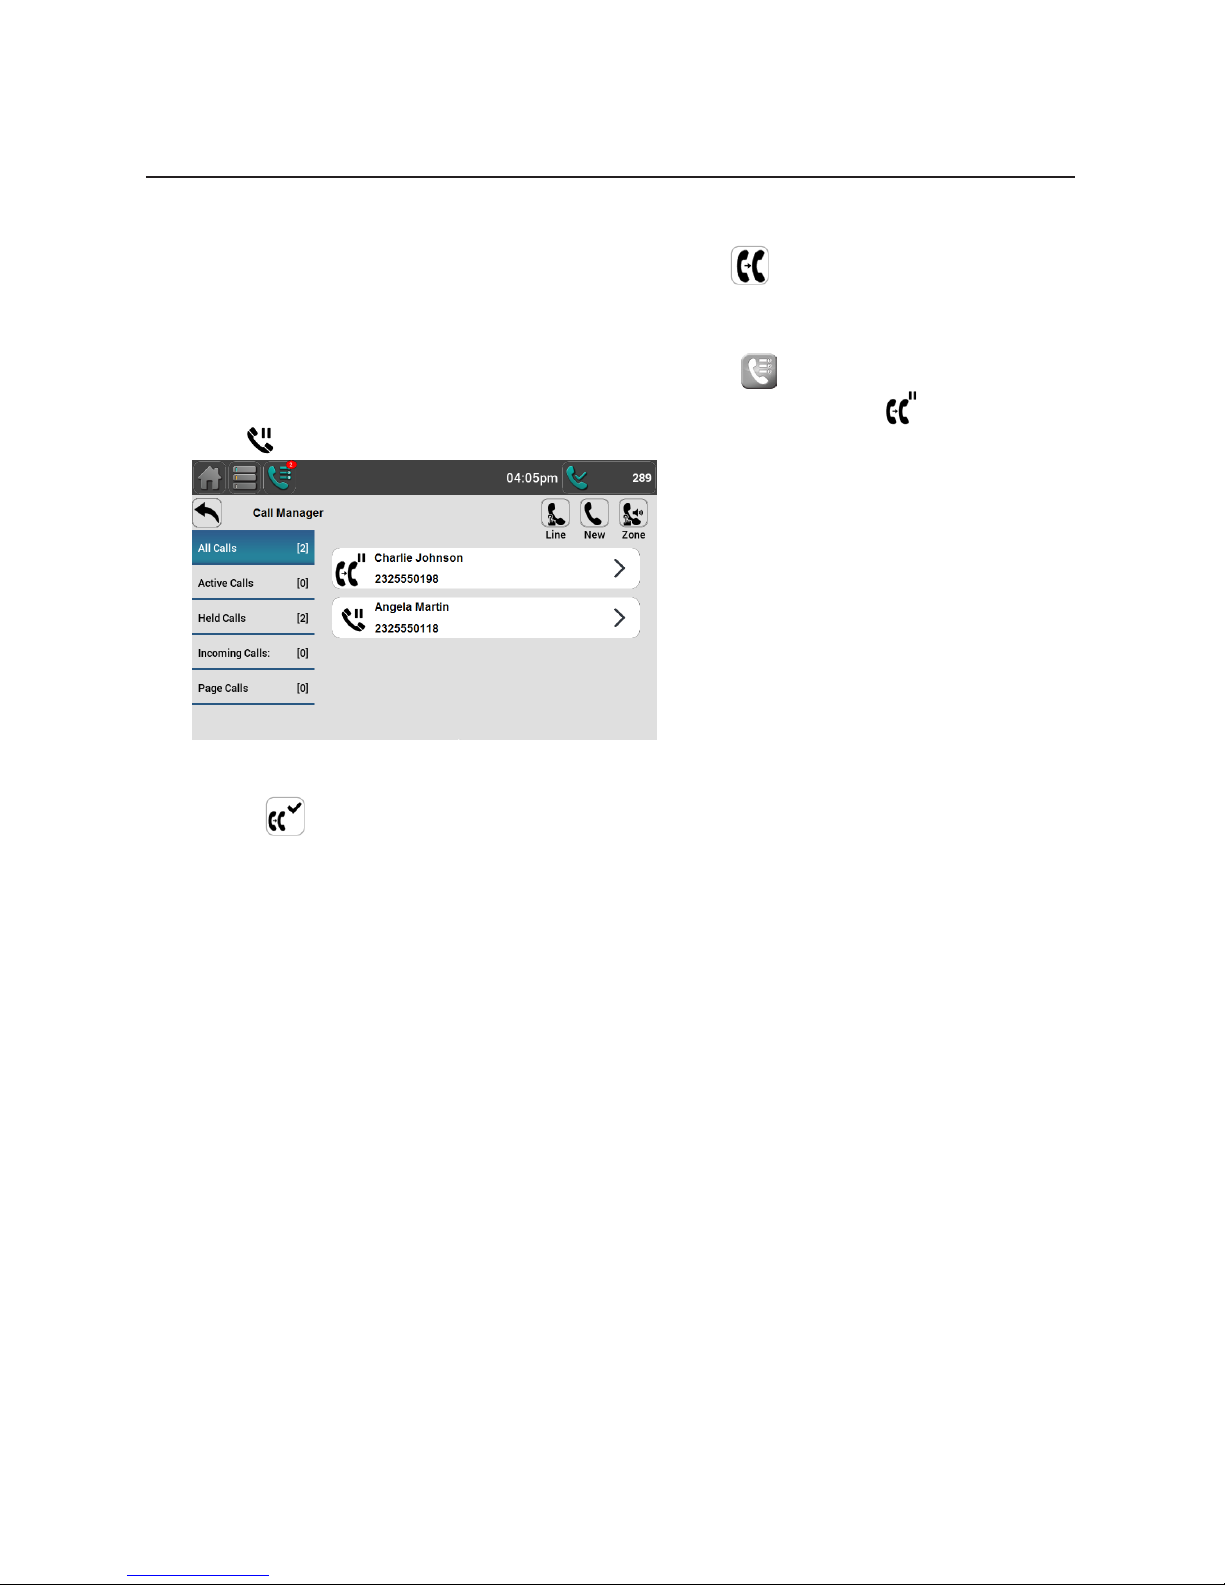
To answer multiple calls:
1. When you have two or more calls, the Call Manager appears, showing the
incoming calls.
2. Press the tab for the incoming call you want to answer and then press .
You can then talk to the selected caller.
è
Page 29

29
Using the Phone
Putting a call on hold
Use this feature to hold one call while you access another. The deskset also
puts calls on hold automatically when you answer another call, transfer a call, or
create a conference.
See also, “Using the Phone” on page 40.
To put a call on hold:
• During a call, press HOLD on the deskset.
–or–
On the screen, press .
The On Hold screen appears.
From the On Hold screen, you can press:
• to end the call
• to take the call off hold
• or to transfer the held call to another party
• to start a conference with the held call.
If another party puts you on hold, you may see the message Held by far end.
This message depends on compatibility between phones and PBX types, and
may not always appear.
Page 30

30
Using the Phone
Forwarding calls
You can forward an incoming call to another number, either by entering the
number yourself, or by selecting a number from another source.
NOTE
Your Call Forward–No Answer setting will cancel the manual forwarding
process if it takes effect rst. For example, your deskset may forward calls to
voicemail after a call rings for 10 seconds, before you can reach the deskset
to forward the call yourself. If you have problems forwarding calls because of
the Call Forward–No Answer setting, you can increase your Call Forward–No
Answer delay. For more information, see “You can automatically forward
incoming calls to another number. The following types of call forwarding are
available:” on page 57.
To forward a call using manual entry:
1. When an incoming call appears, press
Forward
.
The Select the Forward Target screen appears.
2. Press New Call and then enter the number to which you want to forward the call.
NOTE
You can also press Select Line to dial out on a different line, or pre-dial a
number without pressing New Call or Select Line.
3. Press
Dial
.
The phone returns to idle mode if you have no other active calls.
Page 31

31
Using the Phone
Forwarding calls (continued)
To cancel the forwarding process and answer the call:
• Press and then press the ashing green Line key.
–or–
• Press to open the Call Manager and then press the call slot for the call.
Press to cancel forwarding and then press to answer the call.
Page 32

32
Using the Phone
Forwarding calls (continued)
To forward a call using the directory, call history, redial list or feature keys:
1. When an incoming call appears, press
Forward
.
The Select the Forward Target screen appears.
2. Press DIRECTORY, REDIAL or CALL HISTORY to display the directory,
redial list, or call history. You may also access these features using the feature
keys (shown below).
3. Select the call history list or directory you want to access. Pressing REDIAL
takes you directly to the Dialed Calls list in the Call History.
4. Press to select the contact or call history entry to which you want to forward
the call.
5. Press the gray button showing the desired number (as shown in the Call
History and Directory entries below). The call is forwarded and y
our phone
returns to idle mode if you have no other active calls.
NOTE
If you have Quick Dial
feature keys available,
you can also forward
calls by pressing the
desired Quick Dial key.
Page 33

33
Using the Phone
Transferring calls
You can transfer a call to someone else at another phone.
If you talk to the transfer recipient before completing the transfer, you are making
a “supervised” transfer.
However, the transfer recipient does not have to talk to you before receiving the
transferred call. If you do not talk to the transfer recipient before transferring the
call, you are making a “blind” transfer.
You can also transfer a call to a held call.
To transfer a call (supervised):
1. During a call, press . The call is automatically put on hold and the Select
the Transfer Target screen appears.
2. Dial the number to which you want to transfer the call. You can also use a
number from a list, such as the Directory or Call History, or use a Quick Dial
feature key.
3. When the second caller answers, you can talk to the caller to notify them of
the transfer, and then press to transfer the call.
The message Call transferred appears, and your phone returns to idle
mode if you have no other active calls.
è
Page 34

34
Using the Phone
Transferring calls (continued)
To cancel the transfer:
• From the Select the Transfer Target screen, press to view the held call
and then press .
Press to resume talking to the original caller.
•
End
when the second call is active. You will hang up on the second call.
To transfer a call (blind):
1. During a call, press . The call is automatically put on hold and the Select
the Transfer Target screen appears.
2. Dial the number to which you want to transfer the call. You can also use a
number from a list, such as the Directory or Call History, or use a Quick Dial
feature key.
The call is transferred immediately. The message Call transferred appears,
and your phone returns to idle mode if you have no other active calls.
NOTE
If the blind transfer fails—for example, if the transfer target rejects the call—the
transferred call will ring your phone back.
è
Page 35
35
Using the Phone
Transferring calls (continued)
To transfer a call to a held call:
1. While on a call with another call on hold, press .
The active call is automatically put on hold, and the Select the Transfer
Target screen appears.
2. On the Select the Transfer Target screen, press .
The Call Manager opens, showing the call to be transferred ( ) and the held
call ( ) .
3. Select the held call.
4. Press . Your rst call is immediately transferred to the selected held call.
The message Call transferred appears, and your phone returns to idle
mode if you have no other active calls.
Page 36

36
Using the Phone
Making a conference call
You can create a conference call between yourself and two other callers.
To make a conference call:
1. During a call, press . The call is automatically put on hold and the Select
the Conference Target screen appears.
2. Dial the number for the party you want to join your conference. You can also
use a number from a list, such as the Directory or Call History, or use a Quick
Dial feature key.
3. When the second call is established, press .
The conference begins and the conference screen appears.
To cancel the conference setup:
1. From the Select the Transfer Target screen, press to view the Call
Manager and then press .
2. Select a held call and then press to resume talking.
When you have an active call and a held call, you can also create a conference
with the held call.
è
Page 37

37
Using the Phone
Making a conference call (continued)
To create a conference with a held call:
1. While on a call with another call on hold, press .
2. On the Select the Conference Target screen, press .
The Call Manager opens, showing the call to join the conference (
) and
the held call ( ) .
3. Select the held call.
4. Press .
The conference begins and the conference screen appears.
To end a conference call:
Press one of the following:
• , to hang up on both calls.
• , to split the conference and put both calls on hold.
• , to join both calls. The phone returns to idle mode.
Setting up a Network Conference
A Network Conference is hosted by your service provider and allows multiple
parties to join a conference. A Network Conference works in a similar way to
the regular conference described above, except that the
Split
and
Bridge
functions are not available.
In addition, the soft keys
Add
and/or
AddCall
will appear during a
conference, allowing you to add more parties to the ongoing conference call.
Page 38

38
Using the Phone
Retrieving messages
When you have a new message, the New Message alert
appears in the
header. The Message Waiting indicator also illuminates whenever you have new
messages.
Your phone may have separate mailboxes for each line available on the phone.
To listen to your messages:
1. Press the New Message alert .
–or–
Press the Messages shortcut .
The Messages menu appears.
2. Press the desired line to access messages in that mailbox.
3. Press to call your voicemail service.
When there is no New Message alert, you can access the Messages menu using
the Messages shortcut.
NOTE
Depending on your voicemail setup, you may need to access your messages
by dialing a number yourself, not by using the Messages menu and the
button.
Page 39

39
Using the Phone
Using a shared line
Your phone may be congured to have one or more shared lines. This means
that a group of phones, including yours, can make and receive calls on the same
line. The shared line can have more than one programmable key assigned to it.
Ask your system administrator for the conguration that applies to your deskset.
Incoming calls on a shared line will ring every deskset that shares that line. When
someone answers the call, the other desksets stop ringing. In contrast, calls on a
private line will ring only your deskset.
Incoming calls on a shared line look identical to private-line calls, except that the
Forward
button does not appear.
When to Use a Private Line Instead of a Shared Line
The feature keys that access lines should be labeled according to the type of
line. The labels should indicate which keys apply to the shared line(s) and which
keys apply to private lines. In general, you should use private lines for direct calls
to other desksets within your organization. If you use a shared line to call other
desksets, all the other desksets that use that line will ring.
Call monitoring with shared lines
One of the main features of shared lines is the ability to monitor call activity. You
can monitor the call activity by observing the Line key indicator. On your deskset,
the indicator is steady orange when a call has been answered at another
deskset, and ashes orange slowly when the user at another deskset puts a call
on hold. See “Feature key indicators” on page 23.
Page 40

40
Using the Phone
Putting a shared-line call on hold
After you answer a call on a shared line, you have two options for putting that call
on hold.
• You can put a call on hold by pressing the HOLD key. This puts a call on
“normal” hold. On a shared line, this means that other shared-line users can
see that the call is on hold, as indicated by the ashing orange Line key.
Other users can retrieve the call by pressing the ashing Line key. Your
deskset will return to idle mode. Putting a call on hold this way can be useful
if you want to hand off the call to someone else, or if you want to pick up the
held call at another deskset.
• You can also put a call on “private” hold, which means that other users
cannot see that the call is on hold. Their Line key LEDs continue to show a
steady orange, indicating that the call is active. This is useful if you plan to
resume the held call on the same deskset.Using the Phone
When you transfer a call or start a conference call, the other call is put on private
hold automatically. During the transfer or conference setup process, no other
desksets can retrieve the call on hold.
As well, when you are on a call and you answer another incoming call or retrieve
another call on hold, your rst call is put on private hold automatically.
To put a call on private hold manually:
• Press and hold the HOLD key for 2 seconds.
“Barging in”
When you have a shared line, it may be possible to “barge in,” that is, join a call
in progress at another deskset that uses that shared line. The result of barging
in is that you create a “bridged call” between you and the people whose call you
joined. You and the others can then converse. Note that any other shared-line
user can barge in on the call as well.
NOTE
The ability to barge in on calls is a congurable setting for your deskset. Only
your system administrator can enable this setting. Your deskset may have
shared lines, but be unable to barge in on calls.
Bridged calls differ from conference calls in that you can join a call in progress at
any time. However, because the caller ID of the active call is not visible to you,
other participants in the call may need to notify you of an appropriate time to join.
Bridged calls can also have any number of participants, unlike conference calls.
The number of participants on a bridged call depends on the number of desksets
sharing that line and may be limited by system or network capabilities.
Page 41

41
Using the Phone
Putting a shared-line call on hold (continued)
To barge in on a call:
• Press the desired line key that has a steady orange indicator, indicating an
active call on a shared line.
You join the call already in progress.
To leave the call, press
. The other participants can continue the bridged call.
NOTE
If you are unable to barge in on a call, it may be because the other call is
not currently in progess. A line key with a steady orange indicator can also
indicate that the call is on private hold at the other deskset, or that the other
deskset is dialing a number and no call is established yet. As well, If barging
in is disabled on your deskset, pressing the key with the steady orange
indicator will do nothing.
Page 42

42
Using the Phone
Busy lamp eld
As with shared lines, you can monitor call activity using Busy Lamp Field (BLF)
keys. However, BLF keys indicators represent activity on an individual deskset,
not on a line. Keys congured for BLF allow you to monitor call activity for the
extension only. You can use the BLF key as a quick dial key to call the extension
and intercept ringing calls.
NOTE
Your system administrator sets up Busy Lamp Field keys. Your key labels
should identify the BLF keys and which extensions they monitor. The BLF
feature may not be available on your deskset.
For BLF LED states, see “Feature key indicators” on page 23.
To dial a monitored extension:
• Press the BLF key for that extension. The monitored extension can be idle,
or have an active or held call.
Your deskset dials the extension using the rst available line key. When the
other person answers, your deskset indicates two active calls: one active call
on the line key that you dialed out on, and one active call on the BLF key of
the monitored extension you called.
To answer a call ringing at a monitored extension:
• Press the ashing orange BLF key for the desired extension.
Your deskset answers the call on the rst available line key.
è
Page 43

43
Using the Phone
Paging
Your phone supports two types of paging: server-based paging and multicast
paging. An incoming page may interrupt any active calls you are on, depending
on how your system administrator has congured the paging function.
To send a server-based page:
1. Press the Intercom/Page feature key.
–or–
Press a Paging icon .
NOTE
The feature key for paging can have a custom label. Intercom/Page is
the default key label.
Your phone dials out the Page Feature Access Code.
2. Follow the voice prompts to page.
To send a multicast page:
1. Press the Multicast Page feature key.
–or–
Press a Multicast Page icon .
NOTE
The feature key for multicast paging can have a custom label. Multicast
Page is the default key label.
2. Select the desired paging zone. You hear a paging tone.
3. Talk into the speakerphone or handset to broadcast your message.
4. Press
End
to terminate the page.
Page 44

44
Phone Features
This section shows you how to access and use phone features. Depending
on how your phone is congured, you can access these features from the
Home screen and/or the feature keys. The features included in this section are
described below.
Directory—view, add, manage and search for directory entries. If any
network-based directories are available to you, pressing this shortcut displays
an additional screen where you can select the desired directory. To use the
local directory, see “Using the local directory” on page 45.
Blacklist—view, add, and manage blacklist entries.
Messages—Displays the Messages menu where you can access voice
messages. See “Retrieving messages” on page 38.
Call History—View missed calls, received calls, and dialed calls.
Status—View network status, line status, product information, and cordless
accessory status.
Call Recording—Access your call recordings. See “Listening to call
recordings” on page 53.
Page 45

45
Phone Features
Using the local directory
You can store the names and phone numbers for up to 1000 contacts in the
deskset directory. Once directory entries are saved, you can dial them directly
from the directory. You can also search directory entries by rst or last name.
When adding an entry, you can enter numbers for work, mobile, and other. You
can also select a ringtone for that contact. Later, you can edit entries if their
contact information changes.
To view the local directory:
1. On the home screen, press the DIRECTORY icon .
–or–
Press the Directory feature key.
NOTE
If you have one or more server-based directories available, you may
need to select the local directory after pressing the rst Directory icon.
The local directory appears, sorted alphabetically by rst name.
NOTE
To change how the directory is sorted, go to Settings ( ), and then press App
Settings and then press Directory. Under Sorting, select First Name or Last Name.
The following commands are available when viewing a directory entry:
Returns to the previous screen or menu
Dials the entry
Allows you to change the entry
Allows you to add a new entry
Deletes the entry
Allows you to search the list alphabetically by rst or last name
Page 46

46
To call a contact:
1. In the left-hand column, locate and select a contact.
2. On the contact’s screen, press the button for the desired number.
To add a directory entry:
1. When viewing any directory entry, press .
The Add Directory Entry form appears.
2. Press the First Name eld to begin entering information. Use the dial pad keys
to enter the rst name, last name, and contact numbers.
• Press
ABC
to switch between entering upper-case letters, lower-case
letters, and numbers.
• Press to delete incorrect characters.
3. Select a ringtone for incoming calls and the desired line to use when you dial
the contact from the directory.
4. Press
Save
.
To edit a directory entry:
1. When viewing the desired directory entry, press .
The Edit Directory Entry form appears. This form has the same information
as the Add Directory Entry form.
2. Use the dial pad keys to change the rst name, last name, and contact numbers.
• Press
ABC
to switch between entering upper-case letters, lower-case
letters, and numbers.
• Press to delete incorrect characters.
3. If necessary, change the ringtone for incoming calls and the desired line to
use when you dial the contact from the directory.
4. Press
Save
.
Phone Features
Using the local directory (continued)
Page 47

47
To search directory entries:
1. From the local directory, viewing any entry, press .
The Search Criteria form appears.
2. Use the dial pad keys to enter a name.
• Press
ABC
to switch between entering upper-case letters, lower-case
letters, and numbers.
• Press to delete incorrect characters.
3. Press
Search
.
The deskset searches for the rst name or last name matching your search
entry. Search results appear in the left-hand column.
4. Press entries to view their contact information.
5. Press to return to your search results.
NOTE
Searching after entering a single letter will return all contacts with rst or last
names starting with that letter.
Phone Features
Using the local directory (continued)
Page 48

48
To delete a directory entry:
1. While viewing the desired directory entry, press .
2. When the conrmation screen appears, press
Yes
.
To delete all directory entries:
1. From the Home scree, press .
2. From the Settings menu, press App Settings.
3. From the App Settings menu, press Directory.
4. Press
Delete
.
5. When the conrmation screen appears, press
Yes
.
Phone Features
Using the local directory (continued)
Page 49

49
Phone Features
Using the Blacklist
The Blacklist is another local directory containing numbers that cannot reach
your phone. If you experience nuisance calls, you can add the callers’ contact
information to the Blacklist. Calls from blacklisted numbers will not ring your
phone, or be recorded in your call history. The Blacklist can be viewed and edited
in the same way as the Local Directory but is a completely separate Directory
listing.
To add a number to the Blacklist:
1. From the Call History, select the desired call history list.
2. Press the desired call slot to view its details.
3. Press .
4. When the conrmation screen appears, press
Yes
.
NOTE
You can also manually add, edit and delete Blacklist entries in the same way
that you add entries to the directory. Press to view the Blacklist and then
press
, , or to perform the desired task.
Page 50

50
Call history
The call history provides available name and number information for the last 200
incoming and outgoing calls. You can view call history information for:
• All calls—all categories of calls
• Missed calls—incoming calls that were not answered
• Received calls—incoming calls that you answered, forwarded or rejected
• Dialed calls—all outgoing calls. You can use this as a redial list.
To view the call history:
1. On the home screen, press the Call History shortcut .
–or–
Press the Call History feature key.
The Call History appears.
2. Press the desired folder to see call history entries for a particular category.
Each call history entry shows the time, date, name and number of the call, the
number of entries in the folder, along with an icon indicating the type of call.
Received call Dialed call Missed call
To view details for a call history entry:
• Press the call slot for the desired entry.
The caller’s number, the time, date and call duration appear.
Phone Features
Page 51

51
Phone Features
The following commands are available when viewing a call history entry:
Returns to the home screen or feature keys
Dials the entry
Adds the entry to the directory. You can edit the caller’s information before
saving it to the directory.
Deletes the entry
Adds the entry to the blacklist. You can edit the caller’s information before
saving it to the blacklist.
To delete multiple call history entries:
1. From the Home screen, press the settings shortcut .
2. From the Settings menu, press App Settings.
3. From the App Settings menu, press Call History.
4. Press
Delete
for the desired Call History folder: All calls, Missed calls,
Received calls, or Dialed calls.
The entries in this folder are immediately deleted.
Page 52

52
Phone Features
Call recording
If you have the call recording feature available (a microSD card must be installed
and your administrator must enable call recording), you will see the record ( )
option available during an active call.
To record a call:
1. While on a call, press .
You will hear the Record tone if the tone has been enabled by your
administrator.
2. To stop recording, press .
You will hear the Record tone if the tone has been enabled by your
administrator. The recording will be saved to the SD card.
Page 53

53
Phone Features
Listening to call recordings
Recordings can be played back from the Call Recordings screen, available
through a shortcut on the Home screen.
To listen to your recordings:
1. On the Home screen, press the Call Recording shortcut .
The Call Recording screen appears.
2. In the left-hand column, select the desired recording.
3. Press to listen to the recording.
The Call Playback screen appears.
4. Press
PLAY
to play back the recording.
While the recording is playing, you can press:
•
PAUSE
to pause playback.
•
JUMP
to move forward or backward 8 seconds at a time.
•
CANCEL
to cancel playback and return to the Call Recording menu.
To delete a recording:
1. After selecting the desired recording, press .
2. When the conrmation screen appears, press
Yes
.
Page 54

54
Phone Features
Transferring call recordings to a computer
Eject the microSD card before using the card to transfer the sound les to a
computer.
To eject the microSD card:
1. From the Home screen, press the Settings shortcut .
2. From the Settings menu, press User Settings and scroll down to Storage.
3. On the User Settings menu, select Storage.
The SD Card screen appears, showing you the card’s available memory.
4. Press
Eject
.
5. The message “It is now safe to eject your SD card” appears.
6. Move aside the SD card slot cover, and then press down on the SD card to
release it.
7. Remove the SD card from the phone.
Page 55

55
Phone Features
Viewing the Phone Status
You can view information about the phone and its status on the Status Screen.
Status information is grouped into the following categories:
• Overview: Your phone model, IP address, and online status
• Network: Detailed network information
• Lines: Detailed status and registration information for each line available on
your phone
• Product Information: Your phone’s model number, serial number, MAC
address and software version
• Cordless accessories: Registration status of cordless accessories
To view the phone’s status:
• From the Home screen, press the Status shortcut .
The Status screen appears.
Finding the software version
To view the software version of your phone:
1. From the Status screen, press Product Info.
The Product Info screen appears.
2. On the Product Info screen, nd Software Version.
Page 56

56
Phone Features
Finding the IP Address
In order to log on to the WebUI (see “Using the WebUI” on page 77), you must
rst nd the phone’s IP address.
To nd the phone’s IP address:
1. From the Status screen, view the Overview screen. Press Overview in the
left-hand column if you are viewing another Status screen.
2. Note the IP Address.
Setting Do Not Disturb
Do Not Disturb (DND) silences incoming ringing and paging. You can set DND to
apply to all lines, or you can set it on a per-line basis.
To set Do Not Disturb:
1. From the Home screen, press .
2. From the Settings menu, press Call Settings and then press Do Not Disturb.
3. On the Do Not Disturb menu, select:
• Enable Do Not Disturb for All Lines
• An available line and then Enable Do Not Disturb.
NOTE
You can also set DND All using the shortcut on the Home screen (if
available) or a DND All Feature key (if available). You can also congure
a Feature key to enable DND for the single line you selected above.
Page 57
57
Phone Features
Setting Call Forwarding
You can automatically forward incoming calls to another number. The following
types of call forwarding are available:
• Call forward always: incoming calls are forwarded immediately and the
phone does not ring.
• Call forward busy: incoming calls are forwarded if all your line is busy.
• Call forward no ans: incoming calls are forwarded after the no answer delay
expires.
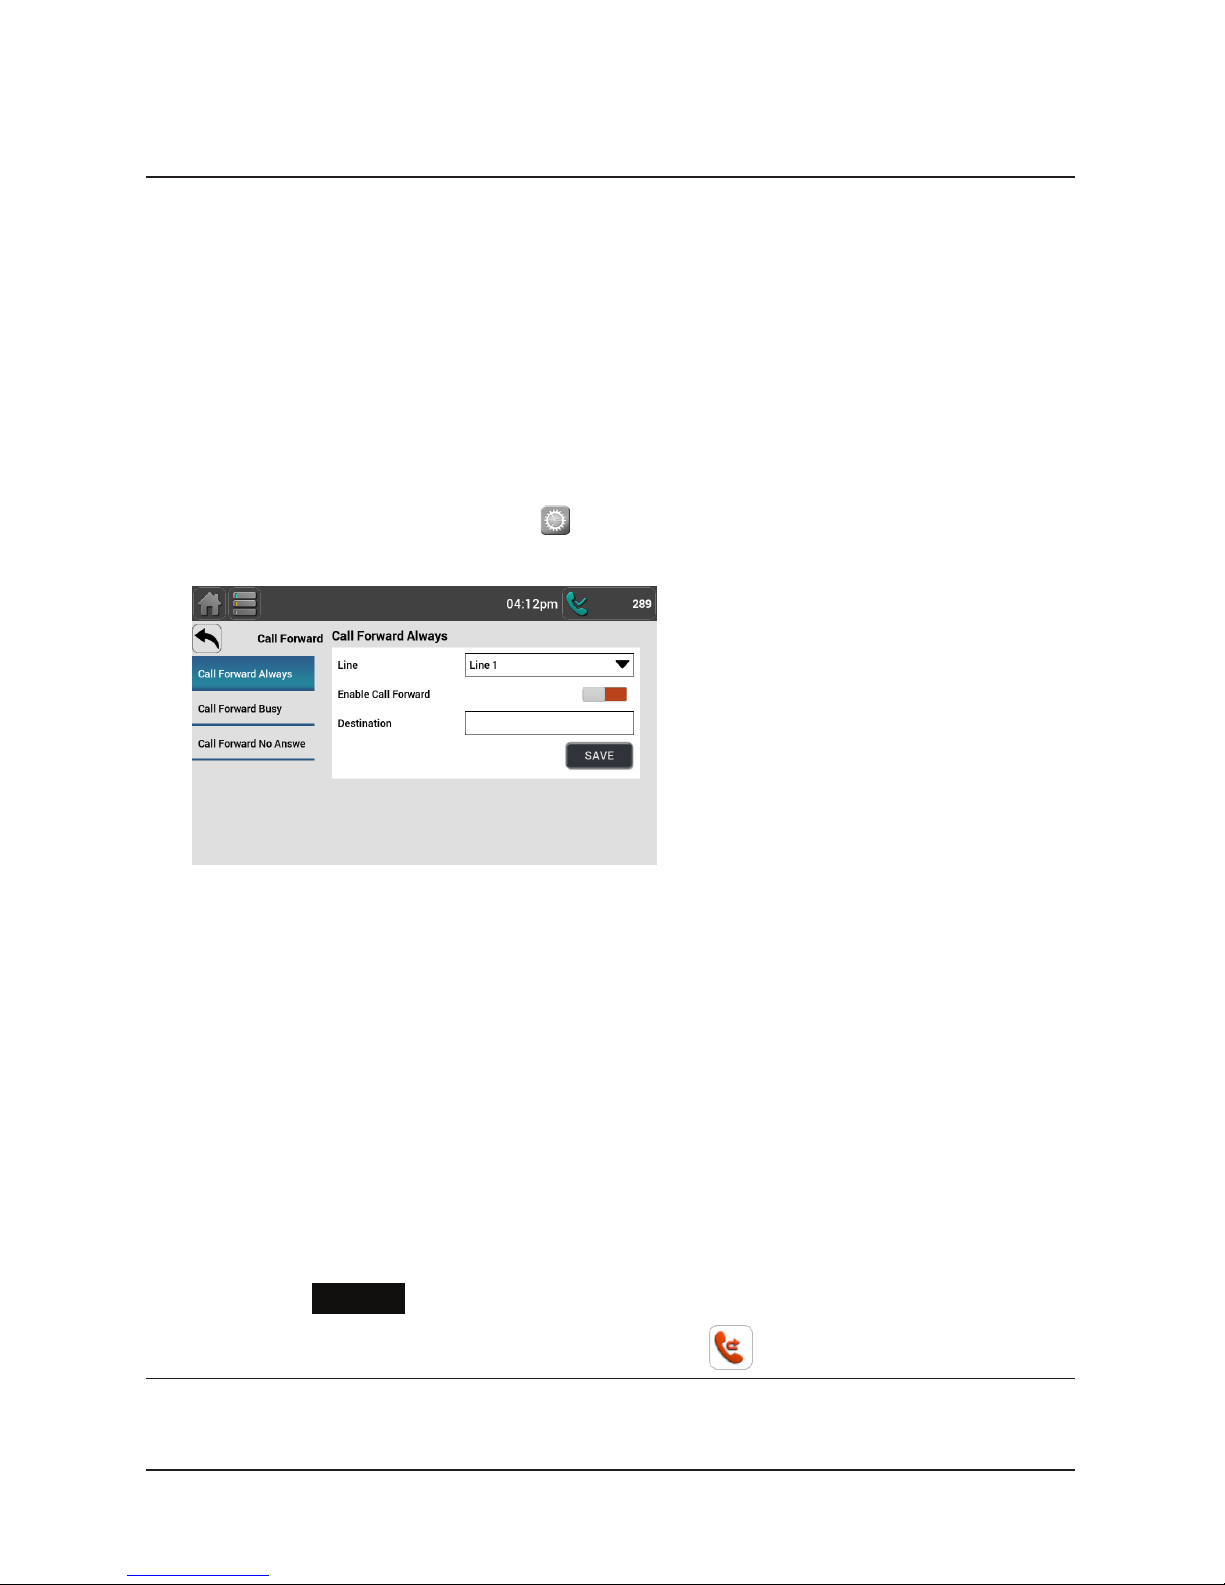
To set Call forward:
1. From the Home screen, press .
2. From the Settings menu, press Call Settings and then press Call Forward.
3. Select the desired option:
• Call Forward Always
• Call Forward Busy
• Call Forward No Answer.
For each option:
a. Select the line for which you want to forward calls.
b. Enable call forwarding.
c. Enter the destination number to which calls will be forwarded.
d. (Call Foward No Answer only) Select the number of rings before the call
is forwarded to the destination number.
e. Press
Save
.
When Call forward for your default line is on,
appears on the idle screen.
NOTE
You can also congure feature keys to turn Call Forward Always, Call Forward
Busy, and Call Forward No Answer on or off.
Page 58

58
Phone Features
Setting Anonymity
The Anonymity settings give you control over Caller ID. You can enable the
phone to reject incoming calls that have no caller ID. As well, you can enable the
phone to make outgoing calls with the Caller ID hidden from the far end.
To block anonymous callers:
1. From the Home screen, press .
2. From the Settings menu, press Call Settings and then press Anonymity.
The Anonymity settings appear.
3. Press Block Anonymous.
The Block Anonymous menu appears.
4. On the Block Anonymous menu, select the desired line.
5. Enable anonymous call blocking for that line.
Page 59

59
To dial as an anonymous caller:
1. From the Home screen, press .
2. From the Settings menu, press Call Settings and then press Anonymity.
The Anonymity settings appear.
3. Press Dial As Anonymous.
4. On the Dial As Anonymous menu, select the desired line.
5. Enable anonymous dialing for that line.
Phone Features
Setting Anonymity (continued)
Page 60

60
Phone Features
Setting Call Alerts
Enables or disables incoming call alerts while you are on another call.
To enable call waiting alerts:
1. From the Home screen, press .
2. From the Settings menu, press Call Settings and then press Alerts.
The Alerts settings appear.
3. Under Call Waiting, enable Call Waiting Alert.
When the call waiting alert is enabled and you are on a call, incoming
calls are displayed on the screen. When the call waiting alert is disabled,
incoming calls are rejected and no notication appears on the screen. See
also “Call Waiting Settings” on page 84.
Setting Auto Answer
You can enable the phone to Auto Answer calls for a selected line. The phone will
answer calls after a delay without any action from you.
To enable Auto Answer:
1. From the Home screen, press .
From the Settings menu, press Call Settings and then press Auto Answer.
The Auto Answer settings appear.
2. Select the desired line.
3. Enable Auto Answer for that line.
Page 61

61
Cordless Headset
Registering an optional cordless headset
You can register one cordless headset to a VSP861 deskset. When a deskset
has a cordless accessory, the deskset and headset are all part of the same
extension, and only one device can be used at a time.
NOTE
The headset must be in the charger, otherwise registration cannot proceed.
To register the cordless headset:
1. From the Home screen, press .
2. From the Settings menu, press User Settings and then press DECT.
The DECT settings appear.
3. Press DECT Headset.
The DECT Headset menu appears.
4. Lift the cordless headset out of the charger, and then place it back in the
charger.
5. On the deskset, press
REGISTER
.
Registering... appears while the deskset searches for the headset.
When registration is complete, Registration succeeded appears.
NOTE
Registration can be terminated by pressing CANCEL on the deskset. If the
cordless headset was registered to another deskset, it must be deregistered
rst. See “Deregistering a cordless headset” on page 62.
Page 62

62
Cordless Headset
Deregistering a cordless headset
You must deregister a cordless headset from its original deskset before you can
register it to a different deskset.
To deregister a cordless headset:
1. On the phone to which the headset is registered press .
2. From the Settings menu, press User Settings and then press DECT.
The DECT settings appear.
3. Press DECT Headset.
The DECT Headset menu appears.
4. On the deskset, press
DEREGIS...
and then press
YES
on the
conrmation screen.
The deskset screen displays Deregistering... The DECT headset menu appears.
Deregistering the cordless headset without the deskset
Cordless headsets can also be deregistered using the headset. You can use
this method when you cannot use the deskset for standard deregistration. The
deskset may be out of range or may have been removed from the system.
To deregister a VSP505 headset, on the headset, press vol +, power, vol –,
power, vol +, vol –, power.
Cordless accessory registration and deregistration time-out
If the cordless device is registered to another deskset or telephone, it must be
deregistered rst. See “Deregistering a cordless headset”.
For security reasons, the registration process on both the deskset and the
cordless accessory terminates after the time-out period of two minutes if
registration is not successful.
If the registration process times out on the cordless accessory, the cordless
accessory resets itself. To reset the headset, lift the headset out of its charging
base, place it back in the charger, and try the registration process again.
Page 63

63
Cordless Handset
Registering an optional cordless handset
You can register one VSP601 DECT cordless handset to a VSP861 deskset.
When a deskset has a cordless accessory, the deskset and handset are all part
of the same extension, and only one device can be used at a time.
NOTE
Make sure the handset has a charged battery before proceeding. As well,
make sure the deskset is powered on and is idle.
To register the cordless handset:
1. On the handset, press MENU. The Main Menu appears.
2. Press q to scroll to User settings and press SELECT.
3. Press q to scroll to Registration and press SELECT.
4. With Handset highlighted, press SELECT. The handset asks
you which device you want to register to. Press
DESKSET
.
5. The handset screen displays instructions. Press
NEXT
to
continue reading the instructions.
6. On the deskset, from the Home screen, press .
7. From the Settings menu, press User Settings and then press
DECT.
The DECT settings appear.
8. Press DECT Handset.
The DECT Handset menu appears.
9. On the deskset, press
REGISTER
.
Registering... appears while the deskset searches for the handset.
10. Press the # key on the handset. The screen shows Please wait...
The registration process takes up to 10 seconds. When
registration is complete, Registration succeeded appears on
the deskset. The handset displays Handset Registered.
If the handset fails to register, place it in the charger for a few
seconds, remove it and repeat the registration procedure.
%$&. (17(5
8VHUVHWWLQJV
0DLQ0HQX
6WDWXV
)HDWXUHV
6SHHGGLDO
%$&. (17(5
5HJLVWUDWLRQ
8VHUVHWWLQJV
.H\7RQH
/LQNORVWWRQH
/RZEDWWWRQH
'(6.6(7
:KLFKGHYLFH
GR\RXZDQW
WRUHJLVWHUWKH
KDQGVHWWR"
%$6(
/,1( 0(18
30
+$1'6(7
Page 64

64
Cordless Handset
Deregistering the cordless handset
Before using the cordless handset with a different deskset, you must deregister
the handset from the device to which it is currently registered.
To deregister using the handset:
1. Press MENU on the handset. The Main Menu appears.
2. Press q to scroll to User settings and press SELECT.
3. Press q to scroll to Registration and press SELECT.
4. Press q to highlight Deregistration and press SELECT.
5. Enter the PIN and then press OK to begin deregistration. The
default PIN is 1592.
To deregister using the deskset:
1. On the deskset, from the Home screen, press .
2. From the Settings menu, press User Settings and then press DECT.
The DECT settings appear.
3. Press DECT Handset.
The DECT Handset menu appears.
4. On the deskset, press
DEREGIS...
.
5. Press
Yes
to conrm deregistration.
The deregistration process takes up to 10 seconds to complete.
BACK SELECT
Registration
Deregistration
Handset
'HUHJLVWUDWLRQ
(QWHU3,1
%$&. 2.
Page 65

65
Conguring the Phone
You can congure the phone using one of two methods:
1. The App Settings and User Settings menus on the phone.
2. The WebUI, which you access using your Internet browser.
This section describes the App Settings and User Settings menus. For
information about the WebUI, see page 77.
Using the App Settings menu
To view the App Settings menu:
1. When the phone is idle, press .
2. Press App Settings.
The App Settings menu appears.
The App Settings are:
Setting Description See page...
Call History Delete all entries from Call History folders. “Call
history” on
page 50
Default Screen Set the default screen to display when your phone is idle. 66
Directory Sort directory and delete all entries. “Using
the local
directory”
on page
45
Blacklist Sort blacklist and delete all entries. “Using the
Blacklist” on
page 49
Applications Select and arrange shortcuts displayed on the Home screen. 67
Page 66

66
Conguring the Phone
Conguring the default screen
You can set the screen that appears when your phone is idle. Depending on your
preference, you can set the screen to the Home screen (showing all the app
shortcuts), the Feature keys, or the Call Manager.
Home Screen Feature keys Call Manager
To congure the default screen:
1. From the App Settings menu, press Default Screen.
2. On the Default Screen menu, select the desired default screen.
Page 67

67
Conguring the Phone
Conguring the Home screen shortcuts
You can select and arrange the shortcuts that appear on the Home screen. The
Home screen can consist of three pages, with up to 10 shortcuts per page. For a
complete list of shortcuts available, see “Home screen shortcuts” on page 20.
To congure Home screen shortcuts:
1. From the App Settings menu, press Applications.
The App Settings menu appears.
2. On the Applications menu, select the desired page.
The list of 10 shortcuts for the selected page appears (numbered 1 to 10 for
page 1, 11 to 20 for page 2, and 21 to 30 for page 3).
3. Select the numbered shortcut/application you would like to change or add
(empty slots are labeled “Unassigned”).
The menu for that application appears.
4. Select the desired shortcut from the list and then press
Save
.
Page 68

68
Conguring the Phone
Using the User Settings menu
To view the User Settings menu:
1. When the phone is idle, press .
2. Press User Settings.
The User Settings menu appears.
The User Settings are:
Setting Options
Display In-Use Backlight ON (Off, Low, Medium, High)
Idle Backlight idle (Off, Low, Medium, High)
Timeout (10–60 seconds)
Audio Ringer Tone (Line 1, Line 2…)
Key Tone (On, Off)
Audio Mode (Speaker, Headset)
Date & Time Date & Time Format
Time Zone
Daylight Savings
Network Time
Manual Time
Language Deskset Language
Phone lock Set Key Unlock PIN
In-Call Digits Hide in-call digits
Feature keys Congure Feature keys 1 to 30
DECT DECT Headset Register/Deregister. See page 61.
DECT Handset Register/Deregister. See page 63.
Edit Password Change the password you use for accessing the WebUI.
Storage Shows available SD card memory and enables you to eject the card.
See page 54.
Restart phone Restart the phone. See page 76.
Page 69

69
Conguring the Phone
Display
Use the Display menu to set backlight behavior.
To use the Display menu:
• From the User Settings menu, press Display.
The Display menu appears.
To set the backlight level that applies when the phone is active:
• Under In Use Backlight, touch the slider to select Off, Low, Medium, or High.
To set the backlight level that applies when the phone is idle:
1. Under Idle Backlight, touch the slider the select Off, Low, Medium, or High.
2. Select the delay before the idle backlight takes effect (between 10 and 60
seconds at 5-second intervals).
Page 70

70
Audio
Use the Audio menu to pick one of ten ringer tones, turn key tones on and off, or
select the default audio mode.
NOTE
To adjust the ringer volume, press the deskset VOLUME q or p keys while
the phone is idle.
To use the Audio menu:
• From the User Settings menu, press Audio.
The Audio menu appears.
To select different ringer tones for each line:
1. From the Audio menu, under Ringer Tone, select a line for which to select a
ringer tone.
2. Select one of ten ringtones. The currently selected ringtone plays (touch it
once more to stop it playing).
To set the key tone:
• From the Audio menu, under Key tone, touch the slider to turn key tones on
or off.
To set the audio mode:
• From the Audio menu, under Audio Mode, select the desired audio mode
(Speaker or Headset).
When you answer a call without lifting the handset (by pressing a Line feature
key or
ACCEPT
), the call is started or answered using the selected audio mode.
Conguring the Phone
Page 71

71
Setting the date and time
To use the Date & Time menu:
• From the User Settings menu, press Date & Time.
The Date & Time menu appears.
To set the time format:
1. From the Date & Time menu, press Date & Time Format.
2. Touch the slider to select a 12-hour clock (12am/pm) or 24-hour clock.
3. Select the desired date format (DD/MM/YY, MM/DD/YY, YY/MM/DD).
To set the Time Zone:
1. From the Date & Time menu, press Time Zone.
2. Select your time zone from the list.
3. Press
Save
.
To enable daylight time saving:
1. From the Date & Time menu, press Daylight Time Saving.
2. Touch the slider to enable or disable automatic daylight time saving
adjustments.
To enable or disable the NTP (Network Time Protocol) server:
1. From the Date & Time menu, press Network Time.
2. Under Network Time Enable, touch the slider to enable or disable your
phone retrieving its time and date settings from the network.
3. If necessary, under Network Time Server Address, edit the NTP server URL.
4. Press
Save
.
NOTE
If the NTP server is disabled, you must manually set the time and date.
Conguring the Phone
Page 72

72
Setting the date and time (continued)
To manually set the Year, Month, Day, Hour and Minute:
1. From the Date & Time menu, press Manual Time.
NOTE
If the NTP server is enabled, you cannot modify this setting. See “To
enable or disable the NTP (Network Time Protocol) server:” on page 71.
2. Under Set Time Manually, select the desired Year, Month, Day, Hour and
Minute.
3. Press
Save
.
Setting the language
The phone menus and other user interface items can be changed to another
language. The languages available may differ depending on your region or phone
software version.
To set the phone language:
1. From the User Settings menu, press Language.
The Language menu appears.
2. Select the preferred language from the list.
The phone language changes after a short pause.
Conguring the Phone
Page 73

73
Setting the Key Unlock PIN
If you are authorized to do so, you can set the PIN to unlock the phone.
When the phone is locked, you cannot make outgoing calls unless you enter
a PIN. However, you can still make a call to an emergency number (911, for
example). This emergency number is congured for your area by your system
administrator.
If your phone has been locked unnecessarily, see your system administrator.
To change the Unlock PIN:
1. From the User Settings menu, press Phone Lock.
The Phone Lock menu appears.
2. Enter the current PIN and then press q .
The default PIN is 1234.
3. Enter the new PIN.
4. Re-enter the new PIN and then press
Save
.
Conguring the Phone
Page 74

74
Hiding In-Call Digits
You can enable the phone to show or hide any additional digits (PIN numbers
and pass codes, for example) that you enter during a call. By default, in-call digits
are shown.
To show or hide in-call digits:
1. From the User Settings menu, press In-Call Digits.
The In-Call Digits menu appears.
2. Touch the slider to enable or disable showing in-call digits.
Conguring the Phone
Page 75

75
Conguring the Phone
Conguring the Feature keys
You can congure the Feature keys on the Deskset.
To congure the Feature keys:
1. From the User Settings menu, press Feature Keys.
The Feature Keys menu appears.
2. Select the key to congure.
The Type select menu appears.
3. Select a Feature key type. Depending on the PFK type, the screen may
prompt you to congure additional settings. For more information, see
“Programmable Keys” on page 85.
4. Press
Save
.
NOTE
You can also congure Feature keys:
• On the WebUI (see “Programmable Keys” on page 85).
–or–
• From the Feature keys page. Press any blank Feature key ( )
and then program the key as shown in step 2 above.
Page 76

76
Conguring the Phone
Changing the password
To enhance security, it is recommended to change the default user password that
you use to log on to the WebUI.
To change the user password:
1. From the User Settings menu, press Edit Password.
The Edit Password menu appears.
2. Enter the current password (for a new deskset, the default password is user).
3. Enter and re-enter a new password. The password is case sensitive and can
consist of both numbers and letters (to a maximum of 15 characters).
4. Press
Save
.
Restarting the phone
To restart the phone:
1. From the User Settings menu, press RESTART.
The RESTART menu appears.
2. Press
RESTART
.
After a pause, the phone restarts.
Page 77

77
WebUI
Using the WebUI
Use a web browser to access the Web User Interface (WebUI) that resides on
your deskset. After you log on to the WebUI with your user password, you can
congure the following features:
• Call Settings
• User Preferences
• Programmable Keys
• Speed Dial
• Local Directory
• Blacklist
• Call History
• Servicing: Passwords, PIN Masking and Phone Lock
The WebUI also has a Status page, where you can view network status and
general information about your phone.
Page 78

78
WebUI
Using the WebUI (continued)
To access the WebUI:
1. Ensure that your computer is connected to the same network as your
deskset. Your computer may already be connected to the network through
the PC port on the back of your deskset.
2. Find the IP address of your phone:
a. When the phone is idle, press .
The Status menu appears.
b. On the Overview screen, note the IP Address.
3. On your computer, open a web browser. Depending on your browser, some of
the pages presented here may look different and have different controls.
4. Type the phone IP address in the browser address bar and press ENTER on
your computer keyboard.
A Login page appears.
5. Under User Name, enter user.
6. Under Password, enter user, or your own password, if you have created
one. You can create or change a password after you log on.
7. Click Log In. The WebUI appears.
Click topics from the navigation bar at the top of the page, and then click the
desired setting on the left side of the WebUI to see the page for that setting. You
view and change settings in two different types of elds: drop-down lists and
entry elds into which you type information. For your security, the WebUI times
out after 10 minutes, so if it is idle for that time, you must log on again.
The remaining procedures in this section assume that you have already logged
on to the WebUI.
Page 79
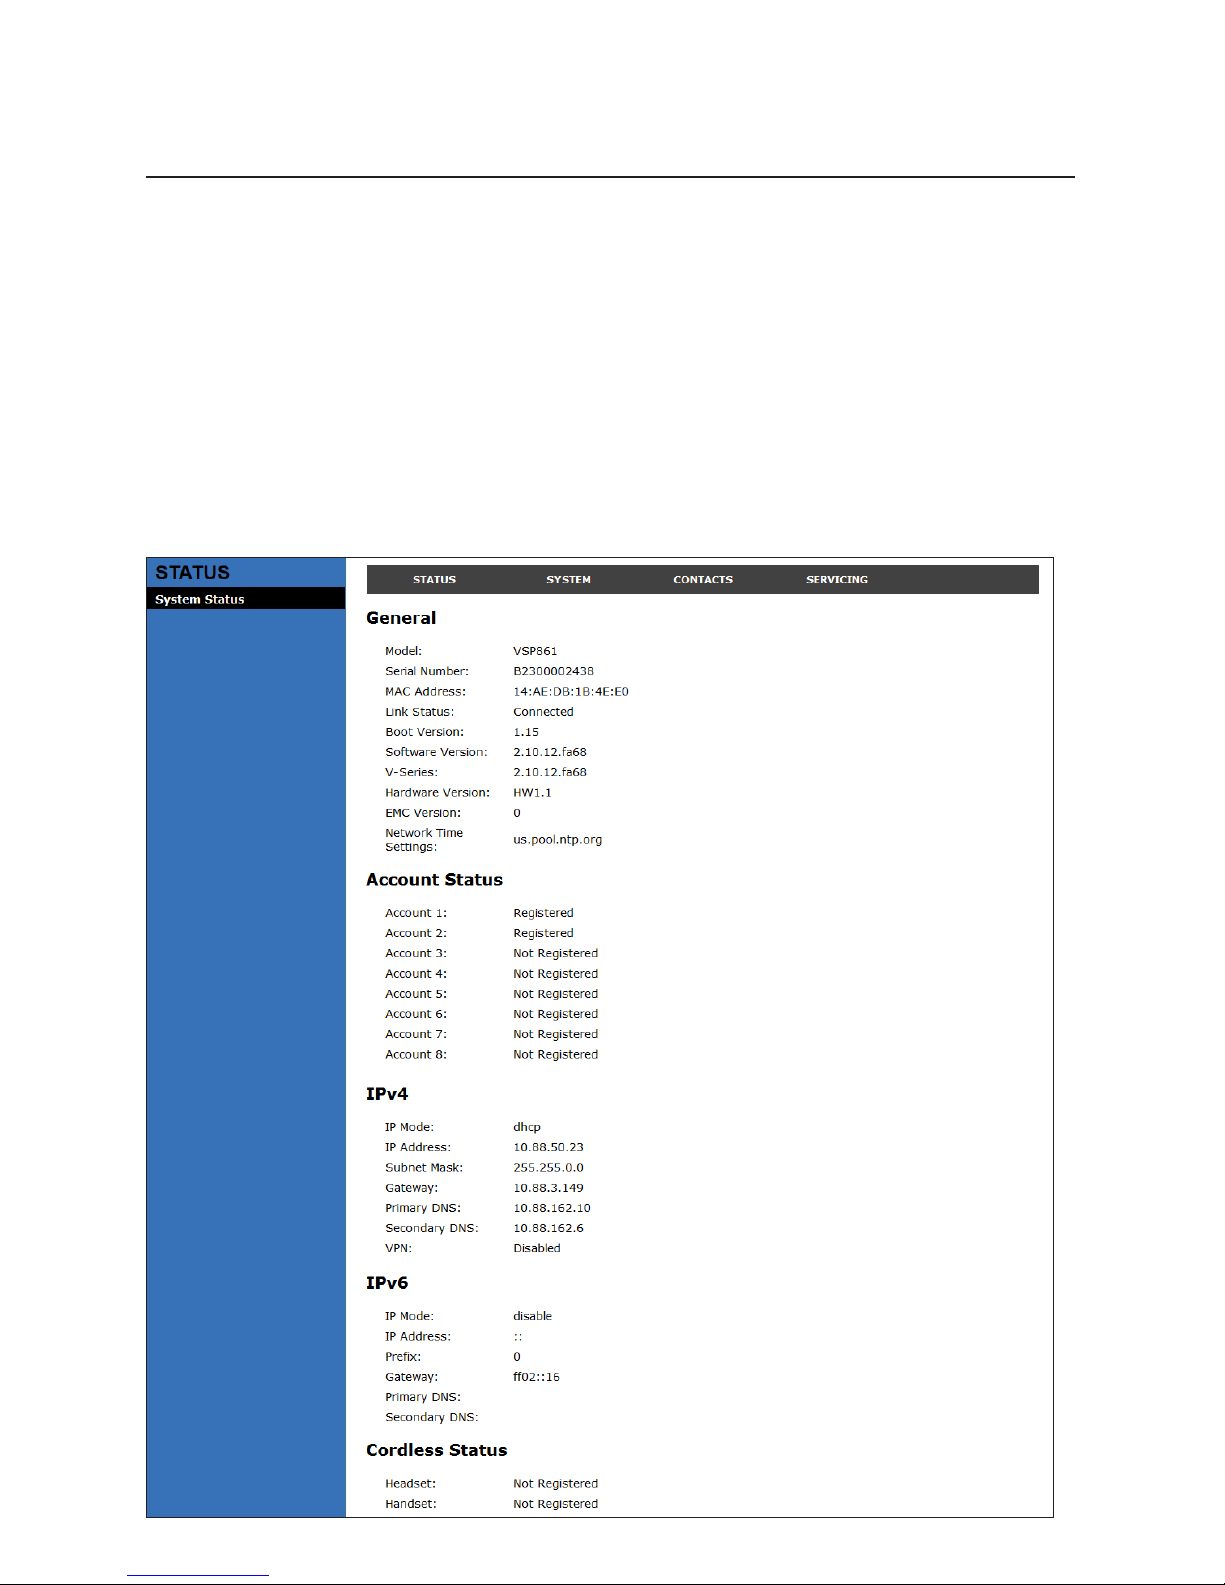
79
WebUI
Status
The Status page shows:
• General information about your phone, including model, MAC address, and
rmware version.
• Account Status information about your SIP account registration.
• IPv4 and IPv6 network information regarding your phone’s network address
and network connection.
• Cordless Status indicating whether a cordless headset and/or cordless
handset is registered to the phone.
The Status page has no settings that you can change. You may need some of
the status information for troubleshooting purposes.
Page 80

80
WebUI
Call Settings
To view the call settings, click SYSTEM in the WebUI header, and then click Call
Settings in the sidebar. You can congure call settings for each account that is
available to your phone. Click Account 1, Account 2, and so on to select the call
settings page for the desired account.
Call Settings include Do Not Disturb and Call Forward settings. You can also set
Do Not Disturb and Call Forward using the desket. See “You can automatically
forward incoming calls to another number. The following types of call forwarding
are available:” on page 57.
When you have nished changing settings on this page, click Save to save them.
General Call Settings
Setting Description
Anonymous Call Reject Select to block incoming calls that have no caller ID.
Enable Anonymous Call Select to make outgoing calls that remove your own caller
ID information.
Do Not Disturb Settings
Setting Description Range Default
Enable DND Turns Do Not Disturb on or off. n/a Disabled
Incoming Calls Selects whether the phone displays incoming
call information while Do Not Disturb is on.
Show, Reject Reject
Page 81

81
WebUI
Call Settings (continued)
Call Forward Settings
Setting Description
Enable Call Forward
Always
Select to enable call forwarding for all calls on that account.
Target Number Enter a number to which all calls will be forwarded.
Enable Call Forward
Busy
Select to enable call forwarding for calls when you are on another
call on that account.
Target Number Enter a number to which calls will be forwarded when the line is busy.
Enable Call Forward
No Answer
Select to enable call forwarding for unanswered calls on that
account.
Target Number Enter a number to which unanswered calls will be forwarded.
Delay Select the number of rings before
unanswered calls are forwarded.
Range: 1 to 10 rings
Default: 6 rings
Page 82
82
WebUI
Call Settings (continued)
Auto Answer Settings
Setting Description Range Default
Enable Auto
Answer
Turns Auto Answer on or off. n/a Disabled
Auto Answer
Delay (secs)
Sets the delay before the phone auto answers
a call. When set to zero, the incoming call is
answered right away without a ringer tone.
However, the auto answer tone is still audible.
0–30 2
Enable Mute
on Answer
Enables muting the mic upon auto answering.
Enabling muting is useful if the auto
answered call is for the purpose of a one-way
announcement. You can unmute the call any
time after being auto answered.
n/a Disabled
Call Completion Settings
When you call a busy number, the Call Completion feature congures the phone
to call the number back automatically.
Setting Description
Enable Call
Completion
Enable the call completion feature. Calls to busy numbers will
prompt a “Retry later?” message on the phone screen.
Disable Call
Completion
Enables an audible alert if you are on another call when the auto
redial interval expires.
Auto Redial Interval
(secs)
Sets a countdown timer until you are prompted for the next
dialing attempt.
Auto Redial Repeat Sets how many auto redial attempts are made.
Custom Ringer Settings
Setting Description
Custom Ringer File Upload a custom ringer audio le. This ringer replaces the existing
ringer 10. For more information, see your system administrator.
Page 83

83
WebUI
User Preferences
On the User Preferences page, you can congure some basic settings for your
phone and set how your phone responds to calls.
After changing any settings on this page, click Save to save them.
General User Settings
Setting Description Range Default
WebUI
Language
Sets the language that appears on
the WebUI.
Any language
supported by your
phone (English,
French, Spanish, etc.)
English
Phone
Language
Sets the language that appears on
your phone.
Any language
supported by your
phone (English,
French, Spanish, etc.)
English
Backlight Timer Sets how long the screen backlight
stays on after the last button press.
10 to 60 seconds 30
seconds
Ringer Volume Sets the ringer volume for incoming
calls. You can also use the VOLUME
q or p keys on the deskset.
Off, 1–9 5
Default Audio
Mode
Sets how calls are answered when
you press a line key or
Answer
.
See also “Audio” on page 70.
Speaker, Headset Speaker
Timeout to Idle
Without Digit
Sets how long it takes the phone to
return to idle mode after the phone
goes off hook and no digits are entered.
10–60 seconds 30
seconds
Enable Key
Beep
Enables or disables key-press
beeps.
n/a — Select to
enable
Disabled
Page 84

84
WebUI
User Preferences (continued)
Call Hold Reminder Settings
Setting Description Range Default
Enable Call Hold
Reminder Tone
Enables or disables the call hold
reminder tone.
n/a — Select
to enable
Enabled
Tone Interval (secs) Sets the interval for the call hold
reminder tone.
10–300
seconds
30
seconds
Call Waiting Settings
Setting Description Range Default
Call Waiting Off Rejects additional incoming calls. No
notication appears on the screen.
n/a — Select
to enable
Disabled
Call Waiting On Shows additional incoming calls on
the screen.
n/a — Select
to enable
Enabled
Enable Call Waiting
Tone
Enables or disables Call Waiting Tone. n/a — Select
to enable
Enabled
Tone Interval (secs) Sets the interval for the call waiting
tone.
10–60
seconds
30
seconds
Call Transfer Settings
Setting Description Range Default
Quick Transfer via
Programmable Keys
Sets transfer options for Quick Dial
and BLF keys. When a quick dial key
or BLF key is pressed during an active
call, the key will:
• Start a new call
• Blind transfer of the active call to
the extension associated with the
quick dial or BLF key.
• Attended transfer of the active call
to the extension associated with
the quick dial or BLF key.
New Call,
Blind Transfer,
Attended
Transfer
New Call
Page 85

85
WebUI
Programmable Keys
The deskset has 30 programmable keys (called Feature Keys on the
VSP861). You can assign up to 30 functions to the programmable keys on the
Programmable Keys page.
Keys can have identical functions, depending on the “Type” of key. For example,
you can assign several “Line”-type keys to Account 1 so that you can manage
multiple calls on Account 1. You can also assign multiple Quick Dial keys.
For the programmable key default settings, see “Programmable Feature keys” on
page 12.
Type Description
Line Congures the key for accessing a line. You can make calls
or answer calls by pressing these keys. The key LED will
change according to call activity.
Select the desired Account number.
Directory Congures the key to access the Directory menu. You can
then press the key to view the Directory menu.
Call History Congures the key to access the Call History list. You can
then press the key to view the Call History list.
Redial Congures the key to access the Redial list. You can then
press the key to view the Redial list.
Page 86

86
Type Description
Messages Congures the key to access the Message menu. You can
then press the key to view the Message menu.
Do Not Disturb Congures the key to turn Do Not Disturb on or off. The key
is lit orange when DND is on.
Do Not Disturb All Congures the key to turn Do Not Disturb on or off for all
accounts. The key is lit orange when DND All is on (as are
any other DND keys).
Call Forward All Congures the key to turn Call Forward All on or off. Select the
line for which Call Forward All will apply. Ensure that you also
congure Call Forward settings on the Call Settings page.
Call Forward No Answer Congures the key to turn Call Forward No Answer on or off.
Select the account for which Call Forward No Answer will
apply. Ensure that you also congure Call Forward settings
on the Call Settings page.
Call Forward Busy Congures the key to turn Call Forward Busy on or off. Select
the account for which Call Forward Busy will apply. Ensure
that you also congure Call Forward settings on the Call
Settings page.
Quick Dial Congures the key to dial a number on the selected
account. After selecting Quick Dial, select the account on
which the number will be dialed out, and enter the number to
be dialed.
BLF (Busy Lamp Field) Congures the key to monitor another extension. Select the
applicable account and enter the URI of the extension you
want to monitor with this key. For example,
2325552001@sipservice.com.
XML App Congures the key to open the XML browser. Enter the URI
of the XML application to be executed.
Auto Call Distribute
(Automatic Call
Distribution)
Congures the key to display the ACD State menu.
Select the account that is subscribed to the ACD service.
Page Congures the key to call one or a group of phones.
Pressing the key dials the Paging feature access code. Your
System Administrator must congure the feature access
code for Paging.
Multicast Page Congures the key to make outgoing multicast pages. Enter
a valid Paging Zone ID (ranging from 1 to 10). Multicast
paging differs from standard paging in that it is handled
locally by the Deskset and does not require a subscription
through the hosted server. To use multicast paging, your
System Administrator must rst set up paging zones.
Park Call Enables you to park a call. Pressing the key dials the Call
Park feature access code (FAC). Your System Administrator
must congure the feature access code and any other
settings for Call Park.
Page 87

87
Type Description
Retrieve Park Call Enables you to retrieve a parked call. Pressing the key dials
the Parked Call Retrieval feature access code (FAC). Your
System Administrator must congure the feature access
code and any other settings for Retrieve Park Call.
In Call DTMF Congures the key to dial a string of numbers while you
are on a call. For example, pressing the key might dial a
conference access code. After selecting In Call DTMF, enter
the number to be dialed.
Call Return Congures the key to dial the number of the last missed call.
Group Call Pickup Enables you to answer a call ringing at another extension.
the call can be ringing at any extension in your phone’s call
pickup group. Pressing the key dials the Group Call Pickup
feature access code (FAC).
Direct Call Pickup Enables you to answer a call ringing at a specic deskset.
Pressing the key dials the Direct Call Pickup feature access
code (FAC). Depending on the server requirements, you
may then need to enter the number of the ringing extension.
Lock Key Congures the key to enable the phone lock or disable the
phone lock with a PIN.
Prex Dialing Congures the key for prex dialing. Pressing a PFK
assigned to Prex Dialing will automatically go off-hook into
Dial mode using the account congured for the PFK. The
digits entered under Value are added to any number you
dial. The outgoing call includes the [Prex] + [Dialing string].
Flash Congures the key as a Flash key. With one call active,
pressing Flash puts the active call on hold and displays a new
call screen with live dial. With two calls active, pressing Flash:
• puts the active call on hold and retrieves a held call, or
• answers an incoming call.
Call Handling Prole Congures the key for Comverse call handling prole. Enter
the string of the call handling prole that the PFK LED will
indicate.
Hunt Group Congures the key to turn Comverse hunt group on or off.
Enter the hunt group extension number assigned for this key.
Secretarial Filtering Congures the key to turn Comverse secretarial ltering on
or off. Enter the manager’s extension number assigned for
this key.
Page 88

88
WebUI
Speed Dial
The speed dial keys are used for dialing numbers with one key press. To view the
speed dial keys, click SYSTEM in the WebUI header, and then click Speed Dial
in the sidebar.
On the Speed Dial page, you can enter up to 10 numbers that you dial frequently.
To dial a speed dial number, press and hold the dial pad key that matches the
speed dial entry number (for entry 10, press 0). For each speed dial number you
enter, you must assign the account on which the number will be dialed out.
You can also add speed dial entries using the deskset. The Speed dial list is
accessed through the Features menu. See “Speed Dial” on page 63.
After entering information on this page, click Save to save it.
To enter speed dial numbers:
1. In the Name column, enter a speed dial label for the desired key.
2. In the Value column, enter a phone number for the desired key.
3. In the Account column, select the account that this speed dial number will
use.
4. Click Save.
Page 89

89
WebUI
Directory
To view the local directory, click CONTACTS in the WebUI header, and then click
Local directory in the sidebar.
On the Local Directory page, you can manage your local directory entries. You can
sort, edit, delete, and add contact information for up to 1000 entries. The page also
allows you to export your phone’s local directory or import a local directory le. The
export function lets you back up your contacts to your computer.
Phone numbers appear as links. If your administrator has enabled the click to
dial feature, you can dial a number by clicking its link.
The Local Directory lists entries on multiple pages. Click Next, First, Last, or a
page number to view the desired page of entries.
NOTE
You can also use the phone menu to manage your local directory entries. For
more information, see “Using the local directory” on page 45.
Page 90

90
WebUI
Directory (continued)
Local Directory
Click To...
Sort the list by last name.
Edit information for an entry.
View the last page of entries.
View the next page of entries.
Delete selected entries from the directory. Click Select All to select
every entry on the page you are viewing.
Add a new directory entry.
Delete all Directory entries
To add a new directory entry:
1. Click Add New Entry.
The Create Local Directory Entry page appears.
2. Enter the required information. At minimum, a rst and last name are required.
Setting Description Range Default
First Name
Enter the appropriate names in these elds. n/a n/a
Last Name
Ringer Tone Sets a unique ringer tone for calls from this
directory entry.
Auto,
Tone 1–10
Auto
Account Sets the account used when you dial this
directory entry.
Default
Account,
Account 1–
Account 8
Default
Account
Work Number Enter the appropriate numbers in these
elds.
n/a n/a
Mobile Number
Other Number
3. Click Save.
Page 91

91
WebUI
Directory (continued)
To edit a directory entry:
1. Click Edit for the entry you want to edit.
The Edit Local Directory Entry page appears.
2. Edit or add the desired information.
3. Click Save.
Import Local Directory
You can import an existing local directory le. Importing a directory le replaces
all your previous local directory entries. After importing a directory le, you can
add, edit, or delete entries as desired.
NOTE
Directory les are .xml or .csv les containing contacts and contact
information. For more information about creating or editing a directory le,
consult your system administrator.
To import a local directory le:
1. Click Choose File.
2. In the Choose File to Upload window, navigate to the directory le.
3. Click the le, and then click Open.
4. On the WebUI, click Import XML or Import CSV, depending on your le type.
NOTE
When importing a .csv le, you can select whether the rst line should be treated
as a header and ignored for the import. Select First line is a header, skip.
Export Local Directory
You can export the directory and save it as an .xml or .csv le on your computer.
To export the local directory:
1. Click Export.
2. At your browser’s prompt, save the le to the desired location on your computer.
Page 92

92
WebUI
Blacklist
You can manage the blacklist on the WebUI. Calls from blacklisted numbers
will not ring your phone, or be recorded in your call history. The procedures
for adding, deleting and editing entries are the same as for the Directory. The
blacklist also supports importing and exporting entry lists in .xml or .csv format.
Remote XML
The deskset supports three server-hosted Remote XML directories. A total of
5000 Remote XML directory entries are supported. The 5000 entries can be
shared across the three remote XML directories.
When you select a remote directory to view, the deskset syncs with the directory
server. The deskset displays Sync failed. if any of the following failing conditions
is encountered:
• Server not reachable
• Remote XML directory le is not available
• Invalid XML directory le
Setting Description
Name Sets the name of the directory as it will appear on the
deskset`s list of directories.
Remote XML URI The location of the XML directory le, from which the phone
will sync and retrieve directory entries. Consult your system
administrator for the correct URI.
Enable Incoming/
Outgoing Call Lookup
Enables/disables the call lookup feature for incoming and
outgoing calls.
Page 93

93
WebUI
Call History
The Call History page has no congurable settings. It displays your Missed
Calls, Received Calls, and Dialed Calls. Phone numbers appear as links. If
your administrator has enabled the click to dial feature, you can dial a number
by clicking its link.
Page 94

94
WebUI
Servicing
On the Servicing page you can reset your password, congure PIN masking, and
change your phone lock PIN.
To change the User password:
1. Enter the old password (for a new deskset, the default password is user).
2. Enter and re-enter a new password. The password is case sensitive and can
consist of both numbers and letters (to a maximum of 15 characters).
3. Click Save.
Page 95

95
WebUI
PIN Masking
The PIN masking feature allows you to hide PIN numbers during call operation.
The different types of PIN masking are:
• Hide DTMF digits—when Hide DTMF is enabled, PIN numbers entered
during an Active Call are automatically masked.
• Password Dial—when Password Dial is enabled, PIN numbers entered as
part of the dial string are hidden according to the Password Dial Prex and
Password Dial Length settings described below.
PIN numbers in a dial string are masked in Pre-Dial and Dial modes (including
variants of these modes, such as Transfer Setup, Conference Setup, and
Incoming Call Forward Setup).
Setting Description
Enable Hidden
DTMF digits
Enable to mask all DTMF digits entered during an Active Call.
Enable Delay for
Hidden DTMF digits
Enable to add a one-second delay before DTMF digits are
masked. By default, the digits are masked immediately.
Enable Password
Dial
Enable to hide PIN numbers entered as part of the dial string.
Enable Delay for
Password Dial
Enable to add a one-second delay before PIN numbers are
masked. By default, the PIN number is masked immediately.
Password Dial
Prex
Enter the prex that triggers the next x digits to be masked (x
being equal to the Password Dial Length). Only the rst matched
Prex triggers PIN masking. If additional instances of the
Password Dial Prex appear elsewhere within the dial string, they
are ignored.
Password Dial
Length
Enter the PIN number length. All digits within this length are
masked. Any digits beyond this length are not masked. For
example, if the Password Prex is 99 and the Password Dial
Length is 3, then 9912345 will appear as 99***45.
Phone Lock
You can reset the PIN that unlocks the phone when call restriction is enabled.
To change the Phone Lock PIN:
1. Enter the old PIN.
2. Enter and re-enter a new PIN. The password is case sensitive and can
consist of both numbers and letters (to a maximum of 15 characters).
3. Click Save.
Page 96

96
Troubleshooting
If you have difculty with your telephone, please try the suggestions below. For
customer service, visit our website at businessphones.vtech.com or call
1 (888) 370-2006.
General issues
Screen is blank.
• Ensure power is connected. If powered by an AC adapter, check that adapter
is plugged into a wall socket and the Deskset power jack. If powered by PoE,
ensure that the network switch is providing power through the correct ports.
The DECT headset doesn’t register. “Registration failed” appears on the
screen.
• Deregister the headset from the deskset to which it had been registered.
• Remove and replace the headset in its charger before pressing Register.
Pages are not received.
• Your phone can be congured to answer a page automatically. See your
system administrator if your phone doesn’t answer a page automatically.
Calls are answered on the headset rather than the speakerphone after I
press a Line key or Answer to answer a call.
• Change the audio mode from Headset to Speaker. See “To set the audio
mode:” on page 70.
Incoming calls do not ring on the deskset when using a cordless handset.
• If you are on a call using the handset, then additional incoming calls will emit
a call waiting tone on the handset, but the deskset ringer will be silent.
My computer can’t connect to the network after plugging the Ethernet cable
through the PC port.
• Make sure the deskset is connected to power. The PC port does not work
when the deskset does not have power source or during a power outage.
• Make sure you plug the Ethernet cable connected to the router into the
deskset Ethernet port and the Ethernet cable connected to the computer into
the deskset PC port.
Page 97

97
Specications
Electrical and environmental specications
RF frequency band 1921.536–1928.448 MHz
Channels 5
Operating temperature 32–122 °F (0–50 °C)
AC adapter output voltage 5.0 Vdc @ 1.5 A or 5.0 Vdc @ 2.0 A
Ethernet network jacks GigE RJ-45 ports
Page 98

98
Special Characters
Entering special characters
When entering text using the dial pad, the following special characters are
available. Press the 1, star ( ), 0, or pound sign (#) keys to enter special
characters.
Key Characters
1 ~ ^ ` % ! & - _ + = |
. @ *
0 : ; “ , ?
# ( ) [ ] { } < > / \ #
Page 99

99
Maintenance
Taking care of your telephone
• Your telephone contains sophisticated electronic parts, so you must treat it
with care.
• Avoid rough treatment.
• Place the corded handset down gently.
• Save the original packing materials to protect your telephone base if you ever
need to ship it.
Avoid water
• You can damage your telephone if it gets wet. Do not use the corded handset
in the rain, or handle it with wet hands. Do not install the telephone near a
sink, bathtub or shower.
Electrical storms
• Electrical storms can sometimes cause power surges harmful to electronic
equipment. For your own safety, take caution when using electric appliances
during storms.
Cleaning your telephone
• Your telephone has a durable plastic casing that should retain its luster for
many years. Clean it only with a soft cloth slightly dampened with water or a
mild soap.
• Do not use excess water or cleaning solvents of any kind.
Remember that electrical appliances can cause serious injury if used when you
are wet or standing in water. If the telephone should fall into water, DO NOT
RETRIEVE IT UNTIL YOU UNPLUG THE POWER CORD AND NETWORK
CABLE FROM THE WALL, then pull the unit out by the unplugged cords.
Page 100

100
GPL License Information
GPL code requests
Portions of the software associated with this product are open source, and fall
within the scope of the GNU General Public License (GPL). Accordingly, those
portions of code are available to the public, consistent with the requirements of
the GPL, in either source code format or object code format, depending upon
the nature of the code at issue. If you would like to exercise your right to receive
the available code, please send a written request for the available code along
with a cashier’s check, payable to VTech Communications, Inc., in the amount of
$15.00 (U.S.$) to:
VTech Communications, Inc.,
9590 SW Gemini Drive, Suite 120
Beaverton OR 97008
ATTN: Information Technology Group—VSP861 GPL code request
If your request does not fully comply with the foregoing requirements, VTech
reserves the right to reject your request. Further, by requesting and receiving
the available code, you release VTech, its afliates, and its and their ofcers,
directors, employees, and representatives (“VTech Parties”) from any liability
or responsibility relating to such code, and you acknowledge that the VTech
Parties make no representations with respect to the origin, accuracy, usability,
or usefulness of such code, and the VTech Parties have no responsibility to you
whatsoever concerning the code, including without limitation any responsibility to
provide explanation, support, upgrade, or any communication whatsoever. Your
review or use of the available code is at your sole risk and responsibility.
 Loading...