

Page 1

NEED HELP?
This manual has all the feature operations and troubleshooting you need to install
and operate your new VTech telephone. Please take the time to review thoroughly
to ensure proper installation of this VTech innovative and feature rich product. You
can also visit our website at www.vtechphones.com for support, shopping, and
everything new at VTech.
In Canada, please visit www.vtechcanada.com.
VTech toll free 1(800)595-9511. In Canada, dial 1(800)267-7377
Important ! Before using this
telephone, you must read Important
safety instructions on page 36 of
this manual.
Page 2

www.vtechphones.com
2
Table of contents
Installation
Parts checklist . . . . . . . . . . . . . . . . . . . . . 4
Choose a location . . . . . . . . . . . . . . . . . . . 5
Install handset battery . . . . . . . . . . . . . . . . . 6
Check dial mode . . . . . . . . . . . . . . . . . . . . 7
About caller ID information. . . . . . . . . . . . . . . 7
If you subscribe to DSL service . . . . . . . . . . . . 8
Settings
Handset layout . . . . . . . . . . . . . . . . . . . . . 9
Telephone base layoutbase layout . . . . . . . . . . . . . . . . 10
Set date and time . . . . . . . . . . . . . . . . . . 11
Set language . . . . . . . . . . . . . . . . . . . . . 11
Set dial mode . . . . . . . . . . . . . . . . . . . . 12
Set ring volume . . . . . . . . . . . . . . . . . . . 12
Set ring tone . . . . . . . . . . . . . . . . . . . . . 13
Reset to default settings . . . . . . . . . . . . . . . 13
Basic Operation
Make, answer, and end calls. . . . . . . . . . . . . 14
Volume . . . . . . . . . . . . . . . . . . . . . . . . 14
Speakerphone . . . . . . . . . . . . . . . . . . . . 14
Mute . . . . . . . . . . . . . . . . . . . . . . . . . 14
Temporary tone dialing . . . . . . . . . . . . . . . 15
Call waiting . . . . . . . . . . . . . . . . . . . . . . 15
Handset locator . . . . . . . . . . . . . . . . . . . 15
Advanced settings
Chart of characters . . . . . . . . . . . . . . . . . 16
Edit handset name . . . . . . . . . . . . . . . . . . 17
Set key beeps tone. . . . . . . . . . . . . . . . . . 17
Set low battery tone . . . . . . . . . . . . . . . . . 18
Set no coverage tone . . . . . . . . . . . . . . . . 18
Set voicemail . . . . . . . . . . . . . . . . . . . . . 19
Change the PIN . . . . . . . . . . . . . . . . . . . 20
Registration . . . . . . . . . . . . . . . . . . . . . 21
De-registering a handset . . . . . . . . . . . . . . 22
Advanced operation
Phonebook . . . . . . . . . . . . . . . . . . . . . . . 23
Store an entry in the phonebook. . . . . . . . . . . 23
Search the phonebook . . . . . . . . . . . . . . . . 24
Dial a phonebook entry . . . . . . . . . . . . . . . 24
Edit a phonebook entry . . . . . . . . . . . . . . . 25
Delete a phonebook entry . . . . . . . . . . . . . . 26
Delete entire phonebook . . . . . . . . . . . . . . . 26
Redial list . . . . . . . . . . . . . . . . . . . . . . . . 27
Store a redial number in the phonebook . . . . . . 27
Dial from the redial list . . . . . . . . . . . . . . . . 28
Delete an entry from the redial list . . . . . . . . . . 28
Delete entire redial list . . . . . . . . . . . . . . . . 29
Call log . . . . . . . . . . . . . . . . . . . . . . . . . 30
Store an entry in the phonebook. . . . . . . . . . . 30
Dial an entry in the call log. . . . . . . . . . . . . . 31
Delete an entry from the call log . . . . . . . . . . . 31
Delete entire call log . . . . . . . . . . . . . . . . . 32
Intercom operation . . . . . . . . . . . . . . . . . . . 32
Internal call . . . . . . . . . . . . . . . . . . . . . . 32
Transfer an external call . . . . . . . . . . . . . . . 33
Conference call . . . . . . . . . . . . . . . . . . . 33
Page 3

www.vtechphones.com
3
Table of contents
Batteries . . . . . . . . . . . . . . . . . . . . . . . . 35
Important safety instructions . . . . . . . . . . . . . . 36
Troubleshooting . . . . . . . . . . . . . . . . . . . . 37
Operating range . . . . . . . . . . . . . . . . . . . . 43
Maintenance . . . . . . . . . . . . . . . . . . . . . . 43
About cordless telephones . . . . . . . . . . . . . . . 44
Warranty . . . . . . . . . . . . . . . . . . . . . . . . 44
FCC, ACTA and IC regulations . . . . . . . . . . . . . 45
Technical specications . . . . . . . . . . . . . . . . 48
Index . . . . . . . . . . . . . . . . . . . . . . . . . . 49
Page 4
www.vtechphones.com
4
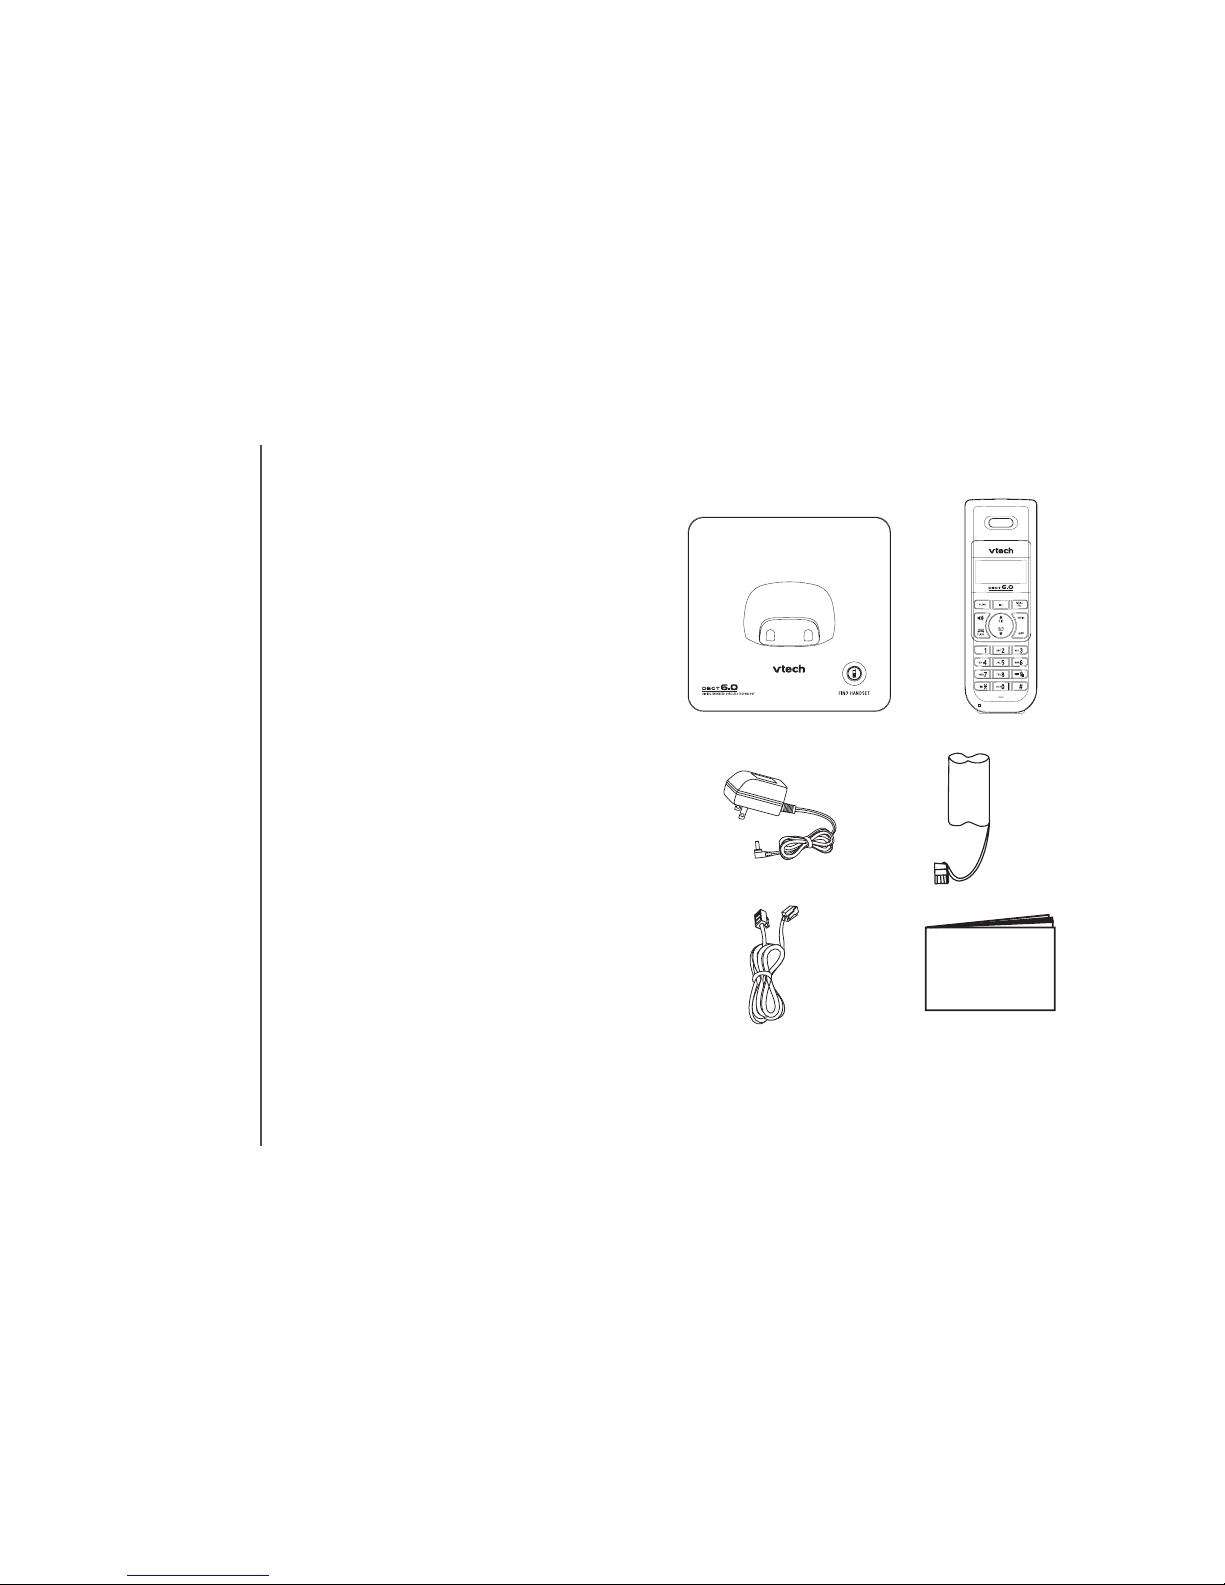
1. Telephone base
2. Handset
3. Telephone line cord
4. Base power adaptor
5. Battery
6. User’s manual
Parts checklist:
Installation
Telephone base
Handset
Telephone line cord
Base power adaptor
Battery
User’s manual
Page 5
www.vtechphones.com
5
Installation
Basic operation
Installation
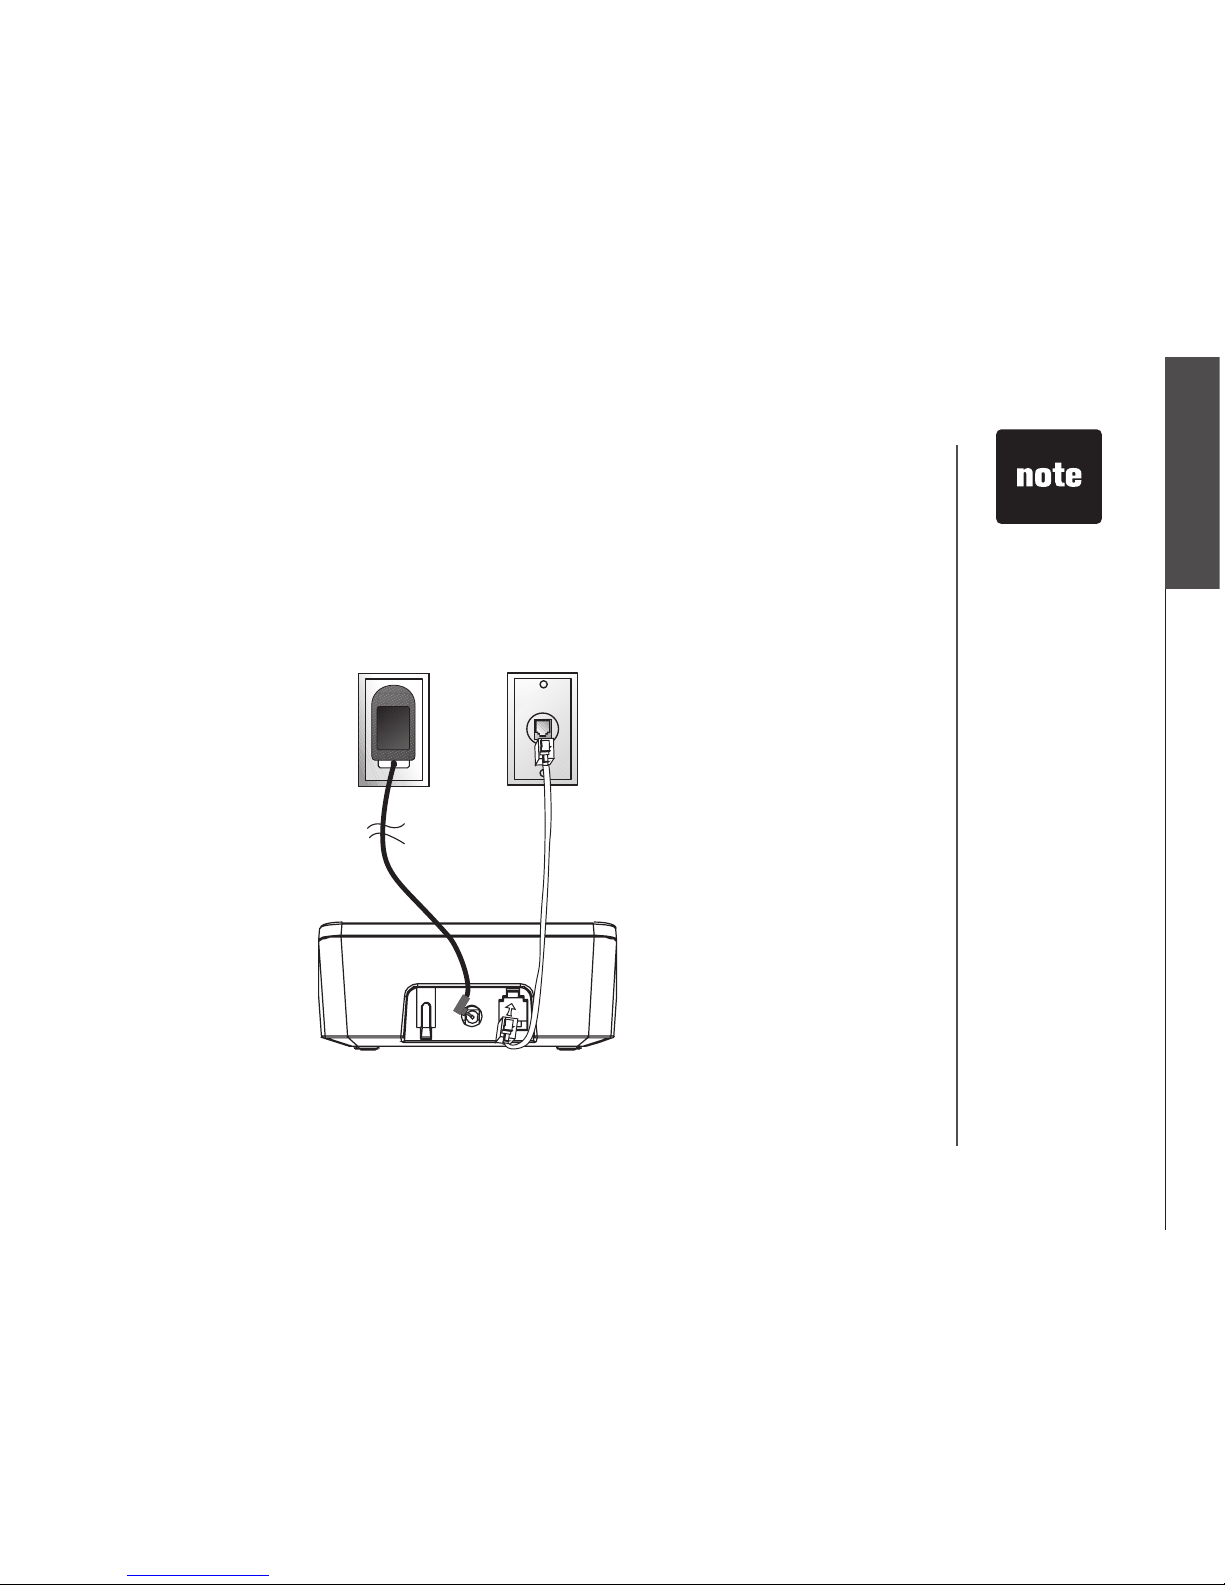
Choose a location
Install the telephone base as shown below. Choose a central location within the home, away from
any electronic equipment and appliances such as personal computers, computer routers, television
sets, microwave ovens, and refrigerators.
Avoid excessive heat, cold, dust or moisture.
Use only the
power cord
supplied with
this product.
If you need a
replacement,
call 1(800)2223111 in the U.S.
In Canada, call
1(866)288-4268.
Be sure to use an
electrical outlet
not controlled by
a wall switch.
Plug power adapter into an
electrical outlet not controlled
by a wall switch.
Plug the telephone line cord
into a telephone jack.
Page 6
www.vtechphones.com
6
Installation
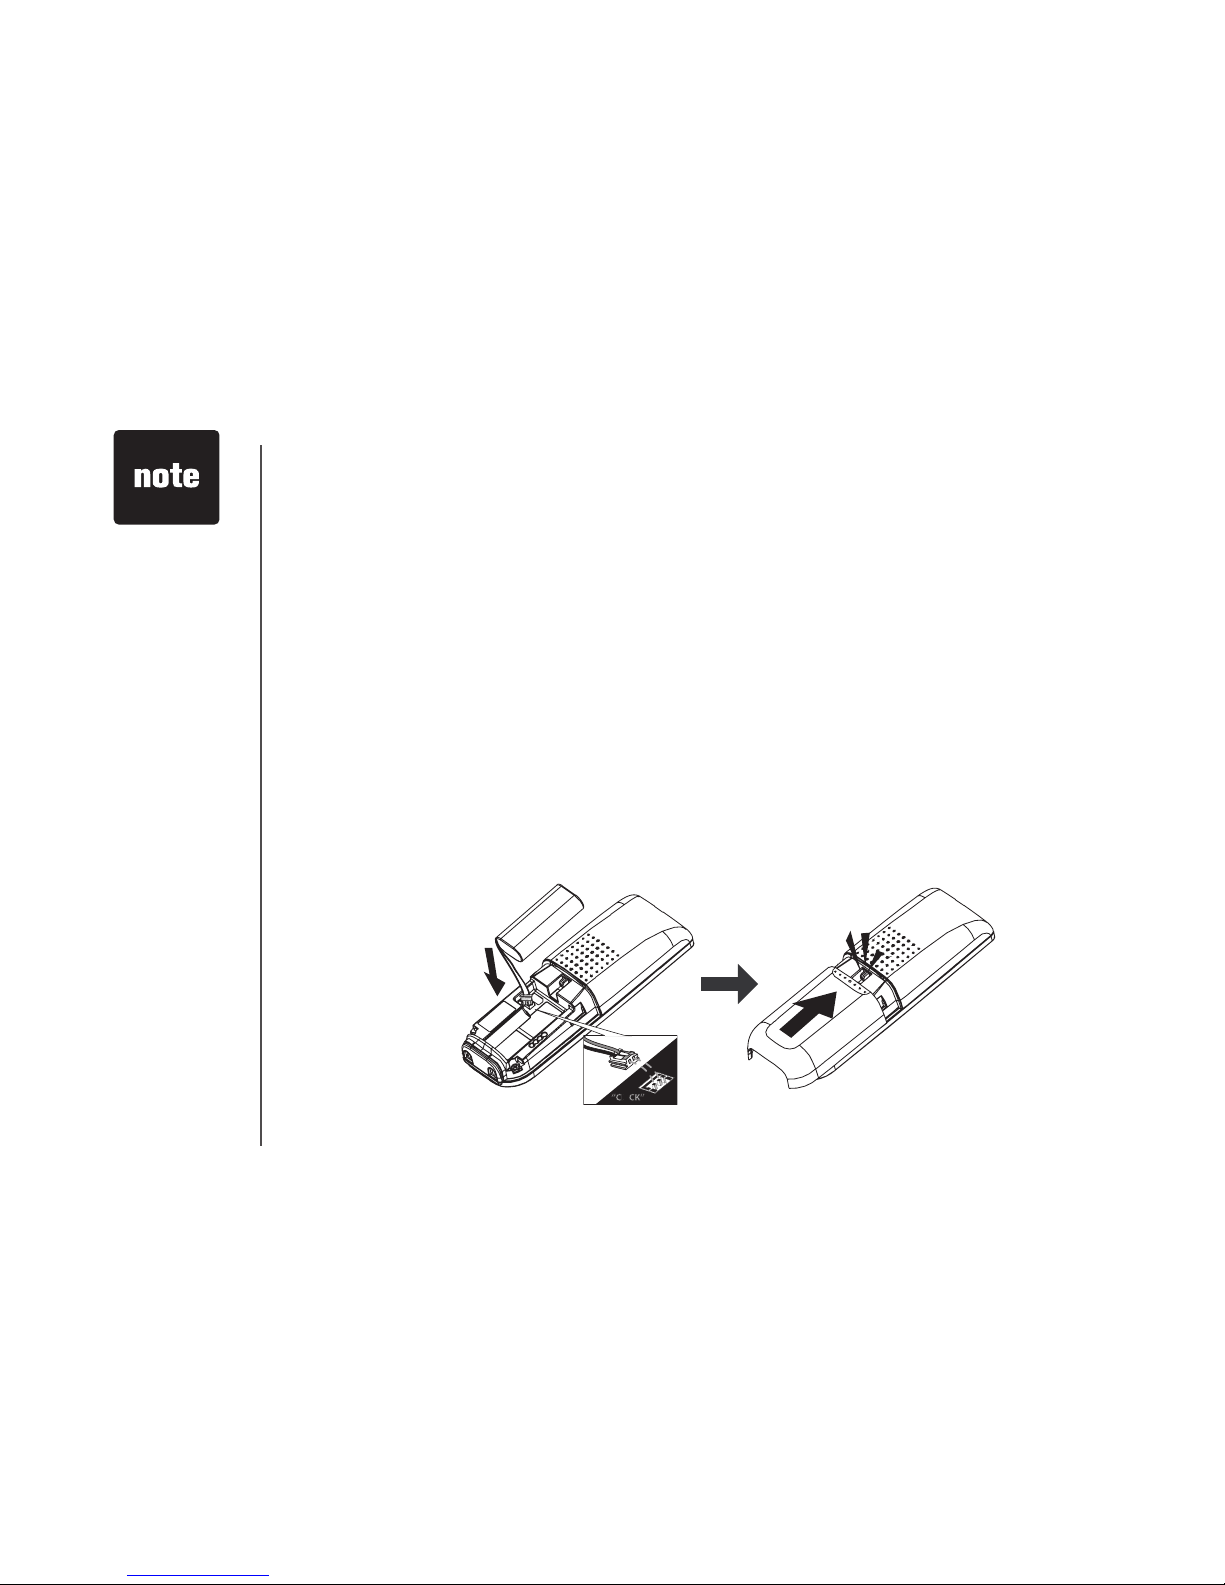
Install handset battery
• Press tab and slide cover away from the battery compartment.
• Plug the battery connector securely into the jack inside the battery compartment according to the
color coded label.
• Insert battery in the center of the battery compartment.
• Press down on the wired side until the battery securely snaps into place.
• Neatly tuck the wires inside the battery compartment.
• Position the battery compartment cover and slide it towards the unit until it clicks into place.
• Put the handset in the telephone base to start charging the new battery for at least 16 hours.
You can keep battery charged by returning the handset to the telephone base after each use. When
the battery power is fully depleted, a full recharge takes about sixteen hours.
For further instruction on battery, refer to Batteries section.
CLICK
• Use only the
VTech battery
and AC power
adaptor supplied
with this
telephone.
• If the handset will
not be used for
a long period of
time, remove the
battery to prevent
possible leakage.
Page 7

www.vtechphones.com
7
Installation
Basic operation
Installation
Check dial mode
If you have touch-tone service, the telephone is ready to use as soon as the battery is charged. If you
have pulse (rotary) service, the dial mode must be changed. Press TALK/FLASH and you should
hear a dial tone. If not, refer to the Setting dial mode section in Basic setting.
About caller ID information
The caller ID with call waiting features in this telephone let you see who is calling before you answer
the phone, even when you are on another call. These features require services provided by your
local telephone company.
Contact your telephone service provider if:
• you have both caller ID and call waiting, but as separate services (you may need combined
service),
• you have only caller ID service, or only call waiting service, or
• you do not subscribe to any caller ID or call waiting services but wish to try them now.
You can use this telephone with regular caller ID service, and you can use its other features without
subscribing to either caller ID or combined caller ID with call waiting service. There may be fees for
these services, and these services may not be available in all areas.
The caller ID features will work only if both you and the caller are in areas offering caller ID service,
and if both telephone companies use compatible equipment.
Page 8
www.vtechphones.com
8
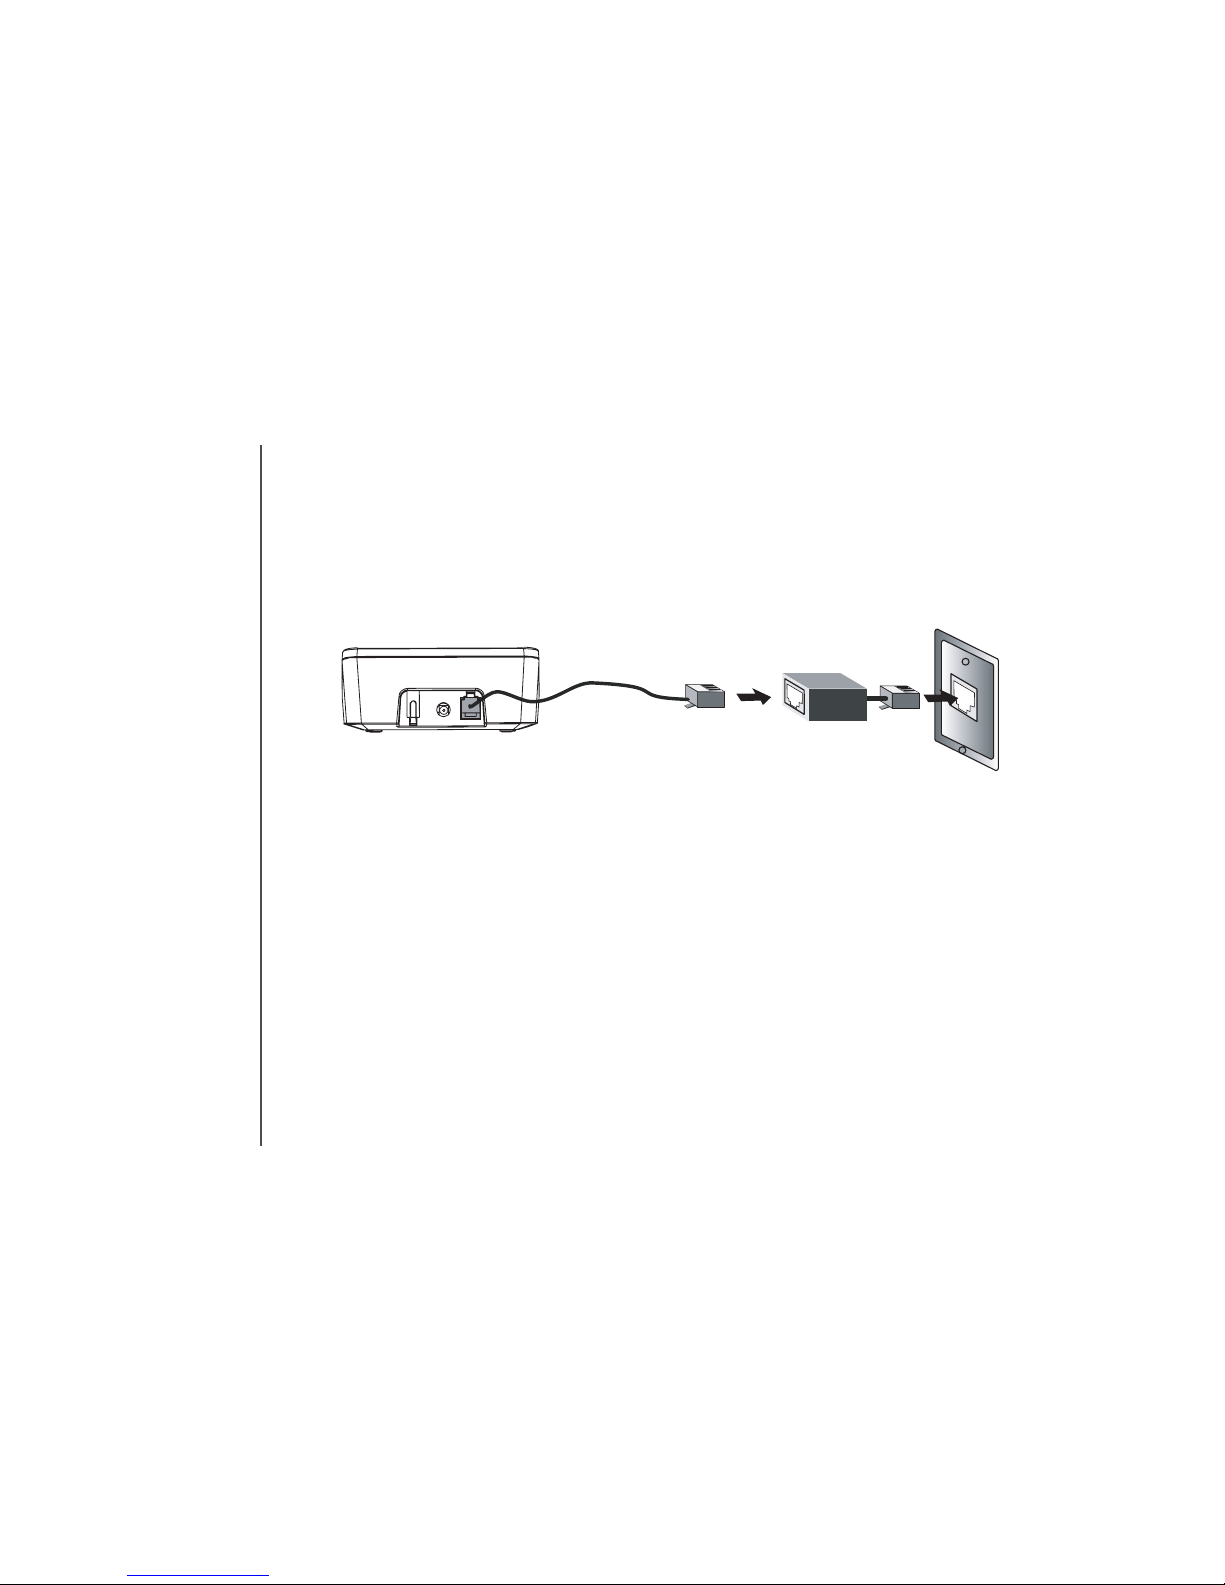
Noise lter (For
DSL users)
To si n gl e tel e ph o n e jack
(RJ11C)
Telepho n e
line cord
If you subscribe to DSL service
If there is interference during telephone conversations and/or your caller ID features are not functioning
properly, install a noise lter to the telephone line between the telephone base and the telephone
wall jack. Contact your DSL provider for a noise lter.
Installation
Page 9

www.vtechphones.com
9
Basic operation
Settings
Handset layout
CLEAR
• Press to backspace number or character
display on screen.
• Press to exit the current menu and go
back to the last menu.
• Press to mute or un-mute microphone
when in call.
(SPEAKERPHONE)
• Pr es s t o a c ti va t e t he h a nd s et
speakerphone.
• Press again to resume normal handset
use.
CID
• While on a call, press to increase the
volume.
• While the telephone is not in use, press
to display caller ID information.
• Press to scroll up menu or list when in
menu.
TALK/FLASH
• Press to make or answer a call or to dial
a number, then press TALK /FLASH to
call.
• During a call, press to put current call
on hold and receive an incoming call, if
you subscribe to call waiting service.
Settings
INTERCOM
• Pr es s to in i ti a t e an in t e rc o m
conversation.
MENU/SELECT
• Press to display menu, or to conrm
selected item from menu.
( )
• While on a call, press to decrease
the volume.
• While the telephone is not in use,
press to display phonebook list.
• Press to scroll down menu or list
when in menu or list.
REDIAL
• Press to display redial list.
OFF
• During a call, press to hang up.
• While using menus, press to cancel
an op e r a t i o n and exi t wi t h o u t
making changes
Page 10
www.vtechphones.com
10
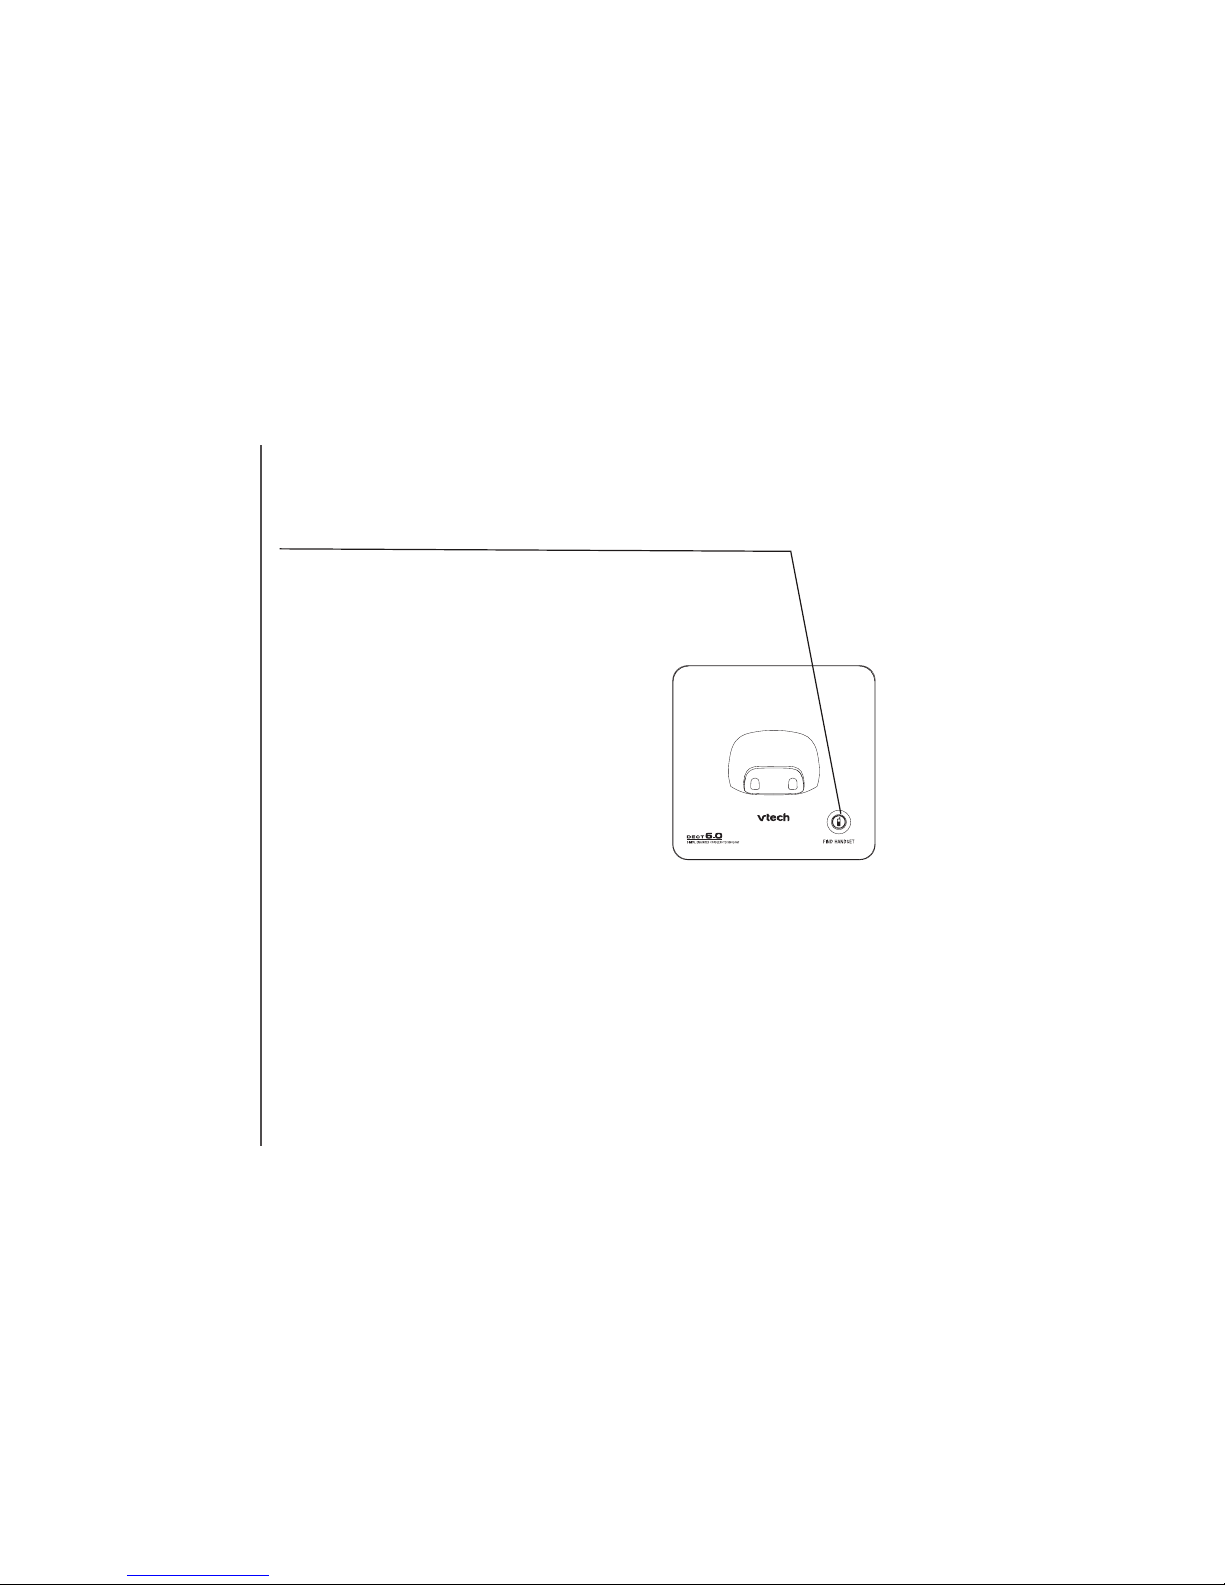
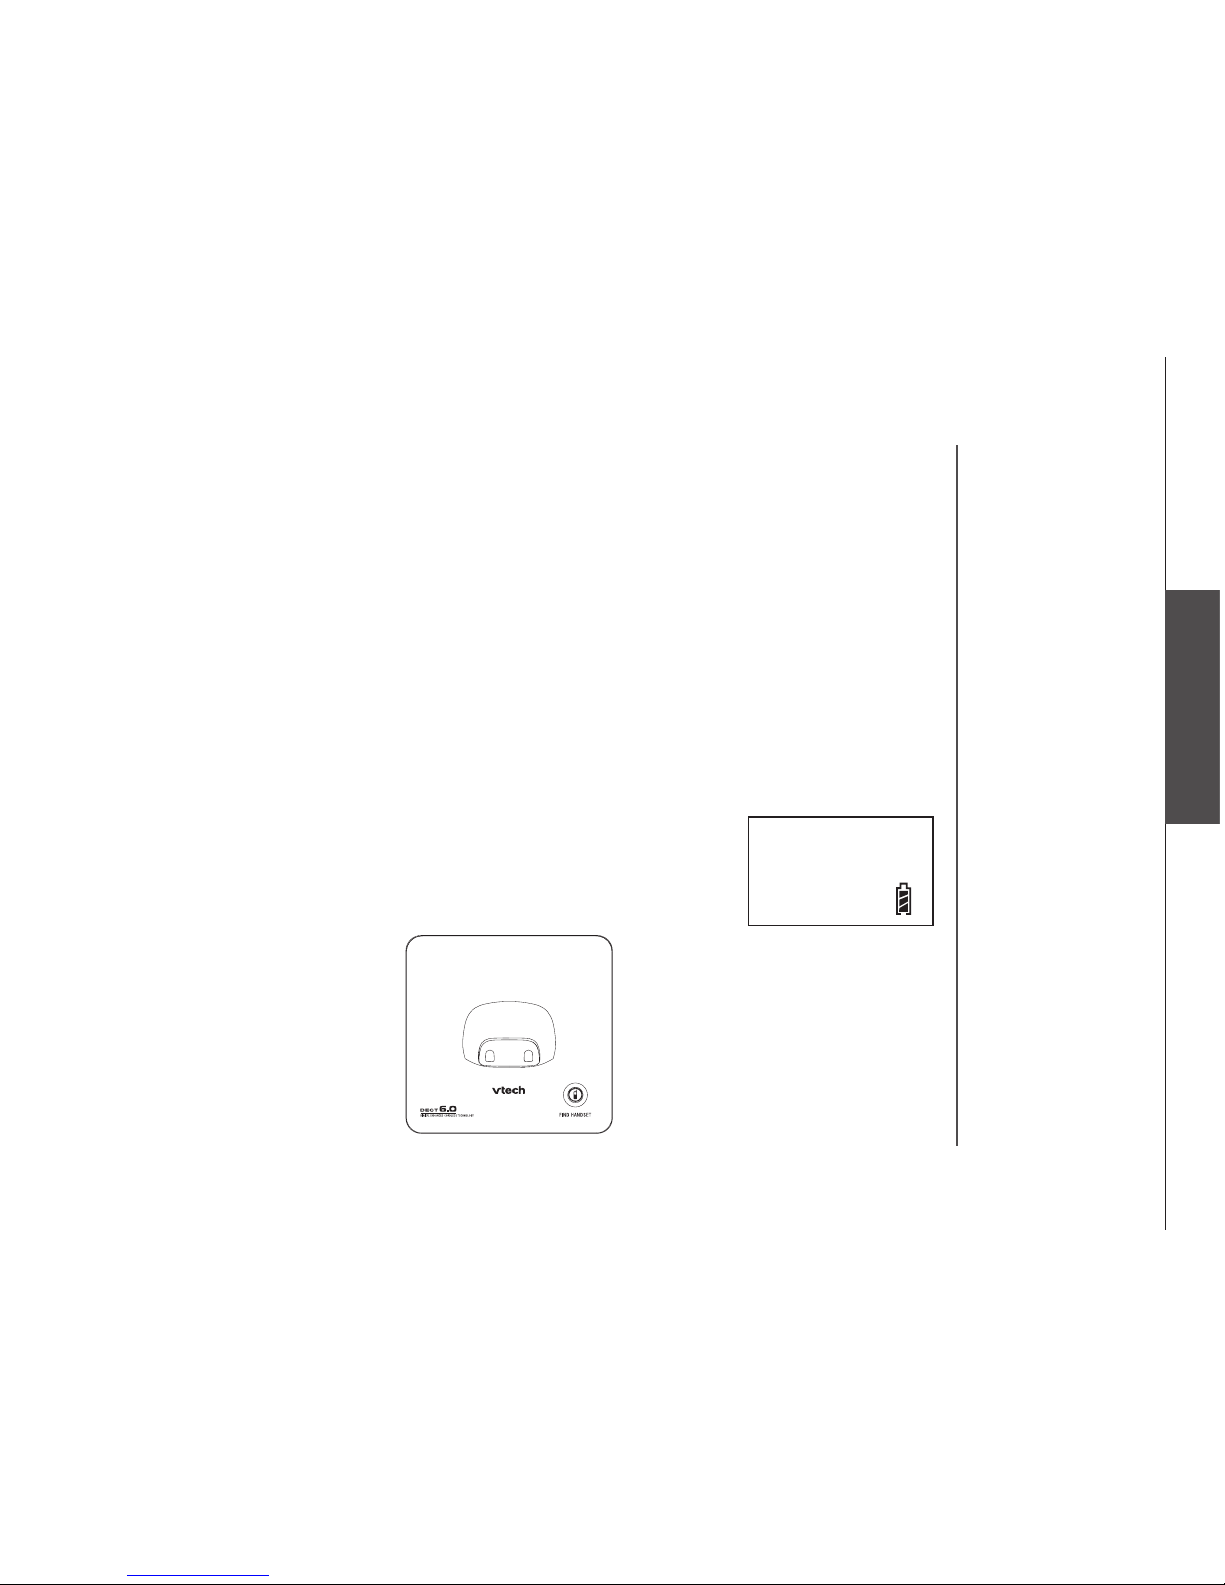
Settings
FIND HANDSET
• Press to page the handset, enter registration
mode, and reset to default setting.
Telephone base layout
Page 11

www.vtechphones.com
11
Basic operation
Settings
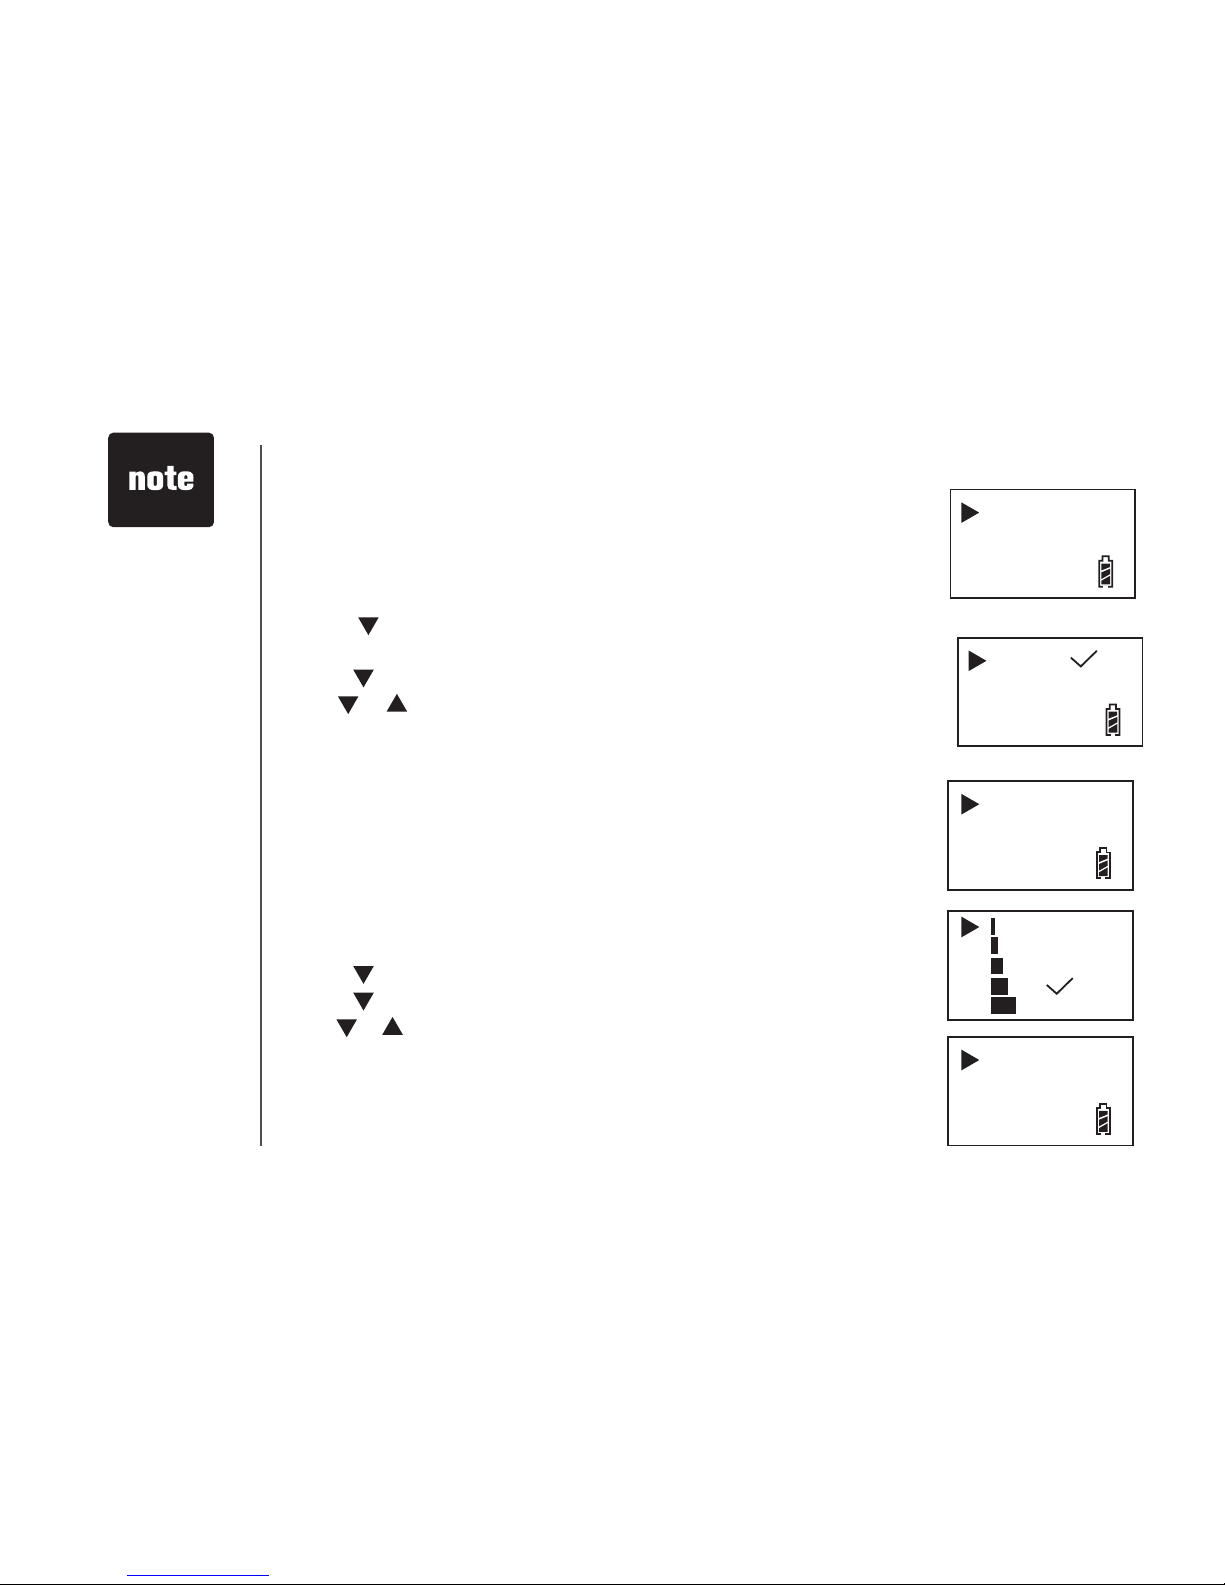
Set date and time
• Make sure the handset is in idle mode.
• Press MENU/SEL to display menu.
• Press twice to reach Date/ Time, then press MENU/SEL to select.
• Use the dial pad to set the last two digits of the year. Press MENU/SEL
when you are done setting the year.
• Use the dial pad to set the date. Press MENU/SEL when you are done
setting the date.
• Use the dial pad to set the time. Press or to select a.m. or p.m.
• Press MENU/SEL when you are done setting the time. The screen will
display Stored and you will hear a conrmation tone (if the Key beeps
setting is on).
Set language
At this menu, you can select the language used in all menus and screen
displays. Choices are English, French and Spanish.
• Make sure the handset is in idle mode.
• Press MENU/SEL to display menu.
• Press twice to reach Setup HS. Press MENU/SEL to conrm.
• Press thre e times to reach Language. Press MENU/ S E L to
conrm.
• Use or to choose your desired language. Current choice is marked
with a tick.
• Press MENU/SEL to conrm. The screen will display Stored and you will
hear a conrmation tone (if the Key beeps setting is on).
Year 2006
Date 1.01
Time 2:05a
Language
Reset
English
French
Spanish
• The time is
automatically
set and updated
with incoming
caller ID
information if
you have this
service.
• If you have
more than one
handset, setting
one handset’s
date and time
will automatically
update all other
handsets.
Settings
Page 12
www.vtechphones.com
12
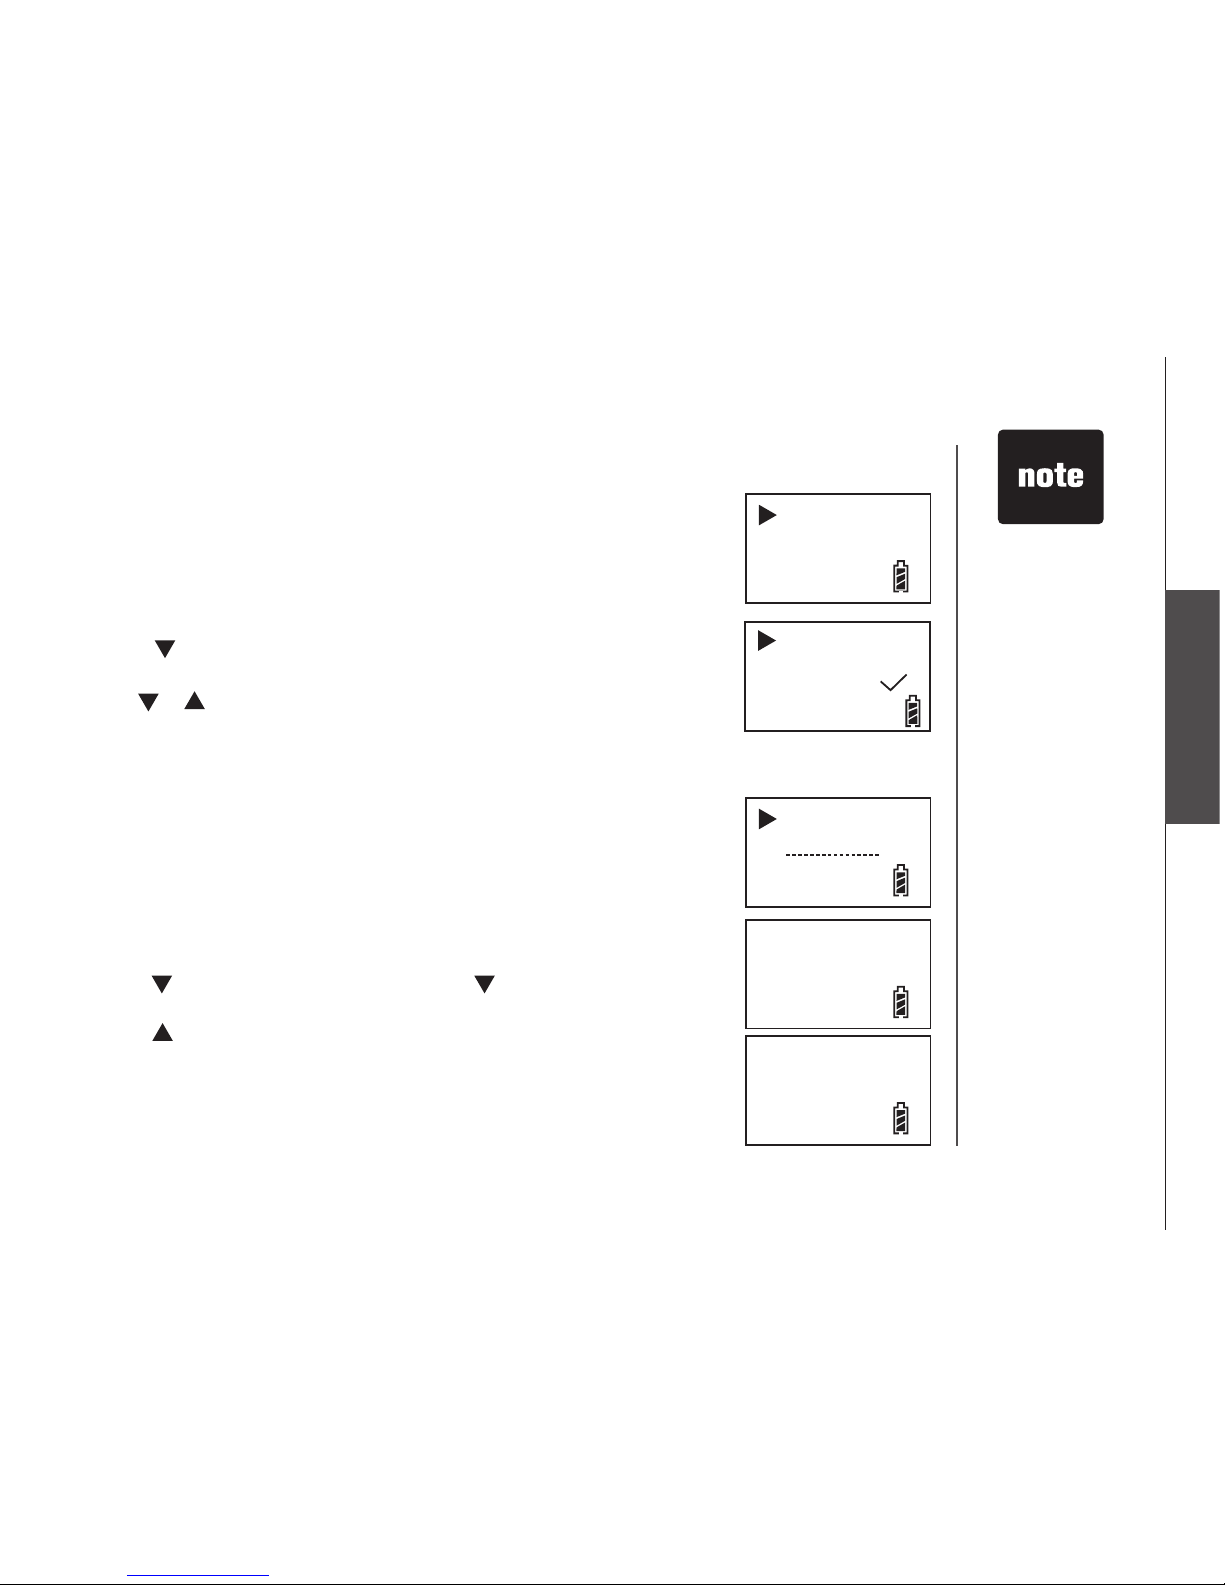
Set dial mode
The dial mode is preset to touch tone. If you’d like to change the setting to
pulse:
• Make sure the handset is idle (off).
• Press MENU/SEL to display menu.
• Press three times to reach Setup BS, then press MENU/SEL to
select.
• Press to select Dial mode and press MENU/SEL to select.
• Use or to select pulse or touch tone (DTMF).
• Press MENU/SEL to conrm your selection. The screen will display Stored
and you will hear a conrmation tone (if the Key beeps setting is on).
Set ring volume
This feature allows you to adjust the ringer volume. The menu includes options
for ve different levels of volume. You will hear a sample of each ringer volume
as you scroll through the choices.
• Make sure the handset is in idle mode.
• Press MENU/SEL to display menu.
• Press twice to reach Setup HS. Press MENU/SEL to select.
• Press to reach Ring volume, and press MENU/SEL to select.
• Use or to scroll through the choices. Current selection is marked with
a tick and a sample of ringer will be played.
• Press MENU/SEL to conrm. The screen will display Stored and you will
hear a conrmation tone (if the Key beeps setting is on).
Settings
• If you have
pulse (rotary)
service, the
dial mode must
be changed.
Dial mode
Voice mail
Ring volume
Tones
Stored
DTMF
Pulse
Page 13
www.vtechphones.com
13
Basic operation
Settings
Set ring tone
This feature allows you to customize the ringer. The menu includes options
for six ring tones (or melodies.) You will hear a sample of each ringer as
you scroll through the choices.
• Make sure the handset is in idle mode.
• Press MENU/SEL to display menu.
• Press twice to reach Setup HS. Press MENU/SEL.
• Press MENU/SEL to select Ring melody.
• Use or to scroll through the choices. Current selection is marked
with a tick and a sample of ringer will be played.
• Press MENU/SEL to conrm your selection. The screen will display
Stored and you will hear a conrmation tone (if the Key beeps setting
is on).
Ring melody
Ring volume
Melody 1
Melody 2
Melody 3
Melody 4
Settings
Reset to default settings
You can reset the telephone to its original factory default settings. All
changes you have made will be lost. You can reset the handset and
telephone base settings in either the Setup HS or Setup BS menu.
• Make sure the handset is in idle mode.
• Press MENU/SEL to display menu.
• Press twice to reach Setup HS, or press three times to reach
Setup BS. Press MENU/SEL.
• Press twice to reach Reset, and press MENU/SEL.
• Press MENU/SEL to conrm. The screen will display Stored and
you will hear a conrmation tone (if the Key beeps setting is on).
Reset
Reset ?
Stored
• If you choose
to reset to the
default settings,
all entries in the
phonebook, call
log and redial list
will be deleted.
Page 14
www.vtechphones.com
14
Make, answer, and end calls
• Press TALK/FLASH or , then dial the number.
-OR-
• Dial the number (use CLEAR to backspace and make corrections), then press TALK/FLASH or
to call.
• To answer a call, press TALK/FLASH, or , if you want to use speakerphone.
• Press OFF to end a call.
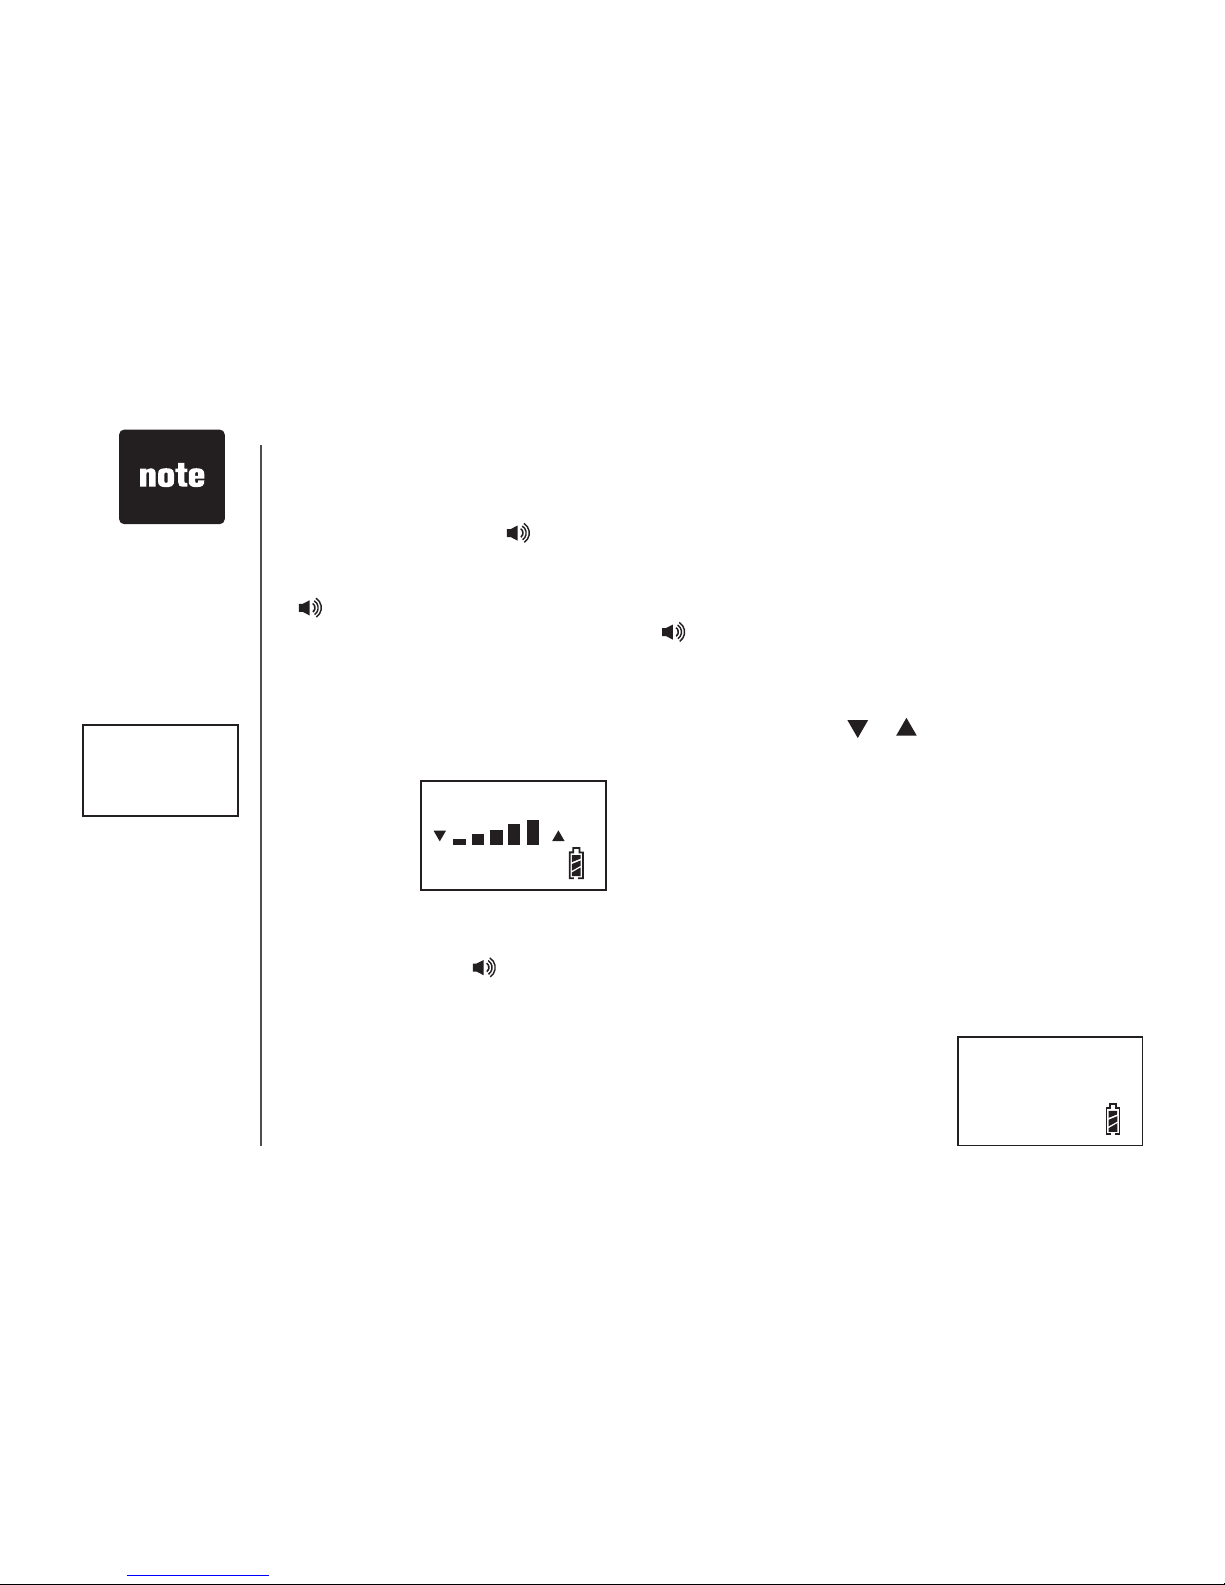
Volume
There are ve levels of volume to choose from during call. Press or to adjust the volume.
Speakerphone
• During a call, press to toggle between handsfree speakerphone and the normal handset use.
Press OFF to hang up.
• Not possible
is displayed
on screen if
one of the
other handsets
is already
engaged on a
call.
Not possible
Phone 00:00:10
Basic operation
Mute
You can silence the microphone so that the caller cannot hear your
conversation with a third party, but you can still hear the caller.
• Press CLEAR during call to mute. MUTE is displayed on the screen.
• Press CLEAR again to un-mute and resume.
Phone 00:00:10
18005959511
MUTE
Page 15
www.vtechphones.com
15
Basic operation
Settings
Basic operation
Basic operation
Temporary tone dialing
If you have pulse (rotary) service, you can change from pulse to touch tone dialing during a call by
pressing . This is useful if you need to send touch tone signals for access to telephone banking or
long distance services.
• Dial the number.
• Press .
• After you hang up, the telephone automatically returns to pulse dial service.
Call waiting
• If you have call waiting service, press TALK/FLASH during call if you
have another incoming call. Press TALK/FLASH again to switch back
to the original call.
Handset locator
• Press the key on the telephone base to page the handset.
• Paging will display on the screen of all handsets.
• To cancel the page, press the key on the telephone base again, or, press
TALK/FLASH or OFF on handset, or place handset in the telephone
base.
Paging
*
*
Page 16

www.vtechphones.com
16
Chart of characters
• When editing characters, useWhen editing characters, use CLEAR to backspace and delete. A long press of CLEAR will delete
the entire string.
• A long press of the 0 key will insert a dialing pause.
Characters by number of key presses
Keys
1st 2nd 3rd 4th 5th 6th 7th 8th 9th
space 1
A B C 2 a b c
D E F 3 d e f
G H I 4 g h i
J K L 5 j k l
M N O 6 m n o
P Q R S 7 p q r s
T U V 8 t u v
W X Y Z 9 w x y z
0
? ! / ( )
# ‘ , - . &
1
2
3
4
5
6
7
8
9
0
#
Advanced settings
Use the dial pad and the chart below to enter a name (up to 15 characters). Each press of a particular
key causes characters to be displayed in the following order:
Page 17

www.vtechphones.com
17
Advanced operation
Edit handset name
You can personalize the name of the handset and assign numbers to identify
different handsets (if you have more than one handset).
• Make sure the handset is in idle mode.
• Press MENU/SEL to display the menu.
• Press twice to reach Setup HS. Press MENU/SEL to select.
• Press three times to reach Handset Name, and press MENU/SEL.
• Use the dial pad to enter characters. (See the chart on the previous
page.)
• Press MENU/SEL to conrm. The screen will display Stored and you will
hear a conrmation tone (if the Key beeps setting is on).
Set key beeps tone
The handset is preset to beep when any key is pressed. To change the
setting:
• Make sure the handset is in idle mode.
• Press MENU/SEL to display the menu.
• Press twice to reach Setup HS. Press MENU/SEL.
• Press twice to reach Tones, and press MENU/SEL.
• Use twice to reach Key beeps. Press MENU/SEL.
• Use or to select On or Off.
• Press MENU/SEL to conrm. The screen will display Stored and you will
hear a conrmation tone (if you have set the Key beeps setting to on).
Handset name
Language
Name
Stored
Tones
Handset name
Key beeps
Advanced settings
Page 18

www.vtechphones.com
18
Battery low
No coverage
Key beeps
Set low battery tone
The handset is preset to beep when battery level is low. You have the option
to set it on or off.
• Make sure the handset is in idle mode.
• Press MENU/SEL to display the menu.
• Press twice to reach Setup HS. Press MENU/SEL.
• Press twice to reach Tones, and press MENU/SEL.
• Press MENU/SEL to select Battery low.
• Use or to choose On or Off.
• Press MENU/SEL to conrm. The screen will display Stored and you will
hear a conrmation tone (if the Key beeps setting is on).
Set no coverage tone
The handset is able to beep when there is no coverage. It is preset at the
factory to off. If you’d like to change the setting:
• Make sure the handset is in idle mode.
• Press MENU/SEL to display the menu.
• Press twice to reach Setup HS, press MENU/SEL.
• Press twice to reach Tones, press MENU/SEL.
• Press to reach No coverage, press MENU/SEL.
• Use or to select between On or Off.
• Press MENU/SEL to conrm. The screen will display Stored and you will
hear a conrmation tone (if the Key beeps setting is on).
On
Off
Battery low
No coverage
Key beeps
On
Off
Advanced settings
Page 19

www.vtechphones.com
19
Advanced operation
Set voicemail
• Make sure the handset is in idle mode.
• Press MENU/SEL to display the menu.
• Press three times to reach Setup BS. Press MENU/SEL.
• Press twice to reach Voice mail, and press MENU/SEL.
• The screen will display Voice mail off? Press MENU/SEL to turn it
off. Press OFF or CLEAR to exit this menu and keep it on.
• Press MENU/SEL to conrm. The screen will display Stored and
you will hear a conrmation tone (if the Key beeps setting is on).
Voice mail
Reset
Voice mail off?
Stored
Advanced settings
Page 20

www.vtechphones.com
20
Change the PIN
A personal identication number (PIN) is required for registering and
deregistering of handsets. The factory preset PIN is 0000.
• Make sure the handset is in idle mode.
• Press MENU/SEL to display the menu.
• Press three times to reach Setup BS. Press MENU/SEL.
• Press MENU/SEL to select Change PIN.
• Enter the current PIN (enter the preset PIN of 0000 if it is rst time
PIN change). Press MENU/SEL.
• Enter your new PIN and press MENU/SEL.
• Repeat PIN is displayed. Enter your new PIN again and press
MENU/SEL to conrm.
• Press MENU/SEL to conrm. The screen will display Stored
and you will hear a conrmation tone (if the Key beeps setting
is on).
• Wrong PIN will
be displayed if
a wrong PIN is
entered.
Change PIN
Dial mode
Enter PIN
****
New PIN
Repeat PIN
Wrong PIN
Advanced settings
Page 21

www.vtechphones.com
21
Advanced operation
Registration
When an additional handset is rst powered up or the handset has been de-
registered, Register! will display on the screen prompting you to register the
handset. Follow these steps to register a handset:
• Locate the handset beside the telephone base.
• Press FIND HANDSET on the telephone base for about 15 seconds.
• Press MENU/SEL to enter menu.
• Press # ## to activate the registration menu.
• Press MENU/SEL to select Registration.
• Press MENU/SEL to select Register.
• Use the dial pad to enter PIN (factory preset PIN: 0000), and press MENU/
SEL to conrm, Searching is displayed on screen.
• Registered should display on the screen and you will hear a conrmation
tone (if the Key beeps setting is on).
Register!
Registration
Register
Deregister
*
Searching
Registered
Advanced settings
**
*
• If the telephoneIf the telephone
base cannot
detect the
handset, or a
wrong PIN is
entered, No base
will be displayed.
Keep the handset
close to the
telephone base
and repeat the
above steps to
register again.
• If a handset is
not registered,
it cannot make
or receive calls
or access the
call log. All other
menus and
features can still
be used.
Page 22

www.vtechphones.com
22
De-registering a handset
• Press MENU/SEL to enter menu.
• Press # ## to activate the registration menu.
• Press MENU/SEL to select Registration.
• Press to reach Deregister, and press MENU/SEL to conrm.
• Use the dial pad to enter the PIN (factory preset PIN: 0000), and press
MENU/SEL.
• All registered handset numbers are displayed. Use and to select
the handset you want to deregister, and press MENU/SEL.
•Deregister? is displayed. Press MENU/SEL.
•Stored is displayed and you will hear a conrmation tone (if Key beeps
setting is on).
Register
Deregister
Enter PIN
*
Handset 1
Handset 2
Deregister?
Stored
Advanced settings
** *
Page 23

www.vtechphones.com
23
Advanced operation
Advanced operation
Phonebook
This telephone phonebook can store a maximum of 50 entries. The name
can be up to 12 characters and the number up to 20 digits.
• Phonebook menu can be entered in idle mode either by pressing the ,
or pressing MENU/SEL twice.
• Press CLEAR or OFF to quit the menu without saving the change.
• Empty is displayed on screen when there is no entry in the phonebook.
• Full is displayed on screen when the phonebook is full.
• It is permissible for duplicate entries to be stored in the phonebook, or for
the same number to be stored under two names.
Store an entry in the phonebook
• Press MENU/SEL to display menu.
• Press MENU/SEL to select Phonebook.
• Press MENU/SEL to enter Phonebook menu.
• Press MENU/SEL to select New.
• Use the dial pad to enter the telephone number and press MENU/SEL to
conrm.
• Use the dial pad to enter the name and press MENU/SEL to conrm.
• The screen will display Stored and you will hear a conrmation tone (if
the Key beeps setting is on).
Advanced operation
Empty
Full
New
Select
Number
043
Name
Aha
Page 24

www.vtechphones.com
24
Search the phonebook
Entries are sorted alphabetically, and names beginning with numbers are presented in list rst.
An alphabetical search can be done after entering the phonebook. Enter the rst letter of the name
using the method entering characters (see chart on page 16). The rst name beginning with that
letter will be displayed.
For example, press 5 (JKL) once to nd Jenny, twice to nd Kristen, or three times to nd Linda.
Dial a phonebook entry
Anna
Joyce
•Press to enter phonebook.
• Press or to scroll through the list until you see the entry you want
to dial.
• Press TALK/FLASH or to dial.
If you want to change the way the number will be dialed (for example with
or without an area code):
• Press MENU/SEL when you see the entry you want to dial.
• Press to reach Select, and press MENU/SEL.
• Use CLEAR and dial pad to change the way the number will be dialed
(1 + area code + number, area code + number, 1 + number, number
only).
• Press TALK/FLASH or to dial.
Select
Edit
Advanced operation
Page 25

www.vtechphones.com
25
Advanced operation
Advanced operation
Edit a phonebook entry
• Press to enter phonebook.
• Press or to scroll through the list until you see the entry you want
to edit.
• Press MENU/SEL to enter the phonebook menu.
• Press twice to reach Edit, and press MENU/SEL.
• Use CLEAR and the dial pad to edit the number. Press MENU/SEL.
• Use CLEAR and the dial pad to edit the name. Press MENU/SEL to
conrm.
• The screen will display Stored, and you will hear a conrmation tone (if
Key beeps setting is on).
Edit
Delete
18005959511
Peter
Stored
Advanced operations
Page 26

www.vtechphones.com
26
Delete a phonebook entry
• Press to enter phonebook.
• Press or to scroll through the list until you see the entry you
want to delete.
• Press MENU/SEL to enter the phonebook menu.
• Press three times to reach Delete, and press MENU/SEL.
• Press MENU/SEL again when Delete? is displayed.
• The screen will display Deleted, and you will hear a conrmation
tone (if Key beeps setting is on).
Delete entire phonebook
• Press to enter phonebook.
• Press MENU/SEL to enter the phonebook menu.
• Press four times to reach Delete, and press MENU/SEL.
• Press MENU/SEL again when Delete list? is displayed.
• The screen will display Deleted, and you will hear a conrmation
tone (if Key beeps setting is on).
Delete?
Deleted
Delete list
Delete list?
Deleted
Advanced operation
Delete
Delete list
Page 27

www.vtechphones.com
27
Advanced operation
Advanced operation
Redial list
This telephone’s redial list can store a maximum of ten most recent dialed
numbers. You can review, redial, or copy the number into your phonebook.
• When there are already ten numbers in the redial list, the oldest number
is deleted to make room for the new one.
• Press CLEAR or OFF to quit the menu without saving the change.
• Empty is displayed on the screen if there is no dialed number in the list.
• The name is displayed rather than the number if the number dialed is in
the phonebook.
• If a call dialed is already in the list, the new number will be added to the
list and the previous one deleted.
Store a redial number in the phonebook
• Press REDIAL to enter redial list.
• Use or to scroll through the list until the desired entry is displayed.
• Press MENU/SEL to enter redial menu.
• Press to reach Store No., and press MENU/SEL.
• Use the dial pad to enter the name, and press MENU/SEL.
• The screen will display Stored, and you will hear a conrmation tone (if
Key beeps setting is on).
Empty
18005959511
Peter
Name
Store No.
Delete
Peter
Advanced operation
Page 28

www.vtechphones.com
28
Dial from the redial list
• Press REDIAL to enter redial list.
• Use or to scroll through the list until the desired entry is
displayed.
• Press TALK/FLASH, or to dial.
If you want to change the way the number will be dialed (for example
with or without area code):
• Press MENU/SEL when you see the entry you want to dial.
• Press to reach Select, and press MENU/SEL.
• Use CLEAR and dial pad to change the way the number will be
dialed (1 + area code + number, area code + number, 1 + number,
number only).
• Press TALK/FLASH or to dial.
Delete an entry from the redial list
• Press REDIAL to enter redial list.
• Use or to scroll through the list until the desired entry is
displayed.
• Press MENU/SEL to enter the redial menu.
• Press twice to reach Delete, and press MENU/SEL.
• The screen will display Delete? Press MENU/SEL.
• The screen will display Deleted, and you will hear a conrmation
tone (if Key beeps setting is on).
18005959511
Peter
Select
Store No.
Delete
Delete list
Advanced operation
Deleted
Delete?
Page 29

www.vtechphones.com
29
Advanced operation
Advanced operation
Delete entire redial list
• Press REDIAL to enter redial list.
• Press MENU/SEL to enter the redial menu.
• Press three times to reach Delete list, and press MENU/SEL.
• The screen will display Delete list? Press MENU/SEL.
• The screen will display Deleted, and you will hear a conrmation tone
(if Key beeps setting is on).
Delete list
Delete list?
Deleted
Advanced operation
Page 30

www.vtechphones.com
30
Call log
If you subscribe to caller ID service, information about each incoming call
will be displayed.
The call log can be entered in idle mode by either pressing , or entered
through the menu:
• Press MENU/SEL to enter the menu.
• Press and press MENU/SEL.
• You can review, redial, or copy the number into your phonebook.
• Press CLEAR or OFF to quit the menu without saving the change.
• The call log can store up to 50 entries. Calls are displayed in reverse
chronological order (the latest rst).
• When the call log is full, the earliest entry is deleted to make room for new
incoming call information.
• Empty will be displayed after entering pressing if there is no entry in
the call log.
• NEW will be displayed on the screen if there are new call log entries
(missed call and unread).
• Duplicates or anonymous calls (no CID) entries will not be stored in the
call log.
Store an entry in the phonebook
Press to enter call log.
Use or to scroll through the list until the desired entry is displayed.
Press MENU/SEL.
Press to reach Store No., and press MENU/SEL.
Use the dial pad to enter the name, and press MENU/SEL.
Empty
John
18005959511
2/23 5:27
PM
Store No.
Delete
Advanced operation
Page 31

www.vtechphones.com
31
Advanced operation
Advanced operation
The screen will display Stored, and you will hear a conrmation tone (if
Key beeps setting is on).
Dial an entry in the call log
Press to display call log.
Use or to scroll through the list until the desired entry is
displayed.
Press TALK/FLASH, or to dial.
If you want to change the way the number will be dialed (for example with
or without area code):
• Press MENU/SEL when you see the entry you want to dial.
• Press to reach Select, and press MENU/SEL.
• Use CLEAR and dial pad to change the way the number will be dialed (1 +
area code + number, area code + number, 1 + number, number only).
• Press TALK/FLASH or to dial.
Delete an entry from the call log
• Press to enter call log.
• Use or to scroll through the list until the desired entr y is
displayed.
• Press MENU/SEL.
• Press twice to reach Delete, and press MENU/SEL.
• The screen will display Delete? Press MENU/SEL.
• The screen will display Deleted, and you will hear a conrmation tone
(if Key beeps setting is on).
Name
Aha
Select
Store No.
Delete
Delete list
Delete?
Advanced operation
Page 32

www.vtechphones.com
32
Delete entire call log
• Press to enter call log.
• Press MENU/SEL.
• Press three times to reach Delete list, and press MENU/SEL.
• The screen will display Delete list? Press MENU/SEL.
• The screen will display Deleted, and you will hear a conrmation tone
(if Key beeps setting is on).
Deleted
Delete list
Delete list?
Deleted
Intercom operation
The intercom feature allows conversation between system handsets, call
transfer, and conference calling with different handsets and the external
line.
Internal call
• Press INTERCOM while in idle mode.
• Enter the handset number (1, 2, 3, 4) you want to call.
• Selected handset will ring, press TALK/FLASH or to answer an
internal call.
• Press OFF on both handsets to end the call.
Number
Advanced operation
Page 33

www.vtechphones.com
33
Advanced operation
Advanced operation
Transfer an external call
This feature allows you to transfer an external call from one handset to
another handset.
• During a call, press INTERCOM on the rst handset (HS1).
• Enter handset number of selected handset you want to transfer to (for
this example, we’ll call it HS2).
• Once HS2 answers the intercom page, press OFF on HS1 to transfer the
call.
• If HS2 does not answer the intercom page, press OFF on HS1 to return
to the external call, this stops the ringing at HS2.
Conference call
This feature allows the external call have conversation with up to two
handsets at the same time.
• During a call, press INTERCOM.
• Enter handset number of selected handset you want to have conference
call with.
• Press TALK/FLASH on the selected handset to answer.
• Press MENU/SEL on the selected handset to enter intercom menu.
• Press MENU/SEL to select Conference, the conference call will be
connected.
• Press OFF on either handset to disconnect from the conference call.
The external call will only be disconnected if OFF is pressed on both
handsets.
• If an internal call
is made to a
handset that is
not available,
Not possible
will be displayed
on screen for 15
seconds, and
then the handset
returns to idle.
• If the internal call
is not answered,
the ring will not
end until OFF is
pressed in either
handsets.
Conference
Switching
CONF 00:02:08
Advanced operation
Page 34

www.vtechphones.com
34
When an internal call is connected, you have the option of switching between
the external call and internal call.
• While on an external call press MENU/SEL.
• Use to select Switching, and press MENU/SEL to toggle between
external call and internal call.
During a conference call, you also have the option to change to a single
call.
• Press MENU/SEL during a conference call.
• Press MENU/SEL to select Single call.
• You can now talk to the other handset while the external call is put on
hold.
Advanced operation
Single call
Switching
Page 35

www.vtechphones.com
35
Appendix
Batteries
After the battery is fully charged, you can expect the following performance:
Operation Operating time
While in use (talking) 10 hours
While not in use (standby*) 100 hours (approximately 4 days)
*Handset is of f the telephone base but not in base.
The battery needs charging when:
• A new battery is installed in the handset.
• The telephone beeps twice once taken off the base.
• Batter y indicator on screen is empty.
CAUTION:
To reduce the risk of re or injury to persons, read and follow these instructions:
1. Use only the battery(ies) specied.
2. Do not dispose of the battery(ies) in a re. They may explode. Check with local waste management codes for special disposal
instructions.
3. Do not open or mutilate the battery(ies). Released electrolyte is corrosive and may cause burns or injury to the eyes or skin. The electrolyte
may toxic if swallowed.
4. Exercise care in handling batteries in order not to short the battery to conductive materials such as rings, bracelets, and keys. The batter y
and/or conductor may overheat and cause burns.
5. Charge the batter y(ies) provided with or identied for use with this product only in accordance with the instructions and limitations specied
in this manual.
WARNING:
TO PREVENT FIRE OR SHOCK HAZARD, DO NOT EXPOSE THIS PRODUCT TO RAIN OR ANY T YPE OF MOISTURE.
The AC adaptor is used as the main disconnect device, ensure that the AC outlet is located/installed near the unit and is easily accessible.
Page 36

www.vtechphones.com
36
Important safety instructions
When using your telephone equipment, basic safety precautions should always be followed to reduce the risk of re, electric shock and injury, including the following:
1. Read and understand all instr uctions.
2. Follow all warnings and instructions marked on the product.
3. Unplug this product from the wall outlet before cleaning. Do not use liquid or aerosol cleaners. Use a damp cloth for c leaning.
4. Do not use this product near water (for example, near a bathtub, kitchen sink, or swimming pool).
5. Do not place this product on an unstable surface, such as a table, shelf or stand. This produ ct may fall, causing serious damage.
6. Slots and openings in the back or bot tom of the base unit and handset are provided for ventilation. To protect them fr om overheating, these openings must not be blocked
by placing the produc t on a sof t surface such as a bed, sofa or r ug. Thi s product should never be plac ed near or over a radiator or hear regi ster. This product should not be
placed in ay area where proper ventilation is not provided.
7. This product should be operated only from the type of power source indicated on the marking label. If you are not sure of the type of power suppl y in your home, consult your
dealer or local power company.
8. Do not allow anyt hing to rest on the power cord. Do not install this product where the cord may be walked on.
9. Never push object s of any kind into this product through sl ots in the base or handset as they may tou ch dang erous voltage points or short out parts that could result in a risk
of re or electric shoc k. Never s pill li quid of any kind on the product.
10. To reduce the risk of electric shock, do not disassemble this product, but take it to an authorized servic e facility. Opening or removing pars of the base or handset other than
speci ed access doors may expose you to dang erous voltages or other risks. Incorrect reassembling can cause electric shock when the product is subsequently used.
11. Do not overload wall outlets and ex tension cords as this can result in the risk of re or ele ctric shock.
12. Unplug this product from the wall outlet and refer ser vicing to an aut horized service facilit y under the following conditions:
A. When the power supp ly cord or plug is damaged or frayed.
B. If liquid has been spilled onto the produ ct.
C. If the product has been exposed to rain or water.
D. If the product does not operate normally by following the operating instructions. Ad just o nly those controls that are covered by the operation instructions, as improper
adjust ment of other controls may result in damage and of ten requires ex tensive work by an authorized technic ian to restore th e product to normal op eration.
E. If the product has been dropped and the base and /or hand set has been damaged.
F. If the produc t exhibits a distinct change in performance.
13. Avoid using a telephone (other than c ordless) during an ele ctrical storm. There is a remote risk of electric shock from lightning.
14. Do not use the telephone to repor t a gas leak in the vicinity of the leak.
15. Only put the handset of your telephone nex t to your ear when it is in normal talk.
CAUTION: Use only the power adapter provided with this product. To obtain a replacement, call 1(800)222-3111. In Canada, call 1(866)288- 4268.
SAVE THESE INSTRUCTIONS
Page 37

www.vtechphones.com
37
Appendix
Troubleshooting
Problem Suggestion
My telephone doesn’t
work at all.
• Make sure the power adaptor is plugged in.
• Make sure the telephone line cord is plugged rmly into the telephone base and the telephone
wall jack.
• Disconnect the power adaptor for a few minutes, and then reconnect it.
• Charge the battery in the handset for 16 hours. For optimum daily performance, return the
handset to its telephone base when not in use.
• Reset the telephone base. Unplug the electrical power. Wait for 15 seconds then plug it back
in. Allow up to one minute for the handset and telephone base to reset.
• You may need to purchase a new battery, please refer to the Batteries sections in this user’s
manual.
I can n ot g e t a dia l
tone.
• Try all the suggestions above.
• Move the handset closer to the telephone base. You might have moved out of range.
• Make sure the telephone is set to the correct dial mode for the type of service that you have
(pulse or touchtone). Refer to the Installation section of this user’s manual to set the dial
mode.
• Your line cord might be malfunctioning. Try installing a new line cord.
• If the previous suggestions do not work, disconnect the telephone base from the telephone
jack and connect a different telephone. If there is no dial tone on that telephone either, the
problem is in the wiring or local service. Contact your local telephone company.
If you have difculty operating your telephone, the suggestions below should solve the problem. If you still have difculty
after trying these suggestions, call VTech Communications at 1(800)595-9511. In Canada, call VTech Telecommunications
Canada Ltd. at 1(800)267-7377.
Page 38

www.vtechphones.com
38
Problem Suggestion
I cannot dial out. • Make sure there is a dial tone before dialing. It is normal for handset to take a second or two
to nd the telephone base and produce a dial tone. Wait an extra second before dialing.
• Make sure the telephone is set to the correct dial mode for the type of service that you have
(pulse or touchtone). Refer to the Installation section of this user’s manual to set the dial
mode.
• If the other telephones in your home are having the same problem, the problem is in your wiring
or local service. Contact your local telephone company.
• Eliminate any background noise. Noise from a television, radio or other appliance may cause the
telephone not to dial out properly. If you cannot eliminate the background noise, rst try muting
the handset before dialing, or dialing from another room in your home with less background
noise.
The bat teries do not
hold a charge.
• Charge the battery in the handset for 16 hours. For optimum daily performance, return the
handset to its telephone base when not in use.
• You may need to purchase a new battery, please refer to the Batteries section in this user’s
manual.
• Your telephone might be malfunctioning. Please refer to the Warranty section of this user’s
manual for further instruction.
Troubleshooting
Page 39

www.vtechphones.com
39
Appendix
Troubleshooting
Problem Suggestion
I get noise, static, or
weak signal even when
I’m near the telephone
base.
• Other electronic products can cause interference with your cordless telephone. Try installing
your telephone away from these types of electronic devices: wireless routers, radios, radio
towers, pager towers, cell phones, intercoms, room monitors, televisions, personal computers,
kitchen appliances and other cordless telephones.
• Microwave oven operates on the same frequency as your telephone. It is normal to experience
static on your telephone while the microwave oven is running. Do not install this telephone in
the same outlet or near the microwave oven.
• If your telephone is plugged in with a modem or surge protector, plug the telephone (or modem/
surge protector) into a different location. If this solves the problem, re-locate your telephone
or modem farther apart from one another, or use a different surge protector.
• Relocate your telephone base to a higher location. The telephone will likely get better reception
if not installed in a lower area.
• If the other telephones in your home are having the same problem, the problem is in your wiring
or local service. Contact your local telephone company (charges may apply).
I hear no i se in th e
handset, and none of
the key s or bu t ton s
work.
• Make sure the power cord is plugged in.
I hear other calls while
using my telephone.
• Disconnect your telephone base from the telephone jack, and plug in a regular telephone. If
you still hear other calls, the problem is probably in your wiring or local service. Call your local
telephone company.
Page 40

www.vtechphones.com
40
Troubleshooting
Problem Suggestion
My handset does not
ring whe n I re cei ve
a call.
• Make sure you have the ringer activated. Refer to the section(s) on ringer selection in this
user’s manual.
• Make sure the telephone line cord is plugged rmly into the telephone base and the telephone
jack. Make sure the power cord is plugged in.
• The handset may be too far from the telephone base.
• Charge the battery in the handset for 16 hours. For optimum daily performance, return the
handset to its telephone base when not in use.
• You may have too many extension telephones on your telephone line to allow all of them to
ring. Try unplugging some of the other telephones.
• The layout of your home or ofce might be limiting the operating range. Try moving the telephone
base to another location, preferably on an upper oor.
• If the other telephones in your home are having the issue, the problem is in your wiring or local
service. Contact your local telephone company (charges may apply).
• Test a working telephone at the telephone jack. If another telephone has the same problem, the
problem is the telephone jack. Contact your local telephone company (charges may apply).
• Other electronic products can cause interference with your cordless telephone. Try installing
your telephone as far away from these types of electronic devices as possible: wireless routers,
radios, radio towers, pager towers, cell phones, intercoms, room monitors, televisions, personal
computers, kitchen appliances and other cordless telephones
• Your line cord might be malfunctioning. Try installing a new line cord.
Page 41

www.vtechphones.com
41
Appendix
Troubleshooting
Problem Suggestion
My calls fade or cut in
and out while I’m using
my handset.
• Other electronic products can cause interference with your cordless telephone. Try installing
your telephone as far away from these types of electronic devices as possible: wireless routers,
radios, radio towers, pager towers, cell phones, intercoms, room monitors, televisions, personal
computers, kitchen appliances and other cordless telephones.
• Microwave oven operates on the same frequency as your telephone. It is normal to experience
static on your telephone while the microwave oven is running. Do not install this telephone in
the same outlet or near the microwave oven.
• If your telephone is plugged in with a modem or surge protector, plug the telephone (or modem/
surge protector) into a different location. If this solves the problem, re-locate your telephone
or modem farther apart from one another, or use a different surge protector.
• Relocate your telephone base to a higher location. The telephone will get better reception if
not installed in a lower area.
• If the other telephones in your home are having the issue, the problem is in your wiring or local
service.
M y c a l l e r I D i s n’ t
working.
• Caller ID is a subscription service. You must subscribe to this service for this feature to work
on your telephone.
• Your caller must be calling from an area that supports caller ID.
• Both you and your caller’s telephone companies must use caller ID compatible equipment.
Page 42

www.vtechphones.com
42
Troubleshooting
Problem Suggestion
C om mo n c ur e f o r
electronic equipment
If the unit does not seem to be responding normally, then try putting the handset in its telephone
base. If it does not seem to respond, do the following (in the order listed):
1. Disconnect the power to the telephone base.
2. Disconnect the handset battery, and spare battery, if applicable.
3. Wait a few minutes.
4. Connect power to the telephone base.
5. Re-install the battery(ies).
6. Wait for the handset to re-establish its link with the telephone base. To be safe, allow up to
one minute for this to take place.
Page 43

www.vtechphones.com
43
Appendix
Operating range
This cor dless telephone oper ates with the max imum power allowed by the Federal Communications Commiss ion (FCC). Even so, this handset and telepho ne base c an communicate over only a
cert ain dist ance - ---which c an vary w ith the locations of the telepho ne base and handset, the we ather, and the layout of your home or ofce.
When th e handset is ou t of ran ge, the handset will d isplay Searching. The user can ac cess t he handset ph onebo ok, and cert ain par ts of the menu system, i.e. hand set set ting a nd registrati on,
but not the time set ting an d base setting. Not pos sible w ill be displayed if acces s is trie d.
If there is a call whil e the ha ndset i s out of range, it might not ring, or if it doe s ring, the ca ll migh t not co nnect well when you pr ess TALK/FLAS H. Move c loser to the te lepho ne base, then press
TALK/FL ASH to answer the ca ll.
If the han dset move s out of ran ge duri ng a telep hone co nversation, there might be inter ference.
To improve reception, move clos er to the ba se.
Maintenance
Taking car e of your te lephone
Your cordless telep hone co ntains sophis ticate d electronic p arts, so it must b e treated with car e.
Avoid roug h trea tment
Place the handset down gently. Save the o riginal packi ng materials to protect your telephone if you ever need to s hip it.
Avoid wate r
Your telepho ne can be d amaged if it gets wet. Do not use the han dset outdoors in the rai n, or handle it with wet hands . Do not ins tall you r base unit near a sin k, batht ub or shower.
Electrical storms
Electr ical st orms ca n someti mes cause power surges har mful to el ectro nic equipment . For your own safety, use cautio n when using elec tric applian ces dur ing stor ms.
Clean ing your teleph one
Your telep hone has a durab le pl astic casi ng th at sho uld retain its luster for ma ny year s. Clean it only with a soft c loth slight ly da mpene d wit h water or a mild soap. Do not use exces s water or
cleani ng solve nts of any k ind.
Rememb er that el ectri cal applianc es can c ause ser ious injury if used when you are wet o r stand ing in water. If your base unit shou ld fall into water, DO NOT RETRIEVE IT UNTIL YOU UNPLUG
THE POWER CO RD AND TELEPHONE LINE CORDS FRO M THE WALL. T hen pull t he unit out by the un plugg ed cord s.
Page 44

www.vtechphones.com
44
About cordless telephones
• Privac y: the s ame features t hat make a cord less p hone c onvenie nt create some limitations. Telephone calls are tra nsmit ted between the bas e and t he cor dless handset by rad io waves, so
there is a possibili ty that your cordles s phon e conver satio ns could be in tercepted by radio re ceivi ng equi pment within range of the c ordless hand set. Fo r this r eason, you sho uld not think o f
cordless phone conver sations as bein g as private as thos e on cord ed phon es.
• Elec trical Powe r: The base unit of this cor dless telephone must b e con necte d to a working electri cal o utlet. The elect rical outl et sho uld not be contro lled by a wall switch. Calls c annot be
made from the cor dless handset i f the bas e unit is un plugg ed or swit ched of f, or if the e lectr ical power is inte rrupte d.
• Poten tial T V Inter ference: So me cordless tele phone s operate at fr equen cies that may cause interference to TVs and VCRs. To minimize or prevent such interference, do not place the base
unit of t he cordless te lepho ne near o r on top o f a TV or VCR. If interference is experienced, moving the cor dless teleph one father away from the T V or VCR will ofte n reduc e or eliminate the
interference. (Applies to 25- channel cordless ph ones on ly).
• Rech arge able Batteries: This product contains either Nicke l-Ca dmium or Nic kel-M etal Hydride rechargeab le bat teries. Exer cise c are in handl ing bat terie s in order not to short the bat tery
with conduct ing mater ial suc h as ring s, bracelets, and keys. The b atter y or conductor may overheat and cause harm. O bser ve proper polarity bet ween the batter y and th e batter y char ger.
• Nickel-Meta l Hydride Rechargea ble Batteries: Dispose of th ese b atteries in a s afe manner. Do not burn or puncture. Like other bat teries of this type, if burned or punctured, they could
releas e causti c materi al whic h could c ause injury.
Warranty
What do es this l imite d warranty cove r?
The manu factur er of this Vtech pr oduct, Vtech C ommunicatio ns, warr ants to the holder of a valid proof of p urchase (“Co nsumer ” or “you”) th at the product a nd all ac cesso ries provided by Vtech
in the sales packag e (“Product ”) are fre e from mater ial defe cts in mate rial and workman ship, pur suant to th e following terms and conditions , when installed and used normally and in acco rdanc e
with operation instru ction s. This limited warrant y extends only to t he Consumer for Product s purch ased and used in the United States of A meric a.
What will Vte ch Communic atio ns do if the Produc t is not free from material def ects in materials and workma nshi p during the limit ed warranty per iod (“Materiall y Defect ive
Produc t”)?
During the limited warrant y peri od, Vte ch’s aut horized service represe ntative will r epair or replace at Vtech’s op tion, w ithou t charge, a Materiall y Defec tive Pr oduct. If we repair this pr oduc t, we
may use new or refurbished replac ement p arts. If we cho ose to re place t his pro duct, we may repl ace it with a new or refurbished produc t of the s ame or similar de sign. Vtech wil l return repaire d
or replacement p roduc es to you in wo rking c ondit ion. Vtech will retain defective parts, m odule s, or equi pment. Repair or replacement of Product , at Vtech’s option, is your exclusive remedy. You
should ex pect t he repair or repla cement to take app roximately 30 days.
How long i s the lim ited wa rrant y peri od?
The limited warrant y perio d for the produ ct exten ds for ONE (1) YEAR from the date of pur chase if we rep air or replace a Materially Defective Produ ct under the terms of this li mited warr anty. This
limited warranty als o appl ies to repaired or replaceme nt Prod ucts f or a per iod of either (a) 90 days f rom the date th e repai red or r eplacement Pr oduct is shi pped to you or (b) the time remaining
on the ori ginal one-year warrant y; whichever is longer.
What is not c overed by t his limi ted warranty?
This lim ited warr anty d oes not cover
1. Produc t that has been subjected to misuse, accid ent, shipp ing or other physical damage, improper insta llatio n, abnorma l operation or handling, negligent, inundatio n, re, water or other liquid
intrus ion; or
2. Produc t that has b een dam aged due to repair, alteration or modicatio n by anyone other tha n an autho rized servic e representative of Vtec h; or
3. Produc t to the extent that t he prob lem experienc ed is cause by signal conditions , networ k relia bilit y or cabl e or antenna systems; or
4. Produc t to the extent that t he prob lem is caused by use with non-Vtech electr ical ac cessories; or
5. Produc t whose warrant y/quali ty stickers, Product s erial numbers plates or e lectr onic serial num bers have b een removed, alte red or ren dered illegib le; or
6. Produc t purchased, used serv iced, or shippe d for repair from outs ide the United States, or used fo r commercial or in stitutional pu rpose s (inclu ding but n ot limite d to Produc ts used fo r rental
purposes); or
Page 45

www.vtechphones.com
45
Appendix
7. Produc t return ed with out valid proof of p urchase (see 2 below); or
8. Charges for inst allation or set up, ad justm ent of cus tomer control s, and ins tallat ion or repair of systems outside the unit.
How do you get warranty servic e?
• To obtain warranty service in the United States of America, call 1(800)59 5-9511 for instruct ions regarding where to return the Product. Before calling for servi ce, please check the user’s manual.
A check of the Prod uct controls a nd features may save you a s ervi ce call.
• Except as provided by applicabl e law, you assume the risk of lo ss or damag e during tr ansit an d transp ortation and are responsible for deliver y or handling charges incurred in the transpo rt of
Produc t(s) to the service lo cation. VTech will retu rn repaired or repla ced pr oduct under this limited warrant y to you, transportation, delivery or handling charges prepaid. VTech as sumes no
risk for d amage or l oss of th e Produc t in tran sit.
• If the Produc t failu re is not covered by this limited warran ty, or pro of of pur chase does not meet t he term s of this limite d warra nty, Vtec h will n otify you and w ill req uest that you au thorize the
cost of re pair and r eturn sh ipping costs for the rep air of Prod ucts t hat are not c overed by this limi ted warranty.
What must you ret urn with the Product to g et warr anty service?
1. Return the entire o riginal package and co ntents including the Product t o the Vtec h serv ice lo cation along wi th a desc ription of the ma lfunc tion or difc ulty;
2. Includ e “valid proof o r purchase” (sales recei pt) identifyi ng the Pro duct purchas ed (Product model) and the date of pu rchas e or receipt; and
3. Provide your name, c omplete and cor rect mailing ad dress, a nd telephone nu mber.
Other Limita tions
• This warran ty is the complete and exclusive agreement between you and Vtech. It supersedes all other written or oral communicati ons related to this Product. Vtech provides no other warranties
for this produc t. The war ranty exclusively des cribe s all of Vtech’s respo nsibilities r egarding the pr oduct.
There are n o other express war ranties. No one i s author ized to make modi cations to this limited wa rrant y and you sh ould not rely on any s uch mod ication.
State L aw Rights: This warrant y gives you specic leg al rights, and you may also have o ther rights, wh ich var y from st ate to state.
Limita tions: Im plied warranties, including thos e of tness for a particu lar purpo se and merc hantability (an written warranty th at the produ ct is t for ordinary use) are lim ited to one year fro m date
of purch ase, Som e states d o not allow limitations on h ow long an i mplie d warranty last s, so the above limi tation m ay not apply to you.
• In no event sh all Vtech be liable for any indirect, sp ecial, incide ntal, co nsequ ential, or similar d amages (i nclud ing, but not limited to lost pro ts or revenu e, inability to use the produ ct, or oth er
assoc iated equip ment, the cost of substitute equi pment, and claims by third par ties) result ing from the use of th is produc t, s ome states do not allow exclus ion or li mitati on of inc ident al or
consequenti al damag es, so the above lim itatio n or exclus ion may not apply to you.
FCC, ACTA and IC regulations
This devic e complies with Part 15 of the FCC rules. Oper ation is subject to the following two condition s: (1) this device may not cause inter feren ce, and (2) this device must accept any interferen ce
received, inc luding interference that may cause undesired o peration. It also compl ies with regulat ions RSS213 and CS- 03 of Industry and Scie nce Can ada.
A labe l is l ocated on the und ersid e of t he base unit cont aining either the FCC re gistration number and R inger Equival ence Number (REN) o r the IC reg istrat ion nu mber a nd Load Number. You
must, up on requ est, provide this infor mation to your loc al telep hone co mpany.
This equ ipment is compatible with inductive ly coup led hearing aid s.
Should you experience tr ouble w ith this teleph one equipment , please contact:
VTech Communic ation s Inc.
CUSTOMER SERVICE at 1(800)59 5-9511. In Canada, call Vtech Teleco mmunic ations Canada Lt d. at 1(800)267-7377.
For repair/warranty information. The telephon e company may ask you to disconnect this equ ipment from the l ine net work unt il the problem ha s been co rrect ed.
Warranty
Page 46

www.vtechphones.com
46
FCC Par t 15
Warning: Changes o r modi cations to this u nit not exp ressl y approve d by the par ty responsible for c ompli ance could void the user ’s author ity to operate th e equip ment.
The equ ipment has been teste d and found to c omply with th e limit s for a Class B d igita l devic e, purs uant to p art 15 of t he FCC r ules. T hese limits are desi gned to provid e reaso nable protec tion
against harmful interference in a resid ential install ation. This equipm ent gener ates, uses and can radiate radio freq uency energy and, if not install ed and used in accordance with th e instru ction s,
may cause h armful i nterference to radio communi cations.
However, there is no guarantee that inter ference will not occur in a particular installat ion. If this equipme nt does cause harmful interfer ence to radio or televisi on recepti on, which can be determi ned
by turnin g the equipment o ff and on, the user is enco uraged to try and correct the interference by on e or more of t he following measures:
• Reorient or rel ocate the receiving an tenna.
• Incre ase the s eparation bet ween the e quipment and re ceiver.
• Connect the e quipment into an o utlet or o n a circu it dif ferent fr om that to w hich th e recei ver is con necte d.
• Consult the de aler or an ex perie nced radio/ TV tec hnici an for hel p.
To ensure sa fety of users, the FCC has established criteria for the am ount of radio frequency energy t hat ca n be safely ab sorbe d by a u ser or bystand er acc ordin g to th e inten ded us age of the
product. This produc t has been tested and found to comp ly with the criteria. Use of other acces sorie s may not ensure complianc e with FCC RF exposu re guidelines. It may be safely held against the
ear of the user. The base u nit shall be inst alled & u sed suc h that par ts of the user’s bo dy other than the h ands sh ould be maintained at a com fortable distanc e of approximatel y 20cm or m ore.
FCC Part 6 8 and ACTA
If this eq uipment was approved for c onnec tion to the telephone net work pr ior to Jul y 23, 2001, it complie s with Par t 68 of the Federal Commun ications Comm issio n (FCC) rule s. If the equipme nt
was approved after that date, it complies with the Par t 68 rules and with Technic al Requir ements for Connec tion of Equipment to the Telephone Network adopted by the Admini strati ve Council for
Terminal Att achme nts (ACTA). We are required to prov ide you with the fo llowin g inform ation.
1. Produ ct ide ntier and RE N infor matio n
The la bel o n the back or bottom of thi s equipment cont ains, among other thing s, an identier indic ating produ ct ap proval and t he Ringer Eq uivale nce N umber (REN). This in formation mu st be
provid ed to your loca l tel ephone com pany upon reque st. For equipmen t approved prior to July 23, 2001, the prod uct identier is precede d by the phrase “FC C Reg No.” and the REN is listed
separately. For equip ment approved af ter that dat e, the prod uct identier is prece ded by “US ” and a col on (:), and the REN is encoded in th e product ident ier without a de cimal point as the s ixth
and seventh c haract ers fo llowin g the colon. For ex ample, the p roduc t ide ntier US:AA AEQ3T123XYZ would ind icate an REN of 0.3. The REN is used to determine how many devi ces yo u may
connect to your telephone line and stil l have them ring when you are called. In most, but not all areas, the sum of all RENs should be ve (5.0) or less. You may want to contac t your local tel ephone
company for more informat ion.
2. Conn ection and use with th e natio nwide teleph one network
The plug and jack used to connect this equipment to the prem ises wiri ng and the telep hone net work must comply with th e applicable Part 68 rules and technical req uireme nts adopted by ACTA. A
compliant telephone cor d and modul ar plug is provided wit h this product. It is des igned to be co nnected to a compati ble modu lar jack that is also comp liant. An RJ11 jack shou ld normally be used
for conn ectin g to a singl e line and an RJ14 jack for t wo lines. See Inst allati on Instr uctions in the u ser’s manual. Thi s equip ment may no t be used with Coin Telephone Lines or with Part y Lines . If
you have specially wired alar m dialing equip ment con necte d to your tele phone li ne, ensur e the connection of this eq uipment does not disabl e your alar m equipm ent. If you have questions abou t
what will d isabl e alarm equipme nt, con sult your telephone com pany or a qualied i nstaller.
3. Repa ir inst ructi ons
If this equipmen t is malfu nctio ning, it must be unp lugge d from the m odular jack unti l the prob lem has been corr ected. Repairs to this telephone equipm ent can on ly be made by the manuf acture r
or its authorized agents. For repair procedures, fo llow the instru ction s outlined under the Lim ited Warranty.
4. Right s of the t elephone company
If this equipme nt is cau sing harm to the telepho ne network, the telep hone co mpany may tempor arily discontinue your telep hone servic e. The tel ephon e company is required to n otify you befor e
interru pting s ervi ce. If ad vance notice is not pr actic al, you w ill be notied as soon as possible. You wi ll be gi ven the oppor tunit y to correct t he problem an d the telephon e comp any is required to
inform yo u of your ri ght to le a compl iant wit h the FCC. Your telephone company may make c hanges in its fac ilities, equi pment, operation, or pr ocedures that c ould af fect t he prop er func tioning
of this product . The telephone c ompany is required to notify you if such changes are planne d.
5. Hearing aid c ompat ibilit y
FCC, ACTA and IC regulations
Page 47

www.vtechphones.com
47
Appendix
If this product i s equip ped wit h a corde d or cord less ha ndset, it is hear ing aid compatible.
6. Progr ammin g/t estin g of emer gency numbers
If this produc t has mem ory dialing l ocati ons, you may choo se to store police, re de partment and emerge ncy medical s ervi ce tele phone n umber s in thes e locations. I f you do, please keep three
things i n mind:
a. We recommend that you also write th e teleph one number on the direct ory ca rd, so that you can st ill dial the emer gency number ma nually i f the mem ory di aling feature doesn’t wor k.
b. This feature is pr ovided only as a convenience, and t he manuf acture r assumes no resp onsib ility f or custo mer reli ance up on the me mory feature.
c. Testin g the emer gency telephone numb ers you have stored is not reco mmend ed. Howeve r, if you do make a c all to an emergency number:
• You must remain on the line and br iey exp lain the reason f or the call before hanging up.
• Programming /testing of emergenc y numbers should be per forme d during off-p eak hours, such as in the early mor ning or late evening, when the emerge ncy ser vice s tend to be l ess busy.
IC (Industr y Cana da)
This telephone i s regis tered for u se in Canada.
This Cla ss B digi tal app aratus complies with Canadian ICES-0 03.
The term “ IC” before the radio cer tication number only signies that Industry Can ada technical speci cations were me t.
Notic e:
This equipm ent m eets the a pplic able Indus try Canada Terminal Equipment Technica l Specic ations. Thi s is conrmed by the reg istration number. T he abbreviation, IC, before the registr ation
number signies that registration was perform ed based on a D eclar ation of Conformity indic ating t hat Ind ustr y Canad a technical s peci cations were met. It does no t imply that In dustr y Cana da
approve d the equipment .
Notic e:
The Ring er Equivalence Nu mber (REN) for this terminal equipmen t is 0.1. The REN assigne d to each ter minal eq uipment provid es an indi catio n of the max imum num ber of term inal all owed to be
connected to a telephone interface. Th e termination on an i nterf ace may consi st of any comb inatio n of dev ices subjec t only to the requir ement t hat the sum of the Ri nger Equivalence Numbers
of all the d evices does not exceed ve.
Before ins talling this equi pment, us er should en sure that it is per missi ble to be conne cted to the fac ilities of the local telecommunications co mpany. The equi pment mus t also be installed using an
acceptable method of connection. The customer should be aware that compliance with the above conditions may not prevent degradation of servic es in some situation s. Privacy of communi cations
may not be en sured wh en using this telephone.
Repair s to certied equipment shou ld be made by an author ized Canadian mainte nance facility designated by the supplier. Any repairs or alterat ions made by the user to this equi pment, or
equipm ent malfunctions, may g ive the telecom munications c ompany c ause to re quires t he user to disconnect t he equipment.
Users should ensure for their own prote ction that the ele ctric al ground conne ctions of the power utilit y, telephone lines an d interna l metall ic water pip e system, if present , are connected together.
This pre caution may be par ticu larly im portant in rural areas.
Caution:
Users sh ould not attempt to make sue c onnec tions t hemselves, but s hould c ontac t the appropriate elec trica l inspe ction authority, or electric ian, as ap propr iate.
Your Cordless Phone is desi gned to operate at the max imum power al lowed by the FCC and IC. This means your handset and base unit can commun icate onl y over a certain distance – which wi ll
depend on the location o f the base unit and h andset , weather, and the con struc tion an d layout of yo ur home or ofce.
FCC, ACTA and IC regulations
Page 48

www.vtechphones.com
48
Technical specications
Frequency control Crystal controlled
PLL synthesizer
Frequency Base: 1921.536 - 1928.448 MHz
Handset: 1921.536 - 1928.448 MHz
Channels Five
Nominal effective range Maximum power allowed by FCC and IC. Actual operating range may vary according to
environmental conditions at the time of use.
Size Handset: 143.0mm X 48.0mm X 30.0mm
Base: 108.0mm X 103.0mm X 43.0mm
Weight Handset: 125.6 grams (including battery)
Base: 128.0 grams
Power requirements Handset: 2.4V DC 600mAh NiMH battery
Base: 6V DC @ 300mA
Memory Memory: Directory 50, 12 characters and 20 digits each.
Call log: 50 memory locations.
Page 49

www.vtechphones.com
49
Index
A
About caller ID information 7
About cordless telephones 44
Advanced operation 23–33
Advanced settings 16–21
B
Batteries 35
C
Call log 30
Call waiting 15
Change the PIN 20
Chart of characters 16
Check dial mode 7
Choose a location 5
Conference call 33
D
De-registering a handset 22
Delete an entry from the call log 31
Delete an entry from the redial list 28
Delete a phonebook entry 26
Delete entire call log 32
Delete entire phonebook 26
Delete entire redial list 29
Dial an entry in the call log 31
Dial a phonebook entry 24
Dial from the redial list 28
E
Edit a phonebook entry 25
Edit handset name 17
F
FCC, ACTA and IC regulations 45–47
H
Handset layout 9
Handset locator 15
I
If you subscribe to DSL service 8
Important safety instructions 36
Installation 4–7
Install handset battery 6
Intercom operation 32
Internal call 32
M
Maintenance 43
Make, answer, and end calls 14
Mute 14
O
Operating range 43
P
Parts checklist 4
Phonebook 23
R
Redial list 27
Registration 21
Reset to default settings 13
S
Search the phonebook 24
Set date and time 11
Set dial mode 12
Set key beeps tone 17
Set low battery tone 18
Set no coverage tone 18
Set ring tone 13
Set ring volume 12
Page 50

www.vtechphones.com
50
Index
Settings 9–14
Set voicemail 19
Speakerphone 14
Store an entry in the phonebook 23,
30
Store a redial number in the phonebook
27
T
Technical specications 48
Telephone base layout 10
Temporary tone dialing 15
Transfer an external call 33
Troubleshooting 37–42
V
Volume 14
W
Warranty 44
Page 51

VTECH TELECOMMUNICATIONS LTD.
A member of THE VTECH GROUP OF COMPANIES.
Distributed in the U.S.A. by VTech Communications, Inc. Beaverton, Oregon
Distributed in Canada by VTech Telecommunications Canada, Ltd., Richmond, B.C.
Copyright ©2006 for VTECH TELECOMMUNICATIONS LTD.
Printed in China.
91-000xxx-010-000
Page 52

User’s Manual
w w w . v t e c h p h o n e s . c o m
Model: DE6010
Waiting the
Photo
 Loading...