

Page 1
User’s Manual
Bob the Builder
On the Job Laptop
© 2007 VTech
Printed in China
91-02261-000-000
Page 2

Dear Parent,
At VTech® we know how important the first day of school is for your
child. To help prepare preschoolers for this important event, VTech®
has developed the Preschool Learning™ series of interactive toys.
Preschool Learning™ features fun characters and inviting school
themes that use technology to capture a child’s attention and teach
important preschool skills like spelling, counting and the alphabet.
These vital skills are taught in a way that’s both fun and highly
engaging to maintain a child’s interest. Children will also be
introduced to characters, music, and cheerful sound effects! With
Preschool Learning™, learning is fun from day one!
At VTech® we know that a child has the ability to do great things.
That’s why all of our electronic learning products are uniquely
designed to develop a child’s mind and allow them to exert the best of
their ability. We thank you for trusting VTech® with the important job
of helping your child learn and grow!
Sincerely,
Your Friends at VTech
To learn more about Preschool Learning™ and other VTech® toys, visit
®
www.vtechkids.com
To learn more about Bob the Builder™ visit www.bobthebuilder.com
Page 3
INTRODUCTION
Thank you for purchasing VTech® Bob the BuilderTM On the Job
Laptop!
The Bob the BuilderTM On the Job Laptop provides your preschool
child with a world of knowledge. Basic curriculum includes letters,
words, numbers, logic, music and more. The animations, encouraging
phrases and rich curriculum make learning fun! The three levels of
difficulty make it challenging.
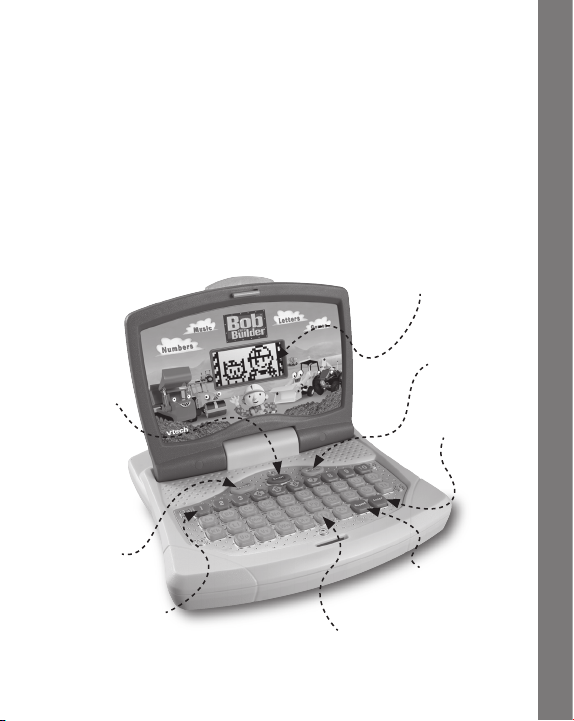
LCD screen
Activity button
On/Off button
Enter button
Volume control
button
Repeat button
INTRODUCTION
Number & direction
buttons
Letter and number keys
2
Page 4
INCLUDED IN THIS PACKAGE
• One VTech® Bob the BuilderTM On the Job Laptop!
• One User’s Manual
WARNING: All packing materials such as tape, plastic sheets,
wire ties and tags are not part of this toy, and should
be discarded for your child’s safety.
GETTING STARTED
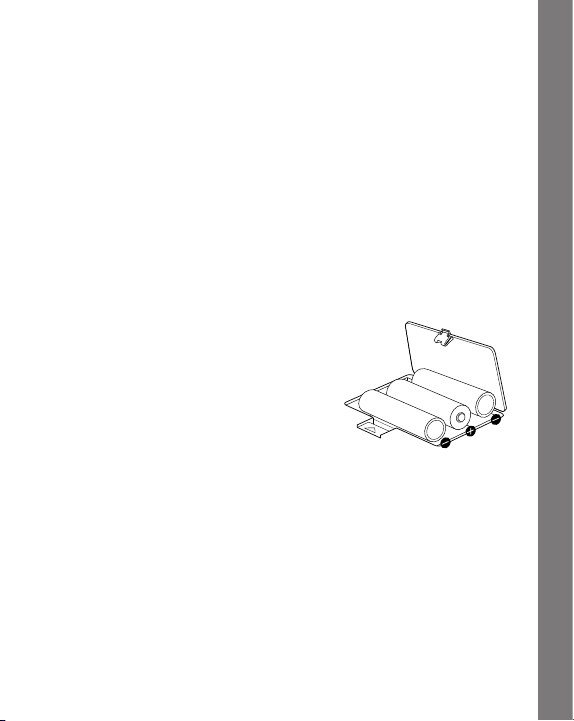
BATTERY INSTALLATION
1. Make sure the unit is turned OFF.
2. Locate the battery cover on the bottom of the unit.
3. Open the battery cover.
4. Install 3 new “AA” (UM3/LR6) batteries
into the compartment as illustrated
(The use of new, alkaline batteries
is recommended for maximum
performance.)
5. Replace the battery cover.
BATTERY NOTICE
• Install batteries correctly observing the polarity (+, -) signs to
avoid leakage.
• Do not mix old and new batteries.
• Do not mix batteries of different types: alkaline, standard (carbonzinc) or rechargeable (nickel-cadmium).
• Remove the batteries from the equipment when the unit will not be
used for an extended period of time.
• Always remove exhausted batteries from the equipment.
• Do not dispose of batteries in fire.
GETTING STARTED
3
Page 5

• Do not attempt to recharge ordinary batteries.
• The supply terminals are not to be short-circuited.
• Only batteries of the same and equivalent type as recommended
are to be used.
WE DO NOT RECOMMEND THE USE OF RECHARGEABLE
BATTERIES.
PRODUCT FEATURES
1. ON/OFF BUTTON
To turn the unit ON, press the ON/OFF BUTTON.
Press the ON/OFF BUTTON again to turn the unit
OFF.
2. VOLUME CONTROL BUTTON
Press the VOLUME CONTROL BUTTON to
increase or decrease the volume.
3. ACTIVITIES BUTTON
Press the ACTIVITIES BUTTON to select an activity
to play.
4. ENTER BUTTON
Press the ENTER BUTTON to enter the selected
activity or to confirm your answer.
PRODUCT FEATURES
5. REPEAT BUTTON
Press the REPEAT BUTTON to repeat a question in
most activities.
4
Page 6

6. LETTER BUTTONS
Press the 26 LETTER BUTTONS to answer the questions in letterrelated activities.
7. NUMBER / DIRECTION BUTTONS
Press the 10 NUMBER / DIRECTION BUTTONS to answer questions
in number-related activities. Press 4 - 7 NUMBER / DIRECTION
BUTTONS to move the cursor or characters left, right, up and down
in most of the activities.
8. AUTOMATIC SHUT-OFF
To preserve battery life, the VTech® Bob the BuilderTM On the Job
Laptop will automatically shut off after several minutes without input.
The unit can be turned on again by pressing the ON/OFF BUTTON.
HOW TO BEGIN PLAYING ACTIVITIES
1. To begin play, press the ON/OFF BUTTON on the keyboard.
2. The animation for choosing an activity will scroll onto the screen
with the number and name of the activity. When the activity you
wish to play appears on the screen, select the activity by pressing
the ENTER BUTTON. Press the 4 & 7 NUMBER / DIRECTION
BUTTONS to see the previous or next activity.
PRODUCT FEATURES
5
Page 7

3. Once selected, some games will have a brief animation that
demonstrates how to play the game.
4. Press the VOLUME CONTROL BUTTON to adjust the volume.
ACTIVITIES
LET’S LEARN LETTERS
1. Missing Letter
Roley needs your help to fill in the missing letter. Find the letter that
completes the word and press the LETTER BUTTON to answer.
2. Letter Order
Bob wants you to arrange sandbags to fill the potholes. Use the
NUMBER / DIRECTION BUTTONS to put the letters in alphabetical
order.
3. Letter Match
Scrambler and Dizzy need your help to match the capital letters to
the lower case letters below. Press the ENTER BUTTON to select a
letter, and then select the lower case letter that matches.
4. Maze
Help the Can-Do Crew find their way out of the maze. A member of
the crew and their name will appear on the screen. In order to get out
of the maze, you need to collect all the letters in their name by using
the NUMBER / DIRECTION BUTTONS.
5. Running Alphabet
The letters of the alphabet are getting away! Help Scrambler catch
the letters by pressing the LETTER BUTTONS when the letters
appear on the screen.
ACTIVITIES
6
Page 8

LET’S LEARN NUMBERS
6. Order 123
Bob needs your help to paint a house. Three paint cans will appear
on the screen. One of the numbers is missing from the label. Find
out which number is missing and press the NUMBER / DIRECTION
BUTTONS to answer.
7. Time
Let’s learn about the Can-Do Crew’s busy schedule. You will be
asked a question about time. You need to choose the correct picture
to answer the question by pressing the 5 or 6 NUMBER / DIRECTION
BUTTON and then the ENTER BUTTON.
8. Counting
Bob is finished with a project and needs your help to recycle some
items. Several items to be recycled will appear on the screen. You
need to click on the same items as the pattern shown by pressing
the 5 or 6 NUMBER / DIRECTION BUTTON and then the ENTER
BUTTON to confirm.
9. Shapes
Bob is building a new house and he needs your help. Bob will ask
you to find the shape he needs. Use the NUMBER /DIRECTION
BUTTONS and ENTER BUTTON to find the shape and confirm your
selection.
10. Number Order
Bob is sorting his tools to get ready for the next big project. You
need to help him put his tools in the right order by using the 5 or 6
NUMBER / DIRECTION BUTTON and then the ENTER BUTTON to
confirm.
ACTIVITIES
7
Page 9

LET’S LEARN LOGIC
11. Who Does What?
Bob and the Can-Do Crew are working on a big project, and everyone
has a different job to do. You will be asked a question. Select the
member of the crew that is right for the job by pressing the 5 or 6
NUMBER / DIRECTION BUTTON and then the ENTER BUTTON
to confirm.
12. Odd One Out
Scoop and Bob need your help to find the tools that do not belong.
Find the tool that is different from all of the others by pressing the
NUMBER / DIRECTION BUTTONS and then the ENTER BUTTON
to confirm.
13. Pipe Connector
Bob needs your help to fix the plumbing in a house. Arrange the
pipes so that the water can flow from one side to the other. Use the 4
& 7 NUMBER / DIRECTION BUTTONS to choose the correct pipes
and the ENTER BUTTON to confirm.
14. Bob’s Jigsaw
Bob wants to hang some pictures in his house, but they are all
jumbled up! Use the ENTER BUTTON to select a piece and the 5 &
6 NUMBER / DIRECTION BUTTONS to arrange the pieces and recreate the original picture.
15. Pair Up
Lofty is trying to figure out which objects are the same. Several pairs
of objects will appear on the screen and then bricks will cover them.
Remember where you saw the matching pairs, then use the NUMBER
/ DIRECTION BUTTONS and the ENTER BUTTON to find the pairs.
ACTIVITIES
8
Page 10

FUN GAMES
16. Racing
It’s the day of the big race and all the machines are ready to complete
the course! Select a machine and then use the 5 or 6 NUMBER /
DIRECTION BUTTONS to move across the track, gathering speed
boosts and avoiding the potholes. Use the 7 Number / Direction
Button to speed up.
17. Shadow Matching
Bob needs help selecting the right tool for the job. A shadow will be
shown on the left side of the screen and a tool will appear on the
right side. You need to select the tool that matches the shadow by
using the 7 NUMBER / DIRECTION BUTTON and then the ENTER
BUTTON to confirm.
18. Picture Puzzle
Bob has some different shapes to show you. A picture made up of
different shapes will appear on the screen. You will be asked to find
one of the shapes. Use the 5 or 6 NUMBER / DIRECTION BUTTONS
to choose the shape and press the ENTER BUTTON to confirm.
19. Where’s Scrambler?
Scrambler wants to play hide and seek. Scrambler will hide in one of
the garages. Then the 3 garages will swap places with each other.
You need to find the garage Scrambler is hiding in by pressing the
4 or 7 NUMBER / DIRECTION BUTTONS and then the ENTER
BUTTON to confirm.
20. Catching
Bob needs your help to gather all the hammers off the conveyor
belt. You need to collect hammers by using the 5 or 6 NUMBER /
DIRECTION BUTTONS.
ACTIVITIES
9
Page 11

CARE & MAINTENANCE
1. Keep the unit clean by wiping it with a slightly damp cloth.
2. Keep the unit out of direct sunlight and away from any direct heat
source.
3. Remove the batteries when the unit is not in use for an extended
period of time.
4. Do not drop the unit on hard surfaces and do not expose the unit
to moisture or water.
TROUBLESHOOTING
If for some reason the program/activity stops working, then please
follow these steps:
1. Turn the unit OFF.
2. Interrupt the power supply by removing the batteries.
3. Let the unit stand for a few minutes, then replace the batteries.
4. Turn the unit back ON. The unit will now be ready to play again.
5. If the unit still does not work, replace with an entire set of new
batteries.
If the problem persists, please call our Consumer Services Department
at 1-800-521-2010 in the U.S. or 1-877-352-8697 in Canada, and a
service representative will be happy to help you.
IMPORTANT NOTE:
Creating and developing Preschool Learning™ products is
accompanied by a responsibility that we at VTech® take very
seriously. We make every effort to ensure the accuracy of the
information which forms the value of our products. However, errors
sometimes can occur. It is important for you to know that we stand
behind our products and encourage you to call our Consumer
Services Department at 1-800-521-2010 in the U.S. or 1-877-3528697 in Canada with any problems and/or suggestions that you
might have. A service representative will be happy to help you.
CARE & MAINTENANCE / TROUBLESHOOTING
10
Page 12

NOTE:
This equipment has been tested and found to comply with the limits
for a Class B digital device, pursuant to Part 15 of the FCC Rules.
These limits are designed to provide reasonable protection against
harmful interference in a residential installation. This equipment
generates, uses and can radiate radio frequency energy and, if not
installed and used in accordance with the instructions, may cause
harmful interference to radio communications. However, there is no
guarantee that interference will not occur in a particular installation.
If this equipment does cause harmful interference to radio or television
reception,which can be determined by turning the equipment off and
on, the user is encouraged to try to correct the interference by one or
more of the following measures:
• Reorient or relocate the receiving antenna.
• Increase the separation between the equipment and receiver.
• Connect the equipment into an outlet on a circuit different from
that to which the receiver is connected.
• Consult the dealer or an experienced radio/TV technician for help.
Caution: Changes or modications not expressly approved by the
party responsible for compliance could void the user’s
authority to operate the equipment.
NOTE
Bob the Builder
TM
On the Job Laptop
© 2007 HIT Entertainment Limited
and Keith Chapman. The Bob
the Builder name and character,
related characters and riveted
logo are trademarks of HIT
Entertainment Limited. Reg. U.S.
Pat. & Tm. Off. and other countries.
www.bobthebuilder.com
11
 Loading...