

Page 1
User’s Manual
!
P
l
a
y
t
i
m
e
w
i
t
Train Station Playset
g
n
i
n
r
a
e
l
f
o
s
h
e
l
i
m
© 2013 VTech
Printed in China
91-002858-007
US
Page 2
Dear Parent,
Go! Go! Smart Wheels
Smart Wheels
fun as well.
Go! Go! Smart Wheels
child by lighting up, singing and talking, while teaching your
vehicles respond to each unique SmartPoint
singing, sound effects and fun phrases.
Our Go! Go! Smart Wheels
your child can do!
With Go! Go! Smart Wheels
Sincerely,
To learn more about VTech
®
®
features vehicles that interact with your
Go! Go! Smart Wheels
®
Go! Go! Smart Wheels
®
®
VTech
®
Go! Go!
SmartPoint
®
playsets
SmartPoint™
™ location with
®
playsets
™
Page 3
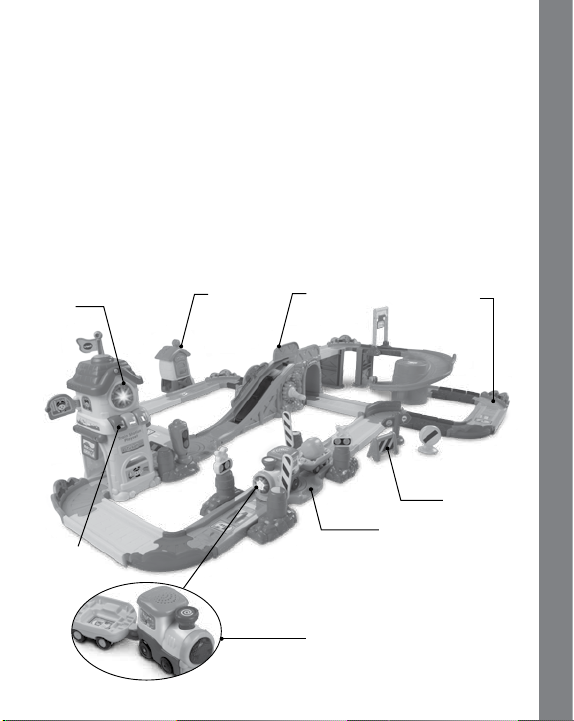
INTRODUCTION
Thank you for purchasing the VTech® Go! Go! Smart Wheels® Train
Station Playset learning toy!
The Go! Go! Smart Wheels® Train Station Playset™ by VTech® lets
your child play like a real conductor! Spark your child’s imagination as
they combine 32 tracks into different congurations. Watch the motorized
train engine and cargo car chug along the tracks and go into the station,
under the bridge and through the tunnel. The train and other Go! Go!
Smart Wheels® SmartPointTM vehicles (each sold separately) respond
to 10 SmartPoint™ locations that teach early language development
skills. All aboard! It’s playtime with miles of learning!
Light-up
button
Piano keys
Storage
tower
Incline
10 SmartPoint
Go! Go! Smart Wheels® playsets
Connect tracks to other
(each sold separately)
locations
3 play pieces
TM
Introduction
1 motorized train*
(*Press the smokestack to turn on the train’s motor.)
2
Page 4
INCLUDED IN THIS PACKAGE
• One VTech® Go! Go! Smart Wheels® Motorized Train with
SmartPoint
• One VTech® Go! Go! Smart Wheels® electronic train station with
one SmartPointTM track
• One incline
• One storage tower
• Two SmartPointTM tracks with trafc lights
• One SmartPointTM track with road sign
• Two bridge supports
TM
cargo car
Included In This Package
3
Page 5
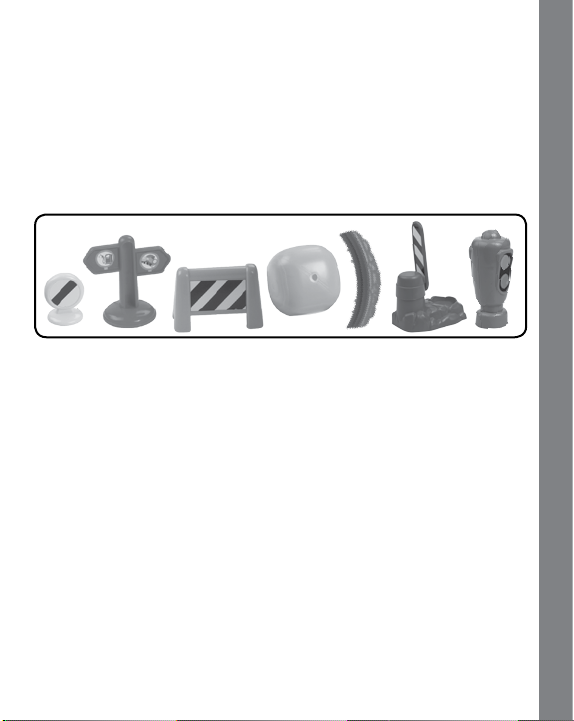
• Four 90-degree tracks, male
• Three 90-degree tracks, female
• Four cross tracks
• Eight short tracks
• Five straight tracks
• Two straight SmartPoint
• One SmartPoint
• One SmartPoint
• One spiral ramp with SmartPoint
TM
TM
TM
tracks
track for the storage tower
tunnel track
TM
location
• One circle sign
• One destination board
• One road block
• One block for the storage tower
• One curved piece for the cross tracks (changes direction)
• One gate railing with base for station
• One trafc light
• One User’s Manual
WARNING: All packing materials, such as tape, plastic sheets,
packaging locks and tags are not part of this toy, and
should be discarded for your child’s safety.
ATTENTION : Pour la sécurité de votre enfant, débarrassez-vous
de tous les produits d’emballage tels que rubans
adhésifs, feuilles de plastique, attaches et étiquettes.
Ils ne font pas partie du jouet.
NOTE: Please keep user’s manual as it contains important
information.
Included In This Package
4
Page 6
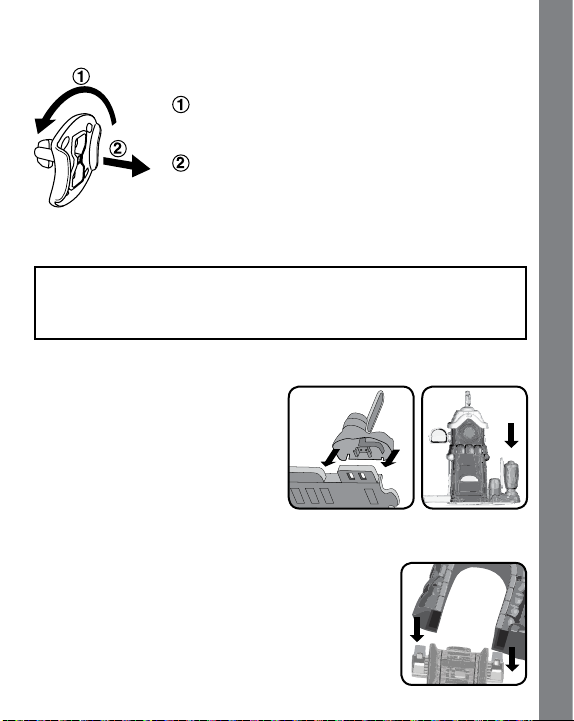
Unlock the packaging locks:
Rotate the packaging lock
counter-clockwise 90 degrees
Pull out the packaging lock
ASSEMBLY INSTRUCTIONS
With the VTech® Go! Go! Smart Wheels® Train Station Playset,
safety comes rst. To ensure your child’s safety, adult assembly is
required.
ELECTRONIC STATION
1. Attach the gate railing base to
the SmartPoint
electronic station. You will hear a
‘click’ sound to indicate the track
is secure.
2. Place the trafc light on the gate
railing.
TUNNEL
1. Attach the incline to the SmartPointTM tunnel
track. You will hear a ‘click’ sound to indicate the
track is secure.
TM
track of the
Assembly Instructions
5
Page 7

STORAGE TOWER
1. Attach the storage tower
structure to its SmartPoint
track. You will hear a ‘click’
sound to indicate the structure
is secure.
After the above steps, connect these pieces to the included track pieces.
You can congure them into different arrangements.
TM
GETTING STARTED
BATTERY INSTALLATION - TRAIN
1. Make sure the unit is turned OFF.
2. Locate the battery cover on the bottom of the
unit. Use a screwdriver to loosen the screw.
3. Install 3 new AAA (AM-4/LR03) batteries
following the diagram inside the battery
box. (The use of new alkaline batteries is
recommended for maximum performance.)
4. Replace the battery cover and tighten the
screw to secure.
Getting Started
6
Page 8

BATTERY INSTALLATION – STATION
1. Make sure the unit is turned OFF.
2. Locate the battery cover on the back of the
station. Use a coin or a screwdriver to loosen
the screw.
3. Install 2 new ‘AAA’ (AM-4/LR03) batteries
following the diagram inside the battery
box. (The use of new alkaline batteries is
recommended for maximum performance.)
4. Replace the battery cover and tighten the
screw to secure.
BATTERY NOTICE
• Use new alkaline batteries for maximum performance.
• Use only batteries of the same or equivalent type as
recommended.
• Do not mix different types of batteries: alkaline, standard (carbon-
zinc) or rechargeable (Ni-Cd, Ni-MH), or new and used batteries.
• Do not use damaged batteries.
• Insert batteries with the correct polarity.
• Do not short-circuit the battery terminals.
• Remove exhausted batteries from the toy.
• Remove batteries during long periods of non-use.
• Do not dispose of batteries in re.
• Do not charge non-rechargeable batteries.
• Remove rechargeable batteries from the toy before charging (if
removable).
• Rechargeable batteries are only to be charged under adult
supervision.
Battery Notice
7
Page 9

PRODUCT FEATURES - TRAIN
1. ON/OFF SWITCH
To turn the unit ON, slide the ON/OFF SWITCH
to the ON ( ) position. To turn the unit OFF,
slide the ON/OFF SWITCH to the OFF ( )
position.
2. SMOKESTACK MOTOR BUTTON
Press the SMOKESTACK MOTOR BUTTON
to activate the motor. Press the button again
to stop the motor.
3. AUTOMATIC SHUT-OFF
To preserve battery life, the VTech
Motorized Train will automatically power-down after approximately
30 seconds without input while the motor is off. The unit can only
be turned on again by pressing the light-up button or pushing the
train quickly.
®
Go! Go! Smart Wheels®
ACTIVITIES - TRAIN
1. Slide the ON/OFF SWITCH to the ON position
to turn the unit ON. You will hear train sounds,
a song and a phrase. The light will ash with
the sounds.
2. Press the SMOKESTACK MOTOR BUTTON
to start the motor. The train will move forward
automatically, and you will hear train sounds.
The light will ash with the sounds.
Activities
3. Press the LIGHT-UP BUTTON to hear train
sounds, songs and phrases. Press and hold
the LIGHT-UP BUTTON to stop the motor. The
motor will restart after the button is released.
8
Page 10

The light will ash with the sounds.
4. While the motor is off, push the train over the 10 SmartPoint
TM
locations included in the playset to hear greetings, fun sounds, short
tunes and sing-along songs. The light will ash with the sounds. The
train also interacts with SmartPoint
Go! Smart Wheels
®
playsets (each playset sold separately). The
TM
locations on other VTech® Go!
light will ash with sounds.
5. While the SMOKESTACK MOTOR BUTTON is pressed down, let
the train run through the SmartPoint
TM
locations to hear greetings,
fun sounds, short tunes and sing-along songs. The light will ash
with the sounds.
Sometimes the train will make stops along the track for added fun.
6. While the motor is off, if there is no input after approximately 8
seconds, you will hear an invitation and a sound effect. After another
8 seconds of no input, a song will play. If there is no input for an
additional 8 seconds, the unit will play a short tune and then go into
sleep mode. While the motor is running, you’ll hear all of the above,
then the train will enter sleep mode after 5 minutes of no input. The
train can be re-activated by pressing the light-up button, pressing
down the smokestack motor button or pushing the train quickly.
SING-ALONG SONG LYRICS
SONG 1
My train is ready,
Let’s start our journey!
Choo, choo, toot, toot.
Chug along with me!
SONG 2
My train is so powerful.
Chugging along is wonderful!
SONG 3
Carrying cars short and long,
Activities
9
Page 11

My train is really strong!
MELODY LIST:
1. I’ve Been Working on the Railroad
2. Jack & Jill
3. It’s Raining, It’s Pouring
4. Old King Cole
5. London Bridge
6. Hey Diddle Diddle
7. Polly Wolly Doodle
8. Humpty Dumpty
9. Here We Go ’Round the Mulberry Bush
10. The Glow Worm
11. This Old Man
12. Hickory Dickory Dock
13. Frère Jacques
14. Pop! Goes the Weasel
15. Hot Cross Buns
16. Pease Porridge Hot
17. Alouette
PRODUCT FEATURES – TRAIN
STAT I O N
1. OFF/VOLUME CONTROL SWITCH
To turn the unit ON, slide the OFF/VOLUME
CONTROL SWITCH to the Low ( ) or the
High ( ) Volume position. To turn the unit
OFF, slide the OFF/VOLUME CONTROL
Product Features
10
Page 12
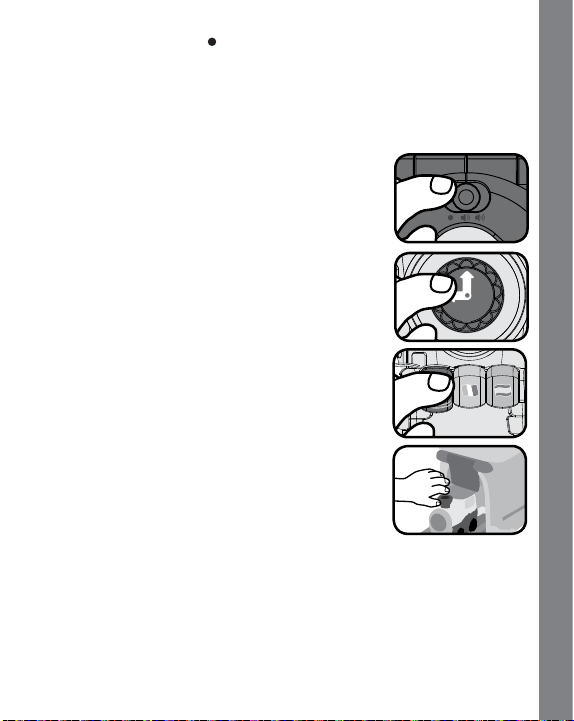
SWITCH to the OFF (
2. AUTOMATIC SHUT-OFF
To preserve battery life, the VTech
Station Playset will automatically power-down after approximately 30
seconds without input. The unit can be turned on again by any input.
) position.
®
Go! Go! Smart Wheels® Train
ACTIVITIES
1. Slide the OFF/VOLUME CONTROL SWITCH
to turn on the station. You will hear a song and
a greeting. The light will ash with the sounds.
2. Press the LIGHT-UP BUTTON to hear clock
sounds, songs, phrases and a short tune. The
light will ash with sounds.
3. Press the COLOR BUTTONS to learn colors
and hear phrases in English, German, Spanish
and French with fun sounds, phrases and short
tunes. The light will ash with sounds.
4. Push the train or let the train run through the
station to activate the FLIPPING BOARD.
You’ll hear fun sounds and greetings in
different languages. The light will ash with
sounds.
5. If there is no input after approximately 10 seconds, you will hear a
sound effect and a reminder that the train is coming. After another 10
seconds of no input, the unit will play a short tune and then go into
Activities
11
Page 13

sleep mode. The unit can be re-activated by pressing any button.
SING-ALONG SONG LYRICS
SONG 1
Welcome to the station, here comes the train.
Rolling here, rolling there, rolling everywhere!
Toot-toot, chug-chug, hello, train!
SONG 2
Chug-chug, toot-toot,
The train is coming!
Hello, hello,
Have your tickets ready!
CARE & MAINTENANCE
1. Keep the unit clean by wiping it with a slightly damp cloth.
2. Keep the unit out of direct sunlight and away from any direct heat
source.
3. Remove the batteries when the unit will not be in use for an extended
period of time.
4. Do not drop the unit on hard surfaces and do not expose the unit
to moisture or water.
TROUBLESHOOTING
If for some reason the program/activity stops working or malfunctions,
please follow these steps:
1. Please turn the unit OFF.
2. Interrupt the power supply by removing the batteries.
Troubleshooting
12
Page 14
3. Let the unit stand for a few minutes, then replace the batteries.
4. Turn the unit ON. The unit should now be ready to play again.
5. If the product still does not work, replace with a new set of batteries.
If the problem persists, please call our Consumer Services Department
at 1-800-521-2010 in the U.S. or 1-877-352-8697 in Canada, and a
service representative will be happy to help you.
®
For information on this product’s warranty, please call VTech
521-2010 in the U.S. or 1-877-352-8697 in Canada.
IMPORTANT NOTE:
Creating and developing Infant Learning products is accompanied
by a responsibility that we at VTech® take very seriously. We make
every effort to ensure the accuracy of the information which forms
the value of our products. However, errors sometimes can occur. It
is important for you to know that we stand behind our products and
encourage you to call our Consumer Services Department at 1-800521-2010 in the U.S. or 1-877-352-8697 in Canada with any problems
and/or suggestions that you might have. A service representative
will be happy to help you.
NOTE:
This equipment has been tested and found to comply with the limits for
a Class B digital device, pursuant to Part 15 of the FCC Rules. These
limits are designed to provide reasonable protection against harmful
interference in a residential installation. This equipment generates, uses
and can radiate radio frequency energy and, if not installed and used in
accordance with the instructions, may cause harmful interference to radio
communications. However, there is no guarantee that interference will
not occur in a particular installation. If this equipment does cause harmful
interference to radio or television reception, which can be determined by
turning the equipment off and on, the user is encouraged to try to correct
the interference by one or more of the following measures:
at 1-800-
Other Info
13
Page 15

• Reorient or relocate the receiving antenna.
• Increase the separation between the equipment and receiver.
• Connect the equipment into an outlet on a circuit different from that
to which the receiver is connected.
• Consult the dealer or an experienced radio/TV technician for help.
Caution : changes or modications not expressly approved by the party
responsible for compliance could void the user’s authority to operate
the equipment.
Other Info
14
 Loading...