

Page 1

User’s Manual
®
© 2013 VTech
Printed in China
91-002843-000
Page 2
Page 3
3
INTRODUCTION
Kidizoom® Camera Connect is a durable and fun camera that empowers
kids to take photos, shoot video and experiment with fun photo effects. In
addition, kids can record their voice and play 3 built-in games!
You can also connect the camera to your computer and download extra
photo effects, apps and games from the VTech Learning Lodge
new fun feature, Animation Maker, will be available for download as a
free gift for registering your camera. Connect your Kidizoom® Camera
Connect to the VTech Learning LodgeTM to register and download the
free app!
TM
. The
FEATURES
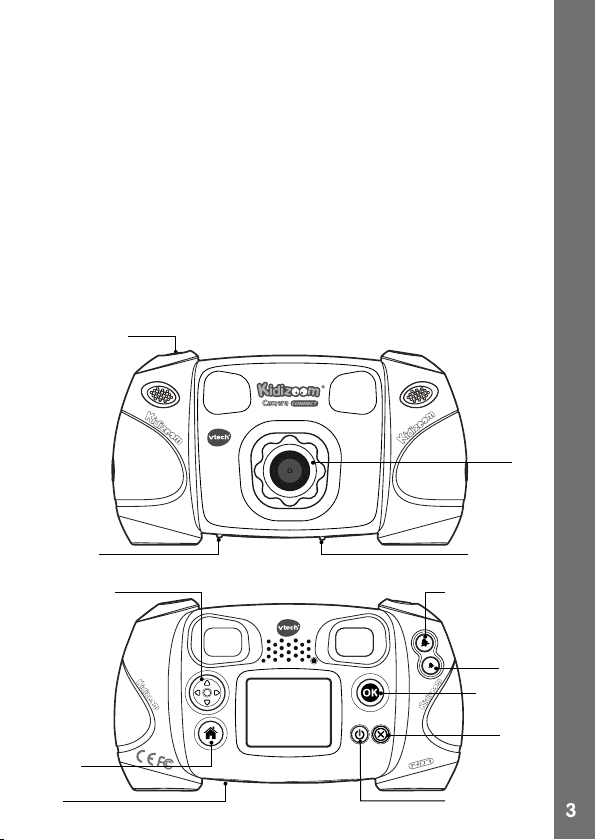
PRODUCT LAYOUT AND BUTTONS
Shutter Button
Lens
microSD
Card Slot
4-Directional
Cursor Buttons
Home
Button
MIC
USB Port for
Computer
Connection
Zoom In Button
Zoom Out
Button
OK Button
Delete
Button
ON/OFF Button
Introduction / Features
Page 4
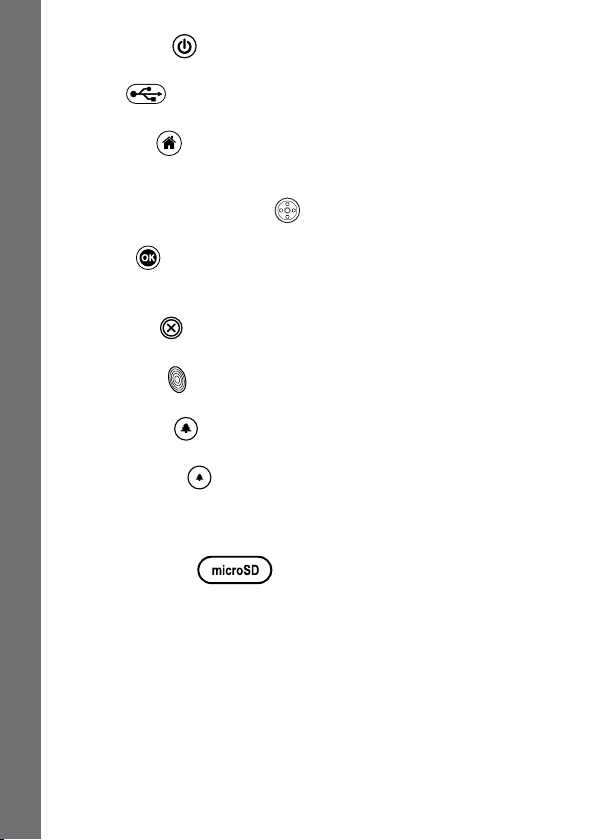
ON/OFF Button
Press this button to turn the camera ON or OFF.
USB Port
Plug the included USB cable into this port to connect to your computer.
Home Button
Press this button to go to the main menu or to go back to the previous
submenu.
4-Directional Cursor Buttons
Press these buttons to move the cursor and make selections.
OK Button
Press this button to conrm a choice or action.
Tips: The OK Button can also be used to take a photo when in camera mode.
Delete Button
Press this button to delete the selected le.
Shutter Button
Press this button to take a photo.
Zoom In Button
Press this button to zoom in.
Zoom Out Button
Press this button to zoom out.
Tips: The zoom buttons can also be used to set sound volume when
zoom function is not available.
microSD Card Slot
Included In This Package
Insert a microSD card here for memory expansion.
INCLUDED IN THIS PACKAGE
• 1 VTech® Kidizoom® Camera Connect
• 1 wrist strap
• 1 user’s manual
• 1 USB cable
WARNING: All packing materials such as tape, plastic sheets, wire
ties, and tags are not part of this toy, and should be discarded for
your child’s safety.
4
Page 5
5
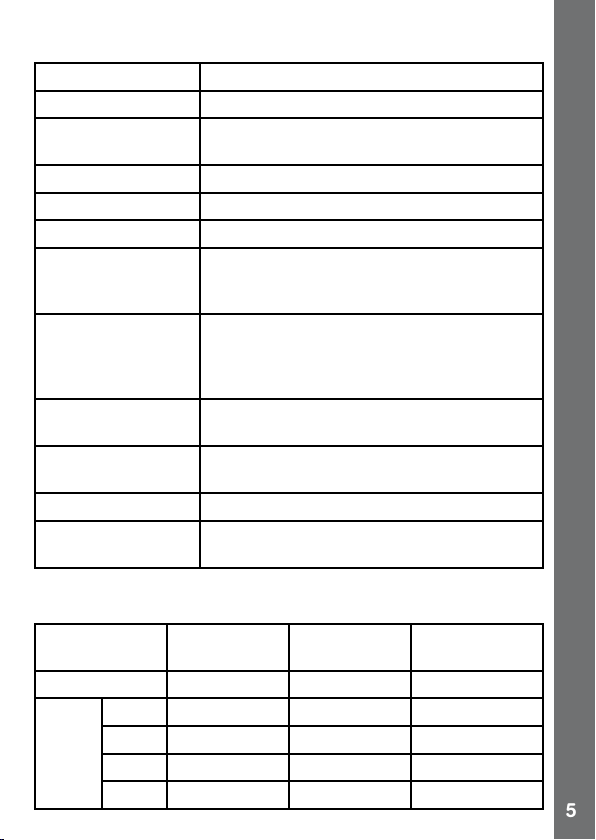
PRODUCT SPECIFICATIONS
Display 1.8” TFT color LCD
Photo Resolution 1.3 MP (1280 x 960) or 0.3 MP (640 x 480)
Movie Resolution 160 X 120 when using internal memory,
Movie Length Limit Maximum 5 minutes per each recording le
Digital Zoom 4X
Focus Range 1.5 feet - ∞
Internal Memory 128 MB built in memory (shared with program
File Format Movies: AVI (Motion JPEG) (recorded with
Connectivity Built-in USB port (Mini-USB) for computer
Memory Card
Format and Capacity
Batteries 4 X “AA” (LR6) alkaline batteries (not included)
Operating
Temperature
320 X 240 when using memory card
data, actually memory available for user
storage will be less)
Kidizoom
Photos: Standard Baseline JPEG (taken by
Kidizoom® Camera Connect)
connection
microSD/ microSDHC card (not included) with
capacity from 1 GB to 32 GB are recommended
0 - 40°C
®
Camera Connect)
STORAGE CAPACITY FOR REFERENCE
Memory Size 1.3 MP Photos 0.3 MP Photos Videos in 160 X
Internal Memory ~280 ~880 ~7
2 GB ~6,640 ~22,130 ~170
Memory
card
4 GB ~13,280 ~44,260 ~330
8 GB ~26,560 ~88,520 ~660
16 GB ~53,120 ~177,040 ~1,330
120 (minutes)
Included In This Package
Page 6
Note: The above amounts are approximations, the actual capacity
depends on the shooting environments. The video length limit is 5
minutes per le.
GETTING STARTED
BATTERY INSTALLATION
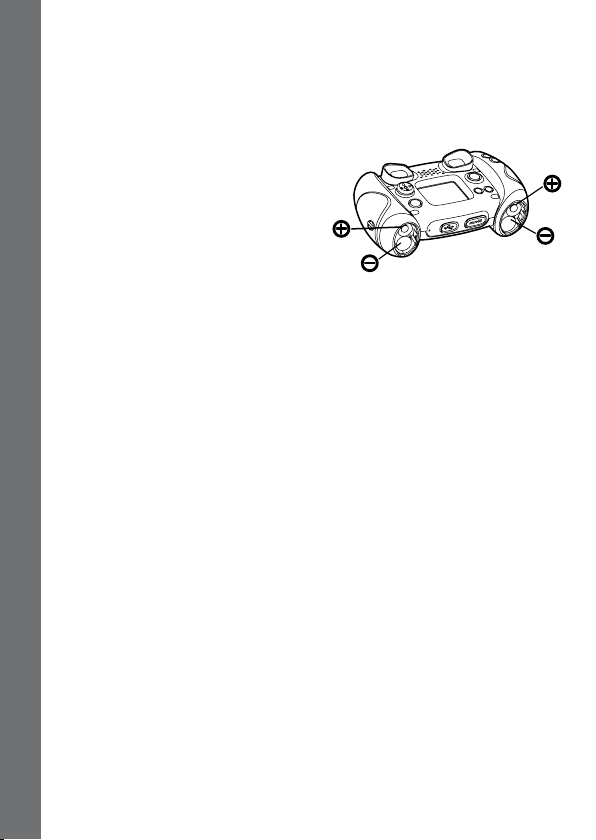
Note: Adult assembly is required for
battery installation.
• Make sure the camera is turned
OFF.
• Locate the battery covers on the bottom
of the camera. Open the battery covers by separately pressing each trigger
downward.
• Install 4 new “AA” batteries (2 on each side) as shown in the illustration
below.
• Replace each battery cover with the arrow on the trigger pointing
downward. Push down until the battery covers click into position.
BATTERY NOTICE
• Use new alkaline batteries for maximum performance.
• Use only batteries of the same or equivalent type as recommended.
• Do not mix different types of batteries: alkaline, standard (carbon-zinc)
Getting Started
or rechargeable (Ni-Cd, Ni-MH), or new and used batteries.
• Do not use damaged batteries.
•
Insert batteries with the correct polarity.
• Do not short-circuit the battery terminals.
• Remove exhausted batteries from the toy.
• Remove batteries during long periods of non-use.
• Do not dispose of batteries in re.
• Do not charge non-rechargeable batteries.
• Remove rechargeable batteries from the toy before charging
(if removable).
• Rechargeable batteries are only to be charged under adult supervision.
6
Page 7

7
MEMORY CARD INSTALLATION
• Kidizoom® Camera Connect supports the below memory cards for
memory expansion.
microSD
microSDHC
microSD Logo and microSDHC Logo are trademarks of SD-3C,LCC.
• Make sure the camera is turned OFF.
• Locate the memory card slot at the
bottom of the camera.
• Pull up the rubber cover.
• Insert the memory card (not included)
as illustrated. Once the memory card
is detected and can be used, the
default memory will set as the memory
card automatically.
• To remove the memory card from the
slot, push the card once and it will eject.
Note: If a memory card is being used, data stored in the internal memory
cannot be seen in the camera unless the memory card is removed. To
prevent accidental data loss, make sure you have backed up all important
data from your memory card before using.
Camera Connect
®
TO BEGIN USING
KIDIZOOM® CAMERA
CONNECT
• Press the ON/OFF Button to turn on the camera.
• If it is the rst time that you are turning on the Kidizoom
you will see an option to select the date and time. Press the Up or Down
Cursor Button to select the correct day, month, year, hour, and minute.
Press the Left or Right Cursor Button to jump to the previous or the
next setting item. Finally, press the OK button to conrm the setting. If
you wish to change the date & time later, please go to Settings.
• After the date and time is set, when Kidizoom
on, it will go directly into camera mode and you can start taking photos.
®
Camera Connect,
®
Camera Connect is turned
To Begin Using Kidizoom
Page 8
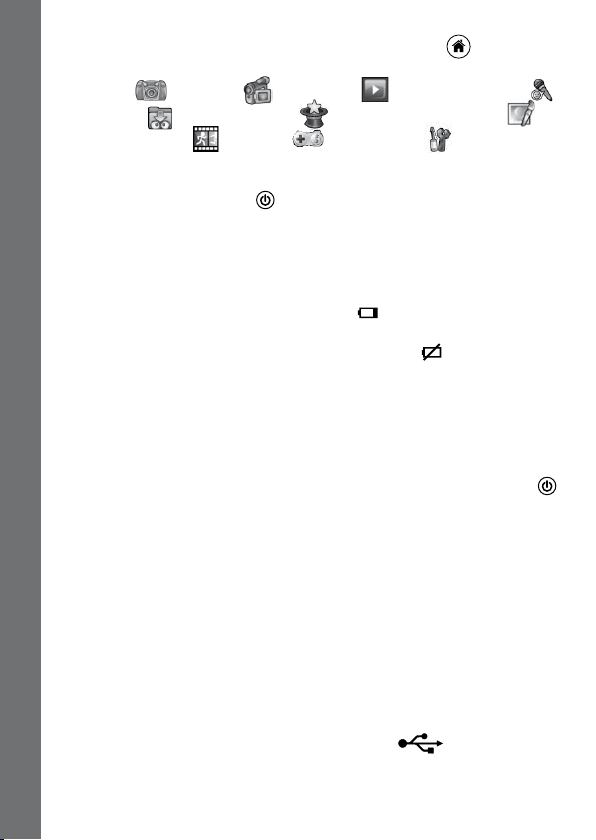
• To switch to other activities, press the Home Button to go to the
Main Menu. From the Main Menu, you can select the following activities:
Camera
Download
Animation Maker
• To connect to a computer, follow the instructions in the Connecting to
a Computer section below.
• Press the ON/OFF Button
Note: Animation Maker will only be available after registering the camera
by connecting it to the VTech Learning Lodge
, Movies , Playback , Voice Recorder ,
, Creative Tools (including Photo Editor and
), Games , and Settings .
again to turn the unit off.
TM
.
BATTERY STATUS
When the screen shows a Low Battery icon , we recommend installing
a fresh set of batteries as soon as possible.
When the unit shows the Batteries Exhausted icon
work properly. New batteries should be inserted before further use.
, the unit will not
AUTOMATIC SHUT-OFF
To preserve battery life, Kidizoom® Camera Connect will automatically
turn off after 3 minutes without operation in the preview screen of the
Camera or Movies modes. In other modes, the auto-off time is 2 minutes.
The camera can be turned on again by pressing the ON/OFF Button .
CONNECTING TO A COMPUTER
You can connect Kidizoom® Camera Connect to a PC or Mac computer
using a standard mini B USB cable (included). Once connected, you can
transfer les between the camera and computer; please follow below
steps to make the connection.
• Turn Kidizoom
computer.
• Pull up the rubber cover of the USB port at the bottom of your camera.
• Insert the USB cable (small end) into the USB port on the camera.
Connecting to a Computer / Battery Status
• Insert the larger end of the USB cable into a USB port on the computer.
A USB port is usually marked with this symbol
• Two removable drives called “VTech 1407” and “VT SYSTEM” will
appear. “VTech 1407” is for storage of your data, “VT SYSTEM” is for
storage of system data and cannot be accessed.
8
®
Camera Connect OFF before connecting to a
.
Page 9

9
Note: If there is a memory card in the camera, the removable drive will
show the content in the memory card only.
To back up photo or video les taken by the camera:
• Locate and open the “DCIM” folder in the removable drive “VTech 1407”
• Your photos or video les will be placed in the subfolders, such as
“100VTECH”. Drag and drop the les to a location in your computer for
backup.
To back up voice les recorded by the camera:
• Locate and open the VOICE folder in the removable drive “VTech 1407”.
• Drag and drop the recorded voice les to a location in your computer
for backup.
To transfer photo or video les to the camera:
• Select the photo or video les you would like to upload from your
computer rst.
• Locate and open the “DOWNLOAD” folder in the removable drive
“VTech 1407”, drag and drop the photo les into the “PHOTO”
subfolder, or “VIDEO” subfolder for video les.
Note:
• Do not transfer photo or video les created by other cameras to
Kidizoom
®
Camera Connect, as these le formats may not be
compatible.
• To Download extra fun effects, applications or games to the camera,
please refer to Download in later section.
SYSTEM REQUIREMENTS FOR COMPUTER CONNECTION:
Microsoft
®
Windows® XP, Windows Vista®, Windows® 7, Windows®
8 Operating System and later or Macintosh Computer with Mac OS X
version 10.5, 10.6, 10.7 or 10.8.
Note: Once the camera is connected to your computer, do not insert or
remove the memory card, do not disconnect the camera while les are
uploading or downloading. After you have nished, remove the camera
by following the steps to safely remove hardware from your computer.
Then you can physically unplug the unit from the computer.
To avoid any potential damage to your Kidizoom
®
Camera Connect:
• When the USB cable is not connected to the unit, ensure the USB
rubber cover is fully covering the USB port.
• Please ensure the microSD card slot rubber cover of the camera is
tted in place.
Connecting to a Computer
Page 10

ACTIVITIES
1. CAMERA
• In Camera mode, you can either look through the viewnders or look
at the LCD screen to see the capture subject.
• While holding the camera steady, press the Shutter Button
top of the camera or press the OK Button to take a picture.
• Press the Zoom Buttons
• To add a photo frame, stamp, or special effect to the photo, press the
Left
or Right Cursor Button to scroll through the options. Then
take a photo as usual and the selected frame, stamp, or effect will be
part of the photo.
• To view the photos you’ve taken, press the Up
Button
once to enter the Playback mode.
2. MOVIES
In Movies mode, you can take digital movies. Press the Shutter Button
or the OK Button to start movie recording; press the button again to
stop the recording. When the movie recording is stopped, press the OK
Button to play the movie you have just recorded:
• To add animation frame, press the Left
Activities
to scroll through the options before starting the recording.
Note: You cannot change the selected animation frame during recording.
• Press the Zoom Buttons
• To view the movies you’ve taken, press the Up
Button once to enter the Playback mode.
3. PLAYBACK
In Playback mode, you can view the captured movies or photos. Press
the Up
Press the zoom out button to zoom out to view the les in thumbnails.
Then, press the zoom in button to zoom in and return to a full screen
browser.
Viewing a Movie File
• Press the OK Button
10
or Down Cursor Button to view the previous or next le.
press the Left
or Right Cursor Button once to use the fast rewind
to use the digital zoom feature.
or Down Cursor
or Right Cursor Button
to use the digital zoom feature.
or Down Cursor
to play the movie. While playing the movie,
on the
Page 11

11
or fast forward at 2X speed; press this button again to change the
speed to 4X. Press the Cursor Button or the OK Button
1X normal playing speed.
• While playing the movie, press the Zoom In
to increase or decrease the volume.
Viewing a Photo File
• While viewing a photo, press the Zoom In Button
view of the photo. Press the Cursor Buttons
the photo to a different position. Operate the Zoom Out Button
return to smaller magnication or press the OK button
the normal viewing size.
Deleting a Photo or Movie File
• While viewing a photo or movie le, press the delete button
out the delete menu for deleting the current photo or movie le.
• To delete all photos and movie les, press the delete button
out the delete menu while viewing any photo or movie le, then press
the down button
“Yes” to continue, and then follow the instructions on screen to conrm
the command.
to switch to the “Delete all les” command. Select
or Zoom Out Button
to return to
to have a closer
at this time to pan
to return to
to call
to call
to
4. VOICE RECORDER
In Voice Recorder mode, you can record your own
voice for up to 3 minutes per le. Select the “Voice
Recording” icon
mode.
• Press the OK button
is on the “Recording” icon . Press the OK button again to stop
recording. After recording, it will show the playlist automatically.
• Press the OK button
is on the “Play” icon
• In the playlist, press the left
highlight anytime to the “Record” icon to record a new voice le,
“Play” icon to play the selecting le.
• To add a voice changing effect to an existing voice le, press the left
or right cursor buttons to move the highlight to the “Effect” icon
and press the OK button to go to the voice changing effect
menu.
in the main menu to go to this
to start recording a new le when the highlight
to play the recorded voice when the highlight
. Press the OK button again to pause.
or right cursor buttons to move the
Activities
Page 12

In this menu, press the 4-directional cursor buttons
to select a different voice changing effect and
press the OK button
to add the selected effect.
To save the changed voice as another voice le,
press the cursor buttons
to move the highlight
to the “Save As” icon and press the OK button
to start the saving process. It will return to the
playlist automatically after the saving process is complete.
5. DOWNLOAD
After registering an account and downloading the VTech Learning Lodge
software, you can connect your Kidizoom
computer to download more content. After registering your camera, you
can download a free app of your choice.
The content you downloaded can be accessed by selecting the download
icon from the camera’s main menu. Press the OK button
Download menu.
When there are no downloads in your Kidizoom
will see a slide show of the fantastic content you can download. Press the
OK button
to skip it and enter the download menu.
Note: Downloads stored in either internal memory or memory card (if
inserted) will be available.
Activities
Besides the downloaded contents, there are two functions in Download:
Download Manager and How To Download.
A. Download Manager
In the Download Manager, you can view the memory size of each
download, or you can delete any unwanted downloads to free up memory.
To delete the downloads, press the up or down button to select
the application and then press the delete button
menu. Select “Yes” and press the OK button
delete command.
Note: Once the downloads are deleted, you may connect to the VTech
Learning Lodge to download the application to the camera again.
B. How To Download
Follow these steps to download the VTech Learning Lodge
®
1. Connect Kidizoom
Camera Connect to a computer using the USB cable.
2. Click the ‘Download Website’ link in the Kidizoom drive that appears
on your computer. Or visit this link directly:
12
®
Camera Connect to your
®
Camera Connect , you
to call out the delete
again to conrm the
TM
to enter the
software:
Page 13

13
http://www.vtechkids.com/download
3. Download and install the VTech Learning LodgeTM software.
4. Run the software and download extra features for your Kidizoom!
Note: For details about downloading contents from the VTech Learning
TM
, please refer to the online help section.
Lodge
Minimum System Requirements
PC Hardware Requirements:
CPU: Pentium® 4, 1 GHz or above
Memory: 256MB
Video Adaptor: Graphic card with 1024 x 768 at 16 or 32 bit color
Monitor Resolution: 1024 x 768
USB 1.1 or higher
300MB Hard disk space
Windows® compatible sound card and speakers
PC Software Requirements:
Microsoft® Windows® XP, Windows Vista®, Windows® 7, Windows® 8
Operating System
Internet Explorer® version 6 or above
Adobe® Flash® Player 10 – Other Browsers Version (To acquire the
latest version of Flash player, please visit www.adobe.com)
Macintosh Hardware Requirements:
Macintosh Computer with an Intel (1GHz or faster) processor
256 MB RAM (512 MB recommended)
300 MB Hard disk space
USB Port required
Macintosh Software Requirements:
Mac OS X version 10.5, 10.6, 10.7 or 10.8
Safari Internet Browser version 3.0 or later
Adobe ® Flash ® Player 10 – Other Browsers Version (To acquire the
latest version of Flash player, please visit www.adobe.com)
*Internet connection required for Internet enabled functions on both PC
and Macintosh computers.
Microsoft® and Windows® and Windows Vista® are either registered
trademarks or trademarks of Microsoft Corporation in the United States
and/or other countries. Adobe®, the Adobe logo, Flash® are either
Minimum System Requirements
Page 14

registered trademarks or trademarks of Adobe Systems Incorporated in
the United States and/or other countries. Intel®, Pentium® are trademarks
of Intel Corporation in the United States and other countries. Macintosh,
Mac, Mac OS, and Safari are trademarks of Apple Inc., registered in the
United States and other countries. All other trademarks are the property
of their respective owners. THIS PRODUCT IS NOT ENDORSED OR
SPONSORED BY ADOBE SYSTEMS INCORPORATED, PUBLISHER
OF FLASH.
The Minimum system requirements may be updated later, for the latest
information, you may refer to this link:
www.vtechkids.com/download
6. CREATIVE TOOLS
It includes two fun features, Photo Editor and Animation Maker (fun
and free apps available to you after registering your camera. You can
register your camera by connecting to the VTech Learning Lodge
the Creative Tools menu, press the Left
select the activity and then press the OK button
or Right Cursor Button to
to enter.
A.PHOTO EDITOR
In Photo Editor, you can add photo frames, stamps, funny faces, and
special effects to a photo. Press the Up
view photos, and then press the OK Button
Creative Tools
start editing.
An editing menu will appear. Press the Left
to choose one of the below functions; press the OK Button
A. Photo Frames
photo. Press the Left
and then press the OK Button
B. Stamps
the Left
Up
stamp. Press the OK Button
the cursor buttons to move the stamp to where you want to apply it.
Finally, press the OK Button
C. Special Effects
effect to your photo. Press the Left
choose an effect. Use the Up
or Right Cursor Button to choose a stamp. Press the
or Down Cursor Button to enlarge or shrink the size of the
: Choose this icon to add a photo frame to your
or Right Cursor Button to select a frame,
: Choose this icon to add a stamp to your photo. Press
: Choose this icon to add a funny face or special
14
or Down Cursor Button to
to conrm selection and
or Right Cursor Button
to conrm your selection.
to conrm the selection. Then, press
to add the stamp to the photo.
or Right Cursor Button to
and Down Cursor Buttons to
TM
). In
to begin.
Page 15

15
change the size of the area the effect will be applied to. Press the OK
Button
the effect to where you want to apply it, and then press the OK Button
Note: Generating a special effect on your camera may take more than
1 minute.
D. Undo : Choose this icon to undo the last editing operation.
E. Save As
another le.
Note: The process of saving an edited photo with a distortion effect may
take more than 1 minute.
to conrm your selection. Press the cursor buttons to move
to add it to the photo.
: Choose this icon to save the photo that you just edited as
B. ANIMATION MAKER
(Unlocked as a bonus app after registering your camera by connecting to
the VTech Learning Lodge
Animation Maker is an easy tool for creating
your very own photo animations. You will nd
some demo projects when you enter the project
selection screen. In this screen you can play the
animation, edit it or add your own new projects.
Press the Up
a project. Press the Left
to select the function and then press the OK
button to continue. To delete a project, press the delete button
out the delete menu, then select “Yes” to conrm.
NOTE: The demo projects are for reference only, they cannot not be
edited, deleted or saved as video.
A. ADD A NEW PROjECT
In the preview screen you can start taking
photos. These series of photos will become the
frames of your animation. When completed, the
photos you took can be played continuously to
create your animation. In the preview screen,
press the OK button or shutter button
to take a photo when the camera icon
is highlighted. The image of the last taken photo will overlay on the
screen for reference of the last object position. And the frame index
or Down cursor button to select
TM
.
)
or Right cursor button
to call
Creative Tools
Page 16

will be shown. Press the Left or Right cursor button to select this
after you have taken enough photos. It will go to the project
icon
selection screen again. Press the Left or Right cursor button
to select to play the animation, further edit it or create another new
project.
B. PLAY THE ANIMATION
This is where you can preview the animation you made. While playing
the animation, press the OK button to stop and return to the project.
C. EDIT ANIMATION
Here you can further edit the project:
Add frames
Play animation
Games
Save as video
Advanced Options
NOTE: To delete the selected frame, press the delete button
out the delete frame menu, then select “Yes” to conrm and continue.
Take more photos after the last captured frame.
(Maximum number of frames = 100)
Preview the animation with the chosen
background music
Save the animation as a video (AVI le) to
watch or share on the computer
(It may take a few minutes to save the
animation as video)
Change the settings of:
• Animation Speed
• Background Music
• Overlay of the last frame on the preview screen
7. GAMES
Three games are built into Kidizoom® Camera Connect. After entering
the Game Menu, press the Left or Right Cursor Button to choose a
game, and then press the OK Button to start playing the selected game.
16
to call
Page 17

17
A. ODD ONE OUT
Do you want to be a detective? Find the picture
that’s different from the others as quickly as
possible! Press the 4-directional Cursor Buttons
to select your choice and press the OK
Button to answer. Try to nd as many as
possible in the time available to get a great high
score. Take a picture of yourself or a friend to
play!
B. SWAPPING FUN
Your pictures have been split into four parts and
swapped around. Can you move the sections to
make the original photo? Take more photos to
make your own challenging puzzles. To play,
press the Left
move the highlight to the desired position. Then
press the OK Button to swap the sections.
C. CRAZY CAFE
In this game you can practice your memory
and reaction skills. A customer will order some
food with the ingredients listed in a particular
sequence. Remember the sequence and collect
the falling food in the correct order to complete
their meal. Press the Left
Buttons to move.
Tip: Press the Zoom In Button
volume while playing a game.
or Right Cursor Buttons to
or Right Cursor
or Zoom Out Button to adjust the
Camera Connect
®
ADJUSTING SETTINGS IN
KIDIZOOM® CAMERA CONNECT
You can choose to adjust various settings in your Kidizoom® Camera
Connect. To change the camera’s settings, choose the Settings icon
in the Main Menu. Scroll through the Settings Menu by pressing the
Right or Left Cursor Button . In the menu, press the Up or Down
Cursor Button to change your selection, and press the OK Button
to conrm the selection.
Adjusting Settings In Kidioom
Page 18

• Volume
After choosing Settings in the Main Menu, the Volume setting menu will
be the rst menu to appear. Press the Up
to adjust the volume up or down.
• Memory
This menu allows you to review the status of the camera’s internal
memory or memory card (if inserted). There will be three advanced
commands in settings:
A. Erase All Photos And Videos
This will delete all les in the DCIM and DOWNLOAD folders in the
internal memory or memory card if inserted.
B. Format
This will erase all data in the internal memory or memory card if inserted,
including the downloads.
Camera Connect
®
C. Factory Reset
Reset Factory will erase the contents stored in the internal memory and
reset all system settings to factory default, e.g le index, frequency,
photo resolution, game level and captured game faces.
For those three commands, there will be double conrmations needed to
continue. Follow the instructions on screen to conrm the action.
Note: If the memory card is being used, data stored in the internal
memory cannot be seen in the camera unless the microSD card is
removed. When the internal memory of the Kidizoom
is getting full, or when the le indexes are used up, you should back up
all the les from the camera’s internal memory to your computer. Then,
delete the les in the camera’s internal memory to free up space.
• Photo Resolution
For the best picture quality, please select 1.3 megapixels. To save
memory, choose the 0.3 megapixels option. This option will allow you to
save more pictures.
• Indoor Light Frequency
The default value for the US is 60 Hz. Please leave your camera set to
the default value unless you are travelling outside of the US.
Adjusting Settings In Kidioom
• Date & Time
This menu shows the current Date & Time. If you want to change the
setting, press the OK Button
menu, and press the OK Button
18
, make the change in the Set Date & Time
again to conrm.
or Down Cursor Button
®
Camera Connect
Page 19

19
CARE & MAINTENANCE
1. Keep the camera clean by wiping it with a slightly damp cloth.
2. Keep the camera out of direct sunlight and away from any direct heat source.
3. Remove the batteries when the camera is not in use for an extended
period of time.
4. Do not drop the camera on a hard surface and do not expose it to
moisture or immerse it in water.
WARNING
A very small percentage of the public, due to an existing condition, may
experience epileptic seizures or momentary loss of consciousness when
viewing certain types of ashing colours or patterns.
While Kidizoom
risks, we do recommend that parents supervise their children while
they play games. If your child experiences dizziness, altered vision,
disorientation, or convulsions, discontinue use immediately and consult
your physician.
Please note that focusing on the Kidizoom
a close range and handling the Kidizoom® Camera Connect as a game
controller for a prolonged period of time, may cause fatigue or discomfort.
We recommend that children take a 15-minute break for every hour of play.
®
Camera Connect does not contribute to any additional
®
Camera Connect screen at
TROUBLESHOOTING
Go through this section if you experience difculty in operating Kidizoom®
Camera Connect.
Problem Solution
Program stops
working
Image taken is not
clear
1. Let the camera sit for a few minutes without
batteries, then replace the batteries.
2. Turn the unit ON. The unit should now be
ready to play again.
3. If the unit does not work, replace the batteries
with an entire set of new batteries.
1. Check if the camera is being held steadily.
2. Make sure the lighting condition of the shooting
environment is good.
3. Check to see if the camera lens protection
window is clean.
Troubleshooting
Page 20

Cannot connect to
computer
Cannot save les Check the memory status of the memory card to
Cannot view the
downloaded movie
les
Memory card
cannot be
detected
If you have a problem that cannot be solved by using this manual, we
encourage you to visit us online or contact our Customer Services
Department with any problems and/or suggestions that you might have.
Our support representative will be happy to assist you.
Before requesting support, please be ready to provide or include the
information below:
• The name of your product or model number (the model number is
Troubleshooting
typically located on the back or bottom of your product).
• The specic problem you are experiencing.
• The actions you took right before the problem occurred.
Internet: www.vtechkids.com, or www.vtechcanada.com
Phone: 1-800-521-2010 in the US, or 1-877-352-8697 in Canada.
Check the connections on the USB cable
between the camera and the computer, and
review the appropriate connection procedure in
this manual.
see if it is full.
If there is no memory card inserted, check the
Kidizoom
1. Kidizoom
1. Check if the memory card is correctly inserted.
2. Check to see if the memory card is the
®
Camera Connect internal memory.
®
support movie les created by other models.
Make sure your downloaded movie les are
created by Kidizoom® Camera Connect.
supported type. Kidizoom
only supports microSD / microSDHC card.
Camera Connect does not
®
Camera Connect
DISCLAIMER AND LIMITATION OF
LIABILITY
VTech® Electronics North America, L.L.C. and its suppliers assume
no responsibility for any damage or loss resulting from the use of this
handbook. VTech® Electronics North America, L.L.C. and its suppliers
assume no responsibility for any loss or claims by third parties that may
arise through the use of this product. VTech
20
®
Electronics North America,
Page 21

21
L.L.C. and its suppliers assume no responsibility for any damage or loss
caused by deletion of data as a result of malfunction, dead battery, or
repairs.
Company: VTech
Address: 1155 West Dundee Road, Suite 130, Arlington Heights, IL,
60004 USA
Phone: 1-800-521-2010 in the U.S., or 1-877-352-8697 in Canada.
IMPORTANT NOTE:
Creating and developing Preschool Learning™ products is
accompanied by a responsibility that we at VTech
We make every effort to ensure the accuracy of the information which
forms the value of our products. However, errors sometimes can
occur. It is important for you to know that we stand behind our products
and encourage you to call our Consumer Services Department
at 1-800-521-2010 in the U.S., or 1-877-352-8697 in Canada with
any problems and/or suggestions that you might have. A service
representative will be happy to help you.
®
Electronics North America, L.L.C.
®
take very seriously.
Note:
This equipment has been tested and found to comply with the limits for
a Class B digital device, pursuant to Part 15 of the FCC Rules. These
limits are designed to provide reasonable protection against harmful
interference in a residential installation. This equipment generates, uses
and can radiate radio frequency energy and, if not installed and used in
accordance with the instructions, may cause harmful interference to radio
communications. However, there is no guarantee that interference will
not occur in a particular installation. If this equipment does cause harmful
interference to radio or television reception, which can be determined by
turning the equipment off and on, the user is encouraged to try to correct
the interference by one or more of the following measures:
• Reorient or relocate the receiving antenna.
• Increase the separation between the equipment and receiver.
• Connect the equipment into an outlet on a circuit different from that to
which the receiver is connected.
• Consult the dealer or an experienced radio/TV technician for help.
Disclaimer And Limitation Of Liability
Page 22

Caution: Changes or modications not expressly approved by the party
responsible for compliance could void the user’s authority to operate the
equipment.
THIS DEVICE COMPLIES WITH PART 15 OF THE FCC RULES.
OPERATION IS SUBJECT TO THE FOLLOWING TWO CONDITIONS:
(1) THIS DEVICE MAY NOT CAUSE HARMFUL INTERFERENCE,
AND (2) THIS DEVICE MUST ACCEPT ANY INTERFERENCE
RECEIVED, INCLUDING INTERFERENCE THAT MAY CAUSE
UNDESIRED OPERATION.
CAN ICES-3 (B)/NMB-3(B)
Disclaimer And Limitation Of Liability
22
Page 23

23
HOW TO TAKE A GOOD PHOTO
Are you ready to have fun taking some photos? VTech is here to help you
learn how to take great photos using your new Kidizoom digital camera.
Check out our tips to help you get started.
Step One
First, slide the wrist strap over your hand to help you hold your new
Kidizoom properly.
Step Two
There are 2 ways to look at your photo before you take it. You can either
use the colour LCD screen on the back of your Kidizoom, or the dual
viewnders above the screen.
Step Three
Now you are ready to take some photos! Make sure you hold your
Kidizoom as still as you can with both hands.
Step Four
Get close to the object you are taking a photo of. Be careful not to get too
close or your photo will be blurry. This can take some extra practice so
don’t worry if you don’t get your photo right the rst time.
Step Five
Be mindful of the lighting when you are taking photos. If you are taking outdoor
photos on a sunny day, stand with the sun behind you. If you are taking indoor
photos in dark lighting, hold the camera very still to avoid blurry photos.
Step Six
Listen for the “click” your Kidizoom makes when you have taken a photo.
Once you hear the clicking sound, you can take another photo!
Have fun!
How to Take a Good Photo
Page 24

KIDIZOOM® CAMERA CONNECT
FREQUENTLY ASKED QUESTIONS
Question 1:
I have bought a Vtech Kidizoom® Camera Connect, but it will not work
with my PC; my PC is looking for a driver. I have searched the Internet
and cannot nd a VTech
Answer:
There is no separate driver needed for the Kidizoom® Camera Connect.
It uses a standard USB mass storage device driver. Such a driver comes
standard on all Windows
Service Pack 3 (including Windows
above. If your computer meets these OS requirements and is still looking
for a driver, please contact your PC manufacturer for further assistance.
For earlier operating systems that do not support mass storage, a system
upgrade or mass storage device driver may be available. Again, please
check with your PC manufacturer.
Question 2:
The pictures I take aren’t matching what I see when I look through the
viewnder. The actual captured image covers a greater area than what
the viewnder shows.
Answer:
The actual image and digital saved image may vary due to the refraction
of light through the viewnder lens. Light bends through the lenses at
different angles based on a variety of factors including the distance
between the lens and your eyes, the angle at which you are viewing the
lenses, and even the distance between your eyes. Generally speaking,
when the lenses are placed close to the eyes the way they are intended
to be, light will refract through the lenses in such a way that it focuses in
a tighter and closer area, making the image and the viewing area appear
Camera Connect Frequently Asked Questions
smaller than what is digitally captured.
®
Question 3:
What is the ISO value (light sensitivity) of the Kidizoom® Camera Connect?
Answer:
The Kidizoom® Camera Connect uses an auto-ISO value. It auto
adjusts the exposure time and light sensitivity depending on the lighting
Kidizoom
environment.
®
camera driver. What can I do?
®
operating systems starting with Windows® 2000
®
XP and Vista) and Mac OS® 9.0 or
24
Page 25

25
Question 4:
My camera turns on then immediately shuts off.
Answer:
Please make sure you are using new batteries. If there is no bad contact
due to dirt on the contact spring/plate or deformation of the contact spring
or plate, the power should be able to turn on. If the problem persists after
normal battery installation, then you might have a defective unit. Please
contact customer service as outlined in the Troubleshooting section of
this manual.
Question 5:
Why are my pictures sometimes grainy and fuzzy? Is there anything I can
do to improve the picture quality?
Answer:
In a poorly lit environment, the frame rate (shutter speed) drops to allow
for a longer exposure time. The downside of this is that any movement
in the frame, or of the hand holding the camera, can result in greater
blur. Furthermore, the camera sensor will soften the edges in low light
to counteract the darkness by reducing the image noise. This too can
sometimes result in a blurred picture. Try to improve the lighting to get
better results.
The sensitivity of the photo sensor in low lighting conditions and the
vulnerability of the image to shaking hands have been improved in the
most recent models of the Kidizoom
®
Camera Connect.
Question 6:
Can you delete a group of pictures at one time, or do they have to be
deleted one at a time on the camera?
Answer:
If you connect the Kidizoom® Camera Connect to your computer and
access it as an external drive (labeled VTech 1407), you can select
multiple pictures to delete at any one time.
Question 7:
If you accidentally delete the pictures by reformatting, is there any way
to get them back?
Answer:
If you delete the pictures by formatting the internal storage memory,
there’s no way to retrieve them. There is third party software that can
help recover “deleted” data from storage, but we do not recommend
using this.
Camera Connect Frequently Asked Questions
®
Kidizoom
Page 26

Question 8:
Will changing batteries erase the unit’s internal memory?
Answer:
Battery replacement under normal operation as detailed in the user’s
manual should not cause data corruption or data loss in the built-in memory.
Question 9:
When connecting the camera to the USB port, I get the message “USB
device not recognized. One of the USB devices attached to this computer
has malfunctioned and Windows
Windows® XP.
®
does not recognize it.” I am running
Answer:
This is most likely a hardware or OS issue. A number of consumers have
reported this problem with their computers not recognizing mass storage
devices of all kinds. Please contact your PC manufacturer for support.
Microsoft
trademarks or trademarks of Microsoft Corporation in the United States
and/or other countries. Intel
in the United States and other countries. Macintosh, Mac, and Mac OS
are trademarks of Apple Inc., registered in the United States and other
countries. All other trademarks are the property of their respective owners.
Camera Connect Frequently Asked Questions
®
®
, Windows®, and Windows Vista® are either registered
®
, Pentium® are trademarks of Intel Corporation
Kidizoom
26
Page 27

WRIST STRAP ATTACHMENT
INSTRUCTIONS
Step 1:
Locate the thread loop on the end
of the strap. Insert it into the groove
behind the bar and then push it
through.
Step 2:
Feed the end of the strap up
through the loop and pull it all the
way through.
Step 3:
Make sure the loop is securely
tightened around the bar.
 Loading...