

Page 1
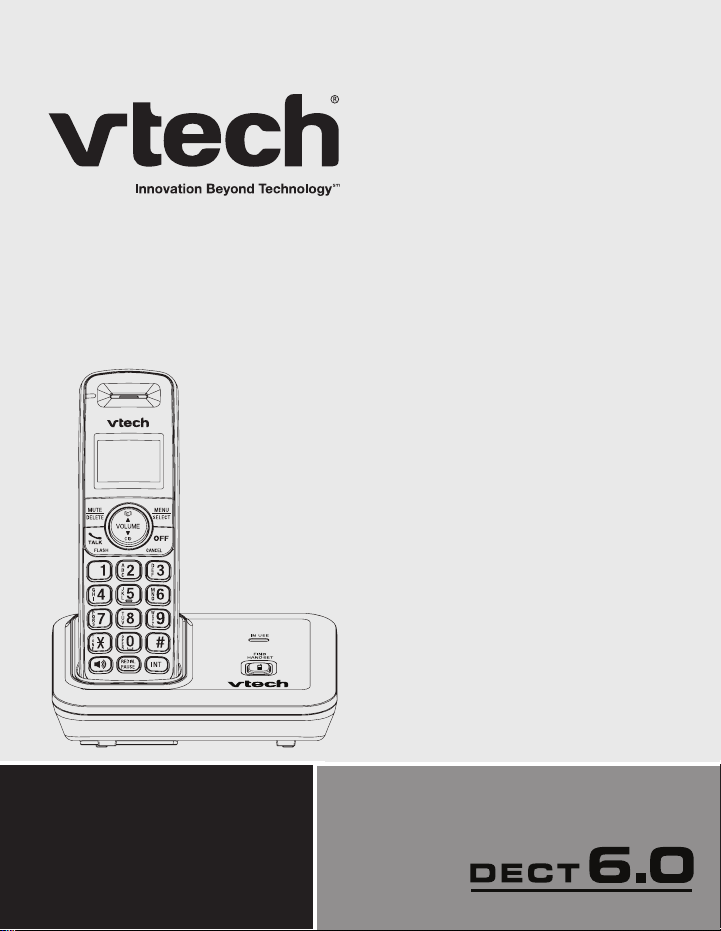
Online user’s manual
Models:
CS6419/CS6419-2
w w w.v t e c h p h o n e s . c o m
Page 2

Congratulations
T
Compatible with
Hearing Aid T-Coil
TIA-1083
on purchasing your new VTech product. Before using this telephone, please read
Important safety instructions on pages 47-48 of this manual.
This manual has all the feature operations and troubleshooting necessary to install
and operate your new VTech telephone. Please review this manual thoroughly to
ensure proper installation and operation of this innovative and feature rich VTech
product. For support, shopping, and everything new at VTech, visit our website at
www.vtechphones.com.
Telephones identied with this logo have reduced noise and interference when
used with most T-coil equipped hearing aids and cochlear implants.
The TIA-1083 Compliant Logo is a trademark of the Telecommunications
Industry Association. Used under license.
In Canada, please visit www.vtechcanada.com.
The ENERGY STAR® program (www.energystar.gov) recognizes and
encourages the use of products that save energy and help protect our
environment. We are proud to mark this product with the ENERGY STAR
label indicating it meets the latest energy efciency guidelines.
®
Page 3

Table of contents
Getting started ................................1
Parts checklist ..................................1
Telephone base and
charger installation ........................2
Battery installation ............................3
Battery charging ...............................4
Installation options ............................5
Telephone base layout ....................7
Handset layout .................................8
Telephone settings .......................10
Using the menu ..............................10
Ringer volume ................................10
Ringer tone .....................................11
LCD language.................................11
Clear voicemail indicators...............12
Key tone .........................................13
Set date and time ...........................13
Home area code .............................14
Dial mode .......................................14
Telephone operation ....................15
Make a call .....................................15
Predial a call ...................................15
Answer a call ..................................15
End a call ........................................15
Speakerphone ................................15
Volume ...........................................15
Mute................................................16
Call waiting .....................................16
Temporary ringer silencing .............16
Temporary tone dialing ...................16
Chain dialing ...................................17
Join a call in progress .....................18
Find handset ...................................18
Redial list ........................................19
Review and dial a redial entry ........19
Store a number from the redial list
to the directory ............................19
Delete a redial entry .......................19
Intercom..........................................20
Answer an incoming call during an
intercom call ................................21
Call transfer using intercom ............21
Directory ........................................23
About directory ...............................23
Create a new directory entry ..........24
Review the directory .......................26
Alphabetical search ........................26
Dial a directory entry.......................26
Edit a directory entry.......................26
Delete a directory entry ..................27
Speed dial.......................................27
Store a speed dial entry..................27
Dial a speed dial number ................28
Delete a speed dial entry ................28
Caller ID .........................................29
About caller ID ................................29
Information about caller ID with
call waiting...................................29
Call log............................................30
Missed call indicator .......................31
Memory match ................................31
Review and dial from the call log ....31
i
Page 4

Table of contents
View dialing options ........................32
Save a call Iog entry to
the directory ................................32
Delete from the call log ...................33
Call log display screen messages ..33
Appendix .......................................34
Handset display
screen messages ........................34
Handset and telephone
base indicators ............................36
Battery ............................................37
Expand your telephone system ......38
Add and register
a handset (optional) ....................38
Replace a handset..........................39
Troubleshooting ..............................40
Important safety instructions...........47
Precautions for users of implanted
cardiac pacemakers ....................48
Operating range..............................48
Maintenance ...................................49
About cordless telephones .............50
The RBRC® seal .............................50
Limited warranty .............................51
FCC, ACTA and IC regulations ......53
Technical specications..................55
Index ..............................................56
ii
Page 5
Getting started
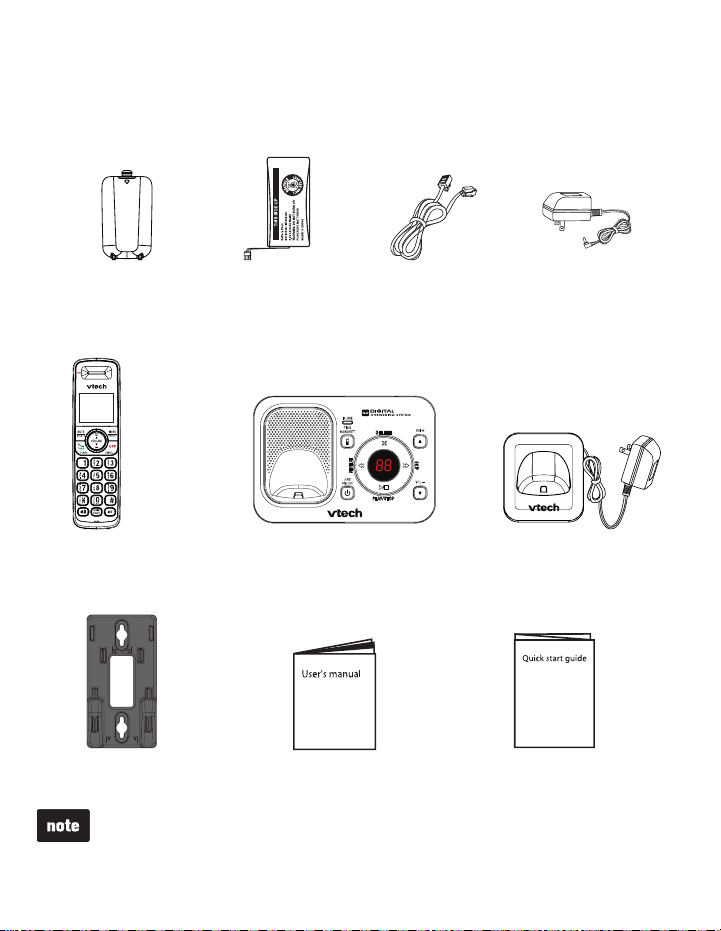
Parts checklist
Your telephone package contains the following items. Save your sales receipt and
original packaging in case it is necessary to ship your telephone for warranty service.
Battery compartment
cover
(1 for CS6419 and
2 for CS6419-2)
(1 for CS6419 and
2 for CS6419-2)
To purchase replacement batteries or power adapters, visit our website at
www.vtechphones.com or call 1 (800) 595-9511. In Canada, go to
www.vtechcanada.com or call 1 (800) 267-7377.
Battery
(1 for CS6419 and
2 for CS6419-2)
Telephone baseHandset
User’s manualWall mount bracket
Telephone line cord
1
Telephone base
power adapter
Charger and charger adapter
(1 for CS6419-2)
Quick start guide
Page 6
Getting started
Telephone base and charger installation
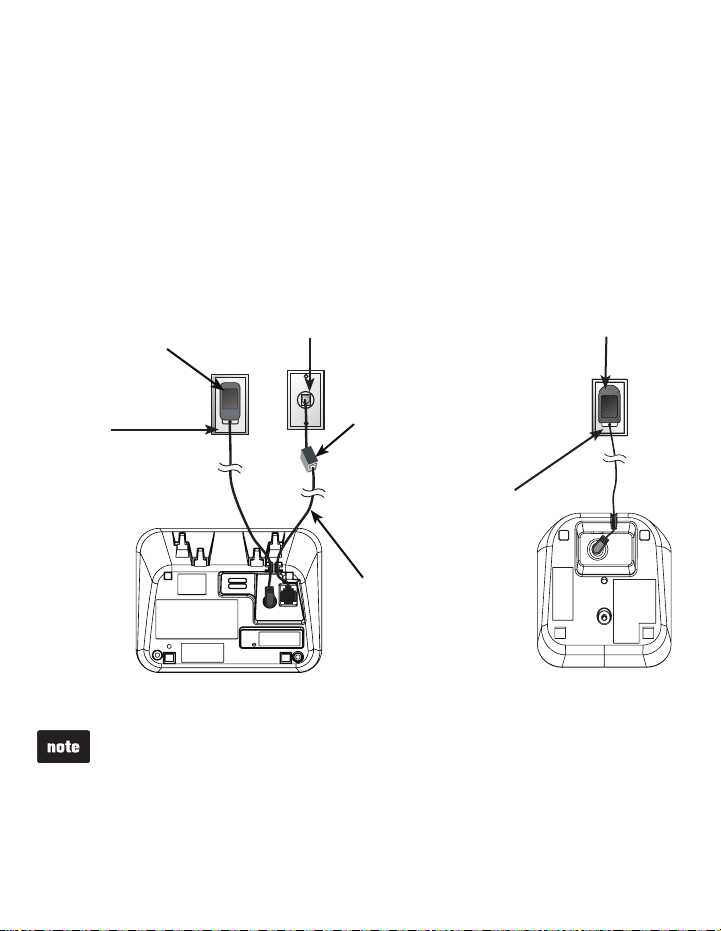
Install the telephone base and charger(s) as shown below.
If you subscribe to digital subscriber line (DSL) high-speed Internet service
through your telephone line, you must install a DSL filter between the telephone
line cord and the telephone wall jack. Contact your DSL service provider for more
information about DSL filters.
The telephone base comes ready for tabletop use. If you want to mount your
telephone on a wall, refer to Tabletop to wall mount installation on page 5
for details.
Telephone base
power adapter
Electrical
outlet not
controlled
by a wall
switch
Telephone
wall jack
If you have DSL
high speed
Internet service,
a DSL filter (not
included) is
required.
Electrical
outlet not
controlled by
a wall switch
Telephone line
cord
Use only the power adapters supplied with this product. To order a
•
replacement, visit our website at www.vtechphones.com or call
1 (800) 595-9511. In Canada, go to www.vtechcanada.com or dial
1 (800) 267-7377.
The power adapters are intended to be correctly oriented in a vertical or floor
•
mount position. The prongs are not designed to hold the plug in place if it is
plugged into a ceiling, under-the-table or cabinet outlet.
Charger adapter
ChargerTelephone base
2
Page 7
Getting started
Battery installation
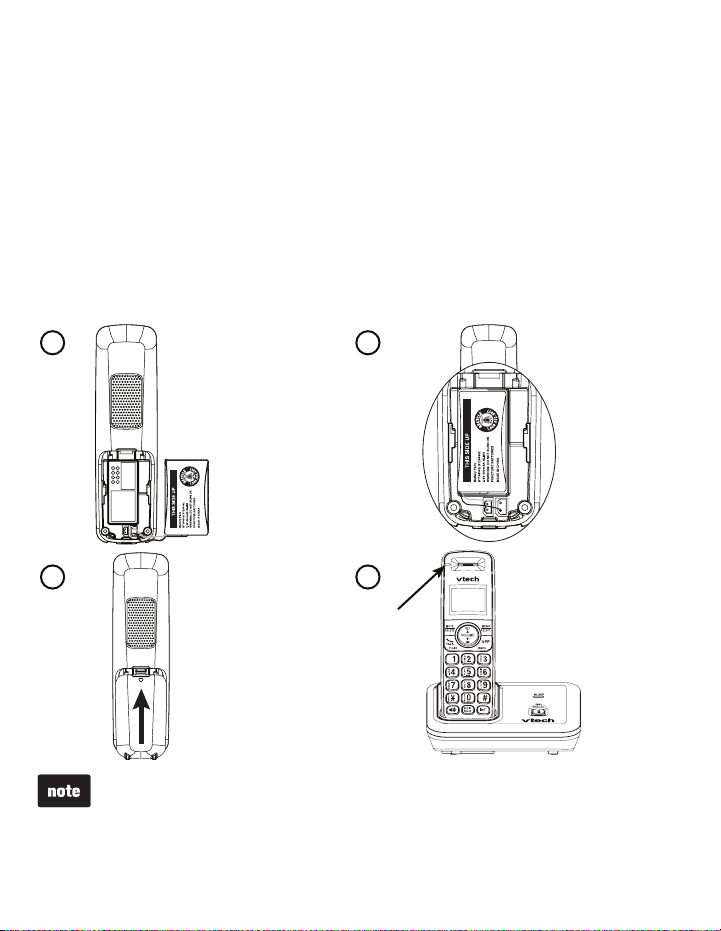
Install the battery as shown below.
Plug the battery connector securely into the socket inside the handset
1.
battery compartment.
Place the battery with the label THIS SIDE UP facing up and the wires inside
2.
the battery compartment.
Align the cover flat against the battery compartment, then slide it towards the
3.
center of the handset until it clicks into place.
Charge the handset by placing it in the telephone base or charger. The
4.
CHARGE light is on when the handset charges.
1
3 4
CHARGE light remains
on when charging.
If the handset will not be used for a long time, disconnect and remove the
•
battery to prevent possible leakage.
To purchase replacement batteries, visit our website at
•
www.vtechphones.com or call 1 (800) 595-9511. In Canada, go to
www.vtechcanada.com or dial 1 (800) 267-7377.
3
2
Page 8
Getting started
Battery charging
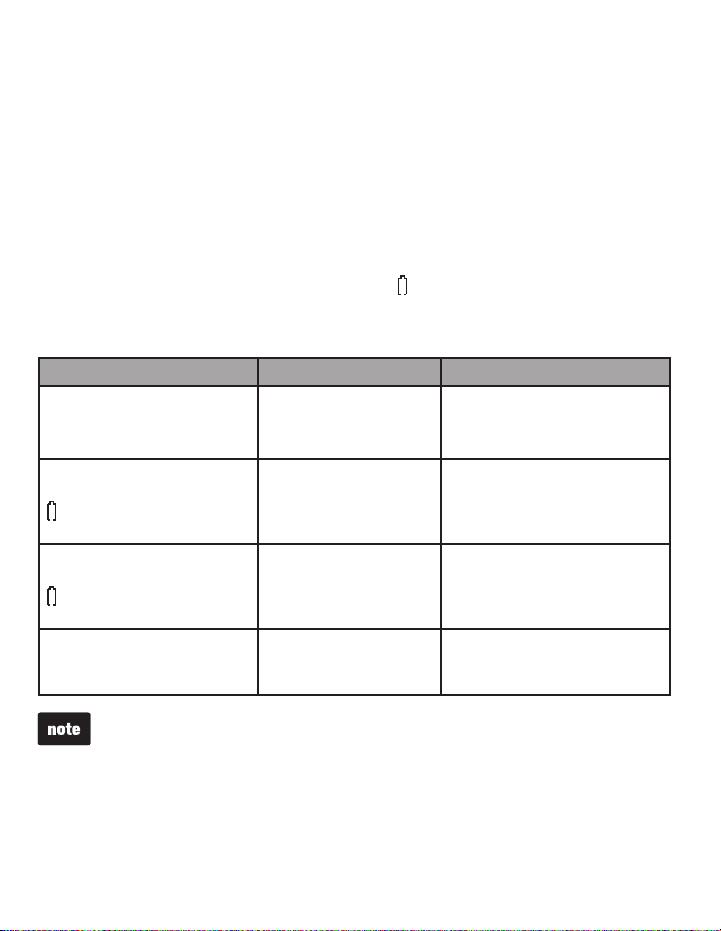
Once you have installed the battery, the screen indicates the battery status (see
the table below). If necessary, place the handset in the telephone base or charger
to charge the battery. For best performance, keep the handset in the telephone
base or charger when not in use. The battery is fully charged after 10 hours of
continuous charging. See the table on page 37 for battery operating times.
If the screen is blank, you need to charge the handset without interruption for
at least 30 minutes to give the handset enough charge to use the telephone for
a short time. When the battery is low, the handset plays four short beeps and
shows LOW BATTERY along with a flashing icon. When you are on a call in
low battery mode, the handset plays four short beeps every 50 seconds.
The following table summarizes the battery charge indicators and actions to take.
Battery indicators Battery status Action
The screen is blank. Battery has no charge
and the handset
cannot be used.
Charge without interruption
(at least 4 minutes).
The screen shows
PLACE IN CHARGER and
flashes.
The screen shows
LOW BATTERY and
flashes.
The screen shows
HANDSET X.
If you place the handset in the telephone base or charger without plugging in
•
a battery, the screen displays NO BATTERY.
After you install your telephone or power returns following a power outage,
•
the handset will prompt you to set the date and time. For instructions, see
Set date/time on page 13. To skip setting the date and time, press
OFF/CANCEL.
Battery has very
little charge and the
handset cannot be
used.
Battery has enough
charge to be used for a
short time.
Battery is charged. To keep the battery charged,
Charge without interruption
until the screen shows
HANDSET X (at least
30 minutes).
Charge without interruption
until the screen shows
HANDSET X (at least
30 minutes).
place it in the telephone base
or charger when not in use.
4
Page 9
Getting started
Installation options
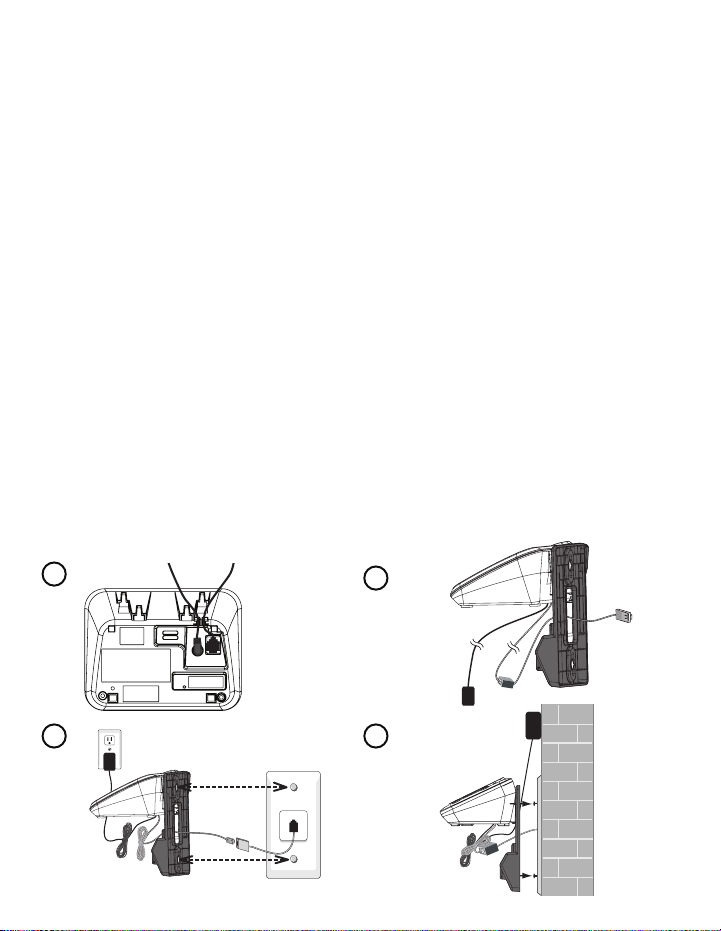
The telephone comes ready for tabletop use. If you want to mount your telephone
on a wall, use the provided wall mount bracket to connect with a standard
dual-stud telephone wall mount plate. If you do not have this wall mount plate,
you can purchase one from many hardware or consumer electronics retailers.
You may need a professional to install the wall mount plate.
Tabletop to wall mount installation
Plug one end of the telephone line cord into the TEL LINE jack on the bottom
1.
of the telephone base. Plug the small end of the base power adapter into the
POWER jack on the bottom of the telephone base.
Position the telephone base against the wall mount bracket. Insert the extend tabs
2.
(marked B) of the wall mount bracket into the slots on the back of the telephone
base. Push the telephone base down until it clicks securely in place.
Route the telephone line cord (or DSL) filter through the hole in the middle
3.
of the wall mount bracket and plug it into the telephone wall jack. Route the
power cord out of the bottom of the telephone and plug it into an electrical
outlet not controlled by a wall switch.
Align the holes on the bracket with the standard wall mount plate and slide the
4.
bracket down until it locks securely. Bundle the telephone line cord and power
adapter cord neatly with twist ties.
1
3 4
5
2
Page 10
Getting started
Installation options (continued)
Wall mount to tabletop installation
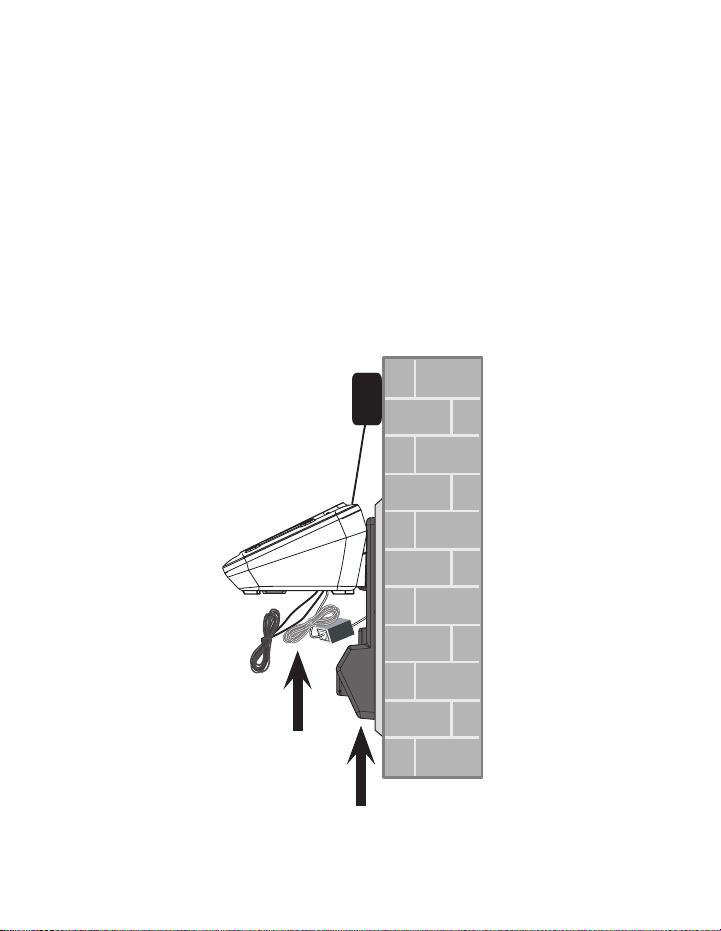
If the telephone line cord and power adapter cord are bundled, untie
1.
them first.
Slide the black wall mount bracket up and remove it from the wall mount plate.
2.
Unplug the end of the telephone line cord (or DSL filter) from the telephone
wall jack. Unplug the power adapter from the power outlet.
Slide the telephone base up and remove it from the wall mount bracket.
3.
See Telephone base and charger installation on page 2.
4.
6
Page 11
Getting started
Telephone base layout
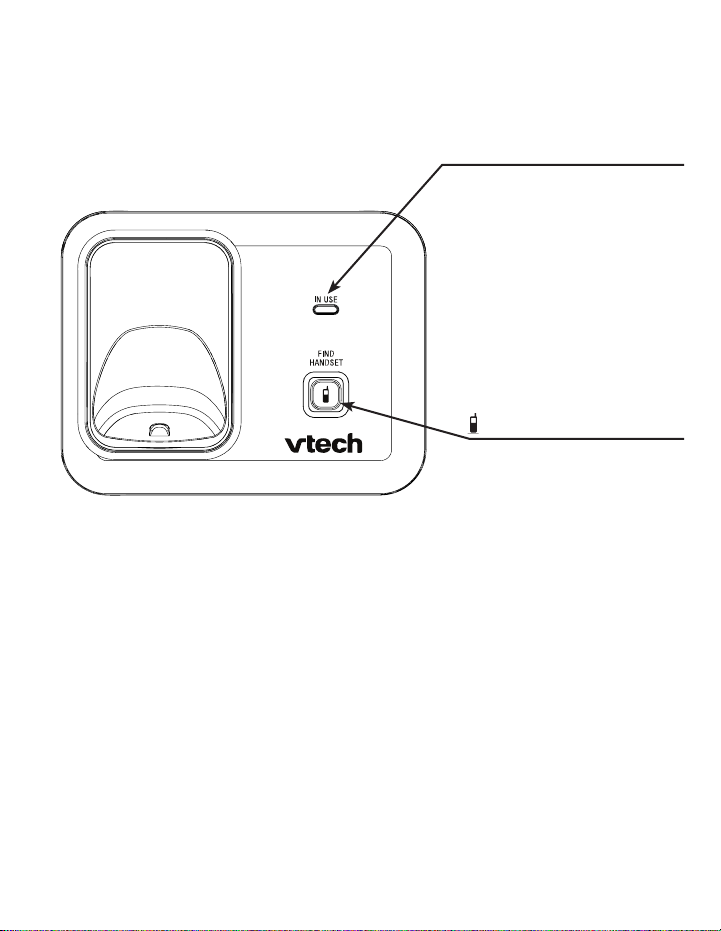
IN USE light
On when the handset is
in use.
Flashes quickly when there is
an incoming call.
Flashes slowly when another
telephone sharing the same
line is in use.
/FIND HANDSET
Press to page the handset.
7
Page 12
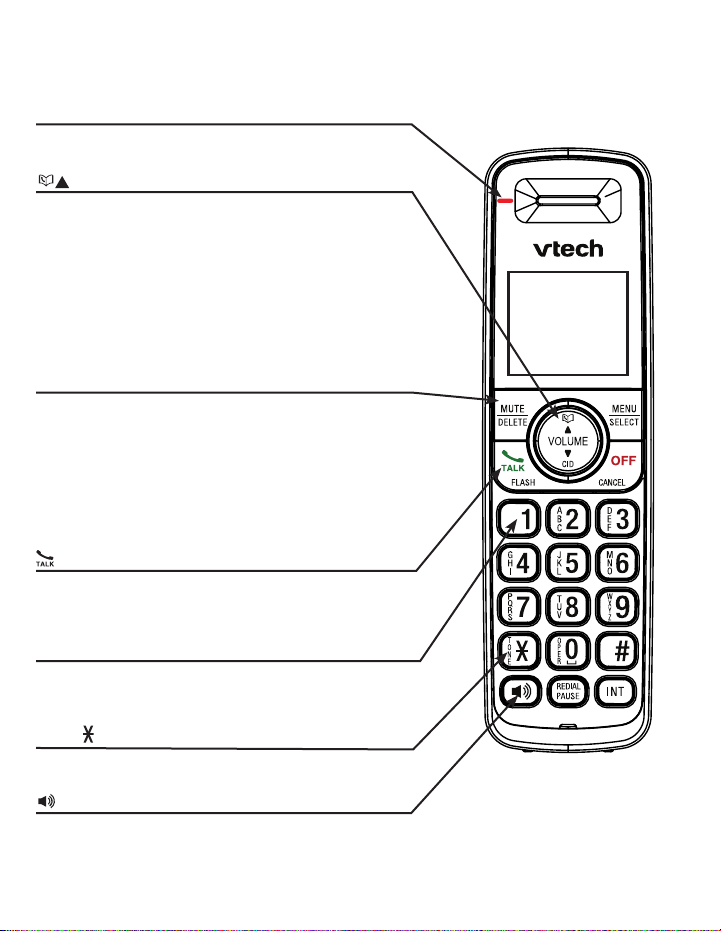
Getting started
Handset layout
CHARGE light
On when the handset is charging in the telephone
base or charger (page 3).
/VOLUME
Press to enter the directory when the telephone is
not in use (page 26).
Press to scroll up while in a menu, or in the
directory, call log or redial list.
During a call, press to increase the listening volume
(page 15).
When entering numbers or names in the directory,
press to move the cursor to the right.
MUTE/DELETE
While on a call, press to mute the microphone (page 16).
While using the dialing keys, press to delete digits
or characters.
While the handset is ringing, press to silence the
ringer temporarily (page 16).
When reviewing redial list, the directory or call log,
press to delete the displayed entry (page 19, 27 or 33).
/FLASH
Press to make or answer a call (page 15).
During a call, press to answer an incoming call when
you receive a call waiting alert (page 16).
1
While reviewing a call log entry, press repeatedly to
add or remove 1 in front of the call log entry before
dialing or saving it to the directory.
TONE
Press to switch to tone dialing temporarily when
using the pulse service.
(speakerphone)
Press to make or answer a call.
During a call, press to switch between the
speakerphone and the handset (page 15).
8
Page 13
Getting started
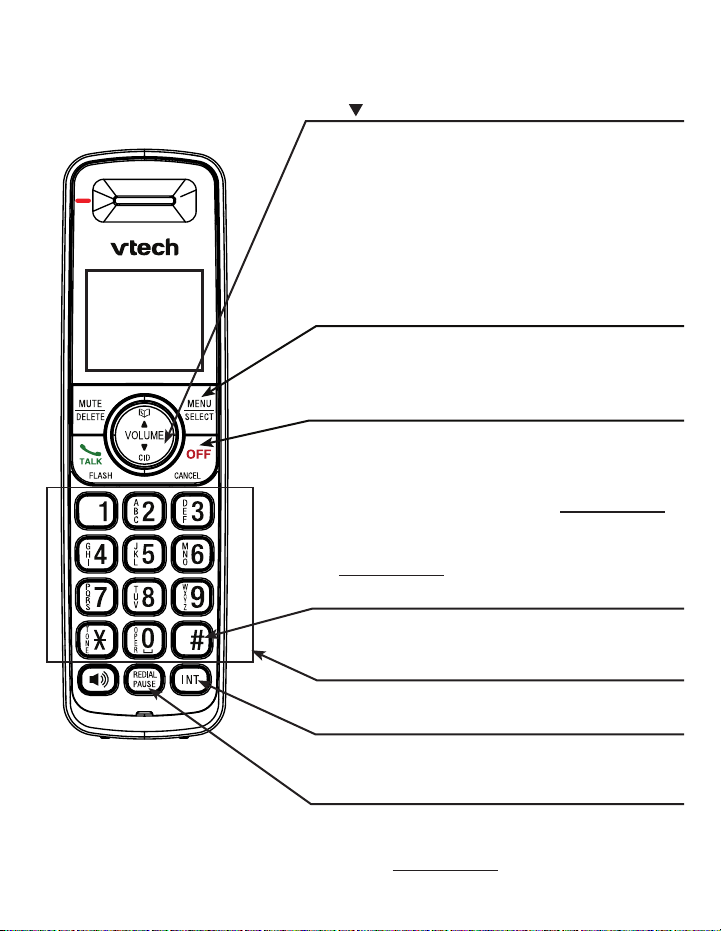
Handset layout
CID /VOLUME
Press to review the call log when the telephone
is not in use (page 31).
Press to scroll down while in a menu, or in the
directory, call log or redial list.
During a call, press to decrease the listening volume
(page 15).
When entering numbers or names in the directory,
press to move the cursor to the left.
MENU/SELECT
Press to show the menu.
While in a menu, press to select an item, or save
an entry or setting.
OFF/CANCEL
During a call, press to hang up.
While the handset is ringing, press to silence the
ringer temporarily (page 16).
While the telephone is not in use, press and hold to
erase the missed call indicator (page 31).
While in a menu, press to exit to the previous menu
or press and hold to exit to idle mode.
# (pound key)
Press repeatedly to show other dialing options
when reviewing a call log entry (page 32).
Dialing keys
Press to enter numbers or characters.
INT (intercom)
Press to start an intercom conversation or transfer
a call (pages 20-22).
REDIAL/PAUSE
Press to review the redial list (page 19).
While dialing or entering numbers into the
directory, press and hold to insert a dialing pause.
9
Page 14
Telephone settings
Telephone settings
Using the menu
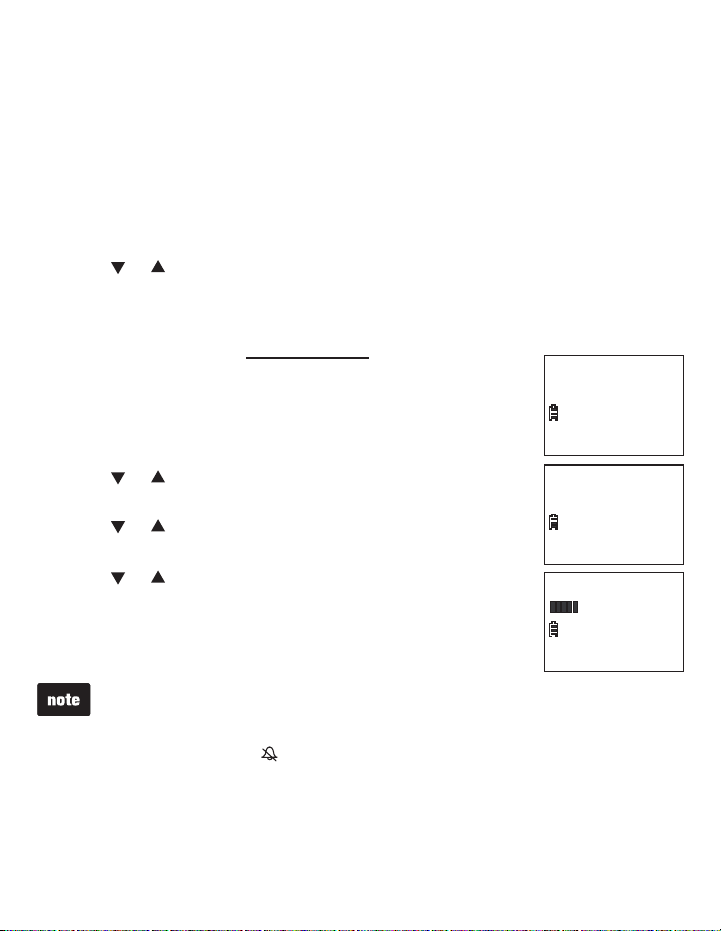
In the ringers menu, you can select the ringer tones and adjust the ringer volume
for incoming calls.
In the settings menu, you can change and edit the settings for LCD language,
voicemail indicators, key tone, date and time, home area code and dial mode.
To enter the handset menu:
Press MENU/SELECT when the handset is not in use.
1.
Press or until the screen displays the desired feature menu.
2.
Press MENU/SELECT to enter that menu.
3.
To return to the previous menu, press OFF/CANCEL.
•
To return to idle mode, press and hold OFF/CANCEL.
•
>
RINGERS
Ringer volume
You can adjust the ringer volume or turn the ringer off.
Press MENU/SELECT when the handset is not in use.
1.
Press or to select >RINGERS, then press
2.
MENU/SELECT.
Press or to select >RINGER VOLUME, then press
3.
MENU/SELECT.
Press or to adjust the volume. A sample of each
4.
ringer volume plays as you scroll through the choices.
Press MENU/SELECT to save your selection. You hear a
5.
confirmation tone.
SETTINGS
>
RINGER VOLUME
RINGER TONE
RINGER VOLUME
The ringer volume also determines the ringer volume of the intercom calls
•
The ringer volume also determines the ringer volume of the intercom calls
•
and the volume of paging tone.
and the volume of paging tone.
When the handset ringer volume is set to off, that handset is silenced for all
•
When the handset ringer volume is set to off, that handset is silenced for all
•
incoming calls and displays on the handset.
incoming calls and displays on the handset.
Unless the ringer volume is turned off on that handset, each handset rings
•
Unless the ringer volume is turned off on that handset, each handset rings
•
when there is an incoming call.
when there is an incoming call.
10
Page 15
Telephone settings
Ringer tone
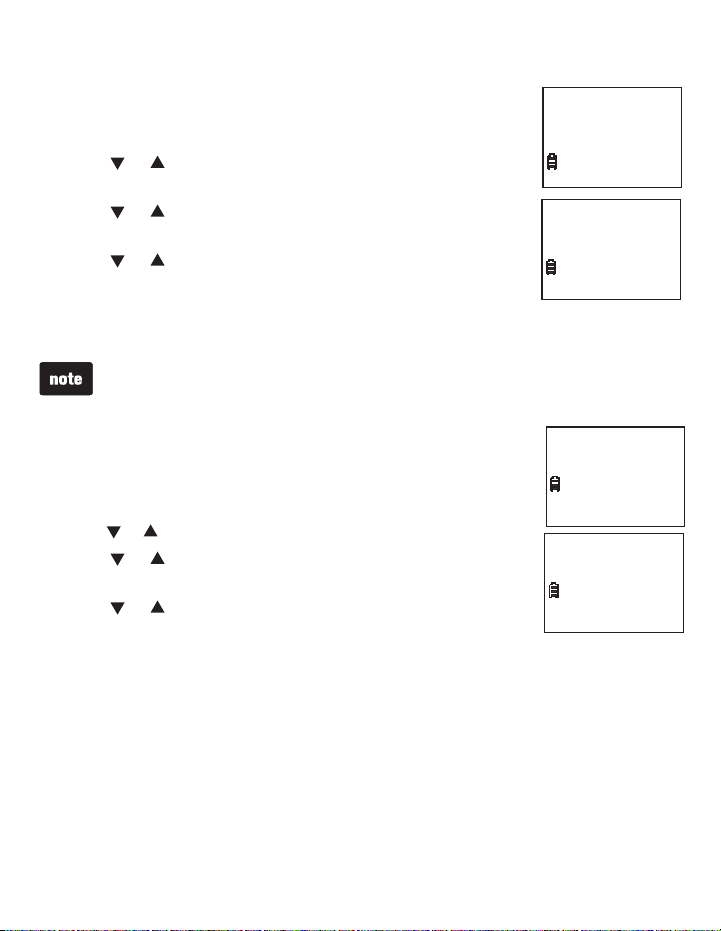
You can choose from different ringer tones.
Press MENU/SELECT when the handset is not in use.
1.
Press or to select >RINGERS, then press
2.
MENU/SELECT.
Press or to select >RINGER TONE, then press
3.
MENU/SELECT.
Press or to select a desired ringer tone. A sample of
4.
each ringer tone plays as you scroll through the choices.
Press MENU/SELECT to save your selection. You hear a
5.
confirmation tone.
If you turn off the handset ringer volume, you will not hear ringer tone samples.If you turn off the handset ringer volume, you will not hear ringer tone samples.
RINGER VOLUME
>
RINGER TONE
RINGER TONE
>
1
LCD language
>
You can select a language (English, French or Spanish) to be
used in all screen displays.
Press MENU/SELECT when the handset is not in use.
1.
Press or to select >SETTINGS, then press MENU/SELECT.
2.
Press or to select >LCD LANGUAGE, then press
3.
MENU/SELECT.
Press or to choose ENGLISH, FRANÇAIS or
4.
LCD LANGUAGE
CLR VOICEMAIL
LCD LANGUAGE
>
ENGLISH
ESPAŇOL.
Press MENU/SELECT to save your selection. You hear a confirmation tone.
5.
11
Page 16
Telephone settings
Telephone settings
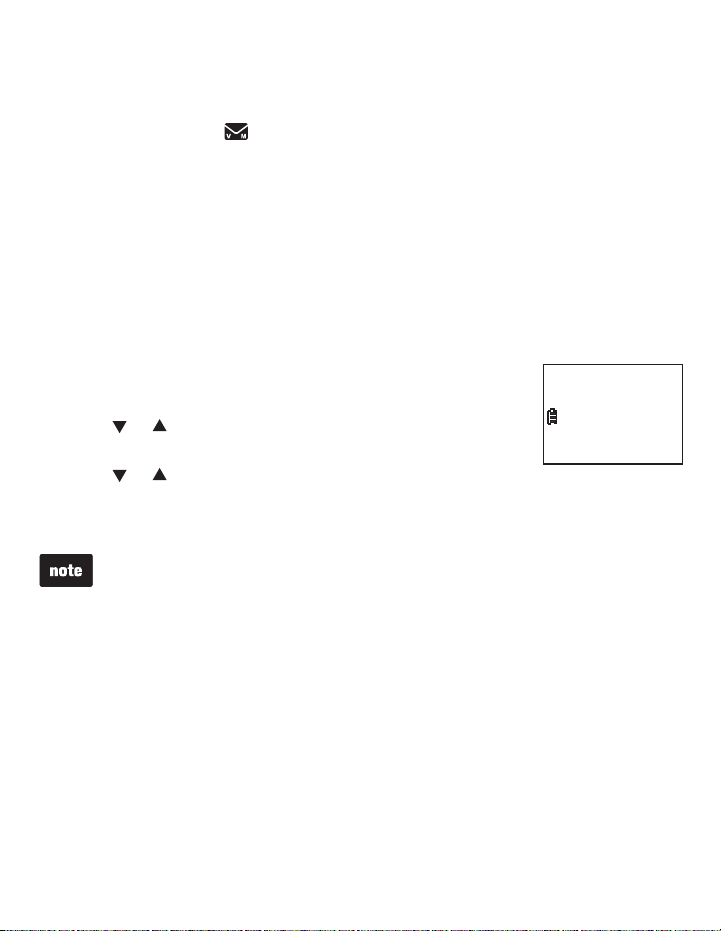
Clear voicemail indicators
If you subscribe to voicemail service offered by your telephone service provider,
NEW VOICEMAIL and appear on the handset when you have new voicemail
messages. Contact your telephone service provider for more information about
using your voicemail service.
After you have listened to all new voicemail messages, the indicators on the
handset turn off automatically.
Use this feature when the telephone indicates that there is new voicemail but
there are none (for example, when you have accessed your voicemail while
away from home). This feature only turns off the indicators, it does not delete
your voicemail messages. As long as you have new voicemail messages, your
telephone service provider continues to send the signal to turn on the indicators.
To manually turn off these indicators:
Press MENU/SELECT when the handset is not in use.
1.
Press or to select >SETTINGS, then press
2.
MENU/SELECT.
Press or to select >CLR VOICEMAIL, then press
3.
MENU/SELECT. The screen shows TURN OFF INDICATOR?
Press MENU/SELECT to save your selection. You hear a confirmation tone.
4.
Your telephone service provider may alert you of new messages with a stutter
Your telephone service provider may alert you of new messages with a stutter
(broken) dial tone. Contact your telephone service provider for details.
(broken) dial tone. Contact your telephone service provider for details.
INDICATOR?
TURN OFF
12
Page 17
Telephone settings
Key tone
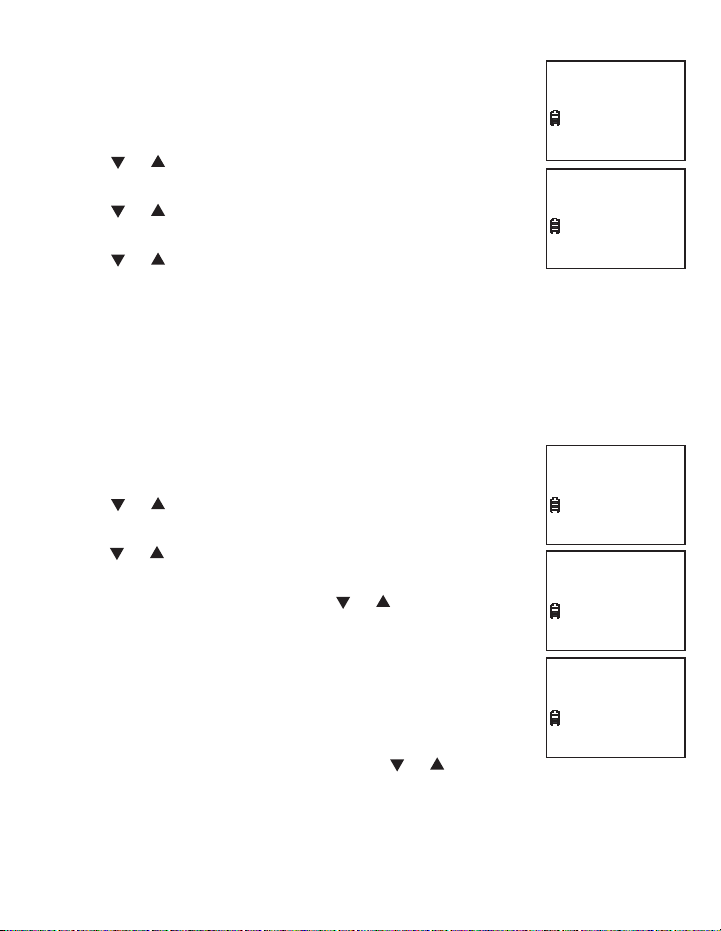
You can turn the key tone on or off.
Press MENU/SELECT when the handset is not in use.
1.
Press or to select >SETTINGS, then press
2.
MENU/SELECT.
Press or to select >KEY TONE, then press
3.
MENU/SELECT.
Press or to choose ON or OFF.
4.
Press MENU/SELECT to save your selection. You hear a confirmation tone.
5.
Set date and time
The answering system announces the date and time of each message prior to
playing it. If you subscribe to caller ID service, the day, month and time are set
automatically with each incoming call. However, the year must be correct so that
the day of the week can be calculated from the caller ID information. Before using
the answering system, set the date and time.
Press MENU/SELECT when the handset is not in use.
1.
Press or to select >SETTINGS, then press
2.
MENU/SELECT.
Press or to select >SET DATE/TIME, then press
3.
MENU/SELECT.
When the month is flashing, press or until the screen
4.
displays the correct month. Press MENU/SELECT to confirm.
-OR-
Press the dialing keys (0-9) to enter the current month (for
example, if the month is March, you must enter 03).
Repeat Step 4 to set the correct date and year and then
5.
press MENU/SELECT to advance to set the time.
Repeat Step 4 until the time is set. Press or to
6.
choose AM or PM. Press MENU/SELECT to save your selection. You hear a
confirmation tone.
>KEY TONE
SET DATE/TIME
KEY TONE
>
ON
>
SET DATE/TIME
HOME AREA CODE
SET DATE
11/20/09
SET TIME
10:30 PM
13
Page 18
Telephone settings
Home area code
If you dial your local calls using only seven digits (area code not required), you
can program your home area code so that when you receive a call within your
local area, the telephone number is automatically stored without the area code in
the call log.
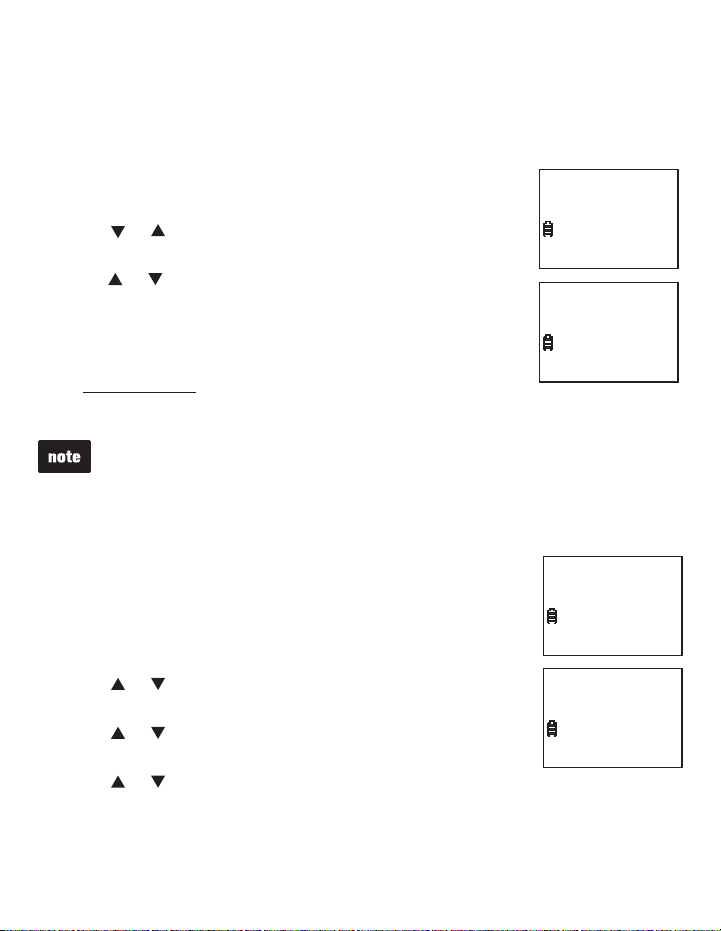
Press MENU/SELECT when the handset is not in use.
1.
Press or to select >SETTINGS, then press
2.
MENU/SELECT.
Press or to select >HOME AREA CODE, then press
3.
MENU/SELECT.
Use the dialing keys to enter the desired home area code.
4.
Press MUTE/DELETE to delete a digit.
•
Press and hold MUTE/DELETE to delete the entire entry.
•
Press MENU/SELECT to save the selection. You hear a confirmation tone.
5.
If, in the future, your telephone service provider requires you to dial the area
If, in the future, your telephone service provider requires you to dial the area
code when making a local call, or, if you move to a location that requires it,
code when making a local call, or, if you move to a location that requires it,
delete the home area code you have already programmed, following the steps
delete the home area code you have already programmed, following the steps
above. After you have deleted the home area code, _ _ _ will appear in
above. After you have deleted the home area code, _ _ _ will appear in
the display.
the display.
>
HOME AREA CODE
DIAL MODE
HOME AREA CODE
---
Dial mode
>
The default dial mode is tone dialing. If you have pulse
(rotary) service, you need to change the dial mode to pulse
dialing before using the telephone.
Press MENU/SELECT when the handset is not in use.
1.
Press or to select >SETTINGS, then press
2.
MENU/SELECT.
Press or to select >DIAL MODE, then press
3.
MENU/SELECT.
Press or to choose TONE or PULSE.
4.
Press MENU/SELECT to save your selection. You hear a confirmation tone.
5.
DIAL MODE
LCD LANGUAGE
DIAL MODE
>TONE
14
Page 19
Telephone operation
Make a call
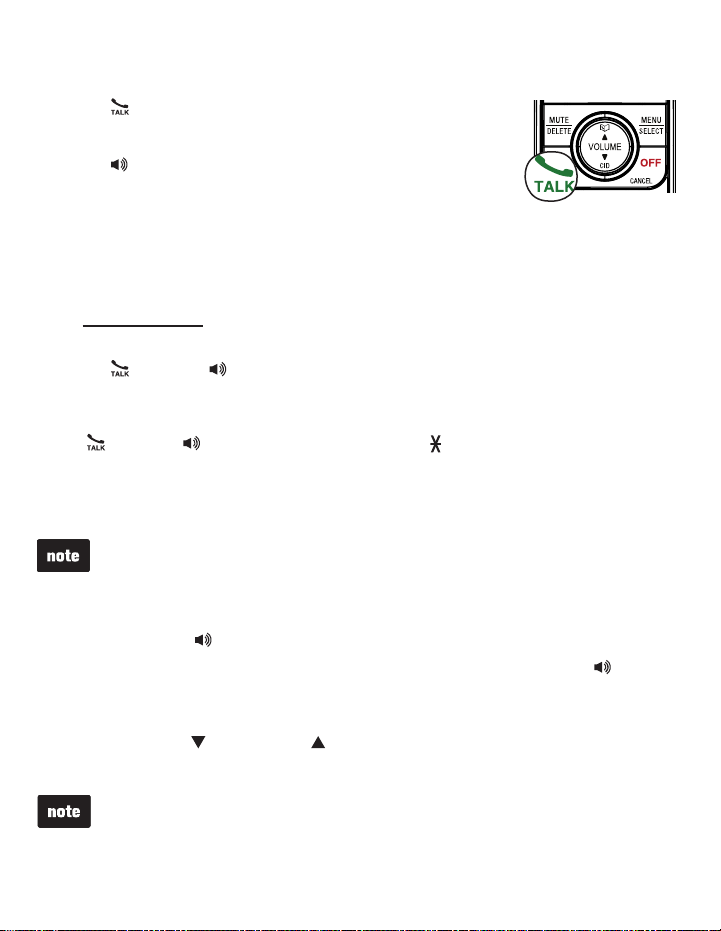
Press /FLASH, then wait for a dial tone.
1.
-OR-
Press to use the speakerphone, then wait
for a dial tone.
Use the dialing keys to enter the telephone number.
2.
Predial a call
Use the dialing keys to enter the telephone number (up to 30 digits).
1.
Press and hold REDIAL/PAUSE to insert a dialing pause (a P appears).
•
Press MUTE/DELETE or OFF/CANCEL to make corrections.
•
Press /FLASH or to call.
2.
Answer a call
Press /FLASH or or any dialing key (0-9, TONE or #).
End a call
Press OFF/CANCEL or put the handset in the telephone base or charger.
The screen shows the elapsed time as you talk (in hours, minutes
The screen shows the elapsed time as you talk (in hours, minutes
and seconds).
and seconds).
Speakerphone
During a call, press to switch between speakerphone and normal handset use.
When the speakerphone is active, the handset shows SPEAKER and .
Volume
During a call, press /VOLUME or /VOLUME to adjust the listening volume.
When the volume reaches the minimum or maximum setting, you hear two beeps.
The handset earpiece volume setting and speakerphone volume setting
The handset earpiece volume setting and speakerphone volume setting
are independent.
are independent.
15
Page 20

Telephone operationTelephone operation
Mute
The mute function allows you to hear the other party but
the other party cannot hear you.
During a call, press MUTE/DELETE on the handset. The
1.
handset displays MUTED for a few seconds and MUTE
appears until the mute function is turned off.
Press MUTE/DELETE again to resume the conversation.
2.
The handset screen temporarily shows
MICROPHONE ON.
Call waiting
When you subscribe to call waiting service from your telephone service provider,
you hear an alert tone if there is an incoming call while you are on another call.
Press /FLASH to put the current call on hold and take the new call.
•
Press /FLASH at any time to switch back and forth between calls.
•
Temporary ringer silencing
When the telephone is ringing, you can temporarily silence the ringer of the
handset without disconnecting the call. The next call rings normally at the
preset volume.
To silence the ringer:
When the telephone is ringing, press OFF/CANCEL or MUTE/DELETE on the
handset, RINGER MUTED and show on the screen.
MUTED
3:15PM MUTE12/25
Temporary tone dialing
If you have dial pulse (rotary) dialing service only, you can temporarily switch
from dial pulse to touch-tone dialing during a call.
During a call, press TONE .
1.
Use the dialing keys to enter the number. The telephone sends
2.
touch-tone signals.
The telephone automatically returns to pulse dialing mode after you end
3.
the call.
16
 Loading...