

Page 1
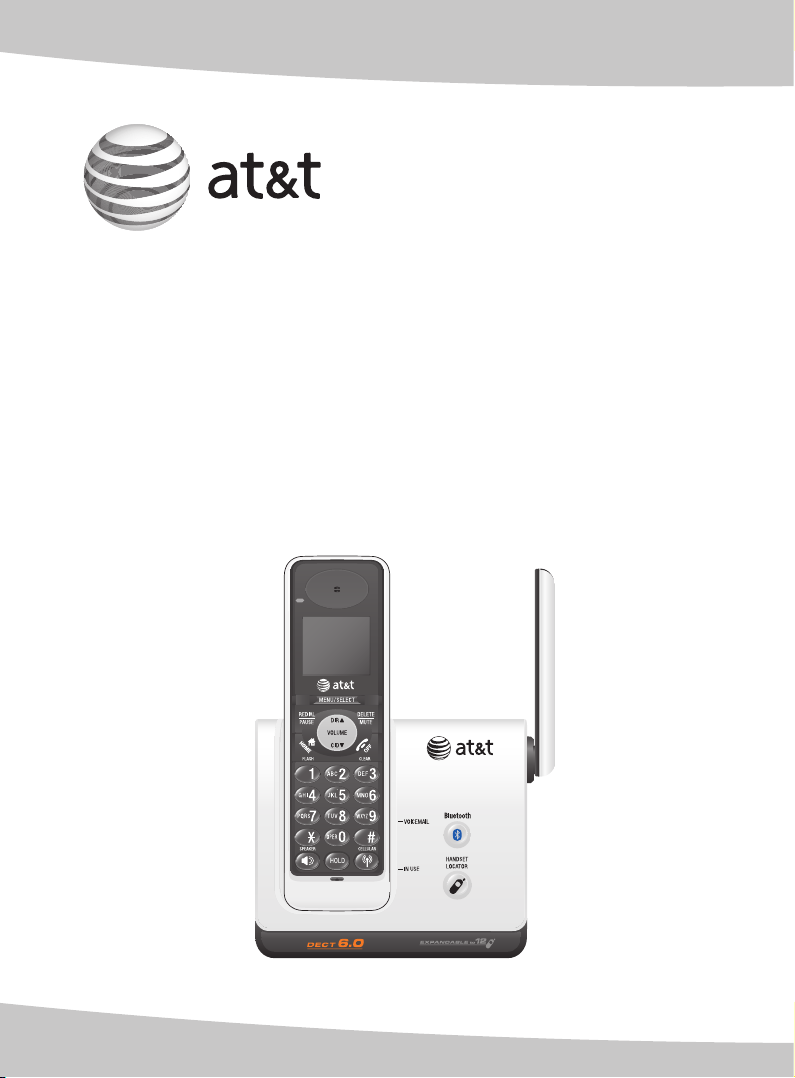
User’s manual
TL91178/TL91278/TL91378TL91278/TL91378TL91378
DECT 6.0 cordless
telephone with Bluetooth®
wireless technology
Page 2

Congratulations
on your purchase
of this AT&T product.
Before using this AT&T product, please
read the Important safety information
on pages 72-74 of this manual.
Please thoroughly read this user’s
manual for all the feature operations
and troubleshooting information necessary
to install and operate your new
AT&T product. You can also visit our
website at www.telephones.att.com or call
1 (800) 222-3111.
In Canada, dial 1 (866) 288-4268.
Model #: TL91178 (one handset)
TL91278 (two handsets)
TL91378 (three handsets)
Type: DECT 6.0 cordless telephone with Bluetooth wireless
technology
Serial #:
Purchase date:
Place of purchase:
Both the model and serial number of your AT&T product can be found on the
bottom of the telephone base.
Save your sales receipt and original packaging in case it is necessary to return
your telephone for warranty service.
Page 3
Telephones identified with this logo have reduced noise and
T
Compatible with
Hearing Aid T-Coil
TIA-1083
interference when used with most T-coil equipped hearing aids and
cochlear implants. The TIA-1083 Compliant Logo is a trademark of
the Telecommunications Industry Association. Used under license.
The ENERGY STARR program (www.energystar.gov) recognizes
and encourages the use of products that save energy and help
protect our environment. We are proud to mark this product
with the ENERGY STARR label indicating it meets the latest
energy efficiency guidelines.
© 2008 Advanced American Telephones. All rights reserved.
AT&T and the AT&T logo are trademarks of AT&T Intellectual Property II, L.P. d/b/a
AT&T Intellectual Property licensed to Advanced American Telephones. Printed in �hina.Printed in �hina.
The Bluetooth® word mark and logos are owned by Bluetooth SIG, Inc. and any use of such marks by Advanced
American Telephones and its parent, VTech Holdings Limited, is under license. VTech Holdings Limited is a member of
Bluetooth SIG, Inc. Other trademarks and trade names are those of their respective owners.
Page 4

Before you begin
you must install and charge the battery.
See page 9 for Battery installation instructions.
Please read and follow these instructions carefully:
• Use only the supplied rechargeable battery or replacement
battery.
• Observe the proper polarity orientation between the battery
and handset during battery installation.
• Do not dispose of the battery in a fire. Check with local codes
for special disposal instructions.
• Do not open or mutilate the battery. Released electrolyte is
corrosive and may cause damage to the eyes or skin. It may be
toxic if swallowed.
• Exercise care in handling batteries in order not to create a
short circuit with conductive materials such as rings, bracelets,
and keys. The battery or conductor may overheat and cause
harm.
• Charge the supplied battery or replacement battery with
this product only in accordance with the instructions and
limitations specified in this manual.
• Do not disassemble your telephone. There are no userserviceable parts inside. Refer to qualified service personnel for
servicing.
• To prevent fire or shock hazard, do not expose this product to To prevent fire or shock hazard, do not expose this product to
water or any type of moisture.
Page 5
Parts checklist
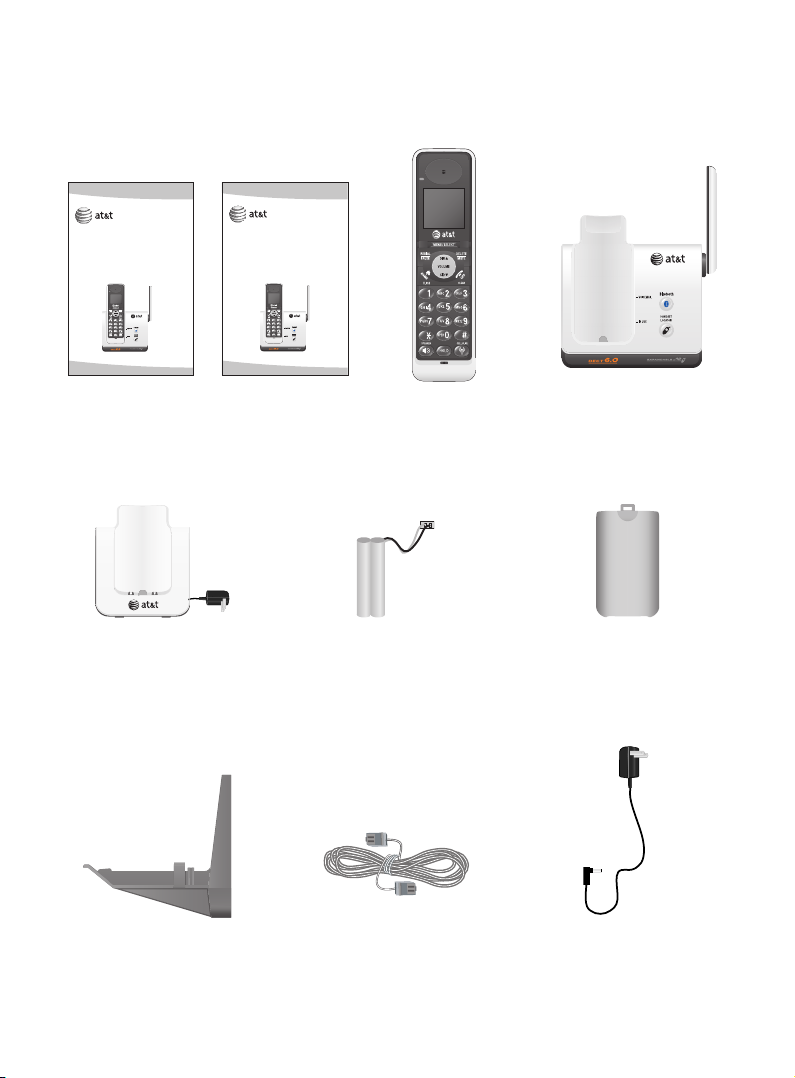
Your telephone package contains the following items.
User’s manual
TL91178/TL91278/TL91378
DECT 6.0 cordless
telephone with BLUETOOTH®
wireless technology
Quick start guide
TL91178/TL91278/TL91378
DECT 6.0 cordless
telephone with BLUETOOTH®
wireless technology
User's manual Quick start guide
Charger for cordless handset
with power adapter installed
(1 for TL91278)
(2 for TL91378)
Cordless handset
(1 for TL91178)
(2 for TL91278)
(3 for TL91378)
Battery for cordless handset
(1 for TL91178)
(2 for TL91278)
(3 for TL91378)
Telephone base
Battery compartment cover
(1 for TL91178)
(2 for TL91278)
(3 for TL91378)
Wall mount bracket
Telephone line cord
Power adapter for
telephone base
Page 6
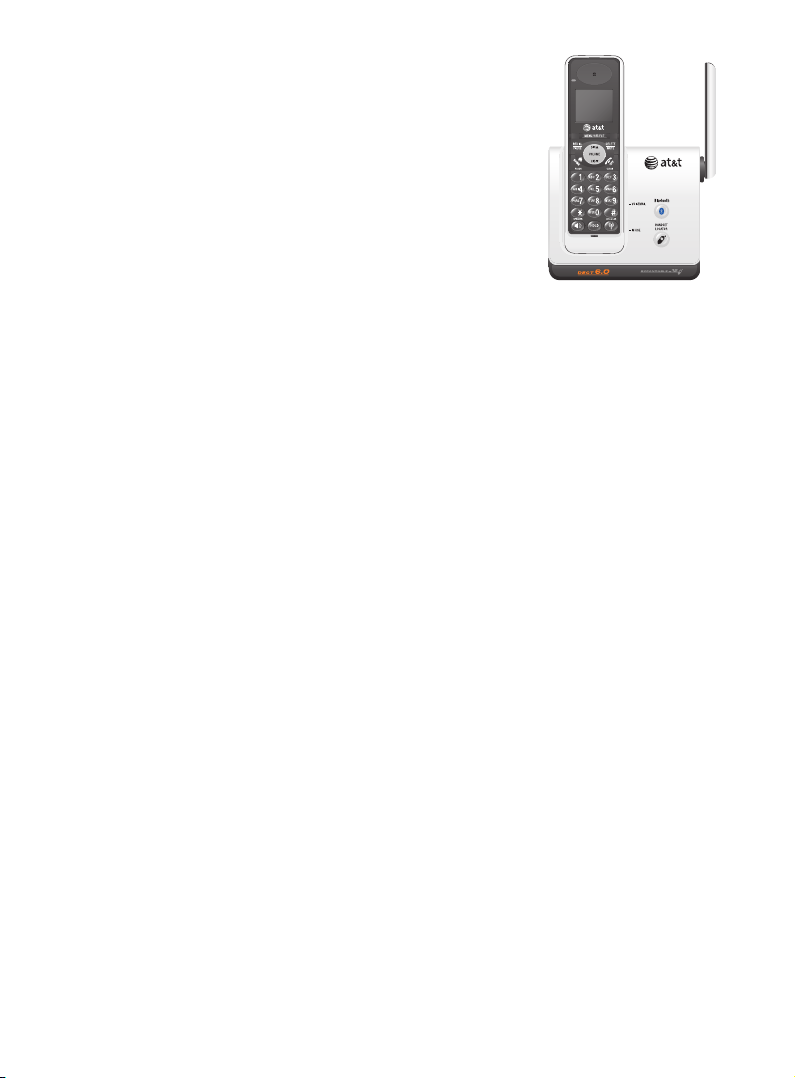
User’s manual
TL91178/TL91278/TL91378
DECT 6.0 cordless
telephone with Bluetooth®
wireless technology
Table of contents
Getting started
Quick reference guide
handsethandset ............................................1
telephone base ............................3
Handset status icons ....................... 4
Installation ............................................5
Telephone base installation ......... 7
Charger installation ..........................8
Battery installation &
charging ........................................... 9
Installation options ...............................10
Bluetooth
Introducing Bluetooth ...................15
Glossary of terms ............................16
Bluetooth setup ...............................17
Handset settings
Handset main menu .......................20
Handset settings ..............................21
Telephone operation
Handset operation ..........................26
Options while on calls ..................32
Chain dialing ......................................35
Intercom ...............................................36
Call transfer using intercom ......38
Directory
About the directory ........................40
Creating directory entries ...........41
Directory review ...............................43
Directory search ...............................44
To dial, delete or
edit entries ...................................45
Caller ID
Caller ID operation ..........................47
To review the caller ID
history ..............................................52
Appendix A,
Alert tones and lights ...................54
Appendix B,
Handset display screen
messages ......................................55
Appendix C,
Expansion handset ...............................58
Adding & registering handsets .....59
Replacing a handset ............................60
Page 7

Table of contents
Appendix D,
Troubleshooting ...............................61
Appendix E,
Maintenance.......................................71
Appendix F,
Important safety information ....72
Appendix G,
FCC Part 68 and ACTA..................75
Appendix H,
FCC Part 15 ........................................77
Appendix I,
Limited warranty ..............................78
Appendix J,
Technical specifications ...............81
Index ...................................................83
Page 8
Getting started
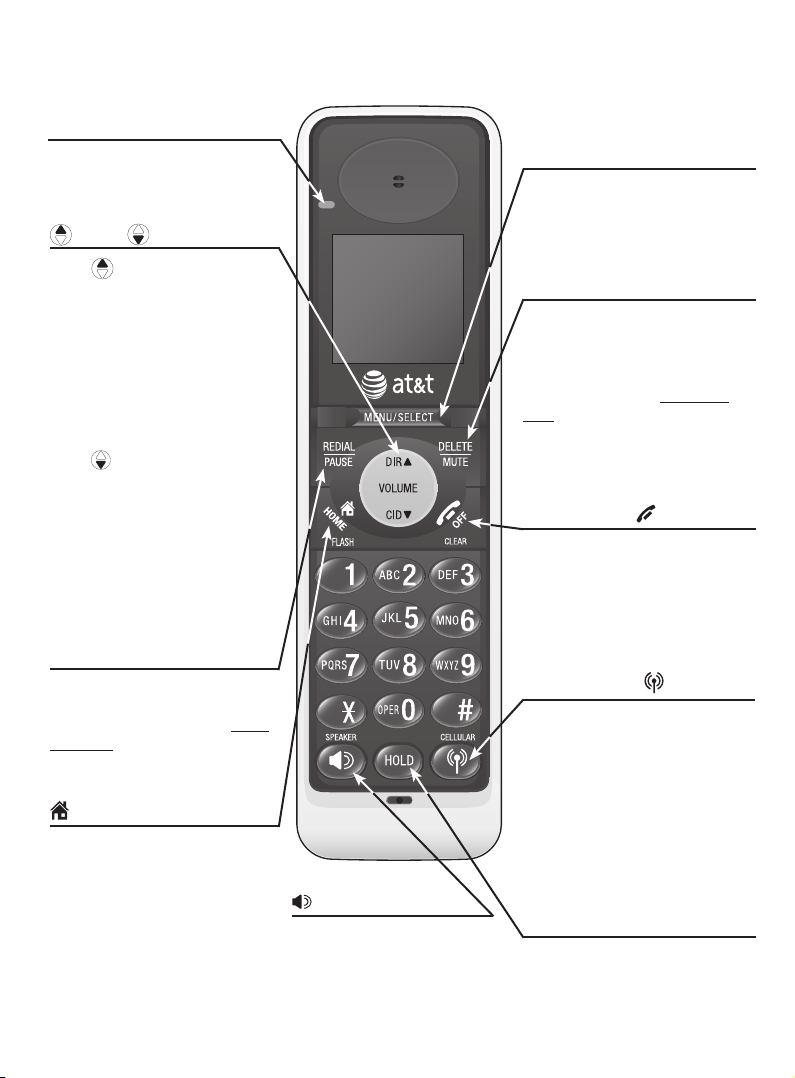
Quick reference guide - handset
CHARGE indicator
On when the handset is
charging in the telephone base
or charger.
DIR / CID
Press DIR to show directory
entries (page 45).
Press to scroll up while in
menus.
While entering names or
numbers, press to move the
cursor to the right.
Press to increase the listening
volume when on a call.
Press CID to show caller ID
history (page 52).
Press to scroll down while in
menus.
While entering names or
numbers, press to move the
cursor to the left.
Press to decrease the listening
volume when on a call.
REDIAL/PAUSE
Press to view redial memory
(page 30).
While entering numbers, press
and hold to insert a dialing
pause (page 45).
HOME/FLASH
Press to make or answer a
HOME call.
Flashes rapidly when there is rapidly when there is
an incoming HOME call.
Flashes slowly when a HOME
call is on hold.
During a HOME call, press to
receive an incoming call if call
waiting is activated (page 26).
SPEAKER
Press to turn on the
handset speakerphone.
Press again to resume
normal handset use
(page 30).
1
MENU/SELECT
Press to show the menu.
While in the menu, press to
select an item or save an entry
or setting.
DELETE/MUTE
During a call, press to mute
microphone (page 33).
While reviewing the caller
ID history, press to delete an
individual entry, or press and
hold to clear the caller ID
history (page 53).
While predialing, press to delete
digits (pages 26 & 28).
OFF/CLEAR
During a HOME or CELLULAR
line call, press to end the call.
While in a menu, press to
cancel an operation, back up to
the previous menu, or exit the
menu display.
CELLULAR
Press to make or answer a
CELLULAR call.
Flashes rapidly when there is an
incoming CELLULAR call.
Flashes slowly when a
CELLULAR call is on hold.
During a CELLULAR call, press
to receive an incoming call if
call waiting is activated
(page 29).
HOLD
Press to put the HOME or
CELLULAR call on hold
(page 34).
Page 9
Getting started
Quick reference guide - handset
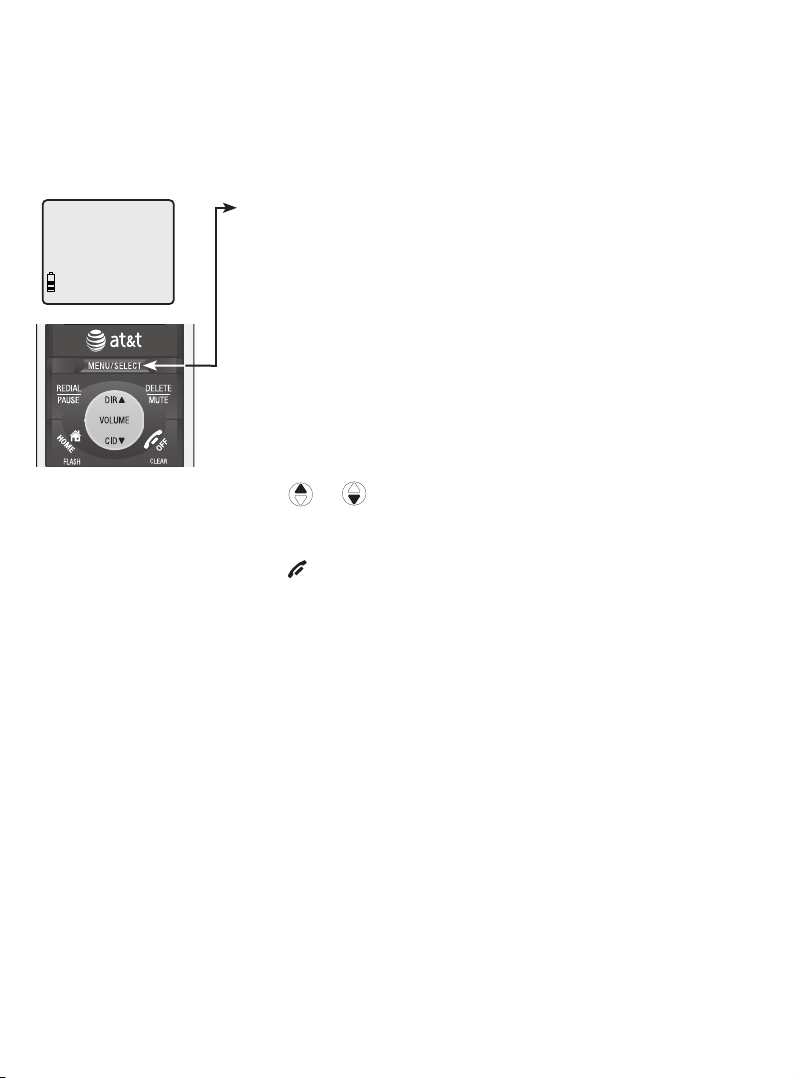
Feature menu
The > symbol shows a
highlighted menu item.
>DIRECTORY
CALL LOG
Feature menu
DIRECTORY (page 40)
CALL LOG (page 47)
INTERCOM (page 36) - This feature is not available on model TL91178.
RINGER VOLUME (page 21)
RINGER TONE (page 22)
KEY TONE (page 23)
LANGUAGE (page 23)
CLR VOICEMAIL (page 24)
HOME AREA CODE (page 25)
Using menus
Press or to scroll through menu items.
Press MENU/SELECT to select or save changes to a highlighted menu
item.
Press OFF/CLEAR to cancel an operation, back up to the previous
menu, or exit the menu display.
2
Page 10
Getting started
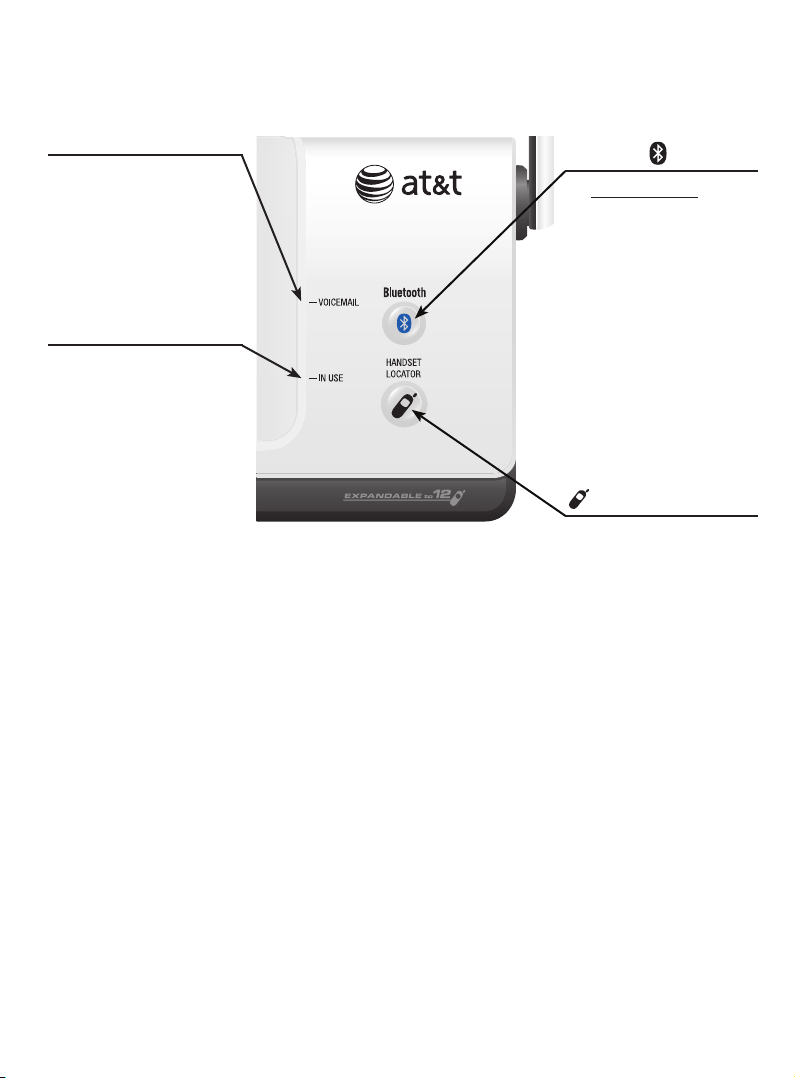
Quick reference guide - telephone base
VOICEMAIL indicator
Flashes when you have
new voicemail on your
HOME line (offered by
your telephone service
provider). The indicator
does not support
voicemail on your
CELLULAR line.
IN USE indicator
On when the handset
•
is in use, or when
you are registering a
handset.
Flashes when another
•
telephone is in use on
the same line, or when
you are de-registering
handsets from the
telephone base.
Flashes quickly when
•
there is an incoming
call.
Bluetooth
Press and hold to
•
enable the Bluetooth
feature on the
telephone base
(page 17).
On when the
•
telephone base is
paired and connected
with a cellular phone.
Flashes when the
•
Bluetooth feature is
activated and waiting
for pairing and
connection.
HANDSET LOCATOR
Press to make handsets
beep so you can locate
them (page 31).
3
Page 11
Getting started
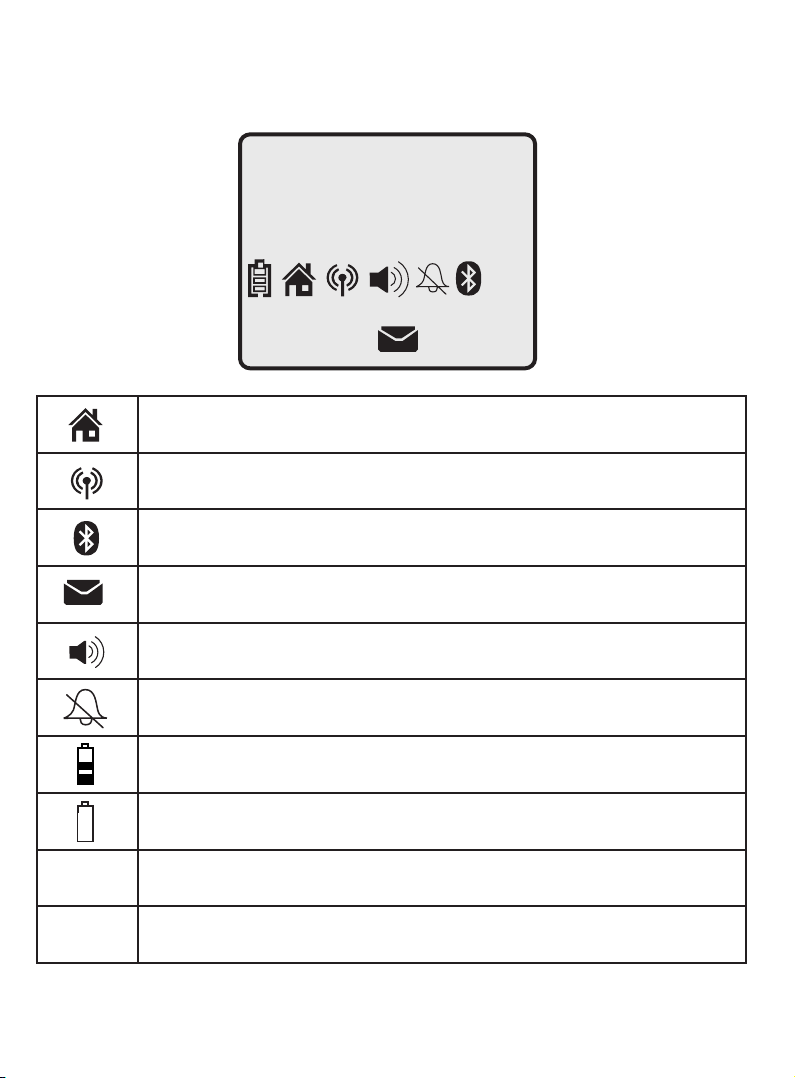
Handset status icons
25 MISSED CALLS
HANDSET 1
NEW
MUTE
MUTE
10:21
HOME line - on steady when the HOME line is in use.
CELLULAR line - on steady when the CELLULAR line is in use.
BLUETOOTH - on steady when a cellular phone is connected with
the telephone base.
NEW VOICEMAIL - new voicemail received on your HOME line.
SPEAKERPHONE - the speakerphone is in use.
Ringer off - the handset ringer is turned off.
Battery status - battery is charging (animated display).
Battery status - low battery (flashing); place handset in telephone
base or charger to recharge.
Microphone is muted.
AM
11/23
NEW
Missed and unreviewed calls.
4
Page 12
Getting started
Installation
You must install and charge
the handset battery before
using the cordless handset.
Install the telephone base close to a telephone jack and a power outlet not
controlled by a wall switch. The telephone base can be placed on a flat surface
or vertically mounted on the wall (see page 10). For optimum range and better
reception, place the telephone base in a central and open location.
You may hear interference if your cellular phone is too close to the telephone
base during a CELLULAR call. Make sure that your Bluetooth enabled cellular
phone is between one to 12 feet away from the telephone base in order
to maintain a clear and consistent connection between your Bluetooth cell
phone, telephone base and cell tower.
If you subscribe to high-speed Internet service (digital subscriber line - DSL)
through your telephone line, you must install a DSL filter between the telephone
base and the telephone wall jack (see the following page). The filter prevents
noise and caller ID problems caused by DSL interference. Please contact your
DSL service provider for more information about DSL filters.
Your product may be shipped with a protective sticker covering the handset or
telephone base display - remove it before use.
STOP!
See page 9
for easy instructions.
For customer service or product information, visit our website at
www.telephones.att.com or call 1 (800) 222-3111. In Canada, dial
1 (866) 288-4268.
5
Page 13

Getting started
Installation
Avoid placing the telephone base too close to:
• Communication devices such as: television sets, VCRs, or other cordless
telephones.
• Excessive heat sources.
• Noise sources such as a window with traffic outside, motors, microwave
ovens, refrigerators, or fluorescent lighting.
• Excessive dust sources such as a workshop or garage.
• Excessive moisture.
• Extremely low temperature.
• Mechanical vibration or shock such as on top of the washing machine or
workbench.
6
Page 14
Getting started
Telephone base installation
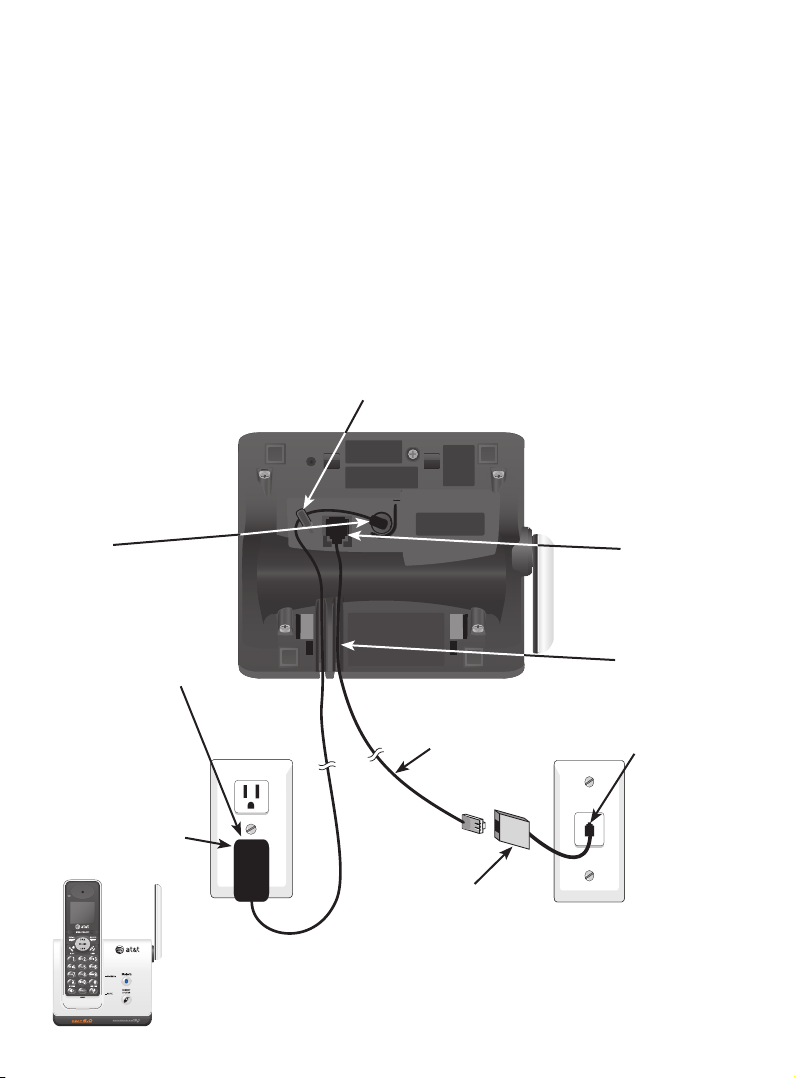
Install the telephone base as shown below. Make sure that the electrical outlet
is not controlled by a wall switch.
If you subscribe to high-speed Internet service (digital subscriber line - DSL)
through your telephone line, you must install a DSL filter between the telephone
base and the telephone wall jack. The filter prevents noise and caller ID
problems caused by DSL interference. Please contact your DSL service provider
for more information about DSL filters.
The telephone base is set for desktop use. If you want to change to the wallIf you want to change to the wall
mounting position, install the supplied wall mount bracket to the telephone base.
See page 10 for details.
2. Route the power cord through the
1. Plug the small
end of the power
adapter into the
power jack at
the bottom of
the telephone
base.
slot next to the telephone jack.
3. Plug one end of
the telephone
line cord into the
telephone jack at
the bottom of the
telephone base.
6. Plug the large
end of the
power adapter
into a power
outlet not
controlled by a
wall switch.
Power
adapter
7. Raise the antenna.
Telephone
line cord
DSL filter (not included),
required if you have DSL
high-speed Internet service.
7
4. Place the cords
into the channels.
5. Plug the other
end of the
telephone line
cord into a
telephone jack
or a DSL filter.
Page 15
Getting started
�harger installation
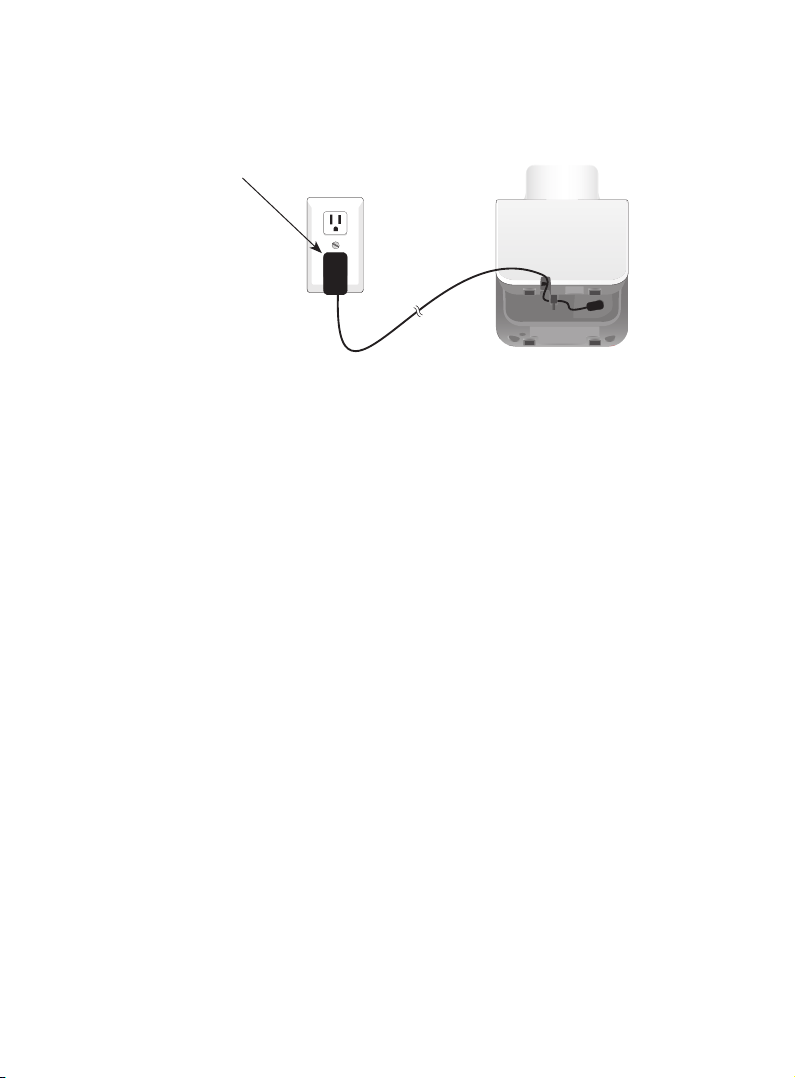
Plug the power adapter
into an electrical outlet not
controlled by a wall switch.
IMPORTANT INFORMATION
Use only the power adapter supplied with this product. To order a replacement
1.
power adapter, visit our website at www.telephones.att.com, or call
1 (800) 222-3111. In Canada, dial 1 (866) 288-4268.
The power adapters are intended to be correctly oriented in a vertical or floor
2.
mount position. The prongs are not designed to hold the plug in place if it is
plugged into a ceiling, under-the-table or cabinet outlet.
8
Page 16
Getting started
Battery installation & charging
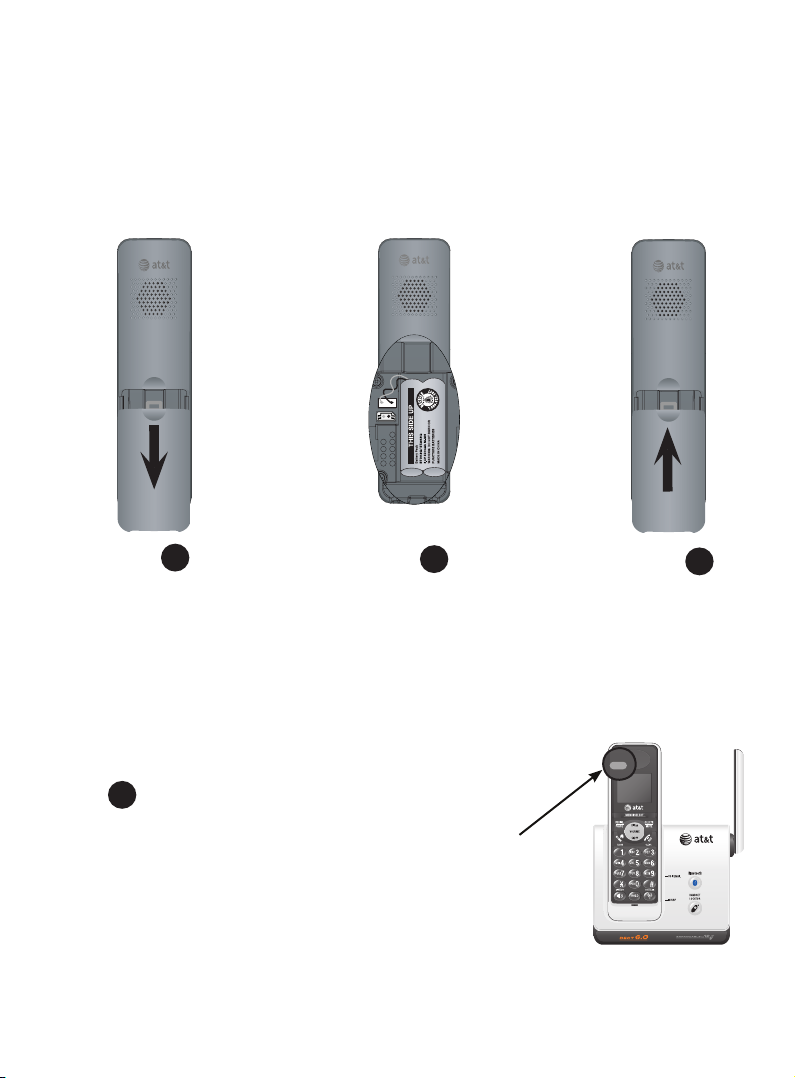
Install the battery as shown below. After installing the battery, you can make
and receive short calls. Place the handset in the telephone base or charger
when not in use. For optimal performance, charge the handset battery for
at least 16 hours before use. See the table on page 81 for battery operating
times.
Step 1
Press on the recessed
area and slide the battery
compartment cover
downwards (if necessary).
Plug the battery securely
into the connector inside
the handset battery
compartment, matching
the color-coded label.
Insert the supplied battery
with the label THIS SIDE
UP facing up as indicated.
Step 2
Step 3
Align the cover flat
against the battery
compartment
cover, then slide
it upwards until it
clicks into place.
Step 4
Charge the handset by placing it face up
in the telephone base or charger. The
CHARGE light is on when charging.
IMPORTANT INFORMATION
Use only the supplied rechargeable battery or replacement battery (model BT8001). To
order, visit our website at www.telephones.att.com or call 1 (800) 222-
CHARGE light
3111. In Canada, dial 1 (866) 288-4268.
9
Page 17
Getting started
Installation options
The telephone base is set for desktop use. It is possible to change to a
wall mounting position by installing the provided wall mount bracket. Wall
mounting requires a telephone outlet wall mounting plate with mounting
studs that may require professional installation. You can purchase the
mounting plate from many hardware or consumer electronics retailers.
Desktop to wall mount installation
Before you begin, make sure you unplug the telephone line cord and power
adapter from the wall outlets. To prevent possible damage, remove the
handset from the telephone base.
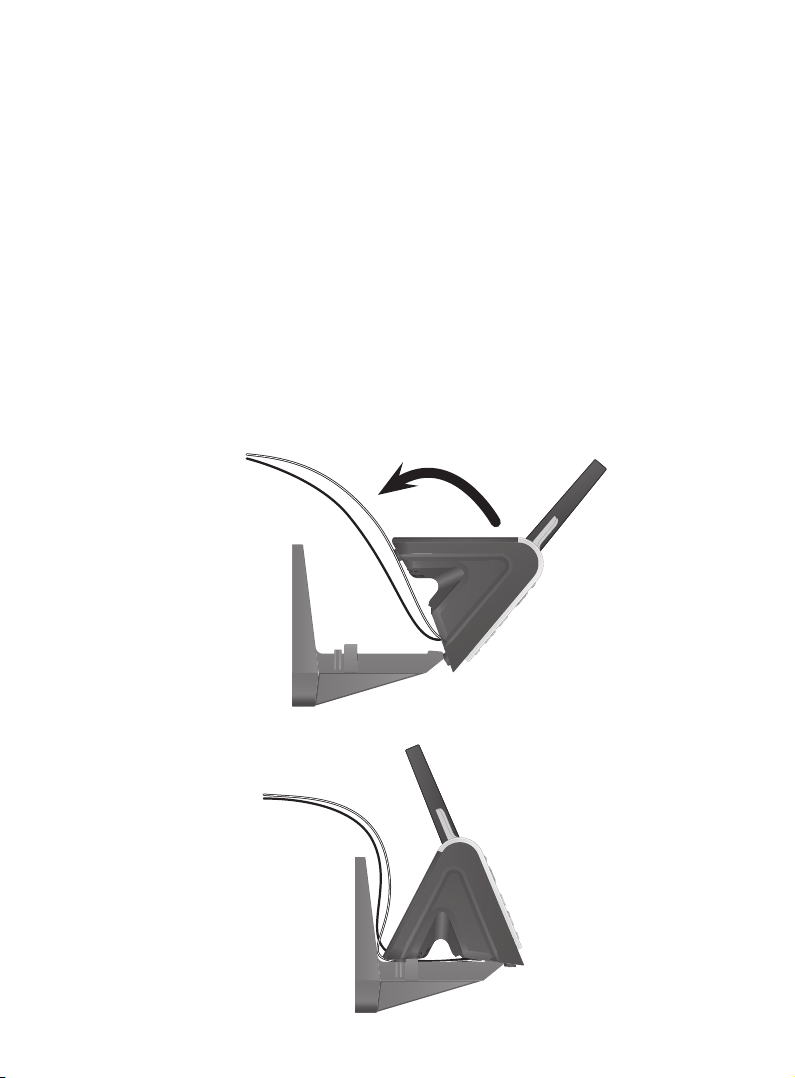
1. Position the telephone base as shown below, and insert the extended tabs of
the bracket into the slots under the telephone base.
2. Push the telephone base down until it clicks into place on both sides of the
bracket.
10
 Loading...