

Page 1

Table of contents
Appendix G, FCC Part 68 and
ACTA ................................................65
Appendix H, FCC Part 15 ......67
Appendix I,
Limited warranty .........................68
Appendix J, Technical
specifications ................................71
Appendix K,
Troubleshooting ..........................72
Index ...................................................80
Page 2
Getting started
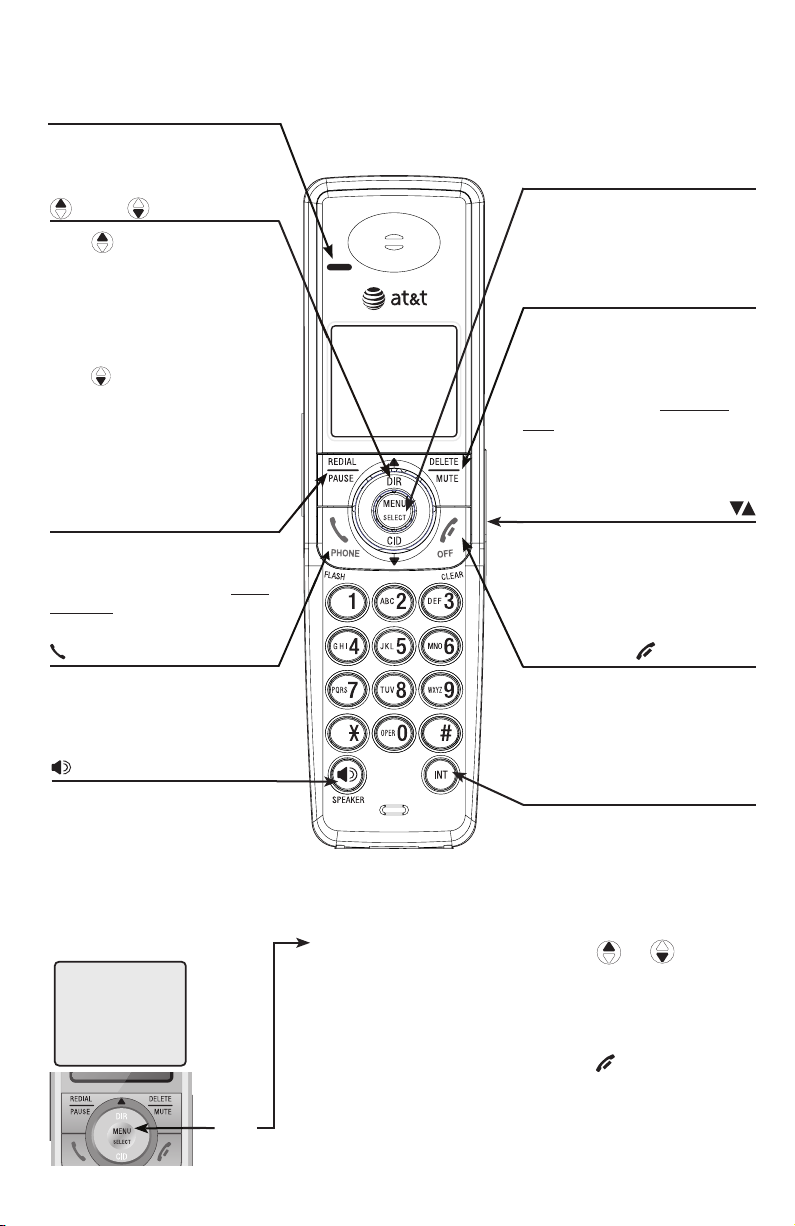
Quick reference guide - handset
CHARGE indicator
On when the handset is
charging in the telephone base
or charger.
DIR / CID
Press DIR to display
directory entries (page 34).
Press to scroll up while in
menus.
While entering names or
numbers, press to move the
cursor to the right.
Press CID to display caller ID
history (page 40).
Press to scroll down while in
menus.
While entering names or
numbers, press to move the
cursor to the left.
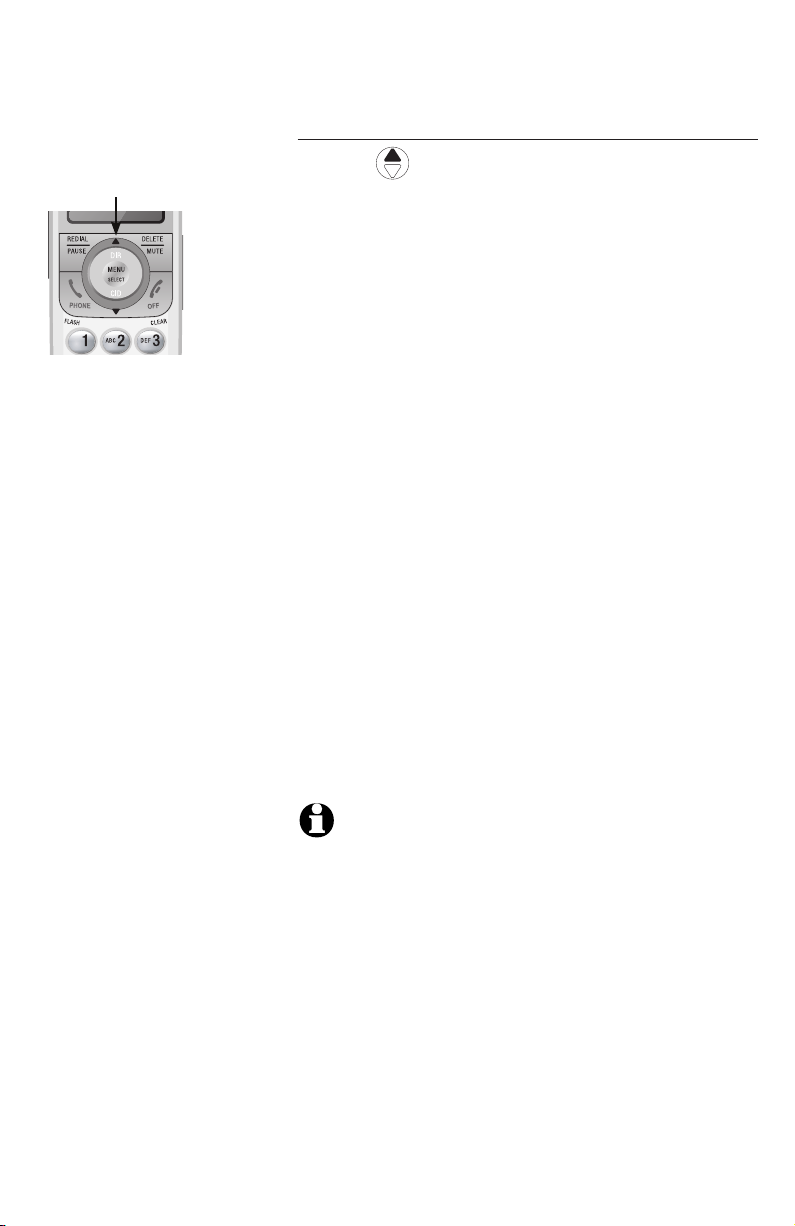
REDIAL/PAUSE
Press to view redial memory
(page 22).
While entering numbers, press
and hold to insert a dialing
pause (page 32).
PHONE/FLASH
Press to make or answer a call.
During a call, press to receive
an incoming call if call waiting
is activated (page 24).
SPEAKER
Press to turn on the handset
speakerphone.
Press again to resume normal
handset use (page 21).
MENU/SELECT
Press to display the menu.
While in the menu, press to
select an item or save an entry
or setting.
DELETE/MUTE
During a call, press to mute
microphone (page 25).
While reviewing the caller
ID history, press to delete an
individual entry, or press and
hold to clear the caller ID
history (page 40).
While predialing, press to delete
digits (page 21).
VOLUME
Press the volume key on the side
of the handset to adjust listening
volume when on a call.
Press to adjust ringer volume
when in idle mode.
OFF/CLEAR
During a call, press to hang up.
While using menus, press to cancel an operation, back up to the
previous menu, or exit the menu
display.
INT
Press to begin an intercom
conversation or to transfer a
call (pages 27-30).
Feature menu
The > symbol shows a
highlighted menu item.
>DIRECTORY
CALL LOG
Menu
Feature menu
DIRECTORY (page 34)
CALL LOG (page 40)
RINGER VOLUME (page 16)
RINGER TONE (page 17)
KEY TONE (page 17)
LANGUAGE (page 18)
CLR VOICE MAIL (page 19)
3
Using menus
Press or to scroll
through menu items.
Press MENU/SELECT to
select or save changes to a
highlighted menu item.
Press OFF/CLEAR to
cancel an operation, back
up to the previous menu, or
exit the menu display.
Page 3
Getting started
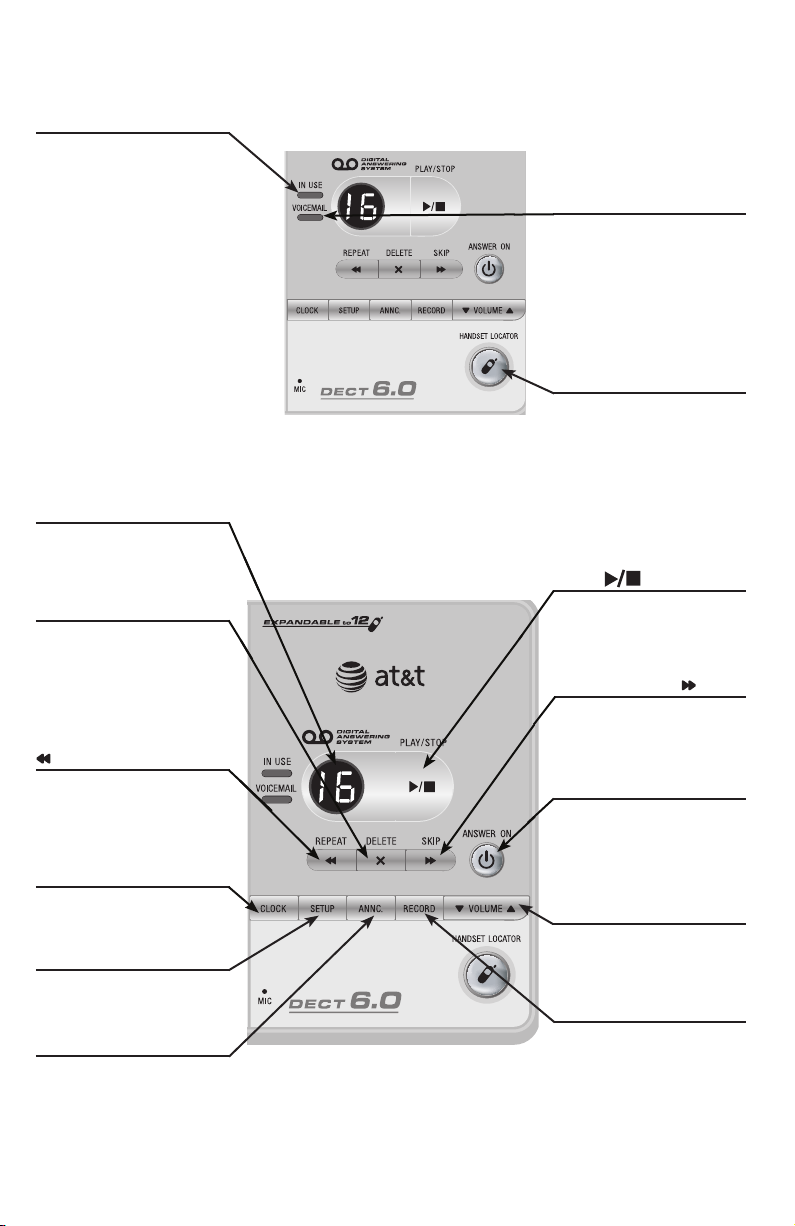
Quick reference guide - telephone base
IN USE indicator
On when the handset
•
is in use, when the
answering system is
answering an incoming
call or when you are
registering a handset.
Flashes when another
•
telephone is in use
on the same line, or
you are deregistering
handset(s) from the
telephone base.
Flashes quickly when
•
there is an incoming
call.
MESSAGE COUNTER
Number of messages (or
during playback, message
number currently playing).
X/DELETE
Press to delete the
message currently playing.
Press twice to delete all
old messages when the
phone is not in use
(page 51).
/REPEAT
Press to repeat a
message. Press twice to
play the previous message
(page 51).
CLOCK
Press to review or set the
clock (page 43).
SETUP
Press to hear and change
setup options (page 47).
ANNC.
Press to review or
record the outgoing
announcement.
Press again to end
announcement playback
or recording (page 45).
Answering System Functions
4
VOICEMAIL indicator
Flashes when you have
new voicemail. Voicemail
is a service offered by
your local telephone
company, and is different
from answering system
messages (page 19).
HANDSET LOCATOR
Press to make handsets
beep so you can locate
them (page 23).
PLAY/STOP
Press to start or stop
message playback (page
51).
/SKIP
Press to skip a message
(page 51).
ANSWER ON
Press to turn the
answering system on or
off (page 44).
VOLUME
Press to adjust playback
volume (page 51).
RECORD
Press to record a
memo (page 52) or,
after pressing ANNC.
to record an outgoing
announcement
(page 45).
Page 4

Getting started
Installation preparation
You must install and
charge the battery before
using the telephone.
If you subscribe to high-speed Internet service (Digital Subscriber Line - DSL)
through your telephone lines, you must install a DSL filter between the
telephone base and the telephone wall jack (see the following page). The filter
will prevent noise and caller ID problems caused by DSL interference. Please
contact your DSL service provider for more information about DSL filters.
Your product may be shipped with a protective sticker covering the handset or
telephone base display - remove it before use.
For customer service or product information, visit our website at
STOP!
See page 8
for easy instructions.
www.telephones.att.com or call 1 (800) 222-3111. In Canada, dial
1 (866) 288-4268.
Avoid placing the telephone base too close to:
• Communication devices such as: television sets, VCRs, or other cordless
telephones.
• Excessive heat sources.
• Noise sources such as a window with traffic outside, motors, microwave ovens,
refrigerators, or fluorescent lighting.
• Excessive dust sources such as a workshop or garage.
• Excessive moisture.
• Extremely low temperature.
• Mechanical vibration or shock such as on top of the washing machine or work
bench.
5
Page 5

Getting started
Telephone base & charger installation
Install the telephone base as shown below. Make sure that the electrical outlet
is not controlled by a wall switch.
If you subscribe to high-speed Internet service (Digital Subscriber Line - DSL)
through your telephone lines, you must install a DSL filter between the
telephone base and the telephone wall jack. The filter will prevent noise and
caller ID problems caused by DSL interference. Please contact your DSL service
provider for more information about DSL filters.
The telephone base comes with the mounting bracket installed for desktop use.
Also, the telephone line cord and the power adapter are already plugged into the
telephone base. If you want to change to wall mounting installation, see page 10
for details.
Telephone base installation
1. Plug the other end
of the telephone line
cord into a telephone
jack.
Telephone
line cord
DSL filter (not included),
required if you have DSL
high-speed Internet service.
4. Raise the antenna.
2. Plug the power
adapter into an outlet
not controlled by a
wall switch.
Power
adapter
3. Make sure the
telephone line cord
and power adapter
cord are routed
through the slots on
the bracket.
6
Page 6

Getting started
Telephone base & charger installation
Charger installation
Plug the power adapter
into an electrical outlet.
IMPORTANT INFORMATION
Use only the power adapter(s) supplied with this product. To order a replacement
1.
power adapter, visit our website at www.telephones.att.com, or call
1 (800) 222-3111. In Canada, dial 1 (866) 288-4268.
The power adapters are intended to be correctly oriented in a vertical or floor
2.
mount position. The prongs are not designed to hold the plug in place if it is
plugged into a ceiling, under-the-table or cabinet outlet.
7
Page 7
Getting started
Battery Pack
BT18433 / BT28433
2.4V 500mAh Ni-MH
WARNING: DO NOT BURN OR
PUNCTURE BATTERIES
MADE IN CHINA
THIS SIDE UP
Battery Pack
BT18433 / BT28433
2.4V 500mAh Ni-MH
WARNING: DO NOT BURN OR
PUNCTURE BATTERIES
MADE IN CHINA
THIS SIDE UP
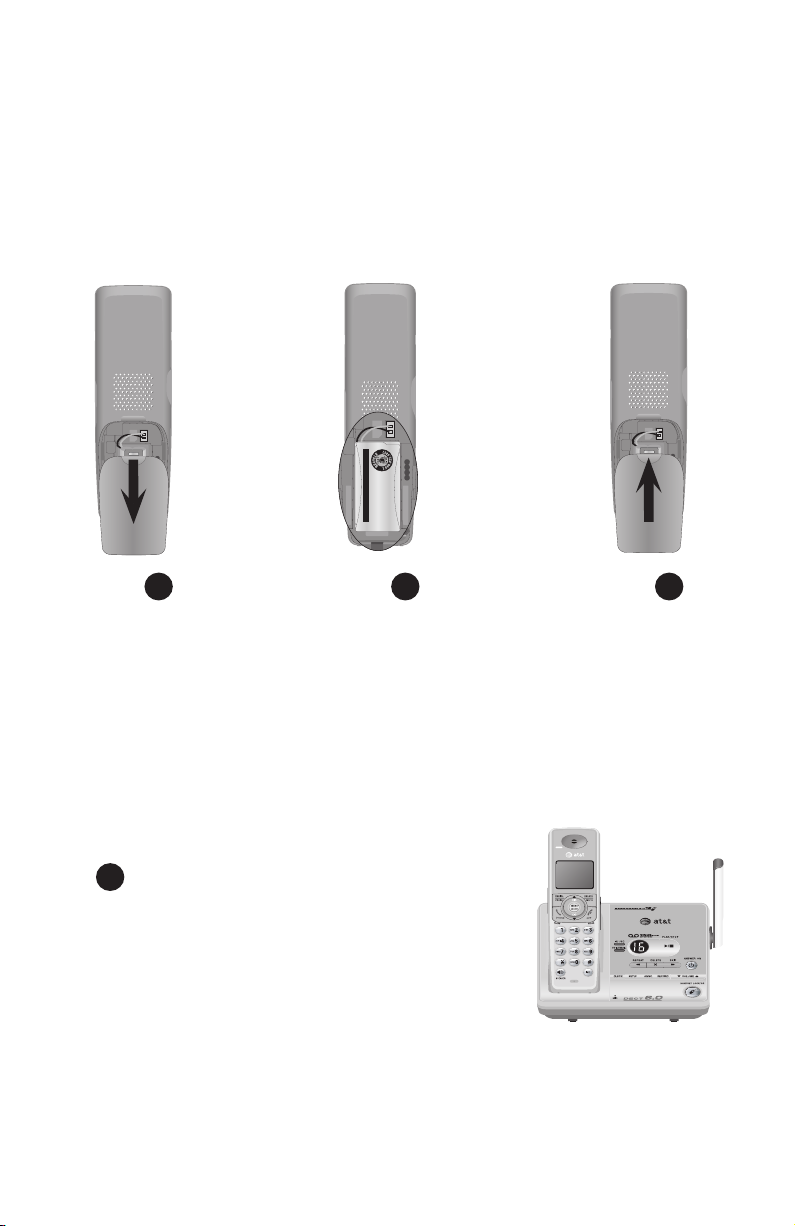
Battery installation & charging
Install the battery as shown below. After installing the battery, you can make
and receive short calls, but replace the handset in the telephone base or
charger when not in use. For optimal performance, charge the handset battery
for at least 16 hours before use. When fully charged, the handset battery
provides approximately five hours of talk time or three days of standby time.
Step 1
Press the depression
and slide the battery
compartment cover
downwards.
(if necessary)
Step 2 Step 3
Plug the battery securely
into the connector inside
the handset battery
compartment, matching
the color-coded label.
Insert the supplied battery
Align the cover flat
against the battery
compartment
cover, then slide
it upwards until it
clicks into place.
with the label THIS SIDE
UP facing up as indicated.
Step 4
Charge the handset by placing it face up in the
telephone base or charger. The CHARGE light will
be on when charging.
IMPORTANT INFORMATION
Use only the supplied rechargeable battery or replacement battery (model BT8001). To
order, visit our website at www.telephones.att.com or call 1 (800) 222-
3111. In Canada, dial 1 (866) 288-4268.
8
Page 8
Getting started
Belt clip & optional headset
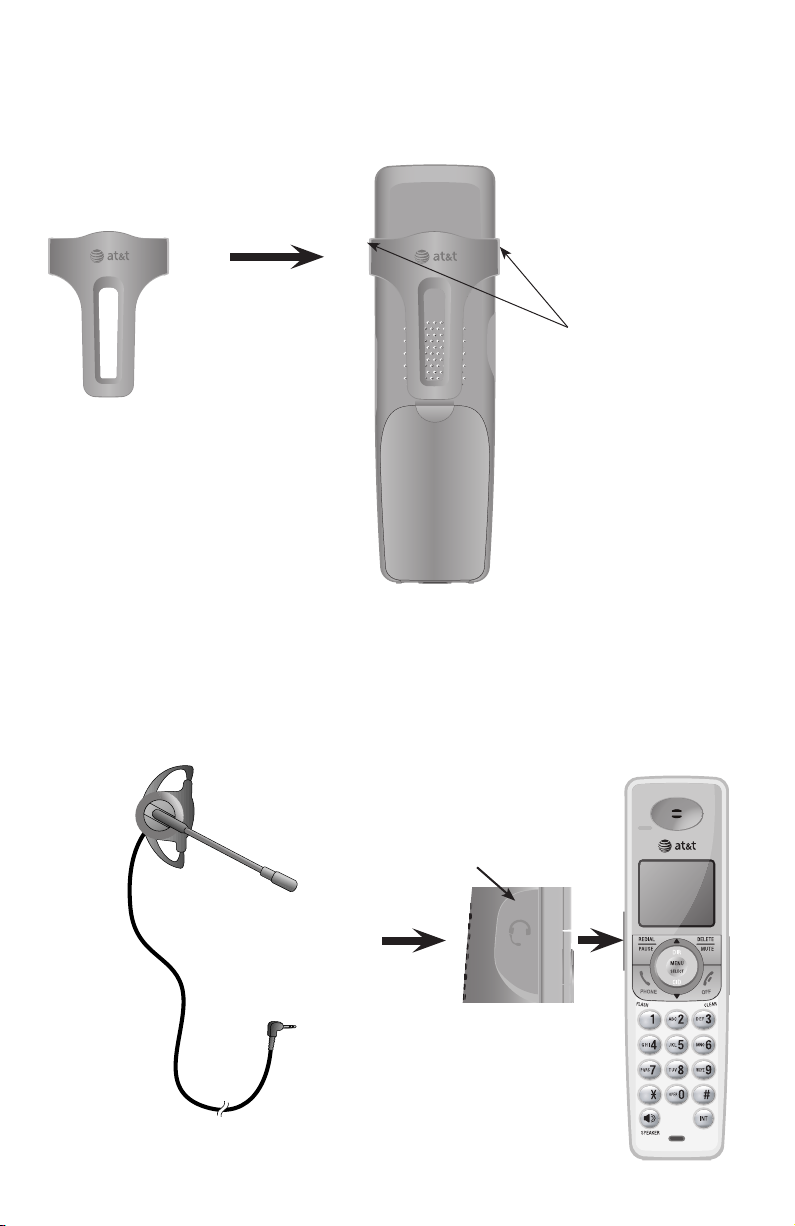
To attach the belt
clip:
Snap the belt clip
into the retaining tabs
on both sides of the
handset as shown in the
figure.
To remove the belt
clip:
Gently lift either of the
belt clip retaining tabs,
shown in the figure,
outwards to remove
the belt clip from the
handset.
For handsfree telephone conversations, you can use any industry standard
2.5 mm headset (purchased separately). For best results, use an AT&T 2.5
mm headset. To purchase a headset, visit our website atvisit our website at
www.telephones.att.com or call 1 (800) 222-3111. In Canada dial
1 (866) 288-4268.
Lift the rubber
flap here.
Plug a 2.5 mm headset
into the jack on the side
of handset (beneath the
small rubber flap).
Side of handset
9
Page 9
Getting started
Mounting bracket procedure
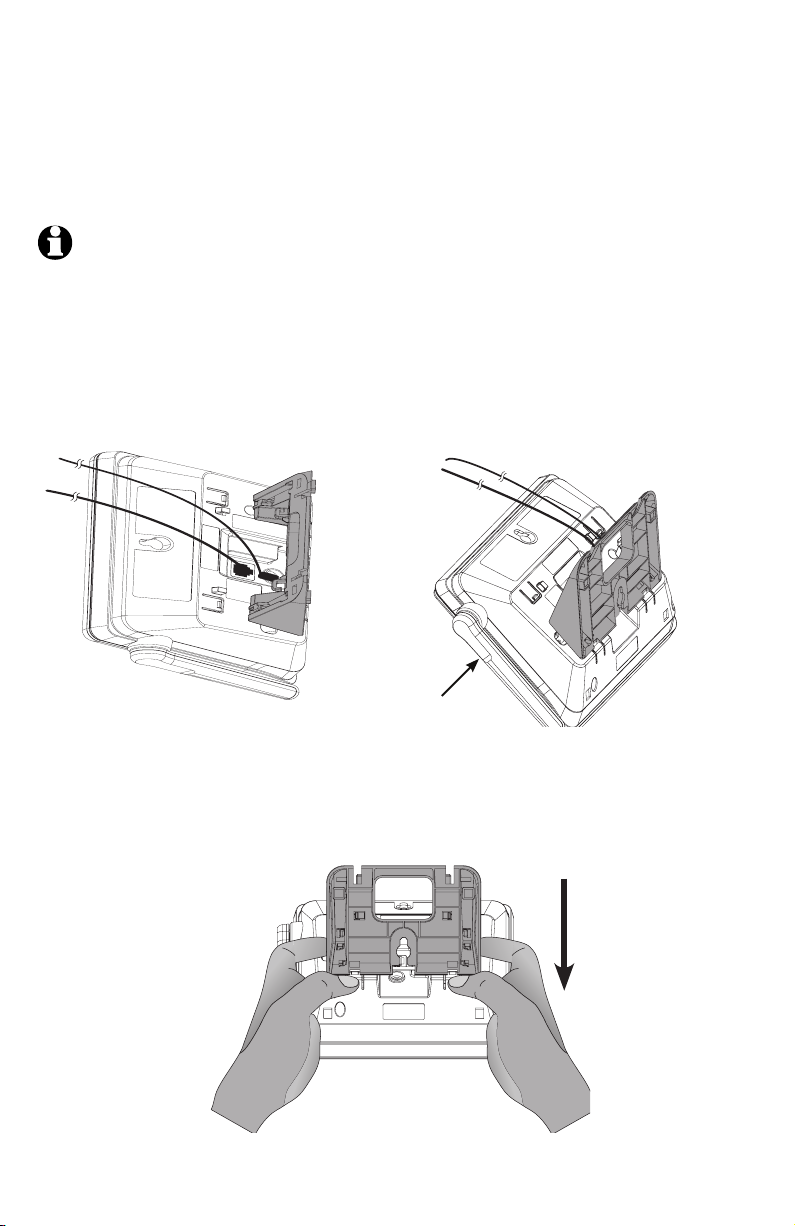
The telephone base comes with the mounting bracket installed for desktop
use. Wall mounting requires a telephone outlet wall mounting plate with
mounting studs that may require professional installation. You can purchase
the mounting plate from many hardware or consumer electronics retailers.
NOTE: The mounting bracket must be used for both tabletop and wall mounting positions.
Desktop to wall mount installation
To change the telephone base to the wall mount position:
1. Remove the cords from the routing
slots on the bracket.
2. Place the telephone base on a flat
surface with the antenna on the left
side as shown in Figure 2.
Antenna
Figure 1. Cords removed from the routing slots
Figure 2. Desktop mounting bracket location
3. Position your hands as shown in Figure 3. Press your thumbs down on the tabsPosition your hands as shown in Figure 3. Press your thumbs down on the tabs
that are below the bracket, holding it in place. Use your index fingers to move
the bracket towards yourself.
Figure 3. Detaching the bracket from the telephone base
10
Page 10

Getting started
Mounting bracket procedure
Desktop to wall mount installation
4. Make sure the cords are pointing towards you as shown in Figure 4.
Upper keeper tabs
Figure 4. Upper keeper tab location
5. Tilt the top of the bracket away from you until it is resting on the telephoneTilt the top of the bracket away from you until it is resting on the telephone
base. Align the grooves of the bracket with the upper keeper tabs on theAlign the grooves of the bracket with the upper keeper tabs on the
telephone base.
6. Slide the bracket away from you
until it clicks into the keeper
tabs. Bundle the telephone line
cord and power adapter cord,
and secure them with a twist tie.
Figure 5. Bracket installation
7. Place the bundled telephone
cord and power adapter cord
under the bracket as shown
below.
Figure 6. Cord bundles
11
Page 11
Getting started
Mounting bracket procedure
Desktop to wall mount installation
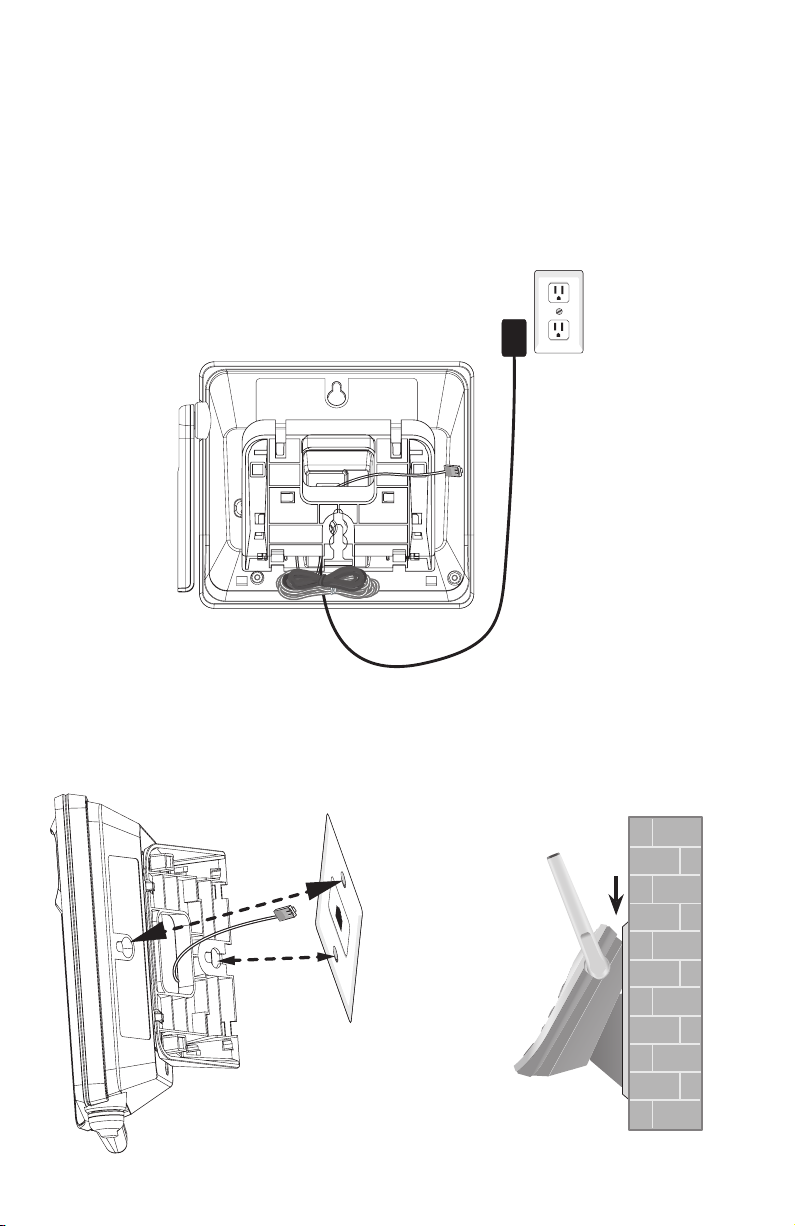
8. Route the other end of the telephone line cord through the bottom of the
bracket until it loops through the large rectangular opening in the middle
of the bracket as shown in Figure 7 below.
9. Plug the power adapter into an electrical outlet not controlled by a wall
switch.
Figure 7. Cord routing
10. Plug the telephone line cord into
the wall plate telephone jack.
Align the holes on the telephone
base with the standard wall plate.
Figure 8. Wall mount alignment
11. Slide the telephone base down
until it locks in place. Make
sure the telephone is securely
positioned as shown in Figure 9,
and raise the antenna.
Figure 9. Wall mount position
12
Page 12
Getting started
Mounting bracket procedure
Wall mount to desktop installation
To change the telephone base to the desktop position:
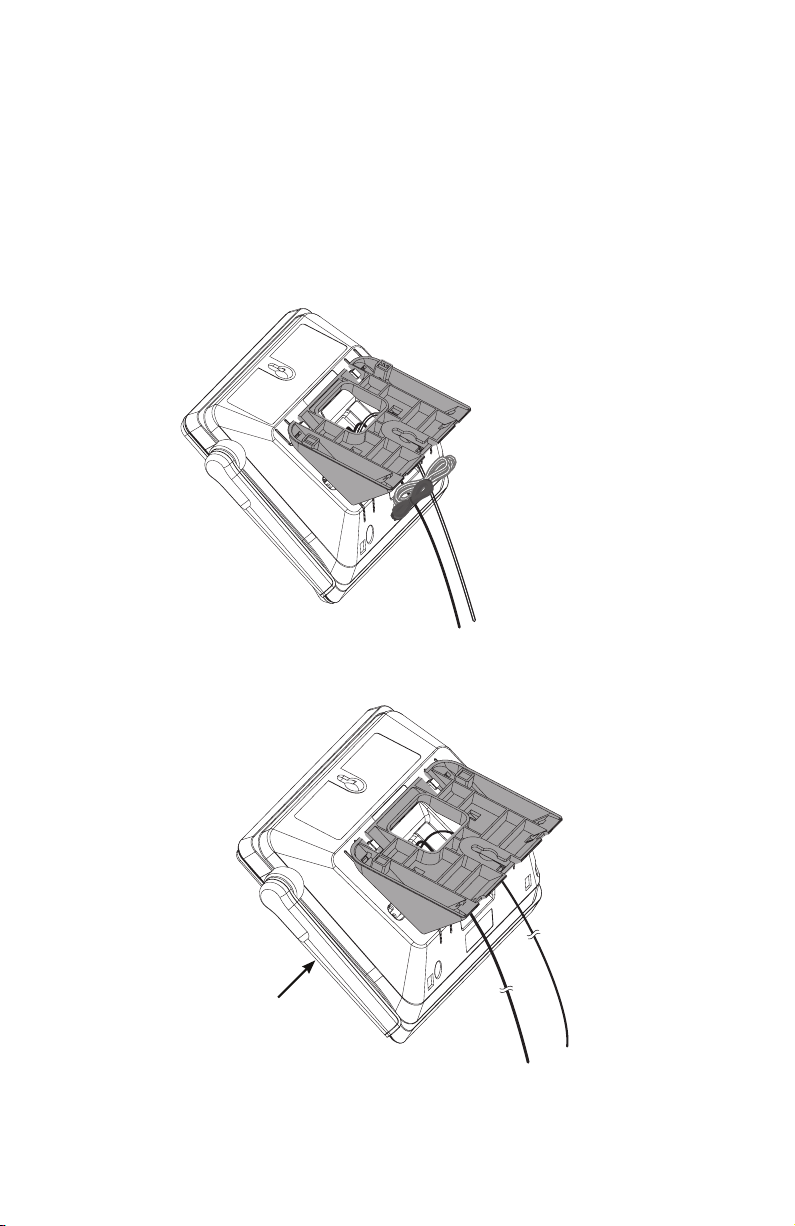
1. Remove the telephone base from the wall and unplug the telephone line
cord from the wall plate. Loop the telephone line cord through the largelarge
rectangular opening in the middle of the bracket, making sure both cords, making sure both cords
are pointing downwards as shown in Figure 10 below.
Figure 10. Cord routing
2. Untie the bundled telephone cord and power adapter cord. Place the telephone
base on a flat surface with the antenna on the left side as shown in Figure 11.
Antenna
Figure 11. Unbundled cords
13
Page 13
Telephone operation
Mounting bracket procedure
Wall mount to desktop installation
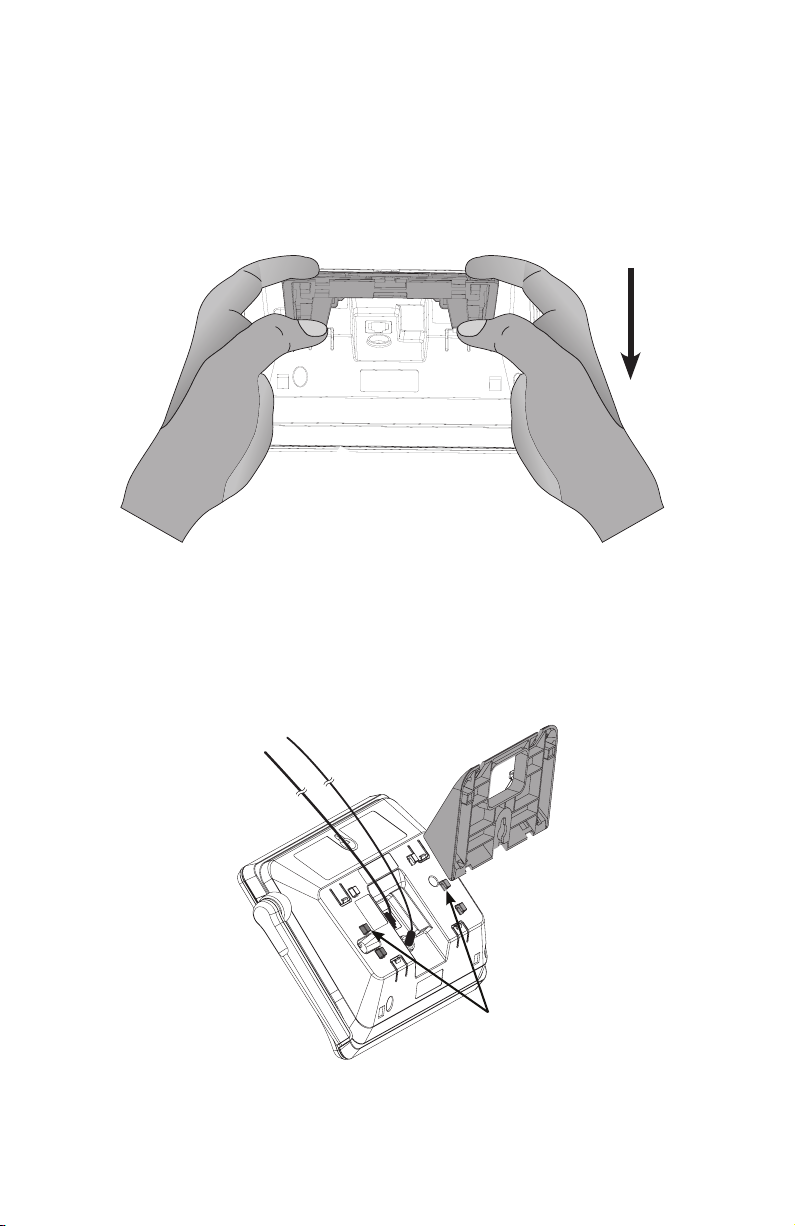
3. Position your hands as shown in Figure 12. Press your thumbs down on the
tabs that are below the bracket, holding it in place. Use your index fingers to
move the bracket towards yourself.
Figure 12. Detaching the bracket from the telephone base
4. Tilt the top of the bracket towards you until it is resting on the telephone base.
5. Align the grooves of the bracket with the lower keeper tabs on the base. MakeAlign the grooves of the bracket with the lower keeper tabs on the base. Make
sure the cords are pointing away from you as shown in Figure 13.
Lower keeper tabs
Figure 13. Bracket installation
14
Page 14
Telephone operation
Mounting bracket procedure
Wall mount to desktop installation
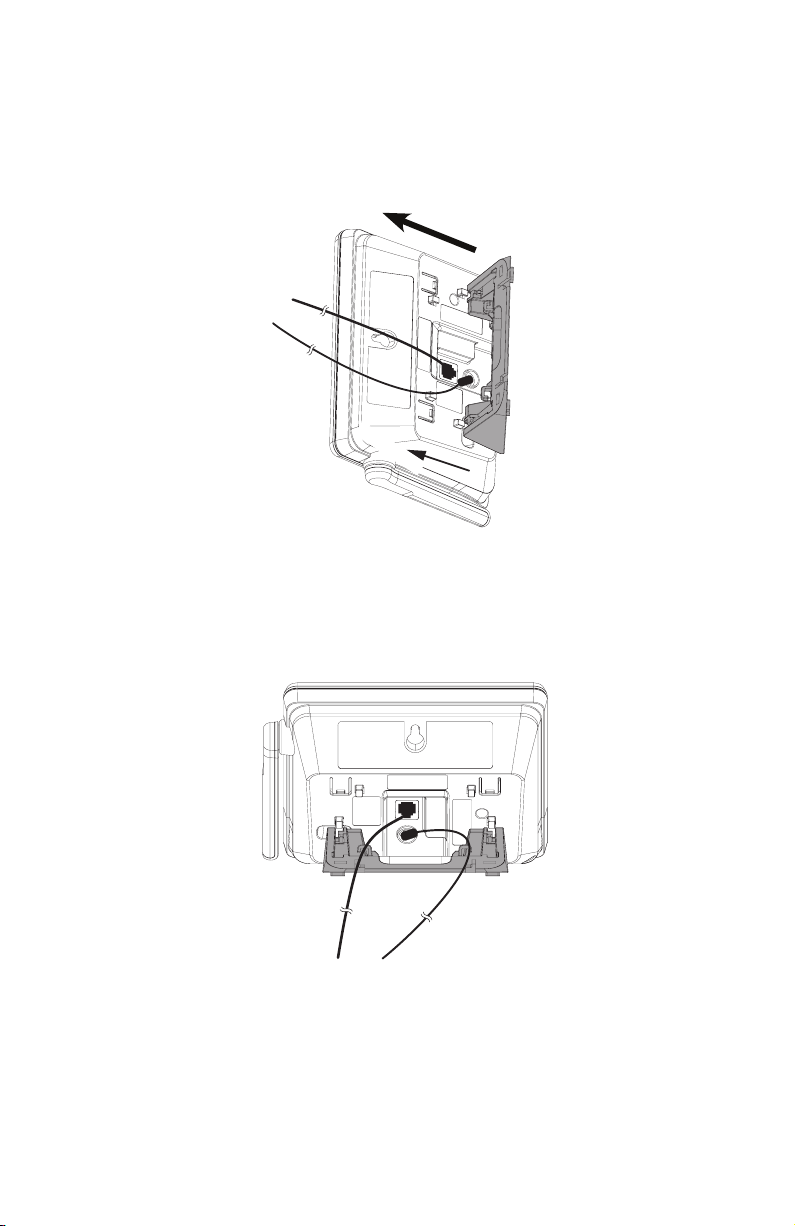
6. Slide the bracket away from you until it clicks into the keeper tabs.Slide the bracket away from you until it clicks into the keeper tabs.
Figure 14. Bracket installation
7. Route the telephone line cord and the power adapter through the slots on theRoute the telephone line cord and the power adapter through the slots on the
bracket.
Figure 15. Cord routing
15
Page 15
Handset settings
>
DIRECTORY
CALL LOG
>
DIRECTORY
CALL LOG
Handset settings
Using the feature menu, you can customize many
of the telephone’s settings.
1. Press MENU/SELECT when in idle mode (when
the phone is not in use) to enter the feature
menu.
2. Use DIR / CID to scroll to the feature
to be changed. When scrolling through the
menu, the top menu item is always highlighted
with a > symbol.
3. Press MENU/SELECT to select the highlighted
item.
NOTE:
Press OFF/CLEAR to cancel an operation, back
up to the previous menu or exit the menu display. Press
and hold OFF/CLEAR to return to idle mode.
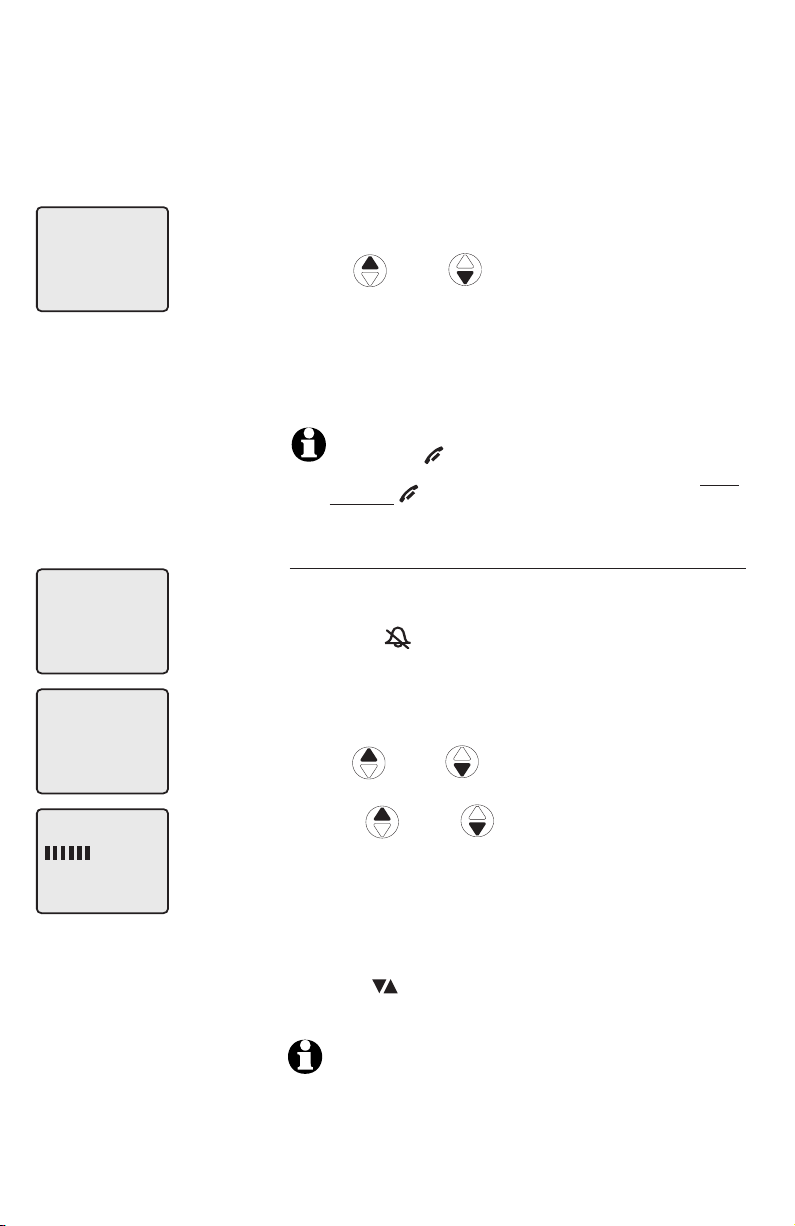
Ringer volume
Using this menu, you can set the ringer volume
level (1-6), or turn the ringer off. When the ringer is
turned off, will appear on the handset screen.
>
RINGER VOLUME
RINGER TONE
RINGER VOLUME
To adjust the RINGER VOLUME:
1. Press MENU/SELECT when in idle mode to enter
the feature menu.
2.
Use DIR / CID to scroll to >RINGER
VOLUME, then press MENU/SELECT.
3. Press DIR / CID to sample each volume
level.
4. Press MENU/SELECT to save your preference and
return to the feature menu.
-OR -
When the handset is in idle mode, press the
VOLUME buttons on the right side of the handset
to change the ringer volume.
NOTE: The ringer volume also determines the ringer
volume of intercom calls (pages 27-28) and the paging
tone for the handset locator feature (page 23). If the
handset ringer volume is set to off, that handset is
silenced for all incoming calls and paging.
16
Page 16
Handset settings
>
DIRECTORY
CALL LOG
Handset settings
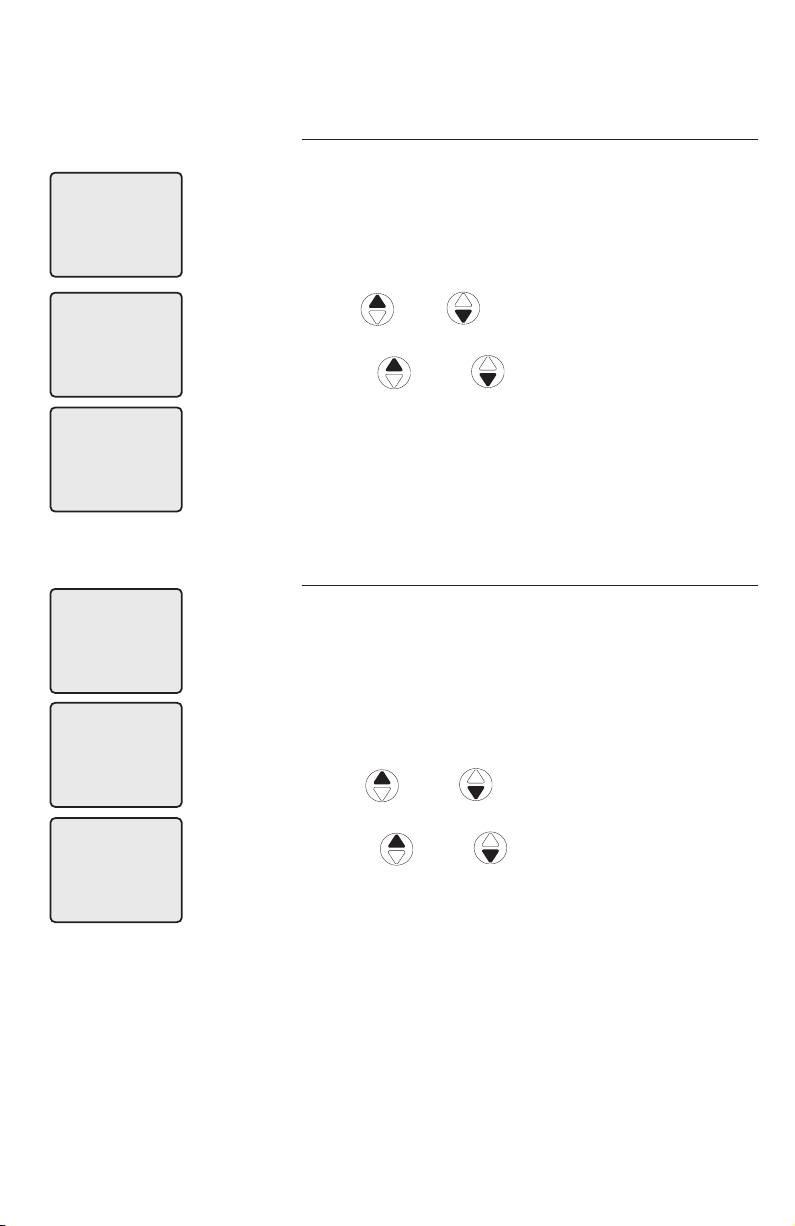
Ringer tone
This feature allows you to choose one of 10 ringer
tones.
To choose a ringer tone:
1. Press MENU/SELECT when in idle mode to enter
the feature menu.
>
RINGER TONE
KEY TONE
RINGER TONE
1
>
DIRECTORY
CALL LOG
>
KEY TONE
LANGUAGE
KEY TONE
ON
2. Use DIR / CID to scroll to >RINGER
TONE,
then press MENU/SELECT.
3. Press
DIR / CID
to get to the next ringer
tone and to hear a sample of it.
4. Press MENU/SELECT to save your preference and
return to the feature menu.
Key tone
The handset is factory programmed to beep with
each key press. If you turn off the KEY TONE,
there will be no beeps when keys are pressed.
To turn the KEY TONE on or off:
1. Press MENU/SELECT when in idle mode to enter
the feature menu.
2. Use
DIR / CID
to scroll to >KEY TONE,
then press MENU/SELECT.
3. Press
DIR / CID
to select ON or OFF.
4. Press MENU/SELECT to save your preference
and return to the feature menu.
17
Page 17
Handset settings
>
DIRECTORY
CALL LOG
>
LANGUAGE
CLR VOICE MAIL
Handset settings
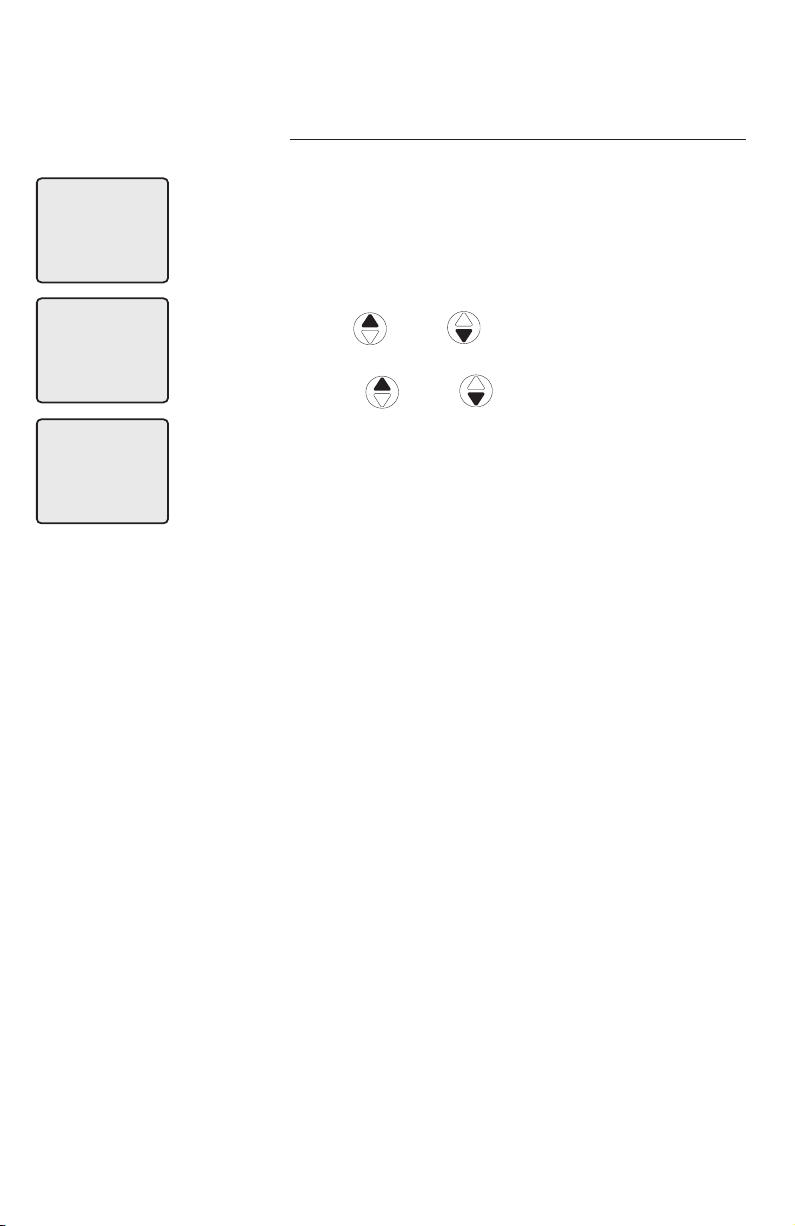
Language
In this menu, you can select the language used for
all screen displays.
To select a language:
1. Press MENU/SELECT when in idle mode to enter
the feature menu.
2. Use
>LANGUAGE, then press MENU/SELECT.
DIR / CID
to scroll to
LANGUAGE
ENGLISH
3. Press
DIR / CID
to select ENGLISH,
FRANCAIS or ESPANOL.
4. Press MENU/SELECT to save your preference and
return to the feature menu.
18
Page 18
Handset settings
>
DIRECTORY
CALL LOG
>
CLR VOICE MAIL
DIRECTORY
TURN INDICATOR
OFF?
Handset settings
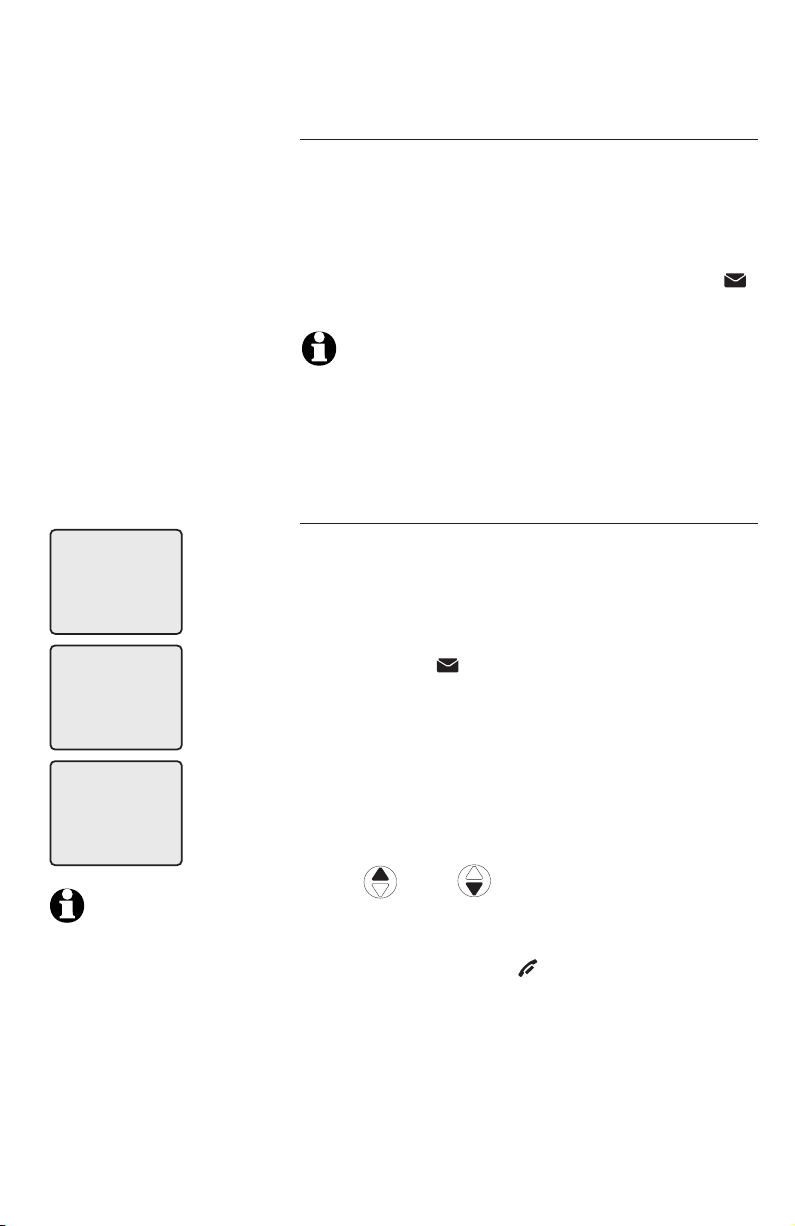
Visual message waiting (voicemail) indicator
If you subscribe to a voicemail service offered
by your local telephone company, the voicemail
waiting indicator feature will provide visual
indication when you have new voicemail
messages. The VOICEMAIL light on the telephone
base will flash, and NEW VOICE MAIL and the
icon will appear on the handset screen(s).
NOTES:
1. This feature does not indicate new answering system
messages recorded on your phone.
2. For more information about the difference between your
answering system and voicemail, see page 41.
To clear voicemail indication
Use this feature when the telephone indicates there
is new voicemail but there is none (for example,
when you have accessed your voicemail from a
different telephone line while away from home). This
feature only turns off the displayed NEW VOICE
MAIL message, icon and VOICEMAIL light; it
does not delete your voicemail message(s). If there
actually are new voicemail messages, your local
telephone company will continue to send the signal
to activate the visual message waiting indicator.
To manually turn off the new voicemail indicator:
1. Press MENU/SELECT when in idle mode to enter
the feature menu.
NOTES:
1. Telephone company
voicemail may alert you
to new messages with
stutter (broken) dial tone.
Contact your telephone
company for more details.
2. For information about
using your voicemail
service contact your
telephone company for
assistance.
2. Use
DIR / CID
to scroll to
>CLR VOICE MAIL, then press MENU/SELECT.
3. Press MENU/SELECT again to turn the voicemail
indication off, or press OFF/CLEAR to cancel the
procedure.
19
Page 19
Handset settings
DELETE/MUTE
Handset settings
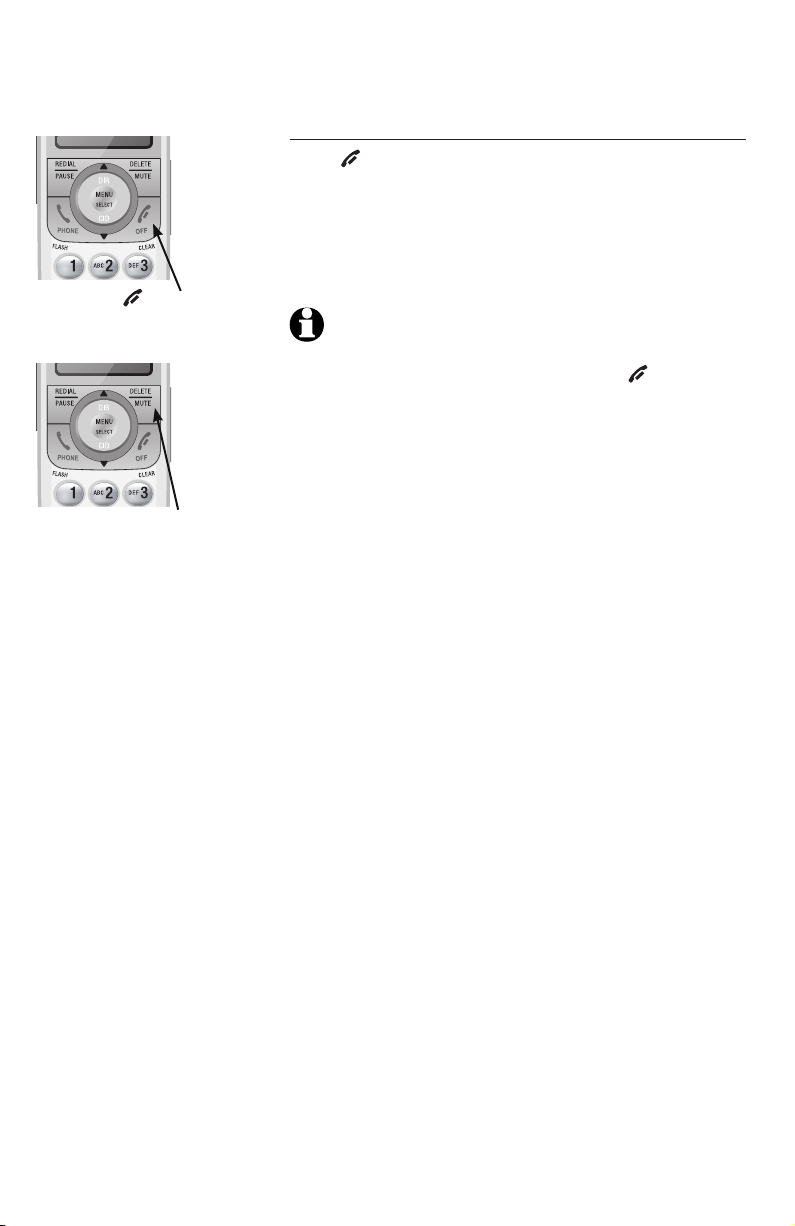
Temporary ringer silencing
Press OFF/CLEAR or DELETE/MUTE while the
telephone is ringing to silence the ringer temporarily.
This will silence the ringer without disconnecting the
call. The next incoming call will ring normally at the
preset volume.
OFF/CLEAR
NOTE: If more than one handset is installed, each
handset will ring when there is an incoming call unless
the ringer volume is turned off. Pressing OFF/CLEAR or
DELETE/MUTE on one handset will only silence the ringer
of that particular handset.
20
Page 20
Telephone operation
Handset operation
Elapsed
time
PHONE 00:00:30
NOTE:
Pressing
PHONE/FLASH to
access services from
your local telephone
service provider will
not affect the elapsed
time.
Elapsed
time
SPEAKER 00:00:30
Making a call
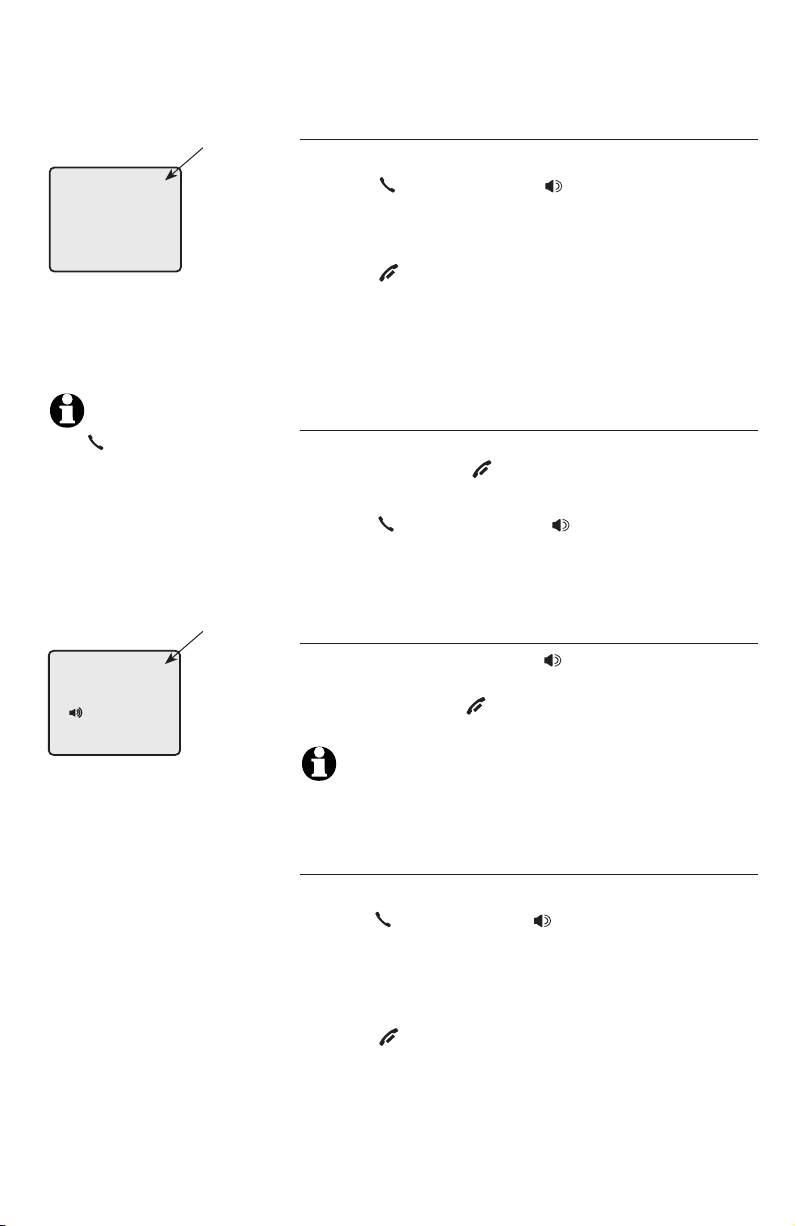
To make a call:
• Press PHONE/FLASH or SPEAKER, then enter
the telephone number.
To end a call:
• Press OFF/CLEAR or return the handset to the
telephone base or charger.
The screen displays the elapsed time as you talk
(in hours, minutes and seconds).
On-hook dialing (predialing)
• Enter the telephone number. Press
DELETE/MUTE or OFF/CLEAR to make
corrections when entering the phone number.
Press PHONE/FLASH or SPEAKER to dial.
•
The screen displays the elapsed time as you talk
(in hours, minutes and seconds).
Handset speakerphone
During a call, you can press SPEAKER to alternate
between hands-free speakerphone and normal
handset use. Press OFF/CLEAR to hang up.
NOTE: If a headset is plugged into the handset, you will
not be able to use the handset speakerphone.
Answering a call
To answer a call:
• Press PHONE/FLASH or SPEAKER.
–OR–
• Press any dial pad key (0-9, * or #).
To end a call:
• Press OFF/CLEAR or return the handset to the
telephone base or charger.
21
Page 21

Telephone operation
REDIAL
888-883-2445
Handset operation
Auto off
A call will end automatically when you put the handset in the telephone base or charger.
Last number redial
To view the five most recently dialed numbers:
• Press REDIAL/PAUSE to display the most recently
called number (up to 30 digits).
• Press DIR / CID or REDIAL/PAUSE
repeatedly to view up to five recently called
numbers.
The handset will beep twice at the beginning and at
the end of the list.
Press OFF/CLEAR to exit.
To redial a number:
• Press PHONE/FLASH or SPEAKER to dial the
displayed number.
–OR–
• Press PHONE/FLASH or SPEAKER, then
REDIAL/PAUSE to call the most recently called
number (up to 30 digits).
While reviewing the redial memory, press
DELETE/MUTE to delete the displayed number.
22
Page 22
Telephone operation
**PAGING**
Handset operation
Handset locator
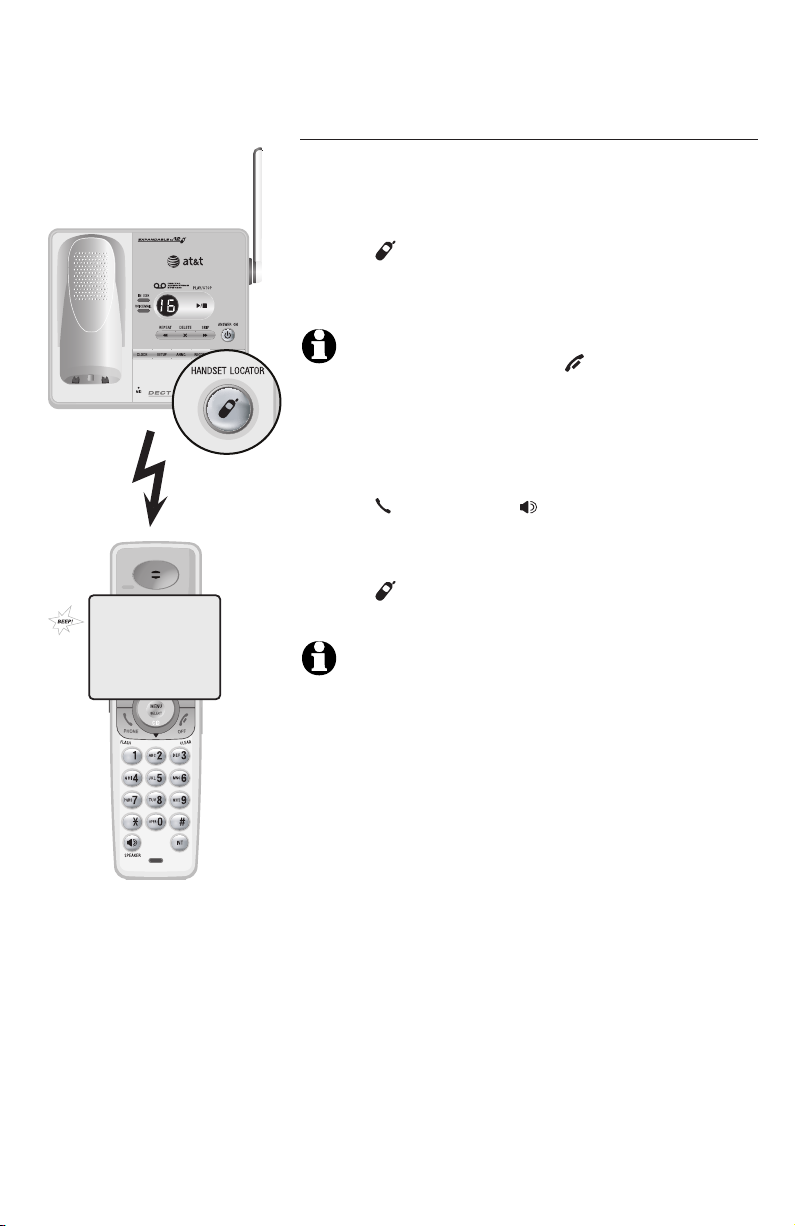
The handset locator feature is useful if you misplace
a handset(s).
To start the paging tone:
• Press HANDSET LOCATOR at the telephone
base. This starts the paging tone on the handset(s)
for 60 seconds.
NOTE: When paging, if you press OFF/CLEAR or
DELETE/MUTE on a handset, the ringer of the handset will be
silent but the handset locator feature will not be canceled.
To stop the paging tone:
• Press PHONE/FLASH, SPEAKER, or any dial
pad key (0-9, *, or #) on the handset(s),
–OR–
• Press HANDSET LOCATOR on the telephone
base.
NOTE: The handset ringer volume also determines the level
of the paging tone. If the handset ringer volume level is set
to off, that handset will be silent for all calls and paging
(page 16).
23
Page 23
Telephone operation
Options while on calls
Volume control
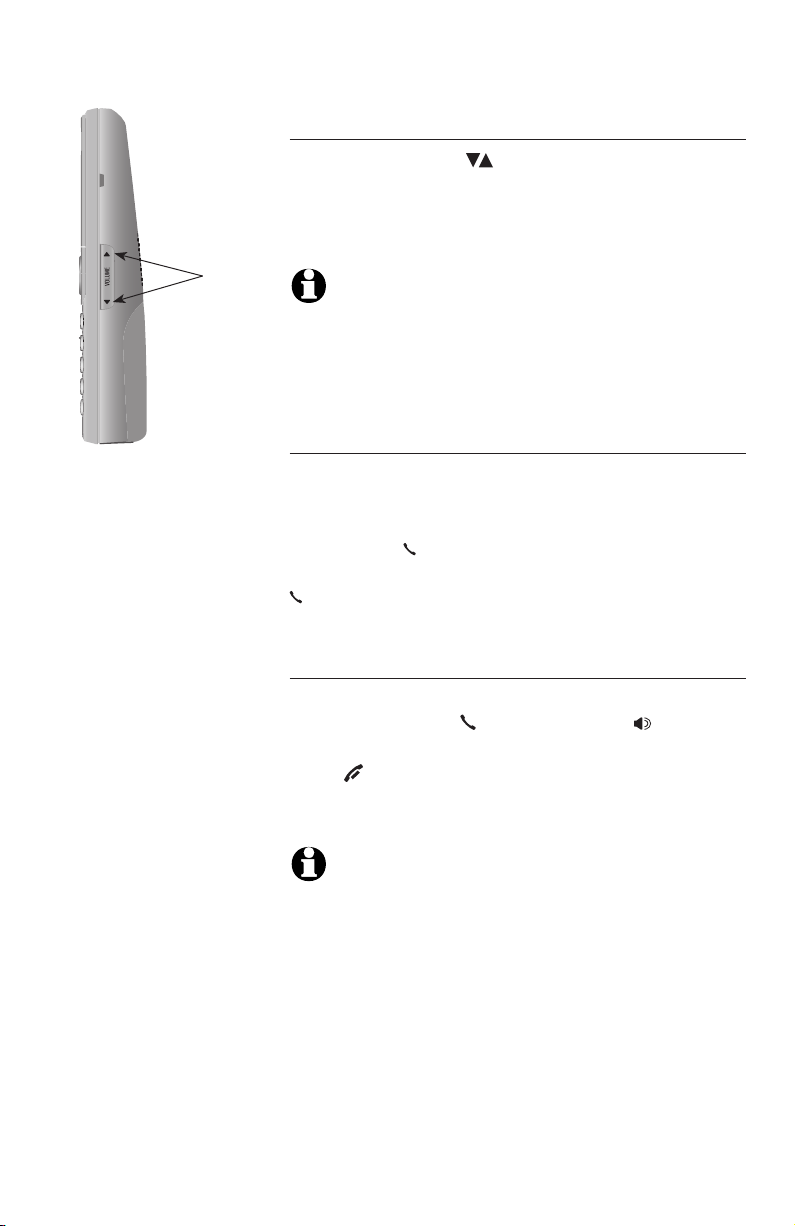
Press the VOLUME keys on the side of thekeys on the side of the
handset to adjust the listening volume. Each press
of the button increases or decreases the volume
level.
Volume
control
NOTES:
1. All volume settings, (normal handset, speakerphone, and
headset) are independent.
2. When the volume reaches the minimum or maximum setting,
you will hear two beeps.
Call waiting
If you subscribe to call waiting service with your
local telephone service provider, you will hear a
beep if someone calls while you are already on
a call. Press PHONE/FLASH to put your current
call on hold and take the new call. You can press
PHONE/FLASH at any time to switch back and
forth between calls.
Multiple handset use (not for model SL82118)
If a handset is already on a call and you’d like to
join the call, press PHONE/FLASH or SPEAKER
on another system handset.
Press OFF/CLEAR or place the handset in the
telephone base or charger to exit the call. The call
will not be terminated until all handsets hang up.
NOTE: Only two system handsets can be used at the
same time on an outside call.
24
Page 24
Telephone operation
Options while on calls
Mute
The mute function allows you to turn off the
microphone. You can hear the caller, but the caller
will not be able to hear you.
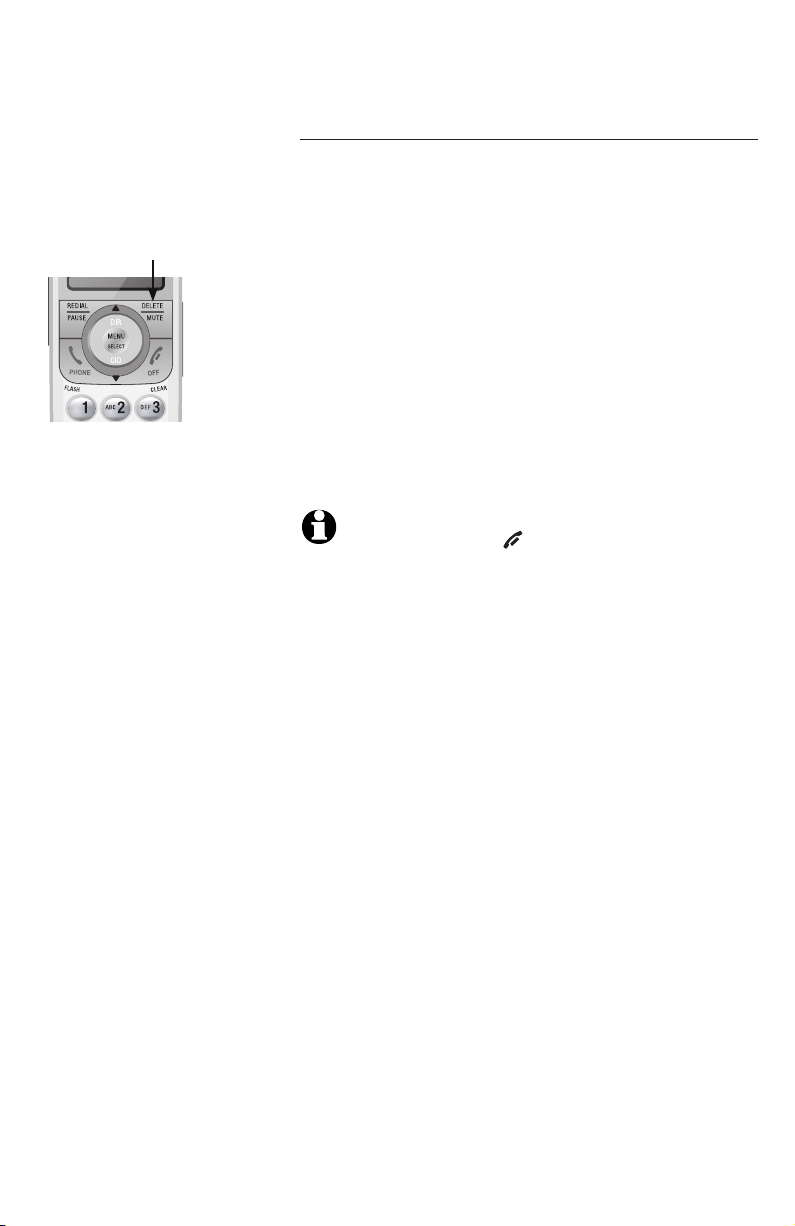
DELETE/MUTE
To mute the call:
• Press DELETE/MUTE to turn off the microphone.
When mute is on, the handset screen will show
MUTED for a few seconds and the MUTE icon
will be shown until mute is turned off.
To un-mute the call:
• Press DELETE/MUTE again and resume speaking.
When mute is turned off, MICROPHONE ON
will display temporarily on the handset screen.
NOTE: You cannot press OFF/CLEAR to exit redial, directory
or caller ID history without ending the call.
25
Page 25
Telephone operation
NOTES:
1. You cannot edit a
directory entry while you
are on a call.
details about the directory,
see page 34.
2.
You cannot copy a caller ID
entry into the directory while
you are on a call. For more
details about the caller ID
history, see page 40.
3. While on a call, only
the most recently called
number can be reviewed,
and erasing the entry is
not allowed. For more
details about the redial
memory, see page 22.
For more
�hain dialing
This feature allows you to initiate a dialing
sequence from numbers stored in the directory,
caller ID history or redial list while you are on a
call.
Chain dialing can be useful if you wish to access
numbers other than phone numbers (such as bank
account information or access codes) from the
directory, caller ID history or redial list.
Directory
Press DIR to review the directory. To dial the
displayed number, press MENU/SELECT.
Caller ID history (call log)
Press CID to review the caller ID history. To dial
the displayed number, press MENU/SELECT.
Last number redial
Press REDIAL/PAUSE to display and dial the
most recently dialed number. If you press
REDIAL/PAUSE again within two seconds, the
number will not be dialed.
26
Page 26
Telephone operation
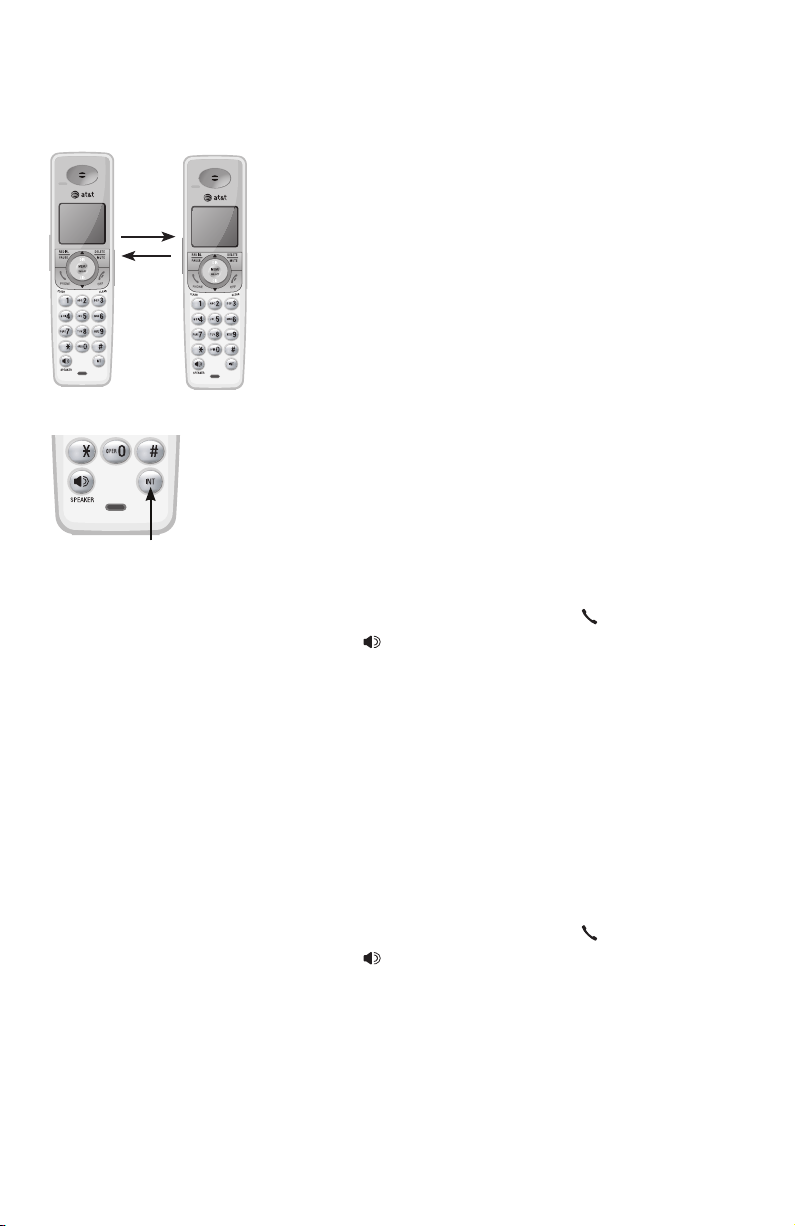
INT
Intercom
Use the intercom feature for conversations between
handsets. Unless additional handsets have been
registered, this feature is not available on model
SL82118.
You can buy additional accessory handsets
(model SL80108) for this telephone base. Up to
12 handsets can be registered to the telephone
base. The first nine handsets that you register will
be named Handsets 1-9. Use the handset number
to intercom and transfer calls.
Although the names for handsets 10-12 will
appear in their displays as 10-12, when you
intercom or transfer to one of them, you must
use *0 for Handset 10, *1 for handset 11, and *2
for Handset 12.
Model SL82218
1. Press INT. The screen will show CALLING OTHER
HANDSET. The called handset will ring, and its
screen will show OTHER HANDSET IS CALLING.
2. On the ringing handset, press PHONE/FLASH,
INT, SPEAKER, or any dial pad key (0-9, * or #)
to answer the intercom call.
Models SL82318/SL82418/SL82518/SL82558/
SL82658
1. Press INT. The screen will show INTERCOM TO:
2. Enter the handset number 1-9 or, for handsets
10, 11 and 12, enter *0, *1 or *2, respectively.
The display will show CALLING HANDSET X, with
X being the handset number. The called handset
will ring, and its screen will show HANDSET X IS
CALLING.
3. On the ringing handset, press PHONE/FLASH,
INT, SPEAKER, or any dial pad key (0-9, * or #)
to answer the intercom call.
27
Page 27

Telephone operation
Intercom
To end the intercom call:
• Press OFF/CLEAR or INT on either handset.
-OR-
• Place either handset in the charger or telephone
base.
NOTES:
1. Before the intercom call is answered, you can cancel the
intercom call by pressing OFF/CLEAR or INT on the calling
handset.
2. If the called handset is not answered within 100 seconds, or
if it is in the directory or caller ID history mode, or on a call,
or out of range, the calling handset will show the message
UNABLE TO CALL TRY AGAIN.
3. Pressing OFF/CLEAR or DELETE/MUTE will temporarily silence
the intercom ringer.
4. You can buy additional accessory handsets, (SL80108). If
there are a total of two handsets registered to the telephone
base, the intercom feature will be the same as that of model
SL82218. If there are more than two handsets registered to
the telephone base, the intercom feature will be the same
as that of models SL82318/SL82418/SL82518/SL82558/
SL82658. If you want to intercom with the handset 10, 11 or
12, enter the handset number as *0, *1 or *2 respectively on
the calling handset.
28
Page 28
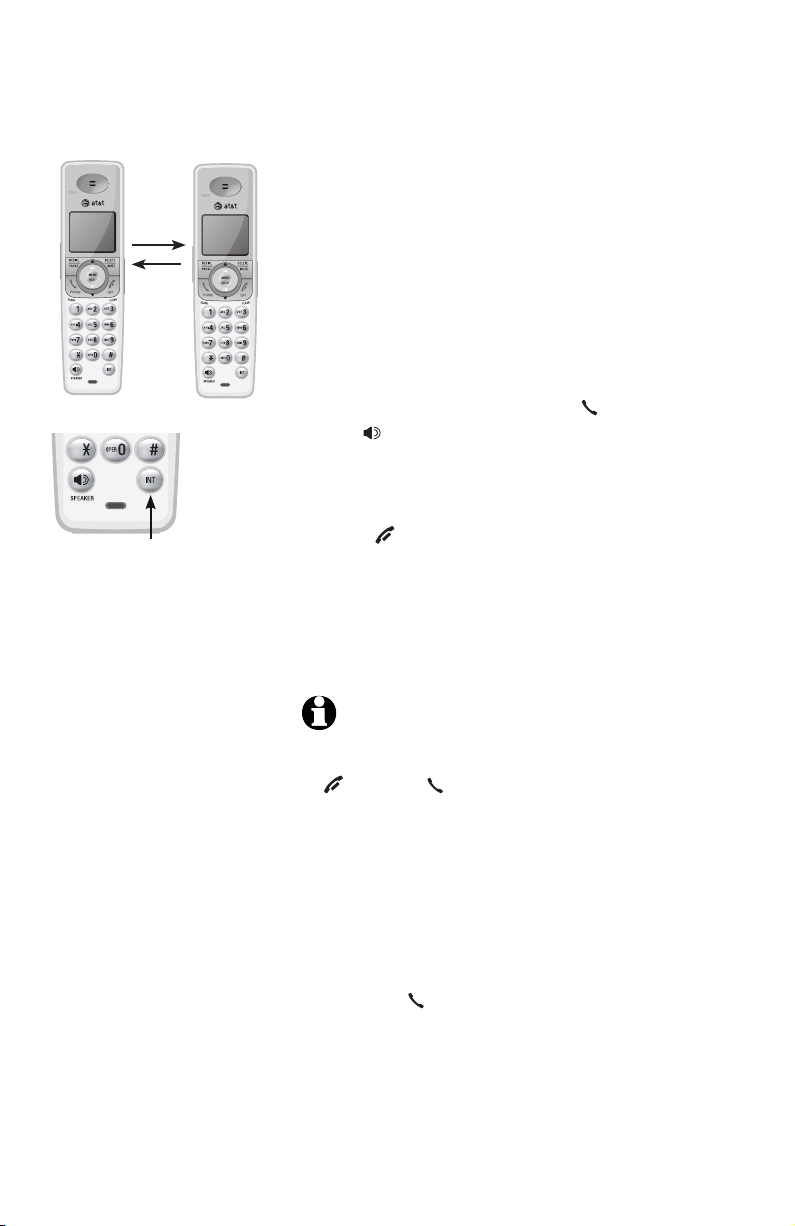
Telephone operation
INT
�all transfer using intercom
Use the intercom feature to transfer an outside
call from one handset to another. Unless additionalUnless additional
handsets have been registered, this feature is not
available on model SL82118.
Model SL82218
1. When on an outside call, press INT. The outside
call is automatically placed on hold. The
transferring set’s screen will show CALLING
OTHER HANDSET. The called handset will ring,
and its screen will show OTHER HANDSET IS
CALLING.
2. On the ringing handset, press PHONE/FLASH,
INT, SPEAKER, or any dial pad key (0-9, * or
#) to answer the intercom call. You can now
talk without the outside caller hearing the
conversation.
3. Press OFF/CLEAR on the transferring handset
or place it in the telephone base or handset
charger to complete the transfer. The transferring
handset’s screen will show CALL TRANSFERED
and the other handset will automatically be
connected to the outside call.
NOTES:
1. Before the intercom call is answered, you can cancel the
transfer and return to the outside call by pressing
OFF/CLEAR, PHONE/FLASH, or INT.
2. If the called handset does not answer the intercom call
within 100 seconds, is in directory or caller ID history
mode or is or out of range, the transferring handset will
show UNABLE TO CALL TRY AGAIN on its screen and will
automatically return to the outside call.
3. You can switch between the intercom call and the outside call
by pressing INT on the transferring handset. The display will
alter between INTERCOM and OUTSIDE CALL to indicate
which call is active.
4. You can end the intercom call and return to the outside call
by pressing PHONE/FLASH on the transferring handset.
5. If you register an accessory handset to your SL82118 (for a
total of two handsets), call transfer using intercom will be the
same as model SL82218.
29
Page 29

Telephone operation
�all transfer using intercom
Models SL82318/SL82418/SL82518/SL82558/
SL82658
1. While on an outside call, press INT. The screen
will display TRANSFER TO:
2. Enter a handset number, 1-9 or *0-*2. The
transferring set’s screen will show CALLING
HANDSET X. The called handset will ring, and its
screen will show HANDSET X IS CALLING.
3. On the ringing handset, press PHONE/FLASH,
INT, SPEAKER, or any dial pad key (0-9, * or
#) to answer the intercom call. You can now
talk without the outside caller hearing the
conversation.
4. Press OFF/CLEAR on the transferring handset
or place it in the telephone base or handset
charger to complete the transfer. The transferring
handset’s screen will show CALL TRANSFERED
and the other handset will automatically be
connected to the outside call.
NOTES:
1. Before the intercom call is answered, you can cancel the
transfer and return to the outside call by pressing
OFF/CLEAR, PHONE/FLASH, or INT.
2. If the called handset does not answer the intercom call
within 100 seconds, is in directory or caller ID history
mode or is or out of range, the transferring handset will
show UNABLE TO CALL TRY AGAIN on its screen and will
automatically return to the outside call.
3. You can switch between the intercom call and the outside call
by pressing INT on the transferring handset. The display will
change between INTERCOM and OUTSIDE CALL to indicate
which call is active.
4. You can end the intercom call and return to the outside call
by pressing PHONE/FLASH on the transferring handset.
5. If you register two or more accessory handsets (for a total
of three or more), the feature of call transfer using intercom
will be the same as models SL82318/SL82418/SL82518/
SL82558/SL82658. If you want to transfer the call to handset
10, 11 or 12, enter the handset number as *0, *1 or *2
respectively on the calling handset.
30
Page 30

Directory
Robert Brown
888-883-2445
About the directory
Shared directory
The directory is stored in the telephone base, and
is shared by all handsets. Changes made to the
directory on any one handset will apply to all.
NOTE: Only one handset can review the directory at a
time. If another handset attempts to enter the directory,
the screen will display NOT AVAILABLE AT THIS TIME.
Capacity
The directory can store up to 50 entries, with a
maximum of 15 alphanumeric characters (including
spaces) for the names and 30 digits for the
telephone numbers. A convenient search feature
can help you find and dial numbers quickly (page
35).
If there are already 50 entries, the screen will
display LIST FULL. You will not be able to store a
new number until an existing one is deleted.
Exiting the directory
Press OFF/CLEAR to cancel an operation, back
up to the previous menu, or exit the menu display.
Press and hold OFF/CLEAR to return to the idle
mode.
If you pause for too long while creating or
reviewing an entry, the procedure will time out
and you will have to begin again.
31
Page 31
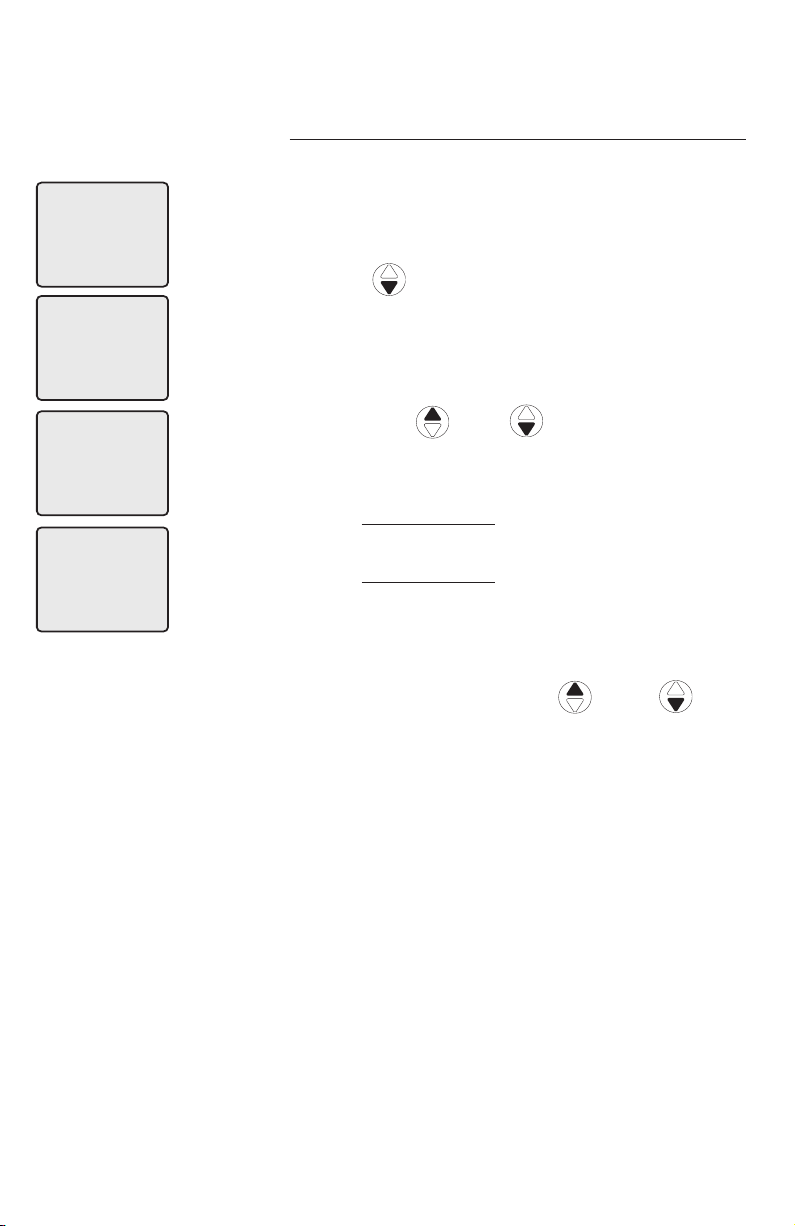
Directory
>
DIRECTORY
CALL LOG
�reating directory entries
To create a new directory entry
1. Press MENU/SELECT when in idle mode to enter
the feature menu.
2. Press MENU/SELECT again to enter
>DIRECTORY menu.
>
REVIEW
STORE
>
STORE
REVIEW
ENTER NUMBER
888-883-2445_
3. Press
CID
to highlight STORE.
4. Press MENU/SELECT.
5. Enter the telephone number when prompted.
• Use the dial pad to enter up to 30 digits.
– Press
DIR / CID
to move the
cursor to the right or left.
– Press DELETE/MUTE to erase digits.
– Press and hold DELETE/MUTE to erase all
digits.
– Press and hold REDIAL/PAUSE to enter a
three-second dialing pause.
-OR-
• Copy a number from redial by pressing
REDIAL/PAUSE then press
to locate the number to copy. Press
DIR or CID
MENU/SELECT to copy the number.
6. Press MENU/SELECT to save the number in the
display.
The display will show ALREADY SAVED if the
number is already in the directory. The same
number cannot be saved twice.
32
Page 32
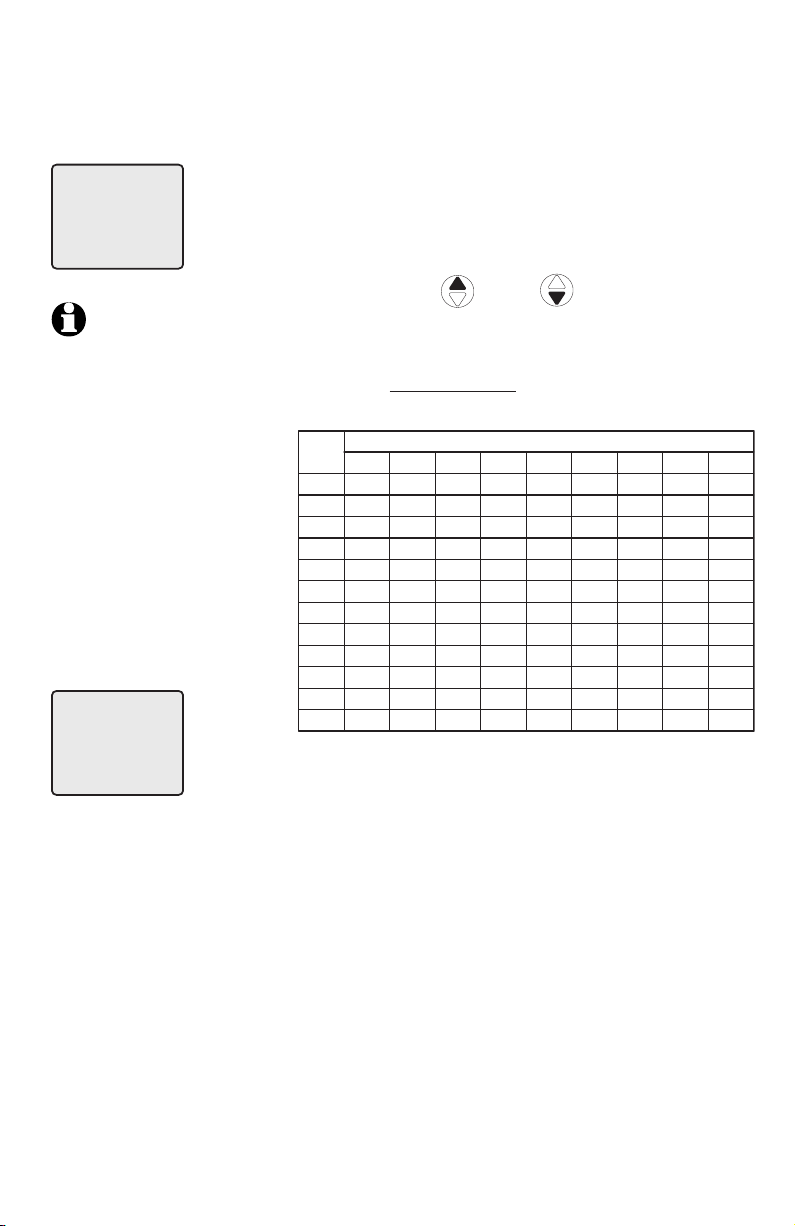
Directory
Dial
Key
1
1 2 3 4 5 6 7 8 9
1 # ‘ , - . &
A B C 2 a b c
D E F 3 d e f
G H I 4 g h i
J K L 5 j k l
M N O 6 m n o
P Q R S 7 p q r s
T U V 8 t u v
W X Y Z 9 w x y z
0
* ? ! / ( ) @
space
Characters by number of key presses
2
3
4
5
6
7
8
9
0
*
#
ENTER NAME
Robert Brown_
NOTE: The first letter
of every word will be
capitalized. The
remaining letters in a
word begin with
lower case letters
shown in the chart to
the right.
�reating directory entries
7. Enter the name when prompted.
• Use the dial pad to enter a name (up to
15 characters). Each time a key is pressed,
the character on that key will be displayed.
Additional key presses will produce other
characters on that key. See the chart below.
– Press– PressPress DIR or CID to move the
cursor to the right or left.
– Press DELETE/MUTE to erase letters.
– Press and hold DELETE/MUTE to erase all
letters.
Robert Brown
888-883-2445
8. Press MENU/SELECT to store your new directory
entry. The name and the telephone number will
then be shown on the screen. To change them
later, see page 36.
33
Page 33
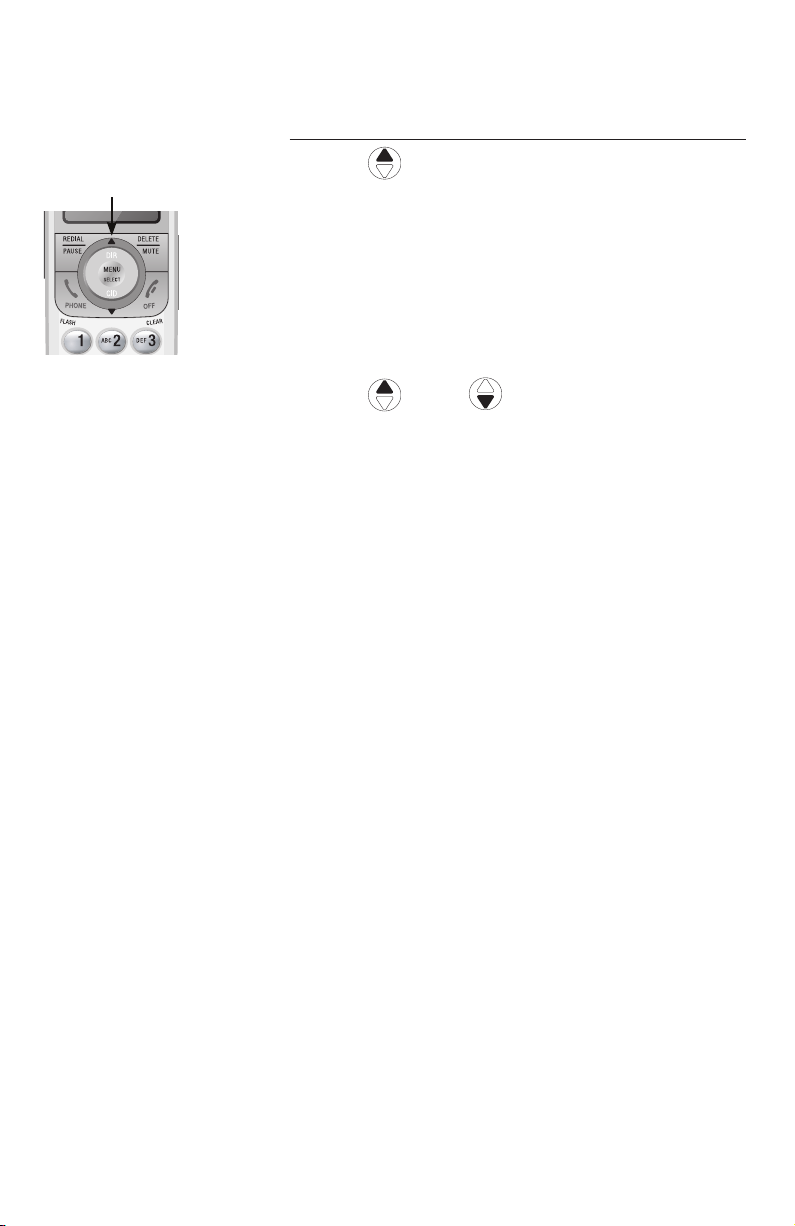
Directory
DIR
Directory review
To review directory entries
1. Press DIR when in idle mode to display the
first entry in the directory. DIRECTORY EMPTY
will be displayed if there are no directory
entries.
-OR-
You can also display the first entry in the
directory by pressing MENU/SELECT twice,
then pressing MENU/SELECT again to choose
>REVIEW.
2. Press
the directory. Entries will be displayed
alphabetically by the first letter in the name.
DIR or CID
to browse through
34
Page 34
Directory
Directory search
To search by name
DIR
1. Press DIR when in idle mode to display the
first listing in the directory. DIRECTORY EMPTY
will be displayed if there are no directory
entries.
2. When a name entry is displayed, press the dial
pad keys (2-9) to start a name search.
The directory will display the first name
beginning with the first letter associated with
the dial pad key if there is an entry in the
directory that begins with that letter.
3. To see other names that start with the letters
on the same dial pad key, keep pressing the
key. The names will be shown in alphabetical
order.
For example, if you have the names Jennifer,
Jessie, Kevin and Linda in your directory:
• If you press 5 (JKL) once, you will see Jennifer.
• If you press 5 (JKL) twice, you will see Jessie.
• If you press 5 (JKL) three times, you will see
Kevin.
• If you press 5 (JKL) four times, you will see
Linda.
• If you press 5 (JKL) five times, you will see
Jennifer again.
NOTES:
1. If there is no name matching the first letter of the key you
press, you will see a name that matches the second letter of
the key.
2. If you press a key (2-9) and no name starts with the letters
on that key, the directory will show the entry that matches
the next letter in the directory.
35
Page 35
Directory
Andrew
888-490-2005
To dial, delete or edit entries
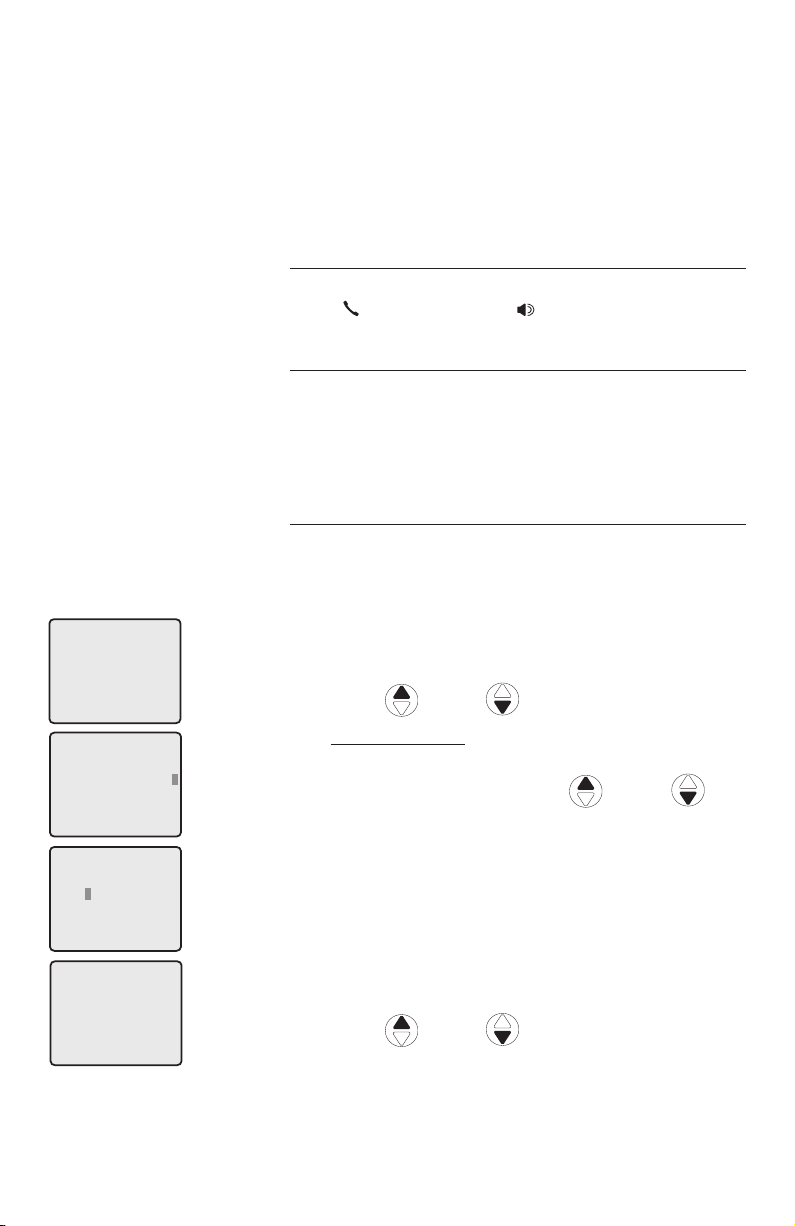
To dial, delete or edit a directory entry (name
and number), the entry must be displayed on
the handset. Use the directory search or review
(pages 34-35) to display an entry.
Display dial
To dial a displayed number from the directory,
press PHONE/FLASH or SPEAKER.
To delete an entry
When a directory entry is displayed, press
DELETE/MUTE to delete the displayed entry from
the directory. Once deleted, an entry cannot be
retrieved.
To edit an entry
When a directory entry is displayed:
1. Press MENU/SELECT to modify the entry. You
will be prompted to EDIT NUMBER.
Press the dial pad keys to add digits.
•
• Press DELETE/MUTE to erase digits.
• Press
DIR or CID
to move the cursor.
EDIT NUMBER
888-883-2445
EDIT NAME
Andy
Andy
888-883-2445
Press and hold REDIAL/PAUSE to add a three-
•
second pause if desired.
• Press REDIAL/PAUSE, then DIR or CID
to scroll to a previously dialed number. Press
MENU/
SELECT
to add the redial number to the
entry.
2. Press MENU/SELECT. You will be prompted toYou will be prompted to
EDIT NAME.
Press the dial pad keys to add characters
•
(page 33).
Press DELETE/MUTE to erase characters.
•
Press
•
DIR or CID
to move the cursor.
3. Press MENU/SELECT to confirm.
36
Page 36
Caller ID
CHRISTINE SMITH
888-722-7702
10:01
AM
11/23
NEW
�aller ID operation
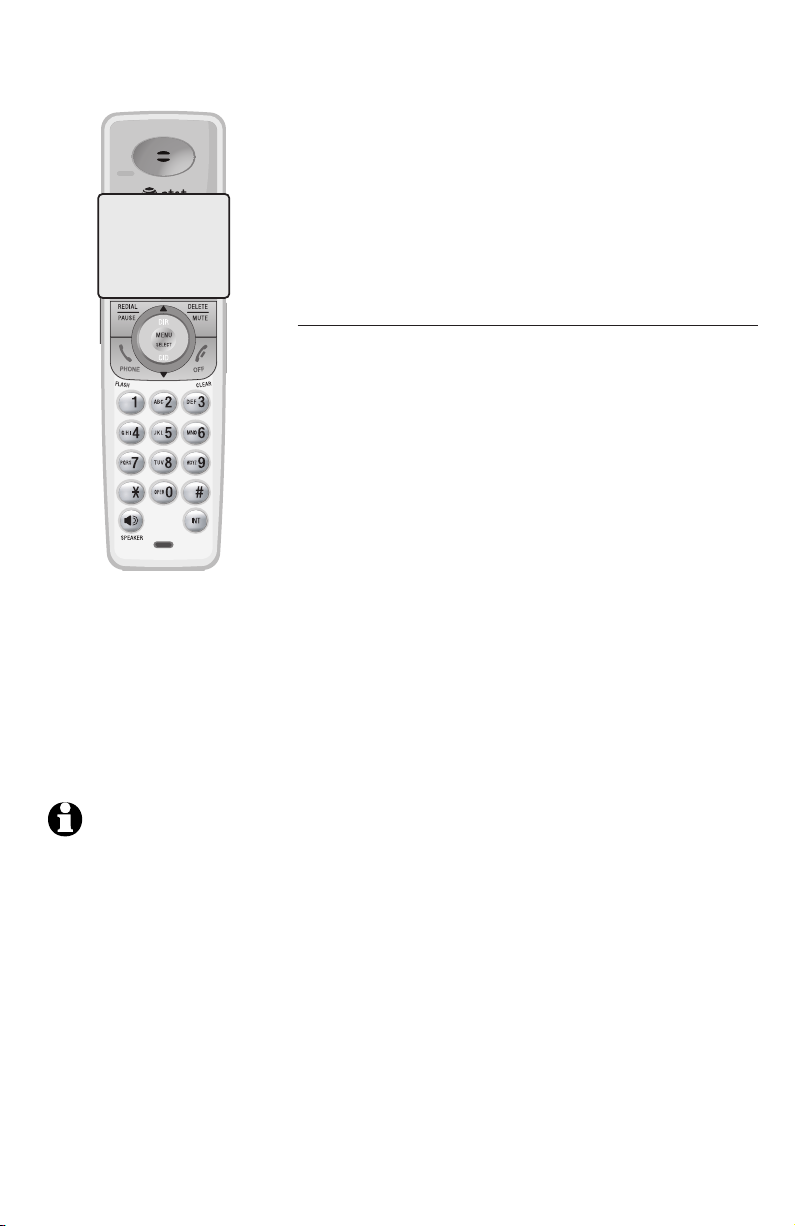
This product supports caller ID services provided
by most local telephone service companies.
Depending on your service subscription, you may
see the caller’s number, or the caller’s name and
number which are sent by the telephone company
after the first or second ring. Caller ID allows you
to see the name, number, date and time of calls.
Information about caller ID with call waiting
Caller ID with call waiting lets you see the name
and telephone number of the caller before
answering the telephone, even while on another
call.
It may be necessary to change your telephone
service to use this feature. Contact your
telephone company if:
• You have both caller ID and call waiting, but as
separate services (you may need to combine
these services).
• You have only caller ID service, or only call
waiting service.
• You don't subscribe to caller ID or call waiting
services.
NOTE: You can use
this product with
regular caller ID
service, or you can
use this product’s
other features without
subscribing to either
caller ID or combined
caller ID with call
waiting service.
There are fees for caller ID services. In addition,
services may not be available in all areas.
Depending on your service, you may see the
caller’s phone number or the caller’s name and
number.
This product can provide information only if both
you and the caller are in areas offering caller
ID service and if both telephone companies use
compatible equipment. The time and date are
sent by the telephone company along with the
call information.
37
Page 37
Caller ID
CHRISTINE SMITH
888-722-7702
10:01
AM
NEW
11/23
�aller ID operation
How the caller ID history (call log) works
The caller ID history stores information about the
last 50 incoming calls. Review the caller ID history
to find out who called, to easily return the call, or
to copy the caller’s name and number into your
directory.
The phone deletes the earliest entry when the log
is full to make room for new calls.
If you answer a call before the information
appears on the screen, it will not be saved in the
caller ID history.
The caller ID history is stored in the telephone
base, and is shared by all handsets. Changes
made on any one handset will be reflected in all.
NOTE: Only one handset can review the caller ID
history at a time. If another handset attempts to enter
the directory or caller ID history, it will display NOT
AVAILABLE AT THIS TIME.
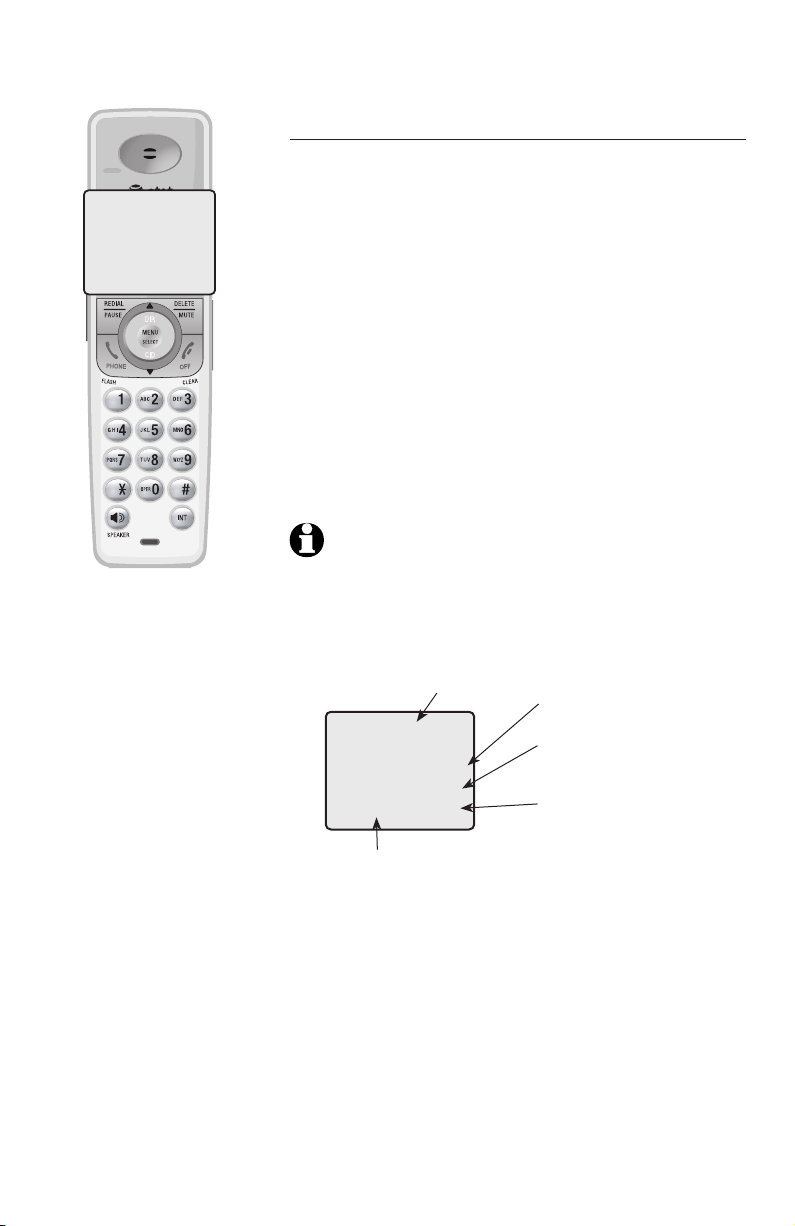
Caller’s name
CHRISTINE SMITH
888-722-7702
NEW
AM
10:01
Time of call
11/23
38
Caller’s number
Appears when the
call is missed and
un-reviewed
Date of call
Page 38
Caller ID
Chris
888-722-7702
AM
10:01
HANDSET 1
6 MISSED CALLS
Robert Brown
888-883-2445
AM
10:31
11/23
NEW
11/23
NEW
�aller ID operation
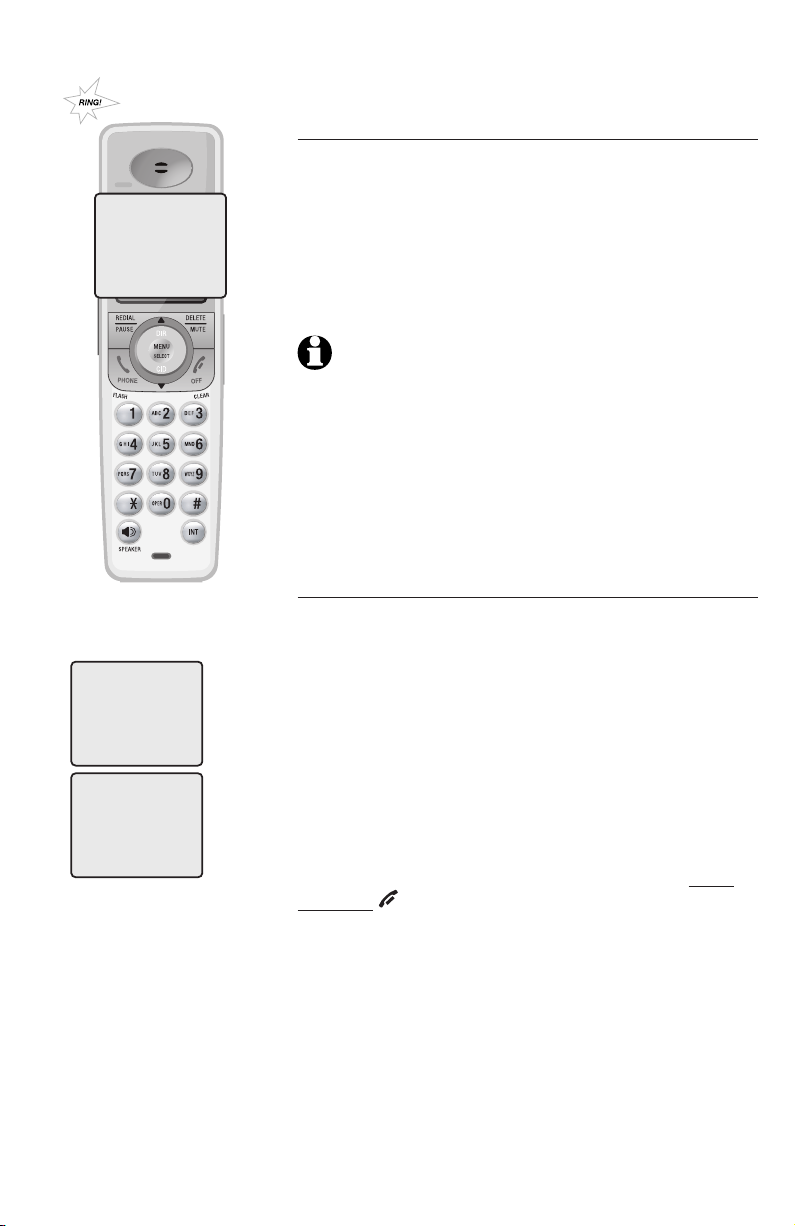
Memory match
If the incoming telephone number exactly matches
a telephone number in your directory, the name that
appears on the screen will match the corresponding
name in your directory.
For example, if Christine Smith calls, her name will
appear as Chris if this is how you entered it into your
directory.
NOTE: The number shown by your caller ID will be in the
format sent by the phone company. The phone company
usually delivers ten-digit phone numbers (area code plus
phone number). If the telephone number of the caller
does not exactly match a number in your directory, the
name will appear as it is delivered by the phone company.
For example if the phone company includes the area code
and the directory number does not, the name will appear
as delivered by the phone company.
Missed (new) calls indicator
When a handset is in idle mode and has calls that
have not been reviewed, its screen will show XX
MISSED CALLS.
All entries which have not been reviewed will be
counted as missed calls when the phone is idle. Each
time an entry in the caller ID history marked NEW is
reviewed, the number of missed calls decreases by
one.
If you have too many missed calls and you do not
want to review them one by one, but you still want
to keep them in the caller ID history, you can press
and hold OFF/CLEAR for four seconds when the
handset is idle. All the entries in the caller ID history
will be considered old (have been reviewed), and the
missed calls counter is reset to 0.
39
Page 39
Caller ID
HANDSET 1
6 MISSED CALLS
CID
Robert Brown
888-883-2445
10:31AM11/23
Charlie Johnson
800-222-3111
10:21AM11/23
The various dialing options are:
888-883-2445
1-888-883-2445
1-883-2445
1-883-2445
888-883-2445
1-888-883-2445
NOTES:
1. You may need to change
how a caller ID number
will be dialed if the entry
is not displayed in the
correct format. Caller ID
numbers may appear with
an area code which may
not be required for local
calls, or without a 1
which may be needed for
long distance calls.
2. If neither the name nor
number is provided,
UNABLE TO SAVE will be
displayed.
NEW
NEW
883-2445
883-2445
Press #
Press 1
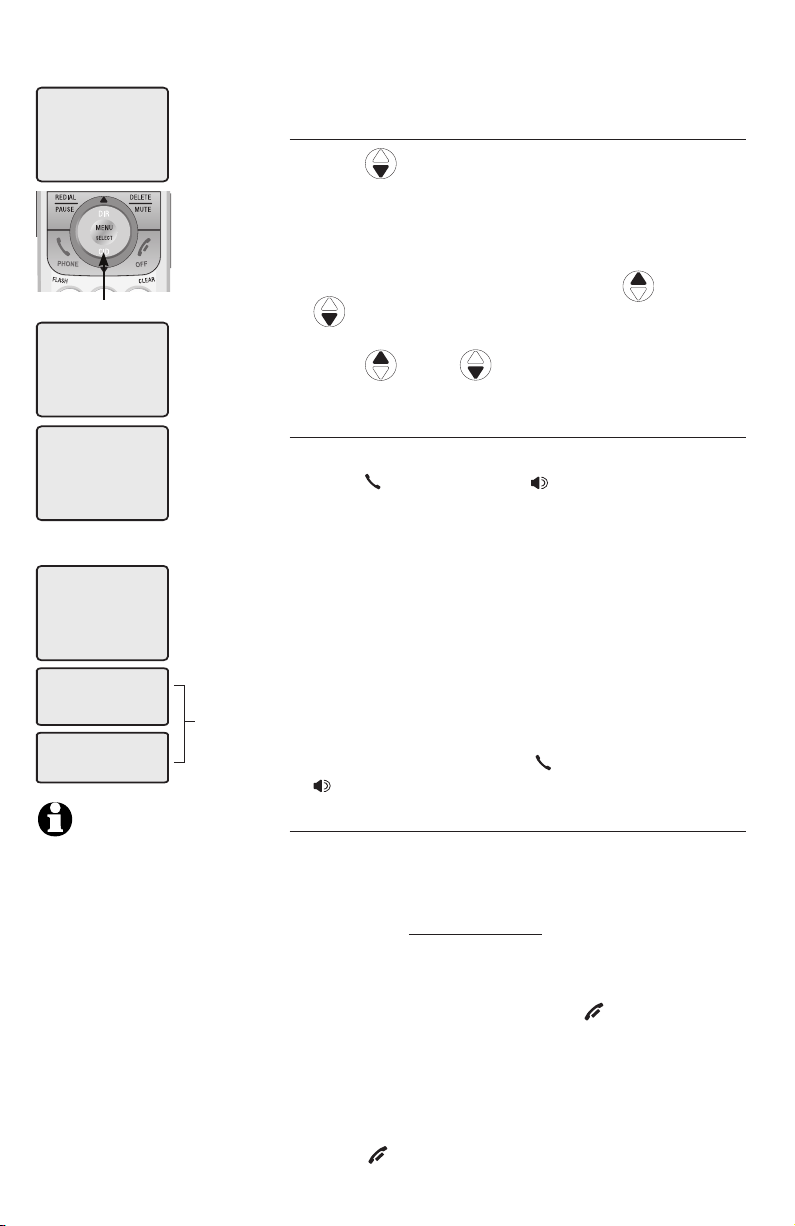
To review the caller ID history
To review the caller ID history
Press CID to review the caller ID history in
1.
reverse chronological order starting with the most
recent call.
-OR-
You can also review the caller ID history by
pressing MENU/SELECT, and using
CID
to scroll to >CALL LOG, then press
MENU/SELECT.
2. Press
DIR or CID
to scroll through the list
as shown on the left.
To dial from the caller ID history
While reviewing an entry in the caller ID history:
• Press PHONE/FLASH or SPEAKER to call the
number as it is displayed in the caller ID history.
-OR-
• Press # repeatedly to display different dialing
options for local and long distance numbers
before dialing or saving the telephone number
in the directory. See the example on the left.
You may also press 1 repeatedly to add or
remove a 1 in front of the telephone number
before dialing or saving the telephone number
in the directory. See the examples on the left.
When the number displayed is in the correct
format for dialing, press PHONE/FLASH or
SPEAKER to call the number.
Other options
• Press DELETE/MUTE to delete the displayed
entry from the caller ID history.
• With an entry from the caller ID history is
displayed, press and hold DELETE/MUTE to
delete all entries from the caller ID history.
When the screen displays DELETE ALL CALLS,
press MENU/SELECT to clear the caller ID
history of all entries, or press OFF/CLEAR to
exit and leave all entries in the caller ID history
intact.
• Press MENU/SELECT to copy the entry into
your directory. You can edit the name and the
number (page 36).
• PressPress OFF/CLEAR to exit the caller ID history.
40
DIR or
Page 40

Answering system
About the answering system
Answering system and voicemail
Your telephone has both a digital answering
system and voicemail indication. Voicemail is
offered by your telephone service provider (fees
may apply). Your telephone’s answering system
and voicemail indication are independent features.
Each alerts you to new messages differently. For
more information on the voicemail indicators, see
page 19. To listen to your voicemail, you typically
dial an access number provided by your telephone
company, followed by a security code or PIN.
To listen to messages recorded on your digital
answering system, press
the telephone base.
If you subscribe to caller ID/call waiting service
through your telephone service provider, you
can use your telephone answering system and
voicemail together. Set your answering system to
answer calls at least two rings earlier than your
voicemail is set to answer. For example, set your
voicemail to answer calls after six rings and set
you answering system to answer after four rings.
Some voicemail providers may program the delay
before answering calls in seconds instead of
rings; in this case allow six seconds per ring when
determining the appropriate setting. By doing this,
if you are on a call, or if the answering system is
busy recording a message and you receive another
call, the second caller can leave a voicemail
message.
PLAY/STOP button on
41
Page 41
Answering system
About the answering system
The answering system can record up to 99
messages, depending on the length of each
message. Individual messages can be up to four
minutes, and the maximum recording time is 14
minutes. Messages will remain available for replay
until you delete them.
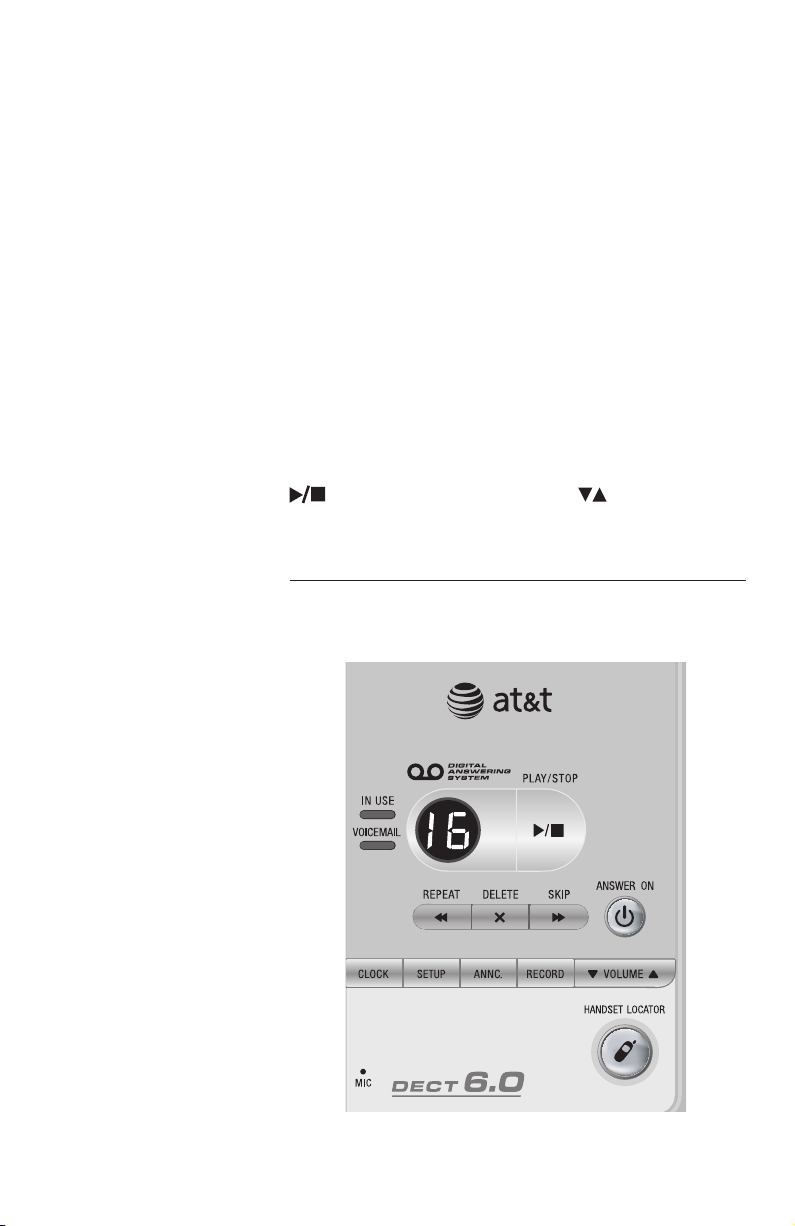
When there are new messages (including
memos) on the answering system, the number
of messages stored will flash in the message
counter.
If F is flashing in the message counter, the
memory is full. You will have to delete some
messages before new ones can be recorded.
To play the answering system messages, press
PLAY/STOP. Press VOLUME to adjust theto adjust the
playback volume when playing messages.
Voice prompts
The system provides voice prompts to guide you
through setup.
42
Page 42
Answering system
NOTE: If the clock is
not set when a
message is recorded,
the system will
announce "Time and
day not set" before the
message is played.
Day & time announcement
Before playing each message, the answering
system announces the day and time the message
was received.
If you subscribe to caller ID service from your local
telephone company, the time will automatically
be set with every incoming call. You must set
the year so that the day of the week can be
calculated from the caller ID information.
To check day & time
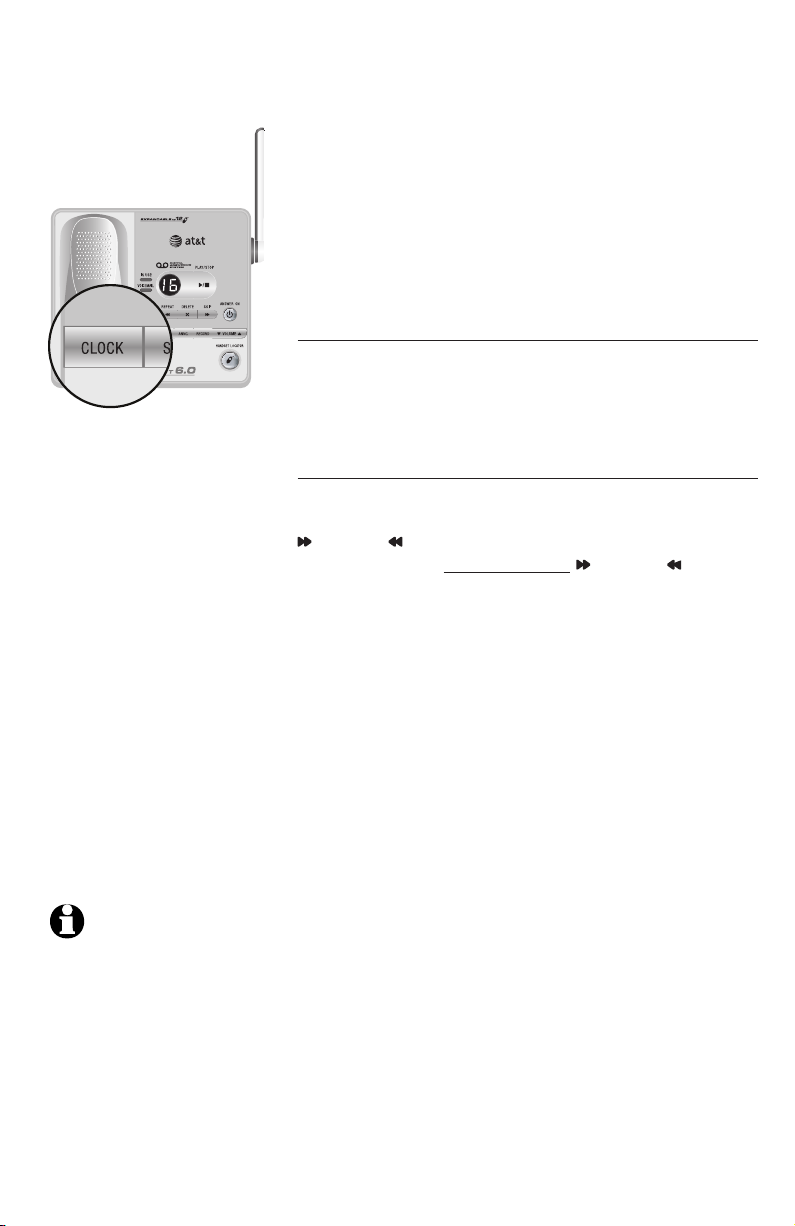
You can press CLOCK when the system is idle to
hear the current day and time.
If you do not hear the correct time, day, and year,
follow the steps below.
To set day & time
Follow the steps below to set the year, time and day,
so the day and time are correct. Each time you press
SKIP or REPEAT, the year, hour, minute or day is
adjusted by one. Press and hold SKIP or REPEAT
to adjust the minutes or year by increments of ten.
When you hear the correct setting, press CLOCK to
move to the next setting.
1. Press CLOCK. The system will announce the
current clock setting, and then announce “To set
the clock, press CLOCK.”
2. Press CLOCK. The system will announce the
current year setting, and then announce “To
change the year, press SKIP or REPEAT. To
change the hour, press CLOCK.”
3. Press CLOCK. The system will announce the
current hour setting, and then announce “To
change the hour, press SKIP or REPEAT. To
change the minute, press CLOCK.”
4. Press CLOCK. The system will announce the
current minute setting, and then announce “To
change the minute, press SKIP or REPEAT. To
change the day, press CLOCK.”
5. Press CLOCK. The system will announce the
current day setting, and then announce “To change
the day, press SKIP or REPEAT. Press CLOCK
when you are done.”
6. Press CLOCK. The system announces the current
clock setting.
43
 Loading...