

Page 1
User’s manual
EL42108
5.8 GHz cordless telephone/
answering system with
caller ID/call waiting
REMOVE
ANNC.
RECORD
Page 2

Congratulations
on purchasing your
new AT&T product.
Before using this AT&T product, please
read the Important safety instructions
on pages 46-48 of this manual.
Please thoroughly read the user’s
manual for all the feature operations
and troubleshooting information necessary to install
and operate your new
AT&T product. You can also visit our
website at www.telephones.att.com
or call 1 (800) 222-3111.
In Canada, dial 1 (866) 288-4268.
Model #: EL42108
Type: 5.8GHz cordless telephone/answering system
Serial #:
(found on the bottom of the telephone base)
Purchase date:
Place of purchase:
Both the model and serial number of your AT&T product can be found on the
bottom of the telephone base.
© 2007 Advanced American Telephones. All rights reserved.
AT&T and the AT&T logo are trademarks of AT&T Knowledge Ventures,
licensed to Advanced American Telephones.
Page 3
You must install and charge
the battery before using the
telephone.
Your product may be shipped with a protective sticker covering the handset or
base display - remove it before use.
For customer service or product information, visit our website at
STOP!
See page 7
for easy instructions.
www.telephones.att.com or call 1 (800) 222-3111. In Canada, dial
1 (866) 288-4268.
CAUTION: To reduce the risk of fire or injury to persons or damage to
the telephone, read and follow these instructions carefully:
• Use only the supplied rechargeable battery or replacement battery 2422
(SKU 23402, part number 89-0047-00-00) or equivalent. To order a replace-
ment battery, visit our website at
www.telephones.att.com or call
1 (800) 222-3111. In Canada, dial 1 (866) 288-4268.
• Do not dispose of the battery in a fire. Like other batteries of this type, it
could explode if burned. Check with local codes for special disposal instructions.
• Do not open or mutilate the battery. Released electrolyte is corrosive and
may cause damage to the eyes or skin. It may be toxic if swallowed.
• Exercise care in handling batteries in order not to create a short circuit. Do
not allow conductive materials such as rings, bracelets, or keys to touch
the battery. The battery or conductor may overheat and cause harm.
• Charge the battery provided with or identified for use with this product only
in accordance with the instructions and limitations specified in this manual.
• Observe proper polarity orientation between the battery and battery charger.
• Do not disassemble your telephone. There are no user-serviceable parts
inside. Refer to qualified service personnel for servicing.
Page 4
Parts checklist
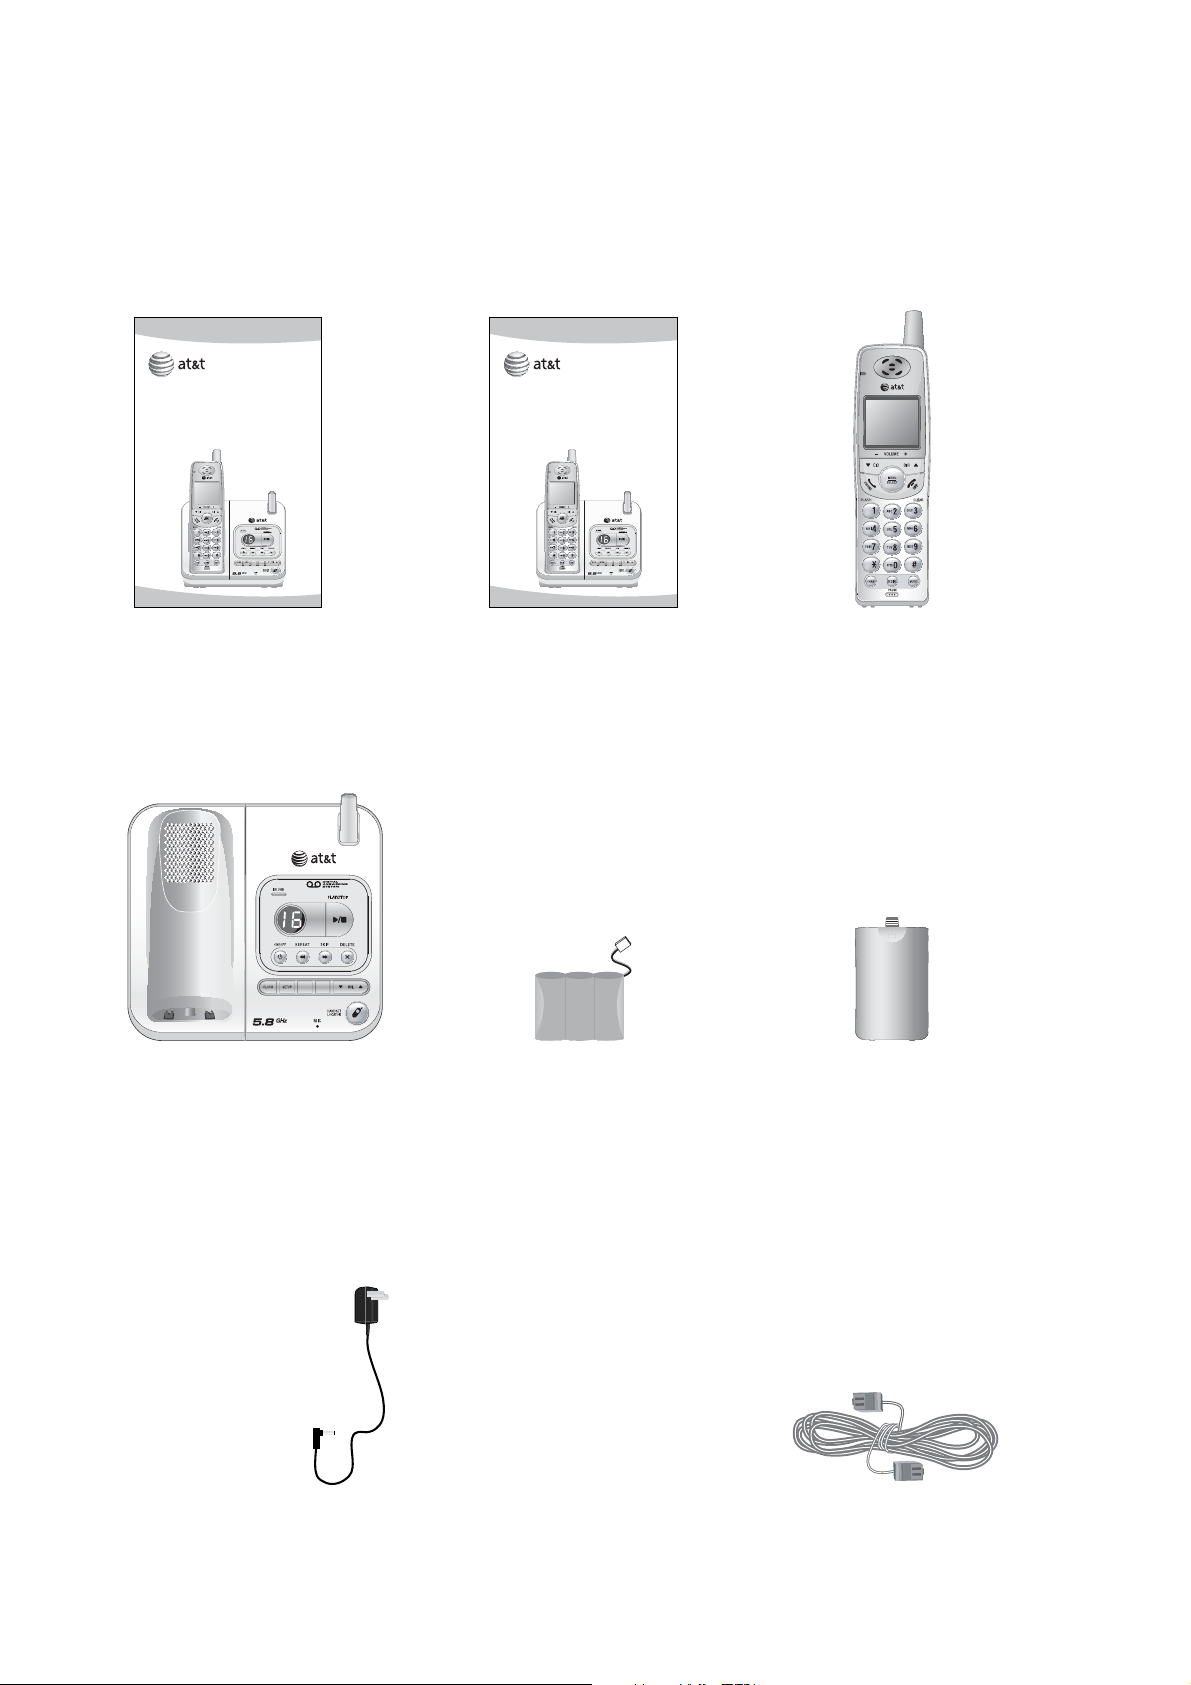
Your new AT&T EL42108 telephone system includes:
User’s manual
EL42108
5.8 GHz cordless telephone/
answering system with
caller ID/call waiting
ANNC.
REMOVE
RECORD
Quick start guide
EL42108
5.8 GHz cordless telephone/
answering system with
caller ID/call waiting
ANNC.
REMOVE
RECORD
REMOVE
Cordless handsetUser's manual Quick start guide
ANNC.
RECORD
Telephone base Battery for cordless handset
Power adapter for telephone base
Battery compartment cover
Telephone line cord
Page 5

User’s manual
RECORD
ANNC.
REMOVE
EL42108
5.8 GHz cordless telephone/
answering system with
caller ID/call waiting
Table of contents
Getting started
Quick reference guide ......................2
Parts checklist......................................4
Telephone base installation...........5
Battery installation & charging....7
Installation options ............................8
Belt clip & optional headset............10
Telephone operation
Settings................................................. 11
Basic operation................................. 13
Options while on calls................... 16
Directory
Directory............................................... 17
Speed dial............................................ 18
New directory entries.................... 19
Directory search ............................... 21
To change or dial entries................ 22
Answering system operation
Answering system operation.........29
Day & time announcements.......... 30
Outgoing announcements..............31
Changing feature options...............32
Message playback...............................33
Recording & playing memos .........34
Message counter displays .............. 35
Answering system mode.................36
Remote access..................................... 37
Appendix
Screen icons, indicator lights
& tones.............................................38
Handset display screen messages
Troubleshooting................................40
Important safety instructions......46
FCC Part 68 & ACTA........................49
...39
Caller ID summary
Caller ID summary ........................... 23
To review the call summary ....... 26
Delete call summary entries ...... 27
Add entries to the directory....... 28
FCC Part 15.........................................51
Limited warranty...............................52
Technical specifications.................55
Index ......................................................56
Remote access wallet card ..........57
1
Page 6
Getting started
Quick reference guide
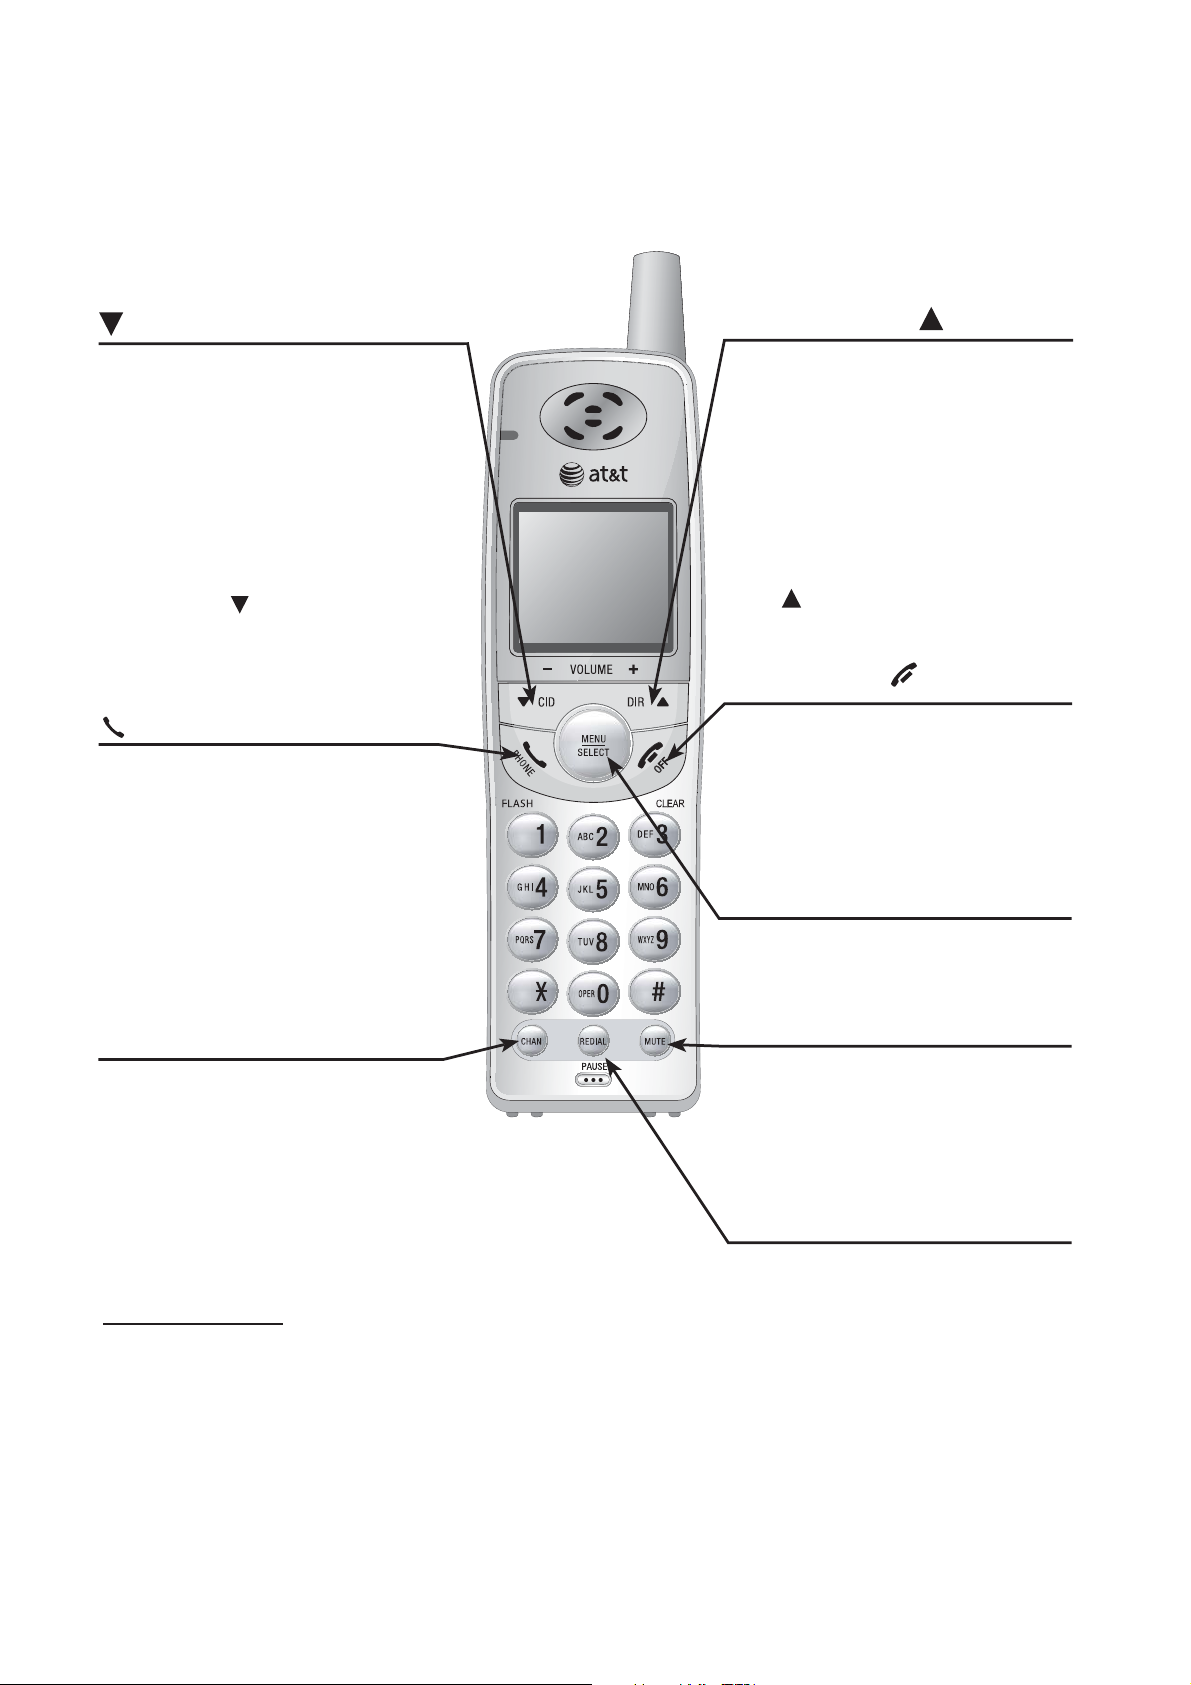
Cordless handset
CID/
-VOLUME
When in a menu, press to
scroll down. When in idle
mode, press to display call
summary entries (page 26).
When entering names or
numbers, press to move the
cursor to the left. During a
call, press
CID to decrease
listening volume.
PHONE/FLASH
Press to make or answer
a call. During a call, press
to receive an incoming call
if call waiting is activated
(page 16).
DIR
/VOLUME +
When in a menu, press
to scroll up. When in idle
mode, press to display
directory entries (page
21). While entering names,
press to advance the cursor. During a call, press
DIR
to increase listening
volume.
OFF/CLEAR
During a call, press to
hang up. While using
menus, press to cancel an
operation, or exit the menu
(page 12).
MENU/SELECT
CHAN/REMOVE
When on a call, press CHAN/
REMOVE to scan for a clearer
channel when there is static or
interference on the line (page
16). When in caller ID mode,
press to delete the displayed
caller ID entry (page 27), or
press and hold to delete all
caller ID entries (page 27).
REMOVE
Press to display a menu or
to confirm a command.
MUTE
While on a call, press to mute
microphone. Press again to
resume your conversation
(page 16).
REDIAL/PAUSE
When in idle mode, Press
repeatedly to display the
last five numbers called
(page 14). While dialing or
entering numbers to the
directory, press to insert a
four-second dialing pause
(page 20).
2
Page 7
Getting started
Quick reference guide
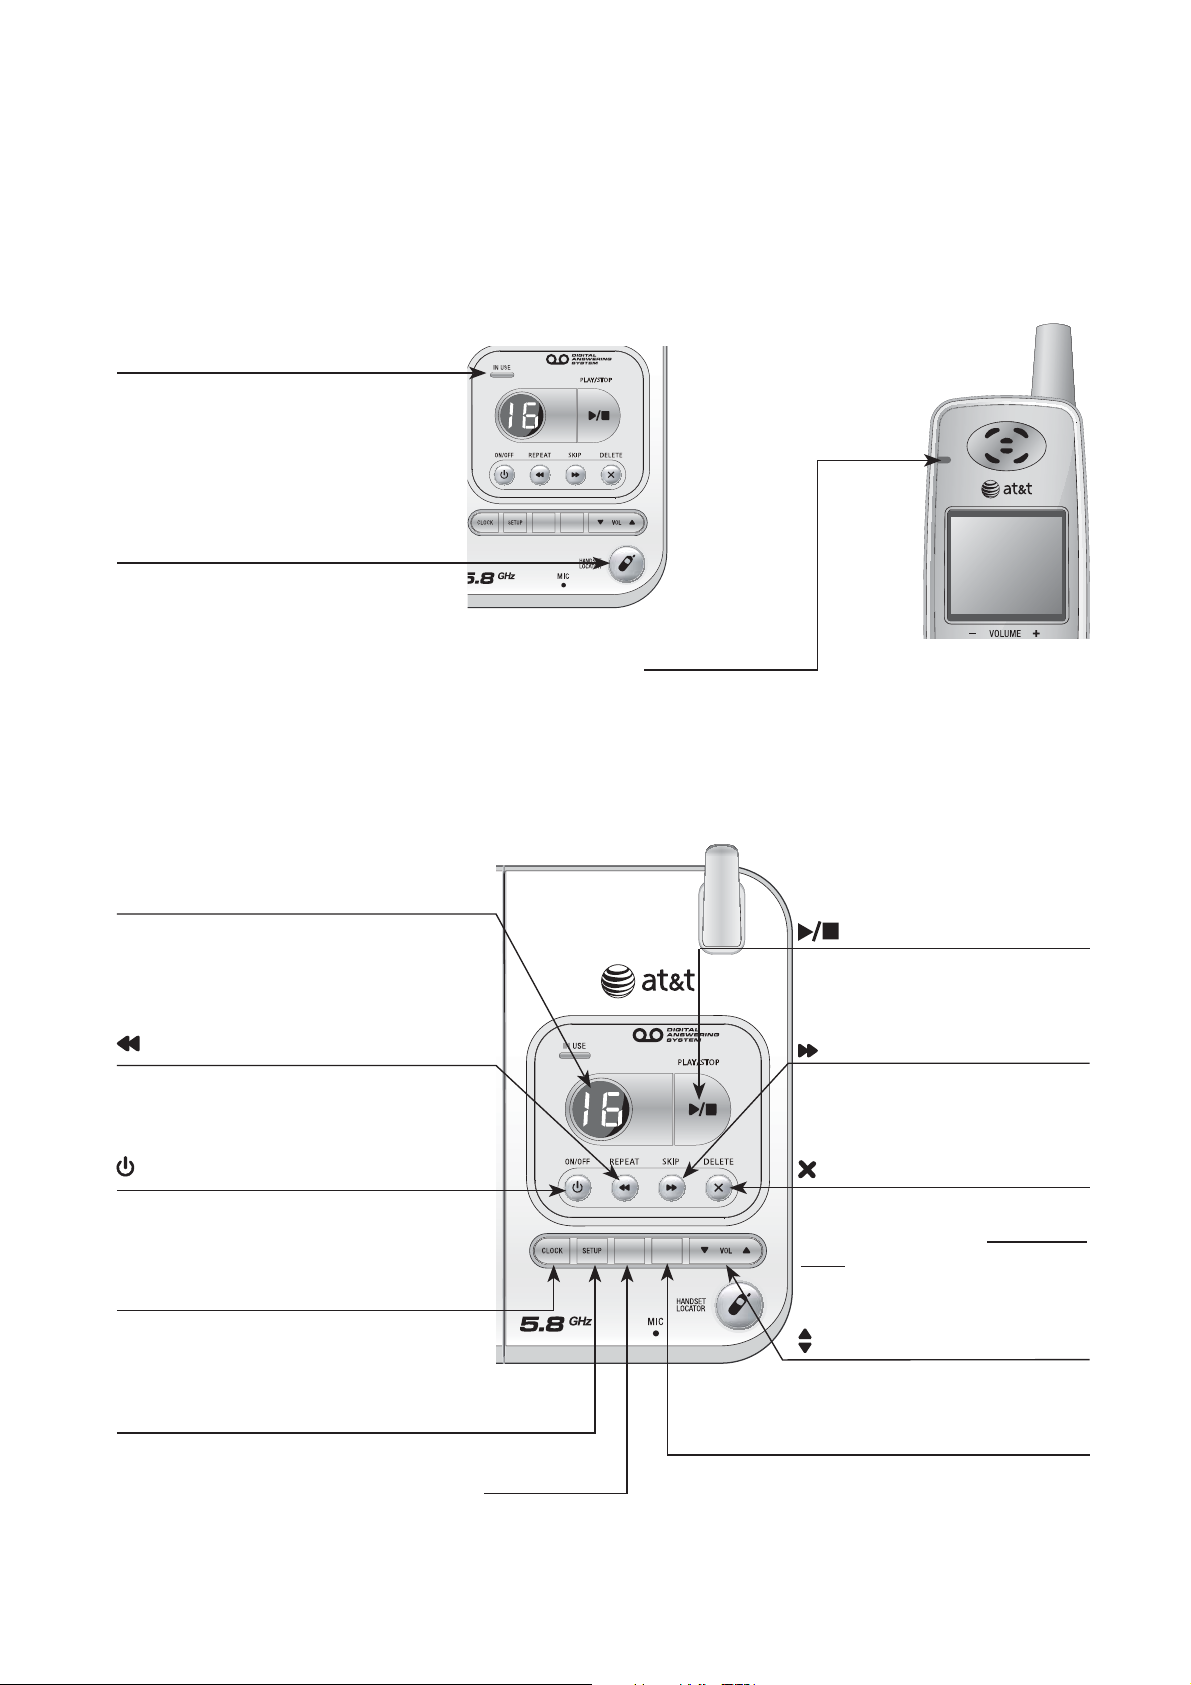
Telephone base
IN USE
• Flashes quickly while an
incoming call is ringing.
• On steady when the handset
is in use.
HANDSET LOCATOR
Press to make the handset
beep when the handset is
not in the telephone base
(page 15).
ANNC.
RECORD
CHARGE
On when the cordless handset is properly positioned to
charge in the telephone base.
MESSAGE COUNTER
Number of messages (or
during playback, message
number currently playing).
REPEAT
Press to repeat message;
press twice to play previous
message (page 33).
ANSWER ON
Press to turn answering
system on or off (page
36).
CLOCK
Press to review or set clock
(page 30).
SETUP
Press to review or change
answering system options
(page 32).
ANNC.
RECORD
ANNC.
Press to review or record
announcement; press
again to quit (page 31).
PLAY/STOP
Press to start or stop message playback (page 33).
SKIP
Press to skip message
(page 33).
DELETE
Press to delete message
currently playing; press and
hold to delete all old messages (page 33).
VOL
Press to adjust playback volume
(page 33).
RECORD
Press to record a memo (page
34) or after pressing ANNC. to
record an outgoing announcement (page 31).
3
Page 8
Getting started
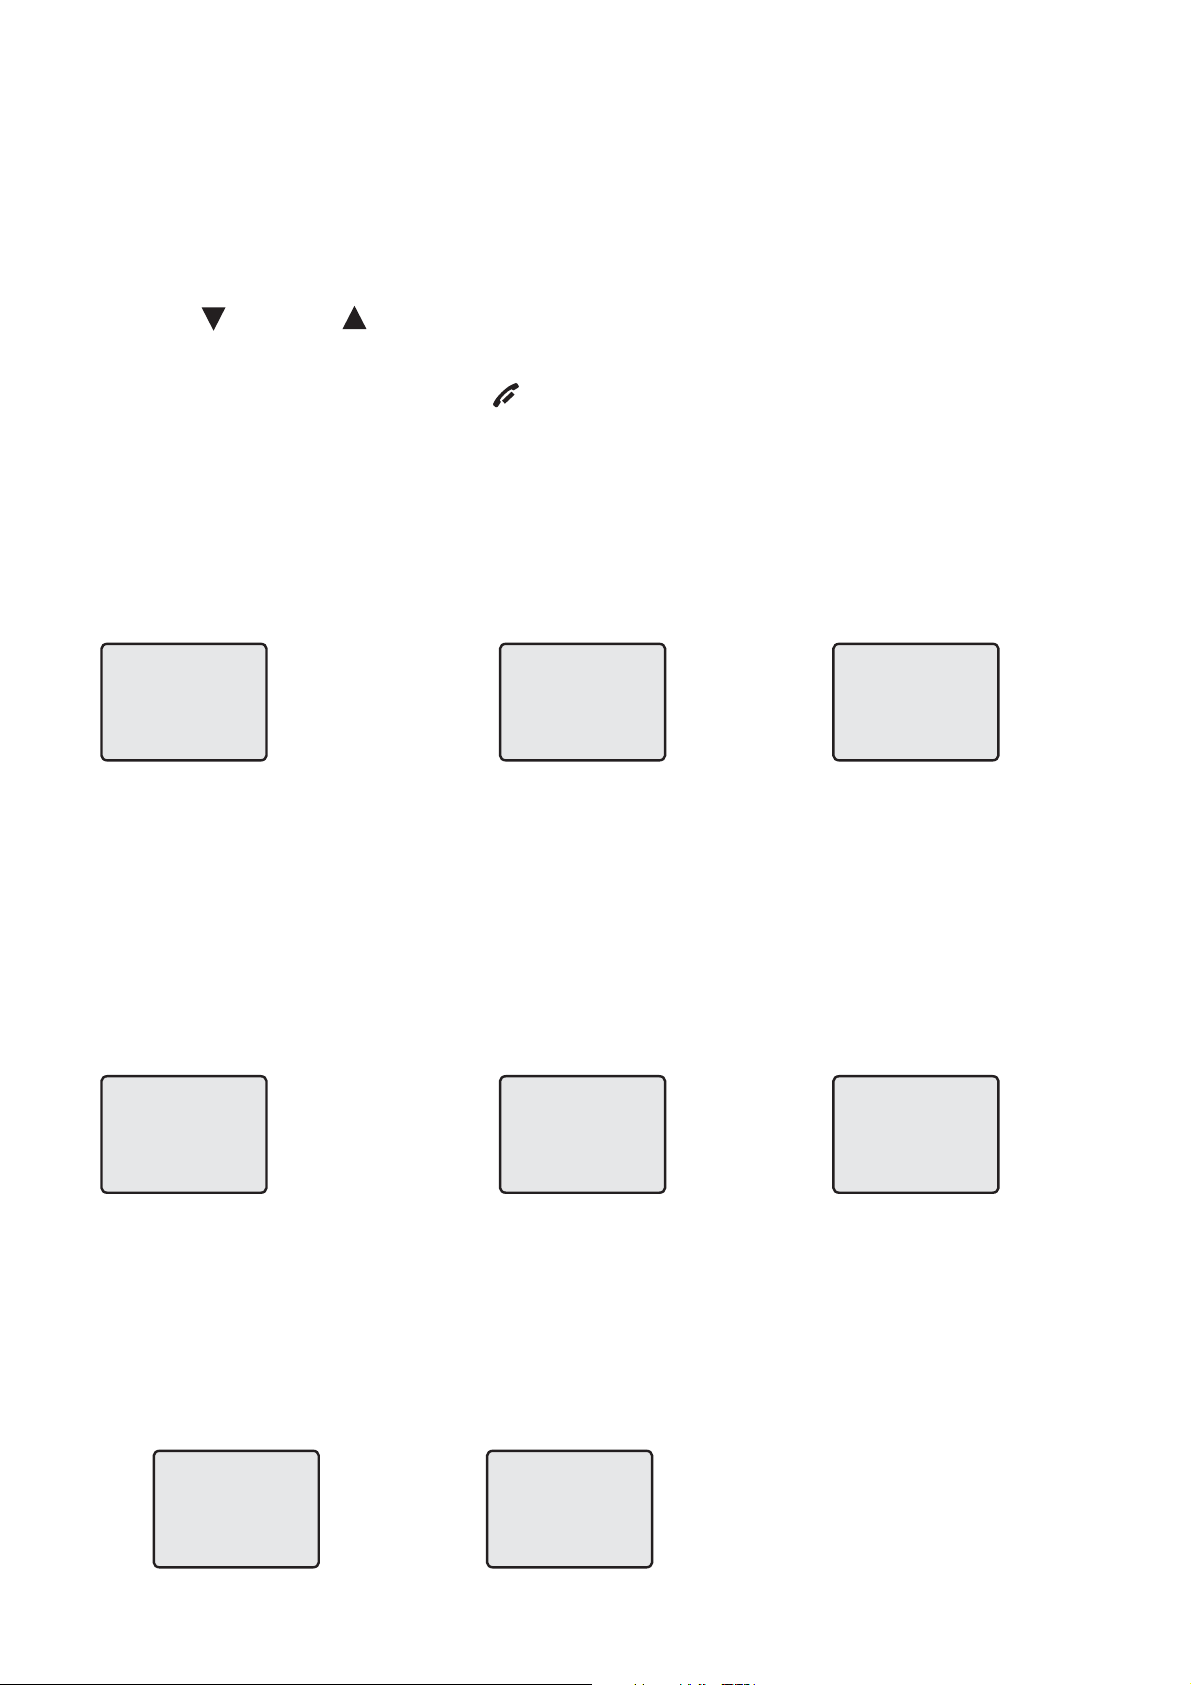
Handset main menu
To enter the main menu:
1. Press MENU/
2. Press
CID or DIR to select a handset feature menu, then press MENU/SELECT
SELECT when the handset is in idle mode.
to enter that menu.
To return to the idle mode, press
DIRECTORY allows you
to store and search for
names and numbers.
DIRECTORY
SPEED DIAL allows you
to store or dial a number
in speed dial location.
OFF/CLEAR.
RINGER: allows you to
set the ringer melodies.
RINGER: 1SPEED DIAL
RINGER VOL: allows you
to set the ringer volume.
HOME AREA CODE
allows you to set your
home area code.
DATE/TIME allows you
to set the date and time.
LANGUAGE allows you
to set your phone language.
LANGUAGEHOME AREA CODE
DIAL MODE allows you
to set the dialing type.
DIAL MODE: TONEDATE/TIMERINGER VOL: HI
4
Page 9

Getting started
Installation setup
Install the telephone base close to a telephone jack and a power outlet not
connected to a wall switch. The telephone base can be placed on a flat surface or vertically mounted on the wall (page xx). For optimum range and better reception, place the telephone base in a central and open location.
Avoid placing the telephone base too close to:
• Communication devices such as: personal computers, computer routers,
television sets, VCRs, wireless routers (wireless broadband, wi-fi, or 802.11)
or other cordless telephones.
• Excessive heat sources.
• Noise sources such as a window with traffic outside, motors, microwave
ovens, refrigerators, or fluorescent lighting.
• Excessive dust sources such as a workshop or garage.
• Excessive moisture.
• Extremely low temperature.
• Mechanical vibration or shock such as on top of the washing machine or
work bench.
5
Page 10
Getting started
Telephone base installation
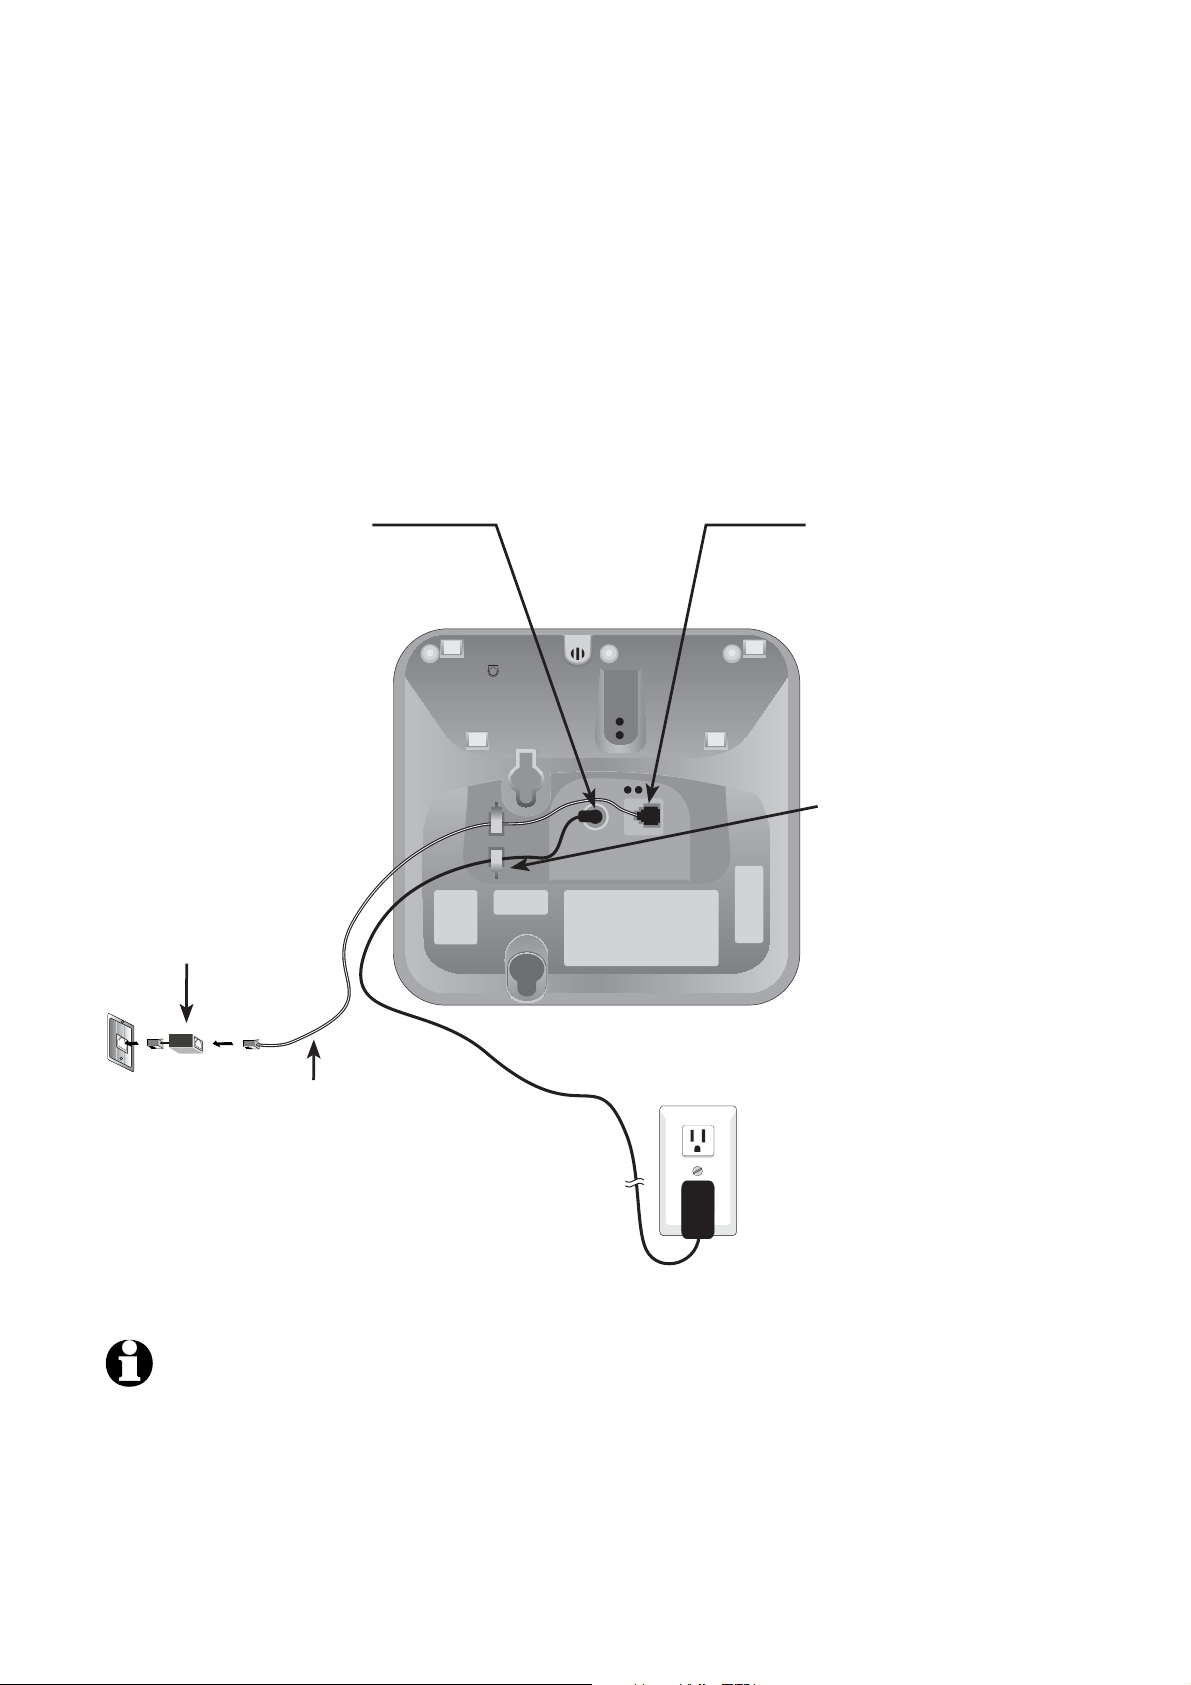
Install the telephone base close to a telephone jack and a power outlet
not connected to a wall switch. The telephone base can be placed on a flat
surface or vertically mounted on the wall (page xx). For optimum range and
better reception, place the telephone base in a central and open location.
1. Plug the small end
of the power adapter
into the power jack
at the bottom of the
telephone base.
DSL filter
(Optional for DSL users,
see number four in the
note section, below.)
Telephone line cord
5. Plug the other end of
the telephone line cord into
a telephone jack.
2. Plug one end of the
telephone line cord
into the telephone
jack at the bottom of
the telephone base.
3. Route cords
through slots.
4. Plug the large
end of the power
adapter into an
electrical outlet not
connected to a wall
switch.
NOTES:
1. Use only the power adapter supplied with this product or equivalent. To order a
replacement power adapter, visit our website at
1 (800) 222-3111. In Canada, dial 1 (866) 288-4268.
call
www.telephones.att.com or
2. This power adapter is intended to be correctly oriented in a vertical or floor
mount position.
6
Page 11

Getting started
Installation options
This telephone is used for both desktop installation and wall mount installation. If wall mounting is desired, a telephone outlet wall mounting plate with
mounting studs is required. This mounting plate with studs may be available
for purchase from any hardware or consumer electronics retailers and may
require professional installation.
Desktop to wall mount installation
To install the telephone base in the wall mount position, make sure that you first
unplug all cords connected to the telephone base before you begin.
1. Plug the telephone line cord and power adapter into the telephone base. Bundle the telephone
line cord and power adapter line, then secure with a twist tie.
7
Page 12
Getting started
Installation options
Wall mount to desktop installation
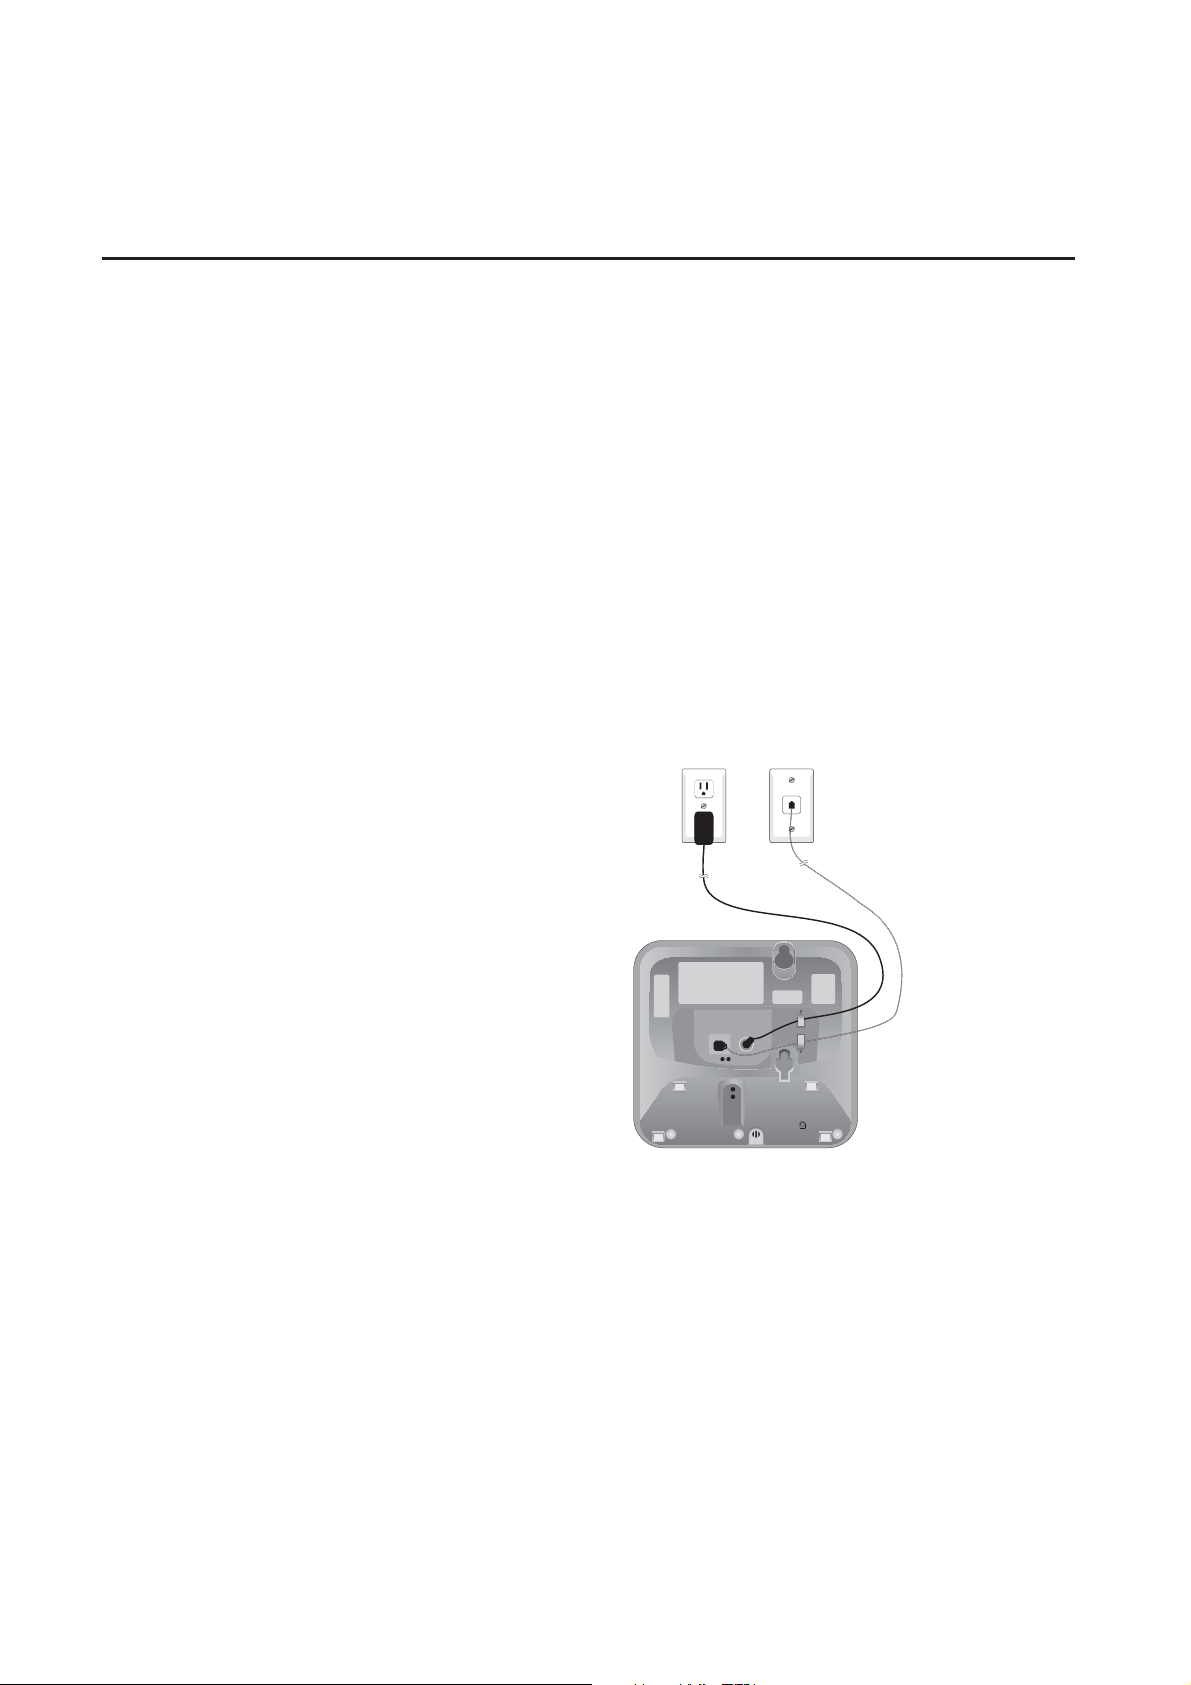
To change the telephone base from the wall mount position to desktop position, make sure that you first unplug the power adapter and telephone line
cord from the wall outlets before you begin.
1. Slide the telephone base upwards, then pull the
telephone base away from the wall off of the
mounting studs.
3. Plug the telephone line cord into the telephone base
and telephone wall jack, then plug the power adapter
plug into the telephone base and to an electrical wall
outlet not controlled by a wall switch (page xx).
2. Remove the telephone line cord and
power adapter plug from the telephone base.
8
Page 13
Getting started
Battery installation & charging
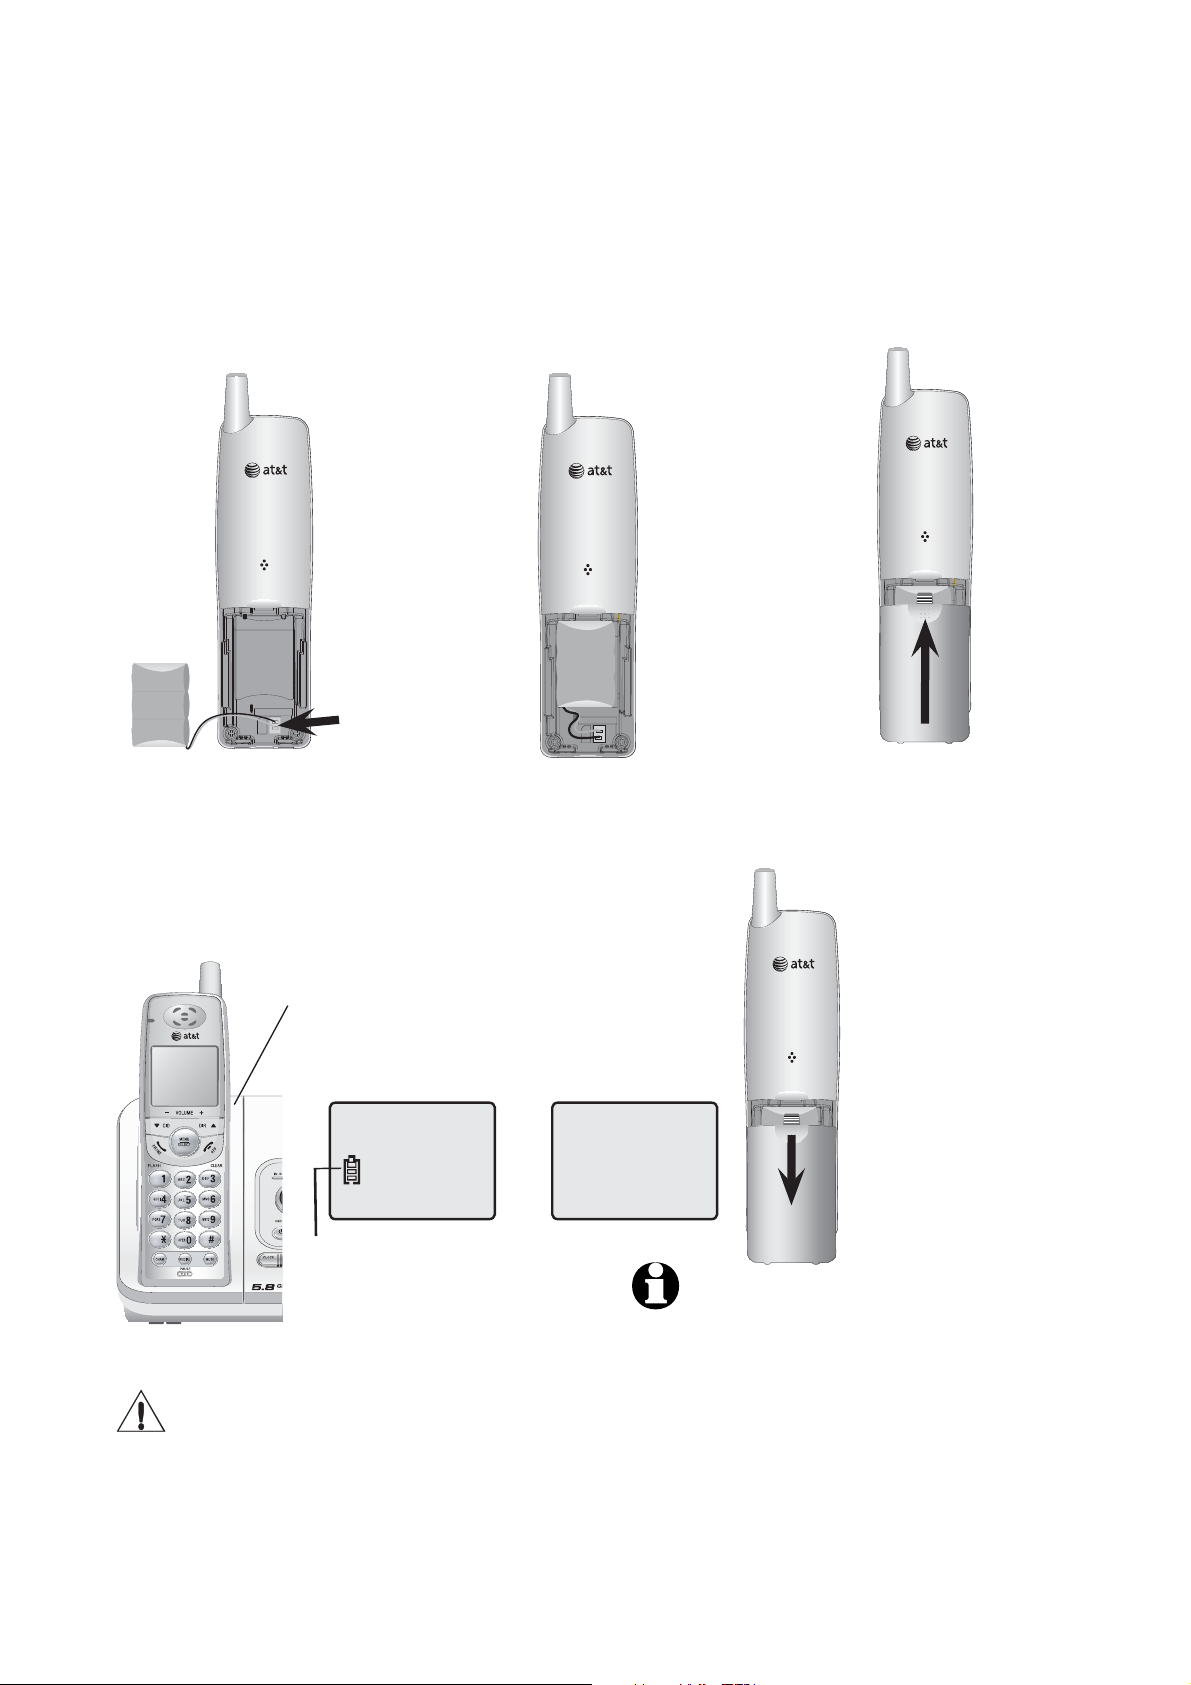
Install the battery as shown below. After installing the battery, you can make and
receive short calls, but replace the handset in the telephone base when not in
use. For optimal performance, charge the handset battery for at least 16 hours
before use. When fully charged, the handset battery provides approximately five
hours of talk time and six days of standby time.
Step 1
Insert the plug as indicated. Be
sure to securely insert the plug,
making sure that it matches the
color-corded label inside the battery compartment.
Step 4
You may be able to make or receive
short calls. For optimal performance,
charge the handset battery for at least
16 hours before first use.
BATTERY LOW
AM
10:08
REMOVE
Battery low indicator
Return the handset to the
telephone base to recharge
when this symbol flashes and
the handset beeps or when
the handset screen displays
NEEDS CHARGING.
02/14
Step 2
Place the battery
and wires inside
the compartment.
NEEDS CHARGING
then
NOTE: Under normal conditions,
the battery should last around one
year. This may vary depending on
usage.
Step 3
Slide the battery
compartment cover
up until it clicks.
To replace the battery, For optimal performance, charge the
handset battery for at
least 16 hours before
first use. Lift out the old
battery and disconnect
it from the handset.
Follow the instructions
on this page to install
and charge the new
battery.
Caution:
1. Use only the supplied rechargeable battery, replacement battery 2422 (SKU 23402,
part number 89-0047-00-00) or equivalent. To order a replacement battery, visit our
website at www.telephones.att.com or call 1 (800) 222-3111. In Canada,
dial
1 (866) 288-4268.
2. See the Troubleshooting section on page xx for charging issues.
9
Page 14
Telephone operation
Settings
Follow the steps below to program the cordless
handset. To stop at any time, press
Language
The default language setting is English. To change
the language to Espanol, or Francais:
OFF/CLEAR.
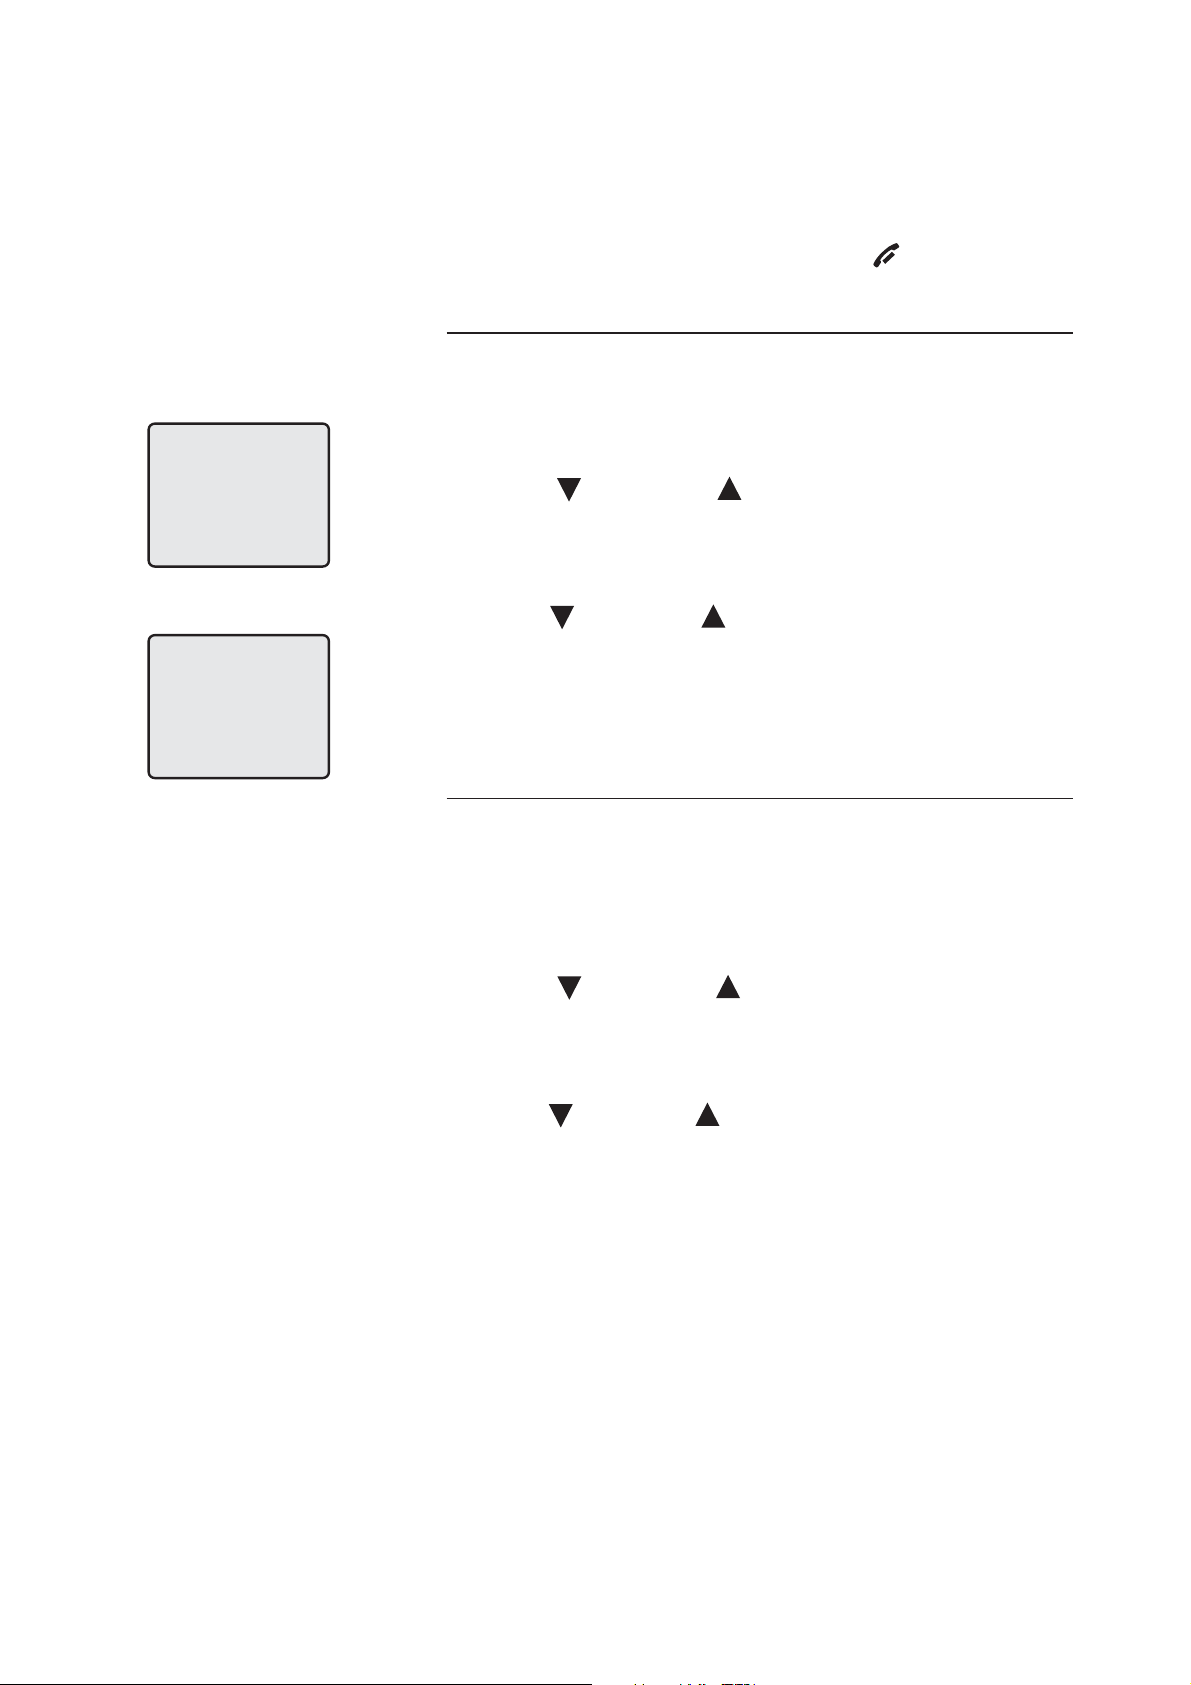
LANGUAGE
DIAL MODE: TONE
1. Press
MENU/
SELECT
.
2. Press CID or DIR until the screen displays
LANGUAGE.
3. Use
4. Press
MENU
/SELECT
CID or DIR to choose among ENGLISH,
to change the current setting.
FRANCAIS, or ESPANOL.
5. Press
MENU
/SELECT
to confirm your selection
and exit.
Choose dial mode
The dial mode defaults to tone. If you do not have
touch tone service, you’ll need to change the setting to pulse:
1. Press
2. Press
MENU/
SELECT
CID or DIR until the screen displays
.
DIAL MODE: and the current setting.
3.
Use
4.
Press
5. Press
and exit.
MENU
/SELECT
CID or DIR to display TONE or PULSE.
MENU
/SELECT
10
to change the current setting.
to confirm your selection
Page 15
Telephone operation
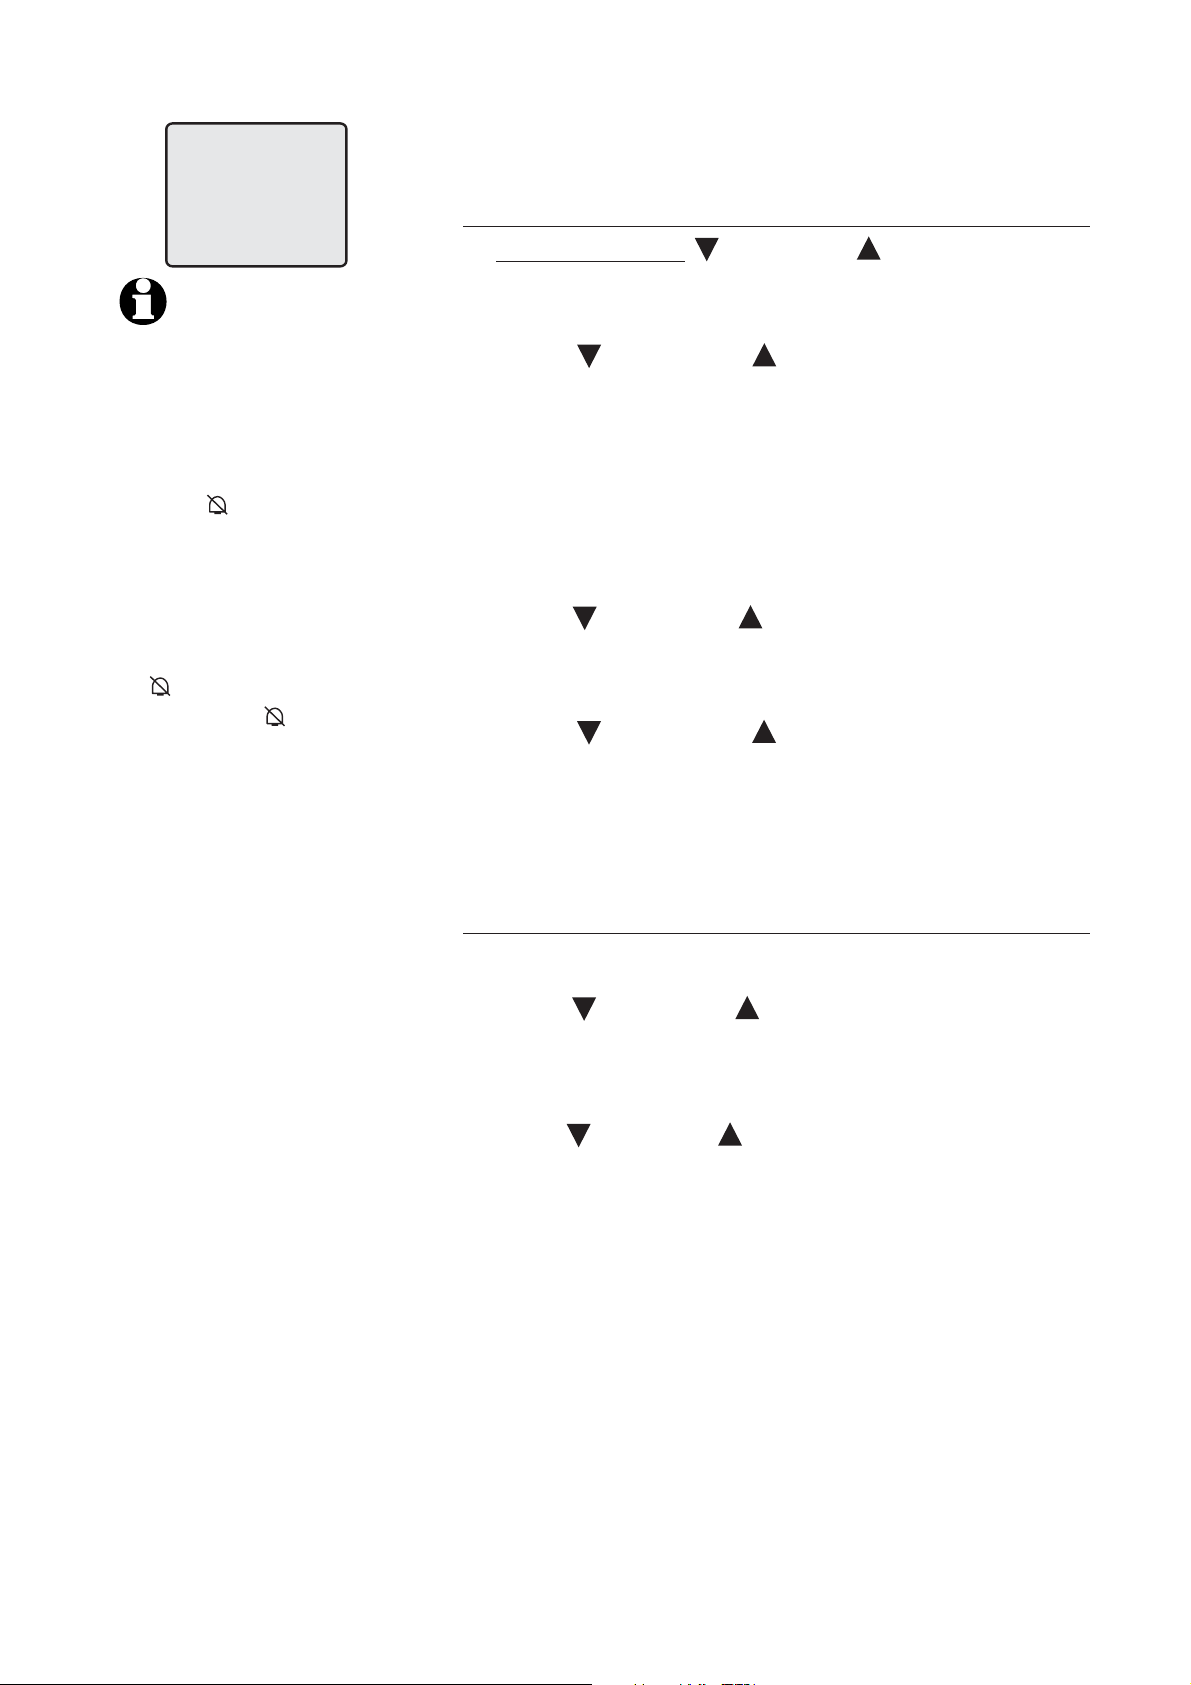
RINGER VOL: LOW
NOTES:
• If you choose OFF,
the cordless handset
ringer will be turned
off, and the screen will
display RINGER OFF
and
when the cordless handset is idle
(not in use). If there
are un-reviewed calls,
the screen will display
XX MISSED CALLS
instead of RINGER
OFF and
.
• When the volume level
is at the maximum or
minimum setting, you
will hear two alert
beeps.
Settings
Choose ringer volume setting
1.
Press and hold
less handset is idle (not in use). This feature
allows you to choose HI, low or OFF.
2. Press
CID or DIR to choose the desired
option. You will hear a sample of each ringer
volume.
3. Press
MENU/SELECT to choose blinking ringer
volume and exit.
-OR-
1. Press
2. Press
MENU/SELECT to begin programming.
CID or DIR until the screen displays
RINGER VOL: and the current setting.
3. Use
4. Press
MENU/SELECT to change the current setting.
CID or DIR to choose the desired
volume level.
5. Press
MENU/SELECT to save your selection and
exit.
Selectable ringer melodies
CID or DIR when the cord-
1. Press MENU/
2. Press
CID or DIR until the screen displays
SELECT to begin programming.
RINGER: and the current setting.
3. Use
4. Press
MENU/SELECT to change the current setting.
CID or DIR to display 1, 2, 3, 4 or OFF.
You will hear a sample of each ringer sound.
5. Press
MENU/SELECT to choose the displayed
ringer sound and exit.
11
Page 16
Telephone operation
Settings
Set cordless handset display date and time
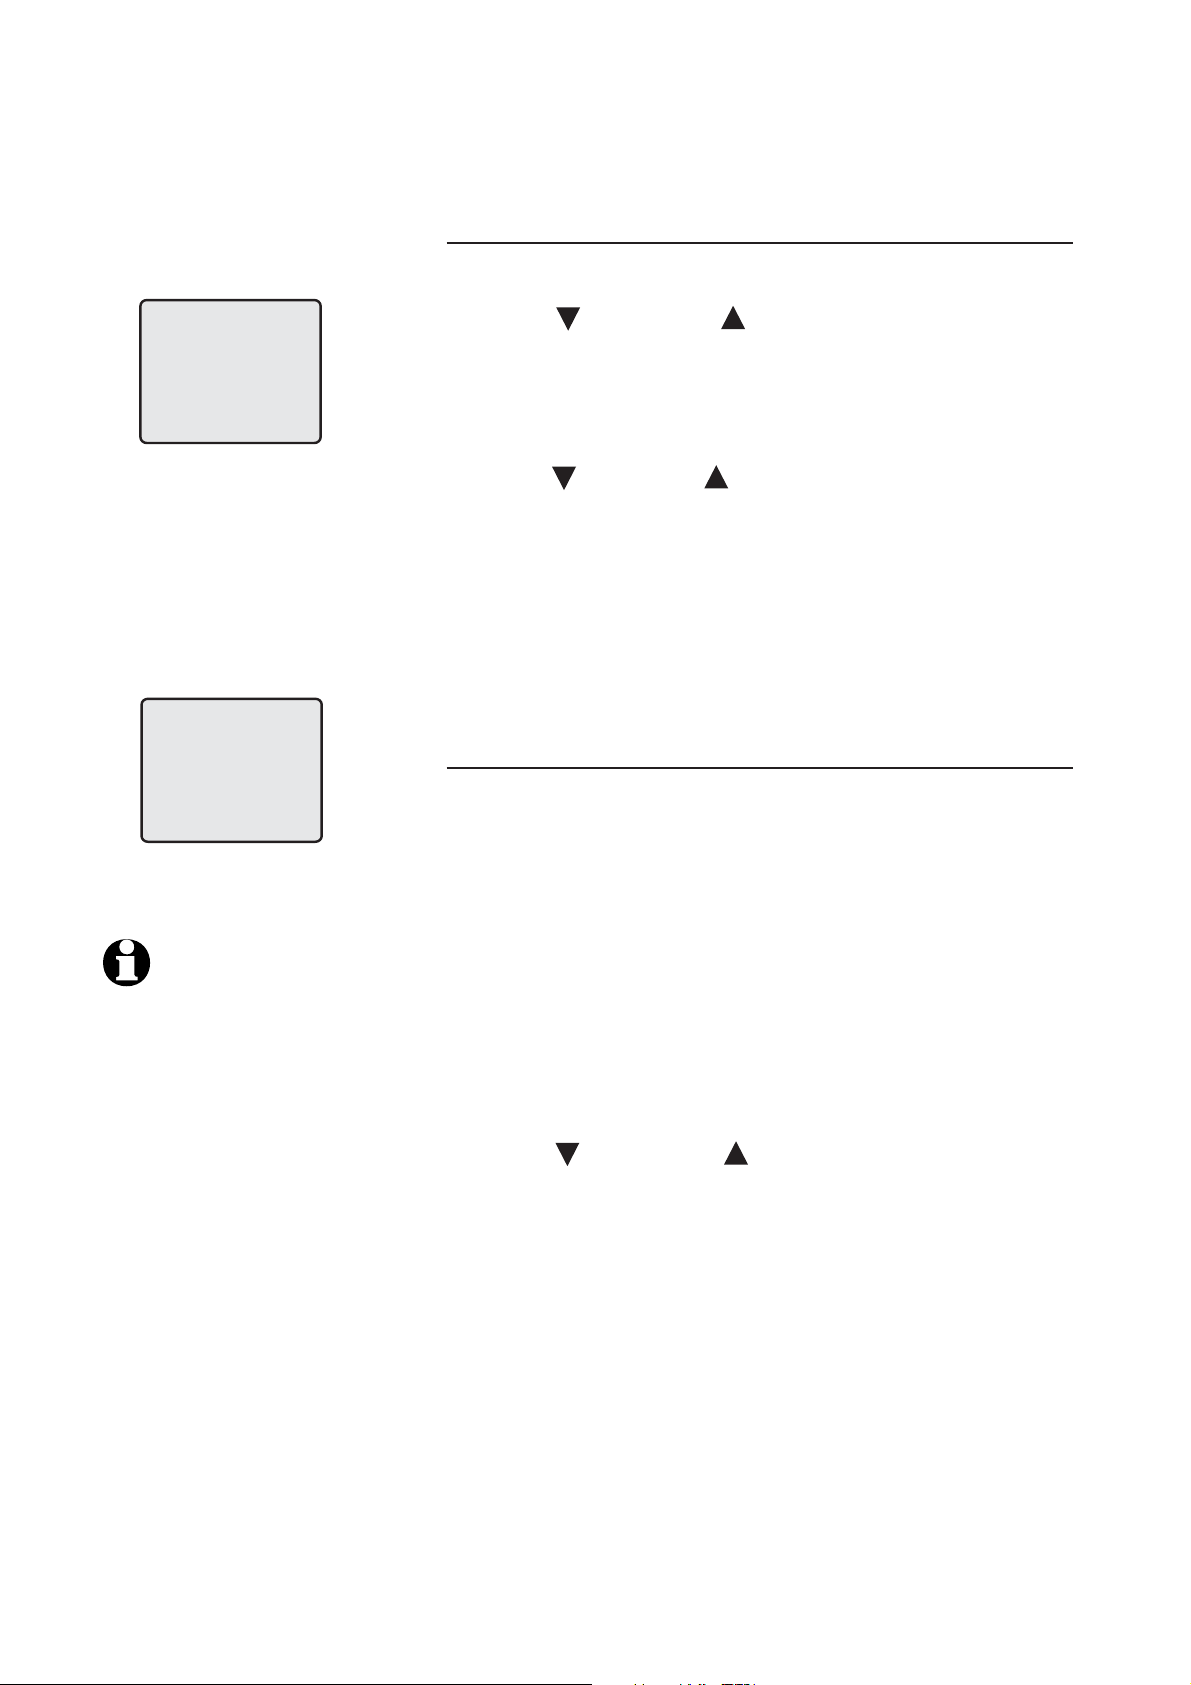
RINGER: 1
DATE/TIME
10:08 02/14
NOTES:
• You can choose to set
the time manually, or
you can allow it to be
set automatically with
incoming caller ID information. The time will be
set automatically only if
you subscribe to caller
ID service provided by
your local telephone
company (page 23).
The date and time for
the answering machine
need to be set separately (page 30).
• Caller ID will not set the
year. See page 30 for
instructions on how to
set the year.
1. Press MENU/
2. Press
CID or DIR until the screen displays
DATE/TIME
3. Press
MENU/SELECT to view or set the date and
SELECT to begin programming.
.
time.
4. Press
CID or DIR to change the month in the
date and time line at the bottom of the display,
then press
MENU/SELECT.
5. Repeat step four to set the day, hour, minute,
and the AM/PM.
6. Press
MENU/SELECT to save and exit.
To set home area code
Home area code is the area code for your telephone number. Most users simply dial the seven
digits of a telephone number to make a call within
their own area code and 10 digits outside of their
area code. If this applies to you, you should enter
your own area code into the telephone as the
home area code. After setting, if you receive a call
from within your home area code, the screen will
display the seven digits of the telephone number.
1. Press
2. Press
MENU/SELECT to begin programming.
CID or DIR until the screen displays
HOME AREA CODE.
3. Press
MENU/SELECT.
4. Press the dial pad keys to enter a three-digit
home area code.
5. Press
MENU/SELECT to save and exit.
12
Page 17
Telephone operation
Basic operation
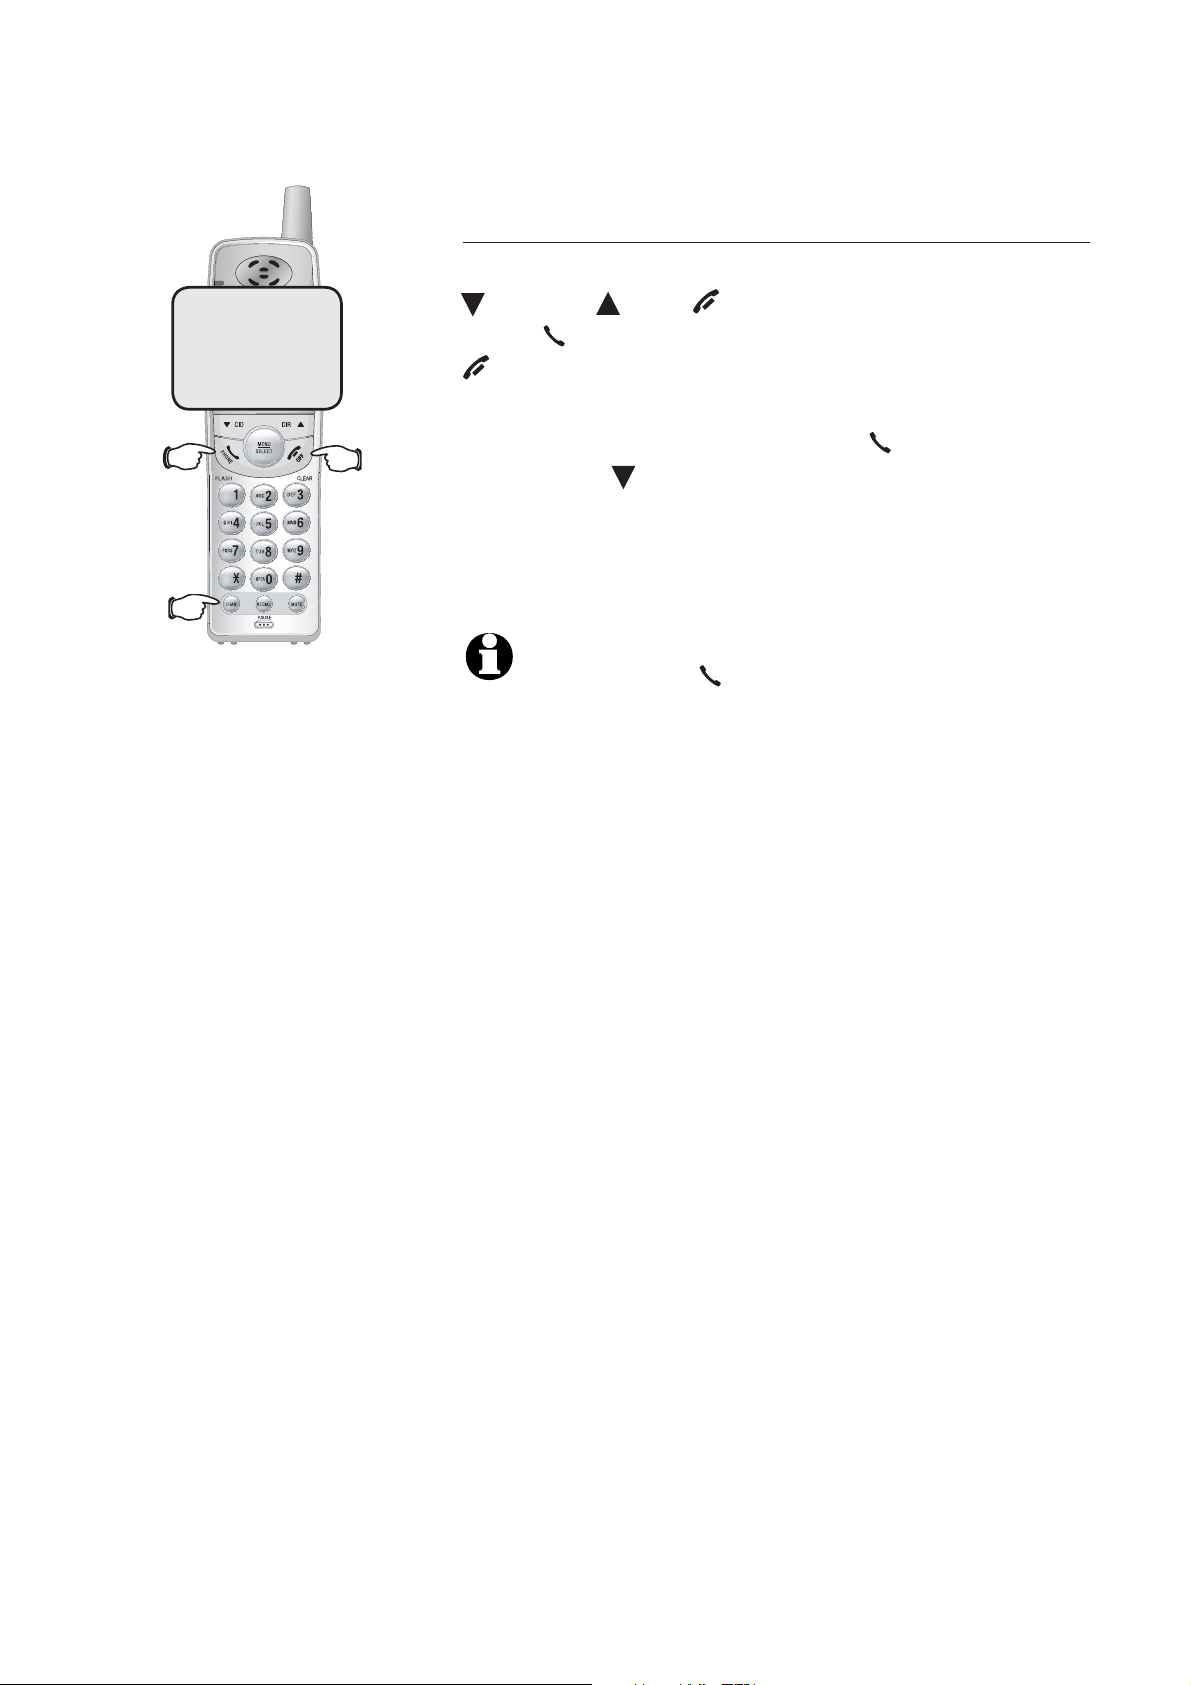
Making and answering calls
0:00:30
Elapsed
time
To answer an incoming call,
CID, DIR
press
OFF/
CLEAR
and OFF/
PHONE/
to hang up.
FLASH
, then dial a number. Press
press any keys (except
CLEAR
).
To make a call,
To predial (preview numbers before dialing),
enter numbers first, then press
dial. Press
CID then
CHAN
/REMOVE
PHONE/
FLASH
to
anytime to
make corrections when entering numbers.
The screen displays the elapsed time of the current
call (in hours, minutes and seconds).
REMOVE
NOTE: Press PHONE/FLASH to access ser-
vice from your local telephone service provider
will not affect the elapsed time.
13
Page 18
Telephone operation
Basic operation
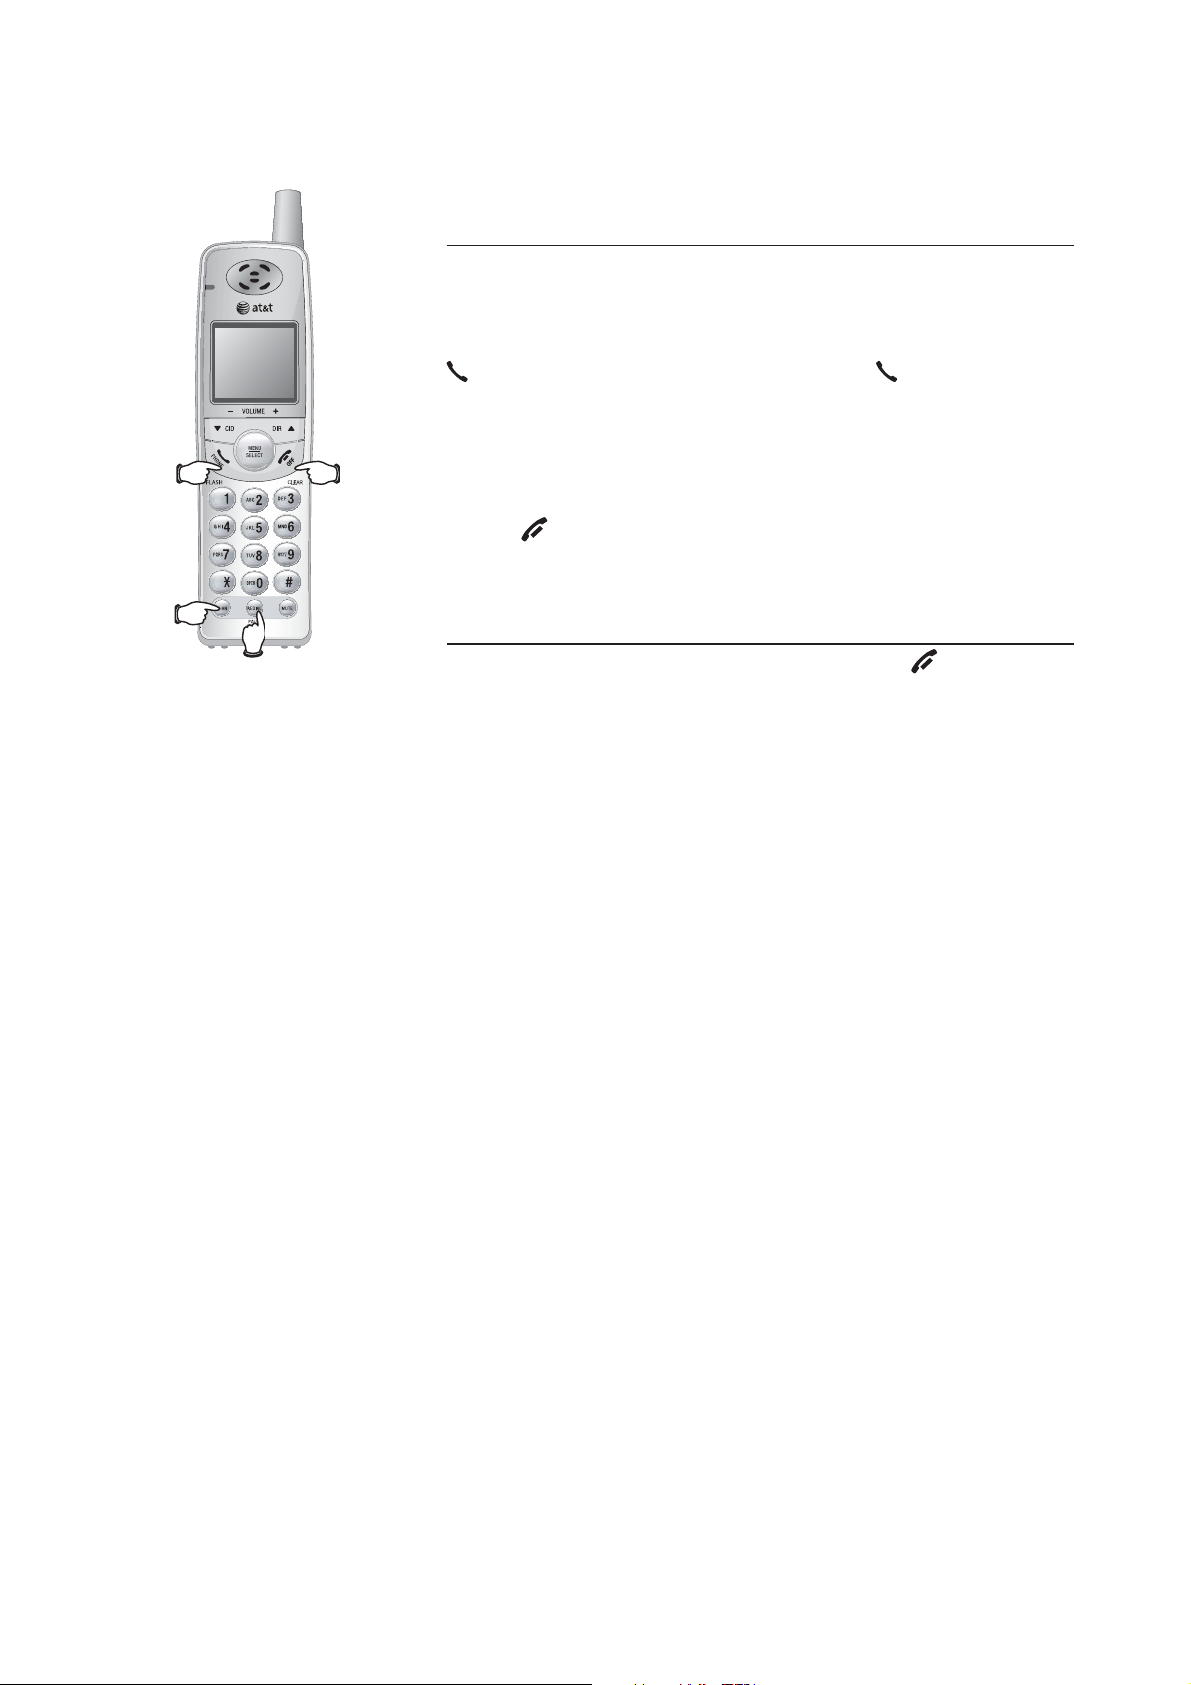
Last five numbers redial
While the phone is not in use, press REDIAL/
PAUSE
repeatedly to display the last five numbers called
(up to 30 digits). To dial the number displayed, press
PHONE/FLASH. Or after pressing PHONE/FLASH,
press REDIAL/
To delete the redial memory, press REDIAL/
Ringer
silenced
REMOVE
then press
Press
OFF/CLEAR to exit.
Temporary ring silencing
While the telephone is ringing, press
PAUSE to call the number last dialed.
PAUSE,
CHAN/REMOVE to delete one by one.
OFF/CLEAR
to silence the ringer temporarily. This will silence
the ringer without disconnecting the call. You can
answer the call. The next incoming call will ring
normally.
14
Page 19
Telephone operation
Basic operation
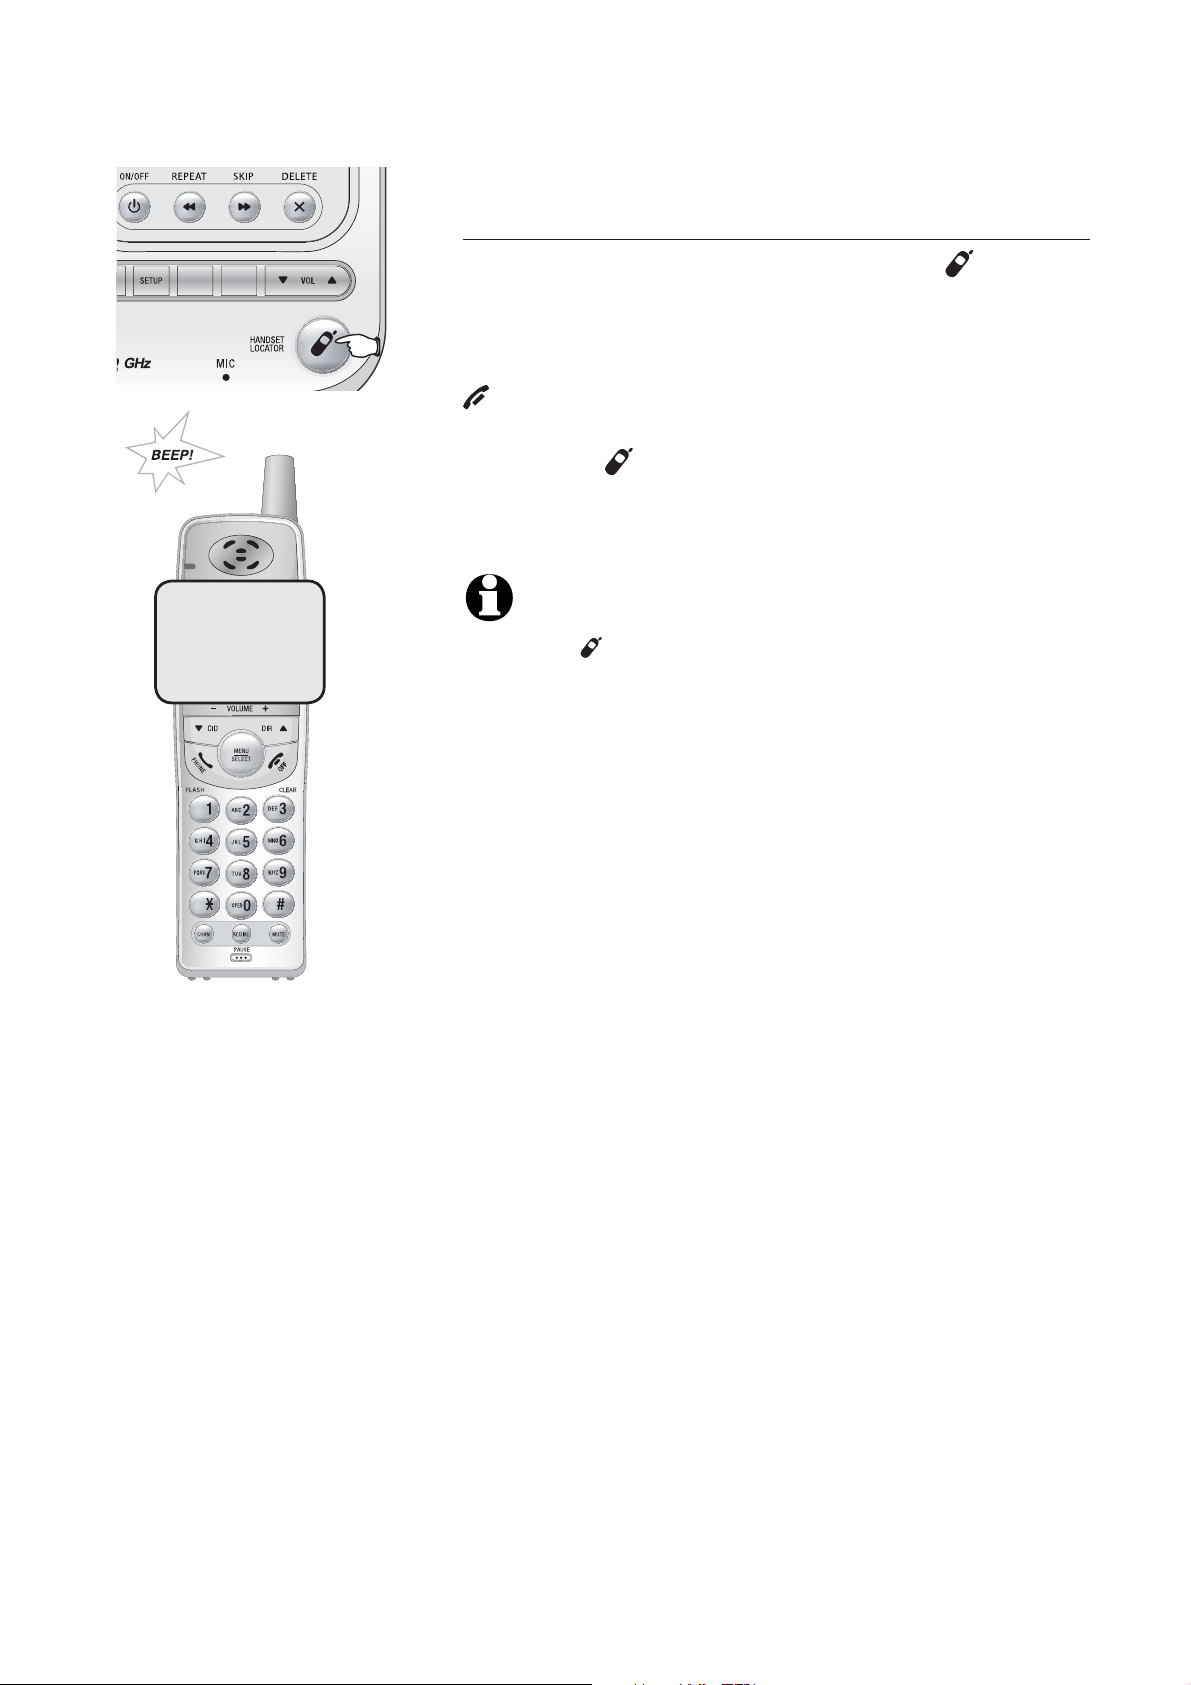
Handset locator
ANNC.
RECORD
** PAGING **
If you misplace the handset, press
LOCATOR
on the telephone base. This starts the
HANDSET
paging tone at the handset for 60 seconds to
help you locate it. To stop the paging tone, press
OFF/CLEAR on the cordless handset, or place
the cordless handset in the telephone base, or
press the
HANDSET LOCATOR on the tele-
phone base.
NOTE: If the handset is charging in the base,
pressing
HANDSET LOCATOR does not gener-
ate a paging tone.
REMOVE
15
 Loading...