

Page 1
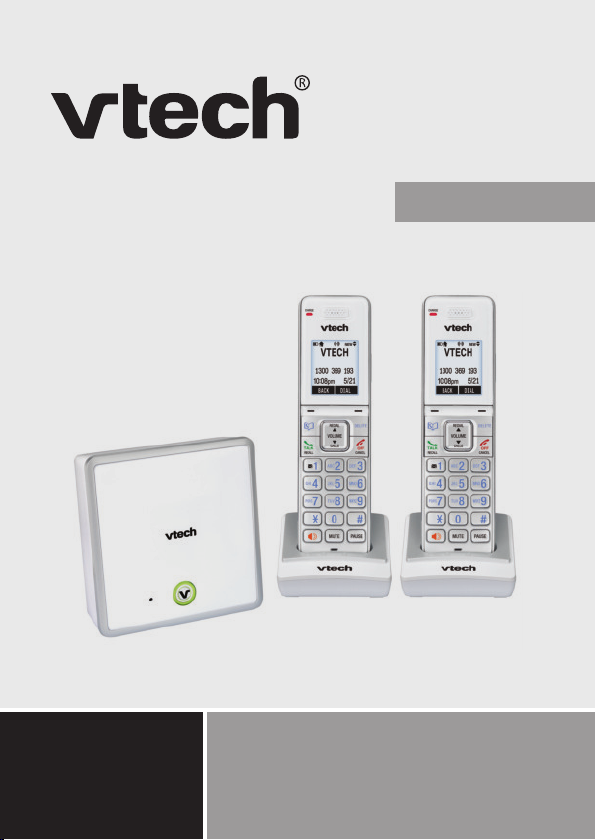
User Guide
Model:
VTech 18150 TWIN
For product support
please call: 1 300 369 193
Page 2

INTRODUCTION
To your VTech 18150 DECT6.0 Cordless Phone with
Answering Machine
•
Phonebook –The phonebook stores up to
200 entries.
•
Calling Number Display* lets you see who’s calling.
Your phone stores details of the last 50 callers in the
Call List.
•
Answering machine, with up to 40 minutes digital
recording time and helpful voice prompts.
* IMPORTANT
You need to subscribe to a Network Calling Number
Display service to be able to see the caller’s number or
name when called, or in the Calls List. See page 63 for
more details.
This User Guide provides you with all the information
you need to get the most from your phone. Before you
make your rst call, you will need to set up your phone.
Follow the simple instructions on the next few pages.
NEED HELP?
PLEASE LOOK IN THE HELP SECTION AT THE END
OF THE USER GUIDE IF YOU EXPERIENCE ANY
OPERATIONAL DIFFICULTIES WITH YOUR VTECH
PRODUCT, OR PLEASE CONTACT THE TECHELP
INFORMATION LINE 1300 369 193 OR CONTACT US BY
EMAIL AT: tcpsupport_au@vtech.com
2
Page 3

GOT EVERYTHING?
The package contains the following items:
VTech 18150 telephone base
•
2 VTech 18150 handsets
•
2 VTech 18150 chargers
•
3 Power adaptors
•
Telephone line cord and adaptor
•
2 NiMH rechargeable battery packs
•
Warranty registration information
•
User guide
•
3
Page 4

IN THIs GUIDE
Important safety instructions 9
Getting started 11
Location 11
Setting up 12
Battery low warning 16
Battery performance 16
Using your VTech 18150 phone on a broadband
ADSL line? 17
Date and time 18
Getting to know your phone 19
Handset overview 19
Telephone base overview 22
Navigating the menus 23
Handset menu layout 24
Keystroke table 25
Handset display icons 26
Using the phone 27
Make, answer or end a call 27
Call waiting 28
Volume boost 28
4
Page 5

Handset speakerphone 29
Volume control 29
Mute 29
Temporary ringer silencing 30
Hold 30
Redial 31
Chain dialing 33
Handset locator 34
Multiple handset use 35
Join a call in progress 35
Intercom 35
Answer an incoming call during an intercom call 36
Call transfer using intercom 37
One-touch broadcast (OTB) 39
Turn OTB on or off 39
OTB call to a single device 40
Change a one-to-one broadcast call to an intercom
call 42
Answer an incoming call during a broadcast call
42
Phonebook 45
Add a phonebook entry 46
Add a predialed number to phonebook 47
Review phonebook entries 48
5
Page 6

Alphabetical search 49
edit a phonebook entry 51
Delete a phonebook entry 52
Phone settings 53
Using the menu 53
Set date and time 54
Ringer volume 55
Ringer melody 56
Key tone 57
Flash time 57
ECO mode 58
Calling number display announce 59
QUIET mode 61
Reset 62
Telephone Network Services* 63
Calling Number Display 63
Memory match 65
Call log display screen message 65
Missed call indicator 66
Review the call log 66
Dial from the call log 67
Save a call log entry to the phonebook 67
Delete an entry in the call log 69
6
Page 7

Delete the entire call log 69
Network Voicemail 69
Call guard 71
Add a block list entry 71
Review block list entries 72
Delete a block list entry 74
Block calls without number 74
Call guard announce 75
Outgoing message for calls without number 76
Answering machine 79
Answer on/off 79
Outgoing message 80
Message playback 81
Delete all messages 83
Record, play or delete memos 84
Answering system settings 84
Number of rings 85
Remote access code 85
Recording time 86
Answering system and voicemail indicators 87
Call intercept 88
Remote access 88
Help 90
7
Page 8

General information 103
Replacing the handset batteries 103
Safety 103
Cleaning 104
Environmental 105
How many telephones can you have? 105
Customer service & Product warranty 106
8
Page 9

IMPORTANT sAfETY INsTRUCTIONs
When using your telephone equipment, basic safety
precautions should always be followed to reduce the risk
of re, electric shock and injury, including the following:
Read and understand all the instructions.
1.
Follow all warnings and instructions marked on the
2.
product.
Unplug this product from the wall outlet before
3.
cleaning. Do not use liquid or aerosol cleaners. Use a
damp cloth for cleaning.
Do not use this product near water (for example, near
4.
a bath tub, kitchen sink, swimming pool) or in humid
areas.
Do not overload wall outlets and extension cords as
5.
this can result in the risk of re or electric shock.
Unplug this product from the wall outlet and contact
6.
TecHelp on 1300 369 193 under the following
conditions:
When the power supply cord or plug is damaged
•
or frayed.
•
If the product does not operate normally by
following the operating instructions.
•
If the product has been dropped and the outer
casing has been damaged.
•
If the product exhibits a distinct change in
performance.
9
Page 10

7.
Avoid using a telephone during an electrical storm.
There may be a remote risk of electric shock from
lightning.
8.
Do not use the telephone to report a gas leak in the
vicinity of the leak.
9.
Use only the supplied NiMH (Nickel Metal Hydride)
batteries. The operation periods for the handsets are
only applicable with the default battery capacity.
10.
The use of other battery types or non rechargeable
batteries/primary mobile batteries can be
dangerous. These may cause interference and/or
unit damage. VTech will not be held liable for damage
arising from such noncompliance.
11.
Use only the power adaptors supplied with this
product. Please contact TecHelp on 1300 369 193 for
replacement adaptors.
12.
Please ensure that the batteries inserted properly.
13.
Do not immerse the batteries in water, and do not
place them in a re.
14.
Telephone receivers produce magnetic elds that
can attract small metallic objects such as pins or
staples. To avoid injury, do not place the handset
where such objects can be picked up.
10
Page 11

GETTING sTARTED
LOCATION
Place your VTech 18150 within 2 metres of the mains
power socket and telephone socket so that the cables
will reach.
Make sure it is at least 1 metre away from other
electrical appliances to avoid interference. Your VTech
18150 works by sending radio signals between the base
and handset. The strength of the signal depends on
where you locate the base. Putting it as high as possible
ensures the best signal.
The maximum range between the telephone base and
the handset is approximately 300 meters.
11
Page 12
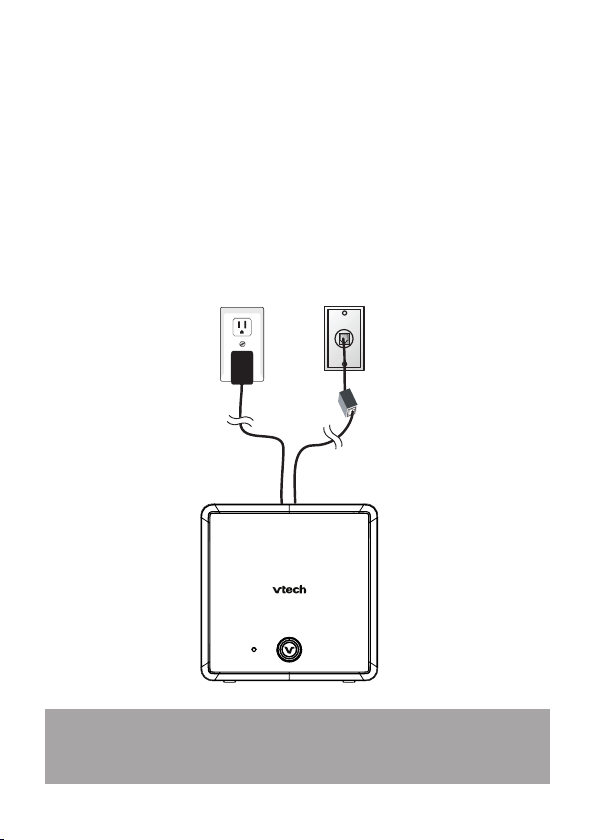
sETTING UP
Telephone base installation
1.
Insert the power adapter and the telephone line cord
into the telephone base.
2.
Insert the telephone line cord into a telephone wall
jack. If you have DSL high speed internet service, a
DSL lter (not included) is required.
Insert the other end of the power adapter into the
3.
wall outlet.
Note: Ensure power cord is fed through slot on base so
unit sits ush with the desk.
12
Page 13

Handset charger installation
Plug the power cable into the charger base.
1.
Plug the other end into a mains power wall socket.
2.
Install batteries to handset, and place the handset in
3.
the handset charger to charge.
Mains power
wall socket
Note: Ensure power cord is fed through slot on base
so unit sits ush with the desk.
13
Page 14
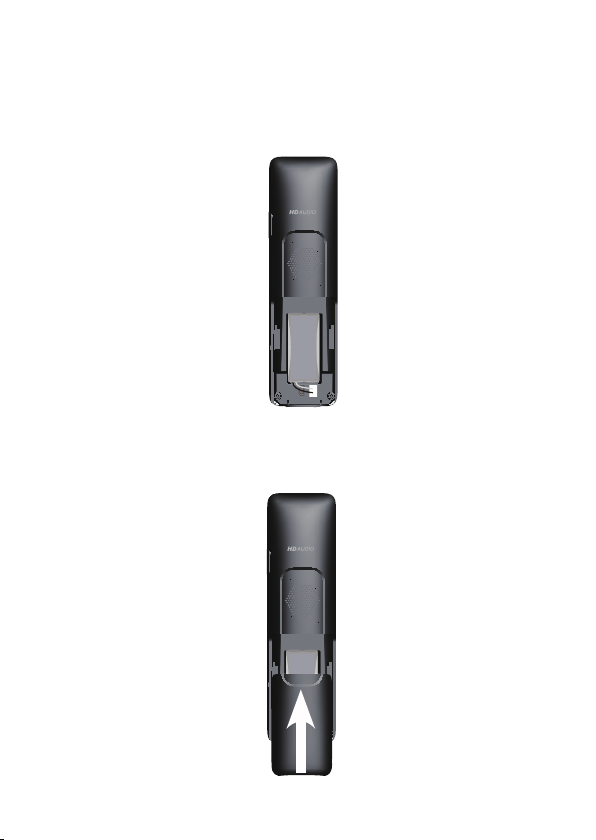
Handset batteries installation
THIS SIDE UP / CE CÔTÉ VERS LE HAUT
Battery Pack / Bloc-piles :
BT183342/BT283342 (2.4V 400mAh Ni-MH)
WARNING / AVERTISSEMENT :
DO NOT BURN OR PUNCTURE BATTERIES.
NE PAS INCINÉRER OU PERCER LES PILES.
Made in China / Fabriqué en chine
THIS SIDE UP / CE CÔTÉ VERS LE HAUT
Battery Pack / Bloc-piles :
BT183342/BT283342 (2.4V 400mAh Ni-MH)
WARNING / AVERTISSEMENT :
DO NOT BURN OR PUNCTURE BATTERIES.
NE PAS INCINÉRER OU PERCER LES PILES.
Made in China / Fabriqué en chine
1.
Plug the battery connector securely into the socket
inside the handset battery compartment. Insert the
supplied battery as indicated.
Align the cover at against the battery compartment,
2.
then slide it upwards until it clicks into place.
14
Page 15

Charge the handset by placing it in the charger. The
3.
CHARGE light on the handset is on during charging.
Note: The display of your handset may go blank for a
short time when placing back on charge. This is the
normal operation of your handset.
15
Page 16

IMPORTANT
Check for a dial tone by pressing
hear a dial tone, the installation is successful.
TALK/RECALL. If you
WARNING
Do not place your VTech 18150 in the bathroom or other
humid areas.
IMPORTANT
The telephone base must be plugged into the mains
power socket at all times. Do not connect the telephone
line until the handset is fully charged. Only use the power
adaptor, telephone cables and NiMH batteries supplied
with the product.
BATTERY LOw wARNING
If the
to recharge the handset before you can use it again.
During charging, the
the display.
icon ashes in the handset display you will need
icon will appear to be lling in
BATTERY PERfORMANCE
In ideal conditions, the fully charged battery should give
up to 12 hours talk time, or 160 hours standby time, on a
single charge. Note that a new battery will not reach full
capacity until it has been in normal use for several days.
To keep the batteries in the best condition, leave the
handset off the base for a few hours at a time. Running
the battery right down at least once a week will help
16
Page 17

it last as long as possible. The charge capacity of the
rechargeable battery will reduce with time as it wears
out, giving the handset less talk / standby time.
Eventually it will need to be replaced. A replacement
battery can be obtained by contacting TecHelp on
1300 369 193 or from your local electrical retailer.
After charging your handset for the rst time,
subsequent charging time is about 6–8 hours a day. The
battery and handset may become warm during charging,
however, this is normal.
UsING YOUR VTECH 18150 PHONE ON A
BROADBAND ADsL LINE?
If this product is to be used on a broadband ADSL line,
then you must ensure that it is connected via an ADSL
lter. Using this product on a Broadband line without an
ADSL lter may cause problems with this product and
your Broadband service.
17
Page 18

DATE AND TIME
If you have subscribed to a Network Calling Number
Display service, the date and time are set automatically
with each incoming call.
The date and time is recorded with each answering
machine message you receive. If you have not subscribed
to a Network Calling Number Display Service you can set
the date and time manually.
Set the date and time manually
Press
1.
2.
3.
4.
5.
MENU when the handset is not in use.
Press
Press
the date according to the date format you set.
Press
time according to the time format you set.
Press
or to scroll to Set date/time.
SELECT, and the use the dialing keys to enter
NEXT, and the use the dialing keys to enter the
SAVE to conrm. You hear a conrmation tone.
18
Page 19
GETTING TO kNOw YOUR PHONE
1
1
2
3
4
5
6
7
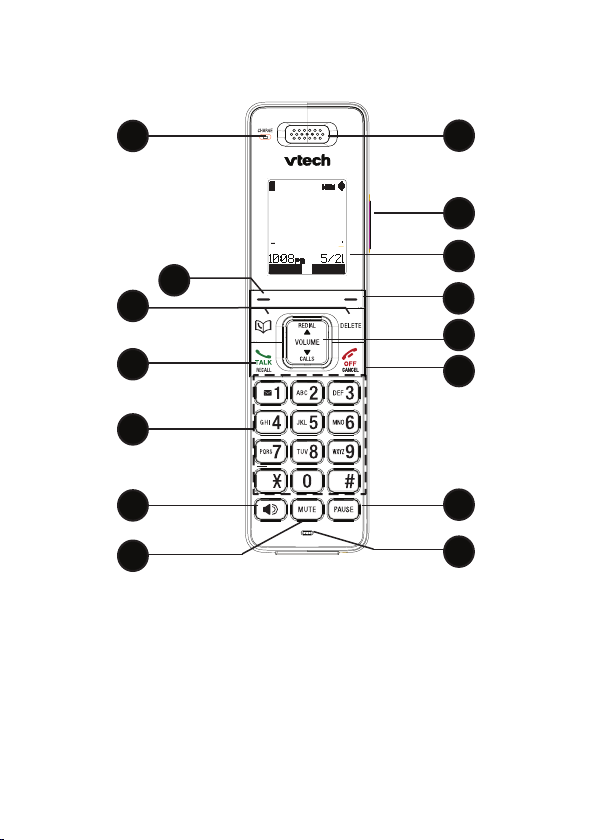
HANDsET OVERVIEw
1. CHARGE light
On when the handset is charging in the charger.
•
2. Softkeys
Press to select the menu item displayed above the key.
•
In menu mode: Press to select an item or save an entry or
•
setting.
8
9
10
11
12
13
14
15
19
Page 20

3. PHONEBOOK
In idle mode: Press to access the phonebook .
•
4.
TALK/RECALL
•
During call ringing: Press to answer a call.
•
During a call: Press to activate Recall for use with Telephone
Network Services such as Call Waiting during a call.
•
During message playback: Press to call back the caller if the
caller’s number is available.
5. ALPHANUMERIC KEYPAD
•
Press to insert a digit / character / #
•
# key in Call List mode: Press to review the caller’s number if
applicable.
•
# key in Idle model: press and hold to turn Quiet Mode on or off.
SPEAKER
6.
During a call: Press to turn on / off the speakerphone.
•
In Idle mode / predialing mode / Redial list / Call List /
•
Phonebook entry: Press to make a call with speakerphone.
During ringing: Press to answer a call with speakerphone.
•
7. MUTE
During a call: Press to mute the microphone.
•
During ringing: Press to mute the ringer temporarily.
•
8. EARPIECE
9. OTB / VB (One-touch broadcast / Voice broadcast)
In idle mode: Press to display the BROADCAST menu to begin
•
a broadcast call, or press and hold to begin a one-to-group
broadcast.
Press to enhance the clarity and loudness of the caller’s voice
•
during a call in earpiece mode.
10. LCD DISPLAY
20
Page 21

11. DELETE
In Redial list / Call List / Phonebook entry: Press to delete an
•
individual entry.
In predialing mode: Press to delete digits.
•
During message or announcement playback: Press to delete
•
the playing message or the recorded announcement.
12. REDIAL/VOLUME
•
In idle mode: Press to access the redial list.
•
In Menu mode / Phonebook list / Redial list / Call List: Press to
scroll up the menu items.
•
During a call, or message / announcement playback: Press to
increase the listening volume.
CALLS/VOLUME
•
In idle mode: Press to access the call log.
•
In Menu mode / Phonebook list / Redial list / Call List: Press to
scroll down the menu items.
•
During a call, or message / announcement playback: Press to
decrease the listening volume.
OFF/CANCEL
13.
During a call: Press to end a call and return to idle screen.
•
During ringing: Press to mute the ringer temporarily.
•
In menu / editing mode: Press to go back to previous menu.
•
In menu / editing mode: Press and hold to return to idle screen.
•
14. PAUSE
In editing mode: Press to insert a pause (P).
•
15. MICROPHONE
21
Page 22
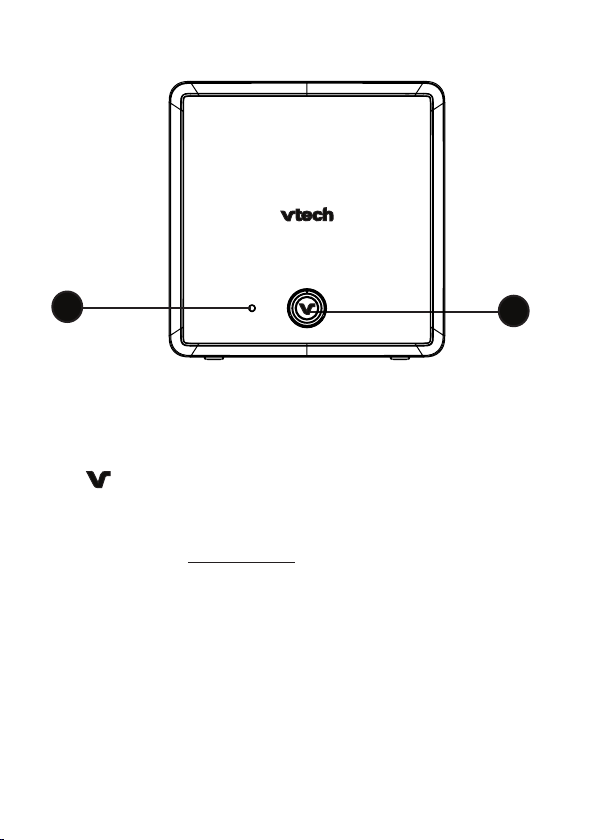
TELEPHONE BAsE OVERVIEw
1
1. - BUZZER SPEAKER
Emits alert tones.
•
2. -
FIND HANDSET
•
LED light turns on when the base is powered on.
•
In idle mode: Press to page all system handsets.
•
In idle mode: Press and hold for about 6 seconds to enter the
handset registration mode.
22
2
Page 23

NAVIGATING THE MENUs
Your VTech 18150 has an easy to use menu system.
Each menu has a list of options, as outlined on the
following page.
To enter the main menu of the handset:
Press
1.
2.
3.
•
•
MENU when the phone is not in use.
Press
feature menu.
Press
To return to the previous menu, press
To return to idle mode, press and hold
or until the screen displays the desired
SELECT to enter that menu.
OFF/CANCEL.
OFF/CANCEL.
23
Page 24

HANDsET MENU LAYOUT
Phonebook Play messages Answering sys
Home Play new msgs
Play old msgs
Call log Call guard Intercom
View
Del all calls
Ringers Set date/time CND announce
Ringer volume
Ringer tone
Settings
Display alerts
Time format
Date format
Auto answer
Register
Key tone
Flash time
ECO mode
Reset
Block list
Calls w/o num
Outgoing msg
Delete all old
Record memo
Answer On/Off
Ans sys setup
On
Number only
Off
24
Page 25
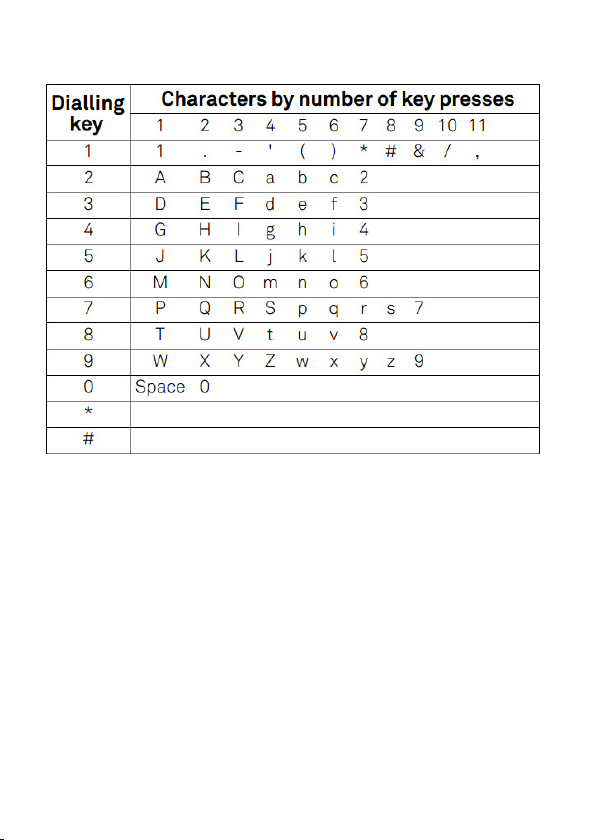
kEYsTROkE TABLE
25
Page 26
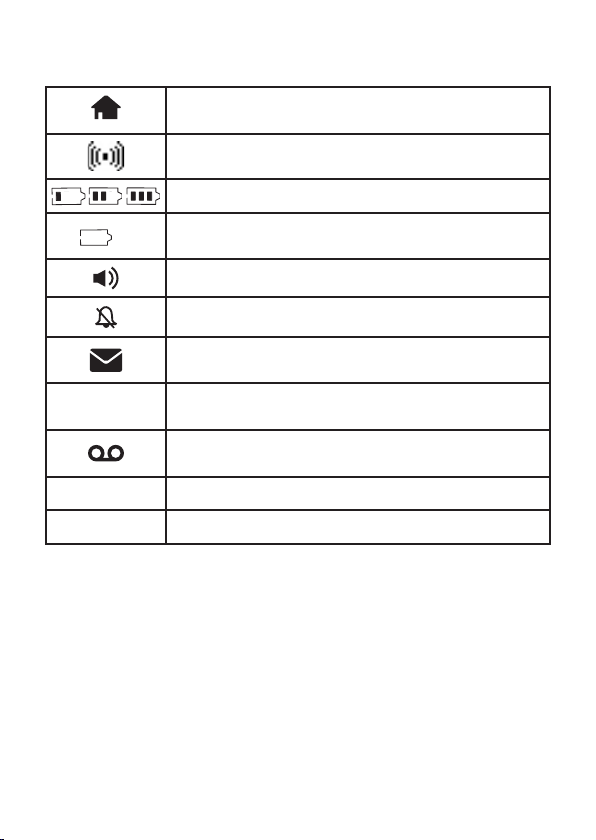
HANDsET DIsPLAY ICONs
HOME line - On steadily when the home line is in
use or there is an incoming call.
Volume boost - On steadily when the volume boost is
turned on during a call using the handset earpiece.
Battery status - Battery is charging (animated display).
ANS
ON
NEW
MUTE
Battery status - The battery icon ashes when the
battery is low and needs charging.
Speakerphone - The speakerphone is in use.
Ringer off - The handset ringer is off.
New voicemail - You have new voicemail from your
telephone service provider.
Answering system on - The answering system is
turned on to answer calls.
Message - New message in the built-in answering
system.
New call list entry -New and missed calls.
MUTE - the handset microphone is off.
26
Page 27

UsING THE PHONE
MAkE, ANswER OR END A CALL
Using a handset:
To make a call:
•
Press TALK/RECALL or , then enter the
telephone number.
To predial
•
To answer
•
To end
Press
Notes:
•
•
a call:
Enter the telephone number, then press
TALK/RECALL or .
a call:
Press
The screen shows the elapsed time as you talk (in
hours, minutes and seconds).
When predialing (preview numbers before dialing),
press DELETE to backspace and delete;
press and hold PASUE to insert a dialing pause (a P
appears).
TALK/RECALL or .
a call:
OFF/CANCEL, or put the handset in the charger.
27
Page 28

CALL wAITING
If you subscribe to call waiting service from your
telephone service provider, you hear a tone if someone
calls while you are already on a call.
•
Refer to your Telephone Service Provider regarding
operation of Call Waiting
VOLUME BOOsT
Use the Volume Boost feature to enhance the clarity
and loudness of the voice on handset earpiece.
To turn on Volume Boost on the handset:
While you are on a call using the handset earpiece,
•
press OTB / VB on the handset. The handset displays
Boost on.
Press OTB / VB again to turn off. The handset
•
displays Boost off.
28
Page 29

HANDsET sPEAkERPHONE
During a call, press
the speakerphone and normal handset use. Press
OFF/CANCEL or return the handset to the charger to
hang up.
on the handset to switch between
VOLUME CONTROL
While on a call, you can adjust the listening volume on
the handset.
To adjust the listening volume of a handset:
Press
•
Note: The handset earpiece volume setting (1-6) and
speakerphone volume setting (1-6) are independent.
VOLUME on the handset while on a call.
MUTE
The mute function allows you to hear the other party
but the other party cannot hear you.
•
During a call, press MUTE. The screen displays
Muted until the mute function is turned off.
•
Press MUTE again to resume the conversation. The
screen displays Microphone ON.
29
Page 30

TEMPORARY RINGER sILENCING
When the telephone is ringing, you can temporarily
silence the ringer of the handset without disconnecting
the call. The next call rings normally at the preset volume.
To silence the ringer temporarily:
Press
MUTE. The screen displays Ringer muted.
HOLD
You can place any call on hold. At 15 minutes on hold,
the call on hold automatically disconnects.
To place a call on hold:
•
To resume a call on hold:
•
HOLD on the handset. Call on hold appears
Press
on the handsets. TALK/RECALL ashes on the
handsets.
Press
TALK/RECALL on handsets.
EqUALIzER
The equalizer feature enables you to change the quality
of the audio to best suit your hearing.
1. While on a call, press
2. Press or to highlight Equalizer, then press
SELECT.
3. Press or to highlight Treble 1, Treble 2, Bass or
Natural (the default setting), then press SELECT.
OPTION.
30
Page 31

Notes:
If you switch the call between the handset and
•
speakerphone by pressing
remains unchanged.
The current equalizer setting remains unchanged
•
until you select a new setting.
, the audio setting
REDIAL
Each handset store the last 10 dialed numbers (up to
30 digits each) in the redial list. The redial entries of each
handset is independent.
To review the redial list:
1. Press REDIAL on a handset in idle mode.
2.
Press
beeps twice at the end of the list.
Press OFF/CANCEL on a handset to exit.
To dial the redial entry:
1. Press
Press OPTION and then or to highlight Redial,
2.
and then press SELECT.
3. Press
displays. The handset beeps twice at the end of the
list.
4. Press DIAL to dial the number displayed.
or
to browse through the list. The handset
TALK/RECALL or on a handset to dial.
or to browse until the desire number
31
Page 32

To save a redial entry to the phonebook:
1.
Press REDIAL on a handset in idle mode.
2. Press or to browse until the desire number
displays.
3. Press
SAVE.
4. The screen displays EDIT NUMBER. Use the dialing
keys to edit the number, if necessary.
•
Press
•
Press DELETE to erase a digit.
•
Press and hold DELETE to erase all digits.
•
Press and hold PAUSE to enter a dialing pause (a
or to move the cursor to the left or right.
P appears).
5. Press
6. Press
7. Press
NEXT.
or to highlight one of the following types:
•
Home
•
Mobile
•
Work
•
Other
NEXT. The screen displays ENTER NAME. Use
the dialing keys to enter a name.
•
Press
•
Press 0 to add a space.
•
Press DELETE to erase a character.
•
Press and hold DELETE to erase all characters.
8. Press
or to move the cursor to the left or right.
SAVE. The screen displays Saved and you
hear a conrmation tone.
32
Page 33

To delete the redial entry:
1.
Press REDIAL on a handset in idle mode.
2. Press or to browse until the desire
number displays.
3. Press DELETE on the handset to delete the
displayed number. You hear a conrmation tone.
CHAIN DIALING
Use this feature to initiate a dialing sequence from the
numbers in the phonebook, call log or redial memory
while you are on a call.
Chain dialing is useful when you wish to access other
numbers (such as bank account numbers or access
codes) from the phonebook, call log or redial list.
To access a number in the phonebook:
Press OPTION while on a call.
1.
Press
2.
Press
3.
phonebook, and then press VIEW.
Press
4.
Press
5.
or to scroll to Phonebook.
SELECT and or to scroll to desired
or to hightlight the desired entry.
DIAL dial the displayed number.
To access a number in the call log:
Press
1.
2.
3.
4.
OPTION while on a call.
Press or to scroll to Call log.
SELECT and or to scroll to desired entry.
Press
Press CALL to dial the displayed number.
33
Page 34

To access a number on the redial list:
Press
1.
2.
3.
4.
OPTION while on a call.
Press
Press
Press
or to scroll to Redial.
SELECT and or to scroll to desired entry.
DIAL to dial the displayed number.
HANDsET LOCATOR
The handset locator feature is useful if you misplace any
handsets.
To start paging:
•
Press
tone on all handsets for
60 seconds. All idle handsets ring and display
**
Note: If you press OFF/CANCEL, #, MUTE, or MUTE
on a handset, the ringer of that handset stops, but the
paging to the rest of the handsets continues.
To stop paging
Press
•
-OR-
Press
•
on the telephone base to start the paging
Paging **.
TALK/RECALL or on the handset(s).
on the telephone base.
34
Page 35

MULTIPLE HANDsET UsE
JOIN A CALL IN PROGREss
Another handset can join you on an outside call. The call
continues until all people hang up.
To join a call:
Press
TALK/RECALL or on another handset to join the
call.
INTERCOM
Use the intercom feature for conversations between two
handsets.
Press MENU in idle mode to enter the main menu.
1.
Press or to scroll to Intercom, then press SELECT.
•
If you have two handsets, the handset shows
Calling other handset.
•
If you have more than two handset, the handset
shows INTERCOM TO: Use the dialing keys to
enter a specific device number, or press or to
scroll to the desired device and press SELECT.
Your handset screen shows Calling other handset
or Calling VTECH X. The destination device rings
and displays Other handset is calling or VTECH X is
calling.
35
Page 36

2. To answer the intercom call, press TALK/RECALL
or on the destination handset. Both handsets
now show Intercom.
3. To end the intercom call, presses
or places the handset back in the charger. Both Both
handsets display Intercom ended.
Notes:
Before the intercom call is answered, you can
•
cancel it by pressing
handset.
If the called device is not answered within 100
•
seconds, or accessing the phonebook or call log, or
is on a call, or is out of range, the initiating device
shows No answer. Try again.
•
To temporarily silence the intercom ringer, press
OFF/CANCEL or MUTE on the handset.
You can only use one pair of devices at a time to
•
make intercom calls.
OFF/CANCEL on the
END, OFF/CANCEL,
ANswER AN INCOMING CALL DURING AN
INTERCOM CALL
To answer a call during an intercom call:
Press TALK/RECALL to answer the call. The
•
intercom call ends automatically.
Press OFF/CANCEL to end the intercom call without
•
answering the incoming call.
36
Page 37

CALL TRANsfER UsING INTERCOM
Use the intercom feature to transfer an outside call to
another system handset. You can also share an outside
call with another system handset.
To transfer or share an outside call using intercom:
During the call, press
1.
2.
Press
SELECT to choose Intercom.
•
If you have two handsets, the handset shows
Calling other handset.
•
If you have more than two handsets, the handset
shows INTERCOM TO: Use the dialing keys to
enter a specific device number, or press or to
scroll to the desired device and press SELECT.
The call is automatically put on hold.Your handsetThe call is automatically put on hold. Your handsetYour handset
screen shows Calling other handset or Calling
VTECH X. The destination device rings and displays
Other handset is calling or VTECH X is calling.
3. To answer the intercom call on the other device,
press TALK/RECALL or on the destination
handset.
4. From this intercom call, you have the following
options:
OPTION.
37
Page 38

You can transfer the call. Press OPTION and then
•
press SELECT to select Transfer on the calling
handset. Your screen shows Call transferred.
The other device automatically connects to the
outside call.
You can let the other device join you on the
•
outside call in a three-way conversation. Press
OPTION. Press or to highlight Share call,
then press SELECT.
You can end the intercom call and continue the
•
outside call with your handset. Press
TALK/RECALL or END on your handset.
Notes:
•
If you want to cancel an intercom call and reconnect
to the outside call before the destination handset
answers, press
OFF/CANCELCANCEL on the originating
handset..
If the called device is not answered within 100
•
seconds, or accessing the phonebook or call log, or
is on a call, or is out of range, the initiating device
shows No answer. Try again.
38
Page 39

ONE-TOUCH BROADCAsT (OTB)
You can directly broadcast messages to the
speakerphone of any handset. Press and hold OTB on a
handset begin two-way communication.
•
Only one device can talk at a time. While talking to
another handset, press and hold OTB on the handset.
•
You must release OTB on the handset, so the other
person can respond.
•
Only one OTB session can be active at a time.
•
While OTB is in use between two handsets, other
handsets cannot use the intercom feature but can
access the answering system.
•
When you attempt to place a broadcast call to
another device which is accessing the answering
system or on an intercom call or outside call, your
device screen shows Not available at this time.
Note: The OTB function is not available when QUIET
mode is on.
TURN OTB ON OR Off
1. Press OTB when the handset is not in use. The
Broadcast menu displays.
2. Press
SELECT.
3. Press
or to highlight OTB On/Off, then press
or to choose On or Off, then press SELECT.
Note: The handset screen displays No OTB call when
OTB is turned off.
39
Page 40

OTB CALL TO A sINGLE DEVICE
1. There are a few ways to begin a OTB call to a single
device. When the handset is not in use:
•
If you have two handsets, press and hold OTB.
•
If you have more than two handsets:
w Press OTB on the handset, then use the dialing
keys to enter the destination handset number.
-OR-
w Press OTB on the handset. Press
highlight the destination handset number,
then press SELECT or OTB.
The handset shows Connecting to VTECH X...
(
VTECH
the destination handset number)
When the connection is made, both your and the
destination handset screens display Press and hold
[OTB] to talk.
2. Press and hold OTB. A chirp indicates your microphone
is on. Speak towards the device. Your voice is
broadcast to the destination handset. While you are
speaking, your handset shows OTB To
3. Release OTB after speaking. Both devices beep once
again and the screens show Press and hold [OTB]
to talk, then you can press and hold OTB to continue
speaking or the destination device can respond.
4. To end the OTB call, press OFF/CANCEL or END, or
place the handset in the charger. The handset shows
Broadcast Ended.
represents the handset name, X represents
for a few seconds.
or to
VTECH
X.
40
Page 41

Note: After OTB is released, the OTB call remains
open for a short time. If no one presses OTB within
10 seconds, the OTB call ends automatically.
BROADCAsT CALL TO MULTIPLE DEVICEs
When there are multiple handsets registered to the
phone system, OTB supports one-to-group calls.
To call multiple handsets:
1. You have two ways to call multiple handsets. When the
handset is not in use:
Press and hold OTB until the handset shows
•
Connecting to group....
Press OTB. Press
•
SELECT or press OTB and your handset shows
Connecting to group....
When the connection is made, both the caller and the
destination parties hear a beep. The speakerphones
on all other devices automatically activate.
2. You need to press and hold OTB when you want
to speak. Speak towards the handset. Your voice is
broadcast to all devices.
3. Release OTB after speaking.
4. Any extension can reply.
or to choose Group. Press
41
Page 42

CHANGE A ONE-TO-ONE BROADCAsT CALL
TO AN INTERCOM CALL
You can convert a one-to-one OTB session to an
intercom call.
1.
When your device shows Press and hold [OTB]
to talk, press
Intercom?
Press
2.
3.
4.
SELECT. Your device displays
Calling
shows Broadcast Ended and then
VTECH
Press
answer the intercom call. Both handsets now show
Intercom.
To end the intercom call, press
handset or place the handset in the charger. Both
screens show Intercom ended.
X is calling. The destination handset rings.
INT.. The screen shows Switch to
VTECH
X. The destination device briey
TALK/RECALL on the destination handset to
OFF/CANCEL on your
ANswER AN INCOMING CALL DURING A
BROADCAsT CALL
When you receive an outside call during a OTB, there is
an alert tone.
To answer an incoming call:
During a one-to-one broadcast call, press
•
TALK/RECALL on the initiating or destination
handset. The broadcast call ends automatically and
the outside call is answered.
42
Page 43

During a one-to-group broadcast call, press
•
TALK/RECALL on the initiating handset. The
broadcast call ends automatically and the outside
call is answered.
During a one-to-group broadcast call, press
•
TALK/RECALL on any one of the destination
handsets. That device answers the outside call.
The broadcast call continues for the rest of the OTB
participants.
To leave the broadcast call without answering the
•
incoming call, press
OFF/CANCEL on your handset.
MAkE AN OUTGOING CALL DURING
BROADCAsT CALL
During a one-to-one broadcast call, press
•
TALK/RECALL on your handset to get a dial tone.
The broadcast call ends automatically.
During a one-to-group broadcast call, press
•
TALK/RECALL on the initiating handset. The
broadcast call ends automatically and you get a dial
tone.
During a one-to-group broadcast call, press
•
TALK/RECALL on any one of the destination
handsets. That device gets a dial tone. The broadcast
call continues for the rest of the OTB participants.
43
Page 44

END OR LEAVE A BROADCAsT CALL
For one-to-one broadcast calls, both initiating and
destination handsets can end the broadcast call.
For broadcast calls to multiple devices, the initiating
handset can end the broadcast call. If any one of the
destination handsets leaves the broadcast call, the call
continues until all participants or the initiator hangs up.
Press
shows Broadcast Ended.
-OR-
Place the handset in the charger, then the handset
return to idle mode.
Note: After OTB on the handset is released, the
broadcast call remains open for a short time. If no
one presses OTB on the handset within ten seconds,
the broadcast call ends automatically.
OFF/CANCEL or END on the handset. The screen
44
Page 45

PHONEBOOk
A phonebook entry can be up to 30 digits for each phone
number and 15 characters for each name.
Phonebook entries are stored at the telephone base
•
and shared by all system handsets. Any changes
made on one device apply to all.
Only one device can review the phonebook at a time.
•
If another device tries to enter the phonebook, its
screen shows Not available at this time.
When there are no records in the phonebook, the
•
screen shows Phonebook empty.
When the phonebook is full and you try to save an
•
entry, the screen shows Phonebook full.
When you try to save a number already stored in
•
the phonebook, the screen shows Number already
saved.
45
Page 46

ADD A PHONEBOOk ENTRY
1. Press
2. Press
3. Press
4. Press
5. Use the dialing keys to enter a telephone number.
6. Press
7. Press
8. Press NEXT. The screen displays ENTER NAME.
9. Use the dialing keys to enter a name (up to 15
10. Press
MENU in idle mode to enter the main menu.
or to scroll to Phonebook, then press
SELECT.
OPTION to choose Home.
SELECT to choose Add contact. The screen
displays ENTER NUMBER.
Press
•
Press DELETE to erase a digit.
•
Press and hold DELETE to erase all digits.
•
•
Press and hold PAUSE to enter a dialing pause
(a P appears).
•
Home
•
Mobile
•
Work
•
Other
characters).
•
Press
Press 0 to add a space.
•
Press DELETE on a handset to erase a character.
•
Press and hold DELETE to erase all characters.
•
You hear a conrmation tone.
or to move the cursor to the left or right.
NEXT.
or to highlight one of the following types:
or to move the cursor to the left or right.
SAVE to conrm and the screen shows Saved.
46
Page 47

ADD A PREDIALED NUMBER TO PHONEBOOk
You can save a predailed telephone number to the
phonebook.
1. Enter the telephone number when in idle mode,
then press
then press NEXT.
2. Press
Home
•
Mobile
•
Work
•
Other
•
3. Press
4. Use the dialing keys to enter a name (up to 15
characters).
Press
•
Press 0 to add a space.
•
Press DELETE to erase a character.
•
Press and hold DELETE to erase all characters.
•
5. Press
You hear a conrmation tone.
SAVE to move on to edit the number and
or to highlight one of the following types:
NEXT. The screen displays ENTER NAME.
or to move the cursor to the left or right.
SAVE to conrm and the screen shows Saved.
47
Page 48

REVIEw PHONEBOOk ENTRIEs
Phonebook entries appear alphabetically.
1. Press
2. Press
VIEW.
3. Press
-OR-
1. Press
2. Press
SELECT.
3. Press
then press VIEW.
4. Press
-OR-
1. Press
2. Press
SELECT.
3. Press
VIEW.
4. Press
on the handset when in idle mode.
or to highlight a phonebook, then press
or to browse.
MENU when in idle mode.
or to highlight Phonebook, then press
or to highlight the desired phonebook,
or to browse.
OPTION while on a call.
or to highlight Phonebook, then press
or to highlight a phonebook, then press
or to browse.
48
Page 49

When the desired entry displays, press # (pound
•
key) on the handset repeatedly to show different
dialing options.
Phonebook empty appears if there are no
•
phonebook entries.
ALPHABETICAL sEARCH
You can use the enhanced 3-character search to nd
your contacts quickly and efciently.
1. Follow the steps in Review phonebook entries on
the previous page to enter the phonebook.
2. When an entry appears, use the dialing keys to enter
the letters associated with the name. You can enter
up to 3 letters for the search. The letters will show
at the top left hand corner of the screen. After you
have entered one to three letters, the system starts
searching in the phonebook. If there is no name
matching the letter(s) entered, the next closest
match in alphabetical order appears. If necessary,
press
Note: The cursor automatically moves to the next
position 2 seconds after you enter a letter. If you do
not enter another letter in the coming 2 seconds, the
system starts searching in the phonebook.
or to browse.
DIAL A PHONEBOOk ENTRY
You can dial a phonebook entry on any line.
49
Page 50

To dial a phonebook entry:
1. Search for the desired entry in the phonebook
(see Review phonebook entries and 3-character
alphabetical search).
•
When the desired entry appears, press # (pound
key) repeatedly on the handset to show different
dialing options.
2. When the displayed number is in the correct format,
press TALK/RECALL or on the handset to dial.
EDIT A PHONEBOOk ENTRY
1. Search for the desired entry in the phonebook
(see Review phonebook entries and 3-character
alphabetical search).
2. When a phonebook entry displays, press
screen shows EDIT NUMBER along with the phone
number to be edited.
3. Use the dialing keys to edit the number.
•
Press
•
Press DELETE to erase a digit.
•
Press and hold DELETE to erase all digits.
•
Press and hold PAUSE to enter a dialing pause
(a P appears).
4. Press
5. Press or to highlight one of the following types:
or to move the cursor to the left or right.
NEXT.
EDIT. The
50
Page 51

Home
•
Mobile
•
Work
•
Other
•
6. Press
7. Use the dialing keys to enter a name (up to
8. Press
NEXT. The screen displays EDIT NAME.
15 characters).
Press
•
Press 0 to add a space.
•
Press DELETE to erase a character.
•
Press and hold DELETE to erase all characters.
•
You hear a conrmation tone.
or to move the cursor to the left or right.
SAVE to conrm and the screen shows Saved.
EDIT A PHONEBOOk ENTRY
If you only want to edit the type of a phonebook entry:
1. Search for the desired entry in the phonebook
(see Review phonebook entries and 3-character
alphabetical search).
2. When a phonebook entry displays, press
LABEL.
51
Page 52

Enter the corresponding shortcut keys shown on
the screen.
Press
CLEAR to erase the assigned label.
DELETE A PHONEBOOk ENTRY
1. Search for the desired entry in the phonebook
(see Review phonebook entries and 3-character
alphabetical search).
2. When the desired entry appears, press DELETE. The
screen displays Delete contact? and the name of
the entry. Press
3. The screen displays Contact deleted and then the
next alphabetical entry in the phonebook. You hear
a conrmation tone.
Note: Once a phonebook entry is deleted, it cannot not
be retrieved.
YES to conrm.
52
Page 53

PHONE sETTINGs
UsING THE MENU
You can use the menu of the handset to change the
telephone settings.
Using a handset:
Press
1.
2.
3.
•
•
MENU when idle.
Press
feature menu.
Press
To return to the previous menu, press
To return to idle mode, press and hold
or until the screen displays the desired
SELECT to enter the menu.
OFF/CANCEL.
OFF/CANCEL.
53
Page 54

sET DATE AND TIME
The answering system records the date and time of
each message you receive. Before using the answering
system or alarm, set the date and time as follows. If you
subscribe to a Network Calling Number Display service,
the date and time are set automatically with each
incoming call. Make sure the settings are correct so that
the alarm feature works properly.
To set the date format:
1.
2.
3.
4.
5.
To set the time format:
1.
2.
3.
4.
5.
MENU when the handset is not in use.
Press
Press
Press
Press
format (MM/DD/YY or DD/MM/YY).
Press
tone.
Press
Press
Press
Time format.
Press SELECT and or to select your desired time
format (12-HR or 24-HR).
Press SELECT to conrm. You hear a conrmation
tone.
or to scroll to Settings.
SELECT and or to scroll to Date format.
SELECT and or to select your desired date
SELECT to conrm. You hear a conrmation
MENU when the handset is not in use.
or to scroll to Settings.
SELECT and or to scroll to
54
Page 55

To set the date and time:
Press
1.
2.
3.
4.
5.
MENU when the handset is not in use.
Press
Press
the date according to the date format you set.
Press
time according to the time format you set.
Press
or to scroll to Set date/time.
SELECT, and the use the dialing keys to enter
NEXT, and the use the dialing keys to enter the
SAVE to conrm. You hear a conrmation tone.
RINGER VOLUME
You can select the ringer volume for incoming calls
1.
2.
3.
4.
5.
MENU when the handset is not in use.
Press
Press
Press
Press
volume level (a total of 7 levels for your selection,
including volume Ringers off).
Press
conrmation tone.
or to scroll to Ringers.
SELECT and or to scroll to Ringer volume.
SELECT and or to sample each ringer
SET to save your selection. You hear a
55
Page 56

RINGER MELODY
You can select the ringer tones for incoming calls.
Press
1.
2.
3.
4.
5.
MENU when the handset is not in use.
Press
Press
Press
melody (a total of 10 melodies for your selection).
Press
tone.
or to scroll to Ringers.
SELECT and or to scroll to Ringer tone.
SELECT and or to select the desired ringer
SELECT to conrm. You hear a conrmation
AUTO ANswER
This feature allows you to answer a call by lifting the
handset off the base if you have set the Auto answer
feature to On.
Press MENU when the handset is not in use.
1.
Press
2.
Press
3.
Press
4.
Press
5.
conrmation tone.
or to scroll to Settings.
SELECT and or to scroll to Auto answer.
SELECT and or to select On or Off.
SET to save your selection. You hear a
56
Page 57

kEY TONE
The handset is set to beep with each key press. If you
turn off the key tone, there are no beeps when you press
keys.
Press
1.
2.
3.
4.
5.
MENU when the handset is not in use.
Press
Press
Press
tone volume level, or Off.
Press
conrmation tone.
or to scroll to Settings.
SELECT and or to scroll to Key tone.
SELECT and or to choose the desired key
SET to save your selection. You hear a
fLAsH TIME
The ash time settings is country dependent. Please
contact your local service provider for the correct
settings.
Press
1.
2.
3.
4.
5.
MENU when the handset is not in use.
Press
Press
Press
time.
Press
conrmation tone.
or to scroll to Settings.
SELECT and or to scroll to Flash time.
SELECT and or to choose the desired ash
SELECT to save your selection. You hear a
57
Page 58

ECO MODE
When ECO mode is set to ON, the radiation, as well as
the transmission range, will be halved.
Press
1.
2.
3.
4.
5.
MENU when the handset is not in use.
Press
Press
Press
Press
conrmation tone.
or to scroll to Settings.
SELECT and or to scroll to ECO mode.
SELECT and or to select On or Off.
SELECT to save your selection. You hear a
58
Page 59

CALLING NUMBER DIsPLAY ANNOUNCE
The calling number display announce feature lets you
know who’s calling without having to look at the display.
When you have an incoming call, the handset and/or
base speaks “Call from...” and the name of the caller
based on the phonebook or Calling Number Display
information. If the caller’s name is private or unknown,
the phone number up to the last 11 digits will be
announced. If the caller’s phone number is also private
or unknown, no information will be announced. The
default setting is On.
To turn on or off the calling number display announce
feature:
Press
1.
2.
3.
4.
MENU when the handset is not in use.
Press
Press
or Off.
Press
tone.
or to scroll to CND announce.
SELECT and or to select On, Number only,
SELECT to conrm. You hear a conrmation
59
Page 60

Notes:
To use the calling number display announce
•
feature, you must subscribe to Calling Number
Display service from your telephone service
provider.
If Number only is selected, only the number of the
•
caller number display will be announced from the
handset and base.
This feature does not announce information for
•
call waiting calls.
It takes at least 2 rings for the phone to receive
•
Calling Number Display information and announce
it. If the phone is answered before the end of
the second ring, the phone won’t have time to
announce the caller’s information.
Pronunciation of names may vary with this feature.
•
Not all names may be pronounced correctly.
Calling number display announce is available in
•
English only.
60
Page 61

qUIET MODE
When QUIET mode is turned on, the telephone silences
all sounds during the set period of time (1-12 hours).
However, the handset locator paging tone and any
sound-generating operations initiated by users, such
as making calls using the speakerphone or setting
ringer volume, will sound as normal. After you turn on
QUIET mode, this feature activates immediately and the
answering system turns on automatically.
When QUIET mode is on, the answering system takes
calls and records messages without broadcasting them.
To turn QUIET mode on:
Press and hold # in idle mode to enter the QUIET
1.
mode setting screen. The screen shows Set quiet
mode duration (1 to 12 hours) _ _.
Use the dialing keys to enter the desired number of
2.
hours (1-12) you would like to turn on QUIET mode,
then press
sys is ON during quiet mode and then Quiet mode
on in the idle screen.
To turn QUIET mode off:
While QUIET mode is on, press and hold #. The
•
screen then shows Quiet mode is off and you hear a
conrmation tone.
SELECT. Your screen shows Answering
61
Page 62

Notes:
•
If you change the base ringer, handset ringer,
ringer volume, key tone, or Calling Number
Display announce features when QUIET mode is
on, the sample plays but the feature is still muted
after saving the setting.
•
After QUIET mode is turned off or the set period
of time has expired, all muted features will be
activated again.
•
The OTB function is not available when QUIET
mode is on.
REsET
Press
1.
2.
3.
4.
5.
MENU when the handset is not in use.
Press
Press
Press
settings.
Press
The screen displays Reset default done.
or to scroll to Settings.
SELECT and or to scroll to Reset.
SELECT. The screen displays Reset to default
YES to conrm. You hear a conrmation tone.
62
Page 63

TELEPHONE NETwORk sERVICEs*
*Subscription and/or usage charges may apply to use
these services. Some features may not operate as
described. Call your Network Service Provider for more
information.
CALLING NUMBER DIsPLAY
If you have subscribed to a Network Calling Number
Display service, you will be able to see your caller’s
number on your handset display (provided it is not
blocked) prior to answering the call. If your caller’s name
is stored in the phonebook and a number match is found,
you will see the caller’s name on the display instead.
Calling Number Display allows you to see the name,
number, date and time of the incoming calls. The Calling
Number Display may appear differently if the caller is
matched to a phonebook entry (see Memory match on
page 65).
When a Network Calling Number Display is active on
your service, incoming numbers will be saved in the
telephone’s Call log. The number will be shown on
the display when the phone is ringing. If the number
matches with one of the entries in your phonebook, the
caller’s name stored in the phonebook will be displayed
with the number. The phone deletes the oldest entry
when the log is full to make room for new calls. This
information is common to all handsets, so changes
made using any handset are reected in all other
63
Page 64

handsets. If you answer a call before the information
appears on the screen, it does not show in the call log
history.
Missed calls are marked with XX Missed calls. Each
time you review a missed call entry, the number of
Note: If the phone number has more than 24 digits,
only the last 14 digits will be saved in the call log.
missed calls decreases by one. When you have reviewed
all the missed calls, the missed calls indicator no longer
shows. You can review, redial, and copy an entry into
the phonebook. Entries appear in reverse chronological
order. Only one handset can review the call log at
a time. If a handset tries to enter the call log while
another handset is already in it, you will hear a beep.
The call log information might not be available for every
incoming call. The callers might intentionally block their
names and / or telephone numbers.
64
Page 65

MEMORY MATCH
If the incoming telephone number matches the exact
telephone number in your phonebook, the name that
appears on the screen matches the corresponding
name in your phonebook.
For example, if Christine Smith calls, her name
appears as Chris if this is how you entered it into your
phonebook.
CALL LOG DIsPLAY sCREEN MEssAGE
With some incoming calls, if the telephone number is not
available, the handset may display one of the following
explanations:
UNAVAILABLE This caller’s number is unavailable.
PRIVATE The caller is blocking the telephone number.
When the list is full, and a new call is received, the oldest
entry will be deleted automatically.
IMPORTANT
To use a Network Calling Number Display you must rst
subscribe to the service from your service provider. For
more information on Network Services call your service
provider. To ensure the caller’s name is displayed, make
sure you have stored the full telephone number in the
phonebook.
65
Page 66

MIssED CALL INDICATOR
When there are calls that have not been reviewed in
the call log, the screens display XX Missed calls. When
you have reviewed all the missed calls, the missed call
indicator goes away.
Each time you review a call log entry marked NEW on
the handset, the number of missed calls decreases by
one.
REVIEw THE CALL LOG
Review the call log to nd out who called, to return the
call, or to copy the caller’s name and number into your
phonebook. Call log empty appears if there are no
records in the call log.
1. When the handset is in idle mode, press
on the handset to review the call log in reverse
chronological order starting with the most recent
call.
-OR-
Review the call log by pressing
Press or to scroll to Call log, then press SELECT
twice to select View.
2. Press
or to scroll through the list.
66
MENU.
CALLS
Page 67

DIAL fROM THE CALL LOG
1. When in the call log, press
2. Press
the displayed entry.
TALK/RECALL or on the handset to dial
or on the to browse.
sAVE A CALL LOG ENTRY TO THE PHONEBOOk
Call log entries can only be saved to the Home
phonebook.
1. Select a desired entry in the call log (see Review the
call log).
2. When the desired entry appears, press # (pound
key) repeatedly to show different dialing options.
3. When the number is in correct format, press
The screen displays SAVE TO.
4. Press
5. Use the dialing keys to edit the number.
6. Press
SELECT to choose Phonebook.
•
Press
•
Press DELETE to erase a digit.
•
Press and hold DELETE to erase all digits.
Press and hold PAUSE to enter a dialing pause
•
(a P appears).
or to move the cursor to the left or right.
NEXT.
SAVE.
67
Page 68

7. Press or to highlight one of the following types:
Home
•
Mobile
•
Work
•
Other
•
8. Press NEXT. The handset displays EDIT NAME.
9. Use the dialing keys to edit the name.
Press
•
Press 0 to add a space.
•
Press DELETE to erase a character.
•
Press and hold DELETE to erase all characters.
•
Press # (pound key) to move the last word to the
•
or to move the cursor to the left or right.
front. For example, Johnson Charlie becomes
Charlie Johnson when you press # (pound key).
10. Press
SAVE to conrm. The screen shows Saved.
Notes:
•
If the caller’s name you received from the
telephone service provider is all in capital letters,
the rst letter of every word remains a capital
letter, while other letters become lowercase.
However, the next letter after the prex “Mac”,
“Mc”, “D’”, “C’” or “O’”, is kept as a capital letter. For
example, the “D” in “MacDonald” is kept as a
capital letter. Another exception is that “VAN DER”
will be changed to “Van der”.
•
If the telephone number from the Calling Number
Display information has already been saved in the
phonebook under a different name, the new name
will overwrite the old one.
68
Page 69

DELETE AN ENTRY IN THE CALL LOG
Press DELETE on the handset to delete the shown
•
entry.
DELETE THE ENTIRE CALL LOG
1. Press
2. Press
3. Press
4. When the screen shows Delete all calls?, press
MENU when in idle mode.
or to scroll to Call log, then press SELECT.
or to scroll to Del all calls, then press
SELECT.
YES
to confirm. You hear a confirmation tone and the
screen returns to the previous menu.
NETwORk VOICEMAIL
You can get messages from your xed home phone
when you are away from the phone, busy on another
call or using the Internet. Callers will hear a standard
greeting inviting them to leave a message.
To call Network Voicemail
While the handset is in idle mode, press and hold 1 to
dial the network voicemail number, 125101.
-OR-
Press
press and hold 1 to dial the network voicemail number,
125101.
TALK/RECALL or on the handset, then
69
Page 70

To reset missed call indication
Press
1.
2.
3.
4.
5.
MENU in idle mode to enter the main menu.
Press
Press
Press
Press
or to scroll to Settings.
SELECT and or to scroll to Display alerts.
SELECT and or to scroll to Missed calls.
SELECT. The screen displays Reset Missed
Call indication?. Press YES to conrm. You hear a
conrmation tone.
To reset voicemail indication
MENU in idle mode to enter the main menu.
Press
1.
2.
3.
4.
5.
Press
Press
Press
Press
or to scroll to Settings.
SELECT and or to scroll to Display alerts.
SELECT and or to scroll to Voicemail.
SELECT. The screen displays Reset voicemail
indication?. Press YES to conrm. You hear a
conrmation tone.
70
Page 71

CALL GUARD
If you have subscribed to Calling Number Display service,
you can use the call guard feature to reject certain calls
automatically by adding numbers into the block list,
and/or all calls without number.
When there is a call from the number saved in the block
list, the call will be disconnected.
•
Blocked calls are treated as new call log entries,
the name of the call log will be replaced with
Blocked call.
ADD A BLOCk LIsT ENTRY
1. Press
1.
2.
3.
4.
5. Use the dialing keys to enter a telephone number.
6. Press
MENU in idle mode to enter the main menu.
Press
Press
Press
Press
•
•
•
•
or to scroll to Call guard.
SELECT twice to select Block list.
or to scroll to Add new entry.
SELECT. The screen displays ENTER NUMBER.
Press
Press DELETE to erase a digit.
Press and hold DELETE to erase all digits.
Press and hold PAUSE on a handset to enter a
dialing pause (a P appears).
or to move the cursor to the left or right.
NEXT. The screen displays ENTER NAME.
71
Page 72

7. Use the dialing keys to enter a name (up to 15
characters).
Press
•
Press 0 to add a space.
•
Press DELETE to erase a character.
•
Press and hold DELETE to erase all characters.
•
8. Press
You hear a conrmation tone.
or to move the cursor to the left or right.
SAVE to conrm and the screen shows Saved.
REVIEw BLOCk LIsT ENTRIEs
Block list entries appear alphabetically.
Press MENU in idle mode to enter the main menu.
1.
Press
2.
3.
Press
Press
4.
Press
5.
Note: When the block list is empty, the screens display
Block list is empty.
or to scroll to Call guard.
SELECT twice to select Block list.
SELECT again to select View.
or to browse.
72
Page 73

EDIT A BLOCk LIsT ENTRY
1. Search for the desired entry in the block list (see
Review block list entries).
2. When a block list entry displays, press
screen shows EDIT NUMBER along with the phone
number to be edited.
3. Use the dialing keys to edit the number:
Press
•
Press DELETE to erase a digit.
•
Press and hold DELETE to erase all digits.
•
Press and hold PAUSE to enter a dialing pause
•
(a P appears).
4. Press
5. Use the dialing keys to edit the name.
Press
•
right.
Press 0 to add a space.
•
Press DELETE to erase a character.
•
Press and hold DELETE to erase all characters.
•
6. Press
conrmation tone and the screen shows Saved.
or to move the cursor to the left or right.
NEXT. The screen displays EDIT NAME.
or to move the cursor to the left or
SAVE to save the entry. You hear a
EDIT. The
73
Page 74

DELETE A BLOCk LIsT ENTRY
1. Search for the desired entry in the phonebook (see
Review block list entries).
2. When the desired entry appears, press DELETE.
3. The screen displays Deleted and then the next
alphabetical entry in the block list. You hear a
conrmation tone.
Note: Once a block list entry is deleted, it cannot not
be retrieved.
BLOCk CALLs wITHOUT NUMBER
You can choose to block calls without number.
1.
2.
3.
4.
5.
6. Press
MENU in idle mode to enter the main menu.
Press
Press
Press
Calls w/o num.
Press
Press
•
tone.
or to scroll to Call guard.
SELECT and then or to scroll to
SELECT twice to select Settings.
or to scroll to On or Off.
When On is chosen, press
Private (for calls that the caller is blocking the
telephone number), Unavailable (for calls that
the caller’s number is unavailable), or Both.
SELECT to conrm. You hear a conrmation
74
or to scroll to
Page 75

CALL GUARD ANNOUNCE
You can turn on the call guard announce feature to
screen incoming calls without number. Answering
system must be On when the call guard announce is
turned On. If the answering system is off, it will be turned
on automatically when the call guard announce is turned
on.
MENU in idle mode to enter the main menu.
Press
1.
Press
2.
Press
3.
Calls w/o num.
Press
4.
Call guard annc..
Press
5.
Press
6.
7. Press
Notes:
•
•
or to scroll to Call guard.
SELECT and then or to scroll to
SELECT and then or to scroll to
SELECT twice to choose On/Off.
or to scroll to On or Off.
SET to conrm. You hear a conrmation tone.
If the answering system is on, the screen will
display Call guard annc will screen incoming calls
w/o number.
If the answering system is off, the screen will
display Answering sys is on to screen calls w/o
number. The answering system will turn on.
75
Page 76

OUTGOING MEssAGE fOR CALLs wITHOUT
NUMBER
You can set a specic outgoing message for calls without
numbers. The preset outgoing message for calls without
numbers is a greeting that answers calls with “Hello,
please leave your name after the tone” You can use this
default outgoing message for calls without numbers, or
replace it with your own.
To play your outgoing message for calls without
number:
1.
2.
3.
4.
5.
6.
7.
MENU in idle mode to enter the main menu.
Press
Press
Press
Calls w/o num.
Press
Call guard annc..
Press
Outgoing msg.
Press
Press
or to scroll to Call guard.
SELECT and then or to scroll to
SELECT and then or to scroll to
SELECT and then or to scroll to
SELECT and then or to scroll to Play OGM.
SELECT to play your outgoing message.
76
Page 77

To record your outgoing message for calls without
number:
Press
1.
2.
3.
MENU in idle mode to enter the main menu.
Press
Press
or to scroll to Call guard.
SELECT and then or to scroll to
Calls w/o num.
Press
4.
SELECT and then or to scroll to
Call guard annc..
Press
5.
SELECT and then or to scroll to
Outgoing msg.
SELECT to highlight Record OGM.
Press
6.
Press
7.
SELECT to start recording your outgoing
message. The telephone announces, “Record after
the tone. Press STOP when you are done.” After
the tone, speak towards the microphone of the
handset.
Press
8.
STOP when you nish recording.
Notes:
Your outgoing message can be up to 90 seconds in
•
length.
Outgoing messages shorter than two seconds are
•
not recorded.
77
Page 78

To reset your outgoing message for calls without
number:
Press
1.
2.
3.
MENU in idle mode to enter the main menu.
Press
Press
or to scroll to Call guard.
SELECT and then or to scroll to
Calls w/o num.
Press
4.
SELECT and then or to scroll to
Call guard annc..
Press
5.
SELECT and then or to scroll to
Outgoing msg.
SELECT and then or to scroll to
Press
6.
Reset OGM.
Press
7.
SELECT. The screen displays Reset to default
OGM?.
Press
8.
YES to conrm. The screen displays OGM reset
to default, and announces “Announcement deleted.”
78
Page 79

ANswERING MACHINE
The answering system can record and store messages.
The actual recording time depends on individual
message characteristics. Messages remain available
for replay until you delete them.
Note: Your answering machine will answer calls after
14 rings even when it is turned off. This allows the
remote access feature to work.
ANswER ON/Off
If you turn the answering system on, it answers calls
and records messages.
If your answering system is turned off and you change any
of its settings, the answering system automatically turns
on again and the handset displays Answering sys is on
and the icon ANS ON.
To turn the answering system on or off:
1.
2.
3.
4.
5.
MENU in idle mode to enter the main menu.
Press
Press
Press
On/Off.
Press
Press SELECT to conrm. You hear a conrmation
tone.
or to scroll to Answering sys.
SELECT and then or to scroll to Answer
SELECT and then or to scroll to On or Off.
79
Page 80

OUTGOING MEssAGE
An outgoing message is the greeting callers hear when
calls are answered by the answering system.
The telephone is preset with a greeting that answers
calls with “Hello, please leave a message after the tone.”
You can use this default outgoing message, or replace it
with your own.
To play your outgoing message:
MENU in idle mode to enter the main menu.
Press
1.
Press
2.
3.
Press
4.
Press
5.
Press
To record your outgoing message:
1.
Press
2.
Press
3.
Press
4.
Press
5.
Press
message. The telephone announces, “Record after
the tone. Press
tone, speak towards the microphone of the handset.
6.
Press STOP when you nish recording.
or to scroll to Answering sys.
SELECT twice to select Outgoing msg.
or to scroll to Play OGM.
SELECT to play your outgoing message.
MENU in idle mode to enter the main menu.
or to scroll to Answering sys.
SELECT twice to select Outgoing msg.
or to scroll to Record OGM.
SELECT to start recording your outgoing
STOP when you are done.” After the
80
Page 81

Notes:
Your outgoing message can be up to 90 seconds in
•
length.
Outgoing messages shorter than two seconds are
•
not recorded.
To reset your outgoing message:
MENU in idle mode to enter the main menu.
Press
1.
Press
2.
Press
3.
Press
4.
Press
5.
OGM?.
Press
6.
to default, and announces “Announcement deleted.”
or to scroll to Answering sys.
SELECT twice to select Outgoing msg.
or to scroll to Reset OGM.
SELECT. The screen displays Reset to default
YES to conrm. The screen displays OGM reset
MEssAGE PLAYBACk
If you have both new and old messages, you can play
either new or old messages. The calling number display
information displays on the screens when you play
messages and you can call back the caller.
When playback begins, the handset screen displays the
message status, calling number display information, and
time and date of the message recorded. You hear the
total number of messages followed by the day and time
of the message. After the last message, the telephone
announces, “End of messages.” and the handset screen
displays End of messages.
81
Page 82

To listen to messages with the handset:
Press
1.
2.
MENU in idle mode.
Press
or to highlight Play messages, then press
SELECT. If you have either new or old messages, the
messages play automatically. If you have both new
and old messages:
To play new messages, press
•
SELECT to select
Play new msgs.
To play old messages, press
•
or to highlight
Play old msgs, then press SELECT.
When the handset is playing a message, its screen
shows [2]-Call info and the caller’s name or number.
If the caller’s information is unavailable, the handset
shows No caller info.
Options during playback on a handset
Press or to adjust the message playback volume.
•
Press
•
•
SKIP to skip to the next message.
Press
REPEAT to repeat the message. Press REPEAT
twice to listen to the previous message.
•
Press DELETE to delete the message.
Press 2 to pause the playback and show the Calling
•
Number Display information.
–
Press
TALK/RECALL, CALL or to call back the
caller. If necessary, press # (pound key) or 1 to
show different dialing options.
Press OFF/CANCEL or BACK to restart the
–
playback. If you do not call back within
10 seconds, message playback restarts.
82
Page 83

Press TALK/RECALL to pause the message
•
playback. The screen displays Call back? with the
Calling Number Display information. Press CALL to
call back the caller, or BACK to restart the message
playback. If the dialing format used is not correct,
then use the option above to choose the correct
dialing format before calling back the caller.
•
Press
OFF/CANCEL to stop the playback.
DELETE ALL MEssAGEs
You can only delete old (reviewed) messages. You cannot
delete new messages until you review them. You cannot
retrieve deleted messages.
Using a handset:
Press MENU idle mode to enter the main menu.
1.
Press
2.
SELECT.
3.
Press
SELECT.
The screen displays Delete all old messages? Then
4.
press
The screen displays Deleting... and then All old
5.
msgs deleted! You hear a conrmation tone.
or to highlight Answering sys, then press
or to highlight Delete all old, then press
YES to conrm.
Note: If there is no messages, there screen will display
No old messages to delete.
83
Page 84

RECORD, PLAY OR DELETE MEMOs
Memos are messages you record as reminders for
yourself or others using the same answering system. You
can record your own memos using a system handset.
Play and delete them the same way as incoming
messages.
To record a memo:
1.
2.
3.
4.
5.
MENU idle mode to enter the main menu.
Press
Press
SELECT.
Press
SELECT.
The system announces, “Record after the tone. Press
STOP when you are done.” After the tone, speak
towards the handset.
Press
announces “Recorded.”, and then returns to the
previous menu.
or to highlight Answering sys, then press
or to highlight Record memo, then press
STOP when you nish recording. The handset
ANswERING sYsTEM sETTINGs
In the answering system setup menu, you can change the
settings for number of rings, remote access code, and
recording time. While monitoring an incoming message,
you can answer the call by pressing
on the handset.
TALK/RECALL or
84
Page 85

NUMBER Of RINGs
You can set the answering system to answer an incoming
call after 6, 5, 4, 3, 2 rings; or time saver. With time saver
selected, the answering system answers after 2 rings
when you have new messages, or after 4 rings when
you have no new messages. This enables you to check
for new messages and avoid paying unnecessary long
distance charges if you are calling from outside your
local area.
To set the number of rings:
MENU idle mode to enter the main menu.
Press
1.
Press
2.
SELECT.
Press
3.
SELECT.
Press
4.
SELECT.
Press
5.
Press
6.
conrmation tone.
or to highlight Answering sys, then press
or to highlight Ans sys setup, then press
or to highlight # of rings, then press
or to highlight 6, 5, 4, 3, 2, or Time saver.
SELECT to conrm your selection. You hear a
REMOTE ACCEss CODE
A two-digit security code is required to access the
answering system remotely from any touch-tone
telephone. The preset code is 19. You can set the code
from 00 to 99.
85
Page 86

To change the remote access code:
Press
1.
2.
3.
4.
5.
6.
Note: Remote access can only be used if this function
is activated.
MENU idle mode to enter the main menu.
Press
SELECT.
Press
SELECT.
Press
SELECT.
Use the dialing keys to enter a two-digit number.
Press
or to highlight Answering sys, then press
or to highlight Ans sys setup, then press
or to highlight Remote code, then press
SAVE to conrm. You hear a conrmation tone.
RECORDING TIME
You can set the recording time limit for each incoming
message.
To change the message recording time:
1.
Press
MENU idle mode to enter the main menu.
2.
Press
SELECT.
3.
Press
SELECT.
4.
Press or to highlight Recording time, then
press SELECT.
5.
Press or to highlight 3 minutes, 2 minutes, or
1 minute.
6.
Press
conrmation tone.
or to highlight Answering sys, then press
or to highlight Ans sys setup, then press
SELECT to conrm your selection. You hear a
86
Page 87

ANswERING sYsTEM AND VOICEMAIL
INDICATORs
Your telephone has separate indicators for two different
types of voice messages: those left on its built-in digital
answering system and those left at your telephone
ser
vice provider’s voicemail (fees may apply). Your
telephone’s built-in digital answering system messages
and voicemail messages are separate. Each alerts you
to new messages differently.
If and XX New msgs show on the handset, there
•
are new messages in the built-in answering system.
If and New voicemail display on the handset, your
•
telephone service provider is indicating that it has
new voicemail for you. To listen to your voicemail,
you typically dial an access number provided by your
telephone service provider, followed by a security
code or PIN.
Some telephone service providers bundle or combine
multiple services like voicemail and call waiting, so
you may not be aware that you have voicemail. To
check what services you have and how to access them,
contact your telephone service provider.
To use your voicemail service rather than your
answering system, turn off your answering system. To
use your answering system rather than your voicemail
service, contact your telephone service provider to
deactivate your voicemail service.
87
Page 88

CALL INTERCEPT
While screening a call, you can stop recording and speak to
the caller by pressing
TALK/RECALL on the handset.
REMOTE ACCEss
A two-digit security code is required to access the
answering system remotely from any touch-tone
telephone. The preset code is 19. See Remote access
code section to change it.
Dial your telephone number from any touch-tone
1.
telephone.
When the answering system answers, press * and
2.
then enter the two-digit remote access code.
Then you can enter one of the following remote
3.
commands.
Command Description
1 Press to listen to all messages.
2 Press to listen to new messages only.
3
33 Press twice to delete all old messages.
4
5
Press to delete the current message
(during playback).
Press to repeat the current message
(during playback).
Press to stop any operation (including
recording).
88
Page 89

*5
6
*7 Press to record a new announcement.
8
0
Press to listen to a list of remote
commands.
Press to skip to the next message
(during playback).
Press to end remote access (the call will
be terminated).
Press to turn the answering system on
or off.
Notes:
If you do not press any keys after you enter the
•
remote access code, all new messages play. If
there are no new messages, all old messages play.
Once the new messages have played, the
•
telephone announces the help menu options. If
you do not press any key within 20 seconds, the
remote access call automatically disconnects.
When the answering system is turned off, the
•
telephone answers after 14 rings, and announces,
“Please enter your remote access code.”
When the memory is full, the answering system
•
answers incoming calls after 14 rings and
announces, “Memory is full. Enter the remote
access code.”
89
Page 90

HELP
My cordless handset isn’t performing normally.
•
Make sure you plug the power cord securely into
the telephone base. Plug the power adapter into
a different working electrical outlet without a wall
switch.
•
Move the cordless handset closer to the telephone
base. You may have moved out of range.
•
Reset the telephone base. Unplug the electrical
power. Wait for 15 seconds, then plug it back in.
Allow up to one minute for the cordless handset and
telephone base to reset.
•
Other electronic products such as HAM radios and
other DECT phones can cause interference with your
cordless phone. Try installing your phone as far away
as possible from these types of electronic devices.
Out of range OR No pwr at base appears on my
cordless handset.
•
Ensure you plug the telephone base in properly and
the power is on.
•
Place the cordless handset in the charger for one
minute to allow the cordless handset and base to
synchronize.
•
Move the cordless handset closer to the telephone
base. You may have moved out of range.
•
Reset the telephone base. Unplug the electrical
power. Wait for 15 seconds, then plug it back in.
90
Page 91

Allow up to one minute for the cordless handset and
telephone base to reset.
Other electronic products such as HAM radios and
•
other DECT phones can cause interference with your
cordless phone. Try installing your phone as far away
as possible from these types of electronic devices.
I cannot get a dial tone.
Try all the suggestions above.
•
Move the cordless handset closer to the telephone
•
base. You may have moved out of range.
If the previous suggestions do not work, disconnect
•
the telephone base from the telephone jack and
connect to a different phone. If there is no dial tone
on that phone either, the problem is in your wiring or
telephone service. Contact your telephone service
provider.
Your line cord may be defective. Try installing a new
•
line cord.
I cannot dial out.
Try all the suggestions above.
•
Make sure you have a dial tone before dialing. The
•
cordless handset may take a second or two to nd
the telephone base and produce a dial tone. This is
normal. Wait an extra second before dialing.
Eliminate any background noise. Noise from a
•
television, radio or other appliances may cause
91
Page 92

the phone to not dial out properly. If you cannot
eliminate the background noise, rst try muting
the cordless handset before dialing, or dialing from
another room with less background noise.
If other phones in your home are having the same
•
problem, contact your telephone service provider
(charges may apply).
The batteries do not hold a charge.
•
If the cordless handset is in the charger and the
charge light is not on, refer to The charge light is off
in HELP section.
•
Charge the battery in the cordless handset for at
least ten hours. For optimum daily performance,
return the cordless handset to the charger when not
in use.
•
If the battery is depleted, it may take approximately
30 minutes to charge the handset before it shows
Low battery.
•
You may need to purchase a new battery. Please
refer to the Handset battery installation section.
I get noise, static, or weak signals even when I’m near
the telephone base.
•
If you subscribe to high-speed Internet service (DSL
- digital subscriber line) through your telephone line,
you must install a DSL lter between the telephone
line cord and the telephone wall jack. The lter
prevents noise and Calling Number Display problems
92
Page 93

as a result of DSL interference. Please contact your
DSL service provider for more information about
DSL lters.
You may be able to improve the performance of your
•
cordless phone by installing your new telephone
base as far as possible from any other existing
cordless telephone system that may already be
installed.
Other electronic products such as HAM radios and
•
other DECT phones can cause interference with your
cordless phone. Try installing your phone as far away
as possible from these types of electronic devices.
Do not install this phone near a microwave oven or
•
on the same electrical outlet. You may experience
decreased performance while the microwave oven is
operating.
If you plug your phone in with a modem or a surge
•
protector, plug the phone (or modem/surge
protector) into a different location. If this does not
solve the problem, relocate your phone or modem
farther apart from one another, or use a different
surge protector.
Move your phone to a higher location. The phone may
•
have better reception in a high area.
If other phones in your home are having the same
•
problem, contact your telephone service provider
(charges may apply).
93
Page 94

I experience poor sound quality when using the
handset speakerphone.
For increased sound quality while using the handset
•
speakerphone, place the handset on a at surface
with the dial pad facing up.
I hear other calls while using my phone.
Disconnect the telephone base from the telephone
•
jack, and plug in a different telephone. If you still
hear other calls, call your telephone
service provider.
My cordless handset does not ring when I receive a call.
Make sure that the ringer is not off. Refer to Ringer
•
volume section.
Make sure you plug in the telephone line cord
•
securely into the telephone base and the telephone
jack. Make sure you plug in the power cord securely.
The cordless handset may be too far from the
•
telephone base.
Charge the battery in the cordless handset for at
•
least ten hours. For optimum daily performance,
return the cordless handset to the charger when not
in use.
You may have too many extension phones on
•
your telephone line to allow all of them to ring
simultaneously. Try unplugging some of the
other phones.
94
Page 95

The layout of your home or ofce may be limiting the
•
operating range. Try moving the telephone base to
another location, preferably to a
higher location.
If other phones in your home are having the same
•
problem, contact your telephone service provider
(charges may apply).
Test a working phone at the phone jack. If another
•
phone has the same problem, contact your
telephone service provider (charges may apply).
Other electronic products can cause interference
•
with your cordless phone. Try installing your phone
as far away as possible from electronic devices
such as television sets, VCRs, or other cordless
telephones.
Remove the battery. Install the battery again and
•
place the cordless handset into the charger. Wait for
the cordless handset to reestablish its connection
with the telephone base. Allow up to one minute for
this to take place.
Your line cord may be defective. Try installing a new
•
line cord.
My calls cut in and out while I’m using my cordless
handset.
Other electronic products such as HAM radios and
•
other DECT phones can cause interference with your
cordless phone. Try installing your phone as far away
as possible from these types of electronic devices.
95
Page 96

•
Do not install this phone near a microwave oven or
on the same electrical outlet. You may experience
decreased performance while the microwave oven is
operating.
•
If you plug your phone in with a modem or surge
protector, plug the phone (or modem/surge
protector) into a different location. If this does not
solve the problem, relocate your phone or modem
farther apart from one another, or use a different
surge protector.
•
Move your telephone base to a higher location. The
phone may have better reception when installed in a
high area.
•
If other phones in your home are having the same
problem, contact your telephone service provider
(charges may apply).
The charge light is off.
•
Make sure you plug the power and line cords in
correctly and securely.
•
Unplug the electrical power. Wait for 15 seconds,
then plug it back in. Allow up to one minute for the
cordless handset and telephone base to reset.
•
Clean the cordless handset, charger and telephone
base charging contacts each month with a pencil
eraser or cloth.
A blinking CHARGE light is an indication that the
•
battery is not connected to the handset or is missing
completely. Ensure that the battery is
installed properly.
96
Page 97

My Calling Number Display isn’t working.
•
Calling Number Display is a subscription service. You
must subscribe to this service from your telephone
service provider for this feature to work on your
phone.
•
The caller may be calling from an area that supports
Calling Number Display.
•
Both your and your caller’s telephone service
providers must use Calling Number Display
compatible equipment.
•
If you subscribe to high-speed Internet service (DSL
- digital subscriber line) through your telephone line,
you must install a DSL lter between the telephone
line cord and the telephone wall jack . The lter
prevents noise and Calling Number Display problems
resulting from DSL interference. Please contact your
DSL service provider for more information about
DSL lters.
System does not receive Calling Number Display when
on a call.
Make sure you subscribe to Calling Number Display
•
with call waiting features from your telephone
service provider. Calling Number Display features
works only if both you and the caller are in areas
offering Calling Number Display service, and if
both telephone service providers use compatible
equipment.
97
Page 98

Incomplete messages.
If a caller leaves a very long message, part of it may
•
be lost when the system disconnects the call after
the maximum recording time you have set.
If the caller pauses for longer than seven seconds,
•
the system stops recording and disconnects the call.
If the system’s memory becomes full during
•
a message, the system stops recording and
disconnects the call.
If the caller’s voice is very soft, the system may stop
•
recording and disconnect the call.
Difculty hearing messages.
Press VOLUME
•
to adjust the message playback
volume on a handset.
System does not answer after the correct number of
rings.
• Make sure that the answering system is on.
ANS ON should show on the handset.
• If toll saver is activated, the number of rings changes
to two when you have new messages stored.
• If the memory is full or the system is off, the system
will answer after ten rings.
In some cases, the answering system is affected by
•
the ringing system used by your telephone service
provider.
98
Page 99

If you subscribe to voicemail service, change the
•
number of rings so that your answering system
answers before your voicemail answers. To determine
how many rings activate your voicemail, contact your
telephone service provider.
If there is a fax machine connected to the same
•
telephone line, try disconnecting the fax machine. If
that solves the problem, consult your
fax machine documentation for information on
compatibility with answering systems.
System does not respond to remote commands.
• Make sure to enter your remote access code
correctly.
• Make sure you are calling from a touch-tone phone.
When you dial a number, you should hear tones. If you
hear clicks, the phone is not a touch-tone telephone
and cannot activate the answering system.
• The answering system may not detect the remote
access code while your announcement is playing.
Try waiting until the announcement is over before
entering the code.
• There may be interference on the phone line you are
using. Press dialing keys firmly.
99
Page 100

System does not record messages.
• Make sure the answering system is on. ANS ON
should show on the handset.
• Make sure the memory of the answering system is
not full.
If you subscribe to voicemail service, change the
•
number of rings so
that your answering system answers before your
voicemail answers. To determine how many rings
activate your voicemail, contact your telephone
service provider.
If there is a fax machine connected to the same
•
telephone line, try disconnecting the fax machine. If
that solves the problem, consult your
fax machine documentation for information on
compatibility with answering systems.
System announces, “Time and day not set.”
• You need to reset the date and time.
Outgoing announcement is not clear.
• When you record your announcement, make sure you
speak in a normal tone of voice, about nine inches
from the handset or the telephone base.
• Make sure there is no background noise (TV, music,
etc.) while recording.
100
 Loading...