

ENGLISH
VIDEO DOOR PHONE SYSTEM
USER MANUAL
DT-ENG-27SDTD7-V1
Manual
Monitor
Monitor
Memory
Playback
Album
User Setup
09/30/2010 Thu.16:41
Close
Intercom
Multimedia
1
2
3
4
?
About

CONTENTS
1. Parts and Functions ........................................................... 1
2. Monitor Mounting ............................................................. 1
3. Operation Instructions ....................................................... 2
4. Basic Setup Instructions .................................................... 4
5. Built-in Memory and SD Card .......................................... 7
6.Specication ....................................................................... 9
Please read this manual carefully before using the
product, and keep it well.
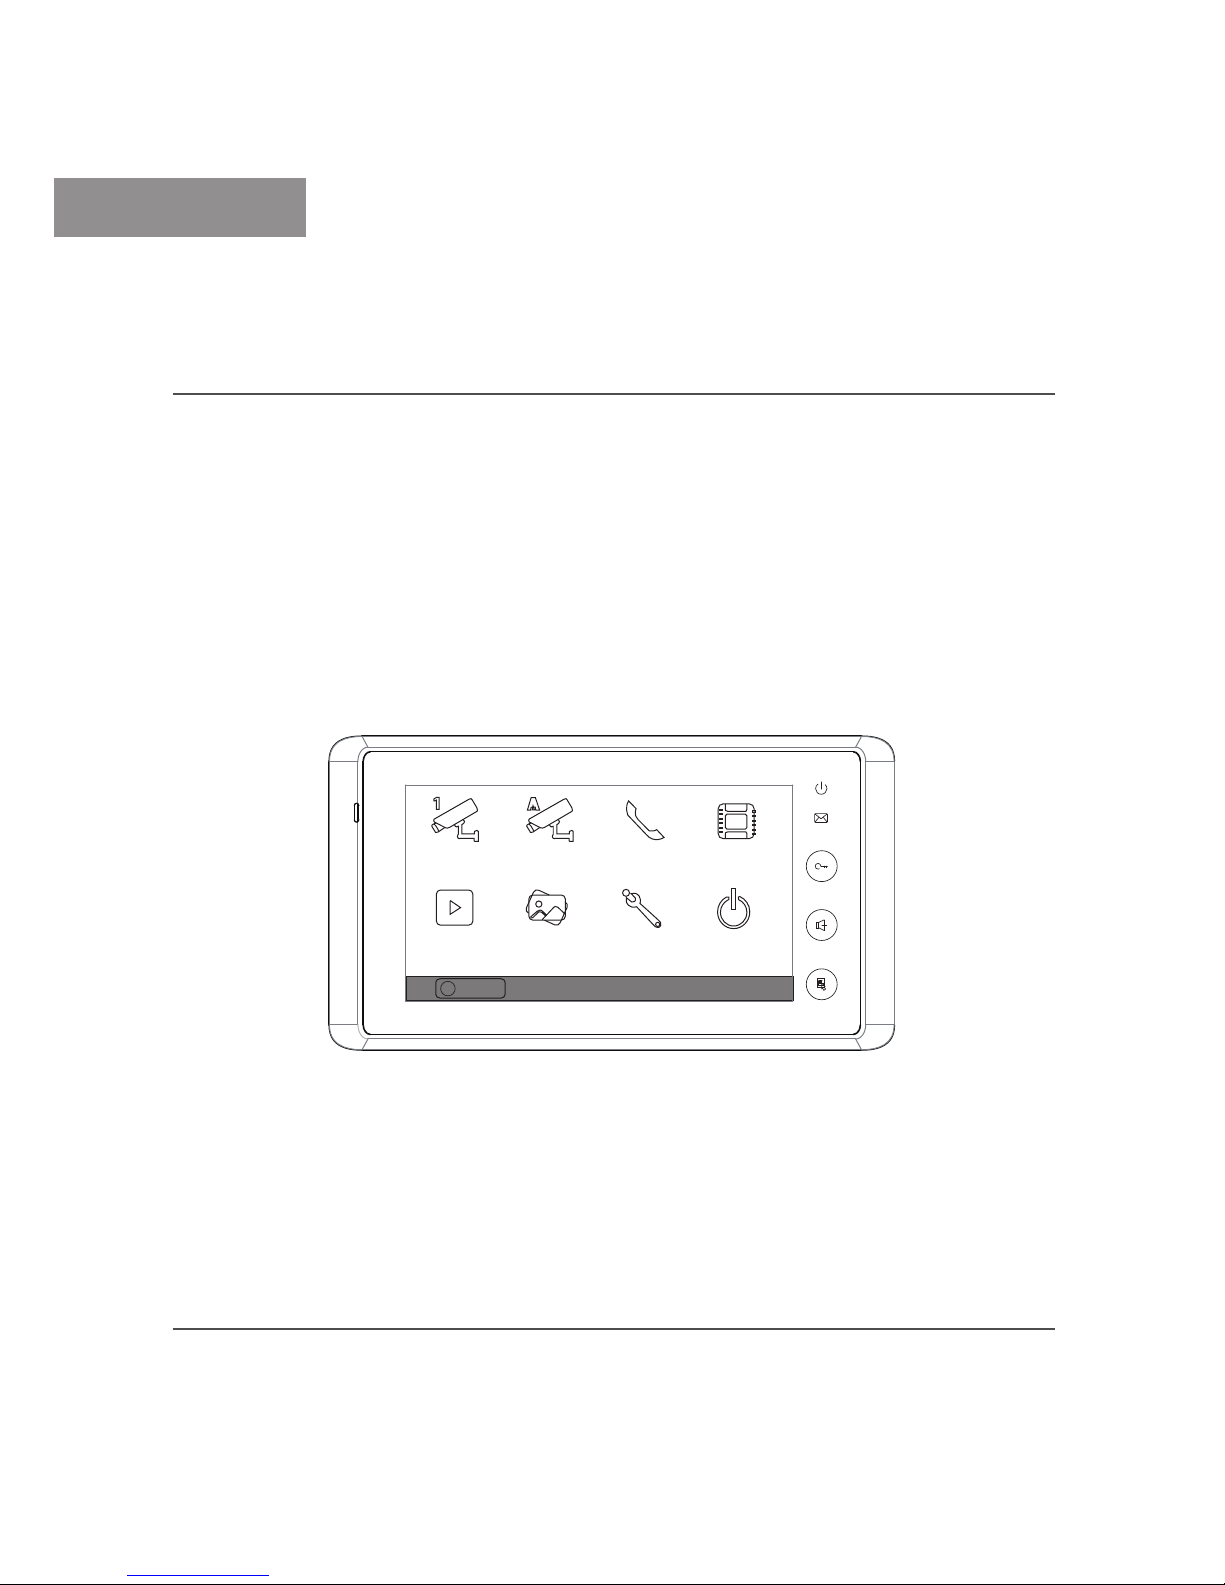
1. Parts and Functions
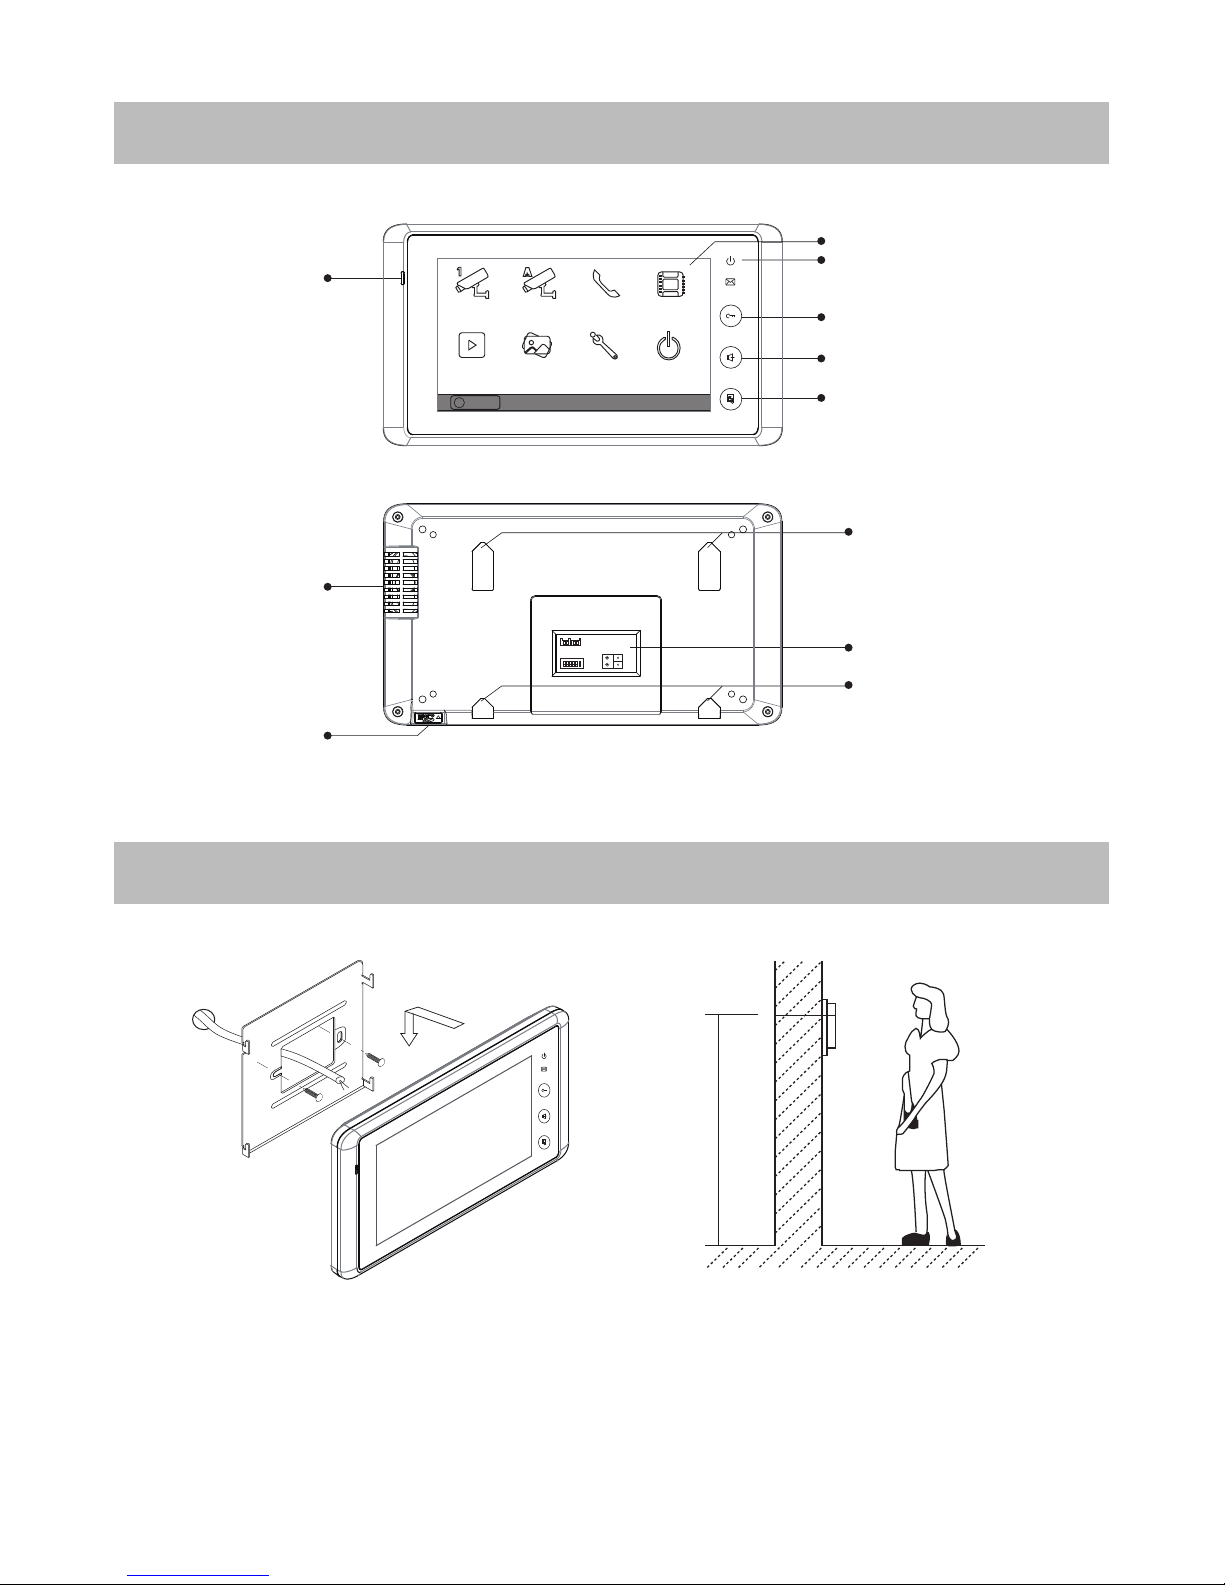
2. Monitor Mounting
145~160 cm
●Use the screws to fix the Mounting Bracket on the wall.(accessories include a
Bracket, two 4X25 screws (use to fasten the Mounting Bracket), 2 wire cables (use
to connect with Monitor)).
●Connect the system correctly. then hang the Monitor on the Mounting Bracket
rmly.
Indicator
Screen
UNLOCK Button
TALK/MON Button
MENU Button
Microphone
Speaker
SD card slot
Connection Port
Mounting Hook
1 2 3 4 5 6
ON
DIPS
L1
BT1
BT2EHGND
VD
L2
Manual
Monitor
Monitor
Memory
Playback
Album
User Setup
09/30/2010 Thu.16:41
Close
Intercom
Multimedia
Mounting Hook
?
About
-1-
3. Operation Instructions
Answering a Door Call
Door Release
How to Enter Main Menu
●Press CALL button on door station.The monitor rings,and the visitor's image will be
seen on screen.
If nobody answers the call,the screen will turn off in 30 seconds automatically.
●Press TALK/M O N B utton or touch
icon, you can talk with the visitor for
90 seconds. During talking state, press
TALK/MON Button again or press icon
again to end the conversation. If the system
connects two or more Monitors, pick up any
Monitor, the others will be automatically shut
off.
●During the conversation, press UNLOCK Button or touch icon to unlock the
door.(if two locks are connected to door camera,touch
unlock 2nd
icon to release
the second lock )
Home
Unlock
Talk
Standard
Screen
Capture
1:1
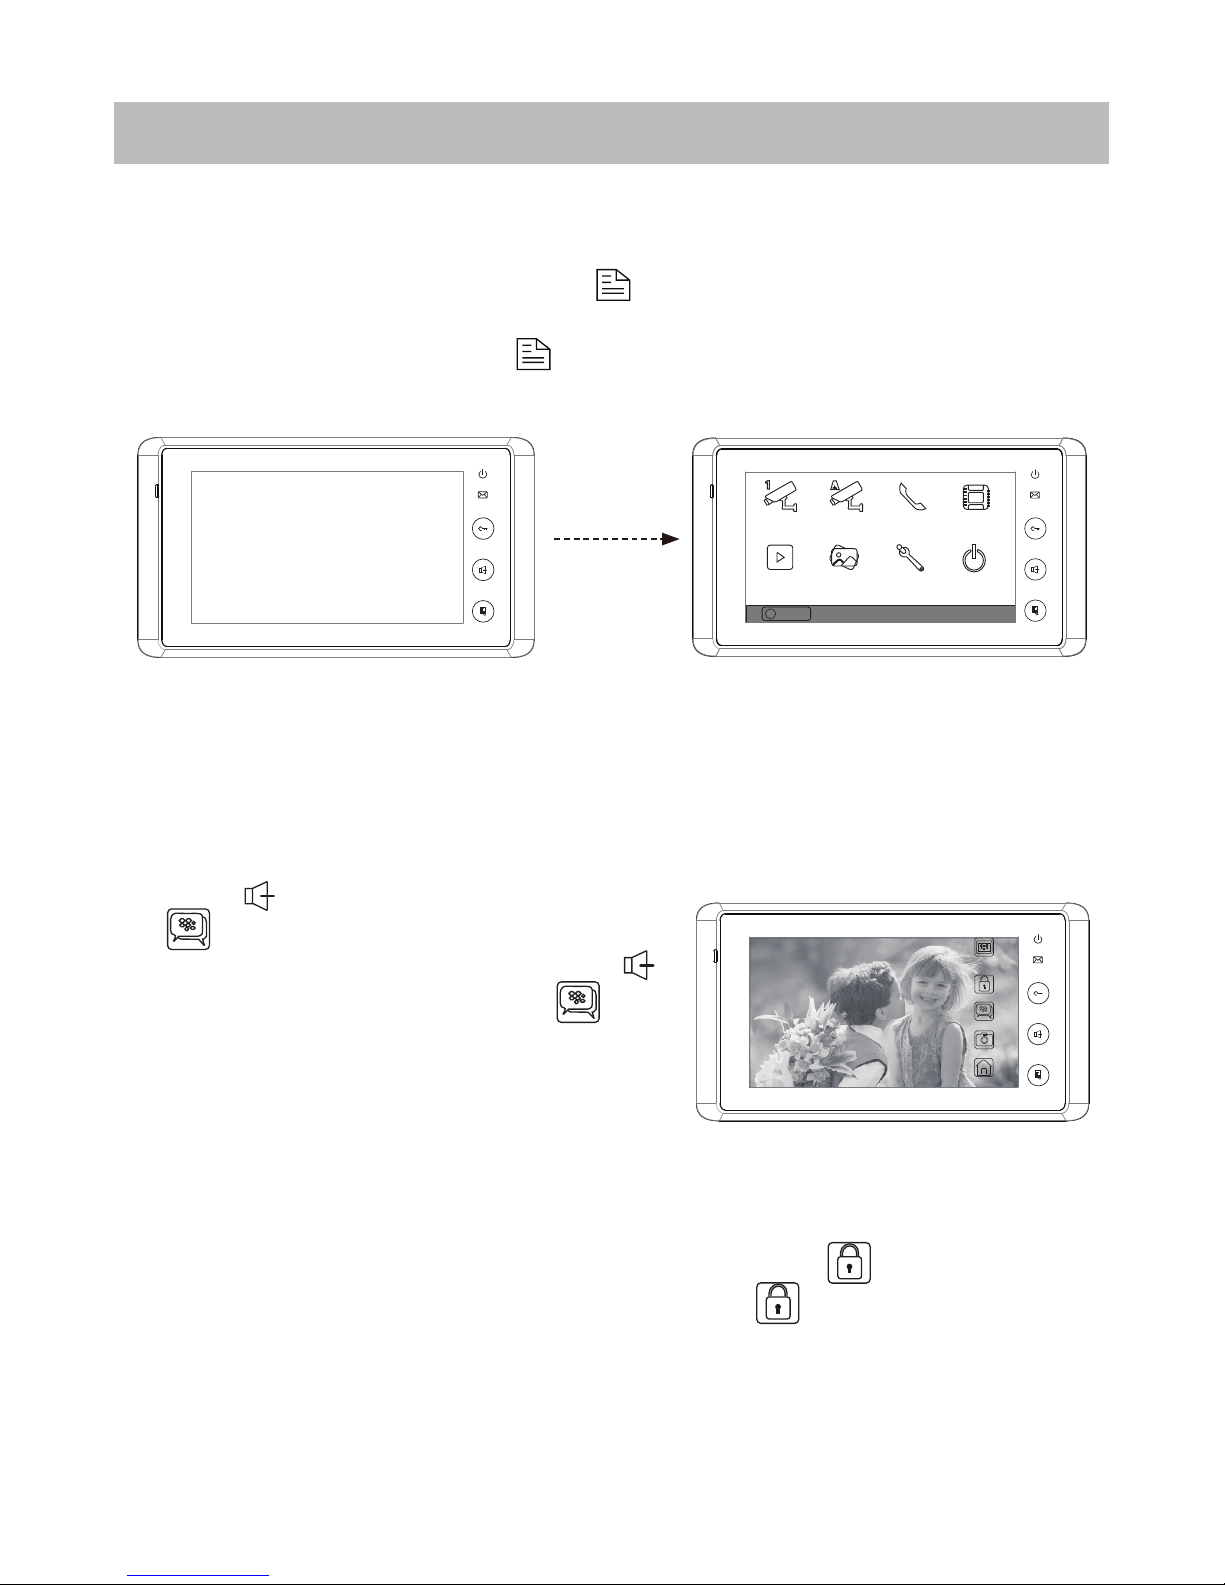
●Touch the screen anywhere (or press MENU button ) in standby mode,a full
screen calendar will be showed.
●Touch the screen again (or press MENU button again) to enter main menu.
09/30/2010
16:41
Thu.
-2-
Manual
Monitor
Monitor
Memory
Playback
Album
User Setup
09/30/2010 Thu.16:41
Close
Intercom
Multimedia
?
About

●
Intercom Call by namelist
:User in one apartment can call other apartments in the
system. Touch
Intercom
item on main menu page , then touch
Intercom
by Namelist
icon (the namelist will be created automatically by the system). Select
a name on the screen then touch
Dial Number
icon to call.Press icon to
enter last/next name list page. (Touch
Dial Number
icon again to redial)
Entrance Monitoring
Intercom Function
Press TALK/MON button on monitor in
standby mode,or touch
Monitor
icon on
main menu.the screen will display the view
of the Outdoor Station. During monitoring,
touch
Manual Monitor
icon to get into the
camera switching mode, (or directly touch
Manual Monitor
icon on main menu page).
if multi Door Stations are installed, you can
press the camera 1/2/3/4 to monitor the Door
Station or CCTV camera you want.press
Home
icon to exit and enter main menu page.
●
Inner Call
: If multi Monitors are installed in one user, select and press the Inner Call
item, the other Monitors will ring at the same time, whichever Monitor answers the
call, conversation is started,and the other monitors will stop ringing at the same time.
●
Direct Dial Guard unit
: A Monitor can be assigned as Guard Unit Monitor; when the
Guard Unit Monitor answers the call, conversation with the guard person is started..
Intercom
by Namelist
Inner Call Direct Call
Guard Unit
09/30/2010 Thu.16:41
Home
Dial
Number
Last
-Name List-
[0001] Jim,Zhang
[0002] Calo,Liu
[0003] Jacko,Zhang
[0004] Jana,Qiao
[0005] Hebe,Zhang
[0006] Tony,Li
Close
Next
-3-
Camera 1 Camera 2
Camera 3
Camera 4
2 3 41
09/30/2010 Thu.16:41
Home
Monitor
Time

●Touch
User Setup
icon on main menu
page to enter call tone setting screen,touch
Door station call tone/intercom call tone/
door bell call tone,12 pieces ring tones will
be displayed , Choose a ring tone which
you want, then touch icon to save and
exit, the ring tone will be performed. or
touch icon to unsave and exit.
Ring Volume Setting
Yo u ca n s e t a ri n g vo l u m e f o r da y
time,6:00 AM~18:00 PM is the day time by
default,enter main menu page.then touch
User Setup
icon to enter next page,and then
touch
Ring Volume
icon to enter Ring
Volume page,Use icon to decrease/
increase the volume. then touch icon to
save and exit,or touch icon to unsave
and exit.
Ring Volume
Night Ring Volume
Ring Volume
6
7
Adjust -
Adjust +
Exit&Save
Exit&Unsave
Door Station
Call Tone
Exit&Save
Carman
Ding Dong
Rhythm of the rain
For Elise
Sonatine
Edelweiss
Going Home
Congratulate
Do Re Me
Happy Birthday
Jingle Bell
Telephone Ring
Exit&Unsave
You can active a ring volume for night time,18:00 PM~6:00 AM is the night time by
default,if you don't want to be disturbed at night ,you can set the volume to 0.Enter main
menu page, touch
User Setup
icon to enter next page, then touch
Night Ring
Volume
icon to enter Night Ring Volume page,Use icon to decrease/increase the
volume.After setting a value you want,you should touch
Ring Volume
icon to active
the setting, after that the Ring Volume icon will change to Night Ring Volume
icon. then touch icon to save and exit,night ring volume will be performed. or touch
icon to unsave and exit.
Note:touch
Night Ring Volume
icon again,you can cancel the night ring volume
setting.
-4-
4. Basic Setup Instructions
Ring Tone Setting

Night Ring
Volume
Night Ring
Volume
4
7
Adjust -
Adjust +
Exit&Save
Exit&Unsave
Night Ring
Volume
Adjust -
Adjust +
Exit&Save
Exit&Unsave
4
Ring
Volume
●Enter main menu page,thenTouch
Manual Monitor
icon to enter next page.then
press
Monitor Time
icon to enter monitor time setting page.
●Input digitals by pressing the digital keypad, and press * icon to change the setting
location,and press # icon to save. Settings will be performed immediately, press
icon to return last page .
●Enter main menu page,then Touch icon to enter next page.and then touch the
screen anywhere and hold for 3s to enter next menu.
Monitor Time Setting
Unlock Parameter Setting
Camera 1 Camera 2
Camera 3
Camera 4
2 3 41
09/30/2010 Thu.16:41
Home
Monitor
Time
Monitor time set
1
4
7
*
809
#
65
2 3
min:[01] sec:[30]
Cancel
1 2 3 4
H/W T3-753 a1.3
S/W: V11.01008.00
Voltage: --Local addr: 01.00
Unlock timing: 5s
Video standard:
Cancel
Home
Installer
setup
Device
Property
Caliber
TouchScreen
-5-

Screen Setting
Restore to Default
When the Monitor is in monitoring or
talking state, Press
Adjust
icon to
enter screen setting page.Touch any item
you want,then touch to decrease
or increase the value.Settings will be
performed immediately. Press icon to
exit out the page.
The restore to default function allows
the user to recover the settings to factory
setting.Note that the restore to default
operation will not change the time setting
and the datas on buit-in memory or SD
card.
Enter main menu page,then touch
User Se t u p
icon t o en t e r th e setting
page,press Restore to default item, the
default settings will be loaded. press
Home
icon to return to home screen page.
5
Brightness
color
scene
Talk Volume
Adjust Return
Adjust - Adjust +
Door Station
Call tone
Intercom
Call tone
DoorBell
Call tone
Clock
Ring
Volume
Night Ring
Volume
Refault to
Default
09/30/2010 Thu.16:41
Home
●Touch
Installer setup
icon,a digital
keypad and installation setting will be
showed on screen.
●Input code number by touching the
digital keypad.According to the left
instructions, 8010 and 8011 are used
to se t th e unlock mode(0 a n d 1) .
8021~8029 are used to set the unlock
time (1s~9s) .use to cancel the
input,and use to save the setting.
Touch icon to return last page .
Code Number:[----]
[0010]#:Remove all remote control
[0011]#:Add remote control
[8000]#:Set as master unit 0
[8001]#:Set as slaver unit 1
[8002]#:Set as slaver unit 2
[8003]#:Set as slaver unit 3
[8004]#:Set as guard unit
[8005]#:Set as not guard unit
[8010]#:Set lock mode to 0
[8011]#:Set lock mode to 1
[8021]#:Set the lock time of 1s
[8022]#:Set the lock time of 2s
[8023]#:Set the lock time of 3s
[8024]#:Set the lock time of 4s
[8025]#:Set the lock time of 5s
[8026]#:Set the lock time of 6s
[8027]#:Set the lock time of 7s
[8028]#:Set the lock time of 8s
[8029]#:Set the lock time of 9s
1
4
7
8
0
9
6
5
2
3
Cancel
Installation settings:
-6-

5. Built-in Memory and SD Card
This Monitor has been equipped with a built-in memory (about 120 MB) together with a
SD card reader. Maximum 16 GB SD card can be supported.
●The monitor can play photos and pictures.
●Photo frame function, each photo playing will last 5 seconds, More pictures in the
SD card, longer time for triggering the function, 800 pictures is supported in inner
memory. With 2G SD card,more than 30000 pictures can be supported.
●Must use T-views album software tool to transform the JPG format photos took by
digital camera to TVS format photos that can be viewed on Monitor.
●The captured pictures will be saved in a folder named by date,note that the pictures
recording every day will be saved in different folders which automatically generated
every day.
●The captured pictures in the built-in memory can be copied to the SD card, and you
should use T-views memo software tool to convert the pictures to JPG format that can
be seen on the computer. (select the pictures(press Ctrl+A to select all)->>click the
right key of the mouse ->>choose transfer selected to JPG item->>save the pictures on
computer)
●When the built-in memory is full,the oldest picture will be deleted to make room for
new record .
●The built-in memory can be formatted by the Monitor,but SD card cannot,you should
format the SD card on computer.
●Avoid to plug in/out the SD card when the monitor is under operation.
●Playing will be interrupted by the calling from outdoor station.
Micro SD card
-7-

Picture Recording
Record times Setting
Picture Playback
Both Auto-Recording and Manual-Recording
are available.and Auto-Recording is default.
If receive a Call , after 3s, the monitor will
record automatically. or you can touch
Capture
icon to record the visitor's image
manually.
Touch
Memory Playback
icon on main
menu,4 pictures will be displayed in the
memo for each page. you can touch
or to enter last or next picture memo,or
touch icon to delete all pictures. And
you can zoom the picture on full screen by
touch icon , on full screen mode, touch
icon to preview last/next picture.or
you can touch icon to delete the picture
you are previewing.press icon to return
home screen page.
You can setup Memo Options to choose
1/4/8 pictures memo. If 4/8 was chosen,
you will have 4/8 shots for each recording
operation, and every 1.5 seconds catch a
picture.
Touch
Multi Media
icon on main menu
to enter next page, then touch
Memory
Options
icon,a digital keypad will be showed
on the screen,you can only set the record
times for 1/4/8 by touching the digital
keypad.touching other digitals are unvalid
.and press # icon to save. Settings will be
performed immediately, press icon to
return last page .
Record times: [ 1 ]
1
4
7
*
809
#
65
2 3
Cancel
Page Down
Home
Full Screen
Picture 4
2010-9-30 004 2010-9-30 003
2010-9-30 0012010-9-30 002
Picture 3
Picture 1Picture 2
Delete All
Page UP
Recording...
DS1 00:03 Talking
Home
Unlock
Talk
Standard
Screen
Capture
1:1
-8-

6.Specication
Photo Playing
Playing time setting
Touch
Album
icon on main menu to play the photos(must plug in SD card).it can be
played both manually and automatically,use your ngers to slide right or left on screen to
play last/next photo.
Touch
Multi Media
icon on main menu
to enter next page, then touch
Album
Options
icon,a digital keypad will be showed
on the screen,then you can set the playing
time by touching the digital keypad to input
digitals and press * icon to change the
location,and press # icon to save. Settings
will be performed immediately, press
icon to return last page .
Photo Frame
Power Supply : DC 24V (supplied by Adaptor)
Power Consumption: Standby 15mA; Working status 400mA
Monitor Screen: 7 Inch color TFT-LCD
Display Resolution: 800*3(RGB)*480 pixels
Built-in Memory: 120 MB
Picture Memo: 800pcs(inner memory),>30000pcs(2G SD card)
Monitor Dimension: 125(H)×225(W)×23(D)mm
Album time set
1
4
7
*
809
#
65
2 3
min:[01] sec:[30]
Cancel
-9-

The design and specications can be changed without notice to the user.
Right to interpret and copyright of this manual are preserved.
 Loading...