

Smoke Alarm Camera Manual
Model : WM2

Thank you for choosing Vstarcam!
Welcome
Start your security journey~

Packing List
Smart smoke alarm*1
A bag of screws
3V Alkaline Battery*1
User Manual*1
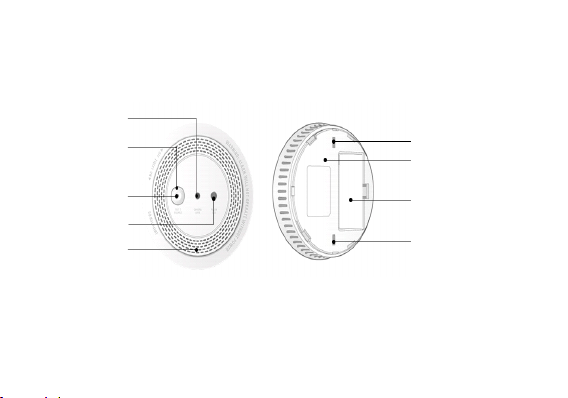
Product Description
Lens
Key Button
Screw Fixing Hole
Base Plate
LED Indicator
Flash LED
Smoke Input/
Sound Output
Holes
Battery Compartments
Screw Fixing Hole
Front Rear

Functions
Boot and Working
status of device
Function of the
key button
After the battery is installed, it will start automatically (once the siren rings,
the red LED flashes once, and the blue LED flashes 2S).
If the device is not configured with WIFI, and still not start to configure WiFi
after 30S, the device will enter sleep state. Short pres s t he key button to
re-enter the network configuration mode.
After detecting that the device has been equipped with WIFI, the device
will automatically sleep.
When there is no network configuration, the device will sleep, short press the
key button to wake up the device and enter the network configuration mode.
The Test mode canno t be enter ed (i.e. the alarm siren/red LED flashing
cannot be trigg ered) . If the device is not i n sleep st ate, short press the
key button will do nothing.
After WIFI is configured, if the device sleep, short press to wake up the
device and trigger Test alarm, take a photo and push it once, and the siren
will alarm/red LED will flash. When the device is not asleep, the device
will be in Test alarm mode, short press to stop Test mode.
When Test alarm is triggered (siren alarm/red LED flashing), short press
once to stop siren alarm/red LED flashing, continue taking photos, and
push the photo.
After smoke alarm is triggered for 3S, short press once to stop the alarm (if
the smoke is detected continuously, press the button to turn off the siren

Smoke alarm
Flash LED
LED indicator
Low power alarm
alarm once. After 10S, if detected smoke alarm again, the siren will alarm
again, and continue to c irculate unti l t he smoke c oncen tratio n is lower
than the alarm value).
Long press 5S to clear WIFI information and restore factory Settings
Detectionfrequency:once /10s(oncesmoke isdetected,the detection
frequencywillbeaccelerateduntilan alarmisgiven)
Sound and light alarm: siren continues alarm, red LED flash continuously,
and push photos to APP
Lig ht 5S whe n you s tar t tak ing p hotos , and c los e whe n you fi nis h takin g
pho tos
1. Power on: The blue light flashes for 2S, then it will change according to
the network state of the device.
2. Wa it f or t he ne tw ork co nfi gur ati on: th e blue l igh t go es o n an d o ff ,
ev ery 2S
3. Network interruption: the blue light comes on every 4S
4. Internet connected: blue light off
5.Test push: After the blue light flashes, it will change after detected the
network status, and the red LED flashes at the same time
6. Smoke alarm trigger: The red light flashes continuously until the next
detection
When the battery is lower than 2.3v, the APP will push low-power notific
-ations every 24 hours until the battery is replaced.

Ignore Push
OTA
Smoke t riggers the alarm. After the AP P r eceives the push, press th e
ignore button on the push interface. After that, the push will not be carried
out for 2 minutes. At the same time, alarm siren/red LED alarm every 5S)
1. The APP displays version information, and users can manually upgrade
the firmware
2. When waking up every month, test the version information and prompt
the user to upgrade
Application scenarios
It’s recommended to install the smart photo smoke alarm in the warehouse, living room, sitting
room, study room, storehouse, dining-room or workshop. Alarm is sensitive to smoke , dus t,
water mist and volatile gas, so it’s not suitable for the places with lar ge dus t and water mist,
such as the kitchen, bathroom an d air vents with wind spee d greater than 5m/s (it is diffic
-ult to accumulate smoke in these places).

Instructions
Pull out the battery insulator in the battery box, and the blue light on the front of the smoke det
-ecto r starts t o flash slowly after the power is co nnected (fl ashing every 2 seconds,
indicating that the bat tery is energized and waiting for the network configuratio n),then follow
the instruction steps in the mobile APP to complete the addi ng of the smart smoke alarm.
When press the test button, the alarm will give out the alarm prompt of sound and light. At the
same time, the flash LED will be on, the camera will start to take photos and push photos to
the mobile APP.
When the concentration of smoke reaches the limited value, through the judgment of the smoke
sensor, the red indicator light of the smart smoke alarm will start flashing continuously, and the
alarm will emit the "beep" alarm sound, photos of the dangerous scene will be timely captured
and sent to the mobile APP.

Connect to the network
1. APP download
① Search "Eye4" in App Store, Google Play or other phone platform store.
②Scan the QR code below to download the APP.
2、Account Register
Launch the APP Eye4, select the "Register" button, create a user name & a password and
tap ‘Submit’, done.
Note: In order to facilitate future login, we suggest you take down the username and
password.

3.Add the device
There are two ways to connect the smoke alarm: Scan QR code and Others.
Before adding the device, please turn on the bluetooth function of your mobile phone.
Scan QR code
① Open the APP, click the "+" icon on the upp er right corn er o f the homepa ge, and
scan the QR code on the body of the smoke alarm.

② After scanning the code successfully, confirm that the blue indicator light of smoke sense
flashes every 2 seconds, check this option on the APP page and click "Next".
(Note : A fter 30s wit hout network configu rat ion, the blu e l igh t g oes out and enters s leep
mod e. Pre ss the key butt on and it w ill enter netwo rk configu ration mode aga in, flashing
eve ry 2 seco nds)

Reset method: Long press "Test/Reset button" for 5 seconds to reset. After successful reset,
the blue light flashes every 2 second.
③ The APP began to search for the smoke alarm, which takes about 5~30 seconds. After the
smoke alarm is detected, click “configure" to enter the WiFi configuration page.
Please confirm your wifi SSID and enter the correct wifi password, click "Working". After the binding
is completed, the device will be on the APP homepage.

If this method failed, you may try ‘Others’ way.

Others
① Open the APP, click the "+" icon in the upper right c orner of t he homepage, and select
"Others" in the lower rig ht corner, then select "Photograph smoke detector ", and select the
correct model.(You can check the product model on the package box.).

② Please confirm that the blue indicator light of smoke alarm flashes every 2 seconds.
Check this option on the APP page and click "Next".
(Note: After 30s without network configuration, the blue light goes out and enters sleep
mode. Press the key button and it will enter network configuration mode again, flashing
every 2 second)

③ The APP began to search for smoke alarm, which takes about 5~30 seconds. After the
smoke alarm is detected, click “configure" to enter the WiFi configuration page.
Please confirm your wifi SSID and enter the correct wifi password, click "Working". After the
binding is completed, the device will be on the APP homepage.

Use and share
Smoke alarm prompt: If the device is connected the network successfully, when the smoke
concentration reaches the alarm value, the alarm red light flashes continuously, the siren
sounds twice (beep,beep,beep ), the fill light lights up, the alarm take s a p icture a nd the
picture is sent to the APP ( If the device is not connected to the network , the alarm sounds
and the red indicator light flashes, the fill light does not light, and the photo is not taken).
Device Share: O pe n the A PP, click the ‘ ’ on t he upper r ight corn er of the al arm,
choose “Share” to share the QR code of the device with other users. Other users can scan
the QR code to add the device.

Installation guide
The installation location is gene rally selected under the ceiling in the center of the room.
For the sloping beam roof, the ceiling i s al so i nclined , th e an gle of i nclinat ion of t he a larm
shall not exc eed 45 °C, a nd the horizon tal distanc e fr om t he a pex shall not exce ed 0 .9 m .
Fix the base to the ceiling with
1 2
screws and plastic expansion
rubber plug.
Install the detector on the base by
rotating clockwise

FAQ
Q: Why can not add device to mobile app?
A: 1. Please confirm that the wireless network to be connected is 2.4G frequency.
2. Confirm tha t the device i s in the stan dby s tate: the indicator flashes once every
one second.
3. Please make sure the wifi network password which connected to your cell phone
does not exceed 16 characters and does not have special characters such as @!.
The wifi password should consist of letters and numbers.
4. If the mobile app has a new version, please upgrade to the latest version.
Q: The device is online and has push event, but the phone doesn’t receive push
information.
A: Turned on “self-starting” and the ‘app permission’ of the phone. Turned off the‘battery
op timization’ and‘En d the APP at background and screen ti me’. (The mobile phone
manufacturer optimization method is inconsistent, please refer to the actual situation).
Q: If have the network, still needs to buy another gateway?
A: Connect to the Internet using a normal wi-fi router in your home.
Q: Can it alarm the gas leak?
A: No.

Q: What if no alarm when there is smoke?
A: 1. Check whether the network connection of the alarm is normal (When not connected
to network, the alarm sounds and the red indicator light flashes, but no fill lights on,
no pictures taken).
2. Check whether the battery power is sufficient (If there is a low power alarm, the battery
of the same specification should be replaced in time).
If the smoke concentration in the environment r eaches the limit value, but the smart
photo smoke alarm fails to detect and does not a larm, or i f there is no smoke in the
room but it alarms (I t’s faulty), please contact the supp lier o r custom er servi ce
department to find out the cause of the problem and fix it as soon as possible.

If you have any questions about the product, please contact us:
Email:support@vstarcam.com
Website: http://www.vstarcam.com


 Loading...