

Page 1

111 - 1 - - 1 -
1
Chapter 1 VR-110A Introduction and Installation
1-1. VR-110A Characteristic
1-2. Package Information
1-3. Parts Description
1-4. Front LED description
1-5. Product Specification
Chapter 2 VR-110A Network Configuration
2-1. Windows 98/me
2-2. Windows 2000
2-3. Windows XP
Chapter 3 VR-110A Set up
3-1. VR-110A setup
3-2. Product information
3-3. System Configuration
3-4. Basic setting
3-5. Network setting
3-6. Wireless LAN setting
3-7. RTSP setting
3-8. Media Setting
3-9. Camera setting
3-10. Checking current setting
3-11. Customer Support
3-12. Advanced Setting
Chapter 4 MediaWings
4-1. MediaWings System configuration
4-2 How to use MediaWings
Chapter 5 VR-110A Advanced Setting
5-1. When using Firewall / IP router
5-2 Upgrading your Firmware
Table of Contents
Page 2

222 - 2 - - 2 -
2
Chapter 1 VR-110A Introduction
1-1. VR-110A Characteristics
z Support MPEG-4 VOD Server
z EVDO mobile phone with RTSP player installed can use it with VOD service
z Full support on Static IP, external xDSL modem, and dynamic IP such as Cable modem
(Cf. VR-110A does not support ADSL service with internal modem
z Easily managed by remote control and firmware upgrade through network
z With additional PCMCIA card, it is fully adaptable to 802.11b, wireless LAN
z Easily configured by using Internet Brower
z With built in DHCP function, it can manage maximum number of 254 private IP address for PCs
under HUB
For your Information :
This equipment has passed for EMI testing, and can be used residential and other areas.
서식 있음: 글머리 기호 및
번호 매기기
서식 있음: 글머리 기호 및
번호 매기기
Page 3
333 - 3 - - 3 -
3
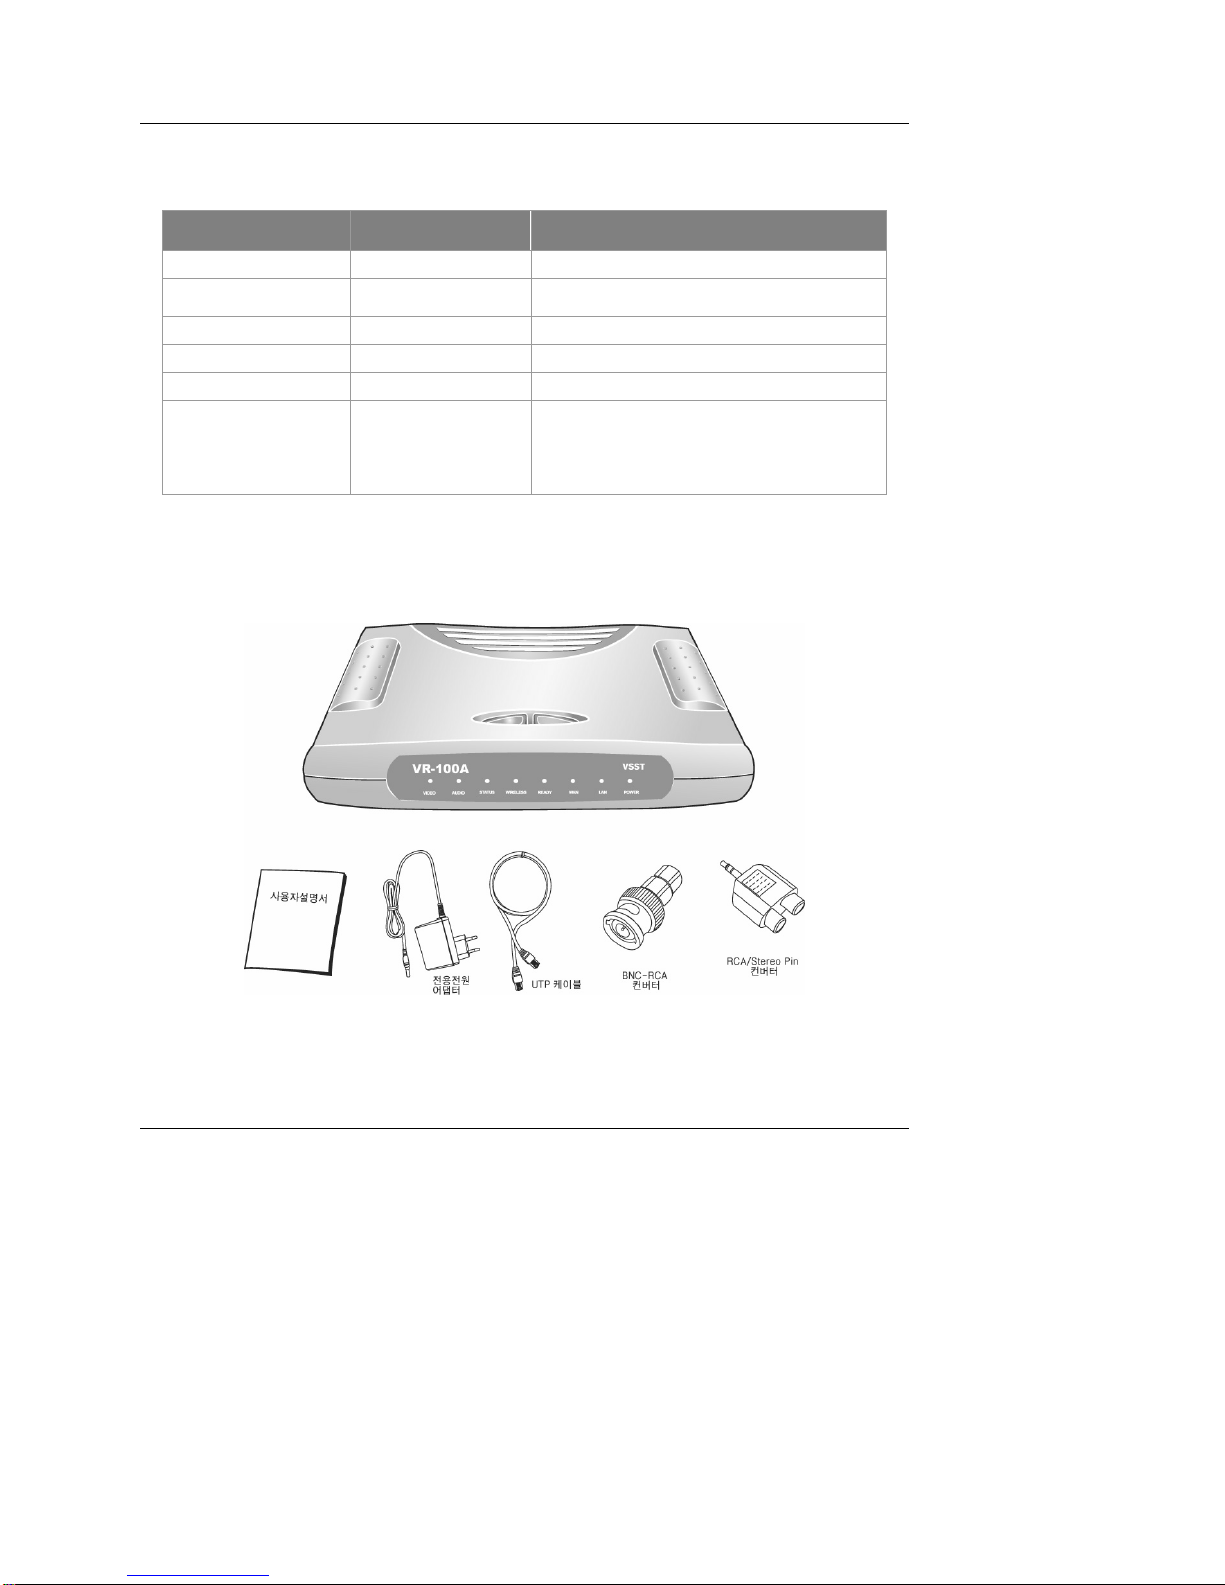
1-2. Product package description
Please check the follow before installation.
Listings EA 용 도
VR-110A 1 VR-110A
User
Manual
1 Explai n spec, function and feature
Power Adapter (DC 6) 1 Powe r su pply
UTP cable 1 Cable for LAN and VR-110A
BNC-RCA Converter 1 Converter between RCA and BNC
RCA/Stereo Pin
Converter
1 Audio Jack Type change
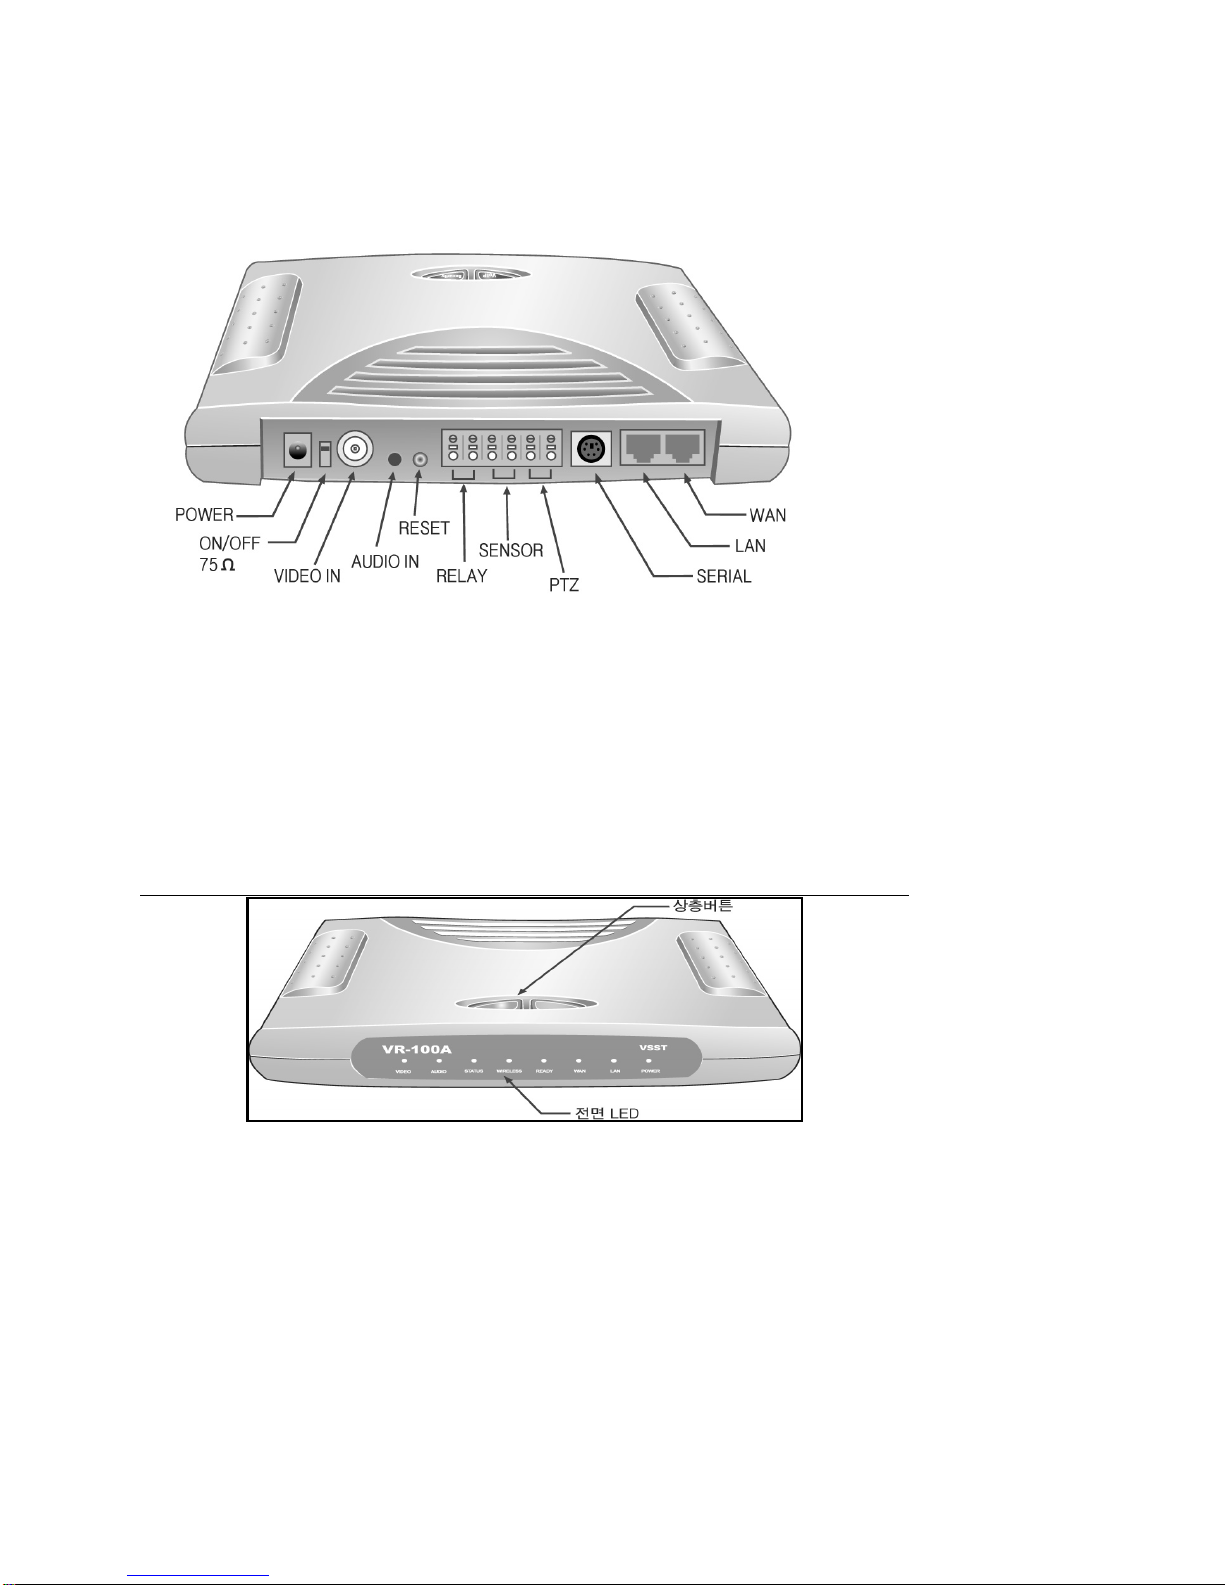
1-3. Parts Description
[Power] Connect your 6V power adaptor here.
[WAN Port] Connect ADSL or Cable Modem here.
[LAN Port] Connect to your PC with LAN cable here.
Page 4
444 - 4 - - 4 -
4
[Reset button] Press this button for reset VR-110A to default value.
[Video Port] Video Input for receiving Video data
[Audio Port] Audio input with RCA / Stereo connection
[On/Off] 75Ω Impedance resistor On/OFF switch
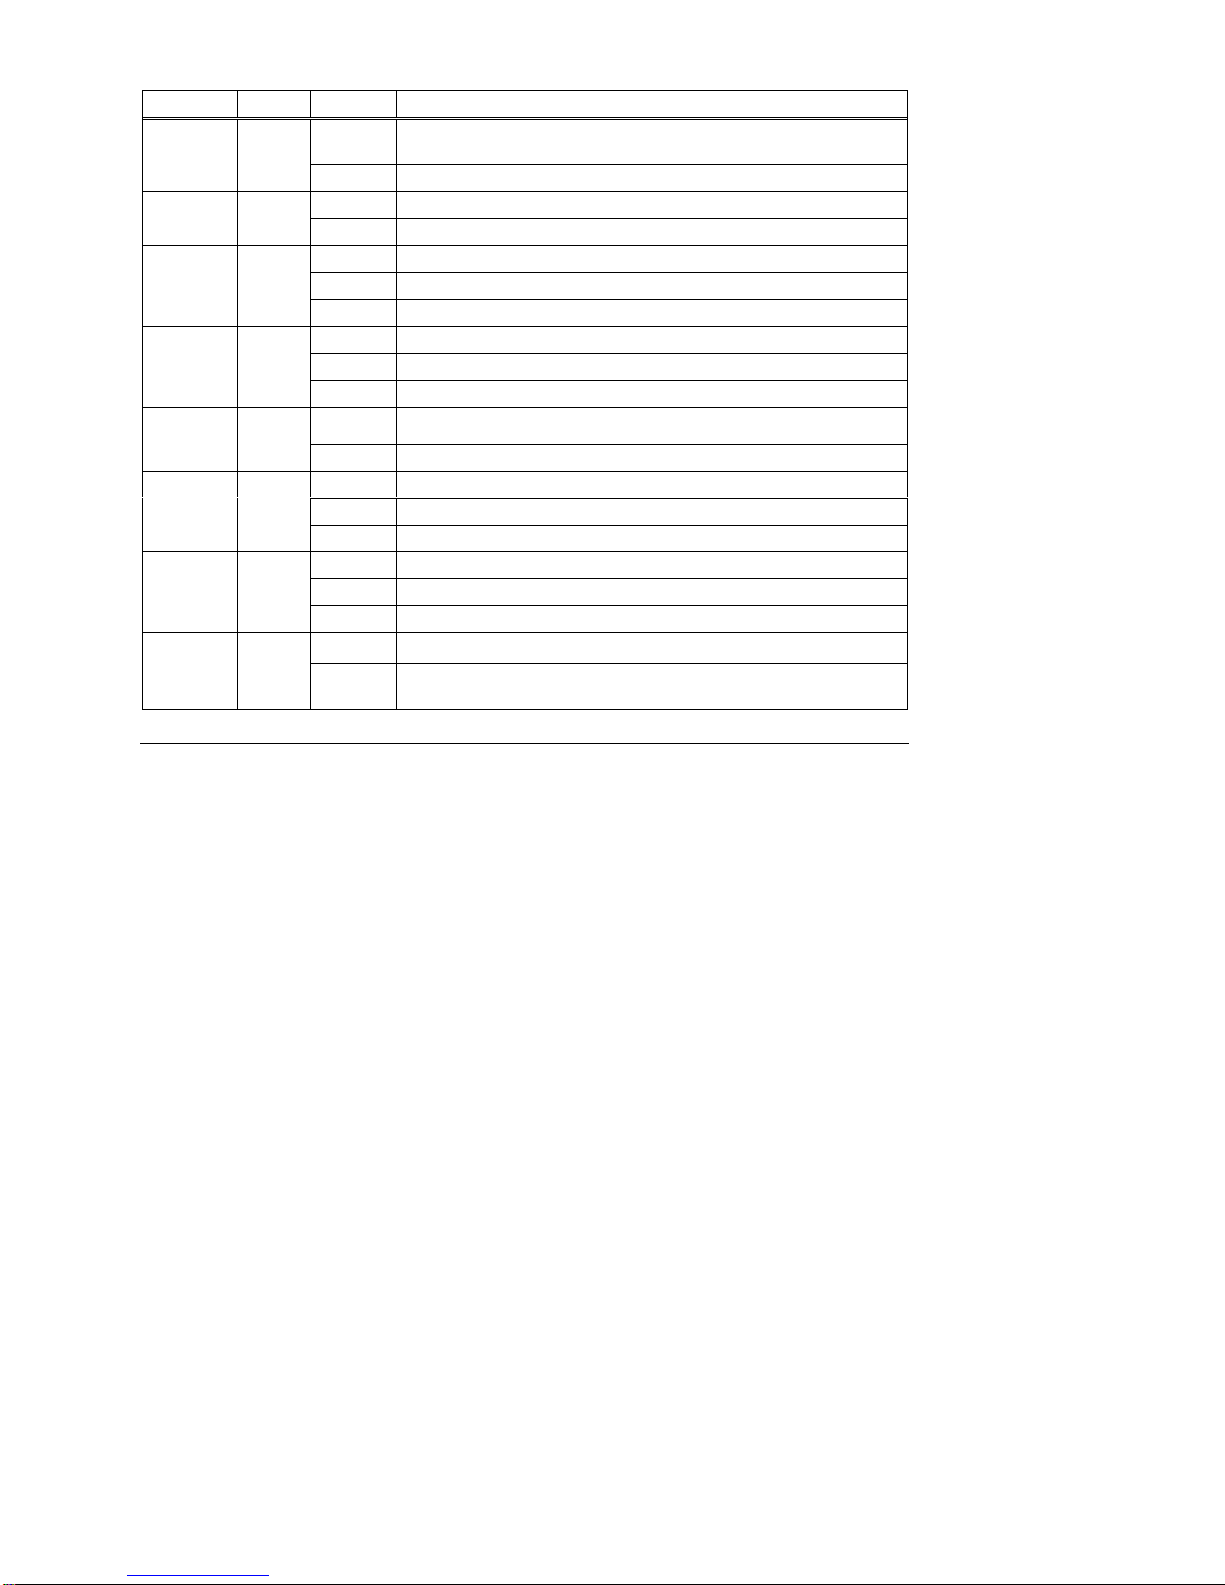
1-4. Front LED
Page 5
555 - 5 - - 5 -
5
Name Color Status Description
OFF No Video Streaming
VIDEO Green
Blinking Video Streaming in progress
OFF No Audio Streaming
AUDIO Green
Blinking Audio Streaming in progress
OFF No client access
ON More than one client access
STATUS Green
Blinking Firmware upgrade in progress
OFF No PCMCIA Wireless LAN
ON PCMCIA Wireless LAN is inserted and working properly
WIRELESS Green
Blinking Wireless LAN communication in progress
ON
IP setting is done property and ready for streaming
READY Green
Blinking
Streaming now ready and there is problem
OFF No connection in WAN port
ON Connection established in WAN port
WAN Green
Blinking Communication in progress in WAN port
OFF No connection in LAN port
ON
Connection established in LAN port
LAN Green
Blinking
Communication in progress in LAN port
OFF No DC power supply
POWER Red
ON DC power supply
Page 6

666 - 6 - - 6 -
6
1-5. Product Specification
List
Description
Video Interface
Support standard NTSC / PAL analog video signal with 1 channel through BNC
connector
Audio Interface
Support Standard analog stereo audio signal( RCA connector)
Network Interface
2 10/100Base-T Ethernet interface to access LAN/WAN (RJ-45 ports)
Remote Interface
2 relay inputs for remote control
Sensor Interface
2 sensor inputs to receive event through detecting sensor
Camera Interface
Remote Pan/Tilt/Zoom control through RS-232/485 interface
Interface
Spec
WLAN Interface
Wireless LAN support with WLAN PCMCIA card(IEEE 802.11b)
Video 압축 방식
MPEG-4 Simple Profile Level 1
Audio 압축 방식
MPEG-4 AAC(Advanced Audio Coding)
Image Resolution
176ⅹ144(QCIF)
Frame Rate
Max frame @ 15 fps(frames per second)
Bit Rate
Max rate @ 500 kbp
Streaming Protocol
TCP/UDP/IP based RTSP/RTP/RTCP
Video &
Audio
Server
Spec
Multi client support
Intelligent rate control and channel adaptation for multi user connection
IP setting
Supports both static IP and DHCP based Dynamic IP
Network connection
Supports PPPoE based ADSL and cable Modem
IP sharing
2 RJ-45 port setting support NAT, port forwarding based IP router / switching Hub
Remote control
Embedded HTTP server for remote control
Network
spec
Firmware Upgrade
Firmware upgrade support using FTP, serial port or UTP cable
Processor
32-bit RISC CPU와 TMS320C54x DSP
Memory
2MB FLASH ROM과 8MB DRAM
Platform
OS
Precise/MQX Real-time OS
Power
DC 6V 1.0A
Size
200 mm ⅹ 140 mm ⅹ 33 mm
Physical
spec
Weight
380 g
Page 7

777 - 7 - - 7 -
7
Chapter 2 VR-110A network
2-1. Windows 98/me configuration
① Select Windows menu [Start] Æ [Setting] Æ [Control Panel]
② Select [Network]
③ In the Network Window, select the LAN card being used among [TCP/IP] list, and click on [Property]
④ In [TCP/IP Property], in [IP address], select [Obtain DNS server address automatically]
⑤ Click on [OK]
⑥ Restart your computer.
2-2. Windows 2000 configuration
① Select Windows menu [Start] Æ [Setting] Æ [Control Panel]
② Select [Network connection]
③ Click right mouse button to select [Property]
④ In the Property Window, select [Internet Protocol(TCP/IP)] and click [Property]
⑤ Select [Obtain an IP address automatically] and [Obtain DNS server address automatically]
⑥ Select OK
2-3. Windows XP configuration
① Select Windows menu [Start] Æ [Setting] Æ [Control Panel]
② Select [Network connection]
③ Click right mouse button to select [Property]
④ In the Property Window, select [Internet Protocol(TCP/IP)] and click [Property]
⑤ Select [Obtain an IP address automatically] and [Obtain DNS server address automatically]
⑥ Select OK
서식 있음: 글머리 기호 및
번호 매기기
Page 8
888 - 8 - - 8 -
8
Chapter 3 VR-110A setup
3-1. VR-110A setup
By using embedded web interface, system configuration to use VR-110A can be set. When you start VR110A for the first time, or do not know the IP address that is given to VR-110A, you can use the following
method. B y default, VR-110A has IP address of “192.168.120.1” Since this IP will not change no matter
what, you can change settings by accessing to this IP address directly.
Connect PC and VR-110A’s LAN port using LAN cable.
Check the Local Network status, and if you have following screen, th e connection is established
properly .
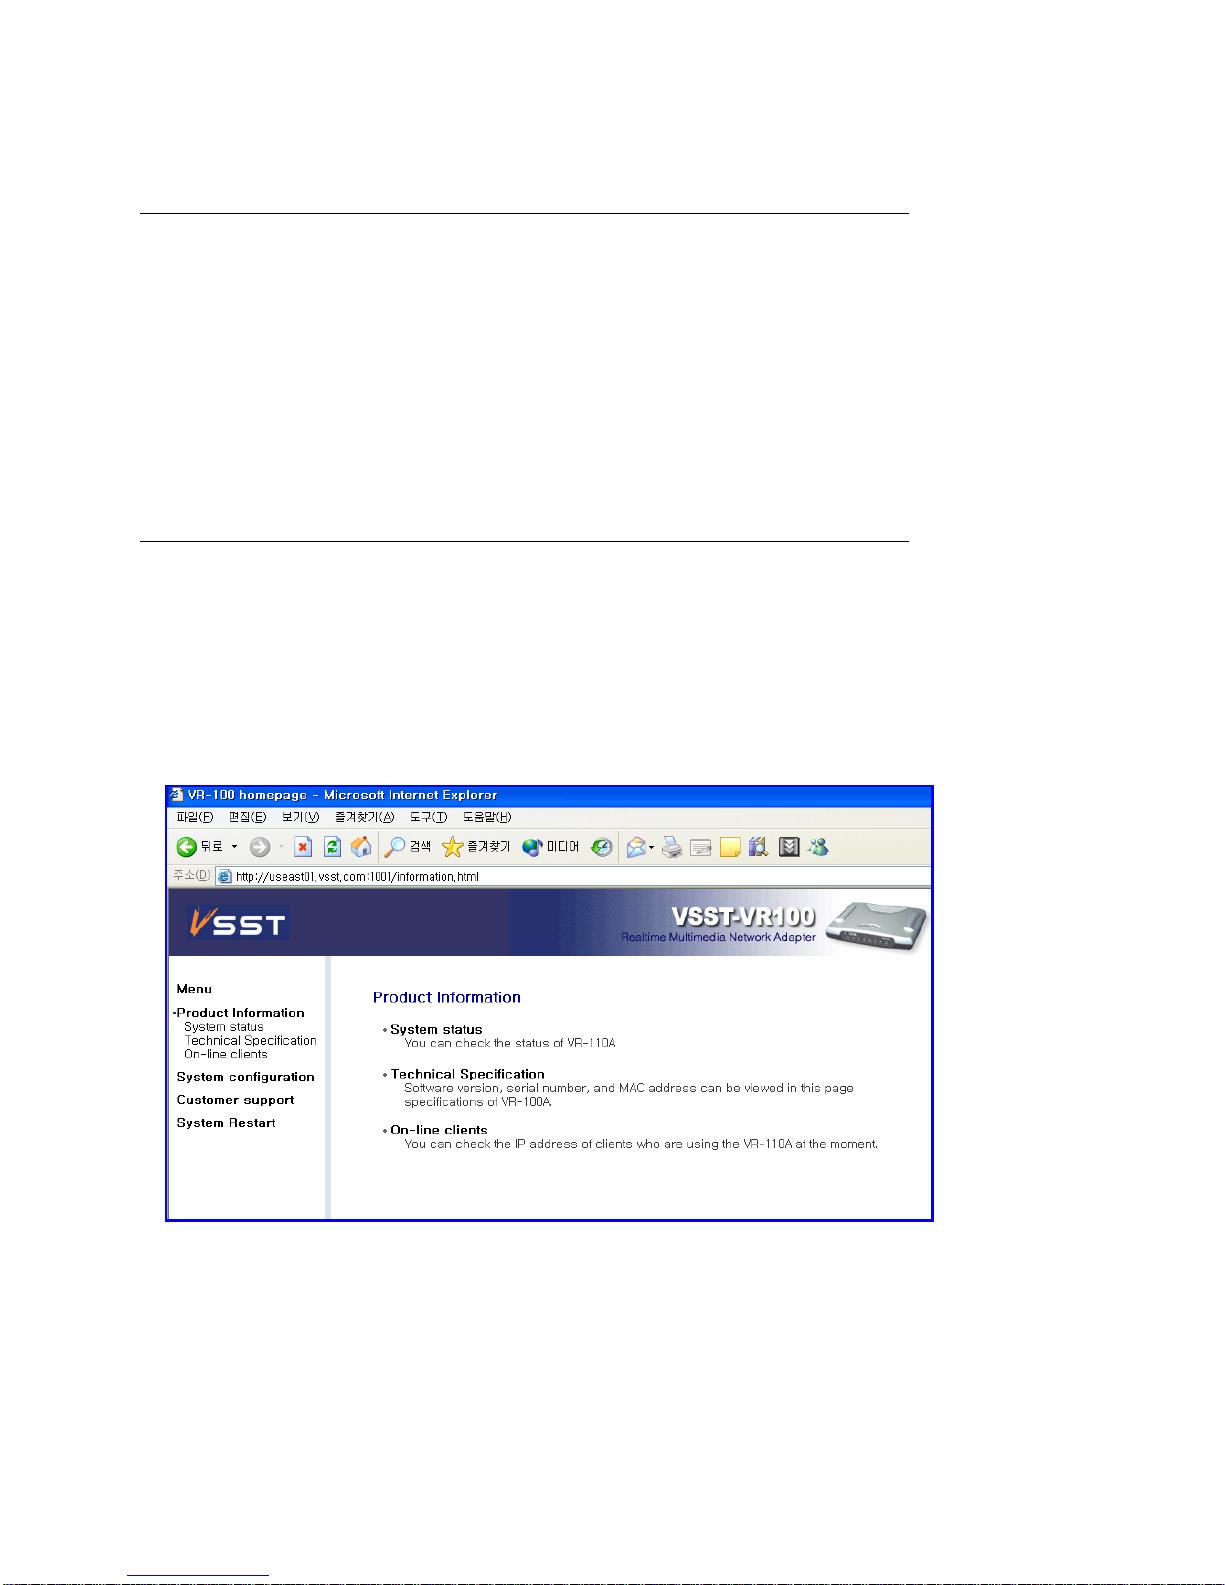
3-2. Product Information
From internet browser of PC, access the following address
“http://192.168.120.1:1001/”
z System Status : You can check the status of VR-110A.
z Technical Specification : Software version, serial number, and MAC address can be viewed i n this
page
z On-line clients : You can check the IP address of clients who are using the VR-110A at the moment.
Page 9
999 - 9 - - 9 -
9
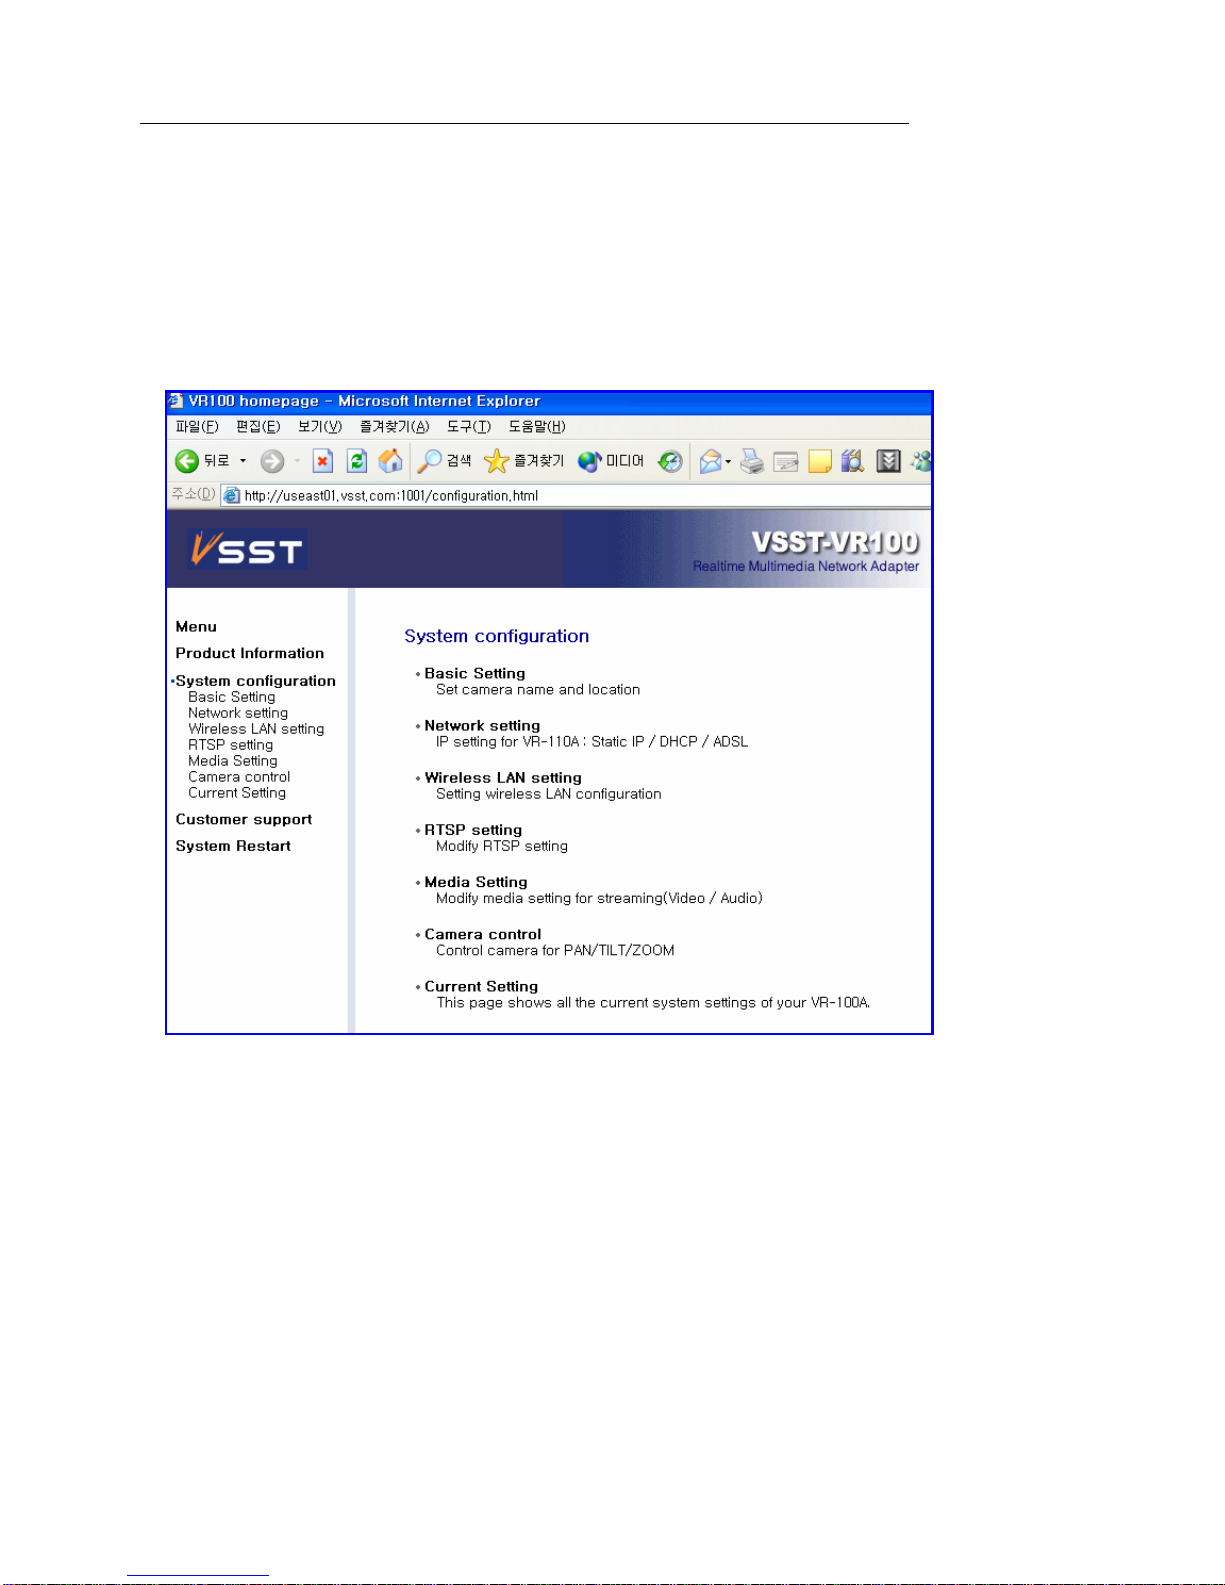
3-3. System Configuration
z Basic Setting: Set camera name and location.
z Network Setting : IP setting for VR-110A : Static IP / DHCP / ADSL.
z Wireless LAN setting: Setting wireless LAN configuration
z RTSP setting : set RTSP port number, time out, concurrent user
z Media setting : Modify media setting for streaming(Video / Audio)
z Camera Control : Control camera for PAN/TILT/ZOOM relay, sensor input..
z Current setting : Show the current setting of VR-110A
Page 10
101010 - 10 - - 10 -
10
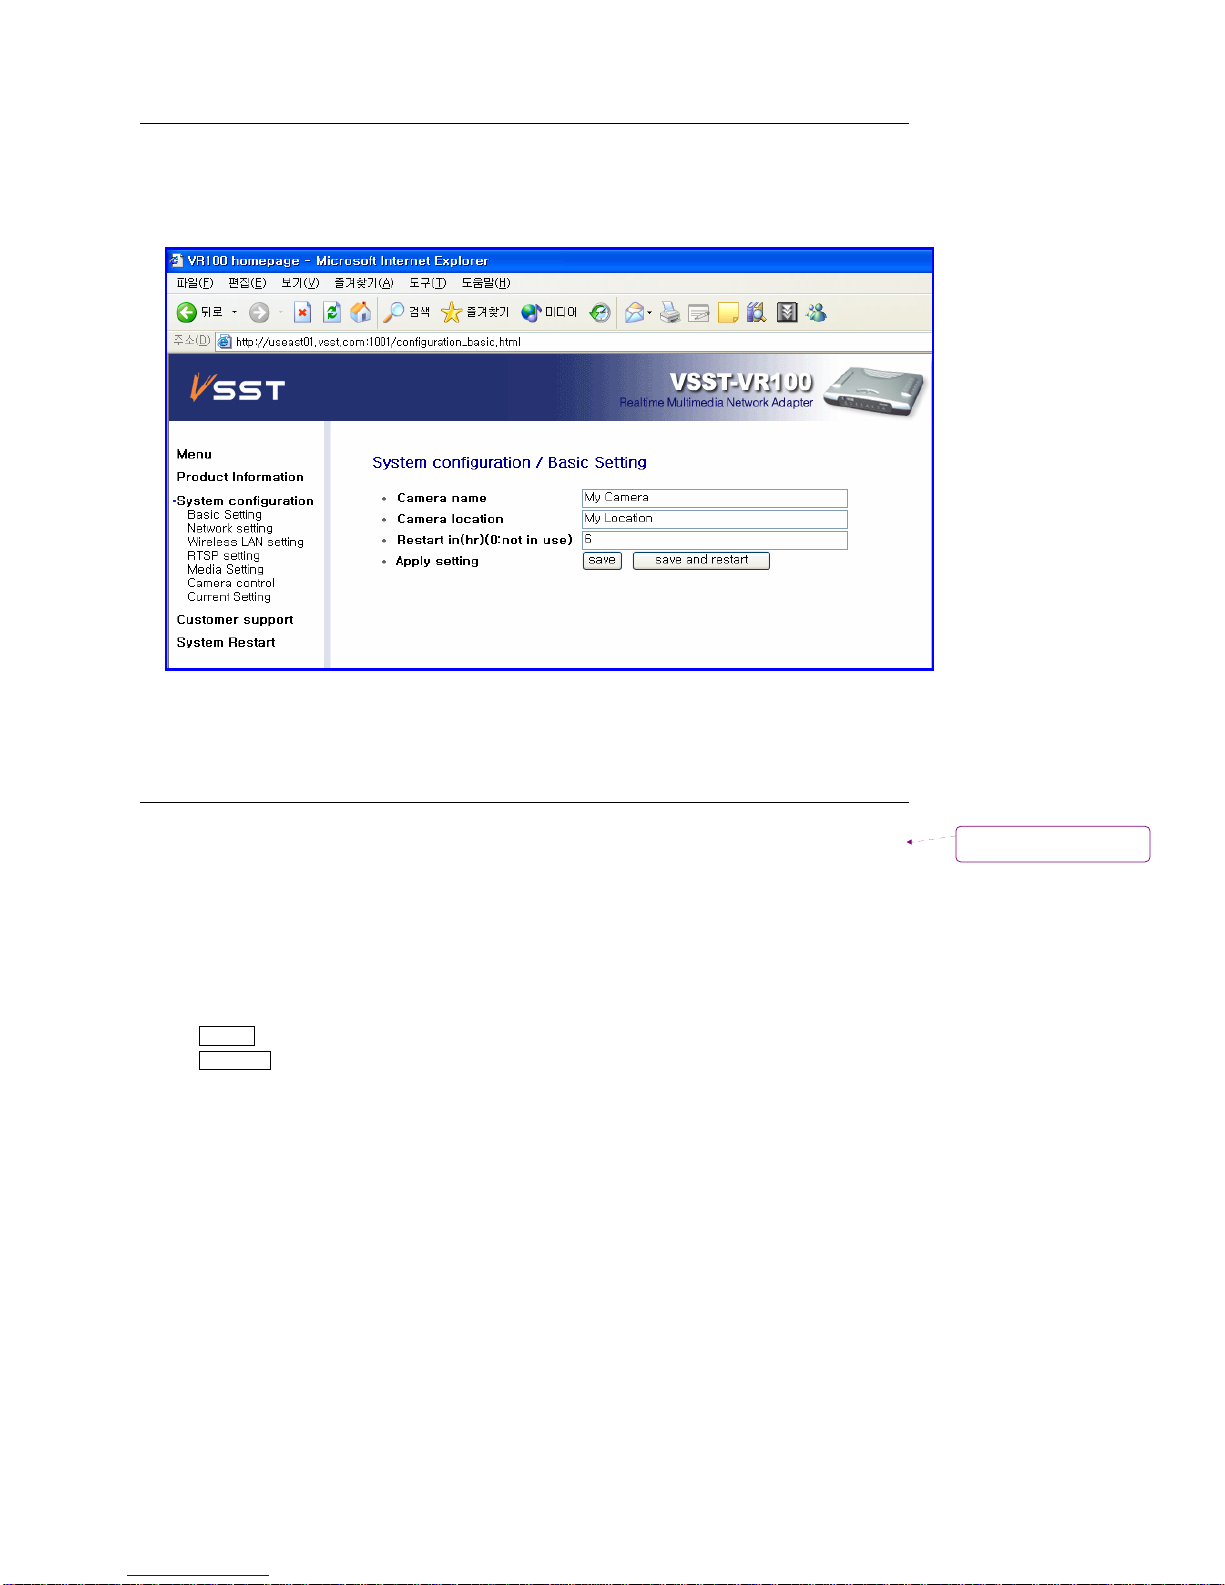
3-4. Basic Setting
Select Basic Setting and fill in the camera name and location
Select either “save” or “save and restart” button to apply changed setting.
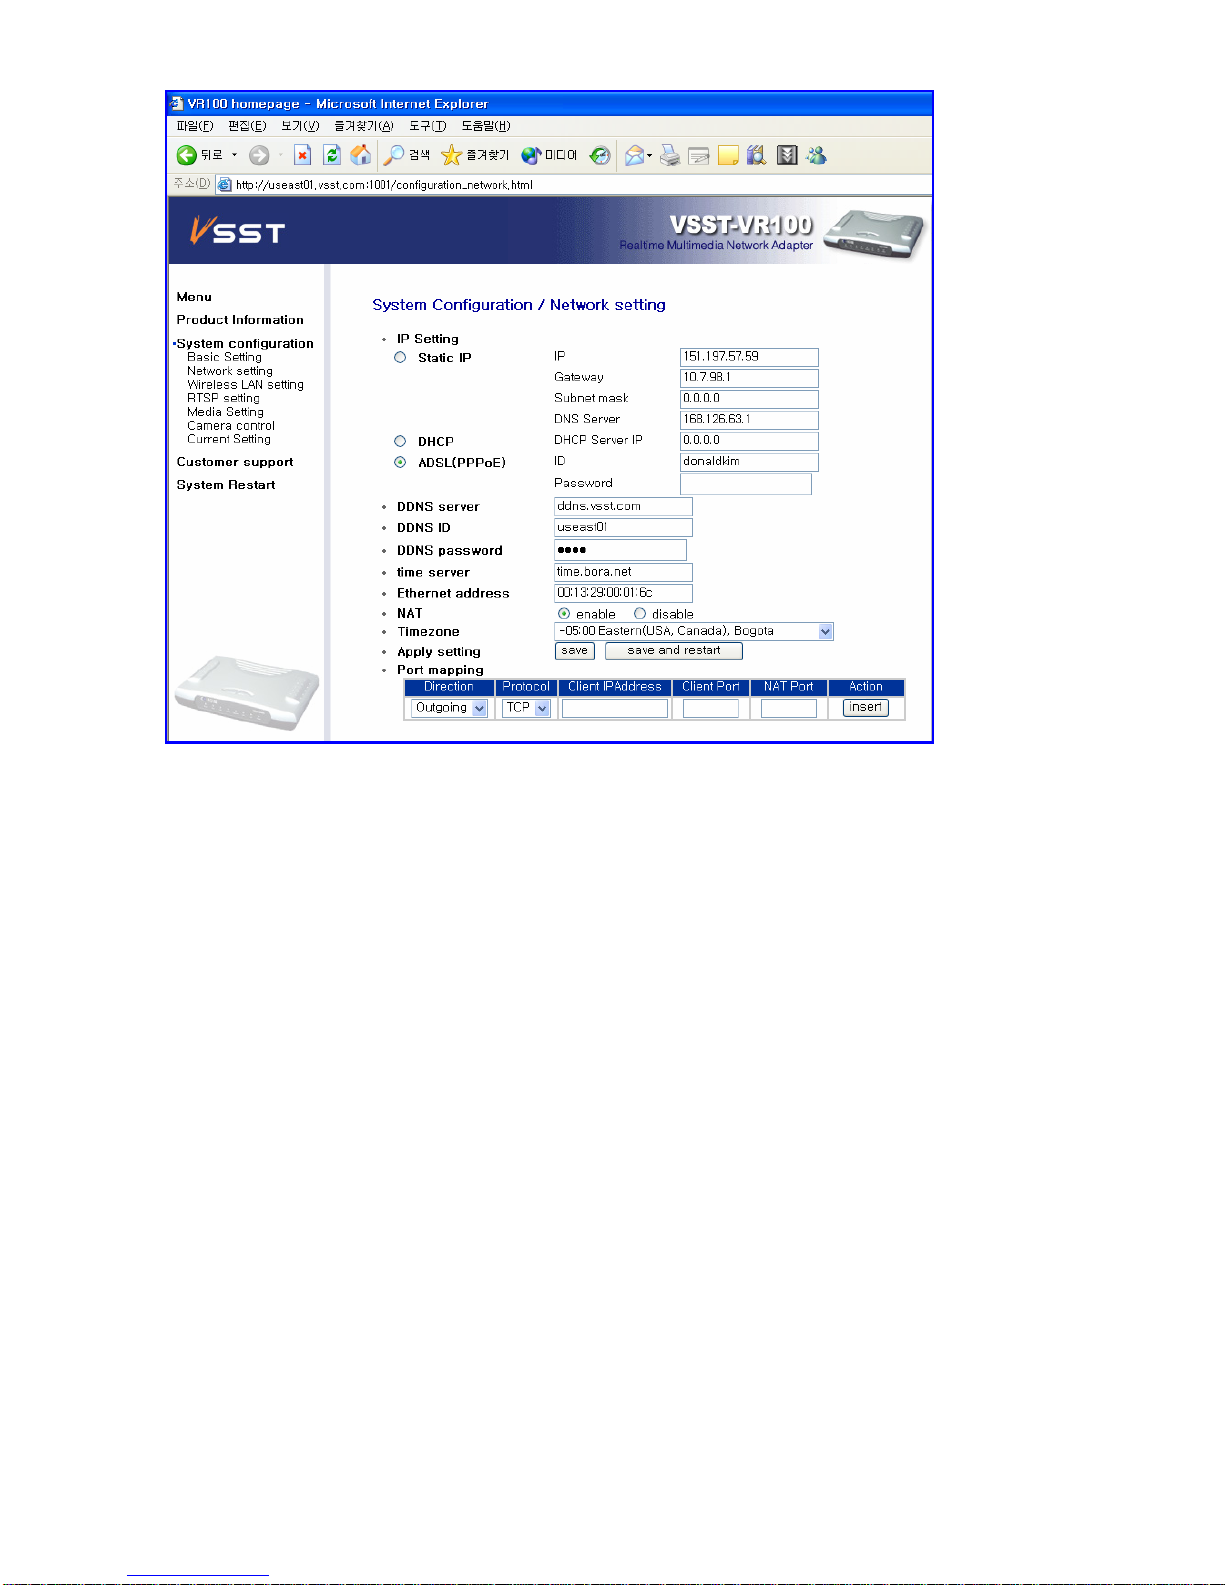
3-5. VR-110A Network Setting
From the menu in the left, select network setting and fill in the information.
Select “save and restart” button to reset VR-110A automatically and apply changed setting
z Static IP : click here if you use static IP address
z DHCP user : click here if you use dynamic IP address.
z DNS server : Address of DNS server that service provider runs
z ADSL (PPPoE): In case of external ADSL modem, select “ADSL (PPPoE)”
User ID: ADSL ID
Password: ADSL Password
z Time server: IP address of server that sets, and manages time
z DDNS server : Once registered with VSST through phone or e-mail, your ID and password will be
given.
z NAT : When using router before VR-110A, click here.
서식 있음: 글머리 기호 및
번호 매기기
Page 11
111111 - 11 - - 11 -
11
Page 12
121212 - 12 - - 12 -
12
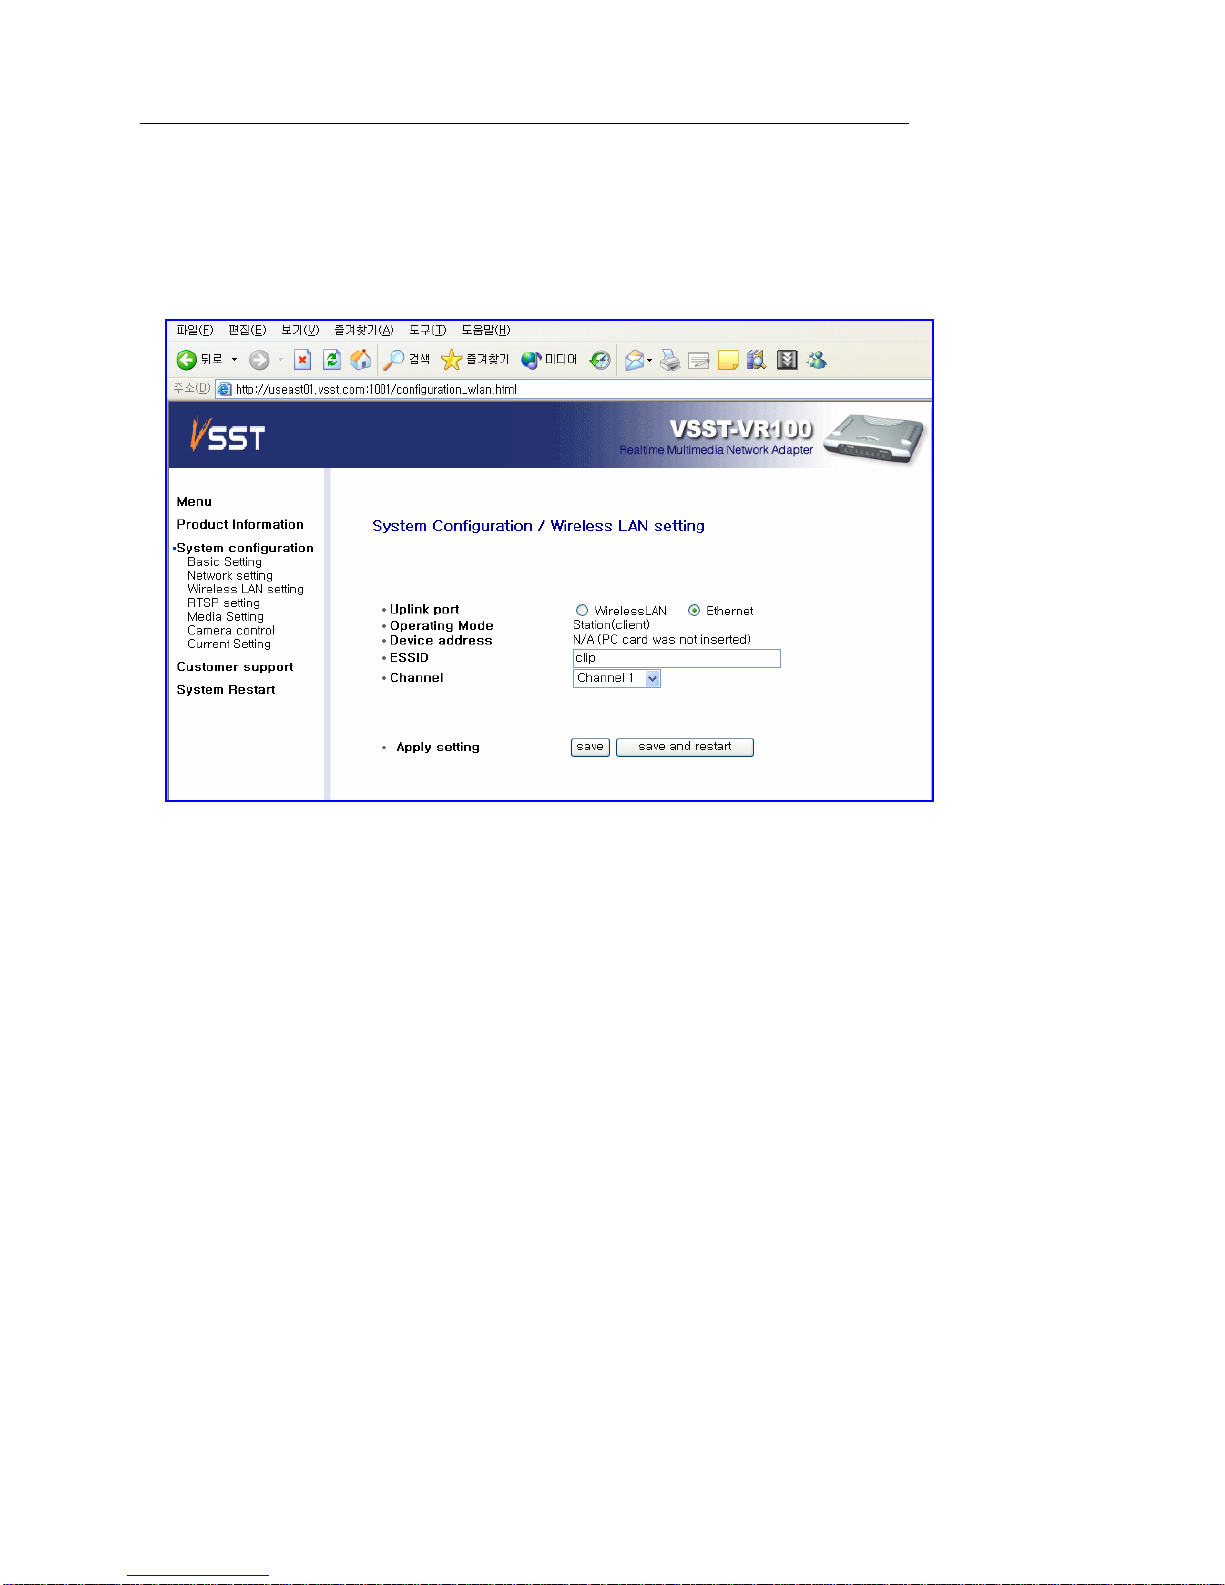
3-6. VR-110A Wireless LAN setting
From the menu in the left, select WLAN setting, and fill in the information
Select “save and restart” button to reset VR-110A automatically and apply changed setting
z Uplink Port : This option decide whether to use Wireless LAN or Ethernet.
z ESSID : Fill in the ESSID information
z Channel : use this option when using specified channel.
Page 13
131313 - 13 - - 13 -
13
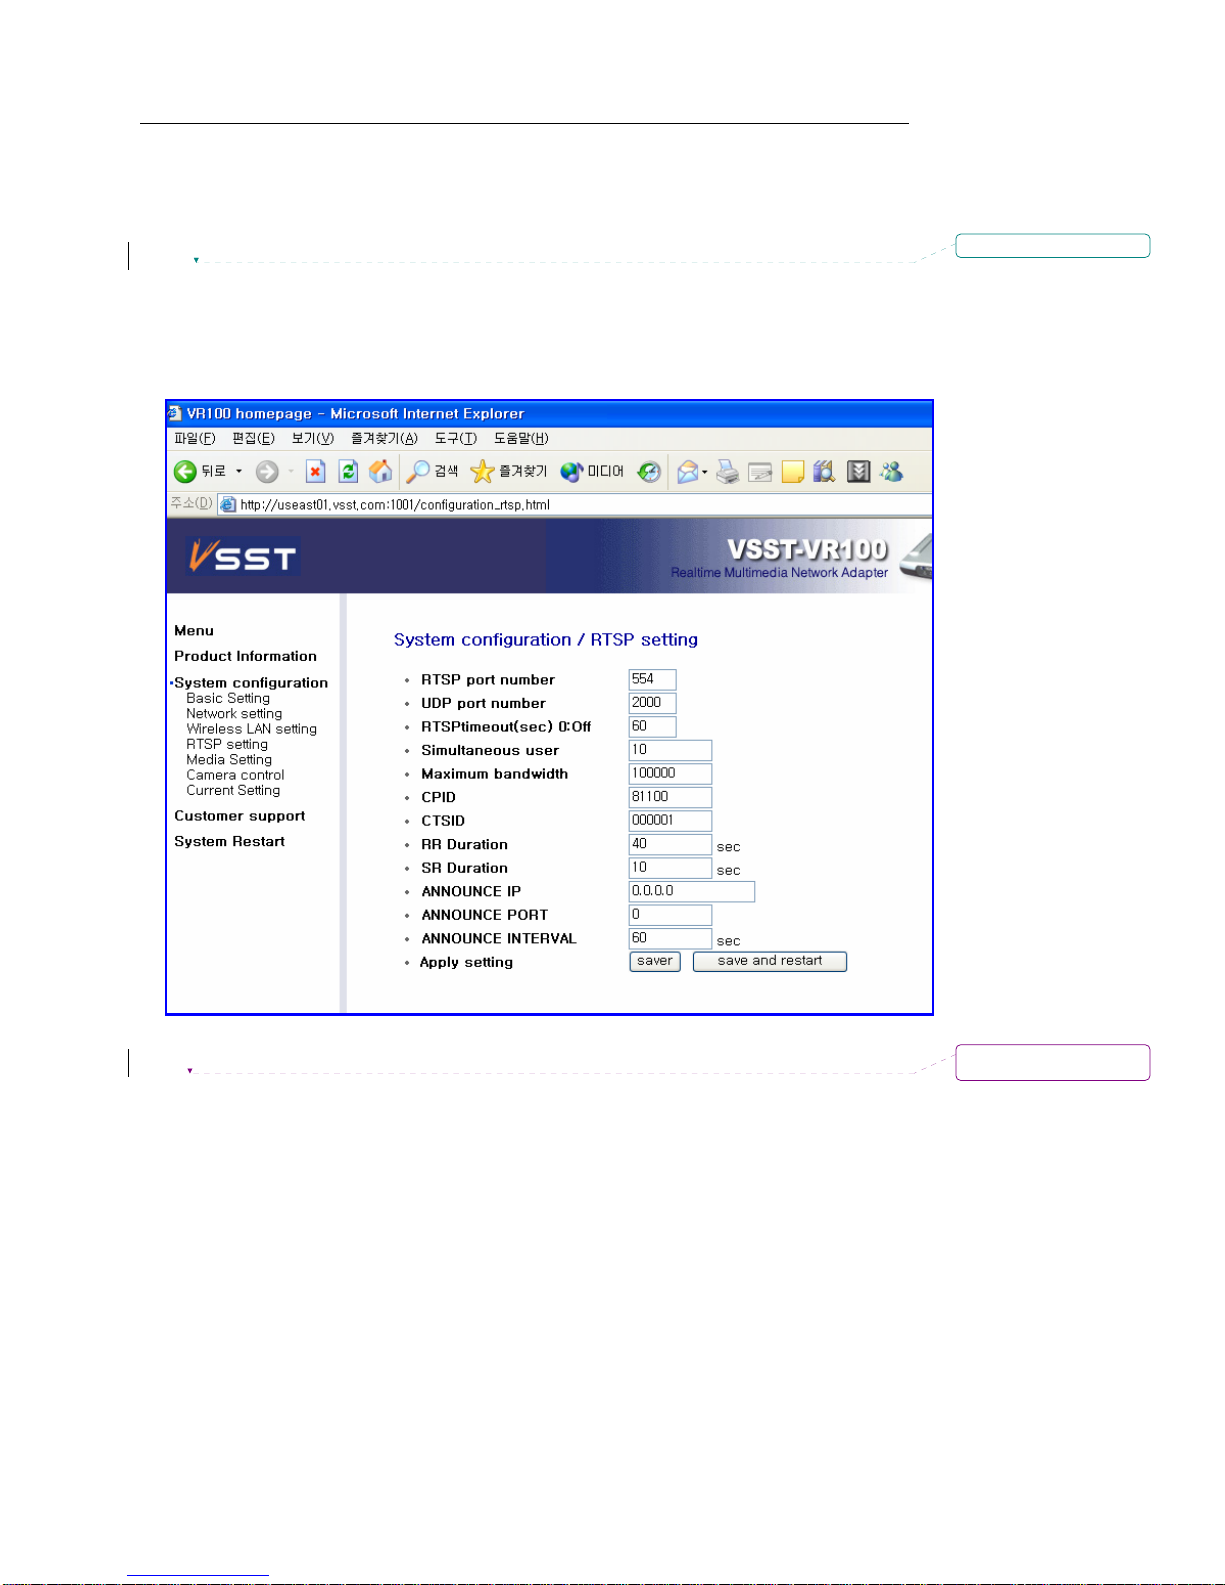
3-7. VR-110A RTSP setting
From the menu in the left, select RSTP setting, and fill in the information
Select “save and restart” button to reset VR-110A automatically and apply changed setting
z RTSP number : Port number of RTSP which clients access
z RTSP timeout : Set the idle time to stop streaming when no response from clients
z Maximum number of concurrent user. : maximum number of concurrent user that RTSP server allows
z Maximum Bit rate : Maximum range of Bit rate that RTSP server allows
z Other values should follow the setting value from mobile carrier.
삭제됨:
삭제됨:
Page 14
141414 - 14 - - 14 -
14
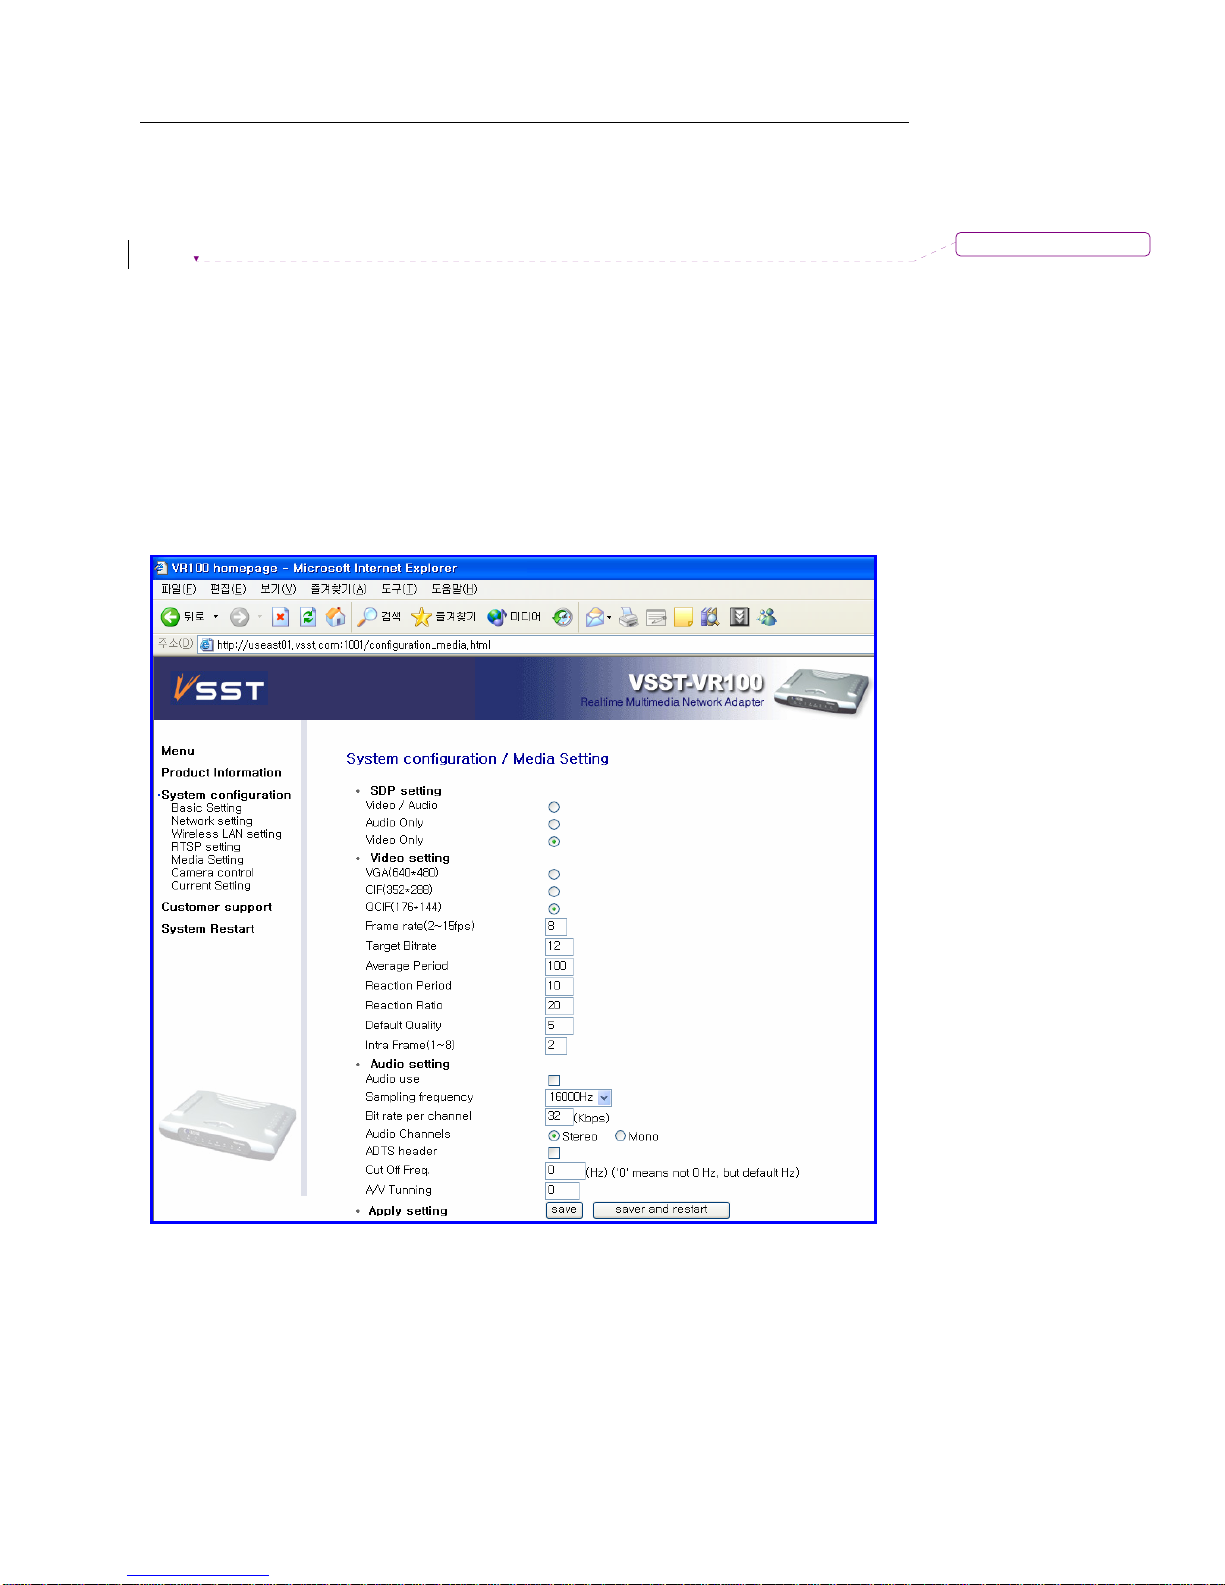
3-8. VR-110A Media setting
From the menu in the left, select Media setting, and fill in the information
Select “save and restart” button to reset VR-110A automatically and apply changed setting
z Frame rate : fps-frame per second
z Image quality : Decides quality of image. Lower value gives higher quality, but requires more
bandwidth.
z Image Bandwidth : Bandwidth for Video Stream
z Standard Frame : Decide how many frame to send as standard
z Audio on : Click here to use AAC audio.
z Sampling frequency : Decide audio sampling frequency. Determine audio quality
z Bit rate per channel : Decide transmission rate per audio channel. Determine audio quality
z Audio channel: Audio option for Stereo and Mono
z ADTS header option : for compatibility, you can select to use ADTS header or not.
삭제됨:
Page 15
151515 - 15 - - 15 -
15
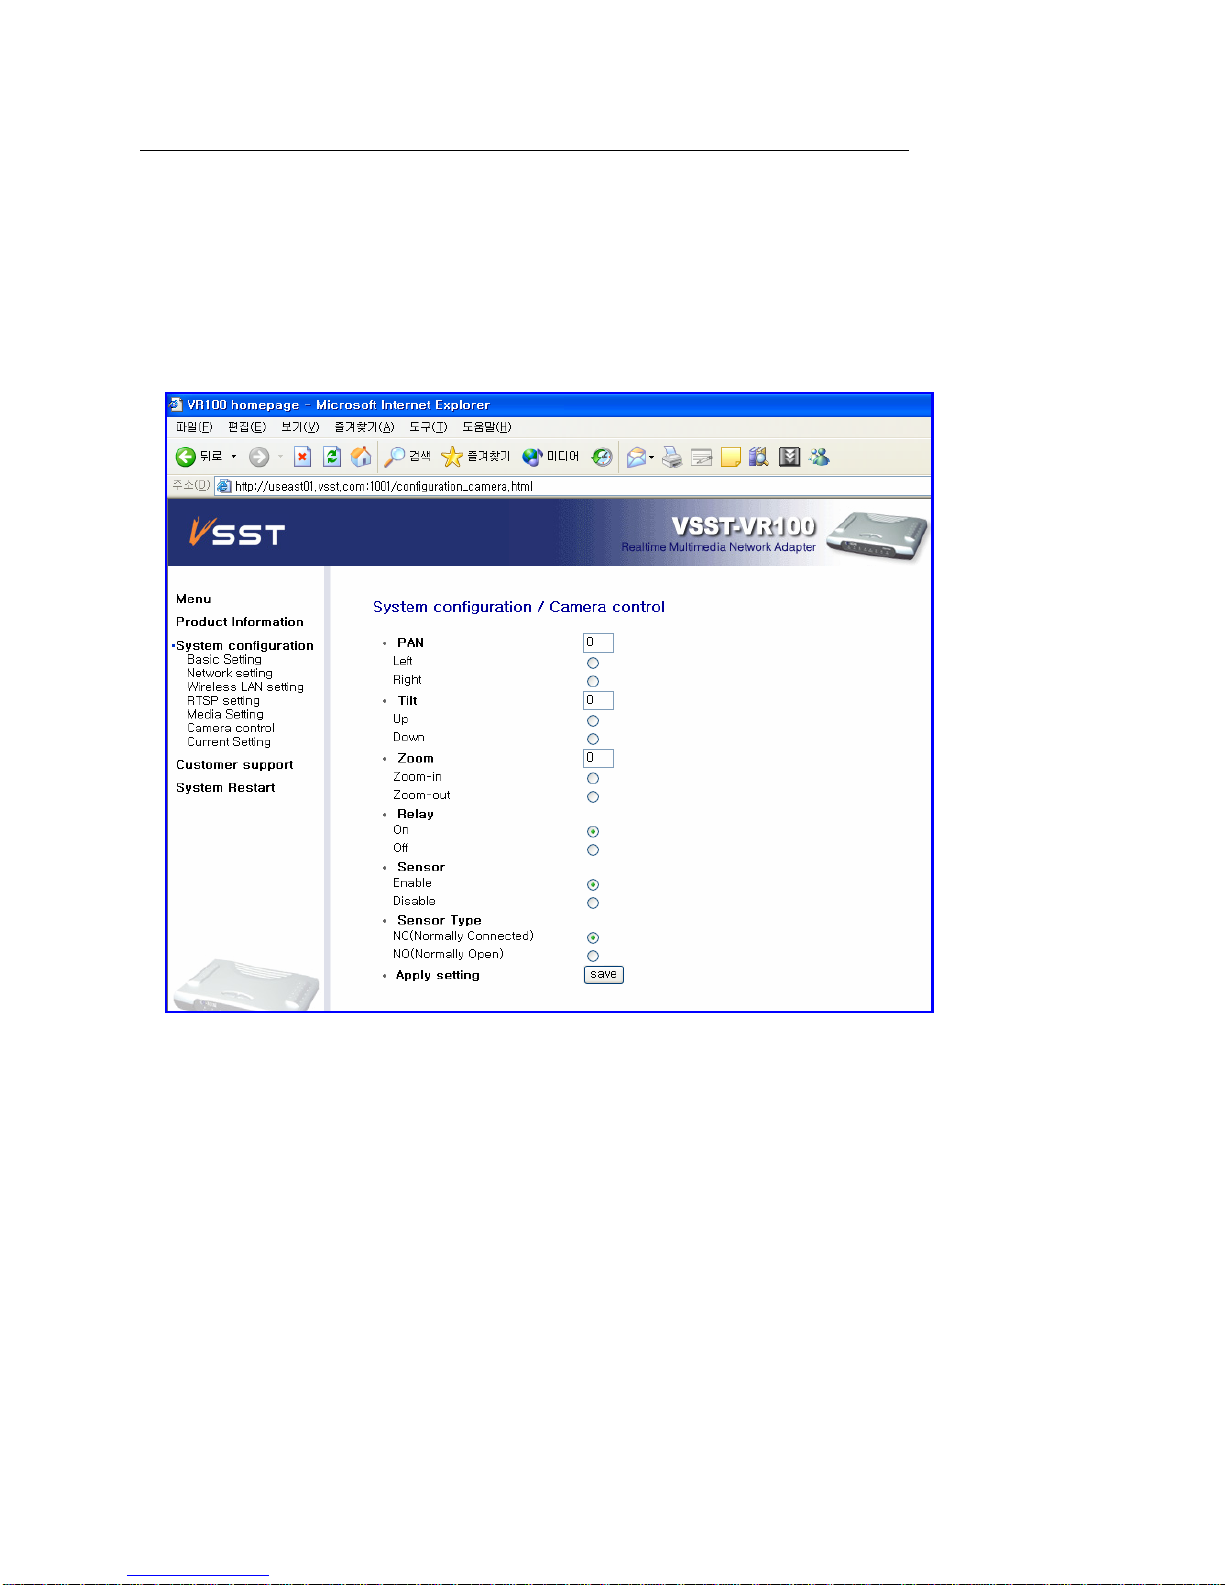
3-9. VR-110A Camera setting
From the menu in the left, select camera setting, and fill in the information
Select “save and restart” button to reset VR-110A automatically and apply changed setting
z PAN value can be in the range of 0-350. Tilt value can be in the range of 0-90 and Zoom value can
be in the range of 1-230
z Choose on/off for relay
z Choose enable / disable for sensor
z Sensor type can be either NC(normally connected) or NO(Normally Open)
Page 16
161616 - 16 - - 16 -
16
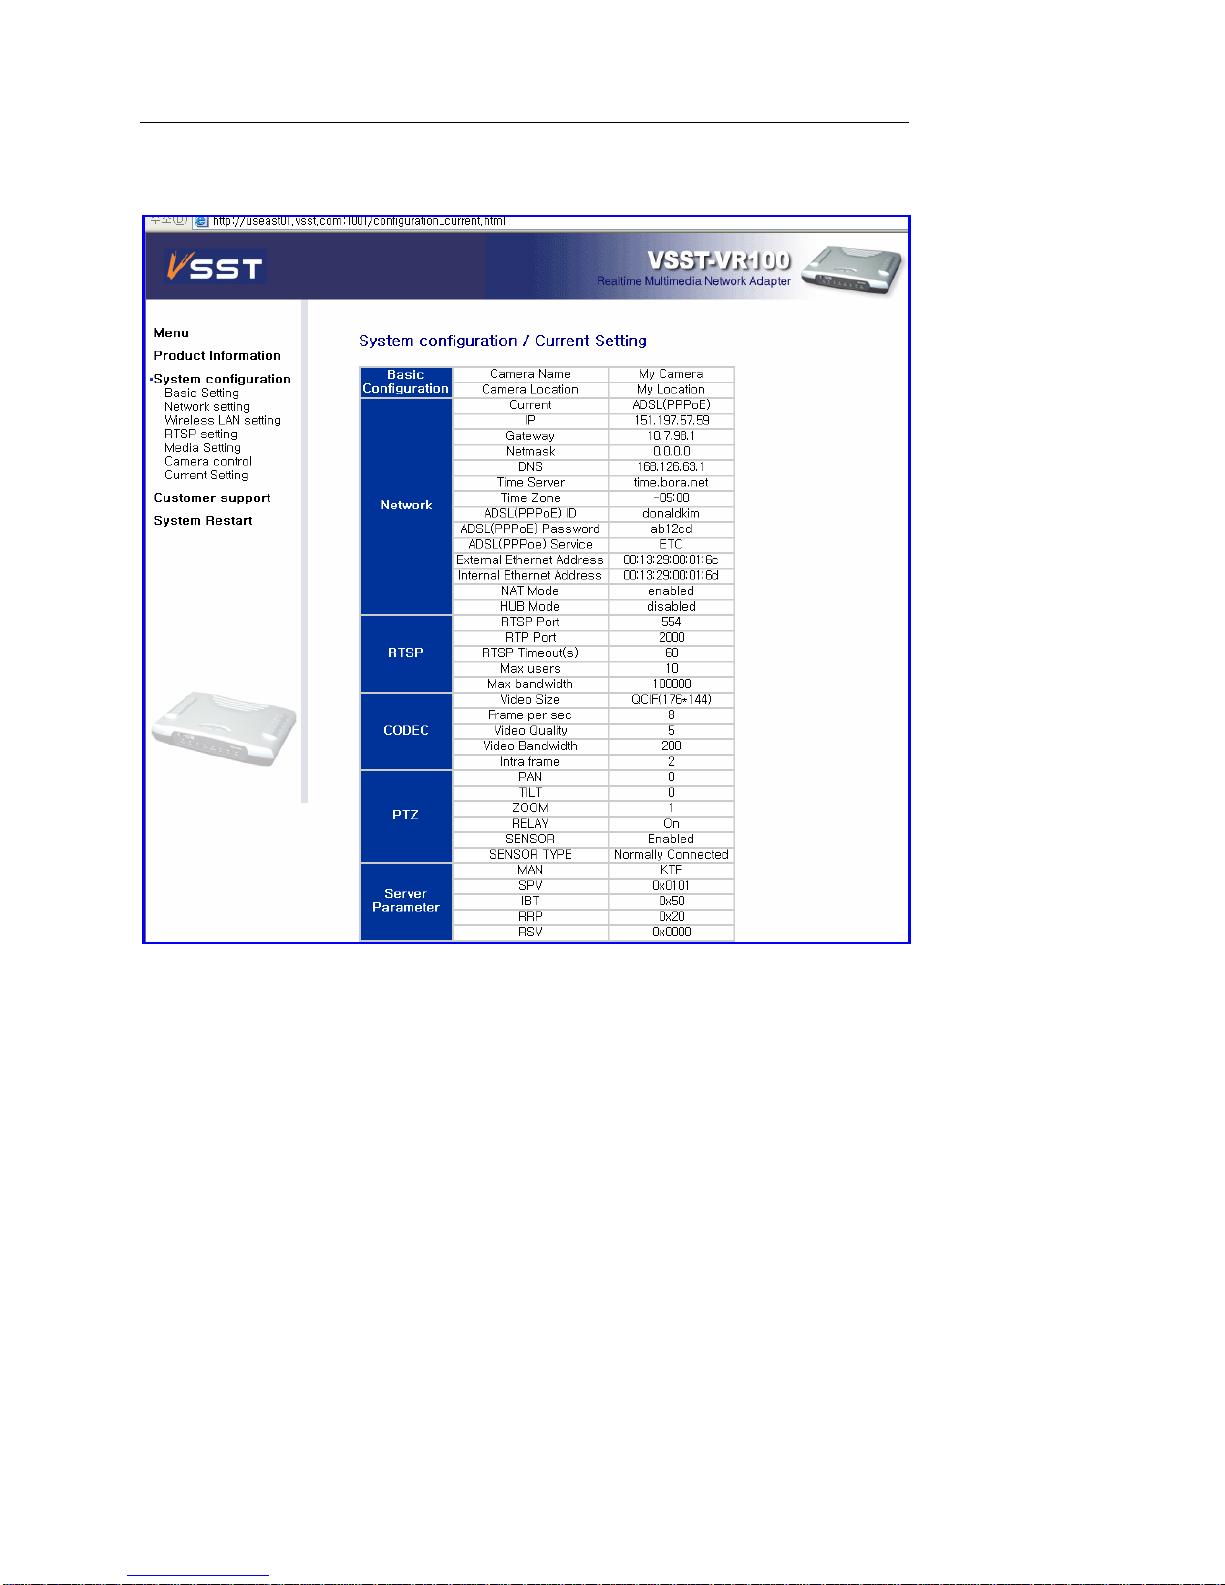
3-10. VR-110A Current Setting
VR-110A’s current value and setting can be viewed by selecting “Current Setting”
Page 17
171717 - 17 - - 17 -
17
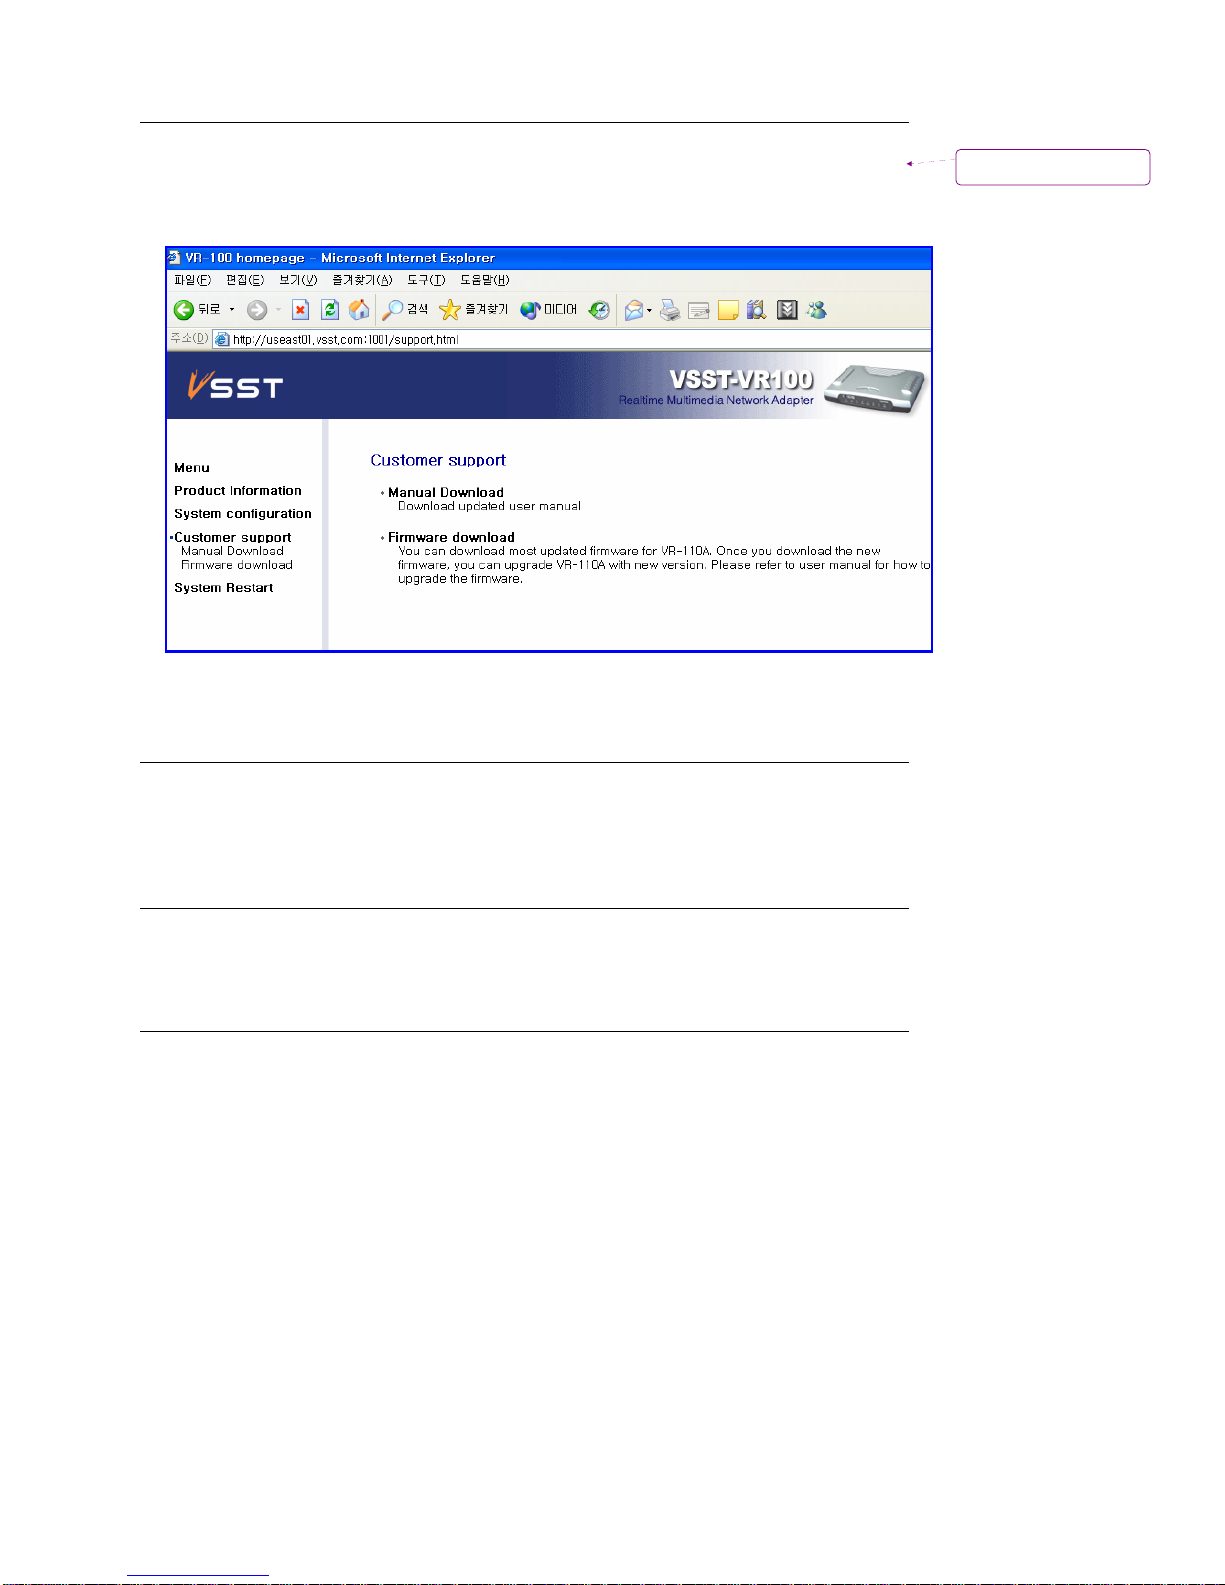
3-11. VR-110A Customer Support
Manual Download : Download online Manual
Firmware download : download updated firmware
3-12. Advanced setting
When connecting VR-110A in a single internet line, set up your system in the ord er of Internet line >
Modem > VR-110A > PC
System diagram – No IP router
System diagram – Using IP router
- When using IP router, set up your system in the order of Internet line > modem > Router> PC and VR-110A
- VR-11A can be considered as a client, and by having DMZ setting for VR-110A, you can access from
external network with public IP address. Internally, you can access through private IP.
서식 있음: 글머리 기호 및
번호 매기기
Page 18

181818 - 18 - - 18 -
18
Chapter 4 MediaWings setup
4-1. MediaWings Setting
In the system setting(F2 key), check open URL for default
Replay track must be set on Video replay
4-1. MediaWings Setting
1. start Mediawings player
2. In the play screen, click right mouse button, then select open video
3. type in the url address (ex : rtsp://192.168.120.1/)
4. You can check the IP address in current setting of VR-110A set up
5. play ok to start playing
6. Press record button to select the folder that you would like to store
Page 19

191919 - 19 - - 19 -
19
Chapter 5 VR-110A advanced setup
5-1. Firewall / IP router Setting
[TCP]
1001 : Port that connects to VR-110A
Ex) http://192.168.1201.:1001 / when you type in IP address of Vr-110A, you will go to setting page.(IP
and setting screen, and no log-in required)
554 : RTSP Port(Real Time Streaming Port) This is player only port for video play. For example,
quicktime player uses example below to run video replay.
Ex) access the IP address RTSP://192.168.1201.:554/
21 : this port is used to upgrade firmware or upload file in Dos mode with FTP.
[UDP]
2000 : port that does initial socket opening
2001 : This port checks on the connection continuously by sending data periodically.
5-2. Firmware Upgrade
When VR-110A is connected normally to the network, firmware can be upgraded with FTP. This method will
update in high speed, but can be used only when the system is normal, and connected to the network.
The screenshot below example of firmware upgrade where IP address is 192.168.0.36 and file name is “VR110A.fls” When connecting with FTP, user name is ‘admin’ and password is same as password of VR110A(4 digit number). The default password is ‘0000’
)
C:\> ftp 192.168.0.36
Connected to 192.168.0.36.
220 Precise/RTCS FTP Ready
User (192.168.0.36:(none)): admin
331 Password required for admin
Password:
230 Logged in
ftp> bin
200 Type OK
ftp> put VR-110A . fls flash
Page 20

202020 - 20 - - 20 -
20
200 Port command okay
150 Opening data connection for STOR (192.168.0.14,1161)
226 File received OK – 1053136 bytes in 10.640 sec
ftp: 1053136 bytes sent in 10.55Seconds 99.82Kbytes/sec.
³ Wanring : Do not change setting or turn off the power of VR-110A during firmware upgrade
³ It takes about 1-2 min to finish upgrade. After upgrade,. VR-110A will restart automatically.
Page 21

212121 - 21 - - 21 -
21
Product Warranty
According to customer protection policy, VSST guarantees the product as followed :
Warranty Period : 1 year after the purchase
Product Multimedia Network Adaptor Model VR-110A
Distributor VSST Manufacturer VSST
Date of
Purchase
Serial No.
1. Free A/S
As long as the A/S is within guarantee period, and was used in normal usages, we will repair or exchange
for free.
2. Paid A/S
■ If the guarantee period is over
■ If user modified or repaired on his/her own
■ When used wrong power connection
■ Natural disaster, fire, flood, or thunder caused malfunction or damage of product
■ When parts wear out
Page 22
Page 23
222222 - 22 - - 22 -
22
 Loading...