

Page 1

THEFAMILYCLIP
TOOL TIPS
for the essential clipping kit
for professional family hair cuts
1
VS704A
Page 2

HEY YOU!
TAKE A BOW FINE SIR.
THINGS ARE LOOKING UP
& YOU’VE JUST MADE A
QUALITY PURCHASE
WITH THIS NEW GROOMING TOOL.
WE KNOW YOU’VE GOT THIS, BUT BEFORE YOU JUMP INTO
USING YOUR NEW SIDE KICK, HERE’S A FEW TIPS & TRICKS
TO KNOW BEFORE LETTING YOUR CREATIVITY RUN LOOSE.
HIT UP VSFORMEN.COM.AU FOR MORE GROOMING & INSPIRATION.
2
Page 3

THE FAMILY CLIP / TOOL TIPS
3
Page 4

THE FAMILY CLIP / TOOL TIPS
IMPORTANT SAFETY
INSTRUCTIONS
When using electrical appliances, especially when children are present, basic
safety instructions should always be foll owed, including the following:
Polythene bags over product or package may be dangerous. To avoid danger of
suffocation, keep this wrapper away from babies and children. This bag is not
a toy.
DANGER: When the unit is used in a bathroom, unplug it after use
since the proximity of water presents a hazard even when the
appliance is switched off
WARNING: Do not use or leave the adaptor in a position where it can become wet
or there is a danger of it falling into a basin or other ves sels containing water.
Keep the applianc e dry, unless it otherwise specified. Do not use this appliance
in or near b athtubs, showers, basins or other vessels containing w ater.
- Do not immerse appliance in water or other liquids.
- Do not reach for an appliance that has fallen into water. Unplug immediately.
- Take care to avoid contact bet ween the moving blades of the unit and the
skin, paying par ticular att ention to the face, neck and hands.
- This appliance is not intended for use by persons (including children) with
reduced physical, sensory or mental capabilities, or lack of experience
and knowledge, unless they have been given supervision or instruction
concerning use o f the appliance by a person responsible for their safety.
- Children should b e superv ised to ensure that they do not play with the
appliance.
4
Page 5

THE FAMILY CLIP / TOOL TIPS
IMPORTANT: Alway s unplug the applianc e when not in use or before cleaning.
Do not leave unattended when plugged in or switched on. Do not place on any
heat sensitive surface.
- Do not use any attachments o ther than those supplied by Conair Australia
Pty Ltd.
- Use this applianc e only for its intended use a s described within this
instruction booklet.
- Always unplug the appliance when fully charged.
- This appliance is not intended for commercial use.
- Never drop or inser t any object into an opening.
- Do not use the appliance with damaged or broken att achment comb s or with
any teeth missing from the bl ades, as injur y may occur.
- Do not place on any surface while it is operating.
- Keep the cord away f rom heated surfaces
- Never t wist or pull on the power cord.
- Do not use an extension cord with this appliance.
- After use do not wr ap the cord around the appliance as in time this may c ause
the cord to fracture. Coil cord loosely by the side of the appliance in storage.
- Do not use outdoor s or operate where aerosol (spray) products are being
used or where oxygen is being administered.
- Do not use the appliance if it is damaged. In the event of damage, discontinue
use immediately and contac t your dealer for instructions on returning it for
examination or exchange. If t he supply cord is damaged, it must be replac ed
by the manufacturer, its service agent or similarly qualified person in order
to avoid a hazard.
- Always ensure that the voltage to be used corresponds to the voltage marked
on the unit.
5
Page 6

THE FAMILY CLIP / TOOL TIPS
THE FAMILY CLIP
BRAVO. YOU’VE MADE A QUALITY PURCHASE.
The Family Clip is the essential clipping kit for professional
family hair cuts.
1
3
2
1. Diamond sharpened blades
2. Cordless use
3. Turbo boost button
4. 39mm clipping blade
5. 8 cutt ing comb guide s
- grade s #1 – 8 (3mm
6
4
5
10 9
to 25mm) f or cuttin g,
shaping & fading
6. Left + r ight ear tap er
cutt ing comb guid es for
the finishing touches
aroun d the ears
7
8
6
11
7. Barber comb
8. Scissors
9. Cleaning brush
10. Oil
11. Drawstring storage pouch
Page 7

THE FAMILY CLIP / TOOL TIPS
PREPPING YOUR
NEW TOOL
CHARGING
The Family Clip clipper is so easy to use. But before you start using your new
tool, you must take the time to charge it overnight f or 16 hours before its first
use. Your new tool comes with a small amount of charge, but the initial charge
will ensure your new tool will have optimum power per formance to give you
smooth fast cutting, every time.
- Before using for the first time, fully charge your new tool continuously for
16 hours.
- Maximum battery capacity will only be reached after 3 charging &
discharging cycles.
- Ensure your new tool is switched off.
- Inser t the small plug on the charging adaptor into the socket on the bottom
of your new tool.
- Plug the charging adaptor into a suitable mains power socket and switch on.
- The red charging L ED indicator light on your new tool will remain on when
correctly connected to the mains power.
- A full charge will supply 30 minu tes cordless runtime.
- To maintain optimum capacity of the rechargeable batter y, it is highly
recommended to f ully discharge & then recharge your tool for 16 hours every
6 months.
- Never charge the clipper for periods longer than 24 consecutive hours and
only use the charger provided.
7
Page 8

THE FAMILY CLIP / TOOL TIPS
OILING THE BLADES
To get the sharpest, most precise cut, it is highly recommended to oil the blades
before each use.
Using the oil supplied with your new tool, unscrew the cap & cut o ff the ver y end
of the plastic tube with a pair of scissors to release the oil .
Switch your tool on, gently squeeze the oil tube & apply 2 drops of oil onto the
blades. Leave the tool on for a further few seconds to allow the oil to thoroughly
spread across each of the bl ades. Switch off the tool & remove any excess oil by
gently dabbing with a cloth.
8
Page 9

HOW TO USE
THE FAMILY CLIP
BEFORE USING
• Always inspect the clipper blades for noticeable signs of damage.
• Ensure the clipper blades are well oiled before using.
• Always inspect the clipper blades before use to ensure they are free from
hair, debr is etc.
• Ensure the clipper is sufficiently charged before use.
• For best performanc e use on clean, dry hair that has been combed until
tangle-free.
THE FAMILY CLIP / TOOL TIPS
9
Page 10

THE FAMILY CLIP / TOOL TIPS
EASY CLIPPING, YOUR WAY
The Family Clip features 8 cutting comb guides from grades #1 – 8 comb guides
(3mm to 25mm) for cutting, shaping & fading and left + right ear taper cutting
comb guides for the finishing touches around the ears.
The comb guides are marked with the following grade number :
Cutting Length Grade
3mm #1
6mm #2
9.5mm #3
13mm #4
16mm #5
19mm #6
22mm #7
25mm #8
Ear taper Left
Ear taper Right
• To attach a comb guide, ensure the appliance is switched off. Position the
comb guide over the f ront of the clipper bl ade and slide over the head. Push
and click the rear of the comb guide into position.
• To remove the comb guide, ensur e the appliance is switched of f. Push the tab
on the rear of the comb guide away f rom the head and lift off.
• To attach the ear comb guides, choose either the left or right guide depending
on which ear you are cutting above. Angle the clipper and gently stroke
around the ear towards the back of the neck.
10
Page 11

THE FAMILY CLIP / TOOL TIPS
CLIPPING TIPS
Hit up ww w.vsformen.com.au for more grooming tips , inspiration & guidance on
how to get the best use of your clipper.
CREATING AN ALL-OVER EVEN CUT
1. Ensure the clipper is switched off.
2. Attach the desired cutting comb guide as required.
3. Switch the clipper on – the blades will start to move.
4. Start cutting at the nape of the neck, holding the clipper with the teeth of
the clipper point ing upwards, ensuring that the comb guide is resting flat
against the head.
5. Slowly move the clipper upwards and outwards through the hair towards your
crown, against the direction of the hair growth. The comb guide will help to
lift the hair and the blades will cut the hair to the length as shown on the
comb guide.
6. Once the desired length is achieved at the back of the hair, start clipping the
top and sides.
7. Hold the clipper to the front of your hair with the teeth pointing towards
the back of your head, and move the clipper towards your crown. Repeat as
necessary, moving in rows from the front and the sides of your head to the
back.
8. For finishing around the ears, attach the required ear taper comb guide and
trim down any longer hairs around the ears.
11
Page 12

THE FAMILY CLIP / TOOL TIPS
CREATING A SHORT BACK & SIDES LOOK, WITH
LENGTH ON THE TOP
1. Ensure the clipper is switched off.
2. Attach the desired cutting comb guide as required.
3. Switch the clipper on – the blades will start to move.
4. Hold the clipper to the front of your hair with the teeth pointing towards
the back of your head and move the clipper towards your crown. Repeat as
necessary, moving in rows from the front and the sides of your head to the
back.
5. If you then wish to take the back and sides of your hair to a shorter length,
switch off the appliance and attac h a shorter comb guide.
6. Start cutting at the nape of the neck, and with the comb guide flat against
the head, move the clipper upwards and outwards over the area you want to
take shorter.
7. Rep eat on the sides of the hair, starting with the teeth of the clipper pointing
upwards and comb guide flat against the area above the ear, again moving
the clipper upwar ds and outwards.
12
Page 13

THE FAMILY CLIP / TOOL TIPS
OUTLINING
1. To tidy up the edges around your cut e.g. neckline and sideburns, detach the
comb guides.
2. Hold the clipper upside down, so the front of the clipper is facing towards
your head.
3. Hold the clipper straight on your sideburns or neckline and move the clipper
downwards. This will give you a clean, smooth finish.
13
Page 14
THE FAMILY CLIP / TOOL TIPS
CLIPPER CLEANING &
MAINTENANCE
Because the clipper blades are precision made for a very special use, they
should always be handled with care. To ensure long-lasting performance of your
clipper, it is impor tant to clean the blades + the comb guides af ter every use.
After each use, clean the clipper blade set as follows:
1. Switch the clipper off or unplug from the power outlet if it is c harging.
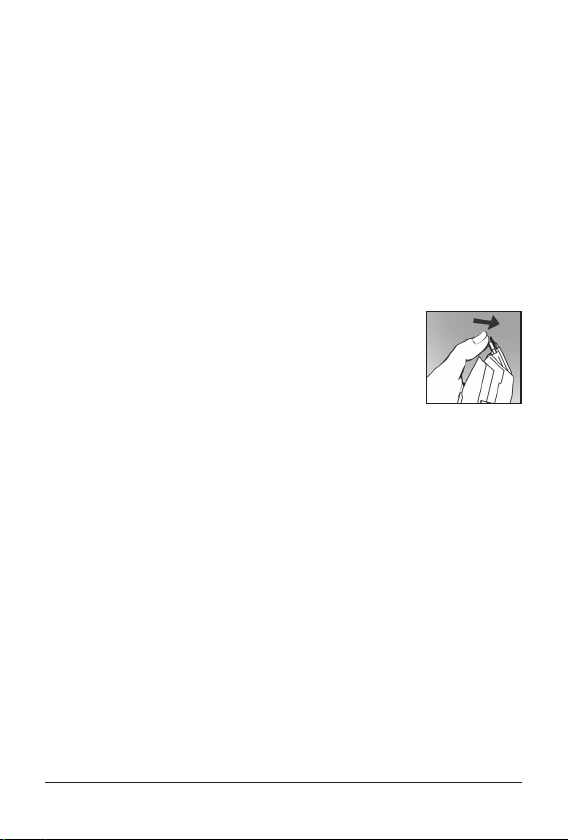
2. Remove the blade set from the clipper as shown below (Fig 1).
3. Using the cleaning brush, gently brush and blow any hairs from the
blade set and head of your clipper.
4. Replace the blade set after cleaning.
5. Do not disassemble the blades for cleaning.
6. After replacing the blade set, always remember to oil the blade of your
clipper.
IMPORTANT – Never place the blades under running water, as this can ruin
the cutting performance of t he blades. Always use the cleaning b rush to
clean the clipper head and blades.
Fig. 1
14
Page 15

THE FAMILY CLIP / TOOL TIPS
BATTERY DISPOSAL
The Family clip contains a Nickel Metal-Hydride battery. To protect the
environment, the appliance must be disposed of safely at the end of its useful life.
Pleas e take the appliance t o a recycling centr e, where the internal
rechargeable battery should be removed by a professional and
recycled separately.
NI-MH
For more information about the recycling of electrical and battery operated
appliances, please contact your l ocal council office or your household waste
disposal service.
15
Page 16

THE FAMILY CLIP / TOOL TIPS
LIMITED TWO
YEAR WARRANTY
Our goods come with guarantees that cannot be excluded under the Australian
Consumer Law. You are entitle d to a replacement or refund for a major failure
and for compensa tion for any other rea sonably foreseeable loss or damage. You
are also entitled to have the goods repaired or replaced if t he goods fail to be
of acceptable quality and the failure does not amount to a major failure. In New
Zealand our goods come with a guarante e that cannot be excluded under the
Consumer Guarantee Act 1993.
Conair Australia Pty Ltd. will repair or replace (at our option) your appliance free
of charge for twenty-four months from the date of purchase if the appliance is
defective in workmanship or materials.
This warranty is an additional benefit and does not affect your legal right s. To
obtain servic e under this warranty, please r ead the War ranty Leaflet included or
contact Conair Customer Service at [email protected].
TO MAKE A WARRANTY CLAIM YOU MUST
RETAIN YOUR PROOF OF PURCHASE.
16
Page 17

THE FAMILY CLIP / TOOL TIPS
17
Page 18

THE FAMILY CLIP / TOOL TIPS
18
Page 19

Vidal Sassoon and relate d logos are trademarks of
The Procter & Gamble Company used under licens e by Conair.
©2017 Conair Australia Pty. Ltd.
Suite 101, 18 Rodborough Rd
Frenchs Forest NSW 2086
Australia
Conair New Zealand Limited
PO BOX 251159
Pakuranga, Auckland 1706
New Zealand
CONTACT US
For advice & tips on your new VS product email us on:
[email protected]
CUSTOMER SERVICE
Australia: 1800 650 263
New Zealand: 0800 266 247
Visit VSFORMEN.COM.AU for grooming tips & inspiration.
Page 20

THE FAMILY CLIP / TOOL TIPS
YOU WERE
BORN TO
BE REAL,
NOT TO BE
PERFECT
20
IB-13/030B
 Loading...