

Page 1
Mini Electronic White Board
User’s manual
Be sure to carefully read this user’s manual first for the proper use of the
Mini electronic board presenter and keep it for future reference.
Page 2

Tables of contents
Features··························································································· 2
I. Operation system ·········································································· 2
II. Part description ············································································ 3
III. Installation ··················································································· 5
IV. Operation manual ······································································· 5
V. Battery installation ··············································· ··· ··· ···· ··· ··· ··· ···· · 9
VI. Technology parameter ······························································ 10
VII. Attention ·················································································· 11
1
Page 3

Features:
z The system consists of a mini white board remote, a touchpen, a
receiver and a program.
z Combining state of the art 2.4GHz radio frequency technology,
control distance up to 8m, an ideal partner for the projector and the
PC.
z Up to date electromagnetism technology, orientation precisely by 4
calibration points. Please be sure to set them before using.
z The Touch pen is built-in the mini white board, easy to carry.
z Multicolor handwritings are available.
z Effective tablet area up to 14cm×7.8cm.
z Remark and label on the screen can be saved; the operation steps
can be record.
z The white board is also a touchscreen. Touch and control the mouse
pointer by the Touch pen.
z Replace the mouse or coexist with the mouse.
z Short response time, computer response to Tablet operations
synchronously.
z Shortcut keys for your easy working.
z
Rechargeable batteries are convenient for use.
I. Operation system
WindowsXP, Win 7
II. Parts description
2
Page 4

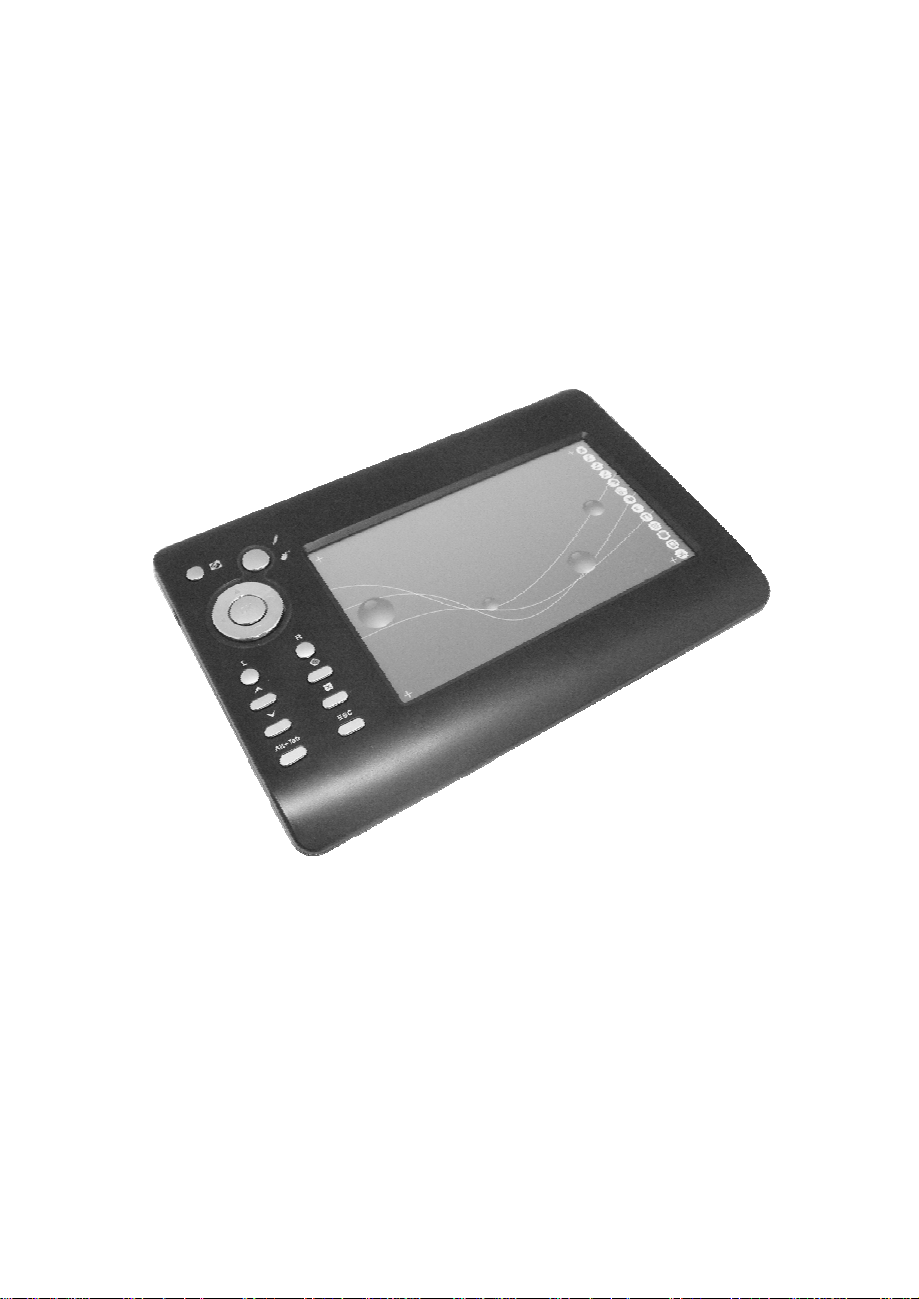
Mini white board front view
USB receiver
LED
KEY FUNCTION Shortcut key
Desktop +D
Colorized pen/Screen mode
OK Enter Enter
Touch pen
3
Page 5

UP arrow /Red pen
Left arrow/Black pen
Right arrow/Blue pen
Down arrow/Green pen
L Mouse left button
R Mouse right button/Open brush
pencil/eraser/magnifier/focus
lamp
menu bar
Pre. Page/Line weight thicker/
Enlarge eraser size
/magnification /focus lamp size
Next page/Line weight thinner/
Diminish eraser
size/magnification /focus lamp
size
Clear handwriting
Close current window Alt+F4
Alt+Tab Switch current windows Alt+Tab
Page Up
Page Down
ESC Esc Esc
III.Installation
1. install the program
Take the installation CD out from the product package and insert it
into the CD-ROM. Open the CD and double click the “TopA White
4
Page 6

Board mini_setup_V1.1.0.exe” to start installation.
Complete the installation, and view the icon of th e program on the
desktop.
2. Install the receiver
Plug the USB receiver to the available USB port. And the Program
will find the new hardware and pop-up the Add Hardware Wizard
dialog box. Follow the wizard, find the driver, and finish the
installation.
After the connection, move the mouse pointer to the icon of the Mini
Electronic White Board, the program will present “ ”.
NOTE!!
① The driver is at the folder which you have installed the program to.
② The detailed operations refer to the installation guide(”TopA White
Board mini_Ins t al l ati o n gui de_V1.1.0.doc”).
IV. Operation manual
1. Start mini board system
Please refer to the installation guide.
2. Screen Calibration
User have to set the touchpad before use it. To open short-cut
Menu, please click right mouse button on the mini electronic white
board icon on the task bar in the lower screen. And select “Screen
Calibration”. Click the coordinate by touch pen point by point to
calibrate coordinate from the PC to the mini white board.
5
Page 7

3. Remote control
The touch control screen is absolutely convenient to do any interactive
operations, and operate the applications on PC using the touch pen.
4. Switch mode
Press and hold the “ ” button on the mini white board, user
can remark or label on the white board via the touch pen by pressing
the “L” key and move the touch pen. Real-time data will be
transmitted t o and displayed on the computer screen. Press and hold
the “
moment, user could run other applications and move the mouse
pointer on desktop.
Note! When you press the “
white board touch screen with the touch pen or other objects.
” button again, will switch into the screen mode, at this
” button, don’t touch the mini
5. Clear
Press “ ” button on the white board to clear the text we write on the
PC screen. As well as, you can press “E” button on the keyboard to
clear the handwritten on the touch screen.
6. Mouse right/left key
Press the “R” or “L” key on the white board, just like clicking the
mouse right or left key.
6
Page 8

As well as ,when you use the brush pencil, or eraser, or
magnifier or focus lamp, press the “R” button, you can open
corresponding menu bar to set up some parameters.
At the same time press the “L”button and move the touch pen,
user could draw lines, erase handwritten with the eraser, move
the magnifier or focus lamp in corresponding func tion mode.
7. Shortcut keys
① Press “ ” key, show desktop.
② Press “
keyboard.
③ The “
arrows.
But, when you use the brush pencil, you can
the four direction buttons to change pen’s color.
Press “
Press “
Press “
Press “
④ Press “
keyboard.
However, when you use
” key, just like press the “Enter ”button on the
” , “ ”, “ ”, “ ” ke ys, equivalent to the four directions
”button is on behalf of opening the red pen.
”button is on behalf of opening the green pen.
”button is on behalf of opening the black pen.
”button is on behalf of opening the blue pen.
” or “ ”, work as page up or page down on the
the brush pencil, or eraser, or
magnifier or focus lamp, press the “
respectively press
”button, you could
make the line weight thicker, or enlarge the eraser size,
magnification or focus lamp size. An d press the “
you could make the line weight thinner, or diminish the eraser
7
”button,
Page 9

size, magnification or focus lamp size.
⑤ Press “Alt+Tab” key, could switch the current applications.
⑥ Press “Esc”key, it works as “Esc”button on the keyboard.
⑦ Press “
and “F4” keys on the keyboard at the same time.
⑧ As well as, it supports the pen shortcuts. On the keyboard, press
the “R” button, you can open the red pen; press the “G” button, can
open the green pen; “B” button open the blue pen, “Y” button can
open the yellow pen.
” can close the current window. It works as press “Alt”
8. Presentation function
On the touch pad screen, there is a menu bar, you can do operations
by clicking the icons with the touch pen.
The detailed presentation operations refer to the help file please.
9、Channel setting
Click the icon
Right-click the icon of White board in taskbar
on the desktop to start the White board system.
, select “channel setting” in
shortcut menu
window
press the “OK” and “L” about two seconds on the mini-whiteboard to confirm
the channel, if you see the light is blinking a few, then that is on the frequency
of success.
V. Battery installation
, select the appropriate channel then click “OK”. Then
, pop-up the channel setting
8
Page 10

z Push and remove the battery cover located on the bottom of the
device.
z Insert batteries into the battery holder and make sure that the
Positive (+) and Negative (-) ends of each battery match the polarity
indicators inside the battery housing.
z Push the battery cover back into position until it “clicks” firmly into
place.
1. A wrong battery placement may cause a battery
overheat.
Note:
● Insert recharging batteries then plug the USB cable to an available
PC’s USB port a nd the rech arg ing por t of t he White boar d. Make sur e
your PC’s power is on, and then the recharging process begins.
z For a supreme battery performance. It is a MUST to fully charge
the rechargeable batteries contained in this package at the
first-time use.
z Please make sure the batteries used for recharging are “recharging
batteries”.
z Keep all batteries out of reach of children.
z To have the batteries with a regular check and replace new batteries
9
Page 11

if not use for a long time.
z Remove the batteries from the transmitter if the device is not to be
used for a long time.
z Do not mix different types of batteries in the mouse.
VI.Technology parameter
Mini white board
Control distance 8m
Frequency range 2.417~2.468 GHz
Channel number 18
Frequency interval 3M
Transmitting power 0 dBm
Tablet area 14cm×7.8cm
battery 2 x AAA nickel and metal
hydride electric batteries.
Work voltage 3.0V
Touch pen length 123.5 MM
dimension 21.5×14.2×1.7CM
Weight(without
battery)
Receiver
Operation system Windows XP, Win 7
sensitivity -90 dBm
USB Ve rsion USB2.0, compatible USB1.1
Working voltage USB electricity supply (4.5-5.5V)
Dimension 73×26×14mm
Weight 16g
206g
10
Page 12

VII. Attenti on
z Keep the presenter away from young children.
z Any attempt to disassemble, adjust or repair the presenter may result
in exposure to laser light or other safety hazards.
z Do not place heavy objects on the mini white board to avoid crushing.
z Do not use ball pens or other sharp instruments to scratch on the
touch screen.
Warning:
Any Changes or modifications not expressly approved by the
party responsible for compliance could void the user’s authority to
operate the equipment.
This device complies with part 15 of the FCC Rules.
Operation is subject to the following two conditions: (1) This
device may not cause harmful interference, and (2) this device
must accept any interference received, including interference that
may cause undesired operation.
Note: This e quipment has been tested an d found to comply with the
limits for a Class B digital device, pursuant to part 15 of the FCC Rules.
These limits are designed to provide reasonable protection against
harmful interference in a residential installation. This equipment
generates uses and can radiate radio frequency energy and, if not
installed and used in accordance with the instructions, may cause
harmful interference to radio communications. However, there is no
guarantee that interference will not occur in a particular installation. If
11
Page 13

this equipment does cause harmful interference to radio or television
reception, which can be determined by turning the equipment off and on,
the user is encouraged to try to correct the interference by one or more
of the following measures:
—Reorient or relocate the receiving antenna.
—Increase the separation between the equipment and receiver.
—Connect the equipment into an outlet on a circuit different from that to
which the receiver is connected.
—Consult the dealer or an experienced radio/TV technician for help.
12
 Loading...