


Four Post Surface Mounted Lift
Capacity 14,000 lbs. (6,350 kg.)
(7,000 lbs. (3,175 kg.) per axle)
TABLE OF CONTENTS:
Owner/Employer Responsibilities ...................................................... 2
Safety Instructions ............................................................................... 3
Operating Instructions ......................................................................... 4
Maintenance Instructions ................................................................... 5
Trouble Shooting ................................................................................... 8
Lift Lockout/Tagout Procedure ........................................................... 10
Operating Conditions ............................................................................ 12
LP60032
© July 2017 by Vehicle Service Group. All rights reserved. CO10102
OM60032
Rev. B 7/24/2017

The Owner/Employer:
• The Owner/Employer shall ensure that lift operators are qualified and that they are
trained in the safe use and operation of the lift using the manufacturer’s operating
instructions; ALI/SM 10-1, ALI Lifting it Right safety manual; ALI-ST-10 ALI Safety
Tips card; ANSI/ALI ALOIM-2008, American National Standard for Automotive LiftsSafety Requirements for Operation, Inspection and Maintenance; ALI/WL Series, ALI
Uniform Warning Label Decals/Placards; and in the case of frame engaging lifts, ALI/
LP-GUIDE, Vehicle Lifting Points/Quick Reference Guide for Frame Engaging Lifts.
• The Owner/Employer shall establish procedures to periodically inspect the lift in
accordance with the lift manufacturer’s instructions or ANSI/ALI ALOIM-2008,
American National Standard for Automotive Lifts-Safety Requirements for Operation,
Inspection and Maintenance; and The Employer Shall ensure that lift inspectors are
qualified and that they are adequately trained in the inspection of the lift.
• The Owner/Employer shall establish procedures to periodically maintain the lift
in accordance with the lift manufacturer’s instructions or ANSI/ALI ALOIM-2008,
American National Standard for Automotive Lifts-Safety Requirements for Operation,
Inspection and Maintenance; and The Employer Shall ensure that lift maintenance
personnel are qualified and that they are adequately trained in the maintenance of
the lift.
• The Owner/Employer shall maintain the periodic inspection and maintenance records recommended by the manufacturer or ANSI/ALI ALOIM-2008, American National Standard for Automotive Lifts-Safety Requirements for Operation, Inspection
and Maintenance.
• The Owner/Employer shall display the lift manufacturer’s operating instructions; ALI/
SM 10-1, ALI Lifting it Right safety manual; ALI-ST-10 ALI Safety Tips card; ANSI/ALI
ALOIM-2008, American National Standard for Automotive Lifts-Safety Requirements
for Operation, Inspection and Maintenance; and in the case of frame engaging lifts,
ALI/LP-GUIDE, Vehicle Lifting Points/Quick Reference Guide for Frame Engaging Lifts;
in a conspicuous location in the lift area convenient to the operator.
• The Owner/Employer shall provide necessary lockout/tagout means for energy
sources per ANSI Z244.1-1982 (R1993), Safety Requirements for the Lockout/Tagout
of Energy Sources, before beginning any lift repairs.
• The Owner/Employer shall not modify the lift in any manner without the prior written
consent of the manufacturer.
2

SAFETY INSTRUCTIONS
• Never allow unauthorized or untrained persons to operate lift or rolling jacks.
• Shop Policy should prohibit customers or non-authorized persons from being in shop area while lift is in use.
• Thoroughly train all employees in the use and care of lift and rolling jacks.
• Be Sure no one is standing in front or behind lift while vehicle is being driven onto or backed off the lift.
• DO NOT allow rear tires or portion of vehicle to interfere with ramp/chocks.
• Be Sure front wheel stops are in raised position before driving vehicle onto lift.
• Never allow front wheels to strike the front wheel stops.
• DO NOT permit employees or customers on lift when it is either being raised or lowered.
• Always stand clear of lift when raising or lowering and observe “Pinch Points” Warning.
• Never overload lift: capacity of lift is 14,000 lbs. (6,350 kg.) (7,000 lbs. (3,175 kg.) per axle). CAPACITY SHOULD
NOT BE EXCEEDED.
• Always engage parking brake and use the rear wheel chocks to keep the vehicle from rolling freely on the
runways.
• Always lower lift on locks before working on vehicle.
• Keep area around lift clean of tools, debris, grease, and oil.
• Always keep runway clean.
• Replace all caution, warning, or safety related decals on the lift when unable to read or missing.
• For Rolling Jack Safety Instructions see Rolling Jack Installation, Operation and Maintenance Instructions in
the rolling jack box.
• Never use work step while lift is in a raised position.
3
OPERATING INSTRUCTIONS
WARNING
WARNING
Fig. 2 Fig. 3
arning
WARNING
WARNING
To avoid personal injury and/or property dam-
age, permit only trained personnel to operate lift.
After reviewing these instructions, get familiar with lift con-
trols by running the lift through a few cycles before loading
vehicle on lift.
Observe and heed SAFETY and WARNING labels on the lift.
1. Loading: Lift must be fully lowered and no one in service
bay while the vehicle is brought on lift.
2. If lift is equipped with rolling jacks, jacks must be fully
lowered and the rear jack pushed toward center of lift to
provide under car clearance.
Engage runway locks before raising vehicle on
jacks! DO NOT operate lift while jacks are engaged with a
vehicle!
3. Stop vehicle when it contacts the front wheel stops. At all
times, be sure rear wheels are forward of the ramp/chocks
and the ramp/chocks will clear tires when the lift is raised,
Fig. 1. Driver and passengers must exit before raising.
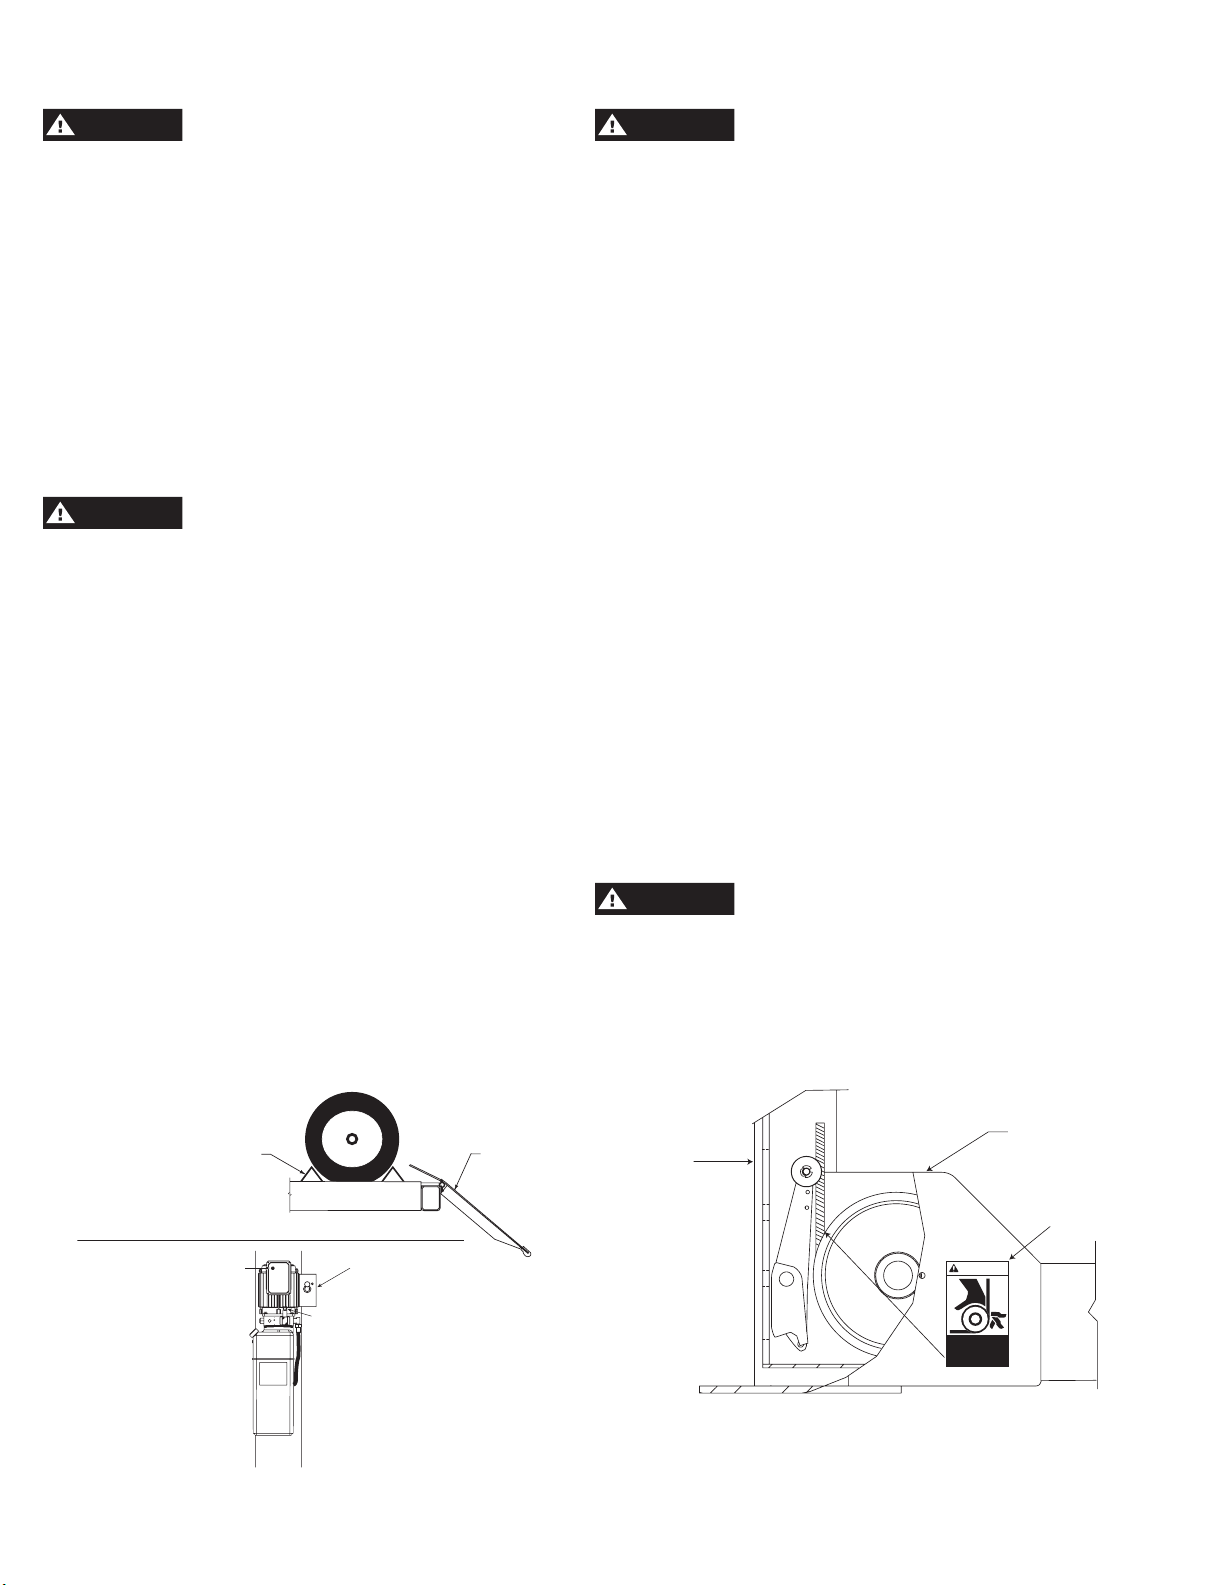
4. Place triangular wheel chocks on each side of one of the
rear tires, Fig. 1.
The runways, ramps and connecting yokes at
each end of lift are designed to rest on the floor when fully
lowered. Observe pinch point warning decals, Fig. 3.
8. Repeat Step 2.
9. To Lower Lift: If lift has been resting on the locking latches,
lift must be raised high enough for all four latches to clear
the latch plate slots inside the columns.
10. Actuate the latch release valve on the power unit column to
disengage all four locking latches, Fig. 2. Hold actuator until
lift has fully lowered.
Note: If actuator on air valve is released, the latches will auto-
matically reset to the engaged position.
11. Push the lowering handle on the power unit to lower lift, Fig.
2. Lowering speed can be controlled by the force applied to
the lowering handle.
12. Observe lift and vehicle to be sure lift is level while being
lowered. If not, STOP repeat Steps 10 through 13.
13. Fully lower lift, remove the triangular wheel chocks and
check to be sure area is clear before removing vehicle from
lift, Fig. 1.
5. To Raise Lift: Push the “RAISE” button on the power unit.
Release button at desired height, Fig. 2.
6. For Rolling Jack Operating Instructions see Rolling Jack
Installation, Operation and Maintenance Instructions in the
rolling jack shipping carton.
7. Before Lowering Lift: Be sure no one is in the lift area and
that all tools, tool trays, etc. have been removed from under
the lift and vehicle.
Triangular
Wheel Stops
Rear Wheel
Chock
Fig. 1
RAISE
Button
Latch Release
Air Button
LOWERING
Handle
14. If your lift is not operating properly, DO NOT use until adjustments or repairs have been made by qualified lift service
personnel.
Keep hands clear of yoke ends while the lift is
being raised or lowered, Fig. 3.
*Maximum operation pressure is:
2500 psi (17237 kPa) for CR14
Yoke End
Column
Hands
Clear
W
CAUTION
Keep hands clear
of yoke ends
during lift
operation.
4

WARNING
MAINTENANCE INSTRUCTION
If you are not completely familiar with automotive lift maintenance procedures, STOP. Contact
factory for instructions.
To Avoid Personal Injury, permit only qualified lift service personnel to perform maintenance on this equipment.
• Periodically: Check all column, lift/runway attaching bolts for tightness.
• Always raise lift when cleaning floor area with solvents and/or cleaning compounds.
• Always keep runways and linkages clean. In salt belt or other corrosive environments, the lift must be
washed down weekly.
• Always: Replace slack cable device springs when replacing new cables.
• Never: Grease rollers or pins on open yoke lifts.
• Daily: Check cables and sheaves for wear. Observe for frayed cable strands. Wipe cables with a rag to detect hard to see small broken cable strands. Replace cables showing any broken strands. Replace worn parts
as required.
• Daily: Inspect front wheel stops and ramp/chocks for damage or excessive wear. Replace as required.
• Daily: Check locking latch operation and reset. Adjust per instructions or repair if required.
• Weekly: Clean foreign debris from rear wheel slip plates and turning radius gauges by blowing out with shop
air. DO NOT GREASE BALL BEARINGS.
• Weekly: Check torque on the column anchor bolts per specifications.
• Monthly: Clean wire rope cables with lift in both lowered and raised position by spraying with penetrating oil
and wiping the cable down.
• Monthly: Check cables for wear. Refer to 4-Post Inspection and Maintenance Guide for wear inspection
information.
• Monthly: Check level of runway. Adjust per instructions.
• Monthly: Lubricate Guide on each turning radius with a dry film lubricant. Clean and lubricate more often as
conditions warrant.
• Semi-Annually: Check fluid level of lift power unit and refill if required. If fluid is required, inspect all fittings,
hoses and seals. Repair as required.
• Semi-Annually: Lubricate front wheel stop and ramp/ chock hinge pins.
IMPORTANT
and after 300 loaded lift cycles.
• For Rolling Jack Maintenance Instructions see Rolling Jack Installation, Operation and Maintenance Instructions in the rolling jack box.
Cable adjustment should be checked by an Authorized Installer after the first 50 loaded lift cycles
5

• Monthly: Filter-Regulator Maintenance - Complete the following steps to ensure optimum Filter Regulator
Lubricator performance.
1. Regulation
a. Make sure dial indicator stays at required air pressure. If dial varies from required air pressure,
adjust the regulator knob until desired pressure is reached. (Pull up on the black knob to unlock
and adjust pressure.)
b. Push the knob back into the locked position once pressure is adjusted appropriately.
2. Drainage
a. Drain water from the clear reservoir (on the left side of the unit) by pushing up on the small metal
nub below the reservoir. Continue pressing on the nub until all fluid is drained from the reservoir.
3. Maintenance
a. Shut off air supply and let off excess air.
b. Unscrew the clear reservoir on the left of the unit by turning it counterclockwise by hand until it is
removed.
c. Check the filter for damage. If the filter needs to be replaced, order part number 95605 from the lift
manufacturer for replacement.
d. The filter may be removed by unscrewing a small Phillips screw from under the filter.
e. Clean the plastic reservoir by wiping it dry with a clean, dry cloth.
f. Make sure the O-ring seal is in the correct position and re-attach the plastic reservoir to the unit.
IMPORTANT
To avoid causing damage to the O-ring seal, do not overtighten the plastic reservoir. Tighten the
reservoir by hand until it is snug.
• Monthly: Lubricator Maintenance - Complete the following steps to ensure optimum Filter Regulator
Lubricator performance.
1. Cleaning
a. Shut off air supply and let off excess air.
b. Unscrew the oil reservoir by hand (on the right side of the unit).
c. Wipe down with a clean, dry cloth.
d. Make sure the O-ring seal is in the correct position and re-attach the oil reservoir to the unit.
IMPORTANT
To avoid causing damage to the O-ring seal, do not overtighten the plastic reservoir. Tighten the
reservoir by hand until it is snug.
2. Adding Oil:
a. Do not remove the clear plastic oil reservoir directly to add oil. Instead, remove the fill plug
(slotted head) on top of the unit by turning counterclockwise.
b. Add ISO-VG32 oil or equivalent lubricants to the oil reservoir through the fill hole.
c. Once the desired amount of oil has been added, replace the fill plug and tighten down with a
screwdriver. To avoid causing damage to the O-ring seal, do not overtighten the fill plug.
6

3. Oil Drop Regulation
a. Adjust the adjustment screw (tall, knurled cap) on top of the unit for desired oil drip rate. Turning
the screw counterclockwise increases the oil drip rate. Turning the screw clockwise decreases
the oil drip rate.
b. Note: Oil drip rate is also influenced by air pressure. A higher air pressure setting results in a
higher oil drip rate.
IMPORTANT
• Only use a clean dry cloth when cleaning the plastic reservoirs. Use of chemicals could cause damage to
the unit.
• Do not overtighten O-ring seals. Tighten O-ring seals until snug.
• Only use the Filter Regulator Lubricator with a pneumatic system.
7

Trouble
Motor does not run.
TROUBLE SHOOTING
Cause
1. Check fuse or circuit breaker.
2. Check for correct voltage to motor.
3. Inspect all wiring connections.
Remedy
1. Replace blown fuse or reset circuit
breaker.
2. Supply correct voltage to motor.
3. Repair and insulate all connections.
Motor runs but will not raise lift.
Motor runs—raises unloaded lift but will
not raise vehicle.
Lift slowly settles down.
Slow lifting speed or fluid blowing out filler
breather cap.
Lift going up unlevel.
4. Switch burned out.
5. Motor windings burned out.
1. Open lowering valve.
2. Pump sucking air.
3. Suction stub off pump.
4. Low fluid level.
1. Motor running on low voltage.
2. Trash in lowering valve.
3. Improper relief valve adjustment.
4. Overloading lift.
1. Trash in check valve seat.
2. Trash in lowering valve seat.
3. External fluid leaks.
1. Air mixed with fluid.
2. Air mixed with fluid suction.
3. Fluid return tube loose.
1. Cables out of adjustment.
2. Lift installed on unlevel floor.
4. Replace switch.
5. Replace motor.
1. Repair or replace lowering valve.
2. Tighten all suction line fittings.
3. Replace suction stub.
4. Fill tank with Dexron III ATF.
1. Supply correct voltage to motor.
2. Clean lowering valve.
3. Replace relief valve cartridge.
4. Check vehicle weight and/or balance
vehicle weight on lifts.
1. Clean check valve.
2. Clean lowering valve.
3. Repair external leaks.
1. Change hydraulic fluid to Dexron III
ATF.
2. Tighten all suction line fittings.
3. Reinstall fluid return tube.
1. Adjust slack out of cable.
2. Shim lift to level columns (Not to
exceed 1/2” (13mm) per column).
Lift stops short of full rise or chatters.
Anchors will not stay tight.
Lift will not lower.
1. Low on fluid.
1. Holes drilled oversize.
2. Concrete floor thickness or holding
strength not sufficient.
1. Insufficient air supply to lift.
2. Latches out of adjustment.
Note: Shim thickness of 2” (51mm) is
possible by using optional shim kit
#FC5393. Contact your authorized
Parts Distributor for ordering
information.
1. Check fluid level and bleed cylinder
If fluid is required inspect all fittings,
hoses, and seals. Repair as required.
Clean power unit pickup stub filter.
1. Use a fast setting cement to pour
into oversize holes and reset anchors
-or- relocate lift using a new bit to drill
holes.
2. Break out old concrete and repour
new pads for lift.
1. Check air pressure. Air supply to lift
should be between: min. 100 p.s.i. and
max. 120 p.s.i. (min. 690 kPa and max.
827 kPa). Check all lines and fittings
for leaks or crimps. Repair or replace
as required.
2. Check latches.
8

Trouble
Lift will not raise off of latches.
TROUBLE SHOOTING
Cause
1. Motor, pump, or cylinder failure.
Remedy
1. Contact lift manufacturer’s Customer
Service.
9

Purpose
This procedure establishes the minimum requirements for the lockout of energy that could cause injury to personnel by the operation of lifts in need of repair or being serviced. All employees shall comply with this procedure.
Responsibility
The responsibility for assuring that this procedure is followed is binding upon all employees and service personnel from outside service companies (i.e., Authorized Installers, contactors, etc.). All employees shall be instructed in the safety significance of the lockout procedure by the facility owner/manager. Each new or transferred
employee along with visiting outside service personnel shall be instructed by the owner/manager (or assigned
designee) in the purpose and use of the lockout procedure.
Preparation
Employees authorized to perform lockout shall ensure that the appropriate energy isolating device (i.e., circuit
breaker, fuse, disconnect, etc.) is identified for the lift being locked out. Other such devices for other equipment
may be located in close proximity of the appropriate energy isolating device. If the identity of the device is in
question, see the shop supervisor for resolution. Assure that proper authorization is received prior to performing
the lockout procedure.
LIFT LOCKOUT/TAGOUT PROCEDURE
Sequence of Lockout Procedure
1) Notify all affected employees that a lockout is being performed and the reason for it.
2) Unload the subject lift. Shut it down and assure the disconnect switch is “OFF” if one is provided on
the lift.
3) The authorized lockout person operates the main energy isolation device removing power to the sub-
ject lift.
• If this is a lockable device, the authorized lockout person places the assigned padlock on the
device to prevent its unintentional reactivation. An appropriate tag is applied stating the person’s
name, at least 3” x 6” (76mm x 152mm) in size, an easily noticeably color, and states not to
operate device or remove tag.
• If this device is a non-lockable circuit breaker or fuse, replace with a “dummy” device and tag it
appropriately as mentioned above.
4) Attempt to operate lift to assure the lockout is working. Be sure to return any switches to the “OFF”
position.
5) The equipment is now locked out and ready for the required maintenance or service.
Restoring Equipment to Service
1) Assure the work on the lift is complete and the area is clear of tools, vehicles, and personnel.
2) At this point, the authorized person can remove the lock (or dummy circuit breaker or fuse) & tag
and activate the energy isolating device so that the lift may again be placed into operation.
Rules for Using Lockout Procedure
Use the Lockout Procedure whenever the lift is being repaired or serviced, waiting for repair when current
operation could cause possible injury to personnel, or for any other situation when unintentional operation could
injure personnel. No attempt shall be made to operate the lift when the energy isolating device is locked out.
10

Notes:

OPERATING CONDITIONS
Lift is not intended for outdoor use and has an operating ambient temperature range of 41º-104ºF (5º-40ºC).
Installer: Please return this booklet to literature package and
GIVE TO LIFT OWNER/OPERATOR.
Trained Operators and Regular Maintenance Ensures
Satisfactory Performance of Your Lift.
See Literature Package for Parts Breakdown.
Vehicle Service Group
2700 Lanier Drive
Madison, IN 47250, USA
1-800-640-5438
www.vsgdover.com
SM
© Vehicle Service Group
All Rights Reserved. Unless otherwise
indicated, Vehicle Service GroupSM,
and all other trademarks are property
of Dover Corporation and its affiliates.
SM
SM
 Loading...